

Page 1

ARCSOFT MMS COMPOSER
TM
- USER’S GUIDE -
© 2003 ArcSoft, Inc. All rights reserved. ArcSoft is a registered trademark in the United States. ArcSoft MMS Composer is
a trademark of ArcSoft, Inc.
www.arcsoft.com
Page 2

ArcSoft MMS Composer
- TABLE OF CONTENTS -
INTRODUCTION 2
MESSAGE BOXES
CREATING A MESSAGE
3
5
VIEWING A MESSAGE
SENDING A MESSAGE 10
TECHNICAL SUPPORT 11
9
- 1 -
Page 3
ArcSoft MMS Composer
- INTRODUCTION -
Welcome to ArcSoft MMS Composer! In no time you’ll be able to create and share your own
MMS messages, complete with photos, videos, text, and audio.
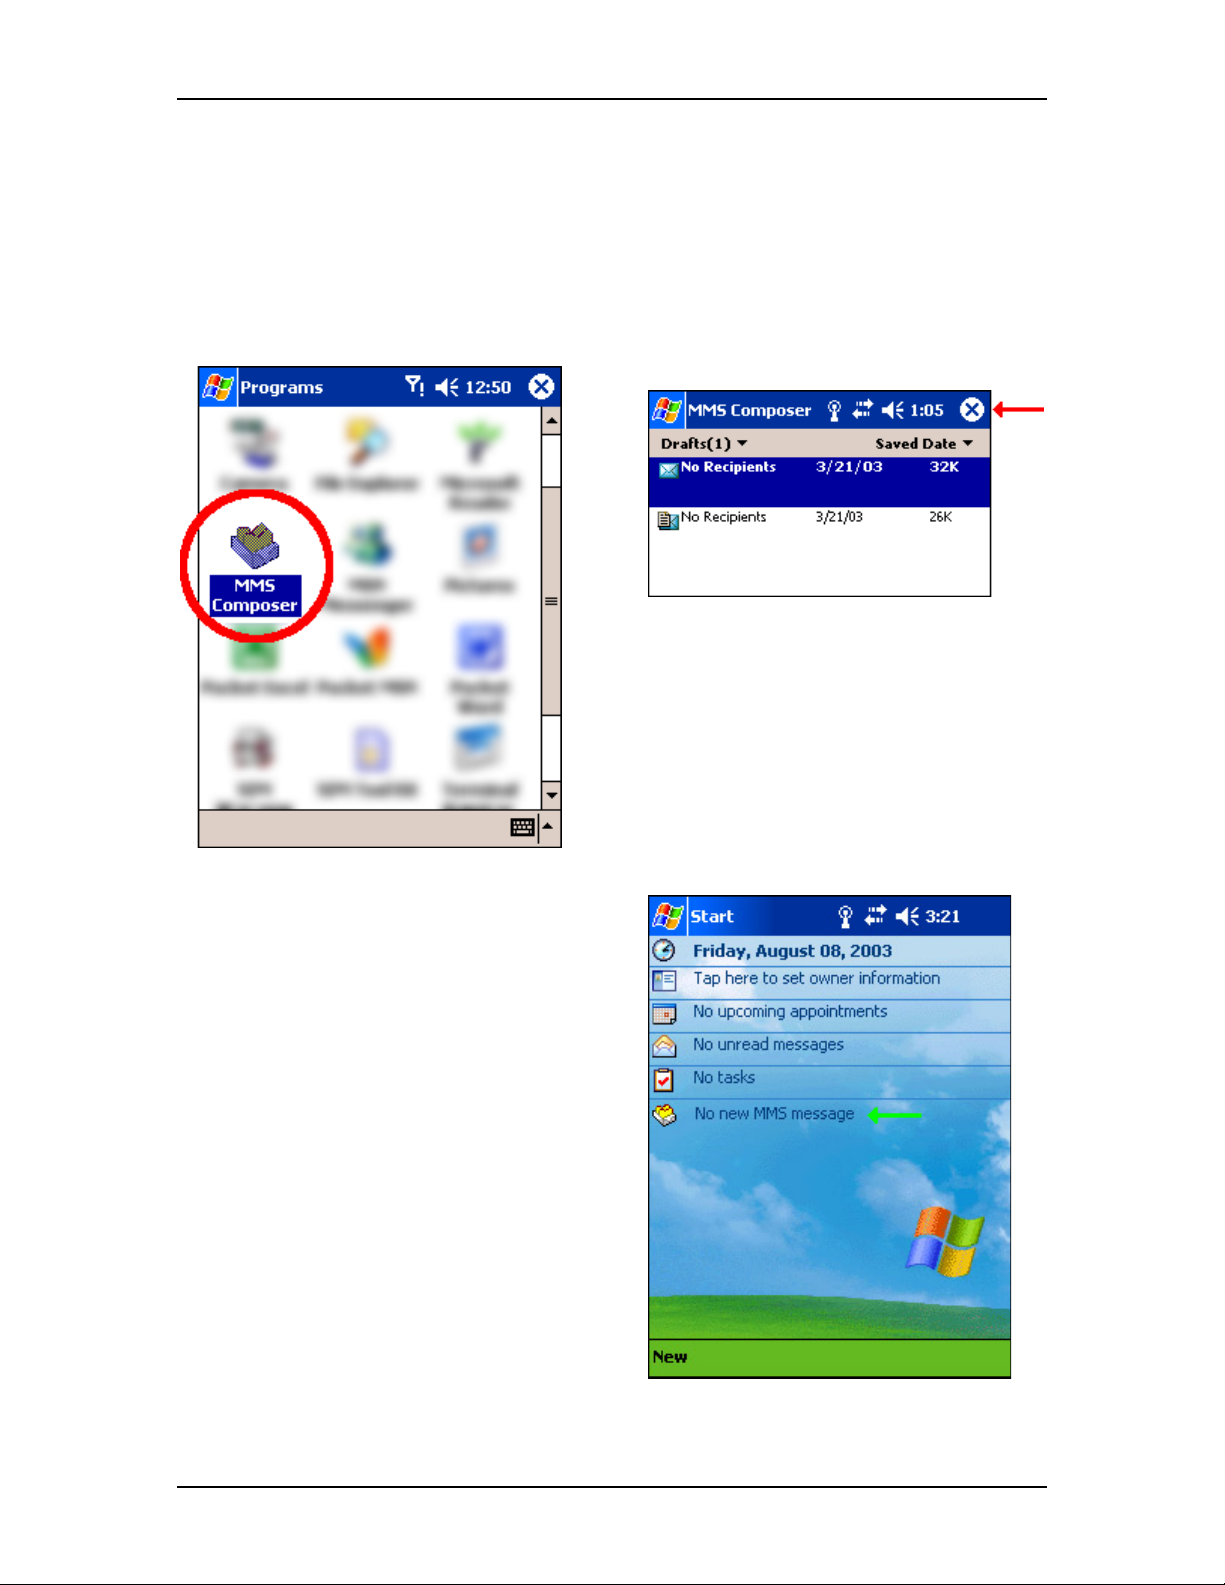
STARTING MMS COMPOSER
To start the program, choose “Start,” then
select “Programs.” Choose “MMS Composer.”
THE “TODAY” SCREEN
The “Today” screen offers another way of
accessing MMS Composer. You are
automatically notified on this page if you
have any new messages. All you need to do
is tap the MMS messages line and the
program will launch.
EXITING MMS COMPOSER
To quit, tap the “X” in the top-right corner
of the screen while viewing any message
box.
- 2 -
Page 4
ArcSoft MMS Composer
- MESSAGE BOXES -
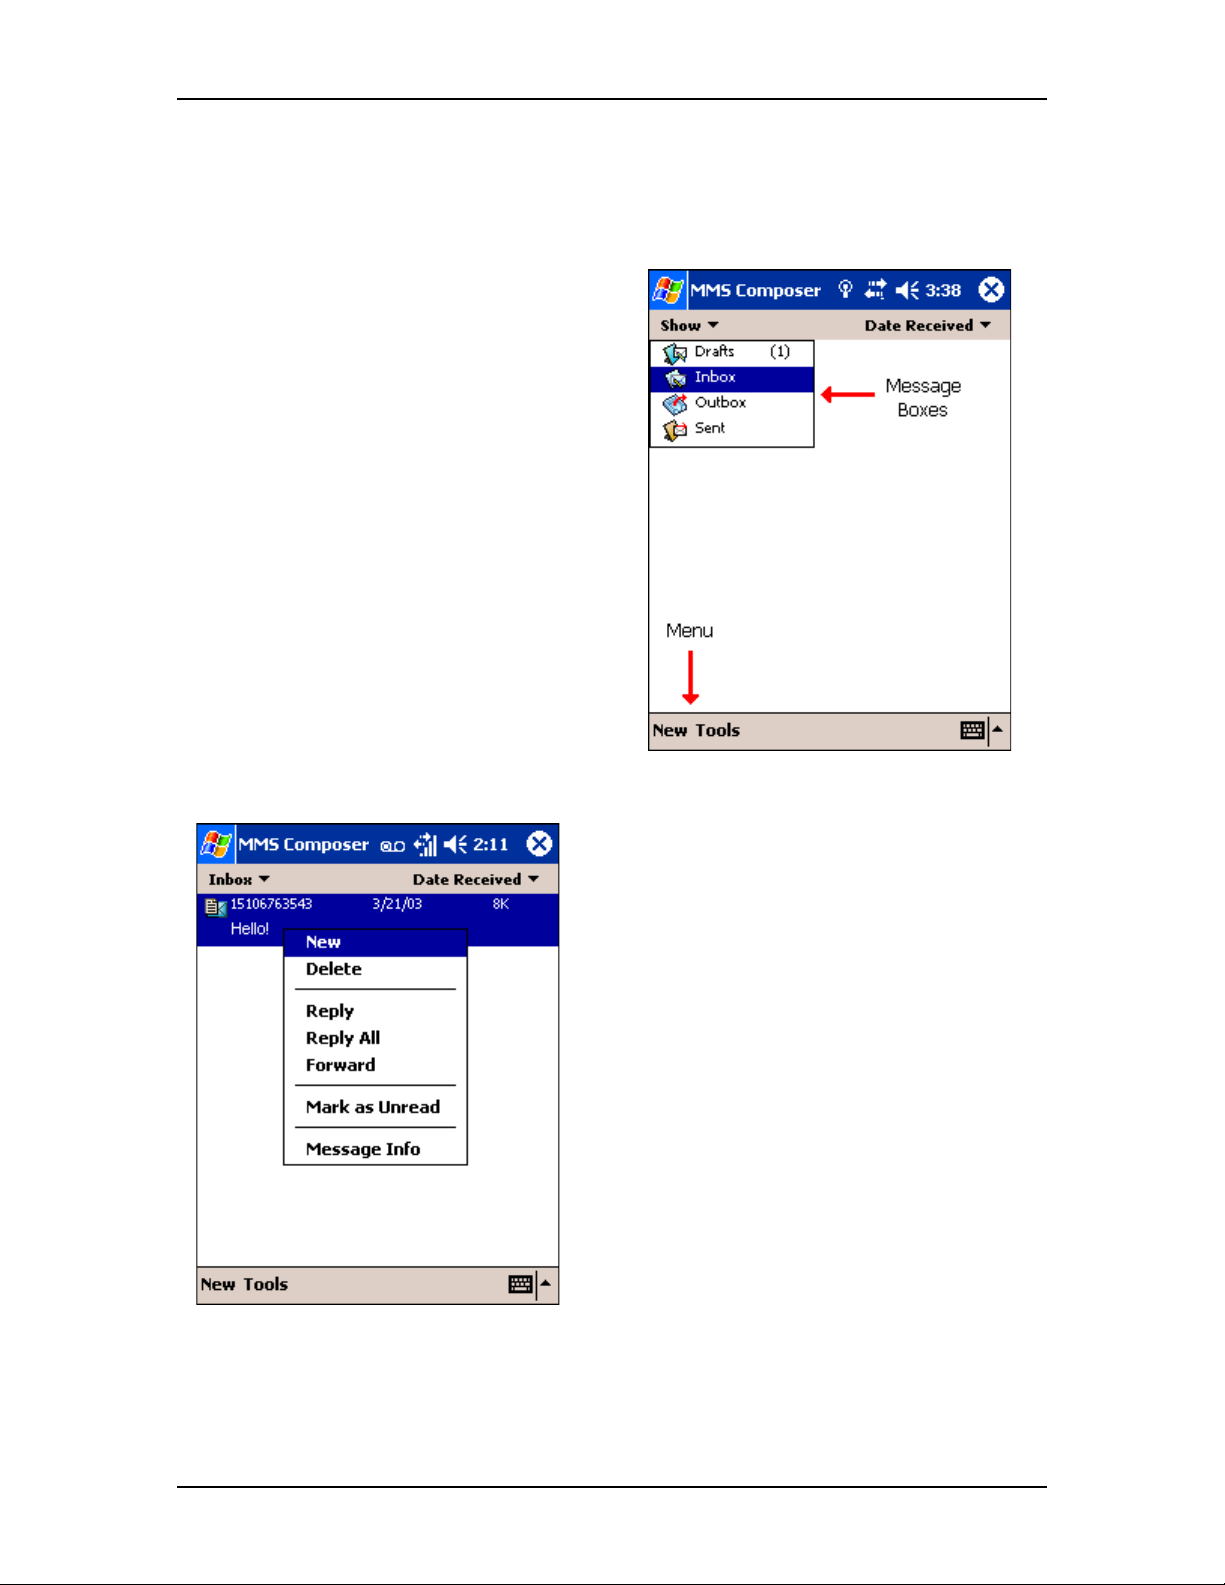
When the program starts, it will take you to your message boxes. Use the pull-down to select
the one you wish to view. The various message boxes are:
Drafts: Stores work-in-progress messages.
Inbox: Stores messages that you receive.
Outbox: Stores messages that are currently
being sent, or those that were unable to be
sent.
Sent: Stores messages that have been
successfully sent.
Within each message box, you can tap and hold on an individual message to see various options:
Messages in the Inbox and Sent folders display
the following options:
New - Creates a new message.
Delete - Removes the message.
Reply - Lets you respond to the message by
sending one of your own.
Reply All - Responds to everyone included in
the initial message.
Forward - Sends the message to someone else.
Mark as Unread - Makes the message appear
as if it is a newly received message.
Message Info - Displays various message
information, such as the sender, the subject, the
date and time it was sent, and the size.
Messages in the Drafts folder only display the
New, Delete, Mark as Read, and Message Info
options.
- 3 -
Page 5

ArcSoft MMS Composer
THE MENU
The menu at the bottom of the screen contains two options, “New” and “Tools”:
New: Choose this option to create a new message (see the next section for details).
Tools: When you select this, you will be given two choices: “Options” and “About.” The
latter simply displays copyright and program information. Choose “Options” to view and
alter the various program settings:
Connect Via: Select your type of Internet
connection from the pull-down.
Connect to Server: Select your wireless server
here.
Retrieve Messages Immediately: Typically,
you receive a notification whenever a new
message is available. Checking this box bypass
the notification and download new messages
automatically.
Size Limitations: You can sent the maximum
size limit for messages that you send and
receive.
No. of attempts before aborting: This value
sets the number of times the program will
attempt to send your message before stopping.
The “Servers” tab lists your available servers.
- 4 -
Page 6

ArcSoft MMS Composer
- CREATING A MESSAGE -
Messages are created by combining various slides. Each slide can consist of a photo or video,
audio, and text. Here’s a quick run-down of the Create screen:
1. Use this pull-down to select a specific slide
in your message. (Remember, messages
can consist of multiple slides.)
2. This pull-down allows you to select the
position of any added text.
3. Tap here to choose a photo or video.
4. Tap here to input a text message.
5. Tap here to include an audio clip.
6. The menu lets you do a number of things,
such as preview and send your message.
We’ll discuss the specifics of including a
photo/video, text, and audio. We’ll also take a
closer look at the menu.
ADDING A PHOTO OR VIDEO
You can add either a still image or a video clip to each individual slide. After you’ve tapped the
area to add a photo or video, you’ll be allowed to select exactly what you want to include.
1. This pull-down lets you select a specific
location that contains photos/videos.
2. Choose either “Photos” or “Videos” from this
pull-down. You can only add either a single
photo or video clip to each individual slide.
3. Tap the specific photo or video clip that you
want to add.
Tap and hold on a file to see the “File Info” and
“Delete” options. “File Info” displays the file
name, resolution, date, and size of a photo.
When viewing video file information, the
duration of the video is also listed. “Delete”
deletes the file.
- Adds the selected photo/video to the slide.
- 5 -
Page 7

ArcSoft MMS Composer
- Takes you to the previous screen.
- Displays photos/videos as a file list.
- Displays thumbnails (as shown here).
- Displays individual photos.
- Lets you capture a new photo or video. When capturing a photo, press the Action button
on your device to take a snapshot. When recording video, press the Action button to begin
recording. Press it again to stop.
ADDING TEXT
You can add text to any slide. You can either enter in new text with the keyboard, or use
“canned” text. Canned text are previously saved words or phrases.
Tap and hold within the text box until a menu pops up. Choose “Insert canned text.” You will be
taken to another screen where you can choose a pre-saved text message. Tap the one you
want, then choose “Select.”
Tap and hold on the Canned Text screen to view additional options:
New: Lets you enter in a new canned text message.
Edit: Lets you modify an existing canned text message.
Delete: Removes the selected canned text from the list.
- 6 -
Page 8

ArcSoft MMS Composer
ADDING AUDIO
Single audio clips can be added to each slide. You can either include an existing sound file, or
record a new one.
1. From the pull-down, select a location that
contains audio files.
2. Tap the file you’d like to use.
You can view file information similarly to the way
you can with photos and videos. Tap and hold on
a file, then choose “File info” (you can also delete
the file).
The file name, duration, date, and size are shown.
You can use the playback controls to preview the
audio:
available.)
(Play/Pause and Stop controls are
If you’re happy with your choice, tap “Select.” Otherwise, tap “Cancel.”
- Tap this button to bring up controls that allow you to record new audio:
- Tap this button to begin recording.
- Tap this button to stop recording.
MENU COMMANDS
The following commands are available along the bottom of the screen:
Edit:
New Slide: Adds a new, blank slide to your message.
Delete Slide: Removes the current slide from your message.
Organize Slides: Lets you arrange the slide order and display time for each slide.
- 7 -
Page 9

Tap and drag a slide to change its position. Alternately, you can tap and hold on the
slide you want to move, then choose whether to move it forward or backward (you can
also choose to delete it from the message altogether). You can also adjust a slide’s
display time. Tap the respective arrow to decrease/increase the time. If audio is
included, you can’t adjust the time (the slide will display for the duration of the included
audio).
Save in Drafts: Saves your message in the Drafts message box.
Cancel: Discards your entire message (you’ll be prompted to save it).
Tools:
Send Message: Lets you send your message to a friend or family member. This will be
discussed later.
Preview Message: Lets you see how your message will look like when the recipient
sees it.
- Previews your message (as mentioned directly above).
- Tap here when you’re ready to send your message.
ArcSoft MMS Composer
- These buttons let you navigate through the various slides in your message.
- 8 -
Page 10

ArcSoft MMS Composer
- VIEWING A MESSAGE -
You have several options when viewing a message that you receive, or previewing a message
that you create.
Use the playback controls (Play/Pause, Stop)
to view the message. You can pause it
anytime during playback.
Tap “Objects” to see a list of each file. If
you’d like to save a particular file, tap it, then
choose “Save” from the Tools menu.
You can also view the message components manually. Use the navigation buttons to scroll
through the message. Use the options in the Save menu to save individual components you like.
- 9 -
Page 11

ArcSoft MMS Composer
- SENDING A MESSAGE -
Now that you’ve finished creating your message and you’ve tapped the Send button, all you need
to do is enter a little bit of information:
1. Enter in the recipient’s phone number. Tap
“To Phone” to see your phone book.
2. Enter in the recipient’s email address. Tap
“To Email” to see your address book.
3. Enter in a subject of your message.
When you’re ready, tap “Send.” Otherwise, tap
“Cancel.”
Options within the Tools menu let you save your message in your Drafts folder, and access the
Send Options screen:
• Uncheck the “Send the message now”
box to manually set the date and time
that you would like the message sent.
• From the “Expiration” pull-down, select
how long you’d like the message to be
stored on the server. The server will
stop attempting to deliver the message
after the set time expires.
• Set the message priority from the
“Priority” pull-down.
• Checking the “Send anonymously” box
will hide your identity from the recipient.
• Choose the resolution for the message
from the pull-down; “Original” does not
alter the resolution. You may want to
choose a lower value to help decrease
the file size of your message.
- 10 -
Page 12

- TECHNICAL SUPPORT -
N. America
ArcSoft, Inc.
46601 Fremont Blvd
Fremont, CA 94538
Tel: 1.510.440.9901
Fax: 1.510.440.1270
Web: www.arcsoft.com
China
ArcSoft Beijing Co., Ltd.
No. 6 South Capital Gym Road
Beijing New Century Hotel
Office Building #1060
Beijing 100044, China
Tel: 8610-6849-1368
Fax: 8610-6849-1367
Email: tech@arcsoft.com.cn
Latin America
Tel (Brazil): 00817-200-0709
Tel (Chili): 800-202-797
Email: latinsupport@arcsoft.com
ArcSoft MMS Composer
Europe
Unit 14, Shannon Industrial Estate
Shannon, Co. Clare, Ireland
Tel: +353 (0) 61-702087
Fax: +353 (0) 61-702001
Email: eurosupport@arcsoft.com
Japan
ArcSoft Japan
9F, 1-21-9, Higashi-Gotanda,
Shinagawa-ku,
Tokyo 141-0022, Japan
Tel: +81-3-5795-1392
Fax: +81-3-5795-1397
Web: www.arcsoft.jp
Email: support@arcsoft.jp
Taiwan
Tel: +886 (0) 2-2506-9355
Fax: +886 (0) 2-2506-8922
Web: www.arcsoft.com.tw
Email: support@arcsoft.com.tw
- 11 -
 Loading...