

Page 1

Rockbox User Manual
Make your box rock!
Page 2

Page 3

Open Source jukebox firmware for the
Archos Jukebox 5000, 6000, Studio, Recorder, Recorder V2 and FM
Recorder MP3 players
Website: http://rockbox.haxx.se/
Rockbox version 2.3
Manual release date 2004-12-06
Copyright © 2004 Christi Alice Scarborough, 2003 José María García-Valdecasas Bernal & Peter
Schlenker. Permission is granted to copy, distribute and/or modify this document under the
terms of the GNU Free Documentation License, Version 1.2 or any later version published by
the Free Software Foundation; with no Invariant Sections, no Front-Cover Texts, and no BackCover Texts. A copy of the license is included in the section entitled “GNU Free Documentation
License”.
Page 4

Contents
PART 1
GETTING STARTED................................................................................7
PART 2
THE ROCKBOX INTERFACE.................................................................. 11
1 YOUR JUKEBOX................................................................................12
2 FILE BROWSER................................................................................13
2.1 CONTROLS................................................................................13
2.2 FILE MENU.................................................................................14
2.3 PLAYLIST SUBMENU....................................................................14
2.4 VIRTUAL KEYBOARD...................................................................15
3 WHILE PLAYING SCREEN (WPS).........................................................17
3.1 KEY CONTROLS..........................................................................18
3.2 PEAK METER (RECORDER ONLY) .................................................19
3.3 ID3 VIEWER..............................................................................19
4 QUICK SCREEN MENUS (RECORDER ONLY)......................................... 20
PART 3
THE MAIN MENU..................................................................................21
1 INTRODUCING THE MAIN MENU.........................................................22
2 RECORDING (RECORDERS ONLY).......................................................23
2.1 WHILE RECORDING SCREEN........................................................23
2.2 RECORDING SETTINGS...............................................................23
3 FM RADIO (FM RECORDERS ONLY).....................................................25
4 BOOKMARKS....................................................................................26
5 PLAYLIST OPTIONS...........................................................................26
6 BROWSE PLUGINS............................................................................27
7 INFO...............................................................................................27
PART 4
CONFIGURING ROCKBOX.................................................................... 28
1 SOUND SETTINGS............................................................................29
2 GENERAL SETTINGS.........................................................................32
2.1 PLAYBACK OPTIONS...................................................................32
2.2 FILE VIEW.................................................................................33
2.3 DISPLAY OPTIONS......................................................................33
2.4 SYSTEM OPTIONS.......................................................................35
2.5 BOOKMARKING..........................................................................38
2.6 LANGUAGE................................................................................38
2.7 VOICE.......................................................................................39
PART 5
PLUGINS.............................................................................................40
1 GAMES............................................................................................41
1.1 FLIPIT (RECORDER ONLY)...........................................................41
1.2 JACKPOT (PLAYER ONLY).............................................................41
1.3 MNESWEEPER (RECORDER ONLY)................................................42
1.4 NIM (PLAYER ONLY)....................................................................42
1.5 PONG (RECORDER ONLY)............................................................43
1.6 ROCKBLOX (RECORDER ONLY).................................................... 43
1.7 SLIDING PUZZLE (RECORDER ONLY)............................................44
1.8 SNAKE (RECORDER ONLY)...........................................................44
Page 5

1.9 SNAKE 2 (RECORDER ONLY)........................................................44
1.10 SOKOBAN (RECORDER ONLY)....................................................45
1.11 SOLITAIRE (RECORDER ONLY)...................................................45
1.12 STAR (RECORDER ONLY)...........................................................45
1.13 WORMLET (RECORDER ONLY)....................................................46
2 DEMOS............................................................................................50
2.1 BOUNCE (RECORDER ONLY)........................................................50
2.2 CUBE (RECORDER ONLY)............................................................50
2.3 GREYSCALE (RECORDER ONLY)...................................................51
2.4 HELLO WORLD (ALL MODELS)......................................................51
2.5 MANDELBROT (RECORDER ONLY).................................................51
2.6 MOSAIC (RECORDER ONLY).........................................................52
2.7 OSCILLOGRAPH (RECORDER ONLY)..............................................52
2.8 SNOW (RECORDER ONLY)...........................................................53
2.9 VU METER (RECORDER ONLY)......................................................53
3 VIEWERS.........................................................................................54
3.1 CHIP-8 EMULATOR (RECORDER ONLY)..........................................54
3.2 JPEG VIEWER (RECORDER ONLY).................................................54
3.3 MOVIE PLAYER (RECORDER ONLY)...............................................54
3.4 ROCKBOX-FLASH (RECORDER ONLY)............................................54
3.5 SEARCH (ALL MODELS)..............................................................55
3.6 SORT (ALL MODELS)...................................................................55
3.7 TEXT VIEWER (ALL MODELS).......................................................55
3.8 VBRfix (ALL MODELS).................................................................56
4 APPLICATIONS................................................................................57
4.1 BATTERY_TEST (ALL MODELS).....................................................57
4.2 CALCULATOR (RECORDER ONLY).................................................57
4.3 CALENDAR (RECORDER ONLY).....................................................57
4.4 CHESS CLOCK (PLAYER ONLY).....................................................58
4.5 CLOCK (RECORDER ONLY)...........................................................59
4.6 EURO CONVERTOR (PLAYER ONLY)...............................................60
4.7 FAVORITES (ALL MODELS)..........................................................60
4.8 FIRMWARE_FLASH (RECORDER ONLY)..........................................60
4.9 METRONOME (RECORDER ONLY)..................................................60
4.10 SPLIT EDITOR (RECORDER ONLY)..............................................61
4.11 STOPWATCH (ALL MODELS).......................................................64
PART 6
ADVANCED TOPICS / REFERENCE....................................................... 65
1 CUSTOMIZING THE USER INTERFACE.................................................66
1.1 LOADING FONTS (RECORDER ONLY)............................................ 66
1.2 LOADING LANGUAGES................................................................66
2 CONFIGURING THE WPS...................................................................66
3 MAKING YOUR OWN SETTINGS FILE...................................................69
4 DIFFERENCES BETWEEN BINARIES.....................................................73
5 FIRMWARE LOADING........................................................................73
6 GETTING EXTRAS: FONTS LANGUAGES...............................................74
7 USING ROLO (ROCKBOX LOADER).....................................................74
8 ROCKBOX IN FLASH (RECORDER ONLY)..............................................74
8.1 INTRODUCTION.........................................................................74
8.2 METHOD....................................................................................74
Page 6

8.3 RISKS.......................................................................................75
8.4 REQUIREMENTS.........................................................................75
8.5 FLASHING PROCEDURE...............................................................76
8.6 KNOWN ISSUES AND LIMITATIONS..............................................77
8.7 ROMBOX...................................................................................78
APPENDICES.......................................................................................79
1 FEATURE COMPARISON CHART..........................................................80
2 SUPPORTED FILE FORMATS...............................................................81
3 BUG REPORTS..................................................................................82
4 FEATURE REQUESTS.........................................................................82
5 WHAT'S NEW SINCE 2.0?..................................................................83
6 FEATURES WE WILL NOT IMPLEMENT.................................................85
7 CREDITS.........................................................................................87
8 GNU Free Documentation License.......................................................88
Page 7

PART 1
GETTING STARTED
Page 8

Welcome
This is the manual for Rockbox. Rockbox is a replacement firmware for the Jukebox
Studio, Recorder and Ondio players made by Archos. It is a complete rewrite of the
software used to make the Jukeboxes play and record music, and contains many
features and enhancements not available in the original firmware supplied by the
manufacturer. Among the things that Rockbox has to offer are the following:
Faster loading than the Archos firmware
Uninterrupted playing of MP3 files – skipping is very rare
More control over how your music is played
Built in viewers for several common file types
Sophisticated plugin system that allows the Jukebox to run games, a calendar, a
clock, and many other applications.
Totally removable and won't invalidate the Archos warranty
Optional voice user interface for complete control without looking at the screen
Rockbox is a complete from scratch rewrite of the Jukebox software and uses no
fragments of the original firmware. Not only is it free to use, it's also released under
the GNU public license, which means that it will always remain free to both use and to
change.
Although Rockbox also runs on the Archos Ondio series of flash based MP3 players,
this is a recent development, which is not yet covered in this manual. Most of this
manual will, however, apply equally to Rockbox on the Ondio Jukeboxes.
Getting more help
This manual is intended to be a comprehensive introduction to the Rockbox software.
There is, however, more help available. The Rockbox website at
http://rockbox.haxx.se/ contains very extensive documentation and guides written by
members of the Rockbox community and this should be your first port of call when
looking for further help.
Before installation
Before you install Rockbox, you will need to know what model of Archos Jukebox you
own. Rockbox comes in different versions depending on the model of your Jukebox.
There are four different versions of the software. The table below will help you to
identify which version of the software you need.
The model name is printed on the case. The hard drive size is listed on the serial
number sticker on the back of the unit.
Please note that Rockbox does not currently run on the Archos Jukebox Multimedia or
later Archos MP3 player products.
8 Rockbox User Manual
Page 9

Picture HD size Model Name Version Name
5GB, 6GB,
10GB, 20GB
6GB, 10GB,
15GB, 20GB
20GB Jukebox Recorder v2 recorderv2
20GB Jukebox Recorder FM fmrecorder
Jukebox 5000, Jukebox 6000, Jukebox
Studio 10, Jukebox Studio 20
Jukebox Recorder 6, Jukebox Recorder
10, Jukebox Recorder 15, Jukebox
Recorder 20
player
recorder
Downloading Rockbox
The latest release of the Rockbox software will always be available from
http://rockbox.haxx.se/download/. Windows users may wish to download the self-
extracting Windows installer, which works for all Jukebox models, but those wishing to
install manually or using a different operating system should choose the .ZIP archive
containing the firmware for their model of the Jukebox.
Installing Rockbox
Using the Windows self installing executable to install Rockbox is the easiest method
of installing the software on your Jukebox. Simply follow the on-screen instructions
and select the appropriate drive letter and Jukebox model when prompted. You can
use “Add / Remove Programs” to uninstall the software at a later date.
For non-Windows users and those wishing to install manually from the archive the
procedure is still fairly simple. Connect your Jukebox to the computer via USB as
described in the manual that came with your Jukebox. On Windows, the Jukebox drive
will appear as a drive letter in your "My Computer" folder. Take the file that you
downloaded above, and unpack its contents to your Jukebox drive. You can do this
using a program such as InfoZip (http://www.info-zip.org/) or WinZip
(http://www.winzip.org/).
You will need to unpack all of the files in the archive onto your hard disk. If this has
been done correctly, you will have a file called archos.mod (for the player) or
ajbrec.ajz (for all other models) in the main folder of your Jukebox drive, and also a
folder called /.rockbox, which contains a number of system files used by the
Rockbox User Manual
Page 10

software.
Enabling Speech Support (optional)
If you wish to use speech support you will also need a language file, available from
http://rockbox.haxx.se/twiki/bin/view/Main/VoiceFiles/. For the English language, the
file is called english.voice. When it has been downloaded, unpack this file and copy it
into the lang folder which is inside the /.rockbox folder on your Jukebox. Voice
menus are turned on by default. See Section 3 for details on voice settings.
Running Rockbox
Remove your Jukebox from the computer's USB port. Unplug any connected power
supply and turn the unit off. When you next turn the unit on, the Jukebox firmware
will start to load, and then it will load Rockbox for you. When you see the Rockbox
splash screen, Rockbox is loaded and ready for use.
Uninstalling Rockbox
If you would like to go back to using the original Archos software, then connect the
Jukebox up to your computer, and delete the archos.mod (players) or ajbrec.ajz
(other models) file from the main folder of the Jukebox. If you wish to clean up your
disk, you may also wish to delete the /.rockbox folder and its contents. Turn the
Jukebox off and on and the normal Archos software will load.
10 Rockbox User Manual
Page 11

PART 2
THE ROCKBOX INTERFACE
Page 12
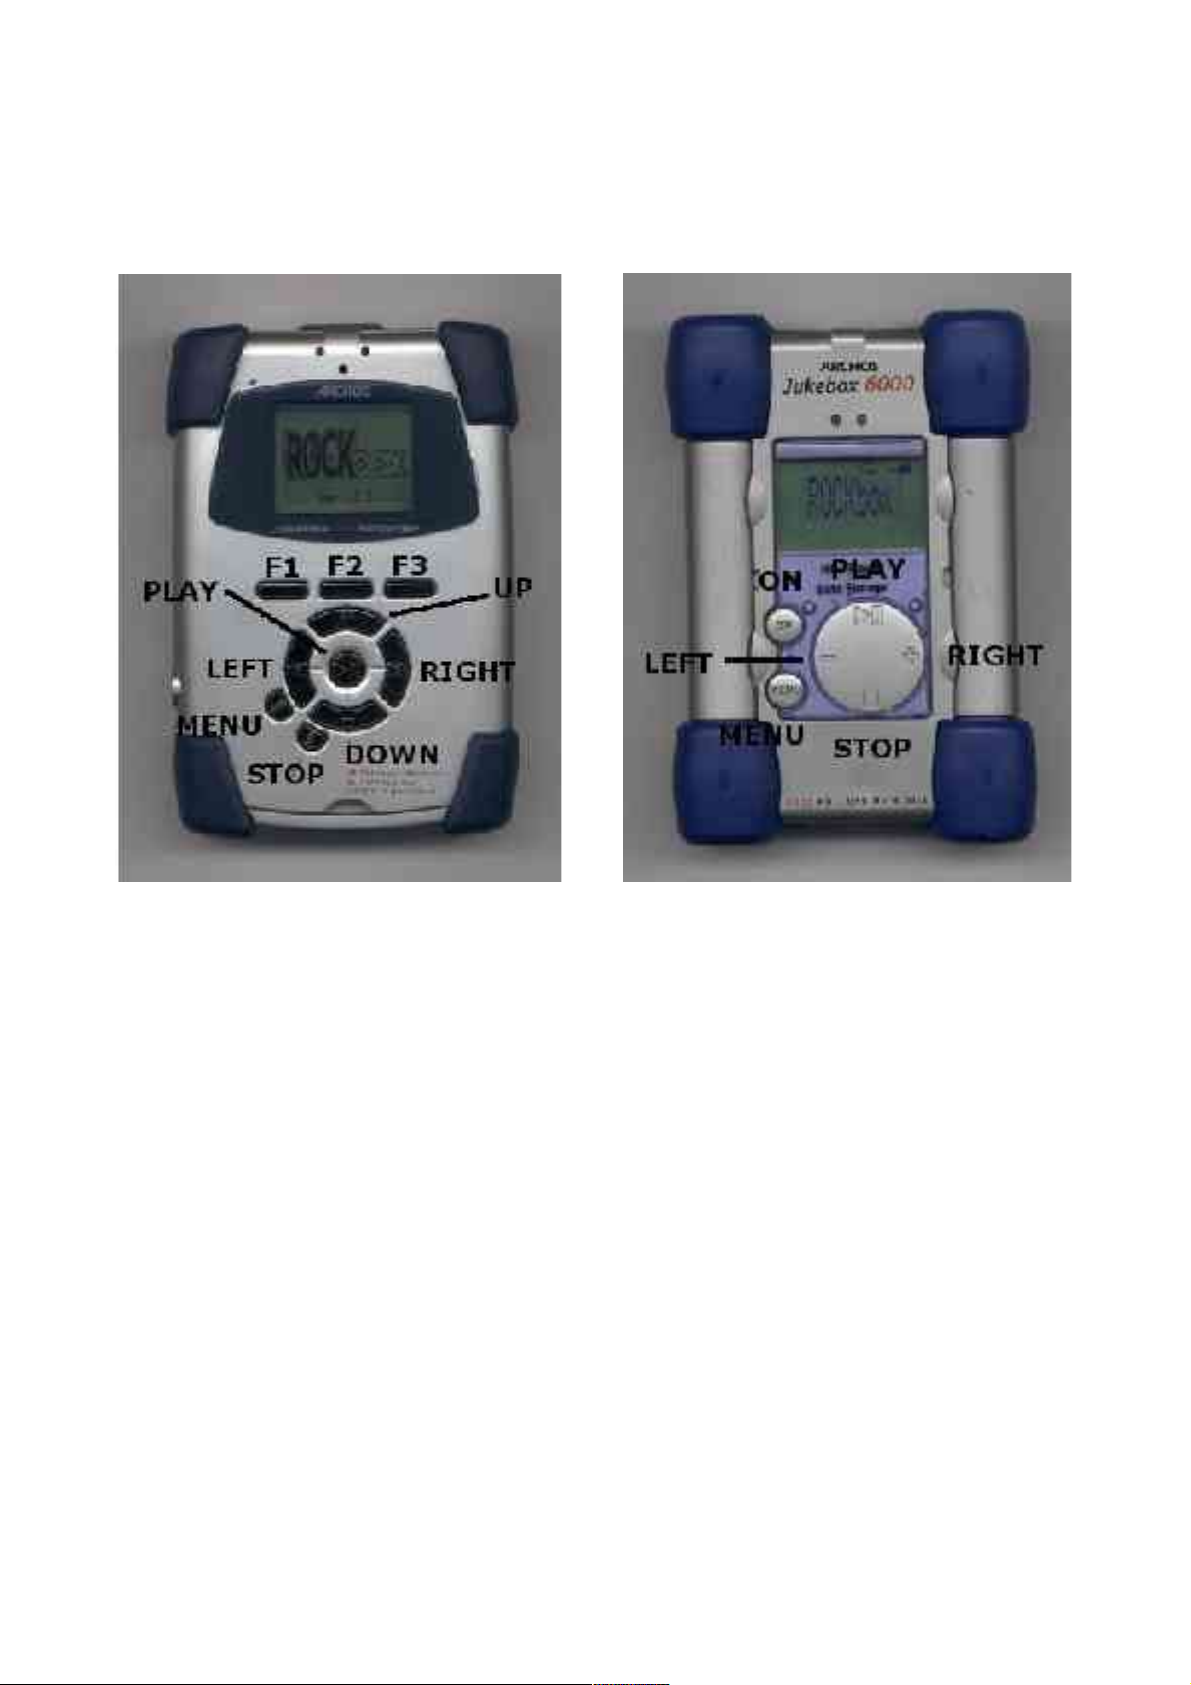
1 YOUR JUKEBOX
Throughout this manual, the buttons on the Jukebox are labelled according to the
pictures below. There are minor cosmetic differences between Jukebox Recorder
models, but the buttons are in approximately the same position whatever the model.
Jukebox Recorder Jukebox Player
Rockbox automatically saves its settings and turns off the hard drive safely on
shutdown. On the recorder, press the MENU/ON button to turn on the
Jukebox. To turn off the Jukebox, hold down the STOP/OFF button for 2-3
seconds. On the player, hold down the ON button for 2-3 seconds to switch it
on. To safely turn off a player, quickly press the STOP button twice in
succession from the Rockbox file browser screen.
In the unlikely event of a software failure, a hardware power off can be
performed by holding down STOP until the Jukebox power light goes off. This
works for all models of Jukebox.
For further details about connecting, charging and caring for your Jukebox,
please see the Archos manual that came with it.
12 Rockbox User Manual
Page 13
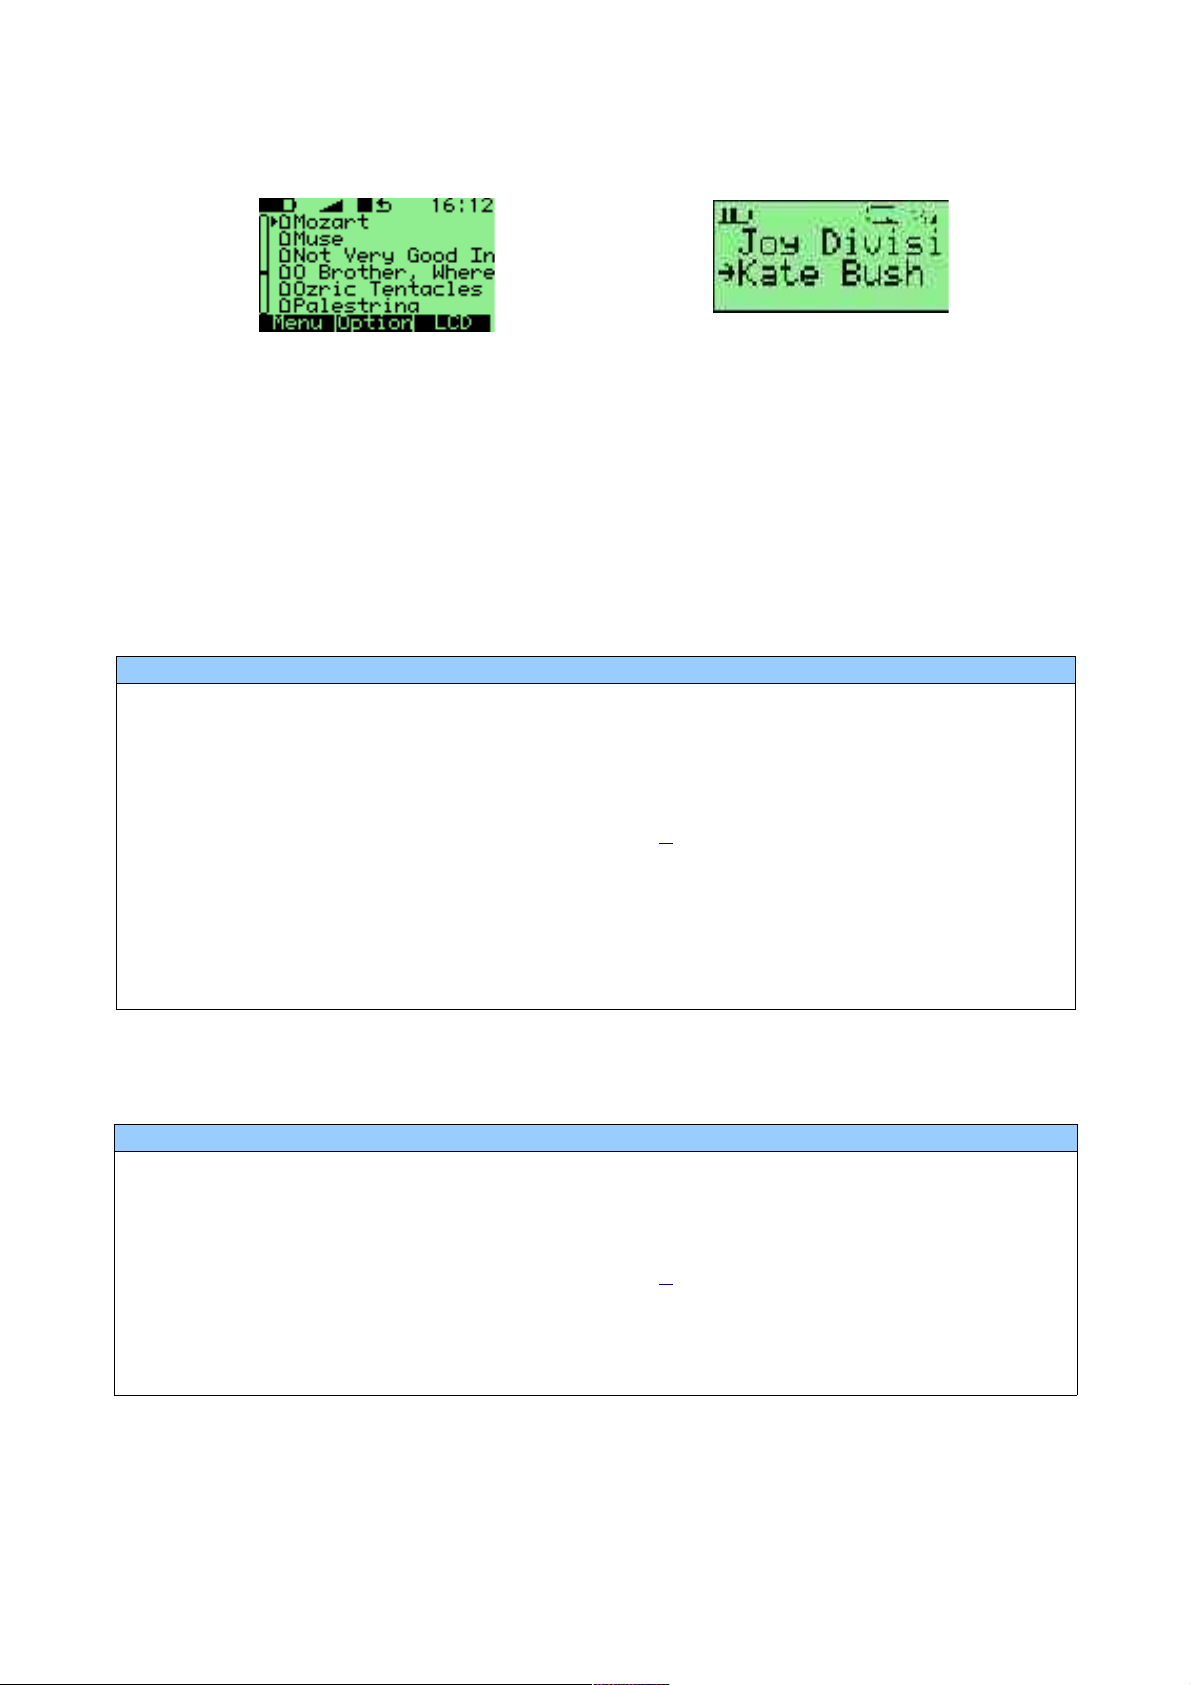
2 FILE BROWSER
Recorder file browser Player file browser
The file browser helps you navigate through the files on your Jukebox, entering folders
and executing the default action on each file. To help us differentiate files, each file
format is displayed with an icon. You can select which file types are displayed (see
page 33).
2.1 CONTROLS
FOR THE RECORDER VERSION
KEY FUNCTION
UP/DOWN
ON+UP/DOWN Move one page up/down on the list.
LEFT Go to the parent directory.
PLAY/RIGHT
ON
ON+PLAY Enters the File Menu
F1 Switches to the Main Menu
F2 Switches to the Browse/play Quick Menu
F3 Switches to the Display Quick Menu
Go to previous/next item in list. If you are on the first/last
entry, the cursor will wrap to the last/first entry.
Executes an action. Depending on the file type, that action may
vary. (See Part III, section 2)
If there is a MP3 playing, it returns to the While Playing Screen
(WPS)
FOR THE PLAYER/STUDIO VERSION
KEY FUNCTION
LEFT/RIGHT
STOP Go to the parent directory.
PLAY
ON
ON+PLAY Enters the File Menu
Menu Switches to the Main Menu
The functions of the F keys are also summarised on the button bar at the bottom of
the screen.
Rockbox User Manual
Go to previous/next item in list. If you are on the first/last
entry, the cursor will wrap to the last/first entry.
Executes an action. Depending on the file type, that action may
vary. (See Part III, section 2)
If there is a MP3 playing, it returns to the While Playing Screen
(WPS)
Page 14
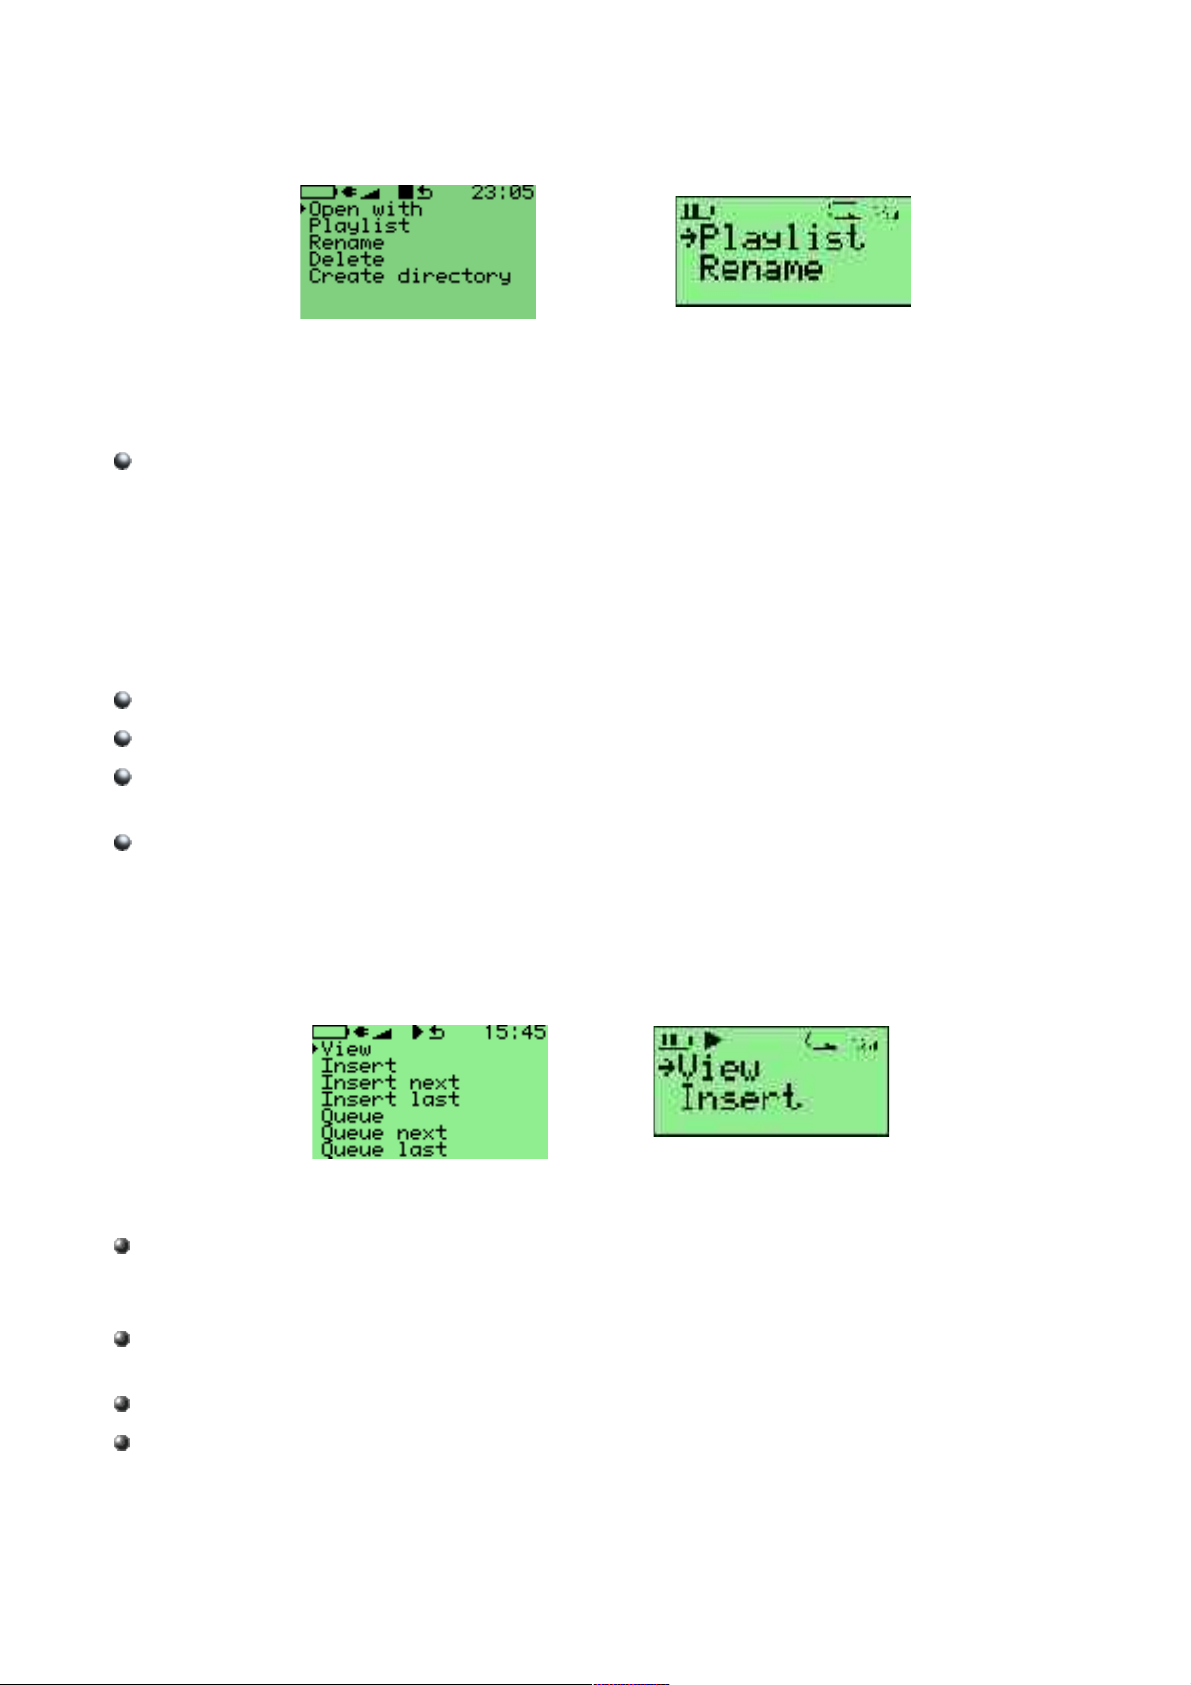
2.2 FILE MENU
Recorder file menu Player file menu
This menu operates on the file that was selected in the browser at the time ON+PLAY
was pressed to enter it. It can also be accessed by holding down the PLAY key for a
short while. It offers the following options:
Open with: Runs a viewer plugin on the file. Normally the filetype of a file is
detected and the appropriate plugin is run automatically when you press play on it.
Use this menu if for some reason you want to override the default action and select
a viewer by hand. See the Viewers section of Part 4 for more details on viewers.
For example, this is how one would run the VBRfix plugin to recreate the Xing
header for an MP3 file, which can fix problems such as fast-forward and rewind not
working correctly on a particular MP3 file or the play time of a track being listed
incorrectly.
Playlist: Change to the Playlist submenu (see below).
Rename: This function lets the user modify a file name.
Delete: Only files can be deleted, not folders. Rockbox will ask for confirmation
before deleting a file. Press PLAY to confirm deletion or any other key to cancel.
Create Directory: Makes a new folder in the current folder on the disk.
2.3 PLAYLIST SUBMENU
If the playlist submenu is invoked on a directory, it will act on all the files within that
directory. If invoked on a playlist it will act on all the files in that playlist. Otherwise it
acts only on the current file.
Recorder playlist submenu Player playlist submenu
This menu provides the following options:
Insert: Add track(s) to playlist. If no other tracks have been inserted then the
selected track will be added immediately after current playing track, otherwise they
will be added to end of insertion list.
Insert next: Add track(s) immediately after current playing track, no matter what
else has been inserted.
Insert last: Add track(s) to end of playlist.
Queue: Queue is the same as Insert except queued tracks are deleted immediately
from the playlist after they've been played. Also, queued tracks are not saved to
the playlist (see page 26).
14 Rockbox User Manual
Page 15
Queue next: Queue track(s) immediately after current playing track.
Queue last: Queue track(s) at end of playlist.
You can insert a track, directory or playlist even if nothing is currently playing. In this
case, a new playlist is created with only the selected tracks and then play is started.
Note: The dynamic playlist is saved so resume will restore it exactly as before
shutdown. Stopped playlists can be resumed from File Browser by pressing ON.
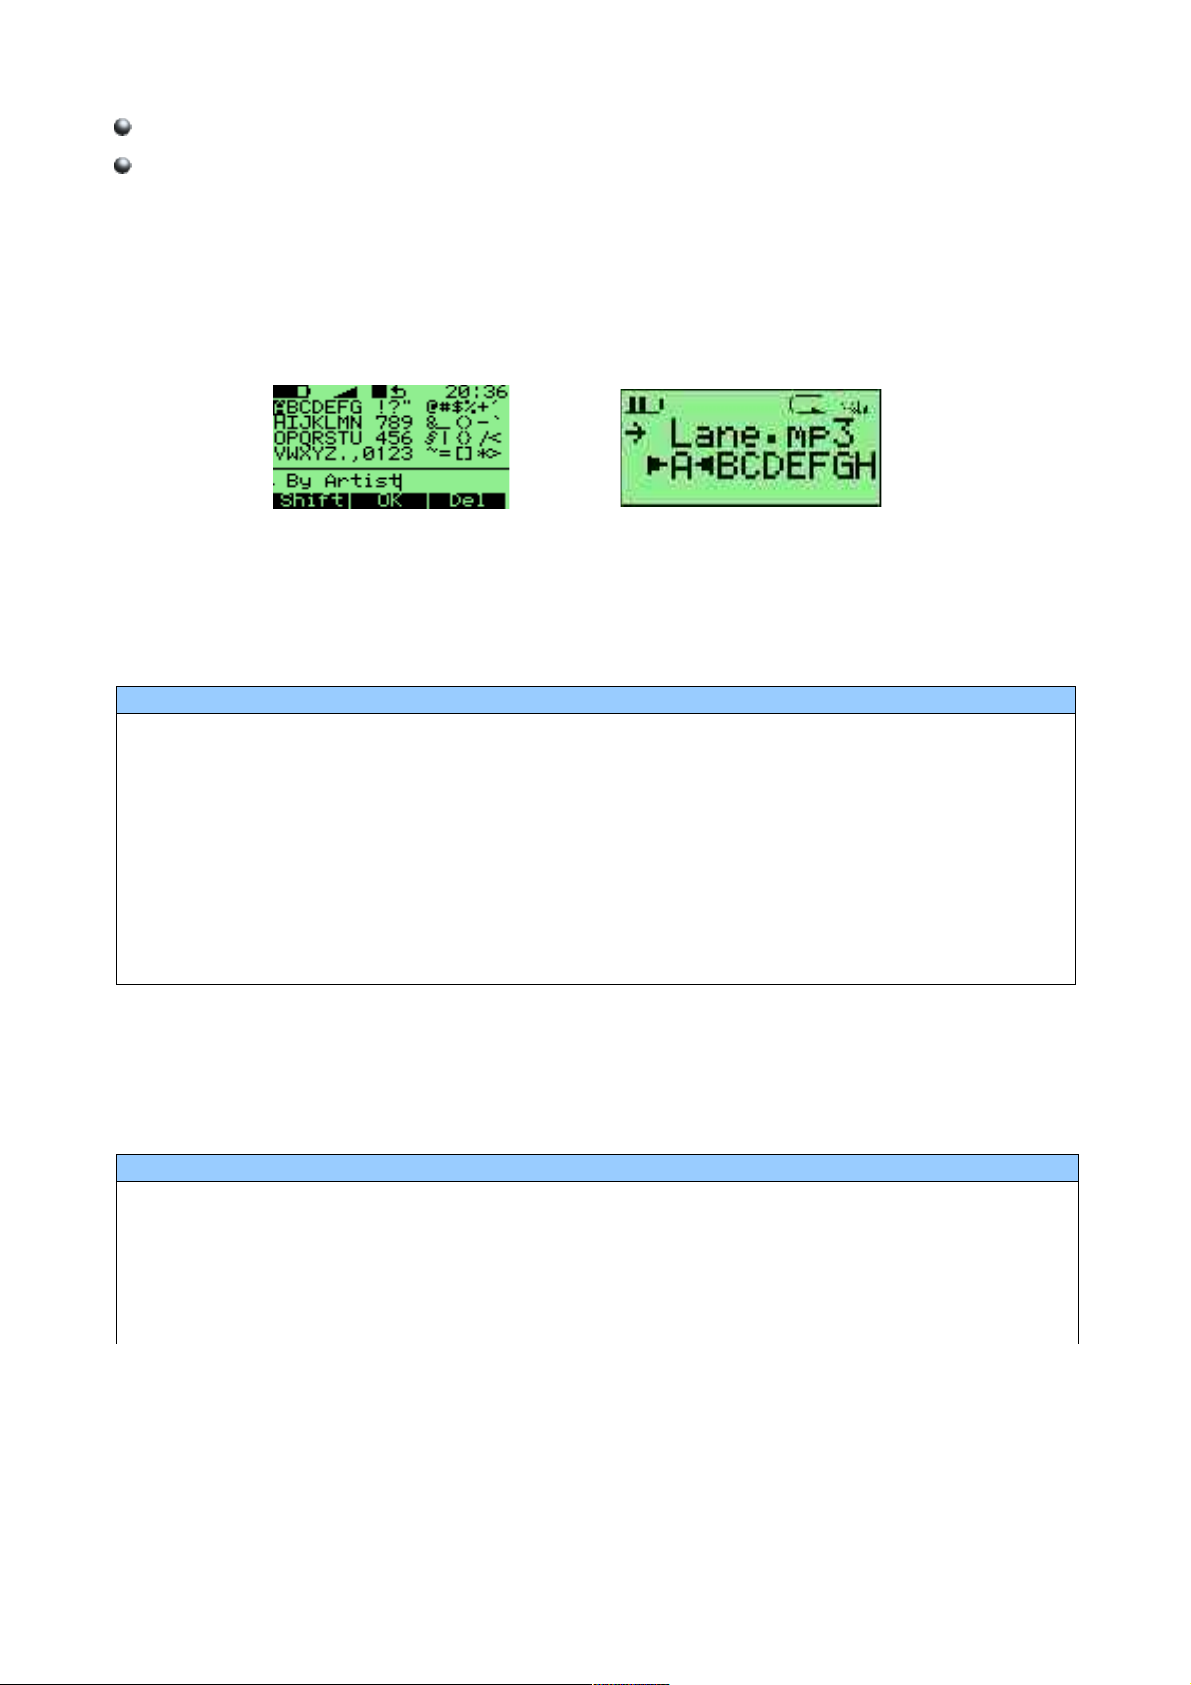
2.4 VIRTUAL KEYBOARD
Recorder keyboard Player Keyboard
This is the virtual keyboard that is used when entering file names in Rockbox.
FOR THE RECORDER VERSION
The recorder keyboard is similar in functionality to the player, but the larger screen
makes editing a little more flexible.
KEY FUNCTION
ARROW KEYS Move about the virtual keyboard (moves the solid cursor)
ON+LEFT/RIGH Move about within the current file name (moves the line cursor)
PLAY
STOP Exits the virtual keyboard without saving any changes
ON No action
F1
F2 OK: Exits the virtual keyboard and saves any changer
F3 DEL: Deletes the character before the current filename cursor
Inserts the currently selected keyboard letter at the current
filename cursor position
SHIFT: Shifts between the upper case, lower case and accented
keyboards
FOR THE PLAYER/STUDIO VERSION
The current filename is always listed on the first line of the display. The second line of
the display can contain the character selection bar, as in the screenshot above, or
one of a number of other options.
KEY FUNCTION
LEFT/RIGHT
Moves the arrow to/from the filename and changes between the
character bar and BACKSPACE, DELETE, ACCEPT and ABORT.
PLAY/STOP Varies (see below)
ON Nothing
Menu
Shift. When the character selection bar is selected this changes
between upper case, lower case, and accented letters.
The function of the play and stop buttons depends on what the arrow is pointing to,
as follows.
Rockbox User Manual
Page 16

SELECTED OPTION PLAY/STOP FUNCTION
filename Moves the cursor left (STOP) or right (PLAY) within the filename
character bar
BACKSPACE PLAY deletes the character before the current cursor position
DELETE PLAY deletes the character at the current cursor position
ACCEPT PLAY exits the virtual keyboard and saves any changes
ABORT PLAY exits the virtual keyboard and discards any changes
Moves the character bar to the next (PLAY) or previous (STOP)
character.
16 Rockbox User Manual
Page 17
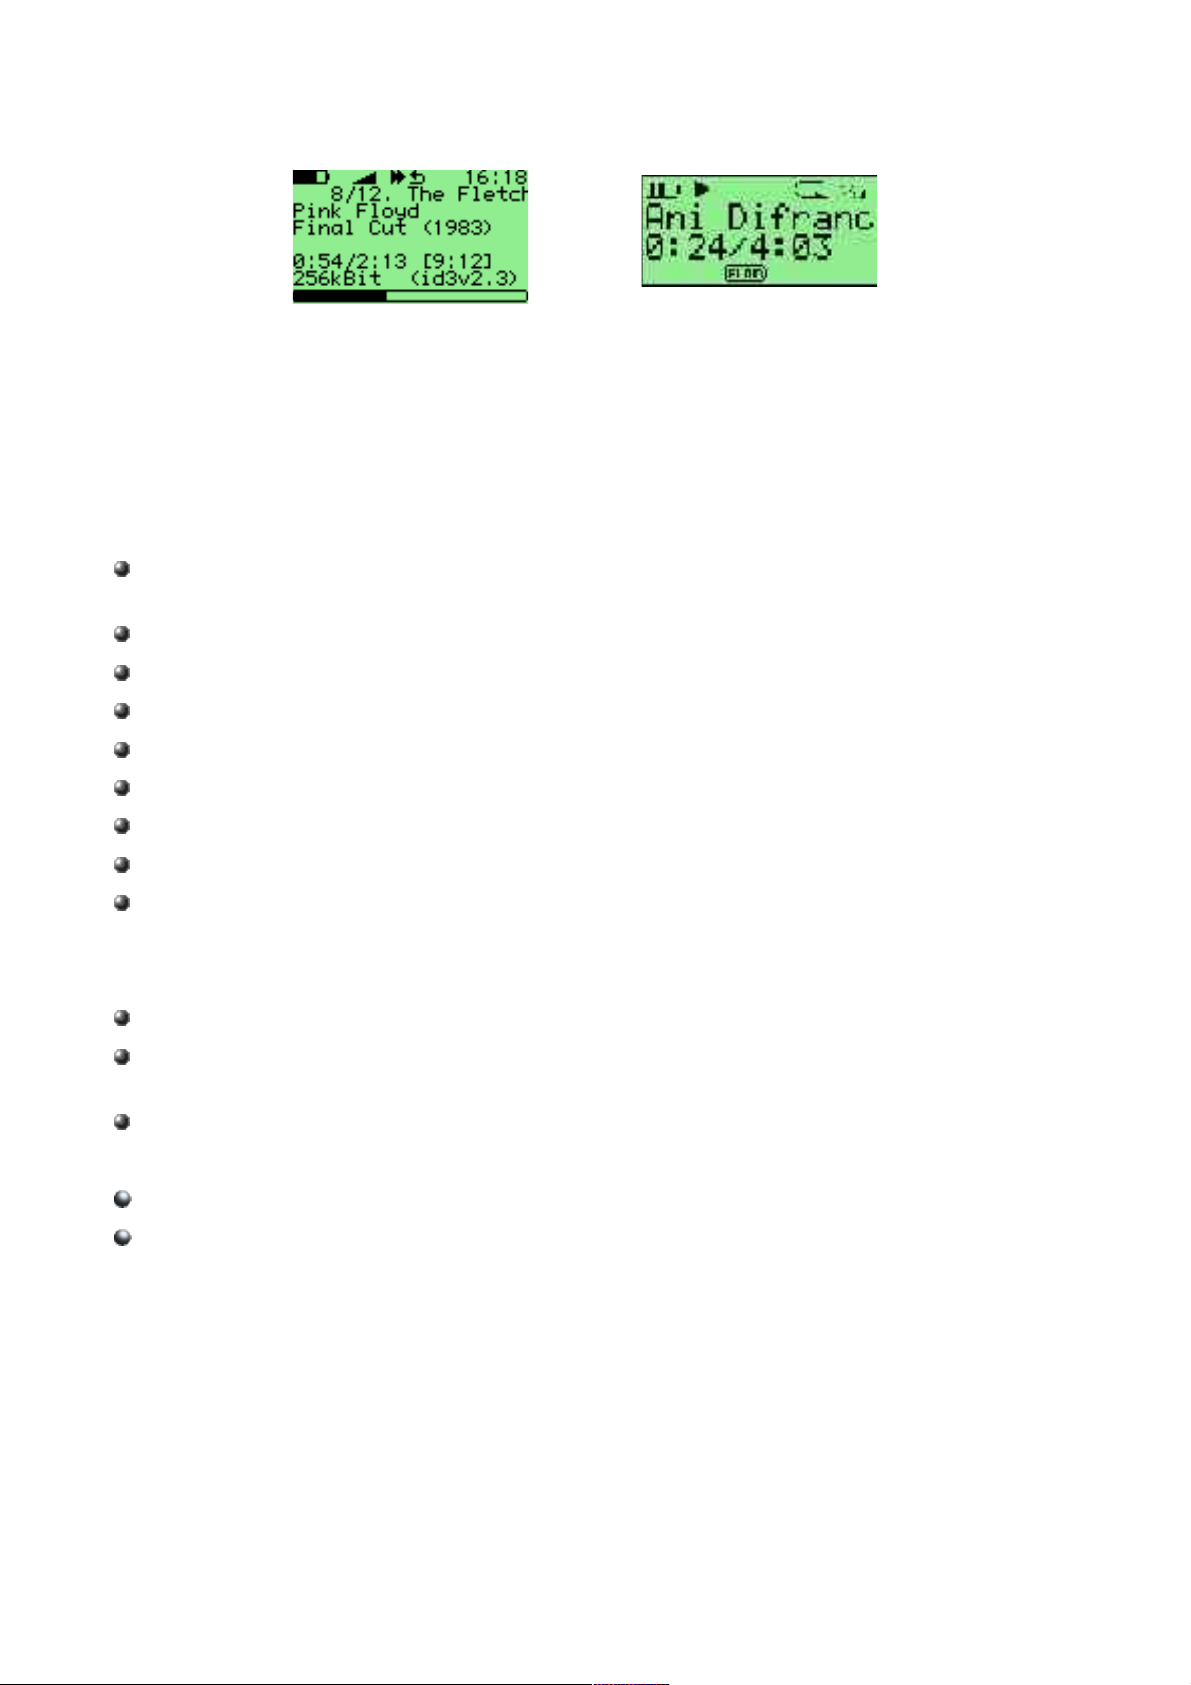
3 WHILE PLAYING SCREEN (WPS)
Recorder’s WPS Player’s WPS
The While Playing Screen (WPS) displays various pieces of information about the
currently playing MP3 file.
The display contains the following information by default:
Recorder
Status bar: Battery level, charger status, volume, play mode, repeat mode, shuffle
mode and clock
Scrolling path+filename of the current song.
The ID3 track name
The ID3 album name
The ID3 artist name
Bit rate. VBR files display average bitrate and "(avg)".
Elapsed and total time
A slidebar progress meter representing where in the song you are
Peak meter
Notes:
The number of lines shown depends on the size of the font used.
The peak meter is only visible if you turn off the status bar or if using a small font
that gives 8 or more display lines.
Player
Playlist index/Playlist size: Artist - Title
Current-time Progress-indicator Left
See page 66 for details of customising your WPS (While Playing Screen).
Rockbox User Manual
Page 18

3.1 KEY CONTROLS
Key controls for the WPS (RECORDER):
KEY ACTION
UP/DOWN Volume up/down
LEFT
LEFT (hold) Rewind in track
RIGHT (quick press) Go to next track.
RIGHT (hold) Fast forward in track.
PLAY Toggle play/pause
ON (quick press) Go to file browser
ON (hold) Show pitch setting screen
STOP Stop playback
F1 Go to Main menu
F2 Toggles Play/browse quick menu
F3 Toggles Display quick menu
F1+DOWN Key lock on/off
F1+PLAY Mute on/off
F1+ON Enter ID3 viewer
(quick press) Go to beginning of track, or if pressed while in the
first seconds of a track, go to previous track
Key controls for the WPS (PLAYER):
KEY ACTION
MENU+RIGHT Increases volume
MENU+LEFT Decreases volume
LEFT
LEFT (hold) Rewind in track
RIGHT (quick press) Go to next track.
RIGHT (hold) Fast-forward in track.
PLAY Toggle play/pause
ON Quick press = Go to file browser
OFF Stop playback
MENU Go to Main menu
MENU+DOWN Key lock on/off
MENU+PLAY Mute on/off
MENU+ON Enter ID3 viewer
(quick press) Go to beginning of track, or if pressed while in the
first seconds of a track, go to previous track.
18 Rockbox User Manual
Page 19
3.2 PEAK METER (RECORDER ONLY)
The peak meter can be displayed on the While Playing Screen and consists of several
indicators. For a picture of the peak meter, please see the While Recording Screen on
page 23.
The bar: That is the fat horizontal bar. It represents the current volume value.
The peak indicator: This is a little vertical line at the right end of the bar. It
indicates the peak volume value that occurred recently.
The clip indicator: This is a little black block that is displayed at the very right
of the scale when an overflow occurs. It usually doesn't show up during normal
playback unless you play an audio file that is distorted heavily. If you encounter
clipping while recording your recording will sound distorted. You should lower the
gain. Note that the clip detection is not very precise. Clipping might occur without
being indicated.
The scale: Between the indicators of the right and left channel there are little
dots. These dots represent important volume values. In linear mode each dot is a
10% mark. In dbfs mode the dots represent the following values (from right to
left): 0db, -3db, -6db, -9db, -12db, -18db, -24db, -30db, -40db, -50db, -60db.
3.3 ID3 VIEWER
The ID3 viewer
This screen is accessible from the WPS screen by pressing F1+ON (recorder) or
MENU+ON (player). It provides a detailed view of all the identity information about
the current track that is stored in an MP3 file. Use the LEFT and RIGHT keys to move
through the information and the STOP key to exit the viewer.
Rockbox User Manual
Page 20
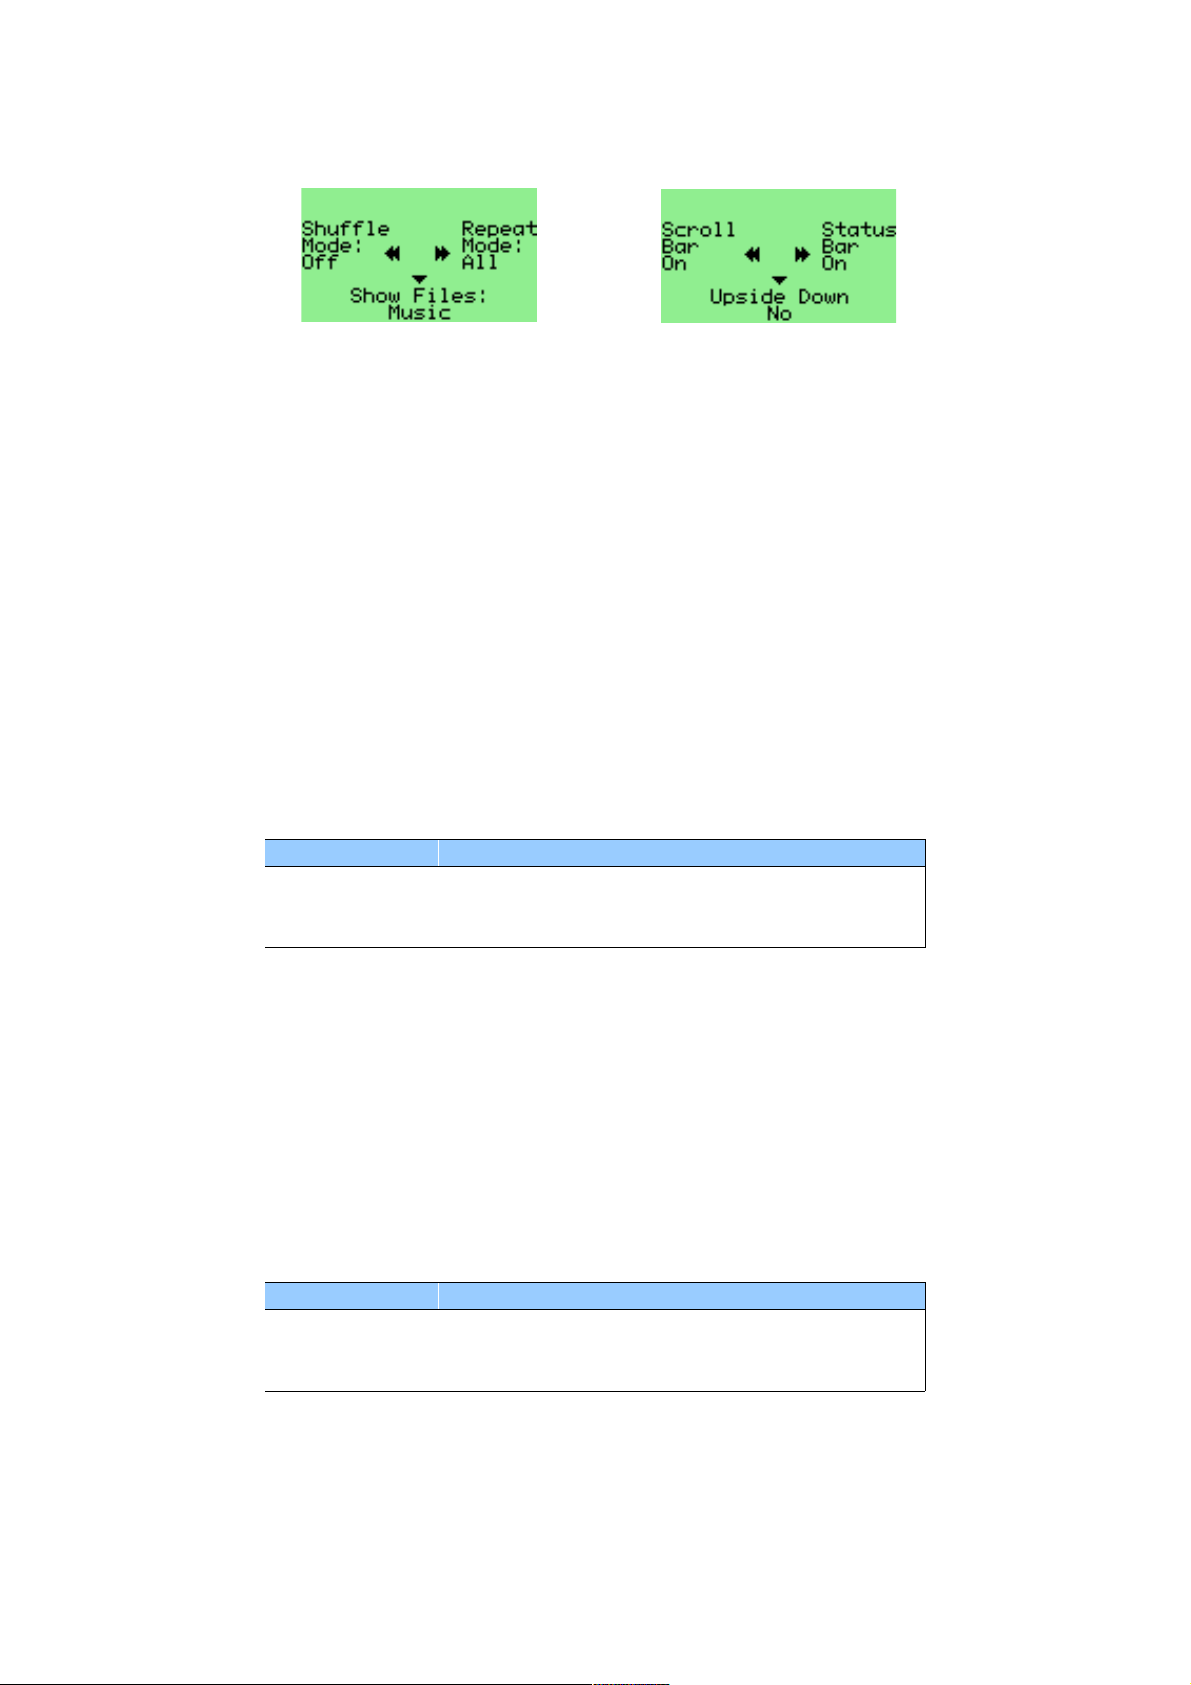
4 QUICK SCREEN MENUS (RECORDER ONLY)
F2 Quick Screen Menu F3 Quick Screen Menu
Rockbox handles function buttons in a different way to the Archos software. F1 is
always bound to the menu function, while F2 and F3 enable two quick menus.
F2 displays some browse and play settings which are likely to be changed frequently.
This settings are Shuffle mode, Repeat mode and the Show files options
Shuffle mode plays each track in the currently playing list in a random order rather
than in the order shown in the browser.
Repeat mode repeats either a single track (One) or the entire playlist (All).
Show files determines what type files can be seen in the browser. This can be just
MP3 files and directories (Music), Playlists, MP3 files and directories (Playlists), any
files that Rockbox supports (Supported) or all files on the disk (All).
See page 32 for more information about these settings.
Key controls for F2:
KEY ACTION
LEFT Controls Shuffle mode setting
RIGHT Controls Repeat mode setting
DOWN Controls Show file setting
F3 controls frequently used display options.
Scroll bar turns the display of the Scroll bar on the left of the screen on or off.
Status bar turns the status display at the top of the screen on or off.
Upside down inverts the screen so that the top of the display appears nearest to the
buttons. This is sometimes useful when storing the Jukebox in a pocket.
See page 33 for more information about these settings.
Key controls for F3:
KEY ACTION
LEFT Controls scroll bar display
RIGHT Controls status bar display
DOWN Controls inverted setting
20 Rockbox User Manual
Page 21

PART 3
THE MAIN MENU
Page 22
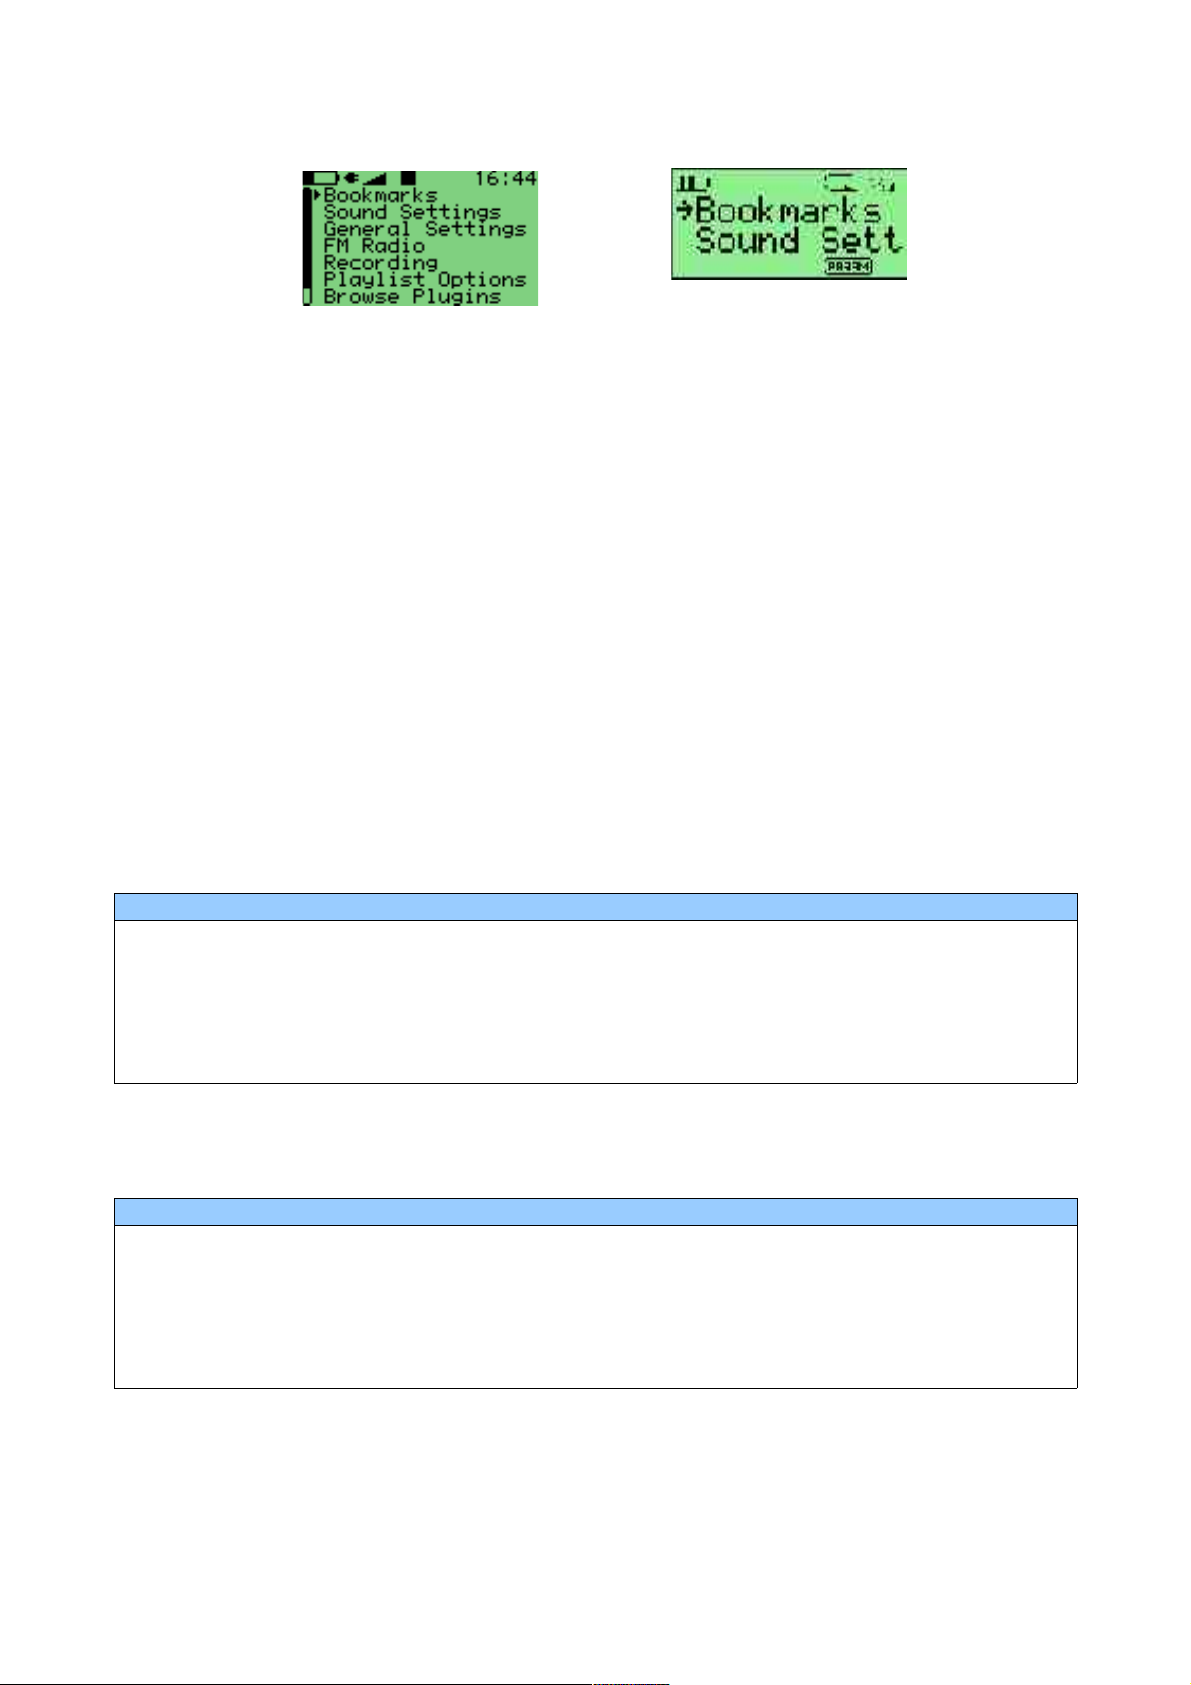
1 INTRODUCING THE MAIN MENU
Recorder main menu Player main menu
This is the screen from which the rest of the Rockbox functions can be accessed. It is
used for a variety of functions, which are detailed below. You can access the Rockbox
main menu by pressing MENU (player/studio version) or F1 (recorder version) key. All
options in Rockbox can be controlled via this menu. Some of them can also be found
in the Quick Menus (recorder version only).
All settings are persistently stored on the unit. However, Rockbox does not spin up the
disk solely for the purpose of saving settings, but instead will do it when it spins up
the disk the next time, for example when refilling the MP3 buffer or navigating
through the file browser. This is important to know since if you change a config setting
and then immediately shut your unit down, the new configuration may not be saved.
The two settings menus are covered in detail starting on page 28. All the other
options on the main menu are explained here.
Navigating through the menu:
PLAYER/STUDIO CONTROLS
KEY ACTION
LEFT
RIGHT
PLAY Selects item
STOP Exit menu, setting or moves to parent menu.
RECORDER CONTROLS
KEY ACTION
UP Moves up in the menu. Inside a setting, increases the value or
DOWN Moves down in the menu. Inside a setting, decreases the value or
PLAY/RIGHT Selects option
OFF/LEFT Exits menu, setting or moves to parent menu
Selects previous option in the menu. Inside an setting, decreases
the value or chooses previous option
Selects next option in the menu. Inside an setting increases the
value or chooses next option
chooses next option
chooses previous option
22 Rockbox User Manual
Page 23
2 RECORDING (RECORDERS ONLY)
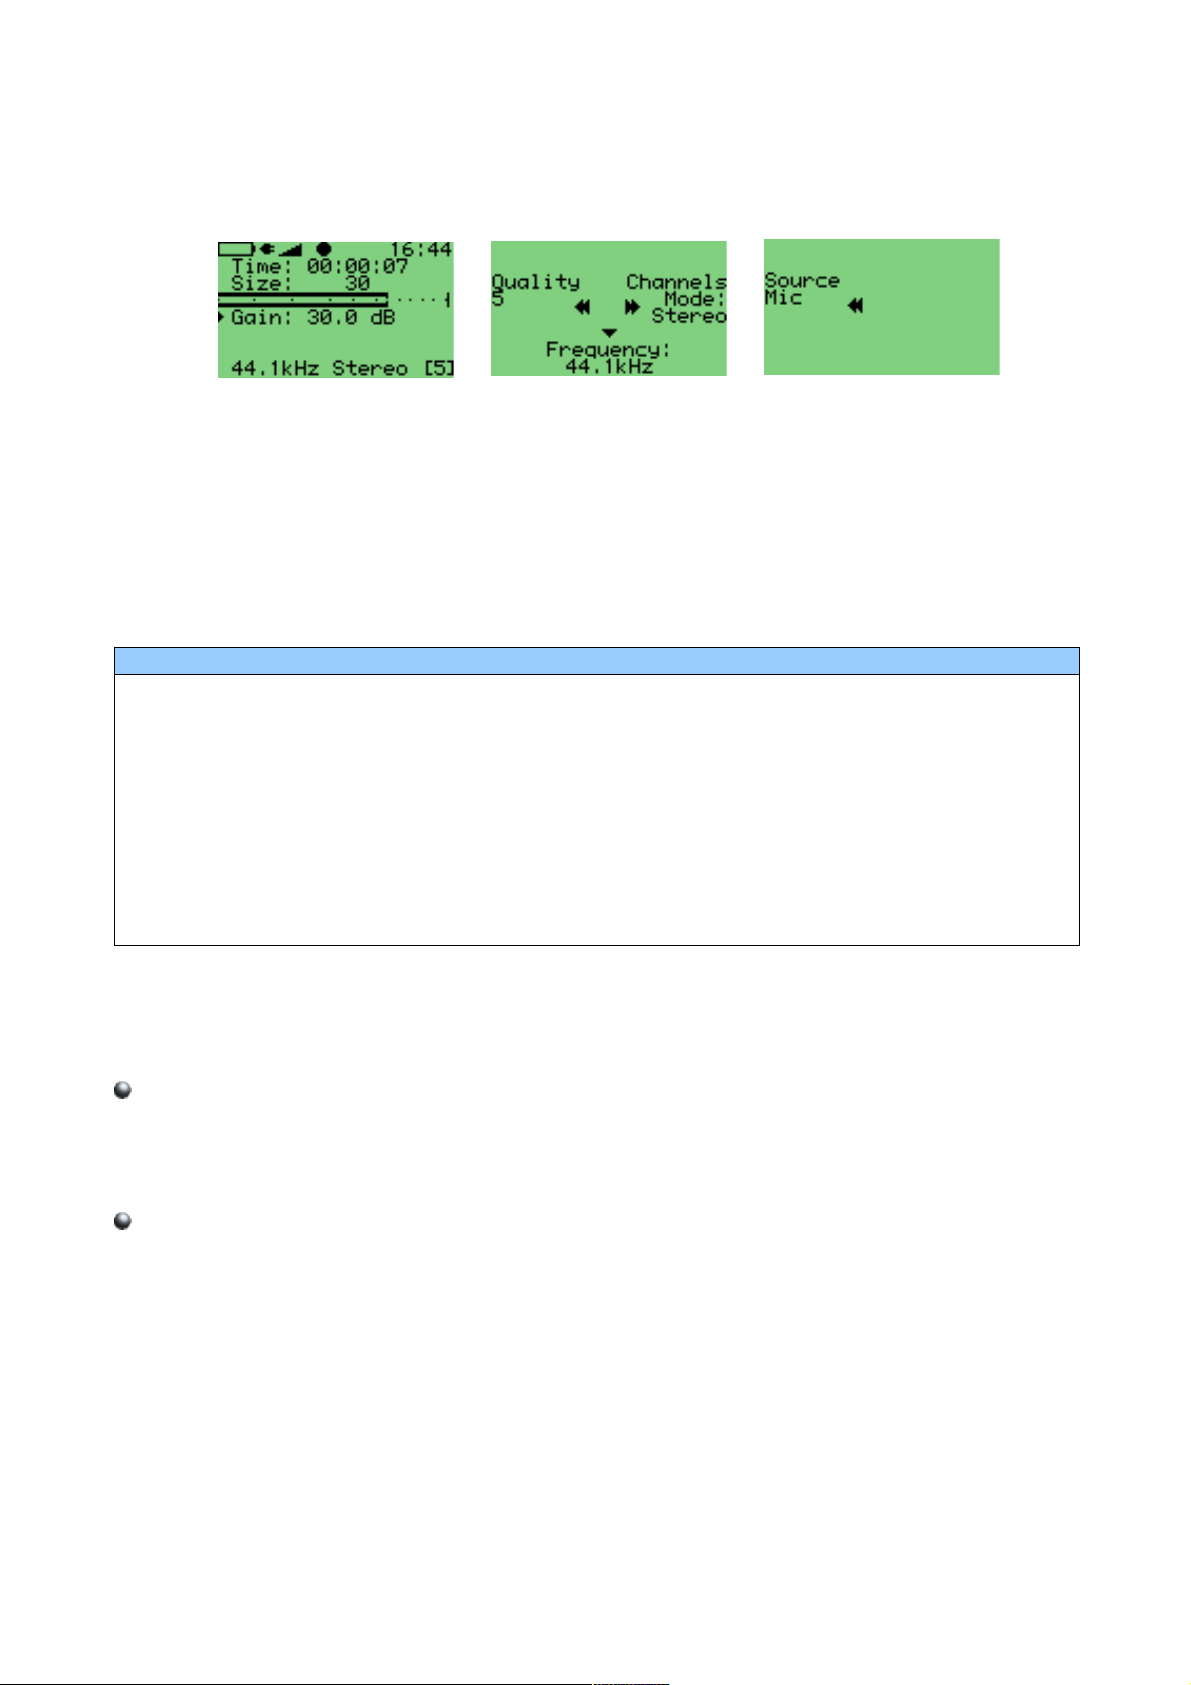
2.1 WHILE RECORDING SCREEN
Recording Screen Recording F2 screen Recording F3 screen
Entering the “Recording” option in the Main menu launches the recording application.
The screen shows the time elapsed and the size of the file being recorded. A peak
meter is present to allow you set Gain correctly. Frequency, channels and quality are
shown on the last line.
The controls for this screen are:
BUTTON FUNCTION
LEFT Decreases Gain
RIGHT Increases Gain
PLAY
STOP Exits Recording Screen. If Recording a file, stop recording
F1 Opens Recording Settings screen (see below)
F2
F3 Quick menu for source setting. Quick/hold works as for F2.
Starts recording. While recording, button closes the current file and opens
a new one
Quick menu for recording settings. A quick press will leave the screen up
(press F2 again to exit), while holding it will close the screen when you
release it.
2.2 RECORDING SETTINGS
Quality
Choose the quality here (0 to 7). Default is 5, best quality is 7, smallest file size is
0. This setting effects how much your sound sample will be compressed. Higher
quality settings result in higher bit rate MP3 files.
Frequency
Choose the recording frequency (sample rate). 48kHz, 44.1kHz, 32kHz, 24kHz,
22.05kHz, 16kHz are available. Higher sample rates use up more disk space, but
give better sound quality.
Rockbox User Manual
Page 24

Source
Choose the source of the recording. This can be microphone, line in, or SPDIF
(digital). For recording from the radio on the FM recorder, see page 25 below.
Note: you cannot change the sample rate for digital recordings.
Channels
This allows you to select mono or stereo recording. Please note that for mono
recording, only the left channel is recorded.
Independent Frames
The independent frames option tells the Jukebox to encode with the bit reservoir
disabled, so the frames are independent of each other. This makes a file easier to
edit.
Time Split
This option is useful when timing recordings. If set to active it stops a recording at a
given interval and then starts recording again with a new file. This is useful for long
term recordings.
The splits are seamless (frame accurate), no audio is lost at the split point. The
break between recordings is only the time required to stop and restart the
recording, on the order of 2-4 seconds.
Options (hours:minutes between splits): off, 24:00, 18:00, 12:00, 10:00, 8:00,
6:00, 4:00, 2:00, 1:00, 00:30, 00:15, 00:10, 00:05.
Prerecord Time
This setting buffers a small amount of audio so that when the record button is
pressed, the recording will begin from that number of seconds earlier. This is useful
for ensuring that a recording begins before a cue that is being waited for.
Options: Off, 1-30 seconds
24 Rockbox User Manual
Page 25
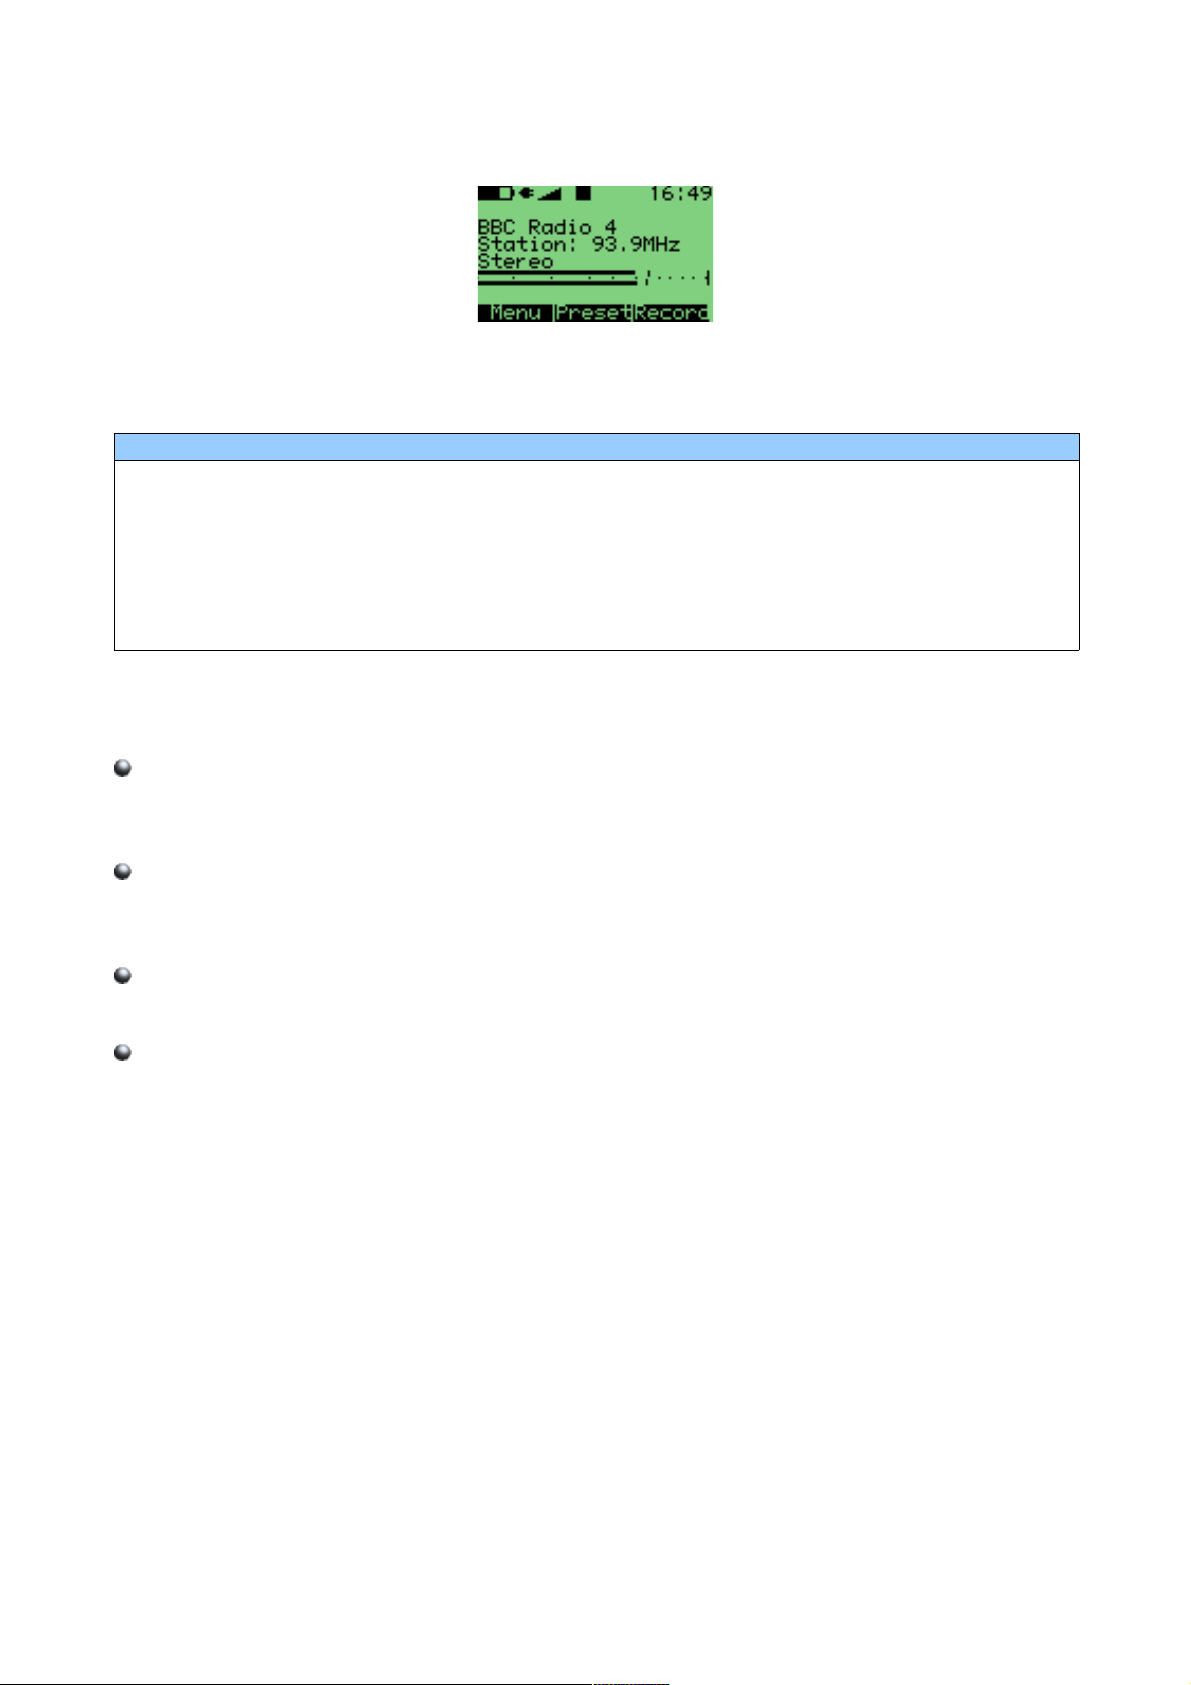
3 FM RADIO (FM RECORDERS ONLY)
FM radio screen
This menu option switches to the radio screen.
The keys are:
BUTTON FUNCTION
LEFT, RIGHT
UP, DOWN Change volume
PLAY
ON Leave the radio screen with the radio playing
OFF Back to main menu
The FM radio has the ability to record and to remember station frequency settings
(presets).
Change frequency in 0.1 MHz steps. For automatic station seek, hold
LEFT/RIGHT for a little longer.
(EXPERIMENTAL) freezes all screen updates, may enhance radio
reception in some cases.
Saving a preset
You can save your favourite stations in the 32 presets. Press F1 to go to the menu,
then select "Save preset". Enter the name (maximum number of characters is 32).
Selecting a preset
Press F2 to go to the preset list. Use UP and DOWN to move the cursor and then
press PLAY to select. Use LEFT to leave the preset without selecting anything.
Removing a preset
Press F1 to go to the menu, then select "Remove preset".
Recording
Press F3 to start recording the currently playing station. Press OFF to stop
recording. Press PLAY again to seamlessly start recording to a new file. The settings
for the recording can be changed in the F1 menu before starting the recording.
Note: The radio will turn off when playing an MP3.
Rockbox User Manual
Page 26
4 BOOKMARKS
The bookmarks menu allows you to create and manage bookmark files.
Create Bookmark
While playing a track, use this option to save your current position within the track
so that you can return to it at a later time. Bookmarks are saved on a per folder
basis i.e. all of the files in the same folder have their bookmarks stored together.
You can store multiple bookmarks for the same track.
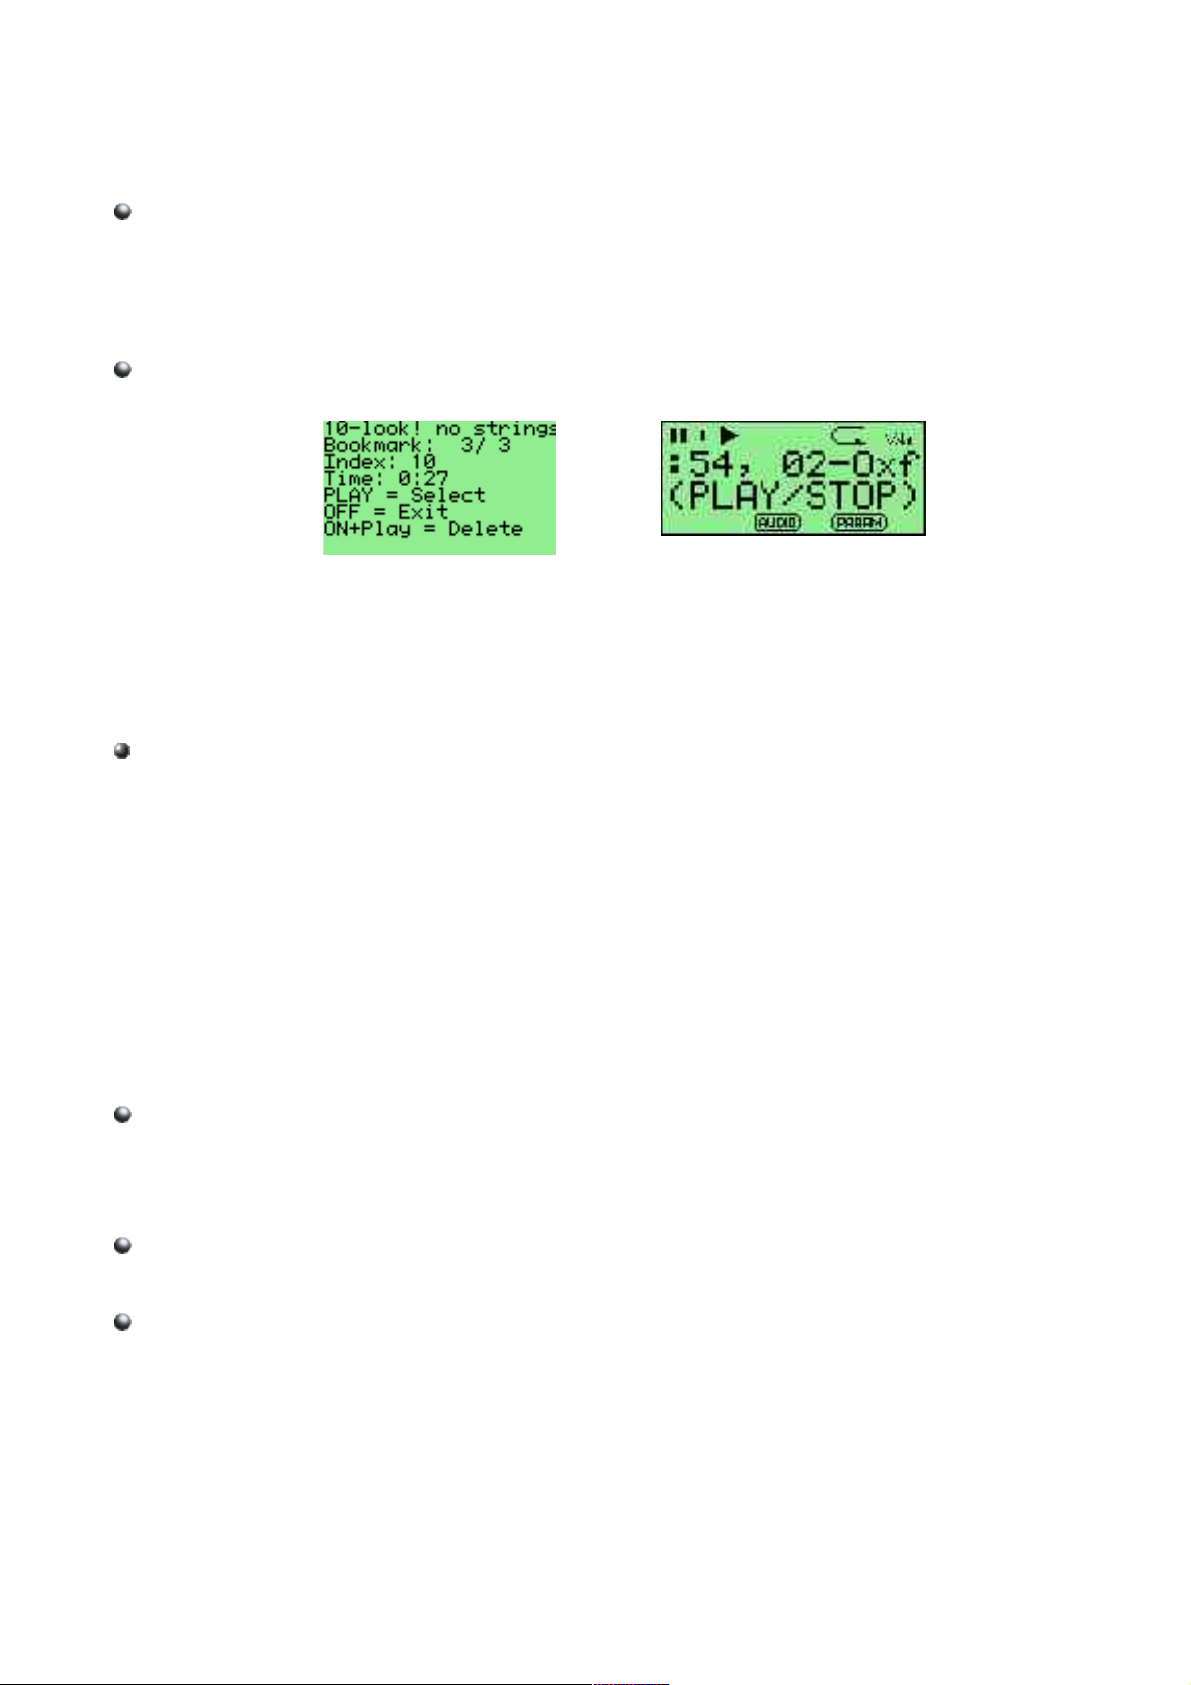
List Bookmarks
recorder bookmark browser player bookmark browser
While playing a track, use this option to return to any bookmark in the current
folder. The bookmark browser screen (shown above) is now displayed. Use the
UP and DOWN keys (recorder) or LEFT and RIGHT keys (player) to navigate
between bookmarks. Press PLAY to jump to a bookmark, ON+PLAY to delete a
bookmark or STOP/OFF to exit the browser.
Recent bookmarks
If the “save a list of recently created bookmarks” option is enabled then you can
view a list of several recent bookmarks here and select one to jump straight to that
track. This option is off by default. See page 38 for more details on configuring
bookmarking in Rockbox.
5 PLAYLIST OPTIONS
This menu allows you to work with playlists. Playlists can either be created
automatically by playing a file in a directory directly, which will cause all of the files in
that directory to be placed in the playlist, or they can be created by hand using the
File Menu (see page 14) or using the Playlist Options menu. Both automatic and
manually created playlists can be edited using this menu.
Create Playlist
Rockbox will create a playlist with all tracks in the current directory and all
subdirectories. The playlist will be created one directory level "up" from where you
currently are.
View Current Playlist
Displays the contents of the playlist currently stored in memory.
Save Current Playlist
Saves the current dynamic playlist, excluding queued tracks, to the specified file. If
no path is provided then playlist is saved to current directory (see page 14).
26 Rockbox User Manual
Page 27

Recursively Insert Directories
If set to ON then, when you insert/queue a directory in Dynamic Playlist, all
subdirectories will also be inserted. If set to ASK then you are prompted about
recursive insertion when inserting a directory.
6 BROWSE PLUGINS
With this option you can load and run various plugins that have been written for
Rockbox.
A detailed description of the different plugins begins on page 40.
7 INFO
This option shows MP3 ram buffer size, battery voltage level and estimated time
remaining, disk total space and disk free space.
On players use the left and right keys to step through several pages of information.
Show ID3 info
This is an alternative way to access the ID3 viewer. See page 19 for details on the
ID3 viewer.
Rockbox Info
Displays some basic system information. This is, from top to bottom, the amount
of memory Rockbox has available for storing music (the buffer), battery status,
hard disk size and the amount of free space on the disk.
Version
Software version and credits display.
Debug (Keep Out!)
This submenu is intended to be used only by Rockbox developers. It shows
hardware, disk, battery and a lot of other information. It is not recommended that
users access this menu unless instructed to do so in the course of fixing a problem
with Rockbox. In particular the “Dump ROM Contents”, “View/clear RTC RAM” and
“Screenshot” and “Sound test” functions should be treated with care.
Rockbox User Manual
Page 28

PART 4
CONFIGURING ROCKBOX
Page 29

1 SOUND SETTINGS
Recorder sound settings Player sound settings
This menu offers a selection of sound properties you may change to improve your
sound experience.
Volume
The sound volume your music is played at. Although settable range is 0-100%,
many units don't produce audible output below 40%.
Bass
This emphasises or suppresses the lower (bass) sounds in the track. 0 means that
bass sounds are unaltered (flat response).
Treble
This emphasises or suppresses the higher (treble) sounds in the track. 0 means
that treble sounds are unaltered (flat response).
Balance
How much of the volume is generated by the left or right channel of the sound.
The default, 0, means that the left and right outputs are equal in volume. Negative
numbers increase the volume of the left channel relative to the right, positive
numbers increase the volume of the right channel relative to the left.
Channels
This option controls the on-board mixing facilities of the Jukebox. A stereo audio
signal consists of two channels, left and right. Available options are
Mono Left: Plays the left channel in both stereo channels.
Mono Right: Plays the right channel in both stereo channels.
Mono: Mix both channels down to mono and send the mixed signal back to both.
Stereo: Do not mix the signal
Stereo Narrow: Mixes small amounts of the opposite channel into the left and
right channels, thus making the sound seem closer together.
Stereo Wide: Elements of one channel that are present in the opposite channel
are removed from the latter. This results in the sound seeming further apart.
Karaoke: Removes all sound that is the same in both channels. Since most
vocals are recorded in this way to make the artist sound central, this often (but
not always) has the effect of removing the voice track from a song.
Loudness (Recorder only)
Loudness is an effect which emphasises bass and treble. This makes the track
seem louder by amplifying the frequencies that the human ear finds hard to hear.
Frequencies in the vocal range are unaffected, since the human ear picks these up
very easily.
Rockbox User Manual
Page 30

Auto Volume (Recorder only)
Auto volume is a feature that automatically lowers the volume on loud parts, and
then slowly restores the volume to the previous level over a time interval. That time
interval is configurable here. Short values like 20ms are useful for ensuring a
constant volume for in car use and other applications where background noise
makes a constant loudness desirable. A longer timeout means that the change in
volume back to the previous level will be smoother, so there will be less sharp
changes in volume level.
Super Bass (Recorder Only)
This setting boosts the volume of bass frequencies, making the sound of drums and
bass guitar louder in comparison to the rest of the track. This setting only has an
effect if Loudness is set to a value larger than 0dB.
MDB - Micronas Dynamic Bass (Recorder Only)
The rest of the parameters on this menu relate to the Micronas Dynamic Bass
(MDB) function. This is designed to enable the user to hear bass notes that the
headphones and/or speakers are not capable of reproducing. Every tone has a
fundamental frequency (the 'main tone') and also several harmonics, which are
related to that tone. The human brain has a mechanism whereby it can actually
infer the presence of bass notes from the higher harmonics that they would
generate.
The practical upshot of this is that MDB produces a more authentic sounding bass
by tricking the brain in believing it's hearing tones that the headphones or speakers
aren't capable of reproducing. Try it and see what you think.
The MDB parameters are as follows.
MDB enable: this turns the MDB feature on or off. For many users this will be
the only setting they need, since Rockbox picks sensible defaults for the other
parameters. MDB is turned off by default.
MDB strength: How loud the harmonics generated by the MDB will be.
MDB Harmonics: The percentage of the low notes that is converted into
harmonics. If low notes are causing speaker distortion, this can be set to 100%
to eliminate the fundamental completely and only produce harmonics in the
signal. If set to 0% this is the same as turning the MDB feature off.
MDB Centre Frequency: The cutoff frequency of your headphones or speakers.
This is usually given in the specification for the headphones/speakers.
MDB shape: It is recommended that this parameter be set to 1.5 time the
centre frequency.
This is the frequency up to which harmonics are generated. Some of the lower
fundamentals near the cut-off range will have their lower harmonics cut off, since
they will be below the range of the speakers. Fundamentals between the cut-off
frequency and the lower frequency will have their harmonics proportionally
boosted to compensate and restore the 'loudness' of these notes.
30 Rockbox User Manual
Page 31

For most users, the defaults should provide an improvement in sound quality and
can be safely left as they are. For reference, the defaults Rockbox uses are:
Setting Value
MDB Strength 50dB
MDB Harmonics 48%
MDB Centre frequency60Hz
MDB Shape 90Hz
Rockbox User Manual
Page 32

2 GENERAL SETTINGS
Recorder general settings Player general settings
2.1 PLAYBACK OPTIONS
This menu is for configuring settings related to MP3 playback
Shuffle
Select shuffle ON/OFF. This alters how Rockbox will select which next song to play.
Repeat
Repeat modes are Off/One/All. "Off" means no repeat. "One" means repeat one
track over and over. "All" means repeat playlist/directory.
Play Selected First
This setting controls what happens when you press PLAY on a file in a directory and
shuffle mode is on. If this setting is Yes, the file you selected will be played first. If
this setting is No, a random file in the directory will be played first.
Resume
Sets whether Rockbox will resume playing at the point where you shut off. Options
are: Ask/Yes/No/Ask once. "Ask" means it will ask at boot time. "Yes" means it will
unconditionally try to resume. "No" means it will not resume. "Ask once" will erase
the resume info if you answer no, and thus not ask you again.
FFwd / Rewind
Two options are available at this point
FF/RW Min Step
The smallest step, in seconds, you want to fast forward or rewind in a track.
FF/RW Accel
How fast you want search (ffwd/rew) to accelerate when you hold down the
button. "Off" means no acceleration. "2x/1s" means double the search speed
once every second the button is held. "2x/5s" means double the search speed
once every 5 seconds the button is held.
Anti-skip Buffer
This setting is really "extra anti-skip". It lets you set a timer for how many seconds
earlier than normally necessary the disk should spin up and start reading data. You
don't need this unless you shake and bump the unit a lot. Spinning up the disk
earlier than necessary naturally drains the batteries a little extra. Most users will
not need this setting.
32 Rockbox User Manual
Page 33

Fade on Stop/Pause
This setting enables and disables a fade effect when you pause or stop playing a
song. Fade is a progressive increase or reduction of volume, from your set volume
to 0, and inverse.
ID3 tag priority
ID3 tags in an MP3 file contain information about the artist, title, album etc. of the
track. This option controls whether Rockbox uses the information from ID3v2 tags
in preference to that from ID3v1 tags when both types of tag are present.
2.2 FILE VIEW
This menu deals with options relating to how the file browser displays files
Sort Case Sensitive: If this option is enabled files that start with a lower case
letter will appear after the files that start with an upper case letter have all been
listed. If disabled, then case will be ignored when sorting files.
Sort Directories: This option controls how Rockbox sorts folders. The default is to
sort them alphabetically. “By date” sorts them with the oldest folder first. “By
newest date” sorts them with the newest folder first.
Sort Files: This option controls how Rockbox sorts files. In addition to the options
for directory sorting above, there is a “By type” option which sorts files
alphabetically by their type (such as .mp3) then alphabetically within each type.
Show Files: Controls which files are displayed in the dir browser:
Music: Only directories, .mp3, .mp2, .mpa and .m3u files are shown. Extensions
are stripped. Files and directories starting with . or has the "hidden" flag set are
hidden.
Playlists: Only shows directories and playlists, for simplified navigation.
Supported: All directories and files Rockbox understands (see page 81) are
shown. Files and directories starting with . or have the "hidden" flag set are
hidden.
All: All files and directories are shown. Extensions are shown. No files or
directories are hidden.
Follow Playlist: If Follow Playlist is set to "Yes", you will find yourself in the same
directory as the currently playing file if you go to the Directory Browser from the
WPS. If set to "No", you will stay in the same directory as you last were in.
Show Icons: This indicates whether Rockbox will display an icon representing what
type a file is on the left of the file in the browser. For details of these icons, please
see page 81.
2.3 DISPLAY OPTIONS
Browse fonts
Browse the fonts that reside in your /.rockbox directory. Selecting one will activate
it. See page 66 for further details about fonts.
Browse WPS files
Opens the file browser in the /.rockbox directory and displays all .wps files.
Selecting one will activate it, stop will exit back to the menu.
Rockbox User Manual
Page 34

For further information about the WPS see page 17. For information about editing a
.WPS file see page 66.
LCD Settings
This submenu contains settings that relate to the display of the Jukebox.
Backlight: How long the backlight shines after a key press. Set to OFF to never
light it, set to ON to never shut it off or set a preferred timeout period.
Backlight on When Plugged: This option turns the backlight on constantly
while the charger cable is connected.
Caption Backlight: This option turns the backlight on briefly for 25 seconds
either side of the start of a new track so that the display can be read to see what
the next song is.
Contrast: Changes the contrast of your LCD display. Warning: Setting the
contrast too dark or too light can make it hard to find this menu option again!
LCD Mode (Recorder only): This setting lets you invert the whole screen, so now
you get a black background and green text graphics.
Upside Down: Displays the screen so that the top of the display is nearest the
buttons. This is sometimes useful when carrying the Recorder in a pocket for
easy access to the headphone socket.
Line Selector: Select this option to have a bar of inverted text (Bar option)
mark the current line in the File Browser rather than the default arrow to the left
(Pointer option). This gives slightly more room for filenames.
Scrolling
This feature controls how text will scroll in Rockbox. You can configure the following
parameters:
Scroll Speed: Controls how many times per second the scrolling text moves a
step.
Scroll Start Delay: Controls how many milliseconds Rockbox should wait before
a new text begins scrolling.
Scroll Step Size: Controls how many pixels the text scroll should move for each
step. (Recorder only)
Bidirectional Scroll Limit: Rockbox has two different scroll methods, scrolling
the text always to the left, and when the line has ended, begin again with the
Start of the text, or move to the left until you can read the end of the line, and
scroll right until you see the beginning of the text. Rockbox chooses which
method it should use, depending of how much it has to scroll left. This setting
lets you tell Rockbox where that limit is, expressed in percentage of line length.
Status/Scrollbar (Recorder only)
Settings related to on screen status display and the scrollbar.
Scroll Bar: Enables or disables the scroll bar at the left.
Status Bar: Enables or disables the status bar at the upper side.
Button Bar: Enables or disables the button bar prompts for the F keys at the
bottom of the screen.
34 Rockbox User Manual
Page 35

Volume Display: Controls whether the volume is displayed as a graphic or a
numerical percentage value on the Status Bar.
Battery Display: Controls whether the battery charge status is displayed as a
graphic or numerical percentage value on the Status Bar.
Peak Meter (Recorder only)
The peak meter can be configured with a number of parameters. (For a description
of the peak meter see page 19.)
Peak Release: This determines how fast the bar shrinks when the music
becomes softer. Lower values make the peak meter look smoother.
Peak Hold Time: Specifies the time after which the peak indicator will reset. If
you set this value e.g. to 5s then the peak indicator displays the loudest volume
value that occurred within the last 5 seconds. Big values are good if you want to
find the maximum value of a song. That might be an interesting value for copying
music from the jukebox via the analogue output to some other recording device.
Clip Hold Time: How long should the clipping indicator be visible after clipping
was detected?
Performance: In high performance mode, the peak meter is updated as often
as possible. That reduces the chance of missing a peak value, making the peak
meter more precise. In energy save mode the peak meter is updated just often
enough to look fluid. This reduces the load on the CPU and thus saves a little bit
of energy. If you crave for every second of runtime of your jukebox or simply use
the peak meter as a screen effect, the use of energy save mode is
recommended. If you want to use the peak meter as a measuring instrument
you'll want to use high performance mode.
Scale: Select whether the peak meter displays linear or logarithmic values. In dB
(decibel) scale the volume values are scaled logarithmically. This very similar to
the perception of loudness. The volume meters of digital audio devices usually
are scaled this way. If you are interested in the power that is applied to your
headphones you should choose linear display. Unfortunately this value doesn't
have real units like volts or watts since that depends on the phones. So they can
only be displayed as percentage values.
Minimum and maximum range: These two options define the full value range
that the peak meter displays. Recommended values for dbFs are -40 for min. and
0 for maximum. For linear display, use 0 and 100%. Note that -40 dbFs is
approximately 1% in linear value, but if you change the minimum setting in
linear mode slightly and then change to dbFs you notice vast changes. You can
use these values for 'zooming' into the peak meter.
2.4 SYSTEM OPTIONS
Battery
Options relating to the batteries in the Jukebox unit.
Battery Capacity, which can be used to tell the Jukebox what capacity (in mAh)
of battery is being used inside it. The default is 1500mAh for NiMH battery based
units, and 2300mAh for LiOn battery based units, which is the capacity value for
the standard batteries shipped with these units. This value is used for calculating
remaining battery life.
Rockbox User Manual
Page 36

Deep discharge (Non-FM recorders only)
Set this to ON if you intend to keep your charger connected for a long period of
time. It lets the batteries go down to 10% before starting to charge again.
Setting this to OFF will cause the charging to restart on 95%.
Trickle Charge (Non-FM recorders only)
The jukebox cannot be turned off while the charger is connected. Therefore,
trickle charge is needed to keep the batteries full after charging has completed.
For more in depth information about charging see Battery FAQ in your /.
rockbox/docs directory.
Disk
Options relating to the hard disk.
Disk Spindown: Rockbox has a timer that makes it spin down the hard disk
after being idle for a certain time. You can modify this timeout here. This idle
time is only affected by user activity, like navigating through file browser. When
the hard disk spins up to fill mp3 buffer, it automatically spins down afterwards.
Disk Poweroff: (non v2/FM-Recorders only) Whether the disk is powered OFF or
only set to “sleep” when spun down. Power off uses less power but takes longer
to spin-up.
Time and Date (Recorder Only)
Time related menu options.
Set Time/Date: Set current time and date.
Time Format: Choose 12 or 24 Hour clock.
Idle Poweroff
Rockbox can be configured to turn off power after the unit has been idle for a
defined number of minutes. The unit is idle when playback is stopped or paused. It
is not idle while the USB or charger is connected, or while recording.
Sleep Timer
This option lets you power off your jukebox after playing for a given time. This
setting is reset on boot.
Wake up alarm (Recorder v2/FM only)
This option turns the Jukebox off and then starts it up again at the specified time.
This is most useful when combined with the Resume setting in the Playback options
set to “Yes”, so that the Jukebox wakes up and immediately starts playing music.
Use LEFT and RIGHT to adjust the minutes setting, UP and DOWN to adjust the
HOURS. PLAY confirms the alarm and shuts your Jukebox down, and STOP cancels
setting an alarm. If the Jukebox is turned on again before the alarm occurs the
alarm will be canceled.
Limits
This submenu relates to limits in the Rockbox operating system.
Max files in dir browser: Configurable limit of files in dir browser (file buffer
size). You can configure the dir size to between 50 and 10000 files in steps of 50
files. Default is 400, higher values will shorten the mpeg buffer.
36 Rockbox User Manual
Page 37

Note: the device must be rebooted for the settings to take effect!
Max playlist size: Option to configure the maximum size of a playlist. The
playlist size can be between 1000 and 20000 files in steps of 1000. By default
it's 10000.
Note: the device must be rebooted for the settings to take effect!
Car Adapter Mode
This option turns on and off the car ignition auto stop function.
When using the Jukebox in a car, car adapter mode automatically stops playback on
the Jukebox when power (i.e. from cigarette lighter power adapter) to the external
DC in jack is turned off.
When the external power off condition is detected, the Car Adapter Mode function
only pauses the playback. In order to shut down the Jukebox completely the Idle
Poweroff function (see above) must be set.
If power to the DC in jack is turned back on before the Idle Poweroff function has
shut the Jukebox off, playback will be resumed 5 seconds after the power is
applied. This delay is to allow for the time while the car engine is being started.
Once the Jukebox is shut off either manually, or automatically with the Idle
Poweroff function, it must be powered up manually to resume playback.
Line In (Player only)
This option activates the line in port on Jukebox Player, which is off by default.
This is useful for such applications as:
Game boy -> Jukebox -> human
laptop -> Jukebox ->human
LAN party computer -> Jukebox -> human
Manage settings
This submenu deals with loading and saving settings.
Browse .cfg Files: This displays a list of configuration (.cfg) files stored in the /.
rockbox system directory. This is useful if the Jukebox is plugged into more than
one different output device (e.g. Headphones, computer, car stereo, hi-fi) so that
a settings file can be maintained for each.
Browse Firmwares: This displays a list of firmware (.mod for Players or .ajz for
Recorders) file in the /.rockbox system directory. Playing a firmware file loads it
into memory. Thus it is possible to run the original Archos firmware or a
different version of Rockbox from here assuming that you have the right files
installed on your disk.
Reset Settings: This wipes the saved settings in the Jukebox and resets all
settings to their default values.
Write .cfg file: Saves the current settings into a .cfg file for later use with
Browse .cfg Files above.
Rockbox User Manual
Page 38

2.5 BOOKMARKING
Bookmark on Stop
Write a bookmark to the disk whenever the stop key is pressed. If playback is
stopped it can be resumed easily at a later time.
Load Last Bookmark
When this is on, Rockbox automatically returns to the position of the last bookmark
within a file when it is played. If set to Ask, Rockbox will ask the user whether they
want to start from the beginning or the bookmark. When set to no, playback
always starts from the beginning and the Bookmark file must be played or Load
Bookmark selected from the Bookmarks submenu of the Main Menu while the file is
playing.
Maintain a list of Recently Used Bookmarks
If this option is turned on, Rockbox will store a list of Bookmarks that have been
accessed recently. This is then accessible from the Recent Bookmarks option of the
Bookmarks submenu of the Main Menu.
2.6 LANGUAGE
See all the different languages your Rockbox can "speak". Selecting one will activate
it. Note: the language files must reside in your /.rockbox/lang/ directory.
See page 66 for further details about languages.
38 Rockbox User Manual
Page 39

2.7 VOICE
Voice Menus
This option turns on the Voice User Interface, which will read out menu items and
settings as they are selected by the cursor. In order for this to work, a voice file
must be present in the /.rockbox/lang/ directory on the recorder. Voice files are
large (1.5MB) and are not shipped with Rockbox by default.
The voice file is the name of the language for which it is made, followed by the
extension .voice. So for English, the file name would be english.voice.
This option is on by default. It will do nothing unless the appropriate .voice file is
installed in the correct place on the Jukebox.
Voice Directories
This option turns on the speaking of directory names. The Jukebox is not powerful
enough to produce these voices in real time, so a number of options are available.
While Hovering: Use special pre-recorded MP3 files (_dirname.talk) in each
directory. These must be generated in advance, and are typically produced
synthetically using a text to speech engine on a PC.
On Enter: Play _dirname.talk on entry to the actual directory (i.e. when PLAY
is pressed on it).
Spell: Speak the directory name by spelling it out letter by letter. Support is
provided only for the most common letters and punctuation.
Numbers: Each directory is assigned a number based upon its position in the file
list. They are then announced as “Directory 1”, “Directory 2” etc.
Off: No attempt will be made to speak directory names.
Voice Filenames
This option turns on the speaking of directory names. The options provided are
“Spell”, “Numbers”, and “Off” which function the same as for Voice Directories.
Rockbox User Manual
Page 40

PART 5
PLUGINS
Page 41

Plugins are little programs that Rockbox can load and run. Plugins have the file
extension .rock. Most of them can be started from the main menu if you put them in
the /.rockbox/rocks directory. Press PLAY on them to start them.
Viewer plugins get started automatically by "playing" an associated file (i.e. text files,
chip8 games), or from the “Open with” option on the File menu.
The plugin loader
Only one plugin can be loaded at a time. Plugins run in the GUI thread and have
exclusive control over the user interface. This means you cannot switch back and forth
between a plugin and Rockbox. A plugin is loaded, ran and then exited, which returns
control to Rockbox. Music will carry on playing whilst plugins are being run.
1 GAMES
See also the Chip-8 emulator on page 54.
1.1 FLIPIT (RECORDER ONLY)
Flipit plugin
Flipping the colour of the token under the cursor also flips the tokens above, below,
left and right of the cursor. The aim is to end up with a screen containing tokens of
only one colour.
KEY ACTION
UP/DOWN/LEFT/RIGHT Changes the cursor
PLAY Toggle
F1 Shuffle
F2 Solution
F3 Step by step
OFF Stop the game
1.2 JACKPOT (PLAYER ONLY)
Jackpot
This is a jackpot slot machine game. At the beginning of the game you have 20$.
Payouts are given when three matching symbols come up.
Rockbox User Manual
Page 42

KEY ACTION
PLAY Play
STOP Exit the game
1.3 MNESWEEPER (RECORDER ONLY)
Minesweeper plugin
The classic game of minesweeper. Use the UP and DOWN keys to select the required
percentage of mines to set the difficulty then press the MENU key to begin.
The aim of the game is to uncover all of the squares on the board. If a mine is
uncovered then the game is over. If a mine is not uncovered, then the number of
mines adjacent to the current square is revealed. The aim is to use the information
you are given to work out where the mines are and avoid them. When the player is
certain that they know the location of a mine, it can be tagged to avoid accidentally
“stepping” on it.
KEY ACTION
UP/DOWN/LEFT/RIGHT Move the cursor across the minefield
PLAY / F1 Toggle flag on / off
MENU / F2 Reveal the contents of the current square
STOP Exit the game
1.4 NIM (PLAYER ONLY)
Nim plugin
Rules of Nim: There are 21 matches. Two players (you and the Jukebox) alternately
pick a certain number of matches and the one who takes the last match, loses.
You can take up to twice as many matches as the Jukebox selected, and vice versa.
KEY ACTION
- Decrease the number of matches
+ Increase the number of matches
PLAY Remove the number of matches you have selected
STOP Exit the game
42 Rockbox User Manual
Page 43

1.5 PONG (RECORDER ONLY)
Pong game
The world's first arcade game comes to Rockbox. This is a "tennis game" for two
players. The left player uses LEFT and F1 to move and the right player uses RIGHT
and F3. The aim is to prevent the ball leaving the screen. The player that loses the
least balls wins.
KEY ACTION
F1 Player 1 up
LEFT Player 1 down
F3 Player 2 up
RIGHT Player 2 down
OFF Quit
1.6 ROCKBLOX (RECORDER ONLY)
Rockblox plugin
This well-known game will probably be familiar. The aim of the game is to complete
rows with the given pieces (blocks). Pieces can be rotated to make them fit into the
rows. Once you complete a row, it gets cleared, but if you fill your display with rows
you lose.
The controls for this game are:
KEY ACTION
UP Rotate piece
LEFT/RIGHT Move piece to the left/right
DOWN Move faster the piece downwards
OFF Exit Tetris
Rockbox User Manual
Page 44

1.7 SLIDING PUZZLE (RECORDER ONLY)
Sliding puzzle
The classic sliding puzzle game. Rearrange the pieces so that you can see the whole
picture.
Key controls:
KEY ACTION
UP/DOWN/LEFT/RIGHT Moves
F1 Shuffle
F2 Change the picture
OFF Stop the game
1.8 SNAKE (RECORDER ONLY)
This is the popular snake game. The aim is to grow your snake as large as possible by
eating the dots that appear on the screen. The game will end when the snake touches
either the borders of the screen or itself.
Change levels with UP/DOWN keys (level 1 is slowest, level 9 is fastest). Press PLAY to
start or pause.
1.9 SNAKE 2 (RECORDER ONLY)
Snake 2 – The Snake Strikes Back
Another version of the Snake game. Move the snake around, and eat the apples that
pop up on the screen. Each time an apple is eaten, the snake gets longer. The game
ends when the snake hits a wall, or runs into itself.
The controls are:
KEY ACTION
UP/DOWN (in menu) Set game speed
F1 (in menu) Change starting maze
F3 (in menu) Select game type (A or B)
UP/DOWN/LEFT/RIGHT Steer the snake
PLAY Pause the game
STOP Exit the game
44 Rockbox User Manual
Page 45

In game A, the maze stays the same, in Game B after an increasing number of apples
eaten the maze is replaced by a new one.
1.10 SOKOBAN (RECORDER ONLY)
Sokoban
The object of the game is to push boxes into their correct position in a crowded
warehouse with a minimal number of pushes and moves. The boxes can only be
pushed, never pulled, and only one can be pushed at a time.
The controls are:
KEY ACTION
UP/DOWN/LEFT/RIGHT Move the “sokoban” up, down, left or right
F1 Back to previous level
F2 Restart level
F3 Go to next level
ON Undo last movement
OFF Exit sokoban
1.11 SOLITAIRE (RECORDER ONLY)
Klondike solitaire
This is the classic Klondike solitaire game for Rockbox. Select 'help' from the game
menu to get an explanation of what the keys do. Rules for Klondike solitaire are
available from http://www.solitairecentral.com/rules/klondike.html.
1.12 STAR (RECORDER ONLY)
Star game
This is a puzzle game. It is actually a rewrite of Star, a game written by CDK
designed for the hp48 calculator.
Rules: Take all of the "o"s to go to the next level. The on key allows you to switch
Rockbox User Manual
Page 46

between the filled circle, which can take “o”s, and the filled square, which is used as a
mobile wall to allow your filled circle to get to places on the screen it could not
otherwise reach. The block cannot take "o"s.
Keys:
KEY ACTION
ON Toggle control
F1 Previous level
F2 Reset level
F3 Next level
OFF Exit the game
1.13 WORMLET (RECORDER ONLY)
Wormlet game
Wormlet is a multi-user multi-worm game on a multi-threaded multi-functional
Rockbox console. You navigate a hungry little worm. Help your worm to find food and
to avoid poisoned argh-tiles. The goal is to turn your tiny worm into a big worm for as
long as possible.
For 2-player games a remote control is not necessary but recommended. If you try to
hold the Jukebox in the four hands of two players you'll find out why. Games with
three players are only possible using a remote control.
Wormlet main menu controls:
KEY ACTION
UP/DOWN Selects number of players
LEFT/RIGHT Controls number of worms on the game
F1 Selects game mode.
46 Rockbox User Manual
Page 47

Game controls:
Players MODES PLAYER 1 PLAYER 2 PLAYER 3
0
1
2
3
Out of
control
2 key
control
4 key
control
Remote
control
No
remote
control
Remote
control
With no player taking part in the game all worms are out of
control and steered by artificial stupidity.
on Jukebox
LEFT: turn left
RIGHT: turn right
on Jukebox
LEFT: turn left
UP: turn up
RIGHT: turn right
DOWN: turn down
on Jukebox
LEFT: turn left
RIGHT: turn right
on Jukebox
LEFT: turn left
RIGHT: turn right
on Jukebox
LEFT: turn left
RIGHT: turn right
- -
- -
on remote control
VOL DOWN: turn left
VOL UP: turn right
on Jukebox
F2: turn left
F3: turn right
on remote control
VOL DOWN: turn left
VOL UP: turn right
-
-
on Jukebox
F2: turn left
F3: turn right
The game
Use the control keys of your worm to navigate around obstacles and find food. Worms
do not stop moving except when dead. Dead worms are no fun. Be careful as your
worm will try to eat anything that you steer it across. It won't distinguish whether it's
edible or not.
Food
The small square hollow pieces are food. Move the worm over a food tile to eat it.
After eating the worm grows. Each time a piece of food has been eaten a new piece
of food will pop up somewhere. Unfortunately for each new piece of food that
appears two new argh pieces will appear, too.
Argh
An “argh” is a black square poisoned piece - slightly bigger than food - that makes
a worm say "Argh!" when run into. A worm that eats an “argh” is dead. Thus
eating an “argh” must be avoided under any circumstances. “Arghs” have the
annoying tendency to accumulate.
Worms
Thou shall not eat worms. Neither other worms nor thyself. Eating worms is
blasphemous cannibalism, not healthy and causes instant death. And it doesn't help
anyway: the other worm isn't hurt by the bite. It will go on creeping happily and eat
all the food you left on the table.
Walls
Don't crash into the walls. Walls are not edible. Crashing a worm against a wall
causes it a headache it doesn't survive.
Rockbox User Manual
Page 48

Game over
The game is over when all worms are dead. The longest worm wins the game.
Pause the game
Press the PLAY key to pause the game. Hit PLAY again to resume the game.
Stop the game
There are two ways to stop a running game.
If you want to quit Wormlet entirely simply hit the OFF button. The game will
stop immediately and you will return to the game menu.
If you want to stop the game and still see the screen hit the ON button. This
freezes the game. If you hit the ON button again a new game starts with the
same configuration. To return to the games menu you can hit the OFF button. A
stopped game can not be resumed.
The scoreboard
On the right side of the game field is the score board. For each worm it displays its
status and its length. The top most entry displays the state of worm 1, the second
worm 2 and the third worm 3. When a worm dies it's entry on the score board turns
black.
Len:
Here the current length of the worm is displayed. When a worm is eating food it
grows by one pixel for each step it moves.
Hungry:
That's the normal state of a worm. Worms are always hungry and want to eat. It's
good to have a hungry worm since it means that your worm is alive. But it's better
to get your worm growing.
Growing:
When a worm has eaten a piece of food it starts growing. For each step it moves
over food it can grow by one pixel. One piece of food lasts for 7 steps. After your
worm has moved 7 steps the food is used up. If another piece of food is eaten while
growing it will increase the size of the worm for another 7 steps.
Crashed:
This indicates that a worm has crashed against a wall.
Argh:
If the score board entry displays "Argh" it means the worm is dead because it tried
to eat an “argh”. Until we can make the worm say "Argh!" it's your job to say
"Argh!" aloud.
Wormed:
The worm tried to eat another worm or even itself. That's why it's dead now.
Making traps for other players with a worm is a good way to get them out of the
game.
48 Rockbox User Manual
Page 49

Hints
Initially you will be busy with controlling your worm. Try to avoid other worms and
crawl far away from them. Wait until they curl up themselves and collect the food
afterwards. Don't worry if the other worms grow longer than yours - you can catch
up after they've died.
When you are more experienced watch the tactics of other worms. Those worms
controlled by artificial stupidity head straight for the nearest piece of food. Let the
other worm have its next piece of food and head for the food it would probably
want next. Try to put yourself between the opponent and that food. From now on
you can 'control' the other worm by blocking it. You could trap it by making a 1
pixel wide U-turn. You also could move from food to food and make sure you keep
between your opponent and the food. So you can always reach it before your
opponent.
While playing the game the Jukebox can still play music. For single player game use
any music you like. For berserk games with 2 players use hard rock and for 3 player
games use heavy metal or X-Phobie (http://www.x-phobie.de). Play fair and don't
kick your opponent in the toe or poke him in the eye. That's would be bad manners.
Rockbox User Manual
Page 50

2 DEMOS
2.1 BOUNCE (RECORDER ONLY)
The bounce Demo
This demo is an analogue clock screen saver with “Rockbox” bouncing across the
screen.
Key controls for this demo are:
KEY ACTION
F1/F2/F3 Enters Bounce configuration options
UP/DOWN Moves to next/previous option
LEFT/RIGHT Increases/decreases option value
ON Changes to Scroll mode
OFF Exits bounce demo
Available options are:
Xdist/Ydist: The distance to X axis and Y axis respectively
Xadd/Yadd: how fast the code moves on the sine curve on each axis
Xsane/Ysane: Changes the appearance of the bouncing.
2.2 CUBE (RECORDER ONLY)
Cube
This is a rotating cube screen saver in 3D. To see it at full speed, press PLAY and it will
run at maximum frame rate. Also you can change the size of the x, y and z axis using
LEFT, RIGHT, UP, DOWN, F1 and F2.
50 Rockbox User Manual
Page 51

2.3 GREYSCALE (RECORDER ONLY)
Greyscale
This is a demonstration of the Rockbox greyscale engine which supports graphics on
the Jukebox. Press OFF to quit the demo.
2.4 HELLO WORLD (ALL MODELS)
Hello world!
This is plugin demo for hackers. Every programmer's first program is the helloworldprogram which does nothing except displaying "Hello world!" on the screen.
2.5 MANDELBROT (RECORDER ONLY)
Mandelbrot
This is another demonstration using the greyscale engine. It draws fractal images
from the Mandelbrot set.
KEY ACTION
Arrow keys Move about the image
PLAY Zoom in
OFF Quit
F1 Increase iteration depth (more detail)
F2 Decrease iteration depth (less detail)
F3 Reset and return to the default image
Rockbox User Manual
Page 52

2.6 MOSAIC (RECORDER ONLY)
Mosaic
This simple graphics demo draws a mosaic picture on the screen of the Jukebox.
Press STOP to quit.
2.7 OSCILLOGRAPH (RECORDER ONLY)
Oscillograph
This demo shows the shape of the sound samples that make up the music being
played.
There are two mechanisms to alter speed.
Slowing down is achieved by increasing the time waiting for user input. This
mechanism uses positive values.
Speeding up is achieved by leaving out the user input check for (-speed) volume
samples. For this mechanism negative values are used.
Key controls:
KEY ACTION
F1 toggles whether to scroll or not
F2 toggles filled / curve / plot
F3 reset speed to 0
UP slow down scrolling
DOWN Speeds up scrolling
PLAY Pauses the demo
OFF Exits demo
52 Rockbox User Manual
Page 53

2.8 SNOW (RECORDER ONLY)
Have you ever seen snow falling?
This demo replicates snow falling on your screen. If you love winter, you will love this
demo. Or maybe not.
2.9 VU METER (RECORDER ONLY)
VU meter
This is a VU meter as a plugin. It has two needles for the left and the right channels.
Currently it works on a linear scale, but in a future release it might have a logarithmic
(dB) scale too.
Rockbox User Manual
Page 54

3 VIEWERS
Viewers are plugins which are associated with specific file extensions. So you can't
execute the plugin directly, but “play" the associated file.
3.1 CHIP-8 EMULATOR (RECORDER ONLY)
The Chip-8 Emulator allows you to play many old chip8 games found on the Net. It
modifies Rockbox, so file extensions .ch8 will be recognised as chip8 games. Just
press PLAY on a .ch8 file to start a game.
There are lots of tiny Chip8 games (usually only about 256 bytes to a couple of KB)
which were made popular by the HP48 calculator's emulator for them. The original
Chip8 had 64x32 pixel graphics, and the new superchip emulator supports 128x64
graphics, which could almost fit on the Jukebox recorder's display. The only problem is
they are based on a 4x4 keyboard, but since most games do not use all of the
buttons, that could easily be worked around.
Some places where can you can find .ch8 files:
The original chip8 patch had several attached:
http://sourceforge.net/tracker/index.php?func=detail&aid=628509&group_id=4430
6&atid=439120
Check out the HP48 chip games section: http://www.hpcalc.org/hp48/games/chip/
Check out the PC emulator by the guy who wrote the HP48 emulator:
http://www.pdc.kth.se/~lfo/chip8/CHIP8.htm
Links to other chip8 emulators:
http://www.zophar.net/chip8.html
3.2 JPEG VIEWER (RECORDER ONLY)
Press PLAY on a .JPG or .JPEG file in order to view the contents using Rockbox's
greyscale library. Use the arrow keys to move around the image, PLAY to zoom in
and ON to zoom out. Press OFF to exit the viewer.
Note: JPEGs that use progressive scan encoding are not supported and will produce an
error.
3.3 MOVIE PLAYER (RECORDER ONLY)
Play movies on your Jukebox! In order to do this, movies must be in AVI format, and
then converted to .RVF, Rockbox's own video format. For more details on how to use
this plugin, please see http://rockbox.haxx.se/twiki/bin/view/Main/VideoTutorial.
3.4 ROCKBOX-FLASH (RECORDER ONLY)
For "playing" .UCL files on flashed Jukeboxes. Reprograms the flash memory of the
Jukebox unit (see page 74 for details).
54 Rockbox User Manual
Page 55

3.5 SEARCH (ALL MODELS)
This plugin can be used on playlists. It searches through the playlist that it is opened
on looking for any occurrences of the string entered by the user. The results of this
search are saved to a new playlist, search_results.m3u within the same directory as
the original playlist.
3.6 SORT (ALL MODELS)
This plugin takes a file and sorts it in forward alphabetical order. Case is ignored.
This is useful for ordering playlists generated by the “Create Playlist” menu option (see
page 26).
3.7 TEXT VIEWER (ALL MODELS)
This is a Viewer for text files with word wrap. Just press PLAY on a .TXT file to display
it. Has controls to handle various styles of text formatting. Has top-of-file and bottomof-file buttons. You can view files without a .TXT extension by using “Open with ..”
from the Play Screen menu
Controls
F1 (recorder) / ON-LEFT (player): toggles Word mode between Wrap and Chop:
Wrap breaks lines at white space or hyphen.
Chop breaks lines at the maximum column limit.
F2 (recorder) / ON-MENU-RIGHT (player): cycles Line mode through Normal,
Join and Expand:
Normal breaks lines at newline characters.
Join ignores unpaired newline characters (i.e., joins lines). Useful for adopting the
orphans that occur with e-mail style (i.e., pre-wrapped) text files.
Expand doubles unpaired newlines (i.e., adds a blank line). Useful for making the
paragraphs clearer in some book style text files.
F3 (recorder) / ON-RIGHT (player): toggles View mode between Narrow and
Wide:
Narrow sets maximum column to the screen width.
Wide sets maximum column to 114. Useful for navigating large files. (Currently,
Wide and Join cannot be selected together.)
ON-F1 (recorder only): toggles Page mode between Normal and Overlap:
Normal sets page-down/page-up to one full screen.
Overlap tells page-down/page-up to retain one line from previous screen.
ON-F3 (recorder only): toggles Scrollbar mode, for the current View mode.
Narrow mode has no scrollbar by default, until toggled.
Wide mode has a scrollbar by default, until toggled.
If file fits on one screen, there is no scrollbar and ON-F3 has no effect.
Settings are remembered until the Jukebox is powered off.
Rockbox User Manual
Page 56

Navigation
Recorder key controls:
ON-DOWN One line down
ON-LEFT One column left
ON-RIGHT One column right
Player key controls:
MENU LEFT Top of file (Narrow mode)
MENU RIGHT Bottom of file (Narrow mode)
KEY ACTION
UP Page-up (one screen up)
DOWN Page-down (one screen down)
LEFT Top of file (Narrow mode)
One screen left (Wide mode)
RIGHT Bottom of file (Narrow mode)
One screen right (Wide mode)
ON-UP One line up
OFF Exit text viewer
KEY ACTION
LEFT Page-up (one screen up)
RIGHT Page-down (one screen down)
One screen left (Wide mode)
One screen right (Wide mode)
STOP Exit text viewer
Compatibility
Correctly reads plain text files in Unix, Win/DOS, or Macintosh format. Latinalphabet Unicode files are a l m o s t r e a d a b l e.
Currently prefers fixed-width fonts. With proportional fonts, pretends all characters
are the width of a lower-case 'o'.
Currently messages are in English (please help with translations!)
Does not currently support right-to-left languages.
3.8 VBRfix (ALL MODELS)
This function scans a VBR (Variable Bitrate) MP3 file and updates/creates the Xing
VBR header. The Xing header contains information about the VBR stream used to
calculate average bit rate, time information and to more accurately fwd/rew in the
stream.
This function is especially useful when the playback of a file skips, fwd/rew does not
work correctly or the time display is incorrect. Run VBRfix on files you record with
your Jukebox. The header is not present in the recorded files and VBRfix adds this
header.
Note: VBRfix can only run when music is turned off (since it uses the same memory as
the player) and can take a while to complete if run on big files.
56 Rockbox User Manual
Page 57

4 APPLICATIONS
4.1 BATTERY_TEST (ALL MODELS)
Recorder battery test Player battery test
This plugin simulates normal power drain by spinning up the disk and reading a big file
once ever 90 seconds (or thereabout). Each spin up also writes the battery level to a
log file. The test stops when battery level reaches 4% in order to avoid being unable
to write to the disk. The power usage data is saved to a file in the root directory of
the Jukebox. This plugin can sometimes be useful for diagnosing problems with
battery charging.
4.2 CALCULATOR (RECORDER ONLY)
Calculator
This is a simple scientific calculator for use on the Jukebox. It works like a standard
calculator. Move using the arrow keys and press PLAY to press a button. Pressing the
“1st” button will toggle between other available functions on the right hand side.
4.3 CALENDAR (RECORDER ONLY)
Calendar
This is a small and simple calendar application with memo saving function.
Dots indicate dates with memos. To add a new memo press PLAY on the date.
Includes one off, annual, monthly, and weekly memos:
Rockbox User Manual
Page 58

KEY ACTION
PLAY monthly
LEFT weekly
RIGHT annually
ON one off
STOP exit
4.4 CHESS CLOCK (PLAYER ONLY)
Chess Clock
The chess clock plugin is designed to simulate a chess clock, but it can be used in any
kind of game with up to ten players.
Setup
First enter the number of players (1-10) (press PLAY to continue).
Then set the total game time in mm:ss (press PLAY to continue, STOP to go back).
Then the maximum round time is entered. For example, this could be used to play
Scrabble for a maximum of 15 minutes each, with each round taking no longer than
one minute. (press PLAY to continue).
Done. Player 1 starts in paused mode. So press PLAY to start.
While playing
The number of the current player is displayed on the top line. The time below is the
time remaining for that round (and possibly also the total time left if different).
Keys are as follows:
KEY ACTION
ON exits the plugin
NEXT switch to the next player
STOP restart round for the current player
PLAY pause the time (play to continue)
MENU enter a simple menu
In the menu you can delete a player, modify the round time for the current player or
set the total time for the game.
When the round time is up for a player the message "ROUND UP!" is shown (press
NEXT to continue).
When the total time is up for a player the message "TIME UP!" is shown. That player
will then be removed from the timer.
58 Rockbox User Manual
Page 59

4.5 CLOCK (RECORDER ONLY)
Clock
This is a fully featured analogue and digital clock program.
Key configuration
KEY ACTION
F1 Help
F2 Start / Stop stopwatch
F2 (Hold down) Reset stopwatch
F3 Options
Play Select clock mode
UP Enable idle power off
DOWN Disable idle power off
RIGHT Enable backlight
LEFT Disable backlight
OFF Save settings to disk and exit
Backlight configuration
If RIGHT or LEFT is not pressed during clock operation (with the exception of at the
Help/Options/Mode Selector/Credit screens) then the Backlight timeout will remain
your Rockbox default setting (example, 15 seconds). If RIGHT or LEFT is pressed,
Clock will set the backlight to ON or OFF, respectively. When Clock is exited, your
default Rockbox setting for Backlight will be restored.
Saving Settings
Settings are saved to disk when Clock is exited. They are saved to
“/.rockbox/rocks/.clock_settings”. To reset your settings back to the defaults,
simply navigate to this file using Rockbox, highlight it, and press the ON+PLAY keys to
get the Delete option. This way you can feel free to experiment with the settings - and
you could even load separate settings, say, one for your desk at home and one for in
the car - by keeping two files in your /.rockbox/rocks folder such as "h.clock_settings"
and "c.clock_settings". Simply remove the "h" for your home settings to go into effect,
or add the "h" back and take off the "c" for your car settings.
In the future, loading different settings will probably be made easier through a built-in
settings file loader in Clock.
Rockbox User Manual
Page 60

4.6 EURO CONVERTOR (PLAYER ONLY)
Euro converter
This plugin converts euros back into pre-euro currency. The country for which is does
this is selectable by pressing the MENU key. The LEFT and RIGHT keys move the
cursor between the digits and the PLAY and STOP keys increase and decrease the
current digit. The amount in the old currency is displayed on the second line.
4.7 FAVORITES (ALL MODELS)
Favourites
When listening to any song you can select Main Menu->Save Favourite and it will add
the current song to a special playlist of all songs you selected in
/favorites.m3u.
4.8 FIRMWARE_FLASH (RECORDER ONLY)
Firmware_flash
Use when flashing Rockbox (see page ). In the ideal case, you'll need this tool only
once. For security reasons you may wish to delete firmware_flash.rock once flashing is
complete.
4.9 METRONOME (RECORDER ONLY)
This plugin can be used as a metronome to keep time during music practice. UP and
DOWN increase and decrease the volume of the sound. RIGHT and LEFT increase and
decrease the speed of the sound (beats per minute).
60 Rockbox User Manual
Page 61

4.10 SPLIT EDITOR (RECORDER ONLY)
When recording an mp3 file, it is common practice to start the recording a little bit
early and stop it a little bit late to ensure all the desired sound is recorded. This results
in recordings that contain extra snippets of sound and the beginning and end.
Unfortunately these snippets can not be deleted easily because they are stored in the
same file as the desired recording. The purpose of the split editor is to split a mp3 file
(the input file) at a point in time (split point). Two new files can be generated from the
input file. The first file contains the part before the split point and the second file
contains the part after the split point. Once this process has been successful the
original file can be deleted or kept as a backup.
The whole process of splitting a mp3 file consists of two steps:
1) defining the split point
2) generating the result files.
3) if desired delete the input file (with the browser, not the split editor) A
paragraph of text
How to use the Split Editor
Pause near the split point
When the device plays the song just hit the pause button, when playback has
roughly reached the split point. This need not be very precise as the split point can
be fine tuned later.
Open the split editor
Open the plugin. A screen similar to the one below will appear.
The Split Editor
Here is an explanation of the areas marked in red on the screenshot.
(1)The waveform
The waveform displays the volume of the song over time. It will appear as the
song plays and help to visually identify the point in time where the split is desired
(2)The split point indicator
The split point indicator is a vertical line with a small triangle at the top end. It is
the most important control element of the split editor. It can be moved with the
LEFT and RIGHT buttons. Later, when you have fine tuned the split point, the
song will be split at this position.
(3)The split time
Rockbox User Manual
Page 62

At the top of the window a time value is displayed. This is the point in time within
the song at which the split point indicator is positioned.
(4)The locator
Another vertical bar represents the position locator. It moves along as the song
plays. In contrast to the split point indicator it has no triangles at the ends.
(5)The time bar
The time bar displays the current position within the song relative to the whole
song. The entire length of the time bar represents the song length. The length of
the solid part of the time bar represents the position and length of the displayed
part of the song.
(6) The scale mode
Directly above the F3 button the scale mode is displayed. The waveform can be
scaled either logarithmically or linearly. In logarithmic scale mode the letters "dB"
are displayed, in linear mode "%". Use F3 to switch between these modes. Linear
mode usually gives better optical hints with commercially recorded music. For
quiet recordings, especially of human speech, the logarithmic scale often is
preferable.
(7)The loop mode
Directly above the F2 button the loop mode icon is displayed. There are 4
different loop modes. Pressing F2 changes to the next loop mode.
Playback loops around the split point indicator. This mode is best used
when searching and zooming for the desired point at which to split the
recording.
Playback loops from the split point indicator to the end of the visible area.
This mode is best used when fine tuning the split indicator position at the
beginning of a recording.
Playback loops from the beginning of the visible area to the split point.
This mode is best used when fine tuning the split indicator position at the end
of a recording.
Playback doesn't loop, the borders of the visible area as well as the split
point indicator are ignored. This mode is best used when playing the song
outside of the borders of the displayed region.
(8)Perform the split
The icon directly above the F1 button indicates its function to execute the split.
When split positioning is complete open the save dialogue with F1.
62 Rockbox User Manual
Page 63

Controls in the split editor
RECORDER ONDIO FUNCTION
OFF ON/OFF Quit plugin
LEFT/RIGHT LEFT/RIGHT Move the split point indicator
UP/DOWN UP/DOWN Zoom in / out
PLAY MODE Play from the split position
F1 MODE+LEFT Enter the save dialogue
F2 MODE+UP Toggle loop modes
F3 MODE+RIGHT Toggle logarithmic / linear scaling
ON+LEFT Play half speed
ON+RIGHT Play 150% speed
ON+PLAY Play normal speed
Save the files
In the save dialogue it is possible to specify which of the files you want to save and
their names. When finished, select "Save" and the files will be written to disk. Note
that files can not be overwritten, so filenames that don't exist yet must be chosen.
If unsure whether the file already exists simply try to save it. If another file with
this name exists the dialogue will return and you can choose another filename.
Save dialogue
Controls in the save dialogue
RECORDER ONDIO FUNCTION
UP/DOWN UP/DOWN Select item
PLAY RIGHT Toggle / edit item
Scale
The values in the waveform are scaled according to the settings of the peak meter.
These can be altered in the menu "General Settings -> Display -> Peak Meter". If
extreme minimum / maximum values are set the waveform might be cut off. A
minimum setting of -60 dB and a maximum setting of 0 dB are recommended. These
settings should be capable of producing useful waveforms for very soft sounds in
logarithmic mode (dB). When the editor is used on loud sounds (such as commercial
rock or pop music) switching to the linear scale may prove more effective since the
logarithmic scale compresses loud noises and makes it more difficult to identify
characteristic shapes. Note that it is always possible to toggle the scale with F3.
Rockbox User Manual
Page 64

4.11 STOPWATCH (ALL MODELS)
Recorder stopwatch Player stopwatch
A simple stopwatch program with support for saving times.
Keys are as follows:
KEY ACTION
PLAY Start / Stop the timer
MENU Save the current time (and keep going)
STOP Quit the stopwatch
64 Rockbox User Manual
Page 65

PART 6
ADVANCED TOPICS / REFERENCE
Page 66

1 CUSTOMIZING THE USER INTERFACE
1.1 LOADING FONTS (RECORDER ONLY)
Rockbox can load fonts dynamically. Simply copy the .fnt file to the disk and "play"
them in the directory browser or from the Main Menu > General Settings > Fonts.
If you want a font to be loaded automatically every time you start up, it must be
located in the /.rockbox folder and the file name must be at most 24 characters long.
Any BDF font file up to 16 pixels high should be usable with Rockbox. To convert from
bdf to fnt, use the convbdf tool. This tool can be found on Rockbox website (Linux:
http://rockbox.haxx.se/fonts/convbdf, Windows:
http://rockbox.haxx.se/fonts/convbdf.exe).
1.2 LOADING LANGUAGES
Rockbox can load language files at runtime. Simply copy the .lng file (not the .lang
file) to the Jukebox and "play" it in the Rockbox directory browser or from the Main
Menu -> General Settings -> Languages.
If you want a language to be loaded automatically every time you start up, it must be
located in the /.rockbox folder and the file name must be max. 24 characters long.
Rockbox supports many different languages. You can get .lng files at
http://rockbox.haxx.se/lang/. Currently all of these languages are included in the
Rockbox distribution.
If your language is not yet supported and you want to write your own language file,
follow these instructions:
Copy the http://rockbox.haxx.se/lang/english.lang file and start filling in the "new:"
lines.
Name your file <language>.lang, where <language> is the local name for your
language. i.e. svenska.lang, francais.lang etc.
When you are done, submit your .lang file to Rockbox patch tracker.
(http://sourceforge.net/tracker/?group_id=44306&atid=439120)
2 CONFIGURING THE WPS
Description / General Info
The Custom While Playing Screen (WPS) display is used on both the Player and
Recorder as a means to customize the WPS to the user's likings.
After editing the .wps file, "play" it to make it take effect.
The file may be 2 lines long for the Player, and 13 lines for the Recorder.
All characters not preceded by % are displayed as typed.
Lines beginning with # are comments and will be ignored.
66 Rockbox User Manual
Page 67

File Location
Custom WPS files may be located anywhere on the drive. The only restriction is that
they must end in .wps. When PLAY is pressed on a .wps file, it will be used for future
WPS screens. If the "played" .wps file is located in the /.rockbox folder, it will be
remembered and used after reboot. The .wps filename must be no more than 24
characters long for it to be remembered.
Tags
ID3 Info Tags:
%ia : ID3 Artist
%ic : ID3 Composer
%id : ID3 Album Name
%ig : ID3 Genre Name
%in : ID3 Track Number
%it : ID3 Track Title
%iy : ID3 Year
%iv : ID3 Version (1.0, 1.1, 2.2, 2.3, 2.4 or empty if no id3 tag)
Battery Info:
%bl : Show numeric battery level in percent
%bt : Show estimated battery time left
File Info Tags:
%fb : File Bitrate (in kbps)
%ff : File Frequency (in Hz)
%fm : File Name
%fn : File Name (without extension)
%fp : File Path
%fs : File Size (In Kilobytes)
%fv : "(vbr)" if variable bit rate or "" if constant bit rate
%d1 : First directory from end of file path.
%d2 : Second directory from end of file path.
%d3 : Third directory from end of file path.
Example for the the %dN commands: If the path is /Rock/Kent/Isola/11 -747.mp3,
%d1 is "Isola", %d2 is "Kent", %d3 is 'Rock'.
Playlist/Song Info Tags:
%pb : Progress Bar
Player: This will display a 1 character "cup" that empties as the song progresses.
Recorder: This will replace the entire line with a progress bar.
%pf : Player: Full-line progress bar + time display
%pc : Current Time In Song
Rockbox User Manual
Page 68

%pe : Total Number of Playlist Entries
%pm : Peak Meter (Recorder only) - the entire line is used as volume peak meter.
%pn : Playlist Name (Without path or extension)
%pp : Playlist Position
%pr : Remaining Time In Song
%ps : Shuffle. Shows 's' if shuffle mode is enabled.
%pt : Total Track Time
%pv : Current volume
Conditional Tags (If/Else block):
%?xx<|> : Conditional: if the tag specified by "xx" has a value, the text between
the "<" and the "|" is displayed, else the text between the "|" and the ">" is
displayed. The else part is optional, so the "|" does not have to be specified if no
else part is desired. The conditionals nest, so the text in the if and else part can
contain all % commands, including conditionals.
Next Song info
You can display information about the next song - the song that is about to play
after the one currently playing (unless you change the plan).
If you use the upper-case versions of the three tags: F, I and D, they will instead
refer to the next song instead of the current one. Example: %Ig is the genre name
used in the next song and %Ff is the mp3 frequency.
Take note that the next song information WILL NOT be available at all times, but
will most likely be available at the end of a song. We suggest you use the
conditional display tag a lot when displaying information about the next song!
Alternating sublines
It is possible to group items on each line into 2 or more groups or "sublines". Each
subline will be displayed in succession on the line for a specified time, alternating
continuously through each defined subline.
Items on a line are broken into sublines with the semicolon ';' character. The
display time for each subline defaults to 2 seconds unless modified by using the '%
t' tag to specify an alternate time (in seconds and optional tenths of a second) for
the subline to be displayed.
Subline related special characters and tags:
; : Split items on a line into separate sublines
%t : Set the subline display time. The '%t' is followed by either integer seconds (%
t5), or seconds and tenths of a second (%t3.5).
Each alternating subline can still be optionally scrolled while it is being displayed,
and scrollable formats can be displayed on the same line with non-scrollable
formats (such as track elapsed time) as long as they are separated into different
sublines.
Other Tags:
%% : Display a '%'
68 Rockbox User Manual
Page 69

%< : Display a '<'
%| : Display a '|'
%> : Display a '>'
%s : Indicate that the line should scroll. Can occur anywhere in a line (given that
the text is displayed; see conditionals above). You can specify up to 10 scrolling
lines. Scrolling lines can not contain dynamic content such as timers, peak meters
or progress bars.
Example File
%s%pp/%pe: %?it<%it|%fn> - %?ia<%ia|%d2> - %?id<%id|%d1>
%pb%pc/%pt
That is, "tracknum - title [artist, album]", where most fields are only displayed if
available. Could also be rendered as "filename" or "tracknum - title [artist]".
Default
If you haven't selected a .wps file in the /.rockbox directory, you get the hard coded
wps layout. The default WPS screen is for player:
%s%pp/%pe: %?it<%it|%fn> - %?ia<%ia|%d2> - %?id<%id|%d1>
%pc%?ps<*|/>%pt
And for recorder:
%s%?it<%?in<%in. |>%it|%fn>
%s%?ia<%ia|%?d2<%d2|(root)>>
%s%?id<%id|%?d1<%d1|(root)>> %?iy<(%iy)|>
%pc/%pt [%pp:%pe]
%fbkBit %?fv<avg|> %?iv<(id3v%iv)|(no id3)>
%pb
%pm
3 MAKING YOUR OWN SETTINGS FILE
A .cfg file is used to load settings from a plain text file. A .cfg file may reside anywhere
on the hard disk. The only restriction is that the filename must end in .cfg
Hint: Use the "Write .cfg file" feature (Main Menu-> General Settings) to save the
current settings, then use a text editor to customize the settings file.
Format Rules
Format: setting: value
Each setting must be on a separate line.
Lines starting with # are ignored.
Settings (allowed values) [unit]
volume (0 - 100)
bass (-15 - 15)
treble (-15 - 15)
Rockbox User Manual
Page 70

balance (-100 - 100)
channels (stereo, stereo narrow, stereo wide, mono, mono left, mono right,
karaoke)
shuffle (on, off)
repeat (off, all, one)
play selected (on, off)
resume (off, ask, ask once, on)
scan min step (1, 2, 3, 4, 5, 6, 8, 10, 15, 20, 25, 30, 45, 60) [seconds]
scan accel (0 - 15) [double scan speed every X seconds]
antiskip (0 - 7) [seconds]
volume fade (on, off)
sort case (on, off)
show files (all, supported, music, playlists)
follow playlist (on, off)
playlist viewer icons
(on, off)
playlist viewer track display
(on, off)
recursive directory insert
(on, off)
scroll speed (1 - 10) [Hz]
scroll delay (0 - 250) [1/10s]
scroll step (1 - 112) [pixels]
bidir limit (0 - 200) [% of screen width]
contrast (0 - 63)
backlight timeout (off, on, 1, 2, 3, 4, 5, 6, 7, 8, 9, 10, 15, 20, 25, 30, 45, 60, 90)
[seconds]
backlight when plugged
(on, off)
disk spindown (3 - 254) [seconds]
battery capacity (1500 - 2400) [mAh]
idle poweroff (off, 1, 2, 3, 4, 5, 6, 7, 8, 9, 10, 15, 30, 45, 60) [minutes]
70 Rockbox User Manual
Page 71

lang (/path/filename.lng)
wps (/path/filename.wps)
autocreate bookmarks
(on, off)
autoload bookmarks
(on, off)
us most-recent-bookmarks
(on, off)
talk dir (off,number, spell, enter, hover)
talk file (off, number, spell)
talk menu (off, on)
Recorder-specific settings (allowed values) [unit]
loudness (0 - 17)
super bass (on, off)
auto volume (off, 2, 4, 8) [seconds]
MDB enable (on, off)
MDB strength (0 – 127) [dB]
MDB harmonics (0 – 100) [%]
MDB center frequency
(20-300) [Hz]
MDB shape (50-300) [Hz]
peak meter release
(1 - 126)
peak meter hold (off, 200ms, 300ms, 500ms, 1, 2, 3, 4, 5, 6, 7, 8, 9, 10, 15, 20,
30, 1min)
peak meter clip hold
(on, 1, 2, 3, 4, 5, 6, 7, 8, 9, 10, 15, 20, 25, 30, 45, 60, 90,
2min,
peak meter busy (on, off)
Rockbox User Manual
3min, 5min, 10min, 20min, 45min, 90min)
Page 72

peak meter dbfs (on, off) (on = dbfs, off = linear)
peak meter min (0 - 89) [dB] or (0 - 100) [%]
peak meter max (0 - 89) [dB] or (0 - 100) [%]
statusbar (on, off)
scrollbar (on, off)
volume display (graphic, numeric)
battery display (graphic, numeric)
time format (12hour, 24hour)
font (/path/filename.fnt)
invert (on, off)
deep discharge (on, off)
trickle charge (on, off)
disk poweroff (on, off)
rec quality (0 - 7) (0=smallest size, 7=highest quality)
rec frequency (48, 44, 32, 24, 22, 16) [kHz]
rec source (mic, line, spdif)
rec channels (mono, stereo)
rec mic gain (0 to 15)
rec left gain (0 to 15)
rec right gain (0 to 15)
editable recordings
(on,off)
rec timesplit (off, 0:05, 0:10, 0:20, 0:30, 1:00, 2:00, 4:00, 6:00, 8:00, 16:00
24:00) [hh:mm]
pre-recording time
(off, 1-30) [secs]
rec directory (/recordings, current)
FM recorder specific settings
force fm mono (on,off)
72 Rockbox User Manual
Page 73

Example File
volume: 70
bass: 11
treble: 12
balance: 0
time format: 12hour
volume display: numeric
show files: supported
wps: /.rockbox/car.wps
lang: /.rockbox/afrikaans.lng
4 DIFFERENCES BETWEEN BINARIES
There are 3 different flavors of firmware binaries from Rockbox website. Current
Version, Daily Builds and Bleeding Edge.
The current version is the latest stable version developed by Rockbox Team. It’s
free of known critical bugs and works perfectly with Archos Jukebox
Player/Studio and Recorders. Head on over to
http://rockbox.haxx.se/download/ and pull it down.
Daily Build is a development version of Rockbox. It supports all new features and
patches developed since last stable version. It may also contain bugs! This
version is made automatically everyday and can be found at
http://rockbox.haxx.se/daily.shtml
Bleeding edge builds are the same as Daily build, but built from the latest
development code every 20 minutes. These builds are for people who want to
test the code that developers just checked in.
There are binaries for different Jukebox models:
The Player version is suitable for Archos Jukebox 5000, 6000 and all Studio
models.
If you have a recorder with blue bumpers, you need the "regular" recorder
version.
FM Recorders are models with a FM radio.
The V2 recorder is a recorder in an FM Recorder form factor, but without radio.
The 8mb version requires a hardware hack, where the RAM chips are replaced.
Note: all references in this manual to "Recorder" apply equally to "FM Recorder"
unless otherwise specified.
5 FIRMWARE LOADING
When your Jukebox powers on, it loads the Archos firmware in ROM, which
automatically checks your Jukebox hard disk’s root folder for a file named
Rockbox User Manual
Page 74

archos.mod (on the player version) or ajbrec.ajz (on the recorder version). Note
that Archos firmware can only read the first ten characters of each file name in this
process, so don’t rename your old firmware files with names like archos.mod.old and
so on, because it’s possible that the Jukebox will load a file other than the one you
intended.
6 GETTING EXTRAS: FONTS LANGUAGES
Rockbox supports custom fonts (for the Recorder version only) and a number of
different languages. The latest stable version comes with 65 fonts and 22 languages
already included. If new fonts and language files have been created, then they will be
found at http://rockbox.haxx.se/fonts/ and http://rockbox.haxx.se/lang/.
7 USING ROLO (ROCKBOX LOADER)
Rockbox is able to load and start another firmware file without rebooting. You just
press PLAY on an .AJZ (Recorders) or .MOD (Players) file. This can be used to test
new firmware versions without deleting your current version, or to load the original
Archos firmware (you have to download the appropriate file from Archos' website).
8 ROCKBOX IN FLASH (RECORDER ONLY)
FLASHING ROCKBOX IS OPTIONAL! It is not required for using Rockbox on your
Jukebox Recorder. Please read the whole section thoroughly before flashing.
8.1 INTRODUCTION
Flashing in the sense used here and elsewhere in regard to Rockbox means
reprogramming the flash memory of the Jukebox unit. Flash memory (sometimes
called "Flash ROM") is a type of non-volatile memory that can be erased and
reprogrammed in circuit. It is a variation of electrically erasable programmable readonly memory (EEPROM).
A from the factory Jukebox comes with the Archos firmware flashed. It is possible to
replace the built-in software with Rockbox.
Terminology used in the following:
Firmware means the flash ROM content as a whole.
Image means one operating software started from there.
By reprogramming the firmware, the Jukebox will boot much faster. The Archos boot
loader seems to take forever compared to the Rockbox version. In fact, the Rockbox
boot loader is so fast that it has to wait for the disk spin-up. The flashing procedure is
a bit involved for the first time, updates are very simple later on.
8.2 METHOD
The replaced firmware will host a bootloader and 2 images. This is made possible by
compression. The first is the "permanent" backup. The second is the default one to be
started, the first is only used when you hold the F1 key during start. The first image is
the original Archos firmware, the second is a current build of Rockbox. This second
image is meant to be reprogrammed whenever a Rockbox upgrade is performed.
There are two programming tools supplied:
The first one is called firmware_flash.rock and is used to program the whole
flash with new content. It can also be used to revert back to the original
74 Rockbox User Manual
Page 75

firmware that is backed up as part of this procedure. This tool will only be
needed once, and can be viewed as "formatting" the flash with the desired
image structure.
The second one is called rockbox_flash.rock and is used to reprogram only the
second image. If the resulting programmed firmware image is not operational, it
is possible to hold down the F1 key while booting to start the Jukebox with the
Archos firmware and Rockbox booted from disk to reinstall a working firmware
image.
8.3 RISKS
Well, is it dangerous? Yes, certainly, like programming a mainboard BIOS, CD/DVD
drive firmware, mobile phone, etc. If the power fails, the chip malfunctions while
programming or particularly if the programming software malfunctions, your Jukebox
may stop functioning. The Rockbox team take no responsibility of any kind - do this at
your own risk.
However, the code has been extensively tested and is known to work well. The new
firmware file is completely read before it starts programming, there are a lot of sanity
checks. If any fail, it will not program. There is no reason why such low level code
should behave differently on your Jukebox.
There's one ultimate safety net to bring back Jukeboxes with even completely garbled
flash content: the UART boot mod, which in turn requires the serial mod. This can
bring the dead back to life, with that it's possible to reflash independently from the
outside, even if the flash is completely erased. It has been used during development,
else Rockbox in flash wouldn't have been possible. Extensive development effort went
into the development of the UART boot mod. Mechanically adept users with good
soldering skills can easily perform these mods. Others may feel uncomfortable using
the first tool (firmware_flash.rock) for reflashing the firmware.
If you are starting with a known-good image, you are unlikely to experience problems.
The flash tools have been stable for quite a while. Several users have used them
extensively, even flashing while playing! Although it worked, it's not the recommended
method.
The flashing software is very paranoid about making sure that the correct flash
version is being installed. If the wrong file is used, it will simply refuse to flash the
Jukebox.
About the safety of operation: Since the Rockbox boo code gives “dual boot”
capability, the Archos firmware is still there when you hold F1 during startup. So even
if you have problems with Rockbox from flash, you can still use the Jukebox, reflash
the second image with an updated Rockbox copy, etc.
The flash chip being used by Archos is specified for 100,000 cycles, so it's very
unlikely that flashing it will wear it out.
8.4 REQUIREMENTS
You need two things:
The first is a Recorder or FM model. Be sure you're using the correct package,
Recorder and FM are different! The technology works for the Player models, too.
Players can also be flashed, but Rockbox does not run cold-started on those,
yet.
Rockbox User Manual
Page 76

Second, you need an in-circuit programmable flash. Chances are about 85%
that you have, but Archos also used an older flash chip which can't do the trick.
You can find out via Rockbox debug menu, entry Hardware Info. If the flash info
gives you question marks, you're out of luck. The only option for flashing if this
is the case is to solder in the right chip (SST39VF020), preferably with the
firmware already in. If the chip is blank, you'll need the UART boot mod as well.
8.5 FLASHING PROCEDURE
Here are step-by-step instructions on how to flash and update to a current daily build
(with the voice feature). It is assumed that you can install and operate Rockbox the
usual way. The flashing procedure is not really dangerous, and will check for correct
model, file, etc., if something is incompatible it just won't flash, that's all.
Now here are the steps:
Preparation
Install (with all the files, not just the .ajz) and use the current daily build you'd like to
have. Enable any voice features that are helpful throughout the process, such as
menus and filename spelling. Set the file view to show all files, with F1 -> General
Settings -> File View -> Show Files set to "all". Have the Jukebox nicely charged to
avoid running out of power during the flash write. Keep the Jukebox plugged into the
charger until flashing is complete.
Backup
Backup the existing flash content. You will need these files if you wish to reverse the
flashing procedure, or if you need to update the bootloader (as opposed to the
firmware) in the future. Keep them safe!
Access the main menu by pressing F1 then select Info -> Debug. Select the first
entry, View ROM contents, by pressing Play one more time. The disk should start to
spin. Wait for it to settle down, then plug in the USB cable to copy the dump file this
has just been created to your PC. The main folder of your Jukebox now should contain
two strange .bin files. Copy the larger one named internal_rom_2000000-
203FFFF.bin to a safe place, then delete them both from the box.
Copy the new flash content file to your box
Depending on your model (recorder, FM, V2 recorder), download one of the 3
packages:
http://joerg.hohensohn.bei.t-online.de/archos/flash/flash_rec.zip
http://joerg.hohensohn.bei.t-online.de/archos/flash/flash_fm.zip
http://joerg.hohensohn.bei.t-online.de/ archos /flash/flash_v2.zip
The zip archives contain two .bin files each. Those firmware*.bin files are all we want,
copy them to the root directory of your box. The names differ depending on the
model, the flash plugin will pick the right one, no way of doing this wrong.
Install the Rockbox Bootloader (“formatting” the flash)
This procedure is only necessary the first time you flash Rockbox. Unplug the USB
cable again, then select Browse Plugins from the main menu (F1). Locate
firmware_flash.rock, and start it with PLAY. Rockbox now displays an info screen,
press F1 to acknowledge it and start a file check. Again wait for the disk to settle, then
press F2 to proceed to a warning message (if the plugin has exited, you don’t have
76 Rockbox User Manual
Page 77

the proper file) and F3 to actually program the file. This takes maybe 15 seconds, wait
for the disk to settle again. Then press a key to exit the plugin.
Flashing boot loader in 3 easy steps
Install the Rockbox binary in flash
All the above was necessary only once, although there will not be any obvious
difference (other than the Archos firmware loading a bit more quickly) after the step
above is complete. Next install the actual Rockbox firmware that will be used from
ROM. This is how Rockbox will be updated when installing a new release from now on.
Unpack the whole build that you are installing onto the Jukebox, including plugins
and support files. This can be done using the Windows setup program to install the
new version onto the Jukebox.
It is recommended that you test the build you are going to flash by playing the .ajz
file so that ROLO loads it up. This puts the firmware in memory without changing
your flash, so you can check that everything is working. If you have just installed
the bootloader (see above) then this will happen automatically as the existing
Archos firmware loads the .ajz that you have just installed.
Play the .ucl file, which is usually found in the /.rockbox directory, this will kick off
the rockbox_flash.rock plugin. It's a bit similar to the other one, but it's made
different to make the user aware. It will check the file, available size, etc. With F2
it's being programmed, no need for warning this time. If it goes wrong, you'll still
have the permanent image.
Using rockbox_flash to update your boot firmware
It is possible that you could get an "Incompatible Version" error, if the plugin
interface has changed since you last flashed Rockbox. You're running an "old" copy
of Rockbox, but are trying to execute a newer plugin, the one you just downloaded.
The easiest solution is to ROLO into this new version, by playing the ajbrec.ajz file.
Then you are consistent and can play rockbox.ucl.
When done, you can restart the box and hopefully your new Rockbox image.
UCLs for the latest Recorder and FM firmware are included in Rockbox 2.3 and also the
daily builds.
8.6 KNOWN ISSUES AND LIMITATIONS
There are two variants of how the boxes starts, which is why there are normal and
Rockbox User Manual
Page 78

_norom firmware files. The vast majority of Jukeboxes all have the same boot ROM
content, differentiation comes later by flash content. Rockbox identifies this boot ROM
with a CRC value of 0x222F in the hardware info screen. Some recorders have the
boot ROM disabled (it might be unprogrammed) and start directly from a flash mirror
at address zero. They need the new _norom firmware, it has a slightly different
bootloader. Without a boot ROM there is no UART boot safety net. To compensate for
that as much as possible the MiniMon monitor is included, and can be started by
pressing F3+ON. Using this the box can be reprogrammed via serial if the first ~2000
bytes of the flash are OK.
8.7 ROMBOX
ROMbox is a flashable version of rockbox that is uncompressed and runs directly from
the flash chip rather than being copied into memory first. The advantage of this is
that memory that would normally be used for storing the Rockbox code can be used
for buffering MP3s instead, resulting in less disk spin-ups and therefore longer battery
life Unfortunately being uncompressed, ROMbox requires more space in flash than
Rockbox and will therefore not fit in the space that is left on an FM recorder. ROMbox
therefore runs on the V1 and V2 recorder models only.
The procedure for flashing ROMbox is identical to the procedure for flashing Rockbox
as laid out on page 77. The only difference is that the file to install is called
rombox.ucl. ROMbox is included automatically with rockbox 2.3 and all the current
daily build, so the procedure is identical otherwise.
78 Rockbox User Manual
Page 79

APPENDICES
Page 80

1 FEATURE COMPARISON CHART
FEATURE ROCKBOX ARCHOS
ID3v1 and ID3v2 support Yes ?
Background noise during playback No Yes
Mid-track resume Yes No
Mid-playlist resume Yes No
Resumed playlist order Yes No
Battery lifetime Longer Long
Battery time indicator Yes No
Customizable font (Recorder) Yes No
Customizable screen info when playing songs Yes No
USB attach/detach without reboot Yes No
Can load another firmware without rebooting Yes No
Playlist load speed, songs/sec 3000 - 4000 15 - 20
Max number of songs in a playlist 20 000 (default) 999
Supports bad path prefixes in playlists Yes Yes
Open source/development process Yes No
Corrects reported bugs Yes No
Automatic Volume Control (Recorder) Yes No
Pitch control (Recorder) Yes No
Text File Reader Yes Yes
Games (Recorder) 8 No
File Delete & Rename Yes Yes
Playlist Building Yes Yes
Recording (Recorder) Yes Yes
Generates XING VBR header when recording Yes No
High Resolution Volume Control Yes No
Deep discharge option (Recorder) Yes No
Customizable backlight timeout Yes Yes
Backlight-on when charging option Yes No
Queue function Yes Yes
Supports the XING header Yes Yes
Supports the VBRI header Partly Yes
Max number of files in a dir 10000 (default) 999
Adjustable scroll speed Yes No
Screensaver style demos (Recorder) Yes No
Variable step / accelerating ffwd and rwd Yes No
Visual Progress Bar Yes No
Select/Load configs Yes No
Sleep timer Yes No
Easy User Interface Yes No
Remote Control Controllable Yes Yes
ISO8859-1 font support (Player) Yes No
Queue songs to play next Yes Yes
Bookmark positions in songs Yes No
Number of available languages 22 3
Accurate VBR bitrate display Yes No
FM Tuner support (FM Recorder) Yes Yes
FF/FR with sound No Yes
80 Rockbox User Manual
Page 81

2 SUPPORTED FILE FORMATS
FILE TYPE ACTION
Directory The browser enters that directory
.mp3 Rockbox takes you to the WPS and starts playing the file
.m3u Rockbox loads the playlist and starts playing the first file
.ajz/ .mod ROLO will load the new firmware
.wps The new WPS display configuration will be loaded
.lng That language will replace current one
.txt This will display the text file using Rockbox text browser plugin
.cfg The settings file will be loaded
.fnt This font will replace the current one (Recorder only)
.rock Starts a Rockbox plugin
.ucl This Rockbox image will be flashed into the ROM
.ch8 Play a Chip8 game
.jpg/.jpeg View a JPEG image
.rvf View a movie (Rockbox format)
Rockbox User Manual
Page 82

3 BUG REPORTS
If you experience inappropriate performance from any supported feature, please file a
bug report on our web page. Do not report missing features as bugs, instead file them
as feature requests (see below).
For open bug reports refer to http://rockbox.haxx.se/bugs.shtml
Rules for submitting new bug reports:
1. Check that the bug hasn't already been reported
2. Always include the following information in your bug report:
Which exact model Jukebox you have (as printed on the unit)
Which exact ROM firmware version you have
Which exact Rockbox version you are using (Menu->Info -> Version)
A step-by-step description of what you did and what happened
Whether the problem is repeatable or a one-time occurrence
All relevant data regarding the problem, such as playlists, MP3 files etc.
(IMPORTANT!)
3. If you have a Sourceforge account, log in before you file the report.
4. If you don't have a SF account, sign the report with your email.
4 FEATURE REQUESTS
For open feature requests refer to http://rockbox.haxx.se/requests.shtml
Rules for submitting a new feature request:
1. Check that the feature hasn't already been requested. Duplicates are really boring!
2. Check that the feature hasn't already been implemented. Download the latest daily
build and/or search the mail list archive.
3. Check that the feature is possible to implement (see page 85).
4. You must be logged in with your Sourceforge account to submit a request. If you
don't have an account, get one.
82 Rockbox User Manual
Page 83

5 WHAT'S NEW SINCE 2.0?
Changes in version 2.3
General changes since 2.2
Spoken menus, filenames and directories
Support for Archos Ondio
File type associations and "open with..." plugin bindings
Added ability to delete directories, even recursively
New WPS tags for information about next song in playlist
ON+PLAY menu can now also be accessed with a long press on PLAY
New directory sort options: date and file type
Clean shutdown which spins down the disk before cutting power
Faster scrolling in file browser
Easy-to-use installation program for windows
New language: Bulgarian
New plugins: Sort, euroconverter, search, chess clock, vbrfix, stopwatch,
metronome
Recorder-specific changes since 2.2
During recording disk doesn't spin up until needed, allowing undisturbed
Use of internal mic for short recordings
Optional button help bar at bottom of screen
More detailed MDB (dynamic bass) settings
ROMbox, optionally saving ~170KB RAM by running code from flash on Recorder
v1 and Ondio SP
Recording can pause
Recorded files now get ID3 v2.3 tags instead of v2.4, since some tools have
problems reading v2.4 tags
Red LED behaviour changed during recording: On during recording and blinking
when paused
New font format. 2.3 requires new fonts, 2.2 fonts are not compatible.
New plugins: Minesweeper, solitaire, mp3 split editor, snake2, pong, JPEG
viewer, Mandelbrot
Changes in version 2.2
Bookmarking functions added
Improved playlist support
WPS enhancements
New plugins: greyscale, Mandelbrot, metronome
Recording enhancements (recorder)
Bug fixes
General changes since 2.0
Loadable plugins
Dynamic playlist creation and manipulation
Configurable max directory size (default: 400 files)
Rockbox User Manual
Page 84

Configurable max playlist size (default: 10000 files)
Remote control now works while keys are locked
Car mode: Pauses and resumes playback with charger power loss and restore
Caption backlight: Briefly turns on backlight during track change
Battery meter is more accurate during the first minutes after boot
Automatically detects modified archos.mod/ ajbrec.ajz after exiting USB mode and
asks if you want to run it
Files and configurations in /.rockbox are now accessible from Menu
Stopped playlists can be resumed from File Browser by pressing ON
Never turns off/reboots while charger is connected
.wps files now support comments
Improved ID3v2 support
Option of hiding icons in File Browser
Player-specific changes since 2.0
Games: Jackpot and NIM
Jump scroll: Scrolls the entire screen width each step
The Line In port is enabled
Recorder-specific changes since 2.0
Rockbox can now be stored in flash ROM, giving much quicker boot up
Support for V2 recorders
Radio support (FM Recorder only)
Default contrast is now auto-detected, preventing unreadable display
Option of using an inverted bar instead of cursor in File Browser and Menu
Frame-accurate recording file splits set manually or preset by time
Improved Xing header generation in recorded files
New games: FlipIt, Snake, Star, Sliding Puzzle and Chip8 emulator
A calendar application plugin
84 Rockbox User Manual
Page 85

6 FEATURES WE WILL NOT IMPLEMENT
This is a list of Feature Requests we get repeatedly that we simply cannot do. View it
as the opposite of a TODO!
Record to WAV (uncompressed) or MP3pro format!
The recording hardware (the MAS) does not allow us to do this
Crossfade between tracks!
Crossfading would require two mp3 decoders, and we only have one. This is not
possible.
Interfacing with other USB devices (like cameras) or 2 player games over USB
The USB system demands that there is a master that talks to a slave. The Jukebox
can only serve as a slave, as most other USB devices such as cameras can. Thus,
without a master no communication between the slaves can take place.
If that is not enough, we have no ways of actually controlling the communication
performed over USB since the USB circuit in the Jukebox is strictly made for diskaccess and does not allow us to play with it the way we'd need for any good
communication to work.
Support MP3pro, WMA or other sound format playback!
The mp3-decoding hardware can only play MP3. We cannot make it play other
sound formats.
Converting OGG->MP3
The mp3-decoding hardware cannot decode ogg. It can be reprogrammed, but
there is too little memory for OGG and we have no documentation on how to
program the MAS' DSP.
Doing the conversion with the CPU is impossible, since a 12MHz SH1 is far too slow
for this daunting task.
Archos Multimedia support!
The Archos Multimedia is a completely different beast. It is an entirely different
architecture, different CPU and upgrading the software is done a completely
different way. We do not venture into this.
Others may do so. We do not.
Multi-band (or graphic) equalizer!
We cannot access information for that kind of visualization from the MP3 decoding
hardware.
Support other filesystems than FAT32 (like NTFS or ext2 or whatever)!
No. Rockbox needs to support FAT32 since it can only start off a FAT32 partition
(since that is the only way the ROM can load it), and adding support for more file
systems will just take away valuable ram for unnecessary features.
You can partition your Jukebox fine, just make sure the first one is FAT32 and then
make the other ones whatever file system you want. Just don't expect Rockbox to
understand them.
Rockbox User Manual
Page 86

Add scandisk-like features!
It would be a very slow operation that would drain the batteries and take a lot of
useful ram for something that is much better and faster done when connected to a
host computer.
CBR recording!
The MP3 encoding hardware does not allow this.
Change tempo of a song without changing pitch!
The MP3 decoding hardware does not allow this.
Graphic frequency (spectrum) analyser!
We can't access the audio waveform from the MP3 decoder so we can't analyse
it. Even if we had access to it, the CPU would probably be too slow to perform the
analysis anyway.
Cool sound effects!
Adding new sound effects requires reprogramming the MAS chip, and we can't do
that. The MAS chip is programmable, but we have no access to the chip
documentation.
86 Rockbox User Manual
Page 87

7 CREDITS
People that have contributed to the project, one way or another. Friends!
Björn Stenberg
Linus Nielsen Feltzing
Andy Choi
Andrew Jamieson
Paul Suade
Joachim Schiffer
Daniel Stenberg
Alan Korr
Gary Czvitkovicz
Stuart Martin
Felix Arends
Ulf Ralberg
David Härdeman
Thomas Saeys
Grant Wier
Julien Labruyére
Nicolas Sauzede
Robert Hak
Dave Chapman
Stefan Meyer
Eric Linenberg
Tom Cvitan
Magnus Öman
Jerome Kuptz
Julien Boissinot
Nuutti Kotivuori
Heikki Hannikainen
Hardeep Sidhu
Markus Braun
Justin Heiner
Magnus Holmgren
Bill Napier
George Styles
Mats Lidell
Lee Marlow
Nate Nystrom
Nick Robinson
Chad Lockwood
John Pybus
Uwe Freese
Randy Wood
Gregory Haerr
Philipp Pertermann
Gilles Roux
Mark Hillebrand
Damien Teney
Andreas Zwirtes
Kjell Ericson
Jim Hagani
Ludovic Lange
Mike Holden
Simon Elén
Matthew P. OReilly
Christian Schönberger
Henrik Backe
Craig Sather
José Maria Garcia-Valdecasas Bernal
Stevie Oh
Jörg Hohensohn
Dave Jones
Thomas Paul Diffenbach
Roland Kletzing
Itai Shaked
Keith Hubbard
Benjamin Metzler
Frederic Dang Ngoc
Pierre Delore
Huw Smith
Garrett Derner
Barry McIntosh
Leslie Donaldson
Lee Pilgrim
Zakk Roberts
Francois Boucher
Matthias Wientapper
Brent Coutts
Jens Arnold
Gerald Vanbaren
Christi Scarborough
Steve Cundari
Mat Holton
Jan Gajdos
Antoine Cellerier
Brian King
Jiri Jurecek
Jacob Erlbeck
Rockbox User Manual
Page 88

8 GNU Free Documentation License
Version 1.2, November 2002
Copyright © 2000,2001,2002 Free Software Foundation, Inc.
59 Temple Place, Suite 330, Boston, MA 02111-1307 USA
Everyone is permitted to copy and distribute verbatim copies of this license document, but changing it is not allowed.
PREAMBLE
The purpose of this License is to make a manual, textbook, or other functional and useful document free in the sense of freedom: to assure everyone the
effective freedom to copy and redistribute it, with or without modifying it, either commercially or non commercially. Secondarily, this License preserves for
the author and publisher a way to get credit for their work, while not being considered responsible for modifications made by others.
This License is a kind of copyleft , which means that derivative works of the document must themselves be free in the same sense. It complements the GNU
General Public License, which is a copyleft license designed for free software.
We have designed this License in order to use it for manuals for free software, because free software needs free documentation: a free program should come
with manuals providing the same freedoms that the software does. But this License is not limited to software manuals; it can be used for any textual work,
regardless of subject matter or whether it is published as a printed book. We recommend this License principally for works whose purpose is instruction or
reference.
17.1 APPLICABILITY AND DEFINITIONS
This License applies to any manual or other work, in any medium, that contains a notice placed by the copyright holder saying it can be distributed under
the terms of this License. Such a notice grants a worldwide, royalty-free license, unlimited in duration, to use that work under the conditions stated herein.
The Document, below, refers to any such manual or work. Any member of the public is a licensee, and is addressed as you. You accept the license if you
copy, modify or distribute the work in a way requiring permission under copyright law.
A Modified Version of the Document means any work containing the Document or a portion of it, either copied verbatim, or with modifications and/or
translated into another language.
A Secondary Section is a named appendix or a front-matter section of the Document that deals exclusively with the relationship of the publishers or
authors of the Document to the Document's overall subject (or to related matters) and contains nothing that could fall directly within that overall subject.
(Thus, if the Document is in part a textbook of mathematics, a Secondary Section may not explain any mathematics.) The relationship could be a matter of
historical connection with the subject or with related matters, or of legal, commercial, philosophical, ethical or political position regarding them.
The Invariant Sections are certain Secondary Sections whose titles are designated, as being those of Invariant Sections, in the notice that says that the
Document is released under this License. If a section does not _t the above definition of Secondary then it is not allowed to be designated as Invariant. The
Document may contain zero Invariant Sections. If the Document does not identify any Invariant Sections then there are none.
The Cover Texts are certain short passages of text that are listed, as Front-Cover Texts or Back-Cover Texts, in the notice that says that the Document is
released under this License. A Front-Cover Text may be at most 5 words, and a Back-Cover Text may be at most 25 words.
A Transparent copy of the Document means a machine-readable copy, represented in a format whose specification is available to the general public, that is
suitable for revising the document straightforwardly with generic text editors or (for images composed of pixels) generic paint programs or (for drawings)
some widely available drawing editor, and that is suitable for input to text formatters or for automatic translation to a variety of formats suitable for input to
text formatters. A copy made in an otherwise Transparent file format whose mark-up, or absence of mark-up, has been arranged to thwart or discourage
subsequent modification by readers is not Transparent. An image format is not Transparent if used for any substantial amount of text. A copy that is not
Transparent is called Opaque .
Examples of suitable formats for Transparent copies include plain ASCII without mark-up, Texinfo input format, LATEX input format, SGML or XML using a
publicly available DTD, and standard-conforming simple HTML, PostScript or PDF designed for human modification. Examples of transparent image formats
include PNG, XCF and JPG. Opaque formats include proprietary formats that can be read and edited only by proprietary word processors, SGML or XML for
which the DTD and/or processing tools are not generally available, and the machine-generated HTML, PostScript or PDF produced by some word processors
for output purposes only.
The Title Page means, for a printed book, the title page itself, plus such following pages as are needed to hold, legibly, the material this License requires to
appear in the title page. For works in formats which do not have any title page as such, Title Page means the text near the most prominent appearance of
the work's title, preceding the beginning of the body of the text.
A section Entitled XYZ means a named subunit of the Document whose title either is precisely XYZ or contains XYZ in parentheses following text that
translates XYZ in another language. (Here XYZ stands for a specific section name mentioned below, such as Acknowledgements , Dedications ,
Endorsements, or History.) To Preserve the Title of such a section when you modify the Document means that it remains a section Entitled XYZ according
to this definition.
The Document may include Warranty Disclaimers next to the notice which states that this License applies to the Document. These Warranty Disclaimers are
considered to be included by reference in this License, but only as regards disclaiming warranties: any other implication that these Warranty Disclaimers
may have is void and has no effect on the meaning of this License.
17.2 VERBATIM COPYING
You may copy and distribute the Document in any medium, either commercially or non commercially, provided that this License, the copyright notices, and
the license notice saying this License applies to the Document are reproduced in all copies, and that you add no other conditions whatsoever to those of this
License. You may not use technical measures to obstruct or control the reading or further copying of the copies you make or distribute. However, you may
accept compensation in exchange for copies. If you distribute a large enough number of copies you must also follow the conditions in section 17.3.
You may also lend copies, under the same conditions stated above, and you may publicly display copies.
17.3 COPYING IN QUANTITY
88 Rockbox User Manual
Page 89

If you publish printed copies (or copies in media that commonly have printed covers) of the Document, numbering more than 100, and the Document's
license notice requires Cover Texts, you must enclose the copies in covers that carry, clearly and legibly, all these Cover Texts: Front-Cover Texts on the
front cover, and Back-Cover Texts on the back cover. Both covers must also clearly and legibly identify you as the publisher of these copies. The front cover
must present the full title with all words of the title equally prominent and visible. You may add other material on the covers in addition. Copying with
changes limited to the covers, as long as they preserve the title of the Document and satisfy these conditions, can be treated as verbatim copying in other
respects.
If the required texts for either cover are too voluminous to fit legibly, you should put the first ones listed (as many as fit reasonably) on the actual cover,
and continue the rest onto adjacent pages.
If you publish or distribute Opaque copies of the Document numbering more than 100, you must either includ e a machine-readable Transparent copy along
with each Opaque copy, or state in or with each Opaque copy a computer-network location from which the general network-using public has access to
download using public-standard network protocols a complete Transparent copy of the Document, free of added material. If you use the latter option, you
must take reasonably prudent steps, when you begin distribution
of Opaque copies in quantity, to ensure that this Transparent copy will remain thus accessible at the stated location until at least one year after the last time
you distribute an Opaque copy (directly or through your agents or retailers) of that edition to the public.
It is requested, but not required, that you contact the authors of the Document well before redistributing any large number of copies, to give them a chance
to provide you with an updated version of the Document.
17.4 MODIFICATIONS
You may copy and distribute a Modified Version of the Document under the conditions of sections 12.2 and 12.3 above, provided that you release the
Modified Version under precisely this License, with the Modified Version filling the role of the Document, thus licensing distribution and modification of the
Modified Version to whoever possesses a copy of it. In addition, you must do these things in the Modified Version:
A. Use in the Title Page (and on the covers, if any) a title distinct from that of the Document, and from those of previous versions (which should, if there
were any, be listed in the History section of the Document). You may use the same title as a previous version if the original publisher of that version
gives permission.
B. List on the Title Page, as authors, one or more persons or entities responsible for authorship of the modific ations in the Modified Version, together with
at least five of the principal authors of the Document (all of its principal authors, if it has fewer than five), unless they release you from this
requirement.
C. State on the Title page the name of the p ublisher of the Modified Version, as the publisher.
D. Preserve all the copyright notices of the Document.
E. Add an appropriate copyright notic e for your modifications adjacent to the other copyright notices.
F. Include, immediately after the copyright notices, a license notice giving the public permission to use the Modified Version under the terms of this
License, in the form shown in the Addendum below.
G. Preserve in that license notice the full lists of Invariant Sections and required Cover Texts given in the Document's license notice.
H. Include an unaltered copy of this License.
I. Preserve the section Entitled History , Preserve its Title, and add to it an item stating at least the title, year, new authors, and publisher of the
Modified Version as given on the Title Page. If there is no section Entitled History in the Document, create one stating the title, year, authors, and
publisher of the Document as given on its Title Page, then add an item describing the Modified Version as stated in the previous sentence.
J. Preserve the network location, if any, given in the Document for public access to a Transparent copy of the Document, and likewise the network
locations given in the Document for previous versions it was based on. These may be placed in the History section. You may omit a network location
for a work that was published at least four years before the Document itself, or if the original publisher of the version it refers to gives permission.
K. For any section Entitled Acknowledgements or Dedications, Preserve the Title of the section, and preserve in the section all the substance and tone of
each of the contributor acknowledgements and/or dedications given therein.
L. Preserve all the Invariant Sections of the Document, unaltered in their text and in their titles. Section numbers or the equivalent are not considered
part of the section titles.
M. Delete any section Entitled Endorsements. Such a section may not be included in the Modified Version.
N. Do not retitle any existing section to be Entitled Endorsements or to conflict in title with any Invariant Section.
O. Preserve any Warranty Disclaimers.
If the Modified Version includes new front-matter sections or appendices that qualify as Secondary Sections and contain no material copied from the
Document, you may at your option designate some or all of these sections as invariant. To do this, add their titles to the list of Invariant Sections in the
Modified Version's license notice. These titles must be distinct from any other section titles.
You may add a section Entitled Endorsements , provided it contains nothing but endorsements of your Modified Version by various parties for example,
statements of peer review or that the text has been approved by an organization as the authoritative definition of a standard.
You may add a passage of up to five words as a Front-Cover Text, and a passage of up to 25 words as a Back-Cover Text, to the end of the list of Cover
Texts in the Modified Version. Only one passage of Front-Cover Text and one of Back-Cover Text may be added by (or through arrangements made by) any
one entity. If the Document already includes a cover text for the same cover, previously added by you or by arrangement made by the same entity you are
acting on behalf of, you may not add another; but you may replace the old one, on explicit permission from the previous publisher that added the old one.
The author(s) and publisher(s) of the Document do not by this License give permission to use their names for publicity for or to assert or imply
endorsement of any Modified Version.
17.5 COMBINING DOCUMENTS
You may combine the Document with other documents released under this License, under the terms defined in section 17.4 above for modified versions,
provided that you include in the combination all of the Invariant Sections of all of the original documents, unmodified, and list them all as Invariant Sections
of your combined work in its license notice, and that you preserve all their Warranty Disclaimers.
Rockbox User Manual
Page 90

The combined work need only contain one copy of this License, and multiple identical Invariant Sections may be replaced with a single copy. If there are
multiple Invar iant Sections with the same name but different contents, make th e title of each such section unique by adding at the end of it, in parentheses,
the name of the original author or publish er of that section if known, or else a unique number. Make the same adjustment to the section titles in the list of
Invariant Sections in the license notice of the combined work.
In the combination, you must combine any sections Entitled History in the various original documents, forming one section Entitled History ; likewise
combine any sections Entitled Acknowledgements , and any sections Entitled Dedications . You must delete all sections Entitled Endorsements.
17.6 COLLECTIONS OF DOCUMENTS
You may make a collection consisting of the Document and other documents released under this License, and replace the individual copies of this License in
the various documents with a single copy that is included in the collection, provided that you follow the rules of this License for verbatim copying of each of
the documents in all other respects.
You may extract a single document from such a collection, and distribute it individually under this License, provided you insert a copy of this License into the
extracted document, and follow this License in all other respects regarding verbatim copying of that document.
17.7 AGGREGATION WITH INDEPENDENT WORKS
A compilation of the Document or its derivatives with other separate and independent documents or works, in or on a volume of a storage or distribution
medium, is called an aggregate if the copyright resulting from the compilation is not used to limit the legal rights of the compilation's users beyond what the
individual works permit. When the Document is included an aggregate, this License does not apply to the other works in the aggregate which are not
themselves derivative works of the Document.
If the Cover Text requirement of section 17.3 is applicable to these copies of the Document, then if the Document is less than one half of the entire
aggregate, the Document's Cover Texts may be placed on covers that bracket the Document within the aggregate, or the electronic equivalent of covers if
the Document is in electronic form. Otherwise they must appear on printed covers that bracket the whole aggregate.
17.8 TRANSLATION
Translation is considered a kind of modification, so you may distribute translations of the Document under the terms of section 17.4. Replacing Invariant
Sections with translations requires special permission from their copyright holders, but you may include translations of some or all Invariant Sections in
addition to the original versions of these Invariant Sections. You may include a translation of this License, and all the license notices in the Document, and
any Warranty Disclaimers, provided that you also include the original English version of this License and the original versions of those notices and
disclaimers. In case of a disagreement between the translation and the original version of this License or a notice or disclaimer, the original version will
prevail.
If a section in the Document is Entitled “Acknowledgements” , “Dedications” , or “History”, the requirement (section 17.4) to Preserve its Title (section
17.1) will typically require changing the actual title.
17.9 TERMINATION
You may not copy, modify, sublicense , or distribute the Document except as expressly provided for under this License. Any other attempt to copy, modify,
sublicense or distribute the Document is void, and will automatically terminate you r rights under this License. However, parties who have received copies, or
rights, from you under this License will not have their licenses terminated so long as such parties remain in full compliance.
17.10 FUTURE REVISIONS OF THIS LICENSE
The Free Software Foundation may publish new, revised versions of the GNU Free Documentation License from time to time. Such new versions will be
similar in spirit to the present version, but may differ in detail to address new problems or concerns. See http://www.gnu.org/copyleft/ .
Each version of the License is given a distinguishing version number. If the Document specifies that a particular numbered version of this License or any
later version applies to it, you have the option of following the terms and conditions either of that specified version or of any later version that has been
published (not as a draft) by the Free Software Foundation. If the Document does not specify a version number of this License, you may choose any version
ever published (not as a draft) by the Free Software Foundation.
ADDENDUM: How to use this License for your documents
To use this License in a document you have written, include a copy of the License in the document and put the following copyright and license notices just
after the title page:
Copyright © YEAR YOUR NAME. Permission is granted to copy, distribute and/or modify this document under the terms of the GNU Free
Documentation License, Version 1.2 or any later version published by the Free Software Foundation; with no Invariant Sections, no Front-Cover
Texts, and no Back-Cover Texts. A copy of the license is included in the section entitled “GNU Free Documentation License”.
If you have Invariant Sections, Front-Cover Texts and Back-Cover Texts, replace the “with...Texts.” line with this: with the Invariant Sections being LIST
THEIR TITLES, with the Front-Cover Texts being LIST, and with the Back-Cover Texts being LIST.
If you have Invariant Sections without Cover Texts, or some other combination of the three, merge those two alternatives to suit the situation.
If your document contains non-trivial examples of program code, we recommend releasing these examples in parallel under your choice of free software
license, such as the GNU General Public License, to permit their use in free software.
90 Rockbox User Manual
 Loading...