

Page 1

Handbook
Manuel
Handbuch
Handleiding
logo
Page 2
safety
guidelines
CAUTION: To reduce the risk of electric shock, do not remove cover (or back). No user serviceable parts inside. Refer servicing to qualified service
personnel.
WARNING: To reduce the risk of fire or electric shock, do not expose this apparatus to rain or moisture.
The lightning flash with an arrowhead symbol within an equilateral triangle, is intended to alert the user to the presence of uninsulated ‘dangerous voltage’
within the product’s enclosure that may be of sufficient magnitude to constitute a risk of electric shock to persons.
The exclamation point within an equilateral triangle is intended to alert the user to the presence of important operating and maintenance (servicing)
instructions in the literature accompanying the product.
CAUTION: In Canada and the USA, to prevent electric shock, match the wide blade of the plug to the wide slot in the socket and insert the plug fully
into the socket.
Important safety instructions
This product is designed and manufactured to meet
strict quality and safety standards. However, you
should be aware of the following installation and
operation precautions.
1. Take heed of warnings and instructions
It is important that you:
A. read all the safety and operating instructions
before operating this speaker.
B. keep this handbook for future reference.
C. follow all instructions and adhere to all warnings
in the handbook or on the speaker.
2. Water and moisture
Do not use this speaker near water.
The presence of electricity near water can be
dangerous – for example next to a bathtub,
washbowl, kitchen sink, in a wet basement or near a
swimming pool, etc.
3. Object or liquid entry
Take care that objects do not fall and liquids are
not spilled, dripped or splashed into the enclosure
through any openings. Liquid-filled objects such as
vases should not be placed on the equipment.
4. Ventilation
Do not block any of the ventilation openings.
Do not place the equipment on a bed, sofa, rug or similar
soft surface, or in an enclosed bookcase or cabinet, since
ventilation may be impeded. We recommend a minimum
distance of 50mm around the sides and top of the
appliance to provide adequate ventilation.
5. Heat
Do not install the speaker near any heat producing
equipment such as radiators, stoves or other
appliances (including other amplifiers) that produce
heat.
6. Climate
The appliance has been designed for use in moderate
climates.
7. Siting the unit
The unit is not designed for placing in a rack or stand.
It should be placed directly on the floor and sited
where electrical and other leads do not cause a trip
hazard.
8. Power sources
The speaker is supplied with a market-suitable
electrical plug. Do not substitute or modify the
supplied plug – see your dealer if a replacement is
required.
This product is a Class II or double insulated electrical
appliance. It has been designed in such a way that
it does not require a safety connection to electrical
earth (U.S. = ground).
The primary method of isolating the Logo speaker
unit from the mains supply is to use the switch on
the rear of the unit. The Logo speaker unit must be
installed in a manner that makes plug disconnection
possible.
9. Power-cord protection
Power supply cords should be routed so that they
are protected against being walked on or pinched,
particularly at plugs and the point where they exit
from the speaker.
10. Protection from electrical storms
Unplug the speaker during lightning storms or when
unused for long periods of time.
11. Abnormal smell
If an abnormal smell or smoke is detected from the
appliance, turn the power off immediately and unplug
the unit from the wall outlet. Contact your dealer
immediately.
12. Cleaning
Unplug the unit from the mains supply before cleaning.
The case should normally only require a wipe with a
soft, dry, lint-free cloth. Do not use paint thinners or
other chemical solvents for cleaning.
We do not advise the use of furniture cleaning sprays
or polishes as they can cause indelible white marks if
the unit is subsequently wiped with a damp cloth.
13. Servicing and repair
Refer all servicing to qualified servicing personnel.
Servicing is required when: the speaker has been
damaged in any way, such as:
A. the power-supply cord or the plug has been
damaged, or
B. liquid has been spilled, or objects have fallen
into the enclosure, or
C. the appliance has been exposed to rain or
moisture, or
D. the appliance does not appear to operate
normally or exhibits a marked change in
performance, or
E. the appliance has been dropped or the
enclosure damaged.
Safety compliance
This product has been designed to meet the IEC
60065 international electrical safety standard.
This device complies with Part 15 of the FCC Rules.
Operation is subject to the following two conditions:
(1) This device may not cause harmful interference,
and (2) this device must accept any interference
received, including interference that may cause
undesired operation.
E-2
Page 3

contents
safety guidelines ......................................E-2
Important safety instructions .................E-2
Safety compliance ..........................................E-2
thank you… ............................................. E-3
installation ................................................E-4
Positioning the unit .......................................E-4
Power ....................................................................E-4
Interconnect cables .......................................E-4
Connecting to a sound source .............E-4
Care of your speaker ..................................E-4
speaker positioning ................................ E-5
Stereo system with no LFE .....................E-6
connection ............................................... E-6
Sub/full range+sat system ........................E-6
Sub/sat system .................................................E-6
Direct mode in Arcam surround
amplifiers .............................................................E-6
Crossover frequency setting ...................E-7
Crossover Q setting.....................................E-7
Volume level setting .....................................E-7
Phase setting .....................................................E-7
calibration .................................................E-7
specification .............................................E-8
Technical specifications ...............................E-8
Worldwide Guarantee ...............................E-8
Claims under guarantee ............................E-8
Problems? ............................................................E-8
On-line registration ......................................E-8
... and congratulations for buying the Arcam Logo sub-bass loudspeaker system.
Logo can extend the bandwidth of your main (satellite) speakers by accurately revealing the low
frequency components of stereo and surround-sound programme sources. It also offers a separate
but concurrent LFE (low frequency effects) connection – this is a channeI intended by the recording
engineer to be exclusively reproduced by a subwoofer. Logo’s own volume control permits the level to
be adjusted independently to achieve a perfect balance in the listening room.
Logo features its own 200W amplifier which is close-coupled to a downward-facing long-excursion
driver that takes full advantage of the latest materials technology and a sophisticated braced
cabinet design. The bass response is actively corrected by a Linkwitz transform crossover circuit to
give a Bessel alignment: this minimizes time distortion for accurate bass transients. The result is a
performance of great power and musicality.
Please take a moment to read this handbook, as the advice that it contains will help you get the
maximum benefit from your purchase.
The Logo Development Team
thank
you…
English
What’s in the box?
< Arcam Logo sub-bass system
< IEC mains power lead
< this Handbook!
logo
E-3
Page 4

installation
AUTO
MANUAL
STANDBY
IN
L
R
LFE
ON OFF
OUT
L
R
LFE
100-240V~50/60HZ 275W MAX
FUSE: T2.5AL 250V
USE ONLY WITH A 250V FUSE
PHASE STANDBY
AUTO
MANUAL
0.3
0.5
0.7
0.9
1.1
1.3
1.5
X-OVER Q
VOLUME
0
1
2
3
456
7
8
9
10
35
50
70
85
100
115
125
140
160
X-OVER FREQ
Positioning the unit
< Place the Logo speaker unit on a level, firm
surface, avoiding direct sunlight and sources of
heat or damp.
< Do not place Logo in an enclosed space such
as a bookcase or closed cabinet unless there is
good provision for ventilation. The Logo speaker
unit is designed to run warm during normal
operation.
< Do not place your record deck on top of Logo.
Record decks are very sensitive to the noise
generated by mains power supplies which will
be heard as a background ‘hum’ if the record
deck is too close. Vibrations from Logo may also
cause the pickup stylus to jump tracks.
Power
Logo is supplied with a moulded mains plug already
fitted to the lead. Check that the plug supplied fits
your supply – should you require a new mains lead,
please contact your Arcam dealer. Logo is fitted with
a transformer designed to accept nominal mains
voltages from 100V to 240V.
Push the IEC plug end of the power cable into the
socket on the back of Logo, making sure that it is
pushed in firmly. Plug the other end of the cable into
your mains socket and, if necessary, switch the socket
on.
Logo is fitted with a main power switch on the rear
panel, above the power inlet: make sure that this is
switched on to use Logo.
If your Logo is not to be used for a prolonged period,
switch the unit off at the main power switch.
Indicator LED
An indicator LED is positioned across
the top edge of Logo’s cabinet.
When the indicator LED is off, it
indicates that the speaker is completely
disconnected from the mains. A blue
light from the indicator shows that the speaker is
powered up and ready for immediate use. A red
light from the indicator shows that the speaker is in
standby (power-saving) mode and will power up as
soon as an audio signal is received.
Standby switch
The push-in STANDBY switch provides two
settings:
AUTO and MANUAL.
AUTO ’ (button out) switches Logo’s
‘
amplifier to standby after a period of
idleness (about 15 minutes) when no audio signal has
been received. ‘
MANUAL’ (button in) means that Logo’s
amplifier is on whenever the unit is receiving mains
power.
Interconnect cables
We recommend the use of high-quality screened
audio interconnect cables. Poor quality cables will
degrade the performance of your system. All cables
should be kept as short as is practically possible.
It is good practice when connecting your equipment
to make sure that the mains power-supply cabling is
kept as far away as possible from your audio cables.
Failure to do so may result in unwanted noise in the
audio signals.
Note: When connecting Logo to signal leads,
or when moving Logo to a new position, make sure
that the unit is not receiving power by switching off
and disconnecting the power lead.
Connecting to a sound source
Check that your sound processor/receiver is switched
off before connecting Logo. Failure to do this may
result in both speaker and amplifier damage.
If your sound source has a
output, connect this to
PRE-OUT SUB or LFE OUT
IN LFE on the back panel using
RCA (phono) connectors at each end. If your sound
source does not have a SUB or LFE output, connect
the left and right channels of the stereo pre-amp
output (
PRE OUT L and PRE OUT R) to IN L and IN R,
respectively.
You may connect both the
LFE and the L and R
outputs to Logo if you wish to use both the LFE
channel and to supplement the bass response of
‘Large’ Left and Right speakers.
OUT L, OUT R and OUT LFE provide line-level outputs
for ‘daisy-chaining’ further units, in a multi-room
installation, for example.
After connecting
Turn the sound source amplifier volume down to
minimum before switching on. Switch the source
amplifier on, select a source signal, then gradually
increase the volume to the required listening level.
Care of your speaker
Running-in
In the same way as a new car requires a ‘running-in’
period, so do all loudspeakers. Your Logo may sound
good when you first connect it, but with time it will
improve dramatically. Expect about 50 hours use
before the full potential of your Logo is realised.
Cleaning
To clean your speaker simply use a soft, slightly
dampened cloth to wipe off any dust or dirt. Do not
use solvent-based or chemical cleaning products as
these may damage the finish of the speaker cabinet.
Power handling
Arcam speakers are designed to reproduce recorded
music under normal domestic conditions. We do
not recommend nor warrant them for commercial
applications, such as discothèques, public address, etc.
E-4
Page 5
speaker positioning
The advice given here is a general guideline for setting up speakers.
Refer to the documentation supplied with your speakers for
more precise positioning and installation information, and see
www.dolby.com/consumer/home_entertainment/roomlayout.html for
usefuI information on listening-room layouts.
Room acoustics
Your room’s shape and how it is furnished will affect the sound you
hear. For instance, too many bare surfaces can cause reflections that
may add harshness to the sound. Carpets, wall-hangings and cur tains
can all help.
If you have a choice of listening rooms, avoid one that is perfectly
square or has one dimension exactly twice another. Such a room can
aggravate resonances that colour the sound.
The closer you place a speaker to corners and the intersection of
wall and floor or wall and ceiling, the stronger the bass output, which
may over-emphasise the bass. Moving a speaker just a few inches can
sometimes make a big difference.
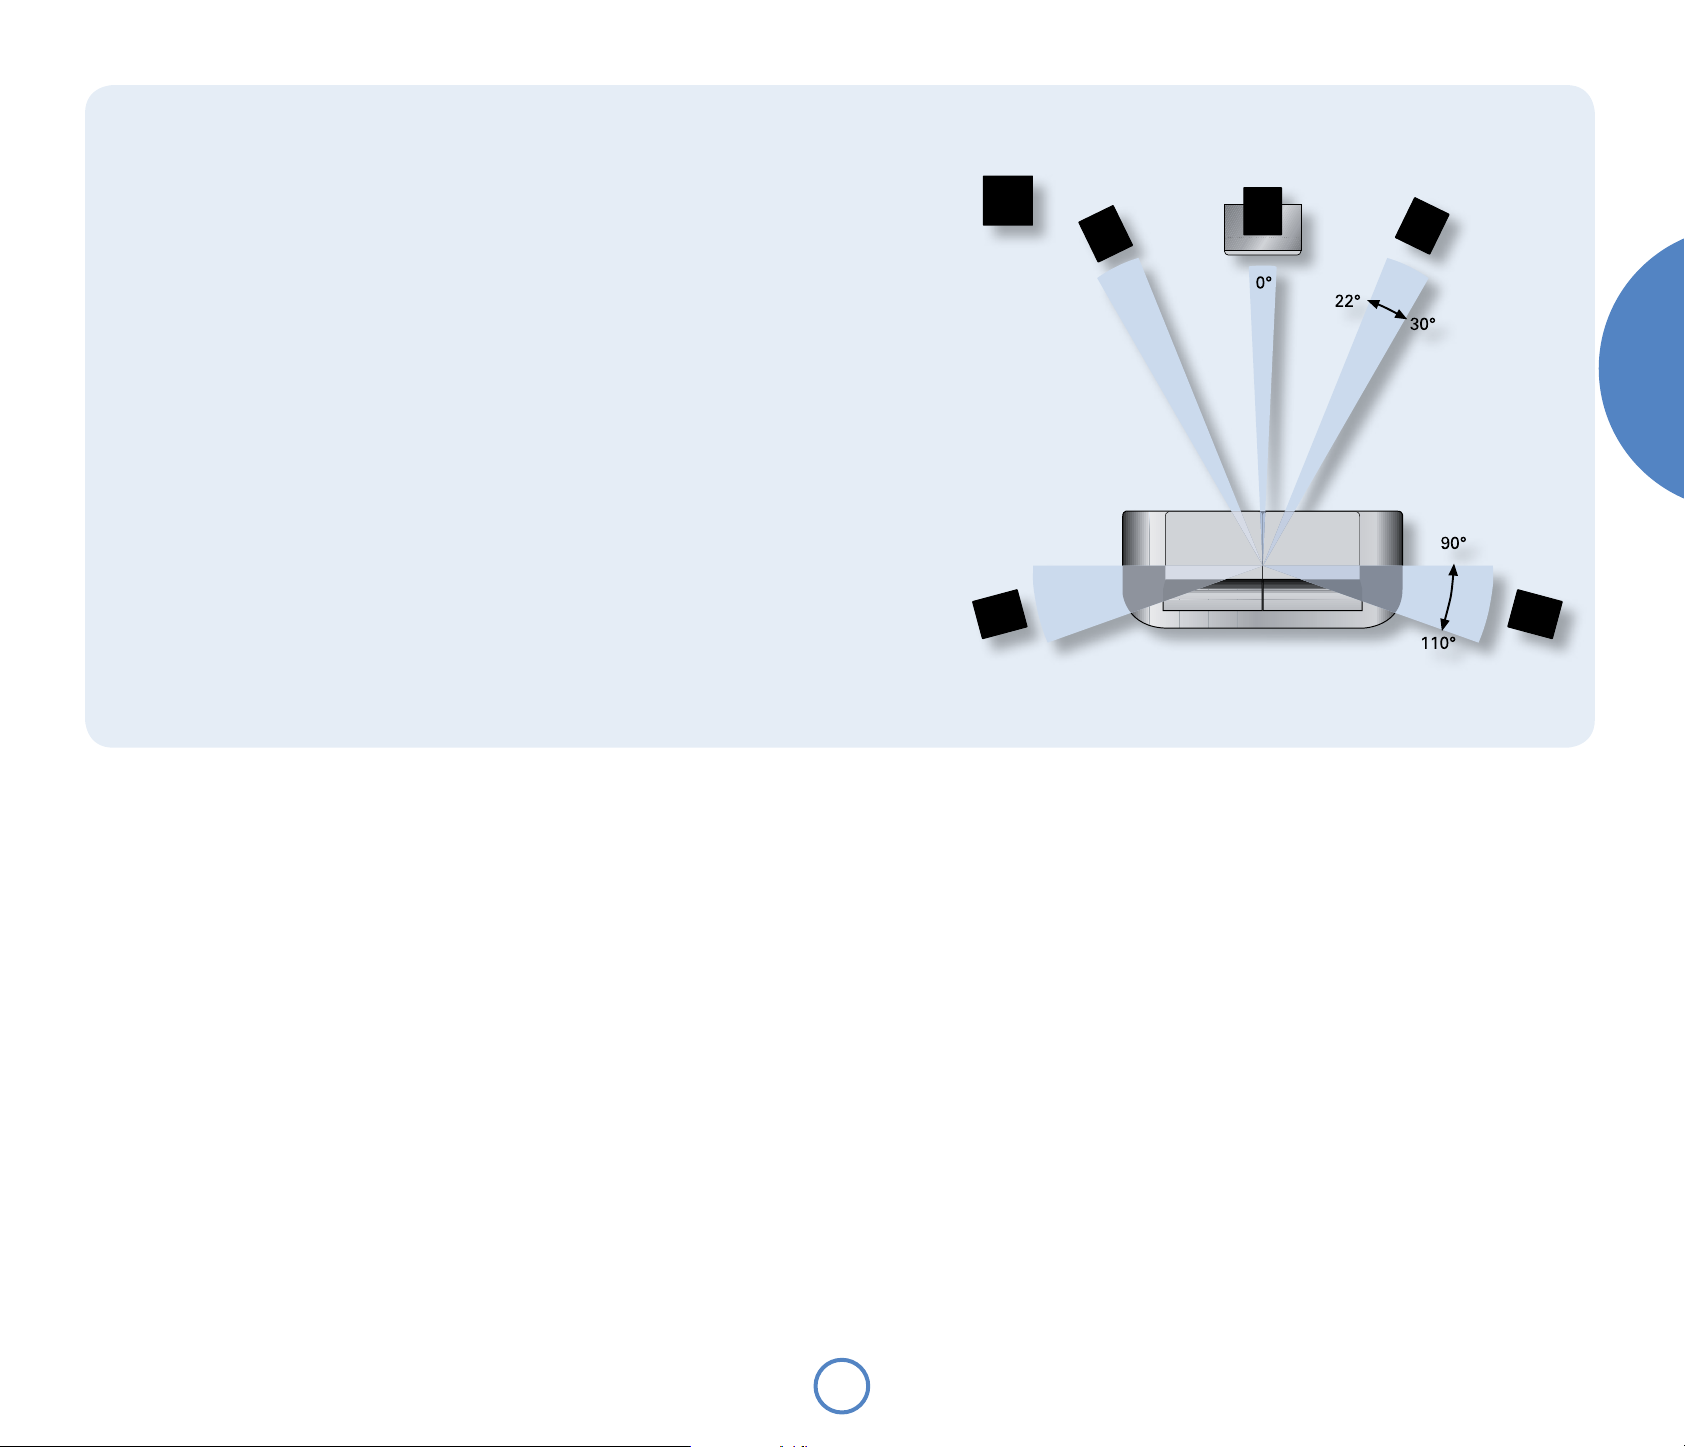
Speaker setup
Proper speaker placement is the key to the best home theatre sound
(see diagram).
As a rough guide, speakers should be placed on rigid stands at about
15cms from the rear wall and at least 60cms from any side wall.
Speakers should never be placed on the floor (unless they are floor-
standing speakers), or in corners. The speaker drivers
should be at, or a little above, ear level when seated.
If possible, centre your seating area between the
surround speakers.
The final sound will depend on the acoustics of
the listening room and experimenting with speaker
positioning is very worthwhile.
Subwoofer
The location of Logo will affect the overall sound
quality. Placing the subwoofer next to a wall or in a
corner will often boost efficiency and give a cleaner
low bass sound. However, all rooms react differently
and we recommend that you experiment with
subwoofer positioning.
Speaker stands
The more firmly a speaker is held, the better it will
sound. We recommend the use of rigid metal stands
of 40–60cms height. Properly damped types that do
not ‘ring’ when tapped with a pencil (either by virtue
of construction, or because they are filled with dry
silver sand) will bring out the best in a speaker. Ensure
that the stands and/or speakers do not wobble.
English
logo
E-5
Page 6
connection
L- R-
IN L
IN R
PRE OUT
LEFT
PRE OUT
RIGHT
L+ R+
R-R+
L-L+
LS RS
C
L
R
IN LFE
PRE OUT SUB
LS
RS
C
L
R
IN LFE
IN L
IN R
PRE OUT LEFT
PRE OUT RIGHT
PRE OUT SUB
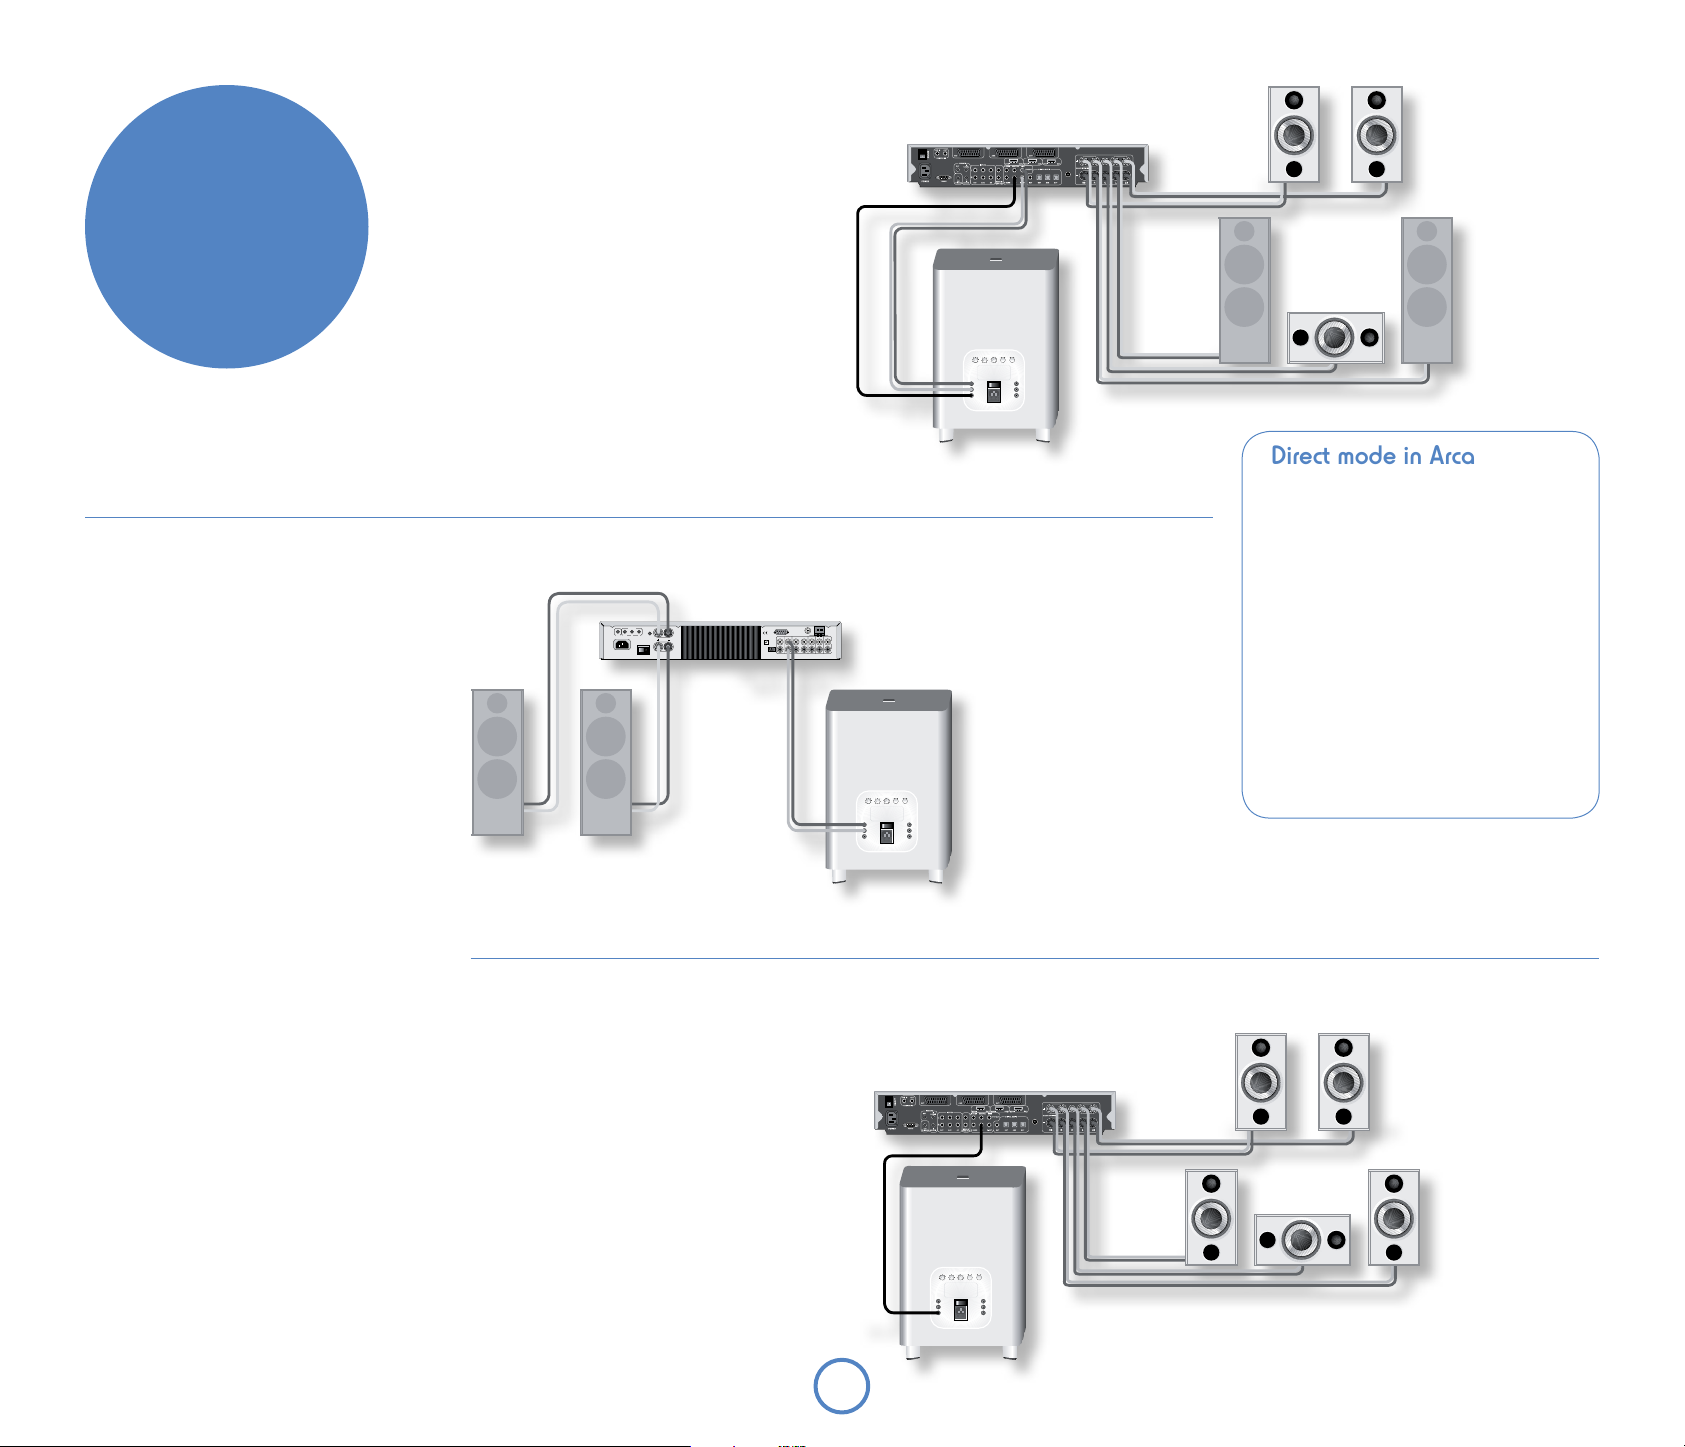
Stereo system with no LFE
This is a typical two-channel system (such as Arcam’s
Solo). Logo is connected to L/R preamplifier outputs.
The crossover frequency on Logo should be
adjusted to the low frequency roll off of the main
speakers (see the manual for your speakers for this
information). The Q-control (
to fine-tune the integration of Logo and your main
speakers.
X-OVER Q) can be used
Sub/full range+sat system
This is a surround-sound system (such as Arcam’s
Solo Movie 5.1) where full range L and R speakers
are combined with satellite (or with full range) rear
speakers. The system should be connected with
both the
IN LFE and Left/Right preamplifier outputs attached to
IN L/IN R on Logo.
In such systems, Logo can be set up to work with two
crossover frequencies. One frequency is set up for the
rear speakers using the surround amplifier crossover,
and one frequency for the full range Left and Right
speakers, using the Logo crossover.
SUB, SUBWOOFER or LFE output connected to
Direct mode in Arcam
surround amplifiers
If you wish to have your system set up to use
the crossover in the surround amplifier for 5.1
or 7.1 material, but use Left and Right full range
speakers with Logo filling in for two-channel
material, you can use Direct mode.
Connect the amplifier and Logo as in the
Sub/full range+sat system diagram. In the
amplifier, set up all speakers to ‘Small’; this
redirects bass to Logo via the LFE channel. To use
the system’s full range, activate ‘Direct mode’ for
two-channel sources. This sends the full range
signals to the Left and Right speakers and use the
IN L/IN R inputs to Logo via its own crossover.
Sub/sat system
This is a surround-sound system (such as Arcam’s
Solo Movie 5.1) where all the main speakers are
satellite speakers, defined as ‘Small’. Logo is connected
to output marked
The LFE input bypasses the crossover in Logo, so the
crossover frequency should be set by the surround
sound amplifier. For the crossover setting, please see
the response of your satellite speakers which may
vary from around 70Hz for large satellites, to 150Hz
for small satellites. We recommend 80Hz as a starting
point if you are unsure.
SUB, SUBWOOFER or LFE.
E-6
Page 7
The subwoofer’s has two jobs: firstly to reproduce accurately and with sufficient power the sub-bass that other
X-OVER FREQ
35
50
70
85
100
115
125
140
160
0.3
0.5
0.7
0.9
1.1
1.3
1.5
X-OVER Q
PHASE
VOLUME
0
1
2
3
456
7
8
9
10
0
40 60 80 100 120 140 160
-12
20
0
-12
Q=1.5
Q=1.0
Q=0.71
Q=0.49
Q=0.58
Q=0.3
‘smaller’ speakers cannot (the centre speaker is almost always a ‘small’ speaker); and secondly to reproduce the
‘.1’ or low frequency effects (LFE) track of 5.1 or 7.1 material.
For optimum results, the subwoofer must be set up in the correct relation to the other speakers in the system.
The two relevant controls are the crossover point and the subwoofer level. The crossover point establishes
the frequency below which signals are redirected away from ‘small’ speakers toward the subwoofer. Setting the
subwoofer level ensures signals that are of equal volume achieve the same sound pressure level no matter what
frequency they are or which speaker they come from (i.e. subwoofer or satellite speaker).
In most surround-sound systems, two crossovers are available: one in the surround-sound decoder and one in
the Logo unit.
In order to get the optimum sound in a variety of systems, Logo allows these controls to be used independently
for systems with ‘Large’ front speakers and an LFE output from the surround-sound decoder.
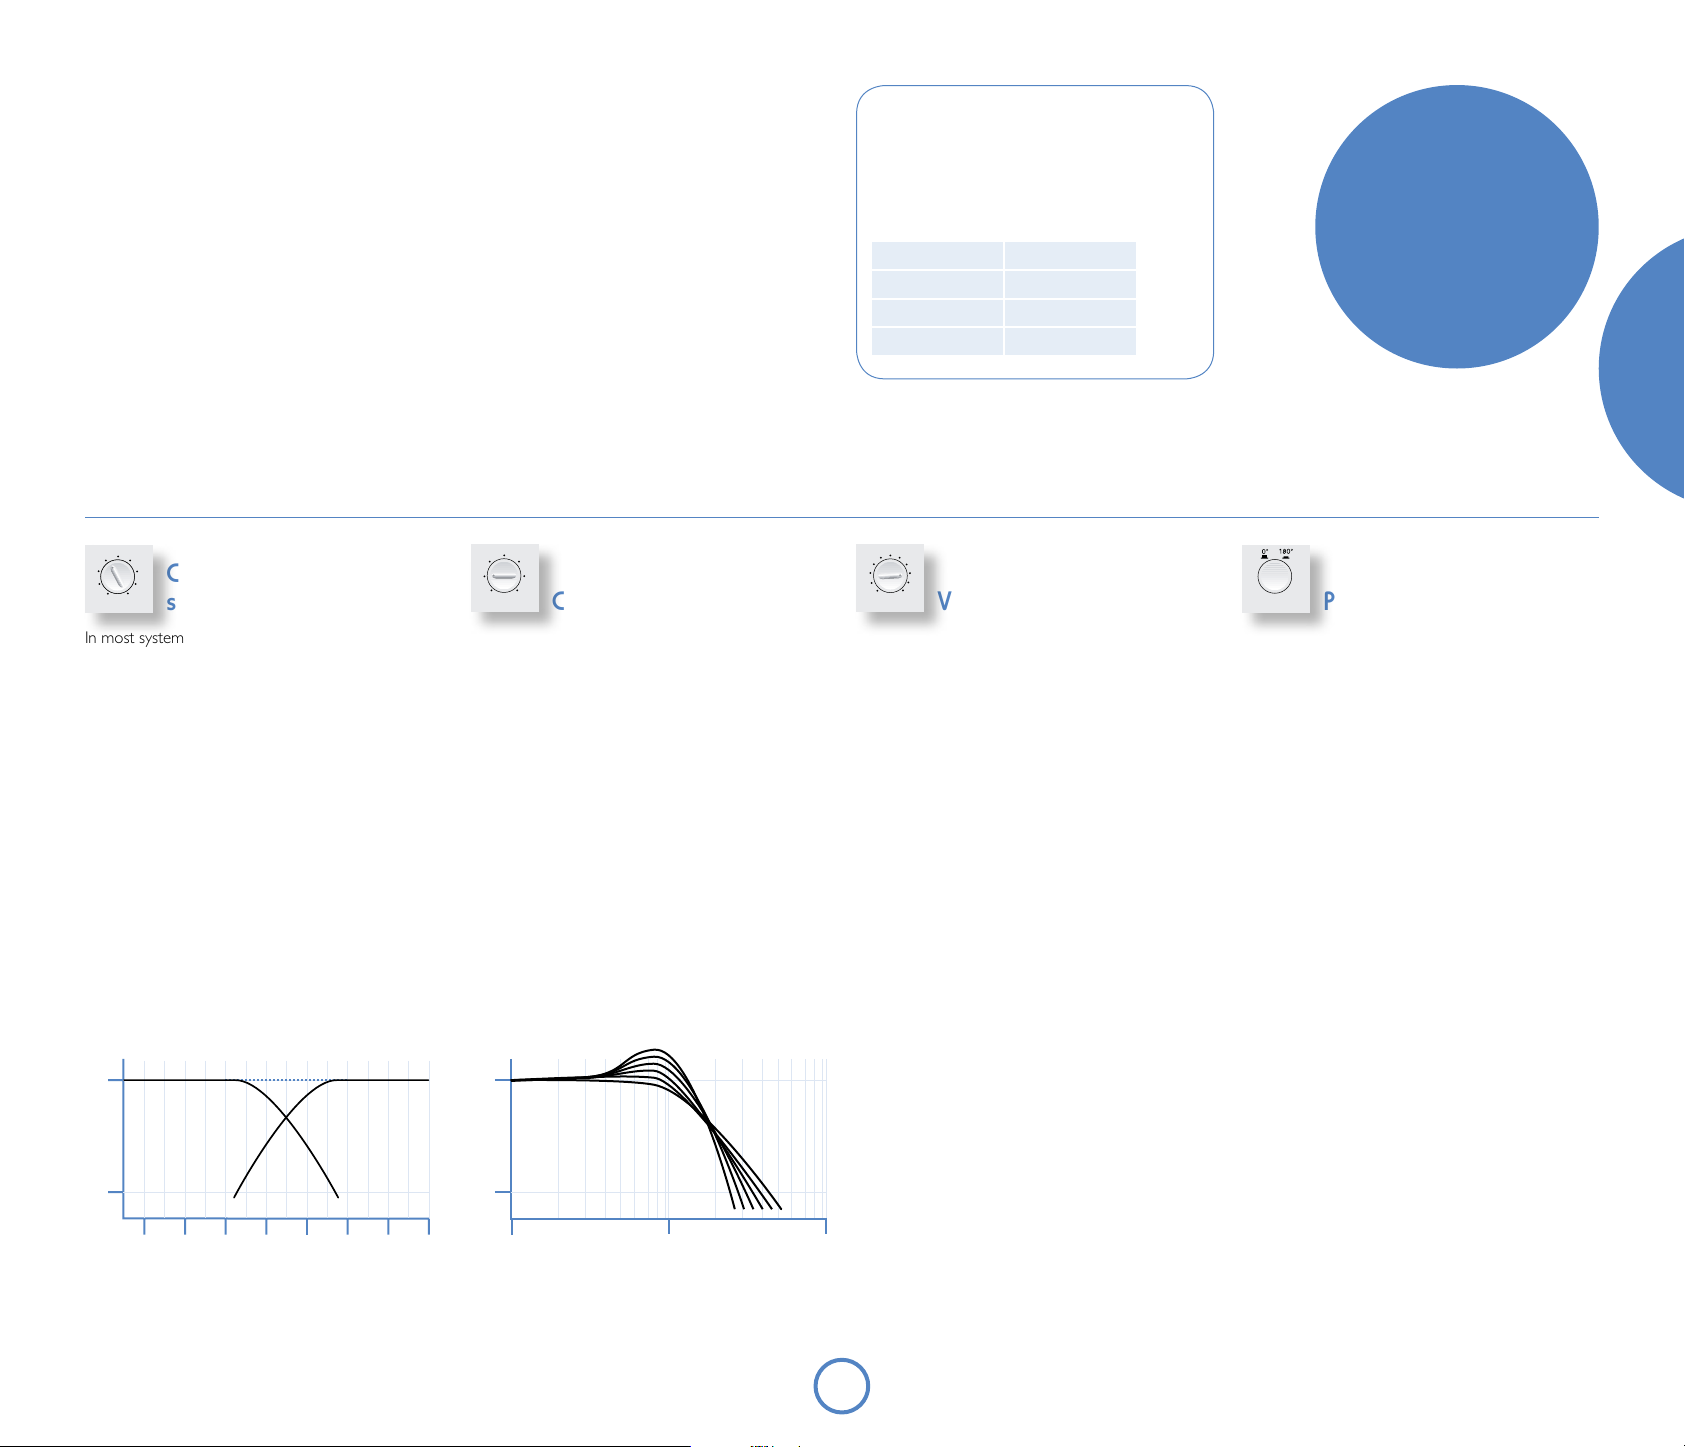
Crossover frequency
setting
In most systems, a crossover point for Logo of 90Hz
is recommended.
If your satellite speakers are very ‘Small’ (and thus
cannot reproduce much bass) you might like to
set the crossover point higher than this figure to
allow Logo to do more of the work. However, be
aware that the higher the crossover point, the more
directional the low frequency sounds, thus the more
easily identifiable is the subwoofer’s physical position.
If your satellite speakers can reproduce reasonable
bass, you can try a lower crossover point.
Experimentation and listening will guide you to the
right spot.
The X-OVER Q setting controls the slope of the trace
beyond the cutoff frequency, in dB/octave. The aim
is to make a ‘mirror image’ match with the slope of
the high-pass filter – a steep cut-off of the high-pass
filter from the sound processor/receiver should be
matched by a steep cut-off of the low-pass filter
from Logo. Similarly, if the sound processor/receiver
provides a more gradual cut-off, the
should have a lower value.
Crossover Q setting
X-OVER Q setting
Recommended settings for use
with Muso speakers
Arcam’s Muso satellite speakers ideally
complement the sound quality and design values
of Logo. The recommended settings of Logo for
use with Muso speakers are:
X-OVER FREQ
X-OVER Q
VOLUME
PHASE
90Hz
0.5
8
0°
Volume level setting
Accurate volume level setting for a subwoofer ideally
requires specialist measuring equipment such as a
Real Time Spectrum Analyser or RTA. A regular SPL
(Sound Pressure Level) meter will not work for this!
For most systems though simple experimentation
by ear will suffice. Start with a medium setting (5)
and experiment with
sounds can be heard as part of the main sound
and not traceable to the subwoofer directly. Most
sound processors or receivers allow Sub levels to be
trimmed ‘on the fly’ to counter excessively high or low
levels from particular source material.
VOLUME until low frequency
calibration
English
Phase setting
This has two settings: with the PHASE button out (0°)
and with the button in (180°).
A phase delay may be used to counteract the effect
of sound waves from Logo interacting with and
partially cancelling out or unduly emphasising sound
from the satellite speakers. This effect depends
critically on the relative positioning of subwoofer
and satellite speakers and can also be remedied by
relocating the subwoofer a short distance. The phase
setting is available if relocation is not possible or
impractical.
Gain,
dB
Crossover frequency, Hz
Gain,
dB
Crossover frequency
logo
E-7
Page 8
specification
Technical specifications
System design One-way speaker, with 10 litres internal volume. The cabinet is solidly
constructed from machined MDF with internal bracing.
Drive unit 10” (254mm) subwoofer drive unit with long excursion, magnetically
shielded.
Frequency range 20Hz to 250Hz
Impedance 4Ω nominal
Sensitivity 85dB/watt, measured at 1m
Crossover Fourth order Linkwitz-Riley crossover circuit, 24dB/octave (80dB/decade),
adjustable for frequency and Q.
Connections
Mains supply 100V–240V at 50/60Hz. Fuse T2.5AL 250V
Amplifier 200 watts/4Ω, under normal operating conditions, 275W max.
Finish Black paint
Dimensions 280 x 280 x 416mm (WxDxH)
Mass Net 15kg (Note: Take care when lifting the unit)
Note that all specification values are typical, unless otherwise stated.
Continual improvement policy
Arcam has a policy of continual improvement for its products. This means that designs and specifications are
subject to change without notice.
LEFT, RIGHT and SUB inputs and outputs: RCA phono sockets (gold), max
2.5V, >22kΩ. The unit may be ‘daisy-chained’.
Worldwide Guarantee
This entitles you to have the unit repaired free of
charge, during the first two years after purchase, at
any authorised Arcam distributor provided that it
was originally purchased from an authorised Arcam
dealer or distributor. The manufacturer can take no
responsibility for defects arising from accident, misuse,
abuse, wear and tear, neglect or through unauthorised
adjustment and/or repair, neither can they accept
responsibility for damage or loss occurring during
transit to or from the person claiming under the
guarantee.
The warranty covers:
Parts and labour costs for two years from the
purchase date. After two years you must pay for both
parts and labour costs. The warranty does not cover
transportation costs at any time.
Claims under guarantee
This equipment should be packed in the original
packing and returned to the dealer from whom it
was purchased, or failing this, directly to the Arcam
distributor in the country of residence.
It should be sent carriage prepaid by a reputable
carrier – not by post. No responsibility can be
accepted for the unit whilst in transit to the dealer or
distributor and customers are therefore advised to
insure the unit against loss or damage whilst in transit.
For further details contact Arcam at:
Arcam Customer Support Department,
Pembroke Avenue, Waterbeach,
CAMBRIDGE, CB25 9QR, England
or www.arcam.co.uk.
Problems?
If your Arcam dealer is unable to answer any query
regarding this or any other Arcam product please
contact Arcam Customer Support at the above
address and we will do our best to help you.
On-line registration
You can register you product on-line at
www.arcam.co.uk.
Page 9

Handbook
Manuel
Handbuch
Handleiding
logo
Page 10

consignes de
sécurité
ATTENTION : afin de réduire les risques de choc électrique, n’ouvrez pas le boîtier de l’appareil. Les pièces internes ne sont pas réparables par
l’utilisateur. Pour tout problème matériel, contactez des techniciens qualifiés.
ATTENTION : afin de réduire les risques de choc électrique et d’incendie, veillez à ne pas exposer cet appareil à la pluie ou à l’humidité.
Le triangle dans lequel figure le symbole d’un éclair alerte l’utilisateur de la présence, dans le boîtier de l’appareil, d’une tension dangereuse, non isolée et
suffisamment importante pour représenter un risque de choc électrique.
Le triangle dans lequel figure un point d’exclamation alerte l’utilisateur de la présence d’instructions de fonctionnement et de maintenance (réparation)
importantes dans la documentation accompagnant le produit.
ATTENTION : au Canada et aux États-Unis, afin de prévenir tout choc électrique, aligner la plus grosse broche de la prise à la fente la plus large de la
fiche et insérez entièrement la prise dans la fiche.
Consignes de sécurité
importantes
La conception et la fabrication de ce produit sont
conformes à des normes de qualité et de sécurité
strictes. Vous devez cependant prendre les précautions
ci-après lors de son installation et de son utilisation.
1. Avertissements et consignes
Il est important de :
A. lire les consignes de sécurité et d’utilisation
avant d’utiliser ce haut-parleur ;
B. conserver ce manuel pour vous y référer par la
suite ;
C. se conformer aux consignes et aux
avertissements figurant dans ce manuel ou sur
le haut-parleur.
2. Eau et humidité
N’utilisez pas ce haut-parleur à proximité d’un point
d’eau.
La présence d’électricité à proximité d’un point
d’eau est dangereuse. N’utilisez pas l’appareil à
proximité d’un point d’eau, (ex. : près d’une baignoire,
d’un lavabo, d’un évier, dans une cave humide ou à
proximité d’une piscine, etc.).
3. Chute d’objets ou pénétration de liquide
Veillez à ne pas laisser tomber d’objets, ni à renverser,
laisser goutter ou asperger des liquides dans quelque
ouverture du boîtier. Ne placez pas d’objet contenant
du liquide sur l’appareil (vase par exemple).
4. Ventilation
N’obstruez pas les orifices de ventilation.
Evitez de placer l’appareil sur un lit, un canapé, un
tapis ou une surface similaire instable, ou dans une
bibliothèque ou un meuble fermé. Ceci risquerait de
nuire à la ventilation du système. Pour assurer une
ventilation correcte, il est conseillé de prévoir un
espace minimum de 50 mm de chaque côté et audessus de l’appareil.
5. Exposition à la chaleur
Ne placez pas l’appareil à proximité d’une source de
chaleur (ex. : radiateur, poêle ou tout autre appareil, y
compris d’autres amplificateurs).
6. Température de fonctionnement
L’appareil est conçu pour fonctionner dans des
conditions thermométriques et hygrométriques
modérées.
7. Installation du haut-parleur
Le haut-parleur n’est pas conçu pour être placé sur
une étagère ou sur un pied. Il doit être posé à même
le plancher, de manière à ce que les conducteurs
électriques et autres cordons ne constituent pas un
danger de chute.
8. Alimentation
Le haut-parleur est alimenté via une fiche adaptée.
Ne changez/modifiez pas la fiche mise à disposition
– consultez votre revendeur pour la remplacer.
Ce produit est un produit de classe II ou du matériel
électrique à double isolation. Sa conception ne
requiert pas de branchement de sécurité à la terre.
Utilisez principalement l’interrupteur situé à l’arrière
de l’appareil pour isoler le haut-parleur Logo de
l’alimentation électrique générale. Le haut-parleur
Logo doit être installé de telle sorte qu’il puisse être
débranché.
9. Protection des cordons d’alimentation secteur
Les cordons d’alimentation secteur doivent cheminer
de façon à être protégés des écrasements ou
pincements, en particulier au niveau des fiches et aux
points de sortie du haut-parleur.
10. Protection contre les orages électriques
Débrancher le haut-parleur en cas d’éclairs ou en cas
de non utilisation sur une période prolongée.
11. Odeur suspecte
Arrêtez et débranchez immédiatement l’appareil
en cas d’émission de fumée ou d’odeur anormales.
Contactez immédiatement votre revendeur.
12. Nettoyage
Mettez l’appareil hors tension avant de le nettoyer.
Pour l’entretien du boîtier, utilisez uniquement un
chiffon doux, humide et non pelucheux. N’utilisez ni
diluant pour peinture, ni solvant chimique.
L’emploi d’aérosols ou de produits de nettoyage pour
meubles est déconseillé, car le passage d’un chiffon
humide risquerait de laisser des traces blanches et
indélébiles.
13. Entretien et réparation
Pour toute opération d’entretien, contactez des
techniciens qualifiés.
Une opération d’entretien est nécessaire quand le
haut-parleur a été endommagé. Exemples :
A. prise ou cordon d’alimentation endommagé, ou
B. renversement de liquide ou pénétration de
corps étrangers dans l’enceinte acoustique, ou
C. appareil exposé à la pluie ou à l’humidité, ou
D. anomalie ou altération de fonctionnement de
l’appareil, ou
E. chute de l’appareil ou enceinte endommagée.
Respect des consignes de sécurité
La conception de ce produit est conforme à la norme
internationale de sécurité électrique CEI 60065.
Ce dispositif est conforme à la partie 15 des règles
de FCC. L’opération est sujette aux deux conditions
suivantes : (1) ce dispositif peut ne pas causer
l’interférence nocive, et (2) ce dispositif doit accepter
n’importe quelle interférence reçue, y compris
l’interférence qui peut causer l’opération peu désirée.
F-2
Page 11

Table des matières
consignes de sécurité ............................ F-2
Consignes de sécurité importantes ...F-2
Respect des consignes de sécurité ..... F-2
merci… ..................................................... F-3
installation ................................................ F-4
Installation de l’appareil .............................. F-4
Alimentation électrique .............................F-4
Câbles de branchement ............................ F-4
Connexion à une source audio ............F-4
Entretien du haut-parleur .........................F-4
positionnement des haut-parleurs ..... F-5
Système stéréo sans LFE ...........................F-6
connexion ................................................ F-6
Système Caisson de basses/Bande
passante complète+Satellite ...................F-6
Système Sub/Sat .............................................F-6
Mode Direct dans les amplificateurs
surround Arcam .............................................F-6
Réglage de la fréquence de croisement . .
F-7
Réglage du croisement Q ........................F-7
Réglage du niveau du volume ................F-7
Réglage de la phase ......................................F-7
étalonnage ................................................F-7
spécification ............................................. F-8
Caractéristiques techniques ....................F-8
Garantie mondiale ........................................ F-8
Réclamations au titre de la garantie...F-8
Des problèmes ? ............................................F-8
Inscription en ligne ........................................F-8
… et félicitations ! Vous venez d’acquérir le haut-parleur de sous-basse Logo d’Arcam.
Le Logo peut étendre la bande passante de vos haut-parleurs (satellite) principaux en affichant
précisément les composants basse fréquence de sources de programme surround et stéréo.
L’appareil offre également une connexion LFE (effets basses fréquences) distincte mais commune.
L’ingénieur du son réserve ce canal à la reproduction exclusivement à l’aide d’un caisson de basse.
Le contrôle de volume unique du Logo permet d’effectuer des ajustements de niveaux de manière
indépendante, pour assurer un équilibrage parfait dans la pièce d’écoute.
Le Logo est constitué d’un amplificateur unique de 200 W monté en monobloc avec un pilote à
longue excursion orienté vers le bas. Conçu sous la forme d’une baie renforcée sophistiquée, ce
pilote exploite les technologies matérielles les plus avancées. Un filtre d’égalisation pour hautparleur (Linkwitz transform crossover circuit) corrige activement la réponse des basses et fournit un
alignement Bessel qui permet de minimiser la distorsion temporelle, pour garantir des transitions de
basse précises. La musicalité et la puissance obtenues sont fantastiques.
Nous vous remercions de bien vouloir prendre le temps de lire ce manuel. Les informations que vous
y trouverez vous permettront de tirer pleinement avantage de l’appareil que vous venez d’acquérir.
L’équipe de développement Logo
merci…
Français
Contenu du carton d’emballage
< Système sous-basse Logo d’Arcam
< Câble secteur IEC
< Le présent manuel!
logo
F-3
Page 12

AUTO
MANUAL
STANDBY
IN
L
R
LFE
ON OFF
OUT
L
R
LFE
100-240V~50/60HZ 275W MAX
FUSE: T2.5AL 250V
USE ONLY WITH A 250V FUSE
PHASE STANDBY
AUTO
MANUAL
0.3
0.5
0.7
0.9
1.1
1.3
1.5
X-OVER Q
VOLUME
0
1
2
3
456
7
8
9
10
35
50
70
85
100
115
125
140
160
X-OVER FREQ
installation
Installation de l’appareil
< Placez le haut-parleur Logo sur une surface plane
et dure, à l’abri des rayons directs du soleil et de
toute source de chaleur ou d’humidité.
< Veillez à ne pas le placer dans un espace
clos, tel qu’une baie ou un placard fermé,
sauf si la ventilation est suffisante. Lors du
fonctionnement du haut-parleur Logo, sa
température augmente.
< Ne posez pas votre platine sur le Logo. Les
platines sont très sensibles au bruit généré par
l’alimentation secteur, qui risque d’être audible
à la lecture sous forme de bourdonnement
si la platine d’enregistrement est trop proche.
En outre, la pointe de lecture peut se placer
inopinément sur des pistes en raison des
vibrations issues du Logo.
Alimentation électrique
Le Logo est livré avec une prise moulée fixée au
câble pour l’alimentation secteur. Vérifiez que la
prise fournie est compatible avec votre système et
contactez votre revendeur Arcam si vous avez besoin
d’un autre câble d’alimentation secteur. Le Logo est
équipé d’un transformateur conçu pour accepter des
tensions secteur nominales de 100 V à 240 V.
Branchez la prise IEC du câble d’alimentation dans la
prise à l’arrière du Logo, en vous assurant qu’elle est
solidement enfoncée. Branchez l’autre extrémité du
câble d’alimentation à la prise secteur et, si nécessaire,
permutez la prise.
Le Logo est équipé d’un commutateur d’alimentation
sur le panneau arrière, au-dessus de l’arrivée de
l’alimentation électrique. Assurez-vous qu’il est ouvert
lorsque vous souhaitez utiliser le Logo.
Si le Logo n’est pas utilisé pendant une période
prolongée, mettez l’appareil sous tension en fermant
le commutateur d’alimentation.
Témoin lumineux
Un témoin lumineux est situé sur le
bord supérieur du dispositif Logo.
Lorsque le haut-parleur n’est pas
alimenté, le témoin est éteint.
Lorsque le haut-parleur est connecté et
prêt à l’emploi, le témoin s’allume en bleu.
Lorsque le haut-parleur est en mode de veille
(économie d’énergie), le témoin s’allume en rouge. Le
haut-parleur s’allume dès qu’il reçoit un signal audio.
Commutateur de veille
Le bouton du commutateur
d’alimentation (libellé
être placé sur deux positions :
MANUAL.
S’il est en position «
AUTO » (bouton non enfoncé),
STANDBY) peut
AUTO et
l’amplificateur du Logo se met en veille si aucun
signal audio n’est reçu pendant une certaine période
(période d’inactivité). S’il est en position «
MANUAL »
(bouton enfoncé), l’amplificateur du Logo reste
constamment activé lorsque l’appareil est sous
tension.
Câbles de branchement
Il est recommandé d’employer des câbles de
branchement audio blindés et de qualité supérieure.
Les câbles de qualité médiocre altèrent les
performances du système. Les câbles doivent être
aussi courts que possible.
Lors de la connexion de l’équipement, il est préférable
de s’assurer que le câblage de l’alimentation électrique
principale est à bonne distance des câbles audio, afin
d’éviter les bruits indésirables dans les signaux audio.
Connexion à une source audio
Avant de connecter le Logo, vérifiez que le
récepteur/processeur audio est éteint. Dans le cas
contraire, l’opération endommagera le haut-parleur et
l’amplificateur.
Si la source audio présente une sortie
ou
LFE OUT, branchez-la à l’entrée IN LFE du panneau
PRE-OUT SUB
arrière en utilisant des connecteurs RCA (phono) aux
deux extrémités. Si la source audio ne présente pas
de sortie SUB ou LFE, branchez les canaux gauche et
droit de la sortie stéréo de préamplificateur (
et
PRE OUT R) aux entrées IN L et IN R, respectivement.
PRE OUT L
Il est possible de connecter simultanément la sortie
LFE et les sorties L et R au Logo. Ainsi, vous pouvez à
la fois utiliser le canal LFE et disposer de « grands »
haut-parleurs gauche et droit pour la réponse des
basses.
Les sorties de niveau de ligne
OUT L, OUT R et OUT LFE
permettent la connexion en série d’autres appareils,
par exemple pour une installation répartie dans
plusieurs pièces.
Après la connexion
Avant la mise sous tension, mettez le volume de
l’amplificateur de la source audio au niveau minimum.
Mettez l’amplificateur de la source sous tension,
sélectionnez un signal source, puis augmentez
progressivement le volume jusqu’au niveau d’écoute
souhaité.
Entretien du haut-parleur
Mise en train
De même qu’une voiture neuve, tout haut-parleur
requiert une période de « rodage ». Même si le
son reproduit par le Logo semble correct dès de la
première connexion, il s’améliore prodigieusement
avec le temps. Environ 50 heures d’utilisation sont
nécessaires pour atteindre les performances optimales
du Logo.
Remarque : lors de la connexion du Logo via
des câbles de transmission de signal ou en cas
de déplacement du Logo, l’appareil doit être hors
tension. Pour vous en assurer, désactivez la connexion
du cordon d’alimentation et débranchez-le.
Nettoyage
Pour enlever la poussière et la saleté, nettoyez
simplement le haut-parleur à l’aide d’un chiffon doux
légèrement humide. N’employez aucun produit de
nettoyage chimique ou à base de solvant, car ils
détériorent le revêtement de l’armoire du hautparleur.
Puissance
Les haut-parleurs Arcam sont conçus pour reproduire
de la musique enregistrée dans des conditions
normales, chez vous. Leur emploi dans le cadre
d’utilisations commerciales (dans une discothèque
ou pour un système de sonorisation publique, par
exemple) est déconseillé et non garanti.
F-4
Page 13

positionnement des haut-parleurs
Les conseils fournis ici constituent des recommandations générales
relatives à la configuration des haut-parleurs. Reportez-vous à la
documentation fournie avec les haut-parleurs pour obtenir des
informations plus précises sur le positionnement et l’installation. En outre,
la page www.dolby.com/consumer/home_entertainment/roomlayout.html
fournit des informations pratiques sur les dispositions des pièces d’écoute.
Acoustique de la pièce
La forme de la pièce et les meubles qui s’y trouvent ont une incidence
sur le son perçu. Par exemple, des surfaces trop vides provoquent des
réflexions susceptibles d’accentuer la rudesse du son. À l’inverse, les
tapis, les décorations murales et les rideaux peuvent l’améliorer.
Si vous avez le choix entre plusieurs pièces d’écoute, éviter d’en
sélectionner une qui soit parfaitement carrée ou dont la dimension
correspond au double d’une autre. Une telle pièce aggrave la
résonance qui imprègne le son.
Plus un haut-parleur se trouve près des angles de la pièce ou des
intersections mur-sol ou mur-plafond, plus la sortie des basses est
forte, ce qui risque d’amplifier démesurément les basses. Il suffit parfois
de déplacer un haut-parleur de quelques centimètres pour sentir la
différence.
Réglage du haut-parleur
Le positionnement adéquat du haut-parleur est crucial pour obtenir un
son Home-cinéma optimal (voir schéma).
De manière générale, les haut-parleurs doivent être placés sur un pied
rigide à environ 15 cm du mur situé à l’arrière et à 60 cm au moins
du mur latéral. Les haut-parleurs ne doivent jamais être placés sur le
sol (sauf s’ils sont prévus à cet effet) ni dans un coin.
Les pilotes de haut-parleur doivent se trouver au
niveau de l’oreille de l’utilisateur assis, ou légèrement
plus haut. Dans la mesure du possible, les utilisateurs
doivent s’asseoir entre les deux haut-parleurs
surround.
Le son produit dépend de l’acoustique de la pièce et
il est recommandé de tester le positionnement des
haut-parleurs.
Caisson de basses
Le placement du Logo a un impact sur la qualité
audio générale. En général, vous obtiendrez de
meilleures performances et un son plus net pour
les basses si vous placez le caisson de basses près
d’un mur ou dans un angle. Toutefois, les résultats
obtenus sont différents d’une pièce à une autre.
Il est recommandé d’effectuer plusieurs essais de
positionnement du caisson de basses.
Supports de haut-parleur
Plus le haut-parleur est tenu fermement, meilleur est
le son. Il est recommandé d’utiliser un support en
métal rigide de 40 à 60 cm de hauteur. Les modèles
proprement amortis qui ne sonnent pas quand on les percute avec un crayon (en raison de
leur fabrication ou de leur remplissage avec du sable de silice sec) donneront le meilleur son.
Assurez-vous que ni le support, ni le haut-parleur n’oscillent.
Français
logo
F-5
Page 14

connexion
L- R-
IN L
IN R
PRE OUT
LEFT
PRE OUT
RIGHT
L+ R+
R-R+
L-L+
LS RS
C
L
R
IN LFE
PRE OUT SUB
LS
RS
C
L
R
IN LFE
IN L
IN R
PRE OUT LEFT
PRE OUT RIGHT
PRE OUT SUB
Système stéréo sans LFE
Il s’agit d’un système à double canal classique (tel que
le Solo d’Arcam). Le Logo se connecte aux sorties
de préamplificateur G/D. La fréquence de croisement
sur le Logo doit être réglée sur l’affaiblissement
basse fréquence des haut-parleurs principaux
(indiquée dans le manuel des haut-parleurs). Vous
pouvez utiliser le contrôle Q (
précisément l’intégration du Logo et de vos hautparleurs principaux.
X-OVER Q) pour ajuster
Système Caisson de
basses/Bande passante
complète+Satellite
Ce système surround (tel que Solo Movie 5.1
d’Arcam) présente des haut-parleurs gauche et droit
à bande passante complète et des haut-parleurs
arrière satellite (ou à bande passante complète). Il
doit être connecté, avec la sortie Sub, Subwoofer
ou LFE branchée à l’entrée
préamplificateur gauche/droite branchées aux entrées
IN L/IN R du Logo.
Dans de tels systèmes, le Logo peut- être configuré
de manière à fonctionner avec deux fréquences
de croisement. Une fréquence est configurée pour
les haut-parleurs arrière à l’aide du croisement
d’amplificateur surround, tandis qu’une autre
fréquence est configurée pour les haut-parleurs
gauche et droit à bande passante complète, à l’aide du
croisement Logo.
IN LFE et les sorties de
Mode Direct dans les
amplificateurs surround Arcam
Si le système doit utiliser le croisement dans
l’amplificateur surround pour le matériel 5.1 ou
7.1, mais utiliser les haut-parleurs gauche et droit
à bande passante complète avec le remplissage
Logo pour un appareil à double canal, vous
pouvez utiliser le mode Direct.
Connectez l’amplificateur et le Logo comme
indiqué dans le schéma du Système Caisson de
basses/Bande passante complète+Satellite. Dans
l’amplificateur, configurez tous les haut-parleurs
sur une « petite » taille. Ainsi, les basses sont
redirigées vers le Logo via le canal LFE. Pour
utiliser la bande passante complète du système,
activez le mode Direct pour les sources à double
canal. Les bandes passantes complètes sont alors
envoyées vers les haut-parleurs gauche et droit et
les entrées
de son propre croisement.
IN L/IN R du Logo sont utilisées à l’aide
Système Sub/Sat
Dans ce système surround (tel que Solo Movie 5.1
d’Arcam), tous les haut-parleurs principaux sont
des haut-parleurs satellite, définis comme étant
« petits ». Le Logo est connecté à la sortie libellée
SUB, SUBWOOFER ou LFE.
L’entrée LFE ignore le croisement dans le Logo. La
fréquence de croisement doit donc être définie par
l’amplificateur surround. Pour déterminer le réglage
du croisement, veuillez consulter la réponse des
haut-parleurs satellite. Celle-ci peut aller de 70 Hz
environ pour les grands satellites à 150 Hz pour les
petits satellites. En cas de doute, il est recommandé
de commencer avec une valeur de 80 Hz.
F-6
Page 15

Le caisson de basses a deux fonctions : d’une part la reproduction exacte et selon une puissance suffisante des
X-OVER FREQ
35
50
70
85
100
115
125
140
160
0.3
0.5
0.7
0.9
1.1
1.3
1.5
X-OVER Q
PHASE
VOLUME
0
1
2
3
456
7
8
9
10
0
40 60 80 100 120 140 160
-12
20
0
-12
Q=1.5
Q=1.0
Q=0.71
Q=0.49
Q=0.58
Q=0.3
sub-basses, impossible avec d’autres « petits » haut-parleurs (le haut-parleur central est presque toujours un
« petit » haut-parleur) ; d’autre part la reproduction du « .1 » ou piste LFE (effets basse fréquence) du matériel
5.1 ou 7.1.
Pour des résultats optimaux, il faut configurer correctement la relation entre le caisson de basses et les autres
haut-parleurs du système. Ce paramétrage s’effectue via le réglage du point de croisement et du niveau du
caisson de basses. Le point de croisement établit la fréquence au-dessous de laquelle les signaux sont redirigés
des « petits » haut-parleurs vers le caisson de basses. Le niveau du caisson de basses permet de garantir que les
signaux de volume identiques créent la même pression sonore, quelle que soit leur fréquence et quel que soit le
haut-parleur dont ils proviennent (haut-parleur satellite ou caisson de basses, par exemple).
Dans la plupart des systèmes surround, deux croisements sont disponibles : l’un se trouve dans le décodeur
surround, l’autre dans le Logo.
Afin d’assurer un son optimal sur de nombreux systèmes, le Logo permet l’utilisation indépendante de ces
contrôles pour les systèmes présentant de « grands » haut-parleurs avant et une sortie LFE à partir du
décodeur surround.
Valeurs conseillées pour les hautparleurs Muso
Les haut-parleurs satellite Muso d’Arcam
complètent parfaitement la qualité sonore et la
conception du Logo. Les valeurs recommandées
pour le Logo utilisé avec des haut-parleurs Muso
sont les suivantes :
X-OVER FREQ
X-OVER Q
VOLUME
PHASE
90Hz
0,5
8
0°
étalonnage
Français
Réglage de la fréquence
de croisement
Dans la plupart des systèmes, il est recommandé
d’utiliser un point de croisement de 90 Hz pour le
Logo.
Si vos haut-parleurs satellite sont très « petits »
(et sont donc peu adaptés à la reproduction des
basses), il peut s’avérer judicieux de définir un point
de croisement supérieur pour permettre au Logo
de prendre en charge une plus grande partie du
travail. Cependant, notez bien que plus le point de
croisement est élevé, plus les fréquences basses
semblent directionnelles, et plus la position physique
du caisson des basses est facilement identifiable.
Si vos haut-parleurs satellite sont à même de
reproduire des basses raisonnables, vous pouvez
essayer d’utiliser un point de croisement inférieur.
Faites plusieurs essais et écoutez les résultats afin de
déterminer le réglage adéquat.
Réglage du croisement Q
Le paramètre X-Over Q contrôle la pente de la
courbe une fois la fréquence de blocage dépassée,
en dB/octave. Son objectif est d’établir une
correspondance de type « image inverse » avec la
pente du filtre passe-haut (tout point de coupure net
du filtre passe-haut du récepteur/processeur audio
doit correspondre à un point de coupure net du
filtre passe-bas du Logo). De même, si le récepteur/
processeur audio présente un point de coupure plus
graduel, le paramètre
valeur plus petite.
X-OVER Q doit être défini sur une
Réglage du niveau du
volume
Dans l’idéal, la définition du niveau de volume d’un
caisson de basses requiert un équipement de mesure
spécialisé, tel que Real Time Spectrum Analyser ou
RTA. Un compteur SPL (Sound Pressure Level)
normal ne suffit pas !
Toutefois, pour la majorité des systèmes, vous pouvez
vous contenter de réaliser des essais en testant les
résultats à l’oreille nue. Commencez avec une valeur
moyenne (5) et faites des essais à l’aide du paramètre
Volume jusqu’à ce que les basses fréquences soient
audibles comme faisant partie du son principal et
non traçables directement sur le caisson de basses. La
plupart des processeurs audio permettent le réglage
« à la volée » des niveaux basses fréquences afin de
prendre en compte les niveaux trop élevés ou trop
faibles d’un matériel source particulier.
Réglage de la phase
Ce paramètre peut prendre deux valeurs : 0° (bouton
Phase non enfoncé) et 180° (bouton Phase enfoncé).
Un délai de phase permet de contrer l’effet des
ondes acoustiques du Logo interagissant avec le son
issu des haut-parleurs satellite, l’annulant partiellement
et en accentuant l’ondulation. Cet effet dépend en
grande partie de la position relative du caisson des
basses et haut-parleurs satellite. Par conséquent, il
est possible de régler le problème simplement en
repositionnant le caisson de basses plus près. S’il est
impossible de déplacer le caisson de basses, vous
pouvez utiliser le réglage de la phase.
Gain,
dB
Fréquence de croisement, Hz
Gain,
dB
Fréquence de croisement
logo
F-7
Page 16

spécification
Caractéristiques techniques
Conception du système Haut-parleur unidirectionnel, volume intérieur de 10 litres. L’armoire est
solidement conçue à base de MDF (répartiteur d’entrée) usiné avec
armature intérieure.
Boîtier de commande Boîtier de commande de caisson de basses de 254 mm à longue
excursion, à écran magnétique
Plage de fréquence De 20 Hz à 250 Hz
Impédance 4 Ω (nominale)
Sensibilité 85 dB/watt (mesurée à 1 m)
Croisement Circuit de croisement de Linkwitz-Riley du quatrième ordre, 24 dB/
octave (80 dB/decade), ajustable pour Q et la fréquence.
Connexions Entrées et sorties
> 22 kΩ. L’appareil peut être « connecté en série ».
Alimentation électrique
générale
Amplificateur 200 watts/4 Ω, dans des conditions de fonctionnement normales,
Revêtement Revêtement de peinture noire
Dimensions 280 x 280 x 416 mm (LxPxH)
Poids Net 15 kg (remarque : soulevez l’appareil avec précaution)
Sauf indication contraire, toutes les valeurs spécifiées sont des valeurs types.
Politique d’amélioration continue
Arcam améliore continuellement ses produits. Aussi, la conception et les spécifications peuvent faire l’objet
de modifications sans préavis.
100 V–240 V à 50/60 Hz. Fusible T2,5AL 250 V
max. 275 watts
LEFT, RIGHT et SUB : Prises phono RCA (or), max. 2,5 V,
Garantie mondiale
Cette garantie vous autorise à faire réparer
gratuitement votre appareil chez un distributeur
Arcam agréé durant les deux premières années
suivant l’achat, à condition que l’appareil ait à l’origine
été acheté chez un revendeur ou un distributeur
Arcam. Le fabricant ne peut engager sa responsabilité
en cas de défauts découlant d’un accident, d’une
mauvaise utilisation, d’une utilisation intensive, d’une
usure normale, d’une négligence ou d’un réglage
ou d’une réparation non autorisée. Il ne peut en
outre engager sa responsabilité pour tout dommage
ou toute perte survenant pendant le transport du
matériel sous garantie.
La garantie couvre :
Le coût des pièces et de la main d’œuvre pendant
deux ans à compter de la date d’achat. Après deux
ans, ces frais incombent au client. La garantie ne
couvre jamais les frais de transport.
Réclamations au titre de la
garantie
L’appareil doit être réexpédié dans son emballage
d’origine et renvoyé au revendeur auprès duquel il
a été acheté, ou directement au distributeur Arcam
dans le pays de résidence du client.
Il doit être envoyé en port prépayé par l’intermédiaire
d’un transporteur fiable – jamais par la poste. Aucune
responsabilité n’est acceptée pendant le transport de
l’appareil au titre de la garantie ; aussi, est-il conseillé
aux clients d’assurer l’appareil contre les pertes et les
dommages subis en transit.
Pour tout renseignement complémentaire, veuillez
contacter le Service client Arcam à l’adresse suivante :
Pembroke Avenue, Waterbeach, CAMBRIDGE
CB25 9QR, Grande Bretagne
ou www.arcam.co.uk.
F-8
Des problèmes ?
Si votre revendeur ne peut répondre à votre
demande pour ce produit Arcam ou tout autre
produit Arcam, veuillez contacter le Service client
d’Arcam, à l’adresse ci-dessus, où nous ferons de
notre mieux pour vous aider.
Inscription en ligne
Vous pouvez enregistrer votre produit Arcam à
l’adresse suivante : www.arcam.co.uk
Page 17

Handbook
Manuel
Handbuch
Handleiding
logo
Page 18

sicherheits-
richtlinien
Achtung: Um das Risiko eines Elektroschocks zu minimieren, sollten Sie die Abdeckung (Rückseite) nicht entfernen. Die Bauteile im Gerät können vom
Benutzer nicht gewartet werden. Überlassen Sie die Wartung des Geräts einem Fachmann.
Warnung: Um das Risiko von Brand oder Elektroschock zu reduzieren, sollten Sie dieses Gerät weder Regen noch Feuchtigkeit aussetzen.
Das Blitzsymbol in einem Dreieck weist den Anwender auf eine nicht isolierte „gefährliche Spannungsquelle“ im Gehäuse des Geräts hin, die stark genug sein
kann, um einen Stromschlag auszulösen.
Das Ausrufezeichen in einem gleichschenkligen Dreieck weist den Anwender auf wichtige Anweisungen zum Betrieb und zur Instandhaltung (Wartung) in der
Dokumentation hin.
Achtung: In Kanada und den USA muss zur Vorbeugung gegen elektrische Schläge der breite Teil des Steckers in die breite Öffnung der Steckdose
vorsichtig eingesteckt werden.
Wichtige Sicherheitsanweisungen
Dieses Gerät wurde unter Berücksichtigung strikter
Qualitäts- und Sicherheitsbestimmungen entworfen
und gefertigt. Sie sollten jedoch bei der Installation und
dem Betrieb folgende Vorsichtsmaßnahmen treffen.
1. Beachten Sie die Warnungen und Anweisungen
Wichtig:
A. Vor der Inbetriebnahme dieser Lautsprecher
sollten Sie die entsprechenden Sicherheits- und
Betriebsanweisungen lesen.
B. Bewaren Sie dieses Handbuch auf.
C. Beachten Sie die enthaltenen Warnungen sowie
die Hinweise auf den Lautsprechern.
2. Wasser und Feuchtigkeit
Verwenden Sie die Lautsprecher nicht in einer
feuchten Umgebung.
Das Betreiben von elektrischen Geräten in der Nähe
von Wasser (z. B. in der Nähe von Badewannen,
Waschbecken, Swimming Pools oder in einem
feuchten Keller) kann gefährlich sein.
3. Eindringen von Flüssigkeiten oder Schmutz
Achten Sie darauf, dass keine Flüssigkeiten oder
Schmutz in das Geräteinnere gelangen. Sie sollten
keine mit Flüssigkeit gefüllten Behälter (z. B.
Blumenvasen) auf dem Gerät abstellen.
4. Belüftung
Verdecken Sie keine der Belüftungsöffnungen.
Stellen Sie das Gerät nicht auf ein Bett, ein Sofa, einen
Teppich oder eine andere weiche Oberfläche, oder in
ein abgeschlossenes Bücherregal bzw. einen Schrank,
da hierdurch die Belüftung beeinträchtigt werden
könnte. Es wird empfohlen, einen Mindestabstand von
50 mm um die Seiten- und Oberkanten des Gerätes
freizuhalten.
5. Wärme
Stellen Sie die Lautsprecher nicht in der Nähe von
Wärme abgebenden Geräten wie Heizkörpern,
Herden oder anderen Elektrogeräten (z. B.
Verstärkern) auf.
6. Klima
Das Gerät wurde für den Betrieb in gemäßigten
Klimazonen ausgelegt.
7. Aufstellen des Geräts
Dieses Gerät ist nicht für das Aufstellen auf einem
Regal oder Ständer geeignet. Es sollte direkt auf dem
Fußboden aufgestellt werden. Achten Sie darauf, dass
elektrische und andere Kabel keine Stolpergefahr
darstellen.
8. Stromversorgung
Die Lautsprecher werden mit einem passenden
Netzkabel geliefert. Verwenden Sie keine anderen
Netzkabel. Wenden Sie sich an Ihren Händler, wenn
Sie Ersatz benötigen.
Dieses Gerät ist ein doppelt isoliertes elektrisches
Gerät (Class II). Es ist keine Erdung für das Gerät
erforderlich.
Zum Trennen der Lautsprecher von der
Stromversorgung sollte der Netzschalter auf der
Rückseite verwendet werden. Der Lautsprecher muss
so aufgestellt werden, dass der Stecker abgezogen
werden kann.
9. Schutz der Netzkabel
Netzkabel sollten so verlegt werden, dass Sie nicht
geknickt, gedehnt oder anderweitig werden können,
besonders an den Steckern.
10. Schutz bei Gewitter
Ziehen Sie das Netzkabel der Lautsprecher bei
Gewitter oder wenn Sie die Lautsprecher für längere
Zeit nicht nutzen.
11. Seltsamer Geruch
Sollten Sie einen ungewöhnlichen Geruch bemerken
oder Rauch am Gerät entdecken, schalten Sie es aus
und ziehen Sie den Netzstecker. Wenden Sie sich
dann unverzüglich an Ihren Arcam-Händler.
12. Reinigung
Ziehen Sie vor dem Reinigen des Geräts den
Netzstecker.
In den meisten Fällen reicht es aus, wenn Sie das
Gehäuse mit einem weichen, fusselfreien und
trockenen Tuch abwischen. Verwenden Sie keine
Verdünner oder andere chemische Lösungsmittel.
Von der Verwendung von Polituren oder Möbelsprays
wird abgeraten, da diese Substanzen weiße Spuren
hinterlassen können, wenn das Gerät danach mit
einem feuchten Tuch abgewischt wird.
13. Wartung und Reparatur
Überlassen Sie die Wartung des Geräts einem
Fachmann.
Eine Wartung ist beispielsweise erforderlich, wenn:
A. das Netzkabel oder der Netzstecker beschädigt
wurde
B. Flüssigkeiten oder Gegenstände in das Gehäuse
gelangt sind
C. das Gerät Regen oder Feuchtigkeit ausgesetzt war
D. das Gerät nicht ordnungsgemäß funktioniert
oder einen erheblichen Leistungsabfall aufweist
E. das Gerät zu Boden gefallen oder das Gehäuse
beschädigt ist.
Einhaltung von
Sicherheitsbestimmungen
Dieses Gerät entspricht der internationalen
Sicherheitsnorm für Elektrogeräte IEC 60065.
Diese Vorrichtung stimmt mit Teil 15 der FCC
Richtlinien überein. Betrieb ist abhängig von den
folgenden zwei Bedingungen: (1) kann diese
Vorrichtung möglicherweise nicht schädliche
Störung verursachen, und (2) muß diese Vorrichtung
jede mögliche empfangene Störung annehmen,
einschließlich Störung, die unerwünschten Betrieb
verursachen kann.
D-2
Page 19

Inhalt
sicherheitsrichtlinien .............................D-2
Wichtige Sicherheitsanweisungen ..... D-2
Einhaltung von
Sicherheitsbestimmungen .......................D-2
vielen dank... ............................................D-3
installation ...............................................D-4
Aufstellen des Geräts ................................ D-4
Betrieb ................................................................ D-4
Verbindungskabel ......................................... D-4
Anschließen an eine Tonquelle ............D-4
Pflege des Lautsprechers ........................ D-4
lautsprecherposition .............................D-5
Stereosystem ohne LFE ........................... D-6
anschluss ..................................................D-6
Sub/Vollständiger Frequenzbereich
+Sat-System .................................................... D-6
Sub/Sat-System ............................................. D-6
Direktmodus in Surround-
Verstärkern von Arcam ...........................D-6
Übergangsfrequenze instellung .............D-7
Übergangs-Q-Einstellung ........................ D-7
Lautstärkepegele instellung ..................... D-7
Phaseneinstellung ......................................... D-7
kalibrierung .............................................D-7
spezifikation ............................................ D-8
Technische Daten ........................................ D-8
Weltweite Garantie ....................................D-8
Inanspruchnahme der Garantie .......... D-8
Probleme? ......................................................... D-8
Online-Registrierung .................................. D-8
…, dass Sie das Arcam Logo-Sub-Bass-Lautsprechersystem erworben haben.
Logo kann die Bandbreite Ihrer Haupt- (Satelliten-)Lautsprecher erweitern, indem die
Niederfrequenzbestandteile der Stereo- und Surround-Sound-Programmquellen exakt freigelegt
werden. Außerdem bietet der Lautsprecher eine separate, aber simultane Niederfrequenz-Verbindung
(LFE - Low Frequency Effects), das heißt, ein Kanal, der vom Tonmeister ausschließlich für die
Wiedergabe durch einen Subwoofer verwendet wird. Die interne Lautstärkeregelung von Logo
ermöglicht eine unabhängige Anpassung der Lautstärke und dadurch eine perfekte Balance im Raum.
Logo enthält einen internen 200-W-Verstärker, der auf einem nach unten gerichteten Langhub-Modul
ansitzt, das gemäß der neuesten Werkstofftechnologie aus einer fortschrittlichen Gehäusekonstruktion
mit Verstärkung besteht. Die Wiedergabe der Bässe (Tiefen) wird durch eine Linkwitz-TransformationFrequenzweiche aktiv korrigiert, um eine Bessel-Anordnung zu erhalten. Das verringert die
Zeitverzögerung für exakte Tiefenübergänge. Das Ergebnis ist hervorragende technische Leistung und
musikalische Wiedergabe.
Nehmen Sie sich Zeit zum Lesen dieses Handbuchs, da es wertvolle Hinweise für eine optimale
Nutzung des Produkts enthält.
Ihr Logo Development Team
vielen dank...
Deutsch
Lieferumfang
< Arcam Logo-Sub-Bass-System
< IEC-Stromversorgungskabel
< Dieses Handbuch!
logo
D-3
Page 20

AUTO
MANUAL
STANDBY
IN
L
R
LFE
ON OFF
OUT
L
R
LFE
100-240V~50/60HZ 275W MAX
FUSE: T2.5AL 250V
USE ONLY WITH A 250V FUSE
PHASE STANDBY
AUTO
MANUAL
0.3
0.5
0.7
0.9
1.1
1.3
1.5
X-OVER Q
VOLUME
0
1
2
3
456
7
8
9
10
35
50
70
85
100
115
125
140
160
X-OVER FREQ
installation
Aufstellen des Geräts
< Stellen Sie den Logo-Lautsprecher auf
einer ebenen, festen Oberfläche auf.
Achten Sie darauf, dass das Gerät nucht
direktem Sonnenlicht oder Wärme- bzw.
Feuchtigkeitsquellen ausgesetzt ist.
< Stellen Sie das Gerät nicht in ein geschlossenes
Bücherregal oder einen Schrank, es sei denn,
es ist für ausreichende Belüftung gesorgt. Der
Logo-Lautsprecher wird bei Normalbetrieb
warm.
< Stellen Sie keinen Plattenspieler auf das Gerät.
Plattenspieler reagieren sehr empfindlich auf
das von Netzteilen erzeugte Brummen, das als
Hintergrundbrummen zu hören ist, wenn sich
der Plattenspieler zu dicht am Gerät befindet.
Durch die Schwingungen von Logo kann der
Tonabnehmer möglicherweise zwischen den
Rillen springen.
Betrieb
Logo wird normalerweise mit einem verschweißten
Netzstecker am Netzkabel ausgeliefert. Vergewissern
Sie sich, dass der mitgelieferte Stecker zur Steckdose
passt. Sollten Sie ein anderes Netzkabel benötigen,
wenden Sie sich an Ihren Arcam-Händler. Logo enthält
einen Transformator für Netzspannungen mit einem
Nennwert von 100 V bis 240 V.
Drücken Sie den IEC-Stecker des Netzkabels
fest in die Netzbuchse an der Geräterückseite.
Stecken Sie das andere Ende des Netzkabels in eine
Netzsteckdose.
Über dem Netzanschluss auf der Geräterückseite
befindet sich ein Netzschalter. Dieser muss zum
Betrieb des Geräts eingeschaltet sein. Wenn Logo
längere Zeit nicht verwendet wird, schalten Sie das
Gerät über den Netzschalter aus.
Anzeige-LED
An der Oberkante des Logo-Gehäuses
befindet sich eine Anzeige-LED. Wenn
der Lautsprecher vollständig von der
Stromversorgung getrennt ist, ist die
LED aus ist. Leuchtet sie blau, ist der
Lautsprecher einsatzbereit. Leuchtet sie rot, befindet
sich der Lautsprecher im Standby-Modus und schaltet
sich ein, sobald ein Audiosignal empfangen wird.
Standby-Schalter
Der eindrückbare (mit STANDBY
gekennzeichnete) Netzschalter hat zwei
Stellungen:
AUTO und MANUAL.
Durch die automatische Stellung
(Schalter nicht eingedrückt –
AUTO ) wird der
Verstärker von Logo in den Standby-Modus versetzt,
wenn eine Zeit lang kein Audiosignal empfangen
wurde. Durch die manuelle Stellung (Schalter
eingedrückt –
MANUAL) bleibt der Verstärker von Logo
immer eingeschaltet, wenn die Stromversorgung
eingeschaltet ist.
Verbindungskabel
Wir empfehlen die Verwendung hochwertiger,
abgeschirmter Audioverbindungskabel. Kabel
geringerer Qualität führen zu einer Verminderung der
Systemleistung. Alle Kabel sollten so kurz wie möglich
gehalten werden.
Achten Sie bei der Verkabelung der Geräte darauf,
dass das Netzkabel so weit wie möglich von den
Audiokabeln entfernt ist. Andernfalls kann es zu
unerwünschtem Brummen in den Audiosignalen
kommen.
Anschließen an eine Tonquelle
Überprüfen Sie, dass der Tonprozessor/-empfänger
ausgeschaltet ist, bevor Sie Logo anschließen.
Andernfalls kann sowohl der Lautsprecher als auch
der Verstärker beschädigt werden.
Wenn die Tonquelle über einen Ausgang Pre-out sub
oder
LFE OUT verfügt, verbinden Sie diesen Ausgang
durch Phono (Cinch)-Stecker auf beiden Seiten mit
dem Eingang
die Tonquelle über keinen
IN LFE an der Geräterückseite. Wenn
SUB- oder LFE-Ausgang
verfügt, verbinden Sie den linken und rechten Kanal
des Vorverstärker-Stereoausgangs (
PRE OUT R) jeweils mit IN L und IN R.
Sie können sowohl den
R-Ausgänge mit Logo verbinden, um sowohl den
LFE- als auch die L- und
PRE OUT L und
LFE-Kanal zu verwenden als auch die Wiedergabe
der Bässe (Tiefen) der großen linken und rechten
Lautsprecher zu ergänzen.
OUT L, OUT R und OUT LFE bieten Hochpegelausgänge
zum Verketten weiterer Geräte, beispielsweise bei
Installationen in mehreren Räumen.
Nach dem Anschließen
Drehen Sie die Verstärkerlautstärke der Tonquelle auf
den niedrigsten Wert, bevor Sie das Gerät einschalten.
Schalten Sie den Verstärker der Quelle ein, wählen
Sie das Quellsignal und erhöhen Sie schrittweise die
Lautstärke auf den gewünschten Wert.
Pflege des Lautsprechers
Erste Betriebsstunden
Genauso wie ein Auto erst eingefahren werden muss,
benötigen auch neue Lautsprecher diese Zeit am
Anfang. Obwohl Logo nach dem ersten Anschließen
bereits gut klingt, verbessert sich die Leistung des
Lautsprechers im Laufe der Zeit erheblich. Die
vollständige Leistung von Logo kann nach ungefähr 50
Betriebsstunden erreicht werden.
Hinweis: Wenn Sie Signalkabel an das Gerät
anschließen oder das Gerät an einem anderen
Standort aufstellen, achten Sie darauf, dass die
Stromversorgung zum Gerät unterbrochen und der
Netzstecker herausgezogen ist.
Reinigung
Verwenden Sie zum Reinigen des Lautsprechers
ein weiches, leicht angefeuchtetes Tuch, um Staub
oder Verschmutzungen abzuwischen. Verwenden Sie
keine Lösungsmittel enthaltenden bzw. chemischen
Reinigungsmittel, da diese die Oberfläche des
Lautsprechergehäuses beschädigen können.
Leistung
Arcam-Lautsprecher dienen zur Wiedergabe von
Musikaufnahmen unter normalen Bedingungen im
häuslichen Bereich. Wir empfehlen und garantieren
keine gewerbliche Verwendung, beispielsweise in
Diskotheken, als Beschallungssysteme usw.
D-4
Page 21

lautsprecherposition
Die folgenden Hinweise dienen als eine allgemeine Richtlinie zum
Aufstellen von Lautsprechern. Ausführlichere Informationen zur
Positionierung und Inbetriebnahme finden Sie in der im Lieferumfang
des Lautsprechers enthaltenen Dokumentation. Interessante
Informationen zur Aufteilung in Räumen finden Sie im Dokument
www.dolby.com/consumer/home_entertainment/roomlayout.html.
Raumakustik
Die Form des Raums und die Möbel im Raum wirken sich auf die
Akustik aus. Beispielsweise können viele leere Oberflächen Reflexionen
verursachen, die den Ton rau klingen lassen. Teppiche, Wandschmuck
und Vorhänge wirken diesem Effekt entgegen.
Vermeiden Sie nach Möglichkeit einen quadratischen Raum bzw. einen
Raum, bei dem die Länge der Wände doppelt lang wie deren Breite
ist. Ein derartiger Raum kann Resonanzen verstärken, die zur Tonfarbe
beitragen.
Je näher Sie einen Lautsprecher an den Raumecken und der Innenkante
zwischen Wand und Boden bzw. Wand und Decke positionieren, desto
stärker ist die Ausgabe der Tiefensignale, wodurch die Tiefen zu stark
betont werden könnten. Das Verschieben des Lautsprechers um nur
einige Zentimeter kann bereits große Auswirkungen haben.
Lautsprecherkonfiguration
Eine korrekte Aufstellung der Lautsprecher ist entscheidend für ein
optimales Heimkinoerlebnis (siehe Abbildung).
Lautsprecher sollten auf einem stabilen Ständer ungefähr 15 cm vor
der hinteren Wand und mindestens 60 cm von den Seitenwänden
aufgestellt werden. Lautsprecher sollten niemals auf dem Fußboden
(es sei denn, sie sind dafür ausgelegt) oder in Ecken
aufgestellt werden. Die Lautsprecherausgänge sollten
sich ungefähr auf oder etwas über Ohrhöhe befinden.
Der Sitzbereich sollte sich nach Möglichkeit zwischen
die Surround-Lautsprecher befinden.
Ihr Hörerlebnis hängt von der Akustik des Raums ab.
Experimentieren Sie mit unterschiedlichen Positionen,
bis das Klangbild optimal ist.
Subwoofer
Der Standort von Logo wirkt sich auf die
Gesamtklangqualität aus. Indem Sie den Subwoofer
neben einer Wand oder in einer Raumecke
positionieren, erhalten Sie oftmals eine bessere
Leistung und einen klareren Klang in den Bässen
(Tiefen). Da die Reaktion in jedem Raum anders ist,
empfehlen wir Ihnen, die Position des Subwoofers zu
testen.
Lautsprecherständer
Je stabiler ein Lautsprecher steht, desto besser ist
sein Klang. Wir empfehlen die Verwendung stabiler
Metallständer mit einer Höhe von 40-60 cm. Mit
gedämpften Ständern, die nicht klingen, wenn Sie mit
einem Stift dagegen schlagen (entweder aufgrund ihrer Bauweise oder weil sie mit feinem
Sand gefüllt sind), erzielen Sie das beste Ergebnis. Stellen Sie sicher, dass die Ständer und/
oder Lautsprecher nicht wackeln.
Deutsch
logo
D-5
Page 22

anschluss
L- R-
IN L
IN R
PRE OUT
LEFT
PRE OUT
RIGHT
L+ R+
R-R+
L-L+
LS RS
C
L
R
IN LFE
PRE OUT SUB
LS
RS
C
L
R
IN LFE
IN L
IN R
PRE OUT LEFT
PRE OUT RIGHT
PRE OUT SUB
Stereosystem ohne LFE
Dabei handelt es sich um ein typisches
Zweikanalsystem (beispielsweise Arcam Solo).
Logo wird an den L/R-Vorverstärker-Ausgängen
angeschlossen. Die Übergangsfrequenz bei Logo
sollte auf die Niedrigfrequenz-Abnahme (Roll-Off)
der Hauptlautsprecher angepasst sein (weitere
Informationen finden Sie im Handbuch zu Ihren
Lautsprechern). Die Q-Steuerung (
kann zur Feineinstellung zwischen Logo und den
Hauptlautsprechern verwendet werden.
X-OVER Q)
Sub/Vollständiger
Frequenzbereich+Sat-System
Dabei handelt es sich um ein Surround-SoundSystem (beispielsweise Arcam Solo Movie 5.1), das
aus einer Kombination aus L- und R-Lautsprechern
mit vollständigem Frequenzbereich und hinteren
Lautsprechern in Satellitenbauweise (bzw. mit
vollständigem Frequenzbereich) besteht. Verbinden
Sie bei diesem System sowohl den
bzw.
LFE-Ausgang mit dem IN LFE-Eingang und den
linken/rechten Vorverstärkerausgängen, die mit dem
IN L/IN R-Eingang von Logo verbunden sind.
Bei diesen Systemen kann Logo für die Konfiguration
mit zwei Übergangsfrequenzen verwendet werden.
Eine Frequenz wird für die hinteren Lautsprecher
mithilfe der Surround-Verstärker-Frequenzweiche
und eine Frequenz wird für die linken/rechten
Lautsprecher mit vollständigem Frequenzbereich
mithilfe der Logo-Frequenzweiche eingerichtet.
SUB-, SUBWOOFER-
Direktmodus in Surround-
Verstärkern von Arcam
Wenn Sie für die Systemkonfiguration die
Frequenzweiche im Surround-Verstärker für
5.1- oder 7.1-Material verwenden möchten,
aber linke/rechte Lautsprecher mit vollständigem
Frequenzbereich verwenden (und Logo das
Zweikanalmaterial verarbeitet), können Sie den
Direktmodus verwenden.
Schließen Sie den Verstärker und Logo wie in der
Abbildung Sub/Vollständiger Frequenzbereich+Sat-
System gezeigt an. Legen Sie im Verstärker
für alle Lautsprecher die Einstellung für kleine
Lautsprecher fest; dadurch werden die Tiefensignale
über den LFE-Kanal zu Logo umgeleitet. Um den
vollständigen Frequenzbereich des Systems zu
verwenden, aktivieren Sie den Direktmodus für
Zweikanalquellen. Dadurch werden die Signale
für den vollständigen Frequenzbereich zu den
linken und rechten Lautsprechern geleitet und die
IN L/IN R-Eingänge über die interne Frequenzweiche
zu Logo verwendet.
Sub/Sat-System
Dabei handelt es sich um ein Surround-Sound-System
(beispielsweise Arcam Solo Movie 5.1), in dem alle
Hauptlautsprecher als Satellitenlautsprecher mit der
Einstellung für kleine Lautsprecher konfiguriert sind.
Logo wird an die Ausgänge
angeschlossen.
Der LFE-Eingang umgeht die Frequenzweiche in
Logo, sodass Sie die Übergangsfrequenz durch den
Surround-Sound-Verstärker festlegen sollten. Beachten
Sie bei der Einstellung der Frequenzweiche den
Frequenzgang der Satellitenlautsprecher, der zwischen
ungefähr 70 Hz für große Satelliten und 150 Hz für
kleine Satelliten betragen kann. Wir empfehlen eine
Frequenz von 80 Hz zum Testen am Anfang.
SUB, SUBWOOFER oder LFE
D-6
Page 23

Der Subwoofer hat zwei Aufgaben: Erstens die exakte und leistungsentsprechende Wiedergabe des Sub-Basses,
X-OVER FREQ
35
50
70
85
100
115
125
140
160
0.3
0.5
0.7
0.9
1.1
1.3
1.5
X-OVER Q
PHASE
VOLUME
0
1
2
3
456
7
8
9
10
0
40 60 80 100 120 140 160
-12
20
0
-12
Q=1.5
Q=1.0
Q=0.71
Q=0.49
Q=0.58
Q=0.3
den andere, kleinere Lautsprecher nicht wiedergeben können (der mittlere Lautsprecher ist fast immer ein
kleiner Lautsprecher). Zweitens die Wiedergabe des „.1“ bzw. des Niedrigfrequenzanteils (LFE - Low Frequency
Effects) des 5.1- oder 7.1-Materials.
Um optimale Ergebnisse zu erreichen, muss der Subwoofer in der korrekten Entfernung zu den anderen
Lautsprechern im System aufgestellt sein. Zur Steuerung sind Übergangspunkt und Subwoofer-Pegel verfügbar.
Der Übergangspunkt bestimmt die Frequenz, bis zu dessen Wert Signale von kleinen Lautsprechern weg und
zum Subwoofer hin umgeleitet werden. Durch Einstellen des Subwoofer-Pegels wird sichergestellt, dass Signale
gleicher Lautstärke den gleichen Schalldruckpegel erhalten, unabhängig von ihrer Frequenz oder von welchem
Lautsprecher (d.h. Subwoofer oder Satellitenlautsprecher) sie stammen.
In den meisten Surround-Sound-Systemen sind zwei Frequenzweichen verfügbar: eine im Surround-SoundDecoder und eine im Logo-Gerät.
Um optimalen Klang in verschiedenen Systemen zu erhalten, können diese Steuerungen in Logo unabhängig für
Systeme mit großen Frontlautsprechern und einem LFE-Ausgang vom Surround-Sound-Decoder verwendet
werden.
Empfohlene Einstellungen bei
Verwendung von Muso-Lautsprechern
Muso-Satellitenlautsprecher von Arcam ergänzen
idealerweise die Klang- und Fertigungsqualität
von Logo. Wir empfehlen folgende Einstellungen
für Logo bei der Verwendung von MusoLautsprechern:
X-OVER FREQ
X-OVER Q
VOLUME
PHASE
90Hz
0,5
8
0°
kalibrierung
Übergangsfrequenzeinstellung
In den meisten Systemen beträgt die empfohlene
Übergangsfrequenz für Logo 90 Hz.
Wenn die Satellitenlautsprecher sehr klein sind (und
daher nur unzureichend Tiefen wiedergeben können),
können Sie Die Übergangsfrequenz erhöhen, damit
Logo weitgehend diese Aufgabe übernimmt. Je höher
die Übergangsfrequenz jedoch liegt, desto mehr
klingen Tiefensignale gerichtet und desto besser kann
der Standort des Subwoofers festgestellt werden.
Wenn die Satellitenlautsprecher angemessen
Tiefensignale wiedergeben, wählen Sie eine
niedrige Übergangsfrequenz. Versuchen Sie durch
Experimentieren und Hören den richtigen Wert zu
finden.
Übergangs-Q-Einstellung
Die Einstellung X-OVER Q steuert den Abfall der Spur
über der Grenzfrequenz in dB/Oktave. Der Abfall
des High-Pass-Filters wird idealerweise gespiegelt:
ein schnelles Abschalten des High-Pass-Filters vom
Tonprozessor/-empfänger sollte einem ebenfalls
schnellen Abschalten des Low-Pass-Filters von Logo
entsprechen. Ebenso sollte, wenn der Tonprozessor/empfänger ein langsameres Abschalten durchführt,
die Einstellung X-Over Q einen niedrigeren Wert
aufweisen.
Lautstärkepegeleinstellung
Eine exakte Lautstärkepegeleinstellung für einen
Subwoofer erfordert eine Spezialmessausrüstung wie
beispielsweise einen Echtzeit-Spektrumanalyser (Real
Time Spectrum Analyser) bzw. RTA. Ein normaler
Schallpegelmesser ist nicht ausreichend für diesen
Vorgang.
Bei den meisten Systemen können Sie einfach
nach Gehör experimentieren. Wählen Sie anfangs
eine mittlere Einstellung (5) und testen Sie mithilfe
von
VOLUME verschiedene Lautstärkepegel, bis
tiefe Frequenzen als Bestandteil des Hauptklangs
wahrnehmbar sind und nicht erkennbar dem
Subwoofer zugeordnet werden können. Bei den
meisten Tonprozessoren/-empfängern können SubPegel mit sofort wirksamen Änderungen geregelt
werden, um übermäßig hohen oder niedrigen Pegeln
in bestimmtem Quellmaterial entgegenzuwirken.
Phaseneinstellung
Es sind zwei Einstellungen verfügbar: bei nicht
eingedrückter Taste
Taste (180°).
Eine Phasenverzögerung kann verwendet
werden, um dem Einfluss der Schallwellen von
Logo entgegenzuwirken, die den Klang von den
Satellitenlautsprechern beeinflussen und teilweise
aufheben oder unangemessen verstärken. Dieser
Einfluss hängt entscheidend vom Abstand zwischen
dem Subwoofer und den Satellitenlautsprechern
ab und kann durch Verringern des Abstands zum
Subwoofer verhindert werden. Die Phaseneinstellung
ist verfügbar, wenn ein Verschieben nicht möglich oder
geeignet erscheint.
PHASE (0°) und bei eingedrückter
Deutsch
Gain,
dB
Übergangsfrequenz, Hz
Gain,
dB
Übergangsfrequenz
logo
D-7
Page 24

spezifikation
Technische Daten
Systemkonstruktion 1-Wege-Lautsprecher mit 10 Liter Innenvolumen. Das Gehäuse
ist eine stabile Konstruktion aus maschinell hergestellter MDF mit
Innenversteifung.
Hauptmodul 254 mm Subwoofer-Modul mit Langhub, magnetisch abgeschirmt.
Frequenzbereich 20Hz biz 250Hz
Impedanz 4 Ω nominal
Empfindlichkeit 85 dB/Watt gemessen bei 1 m
Ferquenzweiche 4th-Order-Linkwitz-Riley-Frequenzweiche, 24 dB/Oktave (80 dB/Dekade),
anpassbar für Frequenz und Q.
Anschlüsse
Stromversorgung 100 V–240 V bei 50/60 Hz. Sicherung T2,5AL 250 V
Verstärker 200 Watt/4 Ω bei normalen Betriebsbedingungen, max. 275 Watt
Oberfläche Oberflächenbeschichtung aus schwarze Farbe
Abmessungen 280 x 280 x 416 mm (Breite, Tiefe, Höhe)
Gewicht Nettogewicht 15 kg
Hinweis: Die technischen Daten entsprechen - sofern nicht anders ausgewiesen - dem Serienstandard.
Laufende Verbesserungen
Arcam bemüht sich um ständige Produktverbesserung. Das heißt, Konstruktion und Spezifikation können
ohne vorherige Ankündigung geändert werden.
LEFT-, RIGHT- und SUB-Eingänge/Ausgänge: Phono (Cinch)-Buchsen (gold),
max. 2,5 V, >22 kΩ. Das Gerät kann verkettet werden.
(Hinweis: Gehen Sie vorsichtig vor beim Anheben des Geräts.)
Weltweite Garantie
Sie sind berechtigt, das Gerät während der ersten
zwei Jahre nach Kaufdatum bei einem autorisierten
Arcam-Fachhändler kostenlos reparieren zu lassen,
unter der Voraussetzung, dass es ursprünglich
bei einem Arcam-Händler erworben wurde. Der
Hersteller übernimmt keine Verantwortung für
Schäden, die durch Unfall, Missbrauch, Verschleiß,
Vernachlässigung oder unautorisierte Veränderungen
bzw. Reparaturen entstehen. Außerdem wird
keinerlei Verantwortung für Schäden oder Verlust
des Gerätes während des Transports zum oder vom
Garantienehmer übernommen.
Die Garantie umfasst Folgendes:
Teile- und Arbeitsstundenkosten bis zu zwei Jahre
nach dem Kaufdatum. Nach Ablauf von zwei Jahren
müssen Sie die vollen Kosten für Ersatzteile und
Arbeitsstunden tragen. Versandkosten werden nicht
übernommen.
Inanspruchnahme der Garantie
Das Gerät sollte in der Originalverpackung an
den Händler zurückgegeben werden, bei dem es
erworben wurde. Ist dies nicht möglich, können Sie
es auch direkt an den Arcam-Vertreter in Ihrem Land
schicken.
Der Versand sollte frei Haus durch einen angesehenen
Kurier erfolgen – nicht mit der Post. Da keine
Verantwortung für Schäden oder Verlust während des
Transports zum Händler übernommen wird, sollten
Sie das Gerät entsprechend versichern.
Weitere Informationen erhalten Sie vom ArcamKundendienst:
Arcam Customer Support Department
Pembroke Avenue, Waterbeach, CAMBRIDGE,
CB25 9QR, England.
oder www.arcam.co.uk.
D-8
Probleme?
Kann Ihr Arcam-Händler Fragen zu diesem oder
einem anderen Arcam-Produkt nicht beantworten,
wenden Sie sich bitte an den Arcam-Kundendienst,
und wir versuchen uns Möglichstes, Ihnen zu helfen.
Online-Registrierung
Sie können Ihr Arcam-Produkt online unter folgender
Adresse registrieren: www.bridgeaudio.de.
Page 25

Handbook
Manuel
Handbuch
Handleiding
logo
Page 26

veiligheids-
richtlijnen
WAARSCHUWING: Verwijder de behuizing (of achterkant) niet, om het risico van een elektrische schok te vermijden. In het apparaat zitten geen
onderdelen die door de gebruiker onderhouden kunnen worden. Laat het onderhoud over aan bevoegd onderhoudspersoneel.
WAARSCHUWING: Stel dit apparaat niet bloot aan regen of vocht om het risico van brand of elektrische schok te vermijden.
De driehoek met de bliksemschicht is bedoeld om de gebruiker erop attent te maken dat er in de kast van het product een ongeïsoleerd ‘gevaarlijk voltage’ is
dat krachtig genoeg is om personen een elektrische schok toe te brengen.
De driehoek met het uitroepteken is bedoeld om de gebruiker attent te maken op belangrijke gebruiksaanwijzingen en onderhoudsinstructies in de
documentatie bij dit product.
WAARSCHUWING: In Canada en de VS moet u ervoor zorgen dat de brede pen van de stekker in de brede opening van het stopcontact gaat en dat de
stekker goed in het stopcontact zit om het risico op een elektrische schok te vermijden.
Belangrijke
veiligheidsvoorschriften
Dit product is ontworpen en vervaardigd om aan
strenge kwaliteits- en veiligheidsnormen te voldoen.
Bij de installatie en bediening moet u echter op de
volgende voorzorgsmaatregelen letten:
1. Neem waarschuwingen en aanwijzingen in acht
Het is belangrijk dat u:
A. alle veiligheidsvoorschriften en
gebruiksaanwijzingen leest alvorens deze
luidspreker te gebruiken.
B. deze handleiding voor toekomstig gebruik
bewaart.
C. alle instructies en waarschuwingen in de
handleiding of op de luidspreker opvolgt.
2. Water en vocht
Gebruik deze luidspreker niet in de buurt van water.
De aanwezigheid van elektriciteit bij water kan gevaarlijk
zijn – bijvoorbeeld naast een bad, wastafel, gootsteen, in
een vochtige kelder of bij een zwembad, enz.
3. Indringing van voorwerpen en vloeistoffen
Zorg ervoor dat er geen voorwerpen via openingen
in de behuizing naar binnen vallen en dat er geen
vloeistof in gemorst wordt. Met vloeistof gevulde
voorwerpen zoals vazen mogen niet op de
apparatuur gezet worden.
4. Ventilatie
Blokkeer geen van de ventilatiesleuven of -gaten.
Plaats de apparatuur niet op een bed, bank, vloerkleed
of ander zacht oppervlak, of in een gesloten
boekenkast of wandkast, aangezien dit de ventilatie kan
belemmeren. Het is raadzaam een minimumafstand
van 50 mm rondom en boven het apparaat te
bewaren om voldoende ventilatie te geven.
5. Hitte
Plaats de luidspreker niet in de buurt van open vuur
of apparatuur die hitte uitstraalt, zoals radiatoren,
kachels of andere apparaten (inclusief andere
versterkers).
6. Klimaat
Het apparaat is ontworpen voor gebruik in gematigde
klimaten.
7. De eenheid plaatsen
De luidspreker is niet bestemd om op een standaard
of in een rek te worden geplaatst. Plaats de
luidspreker op de vloer en zodanig dat niemand over
de stroom- en audiosnoeren kan vallen of struikelen.
8. Stroomvoorziening
De luidspreker is voorzien van een geschikte
elektrische stekker. Vervang of modificeer de
bijgeleverde stekker niet; vraag uw leverancier indien
nodig om een vervanging.
Dit product is een elektrisch apparaat van Klasse II of
dubbel geïsoleerd. Het apparaat is zodanig ontworpen
dat er geen aarding nodig is voor de veiligheid.
De primaire methode om de Logo luidspreker
van het lichtnet te isoleren, is de schakelaar aan de
achterkant van de eenheid te gebruiken. De Logoluidspreker moet zo geïnstalleerd zijn dat de stekker
uit het stopcontact kan worden verwijderd.
9. Netsnoerbescherming
De netsnoeren dienen zodanig te worden geleid
dat niemand over de snoeren loopt en dat ze niet
klem zitten, in het bijzonder bij de stekker en op de
uitgangspunten van de luidspreker.
10. Bliksembescherming
Trek bij onweer of wanneer de luidspreker langdurig
niet wordt gebruikt, de stekker uit het stopcontact.
11. Abnormale reuk
Als het apparaat een abnormale reuk of rook afgeeft,
zet het dan onmiddellijk uit en haal de stekker van de
eenheid uit de wandcontactdoos. Neem onmiddellijk
contact op met uw dealer.
12. Reiniging
Ontkoppel de eenheid van het lichtnet voordat
reiniging plaatsvindt.
De kast hoeft normaal alleen met een zachte,
vochtige lintvrije doek afgeveegd te worden.
Gebruik geen verfverdunners of andere chemische
oplosmiddelen om de kast te reinigen.
Wij raden het gebruik van meubelwas (in blik of
spuitbus) af, aangezien deze permanente witte
plekken kan achterlaten als de eenheid daarna met
een vochtige doek afgenomen wordt.
13. Onderhoud en reparatie
Laat het onderhoud aan bevoegd
onderhoudspersoneel over.
In de volgende gevallen is onderhoud vereist: als de
luidspreker op enige wijze is beschadigd, zoals:
A. Het netsnoer of de stekker is beschadigd.
B. Er zijn voorwerpen in het apparaat gevallen of
er is vloeistof in gemorst.
C. Het apparaat was aan regen blootgesteld.
D. Het apparaat lijkt niet normaal te functioneren
of het prestatievermogen is aanzienlijk
veranderd.
E. Het apparaat is gevallen of de kast is
beschadigd.
Veiligheidsnaleving
Dit product is ontworpen om aan de internationale
IEC 60065-norm voor elektrische veiligheid te
voldoen.
Dit apparaat voldoet aan een Deel 15 van de FCC
Regels. De verrichting is onderworpen aan de
volgende twee voorwaarden:
(1) dit apparaat kan schadelijke interferentie niet
veroorzaken, en (2) dit apparaat moet om het even
welke interferentie goedkeuren die, met inbegrip
van interferentie wordt ontvangen die ongewenste
verrichting kan veroorzaken.
N-2
Page 27

Inhoud
veiligheids-richtlijnen ............................N-2
Belangrijke veiligheidsvoorschriften . . N-2
Veiligheidsnaleving .......................................N-2
hartelijkdank… ......................................N-3
installatie ..................................................N-4
De eenheid plaatsen ..................................N-4
Stroom................................................................N-4
Verbindingssnoeren .................................... N-4
Een geluidsbron aansluiten ....................N-4
Luidsprekeronderhoud ............................N-4
luidsprekerplaatsing ..............................N-5
Stereosysteem zonder LFE ....................N-6
verbinding ................................................N-6
Sub/Volledig bereik+Sat-systeem ...... N-6
Sub/Sat-systeem ...........................................N-6
Modus Direct in Arcam’s surround-
versterkers .......................................................N-6
Instelling voor crossover-frequentie . N-7
Instelling voor crossover-Q ....................N-7
Instelling voor volumeniveau ................ N-7
Instelling voor fase .......................................N-7
kalibratie ..................................................N-7
specificatie ...............................................N-8
Technische specificaties ............................N-8
Universele garantie .....................................N-8
Claims onder garantie...............................N-8
Problemen? ...................................................... N-8
Online-registratie .........................................N-8
… en gefeliciteerd met de aanschaf van Arcam’s subbas-luidsprekersysteem Logo.
Logo kan de bandbreedte van uw hoofdluidsprekers (satellietluidsprekers) uitbreiden door de lage
frequentiecomponenten van stereo- en surroundsound-programmabronnen op accurate wijze weer
te geven. Ook biedt het een aparte maar gelijktijdige LFE-verbinding (Low Frequency Effects), een
kanaal dat alleen door een subwoofer moet worden gereproduceerd. Met de volume-instelling van de
Logo zelf kan het niveau onafhankelijk worden aangepast om in de luisterruimte een perfecte balans
te bereiken.
Logo heeft een versterker van 200 W die op korte afstand is gekoppeld met een omlaag gerichte
driver met grote uitslag. Deze driver maakt optimaal gebruik van de nieuwste materiaaltechnologie
en een geavanceerd versterkt kastontwerp. De lagetonenweergave wordt voor een Bessel-uitlijning
op actieve wijze door middel van een Linkwitz-crossover-scheidingsfilter gecorrigeerd: hierdoor wordt
de tijdvervorming voor accurate lagetonenovergangen geminimaliseerd. Dit resulteert in krachtige en
welluidende prestaties.
Neem even de tijd om deze handleiding door te lezen. Het advies hierin kan u namelijk helpen
optimaal van uw aankoop te genieten.
Het Logo-ontwikkelingsteam
hartelijk
dank…
Wat zit er in de doos?
< Arcam’s subbas-systeem Logo
< IEC-netsnoer
< Deze handleiding!
Nederlands
logo
N-3
Page 28

IN
L
R
LFE
ON OFF
OUT
L
R
LFE
100-240V~50/60HZ 275W MAX
FUSE: T2.5AL 250V
USE ONLY WITH A 250V FUSE
PHASE STANDBY
AUTO
MANUAL
0.3
0.5
0.7
0.9
1.1
1.3
1.5
X-OVER Q
VOLUME
0
1
2
3
456
7
8
9
10
35
50
70
85
100
115
125
140
160
X-OVER FREQ
AUTO
MANUAL
STANDBY
Indicator-led
Aan de bovenrand van de Logo-kast
bevindt zich een indicator-led
Wanneer de indicator-led uit is,
betekent dit dat de luidspreker volledig
van het lichtnet ontkoppeld is. Een
blauw licht geeft aan dat de luidspreker aanstaat
en gebruiksklaar is. Een rood licht geeft aan dat de
luidspreker stand-by staat (energiebesparing) en aan
zal gaan zodra een audiosignaal ontvangen wordt.
Stand-byschakelaar
De indrukbare stroomschakelaar
(gemarkeerd door
instellingen:
AUTO ’ (knop niet ingedrukt) wordt
Bij ‘
STANDBY) heeft twee
AUTO en MANUAL.
de versterker van Logo naar de standby-stand
geschakeld als deze een poosje niet is gebruikt en er
dus geen audiosignaal is ontvangen. Bij ‘
MANUAL’ (knop
ingedrukt) staat de versterker altijd aan wanneer de
eenheid op het stopcontact is aangesloten.
Verbindingssnoeren
We raden u aan hoogwaardige afgeschermde
audioverbindingssnoeren te gebruiken. Snoeren van
slechte kwaliteit resulteren in slechtere prestaties van
uw systeem. Alle snoeren dienen zo kort mogelijk te
zijn.
Het is raadzaam om er bij het aansluiten van uw
apparatuur voor te zorgen dat de snoeren voor
netvoeding en uw audiosnoeren zo ver mogelijk uit
elkaar liggen. Als u dit niet doet, kan dit ongewenste
ruis in de audiosignalen veroorzaken.
Een geluidsbron aansluiten
Controleer of uw geluidsprocessor/ontvanger is
uitgeschakeld voordat u Logo aansluit. Wanneer u
dit negeert, kan dit tot beschadiging van zowel de
luidspreker als de versterker leiden.
Als uw geluidsbron een
PRE-OUT SUB- of een LFE OUT-
uitgang heeft, sluit u deze met behulp van RCAphonoconnectors aan beide uiteinden op
de achterkant aan. Als uw geluidsbron geen
LFE-uitgang heeft, sluit u de linker- en rechterkanalen
van de stereovoorversterkeruitgang (
PRE OUT R) achtereenvolgens op IN L en IN R aan.
U kunt zowel de
LFE- als de L- en R-uitgangen op Logo
IN LFE op
SUB- of
PRE OUT L en
aansluiten als u het LFE-kaneel wilt gebruiken en
tegelijkertijd de lagetonenweergave van ‘grote’ linkeren rechterluidsprekers wilt aanvullen.
OUT L, OUT R en OUT LFE bieden lijnniveau-uitgangen om
verdere eenheden ‘door te lussen’ , bijvoorbeeld in
een installatie in meerdere kamers.
Na het aansluiten
Zet het volume van de geluidsbronversterker zo
laag mogelijk voordat u deze inschakelt. Zet de
bronversterker aan, selecteer een bronsignaal en
verhoog het volume dan geleidelijk naar het gewenste
luisterniveau.
Luidsprekeronderhoud
Inlooptijd
Net als een bij een nieuwe auto, is er ook voor
luidsprekers een inlooptijd vereist. Het geluid van uw
Logo klinkt misschien al goed wanneer u deze voor
het eerst aansluit, maar zal na verloop van tijd nog
veel beter worden. Uw Logo bereikt zijn volledige
potentieel naar verwachting na ongeveer 50 uur.
Reiniging
installatie
De eenheid plaatsen
< Plaats de Logo-luidsprekereenheid op een
vlakke, stevige ondergrond. Zet hem niet in
direct zonlicht, nabij een hittebron of op een
vochtige plaats.
< Zet Logo niet in een gesloten ruimte
(bijvoorbeeld een boeken- of wandkast) tenzij
er gezorgd is voor goede ventilatie. De Logoluidsprekereenheid is zo ontworpen dat deze
tijdens normale werking warm wordt.
< Plaats uw platenspeler niet op Logo.
Platenspelers zijn zeer gevoelig voor de ruis
die door netvoeding worden gegenereerd.
Staat een platenspeler te dichtbij, dan hoort
u deze ruis als gebrom op de achtergrond.
Trillingen van Logo kunnen ervoor zorgen dat
de grammofoonnaald tracks overslaat.
Stroom
Logo wordt geleverd met een netstekker die
al aan het snoer is bevestigd. Controleer of de
meegeleverde stekker in uw contactdoos past
– mocht u een nieuw netsnoer nodig hebben, neem
dan contact op met uw Arcam-dealer. Logo heeft een
transformator die nominale netspanningen tussen
100 V en 240 V kan accepteren.
Duw het IEC-stekkeruiteinde van het stroomsnoer
in het aansluitpunt op de achterkant van Logo, en
zorg ervoor dat de stekker er stevig in zit. Steek de
stekker aan het andere uiteinde van het snoer in het
stopcontact.
Logo heeft een stroomschakelaar op de achterkant
van het apparaat, boven het aansluitpunt van het
netsnoer: zorg ervoor dat deze is ingeschakeld
wanneer Logo wordt gebruikt. Als uw Logo een
langere tijd niet wordt gebruikt, schakelt u de eenheid
door middel van de stroomschakelaar uit.
Gebruik voor reiniging van uw luidspreker een zachte,
vochtige doek om stof of vuil te verwijderen. Gebruik
N.B.: Wanneer u Logo op een signaalsnoer
aansluit, of wanneer u Logo een nieuw plaatsje
geeft, dient u ervoor te zorgen dat de eenheid niet
op het stopcontact is aangesloten.
geen oplosmiddelen of chemische reinigingsproducten
aangezien deze de afwerking van de luidsprekerkast
kunnen beschadigen.
Overbelasting
Arcam-luidsprekers zijn ontworpen om opgenomen
muziek onder normale condities bij mensen thuis te
reproduceren.
We raden u niet aan ze te gebruiken en kunnen
ze niet geschikt verklaren voor commerciële
toepassingen, zoals disco’s en geluidsinstallaties.
N-4
Page 29

luidsprekerplaatsing
Het advies dat hier wordt gegeven, vormt een algemene richtlijn
voor de installatie van luidsprekers. Raadpleeg de documentatie
die met uw luidsprekers wordt meegeleverd voor nauwkeurigere
informatie betreffende de plaatsing en installatie, en ga voor
nuttige informatie over de lay-out van luisterruimtes naar
www.dolby.com/consumer/home_entertainment/roomlayout.html.
Akoestiek van ruimtes
De vorm van de ruimte en hoe deze is ingericht, beïnvloeden het
geluid dat u hoort. Als er bijvoorbeeld te veel kale oppervlakken zijn,
wordt het geluid teruggekaatst en kan het scherper klinken. Tapijten,
wandkleden en gordijnen kunnen dit verhelpen.
Als u tussen luisterruimtes kunt kiezen, moet u geen ruimte kiezen die
volkomen vierkant is of waarvan de lengte twee keer zo groot is als
de breedte. Dergelijke ruimtes kunnen de resonanties die het geluid
vervormen, verergeren.
Des te dichter u een luidspreker bij een hoek en de intersectie van
een muur en vloer of een muur en plafond plaatst, des te sterker is
de lagetonenuitvoer. Hierdoor kunnen de lage tonen te veel worden
benadrukt. Het slechts een klein stukje verplaatsen van de luidspreker
kan soms een wereld van verschil maken.
Luidsprekerinstallatie
De juiste plaatsing van luidsprekers vormt de sleutel tot het beste
thuisbioscoopgeluid (zie diagram).
Over het algemeen dienen luidsprekers op onbuigzame staanders
geplaatst te worden op ongeveer 15 cm van de achtermuur en ten
minste 60 cm van zijmuren. Zet luidsprekers nooit
op de grond (tenzij het om vloermodellen gaat), of in
hoeken. De luidsprekerdrivers moeten wanneer u zit
op of net boven het oorniveau zijn geplaatst. Plaats
uw zitgedeelte indien mogelijk tussen de surroundluidsprekers.
Het uiteindelijke geluid is afhankelijk van de akoestiek
in de luisterruimte, en het is zeker de moeite waard te
experimenteren met de positie van de luidsprekers.
Subwoofer
De locatie van Logo beïnvloedt de algehele
geluidskwaliteit. Plaatst u de subwoofer naast een muur
of in een hoek, dan wordt vaak de doeltreffendheid
verbeterd en een helderder laag basgeluid
gereproduceerd. Alle ruimtes leveren echter weer
andere resultaten en we raden u dan ook aan met
verschillende subwooferposities te experimenteren.
Luidsprekerstaanders
Hoe steviger een luidspreker op zijn plaats gehouden
wordt, hoe beter het geluid zal zijn. We raden u aan
onbuigzame metalen staanders met een hoogte van
40–60 cm te gebruiken. Met goed gedempte types
die niet ‘naklinken’ wanneer u er met een potlood tegenaan tikt (vanwege hun constructie
of omdat ze gevuld zijn met droog zilverzand), zult u de beste prestaties van uw luidsprekers
verkrijgen. Zorg ervoor dat de staanders en/of luidsprekers niet wankelen.
Nederlands
logo
N-5
Page 30

verbinding
L- R-
IN L
IN R
PRE OUT
LEFT
PRE OUT
RIGHT
L+ R+
R-R+
L-L+
LS RS
C
L
R
IN LFE
PRE OUT SUB
LS
RS
C
L
R
IN LFE
IN L
IN R
PRE OUT LEFT
PRE OUT RIGHT
PRE OUT SUB
Stereosysteem zonder LFE
Dit is typisch een tweekanaals systeem (zoals Arcam’s
Solo). Logo is op L/R-voorversterkeruitgangen
aangesloten. De crossover-frequentie op Logo
moet naar de lage frequentie roll-off van de
hoofdluidsprekers worden aangepast (raadpleeg
de handleiding van uw luidsprekers voor meer
informatie hierover). De Q-bediening (
worden gebruikt om de integratie van Logo en uw
hoofdluidsprekers nauwkeurig af te stemmen.
X-OVER Q) kan
Sub/Volledig bereik+Sat-systeem
Dit is een surroundsound-systeem (zoals Arcam’s
Solo Movie 5.1) waarbij L- en R-luidsprekers met
volledig bereik met satellietachterluidsprekers
(of achterluidsprekers met volledig bereik)
worden gecombineerd. Het systeem moet op
zowel de
die op
rechtervoorversterkeruitgangen worden aangesloten.
De linker-/rechtervoorversterkeruitgangen zijn op de
Logo op
Logo kan in dergelijke systemen worden ingesteld om
met twee crossover-frequenties te werken. De ene
frequentie wordt via de crossover van de surroundversterker voor de achterluidsprekers ingesteld en
de andere via de Logo-crossover voor de linker- en
rechterluidsprekers met volledig bereik.
SUB-, SUBWOOFER- of de LFE-uitgang
IN LFE is aangesloten als op de linker-/
IN L/IN R aangesloten.
Modus Direct in Arcam’s
surround-versterkers
Als u uw systeem zodanig wilt instellen dat het de
crossover in de surround-versterker voor 5.1- of
7.1-materiaal gebruikt, maar dat Logo in de linkeren rechterluidsprekers met volledig bereik voor
tweekanaals materiaal wordt gebruikt, kunt u de
modus Direct gebruiken.
Sluit de versterker en Logo aan zoals in het
diagram voor Sub/Volledig bereik+Sat-systeem
wordt getoond. Stel alle luidsprekers in de
versterker op ‘Small’ in; hierdoor worden de
lage tonen via het LFE-kanaal naar Logo geleid.
Wilt u het volledige bereik van het systeem
gebruiken, dan activeert u de modus Direct
voor tweekanaals bronnen. Hierdoor worden
signalen met volledig bereik naar de linker- en
rechterluidsprekers verzonden en de
ingangen via de interne crossover naar Logo
gebruikt.
IN L/IN R-
Sub/Sat-systeem
Dit is een surroundsound-systeem (zoals Arcam’s
Solo Movie 5.1) waarbij alle hoofdluidsprekers
satellietluidsprekers zijn die als ‘klein’ worden
aangeduid. Logo is op de uitgang
aangesloten.
De LFE-ingang negeert de crossover in Logo,
en de crossover-frequentie moet dus door de
surroundsound-versterker worden ingesteld.
Controleer voor de crossover-instelling de respons
van uw satellietsysteem die voor grote satellieten
rond 70 Hz en voor kleine satellieten rond 150 Hz
kan liggen. Als u niet weet welke instelling u moet
gebruiken, raden we u aan allereerst voor 80 Hz te
kiezen.
SUB, SUBWOOFER of LFE
N-6
Page 31

De subwoofer heeft twee functies: allereerst om de subbas die andere ‘kleinere’ luidsprekers niet kunnen
X-OVER FREQ
35
50
70
85
100
115
125
140
160
0.3
0.5
0.7
0.9
1.1
1.3
1.5
X-OVER Q
PHASE
VOLUME
0
1
2
3
456
7
8
9
10
0
40 60 80 100 120 140 160
-12
20
0
-12
Q=1.5
Q=1.0
Q=0.71
Q=0.49
Q=0.58
Q=0.3
reproduceren nauwkeurig en met voldoende kracht te reproduceren (de middenluidspreker is vrijwel altijd een
‘kleine’ luidspreker); en ten tweede om de ‘.1’- of LFE-track (Low Frequency Effects) van 5.1- of 7.1-materiaal te
reproduceren.
De subwoofer moet voor optimale resultaten in de juiste verhouding tot de andere luidsprekers in het systeem
worden ingesteld. De twee bedieningen voor het crossover-punt en het subwooferniveau spelen hierbij een
belangrijke rol. Met het crossover-punt kan de frequentie worden ingesteld waaronder signalen van ‘kleine’
luidsprekers naar de subwoofer worden geleid. Wanneer u het subwooferniveau instelt, bent u ervan verzekerd
dat signalen van gelijke volume hetzelfde SPL-niveau (Sound Pressure Level) bereiken, ongeacht van welk
frequentie ze zijn of ongeacht van welke luidspreker ze afkomstig zijn (d.w.z. subwoofer of satellietluidspreker).
In de meeste surroundsound-systemen zijn twee crossovers beschikbaar. één in de surroundsound-decoder en
één in de Logo-eenheid.
Om in verschillende systemen optimaal geluid te verkrijgen, kunnen deze bedieningen in Logo onafhankelijk voor
systemen met ‘grote’ voorluidsprekers en een LFE-uitgang van de surroundsound-decoder worden gebruikt.
Aanbevolen instellingen voor Musoluidsprekers
Arcam’s Muso-satellietluidsprekers vormen een
perfecte aanvulling op de maatstaven voor de
geluidskwaliteit en het ontwerp van Logo. We
raden u aan met Muso-luidsprekers de volgende
Logo-instellingen te gebruiken:
X-OVER FREQ
X-OVER Q
VOLUME
PHASE
90Hz
0,5
8
0°
kalibratie
Instelling voor
crossover-frequentie
In de meeste systemen wordt voor Logo een
crossover-punt van 90 Hz aanbevolen.
Als uw satellietluidsprekers bijzonder ‘klein’ zijn (en
niet veel lage tonen kunnen reproduceren), kunt u het
crossover-punt hoger dan 90 Hz instellen, zodat Logo
meer van het werk voor zijn rekening kan nemen.
Houd er echter rekening mee dat hoe hoger het
crossover-punt is, des te gerichter de lage frequentie
klinkt, en des te gemakkelijker het zal worden om de
fysieke positie van de subwoofer te bepalen.
Als uw satellietluidsprekers redelijke lage tonen
kunnen reproduceren, kunt u een lager crossoverpunt proberen te gebruiken. Experimenteer en houd
uw oren gespitst om de juiste plaats te vinden.
Instelling voor
crossover-Q
Met de instelling voor X-OVER Q kan de helling
van de curve hoger dan de cut-off frequentie (in
dB/octaaf) worden ingesteld. Het doel is om het
‘spiegelbeeld’ overeen te stemmen met de helling
van de hoogdoorgangsfilter; een steile cut-off van
de hoogdoorgangsfilter van de geluidsprocessor/
ontvanger moet in overeenstemming worden
gebracht door een steile cut-off van de
laagdoorgangsfilter van Logo. Op dezelfde wijze moet
de instelling voor
ontvanger een meer geleidelijke cut-off biedt een
lagere waarde hebben.
X-OVER Q als de geluidsprocessor/
Instelling voor
volumeniveau
De nauwkeurige instelling van het volumeniveau
voor een subwoofer vereist idealiter gespecialiseerde
metingsapparatuur zoals een Real Time Spectrum
Analyser of RTA. Een normale SPL-meter (Sound
Pressure Level) is hier niet voor geschikt!
Voor de meeste systemen kunt u gewoon
experimenteren door goed naar het geluid te
luisteren. Start met een gemiddelde instelling (5) en
experimenteer met het
van het hoofdgeluid geluiden met een lage frequentie
hoort die niet direct aan de subwoofer kunnen
worden toegeschreven. De meeste geluidsprocessors
of ontvangers stellen u in staat de subniveaus direct
bij te stellen om buitensporig hoge of lage niveaus van
bepaald bronmateriaal te pareren.
VOLUME totdat u als onderdeel
Instelling voor
fase
Deze biedt twee instellingen: met de knop PHASE niet
ingedrukt (0°) en met de knop ingedrukt (180°).
Een fasevertraging kan worden gebruikt om het
effect van geluidsgolven van Logo tegen te gaan die
het geluid van de satellietluidsprekers beïnvloeden
en het gedeeltelijk blokkeren of het juist buitensporig
versterken. Dit effect is vooral afhankelijk van
de relatieve plaatsing van de subwoofer en
satellietluidsprekers en kan ook worden verholpen
door de subwoofer een klein eindje verder weg
te plaatsen. De fase-instelling is beschikbaar als de
subwoofer niet kan worden verplaatst of als dit
onpraktisch is.
Nederlands
Voordeel,
dB
Crossover-frequentie, Hz
Voordeel,
dB
Crossover-frequentie
logo
N-7
Page 32

specificatie
Technische specificaties
Systeemontwerp Eénwegs-luidspreker met een intern volume van 10 liter. De kast is stevig
gebouwd uit machinaal bewerkte MDF en intern versterkt.
Aandrijfeenheid Aandrijfeenheid voor subwoofer van 254 mm met grote uitslag,
magnetisch afgeschermd.
Frequentiebereik 20Hz tot 250Hz
Impedantie 4Ω nominaal
Gevoeligheid 85 dB/Watt, gemeten bij 1 m
Crossover Vierde-orde Linkwitz-Riley-crossover-scheidingsfilter, 24dB/octaaf (80
dB/decade), aanpasbaar voor frequentie en Q.
Verbindingen
Lichtnet 100 V–240 V bij 50/60 Hz. Zekering T2,5AL 250 V
Versterker 200 Watt/4Ω, bij normale gebruikscondities, max 275 Watt
Afwerking zwarte verf
Afmetingen 280 x 280 x 416mm (BxDxH)
Gewicht Nettogewicht 15 kilo
Alle specificatiewaarden zijn standaardwaarden, tenzij anders aangegeven.
Beleid voor voortdurende verbetering
Arcam stelt zich ten doel haar producten voortdurend te verbeteren. Dit betekent dat ontwerpen en
specificaties zonder kennisgeving aan verandering onderhevig zijn.
LEFT-, RIGHT- en SUB-ingangen en -uitgangen: RCA-phonoverbindingen
(goud), max 2,5 V, >22 kΩ. De eenheid kan ‘doorlust’ zijn.
(N.B.: Wees voorzichtig bij het optillen van de eenheid)
Universele garantie
Deze garantie geeft u het recht om de eenheid gratis
te laten repareren, tijdens de eerste twee jaar na
aankoop, bij elke erkende Arcam-distributeur, mits
de eenheid oorspronkelijk bij een geautoriseerde
Arcam-dealer of -distributeur aangekocht werd. De
fabrikant kan geen verantwoordelijkheid aanvaarden
voor fouten die ontstaan door ongelukken, verkeerd
gebruik, misbruik, slijtage, onachtzaamheid of door
ongeoorloofde aanpassingen en/of reparaties, en
kan ook geen verantwoordelijkheid aanvaarden voor
schade of verlies, ontstaan tijdens vervoer van of naar
de persoon die onder de garantie claimt.
De garantie dekt:
Onderdelen en arbeidsloon voor twee jaar vanaf de
datum van aankoop. Na twee jaar moet u zowel voor
onderdelen als arbeidsloon betalen. In geen enkel
geval worden transportkosten door de garantie
gedekt.
Claims onder garantie
Deze apparatuur dient in de oorspronkelijke
verpakking terugbezorgt te worden aan de dealer bij
wie ze aangekocht werd, of anders rechtstreeks aan
de Arcam-distributeur in het land waar u woont.
De eenheid dient, vracht betaald, via een
gerenommeerde expediteur verstuurd te worden
– niet per post. Tijdens vervoer naar de dealer of
distributeur kan er geen verantwoordelijkheid voor de
eenheid aanvaard worden, en klanten wordt daarom
aangeraden de eenheid tegen verlies of schade tijdens
vervoer te verzekeren.
Voor meer informatie kunt u contact opnemen met
Arcam:
Arcam Customer Support Department,
Pembroke Avenue, Waterbeach, CAMBRIDGE,
CB25 9QR, Engeland.
of www.arcam.co.uk.
SH186
Issue 2
Problemen?
Als uw Arcam-dealer uw vragen betreffende dit of
een ander Arcam-product niet kan beantwoorden,
neemt u contact op met de Arcam-klantendienst op
het bovenstaande adres, en wij zullen ons best doen
om u te helpen.
Online-registratie
U kunt uw Arcam-product on line registreren op:
www.arcam.co.uk.
A&R Cambridge Ltd, Pembroke Avenue, Waterbeach, CAMBRIDGE CB25 9QR, England
 Loading...