

Page 1

air
air
Connections and Quickstart Guide
Connexions et Guide de démarrage rapide
Schnellstartanleitung
Aansluitingen en snelstartgids
Conexiones y Guía de Inicio Rápido
Краткое руководство по подключению и использованию
Configurazione e Guida Rapida
快速入门指南
1
Page 2

Important Safety Instructions...
1. Read these instructions.
2. Keep these instructions.
3. Heed all warnings.
4. Follow all instructions.
5. Do not use this apparatus near water.
6. Clean only with dry cloth.
7. Do not block any ventilation openings. Install in accordance with the
manufacturer’s instructions.
8. Do not install near any heat sources such as radiators, heat registers, stoves, or other
apparatus (including ampliers) that produce heat.
9. Do not defeat the safety purpose of the polarized or grounding-type plug. A
polarized plug has two blades with one wider than the other. A grounding type plug
has two blades and a third grounding prong. The wide blade or the third prong are
provided for your safety. If the provided plug does not t into your outlet, consult an
electrician for replacement of the obsolete outlet.
10. Protect the power cord from being walked on or pinched particularly at plugs,
convenience receptacles, and the point where they exit from the apparatus.
11. Only use attachments/accessories specied by the manufacturer.
12. Use only with the cart, stand, tripod, bracket, or table specied by the manufacturer,
or sold with the apparatus. When a cart is used, use caution when moving the cart/
apparatus combination to avoid injury from tip-over.
13. Unplug this apparatus during lightning storms or when unused for long periods of
time.
14. Refer all servicing to qualied service personnel. Servicing is required when the
apparatus has been damaged in any way, such as power-supply cord or plug is
damaged, liquid has been spilled or objects have fallen into the apparatus, the
apparatus has been exposed to rain or moisture, does not operate normally, or has
been dropped.
2 3
Page 3

Welcome…
Willkommen...
… and thank you for purchasing the Arcam airDAC Digital-to-Analogue converter.
Arcam has been producing high-quality audio components for over thirty years. During
that time we have amassed a wealth of knowledge on both the design and construction
of audio components in order to give the best sound performance for the price.
This handbook provides guidance for connecting and using your airDAC.
We hope that your airDAC will give you years of trouble-free operation. In the unlikely
event of any fault, or if you simply require further information about Arcam products,
our network of dealers will be happy to help you. Further information can be found on
the Arcam website at www.arcam.co.uk.
The airDAC development team
Bienvenue…
… et merci de faire conance à Arcam airDAC.
Arcam produit des composants audio de haute qualité depuis plus de trente ans. Au l
des années, nous avons acqui un ensemble de connaissances en matière de conception
et de construction de composants audio qui nous a permi de vous orir les meilleures
performances acoustiques au meilleur prix.
Ce manuel est un guide pour l’utilisation de l’airDAC.
Nous espérons que votre système de diusion musicale Solo vous procurera des années
d’écoute musicale sans problème. Si, contre toute probabilité, vous découvriez un
défaut ou si vous avez besoin d’informations supplémentaires sur les produits Arcam,
notre réseau de revendeurs se fera un plaisir de vous aider. Vous trouverez d’autres
informations sur le site Web d’Arcam à l’adresse suivante : www.arcam.co.uk.
L’équipe de dévelopement airDAC
… Vielen Dank, dass Sie sich für einen Arcam aairDAC entschieden haben.
Arcam stellt seit beinahe 35 Jahren hochwertige Audiokomponenten her. Während
dieser Zeit haben wir viel Wissen und Erfahrung über das Design und den Bau von
Audiokomponenten gesammelt, auf deren Grundlage wir Ihnen beste Soundleistung zu
einem guten Preis bieten können.
Dieses Handbuch bietet eine detaillierte Anleitung zur Bedienung des aairDAC.
Wir hoen, dass Ihnen das aairDAC viele Jahre lang Freude bereiten wird. Im
unwahrscheinlichen Fall eines Produktfehlers oder wenn Sie weitere Informationen zu
dem Produkten von Arcam wünschen, wenden Sie sich bitte an einen unserer Händler.
Weitere Informationen nden Sie auf der Arcam-Website unter www.arcam.de.
Ihr airDAC Development Team
Welkom…
… en hartelijk dank voor uw aankoop van de Arcam airDAC Digitaal naar Analoog
omzetter.
Arcam produceert al bijna 35 jaar hoogwaardige audiocomponenten. Door de jaren
heen hebben we een schat aan kennis opgebouwd over het ontwerp en de constructie
van audiocomponenten, zodat we de beste geluidsprestaties voor de prijs kunnen
leveren.
Deze handleiding is bedoeld om u gedetailleerde informatie over het gebruik van de
airDAC geven.
Wij hopen dat uw airDAC u jarenlang probleemloos van dienst zal zijn. Mocht het
apparaat onverhoopt een fout vertonen, of wilt u gewoon verdere informatie over
Arcam-producten, dan staat ons netwerk van dealers klaar om u te helpen. Ga naar de
Arcam-website www.arcam.co.uk voor meer informatie.
Het airDAC-ontwikkelingsteam
4 5
Page 4

Bienvenido…
Benvenuto…
… y gracias por comprar el convertidor Digital Analógico Arcam airDAC.
Arcam ha estado produciendo componentes de audio de elevada calidad durante más
de treinta años. Durante ese tiempo hemos acumulado una fortuna en conocimientos
tanto en el diseño como en la construcción de componentes de audio para entregar las
mejores prestaciones de audio para su precio.
Este manual proporciona una guía para la conexión y utilización del airDAC.
Esperamos que su airDAC le entregue años de funcionamiento libre de problemas. En el
caso improbable de que ocurra una falla o que simplemente requiera más información
acerca de los productos Arcam, nuestra red de distribuidores estará feliz de ayudarle.
Para encontrar más información, vaya al sitio Web de Arcam www.arcam.co.uk.
El equipo de desarrollo del airDAC
Добро пожаловать...
… и спасибо за покупку цифро-аналогового преобразователя Arcam airDAC.
Arcam производит высококачественные аудио компоненты уже более
тридцати лет. За это время мы накопили богатство знаний в дизайне
и конструировании аудио компонентов, чтобы предоставить лучшее
воспроизведение звука по подходящей цене.
Это пособие предлагает указания к соединениям и использованию вашего
airDAC.
Мы надеемся, что ваш airDAC обеспечит бесперебойную эксплуатацию на
многие годы. Хотя обычно это не случается, но в случае любой ошибки или
если вам просто нужна дополнительная информация, наша сеть дилеров
будет рада вам помочь. Дополнительную информацию можете найти на
сайте Arcam www.arcam.co.uk.
… e grazie per aver acquistato il convertitore Digitale – Analogico Arcam airDAC.
Arcam produce componenti audio d’alta qualità da più di trent’anni. Durante questo
periodo abbiamo consolidato la nostra vasta conoscenza sia del design sia della
costruzione di componenti audio, per garantire la migliore resa sonora in rapporto al
prezzo.
Questa guida le fornisce le istruzioni per collegarsi e usare il suo airDAC.
Ci auguriamo che airDAC le ora anni di attività senza problemi. Nel caso improbabile
di un guasto, o se semplicemente desidera ulteriori informazioni sui prodotti Arcam, la
nostra rete di rivenditori sarà lieta di aiutarla. Può trovare ulteriori informazioni visiti il
sito Arcam www.arcam.co.uk.
Il team di sviluppo airDAC
欢迎…
…感谢您购买Arcam airDAC数字-模拟转换器。
Arcam生产优质音频组件已有三十多年的历史。在此过程中,我们在设计和制造
最高性价比音频组件方面积累了丰富的经验。
本手册将提供有关连接和使用airDAC的指导。
我们希望airDAC能够长期让您省心省力。如果您的产品发生故障(不过这种情
况不多见),或者您只是想要了解有关Arcam产品的其他信息,我们的经销商网
点将很乐意为您效劳。有关更多信息,请访问Arcam网站:www.arcam.co.uk
airDAC开发团队
Команда разработчиков airDAC
6 7
Page 5
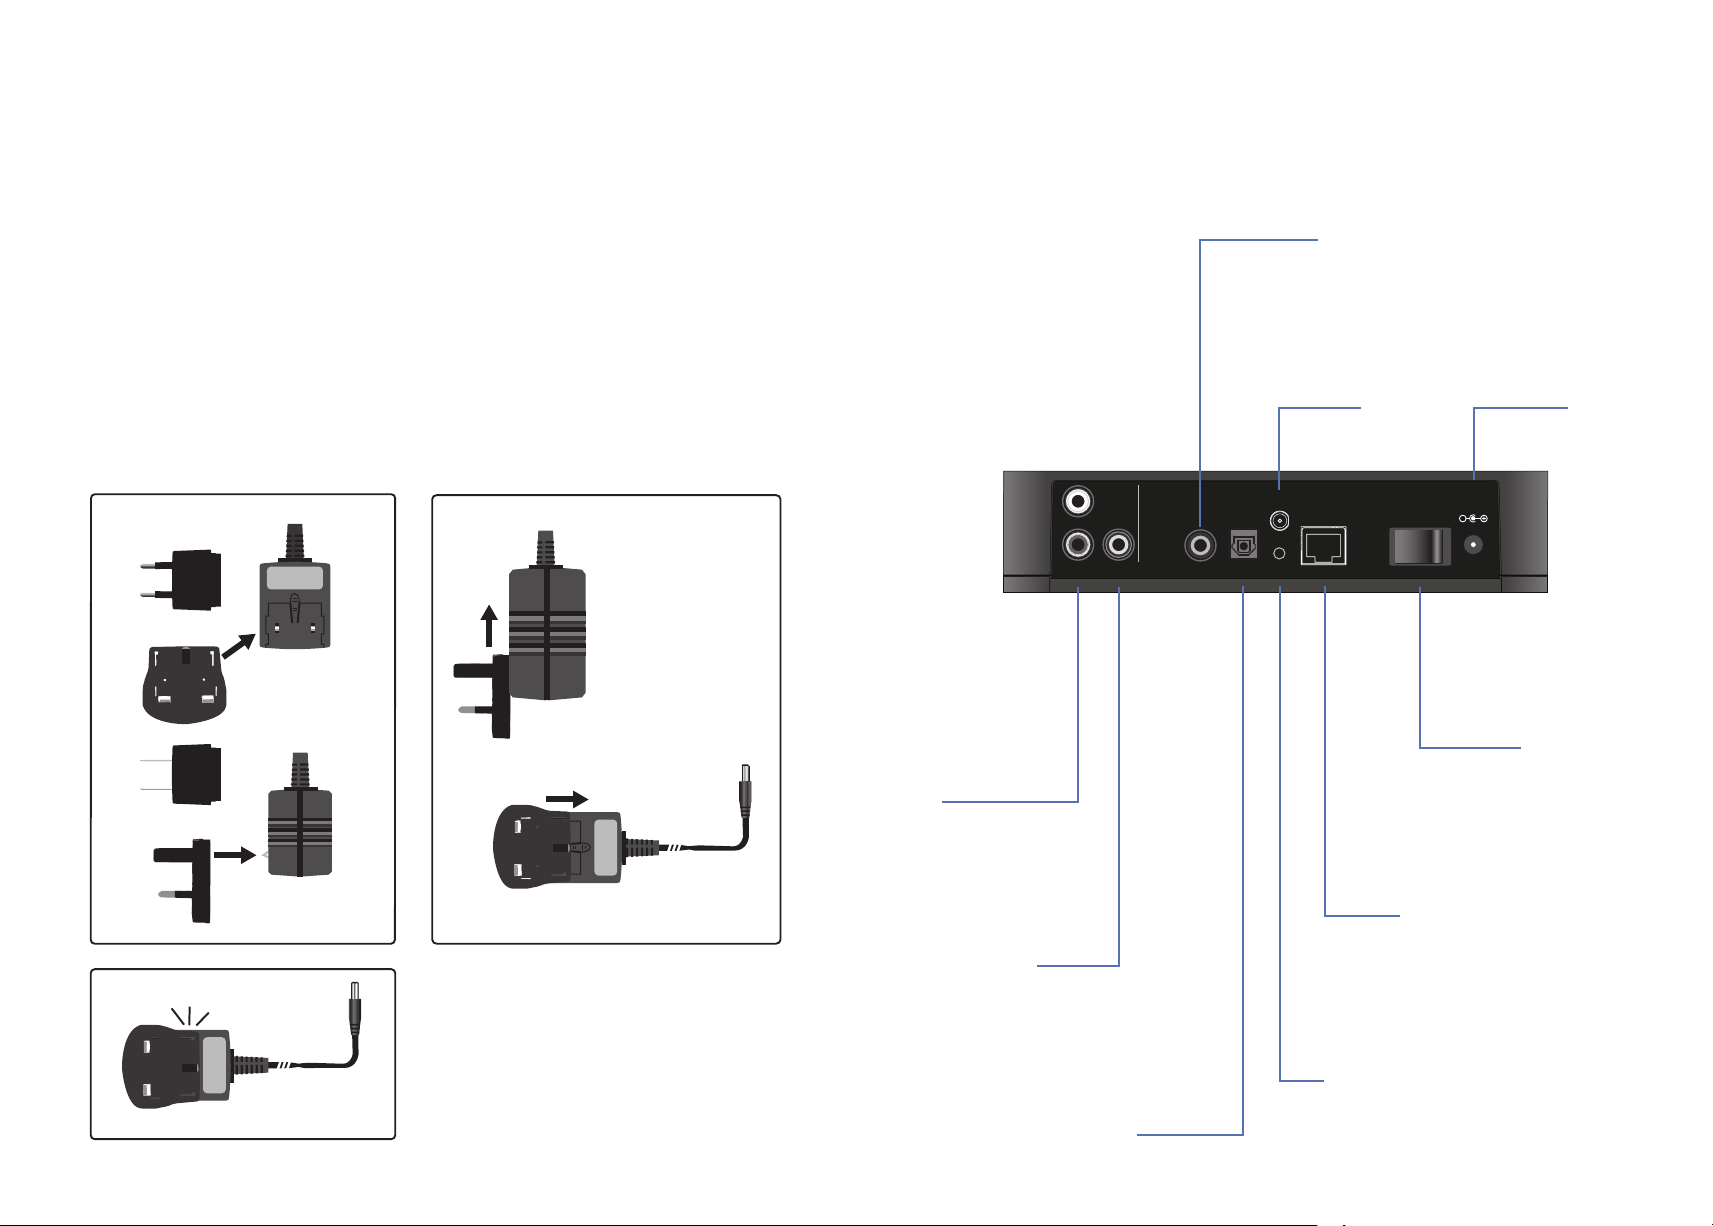
Power Adaptor Setup
Installation de l’adaptateur
Vorbereitung Netzstecker
Set-up van de voedingsadapter
Conguración del Adaptador eléctrico
Установка адаптера питания
Installazione dell’Alimentatore
电源适配器安装
1
EU
UK
US
3
Click!
2
Connectors
Connecteurs
Anschlüsse
Aansluitingen
Conectores
Разъемы
Connettori
连接器
L
R
DIG. OUT COAX OPT
OUTPUT
Audio Output L,R
Sortie audio
Gauche(L), Droite (R)
Audioausgang Links,
Audio-uitgang L, R
Salidas de audio
Аудио выход L,R
Uscita Audio S,D
左右声道音频输出
Prise de sortie numérique
Digitaler Audioausgang
Rechts
Izda., Dcha.
Digital output
Digitale uitgang
Salida Digital
Цифровой выход
Uscita digitale
数字输出
Optical digital input
Entrée optique des signaux numériques
Optischer digitaler Eingang
Optische digitale ingang
Entrada digital óptica
Цифровой оптический вход
Ingresso digitale ottico
Coaxial digital input
Liaison numérique par câble coaxial
Digitaler Koaxial-Eingang
Coaxiale digitale ingangen
Entrada digital Coaxial
Цифровой коаксиальный вход
Ingresso coassiale digitale
同轴数字输入
光纤数字输入
Antenna input
Entrée antenne
Antennen-Eingang
Antenne-ingang
Entrada de Antena
Вход антенны
Ingresso antenna
天线输入
ANT
RESET
NET
NET input
Entrée NET
Netzwerkkabelanschluss (Ethernet)
NET-ingang
Entrada de RED
Сетевой вход
Ingresso NET
网络输入
RESET
REINITIALISER
ZURÜCKSETZEN
RESETTEN
REINICIAR
СБРОС
RIPRISTINA
复位
Power connector
Connexion de
l’alimentation
Anschluss für
Netzteilstecker
Voedingsconnector
Conector de
alimentación
Разъем питания
Alimentatore
电源连接器
POWER
12V DC
1.5A
0
1
Power switch
Bouton de l’alimentation
Ein-/Ausschalter
Aan/Uit-schakelaar
Interruptor de encendido
Выключатель питания
Interruttore corrente
电源开关
8 9
Page 6

Connections
Connexions
Anschluss-Schema
Aansluitingen
Conexiones
Соединения
Connettori
接口
Amplier
Amplicateur
Verstärker
VOLTAGE SELECT
110 -120V
~60Hz
Versterker
Amplicador
Усилитель
Amplicatore
放大器
AV Processor / CD / DVD
Processeur AV / CD / DVD
AV Prozessor / CD / DVD
AV-processor / CD / DVD
Procesador AV / CD / DVD
AV-процессор/ CD / DVD
Processore AV / CD / DVD
AV处理器 / CD / DVD
220 - 240V
~50Hz
REMOTE
AUX
AUDIO OUT
L
R
IN
12
IN
L
R
air
POWER
12V DC
1.5A
0
1
DIGITAL AUDIO OUT
OPTICALCOAX
L
R
DIG. OUT COAX OPT
OUTPUT
ANT
RESET
NET
DIGITAL AUDIO OUT
LAN
COAX
OPTICAL
CD / DVD / TV
10 11
Page 7

Operation
Wired connection to a network
The recommended method for connecting the airDAC into an existing home network is over the wired
Ethernet connection and the device is congured to do this by default. Simply plug one end of the
Ethernet cable into the airDAC, and the other end into a spare Ethernet port on your network and power
on. Once the device is booted and has been assigned an IP address by the network, the network state
LED will show green indicating the airDAC is ready for use.
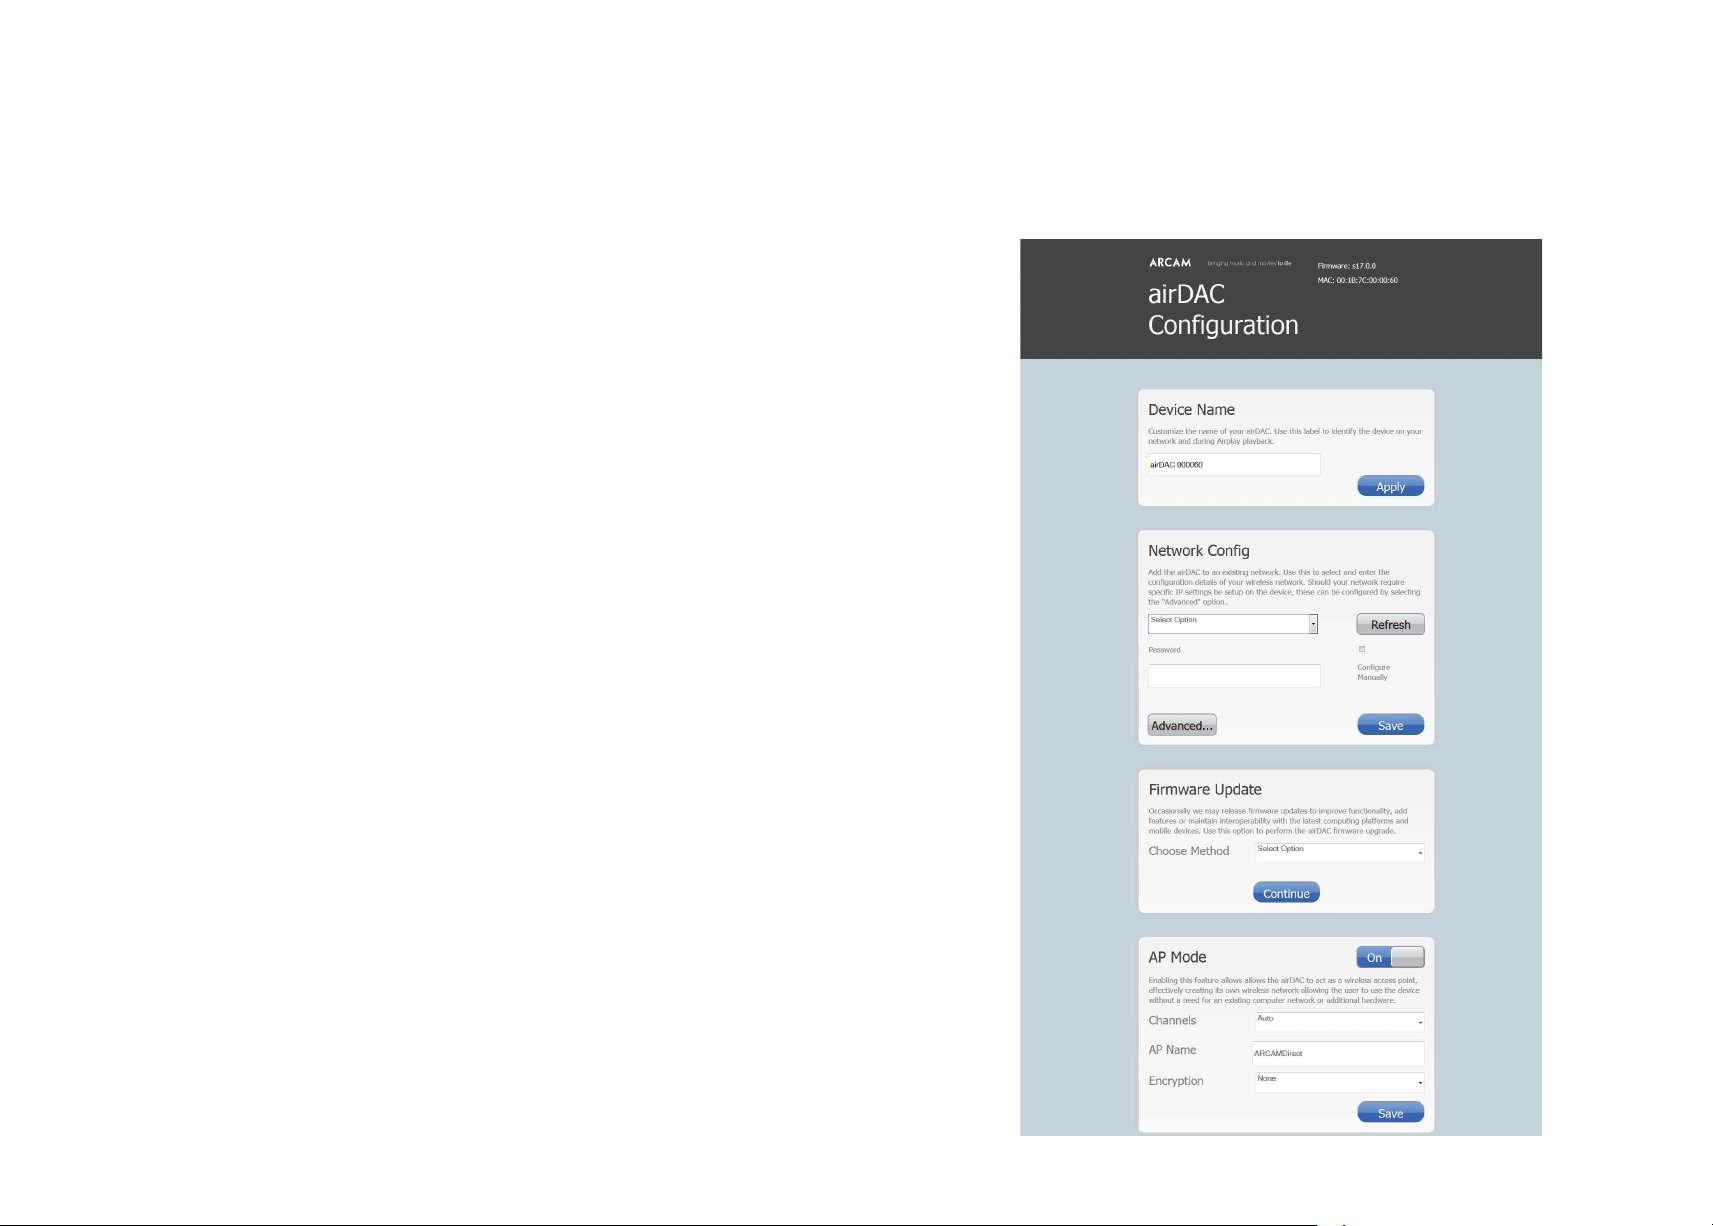
Access point mode
“AP Mode” is a feature which allows the airDAC to act as a wireless access point, eectively creating its
own wireless network enabling the user to enjoy the convenience of a wireless connection without the
need of an existing network or additional hardware. In its default conguration and assuming no wired
network connection exists to the airDAC, this mode is enabled automatically at power up. To use, ensure
the wired Ethernet cable is disconnected and power on the airDAC. Once the network LED has turned
green indicating that the unit is ready, connect your wireless device to the “ARCAMDirect” access point.
AP mode SSID, channel and security settings can be modied using the “AP Mode” section of the web
interface, see “Accessing the Web Interface” below for details.
Wireless connection to a network
Connecting the airDAC to your existing wireless network is done by selecting your SSID from the list of
detected networks and entering the relevant security details through the “Network Cong” section of the
web interface. See “Accessing the Web Interface” below for details.
Note:
Switching between wired and wireless connections requires a power cycle as the selection of network
interface occurs when the airDAC is rst switched on. If using a wired connection, the cable should be
present during the powerup stage and similarly, when using a wireless network a wired connection must
not be present.
Accessing the Web Interface
Once the airDAC and your wireless device are connected using one of the network connection methods
above, the web interface may be accessed by entering the IP address of the device into the address bar
of your internet browser. The default IP address when in AP Mode is 192.168.1.12, when connected by
wired or wireless connection the IP will be as assigned by the DHCP server on your network.
12 13
Page 8

Wireless Connection Setup
To congure the airDAC for your existing wireless network we recommend accessing the web interface
for initial setup through AP Mode (detailed above). Alternatively, setup may be done through direct
connection to your computer using the provided Ethernet cable, see “Direct Connection” below for
details.
From here you can enter the details of your wireless network into the “Network Cong” section and save
the settings before disconnecting the Ethernet cable and power cycling the unit. When starting, the
airDAC will now automatically attempt to join the wireless network using the details provided, successful
connection will result in the network status LED showing green to indicate it's ready for use. A red
network status LED at this point would indicate either incorrect network settings have been entered or
a network fault has occurred. In this case, please reconnect using any of the connection methods above
re-check your settings.
Direct connection (for Web Interface access only)
1) Power o the airDAC, and connect the device directly to the Ethernet port on your computer using
the provided Ethernet cable.
2) Power on the airDAC, and wait 90 seconds for the unit to turn on and the network status LED to glow
green indicating direct connection mode is ready.
3) Launch the setup webpage by typing http://169.254.123.124 into the web browser of the connected
computer.
Firmware update
Occasionally we may release rmware updates to improve functionality, add features or maintain
interoperability with the latest computing platforms and mobile devices. Firmware updates can be
performed using the “Firmware Update” section of the web interface. Future updates will be available for
download at www.arcam.co.uk
Listening to music
On your iOS device (iPhone, iPad or iPod touch), go to Settings and make sure you have the same
network selected that the airDAC is connected to.
Launch the Music app on your iOS device and select the airDAC tab presented to you on the screen. The
name provided is unique to your device (consisting of the last 6 digits of your device's MAC address).
Your iOS device will now remember the network and connect to airDAC whenever it is range. This is
displayed by the AirPlay icon shown in red, a white AirPlay icon means that AirPlay devices are available.
Tap the play icon to listen to your music.
Tap 4 to listen to
your music
14 15
Page 9

Guide d'utilisation
Factory Restore
Factory defaults can be restored using the following steps:
1) Power o the airDAC.
2) Press and hold the RESET button on the rear of the device.
3) Power on the airDAC while continuing to hold the RESET button.
4) Release the button after 10 seconds, the device will boot normally with factory settings fully restored.
POWER
L
R
DIG. OUT COAX OPT
OUTPUT
ANT
RESET
NET
12V DC
1.5A
0
1
Operation
The airDAC uses an automatic input selection determined by which source is playing.
The order of priority (from rst to last) is AirPlay, Coaxial and nally Optical.
When an AirPlay stream is initiated to the airDAC it will automatically switch to the AirPlay input.
LED function
Optical, Coax and AirPlay LED indicate the status of the incoming stream:
green = locked and valid, red = unlocked or invalid stream type.
NET LED: red = no connection or network error, orange = connecting, green = connected and ready.
OPTICAL COAX NET
Connexion câblée à un réseau
Pour connecter l'airDAC au réseau domestique existant, il est recommandé d'utiliser la connexion câblée
Ethernet pour laquelle l'appareil a été conguré par défaut. Branchez simplement une extrémité du
câble Ethernet à l'airDAC, et l'autre extrémité du câble à un port Ethernet libre de votre réseau et allumez
l'appareil. Une fois que l'appareil a démarré et que le réseau lui a attribué une adresse IP, le voyant
lumineux qui indique l'état du réseau devient vert pour vous informer que l'airDAC est prêt à l'utilisation.
Mode point d'accès (AP)
L'«AP Mode» est une fonction qui permet de se servir de l'airDAC comme point d'accès sans l, créant
un réseau sans l indépendant. L'utilisateur peut donc bénécier de la commodité d'une connexion
sans l sans avoir besoin d'un réseau existant ou de matériel supplémentaire. Dans sa conguration
par défaut et si aucune connexion câblée à un réseau n'a été établie avec l'airDAC, ce mode est activé
automatiquement lorsque l'appareil est allumé. Pour utiliser ce mode, assurez-vous que le câble
Ethernet soit débranché et allumez l'airDAC. Une fois que le voyant lumineux du réseau devient vert ce
qui indique que l'unité est prête, connectez votre dispositif sans l au point d'accès «ARCAMDirect».
L'identiant SSID du mode AP, le canal et les paramètres de sécurité peuvent être modiés à partir du
paragraphe intitulée «AP Mode» de l'interface Web. Pour plus d'informations, veuillez consulter le
paragraphe «Accès à l'interface Web» ci-dessous.
Connexion sans l à un réseau
Pour connecter l'airDAC à votre réseau sans l existant, sélectionnez votre SSID dans la liste des réseaux
détectés et entrez les informations relatives à la sécurité dans le paragraphe intitulé «Cong. Réseau»
sur l'interface Web. Pour plus d'informations, veuillez consulter le paragraphe intitulé «Accès à l'interface
Web» ci-dessous.
Remarque:
Pour passer d'une connexion câblée à une connexion sans l, l'appareil doit être éteint car la sélection de
l'interface réseau s'eectue lorsque l'airDAC est allumé. Si vous utilisez la connexion câblée, il faut que le
câble soit connecté avant la phase de démarrage et retiré lorsque vous désirez utiliser la connexion sans l.
Accéder à l'interface Web
Une fois que l'airDAC et votre dispositif sans l sont connectés à l'aide d'une des méthodes de connexion
réseau énoncées ci-dessus, l'interface Web est accessible en saisissant l'adresse IP de l'appareil dans la
barre d'adresse de votre navigateur internet. 192.168.1.12 est l'adresse IP par défaut lorsque l'AP mode a
été sélectionné. Lorsque l'appareil est connecté à l'aide d'une connexion câblée ou d'une connexion sans
l, alors l'adresse IP sera attribuée par le serveur DHCP de votre réseau.
16 17
Page 10

Conguration de la connexion sans l
Pour congurer l'airDAC pour votre réseau sans l existant, nous vous conseillons d'accéder à l'interface
Web pour eectuer sa conguration initiale à l'aide de l'AP mode (détaillé ci-dessus). La conguration
peut autrement être eectuée par le biais d'une connexion directe à votre ordinateur à l'aide du câble
Ethernet fourni. Pour plus d'informations, veuillez consulter le paragraphe intitulé «Connexion directe»
ci-dessous.
D'ici vous pouvez entrer les informations relatives à votre réseau sans l dans le paragraphe intitulé
«Cong. Réseau» et enregistrez les paramètres avant de débrancher le câble Ethernet et réinitialisez
l'unité. Lors de son démarrage, l'airDAC tentera alors automatiquement de se connecter à un réseau sans
l en utilisant les informations fournies. Lorsque la connexion aura été correctement établie, le voyant
lumineux de l'état du réseau devient vert pour indiquer que l'appareil est prêt à l'emploi. Si le voyant
lumineux de l'état devient rouge, il indique soit une erreur dans les informations d’installation du réseau,
soit une défaillance du réseau. Dans ce cas, veuillez vous reconnecter en utilisant l'une des méthodes de
connexion énoncées ci-dessus an de vérier à nouveau vos paramètres.
Connexion directe (pour accéder à l'interface Web uniquement)
1) Éteignez l'airDAC et connectez l'appareil directement au port Ethernet de votre ordinateur à l'aide du
câble Ethernet fourni.
2) Allumez l'airDAC et attendez 90 secondes pour que l'appareil s'allume et que le voyant lumineux de
l'état du réseau devient vert indiquant ainsi que le mode de connexion directe est prêt.
3) Lancez la page Web de conguration en tapant http://169.254.123.124 dans le navigateur internet de
l'ordinateur connecté.
Mise à jour du micrologiciel
Parfois, nous pouvons proposer des mises à jour du micrologiciel pour en améliorer la fonctionnalité,
ajouter des fonctions ou maintenir son interopérabilité avec les dernières plates-formes informatiques
et les derniers dispositifs mobiles. Les mises à jour du micrologiciel peuvent être réalisées à partir de la
section « Mise à jour du micrologiciel » de l'interface web. Les futures mises à jour seront disponibles en
téléchargement sur le site www.arcam.co.uk
18 19
Page 11

Écouter de la musique
Sur votre appareil iOS (iPhone, iPad ou iPod touch), entrez dans Réglages et vériez que vous utilisez le
même réseau que l’airDAC.
Lancez l’application musicale depuis votre appareil iOS et sélectionnez l’onglet airDAC qui apparaît à
l’écran. Le nom choisi est unique et correspond à votre appareil (il est constitué des 6 derniers chires de
l’adresse MAC de votre appareil). Votre appareil iOS va mémoriser le réseau sélectionné et se connecter à
l'airDAC dès qu'il est à sa portée. L’icône AirPlay apparaît alors en rouge, lorsqu’elle apparaît en blanc cela
signie que des appareils AirPlay sont disponibles.
Appuyer sur l’icône pour écouter vos morceaux de musique.
Restaurer les paramètres d’origine
Les paramètres d’origine peuvent être restaurés en suivant les étapes suivantes:
1) Eteignez l'airDAC.
2) Appuyez de façon prolongée sur le bouton RESET à l’arrière de l’appareil.
3) Allumez l'airDAC en appuyant de façon prolongée sur le bouton RESET.
4) Relâchez le bouton au bout de 10 secondes et l’appareil va redémarrer avec tous les paramètres
d’origine.
POWER
L
ANT
12V DC
1.5A
R
DIG. OUT COAX OPT
OUTPUT
RESET
NET
0
1
Guide d'utilisation
L'AirDAC sélectionne automatiquement une entrée en fonction de la source active.
L’ordre de priorité (du premier au dernier) est le suivant:AirPlay, Coaxial et enn Optique.
Lorsque vous lancez le ux audio AirPlay sur l'airDAC, l'appareil passe automatiquement sur l’entrée
AirPlay.
Description des voyants lumineux
Les voyants lumineux Optique, Coax et AirPlay indiquent le statut du ux d’arrivée:
Appuyer sur 4 pour écouter
vos morceaux de musique
vert = verrouillé et actif, rouge = déverrouillé ou le type de ux n’est pas adapté.
Voyant lumineux NET:rouge = connexion absente ou erreur du réseau, orange = en train d’établir la
connexion, vert = connecté et prêt à l’utilisation.
OPTICAL COAX NET
20 21
Page 12

Betrieb
Kabelgebundene Verbindung mit einem Netzwerk
Es wird empfohlenen, den airDAC über ein Ethernetkabel mit einem bestehenden Heimnetzwerk zu
verbinden. Das Gerät ist standardmäßig für diese Verbindungsart konguriert. Stecken Sie einfach ein Ende
des Ethernetkabels in den airDAC, und das andere Ende in einen freien Ethernet-Port Ihres Netzwerks und
schalten Sie ihn ein. Sobald das Gerät hochgefahren ist und ihm eine IP-Adresse im Netzwerk zugewiesen
wurde, leuchtet die Netzwerkstatus-LED grün; der airDAC ist nun einsatzbereit.
Access Point-Modus
Der „AP-Modus“ ist eine Funktion, mit der der airDAC als ein drahtloser Access Point funktioniert. Er erstellt
wirkungsvoll sein eigenes drahtloses Netzwerk, damit Sie den Komfort einer drahtlosen Verbindung
genießen können, ohne dass ein bestehendes Netzwerk oder zusätzliche Hardware vorhanden sein muss.
In seiner Standard-Konguration und wenn keine kabelgebundene Netzwerkverbindung zu dem airDAC
besteht, wird dieser Modus beim Einschalten automatisch aktiviert. Stellen Sie bei Verwendung sicher, dass
das Ethernetkabel nicht angeschlossen ist und schalten Sie den airDAC ein. Wenn die Netzwerk-LED grün
leuchtet, ist das Gerät bereit. Verbinden Sie Ihr drahtloses Gerät mit dem „ARCAMDirect“-Access Point. SSID
des AP-Modus, Kanal und Sicherheitseinstellungen können mit Hilfe des „AP-Modus“-Abschnitts des WebInterfaces geändert werden, siehe „Zugri auf das Web-Interface“ für weitere Details.
Drahtlose Verbindung mit einem Netzwerk
Verbinden Sie den airDAC mit Ihrem bestehenden, drahtlosen Netzwerk, indem Sie Ihre SSID in der Liste der
gefundenen Netzwerke auswählen und die entsprechenden Sicherheitsinformationen im Abschnitt „NetzwerkKonguration“ des Web-Interfaces eingeben. Siehe „Zugri auf das Web-Interface“ für weitere Details.
Hinweis:
Der Wechsel zwischen verkabelten und drahtlosen Verbindungen erfordert ein Aus- und Einschalten
des Geräts, da die Auswahl der Netzwerk-Schnittstelle angezeigt wird, wenn der airDAC zum ersten
Mal eingeschaltet wird. Wenn Sie eine drahtgebundene Netzwerkverbindung verwenden, sollte das
Ethernetkabel schon angeschlossen sein, bevor das Gerät eingeschaltet wird und umgekehrt, muss eine
drahtgebundene Verbindung entfernt worden sein, bevor eine drahtlose Verbindung hergestellt werden
kann.
Zugri auf das Web-Interface
Sobald der airDAC und Ihr drahtloses Gerät mit einer der oben genannten NetzwerkVerbindungsmethoden verbunden wurden, kann das Web-Interface durch die Eingabe der IP-Adresse des
Geräts in der Adresszeile Ihres Internet-Browsers aufgerufen werden. Im AP-Modus lautet die Standard-IPAdresse 192.168.1.12, Wenn Sie über eine kabelgebundene oder drahtlose Verbindung verbunden sind,
wird die IP vom DHCP-Server in Ihrem Netzwerk zugewiesen.
22 23
Page 13

Einrichtung einer drahtlosen Verbindung
Um den airDAC für Ihr bestehendes, drahtloses Netzwerk zu kongurieren, empfehlen wir, das WebInterface für die erste Einrichtung über den AP-Modus (siehe oben) aufzurufen. Alternativ kann die
Einrichtung auch durch direkten Anschluss an Ihren Computer durchgeführt werden. Verwenden Sie
hierzu das mitgelieferte Ethernetkabel, siehe „Direkte Verbindung“ für weitere Details.
Ab hier können Sie die Details Ihres drahtlosen Netzwerks in der „Netzwerk-Konguration“ eingeben
und die Einstellungen speichern, bevor Sie das Ethernetkabel abstecken und das Gerät aus- und wieder
einschalten. Beim Starten des airDAC versucht dieser nun automatisch eine Verbindung mit dem
drahtlosen Netzwerk mit den eingegebenen Daten herzustellen. Bei einer erfolgreichen Verbindung
leuchtet die Status-LED des Netzwerks grün auf und zeigt damit an, dass er betriebsbereit ist. Eine rote
Netzwerk-Status-LED an dieser Stelle würde bedeuten, dass entweder falsche Netzwerkeinstellungen
eingegeben wurden oder ein Netzwerk-Fehler aufgetreten ist. Stellen Sie in diesem Falle eine neue
Verbindung her, indem Sie eine der oben genannten Verbindungsmethoden verwenden. Überprüfen Sie
nochmals Ihre Einstellungen.
Direkte Verbindung (nur für den Zugang über das Web-Interface)
1) Schalten Sie den airDAC aus und schließen Sie das Gerät mit dem mitgelieferten Ethernetkabel direkt
an den Ethernet-Port Ihres Computers an.
2) Schalten Sie den airDAC ein und warten Sie 90 Sekunden, bis das Gerät sich eingeschaltet hat. Die
Status-LED des Netzwerks leuchtet grün auf und zeigt damit an, das der direkte Verbindungsmodus
bereit ist.
3) Rufen Sie die Einrichtungs-Webseite durch Eingabe von http://169.254.123.124 im Web-Browser des
angeschlossenen Computers auf.
Musik hören
Auf Ihrem iOS-Gerät (iPhone, iPad oder iPod touch), gehen Sie zu Einstellungen und stellen Sie sicher,
dass Sie das gleiche Netzwerk gewählt haben, an dem der airDAC angeschlossen ist.
Starten Sie die Musik-App auf Ihrem iOS-Gerät und wählen Sie die Registerkarte airDAC, die auf dem
Bildschirm erscheint. Der angegebene Name ist einmalig für Ihr Gerät vorhanden (bestehend aus den
letzten 6 Ziern der MAC-Adresse). Ihr iOS-Gerät verwendet von nun an das eingestellte Netzwerk und
wird stets versuchen eine Verbindung zum airDAC herzustellen, wenn er in Reichweite ist. Dies wird
durch das rote AirPlay-Symbol angezeigt; ein weißes AirPlay-Symbol bedeutet, dass AirPlay-Geräte zur
Verfügung stehen.
Tippen Sie auf das Play-Symbol, um Ihre Musik zu hören.
Firmware-Aktualisierung
Wir veröentlichen gelegentlich Firmware-Aktualisierungen zur Verbesserung der Funktionalität,
fügen Funktionen hinzu und sorgen für die Kompatibilität mit den neuesten Plattformen und mobilen
Geräten. Firmware-Aktualisierungen können im Abschnitt „Firmware-Aktualisierung“ des Web-Interfaces
durchgeführt werden. Zukünftige Aktualisierungen stehen unter www.Arcam.co.uk zum Download
bereit
Tippen Sie auf 4, um
Ihre Musik zu hören
24 25
Page 14

Gebruik
Zurücksetzen auf Werkseinstellungen
Die Werkseinstellungen können wiederhergestellt werden, indem die folgenden Schritte befolgt werden:
1) Schalten Sie den airDAC aus.
2) Halten Sie die RESET-Taste auf der Rückseite des Gerätes gedrückt.
3) Schalten Sie den airDAC wieder ein, während sie weiterhin die RESET-Taste gedrückt halten.
4) Lassen Sie die Taste nach 10 Sekunden los; das Gerät fährt hoch und die normalen
Werkseinstellungen wurden wiederhergestellt.
POWER
L
R
DIG. OUT COAX OPT
OUTPUT
ANT
RESET
NET
12V DC
1.5A
0
1
Betrieb
Der airDAC besitzt eine automatische Eingangsauswahl und stellt fest, welche Audioquelle
wiedergegeben wird.
Die Reihenfolge der Prioritäten bei der Umschaltung ist (vom ersten bis zum letzten): AirPlay, Koaxial und
abschließend optischer Anschluss.
Wenn ein AirPlay-Stream zum airDAC gesendet wird, schaltet er automatisch zum AirPlay-Eingang um.
LED-Funktion
Die Optical-, Coax- und AirPlay-LEDs zeigen den Status des eingehenden Streams an:
grün = gesperrt und gültig, rot = entsperrt oder ungültige Stream-Art.
NET-LED: rot = keine Verbindung oder Netzwerk-Fehler, orange = Verbindungsaufbau, grün = verbunden
und betriebsbereit.
Bekabelde verbinding met een netwerk
De aanbevolen methode voor het aansluiten van de airDAC op een bestaand thuisnetwerk is via de
bekabelde Ethernet-aansluiting en het apparaat is gecongureerd om dit standaard te doen. Sluit gewoon
één uiteinde van de Ethernet-kabel op de airDAC aan en het andere uiteinde op een vrije Ethernet-poort
op uw netwerk en zet het apparaat aan. Zodra het apparaat is opgestart en vervolgens door het netwerk
een IP-adres toegewezen heeft gekregen, zal de netwerkstatus-LED groen branden om aan te geven dat de
airDAC klaar voor gebruik is.
Toegangspuntmodus
De “AP Mode” is een functie die de airDAC in staat stelt om als een draadloos toegangspunt te werken,
waardoor in feite een eigen draadloos netwerk wordt gecreëerd die de gebruiker in staat stelt om zonder
de noodzaak van een bestaand netwerk of extra hardware met gemak van een draadloze verbinding te
genieten. In de standaardconguratie en ervan uitgaande dat geen bekabelde netwerkverbinding naar
de airDAC bestaat, wordt deze modus bij het inschakelen automatisch ingeschakeld. Om het te gebruiken,
zorg ervoor dat de Ethernet-kabel is losgekoppeld en schakel de airDAC in. Zodra de netwerk-LED groen is
geworden, waarmee wordt aangegeven dat het apparaat gereed is, verbindt uw draadloos apparaat met
het “ARCAMDirect”-toegangspunt. De SSID van de AP-modus, het kanaal en de beveiligingsinstellingen
kunnen met behulp van de “AP Mode”-sectie van de webinterface worden gewijzigd, zie “Toegang tot de
webinterface” hieronder voor details.
Draadloze verbinding met een netwerk
Het verbinden van de airDAC met uw bestaande draadloze netwerk wordt gedaan door uw SSID in de lijst
van gedetecteerde netwerken te selecteren en de relevante veiligheidsgegevens via de “Netwerk Cong”sectie van de webinterface in te voeren. Zie “Toegang tot de webinterface” hieronder voor details.
Opmerking:
Wisselen tussen bekabelde en draadloze verbindingen vereist het opnieuw opstarten omdat de
selectie van de netwerkinterface plaatsvindt wanneer de airDAC eerst wordt ingeschakeld. Als een
bekabelde verbinding wordt gebruikt, moet de kabel tijdens de opstartfase aangesloten zijn en
dienovereenkomstig mag een bekabelde verbinding niet zijn aangesloten wanneer een draadloos
netwerk wordt gebruikt.
OPTICAL COAX NET
Toegang tot de webinterface
Zodra de airDAC en uw draadloos apparaat met één van de netwerkverbindingsmethoden hierboven
verbonden zijn, mag de webinterface worden geopend door het IP-adres van het apparaat in de adresbalk van
uw internetbrowser in te voeren. Het standaard IP-adres in de AP-modus is 192.168.1.12, wanneer via bekabelde
of draadloze verbinding verbonden is, zal de IP door de DHCP-server op uw netwerk worden toegewezen.
26 27
Page 15

Draadloze verbinding instellen
Om de airDAC voor uw bestaande draadloze netwerk te congureren is het raadzaam om de
webinterface voor eerste installatie via de AP-modus (hierboven beschreven) te openen. Als alternatief
kan het instellen met behulp van de meegeleverde Ethernet-kabel via een directe verbinding met uw
computer worden gedaan, zie “Directe verbinding” hieronder voor details.
Vanaf hier kunt u de details van uw draadloze netwerk in de “Netwerk Cong”-sectie invoeren en
de instellingen opslaan alvorens de Ethernet-kabel los te koppelen en het apparaat opnieuw op te
starten. Bij het inschakelen zal de airDAC met de verstrekte gegevens proberen om automatisch met
het draadloze netwerk verbinding te maken en bij een geslaagde verbinding zal de netwerkstatus-LED
groen branden om aan te geven dat het klaar voor gebruik is. Een rode netwerkstatus-LED geeft op dit
punt aan dat ofwel onjuiste netwerkinstellingen zijn ingevoerd of een netwerkstoring is opgetreden. In
dit geval kunt u opnieuw met behulp van één van de verbindingsmethoden hierboven uw instellingen
opnieuw controleren.
Directe verbinding (alleen voor webinterface toegang)
1) Schakel de airDAC uit en sluit het apparaat met de meegeleverde Ethernet-kabel rechtstreeks op de
Ethernet-poort op uw computer aan.
2) Schakel de airDAC in en wacht 90 seconden voor het apparaat om in te schakelen en de
netwerkstatus-LED groen brandt om aan te geven dat de directe verbindingsmodus gereed is.
3) Start de installatiewebpagina door op de aangesloten computer in de webbrowser
http://169.254.123.124 te typen.
Firmware-update
Af en toe kunnen wij rmware-updates vrijgeven om de functionaliteit te verbeteren, functies toe te
voegen of compatibiliteit met de nieuwste computerplatformen en mobiele apparaten te onderhouden.
Firmware-updates kunnen worden uitgevoerd met behulp van de “Firmware Update”-sectie van de
webinterface. Toekomstige updates zullen beschikbaar zijn voor download op www.arcam.co.uk
28 29
Page 16

Luisteren naar muziek
Ga op uw iOS-apparaat (iPhone, iPad of iPod touch) naar “Instellingen” en zorg ervoor dat u hetzelfde
netwerk selecteert waarmee de airDAC verbonden is.
Start de muziek-app op uw iOS-apparaat en selecteer het airDAC-tabblad dat op het scherm is
weergegeven. De opgegeven naam is uniek voor uw apparaat (bestaande uit de laatste 6 cijfers van
het MAC-adres van uw apparaat). Het iOS-apparaat zal het netwerk nu herinneren en met de airDAC
verbinding maken wanneer deze binnen bereik is. Dit wordt door het AirPlay-pictogram in rood
weergegeven, een wit AirPlay-pictogram betekent dat AirPlay-apparaten beschikbaar zijn.
Tik op het afspeelpictogram om naar uw muziek te luisteren.
Fabrieksinstellingen herstellen
De fabrieksinstellingen kunnen worden hersteld met behulp van de volgende stappen:
1) Schakel de airDAC uit.
2) Druk op en houd de “RESET ”-knop aan de bovenkant van het apparaat ingedrukt.
3) Schakel de airDAC in terwijl u de “RESET”-knop ingedrukt blijft houden.
4) Laat de knop na 10 seconden los, het apparaat zal normaal opstarten met de fabrieksinstellingen
volledig hersteld.
POWER
L
ANT
12V DC
1.5A
R
DIG. OUT COAX OPT
OUTPUT
RESET
NET
0
1
Gebruik
De airDAC maakt van een automatische ingangselectie gebruik die afhankelijk is van de bron die wordt
afgespeeld.
De volgorde van prioriteit (vanaf de eerste naar de laatste) is AirPlay, Coaxiaal en als laatste Optisch.
Wanneer een AirPlay-stream naar de airDAC wordt gestart zal het automatisch naar de AirPlay-ingang
overschakelen.
Functie van de LED
Tik op “4” om naar
uw muziek te luisteren
De Optisch-, Coax- en AirPlay-LED geven de status van de inkomende stream aan:
groen = vergrendeld en geldig, rood = ontgrendeld of ongeldig stream-type.
NET-LED: rood = geen verbinding of netwerkfout, oranje = verbinding aan het maken, groen =
verbonden en gereed.
OPTICAL COAX NET
30 31
Page 17
Funcionamiento
Conexión por cable a la red
El método recomendado para conectar el airDAC a una red doméstica existente es a través de la
conexión por cable Ethernet, y el dispositivo viene congurado de fábrica para esto. Simplemente
conecte un extremo del cable Ethernet en el airDAC, y el otro extremo en el puerto Ethernet libre de
su red doméstica, y encienda el dispositivo. Una vez que arranca el dispositivo y la red le asigna una
dirección IP, el LED de estado de red se iluminará en verde indicando que el airDAC está listo para usar.
Modo punto de acceso (AP)
El “Modo AP” es una función que permite al airDAC trabajar como punto de acceso inalámbrico, creando
con ecacia su propia red inalámbrica que permite al usuario disfrutar de la comodidad de una conexión
inalámbrica sin la necesidad de una red o de hardware adicional. En su conguración predeterminada y
asumiendo que no existe conexión por cable al airDAC, este modo se habilita automáticamente durante
el encendido. Para usarlo, asegúrese que tiene el cable Ethernet desconectado y encienda el airDAC.
Una vez que el LED de red (network) se ilumine en verde indicando que la unidad está lista, conecte
su dispositivo inalámbrico al punto de acceso “ARCAMDirect”. Los parámetros SSID, canal y seguridad
del modo AP se pueden modicar usando la sección “AP Mode” de la interfaz Web, consulte el párrafo
“Acceder a la interfaz Web” a continuación para los detalles.
Conexión inalámbrica a la red
Conectar el airDAC a una red inalámbrica existente se hace seleccionando el SSID de la red existente de
la lista de redes detectadas e introduciendo los detalles de seguridad relevantes, a través de la sección
“Network Cong” de la interfaz Web. Consulte el párrafo “Acceder a la interfaz Web” a continuación para
los detalles.
Nota:
El cambio de conexión a la red entre cable o inalámbrica, requiere apagar y encender la unidad ya que
la selección del interfaz de red se realiza cuando se enciende el airDAC. Si usa una red por cable, el cable
debería estar conectado durante el periodo de arranque y del mismo modo, si usa una red inalámbrica el
cable no debería estar conectado durante el arranque.
Acceder a la interfaz Web
Una vez que el airDAC y su dispositivo inalámbrico estén conectados usando uno de los métodos de
conexión anteriores, puede acceder a la interfaz Web introduciendo la dirección IP del dispositivo en
la barra de direcciones de su navegador de Internet. La dirección IP predeterminada en el Modo AP es
192.168.1.12, cuando la conexión es por cable o inalámbrica la IP será asignada por el servidor DHCP de
su red.
32 33
Page 18

Conguración de la conexión inalámbrica
Para congurar el airDAC en su red inalámbrica existente, le recomendamos que acceda a la interfaz Web
para la conguración inicial a través del Modo AP (detallado anteriormente). Como alternativa, puede
congurarla mediante una conexión directa a su PC usando el cable Ethernet proporcionado, y viendo el
párrafo “Conexión directa” a continuación.
Desde aquí podrá introducir los detalles de su red inalámbrica en la sección “Network Cong.” y guardar
los ajustes antes de desconectar el cable Ethernet y apagar-encender la unidad. Cuando vuelva a
encenderlo, el airDAC intentará unirse automáticamente a la red inalámbrica usando los detalles
proporcionados, cuando se obtiene una conexión correcta el LED de estado de red se ilumina en verde,
indicando que está listo para usar. En este punto, un LED de estado de red iluminado en rojo indica que
ha introducido una conguración incorrecta de la red o que ha ocurrido un fallo en la red. En este caso,
por favor vuelva a conectarlo usando cualquiera de los métodos de conexión indicados anteriormente y
compruebe los parámetros.
Conexión directa (sólo para acceso a la interfaz Web)
1) Apague el airDAC, y conecte el dispositivo directamente al puerto Ethernet de su PC usando el cable
Ethernet suministrado.
2) Encienda el airDAC, y espere 90 segundos a que arranque la unidad y se ilumine en verde el LED de
estado indicando que el modo de conexión directa está listo.
3) Abra la Página Web de conguración escribiendo http://169.254.123.124 en el navegador Web del PC
conectado.
Actualización del Firmware
Ocasionalmente se pueden publicar actualizaciones del Firmware para mejorar su funcionalidad, añadir
funciones o mantener la Interoperatividad con las nuevas plataformas informáticas y dispositivos
móviles. Se puede actualizar el Firmware de la unidad usando la sección “Firmware Update” de la interfaz
Web. Las futuras actualizaciones estarán disponibles para su descarga en www.arcam.co.uk
Escuchar música
En su dispositivo iOS (iPhone, iPad o iPod touch), entre en Ajustes y cerciórese de que tiene seleccionada
la misma red en la que está conectado el airDAC.
Ejecute la App de música en su dispositivo iOS y seleccione la pestaña airDAC que le aparece en la
pantalla. El nombre proporcionado es único para su dispositivo (formado por los últimos 6 dígitos de la
dirección MAC de su dispositivo). Su dispositivo iOS recordará la red y se conectará al airDAC siempre
que esté dentro de la cobertura de la red. Cuando está fuera de cobertura el icono AirPlay aparecerá en
rojo; un icono AirPlay blanco indica que los dispositivos AirPlay están disponibles.
Toque sobre el icono de Reproducir para oír su música.
Toque 4 para
escuchar su música
34 35
Page 19

Работа
Recuperar parámetros de fábrica
Los parámetros predeterminados de fábrica se pueden recuperar usando los pasos siguientes:
1) Apague el airDAC.
2) Mantenga pulsado el botón RESET en la parte trasera del dispositivo.
3) Encienda el airDAC mientras mantiene pulsado el botón RESET.
4) Suelte el botón transcurridos 10 segundos y el dispositivo arrancará normalmente con los
parámetros predeterminados de fábrica.
POWER
L
R
DIG. OUT COAX OPT
OUTPUT
ANT
RESET
NET
12V DC
1.5A
0
1
Funcionamiento
El airDAC usa una selección automática de entrada, determinada por la fuente que se esté
reproduciendo.
El orden de prioridad (del primero al último) es AirPlay, Coaxial y por último Óptica.
Cuando la transmisión AirPlay se inicia hacia el airDAC, cambiará automáticamente a la entrada AirPlay.
Función de los LED
Los LED Óptica, Coaxial y AirPlay indican el estado del ujo de datos entrante:
verde = tipo de ujo bloqueado y válido, rojo = desbloqueado o inválido.
LED de RED: rojo = no hay conexión o error de red, naranja = conectando, verde = conectado y listo.
OPTICAL COAX NET
Проводное подключение к сети
Систему airDAC рекомендуется подключать к домашней сети через проводное Ethernet-соединение,
а конфигурация устройства предусматривает делать это по умолчанию. Просто подключите один
конец кабеля Ethernet к системе airDAC, а второй – в резервный порт Ethernet сети и включите
питание. Когда устройство загрузится и сеть присвоит IP-адрес, индикатор состояния сети будет
гореть зеленым цветом, указывая на то, что система airDAC готова к работе.
Режим точки доступа
«Режим точки доступа» - это функция, с помощью которой система airDAC работает в качестве
беспроводной точки доступа, создавая свою собственную эффективную беспроводную сеть и
предоставляя пользователю возможность наслаждаться удобством беспроводного подключения.
Уже существующей сети или дополнительных аппаратных средств при этом не требуется. В
стандартной конфигурации при отсутствии проводного подключения системы airDAC к сети этот
режим приводится в действие автоматически при включении. Перед использованием убедитесь, что
кабель Ethernet отключен и включите систему airDAC. После того, как индикатор сети LED загорится
зеленым, что указывает на то, что устройство готово, подключите беспроводное устройство к точке
доступа «ARCAMDirect». Сетевой идентификатор (SSID) режима точки доступа, канал и настройки
безопасности можно изменить в разделе «AP Mode(режим точки доступа)» сетевого интерфейса, для
получения более детальной информации см. «Доступ к сетевому интерфейсу».
Беспроводное подключение к сети
Для подключения системы airDAC к существующей беспроводной сети выберите SSID из списка
обнаруженных сетей и введите соответствующие данные о безопасности в разделе «Network Cong»
(«Конфигурация сети») сетевого интерфейса. Для получения более детальной информации см. раздел
«Доступ к сетевому интерфейсу».
Примечание:
Для переключения между проводными и беспроводными подключениями необходимо выключить
и включить устройство, так как выбор сетевого интерфейса появляется только после включения
системы airDAC. При проводном соединении на этапе включения питания должен использоваться
кабель и, наоборот, при пользовании беспроводной сетью не должно быть проводного соединения.
Доступ к сетевому интерфейсу
После подключения системы airDAC к беспроводному устройству с помощью одного из
вышеназванных методов подключения к сети, доступ к сетевому интерфейсу осуществляется
посредством введения IP-адреса устройства в адресную строку Интернет-браузера. IP-адрес по
умолчанию в режиме точки доступа - 192.168.1.12, при проводном или беспроводном подключении
IP-адрес будет считаться присвоенным сети DHCP-сервером.
36 37
Page 20

Установка беспроводного подключения
Для изменения конфигурации системы airDAC под уже существующую беспроводную сеть
рекомендуется осуществлять доступ к сетевому интерфейсу для первичного подключения в
режиме точки доступа (подробно описано выше). Также установку можно осуществить через
прямое подключение к компьютеру с помощью поставляемого в комплекте кабеля Ethernet. Для
получения более подробной информации см. раздел «Прямое подключение» ниже.
Теперь можно ввести детали беспроводной сети в разделе «Network Cong» («Конфигурация
сети») и сохранить настройки перед отключением кабеля Ethernet и выключением/включением
устройства. Теперь при включении система airDAC будет пытаться подключиться к беспроводной
сети, используя имеющиеся данные, при успешном подключении индикатор состояния сети
загорится зеленым, что свидетельствует о готовности системы к использованию. Если в этот
момент индикатор состояния сети горит красным цветом, это свидетельствует о том, что были
ведены неверные сетевые настройки, либо произошла сетевая ошибка. В этом случае осуществите
повторное подключение, используя вышеописанные методы, проверьте настройки.
Прямое подключение (только для доступа к сетевому интерфейсу)
1) Выключите систему airDAC и подключите устройство к порту Ethernet компьютера напрямую, с
помощью поставляемого в комплекте кабеля Ethernet.
2) Включите систему airDAC и подождите 90 секунд, пока устройство включится, а индикатор
состояния сети будет гореть зеленым, свидетельствуя о том, что режим прямого подключения
включен.
3) Зайдите на страницу установки. Для этого введите http://169.254.123.124 в веб-браузере
подключенного компьютера.
Обновление микропрограммного обеспечения
Периодически мы можем выпускать обновления микропрограммного обеспечения для
улучшения функциональности, добавлять функции или поддерживать совместимость с новейшим
компьютерным оборудованием и мобильными устройствами. Обновление микропрограммного
можно производить, руководствуясь разделом «Firmware Update» («Обновление
микропрограммного обеспечения») сетевого интерфейса. Новые обновления будут доступны для
скачивания на сайте www.arcam.co.uk
38 39
Page 21

Прослушивание музыки
На устройстве iOS (iPhone, iPad или iPod touch) перейдите к настройкам и убедитесь, что вы
выбрали ту же сеть, к которой подключена система airDAC.
Запустите музыкальное приложение на своем устройстве iOS и выберите ярлык airDAC,
который появится на экране. Вашему устройству будет присвоено уникальное имя, состоящее
из шести последних цифр MAC–адреса устройства. Теперь ваше устройство iOS запомнит сеть
и подключится к системе airDAC, как только появится диапазон. Это будет отображаться в виде
красного значка AirPlay. Белый значок AirPlay означает, что доступны устройства AirPlay.
Чтобы прослушать музыку, нажмите значок воспроизведения.
Восстановление заводских настроек
Восстановить заводские настройки по умолчанию можно следующим образом:
1) Отключите питание системы airDAC.
2) Нажмите и удерживайте кнопку RESET на тыльной стороне устройства.
3) Включите питание системы airDAC, продолжая удерживать кнопку RESET.
4) Через 10 секунд отпустите кнопку, устройство загрузится обычным способом с полностью
восстановленными заводскими настройками.
POWER
L
ANT
12V DC
1.5A
R
DIG. OUT COAX OPT
OUTPUT
RESET
NET
0
1
Работа
Система airDAC использует автоматический выбор входа, определяя его по тому, какой источник
воспроизводится.
Порядок очередности (с первого до последнего) следующий: AirPlay, коаксиальный, а затем
оптический.
Если поток AirPlay поступает в систему airDAC, он автоматически перейдет на вход AirPlay.
Функция индикатора
Светодиодный индикатор оптического, коаксиального кабеля и технологии AirPlay показывает
состояние входного потока:
Чтобы прослушать
музыку, нажмите 4
Зеленый цвет = заблокированный и верный тип потока, красный цвет = разблокированный или
неверный тип потока.
ИНДИКАТОР СЕТИ: красный цвет = нет соединения или произошла сетевая ошибка, оранжевый
цвет = идет соединение, зеленый цвет = подключен и готов к работе.
OPTICAL COAX NET
40 41
Page 22

Funzionamento
Connessione via cavo a una rete
Il metodo di collegamento raccomandato per connettere l’airDAC alla rete domestica esistente è
attraverso una connessione via cavo Ethernet, per la quale il dispositivo è già congurato. Basta inserire
un’estremità del cavo Ethernet nell’airDAC e l’altra estremità in una porta Ethernet libera della sua rete e
procedere con l’accensione. Una volta che il dispositivo si è avviato e gli è stato assegnato un indirizzo IP
dalla rete, il LED di stato della rete diventerà verde, indicando che l’airDAC è pronto all’uso.
Modalità punto di accesso
La modalità punto di accesso “AP” è una funzione che permette all’airDAC di funzionare come un
punto di accesso wireless, creando così ecientemente la sua rete wireless. Ciò permette all’utente di
sfruttare al meglio la convenienza di una connessione wireless senza la necessità di una rete esistente o
di hardware aggiuntivo. Nella sua congurazione predenita, e qualora non esista alcuna connessione
di rete via cavo all’airDAC, questa modalità viene abilitata automaticamente all’avvio. Per utilizzare il
dispositivo, si assicuri che il cavo Ethernet della connessione cablata sia scollegato e accenda l’airDAC.
Una volta che il LED di rete diventa verde, indicando che l’unità è pronta all’uso, colleghi il dispositivo
wireless al punto di accesso “ARCAMDirect”. Le impostazioni SSID, canale e sicurezza della modalità
AP possono essere modicate utilizzando la sezione “Modalità AP” dell’interfaccia web. Per maggiori
dettagli, veda più avanti “Accesso all’interfaccia web” .
Connessione wireless a una rete
La connessione dell’airDAC alla rete wireless esistente viene eettuata selezionando il suo SSID
dall’elenco delle reti rilevate e inserendo i dettagli pertinenti relativi alla sicurezza tramite la sezione
“Cong. di rete” dell’interfaccia web. Per maggiori dettagli, veda “Accesso all’interfaccia utente” di seguito.
Nota:
passare dalla connessione via cavo a quella wireless richiede un riavvio, in quanto la selezione
dell’interfaccia di rete avviene al primo avvio dell’airDAC. Se si utilizza una connessione via cavo, il cavo
dovrebbe essere presente durante la fase di avvio. Allo stesso modo, quando si usa una rete wireless non
deve essere presente una connessione via cavo.
Accesso all’interfaccia web
Una volta che l’airDAC e il suo dispositivo wireless sono stati connessi utilizzando uno dei metodi
di connessione di rete menzionati in precedenza, è possibile eettuare l’accesso all’interfaccia web
inserendo l’indirizzo IP del dispositivo nella barra degli indirizzi del browser web. L’indirizzo IP predenito
quando il dispositivo si trova in modalità AP è 192.168.1.12; se invece è collegato via cavo o wireless, l’IP
verrà assegnato dal server DHCP sulla sua rete.
42 43
Page 23

Congurazione connessione wireless
Per congurare l’airDAC per la rete wireless esistente, le consigliamo di accedere all’interfaccia web per
la congurazione iniziale utilizzando la modalità AP (descritta in dettaglio in precedenza). In alternativa,
la congurazione può essere eseguita tramite connessione diretta al suo computer utilizzando il cavo
Ethernet fornito. Per ulteriori dettagli, veda più avanti “Connessione diretta” .
Da qui è possibile inserire i dettagli della sua rete wireless nella sezione “Cong. di rete”e salvare
le impostazioni prima di scollegare il cavo Ethernet e riavviare l’unità. All’avvio l’airDAC tenterà
automaticamente di accedere alla rete wireless utilizzando i dettagli forniti. La connessione avverrà con
successo quando il LED di stato della rete diventerà verde, indicando che è pronto all’uso. Il LED di stato
rosso a questo punto indica che ha inserito delle impostazioni di rete sbagliate o che si è vericato un
errore di rete. In questo caso, si ricolleghi utilizzando uno qualsiasi dei metodi di connessione tra quelli
indicati in precedenza e verichi nuovamente le impostazioni.
Connessione diretta (solo per accesso all’interfaccia web)
1) Spenga l’airDAC e colleghi il dispositivo direttamente alla porta Ethernet del suo computer
utilizzando il cavo Ethernet fornito.
2) Accenda l’airDAC e attenda 90 secondi anché l’unità si accenda e il LED di stato della rete diventi
verde, indicando che la modalità di connessione diretta è pronta all’uso.
3) Lanci la pagina web di congurazione digitando http://169.254.123.124 nel browser web del
computer connesso.
Aggiornamento del rmware
Occasionalmente potremmo rilasciare aggiornamenti del rmware per migliorare la funzionalità,
aggiungere funzioni o mantenere l’interoperabilità con le piattaforme di elaborazione e i dispositivi
mobili più recenti. Gli aggiornamenti del rmware possono essere eseguiti utilizzando la sezione
“Aggiornamento rmware” dell’interfaccia utente. Download futuri saranno disponibili all’indirizzo
www.arcam.co.uk
Ascolto di musica
Sul suo dispositivo iOS (iPhone, iPad o iPod touch), vada su Impostazioni e si assicuri di aver selezionato
la stessa rete a cui è collegato l'airDAC.
Lanci l’applicazione Musica dal suo dispositivo iOS e selezioni la barra airDAC che compare
sullo schermo. Il nome fornito è solo per il suo dispositivo (le ultime 6 cifre dell’indirizzo MAC
dell'apparecchio). Il suo dispositivo iOS si ricorderà la rete e si collegherà all’airDAC ogni volta che sarà
nel suo raggio di rilevamento. Per accorgersene, faccia caso all'icona AirPlay mostrata in rosso: quando
l'icona AirPlay è bianca signica che ci sono dispositivi AirPlay disponibili.
Sori l’icona play per ascoltare la musica.
Sori 4 per
ascoltare la musica
44 45
Page 24

操作
Ripristino impostazioni di fabbrica
Le impostazioni di fabbrica possono essere ripristinate attraverso i seguenti passaggi:
1) Spenga l’airDAC.
2) Tenga premuto il tasto RESET sul retro del dispositivo.
3) Avvii l’airDAC continuando a tener premuto il tasto RESET.
4) Lasci il tasto dopo 10 secondi, il dispositivo si avvierà normalmente con le impostazioni di fabbrica
ripristinate.
POWER
L
R
DIG. OUT COAX OPT
OUTPUT
ANT
RESET
NET
12V DC
1.5A
0
1
Funzionamento
L’airDAC seleziona automaticamente l’input in base al tipo di fonte in riproduzione.
L’ordine di priorità (dalla prima all’ultima) è AirPlay, Coassiale e inne Ottico.
Quando viene avviato un usso AirPlay, l’airDAC passerà automaticamente all’input AirPlay.
Funzione LED
Il LED Ottico, Coass. e AirPlay indicano lo stato del usso in entrata:
verde = captato e valido, rosso = non captato o tipo di usso invalido.
LED RETE: rosso = connessione assente o errore di rete, arancione = in connessione, verde = collegato e
pronto.
OPTICAL COAX NET
至网络的有线连接
将 airDAC 接入现有家庭网络的推荐方法是建立以太网有线连接,本设备已默认配置为建立这种连接。
只需简单地将以太网线缆的一端插入 airDAC,将另一端插入您网络上的备用以太网断开,然后打开
airDAC 即可。启动设备并由网络分配 IP 地址后,网络状态 LED 将点亮绿色,表示 airDAC 已准备就绪。
接入点模式
“AP Mode”(接入点模式)是允许 airDAC 充当无线接入点,从而有效创建其自己的无线网络的功能,
这使得用户可以尽享无线连接的便捷之利,而无需现有的网络或额外的硬件。airDAC 处于其默认配
置,且不存在连接至 airDAC 的有线网络连接时,此模式会在打开时自动启用。如要使用,请确保以
太网线缆已断开,并打开 airDAC。一旦网络 LED 已变为绿色,则表明设备已处于就绪状态,将您的
无线设备连至“ARCAMDirect”接入点。使用网络界面的“AP Mode”(接入点模式)部分,可以修
改接入点模式的 SSID、通道和安全设置,请参阅下面的“访问网络界面”以了解详细信息。
至网络的无线连接
通过在网络界面的“Network Config”(网络配置)部分从检测到的网络列表中选择您的 SSID,然
后输入相关的安全详细信息,可以将 airDAC 连接至您现有的网络。请参阅下面的“访问网络界面”
以了解详细信息。
注意:
在有线和无线连接之间切换需要开关机,因为网络接口的选择在 airDAC 最初打开时进行。如果使用
了有线连接,则开机阶段应有电缆存在;同理,如果使用无线连接,则不得存在有线连接。
访问网络界面
一旦 airDAC 和您的无线设备使用上述某种网络连接方式进行连接,就可以通过在您互联网浏览器的
地址栏输入设备的 IP 地址来访问网络界面。处于接入点模式时,默认 IP 地址为 192.168.1.12,通过
有线或无线连接进行连接时,IP 地址将由您网络上的 DHCP 服务器来分配。
46 47
Page 25

无线连接设置
如要针对您现有的无线网络配置 airDAC,我们建议通过接入点模式访问网络界面以进行最初的设置
(上文有详细描述)。另外,可以使用随附的以太网线缆通过直接连接至您的计算机来完成设置,
请参阅下面的“直接连接”以了解详细信息。
在此处,您可以将您无线网络的详细信息输入“Network Config”(网络配置)部分,并在将以太
网线缆断开和开关机之前保存设置。启动时,airDAC 将会自动尝试使用提供的详细信息加入无线网
络,连接成功将会使网络 LED 呈绿色,指示设备已就绪可随时使用。如果网络状态 LED 呈红色,则
表示输入的网络设置不正确,或者发生了网络故障。在这种情况下,请使用上述的任意连接方式重
新连接,并重新检查您的设置。
直接连接(仅供网络界面访问)
1)
关闭 airDAC,使用附带的以太网线缆将设备直接连接至您计算机上的以太网端口。
2)
打开 airDAC,等待 90 秒,以便设备启动,网络状态 LED 发出绿光,指示直接连接模式已就绪。
3)
通过将 http://169.254.123.124 键入连接的计算机的网络浏览器,启动设置网页。
固件更新
我们会不时发布固件更新,以便改善功能、增加功能或维持与最新计算平台和移动设备的互操作性。
使用网络界面的“Firmware Update”(固件更新)部分,可以执行固件更新。未来的更新将会在
www.arcam.co.uk 提供下载。
48 49
Page 26

收听音乐
在您的 iOS 设备(iPhone、iPad 或 iPod touch)上,转到“Settings”(设置)并确保选择的网络与
airDAC 连接到的网络相同。
在 iOS 设备上启动音乐应用程序,并选择屏幕上出现的 airDAC 选项卡。为设备提供的名称是唯一的
(包括设备 MAC 地址的最后 6 位数)。您的 iOS 设备将会记住该网络,每当 airDAC 进入连接范围时,
iOS 设备就会连接到 airDAC。此时将显示红色的唱片图标;白色的唱片图标表示唱片设备可用。
点击播放图标即可收听音乐。
恢复出厂设置
可以执行以下步骤来恢复出厂默认设置:
1)
关闭 airDAC。
2)
按住设备背面的 RESET 按钮。
3)
在持续按住 RESET 按钮的同时打开 airDAC。
4)
10 秒后松开该按钮,设备将正常启动,并完全恢复出厂设置。
L
ANT
POWER
12V DC
1.5A
R
DIG. OUT COAX OPT
OUTPUT
RESET
NET
0
1
操作
airDAC 根据播放的信源自动选择输入。
优先顺序(从前到后)为 AirPlay、同轴和光纤输入。
在 airDAC 中启动唱片媒体流时,它将自动切换到 AirPlay 输入。
LED 的功能
光纤、同轴和 AirPlay LED 指示传入的媒体流的状态:
点击4收听音乐
绿色 = 锁定且有效;红色 = 媒体流类型未锁定或无效。
网络 LED:红色 = 无连接或网络错误;橙色 = 正在连接;绿色 = 已连接并已准备就绪。
OPTICAL COAX NET
50 51
Page 27

Specication
Utilisation
technische Daten
Technishe gegevens
Especicación
Технические характеристики
Speciche
规格
DAC Burr-Brown/TI PCM5102
Frequency response 10Hz –20kHz, +0 –0.2dB
Total Harmonic Distortion + Noise 0.002%
Signal-to-noise ratio (A-weighted) 106dB (24-bit)
Maximum output level 2.15V RMS
Supported sample rates Optical 44.1kHz, 48kHz, 88.2kHz, 96kHz
Coaxial 44.1kHz, 48kHz, 88.2kHz, 96kHz, 192kHz
Bit depth 16-bit – 24-bit
Power requirements 12V DC, 1.5A max
Dimensions 190mm x 120mm x 42mm
Weight 1.1kg
Accessories supplied PSU
Antenna
Ethernet cable
Stereo phono–phono cable
Optical cable,
Digital–phono cable
Manual
E&OE. All specications are typical
Technology Licensing
FCC INFORMATION (FOR US CUSTOMERS)
1. PRODUCT
This product complies with Part 15 of the FCC Rules. Operation
is subject to the following two conditions: (1) This device may
not cause harmful interference, and (2) this device must accept
any interference received, including interference that may cause
undesired operation.
2. IMPORTANT NOTICE:
DO NOT MODIFY THIS PRODUCT
This product, when installed as indicated in the instructions
contained in this manual, meets FCC requirements. Modication
not expressly approved by ARCAM may void your authority,
granted by the FCC, to use the product.
3. NOTE
This product has been tested and found to comply with the limits
for a Class B digital device, persuant to Part 15 of the FCC Rules.
These limits are designed to provide reasonable protection against
harmful interference in a residential installation.
This product generates, uses and can radiate radio frequency
energy and, if not installed and used in accordance with
the instructions, may cause harmful interference to radio
communications.
INDUSTRY CANADA INFORMATION
(FOR CANADIAN CUSTOMERS)
This Class B digital apparatus complies with canadian ICES-003
1.“This device complies with Industry Canada licence-exempt RSS
standard(s). Operation is subject to the following two conditions:
(1) this device may not cause interference, and (2) this device must
accept any interference, including interference that may cause
undesired operation of the device.
Le présent appareil est conforme aux CNR d'Industrie Canada
applicables aux appareils radio exempts de licence. L'exploitation
est autorisée aux deux conditions suivantes : (1) l'appareil ne
doit pas produire de brouillage, et (2) l'utilisateur de l'appareil
doit accepter tout brouillage radioélectrique subi, même si le
brouillage est susceptible d'en compromettre le fonctionnement”
2.“This radio transmitter has been approved by Industry Canada to
operate with the antenna types listed below with the maximum
permissible gain and required antenna impedance for each
antenna type indicated. Antenna types not included in this list,
having a gain greater than the maximum gain indicated for that
type, are strictly prohibited for use with this device.
However, there is no guarantee that interference will not occur
in a particular installation. If this product does cause harmful
interference to radio or television reception, which can be
determined by turning the product OFF and ON, the user is
encouraged to try to correct the interference by one or more of
the following measures:
• Reorient or relocate the receiving antenna.
• Increase the separation between the equipment and
receiver.
• Connect the product into an outlet on a circuit dierent
from that to which the receiver is connected.
• Consult the local retailer authorized to distribute this type
of product or an experienced radio/TV technician for help.
This equipment complies with FCC RF radiation exposure limits set
forth for an uncontrolled environment. This equipment should be
installed and operated with minimum distance 20 cm between the
antenna and your body.
Le présent émetteur radio a été approuvé par Industrie Canada
pour fonctionner avec les types d'antenne énumérés ci-dessous
et ayant un gain admissible maximal et l'impédance requise pour
chaque type d'antenne. Les types d'antenne non inclus dans cette
liste, ou dont le gain est supérieur au gain maximal indiqué, sont
strictement interdits pour l'exploitation de l'émetteur.”
{Wanshih WSS002, Antenna Gain +2dBi}
3. “This equipment complies with IC RSS102 radiation exposure
limits set forth for an uncontrolled environment. This equipment
should be installed and operated with minimum distance 20 cm
between the antenna and your body.
Cet équipement est conforme aux limites IC RSS102 d'exposition
aux rayonnements dénies pour un environnement non contrôlé.
Cet équipement doit être installé et utilisé à distance minimale de
20 cm entre l'antenne et votre corps.”
AirPlay, the AirPlay logo, iPhone, iPad and iPod touch are trademarks of Apple Inc., registered in the U.S.
and other countries.
IMPORTANT ANTENNA INFORMATION
The airDAC is only designed to operate with the supplied antenna.
Any other antenna are strictly prohibited for use with the airDAC.
52 53
Page 28

Worldwide Guarantee
Garantie universelle
This entitles you to have the unit repaired free of charge for two years after purchase, provided that it
was originally purchased from an authorised Arcam dealer. The manufacturer can take no responsibility
for defects arising from accident, misuse, abuse, wear and tear, neglect or through unauthorised
adjustment and/or repair, neither can they accept responsibility for damage or loss occurring during
transit to or from the person claiming under the guarantee.
The warranty covers:
Parts and labour costs for two years from the purchase date. After two years you must pay for both parts
and labour costs. The warranty does not cover transportation costs at any time.
Claims under guarantee
This equipment should be packed in the original packing and returned to the dealer from whom it
was purchased, or failing this, directly to the Arcam distributor in the country where the product was
purchased.
It should be sent carriage prepaid by a reputable carrier – not by post. No responsibility can be accepted
for the unit whilst in transit to the dealer or distributor and customers are therefore advised to insure the
unit against loss or damage whilst in transit.
For further details contact Arcam at:
Arcam Customer Support Department,
Stirling House, Waterbeach, CAMBRIDGE, CB25 9QE, England
or www.arcam.co.uk.
Problems?
If your Arcam dealer is unable to answer any query regarding this or any other Arcam product please
contact Arcam Customer Support at the above address and we will do our best to help you.
Cette garantie vous donne le droit à une réparation gratuite durant les deux premières années à compter
de la date d’achat si votre appareil a été acheté auprès d'un revendeur agréé Arcam. Le fabricant ne sera
en aucun cas tenu responsable des défauts résultant d’un accident, utilisation inadéquate, abus, usure,
négligence ou réglages/réparations non autorisés, ainsi que des dommages ou perte se produisant
pendant le transport vers et en provenance de la personne eectuant une demande de réparation/
échange sous garantie.
La garantie couvre :
Le coût des pièces et de la main-d'œuvre durant deux ans à compter de la date d’achat. Ces coûts
devront être payés pour toute réparation eectuée en dehors de la période de garantie. La garantie ne
couvre pas les frais de transport.
Réclamations au titre de la garantie
Cet équipement doit être emballé dans son emballage original et retourné à votre revendeur, vous
pouvez également le retourner au distributeur Arcam du pays d’achat.
Celui-ci doit être envoyé en port payé via un transporteur renommé – et non par la poste. Le revendeur
et le distributeur ne seront en aucun cas tenus responsables des problèmes pouvant survenir pendant le
transport, la souscription à une assurance de transport est recommandée.
Pour davantage de détails, contactez Arcam aux coordonnées suivantes :
Arcam Customer Support Department,
Stirling House, Waterbeach, CAMBRIDGE, CB25 9QE, England
ou www.arcam.co.uk.
Des problèmes ?
Si votre revendeur ne peut répondre à votre demande pour ce produit ou tout autre produit Arcam,
veuillez contacter le Service client d’Arcam, à l’adresse ci-dessus, où nous ferons de notre mieux pour
vous aider.
Correct disposal of this product
This marking indicates that this product should not be disposed with other
household waste throughout the EU.
To prevent possible harm to the environment or human health from uncontrolled
waste disposal and to conserve material resources, this product should be recycled
responsibly.
To dispose of your product, please use your local return and collection systems or
contact the retailer where the product was purchased.
Mise au rebut appropriée de l'appareil
Ce symbole indique que ce produit ne doit pas être mis au rebut avec les déchets
ménagers et ce dans tous les pays de l'Union Européenne. Pour éviter de porter
préjudice à l'environnement ou à la santé humaine à cause de l'élimination
incontrôlée des déchets, et pour préserver les ressources naturelles, ce produit
doit être recyclé de manière responsable. Pour mettre au rebut votre appareil,
ramenez-le dans des points de collecte appropriées ou retournez-le au revendeur
auprès duquel vous l'avez acheté.
54 55
Page 29

Gesetzliche Gewährleistung
Wereldwijde garantie
Arcam-Produkte unterliegen strengen Qualitätskontrollen und technischen Verbesserungen. Falls
unerwartet ein technischer Defekt Ihres Arcam-Produkts vorliegen sollte, stehen Ihnen als Käufer
gesetzliche Gewährleistungsansprüche für einen Zeitraum von zwei Jahren ab Kaufdatum gegenüber
dem Händler zu, bei dem das Gerät gekauft wurde. Bitte wenden Sie Sich in diesem Fall an den Verkäufer
des Produkts.
Hersteller-Garantie für Deutschland
Falls Sie das Produkt bei einem autorisierten Arcam-Fachhändler in Deutschland gekauft haben,
haben Sie die Möglichkeit, das Produkt beim zuständigen Vertrieb zu registrieren. Dazu müssen Sie
den Kaufbeleg und die Garantieanforderungskarte zum deutschen Arcam-Vertrieb einsenden und
bekommen dann die Herstellergarantiekarte zurückgeschickt. Die Garantiezeit beträgt beim Kauf über
einen autorisierten Arcam-Fachhändler und nach Registrierung zwei Jahre für alle Geräte der Solo
Neo-Serie und fünf Jahre für alle Geräte der FMJ-Serie. Der Ablauf für Österreich und die Schweiz kann
unterschiedlich sein. Bitte wenden Sie Sich an die entsprechenden Vertriebe.
Der Hersteller oder Vertrieb übernimmt keine Verantwortung für Schäden, die durch Unfall, Missbrauch,
Verschleiß, Vernachlässigung oder unautorisierte Veränderungen bzw. Reparaturen entstehen.
Außerdem wird keinerlei Verantwortung für Schäden oder Verlust des Gerätes während des Transports
zum oder vom Garantienehmer übernommen.
Die Herstellergarantie umfasst Teile- und Arbeitsstundenkosten. Nach Ablauf der Herstellergarantiezeit
müssen Sie die vollen Kosten für Ersatzteile und Arbeitsstunden tragen. Versandkosten werden nicht
übernommen.
Inanspruchnahme der Garantie
Das Gerät sollte in der Originalverpackung an den Händler zurückgegeben werden, bei dem es
erworben wurde. Sie können es auch direkt an den Arcam-Service in Ihrem Land schicken. Der Versand
sollte frei Haus durch einen angesehenen Kurier erfolgen. Da keine Verantwortung für Schäden oder
Verlust während des Transports zum Händler oder zur Service-Werkstatt übernommen wird, sollten Sie
das Gerät entsprechend versichern. Weitere Informationen erhalten Sie von Ihrem Arcam-Vertrieb oder
vom:
Arcam Customer Support Department
Stirling House, Waterbeach, CAMBRIDGE, CB25 9QE, England
oder www.arcam.co.uk
Deze garantie geeft u het recht om de eenheid gedurende twee jaar na aankoop gratis te laten
herstellen, onder voorbehoud dat de eenheid oorspronkelijk bij een geautoriseerde Arcam-dealer of
-distributeur aangekocht werd. De fabrikant kan geen verantwoordelijkheid aanvaarden voor fouten die
ontstaan door ongelukken, verkeerd gebruik, misbruik, slijtage, onachtzaamheid of door ongeoorloofde
aanpassingen en/of reparaties, en kan ook geen verantwoordelijkheid aanvaarden voor schade of
verlies-ontstaan tijdens vervoer van of naar de persoon die onder de garantie claimt.
De garantie dekt:
Onderdelen en arbeidsloon voor twee jaar vanaf de datum van aankoop. Na twee jaar moet u zowel voor
onderdelen als arbeidsloon betalen. In geen enkel geval worden transportkosten door de garantie
gedekt.
Claims onder garantie
Deze apparatuur dient in de originele verpakking te worden verpakt en te worden geretourneerd naar
de dealer bij wie u het hebt gekocht of anders rechtstreeks naar de Arcam-distributeur in het land waar
het product werd gekocht.
Het moet franco vervoer via een gerenommeerde vervoerder worden verzonden – niet per post. De
dealer of distributeur is niet verantwoordelijk voor het apparaat tijdens transport, daarom is de klant
geadviseerd het apparaat te verzekeren tegen verlies of beschadiging tijdens transport.
Neem voor meer informatie contact op met Arcam op:
Voor meer informatie kunt u contact opnemen met Arcam:
Arcam Customer Support Department,
Stirling House, Waterbeach, CAMBRIDGE, CB25 9QE, England
of www.arcam.co.uk.
Problemen?
Als uw Arcam-dealer uw vragen betreende dit of een ander Arcam-product niet kan beantwoorden,
neemt u contact op met de Arcam-klantendienst op het bovenstaande adres, en wij zullen ons best
doen om u te helpen.
Probleme?
Kann Ihr Arcam-Händler Fragen zu diesem oder einem anderen Arcam-Produkt nicht beantworten,
wenden Sie sich bitte an den Arcam-Kundendienst.
Entsorgung dieses Produkts
Dieses Zeichen zeigt an, dass dieses Produkt in der EU nicht in den Hausmüll
entsorgt werden darf. Um Umweltschäden oder Krankheiten beim Menschen durch
unkontrollierte Entsorgung zu vermeiden, sollte dieses Produkt entsprechend
verantwortungsvoll recycelt werden. Bitte erkundigen Sie Sich bei Ihrem lokalen
Entsorgungsunternehmen oder Elektronik-Sammelstelle oder kontaktieren Sie Ihren
Fachhändler, um das Gerät zu entsorgen.
56 57
De correcte verwijdering van dit product
Deze markering geeft aan dat dit product nergens binnen de Europese Unie met
ander huishoudelijk afval mag worden verwijderd. Om mogelijke schade aan het
milieu of volksgezondheid door ongecontroleerde afvalverwijdering te voorkomen
en grondstoen te sparen, dient dit product op verantwoorde wijze gerecycled te
worden. Om uw product te verwijderen, maak gebruik van u plaatselijke inleveren inzamelsystemen of neem contact op met de winkelier waar het product werd
gekocht.
Page 30

Garantía Mundial
Всемирная гарантия
Esto le da derecho a que se le repare la unidad de forma gratuita, durante los dos primeros años tras
la compra, siempre y cuando haya sido originalmente comprado a un distribuidor Arcam autorizado.
El distribuidor Arcam es responsable de todas las reparaciones post-venta. El fabricante no puede
hacerse responsable por los defectos derivados de accidentes, mal uso, abuso, desgaste, negligencia, ni
de ajustes o reparaciones no autorizados, ni tampoco pueden aceptar responsabilidades por daños o
pérdidas ocurridos durante el transporte hasta o desde la persona que reclama bajo la garantía.
La garantía cubre:
Costes de piezas y mano de obra durante dos años desde la fecha de compra. Después e dos años
deberá pagar tanto por las piezas como por la mano de obra. La garantía no cubre los costes de
transporte en ningún momento.
Reclamaciones bajo garantía
Este equipo debe empacarse en su empaque original y devolverse al distribuidor al cual fue comprado.
Deberá enviarse con un transporte previamente pagado por un transportista reputado – no por correo.
No se aceptan responsabilidades por la unidad durante el transporte al distribuidor, y se aconseja a los
clientes que aseguren la unidad frente a pérdida o daños durante el transporte.
Para más detalles, contacte con Arcam en:
Departamento de Asistencia al Cliente de Arcam,
Stirling House, Waterbeach, CAMBRIDGE, CB25 9QE, England
o a través de www.arcam.co.uk.
¿Problemas?
Si su distribuidor Arcam no es capaz de responder alguna pregunta acerca de este u otro producto
Arcam, por favor, póngase en contacto con el Departamento de Asistencia al Cliente de Arcam, en la
dirección de más arriba, y haremos todo lo posible por ayudarle.
Это дает вам право отремонтировать аппарат бесплатно в течение первых двух лет после покупки,
при условии, что он был изначально приобретен у официального дилера Arcam. Дилер Arcam
отвечает за послепродажный сервис. Производитель не несет никакой ответственности за
дефекты, возникающие от
несчастного случая, неправильного использования, износа, отсутствия заботы или
есанкционированных настроек и/или ремонта, и не может взять на себя ответственность за ущерб
или убытки, произошедших во время перевозки к или от лица, требующего по гарантии.
Гарантия распространяется на:
Части и стоимость работ на протяжение двух лет от даты покупки. Через два года вы должны
оплачивать как части, так и стоимость работ. Гарантия не распространяется на транспортные
расходы в любое ремя.
Претензии по гарантии
Оборудование должно быть упаковано в оригинальную упаковку и возвращено дилеруот которого
оно приобретено.
Его следует послать по авторитетному перевозчику с предварительной оплатой – не по почте.
Никакая претензия не может быть принята за время транспортировки устройства к дилеру
или представителю и поэтому мы советуем потребителей застраховать устройства от потерь и
повреждений во время перевозки.
Для дополнительной информации свяжитесь с Arcam:
Отдел поддержки потребителей Arcam,
Stirling House, Waterbeach, CAMBRIDGE, CB25 9QE, England
или через www.arcam.co.uk.
Проблемы?
Если ваш дилер Arcam не может ответить на ваш вопрос относительно этого или любого другого
изделия Arcam, пожалуйста, свяжитесь с Поддержкой потребителей Arcam по указанному адресу и
мы сделаем все возможное, чтобы помочь вам.
Eliminación correcta de este producto
Estas marcas indican que este producto no debe desecharse junto con la demás
basura doméstica en toda EU.
Para evitar posibles daños al medio ambiente o a la salud de las personas por la
liminación
de residuos descontrolada, y para conservar los recursos materiales, este producto
debe ser reciclado con responsabilidad.
Para deshacerse de su producto, por favor utilice sus sistemas locales de recuperación
y recolección, o contacte con el distribuidor en el cual adquirió el producto.
УТИЛИЗАЦИЯ ЭТОГО ПРОДУКТА
Эти маркировки означают, что изделие не следует выбрасывать вместе с бытовыми
отходами на всей территории ЕС.
Для предотвращения возможного ущерба кружающей среде или здоровью человека
от безразборного выбрасывания мусора и для сохранения материальных ресурсов, это
изделие следует утилизировать ответственно.
Для утилизации вашего изделия, пожалуйста, свяжитесь с местными органами,
отвечающими за утилизацию, или с поставщиком, от которого изделие было закуплено.
58 59
Page 31
Garanzia in tutto il mondo
全球联保
Questo le da diritto a far riparare l’unità gratuitamente per i due anni successivi all’acquisto, sempre
che sia stata acquistata originariamente presso un distributore autorizzato Arcam. Il produttore non si
assume alcuna responsabilità per difetti derivanti da incidenti, uso improprio, abuso, usura, negligenza
o attraverso la modica non autorizzata e/o riparazione, come non accetta la responsabilità per danni o
perdite che si verichino durante il trasporto da o verso la persona che invoca la garanzia.
La garanzia copre:
Parti e costo del lavoro per due anni dalla data di acquisto. Dopo due anni si deve pagare sia per le parti
e il costo del lavoro. La garanzia non copre mai i costi di trasporto.
Domande in garanzia
Questo strumento dovrebbe essere restituito nella confezione originale al distributore presso cui è stato
acquistato, o se non fosse possibile, direttamente al distributore Arcam del paese in cui il prodotto è
stato acquistato.
Dovrebbe essere spedito prepagato da un vettore adabile - non per posta. Nessuna responsabilità
può essere accettata per l'unità mentre è in transito verso il rivenditore o il distributore e i clienti sono
pertanto invitati ad assicurare l'unità contro perdita o danno durante il trasporto.
Per ulteriori dettagli contattare Arcam presso:
Dipartimento di Assistenza Clienti Arcam,
Stirling House, Waterbeach, CAMBRIDGE, CB25 9QE, Inghilterra
o www.arcam.co.uk.
Problemi?
Se il rivenditore Arcam non è in grado di rispondere a una domanda per quanto riguarda questo o
qualsiasi altro prodotto Arcam, si prega di contattare il supporto clienti all'indirizzo Arcam di cui sopra e
noi faremo del nostro meglio per aiutarvi.
在购买本设备后的两年内,您享有免费保修权,但前提是您的设备是从授权的Arcam经销商那里原装
购买的。对于由于意外、误用、滥用、磨损、疏忽、未经授权的调校和/或维修而导致的缺陷,制造
商可以不承担任何责任,此外,对于在运输期间发生的损坏或丢失,制造商可以不履行保修义务。
保修范围:
两年期(从购买日期开始算起)部件与人工费用。两年后,您必须支付部件和人工费用。无论何
时,保修都不包括运输费用。
保修免责声明
应该使用原有包装将本设备退回到销售本设备的经销商;否则,应将设备直接退回到购买本产品所
在国家的Arcam分销商。
应该在预付运费的情况下通过快递公司发货 — 请勿邮寄。如果设备在发往经销商或分销商的途中出
现问题,我们不承担责任;因此,客户需确保设备在运输途中不会发生丢失或损坏。
有关更多详细信息,请联系Arcam:
Arcam Customer Support Department,
Stirling House, Waterbeach, CAMBRIDGE, CB25 9QE, England
或访问
www.arcam.co.uk
问题解决
如果您的Arcam经销商无法解答有关本设备或其他任何Arcam产品的咨询,请通过上述地址联系
Arcam客户支持部,我们将尽力为您提供帮助。
Smaltimento corretto di questo prodotto
Questo marchio indica che il prodotto non dovrebbe essere smaltito con altri riuti
domestici in tutta l'UE.
Per evitare eventuali danni all'ambiente o alla salute umana causati da smaltimento
errato dei riuti e per risparmiare le risorse materiali, il prodotto deve essere riciclato
in modo responsabile.
Per smaltire il prodotto, si prega di utilizzare i sistemi locali di restituzione e raccolta
o contattare il rivenditore presso il quale il prodotto è stato acquistato.
正确处置本产品
此标记指示在整个欧 盟范 围内,不应该将本产品当作普通的家庭 废弃 物进行
处置。
为防止非受控的废弃 物处 置方式对环境或人类健康造成危害以及 为了 节省物
料资源,应该以负责任的态度回收本产品。
要处置您的产品,请利用当地的回收系统,或者与销售本产品的经销商联系。
60 61
Page 32

SH245 issue 3
www.arcam.co.uk
WATERBEACH, CAMBRIDGE, CB25 9QE, ENGLAND
 Loading...