

Aprilaire 6508KV, 6510KV Installation Manual
Model 6508KV and 6510KV
Make-Up Air Damper Kit
Installation Instructions
WARNING
Significant depressurization of the home can lead to back drafting
of combustion appliances or chimneys which can cause build-up
of dangerous levels of chemicals inside the home and lead to
asphyxiation. The make-up air system design must be done by a
qualified design professional.
The Model 65##KV Make-Up Air Kit provides components that are to
be used for the installation of a make-up air duct which can be used
to prevent home depressurization that occurs when larger kitchen
range hoods (generally those that exhaust greater than 400 cfm) are
operating. The negative pressure caused by the range hood, will draw
some make-up air in through openings in the home; this quantity of air
can be significant, and should be measured using a blower door test
or similar procedure to determine how much additional make-up air is
needed. The additional make-up air is drawn in through the installed
make-up air duct; the goal is to achieve proper pressure balance. If
the make-up air duct is connected to the return ductwork of the HVAC
system (see FIGURE 3), additional negative pressure can be made
available to draw in even more air when the make-up air system is
interlocked with the HVAC system.
Excessive negative pressures in the home can result in improper
venting of combustion appliances and fireplaces and thus the design
of the make-up air system must be done by a qualified professional
with knowledge of all relevant local building codes and equipment
manufacturer specifications to determine:
1. if make-up air is required
2. how much make-up air is needed
3. what must be done to install the system safely
4. whether or not the make-up air needs heating, cooling or moisture
control
INCLUDED IN THE KIT
(1) Model 65## Normally Closed 24VAC Damper
• 6508 = 8" diameter damper
• 6510 = 10" diameter damper
(1) Model 50 Current Sensing Relay
(1) Part No. 4010 Transformer
AIRFLOW SPECIFICATIONS
CAUTION
Improper duct sizing can lead to insucient make-up airflow and
reduced performance. Use the airflow specifications provided as a
guide to select the correct size(s) of make-up air duct/damper.
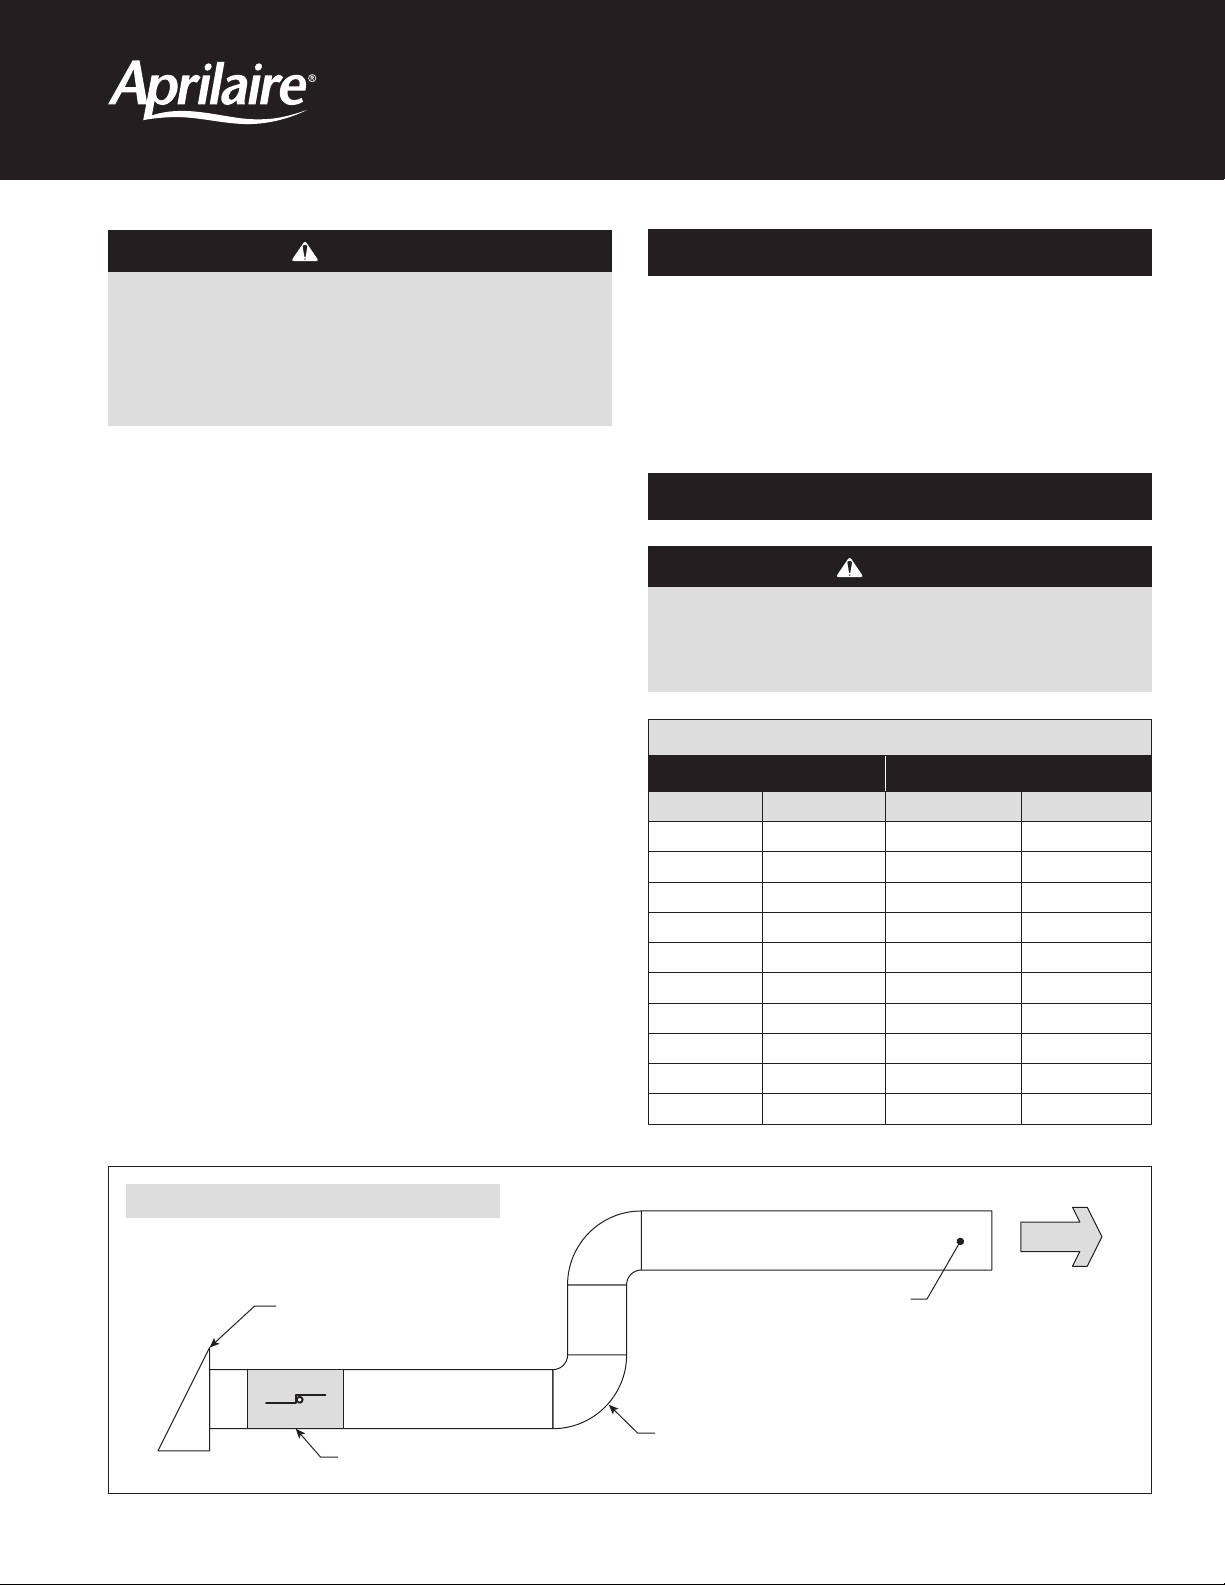
TABLE 1 – TYPICAL AIRFLOW THROUGH MAKE-UP AIR DUCT (FIGURE 1)
Available Negative Pressure Make Up Airflow (CFM)
"w.c. Pa 6508KV (8") 6510KV (10")
-0.02 -5 55 115
-0.04 -10 75 160
-0.06 -15 95 195
-0.08 -20 110 235
-0.10 -25 125 265
-0.20 -50 185 390
-0.30 -75 225 490
-0.40 -100 260 565
-0.50 -125 295 640
-0.60 -150 320 705
FIGURE 1 – MAKE-UP AIR DUCT TEST CONFIGURATION
INTAKE HOOD WITH 1/4" BIRD SCREEN
DAMPER
PRESSURE
TOTAL 25 FT. INSULATED FLEX DUCT WITH TWO 90° BENDS
AIRFLOW
1
TYPICAL DUCT INSTALLATION
WARNING
Sharp edges may cause injury from cuts. Wear appropriate hand/
eye protection when cutting or handling ductwork.
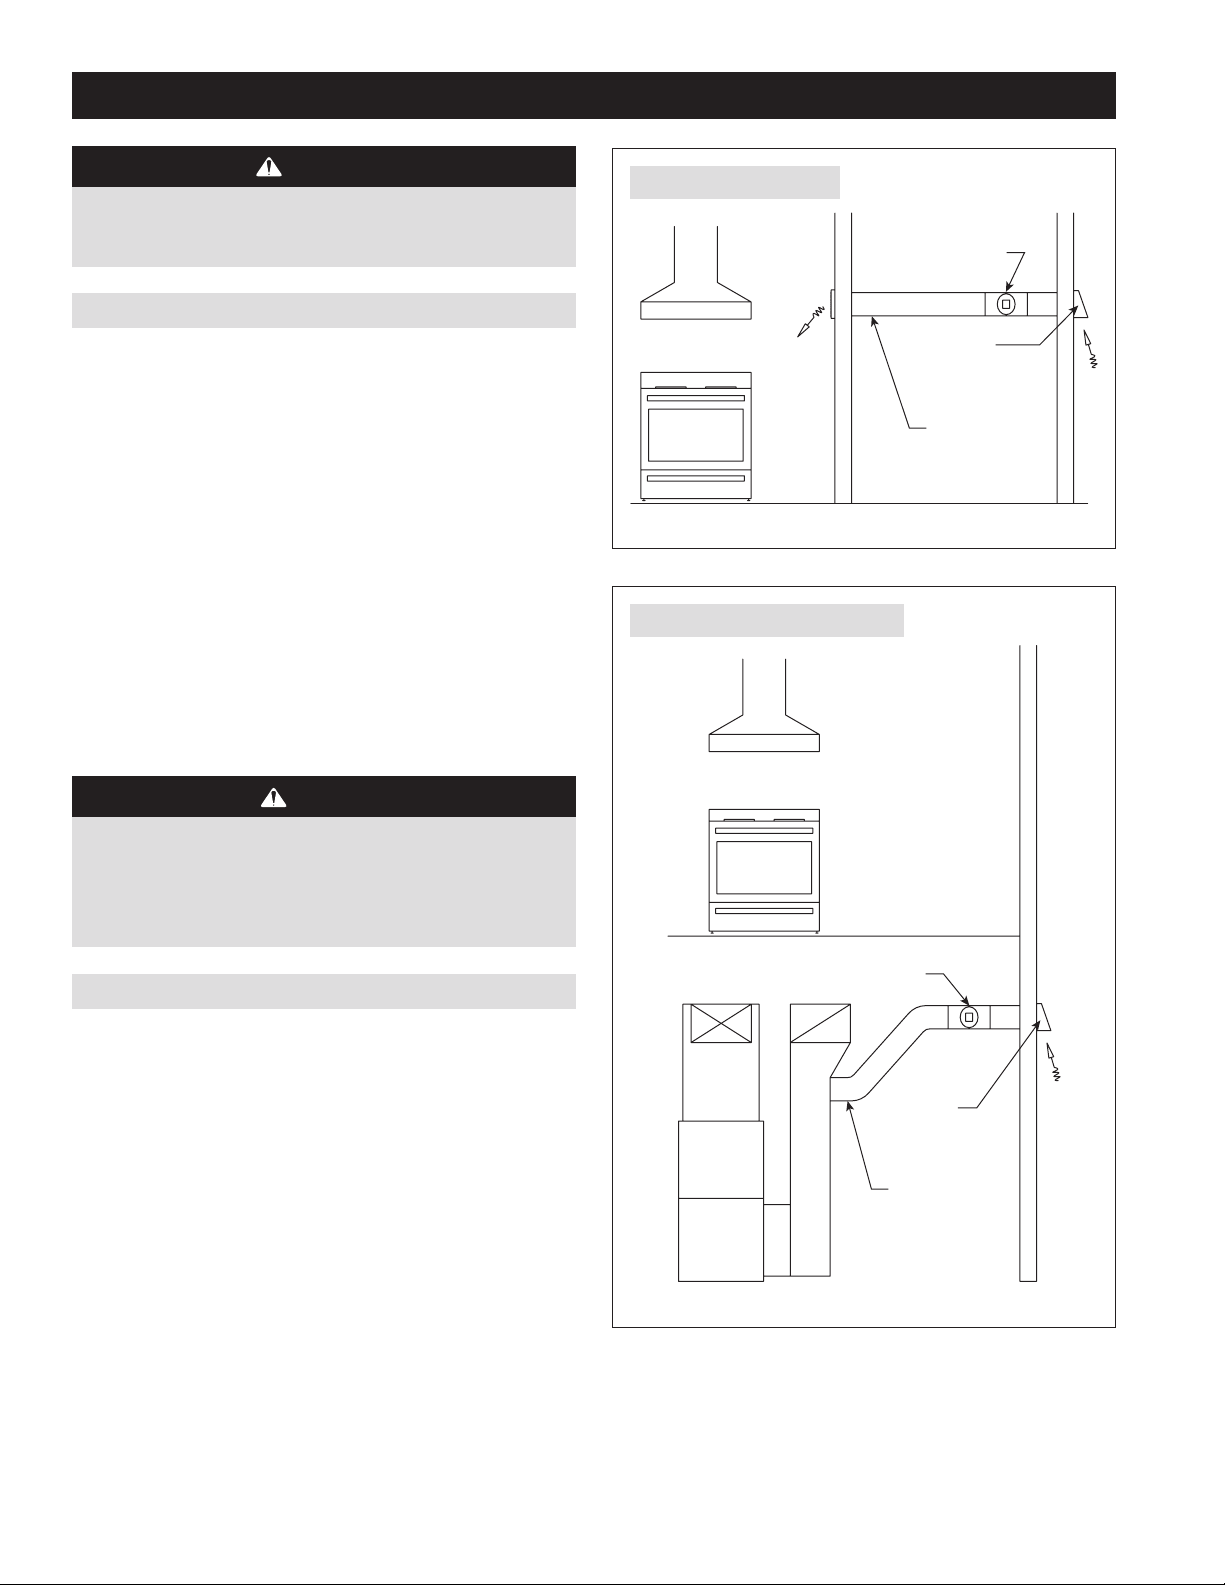
DIRECT DUCTING
Use this method when there is no existing duct system or access to the
existing duct system is not practical (see FIGURE 2).
1. Install a register(s) with the desired neck diameter at the desired
location in the kitchen so that the air is directed toward the range
hood.
2. Install an intake hood of the desired diameter and with a bird
screen at an appropriate location in an outside wall. Make sure the
intake hood is not located near any exhaust hoods or other sources
of contaminants, and that the hood is mounted higher than any
expected snow drift line.
3. Run a duct between the register and intake hood. Insulated
ductwork is required to prevent condensation.
4. Install the properly sized, normally closed damper in the duct as
close to the intake hood as possible. Insulate the damper to prevent
condensation.
FIGURE 2 – DIRECT DUCTING
RANGE
HOOD
RANGE
FIGURE 3 – DUCTING TO HVAC SYSTEM
RANGE
HOOD
NORMALLY CLOSED
DAMPER – INSULATE
FRESH AIR
INTAKE HOOD
WITH BIRD SCREEN
INSULATED DUCT
90-2047
CAUTION
Keep air temperatures entering the HVAC equipment within
manufacturer recommendations to prevent voiding equipment
warranty. Make-up air system design is to be done by a qualified
HVAC professional.
DUCTING TO THE HVAC SYSTEM
Use this method when there is an existing duct system and it is
accessible (see FIGURE 3).
1. Install an intake hood of the desired diameter and with a bird
screen at an appropriate location in an outside wall. Make sure the
intake hood is not located near any exhaust hoods or other sources
of contaminants, and that the hood is mounted higher than any
expected snow drift line.
2. Run a duct between the intake hood and the return plenum of the
HVAC system. Locating the return duct connection close to the HVAC
system maximizes the negative pressure available for drawing in
outside air when the HVAC system is running. Insulated ductwork is
required to prevent condensation.
3. Install the properly sized, normally closed damper in the duct as
close to the intake hood as possible. Insulate the damper to prevent
condensation.
RANGE
NORMALLY CLOSED DAMPER – INSULATE
FRESH AIR
INTAKE HOOD
WITH BIRD SCREEN
INSULATED DUCT
90-2047
2
 Loading...