

Apricorn A25-3BIO256-1000, A25-3BIO256-S512, A25-3BIO256-2000, A25-3BIO256-S128, A25-3BIO256-500 User manual
Page 1
Aegis Bio 3.0
User’s Manual
Page 2

Copyright © Apricorn, Inc 2012. All rights reserved.
Windows is a registered trademark of Microsoft Corporation.
All other trademarks and copyrights referred to are the property of their
respective owners.
Distribution of modied versions of this document is prohibited without
the explicit permission of the copyright holder.
Distribution of the work or derivative work in any standard (paper) book
form for commercial purposes is prohibited unless prior permission is
obtained from the copyright holder.
DOCUMENTATION IS PROVIDED AS IS AND ALL EXPRESS OR
IMPLIED CONDITIONS, REPRESENTATIONS AND WARRANTIES,
INCLUDING ANY IMPLIED WARRANTY OF MERCHANTABILITY,
FITNESS FOR A PARTICULAR PURPOSE OR NON-INFRINGEMENT,
ARE DISCLAIMED, EXCEPT TO THE EXTENT THAT SUCH
DISCLAIMERS ARE HELD TO BE LEGALLY INVALID
Page 3

Contents
About the Aegis Bio 4
Package contents 4
Fingerprint Sensor 5
Swiping your Finger 5
Basic LED States 5
Aegis Bio - Connections 6
Before you begin 6
Connecting the Aegis Bio 6
Connecting the Aegis Bio with USB Y-Cable 7
Getting Started - Out of the Box 8
Unlocking the Aegis Bio 9
Locking the Aegis Bio 9
Complete Re-set 9
Formatting the Aegis Bio After a Complete Re-set 10
Formatting for Windows 10
Formatting for Mac 11
Enrolling a new nger 12
Hibernating, Suspending or Logging off from the OS 13
Troubleshooting 14
Technical Support 15
Warranty and RMA information 15
Page 4
About the Aegis Bio
When security matters, trust your
data to the Aegis Bio.
Designed for those that demand the
highest level of protection for their
data, the Aegis Bio fuses leading
edge technology in biometric
authentication and encryption with a
rugged, portable design to produce
a truly remarkable drive.
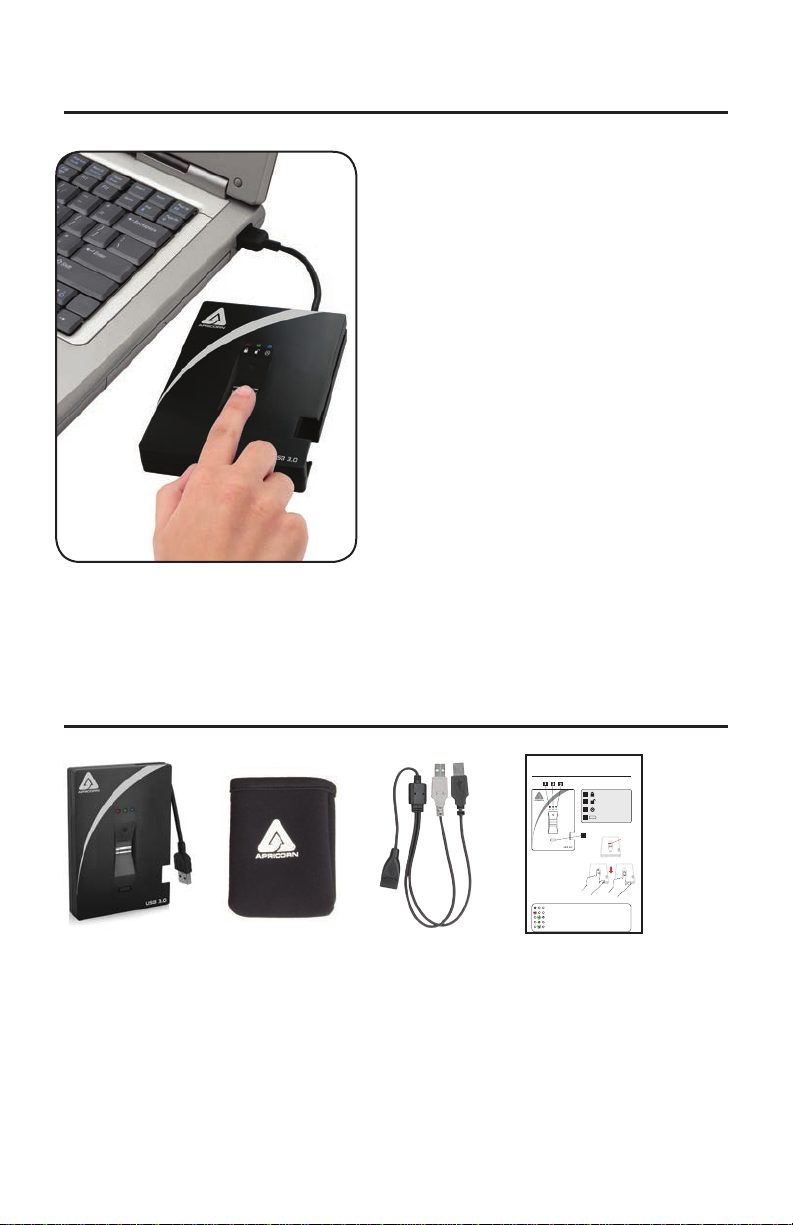
Package contents
Aegis Bio with integrated USB 3.0 cable
Padded Travel Pouch
Auxiliary Y-USB Extension cable
Quick Start Guide
4
Aegis Bio 3.0
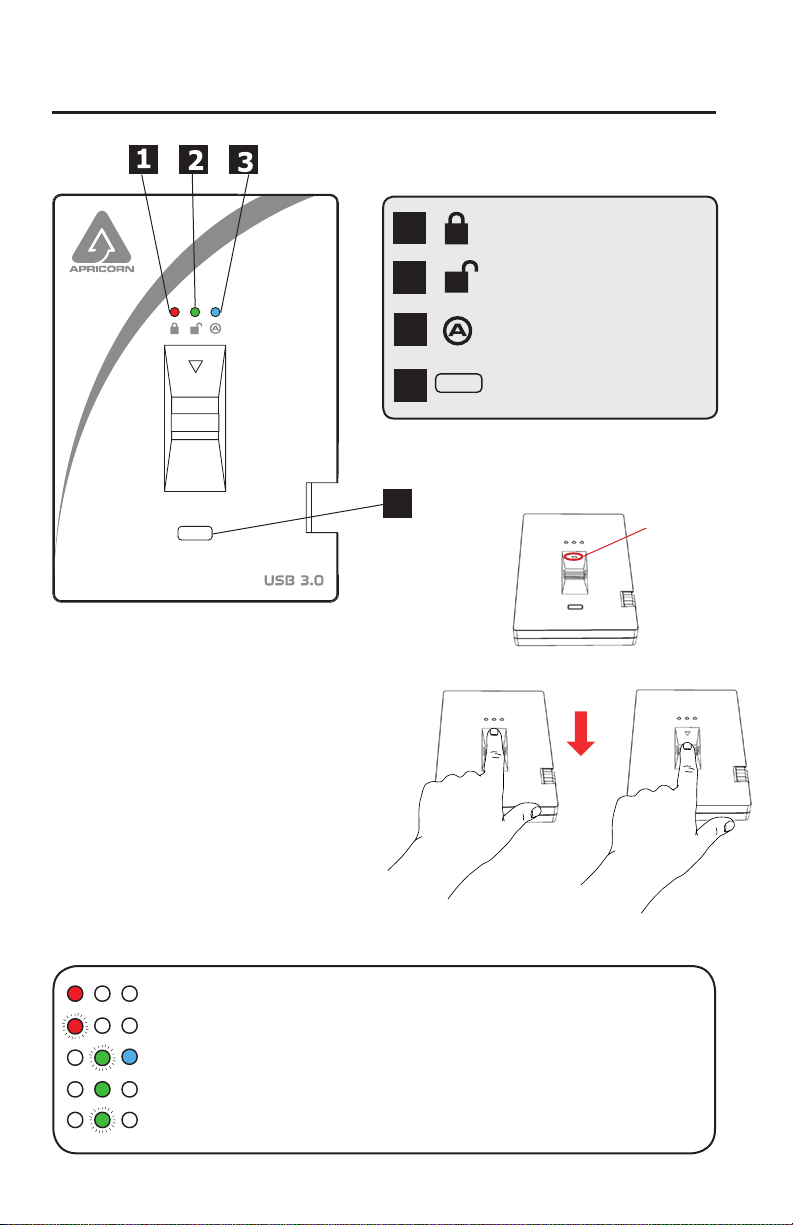
Swiping your Finger
To successfully swipe your nger,
start your swipe by placing your
ngertip on the downward facing
arrow at the top of the biometric
sensor. Swipe your nger in a
downward motion across the
sensor. If your swipe is successful
the GREEN LED will start to icker.
Basic LED States
Solid RED = Standby, swipe nger to unlock
Flashing RED = Error
Solid BLUE / Flashing GREEN = Ready to enroll ngerprint
Solid GREEN = Drive unlocked
Flashing GREEN = Disk activity
Quick Start Guide
LOCK RED LED
1
UNLOCK GREEN LED
2
ADMIN BLUE LED
3
ENROLL Button
4
4
Start
swipe
here
Page 5
Fingerprint Sensor
Swiping your Finger
To successfully swipe your nger,
start your swipe by placing your
ngertip on the downward facing
arrow at the top of the biometric
sensor. Swipe your nger in a
downward motion across the
sensor. If your swipe is successful
the GREEN LED will start to icker.
4
1
2
3
4
LOCK RED LED
UNLOCK GREEN LED
ADMIN BLUE LED
ENROLL Button
Start
swipe
here
Basic LED States
Solid RED = Standby, swipe nger to unlock
Flashing RED = Error
Solid BLUE / Flashing GREEN = Ready to enroll ngerprint
Solid GREEN = Drive unlocked
Flashing GREEN = Disk activity
5
Page 6

Aegis Bio - Connections
Before you begin
Be sure to review the following information before you begin to use the
Aegis Bio.
Attention: Use only the included cables with your Aegis Bio. You
might damage the drive if you use a cable not included with the
Aegis Bio.
The Aegis Bio is designed for portable use without an AC power adapter
and in most cases will be able to power on a single USB port. In the event
that the Aegis Bio is unable to power on a single USB connection, use the
included USB Y -cable.
Connecting the Aegis Bio
1. Attach the integrated USB cable of the Aegis Bio drive to an available USB
port on your computer, as shown below.
2. At least one of the Aegis Bio LEDs should turn on, indicating that the Aegis
Bio is receiving power.
If none of the LEDs
turns on, use the
included USB Y-cable.
Refer to directions on the
following page
6
Page 7

Connecting the Aegis Bio with USB Y-Cable
If none of the Aegis Bio LEDs power on a single USB connection, use the
included USB Y -cable.
1. Attach the Aegis Bio’ s integrated USB cable to the female connector of
the USB Y -cable.
2. Connect the two male USB connectors to two available
USB ports on your computer.
3. At least one of the Aegis Bio LEDs should turn on, indicating that the
Aegis Bio is powered.
7
Page 8

Getting Started - Out of the Box
TIP: We highly recommend that you enroll at least three
different ngers to ensure access to the drive in the case
that your primary nger cannot be used.
1. Attach the integrated USB cable of
the Aegis Bio to an available USB
port on your computer. The Aegis
Bio LEDs will show Solid BLUE and
Flashing GREEN indicating that the
drive is ready to enroll your ngerprint.
2. Swipe your Finger. The BLUE LED
will turn off while the GREEN LED
starts to icker briey as the Aegis Bio
processes your ngerprint.
Wait until the BLUE LED turns back
to Solid BLUE and the GREEN LED
returns to its ashing state.
3. Continue to repeat Step 2 until both
the BLUE and GREEN LED are
in a solid state, indicating that your
ngerprint is fully enrolled.
NOTE: The number of attempts will vary depending on the quality of
the ngerprint read. For most people six swipes will be sufcient.
If there is a problem with a ngerprint read, the BLUE LED will turn off and
the RED LED with start to ash.
4. To enroll more ngerprints, press the ENROLL button within 15
seconds from your last successful ngerprint enrollment and repeat
the process in steps 2 and 3.
NOTE: A maximum of 5 ngerprints can be stored. There is a 15 second
timeout between entering ngerprints. If the ENROLL button is not pressed
again after the last ngerprint, the unit will assume no more ngerprints will
be entered and return to a standby state.
Once 5 ngerprints have been stored, all three LEDs will turn on. After 2
seconds the GREEN and BLUE LED will turn off with just the Solid RED
LED showing. At this point no more ngerprints can be enrolled.
NOTE: Once enrolled, ngerprints cannot be un-enrolled
individually. To remove enrolled ngerprints, a complete re-set
8
of the drive is required.
Page 9

Unlocking the Aegis Bio
Once your ngerprints are enrolled, you can unlock the Aegis Bio using the
directions below.
1. Attach the integrated USB cable of the Aegis Bio to an available
USB port on your computer. The Aegis Bio LED will show Solid RED
indicating that the drive is locked and is in Standby mode.
2. Swipe your Finger. The RED LED will turn off while the GREEN LED will
start to icker briey as the Aegis Bio processes your ngerprint.
3. You will know that your ngerprint has been accepted once the GREEN
LED stops ickering and turns Solid GREEN. The drive is now
unlocked and ready for use.
Locking the Aegis Bio
To lock the Aegis Bio after it has been unlocked, use the directions below.
1. Press the ENROLL button until the RED LED turns on. The drive
will check for disk activity . If no data has been written to the drive for 2
seconds, the drive will lock. If data is being written to the drive, it will wait
until the disk activity has been nished before locking the drive.
2. The Aegis Bio LED will go from GREEN to Solid RED when locked.
NOTE: If you use the safely remove hardware button (Windows) or
Eject device (Mac), the Aegis Bio will lock and dismount but the LED
will remain GREEN. You will need to physically remove and re-plug the
USB cable before being able to access the drive.
Complete Re-set
NOTE: The complete re-set will delete all stored ngerprints and will
change the encryption key used to secure the drive.
THIS WILL ERASE ANY DAT A ON THE DRIVE. USE WITH CAUTION.
1. Hold down the ENROLL button and plug the Aegis Bio USB cable into
your computer. The LED will alternate RED / BLUE.
2. Release the ENROLL button, then within 5 seconds repress and hold the
ENROLL button for 15 seconds. The LED will alternate between RED /
BLUE / GREEN during the 15 seconds.
3. When the drive successfully re-sets, the GREEN LED will stay on for 3
seconds, then will change to Solid BLUE with the GREEN LED ashing.
You can now release the ENROLL button.
4. The Aegis Bio has now been returned to its OUT OF THE BOX state
and is now ready to enroll ngerprints. Once ngerprints are enrolled
the Aegis Bio will need to be partitioned and reformatted before use.
9
Page 10

Formatting the Aegis Bio After a
Complete Re-set
After a complete re-set, follow the instructions on page 8 “Getting
Started” to enroll your ngerprints. Once your ngerprints are enrolled
follow the directions below to format and partition your Aegis Bio.
Formatting for Windows
1. Right-click My Computer, and then click Manage from the Windows
desktop.
2. In the Computer Manage window, click Disk Management. In
the Disk Management window, the Aegis Bio is recognized as an
unknown device that is uninitialized and unallocated.
3. Do the following to make the drive recognized as a basic drive.
• If the Initialize and Convert Disk Wizard window opens, click
Cancel, then initialize the disk manually using the following
steps.
a. Right-click Unknown Disk, and then select Initialize Disk.
b. In the Initialize Disk window, click OK.
4. Right-click in the blank area under the Unallocated section, and
then select New Partition. The Welcome to the New Partition Wizard
window opens.
5. Click Next.
6. Select Primary partition and click Next.
7. If you need only one partition, accept the default partition size and
click Next.
8. Click Next.
9. Create a volume label, select Perform a quick format, and then click
Next.
10. Click Finish.
11. Wait until the format process is complete. The Aegis Bio will be
recognized and it is available for use.
10
Page 11

Formatting for Mac
Once the drive is unlocked, open Disk Utility from Applications/
Utilities/Disk Utilities.
To format the Aegis Bio:
1. Select the Aegis Bio from the list of drives and volumes. Each drive
in the list will display its capacity, manufacturer, and product name,
such as 232.9 Apricorn Bio.
2. Click the ‘Erase’ tab.
3. Enter a name for the drive. The default name is Untitled. The drive’s
name will eventually appear on the desktop.
4. Select a volume format to use. The Volume Format dropdown
menu lists the available drive formats that the Mac supports. The
recommended format type is ‘Mac OS Extended (Journaled).’
5. Click the ‘Erase’ button. Disk Utility will unmount the volume from the
desktop, erase it, and then remount it on the desktop.
6. Your Aegis Bio is now formatted and ready to use.
11
Page 12

Enrolling a new nger
If there are less than 5 ngerprints enrolled and you want to enroll a new
nger, follow the instructions below.
1. Plug in the Aegis Bio to a USB port on your computer. The LED
should be Solid RED indicating that the drive is Standby mode.
2. Push the ENROLL button for 3 seconds.
If less than 5 ngerprints are enrolled, the BLUE LED will become Solid
BLUE and RED LED will remain illuminated. Proceed to Step 3.
If 5 ngerprints are enrolled, the BLUE and GREEN LED will come on for
2 seconds and the RED LED will be Solid RED. You will not be able to
enroll any more ngerprints.
3. Swipe a nger that has been previously enrolled. The GREEN LED
will ash if the ngerprint is accepted. If the ngerprint is not accepted the
RED LED will ash.
4. Once the ngerprint is accepted the BLUE LED will become Solid BLUE
and the GREEN LED will continue ashing, indicating that the Aegis Bio is
ready to enroll a new ngerprint.
5. Swipe a new nger. The BLUE LED will turn off while the GREEN LED
starts to icker briey as the Aegis Bio processes your new ngerprint.
Wait until the BLUE LED turns back to Solid BLUE and the GREEN LED
returns to its ashing state.
6. Repeat Step 5 until both the BLUE and GREEN LED are in a solid state,
indicating that your ngerprint is fully enrolled.
NOTE: Once enrolled, ngerprints cannot be un-enrolled individually.
To remove enrolled ngerprints, a complete re-set of the drive is
required.
12
Page 13

Hibernating, Suspending or Logging
off from the OS
Be sure to save and close all the les on your Aegis Bio before hibernating,
suspending, or logging off from the Windows operating system.
It is recommended that you log off the Aegis Bio manually before
hibernating, suspending, or logging off from your system.
To log off the Aegis Bio press the ENROLL button. The Aegis Bio LED will go
from GREEN to Solid RED when locked.
NOTE: If you use the safely remove hardware button (Windows) or Eject
device (Mac), the Aegis Bio will lock and dismount but the LED will remain
GREEN. You will need to physically remove and re-plug the USB cable before
being able to access the drive.
Attention: To ensure the data integrity of your Aegis Bio, be sure to
lock or log off your Aegis Bio if you are:
• away from your computer
• using the switching user function by sharing a computer with
others
13
Page 14

Troubleshooting
This section contains troubleshooting information for the Aegis Bio. If you
encounter any of the following problems when using the Aegis Bio, refer to
the corresponding answers.
Q: Is there any other way to access the drive without using the
ngerprint scanner?
A: No. Until the scanner authenticates the user’s ngerprint, the drive will
not even be visible to the operating system.
Q: How many ngerprints should be enrolled?
A: The minimum recommendation would be to enroll 3 ngerprints. There
is a maximum of 5 ngerprints; however you may want to reserve 1 or 2
for future use. Once all 5 spots are taken, the only method of removing
ngerprints is to re-set the drive, which will erase all stored ngerprints
and data on the drive.
Q: Will the Aegis Bio’s ngerprint reader interfere with the
ngerprint reader that is built into my laptop.
A: No. The circuitry for the Aegis Bio’s ngerprint reader is securely
isolated from any communications that might come from your computer
or any other source.
14
Page 15

Technical Support
Apricorn provides the following helpful resources for you:
1. Apricorn’s Website (http://www.apricorn.com)
This gives you the ability to check for up-to-date information
2. E-mail us at support@apricorn.com
3. Or call the Technical Support Department at 1-800-458-5448
Apricorn’s Technical Support Specialists are available from
8:00 a.m. to 5:00 p.m., Pacic Standard Time Monday through Friday
Warranty and RMA information
One Year Limited Warranty:
Apricorn offers a 3-year limited warranty on the Aegis Bio against defects in materials and
workmanship under normal use. The warranty period is effective from the date of purchase
either directly from Apricorn or an authorized reseller.
Disclaimer and terms of the warranties:
THE WARRANTY BECOMES EFFECTIVE ON THE DATE OF PURCHASE AND MUST BE VERIFIED
WITH YOUR SALES RECEIPT OR INVOICE DISPLAYING THE DATE OF PRODUCT PURCHASE.
APRICORN WILL, AT NO ADDITIONAL CHARGE, REPAIR OR REPLACE DEFECTIVE PARTS WITH
NEW PAR TS OR SERVICEABLE USED PARTS THA T ARE EQUIV ALENT TO NEW IN PERFORMANCE.
ALL EXCHANGED PARTS AND PRODUCTS REPLACED UNDER THIS WARRANTY WILL BECOME
THE PROPERTY OF APRICORN.
THIS WARRANTY DOES NOT EXTEND TO ANY PRODUCT NOT PURCHASED DIRECTLY FROM
APRICORN OR AN AUTHORIZED RESELLER OR TO ANY PRODUCT THAT HAS BEEN DAMAGED
OR RENDERED DEFECTIVE: 1. AS A RESULT OF ACCIDENT, MISUSE, NEGLECT, ABUSE OR
FAILURE AND/OR INABILITY TO FOLLOW THE WRITTEN INSTRUCTIONS PROVIDED IN THIS
INSTRUCTION GUIDE: 2. BY THE USE OF PARTS NOT MANUFACTURED OR SOLD BY APRICORN;
3. BY MODIFICATION OF THE PRODUCT; OR 4. AS A RESULT OF SERVICE, ALTERNATION OR
REPAIR BY ANYONE OTHER THAN APRICORN AND SHALL BE VOID. THIS WARRANTY DOES
NOT COVER NORMAL WEAR AND TEAR.
NO OTHER WARRANTY, EITHER EXPRESS OR IMPLIED, INCLUDING ANY WARRANTY OR
MERCHANTABILITY AND FITNESS FOR A PARTICULAR PURPOSE, HAS BEEN OR WILL BE
MADE BY OR ON BEHALF OF APRICORN OR BY OPERATION OF LAW WITH RESPECT TO THE
PRODUCT OR ITS INSTALLATION, USE, OPERATION, REPLACEMENT OR REPAIR.
APRICORN SHALL NOT BE LIABLE BY VIRTUE OF THIS WARRANTY, OR OTHERWISE, FOR
ANY INCIDENTAL, SPECIAL OR CONSEQUENTIAL DAMAGE INCLUDING ANY LOSS OF DATA
RESULTING FROM THE USE OR OPERA TION OF THE PRODUCT, WHETHER OR NOT APRICORN
WAS APPRISED OF THE POSSIBILITY OF SUCH DAMAGES.
15
Page 16

© Apricorn, Inc. 2013. All rights reserved.
12191 Kirkham Road
Poway, CA, U.S.A. 92064
1-858-513-2000 www.apricorn.com
 Loading...