

Page 1

Xserve (Late 2006)
Thermal Grease Kit
Instructions
The thermal bond between the processor heat sink and the processor requires thermal grease
for proper operation. Every time you remove or replace the processor heat sink, you must replace
the thermal grease on the processor below the heat sink. New grease and alcohol wipes for
cleaning o the previous grease are included with certain replacement parts and in a separate
thermal grease kit. Instructions for applying the grease are provided in this procedure.
Follow the instructions in this document carefully. Failure to follow these instructions could
damage your equipment and void its warranty.
Note: Online instructions are available at http://www.apple.com/support/diy/.
Kit Contents
The following are included in the thermal grease kit:
2 syringes of pre-measured thermal grease
•
2 alcohol wipes for cleaning previous thermal grease o processors and heat sinks
•
Working Safely Inside the Xserve
Always touch the Xserve enclosure to discharge static electricity before you touch any
components inside the Xserve. To avoid generating static electricity, do not walk around the
room until you have nished working inside the server and have replaced the cover. To minimize
the possibility of damage due to static discharge, wear an antistatic wrist strap while you work
inside the Xserve.
Warning: Always shut down the Xserve and disconnect the power cords before opening
it to avoid damaging its internal components or the components you are installing. Don’t
open the server while it is turned on. Even after you shut down the Xserve, its internal
components can be very hot. Let it cool before you open it.
073-1108 Rev. A
Page 2
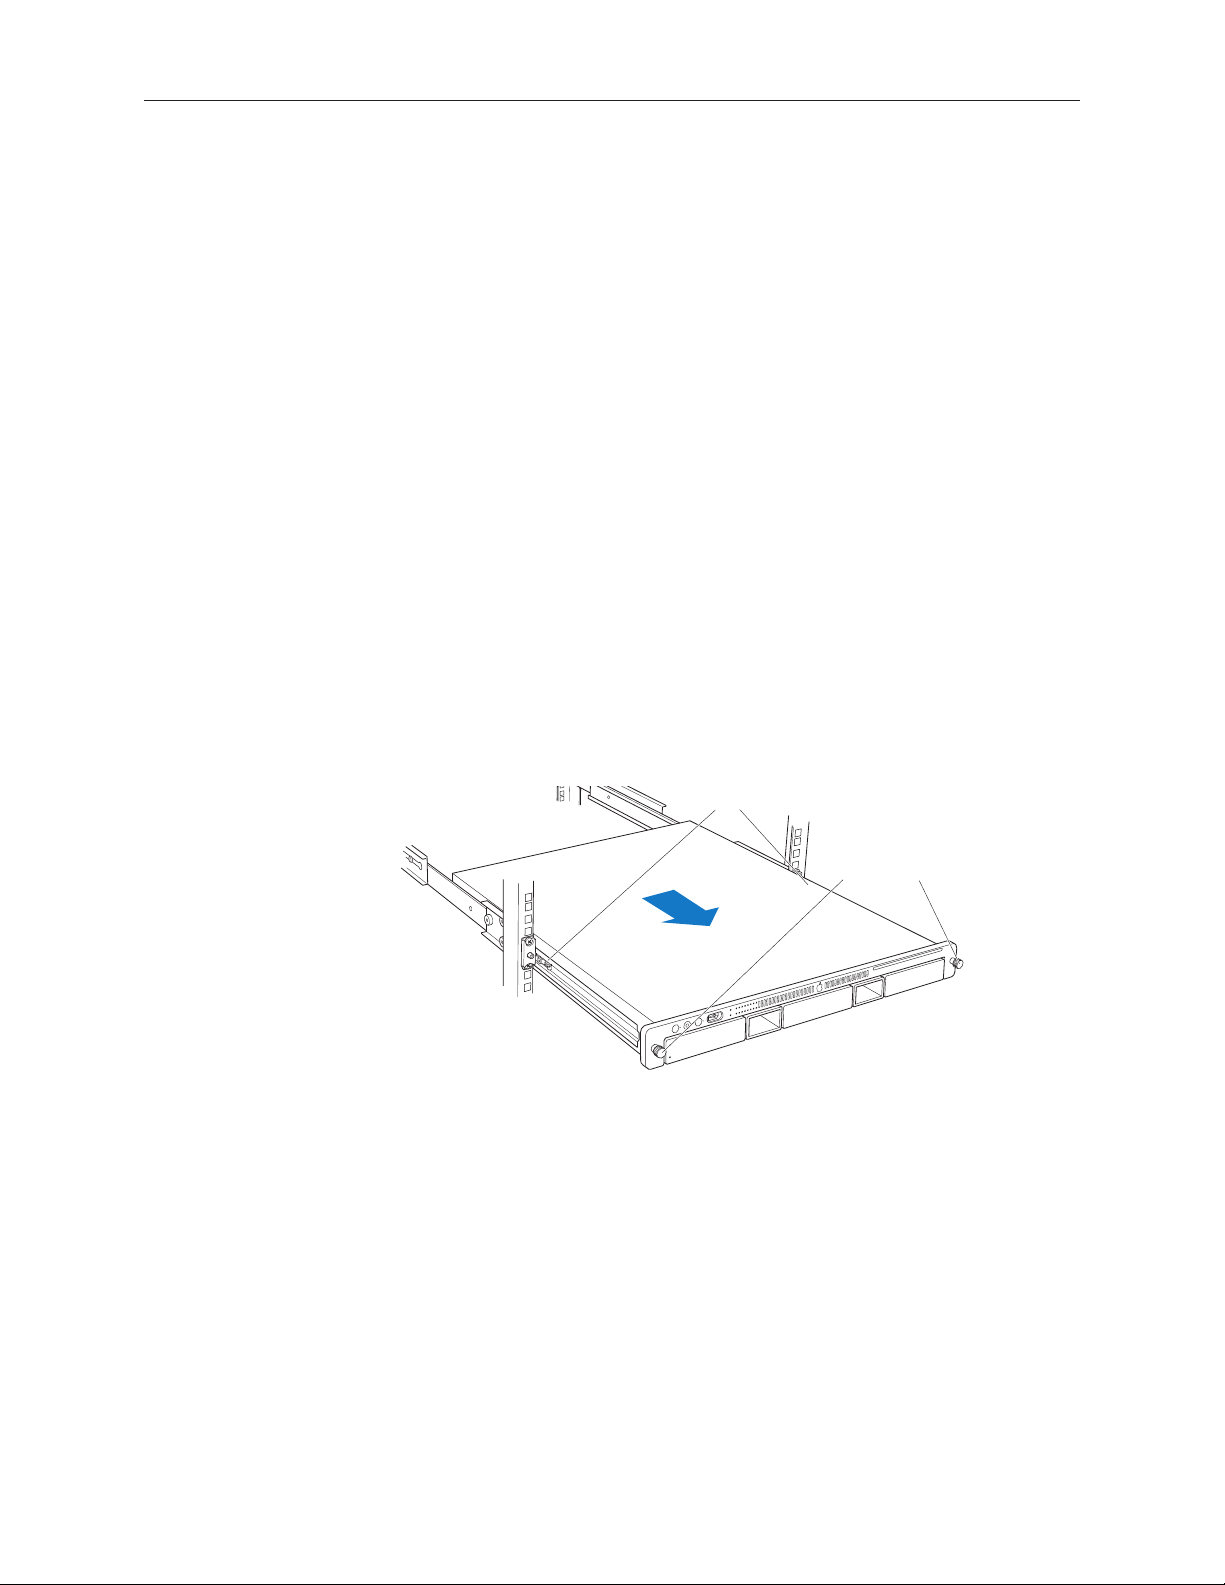
Removing the Xserve from a Rack
Latches
Thumbscrews
Alert users that the server will be unavailable for a period of time.
1.
Shut down the Xserve (see the Xserve User’s Guide for help) and then wait to let the Xserve
2.
internal components cool.
Warning: Always shut down the Xserve before opening it to avoid damaging its internal
components or the components you want to install or remove. Don’t open the Xserve
or try to install or remove items inside while it is turned on. Even after you shut down
the Xserve, its internal components can be very hot. Let it cool down for 5 to 10 minutes
before you open it.
Unplug all cables from the Xserve.
3.
Note: If you have trouble releasing a cable from the back panel, try using a small screwdriver
or other at tool to depress the tab on the cable connector.
To avoid inadvertently unlatching a drive module during handling, use the enclosure key to
4.
lock the enclosure lock on the front panel.
Touch the server’s metal case to discharge any static electricity.
5.
Loosen the thumbscrews at both ends of the front panel.
6.
Grasp the thumbscrews and pull the Xserve forward until the safety latches engage (about
7.
halfway out of the rack).
When the safety latches engage, grip the Xserve where it emerges from the rack, press down
8.
on the latch tabs with your thumbs, and slide the Xserve the rest of the way out of the rack.
Set the Xserve on a at surface and unlock it.
9.
Xserve (Late 2006) Thermal Grease Kit Instructions 2
Page 3
Opening the Xserve
Unscrew the two
captive thumbscrews.
Slide the cover back and lift it off.
Loosen the thumbscrews at the back of the top cover and slide the cover back and up to remove
it. If you have diculty removing the cover, check the enclosure lock on the front panel.
Warning: Even after you shut down the Xserve, its internal components can be very hot. Let
it cool before you open it.
Important: To minimize the possibility of damage to Xserve components due to static discharge,
wear an antistatic wrist strap, if possible, while you work inside the Xserve.
Removing the Processor Heat Sinks
Note: Before removing the processor heat sinks, you must remove the airow duct.
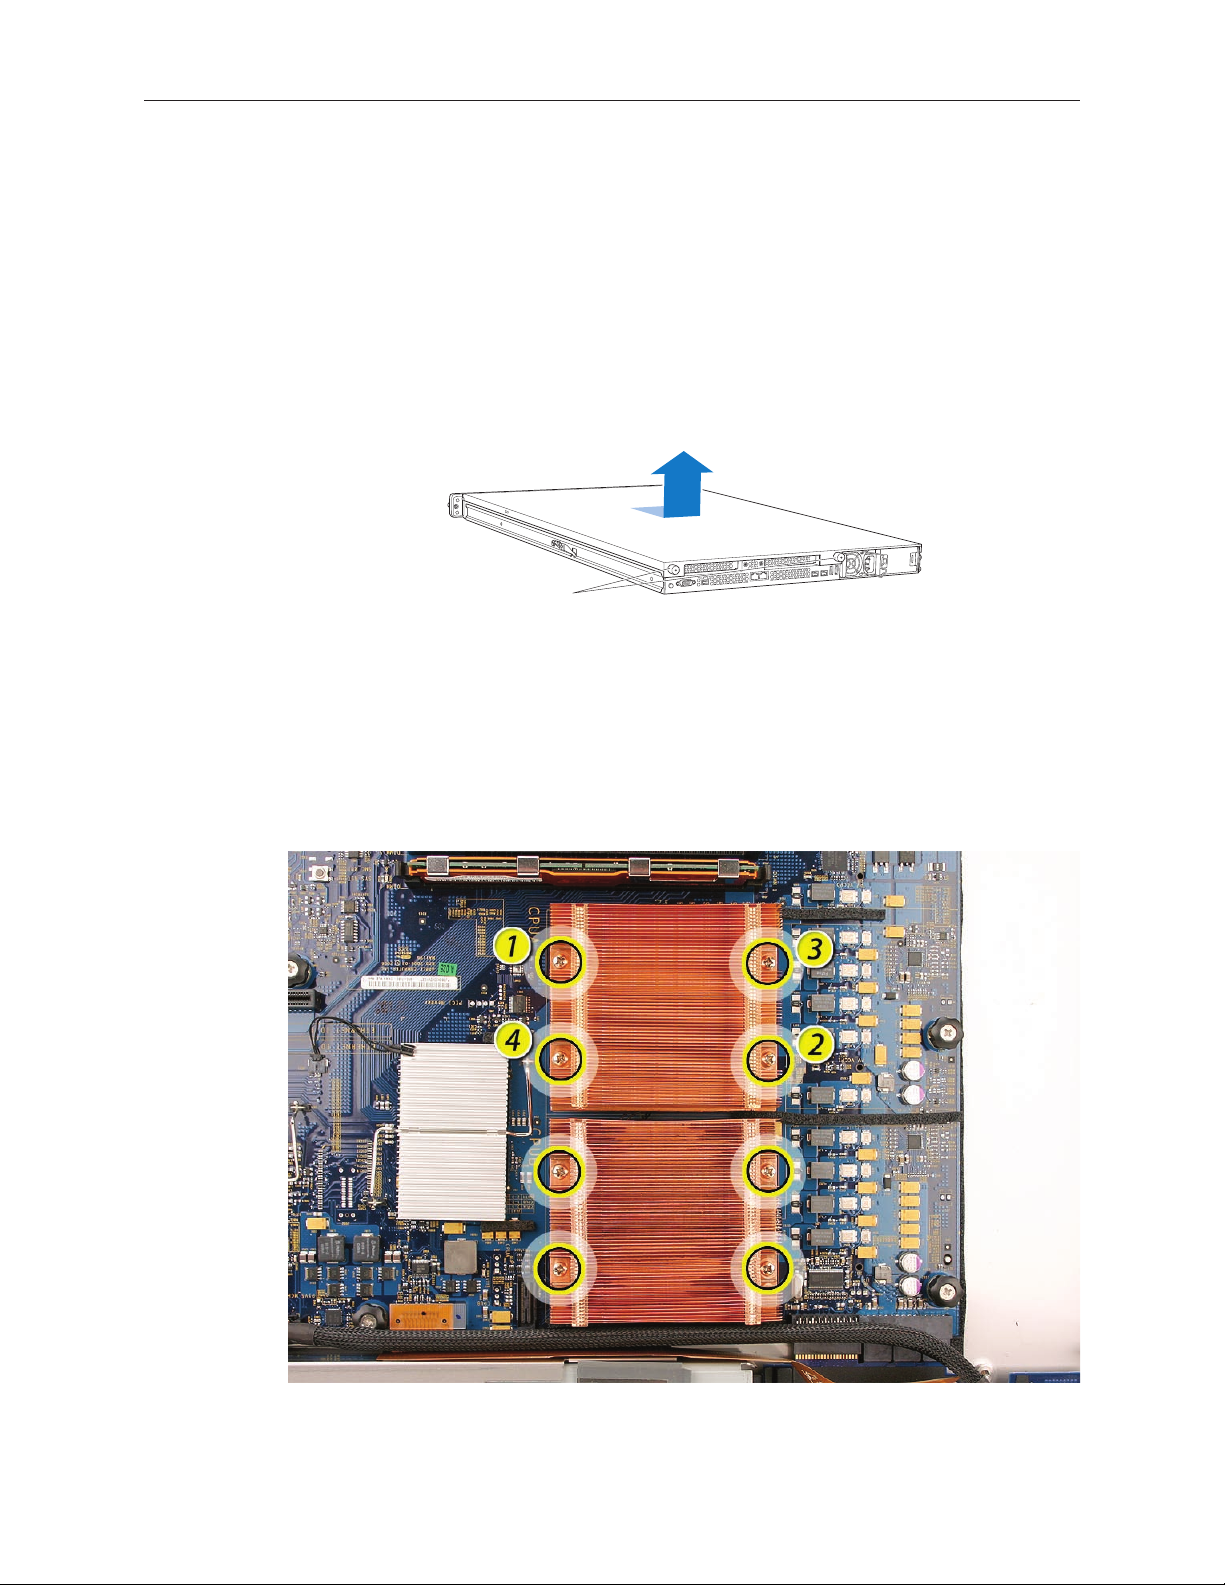
Loosen the four screws securing the heat sink that is closest to the DIMM slots (CPU A) in the
1.
order indicated below.
Xserve (Late 2006) Thermal Grease Kit Instructions 3
Page 4

Important: Each heat sink is connected to the main logic board by a small 2-pin thermal
sensor cable. Be careful not to pull on the wire as you lift each heat sink enough to
disconnect the cable from the main logic board. It’s easier to reach the sensor connectors on
the logic board if you start with the right heat sink near the DIMM slots (CPU A).
Slowly lift the heat sink o the processor just far enough that you can reach the sensor cable
2.
connector. You might feel some resistance from the thermal grease that binds the heat sink
to the processor.
Pull on the connector, not the wires, to disconnect the sensor cable from the main logic
3.
board.
Lift the heat sink straight up and out of the enclosure.
4.
Repeat steps 1 through 4 for the left processor (CPU B) heat sink.
5.
Xserve (Late 2006) Thermal Grease Kit Instructions 4
Page 5

Using the Thermal Grease Kit
Important: Before re-installing each processor heat sink, you will need to clean o any existing
thermal grease from the bottom of the heat sink, using an alcohol wipe from the kit. You must
then clean the top of the processor that sits below the heat sink and apply new thermal grease.
Steps 1–9 below explain how to clean the processor and apply the grease.
Release the latch on the metal processor holder for the processor.
1.
Rotate the top of the holder to the open position.
2.
Carefully lift the processor out of the holder.
3.
Important: When removing or installing a processor, always hold the processor by the edges.
Be extremely careful not to touch the gold pins on the bottom of the processor, as this type
of connector is very sensitive to contamination. Also be careful not to touch the gold pins in
the processor socket on the logic board.
Xserve (Late 2006) Thermal Grease Kit Instructions 5
Page 6

Clean o any existing thermal grease on the top face of the processor using the alcohol wipe
4.
provided with the replacement part, being careful not to get any thermal grease on the
processor contacts.
Apply the contents on a single syringe of thermal grease (approximately 4.5 cc) to the top
5.
surface of the processor.
Important: Be sure not to get any grease anywhere on the processor other than the very
top, at surface that directly contacts the heat sink.
Xserve (Late 2006) Thermal Grease Kit Instructions 6
Page 7

Use the edge of the package that the alcohol wipe came in as a spatula to spread the
6.
thermal grease evenly over the entire top surface of the processor. Scrape o any excess
grease with the package edge, then discard the package.
Holding the processor by its edges only, place the processor into its holder on the
7.
replacement logic board, being careful not to get any thermal grease on the contacts of
either the processor or its socket holder.
Note: When installing the processor on the logic board, align the processor notch with the
tab on the processor holder, as illustrated. Then lower the processor straight down onto the
socket.
Xserve (Late 2006) Thermal Grease Kit Instructions 7
Page 8

Rotate the top of the holder to the closed position.
8.
Engage the latch on the processor holder.
9.
Repeat steps 1–9 for the second processor.
10.
Installing the Processor Heat Sinks
Important: Before re-installing each heat sink, be sure to clean o any existing thermal grease
from the underside of the heat sink.
Holding the heat sink in one hand, reconnect the 2-pin thermal sensor cable for the left
1.
processor (CPU B) heat sink to the logic board.
Note: Make sure the connector on the sensor cable is oriented as illustrated, with the gold
ngers facing up.
Xserve (Late 2006) Thermal Grease Kit Instructions 8
Page 9

Carefully seat the heat sink over the processor, aligning the four screws with the holes in the
2.
logic board.
Tighten the four captive Phillips mounting screws for the left processor heat sink in the order
3.
indicated below. Do not over-tighten the screws.
Repeat steps 1–3 for the right (CPU A) processor heat sink.
4.
Note: After installing the heat sinks, be sure to re-install the airow duct.
Closing the Xserve
Replace and secure the cover.
1.
Slide the Xserve back into the rack, and tighten the front thumbscrews to secure the Xserve
2.
in the rack.
If the server case was locked, use the enclosure key to lock the security lock on the front
3.
panel.
Xserve (Late 2006) Thermal Grease Kit Instructions 9
Page 10

Apple Computer, Inc.
© 2006 Apple Computer, Inc. All rights reserved.
Under the copyright laws, this document may not be copied, in whole or in part, without the
written consent of Apple.
Every eort has been made to ensure that the information in this document is accurate. Apple is
not responsible for printing or clerical errors.
Apple
1 Innite Loop
Cupertino, CA 95014-2084
USA
+ 1 408 996 1010
http://www.apple.com
Apple, the Apple logo, Mac, Macintosh, and Xserve are trademarks of Apple Computer, Inc.,
registered in the U.S. and other countries.
Xserve (Late 2006) Thermal Grease Kit Instructions 10
 Loading...