

Page 1

MacBook
Essentials
Page 2

Contents
4 Chapter 1: Welcome
4 Say hello to MacBook
5 Chapter 2: MacBook at a glance
5 Take a tour
6 What’s included
6 Trackpad
7 Keyboard
8 Accessories
9 Chapter 3: Get started
9 Set up
11 Find your way around
12 Quickly open apps
13 Charge the battery
13 Migrate your data
14 Chapter 4: MacBook basics
14 Use your MacBook
14 Access all your content, anywhere with iCloud
15 Use your MacBook and iOS devices together
17 Wirelessly share, print, and play
19 Make video calls with FaceTime
19 Use an external display
20 Back up and restore
21 Get answers
22 Chapter 5: Apps
22 About Apps
22 Safari
23 Mail
24 Calendar
25 Messages
26 Maps
27 Spotlight
28 iTunes
29 Photos, iMovie, and GarageBand
30 Pages, Numbers, and Keynote
2
Page 3

31 Chapter 6: Safety, handling, and support
31 Important safety information
33 Important handling information
34 Understanding ergonomics
35 Apple and the environment
35 Learning more, service, and support
36 FCC compliance
37 Canadian regulatory compliance
38 Europe—EU Declaration of Conformity
38 ENERGY STAR® Compliance Statement
39 Disposal and recycling information
40 Software License Agreement
Contents 3
Page 4
Welcome
Say hello to MacBook
MacBook is the ultimate in portability—it’s made to take with you wherever you go.
1
Take a look around. Want a quick tour of the features of your MacBook? Go to Take a tour.
Get started. Press the power button and you’re up and running. For tips on setting up, see Set up.
See what you can do. Print and share les, play music, and more. Find out how easy it is in
Use your MacBook.
…And of course, have fun. MacBook is loaded with apps—go to About Apps to get inspired.
4
Page 5
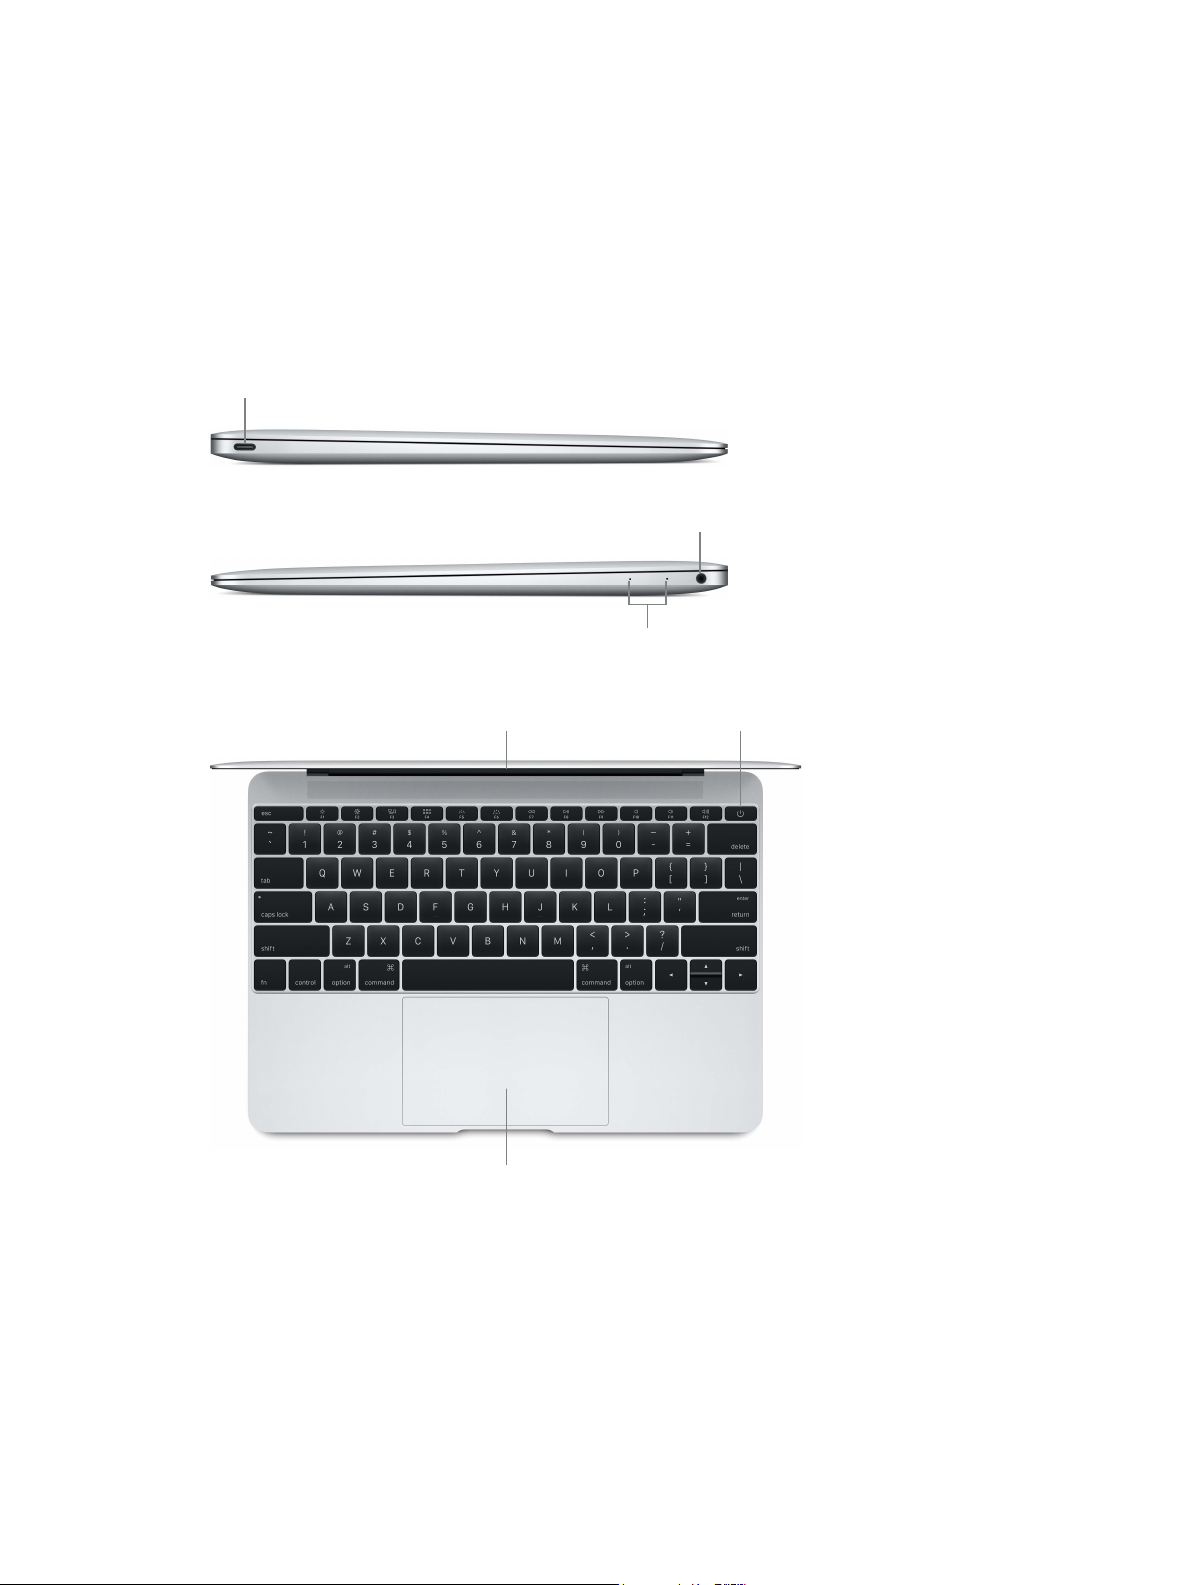
USB-C
Headphone
Power buttonFaceTime camera
MacBook at a glance
Take a tour
Your MacBook has the following features built in:
•
USB-C port: Charge the battery, transfer data, connect an HDMI or VGA display, and more.
Dual microphones
•
Headphone port: Connect speakers or headphones.
•
Dual microphones: Talk with friends or record audio.
2
•
FaceTime camera: Make FaceTime video calls or take pictures and video. If the light is glowing,
the camera is on.
•
Power button: Turn your MacBook on or o, or put it to sleep.
•
Force Touch trackpad: Control your MacBook with gestures. The entire trackpad surface acts as
a button so you can easily click anywhere. For more on using gestures, see Trackpad.
5
Force Touch trackpad
Page 6

What’s included
To use your MacBook, you need these two simple accessories, included in the box:
USB-C Charge Cable (2m): Connect one end to your MacBook and the
other end to the USB-C Power Adapter.
29W USB-C Power Adapter: Plug the adapter into an AC power outlet to
charge your MacBook.
For other accessories you can use, see Accessories.
Trackpad
You can do a lot on your MacBook using simple trackpad gestures—scroll through webpages,
zoom in on documents, rotate photos, and more. And now with the Force Touch trackpad,
pressure-sensing capabilities add an entirely new level of interactivity.
The trackpad senses how hard you press, giving you more options and greater control with every
touch. It also provides feedback—when you drag or rotate objects, you feel a subtle vibration
when they’re aligned, allowing you to work with greater precision.
Here are some common gestures:
Click: Press anywhere on the trackpad. Or enable “Tap to click” in Trackpad
preferences, and simply tap.
Force click: Click and then press deeper. You can Force click to look up
more information—on a word to see its denition, on an address to see a
preview in Maps, and more.
Secondary click (right click): Click with two ngers to open shortcut
menus. If “Tap to click” is enabled, tap with two ngers.
Two-nger scroll: Slide two ngers up and down to scroll.
Pinch to zoom: Pinch your thumb and nger open or closed to zoom in or
out of photos and webpages.
Swipe to navigate: Swipe left or right with two ngers to ip through
webpages, documents, and more—like turning a page in a book.
Open Launchpad: Quickly open apps in Launchpad. Pinch closed with
four or ve ngers, then click an app to open it.
Swipe between apps: To switch from one full-screen app to another,
swipe left or right with three or four ngers.
Chapter 2 MacBook at a glance 6
Page 7
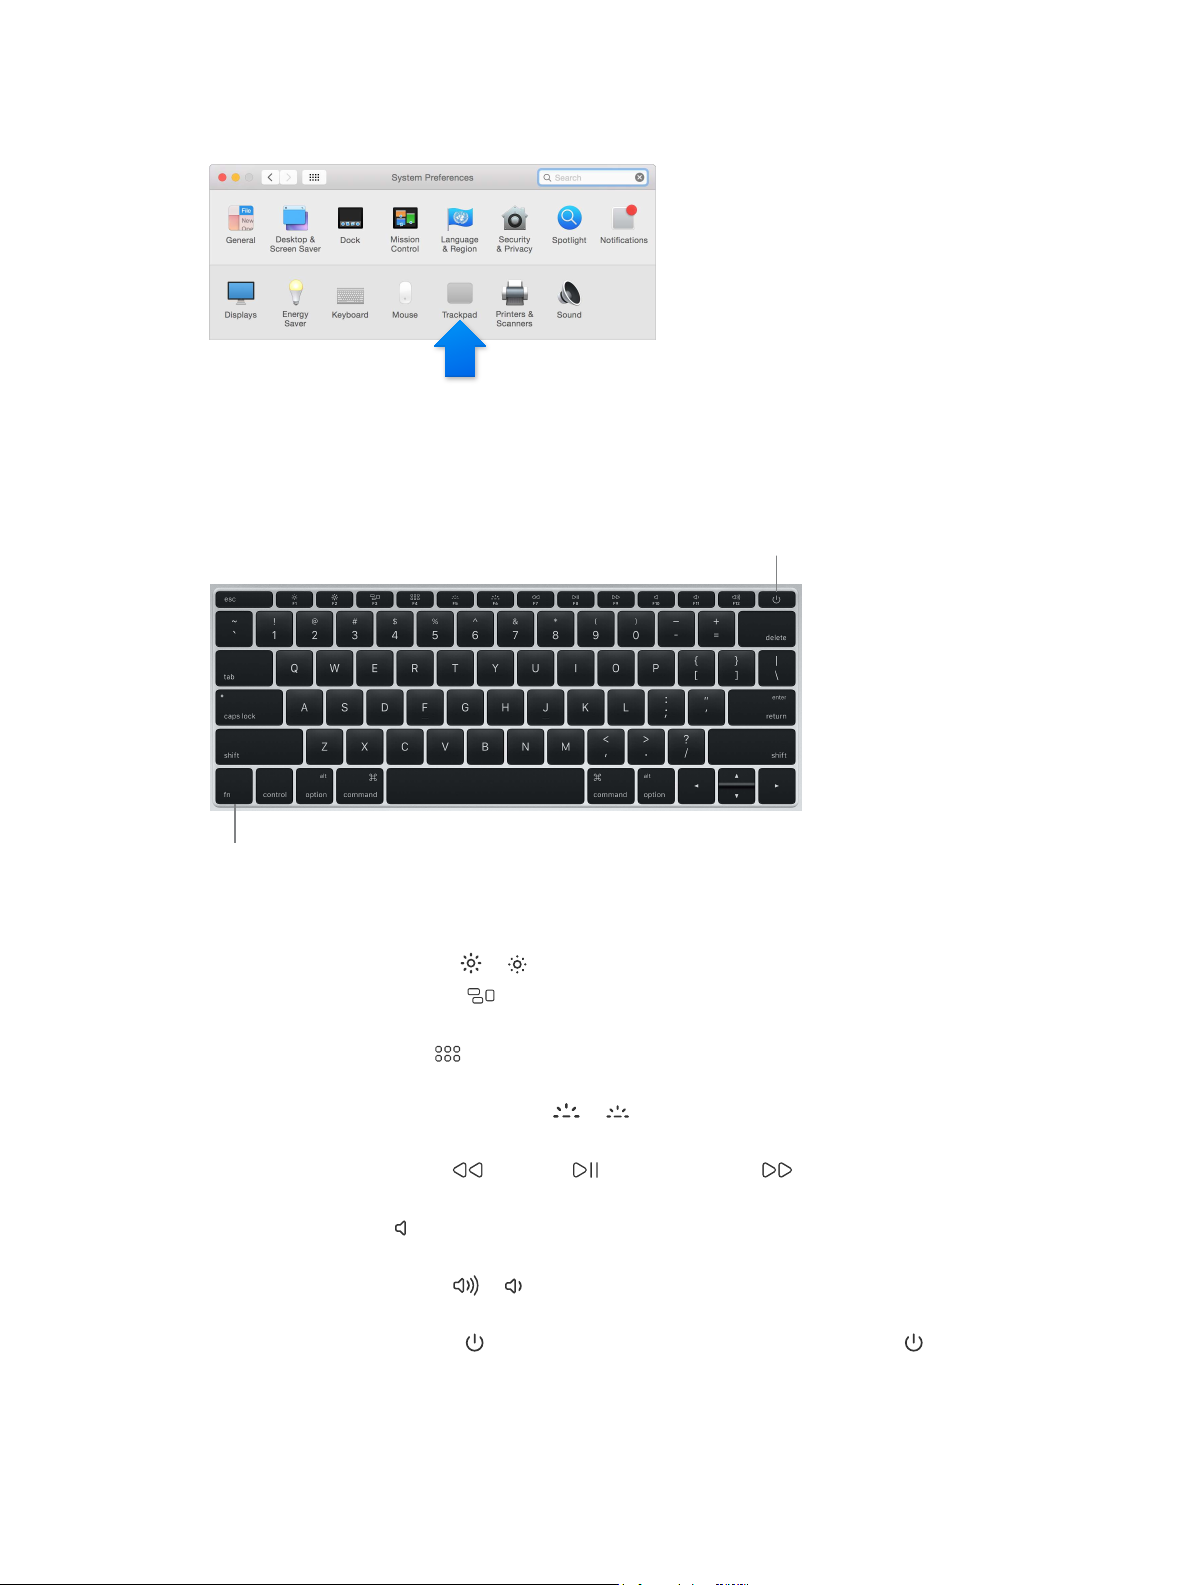
Customize your gestures. Choose Apple menu () > System Preferences or click the System
Power button
Preferences icon in the Dock, then click Trackpad.
Learn more about each gesture, set the pressure you prefer to use, select whether to use
pressure-sensing features, and customize other trackpad features in Trackpad preferences.
Keyboard
Function (fn) key
•
Function (fn) key: Hold this key while you press a function key (F1 to F12) to make the key do
its assigned action. To learn how to customize function keys, click the Help menu in the menu
bar, then search for “function keys” in Mac Help.
•
Brightness keys (F1, F2): Press or to increase or decrease the brightness of the screen.
•
Mission Control key (F3): Press to view what’s running on your MacBook, including all your
spaces and open windows.
•
Launchpad key (F4): Press to instantly see all the apps on your MacBook. Click an app to
open it.
•
Keyboard illumination keys (F5, F6): Press or to increase or decrease the brightness of
the keyboard.
•
Media keys (F7, F8, F9): Press to rewind, to play or pause, or to fast-forward a song,
movie, or slideshow.
•
Mute key (F10): Press to mute the sound coming from the built-in speakers and
headphone port.
•
Volume keys (F11, F12): Press or to increase or decrease the volume of sound coming from
the built-in speakers or headphone port.
•
Power button: Press and hold for 3 seconds to turn your MacBook on or o. Press to put
MacBook to sleep.
Chapter 2 MacBook at a glance 7
Page 8
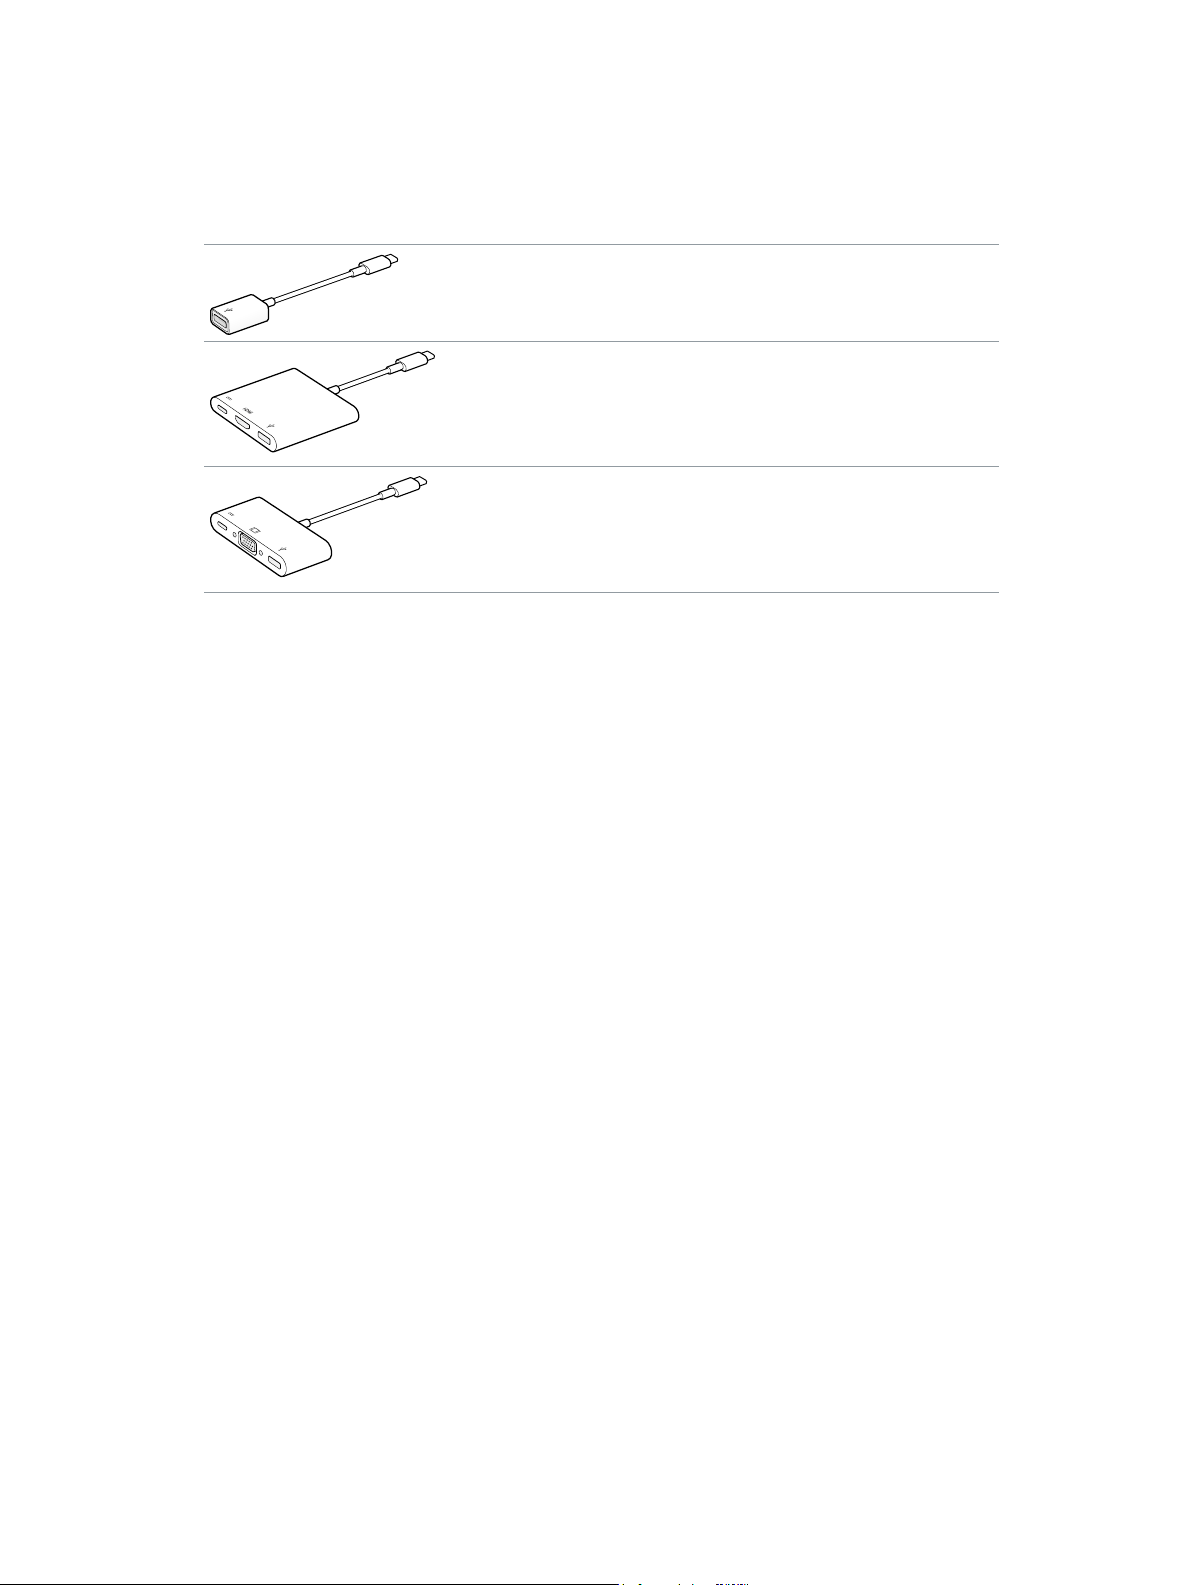
Accessories
The following accessories are available to connect your MacBook to power and use it with other
devices and displays. Use the USB port on these adapters to connect to standard USB accessories,
including cameras and thumb drives. Connect a USB cable to sync and charge your iPhone, iPad,
and iPod.
USB-C to USB Adapter: Connect your MacBook to standard
USB accessories.
USB-C Digital AV Multiport Adapter: Connect your MacBook to an HDMI
display, while also connecting a standard USB device and connecting
a USB-C charging cable to charge your MacBook.
You can also mirror your MacBook display on an HDMI TV or display in up
to 1080p HD.
USB-C VGA Multiport Adapter: Connect your MacBook to a VGA display,
while also connecting a standard USB device and connecting a USB-C
charging cable to charge your MacBook.
You can also mirror your MacBook display on a VGA TV or display in up
to 1080p HD.
To learn more about mirroring your MacBook display, see Use an external display.
Adapters and other accessories are sold separately at store.apple.com or your local
Apple Retail Store. Some USB accessories are not supported. Review the documentation
or check with the manufacturer to make sure you’re choosing the right adapter.
Chapter 2 MacBook at a glance 8
Page 9
Get started
Set up
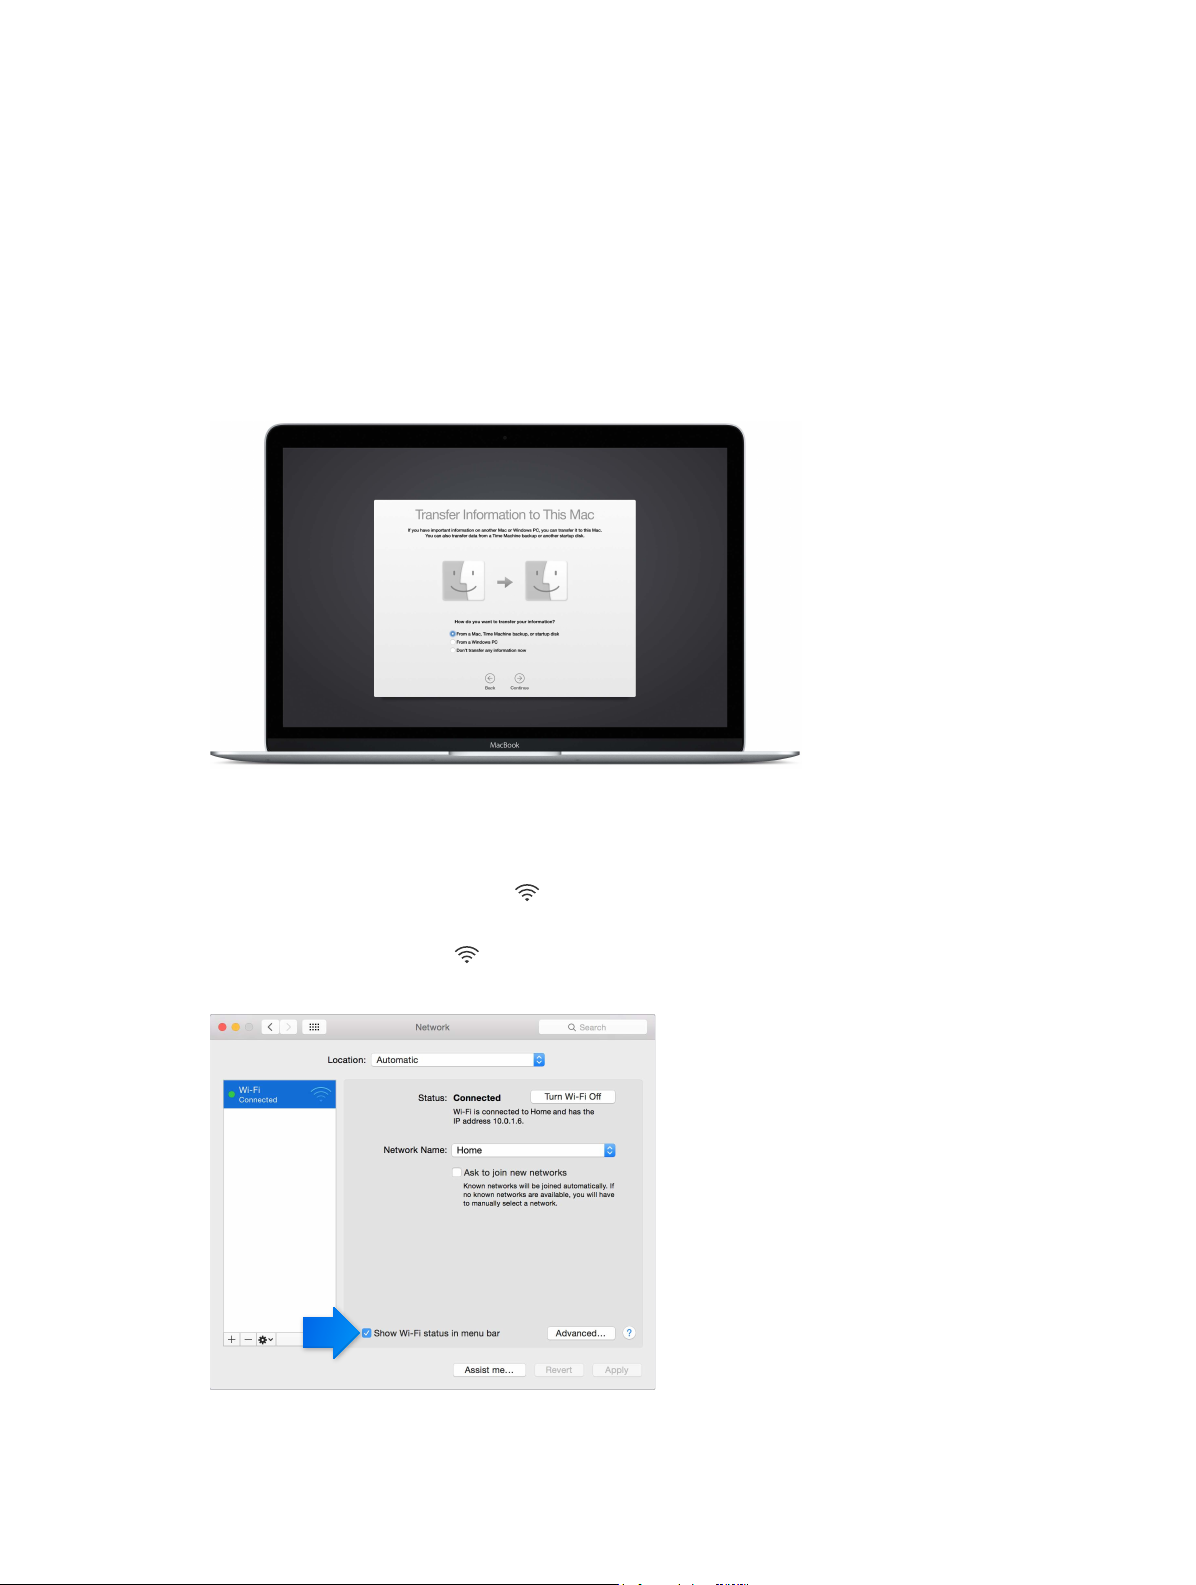
The rst time you turn on MacBook, the Setup Assistant walks you through the simple steps
needed to use your new Mac.
3
To get the most out of MacBook, be sure to connect to Wi-Fi and turn on Bluetooth®, get an
Apple ID, and sign in to iCloud. You can do these steps quickly and easily with Setup Assistant—
but if you want to do them later, here’s how:
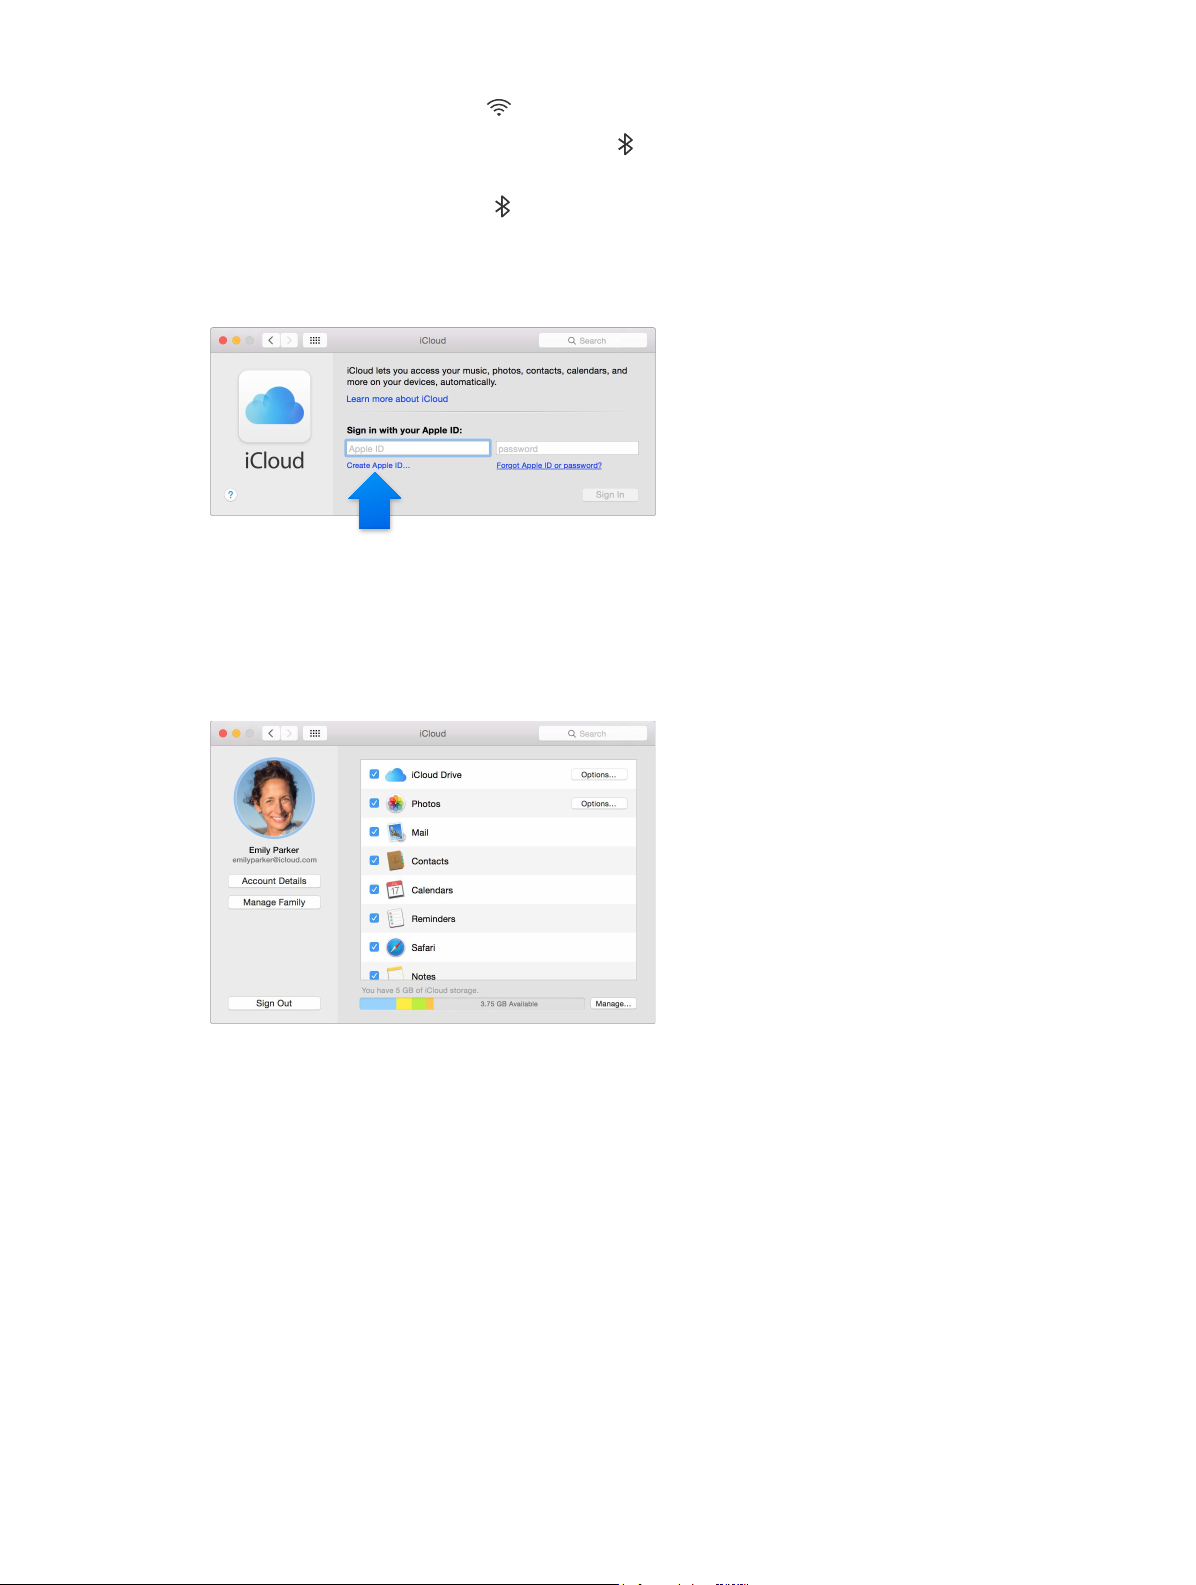
Connect to Wi-Fi. Click the Wi-Fi icon
the password, if necessary.
If you don’t see the Wi-Fi icon , choose Apple menu () > System Preferences, then click
Network. Select Wi-Fi in the list on the left, then select “Show Wi-Fi status in menu bar.”
in the menu bar, then choose a Wi-Fi network and enter
9
Page 10
Turn o Wi-Fi. Click the Wi-Fi icon in the menu bar, then choose Turn Wi-Fi O.
Turn Bluetooth on or o. Click the Bluetooth icon in the menu bar, then choose Turn
Bluetooth On or Turn Bluetooth O.
If you don’t see the Bluetooth icon
, choose Apple menu () > System Preferences, click
Bluetooth, then select “Show Bluetooth in menu bar.”
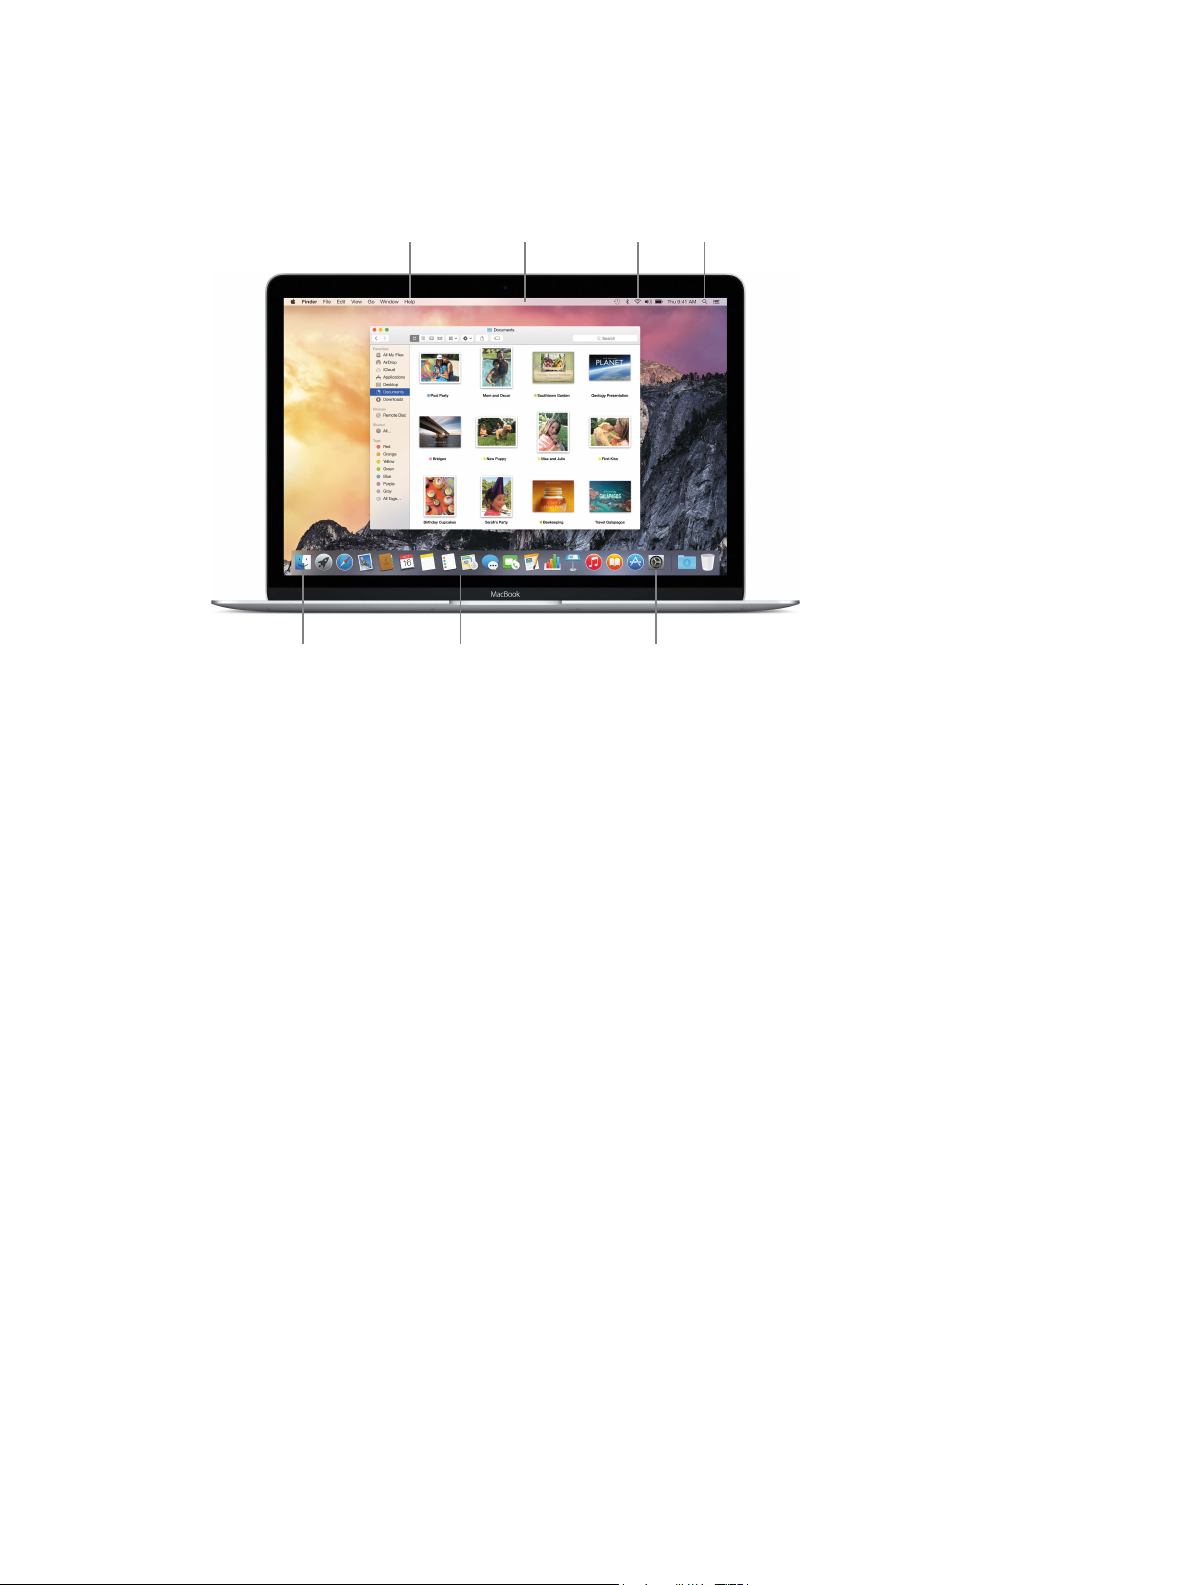
Get an Apple ID. If you don’t already have an Apple ID, you can create one in iCloud preferences.
Choose Apple menu () > System Preferences. Click iCloud and click Create Apple ID.
Your Apple ID is the account you use for just about everything you do with Apple, including
buying music, movies, and TV shows from the iTunes Store, downloading apps from the
App Store, and storing your content in iCloud.
Set up iCloud. Choose Apple menu () > System Preferences. Click iCloud, enter your Apple ID,
then select the features you want to use.
You can store all your documents, movies, music, photos, and more in iCloud, and access them
anywhere you go. To nd out more about what you can do with iCloud and MacBook, see
Access all your content, anywhere with iCloud.
Chapter 3 Get started 10
Page 11
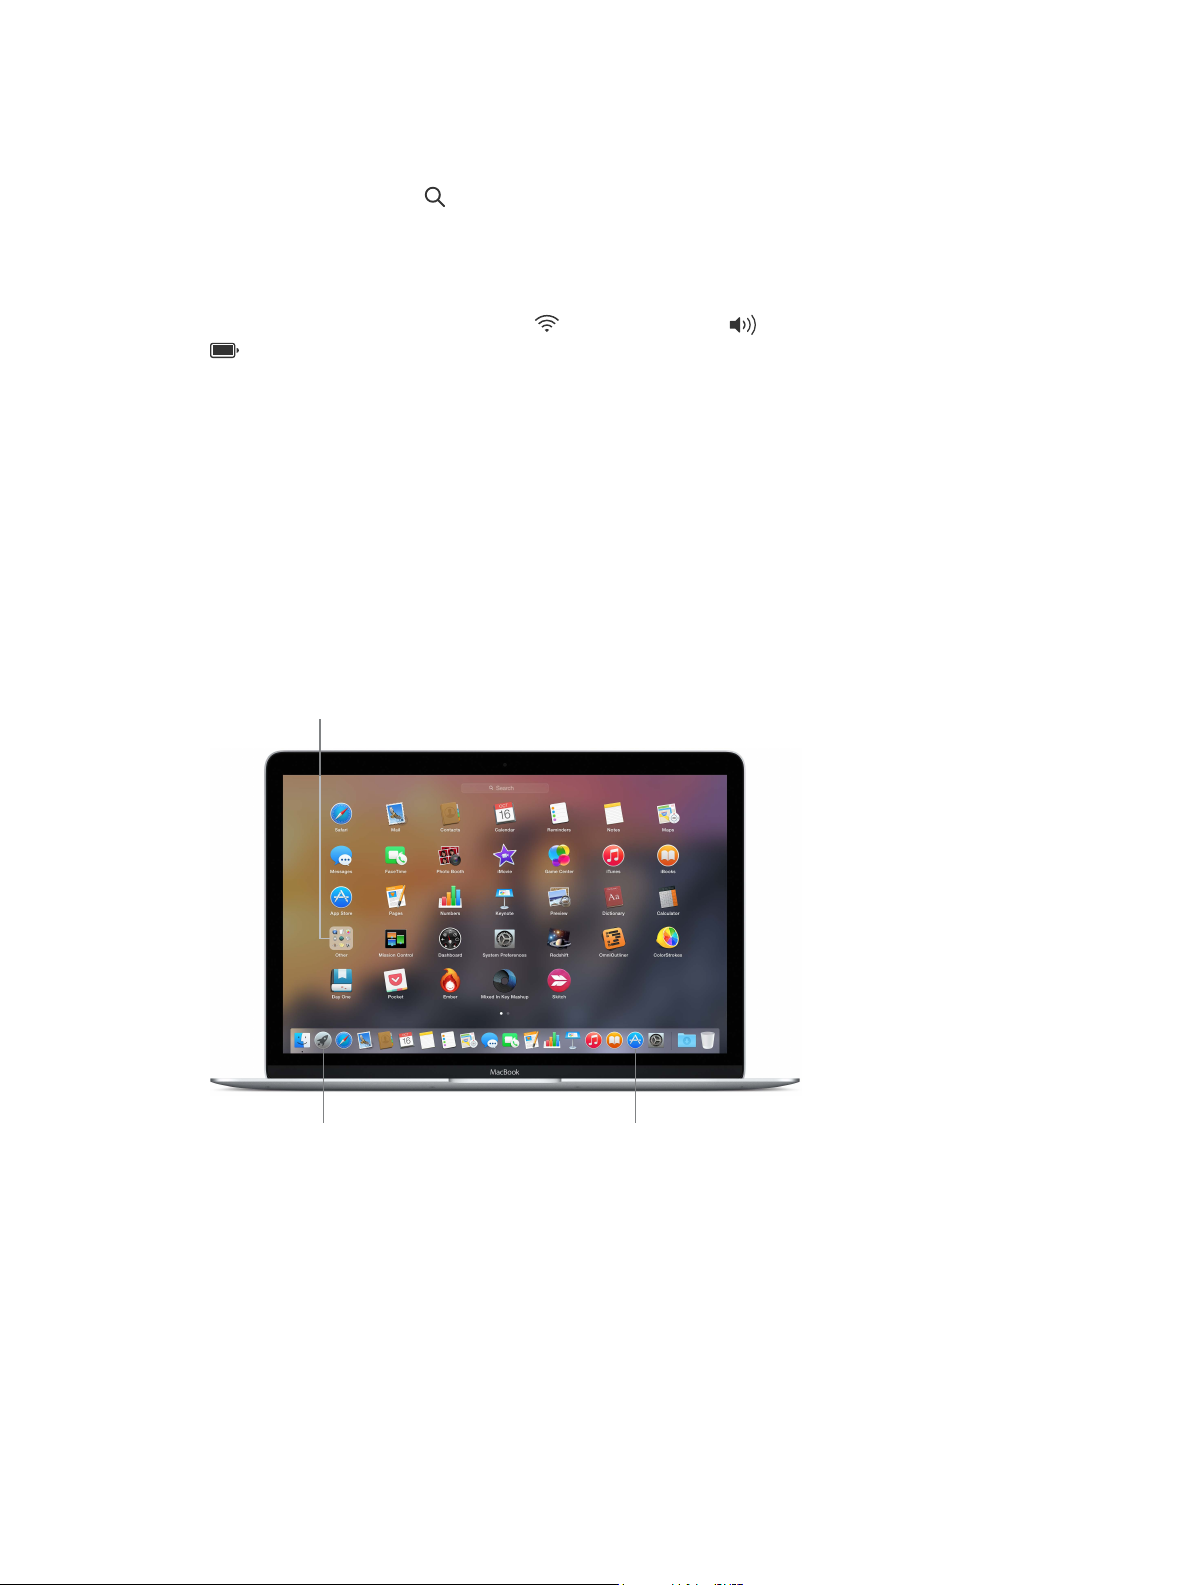
Find your way around
Help menu
Wi-Fi
Menu bar
Spotlight
Overview
Start at the desktop. It’s home base for your Mac—where you can organize your les, quickly
open apps, search for anything on your Mac and beyond, and more.
Finder
Dock
System Preferences
Finder
Use the Finder to organize and nd all your les—including documents, images, movies, and
music—or to quickly preview a le.
Open a Finder window. Click the Finder icon in the Dock, at the bottom of the screen.
Dock
The Dock, at the bottom of the screen, is a convenient place to keep the apps and documents
you use frequently. You can make the Dock larger or smaller, add or remove items, move it to the
left or right side of your screen, or even set it to hide when you’re not using it.
Add an item to the Dock. Drag the item and drop it where you want it. Place apps to the left of
the line in the Dock, and les or folders to the right.
Remove an item from the Dock. Drag it out of the Dock. The item isn’t removed from your
Mac—just from the Dock.
Change how the Dock looks. Choose Apple menu () > System Preferences, then click Dock.
System Preferences
Make your MacBook perfect for you. You can use Energy Saver preferences to change sleep
settings, use Desktop & Screen Saver preferences to add a desktop background or choose a
screen saver, and more.
Open System Preferences. Choose Apple menu () > System Preferences, or click the System
Preferences icon in the Dock. Then click the preference you want to set.
Chapter 3 Get started 11
Page 12
Spotlight
Folders
Find anything on your MacBook—and beyond. Spotlight searches your Mac, as well as Wikipedia,
Maps, news, movie showtimes, and more.
Search for anything. Click at the top-right of the screen or press Command–Space bar, then
start typing.
Menu bar
The menu bar runs along the top of the screen. Use the icons and menus there to connect to
a Wi-Fi network, check your Wi-Fi status , change the volume , check your battery charge
, and more.
Help
You can nd answers to many of your questions in the Help menu.
Get help. Click the Help menu in the menu bar, then type a question or term in the search eld.
Choose a topic from the results list, or choose Show All Help Topics to see all results.
To get help using an app, just click the Help menu while you’re using the app.
Quickly open apps
Your MacBook comes with apps for all the things you love—browsing the web, checking email,
creating documents and presentations, sharing photos, enjoying movies, and more. You can
quickly open apps from Spotlight, from the Dock, or with Launchpad.
Launchpad
Mac App Store
Open an app. Click the app’s icon in the Dock, or click the Launchpad icon in the Dock, and click
the app you want. You can also search for the app using Spotlight, then open the app directly
from your Spotlight search results.
Organize apps in Launchpad. Drag an app onto another app to create a folder. Drag more apps
to the new folder to add them. To remove an app from a folder, just drag it out.
Get more apps. Click the Mac App Store icon in the Dock. When you download apps from
the Mac App Store, they appear in Launchpad. To quickly get updates to apps and OS X, click
Updates in the Mac App Store.
Chapter 3 Get started 12
Page 13
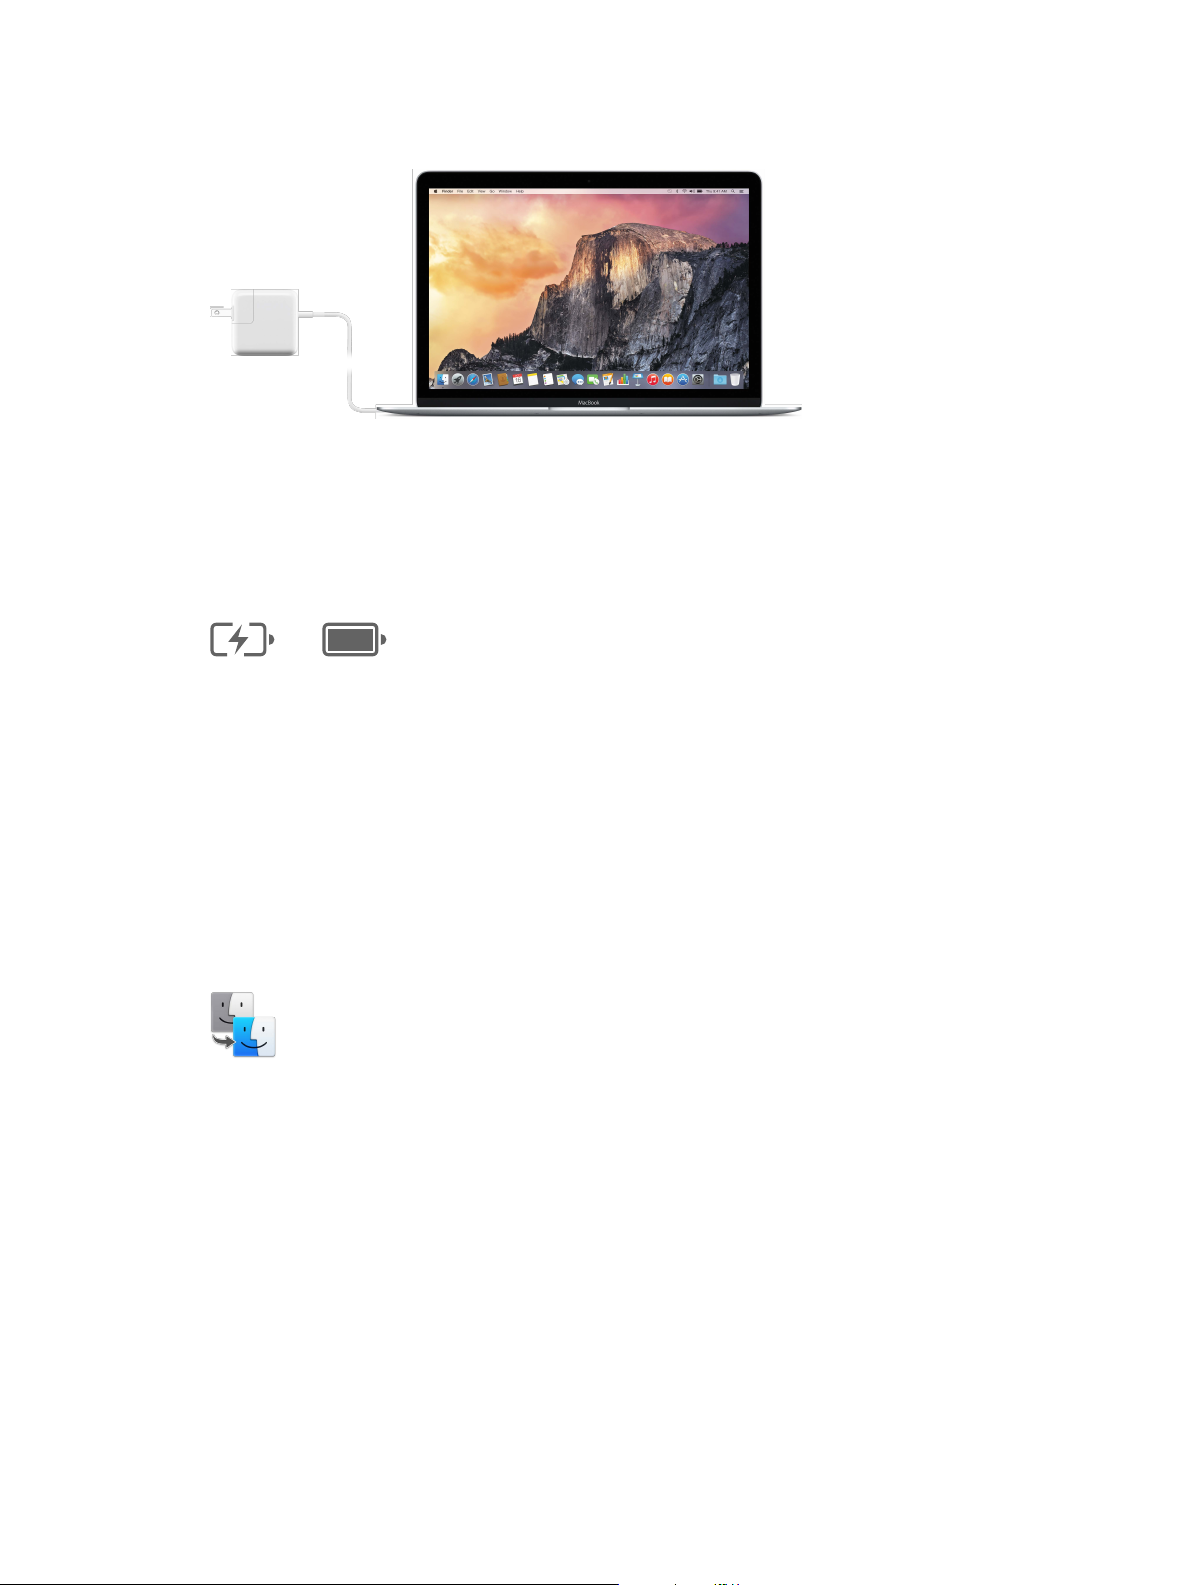
Charge the battery
The battery in your MacBook recharges whenever MacBook is connected to power.
Charge the battery. Connect your MacBook to a power outlet using the included cable and
USB-C Power Adapter. You’ll hear a chime that indicates the battery is charging. The battery
recharges more quickly when the computer is o or in sleep.
Check the battery’s charge. Look at the battery status icon at the right of the menu bar to see
the battery level or charging status. Click the icon to show how much power you have left if you
keep using the apps, peripheral devices, and system settings you’re now using.
ChargedCharging
Conserve battery power. Reduce the display brightness, close apps, and disconnect peripheral
devices you’re not using to extend battery life on a given charge. You can change your power
settings in Energy Saver preferences (click the System Preferences icon in the Dock, then click
Energy Saver). If your MacBook is in sleep or standby mode when a device is connected to it, the
device’s battery may drain.
For more information about the internal, rechargeable battery in your MacBook, and for
conservation and performance tips, go to www.apple.com/batteries.
Migrate your data
It’s easy to move your les and settings from another Mac or a PC to your MacBook. You can
transfer the data when you rst set up your MacBook, using Setup Assistant. If you want to
transfer later, you can use Migration Assistant to wirelessly copy your les from a Time Machine
backup, using an AirPort base station (available separately).
You can transfer data over a wireless network as long as both computers are connected to the
same network.
Use Migration Assistant. Open a Finder window, then go to Applications > Utilities and double-
click Migration Assistant. Follow the onscreen instructions to transfer information using Wi-Fi.
Copy les from a storage device. Connect the device to your MacBook using an adapter, such as
the USB-C to USB Adapter (see Accessories). Then manually drag les to your MacBook.
For more information about Time Machine backups, see Back up and restore.
Chapter 3 Get started 13
Page 14

MacBook basics
4
Use your MacBook
MacBook is built to go everywhere you go. And its features—along with iCloud and
OS X Yosemite—make it easy to bring your content everywhere you are. You can print, play,
share, video chat, and back up your data—and do it all wirelessly. Find out more about how to
make the most of your MacBook.
Access all your content, anywhere with iCloud
iCloud is the easiest way to make sure all your important content is everywhere you are. iCloud
stores your documents, photos, music, apps, contacts, calendars, and more, so you can access
them anytime you’re connected to Wi-Fi.
iCloud also keeps everything up to date on all your devices. So if you have an iPhone or iPad, just
sign in to iCloud using the same account and you’ll have everything you need on any device.
14
Page 15

Here’s some of what you can do with iCloud.
Save your les in iCloud Drive. Store any le in iCloud Drive, then access it anywhere—from
work or home, or on the road. To save a le to iCloud Drive, open a Finder window, then drag the
le to iCloud Drive in the sidebar. You can organize and tag les in iCloud Drive just like the les
on your MacBook. And when you edit a le in iCloud Drive, your edits show up on any device
you use with iCloud.
Share purchases with Family Sharing. Let up to six family members share their iTunes Store,
App Store, and iBooks Store purchases—even if they all use dierent iCloud accounts. Pay for
family purchases with one credit card, and approve kids’ spending right from your MacBook
or iOS device. Plus, share photos, a family calendar, reminders, and locations. To set up Family
Sharing, click the System Preferences icon in the Dock, click iCloud, then click Set Up Family.
Share photos using iCloud Photo Sharing. Share photos and video with just the people you
choose, and let them add their own photos, video, and comments. To get started, click the
System Preferences icon in the Dock, click iCloud, then click Photos.
Enjoy your purchases anywhere. When you’re signed in to iCloud, purchases you’ve made from
the iTunes Store, Mac App Store, and iBooks Store are available on your MacBook at any time. So
all your music, movies, books, and more are available wherever you go.
Locate your MacBook with Find My Mac. If you misplace your MacBook, you can easily locate
it on a map, lock its screen, or even erase its data remotely. To turn on Find My Mac, click the
System Preferences icon in the Dock, click iCloud, then click Find My Mac.
Your iCloud account comes with 5 GB of free storage, and your purchased music, apps, TV shows,
and books don’t count against your available space.
For more information about what you can do with iCloud, go to Mac Help and search for iCloud,
or go to www.apple.com/icloud.
Use your MacBook and iOS devices together
Overview
Your MacBook and iOS devices work together seamlessly, expanding the power and portability
of your MacBook even more. Just sign in to your iCloud account on your MacBook and your
iOS devices, and whenever your MacBook and devices are near each other, you can use them
together in amazing ways.
Chapter 4 MacBook basics 15
Page 16

Phone calls
You can take calls—and make them—right from your MacBook.
Take a call. When someone calls your iPhone, click the notication that appears on your
MacBook screen. Your Mac becomes a speakerphone.
Make a call. Click a phone number in FaceTime, Contacts, Safari, Calendar, Spotlight, or
another app.
Text messages
Send and receive SMS and MMS text messages right from your MacBook. When friends text
you, you can respond from whichever device is closest. All the messages that appear on your
MacBook also appear on your iPhone or iPad.
Instant Hotspot
If you’re on the go and don’t have a Wi-Fi connection, your MacBook can connect to the Internet
using Personal Hotspot on your iPhone (with iOS 8) or iPad (cellular models with iOS 8).
Connect to your device’s Personal Hotspot. Click the Wi-Fi icon i n the menu bar, then choose
your iPhone or iPad from the list of devices that appear. (You don’t need to turn on anything on
your device—MacBook can connect automatically.)
Check the status of your connection. Look in the Wi-Fi menu to see the strength of the
cellular signal.
When you’re not using Personal Hotspot, your iOS device automatically disconnects to save
battery life.
Chapter 4 MacBook basics 16
Page 17

Hando
With Hando, you can pick up on one device where you left o on another. Work on a
presentation on your MacBook, then continue on your iPad. Or start an email on your iPhone,
then nish it on your MacBook. When your MacBook and devices are near each other, an icon
appears in the Dock whenever an activity is being handed o; click it to pick up right where
you left o.
Turn on Hando on your MacBook. Click the System Preferences icon in the Dock, click General,
then select “Allow Hando between this Mac and your iCloud devices.”
Turn on Hando on your iOS device. Go to Settings > General > Hando & Suggested Apps,
then tap to turn on Hando. If you don’t see the option, your iOS device doesn’t support Hando.
Note: To use Hando, you need an iPhone 5 or later, iPod touch (5th generation) or later, or iPad
(4th generation) or later with iOS 8 installed. Make sure your MacBook and iOS device are on the
same Wi-Fi network, you’re signed in to the same iCloud account, and Bluetooth is turned on.
Hando works with Calendar, Contacts, Mail, Maps, Messages, Notes, Reminders, Safari, Keynote,
Numbers, and Pages.
To learn more about using Instant Hotspot, messages, phone calls, and Hando with your
MacBook, go to Mac Help. Or, go to www.apple.com/osx/continuity.
Wirelessly share, print, and play
Overview
Quickly share your les, clippings, and webpages using AirDrop. Print wirelessly to an
AirPrint-enabled printer from apps such as Mail and Safari. Stream your music, photos, and
video to Apple TV with AirPlay.
AirDrop
AirDrop makes sharing les between Mac and iOS devices easy.
Chapter 4 MacBook basics 17
Page 18

Send a le from the Finder. Click the Finder icon in the Dock, then click AirDrop in the sidebar
on the left. When the person you want to send a le to appears in the window, drag the le
to them.
Send les from an app. While using an app like Pages or Preview, click the Share button and
choose AirDrop.
Control who can send items to you using AirDrop. Click the Finder icon in the Dock, click
AirDrop in the sidebar, then click the “Allow me to be discovered by” menu and choose an option.
When you send a le to someone, they can choose whether to accept the le. When someone
sends you a le, you can nd it in the Downloads folder on your MacBook.
Print wirelessly
When you print from an app, just select a printer from the Nearby Printers list in the Print dialog.
You can use AirPrint to print wirelessly to:
•
An AirPrint-enabled printer on your Wi-Fi network
•
A network printer or printer shared by another Mac on your Wi-Fi network
•
A printer connected to the USB port of an AirPort base station
Print to an AirPrint printer. To print from any app, select an AirPrint printer in the list of printers.
Can’t nd the printer you’re looking for? Make sure it’s connected to the same Wi-Fi network as
your MacBook. If it is and you still don’t see it, try adding it: click the System Preferences icon in
the Dock, click Printers & Scanners, then click Add (+). (You may have to connect the printer to
your MacBook using USB.)
See About AirPrint and OS X: Printer and scanner software available for download for a list of
AirPrint-enabled printers and other supported printers.
AirPlay
Display your MacBook screen on your TV using AirPlay Mirroring. If your HDTV is connected
to Apple TV, and Apple TV is on the same Wi-Fi network as your MacBook, you can mirror the
MacBook display on your TV screen or use the TV as a second display.
Use AirPlay Mirroring. Click the AirPlay icon in the menu bar, then choose your Apple TV.
When an AirPlay display is active, the icon turns blue.
In some cases, you can use an AirPlay display even if you’re not on the same Wi-Fi network as
Apple TV (called peer-to-peer AirPlay). To use peer-to-peer AirPlay, you need an Apple TV
(3rd generation rev A, model A1469 or later) with Apple TV software 7.0 or later.
Apple TV and AirPort base stations are sold separately at store.apple.com or your local
Apple Retail Store.
To learn more about AirDrop, AirPrint, and AirPlay, go to Mac Help. To learn more about using a
second display with your MacBook, see Use an external display.
Chapter 4 MacBook basics 18
Page 19

Make video calls with FaceTime
FaceTime camera
Your MacBook has a built-in FaceTime camera that you can use to make FaceTime video calls.
Make a video call. Click the Launchpad icon in the Dock, then click FaceTime. Start typing a
name or number—if it’s in your contacts list, FaceTime completes it for you. Then click the
camera button by the person’s name to make the call.
Make video calls, capture
video, and take snapshots.
You can also use your camera to take pictures and video using Photo Booth. To learn more, open
Mac Help and search for FaceTime or Photo Booth.
To optimize your video calls, use FaceTime in a well-lit environment.
Chapter 4 MacBook basics 19
Page 20

Use an external display
The USB-C port on your MacBook supports video output. You can use an external display, a
projector, or an HDTV with your MacBook.
Connect a VGA display or projector. Use a VGA cable and a USB-C VGA Multiport Adapter.
Connect an HDMI display or projector, or an HDTV. Use an HDMI cable and a USB-C Digital AV
Multiport Adapter.
Adapters are sold separately. See Accessories for more information about MacBook adapters.
Back up and restore
To keep your les safe, it’s important to back up your MacBook regularly. The easiest way to back
up is to use Time Machine—which is built in to your MacBook—with a wireless AirPort Time
Capsule (sold separately) or a self-powered external storage device connected to your MacBook
(using an available adapter). For information about MacBook adapters, see Accessories.
Set up Time Machine. Make sure your MacBook is on the same Wi-Fi network as your
AirPort Time Capsule, or connect your storage device to MacBook. Then click the System
Preferences icon in the Dock, click Time Machine, and click On. Select the drive you want to
use for backup, and you’re all set.
Chapter 4 MacBook basics 20
Page 21

Time Machine:
•
Automatically backs up your entire MacBook, including system les, apps, accounts,
preferences, music, photos, movies, and documents.
•
Remembers how your computer looked on any given day, so you can revisit your MacBook as
it appeared in the past or retrieve an older version of a document.
•
Lets you restore your entire system from a Time Machine backup. So if anything happens to
your MacBook, your les are safe and sound.
To learn more about backing up and restoring your MacBook, go to Mac Help and search
for Time Machine, backup, or restore. To learn more about AirPort Time Capsule, go to
www.apple.com/airport-time-capsule.
AirPort Time Capsule is sold separately at store.apple.com or your local Apple Retail Store.
Get answers
Much more information about using your MacBook is available in Mac Help.
Get help. Click the Finder icon in the Dock, then click the Help menu in the menu bar and type a
question or term in the Search eld. Choose a topic from the results list or choose Show All Help
Topics to see all topics.
To learn about Do this
MacBook support Go to www.apple.com/support/macbook.
MacBook specications Go to www.apple.com/macbook/specs.
Using MacBook safely See Important safety information.
Important MacBook information Choose Apple menu () > About This Mac. Then click
Support and choose Important Information > Product
Information Guide.
Chapter 4 MacBook basics 21
Page 22

Sidebar
Favorites view
Share
Apps
5
About Apps
Your MacBook comes with a collection of great apps for things you do every day, like surng
the web, sending mail and messages, and organizing your calendar. It also comes with apps
like Photos, iMovie, GarageBand, Pages, Numbers, and Keynote—so you can be creative and
productive right from the start.
To nd even more apps, go to the Mac App Store. Organize your recipes, DJ a party, play the
latest game—there’s an app for everything you want to do. Just click the App Store icon in
the Dock.
To get help using any app, just click the Help menu (in the menu bar at the top of the screen)
when you’re using the app.
Safari
Safari is the best way to surf the web on your Mac. Just click in the Smart Search eld to see
icons for your favorite websites, or type a search term or web address—Safari knows the
dierence and will send you to the right place. You can save pages to your Reading List to read
later, and check out Shared Links for pages posted by people you follow on Twitter and LinkedIn.
In tab view, you can see all your open tabs—even ones on your iOS devices.
Your bookmarks, reading
list, and shared links
appear in the sidebar.
Click the Smart Search
field to see icons for
your favorite websites.
Easily send webpages
or share them with
your social networks.
22
Page 23

Conversation view
Search
One-stop email
Mail lets you manage all your email accounts from a single app. It works with most popular email
services like iCloud, Gmail, Yahoo Mail, and AOL Mail.
You can send large attachments using Mail Drop—your attachments are uploaded to iCloud, and
recipients get a link to them. And with Markup, you can ll out and sign forms or mark up a PDF.
To get started, just open Mail, and Setup Assistant helps you set up your accounts.
View all your
accounts in Mail.
See all the email
messages from a
conversation thread.
Quickly narrow search
results to find exactly
what you want.
Chapter 5 Apps 23
Page 24

Calendar
Add an event
Get the details
Calendar view
Keep track of your busy schedule with Calendar. You can create separate calendars—one for
home, another for school, and a third for work. See all your calendars in a single window, or see
just the ones you want. Send invitations to events, then see who has responded. Add a location
to an event, and Calendar will include a map, calculate travel time, and even display the weather
forecast. Use iCloud to automatically update your iCloud calendars on all your Macs and iOS
devices or share calendars with other iCloud users.
You can share iCloud calendars and add Google and Yahoo calendars.
Click + or double-click
the calendar to create
a new event.
Calendar shows an event’s
location on a map and
calculates travel time.
Select the view you
prefer—day, week,
month, or year.
Chapter 5 Apps 24
Page 25

Messages
Manage conversations
Messages gives you many ways to stay in touch. Just sign in with your Apple ID, and you can
send and receive unlimited iMessage texts—including text, photos, video, and more—to anyone
with a Mac, iPad, iPhone, or iPod touch. With iMessage, you can even start a conversation on your
iOS device and continue on your MacBook. If your iPhone is handy, you can send SMS messages
to other mobile devices, too. And if you want to talk to someone face to face, you can start a
FaceTime video call right from a conversation in Messages.
Click Details to start a FaceTime
call or see the attachments from
your conversation.
Replies in progress
Three dots means your
friend is typing a reply.
Delivery receipts
See when your
message has arrived.
Note: To use FaceTime video calling, both the caller and recipient need a FaceTime-enabled
device. This feature is not available in all areas.
Chapter 5 Apps 25
Page 26

Maps
Directions
Favorites
Send to iPhone
Explore new destinations and get directions on your Mac with Maps. View locations using
standard or satellite imagery, or use Flyover to soar through select cities in a photorealistic
3D experience. You can look up information for local points of interest like restaurants and
hotels, and Maps shows you phone numbers, photos, and even Yelp reviews. Once you nd
your destination, Maps provides point-to-point directions that you can send to your iPhone for
turn-by-turn voice navigation.
Maps provides detailed
directions, including
traffic information.
Save a favorite location
and access it from
any device.
Send directions
to your iPhone for
voice navigation.
WARNING: For important information about navigation and avoiding distractions that could
lead to dangerous situations, see Important safety information.
Chapter 5 Apps 26
Page 27

Spotlight
Results
Previews
Easy–access
Spotlight is an easy way to nd anything on your Mac—and in sources like Wikipedia, iTunes,
Maps, and more. Just click the Spotlight icon in the menu bar or press Command–Space bar,
then start typing. Spotlight nds results on your Mac—including documents, contacts, and email
messages—as well as Wikipedia articles, news, movie showtimes, and more. You can take action
right from your search results: make a call, send an email, get directions, even convert currencies.
See Spotlight results
on the left and scroll
through them.
Interact with
previews right
from Spotlight.
Note: Not all features are available in all areas.
Click the Spotlight icon
in the menu bar or press
Command–Space bar.
Chapter 5 Apps 27
Page 28

iTunes
Your library
iTunes Radio
iTunes Store
iTunes makes it easy to enjoy your favorite music, movies, TV shows, and more on your Mac.
iTunes includes the iTunes Store, where you can purchase classics or new favorites. It also
includes iTunes Radio, a great way to discover music.
View your music,
movies, TV shows,
podcasts, and more.
Enjoy free streaming
radio tailored from top
music in the iTunes Store.
Discover and buy
new music, movies,
and more.
Chapter 5 Apps 28
Page 29

Photos, iMovie, and GarageBand
Photos
Share
Projects
Photos, iMovie, and GarageBand give you amazing ways to create and share your photos, movies,
and music. Photos automatically keeps your library organized and helps you create gorgeous
photo books, cards, and calendars. And with iCloud Photo Library, you can keep your entire
collection of photos and videos in iCloud and view them on all of your devices. iMovie lets you
turn your home videos into beautiful movies and epic Hollywood-style trailers. And GarageBand
has everything you need to learn to play an instrument, write music, or record a song.
Photos are automatically
organized by date and
location.
Easily create and order
personalized books,
cards, and calendars.
Post your favorites to
Facebook or share them
with iCloud or Messages.
Chapter 5 Apps 29
Page 30

Pages, Numbers, and Keynote
Add graphics and more
Share
Format sidebar
Create stunning documents, spreadsheets, and presentations on your Mac. Beautiful templates
give you a great head start—simply add your own words and photos. And customizing your
work is a snap—just select any text or object, and you see all your options in the Format sidebar
on the right. Open and edit Microsoft Oce les, and easily share a link to your work via Mail or
Messages, right from the toolbar.
Create media-rich documents
with images, movies, charts,
and more.
Easily share a link
to your work with
Mail or Messages.
Select an item, and
options for it appear
in the sidebar.
Chapter 5 Apps 30
Page 31

Safety, handling, and support
6
Important safety information
WARNING: Failure to follow these safety instructions could result in re, electric shock, or other
injuries, or damage to your MacBook or other property. Read all safety information below
before using your MacBook.
Built-in battery. Don’t attempt to replace or remove the battery yourself—you may damage the
battery, which could cause overheating and injury. The lithium-ion battery in MacBook should
be replaced by Apple or an authorized service provider, and must be recycled or disposed of
separately from household waste. Don’t expose your MacBook to extreme heat sources, such
as radiators or replaces, where temperatures might exceed 212°F (100°C). Don’t incinerate
the battery.
For information about battery service and recycling, go to
www.apple.com/batteries/service-and-recycling.
Handling. Handle your MacBook with care. It is made of metal, glass, and plastic and has
sensitive electronic components inside. Set up your MacBook on a stable work surface that
allows for adequate air circulation under and around the computer. MacBook can be damaged
if dropped, burned, punctured, or crushed, or if it comes in contact with liquid. Don’t use a
damaged MacBook, such as one with a cracked screen, as it may cause injury.
Water and wet locations. Keep your MacBook away from sources of liquid, such as drinks,
washbasins, bathtubs, shower stalls, and so on. Protect your MacBook from dampness or wet
weather, such as rain, snow, and fog.
Repairing. Your MacBook doesn’t have any user-serviceable parts. Do not open or disassemble
MacBook or attempt to repair it or replace any components. Disassembling MacBook may
damage it or may cause injury to you. If MacBook needs service, is damaged, malfunctions, or
comes in contact with liquid, contact Apple or an Apple-authorized repair center, such as an
Apple Authorized Service Provider. If you attempt to open it, you risk damaging your computer,
and such damage isn’t covered by the limited warranty on your MacBook.
Navigation. Maps, directions, and location-based apps depend on data services. These data
services are subject to change and may not be available in all areas, resulting in maps, directions,
or location-based information that may be unavailable, inaccurate, or incomplete. Compare the
information provided on MacBook to your surroundings and defer to posted signs to resolve
any discrepancies. Do not use these services while performing activities that require your full
attention. Always comply with posted signs and the laws and regulations in the areas where you
are using MacBook and always use common sense.
31
Page 32

Charging. Charge MacBook only with the included 29W USB-C Power Adapter, or with other
third-party cables and power adapters that are compatible with USB-C and are compliant with
applicable regulations.
Using damaged cables or chargers, or charging when moisture is present, can cause re, electric
shock, injury, or damage to MacBook or other property. When you use the included 29W USB-C
Power Adapter to charge MacBook, make sure the USB-C Charge Cable (2m) is fully inserted into
the power adapter before you plug the adapter into a power outlet.
Prolonged heat exposure. MacBook and its 29W USB-C Power Adapter may become very warm
during normal use. MacBook and its 29W USB-C Power Adapter comply with applicable surface
temperature standards and limits dened by the International Standard for Safety of Information
Technology Equipment (IEC 60950-1). However, even within these limits, sustained contact with
warm surfaces for long periods of time may cause discomfort or injury.
Use common sense to avoid situations where your skin is in prolonged contact with a device
or its power adapter when it’s operating or plugged into a power source. For example, don’t
sleep with a device or power adapter when it’s plugged into a power source. Don’t operate your
MacBook on a pillow, blanket, or other soft material that can block ventilation openings. It’s
important to keep MacBook and its 29W USB-C Power Adapter in a well-ventilated area when in
use or charging.
Never push anything into the ventilation openings, as doing so may be dangerous and cause
your computer to overheat. Never place anything over the keyboard when operating your
MacBook. If your MacBook is on your lap and gets uncomfortably warm, remove it from your
lap and place it on a stable, well-ventilated work surface. Take special care if you have a physical
condition that aects your ability to detect heat against the body.
29W USB-C Power Adapter. To operate the 29W USB-C Power Adapter safely and reduce the
possibility of heat-related injury or damage, do one of the following:
•
Plug the 29W USB-C Power Adapter directly into a power outlet.
•
If you’re using the Power Adapter Extension Cable, place the power adapter on a desk, table, or
on the oor in a well-ventilated location.
Disconnect the power adapter and any other cables if any of the following conditions exists:
•
You want to clean the case (use only the recommended procedure described in
Important handling information).
•
The power cord or plug becomes frayed or otherwise damaged.
•
Your MacBook or 29W USB-C Power Adapter is exposed to rain, excessive moisture, or liquid
spilled into the case.
•
Your MacBook or 29W USB-C Power Adapter has been dropped, the case has been damaged,
or you suspect that service or repair is required.
If debris gets onto the power port, remove it gently with a dry cotton swab.
29W USB-C Power Adapter specications:
•
Frequency: 50 to 60 Hz, single phase
•
Line Voltage: 100 to 240 V
•
Output Voltage: 14.5 V DC, 2.0 A or 5.2 V DC, 2.4 A
Chapter 6 Safety, handling, and support 32
Page 33

Hearing loss. Listening to sound at high volumes may damage your hearing. Background noise,
as well as continued exposure to high-volume levels, can make sounds seem quieter than they
actually are. Use only compatible earbuds, headphones, or earpieces with your MacBook. Turn on
the audio and check the volume before inserting anything into your ear. For more information
about hearing loss, see www.apple.com/sound.
WARNING: To prevent possible hearing damage, do not listen at high volume levels for
long periods.
Radio frequency exposure. MacBook uses radio signals to connect to wireless networks. For
information about radio frequency (RF) energy resulting from radio signals and steps you can
take to minimize exposure, see www.apple.com/legal/rfexposure.
Medical device interference. MacBook contains components and radios that emit
electromagnetic elds, which may interfere with pacemakers, debrillators, or other medical
devices. Maintain a safe distance of separation between your medical device and MacBook.
Consult your physician and medical device manufacturer for information specic to your medical
device. If you suspect MacBook is interfering with your pacemaker or any other medical device,
stop using MacBook.
Medical conditions. If you have a medical condition that you believe could be aected by using
MacBook (for example, seizures, blackouts, eyestrain, or headaches), consult with your physician
prior to using MacBook.
Repetitive motion. When you perform repetitive activities such as typing or playing games on
MacBook, you may experience discomfort in your hands, arms, wrists, shoulders, neck, or other
parts of your body. If you experience discomfort, stop using MacBook and consult a physician.
Choking hazard. Some MacBook accessories may present a choking hazard to small children.
Keep these accessories away from small children.
High-consequence activities. MacBook is not intended for use where the failure of the computer
could lead to death, personal injury, or severe environmental damage.
Explosive atmospheres. Charging or using MacBook in any area with a potentially explosive
atmosphere, such as areas where the air contains high levels of ammable chemicals,
vapors, or particles (such as grain, dust, or metal powders), may be hazardous. Obey all signs
and instructions.
Important handling information
Operating environment. Operating your MacBook outside these ranges may aect performance:
•
Operating temperature: 50° to 95° F (10° to 35° C)
•
Storage temperature: –13° to 113° F (–25° to 45° C)
•
Relative humidity: 0% to 90% (non-condensing)
•
Operating altitude: Tested up to 10,000 feet (0 to 3048 meters)
Carrying your MacBook. If you carry your MacBook in a bag or briefcase, make sure that there
are no loose items (such as paper clips or coins) that could accidentally get inside the computer
through vent openings or get stuck inside a port.
Using connectors and ports. Never force a connector into a port. When connecting a device,
make sure the port is free of debris, that the connector matches the port, and that you have
positioned the connector correctly in relation to the port.
Chapter 6 Safety, handling, and support 33
Page 34

USB-C Charge Cable (2m). Certain usage patterns can contribute to the fraying or breaking of
Not thisThis
Not thisThis
cables. The USB-C Charge Cable (2m), like any other metal wire or cable, is subject to becoming
weak or brittle if repeatedly bent in the same spot. Aim for gentle curves instead of angles in the
cable. Regularly inspect the cable and connectors for any kinks, breaks, bends, or other damage.
Should you nd any such damage, discontinue use of the USB-C Charge Cable.
Storing your MacBook. If you are going to store your MacBook for an extended period of time,
keep it in a cool location (ideally, 71° F or 22° C) and discharge the battery to 50 percent. When
storing your computer for longer than ve months, maintain the capacity of the battery by
charging the battery to 50 percent every six months or so.
Cleaning your MacBook. When cleaning the outside of your MacBook and its components, rst
shut down your MacBook, and then unplug the 29W USB-C Power Adapter. Then dampen a
clean, lint-free cloth to wipe the MacBook exterior. Avoid getting moisture in any openings. Don’t
spray liquid directly on the computer. Don’t use aerosol sprays, solvents, abrasives, or cleaners
containing hydrogen peroxide that might damage the nish.
Cleaning the MacBook screen. To clean your MacBook screen, rst shut down your MacBook and
unplug the 29W USB-C Power Adapter. Dampen a clean, lint-free cloth with just water and wipe
the screen. Don’t spray liquid directly on the screen.
Understanding ergonomics
When you use the keyboard and trackpad, your shoulders should be relaxed. Your upper arm and
forearm should form an angle that is slightly greater than a right angle, with your wrist and hand
in roughly a straight line.
Use a light touch when typing or using the trackpad and keep your hands and ngers relaxed.
Avoid rolling your thumbs under your palms.
Change hand positions often to avoid fatigue. Some computer users might develop discomfort
in their hands, wrists, or arms after intensive work without breaks. If you begin to develop
chronic pain or discomfort in your hands, wrists, or arms, consult a qualied health specialist.
External mouse. If you use an external mouse, position the mouse at the same height as the
keyboard and within a comfortable reach.
Chapter 6 Safety, handling, and support 34
Page 35

Chair. An adjustable chair that provides rm, comfortable support is best. Adjust the height of
the chair so your thighs are horizontal and your feet are at on the oor. The back of the chair
should support your lower back (lumbar region). Follow the manufacturer’s instructions for
adjusting the backrest to t your body properly.
Built-in display. Adjust the angle of the display to minimize glare and reections from overhead
lights and windows. Do not force the display if you meet resistance. The display is not designed
to open past 135 degrees.
You can adjust the brightness of the screen when you take the computer from one work location
to another, or if the lighting in your work area changes.
For more information about ergonomics, see www.apple.com/about/ergonomics.
Apple and the environment
At Apple, we recognize our responsibility to minimize the environmental impacts of our
operations and products.
For information, go to www.apple.com/environment.
Learning more, service, and support
You can nd more information about your MacBook through Mac Help, System Report,
Apple Hardware Test, and online resources.
Mac Help. You can often nd answers to your questions, as well as instructions and
troubleshooting information, in Mac Help on your Mac. Click the Finder icon in the Dock, click
Help in the menu bar, and choose Mac Help.
System Report. To get information about your MacBook, use System Report. It shows you what
hardware and software is installed, the serial number and operating system version, how much
memory is installed, and more. To open System Report, choose Apple menu () > About This
Mac, then click System Report.
Apple Hardware Test. You can use Apple Hardware Test (AHT) to help determine if there’s a
problem with one of the computer’s components, such as the memory or processor.
To use Apple Hardware Test, disconnect all external devices except the power adapter. Restart
your MacBook and hold down the D key as it starts up. When the AHT chooser screen appears,
select the language for your location. Press the Return key or click the right arrow button. When
the AHT main screen appears (after about 45 seconds), follow the onscreen instructions. If AHT
detects a problem, it displays an error code. Make a note of the error code before pursuing
support options. If AHT doesn’t detect a hardware failure, the problem might be software related.
Online resources. For online service and support information, go to www.apple.com/support.
You can learn about Apple products, view online manuals, and check for software updates.
Connect with other Apple users, and get service, support, and professional advice from Apple.
AppleCare support. If you need assistance, AppleCare representatives can help you with
installing and opening apps, and with troubleshooting. Call the support center number nearest
you (the rst 90 days are complimentary). Have the purchase date and your MacBook serial
number ready when you call.
Your 90 days of complimentary telephone support begins on the date of purchase.
Chapter 6 Safety, handling, and support 35
Page 36

Country Phone number Web address
United States 1-800-275-2273 www.apple.com/support
Australia (61) 1-300-321-456 www.apple.com/au/support
Canada 1-800-263-3394 English:
www.apple.com/ca/support
French:
www.apple.com/ca/fr/support
Ireland 1-800-804-062 www.apple.com/ie/support
New Zealand 00800-7666-7666 www.apple.com/nz/support
United Kingdom (44) 0844 209 0611 www.apple.com/uk/support
Telephone numbers are subject to change, and local and national telephone rates may apply. A
complete list is available on the web at: www.apple.com/support/contact/phone_contacts.html.
FCC compliance
This device complies with part 15 of the FCC rules. Operation is subject to the following two
conditions: (1) This device may not cause harmful interference, and (2) this device must accept
any interference received, including interference that may cause undesired operation.
If this equipment does cause harmful interference to radio or television reception, which can be
determined by turning the equipment o and on, the user is encouraged to try to correct the
interference by one or more of the following measures:
•
Reorient or relocate the receiving antenna.
•
Increase the separation between the equipment and receiver.
•
Connect the equipment to an outlet on a circuit dierent from that to which the receiver
is connected.
•
Consult the dealer or an experienced radio/TV technician for help.
Important: Changes or modications to this product not authorized by Apple could void
the electromagnetic compatibility (EMC) and wireless compliance and negate your authority
to operate the product. This product has demonstrated EMC compliance under conditions
that included the use of compliant peripheral devices and shielded cables between system
components. It is important that you use compliant peripheral devices and shielded cables
between system components to reduce the possibility of causing interference to radios,
televisions, and other electronic devices.
If necessary, contact Apple or take your MacBook to an Apple-authorized repair center, such as
an Apple Authorized Service Provider. Or consult an experienced radio/television technician for
additional suggestions.
Chapter 6 Safety, handling, and support 36
Page 37

This product has demonstrated EMC compliance under conditions that included the use of
compliant peripheral devices and shielded cables (including Ethernet network cables) between
system components. It is important that you use compliant peripheral devices and shielded
cables between system components to reduce the possibility of causing interference to radios,
television sets, and other electronic devices.
Responsible party (contact for FCC matters only):
Apple Inc. Corporate Compliance
1 Innite Loop, MS 91-1EMC
Cupertino, CA 95014
Canadian regulatory compliance
This device complies with Industry Canada license-exempt RSS standard(s). Operation is subject
to the following two conditions: (1) this device may not cause interference, and (2) this device
must accept any interference, including interference that may cause undesired operation of
the device.
Operation in the band 5150–5250 MHz is only for indoor use to reduce the potential for harmful
interference to co-channel mobile satellite systems.
Users are advised that high-power radars are allocated as primary users (i.e., priority users) of the
bands 5250–5350 MHz and 5650–5850 MHz and that these radars could cause interference
and/or damage to LE-LAN devices.
Le présent appareil est conforme aux CNR d’Industrie Canada applicables aux appareils
radio exempts de licence. L’exploitation est autorisée aux deux conditions suivantes :
(1) l’appareil ne doit pas produire de brouillage, et (2) l’utilisateur de l’appareil doit accepter
tout brouillage radioélectrique subi, même si le brouillage est susceptible d’en compromettre
le fonctionnement.
La bande 5150–5250 MHz est rservs uniquement pour une utilisation l’intrieur an de
réduire les risques de brouillage préjudiciable aux systèmes de satellites mobiles utilisant les
mêmes canaux.
Les utilisateurs êtes avisés que les utilisateurs de radars de haute puissance sont désignés
utilisateurs principaux (c.--d., qu’ils ont la priorit) pour les bandes 5250–5350 MHz et
5650–5850 MHz et que ces radars pourraient causer du brouillage et/ou des dommages aux
dispositifs LAN-EL.
CAN ICES-3 (B)/NMB-3(B)
Chapter 6 Safety, handling, and support 37
Page 38

Europe—EU Declaration of Conformity
Hereby, Apple Inc. declares that this wireless device is in compliance with the essential
requirements and other relevant provisions of R&TTE Directive.
A copy of the EU Declaration of Conformity is available at: www.apple.com/euro/compliance.
Apple’s EU representative is Apple Distribution International, Hollyhill Industrial Estate, Cork,
Ireland.
This device can be used in the European Community.
European Community Restrictions
This device is restricted to indoor use in the 5150 to 5350 MHz frequency range.
ENERGY STAR® Compliance Statement
As an ENERGY STAR partner, Apple has determined that standard congurations of this
product meet the ENERGY STAR guidelines for energy eciency. The ENERGY STAR program is
a partnership with electronic equipment manufacturers to promote energy-ecient products.
Reducing energy consumption of products saves money and helps conserve valuable resources.
MacBook is shipped with power management enabled with the computer set to sleep after
10 minutes of user inactivity. To wake your computer, click the trackpad or press any key on
the keyboard. To change this setting, click the System Preferences icon in the Dock, then click
Energy Saver.
MacBook meets the ENERGY STAR guidelines for energy eciency. Reducing energy
consumption saves money and helps conserve valuable resources. For more information about
ENERGY STAR, go to www.energystar.gov.
Chapter 6 Safety, handling, and support 38
Page 39

Disposal and recycling information
This symbol indicates that this product and/or battery should not be disposed of with household
waste. When you decide to dispose of this product and/or its battery, do so in accordance with
local environmental laws and guidelines.
For information about Apple’s recycling program, recycling collection points, restricted
substances and other environmental initiatives, visit www.apple.com/environment.
European Union—Disposal Information
The symbol above means that according to local laws and regulations your product and/or its
battery shall be disposed of separately from household waste. When this product reaches its
end of life, take it to a collection point designated by local authorities. The separate collection
and recycling of your product and/or its battery at the time of disposal will help conserve
natural resources and ensure that it is recycled in a manner that protects human health and
the environment.
Türkiye
Türkiye Cumhuriyeti: AEEE Yönetmeliğine Uygundur.
Brasil—Informações sobre descarte e reciclagem
O símbolo indica que este produto e/ou sua bateria não devem ser descartadas no lixo
doméstico. Quando decidir descartar este produto e/ou sua bateria, faça-o de acordo com as
leis e diretrizes ambientais locais. Para informações sobre o programa de reciclagem da Apple,
pontos de coleta e telefone de informações, visite www.apple.com/br/environment.
Información sobre eliminación de residuos y reciclaje
El símbolo indica que este producto y/o su batería no debe desecharse con los residuos
domésticos. Cuando decida desechar este producto y/o su batería, hágalo de conformidad
con las leyes y directrices ambientales locales. Para obtener información sobre el programa de
reciclaje de Apple, puntos de recolección para reciclaje, sustancias restringidas y otras iniciativas
ambientales, visite www.apple.com/la/environment.
Battery disposal information
Dispose of batteries according to your local environmental laws and guidelines.
Taiwan disposal information
Chapter 6 Safety, handling, and support 39
Page 40

Taiwan battery statement
China battery statement
Battery service
The battery in MacBook should be serviced or replaced only by Apple or an authorized service
provider, and must be recycled or disposed of separately from household waste. For information
about battery service and recycling, go to www.apple.com/batteries/service-and-recycling.
Battery Charger Energy Eciency
Software License Agreement
Use of MacBook constitutes acceptance of the Apple and third-party software license terms
found at www.apple.com/legal/sla.
Chapter 6 Safety, handling, and support 40
Page 41

K Apple Inc.
© 2015 Apple Inc. All rights reserved.
Use of the “keyboard” Apple logo (Option-Shift-K) for
commercial purposes without the prior written consent of
Apple may constitute trademark infringement and unfair
competition in violation of federal and state laws.
Apple, the Apple logo, AirDrop, AirPlay, AirPort, AirPort Time
Capsule, Apple T V, FaceTime, Finder, GarageBand, iMessage,
iMovie, iPad, iPhone, iPod touch, iTunes, Keynote, Launchpad,
Mac, MacBook, Mission Control, Numbers, OS X, Pages,
Photo Booth, Safari, Spaces, Spotlight, and Time Machine
are trademarks of Apple Inc., registered in the U.S. and
other countries.
AirPrint, Flyover, and Hando are trademarks of Apple Inc.
App Store, iBooks Store, and iTunes Radio are service marks
of Apple Inc.
Apple
1 Innite Loop
Cupertino, CA 95014-2084
408-996-1010
www.apple.com
AppleCare, Apple Store, iCloud, and iTunes Store are service
marks of Apple Inc., registered in the U.S. and other countries.
IOS is a trademark or registered trademark of Cisco in the U.S.
and other countries and is used under license.
The Bluetooth® word mark and logos are registered
trademarks owned by Bluetooth SIG, Inc. and any use of such
marks by Apple Inc. is under license.
ENERGY STAR® is a U.S. registered trademark.
Other company and product names mentioned herein are
trademarks of their respective companies.
Every eort has been made to ensure that the information in
this manual is accurate. Apple is not responsible for printing or
clerical errors.
Some apps are not available in all areas. App availability is
subject to change.
019-00163/2015-04
 Loading...