


Apogee ONE:
For Mac and
iPad & Mac
User’s Guide
Spring 2016

Table of Contents - Apogee ONE for Mac User’s Guide |
|
Contents |
|
Overview ......................................................................................................... |
3 |
Introduction |
3 |
Package contents |
4 |
ONE panel tour |
5 |
Getting Started ............................................................................................... |
7 |
Connecting to your Mac |
7 |
Connecting to your iPad |
9 |
Adjusting Input & Output Levels 11 |
|
Maestro Software ......................................................................................... |
12 |
Maestro for Mac |
13 |
Maestro for iOS |
20 |
Operation ...................................................................................................... |
25 |
Using ONE’s built-in mic |
25 |
What sample rate should I record at? |
25 |
Can I record my session on my Mac’s (startup) hard drive? |
25 |
How do I set a recording level? |
26 |
What is phantom power? |
26 |
How do I set the input control of my powered speakers? |
27 |
How do I set my software’s I/O buffer? |
27 |
Maestro Low Latency Mixing |
28 |
Software Setup |
30 |
Additional Support....................................................................................... |
37 |
Specifications............................................................................................... |
38 |
Warranty & Notifications ............................................................................ |
39 |
Registration and Warranty Information |
39 |
2"

Overview - Apogee ONE User’s Guide
Overview
Introduction
Thank you for purchasing ONE. This User’s Guide describes how to set up ONE with your Mac or iOS device, connect headphones to play back music and record your own creations with the built-in mic, an external mic or an electric instrument.
ONE for Mac and ONE for iPad & Mac
The Swiss Army Knife for Personal Recording and Audio Production.
Apogee ONE is an all-in-one portable, USB audio interface that gives you everything you need to make professional recordings on the go. Connect a microphone, guitar or use ONE’s exceptional built-in omnidirectional microphone to easily capture your music without compromise. ONE even lets you record with a microphone (built-in or external) and guitar simultaneously. Using Apogee’s industry-leading AD/DA conversion and mic preamp technology, ONE produces pristine music, podcast, and voice-over recordings while also delivering studio quality sound to your headphones for precision mixing or hi-fi listening. With an intuitive controller knob and seamless compatibility with Mac OS X and iOS, ONE is easy for anyone to use and works great with GarageBand, Logic Pro X, Pro Tools, Ableton or any Core audio compatible application. ONE is made for Mac and iOS, so it is compatible with the latest iOS devices using the iOS Connection Kit.
Legendary Sound Quality
Why Apogee ONE is the best choice for your studio
Apogee is an award-winning industry leader in digital recording technology with over 30 years of experience. Preferred by recording pros around the world, Apogee products like ONE, Duet, Quartet, Ensemble and Symphony I/O have been instrumental in creating countless GRAMMY® and OSCAR® winning recordings and have set the industry standard in professional recording for over two decades.
3"
Overview - Apogee ONE User’s Guide
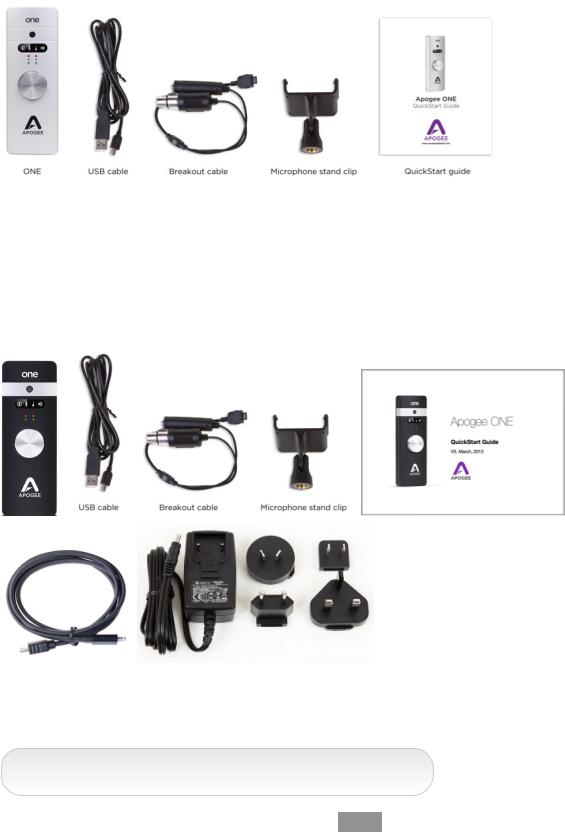
Package contents
The following items are included in the ONE for Mac box:
• |
ONE for Mac (silver) |
• |
Microphone stand clip |
||
• |
Breakout cable with: |
• |
USB cable |
||
|
• |
1 |
XLR Mic input |
• |
QuickStart guide |
|
• |
1 |
1/4” Instrument input |
|
|
The following items are included in the ONE for iPad & Mac box:
• |
ONE for iPad & Mac (black) |
• |
USB cable |
|||
• |
Breakout cable with: |
• |
QuickStart guide |
|||
|
• |
1 |
XLR Mic input |
• |
PSU + adapters |
|
|
• |
1 |
1/4” Instrument input |
• |
Lightning cable |
|
• |
Microphone stand clip |
|||||
|
|
|||||
Lightning cable |
Power Supply + adapters |
Software, firmware and the ONE User’s Guide are available online only. Please register your product and download the latest installer here:
www.apogeedigital.com/support
"
4"
Overview - Apogee ONE User’s Guide
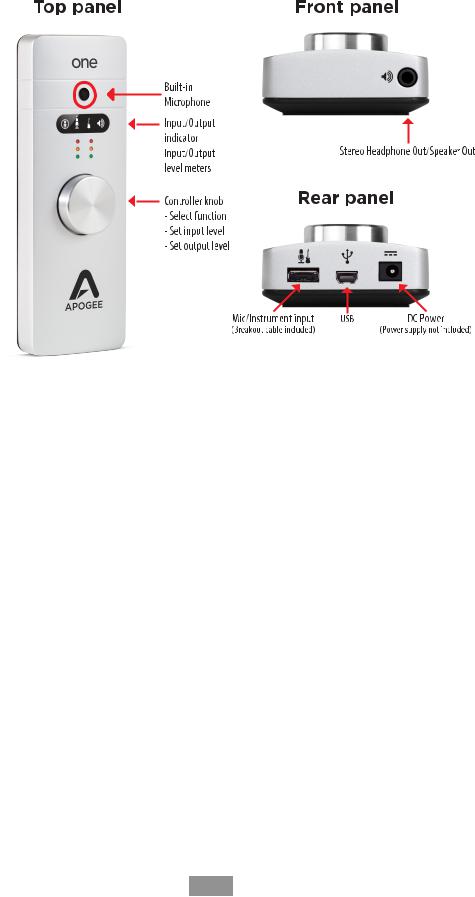
ONE panel tour
Built-in Microphone
ONE’s built-in microphone capsule is located at the top of the front panel. When using the built-in microphone, orient the capsule towards the sound source
being recorded.
Input/Output Selection Indicator
These indicators show the input or output selected for level adjustment using the multi-function Controller Knob.
Input/Output Level Meters
These meters display the input level when any input is selected or the output level when the output is selected for level adjustment using the Controller Knob.
Multi-function Controller Knob
ONE’s multi-function controller knob allows you to easily switch between Inputs and Outputs as well as adjust their levels.
1/8” Stereo Headphone/Speaker Output
ONE’s 1/8” stereo output may be connected to headphones or powered speakers. To connect to powered speakers, use an adaptor cable with a stereo 1/8” connector on one end and the appropriate mating connector for the powered speakers on the other end.
Mic/Instrument Input
This port is for connecting ONE’s breakout cable, which includes one female XLR connector and one female 1/4” connector.
USB
ONE utilizes a single USB connector to interface with Mac devices and iOS devices. To connect to Mac, use the provided cable that terminates in a USB “A” type connector. To connect to an iOS device, use the cable that terminates in the Lightning connector.
DC Power
When connecting to an iOS device, connect the DC power supply to the ONE. When connecting to a Mac, ONE is easily powered by any available USB port and there’s no need to connect a DC power supply.
5"

Getting Started - Apogee ONE User’s Guide
External Power
When connecting to a Mac, both versions of ONE are easily powered by any available USB port; there’s no need to connect an external DC power supply.
When connected to iPad, iPod Touch, or iPhone, external power is required. Here are the options for DC power:
ONE for Mac (Silver)
1.Connect ONE for Mac’s power supply (sold separately) to power ONE for Mac and charge the iOS device.
ONE for iPad & Mac (black)
1.Connect ONE’s for iPad & Mac’s power supply (included) to power ONE for iPad & Mac and charge the iOS device.
2.Install two AA batteries (not included) in ONE for iPad & Mac’s battery compartment as shown to the right. The iOS device runs from its internal battery while ONE for iPad & Mac runs from the AA batteries. This allows the entire system to be completely mobile.
To install 2 AA batteries, use a coin or screwdriver to remove ONE for iPad & Mac’s battery compartment door. Orient the 2 batteries as shown below so that the batteries’ minus (-) terminals are installed against the compartment’s springs. Once batteries are installed, replace the compartment door.
When powering ONE for iPad & Mac from two AA batteries, it is highly recommended to use NiMH rechargeable batteries for the best battery life when recording and playing back audio. Approximate battery life is shown below for minimal and maximum load conditions when using standard and rechargeable NiMH batteries.
|
Standard AA |
Rechargeable NiMH AA |
|
|
|
Playback from iTunes |
2 hours, 40 minutes (See Note Below) |
3 hours, 40 minutes |
(minimal load) |
|
|
|
|
|
Recording - max load |
30 minutes |
2 hours, 10 minutes |
|
|
|
About 5-10 minutes before ONE for iPad & Mac shuts down, the level meters’ red LEDs will flash to warn of the approaching loss of power under most conditions. (see Note 1 below).
After changing batteries, it is necessary to power cycle ONE for iPad & Mac by removing and then re-inserting the USB connector.
Note - Max load condition is as follows: Input 1 set to Ext 48v Mic with a 10mA phantom power load, Input 2 accepts a 1kHz tone at -1 dBfs, output set to maximum. Unit is set to 96kHz sample rate.
6"

Getting Started - Apogee ONE User’s Guide
Getting Started
Connecting to your Mac
System Requirements
•Computer: Intel Mac 1.5GHz or faster
•Memory: 2 GB RAM minimum, 4 GB recommended
•OS: 10.6.8 or greater
•Connection and power: Any available USB port on a Mac
•USB bus powered; DC power optional
Install ONE Software
3.Connect ONE’s USB port to a USB port on your Mac using the supplied USB 2 cable.
4.Go to http://www.apogeedigital.com/downloads.php.
5.Download the latest ONE for Mac or ONE for iPad & Mac software installer.
6.Once you have downloaded the package, double-click the Apogee icon to run the firmware updater.
7.After the firmware update has completed, double-click the open-box icon to run the software installer.
8.You will be required to restart your computer after the install is complete.
Choosing ONE as the Mac’s Sound I/O
After connecting ONE, installing the software and restarting your Mac, a dialog box will prompt you to choose ONE for Mac sound input and output. Click Yes.
Connect to Headphones or Speakers
Connect headphones to the 1/8” output jack on ONE’s front panel.
Alternatively, you can connect ONE’s output to speakers by using an adapter cable. The cable should go from a stereo 1/8” connection (from ONE) to two separate connectors suitable for your speakers (1/4”, RCA, etc.).
7"
Getting Started - Apogee ONE User’s Guide
Configuring ONE’s Inputs on Mac
ONE’s two inputs may be configured in the following manner:
•Internal (built-in) microphone + 1/4” instrument
•External (XLR) microphone + 1/4” instrument
•External 48V (XLR) microphone + 1/4” instrument
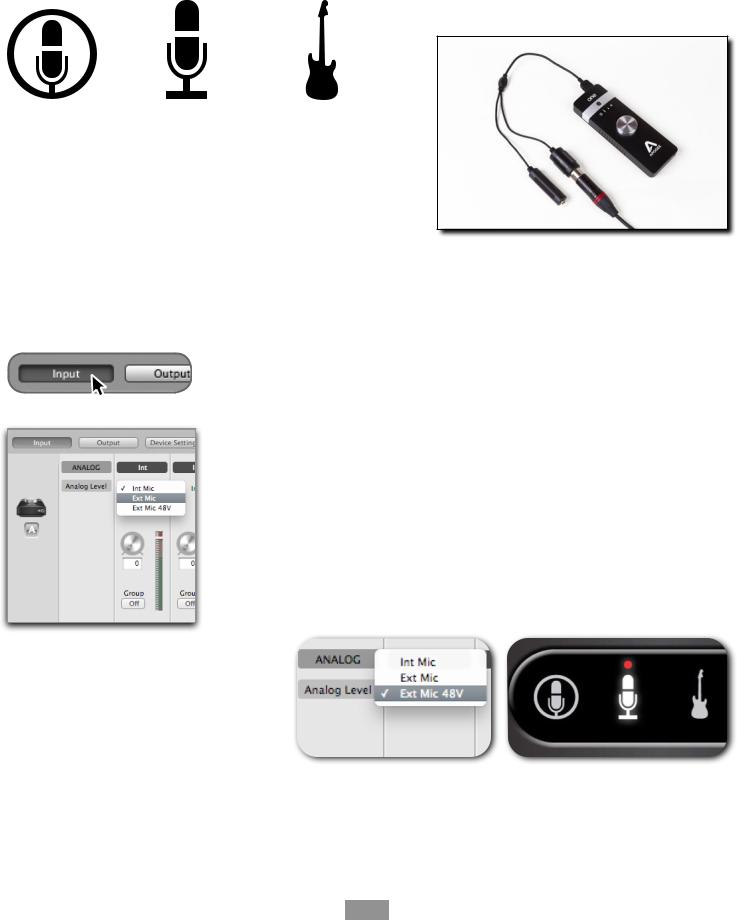
When using an XLR microphone or 1/4” instrument, connect to ONE’s breakout cable.
Open Apogee Maestro software (found in your Mac’s Applications folder), and select the Input tab.
Select the Analog Level setting that corresponds to the microphone source you’d like to record. For example, if you have a microphone connected to the XLR connection on the breakout cable, select Ext Mic from the Analog Level menu on channel 1. If you would like to utilize ONE’s built-in microphone, select Int Mic. Channel 2’s source is always the 1/4” Instrument input.
Note: If you are using a condenser microphone that requires phantom power, select Ext Mic 48V. Phantom power is indicated on ONE’s display by
a red dot above the microphone icon.
8"
Getting Started - Apogee ONE User’s Guide
Connecting to your iPad
System Requirements
•Any iPad, iPhone, iPod Touch equipped with a Lightning port
•Connection: ONE Lightning iOS cable (optional 30-pin iOS cable sold separately)
•iOS version: 6.0 or greater
•Power supply or two AA batteries (black model only) required
Install Maestro from App Store
There is a separate Maestro app that only runs in iOS devices. This is required for control of your ONE when connected to an iPad, iPhone or iPod Touch. Here’s how to download and install this special iOS version of Maestro:
1.Connect ONE to your iPad/iPhone using the Lightning iOS cable.
2.Connect the external power supply to ONE or insert 2 AA batteries (black model only). Note: The iPad will not charge when using ONE’s battery power.
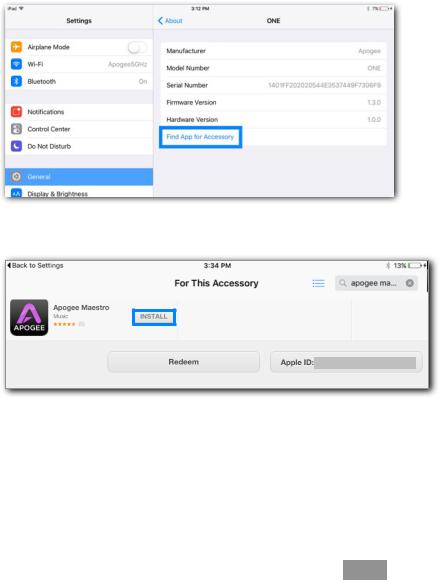
3.On the iPad/iPhone, open Settings and choose General > About > ONE, then choose "Find App for Accessory".
The App Store will open and navigate automatically to the Apogee Maestro app.
4.Once you've signed in to the App Store, click INSTALL to download Apogee Maestro.
Note: it's possible to record through the built-in microphone and play back audio without installing Maestro.
9"

Getting Started - Apogee ONE User’s Guide
Connect to Headphones or Speakers
Connect headphones to the 1/8” output jack on ONE’s front panel.
Alternatively, you can connect ONE’s output to speakers by using an adapter cable. The cable should go from a stereo 1/8” connection (from ONE) to two separate connectors suitable for your speakers (1/4”, RCA, etc.).
Configuring ONE’s Inputs on iPad
ONE’s inputs may be configured in the following manner:
•Internal (built-in) microphone + 1/4” instrument
•External (XLR) microphone + 1/4” instrument
•External 48V (XLR) microphone + 1/4” instrument
When using an XLR microphone or 1/4” instrument, connect to ONE’s breakout cable.
Open Apogee Maestro app, choose ONE from the main menu and select the Input tab.
Select the Analog Level setting that corresponds to the input source you’d like to record. For example, if you have a microphone connected to the XLR connection on the breakout cable, select Ext Mic from the Analog Level menu on channel 1. If you would like to utilize ONE’s built-in microphone, select Int Mic. By default, the 1/4” instrument input is the selected source for Channel 2.
Note: If you are using a condenser microphone that requires phantom power, select Ext Mic 48V. Phantom power is indicated on ONE’s display by a red dot above the microphone icon.
10"
Getting Started - Apogee ONE User’s Guide
Adjusting Input & Output Levels
Input level
To change ONE’s input level (i.e the preamp gain of microphones and instruments):
1.Push the Controller Knob until the built-in microphone, external microphone or instrument icon is lit on ONE’s display.
2.Turn the Controller Knob until the desired recording level is obtained.
The controller knob operates in parallel with Maestro’s input controls.
Note: You will not hear your input until you enable software monitoring from a recording application or engage the low latency mixer in Apogee's Maestro control panel (see page 28 for more info).
Output level
1.Push the Controller Knob until the Speaker icon is lit on ONE’s display.
2.Turn the controller knob to the desired listening level.
|
|
|
The controller knob |
|
|
|
operates in parallel with |
|
|
|
any software output |
|
|
|
controls. |
|
|
|
|
|
|
|
11"
Maestro - Apogee ONE User’s Guide
Maestro Software
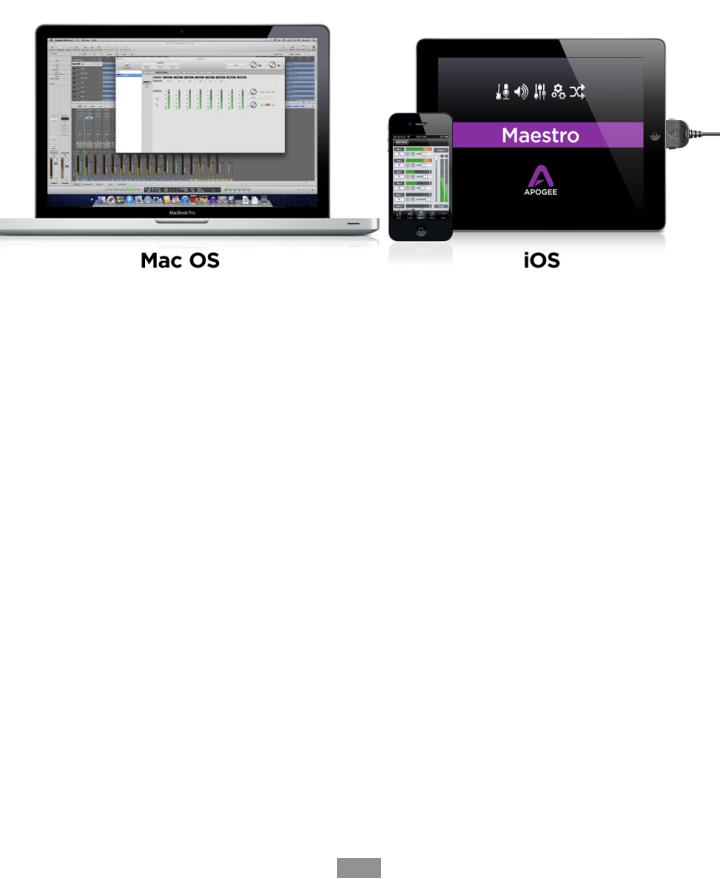
Apogee Maestro is the first audio interface control application made for Mac and iOS*. Featuring a single window design, and multiple tab interface for quick access to all device and system settings.
There are two versions of Maestro, each provides full control over the settings of your Apogee interface.
Maestro for Mac is free and can be downloaded from the Apogee Web site under the Support page, and Maestro for iOS is available for free on the Apple iOS App Store.
*The iOS Connection Kit (sold separately) is required with the silver ONE for Mac to work with an iOS device.
12"
Maestro - Apogee ONE User’s Guide
Maestro for Mac
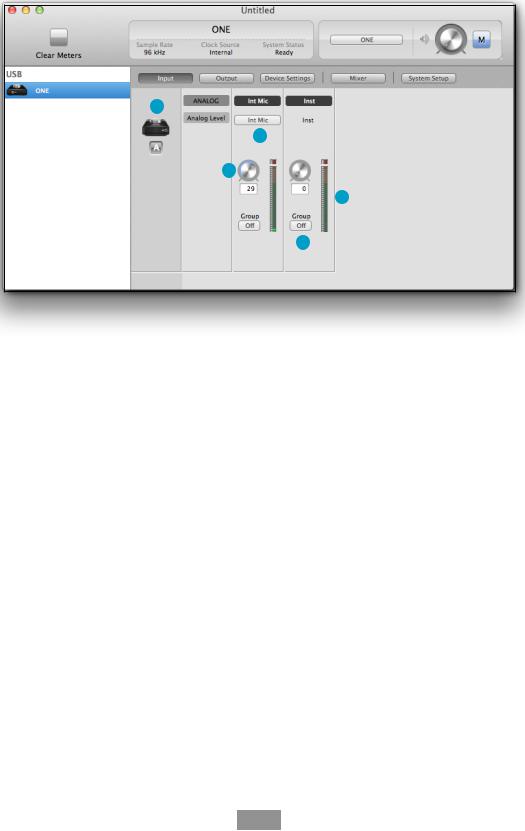
Input
Input Tab
1
2
3
4
5
1.Device Icon & ID Button - A device icon and ID button is placed adjacent to each
row of parameters to identify the hardware unit to which the row belongs. By clicking on the ID button, the corresponding hardware unitʼs front panel will illuminate. Each hardware unit is assigned a Peripheral Prefix (A-Z, found in Maestroʼs Device Settings tab window) which is displayed on the ID button.
2.Analog Level - Use this pop-up menu to select the source for Input 1 - the built-in mic (Int Mic), an external mic connected to the breakout cable’s XLR connector (Ext Mic), or an external mic that requires phantom power connected to the XLR connector (Ext Mic 48v).
3.Input Gain - The gain of each input is controlled with these software knobs. The gain level is indicated in the value box below the knob.
4.Analog Input Meter - This meter displays the level of the analog input after A/D conversion.
5.Group On/O - This button groups the gain setting of both inputs so that ONE’s multi-function knob or one software gain knob controls both input gains simultaneously. If a gain o set is present between inputs when Group is set to On, this o set is preserved.
13"
 Loading...