


AMBUS DIGI8+ CARD

Digi-8+ Card Operating Information v3.1.0
Page 1
AMBus Digi8+ Card for Pro Tools, Firmware Rev 3.1.0
Getting Started Quickly!
Beginning with firmware version 3.1.0, Apogee interfaces may be clocked in precisely the same
manner as any Digidesign interface! If you’re not familiar with signal routing within your Apogee system, you
may want to read on; otherwise, you may now close the manual!
Installing the AMBUS card
Before installing the AMBus card, ensure that the unit is powered down. As is the case with all AMBus
cards, care must be taken to avoid damage from static discharge. These precautions may include 1) leaving a
grounded AC cable connected to the unit; 2) grounding yourself by touching a connector on the unit; 3) leaving
the card in its anti-static bag until ready to be installed and 4) handling the card only by the card edges or front
panel.
To install the card, remove the blanking panel from an available AMBus slot, carefully insert the card
edges into the slot’s guide rails and slide the card in until it has firmly mated with the slot’s backplane
connector. Fasten the card in place using the thumbscrews provided.
Configuring Your Interface(s)
As stated above, Apogee interfaces may be clocked in precisely the same manner as any Digidesign interface,
if firmware version 3.1.0 is installed; please see Figs. 1 & 2 for detailed hookup diagrams.
1) Connect Slave Clock Out of the master interface to Super (Slave) Clock In of interface 2, Super (Slave)
Clock Out of interface 2 to Super (Slave) Clock In of interface 3, and so on until all interfaces have
received a clock signal.
2) Set the sync source of any Apogee slave unit to the Digi8 + AMBUS card.
3) See the “Signal Routing” heading below for more details.
4) If no synchronization device such as a MOTU DTP or Digidesign USD is used, or Pro Tools is the sync
master, then the interface connected to the Pro Tools Core Card should be set to “Crystal” or “Internal”
clock. If this is an Apogee interface, your entire Pro Tools system will benefit from the patented Apogee
Low Jitter Clock! (Note that if Pro Tools is the sync master and the first AD-8000’s Sync Source is set to
“Crystal”, you’ll need to send clock to the device (such as a USD) which is outputting LTC from Pro
Tools.
There exist alternative methods for clocking a mix of Apogee and Digidesign hardware interfaces, depicted in
Figs. 3 & 4. With the following rules, virtually any combination of interfaces may be correctly
configured.
1) When clocking an Apogee interface from a MOTU DTP or Digidesign USD, it is preferable to use
Super (Slave) Clock. (As shown in Figs. 1-4).
2) Given the exception noted above, Apogee interfaces may be clocked using either Word Clock or Super
(Slave) Clock. Slave Clock I/O is found on the Dig8+ card, while Word Clock is found on the interface
chassis.
3) Digidesign interfaces must be clocked with Super (Slave) Clock ONLY.
4) When using Super (Slave) clock on either a Digidesign or Apogee interface, clock cables must be
connected from the Super (Slave) Clock out of the master interface to the Super (Slave) Clock in of
interface 2, Slave Clock Out of interface 2 to Slave Clock In of interface 3, and so on until all interfaces
have received a clock signal
5) When using Word Clock with Apogee interfaces, Word Clock out from the master interface should be
connected to one side of a BNC “T” connector at the Word Clock in of interface 2. The other side of the
BNC “T” connector goes to a similar BNC “T” connector on interface 3, and so on until all interfaces
have received clock. Connect a 75 ohm termination plug to the unused side of the BNC “T” on the
LAST interface (see Fig. 3).
Digi-8+ Card Operating Information v 3.1.0
audio pairs to Pro Tools when pressed away from OPEN
Working with Pro Tools
After configuring your hardware interfaces, you’ll need to configure the Pro Tools application so that it
recognizes the interfaces. Please see Digidesign’s TDM Hardware Installation Guide for precise details,
remembering that Apogee interfaces should be configured as an 888/24.
Unlike meters on Digidesign interfaces, Apogee interface meters display the signal level before being
sent to the Pro Tools application. We feel that input level is the highest priority in digital recording, and have
built our interfaces accordingly.
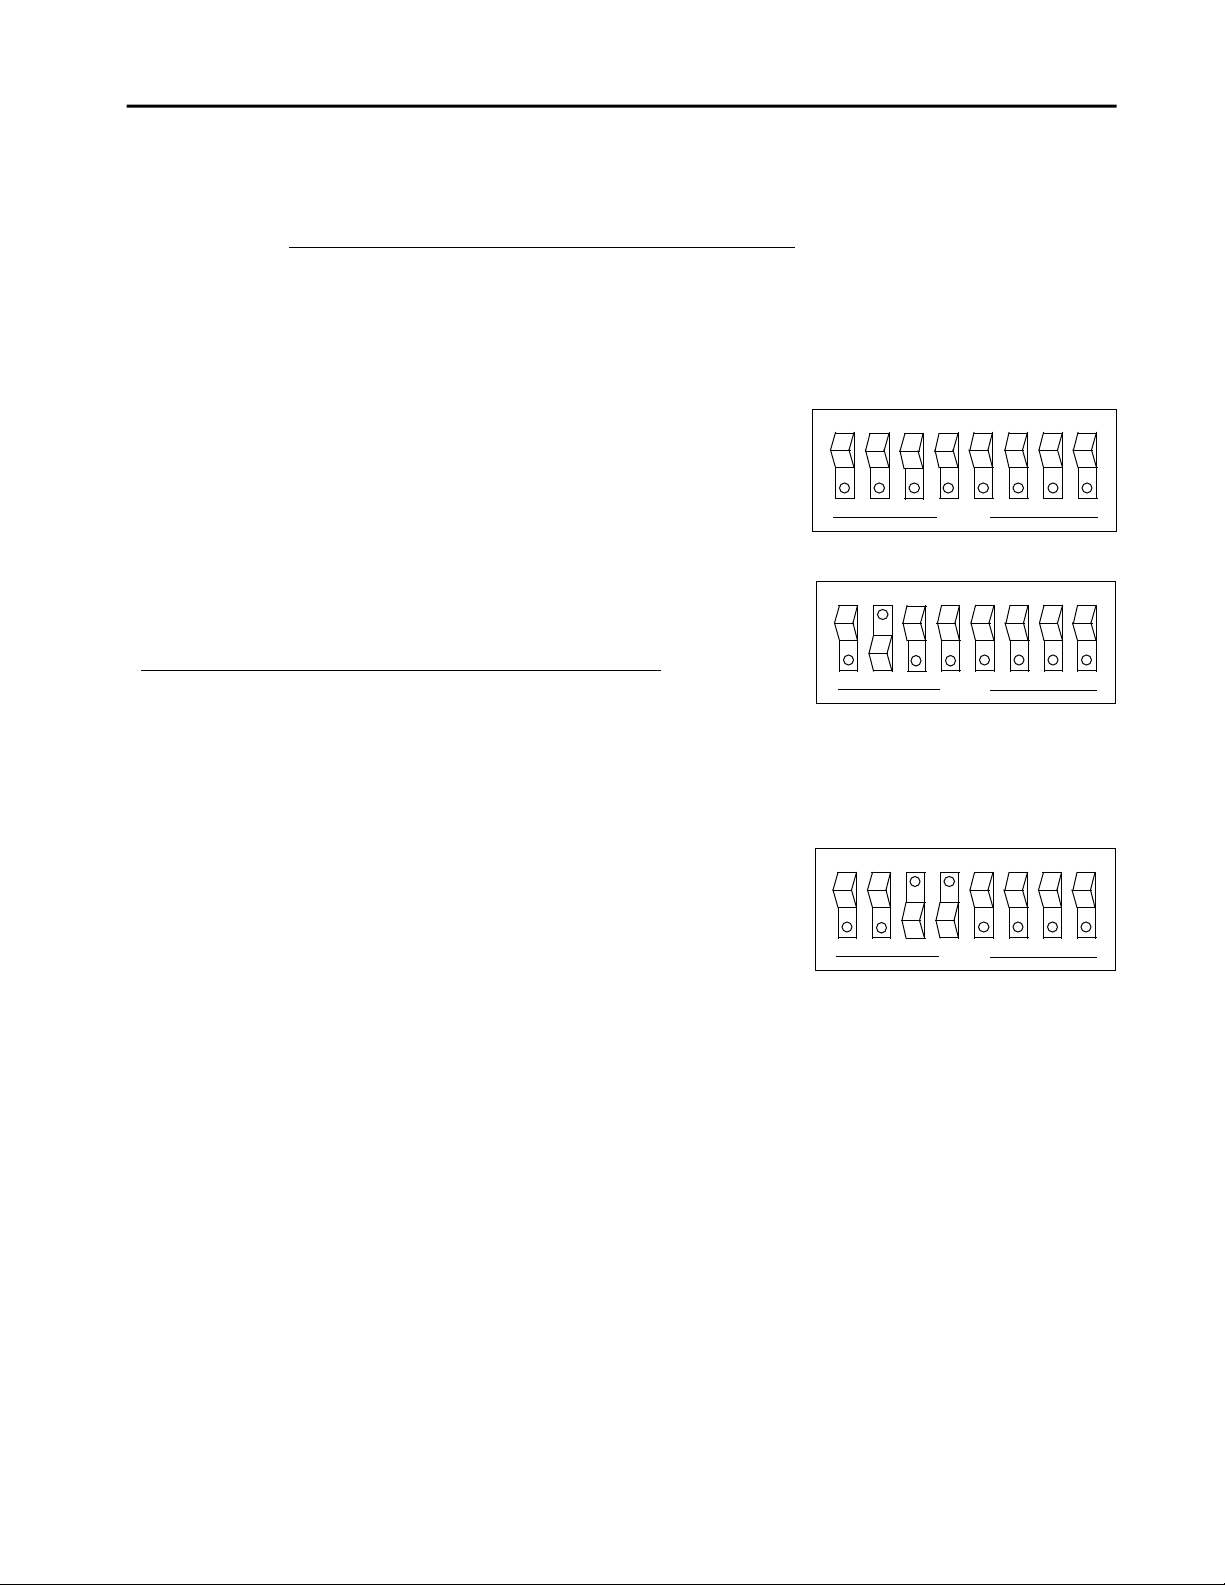
DIP Switches
The default position for the DIP switches found on the
Digi8+ card is shown at right. All switches are pressed towards
OPEN
1 2 3 4 5 6 7 8
OPEN
When DIP switch 2 is pressed away from OPEN (as
shown at right), certain settings on the AD-8000 may be
controlled from Pro Tools:
Pro Tools Settings AD-8000 Settings
Session Sample Rate determines Sample Rate
Sync Mode sets Sync Source*
Digital Format sets Source*
Ch 1-2 Input sets Channel 1-2 input*
* note that the only Digital formats selectable from Pro Tools are
the AES and S/PDIF chassis mount inputs.
be selected from the AD-8000 front panel.
reverses odd/even audio pairs from Pro Tools when pressed
away from OPEN, while DIP switch 4 reverses odd/even
For users of 16-bit Pro Tools systems, DIP switch 3
1 2 3 4 5 6 7 8
1 2 3 4 5 6 7 8
OPEN
OPEN
For Extra Credit (Clock Experts)
Version 3.1.0 firmware makes Apogee-equipped Pro Tools systems highly tolerant of clock phase
differences caused by latency, as long as all devices are ultimately clocked from the same source
Signal Routing in Apogee Interfaces
The AD-8000 and Trak2 interfaces share the same extremely flexible signal routing architecture, which
may configured in the two general signal paths depicted on the next page. When working with Pro Tools,
you’ll want to set the AD-8000 to “Destination” mode and the Trak2 to “Confidence Mon – ON” mode,
with the Digi8+ card selected as the “target” AMBus card.
To configure the AD-8000 for use with Pro Tools:
• Press and Hold the “STEREO SEL” button until the “DEST” LED illuminates
• Without releasing the “STEREO SEL” button, toggle the Headphone “VOLUME” switch until the AMBus
Slot Letter (A,B,C or D) into which your Digi8+ card is installed appears in the 7-segment window to the
left of the Headphone “VOLUME” toggle switch.
To configure the Trak2 for use with Pro Tools:
• In the “D/A" page, set the “CONFIDENCE MONITORING” field to “DIGI”
Page 2
 Loading...