Apex Digital LD4088 User Manual

LD4088
USER’S MANUAL
40” LCD TELEVISION
07/2009

Safety Instructions
1
CAUTION
RISK OF ELECTRIC SHOCK
DO NOT OPEN
Safety:
TO REDUCE THE RISK OF ELECTRICAL SHOCK DO NOT REMOVE COVER (OR BACK). NO USER SERVICEABLE PARTS ARE INSIDE. REFER TO QUALIFIED PERSONNEL ONLY.
The lightning flash with arrowhead symbol, within an equilateral triangle, is intended to alert the user to the presence of uninsulated “dangerous voltage” within the product’s enclosure that may be of sufficient magnitude to constitute a risk of electric shock to persons.
The exclamation point within an equilateral triangle is intended to alert the user to the presence of important operating and maintenance (servicing) instructions in the literature accompanying the television.
WARNING:
TO PREVENT FIRE OR SHOCK HAZARDS, DO NOT EXPOSE THIS PRODUCT TO RAIN OR MOISTURE.
NOTE TO CABLE/TV INSTALLER:
This reminder is provided to call the CATV system installer’s attention to Article 820-40 of the National Electric Code (U.S.A.). The code provides guidelines for proper grounding and, in particular, specifies that the cable ground shall be connected to the grounding system of the building, as close to the point of the cable entry as practical.
FCC REGULATORY INFORMATION:
This television has been tested and found to comply with the limits for a Class B digital device, pursuant to Part 15
of the FCC Rules. These limits are designed to provide reasonable protection against harmful interference in a residential installation. This television generates, uses and can radiate radio frequency energy and, if not installed and
used in accordance with the instructions, may cause harmful interference to radio communications. However, there is no guarantee that interference will not occur in a particular installation. If this television does cause interference to other electronic equipment, which can be determined by turning the television off and on, then the user is encouraged to try to correct the interference by one or more of the following measures:
-Reorient or relocate the receiving antenna.
-Increase the separation between the equipment and television.
-Connect the equipment into an outlet on a circuit different from that to which the television is connected.
-Consult your dealer or an experienced radio/TV technician for assistance.
Any changes or modifications not expressly approved by the party responsible for compliance may void the user’s authority to operate the equipment.

Instructions Safety |
2 |

Safety Instructions |
3 |

Table of Contents
4

Introduction
What’s In The Box
5
Thank you for purchasing the Apex LD4088 HD Television. It has been designed to enjoy today’s high definition television experience. With a display resolution of 1,920 x 1,080 (1080p) you are assured of one of the finest quality televisions available today. View HDTV and digital broadcasts over-the- air when connected to an antenna. Choose an outdoor antenna for the best possible reception. Visit www.antenna.org.
Your television offers many digital and analog inputs. Three (3) High Definition Multimedia Interface (HDMI) interconnects offer the purest audio and video digital signal when connected to compatible HD sources (ie: HD settop box, high definition DVD player, gaming console).
Other video connections available include two (2) sets of HD component video, (2) composite input jacks, one S-Video input jack and one VGA terminal for connection to a computer. A coaxial digital audio (SPDIF) jack is included to connect through your home amplifier/receiver to provide a spectacular home theater experience.
3D Digital noise reduction digitally reduces image noise while “film-mode’ detection adjusts the picture, providing a more natural looking and clearer image.
We recommend that you read the user manual thoroughly before use to familiarize yourself with the installation and adjustment options available to you, thereby enjoying all the features of the LD4088 for many years to come.
The LD4088 package includes |
14 |
3 |
|
|
|
the following items: |
58 |
9 |
|
|
|
|
|
2 |
6 |
|
|
|
|
7 |
0 |
|
|
|
|
_ |
CH |
|
|
• Pedestal Base / Hardware |
|
|
|
|
|
|
+ |
|
|
||
|
|
VOL |
|
|
|
|
|
|
_ |
|
|
• Pedestal Instructions |
|
|
|
|
|
• Remote Control |
|
|
|
|
|
• AAA Batteries |
• Remote Control |
• AC Power Cord |
• Pedestal Base |
||
• AC Power Cord |
|||||
• Quick Start Guide |
• AAA Batteries x 2 |
|
|
||
• User Manual |
|
|
|
|
|

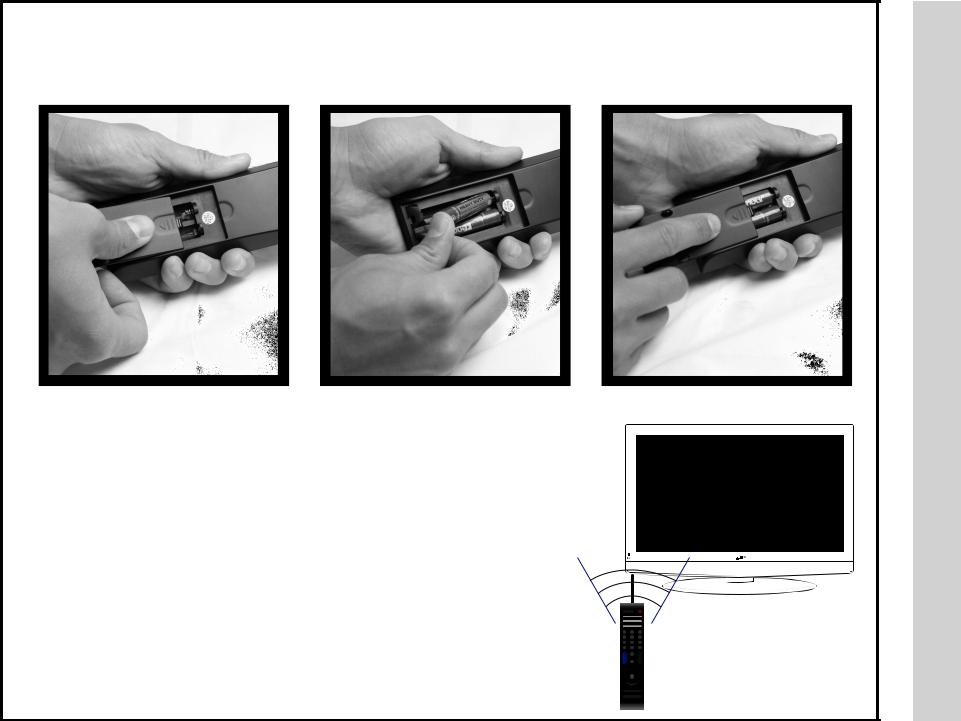
Your remote control handset is powered by two (2) AAA type batteries
• To insert batteries, turn the remote |
• Place two (2) AAA batteries into the |
control over and remove the battery |
compartment with correct polarity. |
cover. |
|
•When pointed towards the television, the effective range is approximately 16 feet from the front of the IR receiver, 30° to the left and right, 20° up and down.
•To avoid damage from possible battery chemical leakage, remove the batteries if you do not plan to use the remote control handset for an extended period of time. Do not mix batteries of different age and/or type. Always discard used batteries safely.
•Do not expose remote control to liquids, direct sunlight or sources of excessive heat.
•The IR receiver will not work properly if TV is in direct sunlight, the remote control is pointed off-axis or an object is in the IR path.
NOTE: Improper use of batteries can result in a chemical leakage or explosion.
• Replace the cover.
30° 30°
IR Receiver
1 2 3
4 5 6
7 |
8 |
9 |
_ |
0 |
|
+ |
|
|
VOL |
|
CH |
_ |
|
|
Control Remote
Install Battery
6

Remote Control
Overview
7
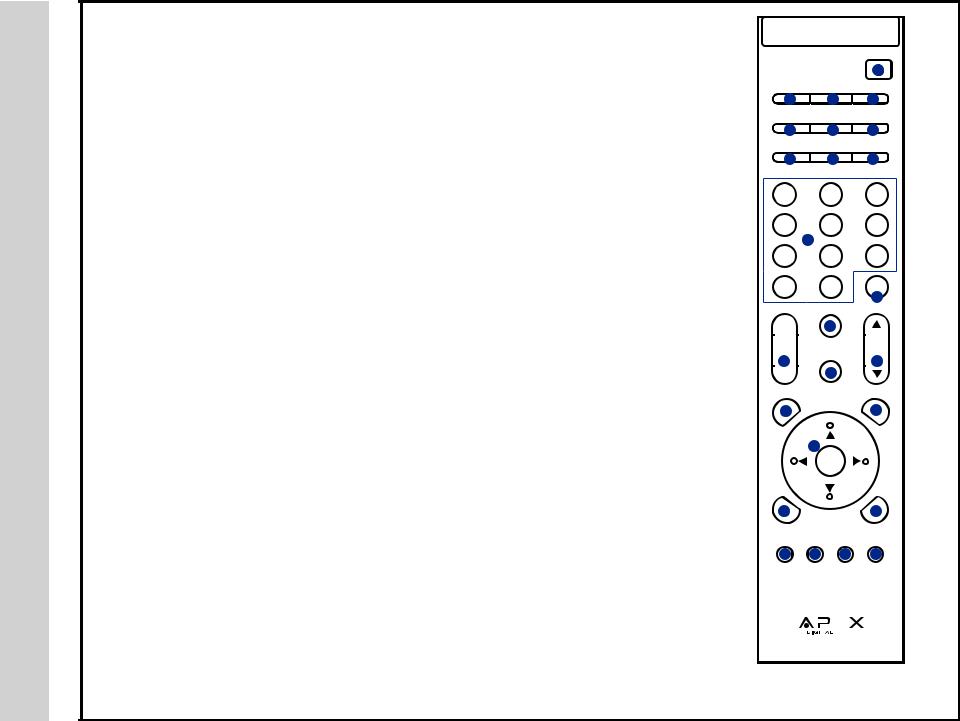
Functions can be controlled using the remote control handset
1.Power - Turn the LCD display ON or OFF (Standby)
2.TV - Direct access to the television tuner
3.HDMI - Press repeatedly to select from HDMI 1, HDMI 2, HDMI 3
4.A/V - Press repeatedly to select from A/V 1, 2 / S-Video / Composite 1, 2 / Component 1, 2
5.VGA - Direct access to the VGA (PC) input; press again to return to the previously viewed input
6.MTS - Press to select a program’s second audio channel (if available)
7.Audio - Select from various preset audio EQ settings: Personal > Standard > Music > Movie
8.CCD - Select closed caption subtitles (if available) OFF > ON > CC ON MUTE
9.Display - Provides program information currently being viewed
10.Guide - Press to view scheduled programming for the current channel viewed (if available)
11.Number Buttons / Dash - Select desired TV channel: For example: to select digital channel four, press 4 – 1 (if available)
12.Recall - Press to switch between the current and previously viewed TV channel
13.Mute - Temporarily turn off audio sound. Press again to resume.
14.Volume (+/--) - Adjust volume up (+) or volume down(--)
15.Channel (p/q) - Select channel up p or channel down q
16.Input - Press to display all input sources on screen
17.Menu - Press to display the user menu. Press again to exit
18.Favorite - Press to display a list of favorite TV channels you’ve added
19.Arrow Buttons/ Enter - Use qpt u to navigate and make selections. Press Enter to confirm a selection
20.Exit - Press to exit the Menu
21.Channel List - Press to display list of channels saved in the TV tuner memory
22.Sleep - Press to activate the sleep function to turn off the TV automatically; 5 Min >10 Min > 15
Min > 30 Min > 45 Min > 60 Min > 90 Min > 120 Min > 180 Min > 240 Min
23.Zoom - Select viewable picture size options: Normal > Wide > Zoom > Cinema
24.Picture - Select from various preset picture modes: Personal > Standard > Dynamic > Movie
25.Color Mode - Select from various preset color temperatures: Cool > Normal > Warm (D6500 for movies and TV shows)
|
|
|
|
POWER |
|
|
|
|
1 |
|
|
2 |
|
3 |
4 |
|
|
VGA |
MTS / SAP |
AUDIO |
|||
5 |
|
6 |
7 |
|
|
|
|
DISPL |
GUIDE |
||
8 |
|
9 |
10 |
|
|
1 |
|
2 |
3 |
|
|
4 |
|
5 |
6 |
|
|
|
|
11 |
|
|
|
7 |
|
8 |
9 |
|
|
_ |
|
0 |
|
RECALL |
|
|
|
|
|||
|
|
|
12 |
|
|
+ |
|
MUTE |
|
|
|
|
13 |
|
|
|
|
|
|
|
|
|
|
|
|
|
|
|
|
VOL |
INPUT |
|
CH |
||
14 |
|
15 |
|
||
|
|
|
|||
|
|
16 |
|
|
|
MENU |
|
FAVORITE |
|||
17 |
|
|
18 |
|
|
19
ENTER
20 |
|
|
|
|
21 |
EXIT |
|
|
|
|
CH LIST |
22 |
23 |
24 |
25 |
||
SLEEP |
ZOOM |
PICTURE |
COLOR |
||
|
|
|
|
|
MODE |
|
|
|
|
|
|
|
|
|
|
|
|
|
|
|
|
|
|
NOTE: When using the remote control, point it directly at the TV.

IR Receiver |
A soft blue light illuminates when |
|
television is powered ON |
||
|
1
2
3
4
5
Side Panel
INPUT |
MENU |
CH+ |
-CH |
VOL+ |
-VOL |
POWER |
1. Input - After connecting your DVD, Cable Box, etc., select the appropriate input source to view. Press the INPUT button to display input options. Press qp buttons to highlight an input. Press ENTER
to select. I
2.Menu - Press the MENU button to display and adjust your TV settings. Press again to turn the OSD (on screen display) OFF. To adjust settings from here, press CH+/CH- qp to navigate to a highlighted setting then press VOL+/VOLto select and adjust.
3.Channel (CHq/CHp) - Press the CHq/CHp buttons to select a channel in TV mode. These buttons are also used to adjust settings in the MENU mode.
4.Volume (VOL+ / VOL-) - Press the VOL+ / VOL- buttons to adjust volume up or down. These buttons are also used to adjust settings in the MENU mode.
5.Power - Press the POWER button to turn the LCD display ON/ OFF (standby). When the power is on, the blue LED illuminates. The screen image will appear within a few seconds.
NOTE: To turn OFF power completely, switch the Master Power button located on the rear of the television. When the Master Power switch is off, neither the remote control or television POWER button will function (See pg. 9 for details).
Overview TV
Panel Side & Front
8

TV Overview
Rear Panel & Pedestal Removal
9
Removal of TV Pedestal |
Wall Mounting |
For Wall Mounting |
It is recommended that you call your |
To remove the pedestal from the |
local TV dealer or a licensed contrac- |
television, unscrew the (5) Philips |
tor to secure the television to the wall |
head screws and slide the TV upward |
using suitable VESA 400 x 200mm |
while securing the base |
wall mount hardware. |
TV REAR PANEL
|
|
|
|
|
|
|
|
|
|
|
|
|
|
2 |
AV2 |
|
|||||||||
|
|
|
|
|
|
|
|
|
|
|
|
|
|
|
|
|
|
|
|
|
|
|
|
|
|
|
|
|
|
|
|
|
|
|
|
|
|
|
|
|
|
|
|
|
|
|
|
|
|
|
|
|
|
|
|
|
|
|
|
|
|
|
|
|
|
|
|
|
|
|
|
|
|
|
|
|
|
|
|
|
|
|
|
|
|
HDMI 3 |
HDMI 2 |
HDMI 1 |
|
|
|
||||||||||||
|
|
|
|
|
|
||||||||||||||||||||
|
|
|
|
|
|
|
|
|
|
|
|
|
|
|
|
|
|
|
1 |
AV1 |
|
||||
|
|
|
|
|
|
|
|
|
|
|
|
|
|
|
|
|
|
|
|||||||
|
|
|
|
|
|
|
|
|
|
|
|
|
|
|
|
|
|
|
|
||||||
|
|
|
|
|
|
|
|
|
|
|
|
|
|
|
|
|
|
|
|
|
|
|
|
|
|
1 2 3 4 5 6 7 8 9
1.Master Power ON/OFF Switch - When the master power is switched OFF, the power button located on the remote control and right side of the television will not function. Make sure it is switched ON for regular TV viewing on a daily basis.
2.AC Power Plug - Insert power plug during initial setup.
3.HDMI Inputs (3) - Connects to digital AV equipment that feature HDMI connectivity. HDMI supports enhanced high definition video and two-channel digital audio all from one cable. *Recommended for best performance
4.PC IN - VGA/Audio Input (3.5mm) - Connect an optional VGA cable from your personal computer and a 3.5mm audio cable for sound.
5.YPbPr 1/2 Inputs and R/L Audio Inputs (2) - Connect up to two (2) AV devices that feature component (YPbPr) video and audio output jacks.
6.AV 1/2 Inputs (2) - Connect up to two (2) standard AV devices to the composite VIDEO (Y) and AUDIO (L/R) output jacks found on most external video equipment.
7.S-Video - Connects to the S-Video output jack found on external video equipment. For audio, connect an AUDIO L/R cable to the L/R on AV1 adjacent to the S-Video input.
8.SPDIF - Connect an optional coaxial digital cable through a compatible amp/receiver to enjoy superior audio sound.
9.RF Input - Connect antenna or cable for television reception.
 Loading...