


® |
Ver 1.4 6/08 |
EN |
|
s i m p l y r e m a r k a b l e ™
Digital TV Converter Box
Caja Convertidora de TV Digital
WITH
Conversion Analogica
DT502
User's Manual Manual del Usuario

Important Safety Information
WARNING
EN
-TO PREVENT FIRE OR SHOCK HAZARD, DO NOT USE THIS PLUG WITH AN EXTENSION CORD, RECEPTACLE OR OTHER OUTLET UNLESS THE BLADES CAN BE FULLY INSERTED TO PREVENT BLADE EXPOSURE.
-TO PREVENT FIRE OR SHOCK HAZARD, DO NOT EXPOSE THIS APPLIANCE TO RAIN OR MOISTURE.
The lightning flash with arrowhead symbol, within an equilateral triangle, is intended to alert the user to the presence of uninsulated "dangerous voltage" within the product's enclosure that may be of sufficient magnitude to constitute a risk of electric shock to persons.
WARNING : TO REDUCE THE RISK OF ELECTRIC SHOCK, DO NOT REMOVE COVER (OR BACK). NO USERSERVICEABLE/PARTS INSIDE REFER SERVICING TO QUALIFIED SERVICE PERSONNEL.
The exclamation point within an equilateral triangle is intended to alert the user to the presence of important operating and maintenance (servicing) instructions in the literature accompanying the appliance.
CHANGES OR MODIFICATIONS TO THIS UNIT NOT EXPRESSLY APPROVED BY THE PARTY RESPONSIBLE FOR COMPLIANCE COULD VOID THE USER’S AUTHORITY TO OPERATE THE EQUIPMENT.
NOTE: THIS EQUIPMENT HAS BEEN TESTED AND FOUND TO COMPLY WITH THE LIMITS FOR A CLASS B DIGITAL DEVICE, PURSUANT TO PART 15 OF THE FCC RULES. THESE LIMITS ARE DESIGNED TO PROVIDE REASONABLE PROTECTION AGAINST HARMFUL INTERFERENCE IN A RESIDENTIAL INSTALLATION. THIS EQUIPMENT GENERATES USES AND CAN RADIATE RADIO FREQUENCY ENERGY AND, IF NOT INSTALLED AND USED IN ACCORDANCE WITH THE INSTRUCTIONS, MAY CAUSE HARMFUL INTERFERENCE TO RADIO COMMUNICATIONS.
HOWEVER, THERE IS NO GUARANTEE THAT INTERFERENCE WILL NOT OCCUR IN A PARTICULAR INSTALLATION. IF THIS EQUIPMENT DOES CAUSE HARMFUL INTERFERENCE TO RADIO OR TELEVISION RECEPTION, WHICH CAN BE DETERMINED BY TURNING THE EQUIPMENT OFF AND ON, THE USER IS ENCOURAGED TO TRY TO CORRECT THE INTERFERENCE BY ONE OR MORE OF THE FOLLOWING MEASURES:
•REORIENT OR RELOCATE THE RECEIVING ANTENNA.
•INCREASE THE SEPARATION BETWEEN THE EQUIPMENT AND RECEIVER.
•CONNECTTHE EQUIPMENT INTO AN OUTLET ON A CIRCUIT DIFFERENT FROM THAT TO WHICH THE RECEIVER IS NEEDED.
•CONSULT THE DEALER OR AN EXPERIENCED RADIO/TV TECHNICIAN FOR HELP.
Digital Television Transition Notice: This device contains a digital television tuner, so it should receive digital over the air TV programming, with a suitable antenna, after the end of full-power analog TV broadcasting in the United States on February 17, 2009. After February 17, 2009, a television receiver with only an analog broadcast tuner will require a converter box to receive full power over-the-air broadcasts with an antenna because of the Nation’s transition to digital broadcasting. Analog-only TVs should continue to work as before to receive low power, Class A or translator television stations and with cable and satellite TV services, gaming consoles, VCRs, DVD players, and similar products. When a converter box is used with an older television receiver, a signal splitter might be necessary to continue to receive low-power analog broadcasts via an antenna. Information about the DTV transition is available from www.DTV.gov or 1-888-CALL-FCC, and from www.dtv2009.gov or 1-888-DTV-2009 for information about subsidized coupons for digital-to-analog converter boxes.
1

|
|
|
Important Safety Information |
|
|
|
EN |
1.Read these instructions.
2.Keep these instructions.
3.Heed all warnings.
4.Follow all instructions.
5.Do not use this apparatus near water.
6.Clean only with dry cloth.
7.Do not block any ventilation openings. Install in accordance with the manufacturer’s instructions.
8.Do not install near any heat sources such as radiators, heat registers, stoves or other apparatus (including amplifiers) that produce heat.
9.Do not defeat the safety purpose of the polarized or grounding-type plug. A polarized plug has two blades with one wider than the other. A grounding type plug has two blades and a third grounding prong. The wide blade or the third prong are provided for your safety. If the provided plug does not fit into your outlet, consult an electrician for replacement of the obsolete outlets.
10.Protect the power cord from being waked on or pinched particularly at plugs, convenience receptacles, and the pint where they exit from the apparatus.
11.Only use attachments/accessories specified by the manufacturer.
12.Use only with the cart, stand, tripod,
bracket, or table specified by the manufacturer, or sold with the apparatus. When a cart is used, use caution when moving the cart/apparatus combination to avoid injury from tip-over.
13.Unplug this apparatus during lightning storms or when unused for long periods of time.
14.Refer all servicing to qualified service personnel. Servicing is required when the apparatus has been damaged in any way, such as power supply cord or plug is damaged, liquid has been spilled or objects have fallen into the apparatus, the apparatus has been exposed to rain or moisture, does not operate normally, or has been dropped.
15.Apparatus shall not be exposed to dripping or splashing and no objects filled with liquids, such as vases, shall be placed on the apparatus.
16.The main electrical plug is designed to be easily connected or disconnected from the power outlet for safe operation.
2
|
|
|
Introduction |
|
EN |
Thank You for purchasing the DT502 digital TV converter box. It has been designed to bring you many years of viewing enjoyment from digital TV broadcasts when connected to a television that does not incorporate a digital tuner. Enjoy crystal clear quality that is free of ghosting and snowy interference.
Special Note:
Digital TV broadcasts require an adequate signal strength from your antenna to provide the best possible viewing experience. Should a TV broadcast be disrupted by choppy reception or picture stutter, readjust your antenna or consider a high quality rooftop antenna for best results.
*Antennaweb.org provides personalized information for choosing antenna type and orientation for your particular location.
What’s In The Box?
|
|
|
The DT502 digital TV converter |
|
|
|
|
|
|
|
box includes the following: |
|
|
|
|
|
|
|
- Remote Control |
|
|
|
|
|
|
|
- 2 AAA Batteries |
|
|
|
|
|
|
|
- AV Cables |
|
|
|
|
|
|
|
- RF Cable |
|
|
|
|
|
|
|
- Owner’s Manual |
|
|
|
|
|
|
|
|
|
|
|
|
|
|
|
|
|
|
|
|
|
|
|
Specifications |
|
|||
|
Unit Dimensions: |
|
9” x 6.1” x 1.6” |
|
|||
|
|
|
|
|
|
||
|
Net Weight: |
|
2 lbs. |
|
|||
|
|
|
|
|
|
|
|
|
Aspect Ratio: |
|
16:9 / 4:3 |
|
|
|
|
|
|
|
|
|
|
||
|
Tuner Type/ Range: |
|
ATSC/ RF CH 2-69 |
|
|||
|
Resolution: |
|
Down converts to 480i |
|
|||
|
|
|
|
|
|
||
|
Video Outputs: |
|
Composite (1); S Video (1), RF Out |
|
|||
|
Video Inputs: |
|
RF (1), Smart Antenna (Optional) |
|
|||
|
|
|
|
|
|
||
|
Audio Outputs: |
|
L/R Audio |
|
|||
|
Energy Standards: |
|
<1 Watts While in Sleep Mode |
|
|||
|
|
|
|
|
|
|
|
|
|
|
3 |
|
|
|
|
|
|
|
|
|
|
||

|
|
|
Table of Contents |
|
EN |
|
|
|
Important Safety Information .............................................................. |
1, 2 |
Introduction / What’s In The Box? / Specifications ........................ |
3 |
Table of Contents ................................................................................. |
4 |
Remote Control Battery Installation............................................... |
5 |
Remote Control Functions.............................................................. |
6 |
Front / Rear Panel Overview............................................................ |
7 |
Connection to TV.............................................................................. |
8, 9 |
Analog Pass-Through Quick Setup................................................. |
9 |
Connection to Stereo........................................................................ |
10 |
Zoom Functions.............................................................................. |
11 |
Quick Start Guide........................................................................... |
12 |
On-Screen Menu (Guide).............................................................. |
13 |
On-Screen Menu (Channel).......................................................... |
14 |
On-Screen Menu (Setup)............................................................... |
15-17 |
On-Screen Menu (Info).................................................................. |
18 |
Display Bars.................................................................................... |
18 |
Troubleshooting Guide................................................................... |
19 |
Legal Notice....................................................................................... |
20 |
Limited Warranty............................................................................... |
21 |
4

Remote Control Battery Installation EN
Remote Control Battery Installation
1Remove the battery compartment cover.
2Load two fresh “AAA” batteries into the battery compartment. Make sure the batteries are inserted properly, matching polarity
by referring to the symbols “+ -” marked in the battery compartment.
3Close the battery compartment cover.
•When replacing batteries, replace both of them. Do not mix new and used batteries together as battery life will be shortened.
Remote Control Operation Range
Point the remote control unit no more than 20 feet from the remote sensor and within 30º from the front of the unit.
•The operating distance may vary depending on the brightness in the room.
Note:
•Do not point bright lights towards the remote control signal sensor.
•Do not place objects between the remote control unit and the remote signal sensor.
•Do not use the remote control unit while operating other units at the same time.
Remote Sensor
30º
5

1
2
3
4
5
6
7
8
9
1 2
4 5
7 8
0 -
MENU |
CH + |
VOL -
OK
RECALL
CH -
GUIDE
FAV +
SIGNAL
FAV -
FAV
Remote Control Functions |
|
EN |
1ON / Standby
Press to turn your converter box ON and Standby mode.
2Number
Press to enter channel numbers and passwords.
3Sub Channel Selector
Press to enter a sub channel number.
For example: 2-1, indicates sub channel 1 of main channel 2
MUTE 10
3
6
9
CCD 11
4Menu
Press to open or close the on-screen menu.
5p q t u / OK / VOL / CH
Press p q to adjust channels, t u to adjust volume. On-Screen Menu: p q t u to move highlight, [ OK ] to confirm.
6Recall
Press to return to last channel viewed.
7 Favorite Channel (up)
EXIT |
12 |
|
Press to scan upward and view FAV channel added into your |
|||
|
|
|
||||
|
|
|
Favorite’s List. |
|||
|
|
|
||||
|
|
|
|
|
|
|
VOL + |
|
|
8 |
Favorite Channel (down) |
||
|
|
|
|
|
|
|
|
|
|
|
|
Press to scan downward and view FAV channel added into |
|
|
|
|
|
|
your Favorite’s List. |
|
DISPLAY |
|
|
|
|
||
13 |
9 |
ADD/DEL Favorite Channel |
||||
|
|
|||||
|
|
|
Press to add viewing channel to Favorite’s List. Press again |
|||
|
|
14 |
|
|||
|
|
|
to remove from Favorite’s List. |
|||
ZOOM |
|
15 |
|
|
||
|
|
16 |
10 |
Mute |
||
|
|
|
||||
|
|
|
|
Press to turn off sound. Press again to restore sound. |
||
MTS |
|
17 |
|
|||
|
|
|
|
|
||
|
|
|
|
|
|
|
|
|
|
|
11 |
Closed Caption |
|
|
|
|
|
|
Press to select the closed caption mode if available. |
|
®12 Exit
Press to exit on-screen menu/display bar.
13Display
Press to view information about the program of channel.
14Guide
Press to open Simple/Full Guide/Reminder List
15Zoom
Press to select aspect ratio.
16Signal Strength
Press to view signal strength of current channel.
17MTS
Press to select alternative audio program if available.
6
|
|
|
Front & Rear Panel Overview |
|
|
|
EN |
|
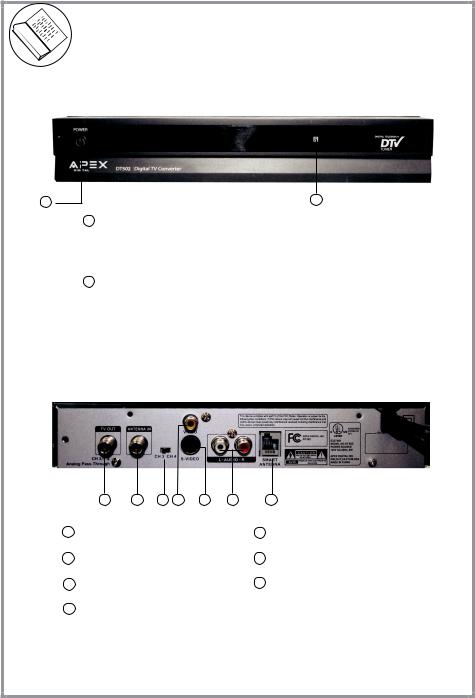
DT502 (front view) |
|
|
1 |
2 |
|
1Power ON / Standby (Green light - On) (Red light - Standy)
2Remote control sensor
DT502 (rear view)
1 2 3 4 5 6 7
1 |
TV out (RF Output) |
5 |
S-Video Output |
|
Channel 3/4 (Analog Pass-through) |
|
|
2 |
Antenna IN (RF Input) |
6 |
Audio (L/R) Output |
3 |
Channel 3/4 Switch |
7 |
Smart Antenna Input |
4 |
Composite Video Output |
|
|
7

|
|
Connection to TV |
EN |
Composite (using supplied AV cables)
TV OUT |
ANTENNA IN |
VIDEO |
|
|
CH 3/4 & |
CH 3 CH 4 |
S-VIDEO |
L AUDIO R |
SMART |
|
|
|||
Analog Pass-Through |
|
|
|
ANTENNA |
yellow
white red
To TV Video Input
Connect the supplied video (yellow) and audio (red & white) cables.
To view, cycle through your television inputs (Video 1, 2, etc) to select the source that the DT502 is connected to.
To TV Audio L/R Input
S Video (using supplied audio cables)
TV OUT |
ANTENNA IN |
VIDEO |
|
|
|
|
|
CH 3/4 & |
CH 3 CH 4 |
S-VIDEO |
SMART |
Analog Pass-Through |
|
|
ANTENNA |
To S-Video Input on TV
white red
To TV Audio L/R Input
For better quality, connect with an optional
S-Video cable (if your TV has this input).
Do not connect the yellow video cable when installing the S-Video cable.
To view, cycle through your television inputs (Video 1, 2, etc) to select the source that the DT502 is connected to.
8
QUICKSETUP |
|
|
|
EN |
|
|
|
|
The DT502 is equipped with a shared analog pass-through and it provides a way for you to receive analog broadcast without using a splitter. The TV Out (RF Out) serves both as the Channel 3/4 output and as the analog pass-through output. The output from this connector depends on if the unit is On (active) or it is in Standby (sleep) mode.
This table illustrates the different output from the RF Out connector.
|
Power Indicator |
TV Out Mode |
Actual Output |
|
|
Light |
(RF Out) |
||
|
|
|||
Standby |
Red |
Analog Pass-through |
RF signal with analog |
|
(Sleep) |
programming from analog broadcast |
|||
|
|
|||
|
|
|
stations |
|
|
|
|
|
|
On |
|
|
Analog RF signal in channel 3 or 4 |
|
Green |
NTSC CH 3/4 |
converted from digital programming |
||
(Active) |
||||
contents broadcasted by digital |
||||
|
|
|||
|
|
|
||
|
|
|
stations |
|
|
|
|
|
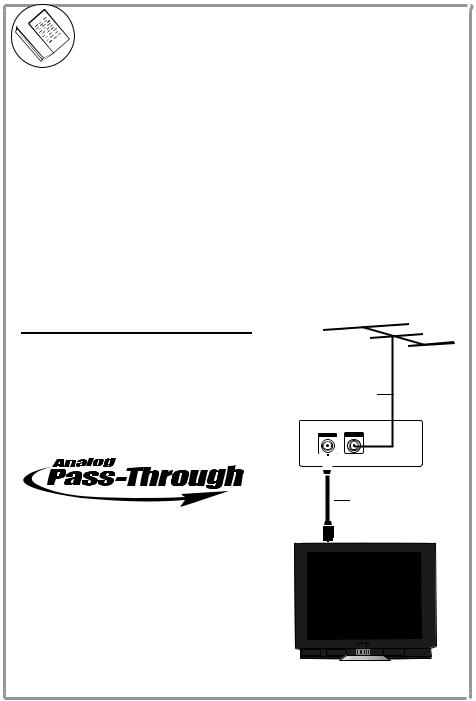
Standard Install - RF Input / Output
Connect antenna wire to RF ANTENNA IN on the rear of the DT502. Connect the supplied coaxial cable wire from the
CH 3/4 terminal (RF Out) to RF ANTENNA INPUT on the rear of your TV.
To view, tune Ch 3 or 4 on your TV, choose the channel that |
Over-the-air Antenna |
||
does not have an active or strong signal. Slide the CH 3/4 |
|
|
|
switch located on the rear of the DT502. |
|
|
|
|
|
TVOUT |
ANTENNAIN |
|
|
|
|
|
|
|
|
RF Coaxial cable to your TV
Please follow the procedure below when using Analog Pass-Through
1.Make sure the converter box is in Standby mode – the power indicator light should be red; otherwise, press the Power button on the converter’s remote control.
2.This step only need to perform once after connection and it is only require if you did not scan the local channel before – scan analog channels by following the instruction of your TV. It is the same as connecting your TV directly with an antenna.
3.You must use the remote control from your TV to change channels.
9
|
|
Connection to Stereo |
|
EN |
|
|
|
You may connect the unit to your stereo system using the following method:
VIDEO
S-VIDEO
Rear panel subject to modification
L |
R |
white red
To Dolby Surround
Equipped Receiver
(L + R Audio Input)
Front Left |
Front Right |
Speaker |
Speaker |
|
Center Channel |
Dolby Surround
Connection Example
Surround Left |
Surround Right |
Speaker |
Speaker |
10

Zoom Functions
EN
Due to the nature of digital broadcasts, the normal image displayed on your television may appear as a “windowbox” or “letterboxed” image. This is a normal condition based on signal transmission and programming. Press the ZOOM button on the remote control to minimize or eliminate the black bars on your TV display, if desired.
Note: ZOOM option can vary depending on the broadcaster.
Zoom effect on a 4:3 TV Display
A windowbox image is typical when viewing DT broadcasts that are not widescreen presentations. Press Zoom to eliminate the black bars.
Normal |
|
Zoom |
|
|
|
A letterbox image is typical when viewing DT broadcasts that are presented in widescreen format. Press Zoom to eliminate the black bars.
Normal |
|
Zoom |
|
|
|
Zoom effect on a 16:9 TV Display (SD Broadcasts Only)
When viewing TV broadcasts on a widescreen television you will find that SD programing does not fill the display entirely. Press ZOOM on the remote control until the display area is filled and black bars are minimized.
Normal Zoom Fill
11

|
|
|
Quick Start Guide |
|
EN |
|
|
|
Once all connections are made, follow this Quick Start Guide to begin viewing digital channels immediately. It is recommended that you read the entire manual to familiarize yourself with all of the functions available to you.
Installation Guide (Initial Setup Menu)
When the converter box is turned on for the first time or has been reset to factory default, the Installation Guide will be displayed automatically. User can follow the Installation Guide to set the following:
•OSD (On Screen Display) Language
•Time Zone / Daylight Savings
•Scan Channels
Installation Guide
OSD Langauge |
English |
English |
|
|
Spanish |
|
|
French |
OSD Language
Press [ t / u ] to select the menu language (English, Spanish, or French), then press [ OK ] to Confirm
OK Next Page
Installation Guide - Custom
|
|
|
Hawaii |
|
Select Time Zone |
Hawaii |
|
|
Auto Daylight Saving |
Yes |
Alaska |
|
|
|
Pacific |
|
|
|
Mountain |
|
|
|
Central |
|
|
|
Eastern |
|
|
|
|
|
EXIT Previous Page |
OK |
Next Page |
|
|
|
|
Time Zone / Daylight Saving
Press [ t / u ] to select your time zone (Hawaii, Alaska, Pacific, Mountain, Central, Eastern) , then press [ q ] to move the cursor to adjust the Auto Daylight Saving using [ t / u ], then press [ OK ] to Confirm and auto scanning will proceed.
**Auto Daylight Saving syncs with schedules of regular programming. If “Yes” is selected, all programming will automatically sync accordingly to Daylight Saving time. If “No” is selected, programs will display times according to the set time zone without Daylight Saving.**
Installation Guide - Scan
1. CH 8-1: KFLA-LD
2. CH-8: CSTV
CH5: 79.00 MHz |
SVSB |
||
Total Channels Found: |
2 |
||
Progress |
|
|
4% |
Quality |
0% |
||
EXIT Stop
Installation Guide - Finish
Setup Completed
The system is configured as followed:
OSD: English
Time Zone: Pacific (-8:00)
Daylight Savings: AUTO
Detected Digital Channel: 51
Detected Digital Frequencies: 22
Press OK to complete a setup and exit to watch TV
Auto Channel Scan
Your converter box searches for available channels in your area and stores them in the channel memory. To stop scan during Auto Scan, press the [ EXIT ] button and the screen will be directed to the first scanned channel
Setup Complete
After auto channel scan is done, press [ OK ] to complete the setup and began to watch TV.
OK Exit
12

|
|
On-Screen Menu - Guide |
EN |
The On-Screen Menu display is for accessing and setting up preferences for the DT502
Guide
Guide menu consists of three options;
Simple Guide, Full Guide and Reminder List. To display the correct information on Simple Guide, Full Guide, and Reminder List, your “Time Zone” must be set correctly.
Simple Guide
Time / Date
|
|
|
|
|
|
|
|
Guide |
|
|
|
|
|
|
|
Simple Guide |
|
|
|
|
|
|
|
Full Guide |
|
|
|
|
Channel |
|
|
|
|
|
|
|
Reminder List |
|
|
|
|
|
|
|
|
|
|
|
|
Setup |
|
|
|
|
|
|
|
|
|
|
|
|
|
Info. |
|
|
|
|
|
EXIT Exit |
|
Move |
MENU Previous Page |
OK Enter |
||
|
|
|
|
|
|
|
Simple Guide
|
Channel |
Time/Date |
|||
|
16:00 |
|
Show Name/Title |
|
|
|
17:00 |
|
Channel 4 News |
|
|
|
18:00 |
|
Channel 4 News |
|
|
|
18:30 |
|
Nightly News |
|
|
|
GUIDE |
Full |
EXIT Exit |
||
|
OK |
Reminder/Release |
|||
|
|
|
|
|
|
Simple Guide can view program information of the current channel.
Press [ GUIDE ] on the remote control to display or press
[ MENU ] on the remote control to display the On-Screen Menu and follow the steps below:
1.Using [ p / q ] arrow buttons to highlight “Simple Guide”, [ OK ] to enter.
2.While highlighting a program, press [ OK ] to add or release the program to the Reminder List
Full Guide |
|
|
|
|
|
|
|
|||||
|
|
|
|
|
|
|
|
|
|
|
|
|
|
|
|
|
|
|
|
|
|
|
|
|
|
|
|
|
|
2-1 |
4-1 |
KNBC-LA |
4-2 |
4-4 |
Date |
|
||
|
|
|
|
|
|
|
|
|
|
|
||
|
|
Today |
|
|
|
|
|
|
Time |
|
||
|
|
|
|
|
|
|
|
|
|
|
||
|
|
The Ellen DeGee Show |
|
|
|
|
|
CC |
|
|
||
|
|
16:00-17:00 |
|
Actor Ewan Mcgrady (”New Movie Title”) |
|
|
|
|
||||
|
|
|
TV-G |
|
|
|
|
|
|
|
|
|
|
|
Channel 4 News |
|
|
|
|
|
|
CC |
|
|
|
|
|
17:00-18:00 |
|
Williams, Mayer |
|
|
|
|
|
|||
|
|
|
|
|
|
|
|
|
||||
|
|
|
|
|
|
|
|
|
|
|
|
|
|
|
Channel 4 News |
|
|
|
|
|
|
CC |
|
|
|
|
|
18:00-19:00 |
|
Williams, Mayer |
|
|
|
|
|
|
||
|
|
|
|
|
|
|
|
|
|
|
||
|
|
FAV+ |
Next Day |
|
Change Channel |
GUIDE Reminder List |
|
|
|
|
||
|
|
FAV- |
Prev Day |
OK |
Move Scroll |
EXIT Exit |
|
|
|
|
|
|
|
|
|
|
|
|
|
|
|
|
|
|
|
Full Guide or Electronic Program Guide (EPG) is the electronic equivalent of a printed TV program guide. You can view a list of programs scheduled for the next few hours.
Press [ GUIDE ] on the remote control twice to display or Press [ MENU ] on the remote control to display the
On-Screen Menu and follow the steps below:
1.Using [ p / q ] arrow buttons to highlight “Full Guide”, [ OK ] to enter.
2.Press arrow buttons to move/show desired information.
Reminder List
Time / Date
Reminder List
|
Guide |
|
|
|
|
|
|
5:00 PM |
|
4-1 KNBC-LA |
|
|
|
|
Mon Jun 21 |
|
Channel 4 News |
|
Channel |
|
|
|
|
|
|
6:00 PM |
|
4-1 KNBC-LA |
|
|
|
|
Mon Jun 21 |
|
Nightly News |
|
|
|
|
|
|
Setup
Info
EXIT Exit MENU Previous Page OK Reminder/Release
Reminder List is a preselected set of programs which you can configure in the Simple Guide to remind you of upcoming programs.
Press [ GUIDE ] on the remote control three times or press [ MENU ] button on the remote control to display On-Screen Menu and follow the steps below:
1. Using [ p / q ] arrow buttons highlight “Reminder List”, [ OK ] to set Reminder/Release.
13
 Loading...