

A.O. Smith ATI-110-N, ATI-110-P, ATI-310-P, ATI-510-P, ATO-110-N Technical Documents
...
03
(One Time)
:
Incorrect d
ipswitch setting
Maaiinntteennaannccee sshheeeett
C
.
Wiring Diag
ram and check point of the
Water heater
31, 32 (Two Times): Disconnected/short
-
circuited thermistor
The
dipswitches
have certain special functions and generally
should
not need adjustment.
D
.
Change the
dipswitch
settings when the power supply is turning off.
The Gas Type dipswitch
to
k voltage between red wire and
Check voltage between yellow wire
Check voltage between orange wire
Dipswitches
Temperature set
FM speed is increased automatically.
FM+
(
2,000
to 4,000 ft)
FM++
(4,000
to 6,000
ft)
Over 6,000
ft:
Consult the manufacturer.
DEFAULT
(0 to 2,000 ft)
The Model Type dipswitch should
A2
I
A
G
B
C
H1
H2
C1
A1
J
F
E1
E2
C2
A3
B1
110
Indoor
110
Out
door
Model
type
M
AATTKKJJ22
6622QQ00664
4
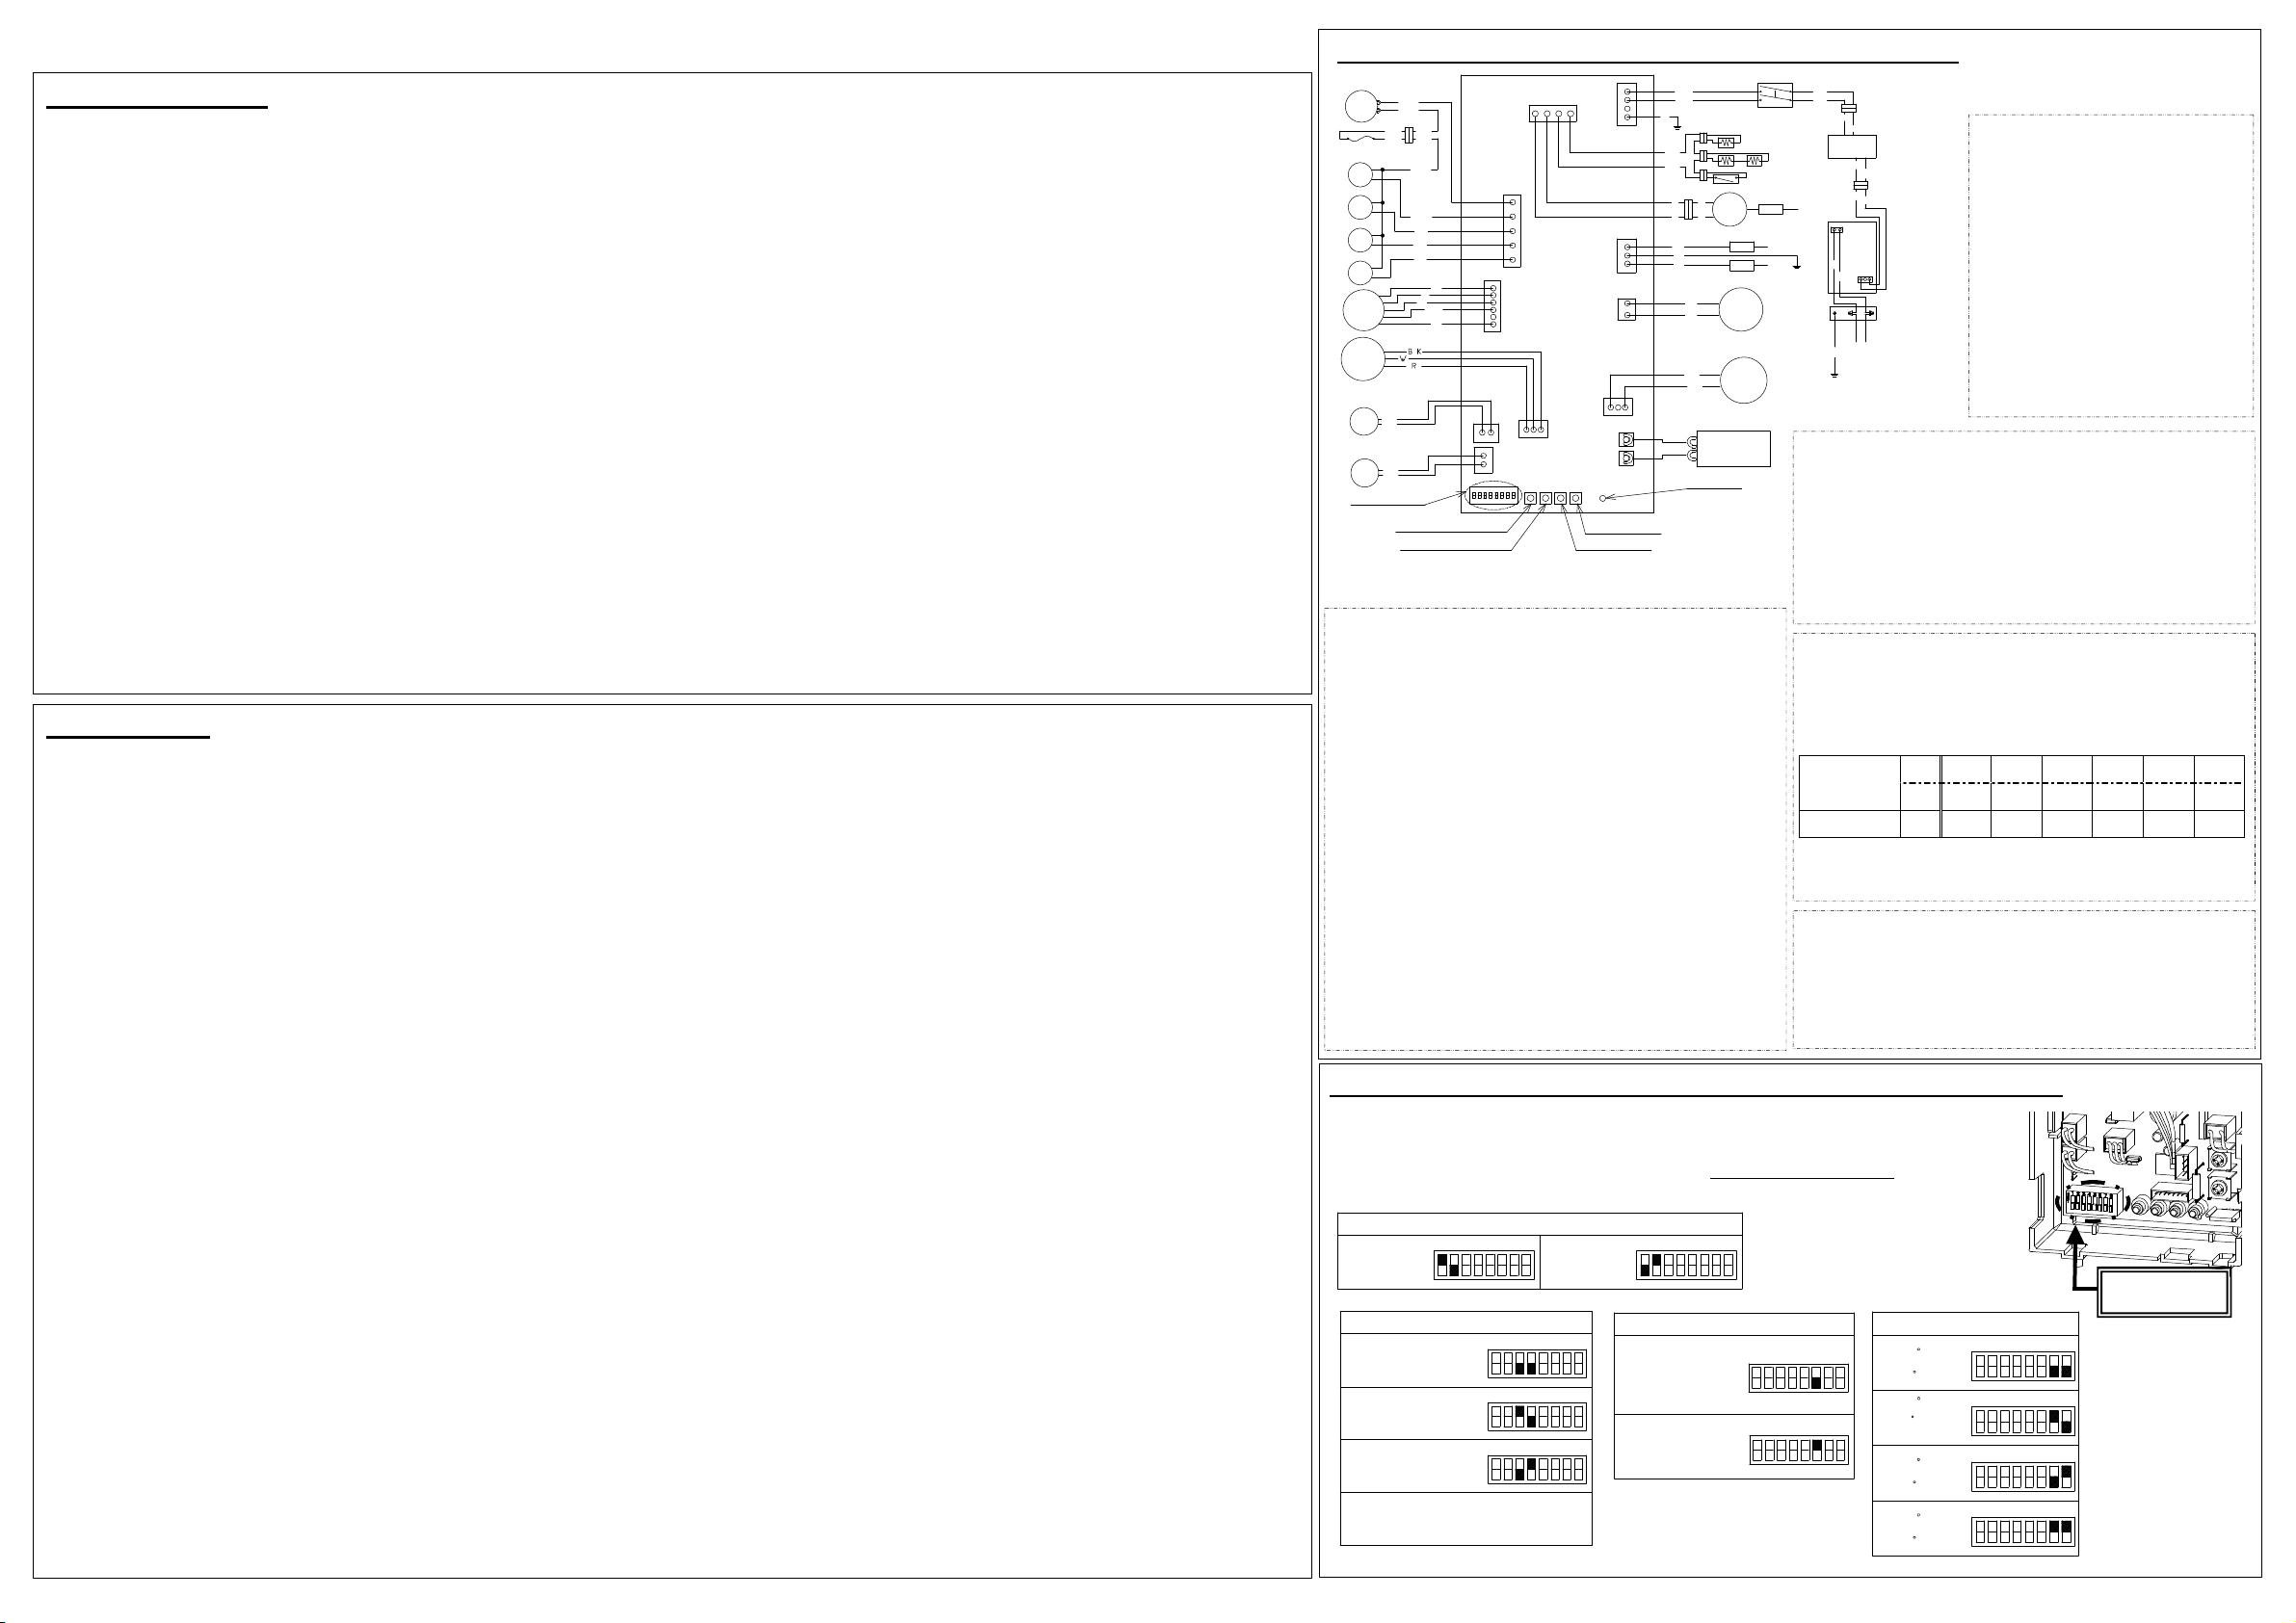
A. Troubleshooting
If the error code is indicated on the Red LED (Refer to the Section C) on the PCB (Part #701) of
the water heater (and/or the remote controller), refer to Section B.
<< It takes long time to get hot water at the fixtures >>
・ The time it takes to deliver hot water from the water heater to your fixtures depends on
the length of piping between the two. The longer the distance or the bigger the pipes,
the longer it will take to get hot water.
・ If you would like to receive hot water to your fixtures quicker, you may want to consider
a hot water recirculation system.
<< The water is not hot enough or turns cold and stays cold >>
・ Compare the flow and temperature. Refer to the “Output temperature chart” of the
installation manual.
・ Check cross plumbing between cold water lines and hot water lines.
・ Check if the gas supply valve fully open, the gas line sized properly and the gas supplies
pressure enough. Refer to the “Gas supply and gas pipe sizing” of the installation
manual.
・ Check the set temperature, and change the dipswitch setting. Refer to Section D.
・ Refer to “Water circuit” in this section.
<<The water is too hot>>
・ Check the set temperature, lower setting temperature.
<<The hot water is not available when a fixture is opened>>
・ Refer to the “Power supply circuit” and “Water circuit” in this section.
<<Fluctuation in hot water temperature>>
・ Check if the filter on the cold water inlet cleaned. (Part #406)
・ Check if the gas line sized properly and the supply gas pressure sufficient.
・ Check for cross connection between cold water lines and hot water lines.
・ Refer to “Water circuit” in this section.
<<Unit does not ignite when water goes through the water heater>>
・ Refer to the “Power supply circuit” and “Water circuit” in this section.
・ If you use the remote controller, turn the power button on and then the set
temperature will be displayed on the screen.
・ Check if the filter on the cold water inlet cleaned. (Part #406)
<<The fan motor still spinning after operation has stopped>>
・ This is normal. After operation has stopped, the fan motor keeps running from 15 to 70
seconds in order to re-ignite quickly, as well as purge all the exhaust gas out of the flue.
<<Abnormal sound from water heater>>
・ An abnormal sound from the water heaters is caused by not enough air supply or wrong
installations. The water heater needs more combustion air. Refer to the “10” error code
in the section B.
<<Power supply circuit>>
1. If the remote controller installed, press the “ON/OFF” button of the remote controller,
and make sure that the set temperature is displayed on the remote controller. Restart the
water heater.
2. Check if the Red LED on the PCB (Part #701) of the water heater is lit for a few seconds
right after the power is supplied. If so, the power supply circuit of the water heater is
under normal condition. Next, refer to the “Water circuit” in this section.
3. Check the fuse on the surge box (Part #703), and if it has a brown spot, need to replace it.
4. Check the power supply, and make sure that the water heater has 120 VAC.
5. If the Red LED on the PCB (Part #701) isn’t lit, some electrical parts can be broken.
Consult the manufacturer.
<<Water circuit>>
1. If you set the remote controller, turn the power button on and then the set temperature
will be displayed on the screen.
2. Open all hot water faucets, and make sure that there is enough water flow. This water
heater needs at least 0.75 GPM water flow to operate.
3. Check for reverse connection and cross connection.
4. Check if the filter on the cold water inlet cleaned. (Part #406)
5. Check if there is no debris or obstruction on the fixtures.
6. Check if water ways in the water heater are frozen. If so, unfreeze them. And refer to
installation manual to protect your water heater from freeze.
7. Check if the inlet water pressure is higher than 40 psi. And if it’s lower than 40 psi, need
to increase the pressure.
8. Check for connections and breakage of wires (Part #402).
9. Check if the motor drive of the flow adjustment valve (Part #402) is locked due to scale
buildup, and/or water leakage. Consult the manufacturer.
B. Error codes
The numbers in parentheses below are the numbers of blinking of the Red LED on the PCB to indicate the error codes.
・ Check the dipswitch settings on the PCB. Refer to Section D.
10 (Five Times): Warning for the “99” error code
・ Check the gas type of the water heater. If it’s wrong gas type model, replace the water
heater to correct one.
・ Check if there is any blockage (For example, Damper sticking, Vent Flaps installed on the
terminator, Snow build up around terminator, Installed in a closet (No ventilation or lack
of combustion air)) in the intake air and/or exhaust. Refer to the “Vent termination
clearances” of the installation manual.
・ If the water heater is installed as a direct-vent system, check whether there is enough
distance between the intake air terminal and the exhaust terminal. Refer to the “ Vent
termination clearances” of the installation manual.
・ Check if the total vent length doesn’t exceed 50 ft and the # of elbows is less than 5Ea.
・ Check the altitude/elevation of area of where the water heater installed. Refer to the
“High-altitude function” of the Section D. And change the dipswitch settings.
・ Check if there is grease and/or dirt in the burner (Part #101) and the fan motor (Part
#103), especially if the water heater has been installed in a contaminated area.
・ Check if there is dust and lint in heat exchanger.
・ Check the manifold pressure of the water heater. Refer to installation manual.
11 (Three Times): Ignition failure
1. Check gas supply and inlet gas pressure.
2. Check if the Hi-limit switch (Part #412) is properly functioning.
3. Check for connection/breakage of wires (Part #413, 708, 709, 712), burn marks on th e
computer board (Part #701), and/or soot on the flame rod (Part #108). And then if
O.H.C.F (Part #413) is breakage, Consult the manufacturer.
4. Check if there is a buzzing spark ignition sound coming from the burner (Part #101) when
water heater prepares for combustion.
5. Listen for the double “clunk” sound coming from the gas valves assembly (Part #102)
when water heater goes into combustion.
6. (Only no sparking and/or kick sound) Check voltage on each wire to gas valves assembly
(Part #102) and/or the igniter (Part #711). Refer to the “Appendix A” in Section C.
*No sparking sound >>>>> Refer to the #1 at “Appendix A” in Section C.
*No kick sound >>>>> Refer to the #2 at “Appendix A” in Section C.
7. Check if there is leaking from heat exchanger (Part #401)
8. Check if there is dust and lint in nozzles of the manifold (Part #102).
9. Check current on the flame rod (Part #108). Refer to the #3 at “Appendix A” in Section C.
12 (Three Times): Loss of flame
1. Check gas supply and inlet gas pressure.
2. Check if the Hi-limit switch (Part #412) is properly functioning.
3. Check for connection/breakage of wires (Part #413, 708, 709, 712), burn marks on the
computer board (Part #701), soot on the flame rod (Part #108). And then if O.H.C.F (Part
#413) is breakage, Consult the manufacturer.
4. Check if there is leakage from heat exchanger (Part #401).
5. Check if there is dust and lint in nozzles of the manifold (Part #102).
6. Check current on the flame rod (Part #108). Refer to the #3 at “Appendix A” in Section C.
・ Check
・ Check thermistor resistance. Refer to the “Appendix D” in Section C.
39 (Two Times): Air-fuel Ratio Rod failure
・
Check for connection/breakage of wires (Part #709) and/or soot on the AFR rod. ( Part #108).
51, 55 (Six Times): Abnormal Gas Solenoid Valve and Main Gas Valve
・ Check for connection/breakage of wires (Part #708) and/or burn marks on the computer
board (Part #701).
・ Reset power supply of the water heater.
・ Check voltage on the each valve on the gas valves assembly (Part #102). Refer to the
“Appendix C ” in Section C.
61 (Four Times): Fan motor fault
・ Check for connection/breakage of wires, dust buildup in the fan motor (Part #103) and/or
burn marks on the computer board (Part #701).
・ Check for frozen/corrosion of connectors of the fan motor (Part #103).
・ Check voltage between blue wire and each wire of the fan motor (Part #103), and check
resistance between white wire and red wire. Refer to the “Appendix B” in Section C.
70 (One Time): Computer board fault
・ Check for c onnection/breakage of wires (Part #714) and/or burn marks on the computer
board (Part #701).
72 (Six Times): False flame detection
1. Clean the flame rod (Part #108).
2. For indoor models, check if condensate drain is installed on the vent collar of the water
heater.
3. Check if there is leaking from heat exchanger (Part #401).
74: Miscommunication between water heater and remote controller
1. Check the model type of the remote controller. Model No. 9007666005 is the correct one.
2. Inspect the connections between the water heater and remote controller. Refer to
“Remote controller connections” of the Installation manual.
3. Check the power supply of the water heater.
4. If this error code appears only the Red LED on the PCB (Part #701), check the voltage on
the remote controller terminal on the PCB. Refer to the “Appendix E” in Section C.
5. If this error code appears only remote controller, replace the PCB (Part #701).
6. If this error code appears both the PCB (Part #701) and the remote controller, replace the
remote controller.
99 (Five Times): Imperfect combustion
・ Refer to the “10” error code in this section.
for
connection/breakage of wires and/or debris on thermistor (Part #407, 408).
Heater
Thermostat
IG
Elect rod
Flame rod
Proportional
Valve
Flow
Adjust
Valve
SW
BR
BR
BR
BR
Transformer
Heater
Ground
W
BK
W
BK
Surge
box
W
BK
AC120V
G
Ground
Appendix C (For error code 51 and 55)
Refer to check point “C” in the diagram to the left and followings.
Check voltage on the each valve on the gas valves assembly.
・
Between blue wire and light blue wire (#3). (Nor mal: DC 78 to 100 V)
・ Between blue wire and green wire. (#9). (Normal: DC 78 to 100 V)
・ Between blue wire and orange wire (#53). (Normal: DC 78 to 100 V)
・ Between blue wire and red wire (#73). (Normal: DC 78 to 100 V)
All check points are normal?
Yes >> Replace the gas valves assembly. (Part #102)
No >> Replace the PCB. (Part #701)
Appendix D (For error code 31 and 32)
・ Outlet thermistor (Find the marking of No.113 on the connector)
Check point “E1”
・ Inlet thermistor (Find the marking of No.42 on the connector)
Check point “E2”
Check resistance between black wire and black wire.
Temperature
Resistance kΩ 15.4 12.6 10.3 8.5 7.0 5.9
All check points are normal?
°F 50 59 68 77 86 95
°C 10 15 20 25 30 35
Yes >> Replace the PCB. (Part #701)
No >> Replace the wrong thermistor. (Part #407, 408)
Appendix E (For error code 74)
Refer to check point “F” on the wiring diagram above.
Check voltage on the remote controller terminal on the PCB.
(Normal: DC 11 to 25 V)
This check point is normal?
Yes >> Replace the remote controller.
No >> Replace the PCB. (Part #701)
BK
Hi-
BL
lim it
BL
BL
BL
O.H.C.F
M V
SV 1
SV 2
S V3
FM
Flow
Sensor
Inlet
thermistor
Outlet
thermistor
Dipswitches
BK: BLACK
W: WHITE
Appendix A (For error code 11)
Check these points during ignition stage.
# 1. Refer to check point “B” on the wiring diagram above.
BLBL
BL
LB
G
O
R
W
O
Y
B
L
R
BK
BK
Increase butt on
Decrease but ton
R: RED
G: GREEN
3
9
5
3
7
3
654321
78
OFF
MIN button
MAX button
BL: BLUE
O: ORANGE BR: BROWN
Y: YELLOW
W
G
Ground
BK
BK
P
P
P
P
Air-fuel ratio rod
Y
G
O
W
R
BK
R
9007666005
Remote
controller
Red LED
LB: LIGHT BLUE
P: PURPLE
Check voltage between purple wires.
(Normal: AC 90 to 110 V)
This Check point is normal?
Yes >> Replace the igniter (Part #711)
No >> Go to Next
# 2. Refer to check point “C” and “H1” on the wiring diagram above.
Check the voltage bellows.
C: Between blue wire and light blue wire (#3).
(Normal: DC78 to 100 V)
C: Between blue wire and orange wire (#53).
(Normal: DC78 to 100 V)
H1: Check the voltage between white wire and red wire.
(Normal: DC 1 to 15 V)
These check points are normal?
Yes >> Replace the gas valves assembly. (Part #102)
No >> Replace the PCB. (Part #701)
# 3. Check current thought the orange flame rod wire (Part #709).
(Normal: more than 1μA)
This check point is normal during operation?
Yes >> Replace the PCB. (Part #701)
No >> Replace the flame rod. (Part #108)
Dipswitch Settings on the computer board of the water heater
The dark square is the direction the dipswitch should be set to.
DEFAULT is the factory setting.
They have settings for four functions, shown below.
1234567
O
Propane
N
OFF
High-altitude function
OFF
OFF
OFF
OFF
Gas type
1234567
O
N
1234567
O
N
1234567
O
N
1234567
O
N
8
Natural
Gas
1234567
O
N
OFF
8
110
Direct Vent
Indoor
8
8
8
1 10
Out doo r
already be properly preset from
the factory.
should already be
8
properly preset from
the factory.
1234567
O
N
OFF
1
O
N
OFF
2
345
8
678
113 F
(45 C)
122 F
(50 C)
DE FAUL T
131 F
(55 C)
140 F
(60 C)
OFF
OFF
OFF
OFF
O
N
O
N
O
N
O
N
Appendix B (For error code 61)
Refer to check point “G” in the diagram
the left and followings.
・ Chec
blue wire.
(Normal: DC 110 to 160 V)
・
and blue wire.
(Normal: DC 13 to 17 V)
・
and blue wire
(Normal: DC 2.0 to 6.5 V)
All check points are normal?
Yes >> Replace the fan motor.
(Part #103)
No >> Replace the PCB. (Part #701)
1234567
1234567
1234567
1
2345678
8
8
8
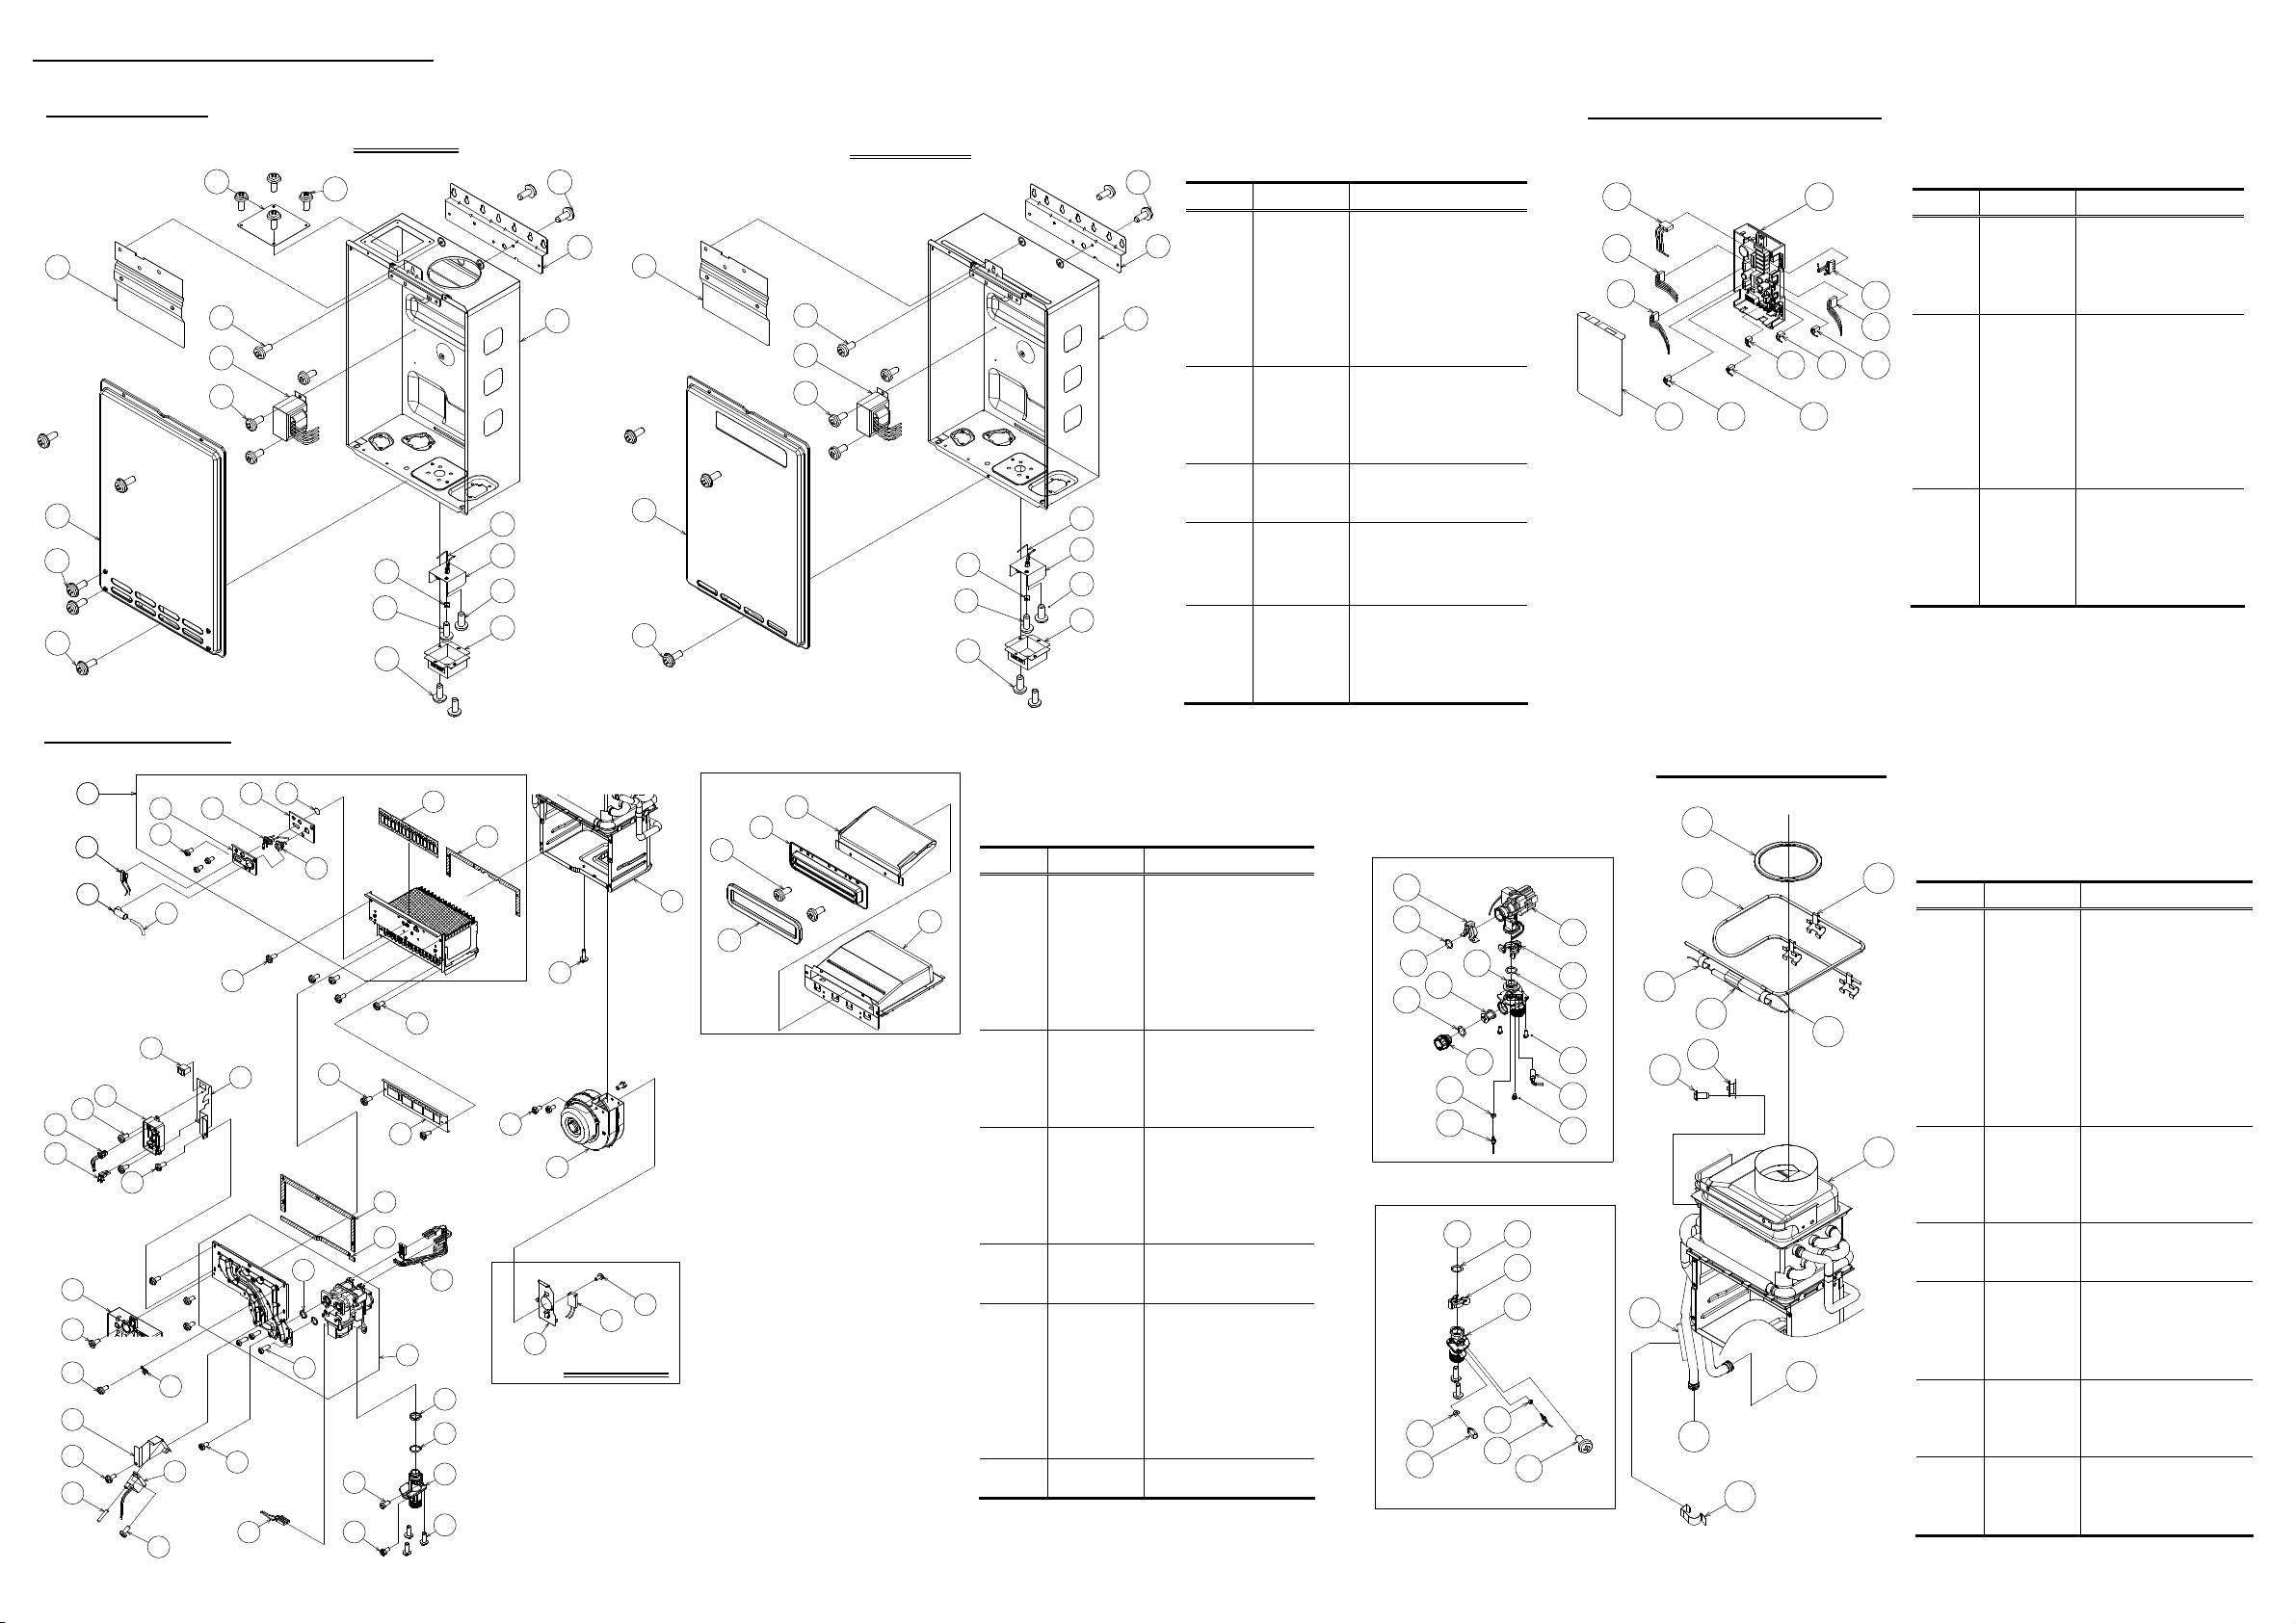
E. Components Diagram / Parts List
Manifold
Case assembly
00 3
00 7
05 2
70 2
05 2
00 2
05 1
05 0
110 Indoor
05 2
06 6
05 6
05 2
70 4
00 6
05 3
00 5
05 2
00 1
00 4
00 7
00 2
05 0
110 Outdoor
05 3
70 2
05 2
06 6
05 6
05 2
70 4
00 6
05 3
00 5
05 2
00 1
Item# Part# Description
001
00 4
002
003
004
005
006
007
050
051
052
053
055
056
058
059
061
062
063
064
065
066
067
319143-159
319143-172
319143-163
319143-173
319143-150
319143-184
319143-014
319143-128
319143-338
319143-025
319143-325
319143-026
319143-060
319143-063
319143-372
319143-327
319143-061
319143-201
319143-062
319143-087
319143-328
319143-059
319143-143
319143-048
Case assembly for 110 Indoor
Case assembly for 110 Outdoor
Front cover for 110 Indoor
Front cover for 110 Outdoor
Junction box inner plate
Screw M4x12 (W/Washer)
Screw M4x10 (W/Washer)
S
Hex head screw M4x8
Pan screw M4x12 (W/Was her
Tap tight screw M4x12 FEZN
Air blockage plate
(Only 110 Indoor)
Bracket
Junction box
Back guard panel
crew M4x10 (Coated)
Screw M4×10
Screw M4x10
Screw M3x10
Pan screw M4x10
Screw M3x6
Screw M4x6
Pan screw M4x8
Nylon clamp
Wire clamp 60
Computer board assembly
4 074 0871 9
7 01
Item# Part# Description
701
319143-164
702
319143-182
703
319143-168
704
7 07
7 09
7 14
40 240 2
705
706
707
708
709
710
319143-222
319143-155
319143-141
319143-154
319143-207
319143-171
319143-209
319143-210
Computer board
Transformer
Surge box
AC120V wire
Transformer wire
AC120V Power ON-OFF
switch
Switch wire
Gas valve wire
Flame rod wire
EH-IG Wire for 110 Indoor
EH-IG Wire with freeze
protection thermostat
711
712
713
714
719
319143-052
319143-039
319143-185
319143-220
319143-212
for 110 Outdoor
Igniter
High voltage igniter wire
Freeze protection thermost at
(Only 110 Indoor)
Proportional gas valve wire
Computer board cover
71 0
70 8
10 3
)
Burner assembly
10 1
10 1
70 9
70 9
Burner assembly
11 0
06 5
11 1
11 1
71 2
70 6
70 3
05 3
70 4
70 5
05 3
70 1
05 3
05 3
12 0
05 3
71 2
06 7
71 1
05 3
10 8
05 3
05 5
12 1
71 4
Water way assembly
10 610 7
10 9
05 3
15 0
06 1
06 2
05 5
10 5
05 2
11 2
11 3
11 4
70 8
assembly
10 2
11 9
15 1
11 8
05 2
10 4
05 9
05 9
10 3
11 5
110 Indoor
71 3
15 3
15 4
05 3
40 1
15 2
Exhaust section for 110 Outdoor
05 8
40 1
Item# Part# Description
101
319143-161
102
319143-169
319143-165
103
319143-347
104
319143-341
105
319143-031
106
319143-033
107
319143-034
108
319143-339
109
319143-373
110
319143-340
111
319143-038
112
319143-170
113
319143-044
114
319143-045
115
319143-160
118
319143-050
119
319143-049
120
319143-051
121
319143-213
150
319143-350
151
319143-057
152
319143-370
153
319143-216
154 319143-219
Burner assembly
Manifold assembly with
gas valve assembly LP
Manifold assembly with
gas valve assembly NA
Fan motor
Burner holder gasket
Burner gasket
Burner window
Rod holder gasket
Flame rod
Igniter rod
Rod holder
Rod cap
Burner damper
Manifold gasket A
Manifold gasket B
Fan damper
(Only 110 Indoor)
Gas inlet
Gas inlet ring
Igniter plate
Surge box plate
O-ring P18 NBR (Black)
O-ring P20 NBR (Black)
Silicon ring
(Only 110 Outdoor)
Rain protection plate in
Exhaust chamber
(Only 110 Outdoor)
Exhaust port
(Only 110 Outdoor)
46 0
45 6
B
45 7
40 4
40 6
40 5
45 4
40 7
Water inlet section
45 6
C
46 0
40 9
45 5
41 0
45 4
40 8
06 4
Water outlet section
40 2
46 1
45 8
05 2
41 5
06 4
41 4
45 2
06 3
46 3
41 4
45 3
40 1
Item# Part# Description
401
319143-162
402
404
405
406
407
408
409
410
412
413
414
415
450
451
452
453
454
455
456
457
458
460
461
463
319143-166
319143-167
319143-193
319143-197
319143-198
319143-214
319143-218
319143-194
319143-199
319143-228
319143-149
319143-200
319143-078
319143-088
319143-125
319143-066
319143-146
319143-082
319143-080
319143-100
319143-091
319143-083
319143-105
319143-226
319143-065
Heat exchanger
assembly
for 110 Indoor
Heat exchanger
assembly
for 110 Outdoor
Flow adjustment valve/
Flow sensor
Water inlet
Inlet drain plug
Inlet water filter
Inlet thermistor
Outlet thermistor
Water outlet
Outlet drain plug
Hi-Limit switch
Overheat cut-off-fuse
Heater
Inlet heater
Pipe heater fixing plate
Heater fixing plate 16
Fuse fixing plate 18
Fuse fixing plate 14
O-ring P4 FKM
O-ring P6 FKM
O-ring P14 FKM
O-ring P15 FKM
O-ring P16 FKM
Fastener “14-22”
Fastener “16A”
Silicon ring
(Only 110 Indoor)
41 3
45 0
41 2
B
C
45 1
 Loading...