

Page 1
AOR
63(&75800$67(5
Simon Collings 1997-2000
©
Software Published and Distributed by:
AOR (UK) LTD.,
4E East Mill,
Bridgefoot,
Belper,
Derbyshire DE56 2UA
ENGLAND
Tel: +44 1773 880788
Fax: +44 1773 880780
info@aoruk.com
http://www.aoruk.com
Page 2

Introduction
Minimum System Requirements
This software requires the following minimum requirements of your PC system:
• Pentium P60 PC processor (or higher)
• Colour graphics display with at least 800 x 600 pixel and 256 colours
• Windows
• 8M byte of system memory (640k bytes of base DOS memory); 16M bytes highly recommended if
running tuner and data base applications together
• Microsoft
• at least 8M bytes of free hard disk space (at least 2.6M bytes for tuner application and 5.3M bytes
for data base applications)
• At least one free RS-232 serial port (GPS feature requires an additional serial port and GPS unit –
not supplied)
• Windows
• AOR AR5000 Communications Receiver (with appropriate RS-232 cabling, not supplied)
Installing the Software
®
95, 98 operating system
®
mouse or equivalent (strongly recommended)
TM
compatible printer (optional)
In this manual, it is assumed that you are familiar with Microsoft® Windows® and the hardware you are
using with your computer. If you need further information on using specific Windows
consult your Microsoft
You should have a CD and a floppy key disk suitable for your operating system version (either
Windows
To install, first place the CD in your CD-ROM or DVD drive and follow the instructions that should
appear on-screen after a few seconds. If nothing happens when you insert the CD disk, you probably
don’t have autorun enabled on your system so to start the main application on the CD manually, just
navigate to it with explorer and launch it yourself by double clicking.
TM
95 or 98).
®
WindowsTM help system.
TM
features,
How do I use AR5000 Tuner?
The AR5000 Tuner package is simple and intuitive to use wherever possible. This means that a large
printed manual is no longer needed. The sections below describe how to use the software in more
detail in softcopy format
Use the substantial on-line help that is provided to navigate your way through the program and to find
out how to do tasks.
A good place to start is the “How do I...?” section of the help which is accessible from the contents
page.
Page 3

Overview of AR5000 Tuner
This is a sophisticated control and spectrum surveillance application for use with the AOR AR5000
Wideband All-mode Communications Receiver - The New Horizon. It contains a number of powerful
features which are accessible from both the menu and tool bar. The AOR Data Base Toolkit may be
used directly with this control program to create a powerful communications monitoring system.
You can obtain context sensitive help at any time. From the main desktop, simply press
open this contents page. Most dialogs contain a help push button which allows you to select specific
help.
To display information about this application, click on the
menu option.
The sections of this manual are organised as follows:
Menu Options
File Menu
Edit Menu
Setup Menu
Tools Menu
Log Menu
Windows Menu
Help Menu
symbol or select the Help|About...
F1 to
Toolbar
Toolbar Commands
Procedures
How Do I...?
Operating the receiver from the Front Panel window
Rules for automode bandplan data (how to check data)
Other Topics
Copy Protection
About AOR
Page 4
Menu Options
File Menu
The File menu provides commands for managing files of memory, automode, search and log data used
by the program. This includes creating new files, opening existing files, saving files and printing. You
can also exit the application from this menu.
New
Open...
Close
Save
Save As
Send to RX...
Get from RX...
Print
Print Setup
Send...
Exit
Note: Although new log files can be created from this menu, they cannot be used. You
should use the search, scan, bandscope, or SFW features to generate a log.
Create a new, untitled, document.
Open an existing file.
Close the current document.
Save the current document if its contents have changed.
Save the current document under a new name.
Send the current document from to radio.
Get a document from the radio.
Print the current document.
Set printer characteristics.
Send the current document as e-mail.
Exit from the program.
File|New Command
The File|New command opens a new, untitled file window, and makes it the active window.
You can select the type of data you want (memory, automode or search) from the pop-up menu that is
displayed.
The program prompts you to name untitled documents when they are closed.
Although it is possible to open a new log file, log entries are created from scan or search
operations.
File|Open... Command
The File|Open... command displays the standard ‘Open a File’ dialog box so you can select a
file to load into a new window. You can also create a new window by naming a file that doesn't
currently exist.
You can select the type of data you want using the “List Files of Type:” list box that is displayed in the
‘Open a File’ dialog. Choose from memory (*.mem), automode (*.aut), search (*.sch) or log (*.log).
File|Close Command
File|Close closes the currently active window. If you have modified the file without saving, you'll be
prompted to save before exiting.
File|Save Command
Page 5
The File|Save command saves the file in the active window to disk. If the file is unnamed, the
‘Save File As’ dialog box is displayed so you can name the file, and choose where it is to be saved.
File|Save As... Command
The File|Save As... command allows you to save a file under a new name, or in a new location on disk.
The command displays the ‘Save File As’ dialog box. You can enter the new file name, including the
drive and directory. If you choose an existing file name, you are asked if you want to overwrite the
existing file.
File|Send to RX... Command
The File|Send to RX... command send the contents of the current window to your radio using
RS-232 commands.
If you are sending memory data, you will be asked if you want to send on ly the current selected
individual channel or the whole bank.
DATA IN YOUR RADIO WILL BE OVERWRITTEN
File|Get from RX... Command
The File|Get from RX... command gets a data from the radio and places it in the currently
active window. You should open a new window before getting new data if you do not want to
overwrite the current window.
If you are getting memory data, you will be asked to select a bank (0-9). Please note that getting a
memory bank can take several minutes to complete.
DATA IN THE CURRENT WINDOW WILL BE OVERWRITTEN
File|Print... Command
The File|Print... command prints the contents of the active window. Use File|Print Setup... to
select a printer, and to set printer options.
Note: blank lines are not printed in order to save paper.
File|Print Setup... Command
The File|Printer Setup... command displays the Printer Setup dialog box which allows you to select and
configure the printer to be used to print documents in the application.
File|Send... Command
File|Send... launches Microsoft Exchange and pre-loads it with the current active file. You
will need to have a memory file open before you can send it. Exchange can be used to send the file as
an e-mail attachment over the Internet or as a FAX.
See your system help files for more information about setting up and using Microsoft Exchange.
Page 6

This feature is only available if you are running Windows 95 and have installed MS-Exchange
(this need not necessarily be installed by default).
File|Exit Command
The File|Exit command exits from the application. You can also click on the power button in the Front
Panel window to exit.
If you have modified files without saving, you'll be prompted to save before exiting.
Edit Menu
The Edit menu provides a range of commands for altering data items in the currently active window.
Cut Delete selected text and move it to the clipboard.
Copy Copy selected text to the clipboard.
Paste Move text from the clipboard to the current document.
Clear Clear the selected text and leave a blank line.
Delete Delete selected text removing it completely.
Add Item... Add a new item below the selected item.
Modify Item... Modify the selected item.
Check Check the data (auto mode only).
Renumber Renumber the items into ascending order.
Edit|Cut Command
The Edit|Cut command removes the selected items from the active window and places the text in the
Clipboard. Choose Edit|Paste to paste the cut text into another window. The text remains selected in
the clipboard, and can be pasted several times.
Edit|Copy Command
The Edit|Copy command leaves the selected items intact and places an exact copy of them in the
Clipboard. To paste the copied text into another document, choose Edit|Paste.
Edit|Paste Command
The Edit|Paste command inserts the text currently in the Clipboard into the current window at the
cursor position.
Edit|Clear Command
The Edit|Clear command removes the selected items and leaves blank lines in their place. The text is
not placed in the Clipboard.
DATA CANNOT BE RECOVERED ONCE IT HAS BEEN CLEARED.
Edit|Delete Command
The Edit|Delete command deletes the currently selected items from the current window removing it
completely. The text is not placed in the Clipboard.
Page 7

DATA CANNOT BE RECOVERED ONCE IT HAS BEEN DELETED.
Edit|Add Item... Command
The Edit|Add Item... option allows you to add a new item of data just below the currently selected
item.
The appropriate Add/Modify dialog is opened for the type of data you are editing:
Add/Modify Memory dialog
Add/Modify Search dialog
Add/Modify Automode dialog (automode frequency offsets can be altered using the Automode Offset
Frequencies... dialog)
Edit|Modify Item... Command
The Edit|Modify Item... opens a dialog which lets you alter the current item of data in the
active window.
The appropriate Add/Modify dialog is opened for the type of data you are editing:
Add/Modify Memory dialog
Add/Modify Search dialog
Add/Modify Automode dialog (automode frequency offsets can be altered using the Automode Offset
Frequencies... dialog)
Edit|Check Command
Note: This option is only available with auto mode data.
This menu option allows you to check the syntax of each line of auto mode data and report any errors
that will prevent AR5000 Tuner from creating RS-232 commands for sending to the radio. The checks
that are done are explained in the help topic entitled “How Do I Check Automode Data?”
If an error is detected, you will be told what the error was and on what line it was found. Go to the
relevant line, correct and try again.
YOU SHOULD CHECK AUTO MODE DATA CAREFULLY BEFORE SENDING THE
DATA TO YOUR RADIO, IMPROPER OPERATION OF THE RADIO MAY OTHERWISE
RESULT.
Edit|Renumber Command
The Edit|Renumber menu option allows you to renumber the lines of data items so that they are in
ascending order (by channel number).
You will need to use this option after editing using Clipboard or whenever the channels are not in the
right order before sending the data to the radio.
Setup Menu
The Setup menu allows you to tune your radio directly, alter key controls, cycle power to the radio
remotely and configure the AR5000 Tuner application for operation with your radio.
Page 8
Tune... Select frequency and mode from desktop.
Increment Increments receiver frequency
Decrement Decrements receiver frequency
Select VFO Selects VFO A to E
Power Toggle the receiver power ON/OFF
Toggle Bank Toggle between banks 0 and 1
Automode Toggle automode operation
Cyberscan Toggle cyberscan operation
AFC Toggle automatic frequency control operation
NB Toggle noise blanker operation
Attenuator... Adjust the attenuator
DTMF Toggle DTMF operation
CTCSS... Select CTCSS tone operation
Sound Recording Enabled Select use of sound card
Data Base Directory... Location of AOR Data Base Toolkit.
Communications... Select serial port parameters.
Automode Offsets... Change frequency offsets used with automode
Setup|Tune... Command
The Setup|Tune... command opens a dialog box which allows you to set the frequency, mode,
step size, auto attenuator and auto mode by tuning the radio d irectly.
You can select auto mode operation from this dialog in addition to the push button on the tool bar. If
you have ‘Auto Mode’ checked, the mode and step size in the dialog is ignored in favour of the
settings stored in the radio.
Use the Tune dialog to select the parameters you want and click on OK to accept or CANCEL to abort.
The RS-232 command needed to change the radio are sent and the status display on the tool bar
updated when you press OK.
Setup|Increment Command
This command tunes the radio up in frequency by one step.
Setup|Decrement Command
This command tunes the radio down in frequency by one step.
Setup|Automode Command
This command toggles auto mode operation. Automode is ON when the associated push
button on the toolbar is depressed and OFF when it is up. A tick mark appears next to this menu
option when the feature is enabled.
It is also possible to toggle automode operation from the Tune... menu option.
Setup|Cyberscan Command
Page 9
This command toggles cyberscan operation. Cyberscan is ON when the associated push
button on the toolbar is depressed and OFF when it is up. A tick mark appears next to this menu option
when the feature is enabled.
Setup|AFC Command
This command toggles automatic frequency control operation. A tick mark appears next to this menu
option when the feature is enabled.
This feature available only where supported by the AR5000 hardware.
Setup|NB Command
This command toggles noise blanker operation. A tick mark appears next to this menu option when the
feature is enabled.
This feature available only where supported by the AR5000 hardware.
Setup|Sound Recording Enabled Command
If you have a Windows compatible sound card fitted to your PC (not supplied), you can use it to record
audio from your radio to the hard disk while searching or scanning or using certain other features.
This menu option must be checked (so that a tick mark is visible) before sound recording is enabled
even if you have a sound card fitted and in operation. This allows you to disable audio recording and
prevent large amounts of unwanted files from accumulating on your system if you don’t intend to use
this feature.
To enable sound recording, ensure the tick mark is visible on the Setup menu next to Sound Recording
Enabled by repeatedly selecting this menu option. To disable, simply remove the tick.
The setting you select is stored in the initial values file for re-use nex t time you run the application.
Disabling sound recording will not affect the log.
Setup|Data Base Directory... Command
This option allows you to selected the directory where the AOR Data Base Toolkit was installed. You
must set this parameter so that this program can launch data base applications.
YOU MUST ENSURE THAT THE DIRECTORY SELECTED HERE IS THE SAME AS
THAT SELECTED WHEN YOU INSTALLED THE DATA BASE.
Setup|Communications... Command
The Setup|Communications... command opens a dialog box which allows you to select the
parameters of the PC serial port you want to use for bi-directional RS-232 communications with your
radio.
YOU MUST MAKE SURE THAT THE RS-232 PARAMETERS SET IN THE RADIO
EXACTLY MATCH THOSE SELECTED FOR YOUR PC SERIAL PORT BY THE
SOFTWARE HERE.
Page 10

Setup|Automode Offsets... Command
Conventional automode data can be added/modified in an automode file using the Add/Modify
Automode dialog. However, it is also possible to associate frequency offsets with each automode entry
from a table of values stored in the AR5000’s EEPROM.
This menu option allows you to launch the Automode Offsets... dialog and add/delete frequency
offsets.
EXTREME CAUTION IS REQUIRED WHEN ENTERING AUTOMODE OFFSET
FREQUENCY INFORMATION. This is because the values are sorted in a lookup table in the
AR5000 when they are stored in the automode area of EEPROM and recalled by index number.
If you add or delete offset frequencies, then the position of each offset frequency value in the
EEPROM’s lookup table could change leading to unexpected results with previously defined
automode entries referencing the table.
Setup|Power Command
This menu option toggles the power on the AR5000. You can also do this by clicking on the power
switch in the Front Panel window.
A tick mark appears on the Setup menu next to the Power option when the receiver is powered up and
is absent when it is powered down.
Setup|Toggle Bank Command
You can operate the AR5000 on either of two independent banks of 1000 (10x100) memory channels 2000 in all!
This menu option allows you to toggles between banks 0 and 1.
When switching between banks, the Front Panel window display is blanked for about 2 seconds before
normal operation is restored.
Setup|Select VFO Command
This sub-menu allows you to directly select one of the available VFOs A to E. Simply choose the
VFO you require.
It is also possible to select VFOs using the VFO button on the Front Panel window to cycle through
each VFO in turn.
Tools Menu
The Tools menu contains special tools for searching, scanning, traffic analysis and provides a link to
the AOR Data Base Toolkit.
Maps... Tune using TX sites projected on a map.
Scan Operation... Scan memory channels from file
Scan Expert Options... Expert options for scan operations
Search Operation... Search between two frequency limits
Search Expert Options... Expert options for search
Bandscope Operation... High-speed bandscope (with spectrum)
Single Frequency Watch Operation... Traffic analysis of a fixed frequency
Offset Simplex Reconstruction Operation... Reconstruct offset simplex transmissions
Page 11
Database Toolkit II... Launch the Database Toolkit II main executable
Tools|Maps... Window
This powerful feature provides a link between the AOR Data Base Toolkit and software
control of your radio. Using the map display, you can read text reports from the AOR data base, plot
individual transmitter sites and tune the radio from the mouse just by clicking on a TX site.
The map window allows you to select any vantage point you want (by default it is your home location).
To start plotting a map, either select View|Vantage Point... or right-click on the window with your
mouse. Next open a report (.RPT) file using the Overlay... menu option to overlay data base data on
top of your map. You can then tune simply by clicking on the transmitter symbols that are displayed.
A simple system of symbols is used to indicate when there is more than one frequency active from the
same site or when there is more than one transmitter at the same location. To achieve this, the
following symbols may appear just to the left of the
when more than one frequency on the same TX
when more than one transmitter at the same site
The following menu options are provided from the Maps window.
File Data base overlay options
Setup Select your home location
View Change the map projection
Maps File menu
The Maps window File menu allows you to select and plot transmitter data read as a report from the
AOR Data Base Toolkit. It has the following options:
Overlay... Open a .RPT file and plot the data
Clear Clear the map display
Maps File|Overlay... Command
This menu option allows you to select a data base report and plot the transmitter data from it onto your
map. You must have used the Vantage Point... dialog to plot a map before you begin.
symbol (depending on the data available):
Data base report files have a .RPT filename extension and must be opened using the standard file open
dialog.
All TX sites that have a geographical location are plotted on the map with labeling telling you what the
station is (either by callsign or station name depending on the type of data). If there are TX sites with
no know geographical location, a dialog box with a list box in it is used to display this data: it will not
be lost or ignored.
To tune your radio to a TX site, just single-click on a TX symbol. If there is more than one frequency
for the selected transmitter, you can select the required one from a list box. If there is more than one
transmitter at the same site, each site will also be listed in a list box.
Maps File|Clear Command
Page 12

This clears the map display and all the transmitter site data.
Maps Setup menu
This menu option allows you to define your home location by latitude and longitude. This is the
location on the map where the radio receiver is plotted. You enter the geographical location and a
suitable name using the Setup|Home... dialog.
Maps View menu
This menu option lets you change the vantage point. The following menu options are provided.
Vantage Point... Opens the vantage point dialog
Zoom In Zoom in x2
Zoom Out Zoom out x2
Antipodes Go to the opposite end of the Earth
Rotate +90 Rotate through +90 degrees of longitude
Rotate -90 Rotate through -90 degrees of longitude
Tools|Scan Operation... Command
This menu option opens the Scan Operation... dialog so that a scan operation can be defined and
started.
Search automatically tunes the receiver through all frequencies between two specific limits
looking for active frequencies. Scan recalls specific spot frequencies which have been stored into
a memory file.
Tools|Search Operation... Command
This menu option opens the Search Operation... dialog so that a search operation can be defined and
started.
Search automatically tunes the receiver through all frequencies between two specific limits
looking for active frequencies. Scan recalls specific spot frequencies which have been stored into
a memory file.
Tools|Bandscope... Command
This feature is very similar to the search feature, except that the search is run in a special mode with no
dwell on active frequencies and there is no audio recording.
The Bandscope Operation... dialog allows you to define and start a bandscope.
Tools|Single Frequency Watch... Command
This feature allows you to collect log data for activity on a fix ed frequency.
The Single Frequency Watch Operation... dialog allows you to start and stop an SFW.
Tools|Offset Simplex Reconstruction... Command
This feature allows you to switch between VFOs D and E automatically to reconstruct offset simplex
transmissions.
The Offset Simplex Reconstruction Operation... dialog allows you to start and stop an OSR.
Page 13

Tools|Database Toolkit II... Command
This menu option launches the main application in the AOR Data Base Toolkit. Further details of
using the database are given in the help that is available direct fro m within the application.
You need to have installed the AOR Data Base Toolkit to use this feature.
Log Menu
This menu lets you replay audio collected in a log while searching or scanning. You can select and
replay all the entries or just select entries corresponding to one particular frequency.
Skip Backwards Play previous log entry
Skip Forwards Play next log entry
Play Play all log entries
Pause Pause playing the current log entry
Stop Stop playing the current log entry
Select By Frequency Play previous log entry
Select All Select all entries in the log
Clear selections Unselect all entries in the log
Report by Tally... Produce a text-format report for the log sorted by tally
Report by Freq... Produce a text-format report for the log sorted by frequency
Aging... Set aging of audio files in logs
Delete Delete the entire log
You can replay and review a single log entry using the digital audio tool by double-clicking on the
required line in a log window.
You need to have a sound card installed in your system and connected to your radio to use
these features. If you do not have wave audio installed and working on your system, these menu
options are greyed out. Logs can still be created and analysed using the Report feature.
Log|Skip Backwards Command
Step backwards one entry, play it then stop.
This feature is only available if you have a sound card fitted.
Log|Skip Forwards Command
Step forwards one entry, play it then stop.
This feature is only available if you have a sound card fitted.
Log|Play Command
Play selected audio log entries.
You can select and replay one or more log entries by single-clicking on the listing shown in a log
window. Either single-click on an entry then select the play option from the log menu, or just doubleclick on the entry to replay and review it using the digital audio recorder tool.
Page 14

You can select a block of entries to replay by clicking on the first and shift-clicking on the last
(clicking with the mouse while holding down the SHIFT key). When you press the play button all the
log entries in the block will be played in sequence.
You can control-click (single-click on an entry while holding down the CTRL key) to select individual
entries one-by-one. You can also control-click to toggle the select status of an individual entry.
Use the Log|Select By Frequency menu option to select entries with the same frequency for replaying.
This feature is only available if you have a sound card fitted.
Log|Pause Command
Pause playing the selected log entries. You can resume playing by selecting pause again.
This feature is only available if you have a sound card fitted.
Log|Stop Command
Stop playing the selected log entries.
Log|Select By Frequency Command
This option allows you to select all the entries in the log that have the same frequency. This is useful
for replaying activity from a single frequency that was found during a search or scan.
To select all entries having the same frequency, first select an entry then select the Log|Select By
Frequency menu option.
You can now play all the entries that are highlighted one after another automatically simply by using
the play option in the log menu.
This feature is only available if you have a sound card fitted.
Log|Select All Command
This option selects all the entries in the current log. This is useful if yo u want to eliminate a few
entries by control-clicking them before playing.
This feature is only available if you have a sound card fitted.
Log|Clear Selections Command
This option allows you to clear the selection on every entry in the log. It does not delete any data, use
the Log|Delete menu option to erase a log.
This feature is only available if you have a sound card fitted.
Log|Report by Tally... Command
The Log|Report by Tally... command generates a text-based summary report of the signal activity in
the current log and loads it into Windows Notepad for you to review. The data is sorted by tally (ie the
number of hits on each frequency).
Page 15

Log|Report by Freq... Command
The Log|Report by Freq... command generates a text-based summary report of the signal activity in the
current log and loads it into Windows Notepad for you to review. The data is sorted into descending
frequency order.
Reports
The Log|Report by Tally... or Log|Report by Freq... menu options generates a text-based summary
report of the signal activity in the current log. The d ata may be cop ied and pasted into other documents
or kept on disk as required.
The report filename assumes the same base name as the log, but with a “.TXT” extension. This helps
to avoid confusion. Note: an existing file w ill be overwritten by a report as it is created.
A report can be generated from any kind of log data created by AR5000 Tuner. To generate a report
you first need to have created a log and opened it from the desktop. Selecting the Log|Report... menu
option will cause the currently opened log to b e analysed and Windows Notepad to be launched with
the report pre-loaded into it for your inspection.
Note that Single Frequency Watch logs include the duration of each transmission, so an additional line
is included with the report for these logs which gives the occupancy as the total number of seconds that
activity was seen in seconds and also as a percentage of the duration of the log.
You need to have Windows Notepad installed on your machine for this feature to work.
Log|Delete Command
The Log|Delete command removes the current log and all the wave audio files that it contains from
your hard disk.
YOU CANNOT RECOVER ANY OF THE FILES IN THE LOG ONCE YOU HAVE
DELETED IT.
This feature is only available if you have a sound card fitted.
Log|Aging... Command
This option allows you to set the maximum number of audio files that can be stored in a log (when
using a sound card). The Log Entries Audio Aging dialog is opened when this menu option is
selected.
Window Menu
The Window menu provides commands to control the position and layout of application's windows.
Cascade Resize and position all windows in an overlapping pattern.
Tile Resize and position all windows in an non overlapping pattern.
Arrange Icons Align all iconized windows along a grid.
Close All Close all windows.
Page 16

Window Cascade Command
The Window|Cascade command arranges all document windows from the top-left position of the
application's main window so that the title bar of each is visible.
Window Tile Command
The Window|Tile command arranges all document windows side-by-side in a non-overlapping pattern.
Window Arrange Icons Command
The Window|Arrange Icons command arranges all iconized windows into rows along the bottom of the
application's main window.
Window Close All Command
The Window|Close All command closes all document windows open in the application.
Help Menu
The Help menu provides access to the help system and the about dialog.
Contents Help topic contents.
Help table of contents
The Help|Contents displays the help contents page.
Page 17

Toolbar
The Toolbar is a row of buttons at the top of the main window which represent application commands.
Clicking one of the buttons is a quick way of choosing a command without having to use the main
menu (not all buttons on the tool bar have a corresponding menu option).
Buttons on the toolbar are enabled and disabled automatically according to the state of the program and
the type of data your are working with.
There is also a status display on the toolbar which shows you what frequency and mode the radio is
currently tuned to.
Button Action
Create a new file File|New
Locate and open a file File|Open
Save the file in the active window File|Save
Send the file via e-mail File|Send...
Get a file from the radio File|Get from RX...
Send a file to the radio File|Send to RX...
Modify the current data item Edit|Modify Item...
Decrement frequency Setup|
Set frequency and mode Setup|Tune...
Menu Equivalent
Decrement
Increment frequency Setup|
Set serial port parameters Setup|Communications...
Automode Setup|
Cyberscan Setup|
Print the active window File|Print
Display help file contents Help|
Increment
Automode
Cyberscan
Contents...
Page 18

Procedures
How do I connect my receiver to the computer?
You must connect your radio to an RS-232 port of your computer before you can operate the software.
A screened cable with a minimum of 5 conductors is required for connecting the PC to the receiver.
If screened cable is not used then digital noise may radiate from the conductors of the cable and
cause interference to reception. All cable connections should be high quality for durability.
Full details of the connection required (including the pin configuration) is given in
REMOTE - RS-232computer port
required (unlike other manufacturer’s receivers), you just connect a serial port of your computer
directly to the radio.
First, you need to select appropriate parameters for operation of the RS-232 interface from your
AR5000 - these must be exactly matched by the computer for correct operation. Instructions for
setting the RS-232 interface parameters are given in
AR5000 Operating Manual
of the
You can check your physical connections before using the AR5000 Tuner program using a terminal
program such as Windows Terminal (for Windows 3.x) or HyperTerminal (for Windows 95). Suitable
parameter files for each of these utilities are provided and are accessible from the group of icons that is
installed onto your system.
To check your system, double-click on the icon you want to use (either “HyperTerminal File” or
“Terminal Settings”) then check the parameters are correct for your system as follows:
For Windows Terminal (Windows 3.x):
Select the Settings|Communications... menu option to launch the “Communications” dialog and check
that the parameters selected match those your AR5000 is setup for. You must also ensure that the
correct serial port on your PC is selected in the “Connector” list box.
For HyperTerminal (Windows 95):
.
AR5000 Operating Manual
of the
Section 6-19 CONFIG - Computer control BPS
. No level shifting interface is
Section 5-17
Select the File|Properties... menu option to launch the “AR5000 Properties” dialog. You must ensure
that the “Connect Using” list box has “Direct to Com 2” (or whichever port you are using). The RS232 parameters are set using the “Configure...” push button to launch the “COM Properties” dialog for
the port you have selected.
Once you have done this, you can test the interface by manually controlling the AR5000 from the
keyboard. Try entering the following:
RF <enter>
If you get a response of the form:
VA RF0125650000 ST025000 AU0 MD1
Your interface is setup and you are ready to begin using the program. If not, you need to review the
connections and parameter settings for both PC and radio.
If problems persist, check that the electrical connections in your cable are sound and correctly wired.
Page 19

How do I connect a GPS unit to the computer?
Later versions of Spectrum Master supports the use of a GPS unit compatible with the NMEA 0183
v2.0 protocol. This is a marine standard for serial data exchange between navigation and other
equipment, but can be used to transfer position information into a PC using a spare RS-232 serial port.
If you have a mobile application for this software and are using a PC with two serial ports, you can
connect you GPS unit to one serial port and have the AR5000 on the other. As you change position
while searching/scanning or using the single frequency watch feature with logging enabled, you
position is added to the log. This is useful wh en returning from the field to determine the proximity or
range of the transmissions you were monitoring when on the move. Log reports show your last
position associated with the active frequency.
To check that your GPS is compatible, it must comply with the NMEA 0183 v2.0 standard and include
the RMC sentence as follows:
$GPRMC,120741,A,5152.985,N,00205.733,W,000.0,349.4,230100,004.1,W*7F
You can confirm this by configuring your GPS unit for NMEA 0183 v2.0 output, connecting it to your
PC (usually your GPS manufacturer supplies a suitable adaptor cable) and running a standard
Windows RS-232 terminal program such as HyperTerminal or Windows terminal. You need to select
the appropriate serial port and a baud rate of 4800 bps (the baud rate is fixed). You should then see a
continuous stream of GPS NMEA sentences (each beginning with a "$GP"). Amongst them you should
see an RMC sentence in the same format as above.
How do I get started with using AR5000 Tuner?
To launch AR5000 Tuner from Windows 95:
Select the AR5000 Tuner shortcut from the AOR Spectrum Master option of the Programs menu on
the Windows 95 task bar.
To launch AR5000 Tuner from Windows 3.x:
Select the AR5000 Tuner icon from the AOR Spectrum Master group of icons in program Manager.
The AR5000 Tuner program should then appear on your screen. The main window has a number of
components as follows:
• Menu
The main menu provides access to all the features of the program and is located just below the top edge
of the window. The Menu Options section on the contents page of this help file lists the menu options
available and provides links to further section on each.
• Tool bar
Underneath the main menu is the toolbar. This contains a number of push buttons which provide rapid
access to the most frequently used menu options. If you move your mouse over any of the tool bar
buttons, a line of text is displayed on the status bar in place of the copyright notice on the bottom edge
of the main window telling you what the button does.
• Status display
Next to the tool bar push buttons is a status display showing the current frequency, mode and step size
the radio is tuned to.
Page 20

• S-meter display
Next to the status display is a simple bargraph-based S-meter display. An open squelch is indicated by
a “:” symbol, whereas a close squelch is indicated by a “.”. The signal level is shown using shevrons.
• Status bar
Along the bottom edge of the window is a copyright notice which can be used to display a dialog
showing the version of the AR5000 Tuner program and the firmware version installed in your
AR5000.. Click on the
• Desktop
The main part of the window (the application’s desktop) is used to display files of data in individual
windows. A specially developed style of list box is used for display and provides a flexible and fast
way to handle data. Data windows can be reduced to icons and appear along the bottom edge of the
desktop as minimised windows.
To setup the software:
You need to use the Setup|Communications... dialog to configure the serial port used with your radio.
Select the PC serial port and the baud rate you want from the dialog and click on the “OK” push button
to continue. The parameters you select are stored in the "AR5000.INI" initial values file so that they
can be reused next time you run AR5000 Tuner.
YOU SHOULD ENSURE THAT THE BAUD RATE IS SET TO THE SAME VALUE AS THE
AR5000 IS SETUP FOR.
Once you have setup your PC serial port for the radio you are using, you can begin to use AR5000
Tuner.
or © symbol to display the dialog.
How do I use the on-line help?
AR5000 Tuner has a extensive context sensitive help available at all times. You can obtain help from
the desktop simply by pressing
also provided from a push button in each dialog.
The help information that is provided is hypertext based and fully inter-referenced for your
convenience.
You can also access the SWL working aids from the help menu. Comprehensive information is
provided on the international bandplan (regions 1, 2, and 3), modulation, propagation and foreign
language recognition (non-English).
F1 or by selecting the “Help” option from the main menu. Help is
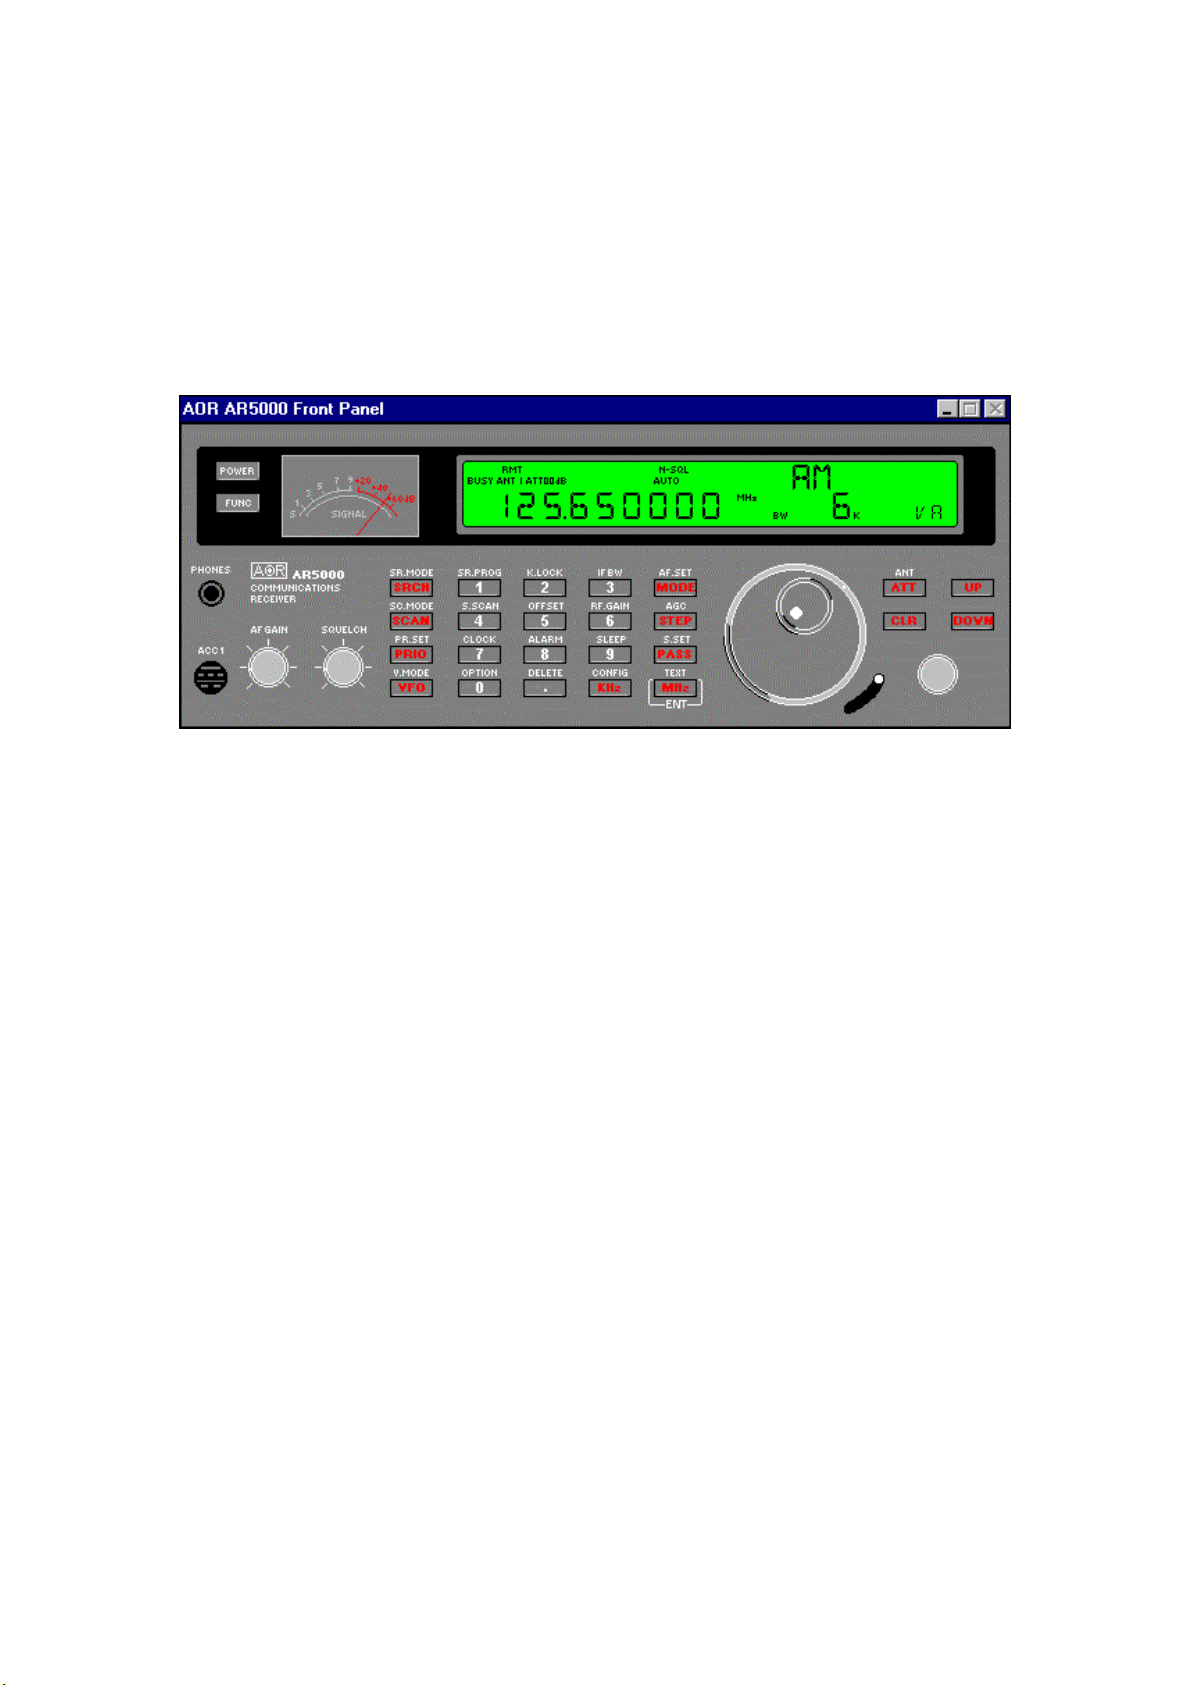
How do I operate the radio using the front panel window?
Full details on how to operate the AR5000 via the front panel window are given in the description.
How do I edit memories?
Memory data is stored in .MEM files in text format. You can use the File|Send to RX... to send data to
the radio or the File|Get from RX... to read memory data from the radio.
Editing is done when a .MEM file is opened into a window on the program’s desktop.
Page 21

The format of the data displayed is as follows:
024 S 123.975000 25.00 AM 0.5k 0dB CIV AIR
025 P 124.000000 25.00 AM 0.5k 0dB CIV AIR
026 121.025000 25.00 AM 0.5k 0dB CIV AIR
027 92.700000 100.00 AUTO FM 110k 0dB
028 P 121.075000 25.00 AM 0.5k 0dB CIV AIR
Where the fields are:
channel number, pass, sel, frequency, step size, automode, mode, bandwidth, attenuator, comment
To edit the parameters of a memory channel, highlight it with your mouse by single-clicking on the
relevant line then click on the modify
menu option to launch the Add/Modify Memory Channel dialog.
Once edited, memory channels must be sent to the radio before they can be used in a scan.
push button on the toolbar or select the Edit|Modify Item...
How do I edit search banks?
Search banks are stored in .SCH files in text format. You can use the File|Send to RX... to send data to
the radio or the File|Get from RX... to read search bank data from the radio.
Editing is done when a .SCH file is opened into a window on the program’s desktop.
The format of the data displayed is as follows:
10 153.740000 154.450000 12.50+ FM ---- 0dB
11 153.740000 154.450000 12.50+ AM ---- 0dB
12 410.000000 425.000000 25.00 FM ---- 0dB USAF
13 156.000000 163.000000 25.00 FM ---- 0dB MARINE
Where the fields are:
bank number, lower frequency, upper frequency, step size (+ = adjust), mode, automode, attenuator,
comment
To edit the parameters of a search bank, highlight it with your mouse by single-clicking on the relevant
line then click on the modify
option to launch the Add/Modify Search Bank dialog.
Once edited, search banks must be sent to the radio before they can be used in a search.
push button on the toolbar or select the Edit|Modify Item... menu
How do I edit the automode bandplan?
Automode bandplan data is stored in .AUT files in text format. You can use the File|Send to RX... to
send data to the radio or the File|Get from RX... to read memory data from the radio.
Editing is done when a .AUT file is opened into a window on the program’s desktop.
The format of the data displayed is as follows:
069 88.000000 FM 100 110k
070 108.000000 AM 50 6k
071 118.000000 AM 25 6k
Page 22

072 137.050000 FM 1 30k
...
078 145.000000 FM 25 15k -600.0
...
105 872.000000 FM 25 15k 12.5
Where the fields are:
band number, starting frequency, mode, step size, bandwidth, step adjust and optional frequency offset
To edit the parameters of a entry, highlight it with your mouse by single-clicking on the relevant line
then click on the modify
to launch the Add/Modify Memory Channel dialog.
Once edited, bandplan data must be sent to the radio before they can be used in a scan.
EXTREME CAUTION IS URGED WHEN EDITING THE BANDPLAN - ESPECIALLY THE
OFFSET FREQUENCIES - AS INCORRECT OPERATION OF THE RECEIVER MAY
RESULT.
The automode data can be check before it sent to the receiver using the Edit| Check menu option. The
checks that are done are explained in the help topic entitled “How Do I Check Automode Data?”
push button on the toolbar or select the Edit|Modify Item... menu option
How do I edit pass frequencies?
A bank of 100 pass frequencies is provided for the VFOs and further banks for each of the search
banks.
To add a pass frequency for the current VFO, click on the “PASS” button in the front panel window.
To list current pass frequencies and delete any that are no longer required, click and hold down for
about one second the “PASS” button so that the pass list dialog is launched.
When searching or scanning, you can review and delete current pass frequencies from the search or
scan dialogs. Frequencies may be added when the search or scan paused on an active channel and the
”Pass” push button in the dialog is enabled.
How do I search between two frequency limits?
Use the search feature, which is accessible from the Tools|Search Operation... menu option. This
allows you to select a search bank from those programmed into the AR5000 and to set the expert
options you want applied to the search. This can also be done from the Tools|Search Expert Options...
menu option.
You can edit search bank, send them to the receiver, then select them for the search from the search
dialog.
It is also possible search using a spectrum display which indicates the signal level on each frequency
found, or the number of times each active frequency is encountered. This is a separate feature
accessible from the Tools|Bandscope Operation...menu option.
The search is done using the search engine provided in the AR5000 firmware. This means
that it is done at the full speed of the receiver and does not require constant polling of the radio
for status information. When active frequencies are found, these are reported by the radio
automatically.
Page 23

How do I scan memories?
Use the scan feature, which accessible from the Scan Operation... menu option. This allows you to
scan memories programmed into the AR5000 from any of the ten banks provided. It is also possible to
change the expert options used for the scan or directly from the Tools|Scan Expert Options... menu
option.
You can edit memories, send them to the receiver, then select banks for the search from the scan
dialog.
The scan is done using the search engine provided in the AR5000 firmware. This means that
it is done at the full speed of the receiver and does not require constant polling of the radio for
status information. When active frequencies are found, these are reported by the radio
automatically.
How do I change the bandplan settings?
The bandplan is changed by editing the automode data for the receiver. There are two types of data
that can be edited: the automode data applied to successive frequencies and automode offset data
EXTREME CAUTION IS URGED WHEN EDITING THE BANDPLAN - ESPECIALLY THE
OFFSET FREQUENCIES - AS INCORRECT OPERATION OF THE RECEIVER MAY
RESULT.
All automode data must be before being sent to the receiver.
To edit the automode data
You can use the File|Send to RX... to send data to the radio or the File|Get from RX... to read
automode data from the radio.
Editing is done when a .AUT file is opened into a window on the program’s desktop.
To edit the parameters of an automode entry, highlight it with your mouse by single-clicking on the
relevant line then click on the modify
menu option to launch the Add/Modify Automode Data dialog.
Once edited, automode data must be sent to the radio and the power cycled for the changes to take
effect.
To edit the automode frequency offset data:
Select the Setup|Automode Offsets... menu option to change the list of frequency offsets available for
use with the automode data.
EXTREME CAUTION IS REQUIRED WHEN ENTERING AUTOMODE OFFSET
FREQUENCY INFORMATION
AR5000 when they are stored in the automode area of EEPROM and recalled by index number from
the table. If you add or delete offset frequencies, then the position of each offset frequency value in the
EEPROM’s lookup table could change leading to unexpected results with previously defined automode
entries referencing the table.
. This is because the values are sorted in a lookup table by the
push button on the toolbar or select the Edit|Modify Item...
How do I record audio from the radio when scanning or
searching?
Page 24

Audio recording needs virtually no setting up, but you will need to install a WindowsTM compatible
sound card, such as one of the Sound BlasterTM cards (not supplied). Follow the installation
instructions that come with your sound card before attempting to use the audio feature. If you have
test software, use that after installation to ensure that your sound card is working properly.
Some adjustment of the audio levels may be necessary for best results. There is usually an audio mixer
utility supplied with your sound card which can be used to adjust the levels correctly. If you are using
Windows® 95, you can use the Volume Control utility to make alterations to sound levels by double-
clicking on the
To connect your radio to the sound card, you need a screened coaxial audio cable with a 3.5mm mono
jack on one end and a suitable connector for the “Line In” socket on your sound card. It may be
necessary to adjust the volume level on the radio to prevent clipping or an excessively low audio level
before proceeding. The ACC 1 accessory socket provides a number of options for connecting audio
related devices to the AR5000.
Once installed, you can enable or disable audio recording from the Setup|Sound Recording Enabled
menu option.
When enabled, audio is recorded to hard disk via your sound card whenever the “Log” check box is
ticked in the search or scan dialogs.
symbol in the bottom right hand corner of the Windows® 95 desktop.
How do I get a text-based report after a search, scan or a
single frequency watch?
Reports are generated from activity logs. You generate a log of this type whenever the “Log” check
box is ticked in the search or scan dialogs.
To generate a report, you need to use the File|Open... menu option and open a .LOG file.
Select the Report by Tally... or Report by Freq... menu options to generate the report and launch
Windows Notepad to view the file automatically. The two different report formats allow you sort
activity by tally (ie the amount of activity) or in descending frequency order. You will see data of the
following form (for an SFW):
=== Single Frequency Watch Log Report ===
Started: Sun Jul 06 16:45:20 1997
Ended: Sun Jul 06 16:52:06 1997
Duration of log = 0.11 hours ( 6.8 minutes)
Number of hits observed = 35
Overall mean traffic density = 309.7 hits/hr ( 5.2 hits/min)
A total of 1 individual active frequencies were found.
Analysis by individual frequency
---------------------------------------------------
Frequency tally density(hits/hr) mean s-meter Your last GPS location
132.40000 2 79.1 55 --°--.---N / ---°--.---W
132.42500 2 79.1 53 --°--.---N / ---°--.---W
132.80000 2 79.1 56 --°--.---N / ---°--.---W
132.95000 2 79.1 54 --°--.---N / ---°--.---W
126.80000 2 79.1 60 --°--.---N / ---°--.---W
133.70000 2 79.1 27 --°--.---N / ---°--.---W
134.12500 1 39.6 45 --°--.---N / ---°--.---W
Page 25

Searches and scans will produce reports with multiple frequencies.
How do I setup the database toolkit?
The optional AOR Data Base Toolkit is installed separately from AR5000 Tuner and so you need to
set the directory you used for the data base to enable the program to launch data base applications.
You just need to type in the appropriate directory name into the dialog that is displayed.
The directory name you choose is stored in the initial values (“.INI”) file so you only need to do this
once. The directory name you type in must be exactly the same as that chosen when installing the data
base.
How do I check automode data?
When editing automode data, you can check that the data is correct using the Edit|Check menu option.
Each line of auto mode data is checked and any errors reported that will prevent the program from
creating valid RS-232 commands for sending to the radio.
The following syntax checks are made:
Invalid channel number
Channel number not in ascending order
Invalid frequency
Invalid step size
Invalid mode type
Frequency is not divisible by current or previous step
Invalid step offset
If an error is detected, you will be told what the error was and on what line it was found. Go to the
relevant line, correct and try again.
When editing auto mode data, a simple set of rules must be followed so that the radio works correctly
when the data is transferred to it. The rules are as follows:
1. The frequencies must be listed in ascending order and be within valid range.
2. Each step frequency must be within the valid range for the radio.
3. The current frequency must have a whole number of steps in it. For example:
046 26.515000 FM 1 6k N
because 26.515 is integer-divisible by 1 kHz, but
001 0.153000 AM 10 6k N
because there are not a whole number of 10 kHz steps in 0.153 MHz
4. The current frequency must be divisible by a whole number of steps used in the previous band
definition. For example, for line 65:
052 29.700000 FM 25 6k N
053 47.450000 FM 12.5 15k N
because 47.450 is divisible by a step size of 25, but
001 0.153000 AM 9 6k N
Page 26

002 1.820000 CW 0.05 3k N
because 1.820 is not divisible by a whole number of 9.0 kHz steps
YOU SHOULD CHECK AUTO MODE DATA CAREFULLY BEFORE SENDING THE DATA
TO YOUR RADIO, IMPROPER OPERATION OF THE RADIO MAY OTHERWISE
RESULT.
How do I switch to the alternate bank of 1000 memory
channels?
To select the alternate bank of 1000 memory channels, select the Setup|Toggle Bank menu option.
How do I move the copy protection token?
A simple utility has been provided so you can move the copy protection “token” that is installed by
your AOR software back onto the distribution floppy disk or between hard disks.
You may need to move the copy protection token back onto you original distribution disk in the
following circumstances:
When installing disk compression software.
)
When upgrading your AOR software
)
When moving the program to a new computer.
)
When returning the original disk to your AOR distributor (for updates etc.)
)
To transfer the token onto the distribution floppy disk, run the Copy Protection Move utility:
To transfer the token onto the distribution floppy disk, click on the “Move to master floppy...” push
button. If the token is already on the floppy disk, you can transfer it to hard disk using the “Move from
master floppy...” push button. You can use this utility to have copies of the program on several
computers at once, however the program will only work on the machine that has the copy protection
token on it.
This AOR software product comes with a single license and two tokens. Contact your AOR dealer to
obtain additional copies of the software.
How do I prevent my system from running out of disk space
when using sound recording?
The amount of space required to store audio on your system can be limited using the Log| Aging...
menu option to set the maximum number of audio files permitted in each log.
How do I send data from AR5000 Tuner by e-mail or FAX?
If you are using Windows 95, you can use an interface to MS-Exchange to send the contents of your
memory (.MEM), automode (.AUT) or search bank (.SCH) files via e-mail or FAX.
With a suitable file loaded into the program, select the File|Send... menu op tion.
Page 27
You must have MS-Exchange installed on your system in the default location for this to work.
How do I switch quickly between VFOs?
You can switch between each VFO (A - E) in sequence using the VFO button in the front panel
window. However, this is quite slow if you want to switch between the VFOs out of sequence.
To select the radio’s VFOs in any order, use the Setup|Select VFO menu option.
How do I exit from the application?
To exit the application, choose File|Exit from the menu.
You can also switch off the radio using the power button on the Front Panel window or from the
Toggle Power menu option.
If you have modified files without saving, you'll be prompted to save before exiting.
How do I drag/drop from Explorer or File Manager?
A memory (.MEM), automode (.AUT), search (.SCH) or log (.LOG) file can be opened into a
window on the AR5000 Tuner’s desktop by dragging the file from the Explorer (or File Manager if
you are using Windows 3.x), and dropping it on the main window.
How do I print files?
There are two commands on the File menu which support printing of documents from the
application. File|Print Setup is used to select and configure a printer device. File|Print causes the
current document to be printed.
Note: blank lines are not printed in order to save paper.
How do I edit files?
Data in this application is presented to you in re-sizable list boxes. This means editing the data is
different to using a text editor but is much more convenient to use with your radio data.
You must first select a line of data before you can work with it. To do this, just single-click on the line
you require with your mouse. To can select a continuous block of data by clicking on the first line
then again on the last line with the
of lines that are not in a block by single-clicking on each with the
You will get slightly different behavior depending on the type of data you are working with (memory,
search bank or auto mode). Some of the Edit Menu options will be disabled at certain times if they
cannot (or should not be used).
SHIFT key held down. Alternatively, you can select a number
CNTRL key held down.
Operating the Reciver from the Front Panel window
The Front Panel window aims to mimic the real AR5000 front panel as closely as the RS-232
command set permits. This means in practice that most of the features of the AR5000 can be accessed
Page 28

via software including volume and squelch settings, IF configuration settings, keypad frequency
display, etc... Some functions described in the AR5000 User’s Manual require front panel keys to be
held down for about a second - supported functions using this method of access can be used in exactly
the same way via software.
Please refer to your AR5000 Operating Manual for details of how to operate your radio. Differences
between the real radio and the software emulation are summarised below:
Power switch - this toggles power to the AR5000 but permits RS-232 operation to continue (so that
power can be restored via RS-232). See the Toggle Power menu option.
Search/Scan - Selecting any search or scan parameter setting individually will launch th e Expert
dialog permitting all parameters to be altered. Refer to the Tools|Scan Operation... and To ols|Search
Operation... menu options for further details.
Audio level - You can adjust the audio level using a slider control having a logarithmic characteristic
by single-clicking on the volume knob to open a dialog.
Squelch level - The squelch level can be controlled using a slider control which is displayed when you
single-click on the squelch knob.
Direct Frequency entry, mode, step, attenuator, up/down, IF bandwidth, AGC, antenna, memory
operation, pass operation, Key lock - Use in the same way as described in the User’s Manual for the
AR5000
AF set - Selecting the AF set function will launch a dialog allowin g any of the audio parameters (LPF,
HPF, de-emphasis and CW pitch) to be changed
VFO - The VFOs can be selected or VFO function restored using the VFO key (as per the AR5000
User’s Manual). It is possible to select any of the available VFOs directly from the Select VFO menu
option.
Options - Selected features only (see below)
The following functions are not supported by this package: Clock functions, alarm, sleep,
T-ELMT, DE-SCR, priority operation, RF Gain control, S.SET, SR.PROG, S.SCAN, OFFSET,
CONFIG
The front panel display follows the status of the receiver wherever possible, however, some
operations do not permit full tracking of status - this could lead to slight discrepancies
betweenthe radio hardware and this software in some circumstances.
Page 29

Other Topics
Copy Protection
THIS AOR SOFTWARE IS COPY PROTECTED. THE PROTECTION DOES NOT USE
A DONGLE OR OTHER CUMBERSOME DEVICES, HOWEVER, THERE ARE A FEW
SIMPLE POINTS THAT YOU MAY NEED TO REFER TO. PLEASE READ THIS SECTION
CAREFULLY.
AOR software is copy protected using a system which places a token on your hard disk when you
install the program. The program will only work on the disk you installed it to. There is no dongle or
key-disk, so once installed the program runs completely normally and you will not be
inconvenienced (unlike other schemes). However, you cannot DISKCOPY the distribution disk or
duplicate it with COPY commands.
Specific points to remember:
1. The distribution disk contains two tokens. This means that you can install up to two complete
copies of the software on separate machines at once. You cannot transfer the program to another
machine without first moving one of the tokens back onto the original distribution disk
then re-installing. The tokens can easily be moved with the MOVE.EXE program that is provided.
Contact your AOR distributor if you need additional copies of the software.
2. You should keep your original disk in a safe place away from strong magnetic fields, high humidity
or other environmental conditions that could damage it. You will not be able to re-install the software
or move it to another machine without the original distribution disk.
3. Two hidden files are copied to a hidden sub-directory of the target directory when you install the
software. These contain configuration information for the copy protection scheme and are normal
DOS format files. DO NOT DELETE THESE FILES UNDER ANY CIRCUMSTANCES. If these
files are deleted, your AOR software will not run.
4. If you are using a backup utility, make sure that the two hidden files are not backed up otherwise,
when restored, the copy protection scheme may not be able to validate the installation and your AOR
software will not run. Most backup utilities do not touch these files because they have the hidden,
system and read-only attributes set. The two copy protection files also do
not have the archive bit set, so you should be able to exclude them from backups by setting up your
backup software to ignore files without an archive bit. Remember, it is not the backup but the restore
that can cause problems.
5. The /d+ option of the PC-Kwik disk cache software from Multisoft Corporation is not compatible
with the copy protection scheme and should be temporarily disabled when installing your AOR
software or moving the token. HyperCache also affects the copy protection scheme in the same way
because of non-standard methods of accessing the floppy disk drive. Again, it
should be temporarily disabled, but both caches may be used at other times.
6. The copy protection scheme is compatible with disk drives compressed with SuperStor, Stacker and
DoubleSpace. However, you should temporarily remove the token from the hard disk when installing
one of these compression utilities because the protection will appear invalid when the drives are
compressed. The disk compression utilities warn you of this in their manuals.
7. The copy protection scheme is known to be compatible with the following disk defragmenters:
Central Point’s Compress, Digital Research's Diskopt, Stac's Sdefrag and Microsoft's Defrag.
Page 30

8. The copy protection scheme is not currently compatible with Windows NT.
9. The copy protection scheme is not compatible with non-standard floppy disk systems. At present
(7/95) this includes the following PCs:
Evesham Vale Voyager laptop
Zeos Pentiums
It is possible to install onto a PC with a non-standard floppy disk (or no floppy disk) using a networked
standard drive. The easiest way to do this if you do not already have a network is to use the
INTERLNK or INTERSVR utilities supplied with MS-DOS.
10. The copy protection scheme is compatible with Windows 95. However, you can completely erase
your tokens using Explorer to drag and drop the AOR directory onto the Recycle bin. Although the
token files are not deleted, they cannot be restored to their original positions on disk. EXPLORER
DOES NOT GIVE WARNINGS LIKE FILE MANAGER UNDER WINDOWS 3.X!.
11. Some problems with deleted token have been reported using Norton Speed Disk.
About AOR
AOR has been around for quite some time in the radio industry. In 1977 two dedicated Japanese Radio
Amateurs Mr.Takano and Mr.Oshima founded AOR and the rest is history. The goal has been to
pursue excellence in radio design and to market their ideas commercially. AOR has always been at the
forefront of radio communications technology, the real breakthrough came in 1984 when the World's
first continuous coverage wide band monitor receiver was launched, the AR2001. Continuous research
and development has upgraded the receiver designs leading to the introduction of the high-tech
AR3000A, AR3030 and AR8000, of course work still continues today.
In 1991 AOR UK LTD was formed as an associate company of AOR LTD Japan. Initially business
concentrated with distributing and servicing products manufactured by our parent company in Japan.
AOR MANUFACTURING LTD is another UK based associate company formed in 1995 to produce
the "UK designed & built" AOR AR7030 high dynamic range short wave receiver.
We supply up-to-date information on new products, factory modifications etc. In return we would like
to hear from users of our products, and especially comments or criticism which may be reflected in our
future productions.
AOR Japan Contact details
International distribution is handled by AOR Japan who appoint distributors world wide. If you have
queries about AOR products from outside of the UK and Ireland or the USA, please contact AOR
Japan:
AOR LTD
2-6-4 Misuji, Taito-Ku, Tokyo 111-0055, Japan
Tel: +81 3 3865 1681 (Japanese)
Tel: +81 3 3865 1695 (English)
Fax: +81 3 3865 1697
E-mail: post@aorja.com
Website: http://www.aorja.com/
Page 31

AOR (UK) Contact details
If you are located in the UK or Ireland and have queries or would like further specific information
about AOR products, please feel free to contact us (please state the country you are located in if
outside of this area):
AOR (UK) LTD / AOR Manufacturing Ltd
4E East Mill, Bridgefoot, Belper, Derbyshire DE56 2UA, England
Tel: 01773 880788 International: +44 1773 880788
Fax: 01773 880780 International: +44 1773 880780
E-mail: info@aoruk.com
Website: http://www.aoruk.com/
AOR (USA) Contact details
If you are located in the USA and have queries or would like further specific information about AOR
products or their support, please feel free to contact:
AOR USA INC.
20655 S. Western Ave, Suite # 112, Torrance, CA 90501, USA
Tel: +1 310 787 8615
Fax: +1 310 787 8619
E-mail: info@aorusa.com
Website: http://www.aorusa.com
 Loading...