

Page 1

PD5084 Color Plasma Display Television
Content
Safety Precautions
Features and Fuction............................................ 2
Prepare
Connection to other equipment
User’s Manual
Prepare ...................................................... 3
Set up TV Cable and Turn on Power ............................. 4
Turn on the TV Set ............................................ 5
Remote Control Transmitter Setup ............................... 5
Front Panel Controls .......................................... 6
Input Connection of Video Signal (DVD/VCD/VCR) .............. 7
Input Connection of PC Signal (PC/DVI-D) ..................... 8
Output Connection of Video Signal ............................... 9
Operation
Operation of Remote Control Transmitter ......................... 10
Menu Fuction ................................................. 11
Main Menu.................................................... 11
Picture Menu.................................................. 11
Sound Menu .................................................. 12
Channel Menu ................................................ 13
Display Menu ................................................. 14
Layout Menu(MultiWindows) .................................... 15
Setup Menu................................................... 16
Time Menu ................................................... 17
Safety Notice ................................................... 18
Specification.................................................... 20
Troubleshooting ................................................ 21
To obtain maximum benefit from your set, please read these Instructions before making any adjustments,
and retain them for future reference.
Page 2

Safety Precautions
WARNING
1) To prevent damage which may result in fire or shock hazard, do not
expose this appliance to rain or moisture.
Do not place containers with water (flower vase, cups, cosmetics, etc.)
above the set. ( including on shelves above, etc.)
2) To prevent electric shock, do not remove cover. No user serviceable parts
inside. Refer servicing to qualified service personnel.
3) Do not remove the earthing pin on the power plug. This apparatus is
equipped with a three pin earthing-type power plug. This plug will only fit an
earthing-type power outlet. This is a safety feature. If you are unable to
insert the plug into the outlet, contact an electrician.
Do not defeat the purpose of the earthing plug.
CAUTION
This appliance is intended for use in environments which are relatively free
of electromagnetic fields.
Using this appliance near sources of strong electromagnetic fields or where
electrical noise may overlap with the input signals could cause the picture
and sound to wobble or cause interference such as noise to appear.
To avoid the possibility of harm to this appliance, keep it away from sources
of strong electromagnetic fields.
Symptoms
After-images appear
Welcome
Check
Do not allow a still picture to be displayed for
an extended period, as this can cause a
permanent after-image to remain on the
Plasma TV.
Examples of still pictures include logos, video
games, computer images, Teletext and images
displayed in 4:3 mode.
Note:
The permanent after-image on the Plasma TV
resulting from fixed image use is not an
operating defect and as such is not covered by
the Warranty.
This product is not designed to display fixed
images for extended periods of time.
1
Page 3

Features and Fuction
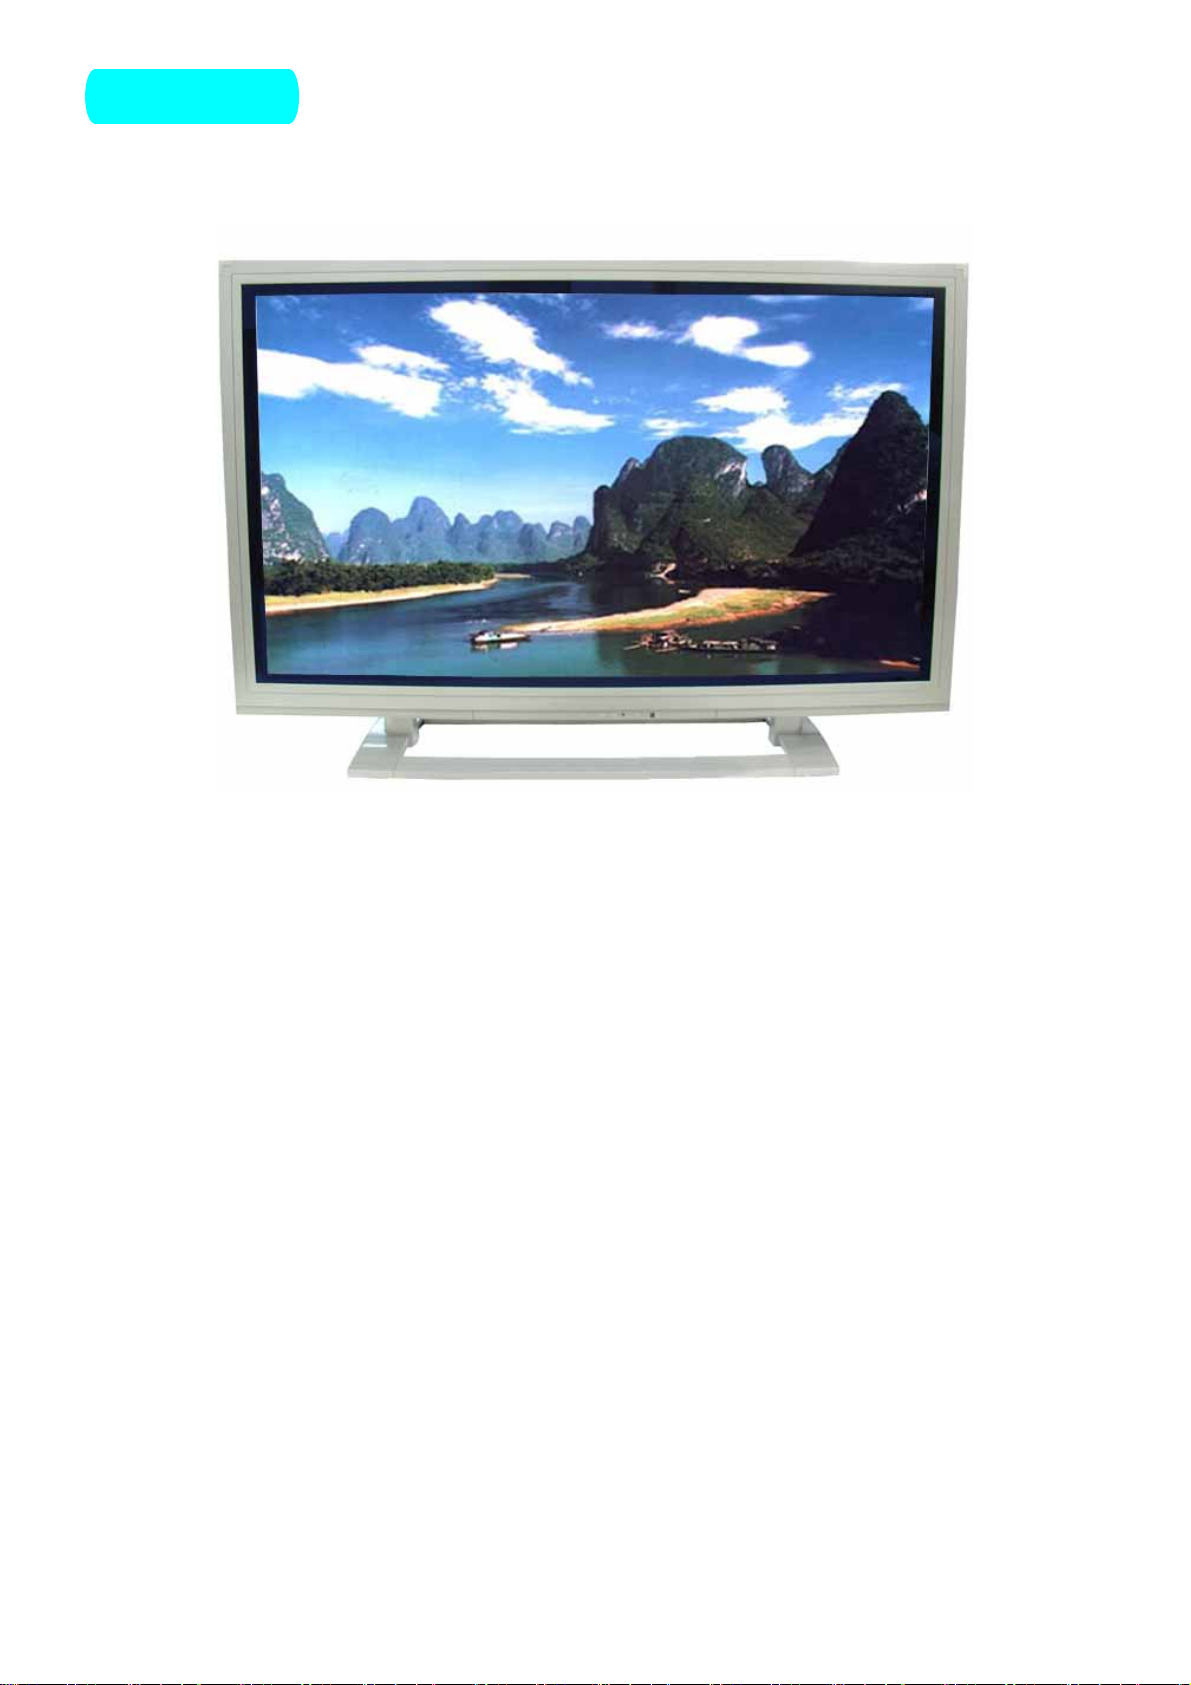
50 inch(127cm)Large Screen Flat Panel Plasma Display
Panel Resolution: WXGA(1366 x 768 Pixels)
MAX Brightness of Panel: 1000 cd/m
2
MAX Contrast Ratio of Panel: 3000:1
View Angle: Greater than 160°
Internal Dual TV Tuner, Support 180 channels
Dual Video, Dual S-Video, Single Y/Cb/Cr(480i, 576i)
Single Y Pb Pr (480P, 576P, 720P, 1080i, 1080P)HDTV Ready
Single Video, Audio(L/R)Output
PC D-SUB 15Pin Signal Receiver
DVI-D Signal(TMDS)Receiver, Support HDTV, SDTV
External 10W×2 Speaker
Intelligent Volume Control Function
PIP(Picture in Picture)
POP(Picture Out Picture, Split Plane)
POP3 and POP9
High Effective 8 bits Digital Video Decoder
Digital 4H Comb Filter
3:2, 2:2 Pull Down
DLTI / DCTI Digital Brightness/ Chroma Adjust
Digital I / P Processor, Progressive Display
HDSPT(High Definition Scaler Processor Technology)
TV RF Frequency Range: 49.75MHz --- 855.25MHz
TV Receiving Systems: PAL D, K, I, B / G, SECAM L, L’
Auto Scan TV Channels, TV Program Order
Favorite Channel Function
Timer to Turn ON / OFF TV Set
MTS, Stereo, Mono Sound, Surround Function
2
Page 4
Prepare
1. Prepare
Appearance must see the Real TV Set
This picture is for reference.
● Do not place the Plasma TV on sloped or unstable surfaces.
● Do not place any objects on top of the Plasma TV.
● This Plasma TV radiates infrared rays, therefore it may affect other infrared
communication equipment.
● Install your infrared sensor in a place away from direct or reflected light from your
Plasma TV.
● Ensure This Plasma TV use in standard atmosphere and under 2000 meter altitude.
● Avoid installing this product near electronic equipment that is easy to receive
electromagnetic waves.
3
Page 5
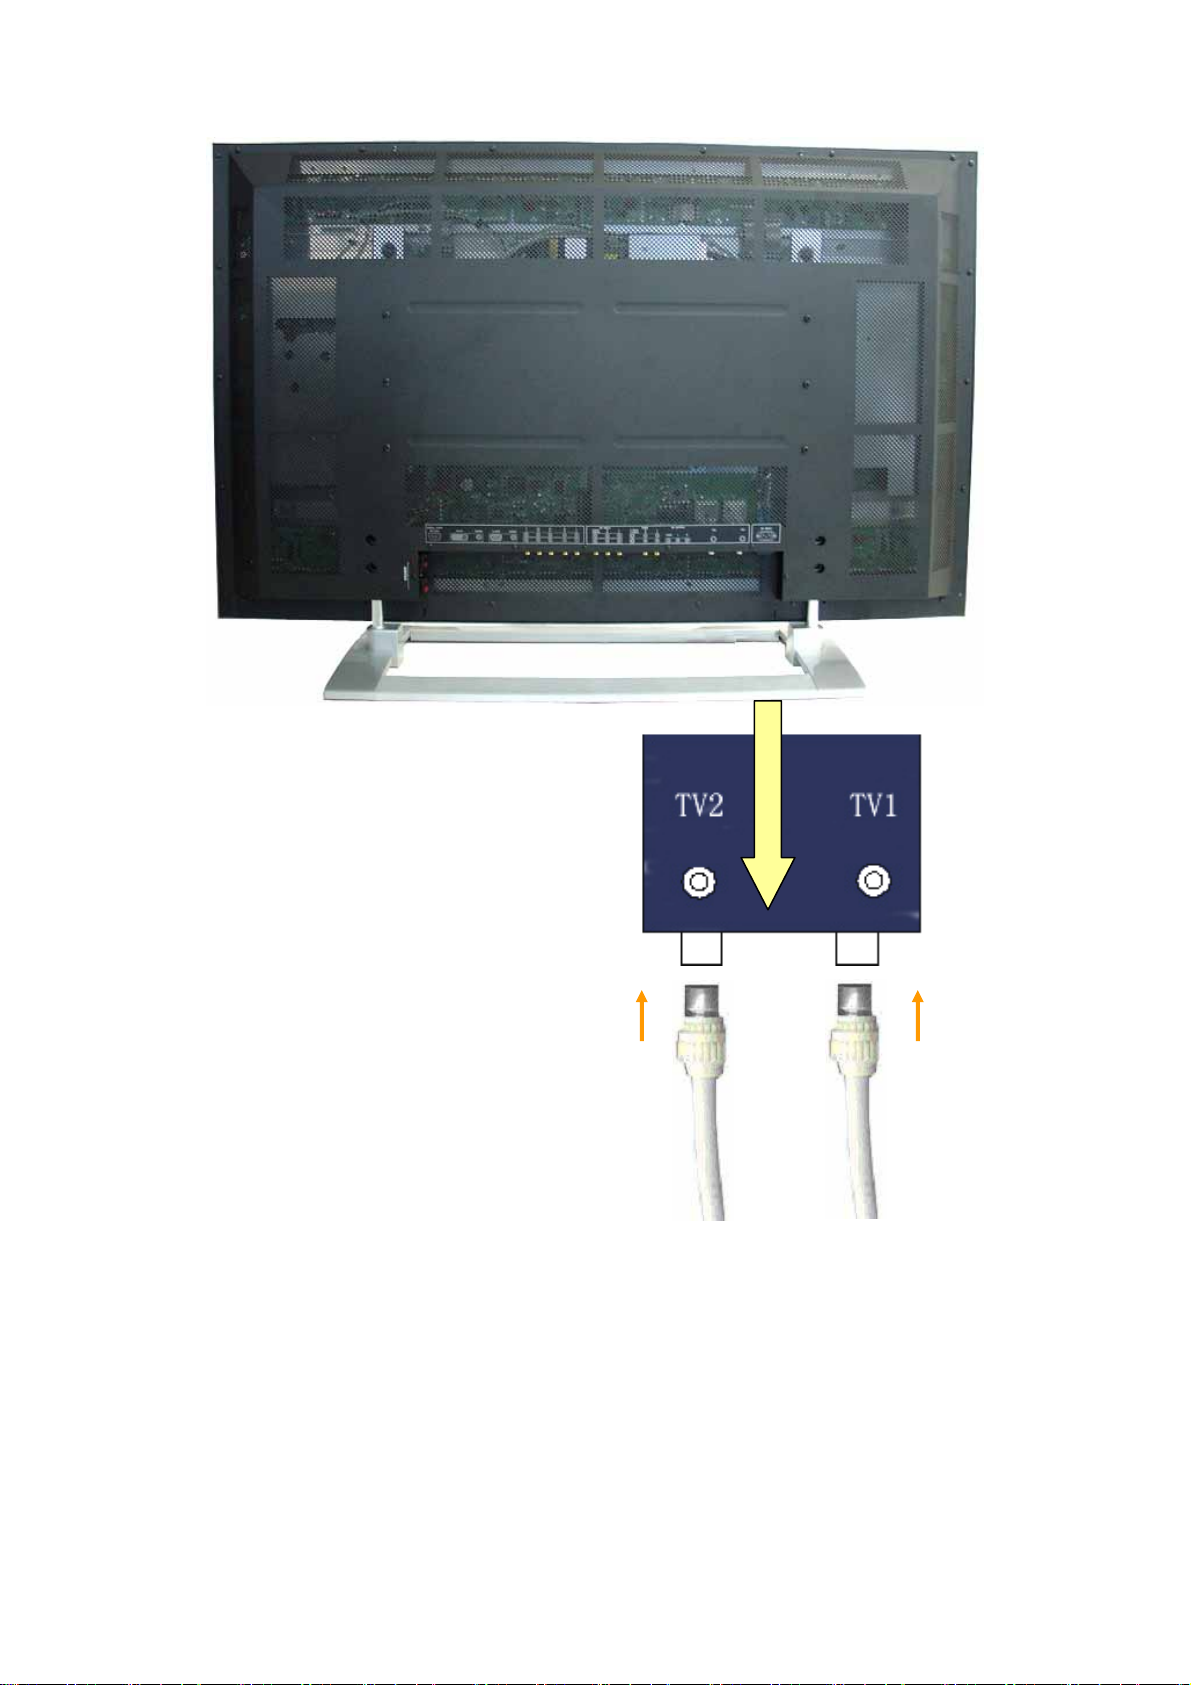
2. Set up TV Cable and Turn on Power
RF connection:
Connect the Aerial lead into the
TV Aerial socket.
Note: Additional equipment and
cables shown are not supplied
with this set.
Antenna Lead
4
Page 6
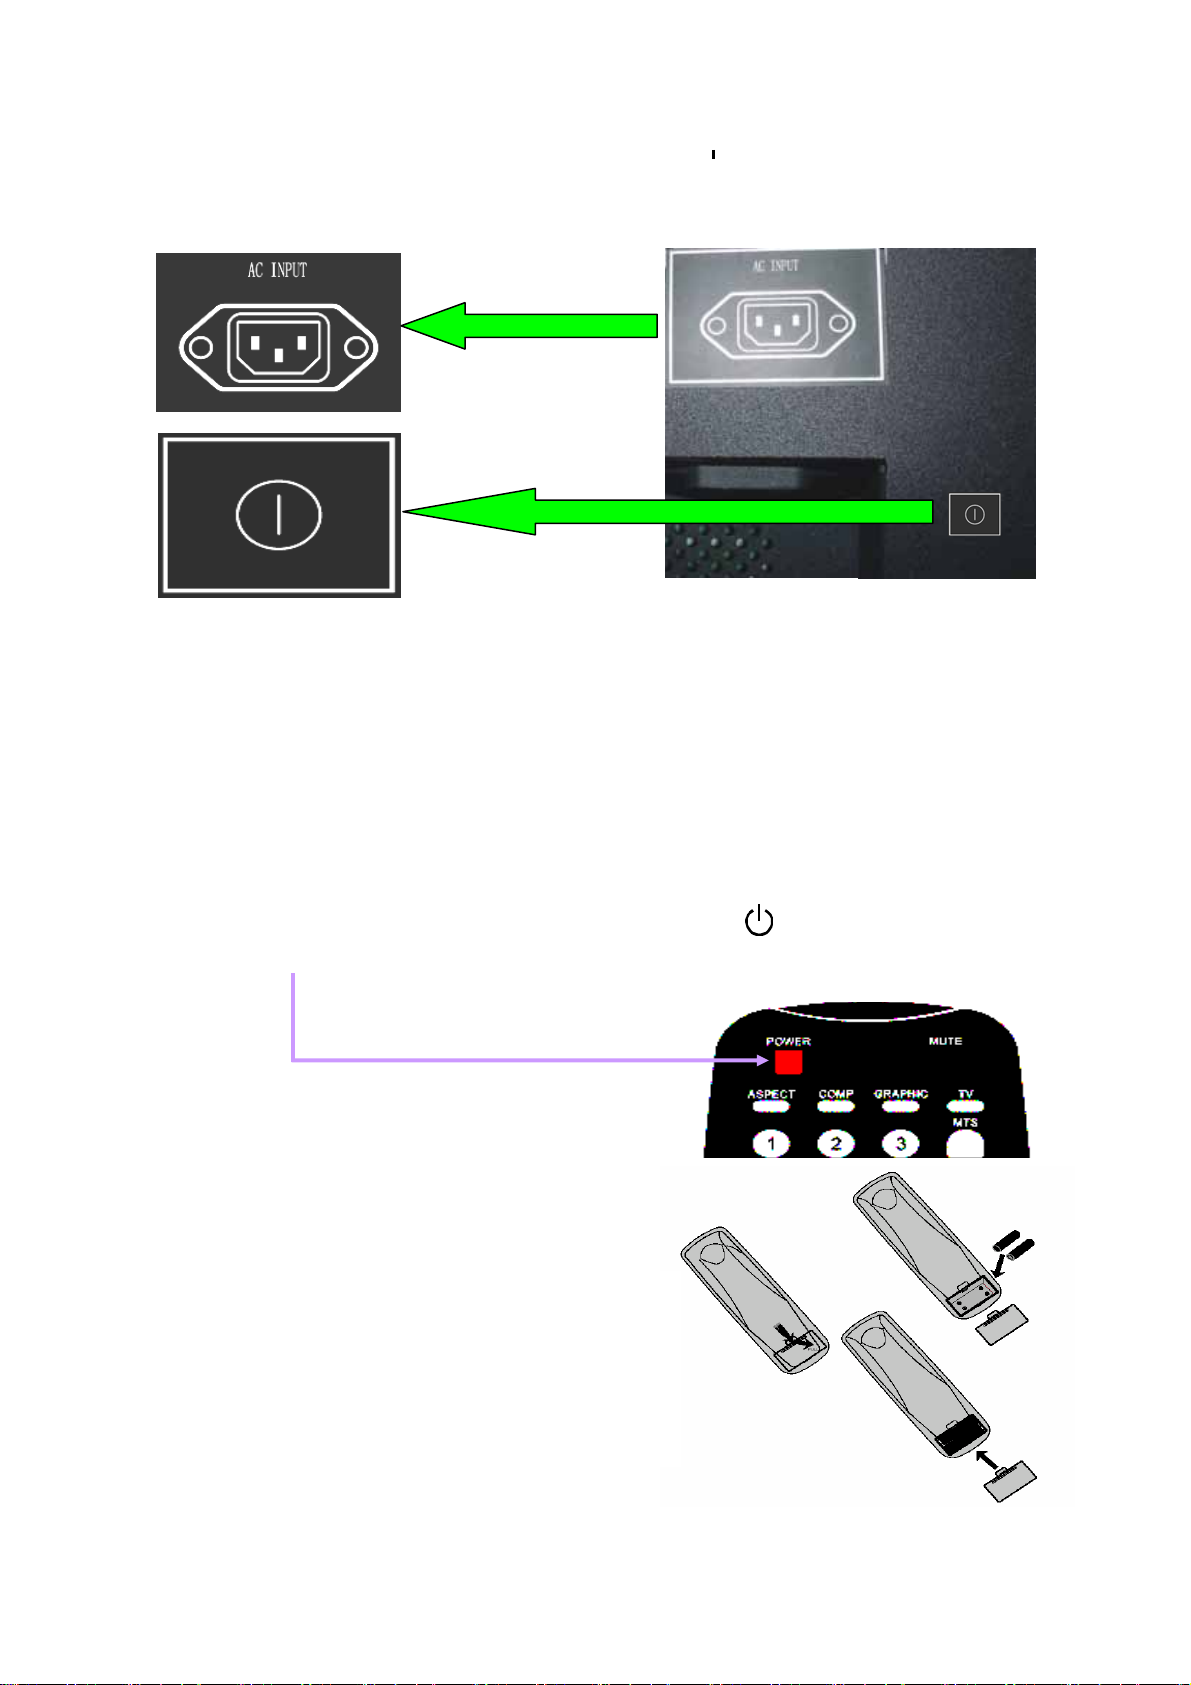
Connect the AC cord plug to the TV Set:
Connect the AC power cord plug to the ”AC IN” jack, Connect the other side
plug to the Wall Outlet. Press the Power switch“
the set on.
View from back of the TV set
○”on the Plasma TV to turn
3. Turn on the TV Set
When turn on the TV Set, the Power Indicator “ LED ” will flicker. Then
terminate to Turn on or standby state.
Power Indicator: Blue(Turn On)
Power Indicator: Orange(standby)
The screen below is displayed for a while after the Plasma TV is turned on. At
TV state, user can see TV program or Snowy Picture.
No TV program can see Snowy Picture or blue screen. (User can setup)
If the Power Indicator is orange, user can press the “
controls or “POWER” key on the Remote Control Transmitter.
” key on the Front panel
4. Remote Control Transmitter Setup
① Slide off the battery cover
② Insert batteries
Note correct polarity (+and -).
③ Replace the cover
• Make sure that the batteries are fitted the
correct way round.
• Do not mix different battery types,i.e.Alkaline
and Manganese or use rechargeable (Ni -
5. Front panel controls
Cad)batteries.
5
Page 7
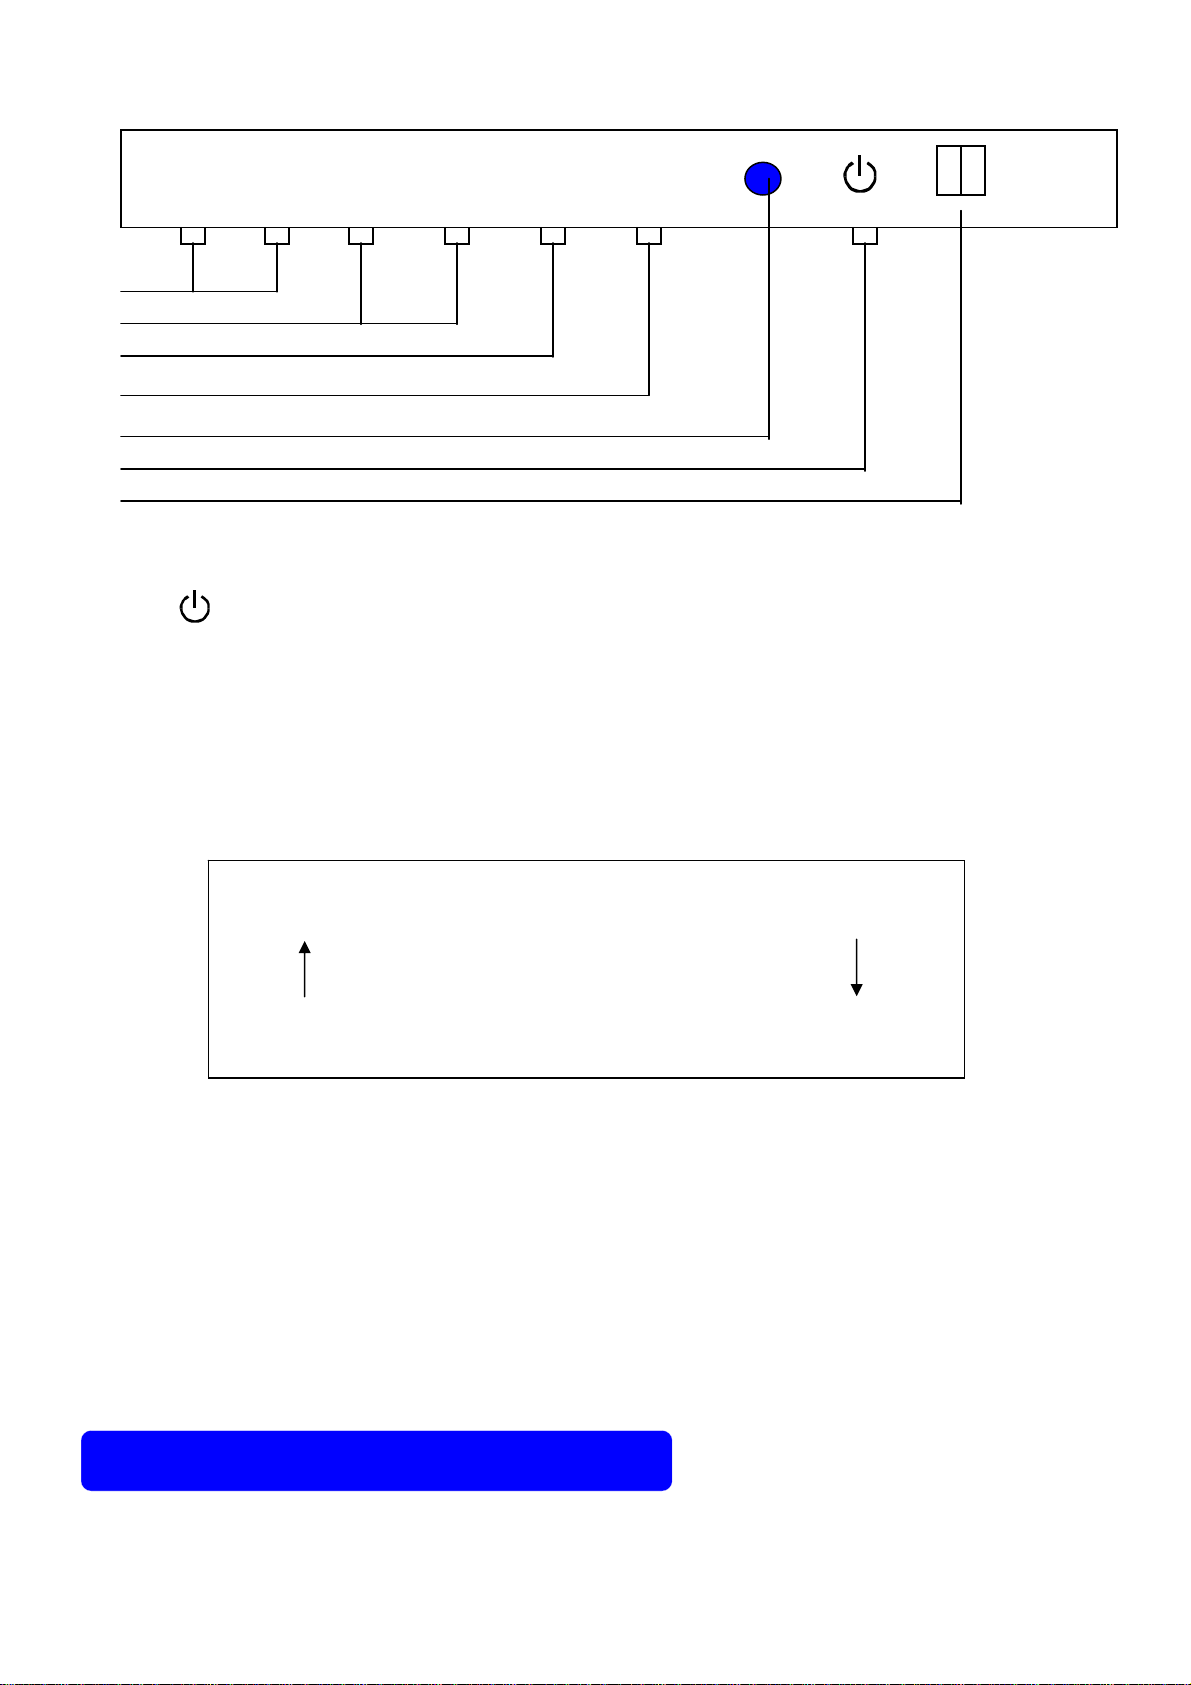
5. Front Panel Controls
⑦
⑥
⑤
④
③
②
①
① IR: Remote Control aim at this part. (infrared ray Receiver)
- CH + - VOL + MENU MODE
IR
②
: Power Key. Press the key into standby or Turn on state.
③ Power Indicator:
Power Indicator: Blue(Turn On)
Power Indicator: Orange(standby)
④ MODE: Signal Source selection.
Press repeatedly to select from the available Signal Input:
TV2 → S-VIDEO2 → AV2 → YCbCr → D-SUB
AV1 ← S-VIDEO1 ← TV1 ← YPbPr ← DVI
⑤ MENU: Displays the On Screen Display and setup the TV Set.
● Press this key into Main Menu, press - CH + key select item.
Press Volume Up (+) key “ VOL + ”into submenu.
● Press MENU key return to main menu or exit menu.
● Press MENU key can stop TV program searching.
⑥ - VOL +: Volume Down (-) / Up (+)
● Press - VOL + key can enter menu or adjust some function.
⑦ - CH +: Programme Number Down (-) / Up (+)
● Press - CH + key can down or up menu item.
Connection to other equipment
Please connect this TV Set to other equipment as picture below.
You may have many types of equipment as: DVD, VCD, VCR, Set Top Box,
X-Box and so on.
6
Page 8

Input Connection of Video Signal(DVD/VCD/VCR)
We have 2 AV input jacks for VIDEO/AUDIO and S-VIDEO/AUDIO. The R / L
is Audio input for every VIDEO and S-VIDEO.
We have 2 components signal input jack: Y Cb Cr and Y Pb Pr. The R / L is
Audio input for every Y Cb Cr and Y Pb Pr.
If your DVD or Set Top Box have Y Cb Cr or Y Pb Pr output, you can connect it to Y
Cb Cr or Y Pb Pr input jack. And select to Y Cb Cr or Y Pb Pr source input. (Some DVD
or Set Top Box need to set to Y Cb Cr or Y Pb Pr output)
Notice: If you see that display abnormality in screen, you need to check the cable
connection and DVD setup.
7
Page 9

Input Connection of PC Signal (PC / DVI-D)
▲ Notice: The PC output can not set out of range
The highest Resolution input is 1280 X 1024 / 60Hz
Some PC models cannot be connected to the set
8
Page 10

● D-SUB 15 Pin:
Connect D-SUB signal cable(VGA cable)from PC to D-SUB jack at
the back of this TV Set. And connect earphone cable from PC earphone
output jack to AUIDO input jack near to the D-SUB jack.
Setup:
Use the key “GRAPHIC”in Remote Control Transmitter or
“MODE”key on Front panel controls select source to “D-SUB”state.
Then turn on the PC.
● DVI-D:
Connect DVI-D 24 Pin signal cable(TMDS cable)from equipment to
DVI-D jack at the back of this TV Set. And connect earphone cable from
equipment earphone output jack to AUIDO input jack near to the DVI-D
jack.
Setup:
Use the key “GRAPHIC”in Remote Control Transmitter or
“MODE”key on Front panel controls select source to “DVI”state. Then
turn on the equipment.
Output Connection of Video
The AV OUTPUT part is analog Video (CVBS)and Audio output. L & R is
Audio left and right channel. They can connect to other analog Video(CVBS)
input and Audio input device. See the picture as top.
9
Page 11

f
j
Operation
Operation of Remote Control Transmitter
“COMP”
S-Video2、AV2、YCbCr、
S-Video1、AV1 source
select key
“POWER”
The TV Set turn on /turn
off key
“ASPECT”
Fill all, Normal, Wide,
Zoom display select
“0~9 number”
Number key
“PIP”
Picture in Picture On
or Off key
“PIP-SWAP”
PIP and POP state
change two picture
“W.SELECT”
Select Main picture PIP
“GRAPHIC”
D-SUB、DVI、Y,Pb,Pr
(HDTV)source input
“MUTE"Mute the sound
“TV”
TV1, TV2 source select,
into TV state
“MTS "
MTS, Stereo, Mono
Sound change
“S-MODE”
Sound mode select:
cinema, music, news, User
“SLEEP ”
Select timer into Power
down state. off→30→60
→90→120→of
“FREEZE"
Press to freeze the picture,
press again to return
“DISPLAY/INFOR”
Display the state, source
“VOL- 〈 / VOL+ 〉”
Press VOL - 〈/ VOL + 〉
key adjust volume,
uct the data in Menu
Ad
“CHRTN”
TV channel return, see
last TV channel
“FAVORITE ”
Into favorite channel Menu.
VOL - 〈/ VOL + 〉and CH+▲
/ CH -▼ key adjust, Enter
“P-MODE”
Picture mode select:
normal,User, Movie,bright
“MENU”
Enter or exit MENU.
Exit other operation
“CH+▲ / CH -▼ ”
Press to select the next
lower or higher Program
number.
Move the cursor up and
down on the Menu
Other Key:
CCD: close caption Menu V-CHIP: RISTRICT TV and Movie Viewing according to the
parental level chosen Menu TT: Europe Teletxet On / Off
Other Teletext function key: HOLD, SUBTITLE, REVEAL, R, G, Y, C, EXIT, INDEX,
MIXER, DISPLAY
10
Page 12

Menu Fuction All the menu picture is for reference! Not real.
1. Press “ MENU” key on Remote Control Transmitter or Front panel controls
2. Press “CH+▲ / CH -▼ ”Move the cursor up and down select sub menu item
3. Press “ VOL+ 〉” enter sub menu item, and adjuct in the item.
Main Menu
Press “MENU” key enter Main Menu, as this picture.
PICTURE: Picture Menu SOUND: Sound Menu
CHANNEL: Channel Menu DISPLAY: Display Menu
LAYOUT: Layout Menu SETUP: Setup Menu
TIMER: Timer Menu
Press “ VOL+ ”,enter sub Menu
1、 PICTURE To Picture adjust menu
CONTRAST: Contrast adjust 0 ~ 100 Adjust
BRIGHTNESS: Brightness adjust 0 ~ 100 Adjust
COLOR: Color chroma adjust 0 ~ 100 Adjust
SHARPNESS: sharpness adjust 0, 25, 50, 75, 100
TINT: tint adjust only in NTSC system Mode
H.PHASE: horizontal Phase adjust(only in D-SUB Mode)
COLOR TEMP.: Color temperature select,standard→Warm →Cool
Press “CH+▲ / CH -▼ ”Move the cursor up and down select sub item
Press “ VOL+ 〉” enter sub menu item, and press VOL - 〈 / VOL + 〉adjuct in the item
11
Page 13

2、SOUND To Sound adjust menu
BASS: Adjusts lower deeper sounds 0 ~ 100 Adjust
TREBLE: Adjusts higher sharper sounds 0 ~ 100 Adjust
BALANCE: Adjusts the sound level difference between left and right speakers
0 ~ 50 / 50~100 Adjust
SURROUND: Surround ON / OFF
EARPHONE VOL: No use in this type TV Set
INTELLIGENT: Use intelligent TV mode On / Off
Turn on this function can set different volume in different channel
SOUND COMP.: TV sound compensate normal / high precision
Only use it in area where it TV broadcast is not very good.
Press “CH+▲ / CH -▼ ”Move the cursor up and down select sub item
Press “ VOL+ 〉” enter sub menu item, and press VOL - 〈 / VOL + 〉adjuct in the item
12
Page 14

3、CHANNEL To TV tuning menu
SEARCH: Manual Tuning desired station
Press VOL - 〈 / VOL + 〉 to search the lower or higher channel
AUTO SEARCH: Automatically scans all TV channels and stores them in memory
SKIP: Add or delete channel in memory
FINE: Fine tuning this channel. Press VOL -〈 / VOL + 〉until the clear picture is received
FAVORITE CH.SEL: Press VOL + 〉enter Favorite channel Menu.
● SEARCH:
Press VOL - 〈 / VOL + 〉
to search the lower or higher
channel.
When the desired station is
found, the program position
will flash.
● AUTO SEARCH:
Automatically scans all TV
channels and stores them in
memory.
Press VOL + 〉 to start.
● SKIP:
Add or delete channel in
memory.
Press VOL - 〈 / VOL + 〉 to
select and enter.
13
Page 15

● FINE: Fine tuning the channel.
The channel is users are watching.
Press “ VOL –〈 ” or “ VOL + 〉” until the
clear picture is received
● FAVORITE: Enter user’s favorite channel
menu, edit and enter.
Tuning mode: Not displayed during AV or PC mode.
Select this item and Press VOL + 〉 enter
the favorite menu.
Press “CH+▲ / CH -▼ ”Move the cursor up
and down select favorite channel.
Press “ VOL + 〉” save the channel users
are watvhing(current channel) to this favorite
channel.
Press“DISPLAY/INFOR”key enter the
channel users saved in this favorite channel.
(User can press “FAVORITE” key in Remote
Control Transmitter enter favorite menu.)
4、DISPLAY To Display menu
H.POSITION: Display picture horizontal location adjust
V.POSITION: Display picture vertical location adjust
PAN AND ZOOM: Press “ VOL + 〉” enter zoom menu
Press “ CH+▲ / CH -▼ ” adjuct scale of zoom
When scale larger than 1,press“ DISPLAY/INFOR”
key enter pan function. Press “ CH+▲ / CH -▼ ”and “VOL –〈 / VOL + 〉”key up /
down and left / right the picture centre to watch.
IMAGE SIZE: Press “ VOL + 〉” enter. Fill all → Normal → Wide → Zoom → Fill all
PIP SIZE: adjust Picture In Picture the sub picture size
PIP POSITION: adjust Picture In Picture the sub picture location
AUTO CONFIG: In D-SUB mode auto adjust picture to the best state
14
Page 16

5、LAYOUT(MultiWindows) To layout menu
FULL SCREEN: Single Picture mode, press “ VOL +”key enter.
PIP: Picture In Picture mode, press “ VOL+” key enter.
SPLIT SCREEN: Two windows display mode, press “ VOL+” key enter.
POP3: One large window and three windows aside display mode,
Press “ VOL+” key enter.
GRID: TV program look through in 9 windows. Only can use in TV2 mode.
● PIP: Picture In Picture mode
After enter it, the main picture is TV2,
sub picture is TV1,sound is from TV2.
User can press“W.SELECT”key
select which is main picture.And the sound
is follow to the main picture.
Press“COMP”key can select main
picture source: S-VIDEO2 , AV1, AV2 etc.
Press“PIP-SWAP” key can exchange
two picture.
All these keys are in Remote Control
Transmitter, see page 10.
● SPLIT SCREEN: Two windows display
mode
After enter it, the main picture is TV2,
sub picture is TV1,sound is from TV2.
User can press“W.SELECT”key select
which is main picture.And the sound is follow
to the main picture.
Press“COMP”key can select main
picture source: S-VIDEO2 , AV1, AV2 etc.
Press“PIP-SWAP” key can exchange
two picture.
All these keys are in Remote Control
Transmitter, see page 10.
POP3
▲ Some source can’t be selected, and some source display need wait for a moment.
▲ If user found some abnormal in picture, can turn off power of this TV Set.
● POP3 and GRID:
POP3 and GRID use for look through TV program, the small windows only is TV
channel. These are no sound in GRID state.
15
Page 17

TV2
POP3
6、 SETUP To setup menu
COLOR SYSTEM: Select TV color system. AUTO、PAL、NTSC、SECAM.
Advise user select: AUTO
SOUND SYSTEM: Select TV color system. D/K、B/G、I、L、M.
Select user’s local TV Sound system.
Chinese user select: D/K
American user select: M
LANGUAGE: Select language in menu. English → 简体中文 → 繁体中文
BLUE SCREEN: Select no signal screen is blue or no blue screen.
On / Off
MENU BKG: Menu background select Opaque → Translucent
OSD TIMER: OSD disappear time. 5 sec → 15 sec → 60 sec
OSD POSITION: Set OSD position. 5 OSD MENU position can select
Press“ VOL –〈 ” key select: Upper left →Upper Right → Middle Center
Press“ VOL + 〉 ” key select: Lower left →Lower Right → Middle Center
TV1
TV1
TV1
TV2 TV2 TV2
TV2 TV2 TV2
GRID
TV2
TV2 TV2
16
Page 18

7、TIMER To Timer menu
CURRENT TIME: Set current time.
POWER ON TIME: Set the power on time.
Need set current time and power off to standby state.
POWER ON CHANNEL: Once power on, display the channel user input.
POWER OFF TIME: Set the power off time. Need to set current time.
POWER SAVING TIMER: If no signal input, the TV Set will turn to standby state.
Power saving timer as: 5Min → 10Min → 15Min → 20Min → 25Min → 30Min
● How to set time:
Press“VOL+ 〉”key enter time set sub menu. Press“ VOL- 〈 ”or
“ VOL+ 〉” key set Hours :Minutes .
● All time set is same.
● POWER ON CHANNEL: Once power on, the TV Set will display the
channel user set.
User can press “ VOL- 〈 ”or“ VOL+ 〉” key set the channel number
decrease or increase.
17
Page 19

Safety Notice
WARNING
Do not place the Plasma TV on sloped or unstable surfaces.
• The Plasma TV may fall off or tip over.
Do not place any objects on top of the Plasma TV.
• If water is spilt onto the Plasma TV or foreign objects get inside it, a short-circuit may occur
which could result in fire or electric shock. If any foreign objects get inside the Plasma TV,
please consult your local Panasonic dealer.
If using the pedestal (optional accessory), leave a space of at least 10 cm at the top, left
and right, at least 6cm at the bottom, and at least 7 cm at the rear. If using some other
setting-up method, leave a space of at least 10 cm at the top, bottom, left and right, and
at least 10 cm at the rear.
Avoid installing this product near electronic equipment that is easy to receive
electromagnetic waves.
• It will cause interference in image, sound, etc. In particular, keep video equipment away from
this product.
When using the Plasma TV
The Plasma TV is designed to operate on 220 - 240 V AC, 50/60 Hz.
Do not cover the ventilation holes.
• Doing so may cause the Plasma TV to overheat, which can cause fire or damage to the
Plasma TV.
Do not stick any foreign objects into the Plasma TV.
• Do not insert any metal or flammable objects into the ventilations holes or drop them onto the
Plasma TV, as doing so can cause fire or electric shock.
Do not remove the cover or modify it in any way.
• High voltage which can cause severe electric shocks are present inside the Plasma TV. For
any inspection, adjustment and repair work, please contact your local Panasonic dealer.
Securely insert the power cord plug as far as it will go.
• If the plug is not fully inserted, heat may be generated which could cause fire.If the plug is
damaged or the wall socket plate is loose, they shall not be used.
Do not handle the power cord plug with wet hands.
• Doing so may cause electric shocks.
Do not do anything that may damage the power cable. When disconnecting the power
cable, pull on the plug body, not the cable.
• Do not damage the cable, make any modifications to it, place heavy objects on top of it, heat it,
place it near any hot objects, twist it, bend it excessively or pull it. To do so may cause fire and
electric shock. If the power cable is damaged, have it repaired at your local Panasonic dealer.
If the Plasma TV is not going to be used for any prolonged length of time, unplug the
power cord plug from the wall outlet.
If problems occur during use
If a problem occurs (such as no picture or no sound), or if smoke or an abnormal odour
starts to come out from the Plasma TV, immediately unplug the power cord plug from the
wall outlet.
• If you continue to use the Plasma TV in this condition, fire or electric shock could result. After
checking that the smoke has stopped, contact your local dealer so that the necessary repairs
can be made. Repairing the Plasma TV yourself is extremely dangerous, and shall never be
done.
18
Page 20

If water or foreign objects get inside the Plasma TV, if the Plasma TV is dropped, or if the
cabinet becomes damages, disconnect the power cord plug immediately.
• A short circuit may occur, which could cause fire. Contact your local dealer for any repairs that
need to be made.
CAUTION
When using the Plasma TV
Do not bring your hands, face or objects close to the ventilation holes of the Plasma TV.
• Heated air comes out from the ventilation holes at the top of Plasma TV will be hot. Do not
bring your hands or face, or objects which can’t withstand heat close to this port, otherwise
burns or deformation could result.
Be sure to disconnect all cables before moving the Plasma TV.
• If the Plasma TV is moved while some of the cables are still connected, the cables may
become damaged, and fire or electric shock could result. Disconnect the power cord plug from
the wall socket as a safety precaution before carrying out any cleaning.
• Electric shocks can result if this is not done.
Clean the power cable regularly to prevent it becoming dusty.
• If dust built up on the power cord plug, the resultant humidity can damage the insulation, which
could result in fire.
Pull the power cord plug out from the wall outlet and wipe the mains lead with a dry cloth.
This Plasma TV radiates infrared rays, therefore it may affect other infrared communication
equipment.
Install your infrared sensor in a place away from direct or reflected light from your Plasma TV.
Cleaning and maintenance
The front of the display panel has been specially treated. Wipe the panel surface gently
using only a cleaning cloth or a soft, lint-free cloth.
• If the surface is particularly dirty, wipe with a soft, lint-free cloth which has been soaked in pure
water or water to which a small amount of neutral detergent has been added, and then wipe it
evenly with a dry cloth of the same
type until the surface is dry.
• Do not scratch or hit the surface of the panel with fingernails or other hard objects, otherwise
the surface may become damaged. Furthermore, avoid contact with volatile substances such as
insect sprays, solvents and thinner, otherwise the quality of the surface may be adversely
affected.
If the cabinet becomes dirty, wipe it with a soft, dry cloth.
• If the cabinet is particularly dirty, soak the cloth in water to which a small amount of neutral
detergent has been added and then wring the cloth dry. Use this cloth to wipe the cabinet, and
then wipe it dry with a dry cloth.
• Do not allow any detergent to come into direct contact with the surface of the Plasma TV.
If water droplets get inside the unit, operating problems may result.
• Avoid contact with volatile substances such as insect sprays, solvents and thinner, otherwise
the quality of the cabinet surface may be adversely affected or the coating may peel off.
Furthermore, do not leave it for long periods in contact with articles made from rubber or PVC.
19
Page 21

Specification
Item Specification
Screen size 50 inch plasma display panel
Aspect 16:9
Panel
Spec
TV Mode
Display pixels 1366 x 768 (WXGA)
Effective display size 1106mm x 622mm
Number of color 1670 million colors
Contrast Ration 3000:1 (in dark room)
Peak brightness 1000 cd/㎡
TV Tuning 2 Tuners, 180 channel save
Sound system D / K, I, B / G
Color system PAL NTSC SECAM
AV1
AV2
Video Mode
PC Mode
DVI Mode
AV Out AV Output RCA × 1
Audio Out
COMPONENT (Y Cb Cr) Y,Cb,Cr x 1 PAL, NTSC, SECAM Audio: L/R x 1
HDTV (Y Pb Pr) Y,Pb,Pr x 1
Signal input Analog:D-Sub 15 pin
Plug and play DDC / 2B
Support Frequency FH:30KHz to 69KHz , FV:56Hz to 85Hz
D-Sub Mode
D-Sub Audio Earphone (3.5ø)
Signal input Digital:DVI-D 24 pin
Plug and play DDC / 2B
Support Frequency FH:30KHz to 80KHz , FV:56Hz to 85Hz
DVIMode
DVI Audio Earphone (3.5ø)
Speaker Amplifier External:10W × 2(4Ώ)
Audio Output RCA (L / R)
RCA x 1 PAL, NTSC, SECAM Audio: L/R x 1
S-Video1 x 1 PAL, NTSC, SECAM Audio: L/R x 1
RCA x 1 PAL, NTSC, SECAM Audio: L/R x 1
S-Video2 x 1 PAL, NTSC, SECAM Audio: L/R x 1
VESA: 640 x 480 (60Hz/72Hz/75Hz/85Hz)
VESA: 800 x 600 (60Hz/72Hz/75Hz/85Hz)
VESA: 1024 x 768 (60Hz/72Hz/75Hz)
VESA: 1280 x 1024 (60Hz)
VESA: 640 x 480 (60Hz/72Hz/75Hz/85Hz)
VESA: 800 x 600 (60Hz/72Hz/75Hz/85Hz)
VESA: 1024 x 768 (60Hz/72Hz/75Hz/85Hz)
VESA: 1280 x 1024 (60Hz)
1920X1080i(60Hz 50Hz)
1920X1080P(30Hz)
480P(60Hz)
720P(60Hz)
Audio: L/R x 1
Power
Environment
Dimension Width x Height x Thickness 1218 x 825 x 85 (mm)
Net weight No Accessory 45 Kg
Accessory Remote Control Transmitter, Battery (AAA X 2), Power Cord, User’s Manual
Choose Part Wall Mounting Bracket,S-Video Cable, D-SUB Cable, DVI-D Cable, RCA Cable
Power input sources AC 100~240V, 50/60Hz
Power consumption 470W (Typical)
Operation Temperature + 0 °C ~ + 40 °C
Storage Temperature - 10 °C ~ + 50 °C
Humidity 10% -- 85%
20
Page 22

Troubleshooting
If there is a problem with your TV Set, please refer to the table below to determine the
symptoms, then carry out the suggested check. If this does not solve the problem,
please contact your local dealer, quoting the model number and serial number (both
found on the rear of this TV Set).
Symptoms
Picture Sound
Snowy Picture
Multiple
Image
Interference
Normal Picture
No Picture
No Color
Poor or
Distorted
Normal Picture
Some parts of the screen do not
light up
Notes:
• External surfaces of the unit may become hot during operation. But this is completely normal.
• See the label on the base of this TV Set for ratings and other information.
Picture
Noisy Sound
Normal Sound
Noisy Sound
No Sound
No Sound
Normal Sound
Weak or
Weak or
The plasma TV panel is manufactured using an extremely high
level of precision technology, however, sometimes some parts of
the screen may be missing picture elements or have luminous
spots. This is not a malfunction.
No Sound
Distorted
Sound
Aerial location, direction or
Sound mute switched on
This set to AV mode
Not plugged into A.C. outlet
Not switched on Picture
/Sound controls set at
minimum levels Check if in
stand-by mode
Sound reception may have
deteriorated. Setting (Sound
menu: SOUND COMP) to high
precision until reception
improves.
Checks
connection
Aerial location,
direction or connection
Electrical appliances
Cars/Motorcycles
Fluorescent lights
Volume level
Color Controls set at
minimum levels
Retune Channel (s)
21
 Loading...