

Page 1
Page 2
©2005 Antares Audio Technologies. All rights reserved. Certified Isinglass-free™
All trademarks are the property of their respective owners.
Antares Audio Technologies 231 Technology Circle, Scotts Valley, California 95066 USA
web: www.antarestech.com
Printed in USA Rev 1.0 08/ 05 PN 35030-0805-M01
Page 3

The Obligatory Legal Mumbo-Jumbo
The AVOX software and this User’s Manual
are protected by copyright law. Making copies,
adaptations, or derivative works without
the prior written authorization of Antares
Audio Technologies, is prohibited by law and
constitutes a punishable violation of the law.
Antares Audio Technologies retains all
ownership rights to the AVOX software and
its documentation. Use of AVOX software is
limited by the following license agreement.
Please carefully read all the terms and
conditions of this license agreement. At the
time of installation of the AVOX software
you will be presented with a copy of the
agreement and asked whether or not you
agree to it. Continuing with the installation
process beyond that point constitutes such
agreement.
AVOX License Agreement
Antares Audio Technologies grants you a
non-transferable, non-exclusive license to
use AVOX software under the terms and
conditions stated in this agreement. Use
of AVOX indicates your agreement to the
following terms and conditions.
License
You may:
1. Use AVOX software on only one computer
at a time. (Moving your AVOX license from
computer to computer requires authorization
via an iLok smart key.)
expressly provided for in this agreement.
Your right to copy AVOX software and
the user manual is limited by copyright
law. Making copies, verbal or media
translations, adaptations, derivative works,
or telecommunication data transmission
of AVOX software without prior written
authorization of Antares, is prohibited by law
and constitutes a punishable violation of the
law.
2. Make alterations or modifications to AVOX
software (or any copy) or disassemble or
decompile AVOX software (or any copy),
or attempt to discover the source code of
AVOX software.
3. Sub-license, lease, lend, rent, or grant other
rights in all or any portion of AVOX software
(or any copy) to others.
Term of the Agreement
This agreement is effective until terminated
by you or Antares. You may terminate the
agreement at any time by notifying Antares
and destroying all copies of the manual, and
erasing all AVOX software from all machinereadable media, whether on-line or on archival
copies.
In the event of breach of any of the terms of
this agreement, you shall pay the attorney’s
fees of Antares that are reasonably necessary
to enforce the agreement plus resulting
damages.
You may not:
1. Make copies of AVOX software or of the
user manual in whole or in part except as
Limited Warranty and Disclaimer
AVOX SOFTWARE AND ACCOMPANYING
MATERIALS ARE PROVIDED “AS IS”
Page 4

WITHOUT WARRANTY OF ANY KIND,
EITHER EXPRESS OR IMPLIED, INCLUDING,
BUT NOT LIMITED TO, THE IMPLIED
WARRANTIES OF MERCHANTABILITY AND
FITNESS FOR A PARTICULAR PURPOSE.
Antares Audio Technologies does not warrant
that the functions contained in the program
will meet your requirements. The entire risk as
to the use, quality, and performance of AVOX
software is with you.
SOME JURISDICTIONS DO NOT ALLOW
LIMITATIONS ON HOW LONG AN IMPLIED
WARRANTY LASTS, SO THE ABOVE
LIMITATION MAY NOT APPLY TO YOU. THIS
WARRANTY GIVES YOU SPECIFIC LEGAL
RIGHTS. YOU MAY ALSO HAVE OTHER
RIGHTS WHICH VARY FROM JURISDICTION
TO JURISDICTION.
Limitation of Liability
IN NO EVENT WILL ANTARES BE LIABLE
FOR ANY DAMAGES, INCLUDING LOSS
OF DATA, LOST PROFITS OR OTHER
SPECIAL, INCIDENTAL, CONSEQUENTIAL
OR INDIRECT DAMAGES ARISING
FROM THE USE OF AVOX SOFTWARE
OR ACCOMPANYING MATERIALS. THIS
LIMITATION WILL APPLY EVEN IF ANTARES
OR ITS AUTHORIZED AGENT HAS BEEN
ADVISED OF THE POSSIBILITY OF SUCH
DAMAGE. YOU ACKNOWLEDGE THAT THE
LICENSE FEE REFLECTS THIS ALLOCATION
OF RISK. SOME JURISDICTIONS DO NOT
ALLOW LIMITATION OR EXCLUSION
OF LIABILITY FOR INCIDENTAL OR
CONSEQUENTIAL DAMAGES, SO THE
ABOVE LIMITATION MAY NOT APPLY TO
YOU.
Whew! Now that that’s over, let’s get on to
the good stuff.
Page 5

Contents
Welcome 1
Chapter 1 Getting Started 3
Chapter 2 Introducing AVOX 5
Chapter 3 THROAT Physical Modeling Vocal Designer 7
Chapter 4 DUO Vocal Modeling Auto-Doubler 17
Chapter 5 CHOIR Vocal Multiplier 21
Chapter 6 PUNCH Vocal Impact Enhancer 23
Chapter 7 SYBIL Variable Frequency De-Esser 25
Index 27
Page 6

vi
Page 7

Welcome!
1
n behalf of everyone at Antares Audio
Technologies, we’d like to offer both
our thanks and congratulations on your
decision to purchase the AVOX Antares
O
Vocal Toolkit, a suite of uniquely powerful DSP
tools for creating spectacular vocal tracks.
As an AVOX owner, you are entitled to receive
notification of any software updates, technical
support, and advance announcements of
upcoming products. But we can’t send you
stuff unless we know who and where you are.
So please, register.
At Antares, we are committed to excellence
in quality, customer service, and technological
innovation. With your purchase of AVOX, you
have created a relationship with Antares which
we hope will be long and gratifying. Let us know
what you think. You can count on us to listen.
Again, thanks.
The Whole Antares Crew
Technical Support
In the unlikely event that you experience a
problem using AVOX, try the following:
1. Make another quick scan through this
manual. Who knows? You may have
stumbled onto some feature that you didn’t
notice the first time through.
2. Check our web page for tips, techniques, or
any late-breaking information:
www.antarestech.com
3. Consult our searchable knowledgebase at:
http://www.antarestech.com/support/
index.html
4. Call your local Antares dealer.
Page 8

2
Page 9

Chapter 1: Getting Started
3
How To Use This
Manual
The plug-ins that make
up the AVOX suite
have been designed with clear, consistent,
friendly user-interfaces. If you come to AVOX
with previous vocal processing experience,
you will find that most of their functions are
self-evident and are extraordinarily easy to
use. However, since some of the AVOX tools
do things that have never been done before,
a few aspects of their user-interfaces may not
be immediately obvious.
Consequently, we encourage you to at least
scan each of the individual plug-in’s chapters
for descriptions of their various parameters.
In particular, THROAT offers an entirely
new approach to vocal processing, offering
capabilities that have simply never before
existed in a DSP plug-in. We strongly suggest
that you read Chapter 3 in its entirety to gain an
understanding of what THROAT can do.
If you just can’t wait to get some sound going,
feel free to load up some vocal tracks and
play around with the various AVOX plug-ins.
(Be sure to check out THROAT’s collection
of factory presets. They’ll give you a good
idea of what THROAT is capable of as well as
providing inspiration for your own creations.)
Then come back and dig into the details.
Chapter 2: Introducing AVOX
This chapter provides an overview of the tools
that make up the AVOX plug-in suite.
Chapter 3: THROAT Physical Modeling Vocal
Designer
This chapter is reference information for all of
the controls used in the THROAT interface.
Chapter 4: DUO Vocal Modeling
Auto-Doubler
This chapter is reference information for all of
the controls used in the DUO interface.
Chapter 5: CHOIR Vocal Multiplier
This chapter is reference information for all of
the controls used in the CHOIR interface.
Chapter 6: PUNCH Vocal Impact Enhancer
We’re guessing that by this point you can
predict what this chapter is about.
Chapter 7: SYBIL Variable Frequency
De-Esser
Yup.
Installing AVOX
Any unique instructions for installing AVOX for
your specific plug-in format will be located in
the AVOX Read Me file that accompanies the
plug-ins. This file may also contain any lastminute AVOX information that didn’t make it
into this manual.
The Contents Of This Manual
Chapter 1: Getting Started
The chapter you are reading.
AVOX is designed to work with a wide variety
of digital audio applications. Please refer to
your host application’s user manual for more
information on installing and using plug-ins.
Page 10

4
Authorizing AVOX
Authorization is the process by which the
AVOX software is allowed to run on your
computer. Detailed instructions covering the
available authorization options will be found
in the file “Authorization Read Me” which is
included on the installation CD ROM or with
your software download.
Note: When initially installed, this
software will run for ten days without
authorization.
So even if you can’t authorize it right away you
can still use your software in the meantime.
(During this period, click the “Continue”
button whenever you are presented with
the Trial Period screen at launch.) But don’t
procrastinate too long. After those ten days
are up, you will no longer be able to launch this
software until it’s authorized.
Page 11

Chapter 2: Introducing AVOX
5
he heart of any great song is a great
vocal sound. With the AVOX Antares
Vocal Toolkit, we’ve combined five
state-of-the-art vocal processing
T
modules that open up an entirely new world of
vocal processing capabilities. AVOX gives you
the power you need to create stunning vocal
tracks in any musical style as well as design
unique vocal effects for audio post-production
applications.
In the following chapters we’ll deal with each
AVOX tool in turn, but first let’s take a brief
look at what’s in AVOX and how you might use
the tools in combination.
AVOX Overview
The AVOX Antares Vocal Toolkit includes:
THROAT Physical Modeling Vocal
Designer THROAT is a revolutionary new
vocal tool that lets you process a vocal through
a meticulously crafted physical model of
the human vocal tract. THROAT begins by
neutralizing the effect of the original singer’s
vocal tract and then gives you the ability to
specify the characteristics of the modeled
vocal tract.
THROAT’s controls allow you to modify the
voice’s glottal waveform as well as globally
stretch, shorten, widen or constrict the
modeled vocal tract. For even more detailed
control, THROAT’s graphical Throat Shaping
display allows you to individually adjust the
position and width of five points in the vocal
tract model, from the vocal chords, through
the throat, mouth and out to the lips. Finally,
THROAT’s Breathiness controls let you
add variable frequency noise to the model,
resulting in a range of vocal effects from subtle
breathiness, to raspiness, to a full whisper.
While THROAT has been designed to allow
subtle modifications to a voice’s vocal quality,
the range of the controls also allows the
creation of vocal tract models well beyond
the limits of physical human anatomy, offering
the possibility of vocal characteristics that are
simply unattainable by any other means.
DUO Vocal Modeling Auto-Doubler DUO
automatically generates a doubled vocal part
from an existing vocal. In addition to allowing
programmable variation in pitch, timing and
vibrato depth, for even more realism, DUO
also includes a simplified version of THROAT’s
vocal modeling to provide timbral variation for
the doubled part. DUO’s output section gives
you independent control of the level and stereo
position of the original and doubled voices.
CHOIR Vocal Multiplier Neither a
harmonizer nor a conventional chorus effect,
CHOIR is a unique processor that actually
turns a single voice into 4, 8, 16, or 32 distinct
individual unison voices, each with its own
pitch, timing and vibrato variations. The voices
can, if desired, be spread across the stereo
spectrum. Assign an instance of CHOIR to
each of four voices singing four-part harmony
and voilà, instant choir.
PUNCH Vocal Impact Enhancer PUNCH is
a unique processor that, as its name implies,
lets you give your vocal more dynamic impact,
allowing it to cut through a dense mix with
clarity and power.
Page 12

6
SYBIL Variable Frequency De-Esser SYBIL
tames vocal sibilance with threshold, ratio,
attack and decay controls as well as a variable
sidechain high pass frequency to match any
vocal performance.
AVOX Processing Guidelines
While it might seem to be convenient to
consolidate all of the AVOX functions in
one integrated plug-in, some of the AVOX
functions use quite a bit of processing power.
By organizing them as separate plug-ins, you
can choose to instantiate only those you need
for each particular vocal track, thereby using
only as much of your computer’s DSP power
as you absolutely need.
While it’s not likely that you’ll be using all five
plug-ins on every track, it is likely that you’ll
often be using more than one. When that’s the
case, keep the following in mind:
Normal Practice
• In general, you should progress from the
cleanest possible source vocal through
successive stages of processing. THROAT,
DUO and CHOIR in particular are designed
to process pitched monophonic voices and
will function much more effectively with
clean input signals. Effects like reverb and
conventional chorus or flanging should
typically be applied after processing by the
desired AVOX plug-ins.
• If a track requires de-essing, use SYBIL as
the first of the AVOX plug-ins.
• THROAT should be either first in line (fed by
a nice clean signal) or second after SYBIL.
• If you will be using PUNCH, it should come
after SYBIL and/or THROAT.
Special Cases:
• While you will usually choose between DUO
or CHOIR, you can use them together for
a really huge vocal section. Assign DUO to
your track and pan the original and doubled
voices to opposite tracks. Then assign
separate instances of CHOIR to each of the
two tracks. Humongous!
• If you will be using a harmonizer to generate
harmonies from a single vocal line, start
with SYBIL (if necessary) and then THROAT
and then feed its output to your harmonizer.
Assign each of the harmonizer’s outputs to
individual tracks and use DUO or CHOIR
on each track to create a vocal group of the
size of your choice. If desired, PUNCH can
be used on THROAT’s output or on the
individual harmonizer outputs prior to DUO
or CHOIR.
• If you have a vocal with problematic vibrato
(either too much or too little), you can use
DUO for vibrato modification. Assign DUO
to the track and use only the doubled output.
Set all parameters to their minimum effect
and use the Vibrato function to adjust the
performance’s vibrato depth. See Chapter 4
for more details.
• For maximum control of the timbre of
doubled voices (at the cost of increased
CPU requirements), assign DUO to your
vocal and pan the original and doubled
voices to opposite tracks. Then assign an
independent instance of THROAT to each
part and create a unique timbre for each
voice.
But all that being said, always feel free to
ignore any of the above suggestions. The
AVOX tools offer entirely new realms of
creative possibilities. There is no wrong way.
• If you will be using DUO or CHOIR, they
should typically be at the end of the AVOX
processing chain.
Now on to the details.
Page 13

Chapter 3: THROAT Physical Modeling
Vocal Designer
7
HROAT is a revolutionary new vocal tool
that lets you process a vocal through a
meticulously crafted physical model of
the human vocal tract. THROAT begins
T
by neutralizing the effect of the original singer’s
vocal tract and then gives you the ability to
specify the characteristics of the modeled
vocal tract.
THROAT’s controls allow you to modify the
voice’s glottal waveform as well as globally
stretch, shorten, widen or constrict the
modeled vocal tract. For even more detailed
control, THROAT’s graphical Throat Shaping
display allows you to individually adjust the
position and width of five points in the vocal
tract model, from the vocal chords, through
the throat, mouth and out to the lips. Finally,
THROAT’s Breathiness controls let you
add variable frequency noise to the model,
resulting in a range of vocal effects from subtle
breathiness, to raspiness, to a full whisper.
While THROAT has been designed to allow
subtle modifications to a voice’s vocal quality,
the range of the controls also allows the
Page 14

8
creation of vocal tract models well beyond
the limits of physical human anatomy, offering
the possibility of vocal characteristics that are
simply unattainable by any other means.
In order to understand what THROAT is
doing and how you can use it to process your
vocal tracks, it helps to know how our throats
actually work to create what we perceive as
unique vocal qualities.
Vocal production starts with the vocal chords.
Air from our lungs is forced through the vocal
chords, causing them to vibrate. The contour
of this vibration is the glottal waveform. The
actual shape of the waveform is affected
by each individual’s anatomy as well as the
pressure applied to the vocal chords. From
there, the voice is propagated through the
throat, the mouth and out through the lips. It
is the shape of these structures, both their
length and width, that create the resonant
characteristics that combine with the glottal
waveform to define a unique vocal identity.
With THROAT, for the first time, you have
individual control over each of the elements
that go into creating a distinct vocal character.
Whether you are a producer or engineer
looking to subtly enhance a singer’s
performance, or a sound designer in pursuit of
a totally new vocal effect, THROAT will give
you creative capabilities that have simply never
before existed.
Controls
In order for THROAT to do the best possible
job of modeling, it needs to know some basic
things about the source audio. The following
three controls are used to characterize the
vocal that you will be processing:
Vocal Range
Use this control to select the range of the
track you will be processing. Choices include
Soprano Voice, Alto/Tenor Voice, Bass/
Baritone Voice and Instrument (a general
setting for anything that isn’t actually a vocal).
Matching the appropriate algorithm to the
input results in faster and more accurate pitch
detection and more accurate modeling.
To select vocal range, click on the Vocal Range
pop-up and then select the desired range from
the pop-up list.
Note: Choosing the wrong Vocal
Range (or just forgetting to set it at
all) can result in compromised performance.
Pay attention.
Source Glottal Waveform
The glottal waveform is the waveform
produced by the vibration of the vocal
chords. The range of an individual’s possible
waveforms is defined by their particular
anatomy. Within that range, the waveform
can change pretty dramatically depending
on the performer’s singing style. Imagine,
for example, the progression from a breathy
whisper, to a straight-ahead pop vocal, to hard
rock or full-on operatic aria.
A lot of subtle factors influence the glottal
waveform, but for ease of setting, we have
characterized the choices as loudness.
Typically, as loudness increases, so does
the pressure applied to the vocal chords and
with that change in pressure a corresponding
change in glottal waveform.
When setting this control, select the loudness
level (soft, medium, loud, intense) that most
closely matches the performance you are
processing. If you’re not sure where your
performance lies on this scale, don’t worry.
There is no need to obsess over subtle
distinctions. If in doubt, just pick one. Once
you have set up a model, you can always
come back and try another setting and see if it
makes a (positive) difference.
Page 15

9
To select vocal type, click on the Vocal Type
pop-up and then select the closest stylistic
character of the vocal performance from the
pop-up list.
Source Throat Precision
If you’ve already been poking around the
THROAT interface, you might be asking
yourself, “What the heck is throat precision?”
And a good question it is.
As it happens, this control works a bit
differently than the previous two. Here, you’re
not being asked to tell THROAT something
about the input, but instead to tell THROAT
how precise to be in its attempt to calculate
the characteristics of the input based on the
type of modeling you intend doing (the choices
being subtle, medium, or extreme).
So why not always leave it at “subtle”?
Another good question. The answer is that
THROAT’s most precise analysis results in
extremely accurate characterization of the
source throat, which works well for models
that are within the general range of human
anatomy (i.e. subtle modifications). However,
for more extreme models, the “subtle”
setting can in some cases result in artifacts
— most often a sort of “whistling.” In those
cases, such artifacts can often be reduced or
eliminated by choosing a different setting for
this control.
As a result, the strategy for this control should
be to always start with “subtle” (which is
the default) and, if a particular model results
in artifacts (and you don’t actually like those
artifacts), change the precision one step at a
time (i.e. to medium and then extreme) until
you get the desired effect.
The next two controls allow you to add a
variety of breathiness effects to your modeled
voice:
Breathiness Mix
This control lets you select the amount of
breathiness component mixed into your
modeled voice. With a setting of 0, there will
be no breathiness (apart from what might be
in the original vocal). At a setting of 100, the
model will be all breathiness, with none of
the original vocal characteristic present at all.
Intermediate settings will produce mixes of the
original vocal and the breathiness component.
The sonic character of the breathiness will
depend both on the articulation of the original
vocal and, more dramatically, the setting of the
Frequency control described below.
Command (Mac)/Control (PC) click the control
to reset it to its default value of 0.
Breathiness Frequency
This control lets you set the high pass
frequency of the breathiness component (i.e.,
the frequency above which the breathiness will
be present). This frequency determines the
audio range and character of the breathiness
effect.
At high settings, the effect will be rather
whispery and ethereal (depending, of course,
on the original vocal and the Mix amount).
At lower settings, the effect is more of a
raspiness (again, depending on the mix).
Experimentation is the best way to become
familiar with the possibilities.
Command (Mac)/Control (PC) click the control
to reset it to its default value of 4000 Hz.
To select source throat precision, click on
the Precision pop-up and then select the
appropriate model type from the pop-up list.
The remaining controls are used to define the
model vocal tract:
Page 16

10
Model Throat Length
The Throat Length control allows you to
globally lengthen or shorten the modeled
throat. Values above 1.00 represent a
lengthening of the throat while values below
1.00 represent a shortening of the throat.
The actual values represent the percentage
change in the throat length. For example, a
value of 1.20 represents a 20% increase in
throat length, while a value of 0.80 represents
a 20% decrease in throat length.
Changes made to this control are reflected on
the Graphic Throat Display described below. If
you have used that display to create a custom
throat contour, this control will preserve the
overall contour while scaling it by the selected
amount.
Note: While this control gives you
the ability to radically change the
throat length, keep in mind that the variation in
the length of human vocal tracts is rarely more
than about 25% in either direction. If you are
looking for a “realistic” vocal characteristic,
start with modest settings of this control. (As a
visual reference, this range is indicated by color
on the control scale.) More extreme settings
can produce dramatic results, but probably not
what anyone would call “realistic.”
Command (Mac)/Control (PC) click the control
to reset it to its default value of 1.00.
Model Throat Width
The Throat Width control allows you to globally
widen or constrict the modeled throat. Values
above 1.00 represent a widening of the throat
while values below 1.00 represent a narrowing
of the throat.
The actual values represent the percentage
change in the throat width. For example, a
value of 1.20 represents a 20% increase in
throat width, while a value of 0.80 represents a
20% decrease in throat width.
Changes made to this control are reflected on
the Graphic Throat Display described below. If
you have used that display to create a custom
throat contour, this control will preserve the
overall contour while scaling it by the selected
amount.
Note: Similar to the Length control
above, this control gives you the
ability to radically change the throat width.
Again, if you are looking for a “realistic” vocal
characteristic, start with modest settings of
this control. (And again, this range is indicated
by color on the control scale.) More extreme
settings can produce dramatic results, but
probably not what anyone would call “realistic.”
Command (Mac)/Control (PC) click the control
to reset it to its default value of 1.00.
Model Glottal Waveform
As was explained above in the Source Glottal
Waveform section, the glottal waveform is
the waveform produced by the vibration of
the vocal chords. We used the Source Glottal
Waveform control to help THROAT neutralize
the effect of the original vocal’s glottal
waveform. The Pulse Width and Voice Type
controls let you define the glottal waveform
you want to model.
Glottal Pulse Width
This control allows you to select the pulse
width of the modeled glottal waveform. If you
are at all familiar with analog synthesizers, you
can think of this as being vaguely similar to the
variable pulse width control on a square wave
oscillator (and if you’re not familiar with analog
synthesizers, don’t worry, just move the slider
and listen to what happens).
You will find that the most dramatic timbral
changes are usually found at the extreme ends
of this control’s range. If you’re looking for
realistic, stay in the middle 80% of the range.
Page 17

11
Important Note: Keep in mind that
this control interacts with the Glottal
Voice Type control below. Each Voice Type sets
a default Pulse Width that is associated with
it. So if you set this control and then select a
new Voice Type below, the value of this control
will change to the new voice type’s associated
pulse width default. For that reason, it is usually
best to select the Glottal Voice Type first and
then make any desired adjustments to the
pulse width.
Command (Mac)/Control (PC) click the control
to reset it to its default value of 64.
Glottal Voice Type
This control is the converse of the Source
Glottal Waveform control described above.
We used that control to tell THROAT the
characteristic of the original performance. We
use this control to tell THROAT what kind of
characteristic we would like to model.
The choices here are the same as the choices
for the Source Glottal Waveform control (i.e.,
soft, medium, loud, and intense). If you want
to preserve the stylistic character of the original
vocal, set this control to the same voice type
as you set the Source Glottal Waveform (e.g., if
you set Source Glottal Waveform to “soft,” set
this control to “soft”).
As mentioned above, this control interacts
with the Glottal Pulse Width control. Each of
the Voice Types sets a default Pulse Width
that is associated with it. Once a Voice Type
is set, the pulse width may then be adjusted
separately.
Note: Despite the value names
(soft, loud, etc.), this control does
not necessarily change the actual level of the
signal (although the “intense” setting does
sometimes result in some level gain). Its
purpose is to model the glottal waveform that
would result from the various styles of singing.
If you want to adjust the level, use the Output
Gain control described below.
To select vocal type, click on the Vocal Type
pop-up and then select the desired stylistic
character from the pop-up list.
Graphic Throat Display
Okay, here’s where the fun really starts.
The Graphic Throat Display allows detailed
tweaking of the model throat. For the purpose
of this control, the model throat is divided into
four sections defined by five boundary points.
For reference, these sections and boundary
points are illustrated on the head graphic to
the left of the Throat Shaping display. Point
(1) starts at the vocal chords and the sections
progress through the throat and the mouth out
to the lips, which are at point (5).
The Throat Shaping display itself consists of
two elements: the original throat plot and the
model throat plot. The original throat plot is
colored blue and is not user-changeable. It
represents the original length and width of the
four throat sections and serves as a reference
relative to which changes to the model throat
are made.
The model throat plot is colored red and
includes five control points that can be grabbed
and moved, effectively adjusting the length and
width of individual sections of the throat.
Additionally, the background of the display is
divided into two sections by color. The lighter
blue central area represents the range of
adjustments that are consistent with typical
Page 18

12
human anatomy. As long as all control points
and plot lines fall in this area, the results of
your model will be more or less “realistic.”
The darker blue area represents the range of
adjustments that exceed the dimensions of
typical human vocal tracts. When any control
point or plot line falls in this area, the result
may or may not sound like something that you
might recognize as a human voice. The more
points and/or plot lines fall in this area, the
more extreme the effect.
When you open a new instance of THROAT,
the default state of the Throat Shaping display
is with the original and model throat plots
exactly superimposed, indicating no difference.
If you adjust the Throat Length and/or Throat
Width sliders, you will see the entire red model
plot move to reflect the changes. Length
changes are self-evident. For width changes,
any part of the model plot that lies above the
original plot indicates a widening of the throat
while any part of the model plot below the
original plot indicates a narrowing of the throat.
Here are some things to consider when
working with the Throat Shaping display:
• Point (1), which represents the vocal chords,
serves as the anchor of the vocal tract. It can
be adjusted for width but not length.
• When you move points (2), (3), or (4)
horizontally, you are adjusting the relative
lengths of the adjacent sections. For
example, if you move point (3) to the right,
you are lengthening the section between
(2) and (3) while shortening the section
between (3) and (4). The overall length of
the throat model remains the same.
for “realistic” vocal characteristics, you
would do well to start with relatively small
adjustments that result in all control points
and plot lines remaining in the central light
blue area.
• In addition to the plot point positions, watch
the contour of the plot lines connecting
them. It’s possible to place the points in
positions relative to each other that cause
the plot lines to bow out towards the edges
of the display (or even pin against an edge of
the display). This will almost always result in
artifacts of one sort or another. (Of course, if
it’s artifacts you’re looking for, they may be
just what you want.)
• When you have created a custom model
contour, the Model Throat Length and Width
controls will adjust the overall throat length
and width while retaining (and scaling) your
custom contour.
• Extremely striking effects can be created
by moving plot points in realtime. You can
do this manually (for one point at a time) or,
much more powerfully, you can use your
host’s automation capabilities to program
movements of all five points simultaneously.
For the purposes of automation, each point
is represented by two parameters, one
for horizontal position (length) and one for
vertical position (width).
In addition to the original and model plots,
when THROAT is processing audio the display
will also contain real-time representations of
the original and modeled throat contours. As
with the plots, the blue contour is the original
throat and the red contour is the model throat.
• Only by moving point (5) can you change the
overall length of the model (apart from using
the Throat Length slider, of course).
• As we’ve mentioned, if you’re looking
As you begin to get familiar with the Throat
Shaping display, trial-and-error will no doubt be
the first order of the day. However, with a little
experience, you will soon be able to predict
what effect a particular plot adjustment will
Page 19

13
have. Checking out the factory presets, with
a particular eye towards model plot shapes,
should help you on your way.
Reset
Clicking the Reset button cancels any custom
contour you have programmed, but retains any
global Stretch and Width settings set by the
Model Throat Length and Width controls. To
reset those controls, Command (Mac)/Control
(PC) click them to set them to their default
values.
Output Gain
This control lets you adjust the output level of
the modeled vocal over a range of +/- 24 dB.
As you will discover, some models result in
substantial level changes. This control is used
to bring them back up or down to the desired
level.
Command (Mac)/Control (PC) click the control
to reset it to its default value of 0 dB.
Level Matching
As mentioned above, some model settings
result in substantial level changes. The Level
Matching function attempts to compensate
for level differences between the original and
processed versions by automatically applying
gain adjustments to the modeled version.
Very Important Note: This
function is provided for ease of A/B
comparisons with the original vocal. It inserts
some processing into the modeled vocal path
that can have a very small but nonetheless real
effect on the overall audio quality. Once you
have a model you like, turn the Level Matching
function Off and use the Output Gain to adjust
the proper level.
Click the Level Matching button to toggle its
state. The button will display On or Off as
appropriate.
Bypass
This control is used to (you guessed it) bypass
the plug-in. It has been designed to provide
artifact-free bypass switching so that you can
use it to seamlessly enable THROAT only
where desired on a track.
Click the Bypass button to toggle its state. The
button will display On or Off as appropriate.
Keep in mind that “On” means that the
Bypass function is on, i.e., the plug-in is
bypassed.
Usage Tips
• THROAT is a monophonic processor.
• For best modeling performance, THROAT
needs to be able to detect the pitch of the
original performance. To do that, THROAT
requires a clean, pitched, monophonic
signal. If THROAT can not reliably detect the
pitch of the input, either because of a noisy
or effected signal or because the input is not
a single monophonic voice, it will not fail, but
will fall back to an alternative (but not quite
as accurate) modeling method.
• As has been mentioned several times
already, for natural, “realistic” results, always
start with relatively small adjustments to the
various throat modeling controls, whether
the Length and Width sliders, or the Graphic
Display control points.
The actual range of variation in human
anatomy is quite small relative to the overall
range offered by THROAT. When you’re
first getting started, try limiting control
changes to around +/- 15%. As you get a
feeling for the effect of various settings,
slowly increase the ranges until things start
sounding weird (not that that’s necessarily a
bad thing).
Page 20

14
• If you just want to start playing, try the
following brief tutorial.
Start by assigning THROAT to a vocal part
and set the above contour on the Throat
Shaping display:
Be sure you have set the proper Vocal
Range and Source Glottal settings and leave
all the other controls at their default values.
Now, while listening to your vocal, slowly
move the Model Throat Length slider from
1.00 to 1.25. Note the effect. Depending,
of course, on the source vocal, you might
typically hear the vocal quality become
subtly darker, more male, older, etc.
Then try moving it back to 0.75. Again note
the effect. In this case the result might be
subtly more bright, female, young, etc.
Next, return the Model Throat Length slider
to 1.00 and repeat the above with the Model
Throat Width.
Finally, experiment with various
combinations of the two controls. As you
become familiar with their effects, try more
extreme settings of the controls.
As mentioned above, the range of human
vocal anatomy is actually relatively small. In
order that we can differentiate between the
voices of the many people we encounter in
our lives, the auditory processing function
in our brains is extremely sensitive to very
small differences in vocal timbre within the
typical range of variation. But as a result
of this, we have no frame of reference for
vocal timbres that fall outside of the range
of common human anatomy. We can’t
picture the person who would sound like
that. So we think more in terms of “filtered,”
“tubular,” or whatever. Trust us, if there
were people with vocal tracts of the more
extreme dimensions THROAT is capable of,
this is what they’d sound like.
• While THROAT has been designed for voice,
experiments here have shown that it can
produce quite striking effects when used on
other instrumental tracks. Try it with drums,
guitars, bass, in fact pretty much anything.
(In particular, applying it to a drum loop and
then following that up with PUNCH has
resulted in some truly twisted beats. Give it
a try.)
• Play, play, play.
• Speaking of weird, it may be useful to
understand just why extreme models are
perceived as “unrealistic” or strange.
Page 21

A Few Words About the THROAT
Factory Presets
Unlike synth presets, which will always sound
the same for all users, the THROAT presets
are heavily dependent on the vocal tracks that
you use them on. Consequently, they serve
primarily as starting points for various general
effects, with the expectation that you will
tweak them to work best with your particular
audio.
Specifically, they all contain the default settings
for Vocal Range and Source Glottal Waveform
controls. After calling up a preset, you should
be sure set each of those controls to reflect
your track.
Also, although some presets are named to
give a general idea of their intent, feel free to
experiment with any preset on any source
track. Their are no rules.
15
Page 22

16
Page 23

Chapter 4: DUO Vocal Modeling
Auto-Doubler
Matching the appropriate
algorithm to the input
results in faster and more
accurate pitch detection.
To select the desired
Vocal Range, click on the
Vocal Range pop-up and
then select the desired
range from the pop-up
list.
Note: Choosing the
just forgetting to set
it at all) can result
in compromised
performance. Pay
attention.
17
wrong Vocal
Range (or
he DUO Vocal Modeling Auto-Doubler
automatically generates a doubled vocal
part from any existing monophonic vocal.
Unlike conventional doublers that simply
T
apply pitch and delay variation to the original
part, DUO makes use of Antares’ unique vocal
modeling and vibrato processing technologies
to create a doubled part that actually sounds
like another singer. There is no easier or quicker
way to create a realistic doubled vocal part.
Controls
Vocal Range
Use this control to select the range of the
track you will be processing. Choices include
Soprano Voice, Alto/Tenor Voice, Bass/
Baritone Voice and Instrument (a general
setting for anything that isn’t actually a vocal).
Vocal Timbre
Behind this unassuming slider lies a compact
version of the THROAT vocal modeler. When
this control is set to 0, the doubled voice will
have exactly the same character as the original
voice. As you move the slider up or down,
DUO sends the doubled voice through a
progressively more extreme vocal model. I.e.,
near 0, the timbre is very close to the original
voice. As the control approaches .40 or -.40, the
vocal timbre undergoes a fairly radical change.
As you might imagine, this slider simultaneously
controls a number of vocal modeling
parameters. We’ve linked them together to give
you quick and easy access to a range of useful
timbres.
Page 24

18
Although the exact effect of any setting
will depend a good deal on the vocal being
processed, in general:
• Selecting a positive value will result in a
lengthening of the vocal tract and hence an
older/darker/more male vocal quality.
• Selecting a negative value will result in a
shortening of the vocal tract and hence a
younger/brighter/more female vocal quality.
Command (Mac)/Control (PC) click the control
to reset it to its default value of 0.
Vibrato
The Vibrato control allows you to select the
amount of variation in vibrato depth applied to
the doubled voice.
Selecting a positive value increases the
doubled voice’s vibrato depth relative to the
original voice.
Selecting a negative value decreases the
doubled voice’s vibrato depth relative to the
original voice.
Pitch Variation
The Pitch Variation control lets you select the
amount of random variation in pitch applied
to the doubled voice. The higher the value,
the larger the maximum amount of allowable
variation.
Command (Mac)/Control (PC) click the control
to reset it to its default value of 10.
Timing Variation
The Timing Variation control lets you select the
amount of random variation in timing applied
to the doubled voice. The higher the value,
the larger the maximum amount of allowable
variation.
DUO’s timing variation is completely
independent of pitch variation. To get a good
idea of the effect of timing variation, use the
level controls to listen only to the doubled
voice. set Vibrato to 0 and Pitch Variation to 10.
Set Timing Variation to maximum and process
a rhythmic vocal performance. Pretty weird.
Command (Mac)/Control (PC) click the control
to reset it to its default value of 10.
Important Note: Unlike vibrato
controls on most vocal processors,
this function does not simply use an LFO to
apply a synthesized vibrato. DUO actually
analyses the original vocal part to identify its
vibrato and modify its depth. As a result, the
modified vibrato will still reflect the overall
contour of the original vibrato. As an additional
consequence however, the Vibrato control will
only have affect if the original vocal contains
vibrato. It will not add vibrato to a performance
that does not originally have it.
The Vibrato control may be used by itself to
modify the vibrato of a performance. See the
Usage Tips below for details.
Command (Mac)/Control (PC) click the control
to reset it to its default value of 0.
Original Level
Sets the level of the original voice.
Command (Mac)/Control (PC) click the control
to reset it to its default value of 0.
Original Pan Position
Sets the original voice’s location in the stereo
spectrum. This control only functions in Stereo
or Mono-> Stereo modes.
Command (Mac)/Control (PC) click the control
to reset it to its default value of -100 (far left).
Double Level
Sets the level of the doubled voice.
Command (Mac)/Control (PC) click the control
to reset it to its default value of 0.
Page 25

Double Pan Position
Sets the doubled voice’s location in the stereo
spectrum. This control only functions in Stereo
or Mono-> Stereo modes.
Command (Mac)/Control (PC) click the control
to reset it to its default value of 100 (far right).
Usage Tips
• DUO is available in mono and stereo
versions and, depending on the capabilities
of your host program, a mono -> stereo
version (which in most cases is the
preferred routing). In the case of the stereo
version, DUO processes only the left
channel. DUO is dramatically more effective
with the original and doubled parts panned
apart, so if at all possible, try always to use it
with stereo output.
• For best performance, DUO requires a
clean, pitched monophonic signal. If DUO
can not reliably detect the pitch of the
input, either because of a noisy or effected
signal or because the input is not a single
monophonic voice, it will apply Vocal Timbre
and Timing variations only.
19
• Experiment with various Pitch and Timing
settings. Different combinations can result in
distinctly different stylistic effects.
• DUO’s Vibrato function can be used by itself
to modify the vibrato depth on a recorded
track. If you have a track with too deep a
vibrato (or too shallow, although that’s a
much rarer problem), assign DUO to the
track and set the mixer so that only the
doubled track is heard. Set Vocal Timbre to
0 and Pitch and Timing to their minimum
values. While listening to the track, adjust
the Vibrato slider to reduce or expand the
vibrato depth as desired. Notice that while
you are modifying the vibrato depth, the
expressive contour of the singer’s original
vibrato is retained.
Page 26

20
Page 27
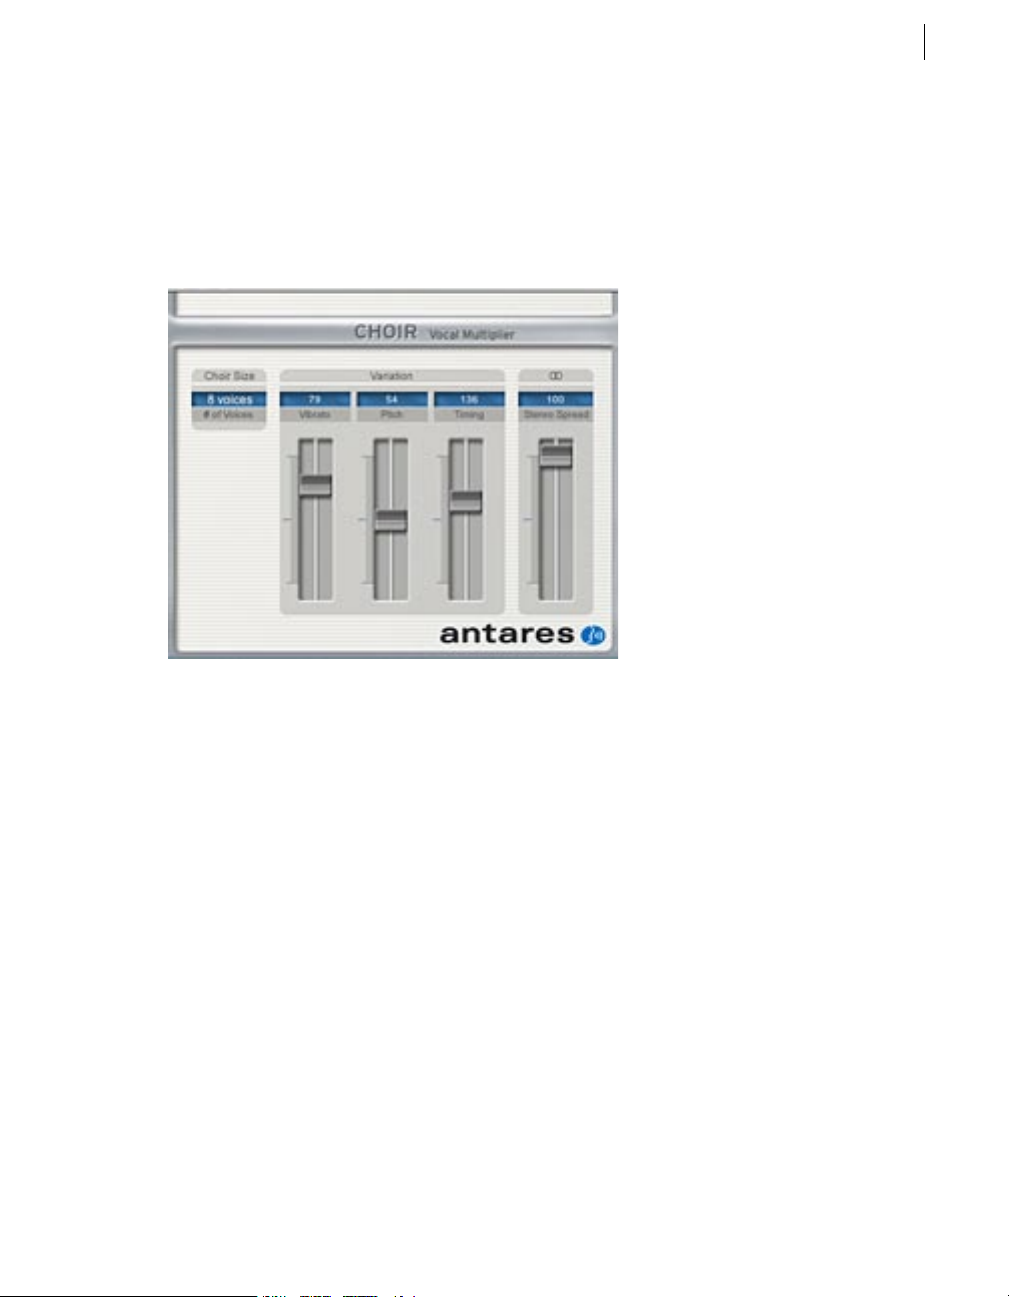
Chapter 5: CHOIR Vocal Multiplier
assigned a vibrato variation relative to
the original voice. The higher the value
of this control, the greater the possible
vibrato variation.
Command (Mac)/Control (PC) click
the control to reset it to its default
value of 30.
Pitch Variation
The Pitch Variation control lets you
select the range of the random
variation in pitch applied to each
generated voice. Each voice is
individually assigned a pitch variation
relative to the original voice. The
higher the value of this control, the
HOIR is a unique processor that turns a
single monophonic voice into 4, 8, 16,
or 32 distinct individual unison voices,
each with its own pitch, timing and
C
vibrato variations. The voices can, if desired,
be spread across the stereo spectrum. When
multiple instances of CHOIR are assigned
to individual harmony parts, the result is an
amazingly realistic large vocal ensemble.
Controls
Choir Size
This control allows you to select the number
of individual voices that will be generated from
the original voice. Choices are 4, 8, 16, and 32
voices.
allowable variation.
Command (Mac)/Control (PC) click the control
to reset it to its default value of 30.
Timing Variation
The Timing Variation control lets you select
the range of the random variation in timing
applied to each generated voice. Each voice is
individually assigned a timing variation relative
to the original voice. The higher the value of
this control, the larger the maximum amount of
allowable variation.
Command (Mac)/Control (PC) click the control
to reset it to its default value of 100.
larger the maximum amount of
21
Vibrato Variation
The Vibrato control allows you to select the
range of variation in vibrato depth applied to
the generated voices. Each voice is individually
Stereo Spread
This control selects the extent to which the
generated voices are spread across the stereo
spectrum. At a setting of 0, all of the voices
Page 28

22
appear in the center of the stereo soundstage.
As the value is increased, the voices spread
out from the center until, at the maximum
value, they appear across the entire stereo
soundstage.
This control only functions in Stereo or Mono->
Stereo modes.
Command (Mac)/Control (PC) click the control
to reset it to its default value of 100.
Usage Tips
• CHOIR is available in mono and stereo
versions and, depending on the capabilities
of your host program, a mono -> stereo
version (which in most cases is the
preferred routing). In the case of the
stereo version, CHOIR processes only the
left channel. CHOIR is dramatically more
effective with the voices panned across the
stereo spectrum, so if at all possible, try
always to use it with stereo output.
• The real power of CHOIR comes not as a
processor for one voice, but as a processor
to assign to each of a number of harmony
parts. Even if you have only one singer, have
them overdub the basic harmony parts and
then process those parts through THROAT
to give each the character of different voices.
Then assign an instance of CHOIR to each of
those parts and create your vocal ensemble.
• Along those same lines, even if you have
tons of CPU power, more is not always
better. Match the choir size to the style
of your music. Not every song needs the
Mormon Tabernacle Choir.
• Experiment with different combinations
of the Pitch and Timing controls. They
can create dramatically different vocal
ensembles. With Timing at its minimum
and substantial Pitch Variation, you have a
choir that’s rhythmically tight but a bit loose
with intonation. Conversely, reversing those
settings gives you a group that’s solidly
in tune, but rhythmically loose. And there
are of course many variations in between.
Match the performance style to the style of
your music.
• For best performance, CHOIR requires a
clean, pitched monophonic signal. If CHOIR
can not reliably detect the pitch of the
input, either because of a noisy or effected
signal or because the input is not a single
monophonic voice, it will apply Timing
variations only.
• Alternatively, create harmony parts by
processing a single vocal part through
a harmonizer and then assigning each
individual harmonizer output to an instance
of CHOIR.
• Keep in mind that the greater the number
of voices, the greater the CPU usage. If you
will be using multiple instances of CHOIR, it
might be wise to limit each instance to 4 or
8 voices.
Page 29

Chapter 6: PUNCH Vocal Impact
Enhancer
your vocal. It will typically be set
in combination with the Impact
control below.
The effect of this control will be
reflected on the Output Level
display.
Command (Mac)/Control (PC)
click the control to reset it to its
default value of 0.0.
Impact
This control lets you select
the amount of “punch” that
is added to the vocal. As you
increase the value of this
UNCH is a processor that is designed
to optimize the level of a vocal track
to allow it to cut through a dense mix
with power and clarity. It provides a
P
combination of compression, gain, limiting,
and overload protection with a user interface
designed for speed and simplicity.
Controls
Input Level
This meter displays the input level of the signal
to be processed.
Note: This display is for reference
purposes only. None of the following
controls affect the input level. The result of
all processing will be reflected on the Output
Level display described below.
Gain
This control allows you to increase the gain of
vocal performance are equalized and their
level raised. The effect of the control will be
reflected on the Output Level display.
Command (Mac)/Control (PC) click the control
to reset it to its default value of 0.
Ceiling
This control allows you to attenuate the signal
after all other processing.
Although PUNCH allows you to create a fulllevel signal without risk of ugly distortion, it
will usually be wise to apply at least a little
attenuation here to allow yourself some room
for any further processing that might apply
gain. The default setting of -3.0 dB is a good
starting point, and you can always come back
and add in more if necessary as you continue
processing and the mix takes shape.
control, level variations in the
23
Page 30

24
Command (Mac)/Control (PC) click the control
to reset it to its default value of -3.0 dB.
Output Level
This meter displays the level of the signal
after all processing by PUNCH. The Gain,
Impact, and Ceiling controls should be set in
combination such that no clipping occurs.
Usage Tips
• PUNCH is available in mono and stereo
versions.
• Since the point of PUNCH is to optimize
the impact of your vocal track in the mix,
it makes sense to set the controls while
listening to the track in the context of the
entire mix.
• Every vocal performance is unique. Finding
the optimum settings for PUNCH is very
much a matter of experimentation. Luckily
there are only two controls that really matter,
so the prospect is not exactly daunting.
• The Impact control has been purposely
designed with a wide enough range to
produce some pretty odd effects at its
extreme. If you’re looking for that sort of
thing, check it out.
• While PUNCH has been designed for the
voice, it can perform its magic effectively
on pretty much any recorded part. It will
even do interesting things to entire recorded
mixes. Check it out.
Page 31

Chapter 7: SYBIL Variable Frequency
De-Esser
The diagram below shows
how a compressor and
a high pass filter are
traditionally configured to
accomplish de-essing.
SYBIL uses a digital
algorithm to implement the
de-esser function. While
the details of the algorithm
are quite complex,
the resulting effect is
functionally equivalent to
the diagram below.
25
Controls
Gain Reduction Meter
YBIL is a digital equivalent of a
traditional vocal de-esser.
When recording spoken or sung
S
material, the sibilant sounds (Ss,
Ts, CHs, and SHs) in the track sometimes
(depending on the individual performer) appear
louder than the rest of the signal. The effect
can sound unnatural and often irritating. The
solution to this problem is to compress only
the sibilants, thereby lowering their level
relative to the rest of the track. Processing a
signal this way is called de-essing.
displays the amount of compression taking
place. If the frequency and threshold controls
are set properly, the meter will display little
gain reduction during vowel sounds and soft
consonants, and substantial gain reduction
during sibilants. For this reason, the meter is a
useful tool when setting the other controls.
High Pass Frequency
This control sets the frequency of SYBIL’s
side-chain high pass filter. The goal is to set
the frequency such that the filter passes any
sibilance (thereby keying the compressor), but
not any of the desired signal.
Command (Mac)/Control (PC) click the control
to reset it to its default value of 8000 Hz.
Threshold
This control sets the threshold level of SYBIL’s
compressor. The range is from 0 dB to -80 dB.
The Gain Reduction Meter
Page 32

26
In most cases, the default value of -48 dB is a
good place to start.
Command (Mac)/Control (PC) click the control
to reset it to its default value of -48 dB.
Compression
This control sets the compression ratio of
SYBIL’s compressor. The range is from 1.0:1 to
99:1. In most cases, the default value of 2.4:1
is a good place to start.
Command (Mac)/Control (PC) click the control
to reset it to its default value of 2.4:1.
Attack Time
This control adjusts the speed with which
SYBIL’s compressor responds to peaks in the
signal coming from the high pass filter. The
range of the control is from 3 milliseconds to
100 milliseconds.
Command (Mac)/Control (PC) click the
control to reset it to its default value of 10
milliseconds.
Release Time
This control adjusts the time it takes the
compressor’s gain to increase 6 dB after the
signal coming from the high pass filter drops
below the threshold. The range of the control
is from 3 milliseconds to 200 milliseconds.
Usage Tips
• SYBIL functions solely as a mono processor.
• If the high pass frequency is set too low,
non-sibilant components of the signal will
be compressed and the vocal will have its
highs attenuated. If it is set too high, some
sibilance will still remain. The trick is to find
that ideal point where only the sibilance is
affected. When set correctly, you can’t tell
that there is processing going on. If you can
hear something happening, SYBIL needs to
have its settings tweaked.
Command (Mac)/Control (PC) click the
control to reset it to its default value of 20
milliseconds.
Page 33

Index
27
A
Authorizing AVOX 4
AVOX Overview
CHOIR
DUO
5
PUNCH
SYBIL
THROAT
6
5
5
5
5
C
CHOIR 21
Choir Size
Controls
Pitch Variation
Stereo Spread
Timing Variation
Usage Tips
Vibrato Variation
contact info
21
21
21
21
22
ii
D
DUO 17
Controls
Double Level
Double Pan Position
Original Level
Original Pan Position
Pitch Variation
Timing Variation
Usage Tips
Vibrato
Vocal Range
Vocal Timbre
17
18
18
18
19
18
17
17
21
21
18
19
18
I
Installing AVOX 3
L
License Agreement iii
P
Processing Guidelines 6
PUNCH
23
Ceiling
Controls
Impact
Input Level
Output Level
Usage Tips
23
23
23
23
24
24
S
SYBIL 25
Attack Time
Compression
Controls
Gain Reduction Meter
High Pass Frequency
Release Time
Threshold
Usage Tips
26
26
25
26
25
26
25
25
Page 34

28
T
Technical Support 1
THROAT
Breathiness Frequency
Breathiness Mix
Bypass
Controls
Factory Presets
Glottal Pulse Width
Glottal Voice Type
Graphic Throat Display
Level Matching
Model Glottal Waveform
Model Throat Length
Model Throat Width
Output Gain
Reset
Source Glottal Waveform
Source Throat Precision
Tutorial
Usage Tips
Vocal Range
7
9
13
8
15
10
11
13
13
13
14
13
8
9
11
10
10
10
8
9
W
Welcome 1
Page 35

29
Page 36

 Loading...