


©2000 Antares Audio Technologies. All Rights Reserved.
Antares Audio Technologies
231 Technology Circle, Scotts Valley, California 95066 USA
voice: (831) 461 7800 fax: (831) 461 7801 service: (831) 461 7814
web: www.antarestech.com
Printed in USA Rev 1.0-10/00

Contents
Getting Started
|
Welcome |
5 |
|
Tech Support |
6 |
|
A few words from Dr. Andy |
7 |
Introducing the ATR-1a |
Chapter 1 |
|
|
Background |
9 |
|
So what exactly is it? |
9 |
|
A little bit about pitch |
10 |
|
Some pitch terminology |
10 |
|
How the ATR-1a determines pitch |
11 |
|
How the ATR-1a corrects pitch |
12 |
|
Program Mode vs. Song Mode |
13 |
Setting Up the ATR-1a |
Chapter 2 |
|
|
Setting up the ATR-1a |
15 |
Panel Controls and |
Chapter 3 |
|
Connectors |
Front panel |
17 |
|
Back panel |
19 |
Display Screens and |
Chapter 4 |
|
Menu Pages |
Flash screen |
20 |
|
Mode pages |
20 |
|
Program Edit pages |
22 |
|
Speed page |
23 |
|
Make Scale from MIDI page |
24 |
|
Scale page |
24 |
|
Vibrato page |
26 |
|
Program Name page |
27 |
|
Save Program page |
27 |
|
Song Edit pages |
27 |
|
Song Speed page |
28 |
|
Song Items page |
28 |
|
Song Vibrato page |
29 |
|
Song Name page |
30 |
|
Save Song page |
30 |
|
System Edit pages |
30 |
|
Bass Mode page |
31 |
|
Sensitivity and LCD page |
31 |
|
Foot Switch and Detune page |
32 |
|
MIDI page 1 |
33 |
|
MIDI page 2 |
34 |
|
MIDI page 3 |
35 |
|
MIDI page 4 |
35 |
|
MIDI page 5 |
36 |
|
Owner Message page |
36 |
Creative Applications |
Chapter 5 |
37 |
Appendix |
|
|
|
Factory Programs |
40 |
|
Scale and Chord Guides |
41 |
|
MIDI SysEx message formats |
44 |
|
MIDI SysEx message examples |
47 |
|
MIDI Implementation Chart |
50 |
|
ATR-1a Specifications |
51 |
Index |
|
52 |

Welcome!
On behalf of everyone at Antares Audio Technologies, we’d like to offer both our thanks and congratulations on your decision to purchase the absolute best intonation correction hardware in the world.
Before you proceed much farther, we’d like to strongly encourage you to fill out and return the ATR-1a registration card. As an ATR-1a owner, you are entitled to receive notification of any firmware upgrades, technical support, and advance announcements of upcoming products. But we can’t send you stuff unless we know who and where you are. So please, send it in.
At Antares, we are committed to excellence in quality, customer service, and technological innovation. With your purchase of the ATR-1a, you have created a relationship with Antares which we hope will be long and gratifying. Let us know what you think. You can count on us to listen to you.
Again, thanks.
The Whole Antares Crew
5

Technical Support
In the unlikely event that you experience a problem using your ATR-1a, try the following:
1.Make another quick scan through this manual. Who knows? You may have stumbled onto some feature that you didn’t notice the first time through.
2.Check our web page for tips, techniques, or any late-breaking information: www.antarestech.com
3.Call your local Antares dealer.
4.Call us at (831) 461-7814 Monday through Friday between 9am and 5pm USA Pacific Standard Time.
5.Email us at: techsupport@antarestech.com
For options 3, 4 and 5, please be prepared to provide the serial number of your ATR-1a.
6

A few words from Dr. Andy
I remember, as if it were yesterday, sitting in my junior high school band, happily playing away on my flute, when I noticed that our conductor was screaming and jumping up and down on the podium. What was this about? Suddenly, I realized she was screaming at me. And just in time too
— since I was able to duck and watch a baton fly past my head, missing me by inches. “Why [expletive] can’t you play in tune?” she asked. But I was in tune. Everybody else was out of tune. It was then I began to learn about intonation.
Many artists struggle with intonation. An entire concert can be spoiled by a single sour note. Many of our most celebrated entertainers spend hours in the studio doing retake after retake, trying to sing expressively and in tune. Afterwards, their producers spend yet more time trying to correct intonation problems using inadequate tools.
The ATR-1a is dramatically changing all of that. Because of the ATR-1a, sessions can focus on feeling and expression, rather than retakes. Studio hours are reduced and production costs are lowered. Even artists in live performance situations can concentrate on interpretation, confident that any pitch inaccuracies will be caught and corrected before they make it out to the audience.
What’s more, the ATR-1a is incredibly easy to use (a fact attested to by the thinness of this manual). So fire up your ATR-1a, invest a half hour or so in reading the following pages, and prepare to make intonation problems a thing of the past.
Andy Hildebrand Ph.D. Founder and Chief Scientist andy@antarestech.com
7

8

Chapter 1:
Introducing the ATR-1a
Some background
In 1997, Antares first introduced the ground-breaking Auto-Tune Pitch Correcting Plug-In for ProTools™ (followed a bit later by the VST and stand-alone versions). Here was a tool that actually corrected the pitch of vocals and other solo instruments, in real time, without distortion or artifacts, while preserving all of the expressive nuance of the original performance. Recording Magazine called Auto-Tune a “Holy Grail of recording.” And went on to say, “Bottom line, Auto-Tune is amazing...
Everyone with a Mac should have this program.” In fact, we know of quite a few people who bought kilo-buck ProTools systems just to be able to run Auto-Tune.
While Auto-Tune has met with tremendous success, we were immediately barraged with requests for a self-contained “Auto-Tune-in-a-box.” The result is the ATR-1a which you have presumably just purchased.
So what exactly is it?
The ATR-1a is a rack-mountable hardware implementation of Antares’s Auto-Tune pitch correcting software. Like Auto-Tune, the ATR-1a employs state-of-the-art digital signal processing algorithms (many, interestingly enough, drawn from the geophysical industry) to continuously detect the pitch of a periodic input signal (typically a solo voice or instrument) and instantly and seamlessly change it to a desired pitch (defined by any of a number of user-programmable scales).
In addition, the ATR-1a, befitting its easy portability, includes a number of new features that make it particularly powerful in live performance situations. These include a new Song Mode that lets the ATR-1a follow even the most complex harmonic song structures, foot switch control of Scale selection and Bypass Mode, as well as MIDI control of every ATR-1a parameter.
9

A little bit about pitch
Pitch is typically associated with our perception of the “highness” or “lowness” of a particular sound. Our perception of pitch ranges from the very general (the high pitch of hissing steam, the low pitch of the rumble of an earthquake) to the very specific (the exact pitch of a solo singer or violinist). There is, of course, a wide range of variation in the middle. A symphony orchestra playing a scale in unison, for example, results in an extremely complex waveform, yet you are still able to easily sense the pitch.
The vocalists and the solo instruments that the ATR-1a is designed to process have a very clearly defined quality of pitch. The sound-generating mechanism of these sources is a vibrating element (vocal chords, a string, an air column, etc.). The sound that is thus generated can be graphically represented as a waveform (a graph of the sound’s pressure over time) that is periodic. This means that each cycle of waveform repeats itself fairly exactly, as in the periodic waveform shown in the diagram below:
Because of its periodic nature, this sound’s pitch can be easily identified and processed by the ATR-1a.
Other sounds are more complex. This waveform:
is of a violin section playing a single tone. Our ears still sense a specific pitch, but the waveform does not repeat itself. This waveform is a summation of a number of individually periodic violins. The summation is nonperiodic because the individual violins are slightly out of tune with respect to one another. Because of this lack of periodicity, the ATR-1a would not be able to process this sound.
Some pitch terminology
The pitch of a periodic waveform is defined as the number of times the periodic element repeats in one second. This is measured in Hertz (abbreviated Hz.). For example, the pitch of A3 (the A above middle C on a piano) is traditionally 440Hz (although that standard varies by a few Hz. in various parts of the world).
10
Pitches are often described relative to one another as intervals, or ratios of frequency. For example, two pitches are said to be one octave apart if their frequencies differ by a factor of two. Pitch ratios are measured in units called cents. There are 1200 cents per octave. For example, two tones that are 2400 cents apart are two octaves apart.
The traditional twelve-tone Equal Tempered Scale that is used (or rather approximated) in 99.9% of all Western tonal music consists of tones that are, by definition, 100 cents apart. This interval of 100 cents is called a semitone.
How the ATR-1a detects pitch
In order for the ATR-1a to automatically correct pitch, it must first detect the pitch of the input sound. Calculating the pitch of a periodic waveform is a straighforward process. Simply measure the time between repetitions of the waveform. Divide this time into one, and you have the frequency in Hertz. The ATR-1a does exactly this: It looks for a periodically repeating waveform and calculates the time interval between repetitions.
The pitch detection algorithm in the ATR-1a is virtually instantaneous. It can recognize the repetition in a periodic sound within a few cycles. This usually occurs before the sound has sufficient amplitude to be heard. Used in combination with a slight processing delay (no greater than 4 milliseconds), the output pitch can be detected and corrected without artifacts in a seamless and continuous fashion.
The ATR-1a was designed to detect and correct pitches up to the pitch C6. If the input pitch is higher than C6, the ATR-1a will often interpret the pitch an octave lower. This is because it interprets a two cycle repetition as a one cycle repetition. On the low end, the ATR-1a will detect pitches as low as A0 (55Hz) in its normal mode and down to 25Hz when Bass Mode is selected. This range of pitches allows intonation correction to be performed on all vocals and almost all instruments.
Of course, the ATR-1a will not detect pitch when the input waveform is not periodic. As demonstrated above, the ATR-1a will fail to tune up even a unison violin section. But this can also occasionally be a problem with solo voice and solo instruments as well. Consider, for example, an exceptionally breathy voice, or a voice recorded in an unavoidably noisy environment. The added signal is non-periodic, and the ATR-1a will have difficulty determining the pitch of the composite (voice + noise) sound. Luckily, there is a control (the SENSITIVITY control, discussed in Chapter 4) that will let the ATR-1a be a bit more casual about what it considers “periodic.” Experimenting with this setting will often allow the ATR-1a to track even noisy signals.
11

How the ATR-1a corrects pitch
The ATR-1a works by continuously tracking the pitch of an input sound and comparing it to a user-defined scale. The scale tone closest to the input is continuously identified. If the input pitch exactly matches the scale tone, no correction is applied. If the input pitch varies from the desired scale pitch, an output pitch is generated which is closer to the scale tone than the input pitch. (The exact amount of correction is controlled by the Speed parameter, described below and in Chapter 4.)
Scales
The heart of the ATR-1a’s pitch correction is the Scale. The ATR-1a allows you to program 50 different Scales. For each Scale you can define which notes will sound and which won’t. And for each note that will sound, you can decide whether the ATR-1a will apply pitch correction to input pitches near that note or leave those pitches uncorrected.
Speed
You also have control over how rapidly, in time, the pitch adjustment is made toward the scale tone. This is set with the SPEED control (see Chapter 4 for more details).
•Fast SPEED settings are more appropriate for short duration notes and for mechanical instruments, like an oboe or clarinet, whose pitch typically changes almost instantly. A fast enough setting will also minimize or completely remove a vibrato.
•Slow SPEED settings, on the other hand, are appropriate for longer notes where you want expressive pitch gestures (like vibrato) to come through at the output and for vocal and instrumental styles that are typified by gradual slides (portamento) between pitches. An appropriately selected slow setting can leave a vibrato unmodified while the average pitch is accurately adjusted to be in-tune.
Vibrato
The ATR-1a can also apply a vibrato to the input sound. You can program the vibrato depth, vibrato rate and the onset delay of the vibrato (or even control it in real time via MIDI). You can also choose the shape of the pitch variation in the vibrato (sine, ramp or square). By combining a fast Speed setting with the ATR-1a Vibrato settings, you can even remove a performer’s own vibrato and replace it with the ATR-1a’s programmed vibrato, all in real time. Also, unusual combinations of Vibrato Waveform, Rate and Depth settings can be used for some interesting special effects.
12
An example
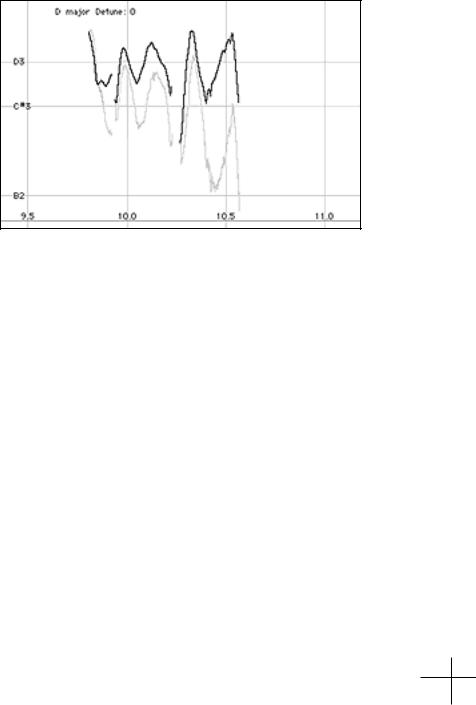
As an example, consider this before-and-after graphic representation of the pitch of a vocal phrase that contains both vibrato and expressive gestures.
CORRECTED
 BY ATR-1
ORIGINAL
 PERFORMANCE
In the original performance, we can see that although the final note should be centered around D, the vocalist allowed the tail of the note to fall nearly three semitones flat. The “after” plot is the result of passing this phrase through the ATR-1a with a Program consisting of a D Major Scale (with C and B set to ”Blank”) and a Speed setting of 10. That Speed causes the pitch center to be moved to D, while still retaining the vibrato and expressive gestures. (Setting C and B to ”Blank” is necessary to keep the ATR-1a from trying to correct the seriously flat tail of the last note to those pitches. See Chapter 4 for more details.)
Program Mode vs. Song Mode
At its top level, the ATR-1a operates in one of two modes, Program Mode or Song Mode. Which mode you use depends upon your application and, to some extent, how radical are the required corrections.
Program Mode
In Program Mode, you call up one of the ATR-1a’s 50 individual Programs to control the correction algorithm. Each Program consists of a Scale, a Speed setting and Vibrato settings. You can step through Programs with a foot switch or via MIDI.
Use Program Mode when a single scale (or maybe two) is all that’s required for a particular correction.
13

If a performance is quite close to begin with and only requires minor correction (i.e., never more that 50 cents), it’s often sufficient to simply choose the Chromatic scale, set Speed to about 10 and leave it there.
If you are working in the studio to correct an already recorded track, you might use Program Mode to deal with the track one section at a time, stoping to change Programs between sections.
Song Mode
Song Mode offers a more elaborate set of controls primarily designed to facilitate the use of the ATR-1a in a live performance situation, whether in actual concert or during tracking in the studio.
The ATR-1a provides 20 Songs. For each Song, you can program a series of up to 15 Song Steps. Each Step can contain a Program (with associated scale) or one of a number of navigation controls (See Chapter 4 for details). In performance you move from Song Step to Song Step via the foot switch or MIDI. You can also call up different Songs via MIDI Program Change messages.
Each Song also contains its own Speed and Vibrato settings that override those settings in the individual Programs. In this way, an individual Program’s scale can be used in any number of songs, each with different Speed and Vibrato settings. (To accomplish the same thing in Program Mode would require you to create multiple Programs, each with the identical scale but with the different Speed and Vibrato settings. Very inefficient. )
There is of course no hard and fast rule for which mode to use in any particular situation. Try out both modes and use what feels comfortable to you.
14

Chapter 2:
Setting Up the ATR-1a
Setting up the ATR-1a is a very straightforward.
1.Find a suitable location. The ATR-1a is designed to be mounted in a standard 19-inch equipment rack.
2.Confirm that the included power supply is correct for the electricity in your part of the world. If you are not sure, or the power supply has a plug that is incompatible with your wall sockets, contact your local Antares dealer for help.
Important! Do not attempt to modify the supply or use any other supply that is not specifically intended for the ATR-1a.
3.First, connect the power supply’s 7-pin DIN connector to the AC INPUT jack on the rear of the ATR-1a. Then plug the power supply into an AC outlet.
4.Connect a balanced or unbalanced audio input to one of the INPUT jacks (see Chapter 4 for details).
5.Connect a cable to one of the OUTPUT jacks and route the output as appropriate for your application.
6.If you will be controlling your ATR-1a via MIDI, connect a MIDI cable from your MIDI source to the ATR-1a’s MIDI IN jack.
An Important Note: Unless you plan to be defining the ATR-1a’s target pitches via MIDI, be sure that MIDI NOTE MODE is set to OFF in the System Edit pages (see page 29 for details). If MIDI NOTE MODE is set to ON and no MIDI note data is present, the ATR-1a will pass through all audio unprocessed, regardless of the settings of the Program Scale Page — giving the impression that the ATR-1a is not functioning.
An Important Note About Grounding: The ATR-1a is an extremely quiet piece of gear. When properly connected and grounded, noise and hum will be inaudible. However, as you’re no doubt well aware, every studio has its own unique quirks when it comes to connections, grounding and noise. For the absolute best sonic performance, ensure that your input and output are fully balanced.
15

An Important Note About Monitoring: If the ATR-1a is used to pitchcorrect an artist’s performance in real time, it is very important that the performer is able to monitor their original signal, not the pitch-corrected signal. Trying to react musically to the processed signal will drive them crazy and, in most cases, drive them farther off pitch.
16
Chapter 3:
Panel Controls and Connectors
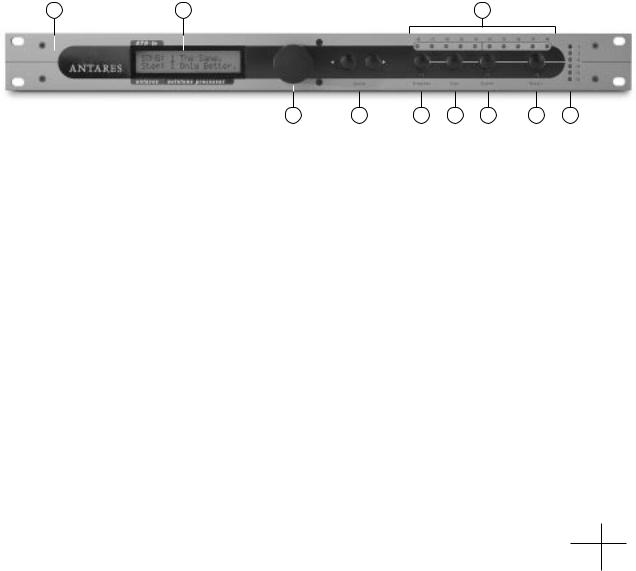
As you have almost certainly noticed, the ATR-1a has relatively few controls. We’ll cover them here.
1 |
2 |
10 |
3 |
4 |
5 |
6 |
7 |
8 |
9 |
The Front Panel
1Non-existent Power Switch That’s right. There isn’t one. The ATR-1a is designed to remain on continuously. You can, of course, plug it in to a switched power strip or power conditioner if you like, but leaving it on all the time will do it no harm.
2LCD An easy-to-read 20 character by 2 line display. You can set the optimum viewing angle in the System menu (See Chapter 4).
3Data Entry Knob As the name implies, turn it to enter data.
4CURSOR Buttons The cursor buttons let you move the cursor in the LCD display from field to field so that you can change the field’s value using the knob.
5PROGRAMS Button Press this button to edit a Program or Song. It is state-sensitive. That is, if you are in Program Mode when you press this button, you will be taken to the Program Edit pages. If you are in Song Mode, you will be taken to the Song Edit pages. The accompanying LED lights to remind you that you are in an edit mode. When the LED is lit, press the PROGRAMS buttom again to exit the Program Mode.
6PAGE Button While in Program, Song or System Edit Mode, press this button to cycle sequentially through the available edit pages. You can only move in one direction, but there are so few pages in each mode that you are never more than a few presses away from where you want to be.
17
 Loading...