

Page 1

Mentor
User’s Guide
Downloaded from - http://www.guardianalarms.net
Page 2

1997, Andover Controls Corporation
All Rights Reserved
No part of this publication may be reproduced, read or stored in a retrieval system, or transmitted, in any
form or by any means, electronic, mechanical, photocopying, recording, or otherwise, without prior
written permission of Andover Controls Corporation.
Produced in the United States of America.
Infinity is a trademark of Andover Controls Corporation. All other trademarks are the property of their
respective owners.
Mentor Use r Gu i d e , Version: A, August 1997
Andover Controls part number: 30-3001-686
The information in this document is furnished for informational purposes only, is subject to change
without notice, and should not be construed as a commitment by Andover Controls Corporation.
Andover Controls Corporation, assumes no liability for any errors or inaccuracies that may appear in this
document.
Andover Controls Corporation
300 Brickstone Square
Andover, MA 01810
(508) 470-0555
fax: (508) 470-0946
Andover Controls Corporation
Page 3

Contents
Introduction......................................................... 1
Installation...........................................................3
Quick Start...........................................................5
Using Mentor.......................................................7
Create an ACX................................................................8
Create an IDX...............................................................17
Objects Installed By Mentor.............................23
Mentor User Guide
Page 4

Andover Controls Corporation
Page 5

Introd ucti on
Introduction
By their nature, access control projects are very repetitive - most doors are set
up the same for an entire project, and most projects require a similar set of basic
graphic panels , r ep o rts, alarms and schedules. With th is in mind, Mentor w as
developed by Andover Controls as a collect ion of tools that helps the
programmer to quickly and easily create a complete SX 8000 database for basic
access control projects. With only a minimum of input, Mentor creates the
entire database for a project. The programmer can then customize the database
by importing scanned-in images of the project for the main menu graphic, and
Autocad drawings for each floor plan. However, the bulk of the configuration is
done up front by Mentor, resulting in considerable time savings.
Specifically, Mentor is a set of SX 8000 graphic panels, Plain English programs,
and associated text files that are installed on an SX 8000 workstation. Once
installed, Mentor guides the programmer first through the installation of the
“common” graphics and reports, and then through the setup of each ACX
700/780/781 panel and IDX 800 panel.
System Requirements
Mentor creates the basics. There are many applications, however, that will
require additional programming not included in Mentor - CCTV interface
programs, elevator control programs, special two-man rule sequences, special
reports, etc. Examples of these programs are available on the Andover Controls
bulletin board, and can easily be added to a Mentor-generated database.
To assist in your database creation, we have included an Excel spreadsheet file
(MENTOR.XLS) on the Mentor distribution diskette that contains the Mentor
forms for each type of controller. You can print out these forms and have your
customer fill them in with desired door names, etc., or you can fill them in
yourself and send them to Andover Controls for factory configuration.
The Mentor components and programs assume the following system
configuration:
SX 8000 Workstation, rev 2.16 or higher, single-user or LAN configuration.
OS/2 WARP version 3.0
Video card with a resolution of 800 x 600, using 256 colors or more.
Note: Mentor graphics were developed using an ATI video display adapter with
the Mach64 chip set. For best results, we recommend using this card.
Mentor User Guide 1
Page 6

Installation
Instal lin g Mentor
The Mentor database is contained on one diskette, and is installed from an OS/2
workstation with SX 8000 (version 2.16 or greater) software previously
installed. The workstation may be either a standalone SX or a workstation
networked to a server. Some of the Mentor features are software-key enabled,
and will not work properly if a Mentor-enabled key is not present. Be sure to
have the Mentor SX key in place.
Also, as mentioned in the introduction, the Mentor graphics are designed for
display on a monitor set to a video resolution of 800 x 600. Be sure that the
correct video drivers are installed and operating on your workstation for this
resolution.
The workstation must be running OS/2 WARP version 3.0. Previous OS/2
versions will cause problems with the graphic features.
Note: We recommend that you install Mentor on a clean database. If you install
Mentor on an existing database there may be existing objects, alarms, panels,
etc. that have the same names as Mentor objects. During the installation
process, Mentor would over write these objects resulting in a loss of data.
1. Open an OS/2 window, insert the diskette, and change to the floppy drive.
2. Type: install
3. At the prompt, enter the name of the drive on which the Infinity software
has been installed. Ordinarily, this will be either c: for a standalone SX, or
i: for a workstation on a LAN. Be sure to include the colon (:) in the drive
name. Once you have confir med that the driv e n ame was entered cor rectly,
the installation program will put the Mentor files in their correct places.
Some files will be added to each of the following directories:
\inf\met, \inf\t ex tdir, and \inf\mentor.
4. Start the SX workstation, and check its name, as well as the name of the site
under which it resides. If the workstation is called Infinity254 and the name
of the site is LocalSite, proceed to step #5.
If the workstation is not called Infinity254, and/or the site is not called
LocalSite, make a note of the correct names. Then, open a text editor and
edit the file called mentroot.dmp in the \inf\mentor subdirectory (it is wise
to make a backup copy of the file first). If the workstation name was
different, then replace “Infinity254” (which occurs numerous times in the
file) with the correct name of your workstation. If the site name was
different, then replace “LocalSite” (which occurs numerous times in the
file) with the correct name of the site. Save the changes.
2 Andover Controls Corporation
Page 7

Installation
5. Back in the SX window, open the Object Tree and highlight the Root icon
(yellow folder symbol at the very top of the tree). Select Database from the
menu bar at the top, then Import. Enter the name of the file,
\inf\mentor\mentroot.dmp on the Infinity drive; select Andover Controls
Format, Ignore Object Last Change Attri bute, and Overwrite Existing
Objects, then click on OK.
6. It will take a few minutes for the file to load. When loading is finished,
check the Error Log for any problems. There should not be any. If you do
see errors, they are probably caused by incorrect workstation names or site
names. Check the dump file (step #4) and reload again.
7. If your Infinity drive is not c:, open the list of Strings on your SX
workstation, and edit the string called MnInfPath. By default, its value is
“C:\Inf\”. If your Infinity drive is not c: (if you are on a LAN workstation,
it is usually I:), change the drive name in this string to the appropriate value,
i.e. “I:\Inf\”
8. This step is for LAN systems only. Install the SQL client utilities for OS/2
on every workstation (single-user systems have these installed by default).
These are needed for some of the special SX 8000 reports that Mentor
generates. The client utilities are included with SQL Server for NT, on a
separate diskette. Norm ally thes e are installed to the C :\S QL\BIN P
directory. When finished, verify the presence of the file ISQL.EXE in this
directory.
9. In order to use some of the SX 8000 reports that Mentor generates, you
must increase the number of User connections in the SQL database to at
least 9 per workstation. To do this, open an OS/2 window, and enter the
following:
C:\> ISQL -USA -P -S (or -SINFINITY for LAN systems)
1> sp_configure “user connections”
2> go (this displays the current value of user connections)
1> sp_configure “user connections”, 9
2> go (use at least 9 for single-user, more for LAN systems)
1> reconfigure
2> go
1> exit
Then, shutdown and restart SQL for the change to take affect. (In a related
issue , check the NUMDBPROC setting in the SX 8000 Options - Settings
menu. If it is missing, add it, using all caps, and give it a value of seven (7).
Do this for each workstation).
10. Mentor is now installed on your workstation and is ready to use. (For a
description of the various Mentor components, refer to the Mentor Tool
Components section of this document.)
Mentor User Guide 3
Page 8

Installation
4 Andover Controls Corporation
Page 9

Quick Start
Quick Start
Once Mentor is installed, it is very easy to configure the database. The following
are simplified instructions for using Mentor. Complete instructions are found in
the next section
Install the Mentor tool package. After the reload, check the Error Log!
1. Select Offline E d it in g.
2. Open the MentorMain panel.
There are two sets of choices on this panel. For stand-alone systems, use the
buttons on the left side of the panel under the CMX/ACX System heading.
For networked systems, use the buttons located on the right side of the
panel under the Networked System heading.
Note: The CMX/ACX system assumes that COMM2 of your single-user SX
8000 is cabled directly to COMM2 of the CMX 240. After loading you can
go back and change the connection if you use a different computer.
3. Select or click Step 1 – Check Initial System Configuration.
After the reload, check the Error Log! Don’t worry about the “Unexpected
Error : 10188” - it is to be expected, and is harmless. For LAN systems that
use a server name other than INFINITY, edit the following programs and
reports on the workstation and change the variable acc_ServerName or
ServerName on line Startu p:
Programs: CheckDB, CheckAlloc, DBSizeCheck
Reports: AreasAllRpt, AreaDeptRpt , AreaDisRpt, CardNumRpt
4. Select or click Step 2 - Create an ACX, or ACX On The Network or ACX
On A Dial-up Site. This opens the MentorACX panel.
5. Select Configure ACX Details . Fill in details of this form.
6. Click the Notes1 button to advance to the Supervised Inputs form. Enter the
required information.
7. Click OK to return to the ACX Configuration form.
8. Click OK to return to the MentorACX panel.
9. At the MentorACX panel, select Create. After the reload, check the Error
Log!
Open up the two panels (one door control, and one floor plan graphic)
created on the ACX to finish Mentor creation. Open them up from the
object tree. Import a floor plan bitmap into the background of the Floor
Plan graphic. Note - when editing the animations on these two panels, a
warning might appear about the network address having changed. This is a
harmless error - ignore it.
Mentor User Guide 5
Page 10

Quick Start
10. (For first ACX created on CMX/ACX system, open up the AddACard pan el
at the root to finish Mentor creation.)
11. (Repeat Steps 5 - 9 for additional ACXs.)
12. At the MentorACX panel, select Cancel,. This returns you to the
MentorMain panel
13. At the MentorMain panel, select Step 3 - Create IDX. This opens the
MentorIDX panel.
14. At the MentorIDX panel, select Configure IDX Details. Fill in details of
this form.
15. Click the Notes1 button to advance to the Supervised Inputs form. Enter the
required information.
16. Click OK to return to the IDX Configuration form.
17. Click OK to return to the MentorIDX panel.
18. At the MentorIDX panel, select Create. After the reload, check the Error
Log!
19. (Repeat Steps 13 - 17 for additio nal IDXs. )
20. At the MentorIDX panel, select Cancel. This returns you to the MentorMain
panel. Close MentorMain.
21. Online Edit (deselect Offline Editing).
22. Reload to Site(s). After the reload, check the Error Log!
23. Animate the Door Control Menu graphic and the Floor Plan Menu graphic
so that the buttons point to the appropriate graphics.
6 Andover Controls Corporation
Page 11
Using Me nt or
Using Mentor
Mentor is a collection of tools that will assist you in building your system’s
database. It is designed to be used with the workstation in Offline Edit mode.
After using, the Mentor-built data is then loaded to your system’s controllers
through a site reload.
Put your workstation into Offline Edit mode:
Select Preferences from the Options menu, then select Offline Editing.
Open the Mento r Main panel from a View All Panels list, or from a list of
panels on the Mentor workstation.
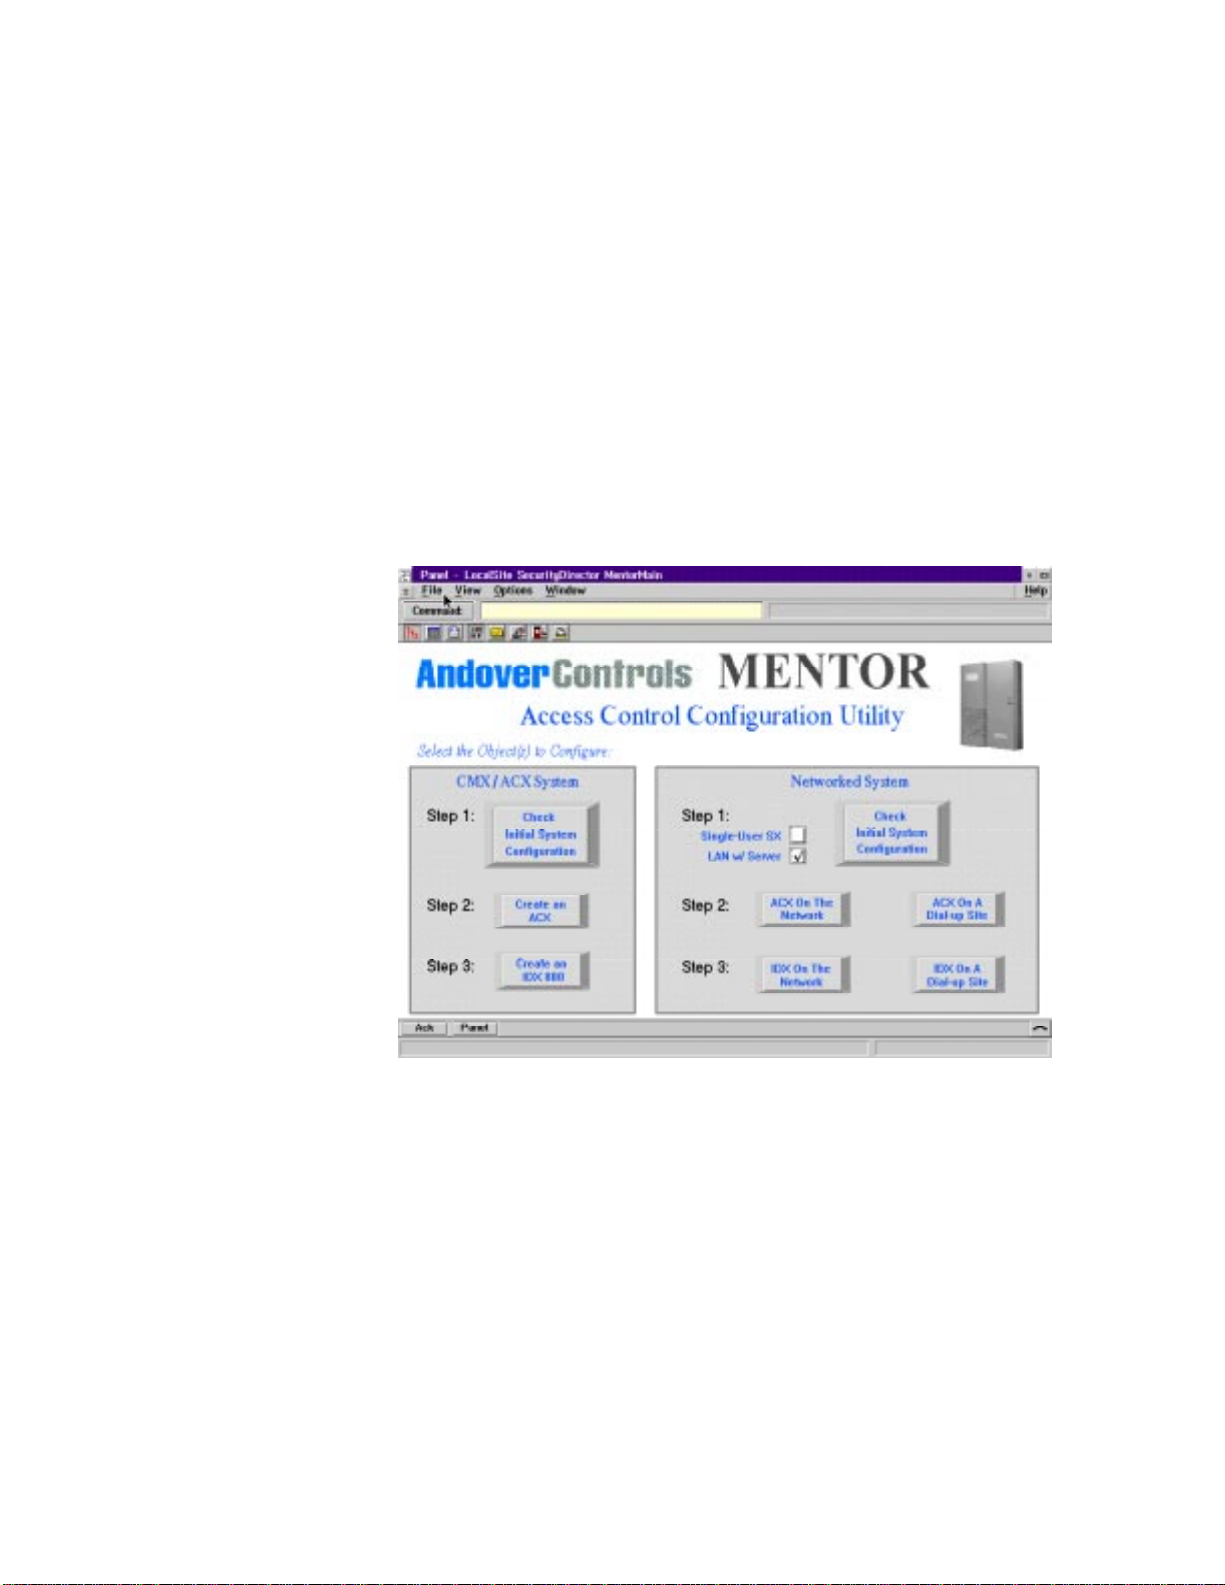
Step 1
Through this panel, Mentor can help configure two different types of systems: a
CMX/ACX System, and a Networked Syst em. The CMX/ACX system is
typically a small access control system, consisting of one CMX, directly
connected to the SX workstation through COMM2, and one or more Infinet
controllers. The Networked System may be a larger system, with CX controllers
on the same network as the SX workstation(s), and/or with dial-up remote site
CMX(s). Determine which of these two types best defines your site; as the
following steps are site-dependent.
Select or click Step 1 – Check Initial System Configuration.
Step 1 for either type of system loads some preliminary files to the database.
This step must be performed before Mentor will allow you to proceed further.
For the CMX/ACX System, just click on the left Check Initial System
Configuration button.
Mentor User Guide 7
Page 12
Using Mentor
For the Networked System, first select either the Single-User SX or LAN
w/Server checkbox, then click on the right Check Initial System Configuration
button. Mentor loads information to your database; this will take several minutes
(you will see a series of messages displayed in the MessageLine and StatusLine
while this is happening).
Mentor displays a Message Box indicating when the Initial System
Configuration is completed. You will also notice that, on the MentorMain panel,
the Check Initial System Configuration buttons have disappeared, leaving a
message that this step has been completed and that you may proceed to the next
step .
This is done to protect the initial system configuration and any subsequent
changes th at may be mad e, by keeping it from being in advertently ov erwritten .
Before going on to the next step, check the Error Log; there should be no
errors (except the following: “Text File Import : Line nnn , Unexp ected Error:
10188” -- don’t worry about this one!).
For LAN systems that use a server name other than INFINITY, edit the
following programs and reports on the workstation and change the variable
acc_ServerName or ServerName on line Startup to your server name:
Programs: CheckDB, CheckAlloc, DBSizeCheck
Reports: AreasAllRpt, AreaDeptRpt , AreaDisRpt, CardNumRpt
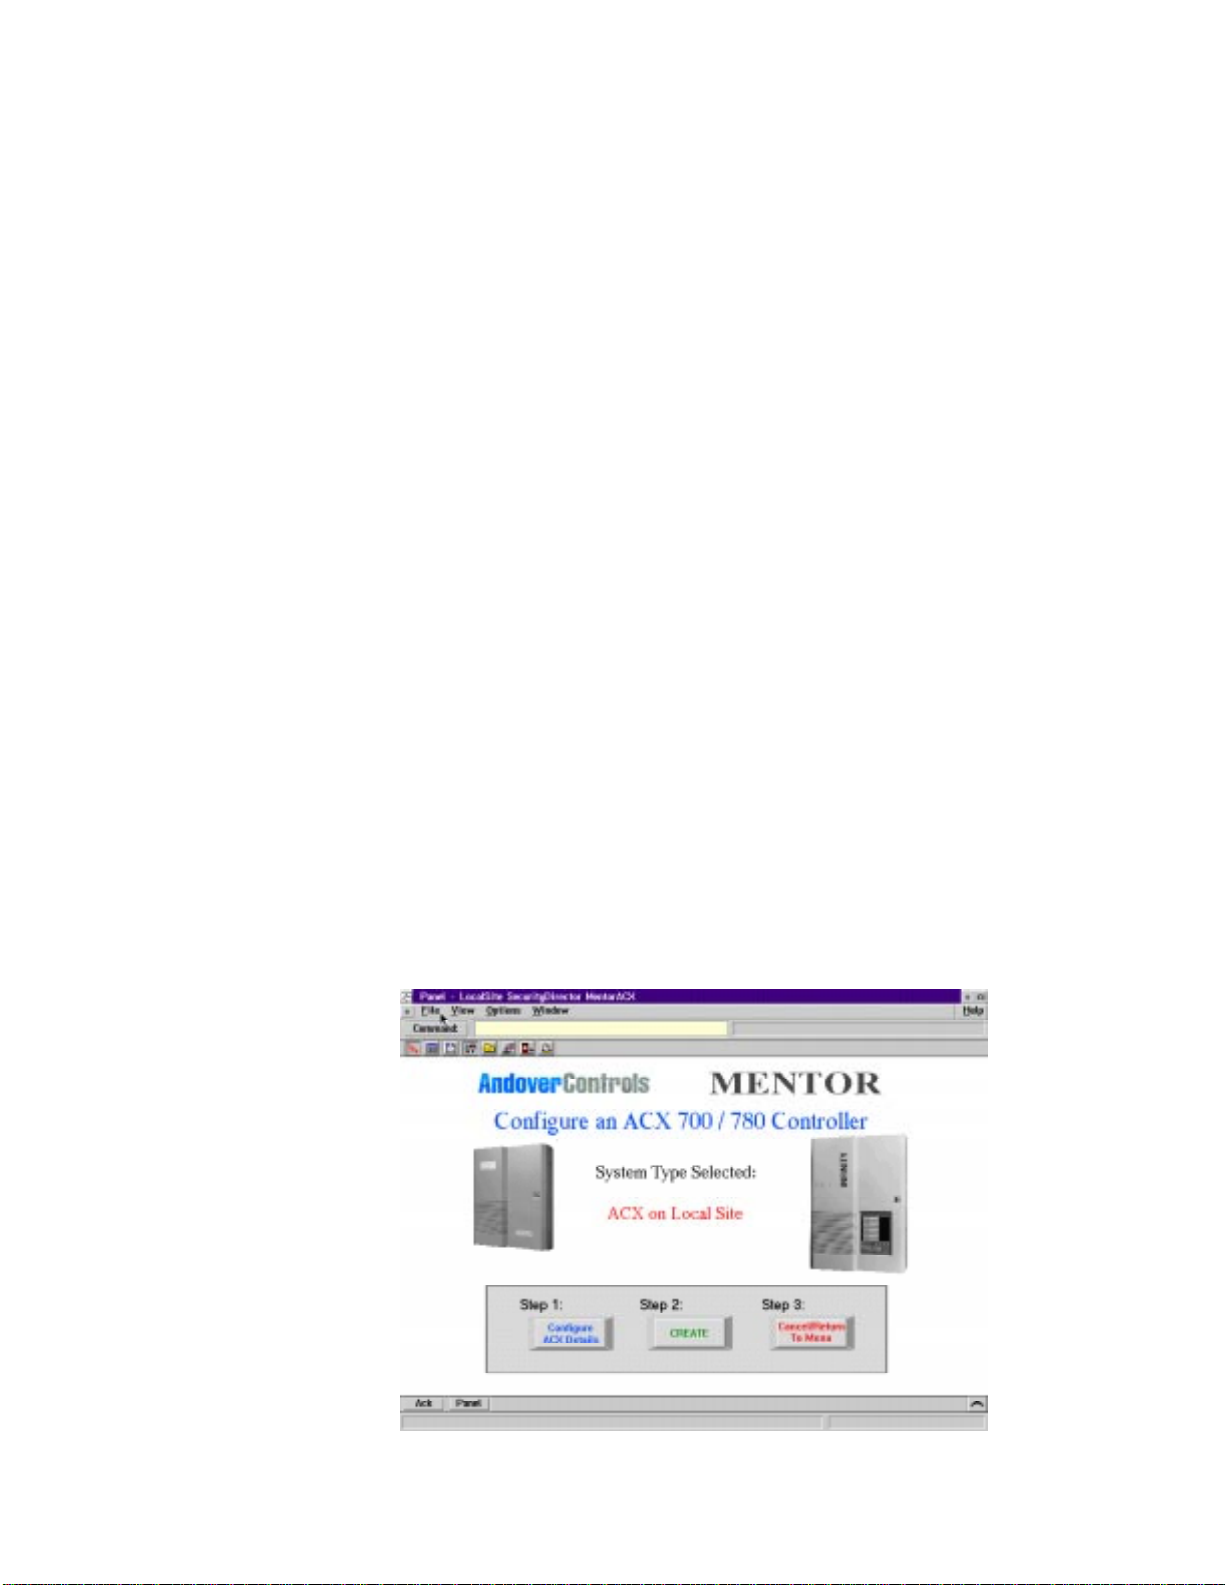
Step 2 This step begins the process of creating an ACX. There are three choices now:
the leftmost for creating an Infinet controller on a directly-connected CMX in
the CMX/ACX System, the middle for an Infinet controller on a networked CX,
and the rightmost for creating an Infinet controller on a remote site dial-up
CMX. The latter two can both be part of the same Networked System.
Select or click Step 2 - Create an ACX, or ACX On The Network or ACX On
A Dial-up Site.
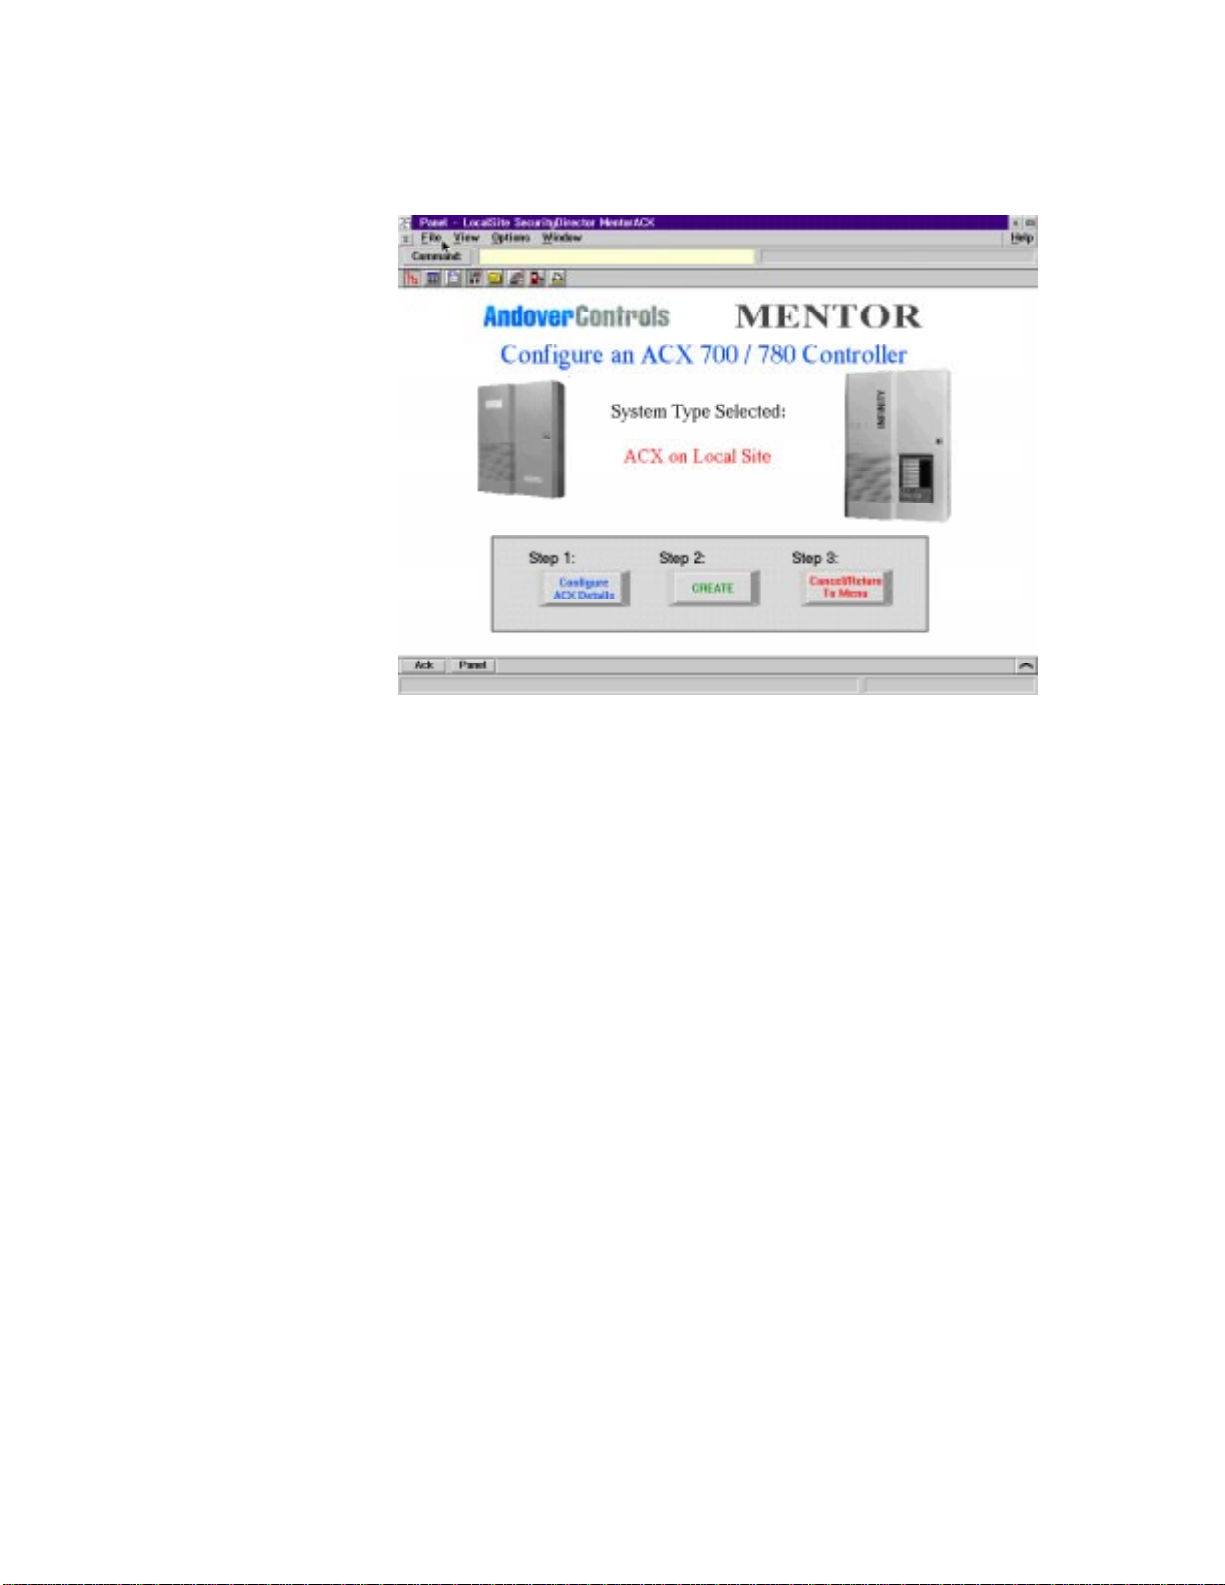
The MentorACX panel displays:
8 Andover Controls Corporation
Page 13
Using Mentor
For both system types, you will follow the same two steps to create an ACX:
1. Fill in a simple three-page form of details
2. Mentor checks the details entered, creates an information file, and then
loads the file into your database.
Note:
The Cancel/Return button returns you to the MentorMain panel. If you
click Cancel/Return before or after step 1, or before you click on step 2, you
will be returned to MentorMain without having added anything to the
database. If you click Cancel/Return after you have clicked on step 2, and
Mentor is running, you will be returned to MentorMain, but you will not
interrupt the Mentor check/create/load file process -- it will continue to run.
If you click Cancel/Return after step 2 has finished running, you will be
returned to MentorMain and may continue or stop.
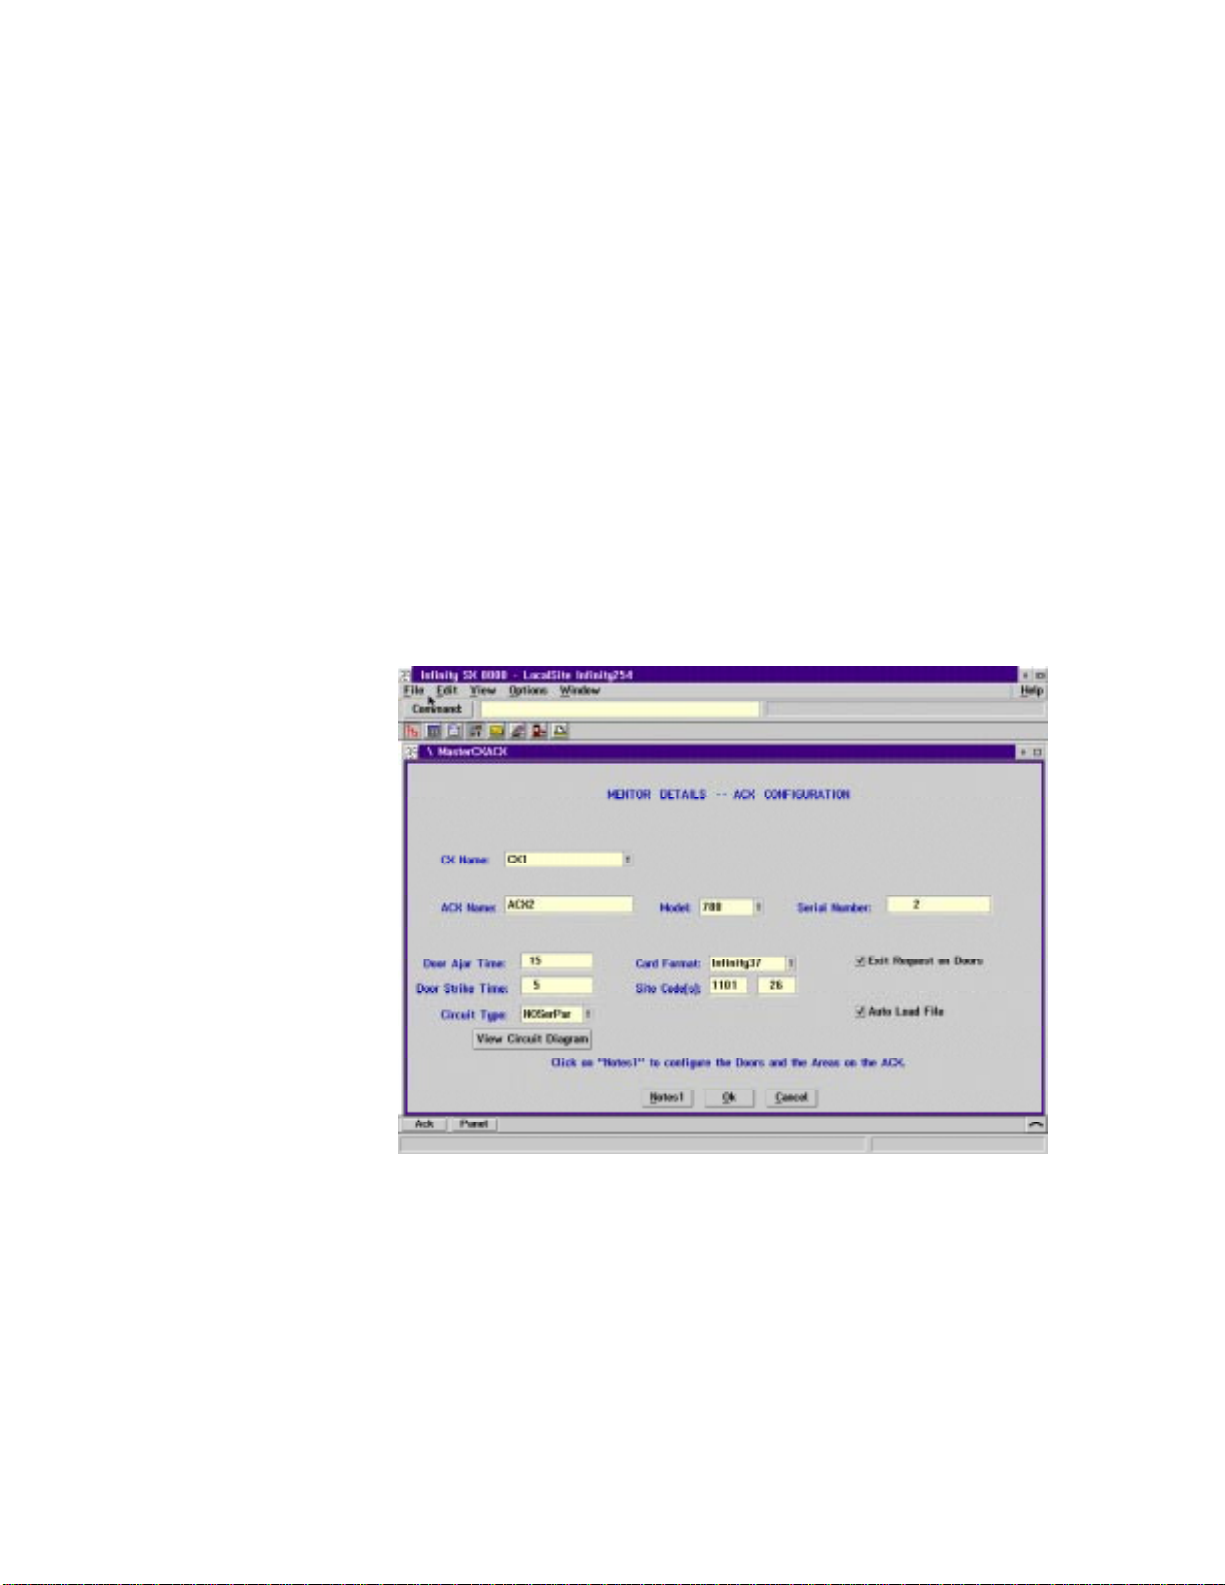
Configure Select or click Step 1, Configure ACX Details, this displays the MENTOR ACX Details
DETAILS -- ACX CONFIGURATION form.
This is a three-page form; identical for the three scenarios, except for one field:
for a CMX (either the directly-connected CMX or the remote dial-up CMX), the
first field on the form is Site Name; for a CX, this field is absent. Each time you
open this form, page one retains the information entered the last time the form
was used.
Mentor User Guide 9
Page 14

Using Mentor
ACX Main Configuration Form (continued)
• Site Name (for a CMX). Enter the name of an existing site, or the name of a
site that does not yet exist (Mentor will create the site). If you are entering
the name of an existing site, you can use the arrow button on the right side
of this box to pull down a list of the system’s existing sites. Select one from
the list, or you can just type it into the box. If you wish to create a new site,
just typ e its n ame in the box.
• CX Name / CMX Name. Enter th e name of the CMX or CX controller that
will own your ACX, either that of an existing controller (you can use the
pull down list here, too) or of a controller that does not yet exist (Mentor
will create it).
• ACX Name. Enter the name of the ACX controller you wish Mentor to
create.
• Model. Either type, or use the pull down list, to enter 700, 780 or 781.
• Serial Number. Enter the six-digit ACX serial number.
• Door Ajar Time. Enter the number of seconds for which it is okay to have
a door on this ACX held open; after the specified number of seconds, an
alarm may occur.
• Door Strike Time. Enter the number of seconds for which the door strike
should be activated following a valid access attempt (and/or an exit request)
at a door on this ACX.
• Circuit T ype. Use the pull down list to display the four types of circuits
(NCSeries, NOPa r al le l, NOSerPa r, and NCSe r Par), and sele c t the one that
is appropriate to the inputs (including the door switches, the exit requests,
and all other supervised inputs) on this ACX. To view a schematic diagram
illustrating the four circuit types, click on View Circuit Diagram but ton ,
immediately below this field.
• Card For m a t. Use the pull down list to display three types of access card
formats (Infinity37, Wiegand26, and ABA), and select the one that is
appropriate for this ACX.
• Site Code(s). Enter the site code(s) appropriate for the access cards used on
this ACX.
• Exit Request on Doors. To use the Exit Request feature on the doors on
this ACX, select this checkbox. This causes an exit request channel to be
assigned to each door, which also causes the door to be unlocked when it is
activated. Deselect this option if you do not wish to use the exit request
feature.
• Auto Load File. This checkbox tells Mentor whether or not to load to the
database the information file created. For normal Mentor operation, select
this option. This allows Mentor to load the information file to the database.
If you do not wish to load the information file created to the database,
deselec t this option.
10 Andover Controls Corporation
Page 15

Using Mentor
When all of the fields on the Configuration Page have been filled, click the
Notes1 button to proceed to the second page of the form.
This page accepts configuration information on the Doors and Areas assigned to
this ACX.
Note:
Each time you open this form through the normal sequence of steps described
here, the information fields on this page will be cleared (unless you repeat
MentorACX Steps 1 and 2 without going back to MentorMain, in which case
this page will retain the information from the previous use).
For an ACX 700, only the first two lines of Door and Area information will be
created. On an ACX 780 or 781, up to eight doors and areas may be created.
• Door Name. Enter a Door Name for each door you’re creating, next to the
channel number used for that door. The associated channel numbers are all
preallo cated: th e door you configur e n ext to the Ch an nel 1 head ing is
configured to use Door Channel 1, Entry Reader Channel 1, Door Switch
Channel 1, and (if you selected the Exit Request on Doors option on the
first page) Exit Request Channel 2. Similarly, Channel 2 entries use Door
Channel 2, Entry Reader Channel 2, Door Switch Channel 3, and
(optionally) Exit Request Channel 4; and so on.
If you skip a Channel, no door will be created for that channel, however, be
aware that the associated channels (Entry Reader, Door Switch, and Exit
Request for that channel are not available for you to use anywhere else
within Mentor. (You could, however, manually assign any unassigned
channels after you have finished with Mentor.)
Mentor User Guide 11
Page 16

Using Mentor
ACX Door Configuration Form (continued)
• Entry Area Name. Enter the name of the Entry Area for each door; the
name may be that of an Area that already exists, or that of one that doesn’t
yet exist (in which case Mentor creates it in the appropriate place -- at the
root for a CX or a dial-up CMX configuration, at the CMX for the directlyconnected CMX configuration). You can use the same Entry Area name for
more than one door.
Mentor creates a new Area for every one of the Entry Area names that you
enter that do not already exist, even if you have entered no Door name for
that channel. This feature saves you time. In addition, for a CMX/ACX
system (the directly-connected CMX) there is another reason to include
“extra” Area names on unused channel lines: the AddACard panel for this
type of system is modified one time only, upon the creation of the first
ACX, to include the names of the Areas.
If you create only four Doors on an ACX, and only four Areas, and then
create a second ACX with additional Areas, only the four Areas created
along with the first ACX will be included in the AddACard panel and its
associated programs.
• Schedule. For each Door you want to have unlocked according to a
schedule, select the Schedule checkbox on that Door’s channel line. If you
do not select Schedule for a Door, the schedule and associated points are
not created for that door. If you select Schedule on a channel line on which
there is no Door, the schedule and associated points are not created.
• Door Fo rced Alarm. Select this checkbox to attach a Door Forced Open
alarm to all of this ACX’s Doors.
• Door Ajar Alarm. Select this checkbox to attach a Door Ajar alarm to all
of this ACX’s Doors.
• Door Tamper Alarm. Select this checkbox to attach a Door Tamper alarm
to all of this ACX’s Doors.
• Invalid Entry Alarm. Select this checkbox to attach an Invalid Entry
Attempt alarm to all of this ACX’s Doors.
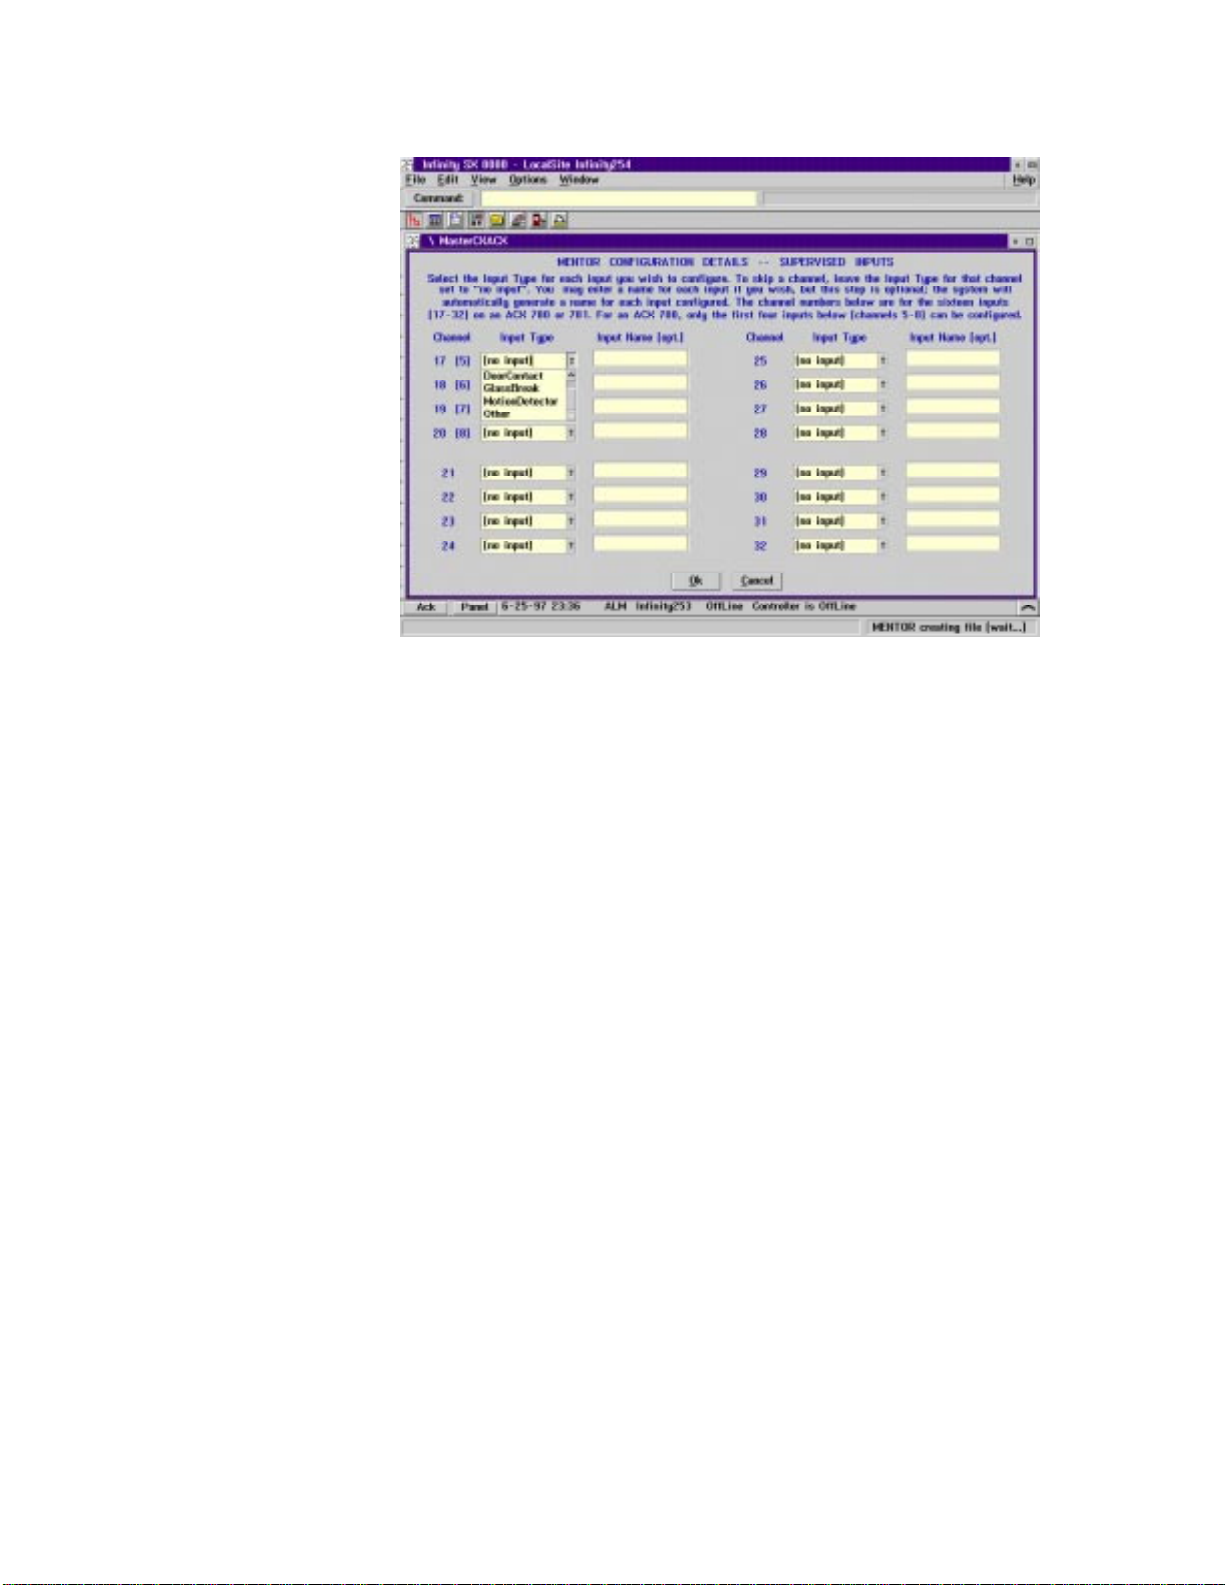
When this p age of the form is complete, click or select the Notes2 butto n to
proceed to the third page of the form. This displays the MENTOR
CONFIGURATION DETAILS -- SUPER VI SED INPUTS scre en.
12 Andover Controls Corporation
Page 17
Using Mentor
This screen is used to configure the Inputs on this ACX. This screen maintain its
data until you return to the main configuration screen. For an ACX 700, only
the first four lines of Input information are created. On an ACX 780 or 781, up
to sixteen inputs may be created.
• Input Type. For each Input being configured, select (from the pull down
list) the Input Type of the Input. Choose from DoorContact, GlassBreak,
MotionDetector, or Other.
The channel numbers available are 17 - 32 on an ACX 780 or 781, and 5 - 8
on an ACX 700. To skip a channel, leave the Input Type for that channel set
to “(no input).” All of the Inputs created here have Supervisory Alarms
attached to indicate a state of Trouble on that Input.
The DoorContact types have Door Contact alarms; the GlassBreak types
have Glas s Br eak alarms, and th e MotionD etector types have a Motion
Detection alarm attached, along with a schedule to shunt these Motion
alarms during the day.
• Input Name (opt. ). The Input Name field is optional, and is used if you
wish to designate your own names for the Inputs created. If you leave the
Input Name field blank on a channel line on which you have selected an
Input Type other than “(no input),” Mentor automatically generates an
appropriate name to identify the Input, by merging the InputType designator
with the channel number, i.e., GlassBreak17 or DoorContact22. (For an
Input of Input Type “other,” the auto-generated name is a merge of “Input”
and the channel number, i.e., Input32.)
When this p age of the form is complete, click the OK button to save and return
to page 2. Click the OK button on page two, and then OK on page one to save
and close the ACX Configuration form.
Mentor User Guide 13
Page 18
Using Mentor
The main ACX menu screen is once again displayed, and you are ready to create
the ACX.
Create ACX Selecting or clicking the Step 2, Create button, starts the Mentor “engine”
program, which does the following:
• Checks the details you entered in Step 1; if necessary, prompts you to
correct errors in those detail entries
• Creates a loadable information file from those details
• Loads the file created to the database (if the Auto Load File option was
selected on page one of the details form).
After clicking the button, a flashing message in the middle of the panel indicates
that Mentor is running. Once Mentor is running, you will not be able to interrupt
it, nor will you be able to start it again until it is finished. A variety of messages
are displayed in the MessageLine and the StatusLine while Mentor is running,
and, depending on the details entered, it is also possible that Mentor will pop up
a variety of message boxes for you to respond to, and/or one or more of the
following panels:
• Create New Site panel. If you have entered the name of a Site that does not
yet exist (for CMX configurations only), Mentor asks you to either verify
that you do actually want to create a new Site, or to cancel and stop Mentor
if you don’t want to go on. The panel displays the Site name that you
entered (you may click on it and change it if you like), and also prompts
you to enter both the remote site phone number and the local site phone
number (if applicable). When you are ready, click the Create New Site
button. A message appears on the panel indicating that Mentor is working.
When Mentor has finished creating the new Site, click the Continue button.
If you were to click Cancel now, instead of Continue, you would stop
Mentor, but the new Site has already been created.
14 Andover Controls Corporation
Page 19

Using Mentor
Create ACX possibl e message boxes ( con t inued)
• Create New CMX panel. If you entered the name of a CMX that does not
yet exist on the Site you specified (for CMX configurations only), Mentor
asks you to either verify that you do actually want to create a new CMX, or
to cancel and stop Mentor if you do not wish to go on. The panel displays
the CMX name that you entered (you may click on it and change it if you
like). Wh en you are re ady, click th e Create New CMX button. A message
is displayed on the panel indicating that Mentor is checking the CMX data.
When it has finished (which is virtually immediately), click the Continue
button.
• Warning - CMX panel. If you inadve rtently attempt to cr eate a CMX on a
Site that already has one configured, Mentor prevents you from doing so.
• Create New CX panel. If you have en tered the n ame of a CX that does not
yet exist on your network (for CX configurations only), Mentor asks you to
either verify that you do actually want to create a new CX, or to cancel and
stop Mentor if you do not wish to go on. The panel displays the CX name
that you entered (you may click on it and change it if you like), and fields to
enter the EnergyNet ID (valid entries are numbers 1 -100), the Model
(9000, 9200, or 9400), and the Ethernet ID number (the first three pairs in
the Ethernet ID, 00:40:11, are always the same, so are not editable; if you
are not sure of the rest of the ID, enter 00 for each of the other three pairs).
When you are ready, click Create New CX. A message is disp layed on th e
panel indicating that Mentor is checking the CX data. When it has finished
(which will be virtually immediately), click the Continue button.
• Warning - CX Conflict panel. If you inadvertently attempt to create a CX
with a name that duplicates that of another controller, or with an EnergyNet
ID that duplicates that of another controller, Mentor displays this panel and
allows you to fix the problem. When finished, click the Continue button.
• Warni ng - Infinet Contro l le r Confli c t panel. If you inadvertently attempt
to create an ACX with a name that duplicates that of another Infinet
controller on that CX/CMX, or with a serial number that duplicates that of
another Infinet controller on that CX/CMX, Mentor displays this panel and
allows you to fix the problem. You may select Cancel to stop Mentor, or
Make Change / Continue for Mentor to resume.
• Warning - Name Conflict. If you inadvertently gave two Doors the same
name in your configuration details, or if you inadvertently entered into the
Entry Area Name field a name that belonged to another, previously existing
object, Mentor displays the panel and stops. You need to return to your
configuration details and fix the problem before Mentor can run
successfully.
When the Create process is finished, Mentor displays a message box to let
you know.
Mentor User Guide 15
Page 20

Using Mentor
Check the Error Log; there should be no errors. If there are errors, you need to
ascertain their nature. If there are any errors to the effect of “operation
abnormally terminated,” then Mentor was not able to successfully complete the
file load. If there are any less serious errors, they should be investigated to be
certain that the information loaded is correct and complet e. Do not forget this
step!
From a View All Panels list, or from a list of panels on the ACX you just
created, open the DoorContrlACXnnn panel created by Mentor. A message box
is displayed indicating that there is a Panel Delete List Operation to be
performed on this panel. Click Yes to allow Mentor to complete the
configuration of this panel. The panel opens in Edit mod e. Sele ct Options, then
deselect Edit Mode to put the panel in Run mode. This procedure deletes any
unnecessary graphic elements from the master to make this panel match your
specification.
Repeat this process with the FlrPlanACXnnn panel on the same ACX.
If this was the first ACX created on a CMX/ACX System, repeat the process
with the AddACard panel located at the root.
Note that each of these three panels must be opened from a list of panels for the
Delete List Operation to function to correctly.
Adding Additio nal Units
To add one or more additional ACXs to your database now, repeat the previous
steps before clicking the S tep 3 Cancel/Ret urn button. If you repeat these steps
without returning to MentorMain, the fields on pages two and three of the details
form will not be “reset” (page one of the details form is never “reset”); if you
wish to have the fields cleared before repeating the steps to create another ACX,
click Step 3 Cancel/Return to return to MentorMain, then select the appropriate
Create ACX button to bring you back to the MentorACX panel to continue.
When you are finished adding your ACX(s), click Cancel/Return to return
MentorMain. To create one or more IDXs, leave MentorMain open, and skip for
ward to th e sub section called Step 3.
Finished Using Mentor?
If you are now finished with your Mentor session, select Close from the File
menu.
To load all of the Mentor-created data from your database to your controllers,
you need to perform a Site Reload. Use the following procedure:
1. Return your workstation to Online Edit mode (click Options, then
Preferences, then deselect Offline Editing).
2. Open the Object Tree (or refresh it if it was already open), and click on the
name of the Site where the new entities were added.. You had specified the
name of the Site, new or existing, in the CMX configurations ; if you have
been working with CX configurations, the correct Site to click on is the
Local S ite.
16 Andover Controls Corporation
Page 21
Using Mentor
3. Select Options from the menu bar and make sure that Include Owned
Objects and Include Branch Controllers are both selected.
4. Select Database from the menu bar and click on Reload Controller.
Confirm that you wish to do the reload.
If you have been adding to more than one Site in your Mentor session, be sure to
repeat this process for each Site. Until this step is completed, the controllers in
your system will not have the information in your database passed along to
them. You may stop your Mentor session here, or continue as you wish.
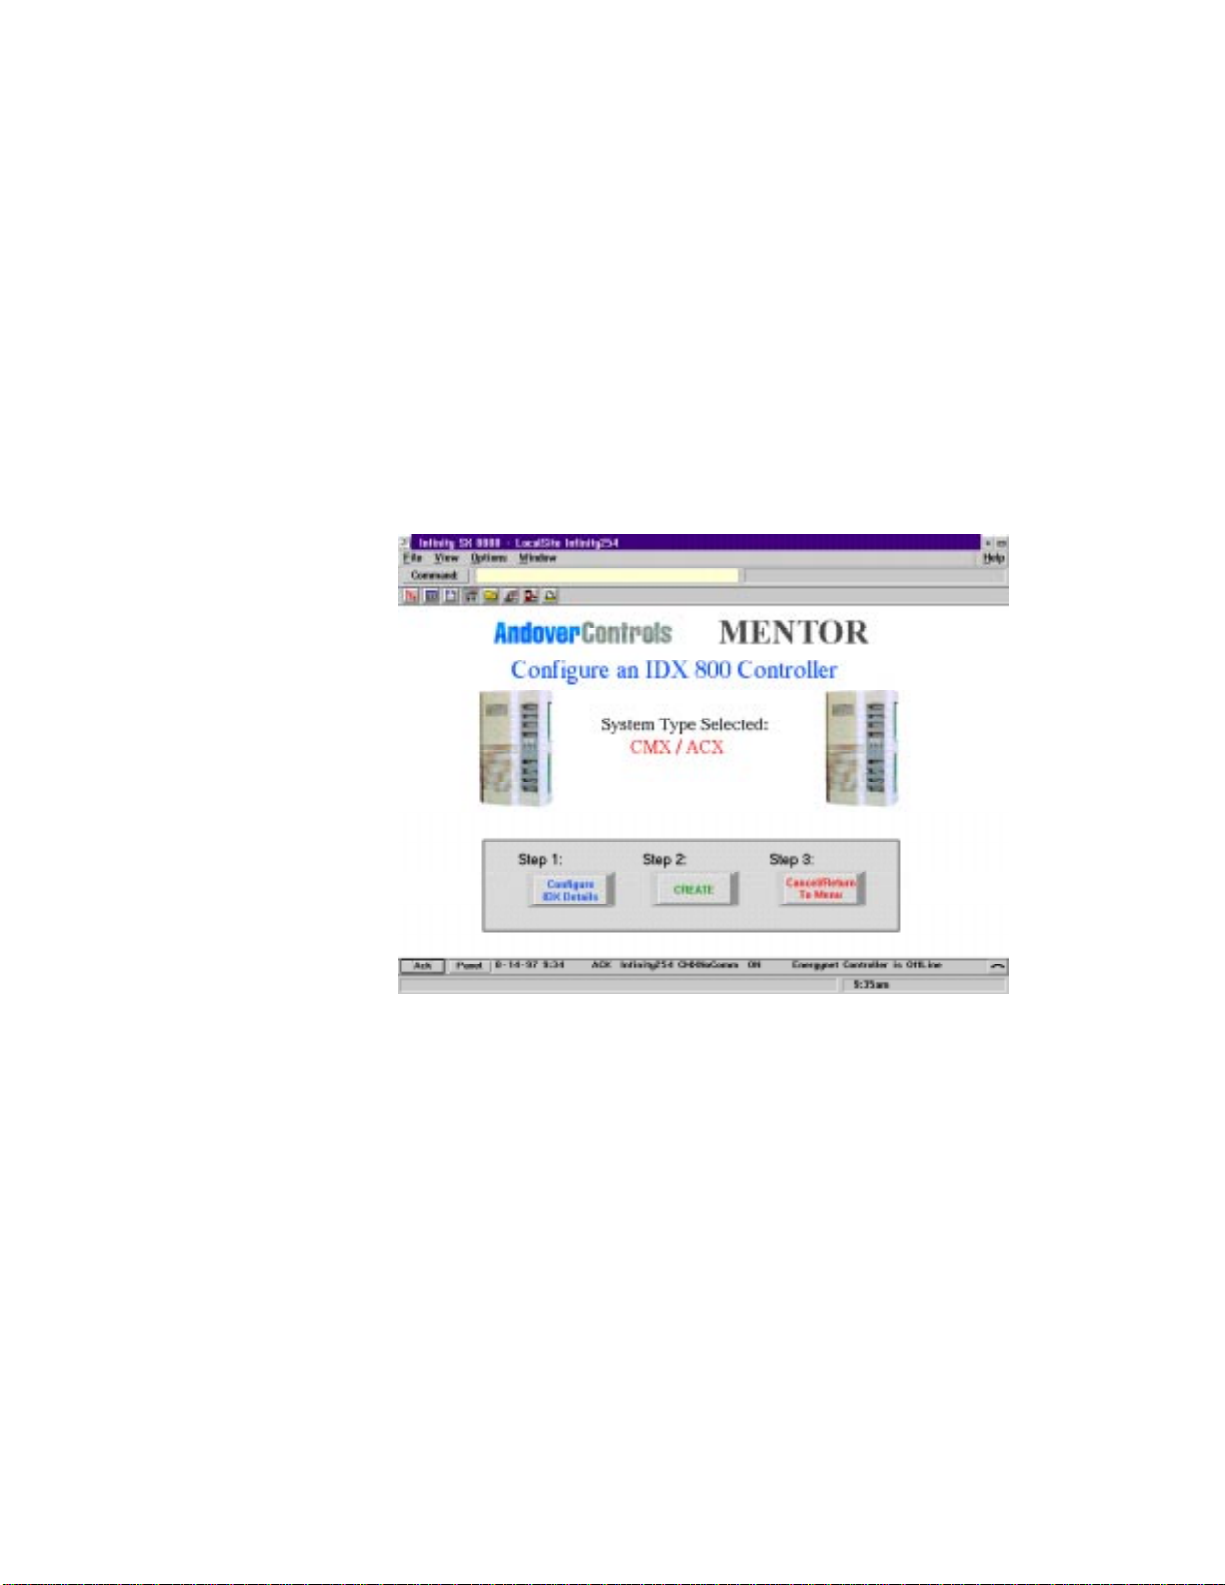
Step 3 Step 3 begins the process of creating an IDX controller for your system. Click
on the appropriate Step 3 C rea te an IDX button.
Mentor displays the MentorIDX panel with a caption in the center indicating
the system type you selected.
For both system types, you follow the same two steps to create an IDX
• Fill out a simple two-page form of details
• Mentor checks the details entered, creates an information file, and then
loads the file into your database.
The Cancel/Return button returns you to the MentorMain panel. If you click
Cancel/Return before or after step 1, or before you click on step 2, you will be
returned to MentorMain without having added anything to the database. If you
click Cancel/Return after you have clicked on step 2, and Mentor is running, you
will be returned to MentorMain, but you will not interrupt the Mentor
check/create/load file process -- it will continue to run. If you click
Cancel/Return after step 2 has finished running, you will be returned to
MentorMain and may continue or stop.
Mentor User Guide 17
Page 22
Using Mentor
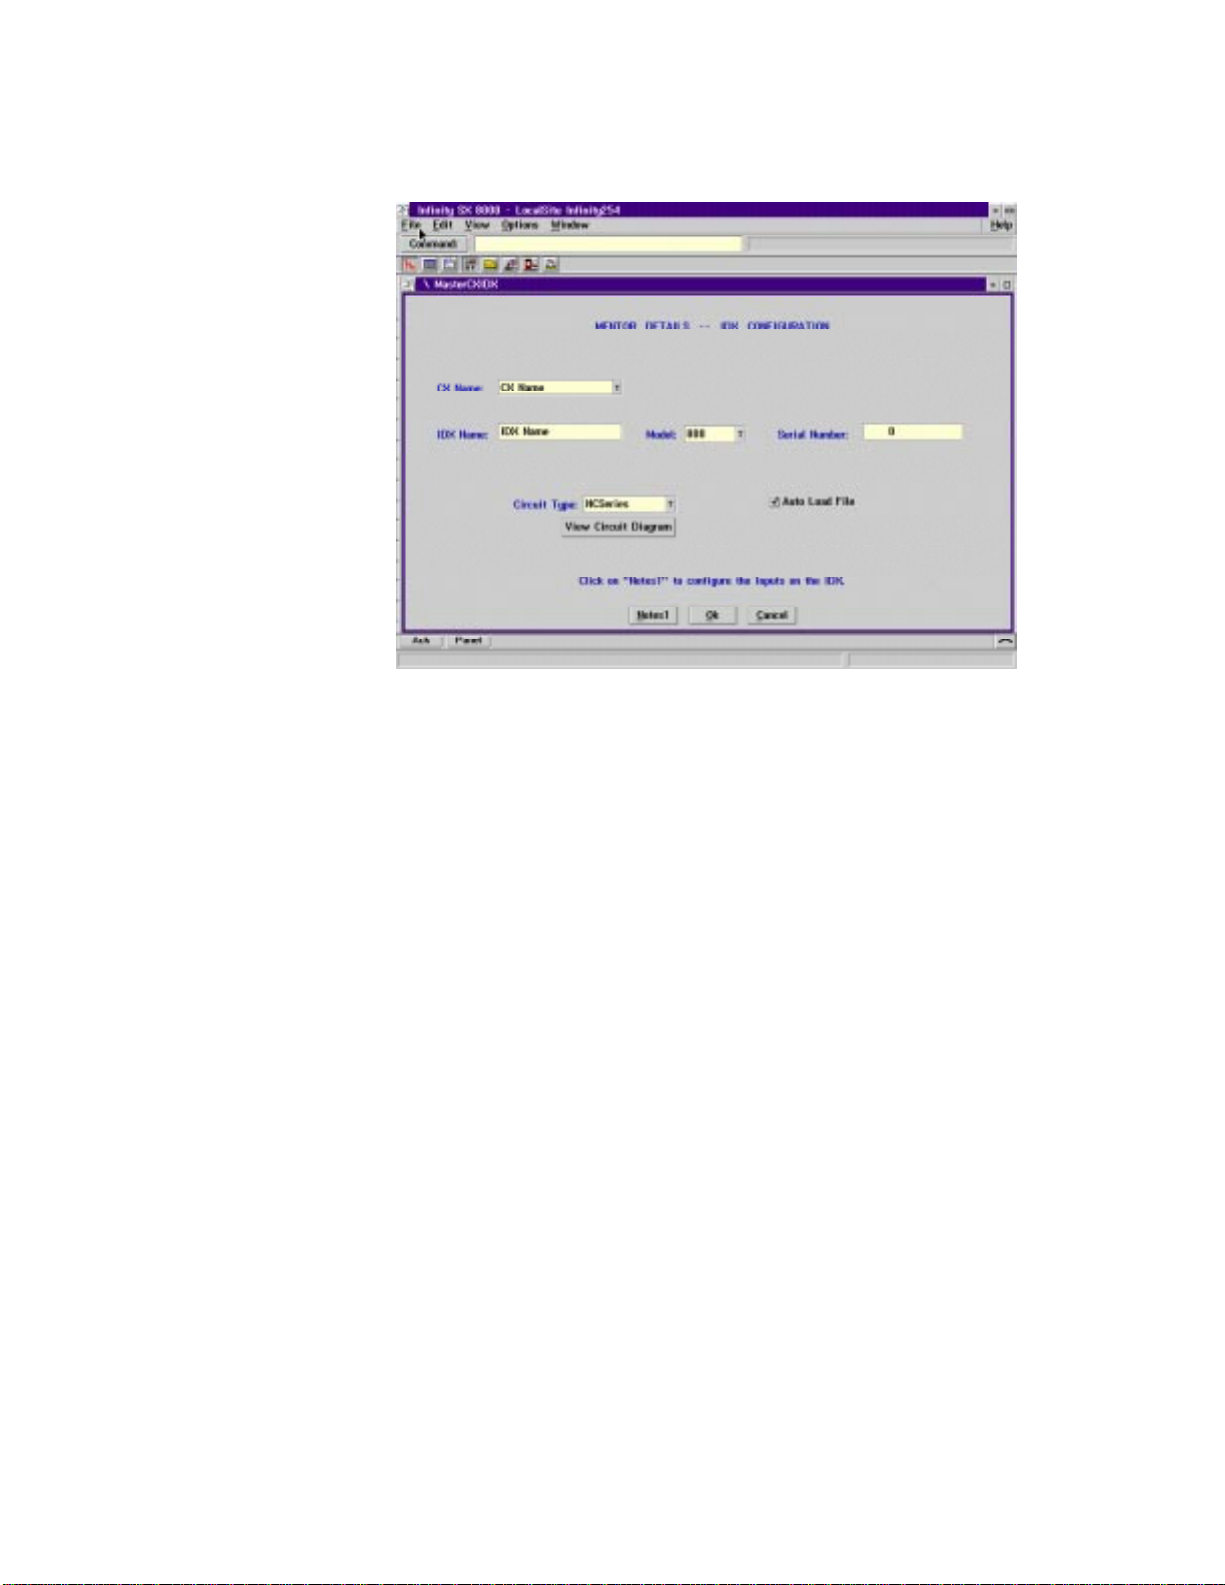
Configure IDX Select or click Step 1, Configure IDX Details, this displa ys the MENTOR Details DETAILS -- IDX CONFIGURATION form.
This is a two-page form; identical for the three scenarios, except for one field:
for a CMX (either the directly-connected CMX or the remote dial-up CMX), the
first field on the form is for Site Name; for a CX, this field is absent. Each time
you open this form, page one will retain the information entered the last time the
form was used.
• CX Name / CMX Name. Enter the name of th e CMX or CX co ntroller that
will own your IDX, either that of an existing controller (you can use the pull
down list here, too) or of a controller that does not yet exist (Mentor will
create it).
• IDX Name. Enter the name of the IDX controller you wish Mentor to
create.
• Model. Either type, or use the pull down list, to enter 800 or 800i.
• Serial Number. Enter the six-digit IDX serial number.
• Circuit Ty p e. Use the pull down list to display the four types of circuits
(NCSeries, NOPa r al le l, NOSerPa r, and NCSe r Par), and sele c t the one that
is appropriate to the inputs (including the door switches, the exit requests,
and all other supervised inputs) on this IDX. To view a schematic diagram
illustrating the four circuit types, click on View Circuit Diagram but ton ,
immediately below this field.
• Auto Load File. This checkbox tells Mentor whether or not to load to the
database the information file created. For normal Mentor operation, select
this option. This allows Mentor to load the information file to the database.
If you do not wish to load the information file created to the database,
deselec t this option.
18 Andover Controls Corporation
Page 23

Using Mentor
When all of the fields on the Configuration Page have been filled, click the
Notes1 button to proceed to the second page of the form.
This screen is used to configure the Inputs on this IDX. This screen maintain its
data until you return to the main configuration screen.
• Input Type. For each Input being configured, select (from the pull down
list) the Input Type of the Input. Choose from DoorContact, GlassBreak,
MotionDetector, or Other.
To skip a channel, leave the Input Type for that channel set to “(no
input).” All of the Inputs created here have Supervisory Alarms
attached to indicate a state of Trouble on that Input.
The DoorContact types have Door Contact alarms; the GlassBreak
types have Glass Break alarms, and the MotionDetector types have a
Motion Detection alarm attached, along with a schedule to shunt these
Motion alarms during the day.
• Input Name (optional). The Input Name field is optional, and is used if
you wish to designate your own names for the Inputs created. If you leave
the Input Name field blank on a channel line on which you have selected an
Input Type other than “(no input),” Mentor automatically generates an
appropriate name to identify the Input, by merging the InputType designator
with the channel number, i.e., GlassBreak1 or DoorContact3. (For an Input
of Input Type “other,” the auto-generated name is a merge of “Input” and
the channel number, i.e., Input7.)
When this p age of the form is complete, click the OK button to save and return
to page 1, and then OK on page one to save and close the IDX Configuration
form.
Mentor User Guide 19
Page 24

Using Mentor
Create IDX Selecting or clicking the Step 2, Create button, starts the Mentor “engine”
program, which does the following:
• Checks the details you entered in Step 1; if necessary, prompts you to
correct errors in those detail entries
• Creates a loadable information file from those details
• Loads the file created to the database (if the Auto Load File option was
selected on page one of the details form).
After clicking the button, a flashing message in the middle of the panel indicates
that Mentor is running. Once Mentor is running, you will not be able to interrupt
it, nor will you be able to start it again until it is finished. A variety of messages
are displayed in the MessageLine and the StatusLine while Mentor is running,
and, depending on the details entered, it is also possible that Mentor will pop up
a variety of message boxes for you to respond to, and/or one or more of the
following panels:
• Create New Site panel. If you have entered the name of a Site that does not
yet exist (for CMX configurations only), Mentor asks you to either verify
that you do actually want to create a new Site, or to cancel and stop Mentor
if you don’t want to go on. The panel displays the Site name that you
entered (you may click on it and change it if you like), and also prompts
you to enter both the remote site phone number and the local site phone
number (if applicable). When you are ready, click the Create New Site
button. A message appears on the panel indicating that Mentor is working.
When Mentor has finished creating the new Site, click the Continue button.
If you were to click Cancel now, instead of Continue, you would stop
Mentor, but the new Site has already been created.
• Create New CMX panel. If you entered the name of a CMX that does
not yet exist on the Site you specified (for CMX configurations only),
Mentor asks you to either verify that you do actually want to create a new
CMX, or to cancel and stop Mentor if you do not wish to go on. The panel
displays the CMX name that you entered (you may click on it and change it
if you like). When you are ready, click the Create New CMX button. A
message is displayed on the panel indicating that Mentor is checking the
CMX data. When it has finished (which is virtually immediately), click the
Continue button.
• Warning - CMX panel. If you inadvertent ly attempt to cr eate a CMX on a
Site that already has one configured, Mentor prevents you from doing so.
• Create New CX panel. If you have en tered the n ame of a CX that does not
yet exist on your network (for CX configurations only), Mentor asks you to
either verify that you do actually want to create a new CX, or to cancel and
stop Mentor if you do not wish to go on. The panel displays the CX name
that you entered (you may click on it and change it if you like), and fields to
enter the EnergyNet ID (valid entries are numbers 1 -100), the Model
(9000, 9200, or 9400), and the Ethernet ID number (the first three pairs in
the Ethernet ID, 00:40:11, are always the same, so are not editable; if you
are not sure of the rest of the ID, enter 00 for each of the other three pairs).
When you are ready, click Create New CX. A message is disp layed on th e
20 Andover Controls Corporation
Page 25

Using Mentor
panel indicating that Mentor is checking the CX data. When it has finished
(which will be virtually immediately), click the Continue button.
• Warning - CX Conflict panel. If you inadvertently attempt to create a CX
with a name that duplicates that of another controller, or with an EnergyNet
ID that duplicates that of another controller, Mentor displays this panel and
allows you to fix the problem. When finished, click the Continue button.
• Warni ng - Infinet Contro l le r Confli c t panel. If you inadvertently attempt
to create an ACX with a name that duplicates that of another Infinet
controller on that CX/CMX, or with a serial number that duplicates that of
another Infinet controller on that CX/CMX, Mentor displays this panel and
allows you to fix the problem. You may select Cancel to stop Mentor, or
Make Change / Continue for Mentor to resume.
When the Create process is finished, Mentor displays a message box to let you
know.
Check the Error Log; there should be no errors. If there are errors, you need to
ascertain their nature. If there are any errors to the effect of “operation
abnormally terminated,” then Mentor was not able to successfully complete the
file load. If there are any less serious errors, they should be investigated to be
certain that the information loaded is correct and complet e. Do not forget this
step!
Adding Additio nal Units
To add one or more additional IDXs to your database now, repeat the previous
steps before clicking the S tep 3 Cancel/Ret urn button. If you repeat these steps
without returning to MentorMain, the fields on pages two and three of the details
form will not be “reset” (page one of the details form is never “reset”); if you
wish to have the fields cleared before repeating the steps to create another IDX,
click Step 3 Cancel/Return to return to MentorMain, then select the appropriate
Create ACX button to bring you back to the MentorIDX panel to continue.
When you are finished adding your IDX(s), click Cancel/Return to return
MentorMain.
Fini she d Using Mentor?
If you are now finished with your Mentor session, select Close from the File
menu.
To load all of the Mentor-created data from your database to your controllers,
you need to perform a Site Reload. Use the following procedure:
1. Return your workstation to Online Edit mode (click Options, then
Preferences, then deselect Offline Editing).
2. Open the Object Tree (or refresh it if it was already open), and click on the
name of the Site where the new entities were added.. You had specified the
name of the Site, new or existing, in the CMX configurations ; if you have
been working with CX configurations, the correct Site to click on is the
Local S ite.
Mentor User Guide 21
Page 26

Using Mentor
3. Select Options from the menu bar and make sure that Include Owned
Objects and Include Branch Controllers are both selected.
4. Select Database from the menu bar and click on Reload Controller.
Confirm that you wish to do the reload.
If you have been adding to more than one Site in your Mentor session, be sure to
repeat this process for each Site. Until this step is completed, the controllers in
your system will not have the information in your database passed along to
them. You may stop your Mentor session here, or continue as you wish.
22 Andover Controls Corporation
Page 27

Objects Installed By Mentor
Successful installation of the Mentor database on the workstation not only
locates a number of files in th e \inf\me t, \inf\ mentor, an d \inf\te x tdir
subdirectories, but also creates a number of objects in the database on the SX
workstation:
Numerics (57):
Mentor_OptType
Mentor_SingUser
Mentor_SysType
MnAddingContr
MnAddingSite
MnArea1 thru MnArea8
MnChoice1ID
MnChoice1SN
MnChoice2ID
Objects Installed by Mentor
MnChoice2SN
MnClosePanel
MnCMXLater
MnCommonLoaded
MnConflictCode
MnCreatingContr
MnCreatingSite
MnDoor1 thru MnDoor8
MnInput1 thru MnInput 32
MnGivenSN
MnMentorStatus
Strings (21):
MnChoice1Name MnNewContrName
MnChoice2Name MnNewCXModel
MnCurrentWSName MnNewENetIDNum
MnDumpFileName MnNewEthernet1
MnGivenMatch1 MnNewEthernet2
MnGivenMatch2 MnNewEthernet3
MnGivenName MnNewLocalPhone
MnInfPath MnNewSiteName
MnKBPFileName MnNewSitePhone
MnLocSiteName MnParseString
MnMasterName
Mentor User Guide 23
Page 28

Objects Installed by Mentor
Programs (21):
Mentor1 MnResetNewSite
Mentor2 MnRestartAccsEng
Mentor3 MnSetup
Mentor4 MnStopMentor
Mentor5 Mn_CheckNewCMX
Mentor6 Mn_CheckNewCX
MnCleanUpOldList Mn_OpenForm
MnCreateNewSite Mn_StartEng
MnEngine Mn_StartLoadCMX
MnLoadCommon Mn_StartLoadCX
MnResetNewContr
Functions (2):
CurWSSiteName
Mn_ParseName
Reports (4):
CMXNameList CXNameList
CMXSiteNameList CXSiteNameList
Panels (11):
MentorACX MentorWarn_CMX
MentorIDX MentorWarn_CX
MentorMain MentorWarn_First
MentorNewCMX MentorWarn_Inf
MentorNewCX MentorWarn_Spec
MentorNewSite
CustomClasse s (4):
Mn_CMX_ACX Mn_CX_ACX
Mn_CMX_IDX Mn_CX_IDX
Mentor creates and modifies a number of objects in your database. After you
have performed Step 1 (Initial System Configuration), Step 2 (Create an ACX),
and Step 3 (Create an IDX), you will have the following added to (or modified
in) your database:
Root:
Alarms (13):
• CabinetTamperAlm. ACX cabinet tamper alarm, attached by Mentor to
each ACX’s SystemVariable CabinetTamper.
• DatabaseAlm. Database fu ll alarm , attached b y Mentor to th e SX numer ics
DB_LogPerctFree and DB_Per centFree.
• DoorAjarAlm. Door ajar alarm, optionally attached by Mentor to each
Door on each ACX.
• DoorContactAlm. Forced entry alarm for non-reader doors, attached by
Mentor to each ACX and IDX supervised Input of DoorContact type.
• DoorForcedAlm. Forced entry alarm, optionally attached by Mentor to
each Door on each ACX.
• DoorTamperAlm. Door switch tamper alarm, optionally attached by
Mentor to each Door on each ACX.
• GlassbreakAlm. Glassbreak sensor alarm, attached by Mentor to each
ACX and IDX supervised Input of Glassbreak type.
24 Andover Controls Corporation
Page 29

Objects Installed by Mentor
• HardDriveAlm. Hard drive space alarm, attached by Mentor to the SX
numeric HD_Free Space.
• InfinetFailAlm. Infinet controller failure alarm, attached by Mentor to the
CMX numeric CommFailACXnnn or CommFailIDXnnn created for that
Infinet controller.
• InvalidEntryAlm. Invalid access attempt alarm, optionally attached by
Mentor to each Door on each ACX.
• MiscContactAlm. Miscellaneous contact alarm, not attached by Mentor to
anything.
• MotionAlm. Motion sensor alarm with shunt, dependent on input point
turning on when Point1 (alarm schedule point) is off; attached by Mentor to
each ACX and IDX supervised Input of MotionDetector type.
• SecPointTampAlm. Supervised input tamper alarm, attached by Mentor to
each ACX and IDX supervised input.
Schedules (1):
• Holidays. A yearly schedule with a couple of holidays already inserted;
this schedule is set up to overwrite the other Mentor-created schedules (door
unlock schedules on the ACX and alarm shunt schedules on the ACX and
IDX).
Panels (10):
• AddACard. This panel and its associated programs and points provides a
user interface for the simplified addition of Personnel records to the
database. For the dial-up CMX, the panel provides for area attachments just
one option: All Areas. For the directly-connected CMX in the CMX/ACX
System, the panel is not completed until the first ACX on the first CMX is
added; the panel will then incorporate all of the Areas (up to eight)
configured in Mentor as part of that first ACX. If additional ACXs (and
Areas) are subsequently added, the Areas will not be added b y M ento r to
this panel.
• CardMenu. This panel allows the user to “find” Personnel records (i.e.,
open Personnel ListViews PersByCardNum, PersByDept, PersByEmpNum,
PersByLicNum, PersByLorFName), and access the AddACard and
TracePanel panels.
• DoorMenu. This panel is design ed to be link ed to each of the A CXs’
DoorControl panels, so that they may all be accessed from one place. You
will need to animate the buttons, and make any graphic changes you wish to
customize this panel for your site.
• FloorPlanExample. This panel is an example of what an animated floor
plan may look like. It is not animated.
• Icons. This panel provides you with some sample buttons and icons; it is
not anim ated.
• MainMenu. This panel is displayed at logon to the users ACC and Guard
(both of which have attached the logon program Login); it serves as “home
base” to the user, and allows easy access to the DoorMenu, CardMenu,
SystemReports, MapMenu, and SystemDiag panels, and the “scrolling”
Event Window.
• MapMenu. This panel is designed to be linked to each of the ACXs’
FlrPlan panels, so that they may all be accessed from one place. You will
need to animate the buttons, and make any graphic changes you wish to
customize this panel for your site.
• SystemDia g. This panel provides the user with a number of tools, including
sixteen different LogViews, ten ListViews, Alarm counts, and the database
and hard drive diagnostic tools.
Mentor User Guide 25
Page 30

Objects Installed by Mentor
• SystemRe ports . This panel provides the user with access to six different
Personnel reports, three Event reports, and three Alarm reports, all of which
may either be printed or displayed on-screen.
• TracePanel. This panel and its associated points, programs, and groups,
allows the user to set up and view activity on particular cardholders.
AlarmLevels (7), (created based on UL 1076 requirements):
• BurglarAlarmLvl. Attached by Mentor to DoorAjarAlm,
DoorContactAlm, DoorForcedAlm, GlassbreakAlm, InvalidEntryAlm, and
MotionAlm.
• BurglarTamperLvl. Attached by Mentor to DoorTamperAlm and
SecPointTampAlm.
• CriticalIndusL vl. Not atta ched by Men tor to any alarms.
• MinorIndustLvl. Not attached by Mentor to any alarms.
• OtherSupvLvl. Attached by Mentor to CabinetTamperAlm, DatabaseAlm,
HardDriveAlm, InfinetFailAlm, and MiscContactAlm.
• PanicAlarmLvl. Not attached by Mentor to any alarms.
• WatchmanTourLvl. Not attached by Mentor to any alarms.
Groups (1):
• TraceGroup. Along with TracePanel, part of the application designed to
trace card activity on particular cardholders.
Areas (Network e d System o nly -- CXs and dial -u p CMXs):
• Areas created from Mentor ACX configuration form.
LogViews (24):
• Last2MinEvents. Event Log, access events, last two minutes (“Scrolling”
EventWindow, from MainMenu panel).
• Last5MinInvalids. Event Log , invalid ac cess atte mpts, last five minutes
(TracePanel panel).
• TodayAllAlarms. Alarm Log, all, today (SystemReports panel).
• TodayAllEvents. Event Log, all, today (SystemReports panel).
• TS_ActLog6Hr. Activity Log, all, last six hours (SystemDiag panel).
• TS_ActLog7Day. Activity Lo g, all, las t seven days (SystemDiag p anel).
• TS_ActLogToday. Activity Log, all, tod ay (Syst emD iag pan el).
• TS_ActLogYest. Activity Log, all, yesterd ay (Syste mDi ag pan el) .
• TS_ErrLog6Hr. Error Log, all, last six hours (SystemDi ag pan el).
• TS_ErrLog7Day. Error Log, all, last seven hours (SystemDiag panel).
• TS_ErrLogToday. Error Log, all, today (SystemDiag panel).
• TS_ErrLogYest. Error Log, all, yesterd ay (Syst emDi ag panel).
• TS_EventLog6Hr. Event Log, problem events, last six hours (SystemDiag
panel).
• TS_EventLog7Day. Event Log, problem events, last seven days
(SystemDiag panel).
• TS_EventLogToday. Event Log, problem events, today (SystemDiag
panel).
• TS_EventLogYest. Event Log, problem events, yesterday (SystemDiag
panel).
• TS_InvEvent6Hr. Event Log, invalid access events, last six hours
(SystemDiag panel).
• TS_InvEvent7Day. Event Log, invalid access events, last seven days
(SystemDiag panel).
26 Andover Controls Corporation
Page 31

Objects Installed by Mentor
• TS_InvEventToday. Event Log, invalid access events, today (SystemDiag
panel).
• TS_InvEventYest. Event Log, invalid access events, yesterday
(SystemDiag panel).
• WeekToNowAlm. Alarm Log, all, last seven days (SystemReports panel).
• WeekToNowEvent. Event Log, all, last seven days (SystemReports panel).
• YestdayAlarm s. Alarm Log, all, yesterday (SystemReports panel).
• YestdayAllEvents. Event Log, all, yesterday (SystemReports panel).
ListViews (16):
• PersByCardNum. Prompts user, finds Personnel by card number
(CardMenu panel).
• PersByDept. Prompts user, finds Personnel by department (CardMenu
panel).
• PersByDeptAll. Lists all Personnel, sorted by department (SystemReports
panel).
• PersByEmpNum. Prompts user, finds Personnel by employee number
(CardMenu panel).
• PersByLicNum. Prompts user, finds Personnel by license number
(CardMenu panel).
• PersByLorFName. Prompts user, finds Personnel by last or first name
(CardMenu panel).
• TS_AccessSvr . Li sts all ACXs and the value of their AccessSer ver
SystemVariabl e ( S y s temDiag panel).
• TS_AccessSvrBad. Lists all ACXs and the value of their AccessServer
SystemVariable where the AccessServer SystemVariable has a “bad” value,
i.e., is not equal to 1 (for CMX/ACX System) or is less than 224 (for
Networked System) (SystemDiag panel).
• TS_AvailRec. Lists all ACXs with AvailRecords SystemVariable less than
0 (SystemDiag panel).
• TS_BadDoors. Lists all Doors that are either disabled, overridden, or in
fault (SystemDiag panel).
• TS_CtlrErrors. Lists all Controllers with Errors SystemVariable greater
than 0 (SystemDiag panel).
• TS_DisPoints. Lists all Points that are either disabled or overridden
(SystemDiag panel).
• TS_DisPrograms. Lists all Programs that are disabled (SystemDiag panel).
• TS_OfflineEnet. Lists all EnergyNet Controllers that are either offline or
reset (SystemDiag panel).
• TS_OfflineInf. Lists all Infinet Controll ers that ar e either offline or hav e
InfinetErrors greater than 0 (SystemDiag panel).
• TS_ResetACXs. Lists all ACXs and the value of their SystemStatus
SystemVariabl e ( S y s temDiag panel).
• (plus modif ication to se v eral existing Lis tViews, such as addition of o r
rearrangement of columns, addition of colored fonts, automatic updating,
etc.)
Mentor User Guide 27
Page 32

Objects Installed by Mentor
LocalSite:
Controller. Mentor SX Workstation Controller modified to select Workstation
icon, select Primary Workstation, and select Automatic Distribution 1:00 AM,
Delayed Personnel.
Controller. CX Controller(s) added by Mentor, with Name, Model, EnergyNet
ID, and EthernetID as specified in Mentor configur at ion forms and NewCX
panel (Networked System -- CXs only).
LocalSite, Mentor SX Workstation:
SystemVariables:
• DayofYear. Mod ified to tri gg er HDCh eck, DayLightSavings, an d
DBSizeCheck programs.
• Hour. Modified to trigger Expire781 program (Networked System only --
CXs and dial-up CMXs).
• Minute. Modified to trigger PrintTime program.
• Second. Modified to trigger UpdateCMXAlarms and UpdateCMXEvents
programs (CMX/ACX System only).
CommPorts:
• Comm2. Modified to set DefaultMode to AutoSet, TrackCXD = False, and
DirectLine = True (CMX/ACX Syste m only); or mod ifi ed to set
DefaultMode to AutoSet, TrackCXD = True, and DirectLine = False (dialup CMX only).
Numerics (24):
• AddaCardExp. Along with associated panel, programs and points, part of
the AddACard application.
• AddaCardSite. Along with associated panel, programs and points, part of
the AddACard application.
• AddaCardType. Along with associated panel, programs and points, part of
the AddACard application.
• Area1thru Area8. Along with associated panel, programs and points, part
of the AddACard application.
• CheckAlloc InfErr. Along with associated panel, programs and points, part
of the System Diagnostics.
• CheckAllocMasErr. Along with associated panel, programs and points,
part of the System Diagnostics.
• CheckDBInfErr. Along with associated panel, programs and points, part of
the System Diagnostics.
• CheckDBMastErr . Along with associated panel, programs and points, part
of the System Diagnostics.
• CMXNoComm. Controlled by CheckCMX program, indicates comm status
of CMX, linked to Node_Failure_Alm (CMX/ACX System only).
• DB_FreeSpace. Along with associated panel, programs and points, part of
the System Diagnostics.
• DB_LogFreeSpace. Along with associated panel, programs and points, part
of the System Diagnostics.
• DB_LogPerctFree. Along with associated panel, programs and points, part
of the System Diagnostics; linked to DatabaseAlm.
• DB_PercentFree. Along with associated panel, programs and points, part
of the System Diagnostics; linked to DatabaseAlm.
28 Andover Controls Corporation
Page 33

Objects Installed by Mentor
• EventLogEnable. Along with associated panel, programs and points, part
of the “scrolling” Event Window application.
• HD_FreeSpace. Along with associated panel, programs and points, part of
the System Diagnostics; linked to HardDriveAlm.
• TraceToLPT1. Along with associated panel, programs and points, part of
the Trace application.
• TraceToScreen. Along with associated panel, programs and points, part of
the Trace application.
Strings (29):
• ImpCardNum. Along with associated panel, programs and points, part of
the AddACard application.
• ImpDept. Along with associated panel, programs and points, part of the
AddACard application.
• ImpEmpNum. Along with associated panel, programs and points, part of
the AddACard application.
• ImpFName. Along with associated panel, programs and points, part of the
AddACard application.
• ImpLName. Along with associated panel, programs and points, part of the
AddACard application.
• ImpMI. Along with associated panel, programs and points, part of the
AddACard application.
• Trace01 thru Trace23. Along with associated panel, programs and points,
part of the Trace application.
Programs (33):
• AddaCardCle ar. Along with associated panel, programs and points, part of
the AddACard application.
• AddaCardExpYear. Along with associated panel, programs and points,
part of the AddACard application.
• AddaCardPr og. Along with associated panel, programs and points, part of
the AddACard application.
• CheckAlloc. Along with associated panel, programs and points, part of the
System Diagnostics.
• CheckCMX. Checks comm status of CMX (CMX/ACX System only).
• CheckDB. Along with associated panel, programs and points, part of the
System Diagnostics.
• DayLightSavings. Triggered by SystemVariable DayofYear, makes
Daylight Savings time adjustment.
• DBSizeCheck. Along with associated panel, programs and points, part of
the System Diagnostics.
• EventWindow. Along with associated panel, programs and points, part of
the “scrolling” Event Window application .
• EventWindowStart. Along with associated panel, programs and points,
part of the “scrolling” Event Window application.
• EventWindowSto p. Along with associated panel, programs and points, part
of the “scrolling” Event Window application.
• Expire781. Disables expired cards in ACX 781s (Networked System only -
- CXs and dial-up CMXs).
• HDCheck. Along with associated panel, programs and points, part of the
System Diagnostics.
• Login. Shows MainMenu panel.
• PrintLogview 1thru Prin tLogview6 . Along with associated panel,
programs and points, part of the System Reports.
Mentor User Guide 29
Page 34

Objects Installed by Mentor
• PrintPersRpt1thru PrintPersRpt6. Along with associated panel,
programs and points, part of the System Reports.
• PrintTime. Triggered by SystemVariable Minute; prints time to statusline.
• TraceClearScreen. Along with associated panel, programs and points, part
of the Trace application.
• TraceOffLPT1. Along with associated panel, programs and points, part of
the Trace application.
• TraceOffScreen. Along with associated panel, programs and points, part of
the Trace application.
• TraceOnLPT1. Along with associated panel, programs and points, part of
the Trace application.
• TraceOnScreen. Along with associated panel, programs and points, part of
the Trace application.
• UpdateCMXAlarms. Triggered by SystemVariable Second; updates
alarms from remote site (CMX/ACX System only).
• UpdateCMXEvents. Triggered by SystemVariable Second; updates events
from remote site (CMX/ACX System only).
Reports (7):
• AreasAllRpt. Along with associated panel, programs and points, part of the
System Reports.
• AreasDeptRpt. Along with associated panel, programs and points, part of
the System Reports.
• AreasDisRpt . Along with associated panel, programs and points, part of the
System Reports.
• CardNumRpt. Along with associated panel, programs and points, part of
the System Reports.
• DeadRpt. Along with associated panel, programs and points, part of the
System Reports.
• ExpandDatabase. Along with associated panel, programs and points, part
of the System Diagnostics.
• TraceReportLPT1. Along with associated panel, programs and points, part
of the Trace application.
Users (1):
• Guard. Password GUARD; has Acknowledge Alarms Security Level,
Logon Program Login.
• ACC. Modified to include Logon Program Login.
LocalSite, CX Controller (Networked System, CX only):
SystemVariables:
• DayofYear. Modified to trigger DaylightSavings program.
• EventLogSize. Modified to set value to 2000.
CommPorts:
• Comm2. Modified to set DefaultMode to Infinet.
Numerics:
• CommFailACXnnn. One for each ACX created by Mentor, indicates
comm failure of ACX; controlled by HeartBeatnnn program, linked to
InfinetFailAlm.
30 Andover Controls Corporation
Page 35

Objects Installed by Mentor
• CommFailIDXnnn. One for each IDX created by Mentor, indicates comm
failure of IDX; controlled by HeartBeatnnn program, linked to
InfinetFailAlm.
• MonFri6_6. Occupancy point for schedule MonFri6to6; not associated by
Mentor with anything.
Programs:
• Daylight Savings. Triggered by SystemVariable DayofYear, makes
Daylight Savings time adjustment; currently Disabled.
• HeartBeatnnn. One for each Infinet controller created by Mentor; monitors
HeartBeat numeric of Infinet device, controls CommFailACXnnn or
CommFailIDXnnn for that device.
Schedules (1):
• MonFri6to6. Monday through Friday, 6:00AM - 6:00 PM, no Holiday or
Special schedules. Occupancy point = MonFri6_6.
InfinetControllers:
ACX(s) and IDX(s) device s create d by Mentor.
Mentor User Guide 31
Page 36

Objects Installed by Mentor
RemoteSite (CMXs only):
Site. Port = COM2 (directly-connected CMXs only); COM2,
AlarmReference = NewAlarmCount, AlmUpdateIntvl = 3, EventReference
= AccessLog, EventUpdateIntvl = 15 (dial-up CMXs only).
Controllers. CMX Controller Type = 240, EnergyNet = 1.
RemoteSite, CMX controller (CMXs only):
SystemVariables:
• DayofYear. Modified to trigger DaylightSavings program.
• EventLogSize. Modified to set value to 2000.
CommPorts:
• Comm2. Modified to set DefaultMode to AutoSet, TrackCXD = False, and
DirectLine = True (CMX/ACX Syste m only); or mod ifi ed to set
DefaultMode to AutoSet, TrackCXD = True, and DirectLine = False (dialup CMX only).
Numerics:
• CommFailACXnnn. One for each ACX created by Mentor, indicates
comm failure of ACX; controlled by HeartBeatnnn program, linked to
InfinetFailAlm.
• CommFailIDXnnn. One for each IDX created by Mentor, indicates comm
failure of IDX; controlled by HeartBeatnnn program, linked to
InfinetFailAlm.
• MonFri6_6. Occupancy point for schedule MonFri6to6; not associated by
Mentor with anything.
Strings(2):
• DialOutLineE. Part of DialOutToSX program (dial-up CMXs only).
• DialOutLog. Part of DialOutToSX program (dial-up CMXs only).
DateTimes(1):
• LastGoodUpdat e. Part of DialOutToSX program (dial-up CMXs only).
Programs:
• DaylightSa vings. Triggered by SystemVariable DayofYear, makes
Daylight Savings time adjustment; currently Disabled.
• DialOutToSX. Dials SX workstation to update remote alarms and events
(dial-up CMXs only).
• HeartBeatnnn. One for each Infinet controller created by Mentor; monitors
HeartBeat numeric of Infinet device, controls CommFailACXnnn or
CommFailIDXnnn for that device.
Schedules (1):
• MonFri6to6. Monday through Friday, 6:00AM - 6:00 PM, no Holiday or
Special schedules. Occupancy point = MonFri6_6.
Areas (CMX/ACX System only):
• Areas created from Mentor ACX configuration form.
32 Andover Controls Corporation
Page 37

Objects Installed by Mentor
InfinetControllers:
• ACX(s) and IDX(s) devices created by Mentor.
ACX:
SystemVariables:
• AccessServer. Modified to set value to 1 (CMX/ACX System) or to 254
(Networked System -- CXs and dial -u p CMXs).
• CabinetTamper. Modified to attach CabinetT amperAl m.
• Minute. Modified to trigger HeartBeatToggle program.
• NumEventPages. Modified to set value to 8.
Inputs:
• Inputs created from Mentor ACX configuration form. Each input has a
unique channel number; ResistorType = setting from Mentor ACX
configuration form; each has attached to it the SecPointTa mpAlm. Also
attached, depending on settings from Mentor ACX configuration form, may
be the DoorContactAlm, the GlassbreakAlm, or the MotionAlm. If the
MotionAlm is attached, then so also is an AlarmPoint1, AlarmShunt, which
causes the alarm to be shunted during the scheduled time.
Numerics:
• AccessLEDPattern. Enables alternate reader LED pattern.
• AlarmShunt. Occupancy point for schedule AlarmShuntSched;
AlarmPoint1 for Motion-type inputs, shunts alarm during scheduled time.
• DoornMaintain. One for each Door configured through Mentor; used in
DoorContrlACXnnn panel and associated programs for locking/unlocking
Doors.
• DoornSchedFlag. One for each Door configured through Mentor to have
an Unlock Schedule attached.
• DoornUnlockFlag. One for each Door configured through Mentor to have
an Unlock Schedule attached.
• HeartBeat. Controlled by HeartBeatToggle program, monitor ed by CMX
HeartBeatnnn program.
Programs:
• DoornMomentary. One for each Door configured through Mentor; part of
DoorContrlACXnnn panel application to lock/unlock Doors.
• DoornSchedProg. One for each Door configured through Mentor to have
an Unlock Schedule attached; part of DoorContrlACXnnn panel application
to lock/unlock Doors.
• HeartBeatToggle. Triggered by SystemVariable Minute; controls
HeartBeat numeric.
Mentor User Guide 33
Page 38

Objects Installed by Mentor
Schedules:
• AlarmShuntSched. Weekly schedule, Monday - Friday, 6:00AM -
6:00PM, with Holiday Overwrite = \Holidays, Occupancy Point =
AlarmShunt.
• DoornSched. One for each Door configured through Mentor to have an
Unlock Schedule attached; weekly schedule, Monday - Friday, 6:00AM 6:00PM, with Holiday Overwrite = \Holidays, Occupancy Point =
DoornSchedFlag.
Panels (2):
• DoorContrlACXnnn. Will show the name of and controls for each Door
configured through Mentor (Mentor’s Delete List Operation will remove the
extraneous graphic elements); allows user to unlock Doors (either
temporarily or on an extended basis); also shows curr ent status of Door
(Locked/Unlock ed and Opened/Clo sed).
• FlrPlanACXnnn. Wi ll show the name of and controls for each Door
configured through Mentor (Mentor’s Delete List Operation will remove the
extraneous graphic elements); allows user to customize a floor plan graphic
(by importing into the background the floor plan diagram and then moving
the animations to the right locations); also provides some non-animated
icons that can be copied and animated.
Doors:
Doors created from Mentor ACX configuration form, based on details
supplied in the form. All Doors created through Mentor are configured as
Entry Reader only, with no Keypad access, no Exit Reader, no Entry/Egress
or AntiPassback. Mentor will (optionally) attach an Unlock Schedule, the
Exit Request operation, and the alarms DoorForcedAlm, the DoorAjarAlm,
the DoorTamperAlm, and/or the InvalidEntryAlm. Each door will also be
linked to the FlrPlanACXnnn for alarms.
IDX:
SystemVariables:
• Minute. Modified to trigger HeartBeatToggle program.
Inputs:
• Inputs created from Mentor IDX configuration form. Each input has a
unique channel number; ResistorType = setting from Mentor IDX
configuration form; each has attached to it the SecPointTa mpAlm. Also
attached, depending on settings from Mentor IDX configuration form, may
be the DoorContactAlm, the GlassbreakAlm, or the MotionAlm. If the
MotionAlm is attached, then so also is an AlarmPoint1, AlarmShunt, which
causes the alarm to be shunted during the scheduled time.
Numerics(2):
• AlarmShunt. Occupancy point for schedule AlarmShuntSched;
AlarmPoint1 for Motion-type inputs, shunts alarm during scheduled time.
• HeartBeat. Controlled by HeartB eatTog gle progra m, moni tor ed by CMX
HeartBeatnnn program.
Programs(1):
34 Andover Controls Corporation
Page 39

Objects Installed by Mentor
• HeartBeatToggle. Triggered by SystemVariable Minute; controls
HeartBeat numeric.
Schedules(1):
• AlarmShuntSched. Weekly schedule, Monday - Friday, 6:00AM -
6:00PM, with Holiday Overwrite = \Holidays, Occupancy Point =
AlarmShunt.
Mentor User Guide 35
Page 40

Objects Installed by Mentor
36 Andover Controls Corporation
Page 41

30-3001-686 Mentor User’s Guide Rev A
 Loading...