


AGC
Use & Care Instructions
MODEL AGC
Item pictured may differ from actual product
El artículo ilustrado puede diferir del producto real
Il est possible que l’article sur la photo soit différent du produit réel
LITERATURE PACKET #04972

2 3
ENGLISH
Please read the following instructions before using your new Andis
clipper. Give it the care that a fine precision built instrument deserves
and it will give you years of service.
IMPORTANT SAFEGUARDS
When using an electrical appliance, basic precautions should
always be followed, including the following: Read all
instructions before using the Andis clipper.
DANGER:
To reduce the risk of electric shock:
1. Do not reach for an appliance that has fallen into water.
Unplug immediately.
2. Do not use while bathing or in a shower.
3. Do not place or store appliance where it can fall or be
pulled into a tub or sink. Do not place in or drop into
water or other liquid.
4. Always unplug this appliance from the electrical outlet
immediately after using.
5. Unplug this appliance before cleaning, removing or
assembling parts.
WARNING: To reduce the risk of burns, fire
electric shock, or injury to persons:
1. An appliance should never be left unattended when
plugged in.
2. Close supervision is necessary when this appliance is used
by, on or near children or individuals with certain disabilities.
3. Use this appliance only for its intended use as described
in this manual. Do not use attachments not recommended
by Andis.
4. Never operate this appliance if it has a damaged cord or
plug, if it is not working properly, if it has been dropped
or damaged, or dropped into water. Return the appliance
to an Andis Authorized Service Station for examination
and repair.
5. Keep the cord away from heated surfaces.
6. Never drop or insert any object into any opening.
7. Do not use outdoors or operate where aerosol (spray)
products are being used or where oxygen is being
administered.
8. Do not use this appliance with a damaged or broken
blade or comb, as injury to the skin may occur.
9. To disconnect turn control to “off” then remove plug from
outlet.
10. WARNING: During use, do not place or leave appliance
where it may be (1) damaged by an animal or (2) exposed
to the weather.
SAVE THESE INSTRUCTIONS
THIS PRODUCT INTENDED FOR PROFESSIONAL USE
To reduce the risk of electric shock, this appliance has a polarized plug (one
blade is wider than the other). This plug will fit in a polarized outlet only one way.
If the plug does not fit fully in the outlet, reverse the plug. If it still does not fit,
contact a qualified electrician to install the proper outlet. Do not change the plug
in any way.
OPERATING INSTRUCTIONS
Before starting clipper, remove blade guard (some
models may not have a blade guard). Plug cord into
electrical outlet, operate at 120 volt, 60 cycle AC
electrical current or as noted on the unit. To start
clipper, move switch button by pressing down on the
lock mechanism and moving to the #1 position. to stop,
press down on the lock mechanism and move switch
button back to original posiion. After using your clipper,
rewrap cord and store in a safe place.
USING ATTACHMENT COMBS
(Some models do not have combs and sizes will vary by kit)
You can set the blades for a longer cut by using any of the attachment combs
made for your Andis clipper. The combs mount easily; simply slip the cutter blade
teeth into comb and snap the comb down. To remove, simply snap off (Figures A
& B). These attachment combs guide hair into the blades and give you precise
control of hair lengths. The length of trim is indicated on the attachment comb.
Use the chart to find the approximate lengths of cut. Different blade angles in
relation to the skin, thickness and texture of the hair will vary the cutting length.
Lock
Mechanism
4 5
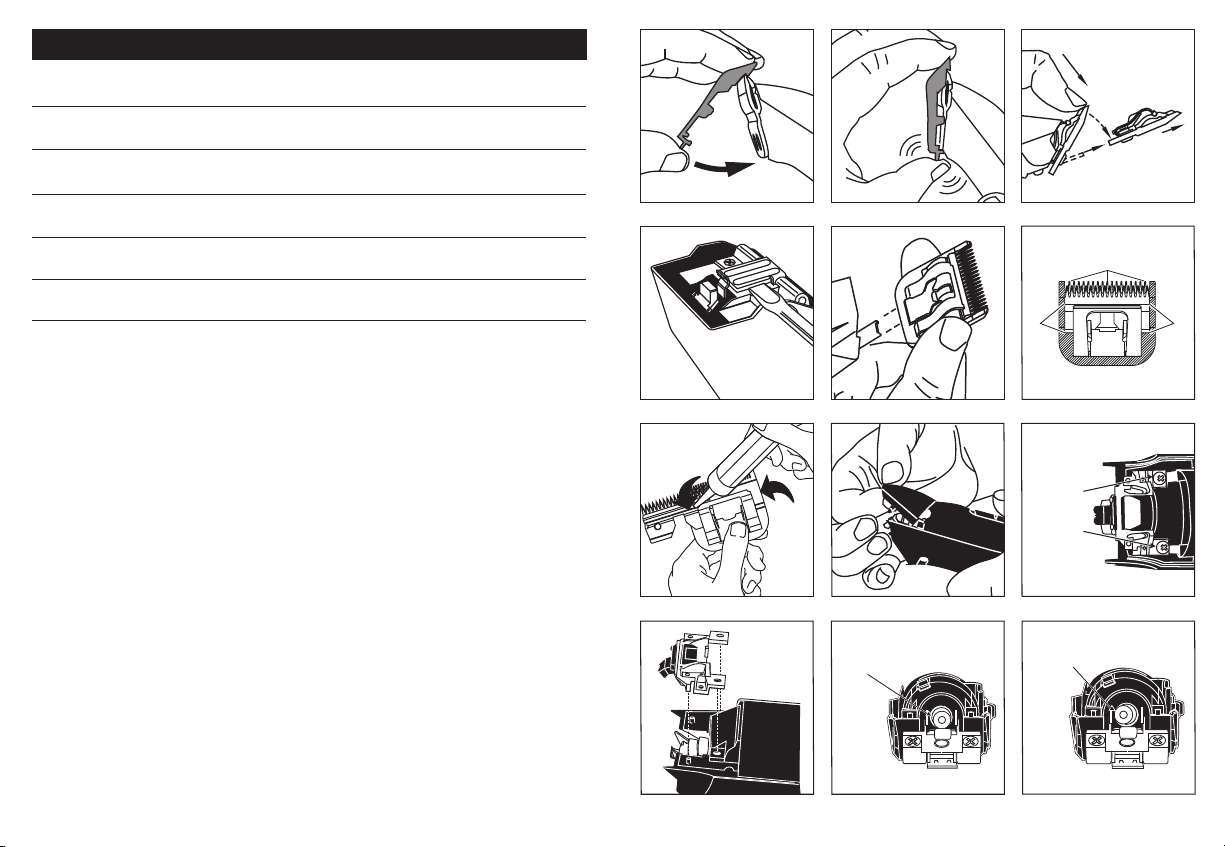
REMOVING BLADE SET
To remove blade set, first make sure your clipper is switched OFF and UNPLUGGED.
Push down on blade, then gently pull the blade forward (Figure C), and slide it
off the blade hinge. If your blade hinge should snap closed and is flush with the
clipper, use a small standard screwdriver to pry the tongue of the hinge out
(Figure D). NOTE: Hair may accumulate in the front cavity of the housing under
the blade. If this happens, you can clean out the hair by brushing out the cavity
with a small brush or an old toothbrush while the blade is off the clipper.
REPLACING OR CHANGING BLADE SET
To replace or change your blade set, slide the blade bracket onto the hinge of
the clipper (Figure E) and with the clipper turned ON, push the blade towards
the clipper to lock into position.
USER MAINTENANCE
The internal mechanism of your motor clipper has been permanently lubricated
by the factory. Other than the recommended maintenance described in this
manual, no other maintenance should be performed, except by Andis Company,
or an Andis Authorized Service Station. To find an Andis Authorized Service
Station near you log on to www.andis.com or contact our customer service
department: 1-800-558-9441 (U.S.) or 1-800-335-4093 (Canada).
FIGURE C
FIGURE D
FIGURE E
FIGURE G
FIGURE A FIGURE B
SNAP!
FIGURE F
OIL
OIL
OIL
FIGURE L
INCORRECT
POSITION
OF DRIVE
BEARING
FIGURE K
CORRECT
POSITION
OF
DRIVE
BEARING
FIGURE J
FIGURE I
BLADE
DRIVE
MOUNTING
SCREWS
FIGURE H
Approx. Length of Cut
Description Clipping Direction Fine Coarse
Standard Andis Blade With hair grain 1/16" - 3/16"
Against hair grain 1/32" - 1/8"
1/8" Blade Attachment With hair grain 1/4" - 3/8"
Against hair grain 1/8" - 1/4"
1/4" Blade Attachment With hair grain 3/8" - 1/2"
Against hair grain 1/4" - 3/8"
3/8" Blade Attachment With hair grain 1/2" - 5/8"
Against hair grain 3/8" - 1/2"
1/2" Blade Attachment With hair grain 5/8" - 7/8"
Against hair grain 1/2" - 5/8"
CLIPPING GUIDE

6 7
5. Drive bearing should be at its lowest position, if not, move it with your finger
to lowest position (Figures K & L).
6. Put on new drive assembly, align screw holes and press down (Figure J).
7. Reassemble blade drive by mounting screws (Figure I).
8. Replace drive cap (Figure H).
9. Replace blade (Figure E).
FACTORY REPAIR SERVICE
When the blades of your Andis clipper become dull after repeated use, it is
advised to purchase a new set of blades available through your Andis supplier
or through an Andis Authorized Service Station. Some blade sets can be
resharpened – contact Andis Company for information on resharpening. To find
an Andis Authorized Service Station near you log on to www.andis.com or
contact our customer service department: 1-800-558-9441 (U.S.) or
1-800-335-4093 (Canada).
BLADE TEMPERATURE
Due to the high speed nature of Andis clippers, please check for blade heat
often, especially on close cutting blades. If blades are too hot, dip the blades
only into Andis Blade Care Plus or apply Andis Cool Care Plus and then Andis
Clipper Oil. If you have a detachable blade unit, you can change your blade in
order to maintain a comfortable temperature; using multiple blades of the same
size is popular among groomers.
CARE AND SERVICING OF YOUR ANDIS CLIPPER BLADES
Blades should be oiled before, during, and after each use. If your clipper blades
leave streaks or slow down, it’s a sure sign blades need oil. Place a few drops of
Andis Clipper Oil on the front and side of the cutter blades (Figure F). Wipe
excess oil off blades with a soft dry cloth. Spray lubricants contain insufficient oil
for good lubrication, but are an excellent clipper blade coolant. Always replace
broken or nicked blades to prevent injury. You can clean the excess hair from
your blades by using a small brush or worn out tooth brush. To clean the blades
we suggest to immerse the blades only into a shallow pan of Andis Clipper Oil,
while the clipper is running. Any excess hair and dirt that has accumulated
between the blades should come out. After cleaning, turn your clipper OFF and
dry blades with a dry cloth and start clipping again.
If upon cleaning your blades you find that the blades will still not cut, there may
be a few fine pieces of hair trapped between the upper and lower blade. If this
happens, you will need to snap the blade off the clipper. Proceed to slide the
upper blade to one side, without loosening the tension spring or moving the
upper blade completely out from under the tension spring (See Figure G for
position of blade). Wipe the surface between the blades clean with a dry cloth,
then place a drop of clipper oil where the upper and lower blades meet and also
in the guide slot of the tension spring (Figure G). Now slide the upper blade to
the opposite side of the lower blade and repeat this process. After completing
this procedure, slide the upper blade, centering it over the lower blade. Handle
or store your Andis Clipper with the blades down so excess oil will not run into
the clipper case.
CHANGING THE BLADE DRIVE ASSEMBLY
If your clipper blades no longer cut properly (be sure to try more than one blade,
since the blade currently being used may be dull), it could be that your blade
drive assembly needs replacement.
To change the blade drive assembly:
1. Remove blade set (Figure C).
2. Remove drive cap (Figure H).
3. Remove blade drive mounting screws (Figure I).
4. NOTE: Before removing blade drive assembly, note the way it is positioned
(this will help you in reassembly). Remove blade drive assembly (Figure J).
Caution: Never handle your Andis clipper while you are operating a water
faucet, and never hold your clipper under a water faucet or in water. There is
danger of electrical shock and damage to your clipper. Andis Company will
not be responsible in case of injury due to this carelessness.
 Loading...