

1 MHz – 8 GHz, 60 dB
FEATURES
Wide bandwidth: 1 MHz to 8 GHz
High accuracy: ±1.0 dB over 55 dB range (f < 5.8 GHz)
Stability over temperature: ±0.5 dB
Low noise measurement/controller output VOUT
Pulse response time 10/12 ns (fall/rise)
Integrated temperature sensor
Small footprint CSP package
Power-down feature: <1.5 mW at 5 V
Single-supply operation: 5V @ 68 mA
Fabricated using high speed SiGe process
APPLICATIONS
RF transmitter PA setpoint control and level monitoring
RSSI measurement in base stations, WLAN, radar
GENERAL DESCRIPTION
The AD8318 is a demodulating logarithmic amplifier, capable of
accurately converting an RF input signal to a corresponding
decibel-scaled output voltage. It employs the progressive
compression technique over a cascaded amplifier chain, each
stage of which is equipped with a detector cell. The device can be
used in measurement or controller mode. The AD8318
maintains accurate log conformance for signals of 1 MHz to
6 GHz and provides useful operation to 8 GHz. The input range
is typically 60 dB (re: 50 Ω) with error less than ±1 dB. The
AD8318 has a 10 ns response time that enables RF burst
detection to beyond 60 MHz. The device provides
unprecedented logarithmic intercept stability versus ambient
temperature conditions. A 2 mV/K slope temperature sensor
output is also provided for additional system monitoring. A
single supply of +5 V is required. Current consumption is
typically 68 mA. Power consumption decreases to <1.5 mW
when the device is disabled.
The AD8318 can be configured to provide a control voltage to a
VGA, such as a power amplifier or a measurement output, from
pin VOUT. Since the output can be used for controller
Logarithmic Detector/Controller
AD8318
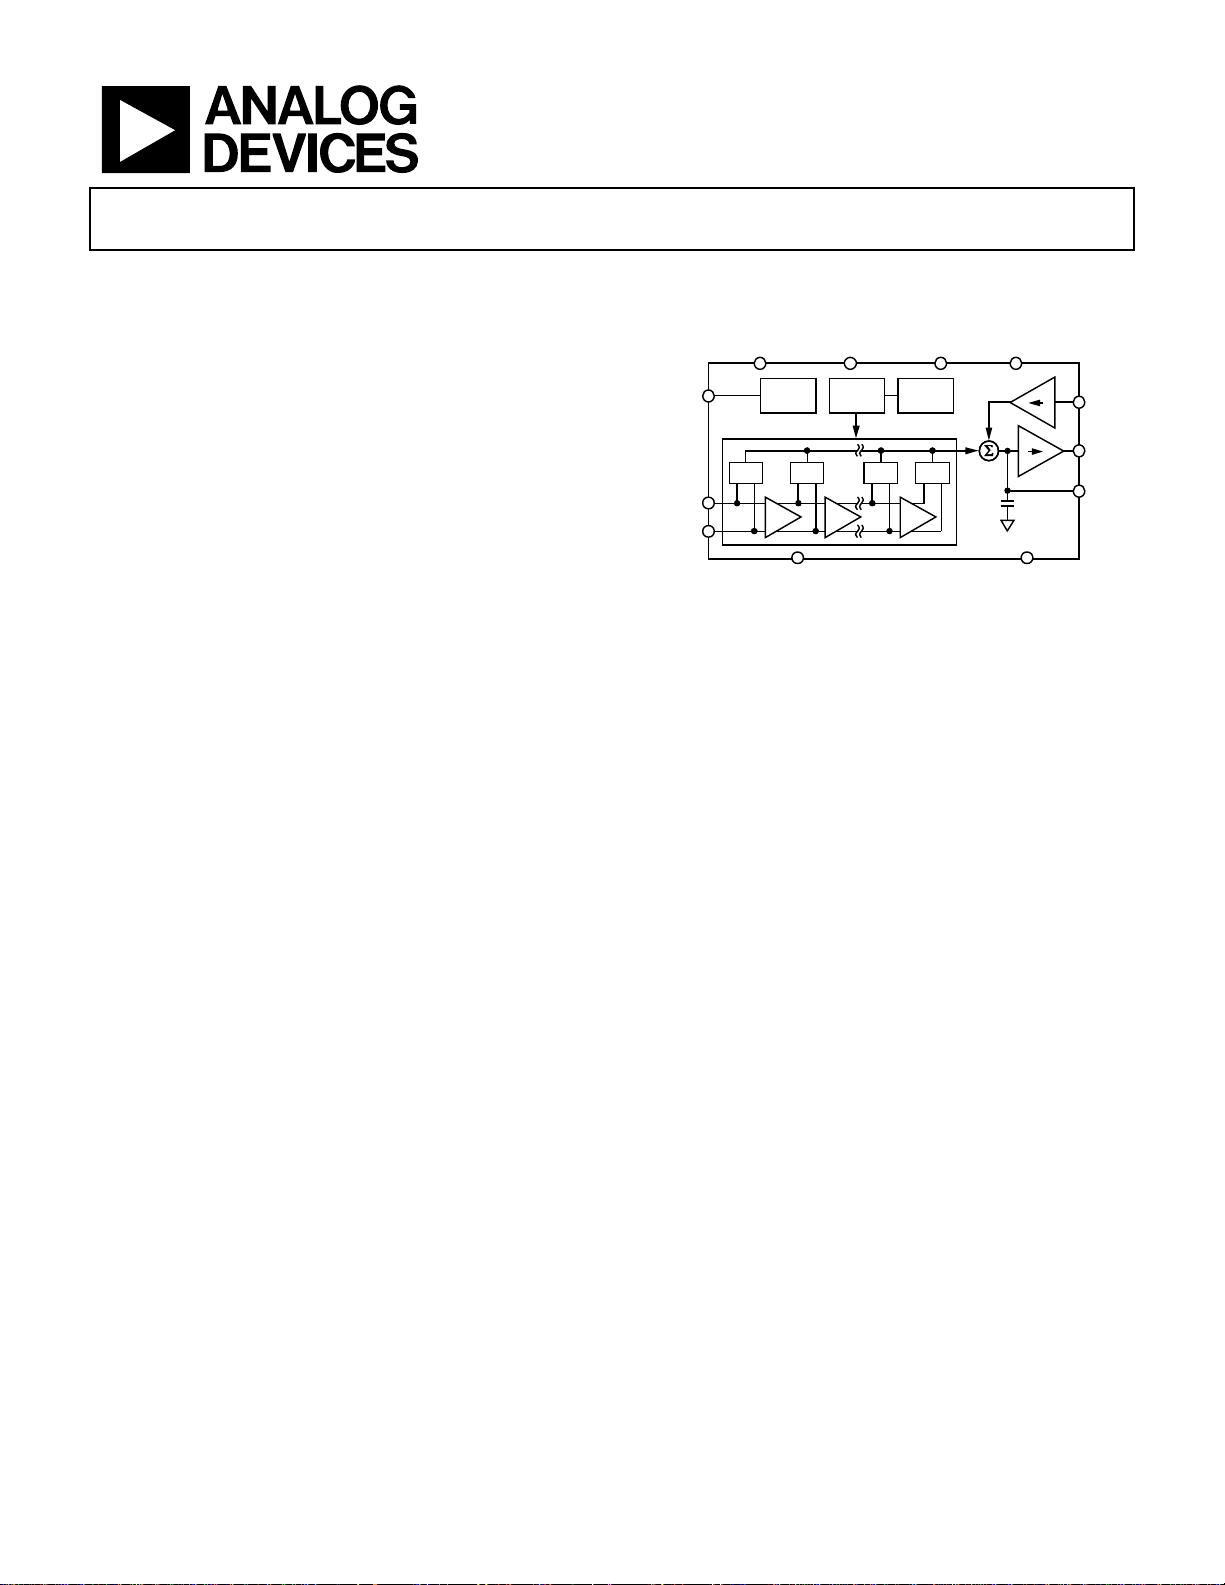
FUNCTIONAL BLOCK DIAGRAM
VPSI ENBL TADJ VPSO
TEMP
INHI
INLO
TEMP
SENSOR
DET DET DET DET
applications, special attention has been paid to minimize
wideband noise. In this mode, the setpoint control voltage is
applied to VSET. The feedback loop through an RF
amplifier is closed via VOUT; the output of which regulates
the amplifier’s output to a magnitude corresponding to V
The AD8318 provides 0 V to 4.9 V output capability at the
VOUT pin, suitable for controller applications. As a
measurement device, VOUT is externally connected to
VSET to produce an output voltage V
linear-in-dB function of the RF input signal amplitude.
The logarithmic slope is nominally −25 mV/dB, but can be
adjusted by scaling the feedback voltage from VOUT to the
VSET interface. The intercept is +20 dBm (re: 50 Ω, CW
input) using the INHI input. These parameters are very
stable against supply and temperature variations.
The AD8318 is fabricated on a SiGe bipolar IC process and
is available in a 4 mm × 4 mm, 16-pin LFCSP package, for
the operating temperature range of –40
GAIN
BIAS
SLOPE
Figure 1.
IV
IV
CMOPCMIP
that is a decreasing
OUT
o
C to +85oC.
VSET
VOUT
CLPF
04853-001
SET
.
Rev. 0
Information furnished by Analog Devices is believed to be accurate and reliable.
However, no responsibility is assumed by Analog Devices for its use, nor for any
infringements of patents or other rights of third parties that may result from its
use. Specifications subject to change without notice. No license is granted by
implication or otherwise under any patent or patent rights of Analog Devices.
Trademarks and registered trademarks are the property of their respective
owners.
One Technology Way, P.O. Box 9106, Norwood, MA 02062-9106, U.S.A.
Tel: 781.329.4700
Fax: 781.326.8703 © 2003 Analog Devices, Inc. All rights reserved.
www.analog.com

AD8318
TABLE OF CONTENTS
Specifications...................................................................................3
Absolute Maximum Ratings ..........................................................6
ESD Caution................................................................................6
Pin Configuration and Functional Descriptions ........................7
Typical Performance Characteristics............................................8
General Description .................................................................... 11
Using the AD8318........................................................................ 12
Basic Connections ................................................................... 12
Enable........................................................................................ 12
Input Signal Coupling ............................................................. 12
Output Interface....................................................................... 13
Setpoint Interface..................................................................... 13
Temperature Compensation of Output Voltage .................. 13
Temperature Sensor................................................................. 14
Measurement Mode................................................................. 14
Device Calibration and Error Calculation............................ 15
Selecting Calibration Points to Improve Accuracy over a
Reduced Range
Variation in Temperature Drift from Device to Device ......17
Temperature Drift at Different Temperatures...................... 17
Setting the Output Slope in Measurement Mode ................ 17
Response Time Capability ......................................................18
Controller Mode....................................................................... 18
Characterization Setups and Methods.................................. 20
Evaluation Board ..........................................................................21
Outline Dimensions..................................................................... 23
Ordering Guide ........................................................................23
......................................................................... 16
REVISION HISTORY
7/04—Revision 0: Initial Version
Rev. 0 | Page 2 of 24

AD8318
SPECIFICATIONS
VP = 5 V, C
Table 1.
Parameter Conditions Min Typ Max Unit
SIGNAL INPUT INTERFACE INHI (Pin 14) and INLO (Pin 15)
Specified Frequency Range
DC Common-Mode Voltage VPOS – 1.8 V
MEASUREMENT MODE
f = 900 MHz 500 Ω at TADJ to GND
Input Impedance 957 || 0.71
±1 dB Dynamic Range TA = +25°C
Maximum Input Level
Minimum Input Level
Slope −26 –24.5 −23 mV/dB
Intercept 19.5 22 24 dBm
Output Voltage—High Power In PIN = –10 dBm 0.7 0.78 0.86 V
Output Voltage—Low Power In PIN = –40 dBm 1.42 1.52 1.62 V
Temperature Sensitivity PIN = –10 dBm
f = 1.9 GHz 500 Ω at TADJ to GND
Input Impedance 523 || 0.68
±1 dB Dynamic Range TA = +25°C
Maximum Input Level
Minimum Input Level
Slope −27 –24.4 −22 mV/dB
Intercept 17 20.4 24 dBm
Output Voltage—High Power In PIN = –10 dBm 0.63 0.73 0.83 V
Output Voltage—Low Power In PIN = –35 dBm 1.2 1.35 1.5 V
Temperature Sensitivity PIN = –10 dBm
f = 2.2 GHz 500 Ω at TADJ to GND
Input Impedance 391 || 0.66
±1 dB Dynamic Range TA = +25°C
Maximum Input Level
Minimum Input Level
Slope −28 –24.4 −21.5 mV/dB
Intercept 15 19.6 25 dBm
Output Voltage—High Power In PIN = –10 dBm 0.63 0.73 0.84 V
Output Voltage—Low Power In PIN = –35 dBm 1.2 1.34 1.5 V
Temperature Sensitivity PIN = –10 dBm
= 220 pF, TA = +25°C, 52.3 Ω termination resistor at INHI, unless otherwise noted.
LPF
0.001 8 GHz
VOUT (Pin 6) shorted to VSET (Pin 7), sinusoidal
input signal
57 dB
−40°C < T
±1 dB Error
±1 dB Error
25°C ≤ T
≤ +85°C
A
−40°C ≤ T
< +85°C
A
≤ +25°C
A
48 dB
–1 dBm
–58 dBm
+0.0011
+0.003
57 dB
−40°C < T
±1 dB Error
±1 dB Error
25°C ≤ T
≤ +85°C
A
–40°C ≤ T
< +85°C
A
≤ +25°C
A
50 dB
–2 dBm
–59 dBm
+0.0011
+0.0072
58 dB
−40°C < T
±1 dB Error
±1 dB Error
25°C ≤ T
≤ +85°C
A
–40°C ≤ T
< +85°C
A
≤ +25°C
A
50 dB
–2 dBm
–60 dBm
−0.0005
+0.0062
Ω || pF
dB/°C
dB/°C
Ω || pF
dB/°C
dB/°C
Ω || pF
dB/°C
dB/°C
Rev. 0 | Page 3 of 24

AD8318
Parameter Conditions Min Typ Max Unit
f = 3.6 GHz 51 Ω at TADJ to GND
Input Impedance 119 || 0.7
±1 dB Dynamic Range TA = +25°C
Maximum Input Level
Minimum Input Level
−40°C < T
±1 dB Error
±1 dB Error
< +85°C
A
58 dB
42 dB
–2 dBm
–60 dBm
Slope –24.3 mV/dB
Intercept 19.8 dBm
Output Voltage—High Power In PIN = –10 dBm 0.717 V
Output Voltage—Low Power In PIN = –40 dBm 1.46 V
Temperature Sensitivity PIN = –10 dBm
25°C ≤ T
–40°C ≤ T
≤ +85°C
A
≤ +25°C
A
+0.0022
+0.004
f = 5.8 GHz 1000 Ω at TADJ to GND
Input Impedance
±1 dB Dynamic Range TA = +25°C
Maximum Input Level
Minimum Input Level
Slope
Intercept
−40°C < T
±1 dB Error
±1 dB Error
< +85°C
A
33 || 0.59
57 dB
48 dB
–1 dBm
–58 dBm
–24.3 mV/dB
25 dBm
Output Voltage—High Power In PIN = –10 dBm 0.86 V
Output Voltage—Low Power In PIN = –40 dBm 1.59 V
Temperature Sensitivity PIN = –10 dBm
25°C ≤ T
–40°C ≤ T
≤ +85°C
A
≤ +25°C
A
+0.0033
+0.0069
f = 8.0 GHz 500 Ω at TADJ to GND
±3 dB Dynamic Range TA = +25°C
Maximum Input Level
Minimum Input Level
Slope
Intercept
−40°C < T
±3 dB Error
±3 dB Error
< +85°C
A
60 dB
58 dB
3 dBm
–55 dBm
–23 mV/dB
37 dBm
Output Voltage—High Power In PIN = –10 dBm 1.06 V
Output Voltage—Low Power In PIN = –40 dBm 1.78 V
Temperature Sensitivity PIN = –10 dBm
25°C ≤ T
–40°C ≤ T
≤ +85°C
A
≤ +25°C
A
+0.028
−0.0085
OUTPUT INTERFACE VOUT (Pin 6)
Voltage Swing VSET = 0 V; RFIN = –10 dBm, no load
VSET = 2.1 V; RFIN = –10 dBm, no load
1
1
4.9 V
25 mV
Output Current Drive VSET = 1.5 V, RFIN = –50 dBm 60 mA
Small Signal Bandwidth RFIN = −10 dBm; From CLPF to VOUT 600 MHz
Output Noise
RF Input = 2.2 GHz, –10 dBm, f
= 100 kHz,
NOISE
90
CLPF = 220 pF
Ω || pF
dB/°C
dB/°C
Ω || pF
dB/°C
dB/°C
dB/°C
dB/°C
nV/√Hz
Rev. 0 | Page 4 of 24

AD8318
Parameter Conditions Min Typ Max Unit
Fall Time Input Level = off to –10 dBm, 90% to 10% 10 ns
Rise Time Input Level = –10 dBm to off, 10% to 90% 12 ns
VSET INTERFACE VSET (Pin 7)
Nominal Input Range RFIN = 0 dBm; measurement mode
RFIN = –65 dBm; measurement mode
Logarithmic Scale Factor –0.04 dB/mV
Bias Current Source RFIN = −10 dBm; VSET = 2.1 V 2.5
TEMPERATURE REFERENCE TEMP (Pin 13)
Output Voltage
Temperature Slope
Current Source/Sink
= 25°C, RL = 10 kΩ
T
A
–40°C ≤ T
= 25°C
T
A
≤ +85°C, RL = 10 kΩ
A
POWER-DOWN INTERFACE ENBL (Pin 16)
Logic Level to Enable Device 1.7 V
ENBL Current When Enabled ENBL = 5 V <1
ENBL Current When Disabled ENBL = 0 V; Sourcing 15
POWER INTERFACE VPSI (Pins 3, 4), VPSO (Pin 9)
Supply Voltage 4.5 5 5.5 V
Quiescent Current ENBL = 5 V 50 68 52 mA
vs. Temperature
–40°C ≤ T
≤ +85°C
A
Supply Current when Disabled ENBL = 0 V, Total Currents for VPSI and VPSO 260
vs. Temperature
1
Controller mode
2
(Gain = 1) For other gains, see Measurement Mode section of the data sheet.
–40°C ≤ T
≤ +85°C
A
2
2
0.5
2.1 V
µA
0.57 0.6 0.63 V
2
mV/°C
10/0.1 mA
µA
µA
68 mA
µA
350
µA
Rev. 0 | Page 5 of 24
AD8318
ABSOLUTE MAXIMUM RATINGS
Table 2.
Parameter Rating
Supply Voltage: VPSO, VPSI
ENBL, VSET Voltage
Input Power (Single-ended, re: 50 Ω)
Internal Power Dissipation
1
θ
JA
Maximum Junction Temperature
Operating Temperature Range
Storage Temperature Range
Lead Temperature Range
1
With package die paddle soldered to thermal pads with vias connecting to inner
and bottom layers
5.7 V
0 to VP
12 dBm
0.73 W
55°C/W
125°C
–40°C to +85°C
–65°C to +150°C
260°C
ESD CAUTION
ESD (electrostatic discharge) sensitive device. Electrostatic charges as high as 4000 V readily accumulate on
the human body and test equipment and can discharge without detection. Although this product features
proprietary ESD protection circuitry, permanent damage may occur on devices subjected to high energy
electrostatic discharges. Therefore, proper ESD precautions are recommended to avoid performance
degradation or loss of functionality.
Stresses above those listed under Absolute Maximum
Ratings may cause permanent damage to the device. This is
a stress rating only; functional operation of the device at
these or any other conditions above those indicated in the
operational section of this specification is not implied.
Exposure to absolute maximum rating conditions for
extended periods may affect device reliability.
Rev. 0 | Page 6 of 24
AD8318
PIN CONFIGURATION AND FUNCTIONAL DESCRIPTIONS
12
CMIP11CMIP10TADJ9VPSO
13
TEMP
14
INHI
15
16
Figure 2. 16-Lead Lead Frame Chip Scale Package (LFCSP)
AD8318
INLO
ENBL
CMIP2CMIP3VPSI4VPSI
1
Table 3. Pin Function Descriptions
Pin No. Mnemonic Function
1, 2, 11, 12 CMIP Device Common (Input System Ground).
3, 4, 9 VPSI, VPSO Positive Supply Voltage for the Device Input System: 4.5 V to 5.5 V (voltage on all pins should be equal).
5 CLPF Loop Filter Capacitor.
6 VOUT Measurement and Controller Output.
CMOP
VSET
VOUT
CLPF
8
7
6
5
04853-002
7 VSET Setpoint Input for Controller Mode, or Feedback Input for Measurement Mode.
8 CMOP Device Common (Output System Ground).
10 TADJ Temperature Compensation Adjustment.
13 TEMP Temperature Sensor Output.
14 INHI
RF Input. Nominal input range: −60 dBm to 0 dBm re: 50 Ω; ac-coupled RF input.
15 INLO RF Common for INHI; ac-coupled RF common.
16 ENBL Device Enable. Connect to VPSI for normal operation. Connect pin to ground for disable mode.
Paddle Internally Connected to CMIP, Solder to Ground.
Rev. 0 | Page 7 of 24
AD8318
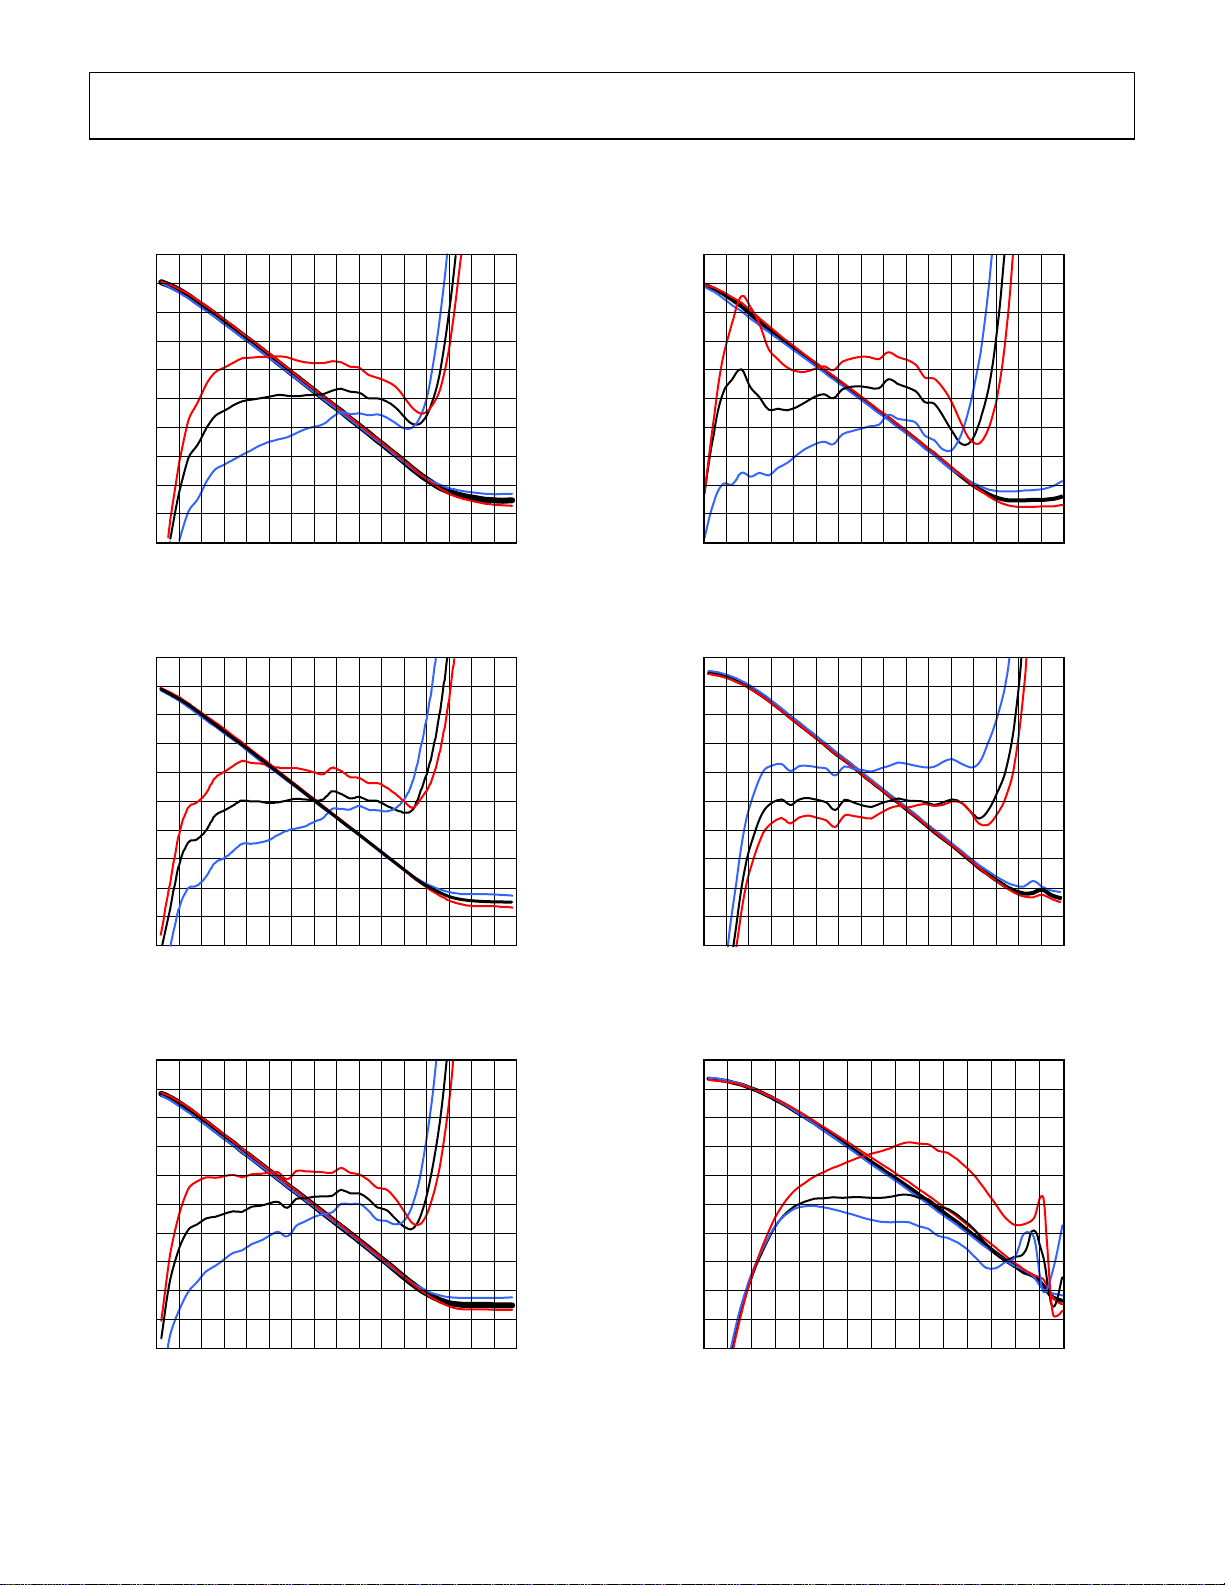
TYPICAL PERFORMANCE CHARACTERISTICS
VP = 5 V, T = +25°C, –40°C, +85°C; C
2.2
2.0
1.8
1.6
1.4
(V)
1.2
OUT
V
1.0
0.8
0.6
0.4
0.2
–65 –55 –45 –35 –25 –15 –5 5 15
Figure 3. V
and Log Conformance vs. Input Amplitude at 900 MHz,
OUT
PIN (dBm)
= 220 pF; T
LPF
Typical Device
2.2
2.0
1.8
1.6
1.4
(V)
1.2
OUT
V
1.0
0.8
0.6
0.4
0.2
–65 –55 –45 –35 –25 –15 –5 5 15
Figure 4. V
and Log Conformance vs. Input Amplitude at 1.9 GHz,
OUT
PIN (dBm)
Typical Device
2.2
2.0
1.8
1.6
1.4
(V)
1.2
OUT
V
1.0
0.8
0.6
0.4
0.2
–65 –55 –45 –35 –25 –15 –5 5 15
Figure 5. V
and Log Conformance vs. Input Amplitude at 3.6 GHz,
OUT
PIN (dBm)
Typical D evice, T
= 51 Ω
ADJ
= 500 Ω; unless otherwise noted. Colors: +25°C Black; –40°C Blue; +85°C Red
ADJ
2.0
1.6
1.2
0.8
0.4
0
–0.4
–0.8
–1.2
–1.6
–2.0
2.0
1.6
1.2
0.8
0.4
0
–0.4
–0.8
–1.2
–1.6
–2.0
ERROR (dB)
04853-003
ERROR (dB)
04853-004
2.2
2.0
1.8
1.6
1.4
(V)
1.2
OUT
V
1.0
0.8
0.6
0.4
0.2
–65 –55 –45 –35 –25 –15 –5 5 15
Figure 6. V
and Log Conformance vs. Input Amplitude at 5.8 GHz,
OUT
Typical D evice, T
2.2
2.0
1.8
1.6
1.4
(V)
1.2
OUT
V
1.0
0.8
0.6
0.4
0.2
–65 –55 –45 –35 –25 –15 –5 5 15
Figure 7. V
and Log Conformance vs. Input Amplitude at 2.2 GHz,
OUT
PIN (dBm)
PIN (dBm)
= 1000 Ω
ADJ
Typical Device
2.0
1.6
1.2
0.8
0.4
0
–0.4
–0.8
–1.2
–1.6
–2.0
ERROR (dB)
04853-005
2.2
2.0
1.8
1.6
1.4
(V)
1.2
OUT
V
1.0
0.8
0.6
0.4
0.2
–65 –55 –45 –35 –25 –15 –5 5
Figure 8. V
and Log Conformance vs. Input Amplitude at 8 GHz,
OUT
PIN (dBm)
Typical Device
2.0
1.6
1.2
0.8
0.4
0
–0.4
–0.8
–1.2
–1.6
–2.0
2.0
1.6
1.2
0.8
0.4
0
–0.4
–0.8
–1.2
–1.6
–2.0
4.5
3.6
2.7
1.8
0.9
0
–0.9
–1.8
–2.7
–3.6
–4.5
ERROR (dB)
04853-006
ERROR (dB)
04853-007
ERROR (dB)
04853-008
Rev. 0 | Page 8 of 24

AD8318
2.0
1.6
1.2
0.8
0.4
0
–0.4
ERROR (dB)
–0.8
–1.2
–1.6
–2.0
–65 –55 –45 –35 –25 –15 –5 5 15
PIN (dBm)
Figure 9. Distribution of Error over Temperature after Ambient
Normalization vs. Input Amplitude at 900 MHz for at least 70 D evices
2.0
1.6
1.2
0.8
0.4
0
–0.4
ERROR (dB)
–0.8
–1.2
–1.6
–2.0
–65 –55 –45 –35 –25 –15 –5 5 15
PIN (dBm)
04853-010
Figure 10. Distribution of Error at Temperature after Ambient
Normalization vs. Input Amplitude at 1900 MHz for at least 70 Devices
2.0
1.6
1.2
0.8
0.4
0
–0.4
ERROR (dB)
–0.8
–1.2
–1.6
–2.0
–65 –55 –45 –35 –25 –15 –5 5 15
PIN (dBm)
Figure 11. Distribution of Error at Temperature after Ambient
Normalization vs. Input Amplitude at 2.2 GHz for at least 70 Devices
04853-009
04853-011
2.0
1.6
1.2
0.8
0.4
0
–0.4
ERROR (dB)
–0.8
–1.2
–1.6
–2.0
–65 –55 –45 –35 –25 –15 –5 5 15
PIN (dBm)
Figure 12. Distribution of Error at Temperature after Ambient
Normalization vs. Input Amplitude at 3.6 GHz for at least 70 Devices
2.0
1.6
1.2
0.8
0.4
0
–0.4
ERROR (dB)
–0.8
–1.2
–1.6
–2.0
–65 –55 –45 –35 –25 –15 –5 5 15
PIN (dBm)
Figure 13. Distribution of Error at Temperature after Ambient
Normalization vs. Input Amplitude at 5.8 GHz (T
=1000 Ω) for at least
ADJ
70 Devices
4.5
3.6
2.7
1.9
0.9
0
–0.9
ERROR (dB)
–1.8
–2.7
–3.6
–4.5
–65 –55 –45 –35 –25 –15 –5 5
PIN (dBm)
Figure 14. Distribution of Error at Temperature after Ambient
Normalization vs. Input Amplitude at 8 GHz for at least 70 Devices
04853-012
04853-013
04853-014
Rev. 0 | Page 9 of 24

AD8318
j
j0.5
1
j2
10k
RF OFF
j0.2
0 0.2 0.5 1 2
–j0.2
START FREQUENCY = 0.1GHz
STOP FREQUENCY = 8GHz
8GHz
5.8GHz
–j0.5
3.6GHz
–j1
1.9GHz
2.2GHz
0.1GHz
0.9GHz
–j2
04853-015
Figure 15. Input Impedance vs. Frequency; No Termination Resistor on INHI
0.07
0.06
0.05
0.04
DECREASING V
0.03
0.02
SUPPLY CURRENT (A)
ENBL
INCREASING V
ENBL
1k
–20dBm
100
–10dBm
NOISE SPECTRAL DENSITY (nV/ Hz)
10
1 3 10 30 100 300 1k 3k 10k
FREQUENCY (kHz)
Figure 18. Noise Spectral Density of Output; C
1k
100
–40dBm
0dBm
= Open
LPF
–60dBm
04853-018
0.01
0
1.4 1.5 1.6 1.7 1.8
V
ENBL
(V)
Figure 16. Supply Current vs. Enable Voltage
VOUT
200mV/VERTICAL
DIVISION
PULSED RF INPUT 0.1GHz,
Figure 17. V
GND
20ns PER HORIZONTAL DIVISION
Pulse Response Time. Pulsed RF Input 0.1 GHz, –10 dBm;
OUT
C
= Open
LPF
–10dBm
04853-016
04853-017
NOISE SPECTRAL DENSITY (nV/ Hz)
10
1 3 10 30 100 300 1k 3k 10k
FREQUENCY (kHz)
04853-019
Figure 19. Noise Spectral Density of Output Buffer (from CLPF to VOUT );
C
= 0.1 µF
LPF
2.2
2.0
1.8
1.6
1.4
(V)
1.2
OUT
V
1.0
0.8
0.6
0.4
0.2
–65 –55 –45 –35 –25 –15 –5 5 15
PIN (dBm)
2.0
1.6
1.2
0.8
0.4
0
–0.4
–0.8
–1.2
–1.6
–2.0
ERROR (dB)
04853-020
Figure 20. Output Voltage Stability vs. Supply Voltage at 1.9 GHz When VP
Varies by 10%, Multiple Devices
Rev. 0 | Page 10 of 24

AD8318
GENERAL DESCRIPTION
The AD8318 is a 9-stage demodulating logarithmic amplifier,
which provides RF measurement and power amplifier control
functions. The design is similar to the AD8313 Logarithmic
Detector/Controller. However, the AD8318 input frequency
range is extended to 8 GHz with 60 dB dynamic range. Other
improvements include: reduced intercept variability versus
temperature, increased dynamic range at higher frequencies, low
noise measurement and controller output (VOUT), adjustable
low-pass corner frequency (CLPF), temperature sensor output
(TEMP), negative transfer function slope for higher accuracy,
and 10 ns response time for RF burst detection capability. A
block diagram is shown in
Figure 21.
VPSI ENBL TADJ VPSO
TEMP
TEMP
SENSOR
GAIN
BIAS
SLOPE
IV
VSET
temperature and supply variations. Since the cascaded gain
stages are dc-coupled, the overall dc gain is high. An offset
compensation loop is included to correct for offsets within
the cascaded cells. At the output of each of the gain stages, a
square-law detector cell is used to rectify the signal. The RF
signal voltages are converted to a fluctuating differential
current having an average value that increases with signal
level. Along with the nine gain stages and detector cells, an
additional detector is included at the input of the AD8318,
altogether providing a 60 dB dynamic range. After the
detector currents are summed and filtered, the function
× log10(VIN/V
I
D
where I
is the internally set detector current, VIN is the
D
input signal voltage, and V
(i.e., when V
IN
= V
) is formed at the summing node,
INTERCEPT
is the intercept voltage
INTERCEPT
, the output voltage would be 0 V,
INTERCEPT
if it were capable of going to 0 V).
IV
DET DET DET DET
INHI
INLO
CMOPCMIP
Figure 21. Block Diagram
VOUT
CLPF
04853-021
A fully differential design, using a proprietary high speed
SiGe process, extends high frequency performance. Input INHI
receives the signal with a low frequency impedance of nominally
1200 Ω in parallel with 0.7 pF. The maximum input with ±1 dB
log-conformance error is typically 0 dBm (re: 50 Ω). The noise
spectral density referred to the input is 1.15 nV/√Hz, which
is equivalent to a voltage of 118 µV rms in a 10.5 GHz bandwidth, or a noise power of –66 dBm (re: 50 Ω). This noise
spectral density sets the lower limit of the dynamic range.
However, the low-end accuracy of the AD8318 is enhanced
by specially shaping the demodulating transfer characteristic
to partially compensate for errors due to internal noise. The
input system common pin, CMIP, provides a quality low
impedance connection to the printed circuit board (PCB)
ground through the use of four package pins. The package
paddle, which is internally connected to the CMIP pin, should
also be grounded to the PCB to reduce thermal impedance from
the die to the PCB.
The logarithmic function is approximated in a piecewise fashion
by 9 cascaded gain stages. (For a more comprehensive explanation of the logarithm approximation, please refer to the
AD8307 data sheet, available at www.analog.com.) The cells have
a nominal voltage gain of 8.7 dB each, and a 3 dB bandwidth of
10.5 GHz. Using precision biasing, the gain is stabilized over
Rev. 0 | Page 11 of 24

AD8318
USING THE AD8318
BASIC CONNECTIONS
The AD8318 is specified for operation up to 8 GHz, as a result
low impedance supply pins with adequate isolation between
functions are essential. In the AD8318, the two positive supply
pins, VPSI and VPSO, must be connected to the same potential.
The VPSI pin biases the input circuitry, while the VPSO biases
the low noise output driver for VOUT. Separate commons are
also included in the device. CMOP is used as the common for
the output drivers. All commons should be connected to a low
impedance ground plane.
A power supply voltage of between 4.5 V and 5.5 V should be
applied to VPS0 and VPS1. 100 pF and 0.1 µF power supply
decoupling capacitors should be connected close to each power
supply pin. (The two adjacent VPS1 pins can share a pair of
decoupling capacitors because of their proximity.)
V
S
499Ω
(SEE TEXT)
12
CMIP11CMIP10TADJ9VPSO
TEMP
OUT
RF
INPUT
52.3Ω
R1
13
TEMP
C1
1nF
14
INHI
C2
1nF
15
INLO
16
ENBL
CMIP2CMIP3VPSI4VPSI
V
1
S
AD8318
V
CMOP
VSET
VOUT
CLPF
S
Figure 22. Basic Connections
The paddle of the AD8318’s LFCSP package is internally
connected to CMIP. For optimum thermal and electrical
performance, the paddle should be soldered to a low impedance
ground plane.
ENABLE
To enable the AD8318, the ENBL pin must be pulled high.
Taking ENBL low will put the AD8318 in sleep mode, reducing
current consumption to 260 µA at ambient. The voltage on
ENBL must be greater than 2 V
When enabled the devices draws less than 1 µA. When the ENBL
pin is pulled low, the pin sources 15 µA.
The enable interface has high input impedance. A 200 Ω resistor
is placed in series with the ENBL input for added protection.
Figure 23 depicts a simplified schematic of the enable interface.
(~1.7 V) to enable the device.
BE
C7
100pF
C8
0.1µF
C5
0.1µF
C6
100pF
8
7
6
VOUT
5
4853-022
VPSI
ENBL
CMIP
200Ω
40kΩ
40kΩ
2×V
BE
2×V
DISCHARGE
BE
ENABLE
04853-023
Figure 23. ENBL Interface
INPUT SIGNAL COUPLING
The RF input to the AD8318 (INHI) is single-ended and
must be ac-coupled. INLO (input common) should be
ac-coupled to ground (See Figure 22). Suggested coupling
capacitors are 1 nF ceramic 0402 style capacitors for input
frequencies of 1 MHz to 8 GHz. The coupling capacitors
should be mounted close to the INHI and INLO pins. These
capacitor values can be increased to lower the input stage’s
high-pass cutoff frequency. The high-pass corner is set by
the input coupling capacitors and the internal 10 pF highpass capacitor. The dc voltage on INHI and INLO will be
2kΩ
.
PSI
A = 8.6dB
FIRST
GAIN
STAGE
OFFSET
COMP
04853-024
about one diode voltage drop below V
The Smith chart in Figure 15 shows the AD8318’s input
impedance vs. frequency. Table 4 lists the reflection coefficient and impedance at select frequencies. For Figure 15 and
Table 4, the 52.3 Ω input termination resistor was removed.
At dc, the resistance is typically 2 kΩ. At frequencies up to 1
GHz, the impedance is approximated as 1000 Ω || 0.7 pF.
The RF input pins are coupled to a network given by the
simplified schematic in Figure 24.
VPSI
10pF 10pF
20kΩ 20kΩ
INHI
INLO
CURRENT
Gm
STAGE
Figure 24. Input Interface
While the input can be reactively matched, in general this is
not necessary. An external 52.3 Ω shunt resistor (connected
on the signal side of the input coupling capacitors, see
Figure 22) combines with the relatively high input impedance to give an adequate broadband 50 Ω match.
Rev. 0 | Page 12 of 24

AD8318
V
Table 4. Input Impedance for Select Frequency
Frequency
MHz
Real Imaginary
S11
Impedance Ω
(Series)
100 0.918 −0.041 927-j491
456 0.905 −0.183 173-j430
900 0.834 −0.350 61-j233
1900 0.605 −0.595 28-j117
2200 0.524 −0.616 28-j102
3600 0.070 −0.601 26-j49
5300 −0.369 −0.305 20-j16
5800 −0.326 −0.286 22-j16
8000 −0.390 −0.062 22-j3
OUTPUT INTERFACE
The VOUT pin is driven by a PNP output stage. An internal 10 Ω
resistor is placed in series with the emitter follower output and
the VOUT pin. The rise time of the output is limited mainly by
the slew on CLPF. The fall time is an RC limited slew given by
the load capacitance and the pull-down resistance at VOUT.
There is an internal pull-down resistor of 350 Ω. Any resistive
load at VOUT is placed in parallel with the internal pull-down
resistor and provides additional discharge current.
VPSO
CLPF
CMOP
+
0.2V
–
Figure 25. Output Interface
10Ω
150Ω
200Ω
VOUT
04853-025
SETPOINT INTERFACE
The V
internal op amp. The V
3.13 kΩ resistor to generate I
applied to VSET, the feedback loop forces −I
(VIN/V
V
input drives the high impedance (250 kΩ) input of an
SET
voltage appears across the internal
SET
. When a portion of V
SET
× log
D
) = I
. If V
= V
INTERCEPT
/(X × 3.13 kΩ). The result is
OUT
V
OUT
SET
= (−ID × 3.13 kΩ × X) × log10(VIN/V
SET
/X, then I
OUT
SET
10
=
INTERCEPT
OUT
is
)
I
SET
SET
3.13kΩ
CMOP
Figure 26. VSET Interface
04853-026
The slope is given by –ID × X × 3.13 kΩ = –500 mV × X. For
example, if a resistor divider to ground is used to generate a
voltage of V
V
SET
/2, then X = 2. The slope will be set to
OUT
–1 V/decade or –50 mV/dB.
TEMPERATURE COMPENSATION OF OUTPUT VOLTAGE
The AD8318 functionality includes the capability to
externally trim the temperature drift. Attaching a groundreferenced resistor to the T
which works to minimize intercept drift vs. temperature. As
a result, the T
resistor can be optimized for operation at
ADJ
different frequencies.
V
INTERNAL
Figure 27. TADJ Interface
A resistor, nominally 500 Ω for optimal temperature
compensation at 2.2 GHz input frequency, is connected
between this pin and ground (see Figure 22). The value of
this resistor partially determines the magnitude of an analog
correction coefficient, which is employed to reduce
intercept drift.
Table 5 lists recommended resistors for other frequencies.
These resistors have been chosen to provide the best overall
temperature drift based on measurements of a diverse
population of devices.
The relationship between output temperature drift and
frequency is not linear and cannot be easily modeled. As a
result, experimentation is required to choose the correct
resistor at frequencies not listed in Table 5.
T
ADJ
pin alters an internal current,
ADJ
I
COMP
2V
~0.4V
2kΩ
TADJ
04853-027
Rev. 0 | Page 13 of 24

AD8318
Table 5. Recommended T
Frequency Recommended T
Resistors
ADJ
ADJ
900 MHz 500 Ω
1.9 MHz 500 Ω
2.2 GHz 500 Ω
3.6 GHz 51 Ω
5.8 GHz 1 kΩ
8 GHz 500 Ω
TEMPERATURE SENSOR
The AD8318 internally generates a voltage that is proportionalto-absolute-temperature (V
PTAT
). The V
voltage is multiplied
PTAT
by a factor of 5, resulting in a +2 mV/°C output at the TEMP pin.
The output voltage at 27°C is typically 600 mV. An emitter
follower drives the TEMP pin, as shown in Figure 28.
VPSI
INTERNAL
CMIP
TEMP
04853-028
4kΩ
1kΩ
Figure 28. Temp Sensor Interface
The internal pull-down resistance is 5 kΩ. The temperature
sensor has a slope of +2 mV/°C.
The temp sensor output will vary with output current due to
increased die temperature. Output loads less than 1 kΩ will draw
enough current from the output stage causing this increase to
occur. An output current of 10 mA will result in the voltage on
the temp sensor to increase by 1.5°C, or ~3 mV.
To get the best precision from the temperature sensor, ensure
that supply current to AD8318 remains fairly constant (i.e., no
heavy load drive).
MEASUREMENT MODE
When the V
back to VSET, the device operates in measurement mode. As
seen in Figure 29, the AD8318 has an offset voltage, a negative
slope, and a V
signal range.
voltage or a portion of the V
OUT
measurement intercept greater than its input
OUT
voltage is fed
OUT
2.2
2.0
V
25°C
PIN (dBm)
OUT
ERROR 25°C
1.8
1.6
1.4
(V)
1.2
OUT
V
1.0
0.8
0.6
0.4
0.2
–65 –60 –55 –50 –45 –40 –35 –30 –25 –20 –15 –10 –5 0 5
RANGE FOR CALCULATION
OF SLOPE AND INTERCEPT
2.5
2.0
1.5
1.0
0.5
0
–0.5
–1.0
–1.5
–2.0
INTERCEPT
Figure 29. Typical Output Voltage vs. Input Signal
The output voltage versus input signal voltage of the
AD8318 is linear-in-dB over a multidecade range. The
equation for this function is of the form
V
OUT
= X × V
SLOPE/DEC
× log10(VIN/V
INTERCEPT
) (1)
= X × V
× 20 × log10(VIN/V
SLOPE/dB
INTERCEPT
) (2)
where:
= V
X is the feedback factor in V
V
V
is expressed in V
INTERCEPT
is nominally –500 mV/decade or −25 mV/dB.
SLOPE/DEC
rms
SET
.
OUT
/X
V
expressed in dBV is the x-axis intercept of the
INTERCEPT
linear-in-dB transfer function shown in Figure 29.
V
INTERCEPT
is +7 dBV (+20 dBm, re: 50 Ω or 2.239 V
rms
) for a
sinusoidal input signal.
The slope of the transfer function can be increased to
accommodate various converter mV per dB (LSB per dB)
requirements. However, increasing the slope may reduce
the dynamic range. This is due to the limitation of the
minimum and maximum output voltages, determined by
the chosen scaling factor X.
The minimum value for V
voltage, V
, of 0.5 V is internally added to the detector
OFFSET
OUT
is X × V
OFFSET
. An offset
signal.
V
OUT(MIN)
= (X × V
OFFSET
)
The maximum output voltage is 2.1 V × X, and cannot
exceed 400 mV below the positive supply.
ERROR (dB)
04853-029
Rev. 0 | Page 14 of 24

AD8318
V
V
V
V
When X = 1, the typical output voltage swing is 0.5 V to 2.1 V.
The output voltage swing can be modeled by using the equations
above and restricted by the following equation:
V
For the case when X = 4 and V
(X × V
(4 × 0.5 V) < V
2 V < V
For X = 4, Slope = −100 mV/dB; V
usable dynamic range will be reduced to 26 dB from 0 dBm to
–26 dBm.
The slope is very stable versus process and temperature
variation. When base-10 logarithms are used, V
represents the “volts/decade.” A decade corresponds to 20 dB,
V
SLOPE/DECADE
As noted in the equations above, the V
slope. This is also the correct slope polarity to control the gain of
many power amplifiers and other VGAs in a negative feedback
configuration. Since both the slope and intercept vary slightly
with frequency, it is recommended to refer to the specification
pages for application specific values for slope and intercept.
Although demodulating log amps respond to input signal
voltage, not input signal power, it is customary to discuss the
amplitude of high frequency signals in terms of power. In this
case, the characteristic impedance of the system, Z
known to convert voltages to their corresponding power levels.
Starting with the definitions of dBm and dBV,
P(dBm) = 10 × log
V(dBV) = 20 × log
Expanding Equation 3 gives us:
P(dBm) = 20 × log
and given Equation 4, we can rewrite Equation 5 as
P(dBm) = V(dBV) − 10 × log
= (2.1 V × X) when X < (VP – 400 mV)/(2.1 V)
OUT(MAX)
= (VP – 400 mV) when X ≥ (VP – 400 mV)/(2.1 V)
OUT(MAX)
< V
< 4.6 V
OUT
/20 = V
OUT
) < V
< V
OUT
OUT
OUT(MAX)
= 5 V
P
< (VP – 400 mV)
< (2.1 V × 4)
can swing 2.6 V, and
OUT
represents the slope in “volts/dB.”
SLOPE/dB
voltage has a negative
OUT
2
/(ZO × 1 mW)) (3)
10(Vrms
/1 V
10(Vrms
10(Vrms
) (4)
rms
) − 10 × log10( ZO × 1 mW) (5)
× 1 mW) (6)
10(ZO
OUT(MIN)
OFFSET
SLOPE/DECADE
, must be
o
For example, P
for a sinusoidal input signal
INTERCEPT
expressed in terms of dBm (decibels referred to 1 mW), in a
50 Ω system is:
P
INTERCEPT
(dBm) = V
– 10 × log
INTERCEPT
(dBV)
(Zo × 1 mW) (7)
10
= +7 dBV − 10 × log
(50 × 10-3) = +20 dBm
10
Further information on the intercept variation dependence
upon waveform can be found in the AD8313 and AD8307
data sheets.
AD8318 data sheet specifications for slope and intercept
have been calculated based on a best straight line fit using
measured data in the −10 dBm to −50 dBm range (see
Figure 29).
DEVICE CALIBRATION AND ERROR CALCULATION
The measured transfer function of the AD8318 at
2.2 GHz is shown in
Figure 30. The figure shows plots of
both output voltage versus input power and calculated
error versus input power.
As the input power varies from
−65 dBm to 0 dBm, the
output voltage varies from 2 V to about 0.5 V.
V
+25°C
OUT
V
–40°C
VOUT
= SLOPE × (PIN– INTERCEPT)
IDEAL
SLOPE = (VOUT
INTERCEPT = PIN
ERROR (dB) = (VOUT
2.2
2.0
1.8
OUT
2
1.6
1.4
(V)
1.2
OUT
V
1.0
0.8
OUT
1
0.6
0.4
0.2
–65 –60 –55 –45 –40 –35 –30 –25 –20 –15 –5 0 5
– VOUT2)/(PIN1– PIN2)
1
– (VOUT1/SLOPE)
1
× VOUT
PIN
2
IDEAL
PIN (dBm)
)/SLOPE
OUT
+85°C
V
OUT
ERROR +25°C
ERROR –40°C
ERROR +85°C
1
2.5
2.0
1.5
1.0
0.5
0
–0.5
–1.0
–1.5
–2.0
INTERCEPTPIN
Figure 30. Transfer Function at 2.2 GHz
Because slope and intercept vary from device to device,
board-level calibration must be performed to achieve high
accuracy.
We can rewrite the equation for output voltage from the
previous section using an intercept expressed in dBm
ERROR (dB)
04853-030
= Slope × (PIN – Intercept) (8)
V
OUT
Rev. 0 | Page 15 of 24

AD8318
V
In general, the calibration is performed by applying two known
signal levels to the AD8318’s input and measuring the
corresponding output voltages. The calibration points are
generally chosen to be within the linear-in-dB operating range of
the device (see Figure 30). Calculation of slope and intercept is
done using the equations
Slope = (V
Intercept = P
OUT1
IN1
− V
− V
)/(P
– P
OUT2
IN1
/Slope (10)
OUT1
) (9)
IN2
Once Slope and Intercept have been calculated, an equation can
be written which will allow calculation of an (unknown) input
power based on the output voltage of the detector.
(unknown) = V
P
IN
(measured)/Slope + Intercept (11)
OUT
Using the equation for the ideal output voltage (7) as a reference,
the log conformance error of the measured data can be
calculated:
Error(dB) = (V
OUT(MEASURED)
− V
OUT(IDEAL)
)/Slope (12)
Figure 30 includes a plot of the error at 25°C, the temperature at
which the log amp is calibrated. Note that the error is not zero.
This is because the log amp does not perfectly follow the ideal
versus PIN equation, even within its operating region. The
V
OUT
error at the calibration points (−12 dBm and −52 dBm in this
case) will, however, be equal to zero by definition.
Figure 30 also includes error plots for the output voltage at
−40°C and +85 °C. These error plots are calculated using the
slope and intercept at 25°C. This is consistent with calibration in
a mass-production environment where calibration at
temperature is not practical.
SELECTING CALIBRATION POINTS TO IMPROVE ACCURACY OVER A REDUCED RANGE
In some applications very high accuracy is required at just one
power level or over a reduced input range. For example, in a
wireless transmitter, the accuracy of the high power amplifier
(HPA) will be most critical at or close to full power.
Figure 31 shows the same measured data as Figure 30. Notice
that accuracy is very high from −10 dBm to −30 dBm. Below
−30 dBm the error increases to about −1 dB. This is because the
calibration points have been changed to −14 dBm and −26 dBm.
–40°C
2
ERROR +25°C
ERROR –40°C
ERROR +85°C
PIN
1
2.5
2.0
1.5
1.0
0.5
0
–0.5
–1.0
–1.5
–2.0
–2.5
VOUT
VOUT
+25°C
OUT
V
OUT
V
+85°C
2.2
2.0
1.8
1.6
1.4
(V)
1.2
OUT
2
V
1.0
1
0.6
0.4
0.2
–65 –60 –55 –45 –40 –35 –30 –20 –10 –5 0 5
OUT
PIN (dBm)
PIN
Figure 31. Output Voltage and Error vs. PIN with 2-Point Calibration at
–10 dBm and –30 dBm
Calibration points should be chosen to suit the application
at hand. In general, though, the calibration points should
never be chosen in the nonlinear portion of the log amp’s
transfer function (above −5 dBm or below −60 dBm in this
case).
Figure 32 shows how calibration points can be adjusted to
increase dynamic range, but at the expense of linearity. In
this case the calibration points for slope and intercept are set
at −4 dBm and −60 dBm. These points are at the end of the
device’s linear range. Once again at 25°C, we see an error of
0 dB at the calibration points. Note also that the range over
which the AD8318 maintains an error of < ±1 dB is
extended to 60 dB at 25°C and 58 dB over temperature. The
disadvantage of this approach is that linearity suffers,
especially at the top end of the input range.
2.2
2.0
1.8
1.6
1.4
(V)
1.2
OUT
V
1.0
0.8
0.6
0.4
0.2
–65 –60 –55 –50 –45 –40 –35 –30 –25 –20 –15 –10 –5 0 5
V
+25°C
OUT
V
–40°C
OUT
V
+85°C
OUT
58dB DYNAMIC RANGE (±1dB ERROR)
PIN (dBm)
ERROR +25°C
ERROR –40°C
ERROR +85°C
Figure 32. Dynamic Range Extension by Choosing Calibration Points
that are Close to the End of the Linear Range
2.5
2.0
1.5
1.0
0.5
0
–0.5
–1.0
–1.5
–2.0
–2.5
ERROR (dB)
04853-031
ERROR (dB)
04853-038
Another way of presenting the error function of a log amp
detector is shown in Figure 33. In this case, the dB error at
hot and cold temperatures is calculated with respect to the
Rev. 0 | Page 16 of 24

AD8318
output voltage at ambient. This is a key difference in comparison
to the previous plots. Up to now, all errors have been calculated
with respect to the ideal transfer function at ambient.
When we use this alternative technique, the error at ambient
becomes by definition equal to 0 (see Figure 33)
.
This would be valid if the device transfer function perfectly
followed the ideal V
= Slope × (Pin-Intercept) equation.
OUT
However since a log amp in practice will never perfectly follow
this equation (especially outside of its linear operating range),
this plot tends to artificially improve linearity and extend the
dynamic range. This plot is a useful tool for estimating
temperature drift at a particular power level with respect to the
(non-ideal) output voltage at ambient. However, to achieve this
level of accuracy in an end application would require calibration
at multiple points in the device’s operating range.
2.2
2.0
1.8
1.6
1.4
(V)
1.2
OUT
V
1.0
0.8
0.6
0.4
0.2
–65 –60 –55 –50 –45 –40 –35 –30 –25 –20 –15 –10 –5 0 5
V
+25°C
OUT
V
–40°C
OUT
+85°C
V
OUT
ERROR +25°C wrt V
ERROR –40°C wrt V
ERROR +85°C wrt V
PIN (dBm)
OUT
OUT
OUT
Figure 33. Error vs. Temperature with respect to Output Voltage at 25 °C Does
Not Take into Account Transfer Functions’ Nonlinearities at 25°C
2.5
2.0
1.5
1.0
0.5
0
–0.5
–1.0
–1.5
–2.0
–2.5
ERROR (dB)
04853-032
VARIATION IN TEMPERATURE DRIFT FROM DEVICE TO DEVICE
Figure 34 shows a plot of output voltage and error for multiple
AD8318 devices, measured in this case at 5.8 GHz. The
concentration of black error plots represents the performance
of the population at 25°C (slope and intercept has been
calculated for each device). The red and blue plots of error
indicate the measured behavior of a population of devices over
temperature. This suggests a range on the drift (from device to
device) of 1.2 dB.
2.2
2.0
1.8
1.6
1.4
(V)
1.2
OUT
V
1.0
0.8
0.6
0.4
0.2
–65 –55 –45 –35 –25 –15 –5 5 15
PIN (dBm)
2.0
1.6
1.2
0.8
0.4
0
–0.4
–0.8
–1.2
–1.6
–2.0
Figure 34. Output Voltage and Error vs. Temperature (+25°C, –40°C, and
+85°C) of a Population of Devices Measured at 5.8 GHz
TEMPERATURE DRIFT AT DIFFERENT TEMPERATURES
Figure 35 shows the log slope and error over temperature
for a 5.8 GHz input signal. Error due to drift over
temperature consistently remains within ±0.5 dB, and only
begins to exceed this limit when the ambient temperature
drops below −20°C. For all frequencies when using a
reduced temperature range higher measurement accuracy is
achievable.
VAPC +25°C
VAPC 0°C
ERROR –10°C
ERROR +70°C
2.2
2.0
1.8
1.6
1.4
1.2
OUT
V (V)
1.0
0.8
0.6
0.4
0.2
–65 –60 –55 –50 –45 –40 –35 –30 –25 –20 –15 –10 –5 0 5
Figure 35. Typical Drift at 5.8 GHz for Various Temperatures
VAPC –40°C
VAPC +70°C
ERROR –20°C
VAPC –10°C
ERROR –40°C
PIN (dBm)
VAPC +85°C
ERROR +25°C
ERROR 0°C
VAPC –20°C
ERROR +85°C
2.5
2.0
1.5
1.0
0.5
0
–0.5
–1.0
–1.5
–2.0
–2.5
SETTING THE OUTPUT SLOPE IN MEASUREMENT MODE
To operate in measurement mode, VOUT must be
connected to VSET. This yields the nominal logarithmic
slope of approximately −25 mV/dB. The output swing
corresponding to the specified input range will then be
approximately 0.5 V to 2.1 V. The slope and output swing
ERROR (dB)
04853-050
ERROR (dB)
04853-039
Rev. 0 | Page 17 of 24

AD8318
can be increased by placing a resistor divider between VOUT
and VSET (i.e., one resistor from VOUT to VSET and one
resistor from VSET to common). For example, if two equal
resistors are used (e.g., 10 kΩ/10 kΩ), the slope will double to
approximately −50 mV/dB. The input impedance of VSET is
approximately 500 kΩ. Slope setting resistors should be kept
below ~50 kΩ to prevent this input impedance from affecting
the resulting slope. When increasing the slope, the new output
voltage range cannot exceed the output voltage swing capability
of the output stage. Refer to the Measurement Mode section of
the data sheet.
AD8318
VOUT
VSET
Figure 36. Increasing the Slope
RESPONSE TIME CAPABILITY
The AD8318 has a 10 ns rise/fall time capability (10% – 90%) for
input power switching between the noise floor and
0 dBm. This capability enables RF burst measurements at
repetition rates to beyond 60 MHz. In most measurement
applications, the AD8318 will have an external capacitor
connected to CLPF to provide additional filtering for VOUT.
However, the use of the CLPF capacitor slows the response time
as does stray capacitance on VOUT. For an application requiring
maximum RF burst detection capability, the CLPF capacitor pin
should be left unconnected. In this case, the integration function
is provided by the 700 fF on-chip capacitor.
There is a 10 Ω internal resistor in series with the output driver,
an external 40 Ω back-terminating resistor should be added in
series at the output when driving a 50 Ω coaxial cable. The backterminating resistor should be placed close to the VOUT pin.
The AD8318 has the drive capability to drive a 50 Ω load at the
end of the coaxial cable or transmission line when back
terminated. See Figure 37.
The circuit diagram in Figure 37 shows the AD8318 used with a
high speed comparator circuit. The 40 Ω series resistor at the
output of the AD8318 combines with an internal 10 Ω to
properly match to the 50 Ω input of the comparator.
V
REF
40Ω
50Ω 50Ω
= 1.8V–1.2V
AD8318
OUTPUT
52.3Ω
INHI
AD8318
INLO
+5V
VPOS
GND
VOUT
VSET
PULSED RF
INPUT
1nF
1nF
Figure 37. AD8318 Operating with the High Speed ADCMP563 Comparator
10kΩ
10kΩ
+5V
ADCMP563
100Ω 100Ω
–5.2V
50mV/dB
–5.2V
50Ω
50Ω
04853-033
COMPARATOR
OUTPUT
04853-040
PULSED RF
INPUT
AD8318
OUTPUT
COMPARATOR
OUTPUT
0 100 200 300 400 500 600 700 800
–50dB –30dB –20dB –10dB
TIME (ns)
Figure 38. Pulse Response of AD8318 and Comparator for RF Pulses of
Varying Amplitudes
Figure 38 shows the response of the AD8318 and the
comparator for a 500 MHz pulsed sine wave of varying
amplitudes. The output level of the AD8318 is the signal
strength of the input signal. For applications where these RF
bursts are very small, the output level will not change by a
large amount. Using a comparator is beneficial because it
will turn the output of the log amp into a limiter-like signal.
CONTROLLER MODE
The AD8318 provides a controller mode feature at the
VOUT pin. Using V
for the AD8318 to control subsystems, such as power
amplifiers (PAs), variable gain amplifiers (VGAs), or
variable voltage attenuators (VVAs) that have output power
that increases monotonically with respect to their gain
control signal.
To operate in controller mode, the link between VSET and
VOUT is broken. A setpoint voltage is applied to the VSET
input; VOUT is connected to the gain control terminal of
the VGA and the detector’s RF input is connected to the
output of the VGA (usually using a directional coupler and
some additional attenuation). Based on the defined
relationship between V
device is in measurement mode, the AD8318 will adjust the
voltage on VOUT (VOUT is now an error amplifier output)
until the level at the RF input corresponds to the applied
. When the AD8318 operates in controller mode, there
V
SET
is no defined relationship between V
will settle to a value that results in the correct input
V
OUT
signal level appearing at INHI/INLO.
In order for this output power control loop to be stable,
a ground-referenced capacitor must be connected to the
pin.
C
FLT
This capacitor integrates the error signal (which is actually a
current) that is present when the loop is not balanced.
for the setpoint voltage, it is possible
SET
and the RF input signal when the
OUT
SET
and V
voltage;
OUT
04853-041
Rev. 0 | Page 18 of 24

AD8318
This AGC loop is capable of controlling signals over ~45 dB
dynamic range. The output of the AD8367 is designed to
drive loads ≥ 200 Ω. As a result, it is not necessary to use the
53.6 Ω resistor at the input of the AD8318; the nominal
input impedance of 2 kΩ is sufficient. If the AD8367’s
output is to be driving a 50 Ω load, such as an oscilloscope
or spectrum analyzer, a simple resistive divider network can
be used. Note that the divider used in Figure 40 has an
insertion loss of 11.5 dB.
Figure 41 shows the transfer function of output power
versus V
voltage for a 100 MHz sine wave at −40 dBm
SET
into the AD8367.
0
–5
–10
–15
–20
–25
–30
(dBm)
–35
OUT
P
–40
–45
–50
–55
–60
0.6 0.8 1.0 1.2 1.4 1.6 1.8 2.0
V
(V)
SET
Figure 41. AD8367 Output Power vs. AD8318 Setpoint Voltage
1.2
1.0
0.8
0.6
0.4
0.2
0
–0.2
–0.4
–0.6
–0.8
–1.0
–1.2
ERROR (dB)
04853-048
In order for the AGC loop to remain locked, the AD8318
must track the envelope of the VGA’s output signal and
provide the necessary voltage levels to the AD8367’s gain
control input. Figure 42 shows an oscilloscope screenshot of
the AGC loop depicted in Figure 40. A 50 MHz sine wave
with 50% AM modulation is applied to the AD8367. The
output signal from the VGA is a constant envelope sine
wave with an amplitude corresponding to a setpoint voltage
at the AD8318 of 1.0 V.
DIRECTIONAL
COUPLER
ATTENUATOR
52.3Ω
1nF
1nF
VGA/VVA
VOUT
INHI
AD8318
INLO
CLPF
GAIN
CONTROL
VOLTAGE
VSET
C
FLT
RFIN
DAC
04853-034
Figure 39. AD8318 Controller Mode
Decreasing V
signal from the VGA, will tend to increase V
, which corresponds to demanding a higher
SET
. The gain
OUT
control voltage of the VGA must have a positive sense that is
increasing gain control voltage increases gain.
The basic connections for operating the AD8318 as an analog
controller with the AD8367 are shown in Figure 40. The AD8367
is a low frequency to 500 MHz VGA with 45 dB of dynamic
range. This configuration is very similar to the one shown in
Figure 39.
The gain of the AD8367 is controlled by the voltage applied to
the GAIN pin. This voltage, V
, is scaled linear-in-dB with a
GAIN
slope of 20 mV/dB and runs from 50 mV at –2.5 dB of gain, up
to 1.0 V at +42.5 dB.
The incoming RF signal to the AD8367 has a varying amplitude
level; receiving and demodulating it with the lowest possible
error requires that the signal levels be optimized for the highest
signal-to-noise ratio (SNR) feeding into the analog-to-digital
converters (ADC). This can be accomplished by using an
automatic gain control (AGC) loop. In Figure 40 the voltage
output of the AD8318 is used to modify the gain of the AD8367
until the incoming RF signal produces an output voltage that is
equal to the setpoint voltage V
SET
.
R2
261Ω
INPT
VSET
CLPF
GAIN
VOUT
+3V
VPOS GND
AD8367
VGA
R1
1kΩ
AD8318
GND
+5V
VPOS
INLO
INHI
VOUT
HPLF
C
100pF
R
100Ω
RF OUTPUT SIGNAL
0.1µF
174Ω
57.6Ω
HP
HP
100MHz
BANDPASS
FILTER
1nF
1nF
04853-047
RF INPUT SIGNAL
DAC
+V
SET
SETPOINT
VOLTAGE
C
FLT
100pF
Figure 40. AD8318 Operating in Controller Mode to Provide Automatic Gain
Control Functionality in Combination with the AD8367
Rev. 0 | Page 19 of 24
Figure 42. Oscilloscope Screenshot Showing an AM Modulated Input
Signal to the AD8367. The AD8318 tracks the envelope of this input
signal and applies the appropriate voltage to ensure a constant output
from the AD8367.

AD8318
The 45 dB control range is constant for the range of V
voltages. The input power levels to the AD8367 must be
optimized to achieve this range. In Figure 43 the minimum and
maximum input power levels are shown vs. setpoint voltage.
10
0
–10
–20
–30
(dBm)
–40
IN
P
–50
–60
–70
–80
0.5 0.6 0.7 0.8 0.9 1.0 1.2 1.2 1.3 1.4 1.5
MAXIMUM INPUT LEVEL
MINIMUM INPUT LEVEL
V
(V)
SET
Figure 43. Setpoint Voltage vs. Input Power. Optimal signal levels must be
used to achieve the full 45 dB dynamic range capabilities of the AD8367.
In some cases, it may be found that if V
is >1.0 V it may take
GAIN
an unusually long time for the AGC loop to recover; that is, the
output of the AD8318 will remain at an abnormally high value
and the gain will be set to its maximum level. A voltage divider is
placed between the output of the AD8318 and the AD8367’s
GAIN pin to ensure that V
In Figure 40, C
and RHP are configured to reduce oscillation
HP
will not exceed 1.0 V.
GAIN
and distortion due to harmonics at higher gain settings. Some
additional filtering is recommended between the output of the
AD8367 and the input of the AD8318. This will help to decrease
the output noise of the AD8367, which may reduce the dynamic
range of the loop at higher gain settings (smaller V
Response time and the amount of signal integration are
controlled by C
—this functionality is analogous to the
FLT
feedback capacitor around an integrating amplifier. While it is
possible to use large capacitors for C
, in most applications
FLT
values under 1 nF will provide sufficient filtering.
Calibration in controller mode is similar to the method used in
measurement mode. A simple two-point calibration can be done
by applying two known V
voltages or DAC codes and
SET
measuring the output power from the VGA. Slope and intercept
can then be calculated with the following equations.
− V
)/(P
− P
Slope = (V
Intercept = P
V
SET
SET1
SET2
OUT1
− V
OUT1
/Slope (14)
SET1
= Slope × (Px − Intercept) (15)
) (13)
OUT2
More information on AGC applications can be found in the
AD8367 Data Sheet.
SET
SET
04853-049
).
CHARACTERIZATION SETUPS AND METHODS
The general hardware configuration used for the AD8318
characterization is shown in Figure 45. The primary setup
used for characterization was measurement mode. The
characterization board is similar to the customer evaluation
board with the exception that the RFIN had a Rosenberger
SMA connector and R10 was changed to a 1 kΩ resistor to
remove cable capacitance from the bench characterization
setup. Slope and intercept were calculated using linear
regression from −50 dBm to −10 dBm. The slope and
intercept are used to generate an ideal line. Log conformance error is the difference from the ideal line and the
measured output voltage for a given temperature in dB. For
additional information on the error calculation, refer to the
Device Calibration and Error Calculation section.
The hardware configuration for pulse response measurement replaced the 0 Ω series resistor on the VOUT pin with
a 40 Ω resistor and the CLPF pin was left open. Pulse
response time was measured using a Tektronix TDS51504
Digital Phosphor Oscilloscope. Both channels on the scope
had 50 Ω termination selected. The 10 Ω internal to the
output interface and the 40 Ω series resistor attenuate the
output response by 2. RF input frequency was 100 MHz
with −10 dBm at the input of the device. The RF burst was
generated using SMT06 with the pulse option with a period
of 1.5 µS, a width of 0.1 µS, and a pulse delay of 0.04 µS. The
output response was triggered using the video out from the
SMT06. Refer to Figure 44 for an overview of the test setup.
R AND S SMT06 TEKTRONIX
VIDEO
RF OUT
OUT
–7dBm
3dB
SPLITTER
1nF
52.3Ω
1nF
INHI
AD8318
INLO
5V
VPOS
GND
VOUT
VSET
Figure 44. Pulse Response Measurement Test Setup
To measure noise spectral density, the evaluation replaced
the 0 Ω resistor in series with the VOUT pin with a 1 µF dc
blocking capacitor. The capacitor was used because the
FSEA cannot handle dc voltages at the RF input. The CLPF
pin was left open for data collected for Figure 18. For
Figure 19 a 1 µF capacitor was placed between CLPF and
ground. The large capacitor filtered the noise from the
detector stages of the log amp. Noise spectral density
measurements were made using R&S spectrum analyzer
FSEA and R&S SMT06 signal generator. The signal
generator’s frequency was set to 2.2 GHz. The spectrum
analyzer had a span of 10 Hz, resolution bandwidth of
50 Hz, video bandwidth of 50 Hz, and averaged the signal
100 times. Data was adjusted to account for the dc blocking
capacitor impedance on the output at lower frequencies.
CH1* CH3* TRIGGER
40Ω
TDS51504
*50Ω
TERMINATION
04853-046
Rev. 0 | Page 20 of 24

AD8318
EVALUATION BOARD
Table 6. Evaluation Board (Rev A) Configuration Options
Component Function Default Conditions
TP1, TP2 Supply and Ground Connections Not Applicable
SW1
R1, C1, C2
R2
C4
R7, R8, R9, R10
R7, R8, R9, R10
C5, C6, C7, C8, R5,
R6
C9
Device Enable: When in position A, the ENBL pin is connected to VP and the
AD8318 is in operating mode. In position B, the ENBL pin is grounded
through R3, putting the device in power-down mode. The ENBL pin may be
exercised by a pulse generator connected to J3 with SW1 in position B.
Input Interface: The 52.3 Ω resistor in position R1 combines with the
AD8318's internal input impedance to give a broadband input impedance
of around 50 Ω. Capacitors C1 and C2 are DC blocking capacitors. A reactive
impedance match can be implemented by replacing R1 with an inductor
and C1 and C2 with appropriately-valued capacitors .
Temperature Sensor Interface: The temperature sensor output voltage is
available at J1, via the current limiting resistor, R2.
Temperature Compensation Interface: The internal temperature
compensation resistor is optimized for an input signal of 2.2 GHz when C4 is
1 kΩ. This circuit can be adjusted to optimize performance for other input
frequencies by changing the value of the resistor in position C4. Note that
the designation C4 on the evaluation board is a typographical error as this
pad will always be populated with a resistor. This error will be corrected on
the Rev B revision of the board.
Output Interface—Measurement Mode: In measurement mode, a portion of
the output voltage is fed back to pin VSET via R7. The magnitude of the
slope of the VOUT output voltage response may be increased by reducing
the portion of VOUT that is fed back to VSET. R10 can be used as a backterminating resistor or as part of a single-pole low-pass filter.
Output Interface—Controller Mode: In this mode, R7 must be open. In
controller mode, the AD8318 can control the gain of an external
component. A setpoint voltage is applied to pin VSET, the value of which
corresponds to the desired RF input signal level applied to the AD8318 RF
input. A sample of the RF output signal from this variable-gain component is
selected, typically via a directional coupler, and applied to AD8318 RF input.
The voltage at pin VOUT is applied to the gain control of the variable gain
element. A control voltage is applied to pin VSET via R9 and R8. The
magnitude of the control voltage may optionally be attenuated via the
voltage divider comprised of R8 and R9, or a capacitor may be installed in
position R8 to form a low-pass filter along with R9.
Power Supply Decoupling: The nominal supply decoupling consists of a
100 pF filter capacitor placed physically close to the AD8318, a 0 Ω series
resistor and a 0.1 µF capacitor placed nearer to the power supply input pin.
Filter Capacitor: The low-pass corner frequency of the circuit that drives pin
VOUT can be lowered by placing a capacitor between CLPF and ground.
SW1 = A
R3 = 10k (Size 0603)
R1 = 52.3 Ω (Size 0402)
C1 = 1 nF (Size 0402)
C2 = 1 nF (Size 0402)
C4 = 500 kΩ (Size 0603)
R7 = 0 Ω = (Size 0402)
R8 = open (Size 0402)
R9 = open (Size 0402
R10= 0 Ω (Size 0402)
R7 = open (Size 0402)
R8 = open (Size 0402)
R9 = 0 Ω (Size 0402)
R10 = 0 Ω (Size 0402)
C6 = 100 pF (Size 0402)
C7 = 100 pF (Size 0402)
C5 = 0.1 µF (Size 0603)
C8 = 0.1 µF (Size 0603)
R5 = 0 Ω (Size 0603)
R6 = 0 Ω (Size 0603)
C4 = open (Size 0603)
Rev. 0| Page 21 of 24

AD8318
V
S
C5
R5
0.1µF
0Ω
C6
100pF
8
CMOP
7
VSET
6
VOUT
5
CLPF
C7
100pF
C8
0.1µF
V
S
OPEN
C9
OPEN
R8
J5
R7
R9
0Ω
OPEN
R10
0Ω
VSET
J4
VOUT
04853-035
TEMP
INHI
ENBL
C4
499Ω
(SEE TEXT)
12
R2
10kΩ
52.3Ω
R3
1kΩ
SW1
C1 1nF
C2 1nF
V
S
R1
J1
J2
J3
CMIP11CMIP10TADJ9VPSO
13
TEMP
14
INHI
15
16
AD8318
INLO
ENBL
CMIP2CMIP3VPSI4VPSI
1
R6
TP1
TP2
GND
VP
0Ω
Figure 45. Evaluation Board Schematic (Rev A)
04853-037
Figure 46. Component Side Layout
04853-036
Figure 47. Component Side Silkscreen
Rev. 0 | Page 22 of 24

AD8318
R
R
OUTLINE DIMENSIONS
4.0
PIN 1
INDICATO
1.00
0.85
0.80
12° MAX
SEATING
PLANE
BSC SQ
TOP
VIEW
0.80 MAX
0.65 TYP
COMPLIANT TO JEDEC STANDARDS MO-220-VGGC
0.35
0.28
0.25
3.75
BSC SQ
0.20 REF
0.60 MAX
0.65 BSC
0.05 MAX
0.02 NOM
0.75
0.60
0.50
COPLANARITY
0.08
Figure 48. 16-Lead Lead Frame Chip Scale Package [LFCSP]
(CP-16)
Dimensions shown in millimeters
0.60 MAX
13
12
EXPOSED
PAD
(BOTTOM VIEW)
9
8
16
1
4
5
1.95 BSC
PIN 1
INDICATO
2.25
2.10 SQ
1.95
0.25 MIN
ORDERING GUIDE
AD8318 Products Temperature Package Package Description Package Outline Ordering Qnty.
AD8318ACPZ-REEL71–40°C to +85°C 16-Lead LFCSP CP-16 1500
AD8318ACPZ-WP
AD8318-EVAL Evaluation Board
1
Z = Pb-free part.
2
WP = Waffle Pack.
1, 2
–40°C to +85°C 16-Lead LFCSP CP-16 64
Rev. 0| Page 23 of 24

AD8318
NOTES
© 2004 Analog Devices, Inc. All rights reserved. Trademarks and
registered trademarks are the property of their respective owners.
D04853–0–7/04(0)
Rev. 0 | Page 24 of 24
 Loading...