


User’s Guide
High Power Wireless-300N Smart Repeater
SR300

SR300 USER’S GUIDE
CONTENTS |
|
INTRODUCTION ........................................................... |
2 |
GETTING STARTED....................................................... |
3 |
Package Contents ........................................................... |
3 |
LED Indicators ................................................................. |
4 |
Back Panel Description ................................................... |
5 |
SETUP GUIDE............................................................... |
6 |
Find a Setup Location...................................................... |
6 |
Connect to the Smart Repeater ...................................... |
7 |
Open your Web Browser.............................................. |
8 |
Welcome to the Smart Setup Wizard........................... |
9 |
Scan for a Wireless Network ...................................... |
10 |
Connecting to a Secure Network................................ |
11 |
Repeater Settings (SSID)............................................. |
12 |
Repeater Settings (Security)....................................... |
13 |
Setup Summary.......................................................... |
14 |
WIRELESS SETTINGS................................................... |
16 |
Home Network Settings ............................................. |
16 |
Extended Network Settings........................................ |
17 |
Wireless Security........................................................ |
21 |
Wi-Fi Protected Setup (WPS)...................................... |
20 |
Advanced Settings...................................................... |
21 |
SMART FEATURES ...................................................... |
22 |
Wireless Settings: Access Schedule ............................ |
23 |
User Access Control:................................................... |
24 |
Wireless Coverage Controls: ...................................... |
25 |
IP SETTINGS ............................................................... |
26 |
MANAGEMENT FEATURES ......................................... |
28 |
Management: System Clock....................................... |
29 |
Management: Upgrade Firmware.............................. |
29 |
Management: Save and Reload Settings.................... |
31 |
Management: Password Settings............................... |
32 |
TECHNICAL SPECIFICATIONS....................................... |
33 |
DEFAULT SETTINGS .................................................... |
34 |
TROUBLESHOOTING AND SUPPORT INFORMATION ... |
35 |
WARRANTY INFORMATION........................................ |
44 |
1

SR300 USER’S GUIDE
INTRODUCTION
Thank you for purchasing this Amped Wireless product. At Amped Wireless we strive to provide you with the highest quality products through innovation and advanced technology. We pride ourselves on delivering products that outperform the competition and go beyond your expectations. If you have any questions please feel free to contact us. We’d love to hear from you and thank you for your support!
Email: sales@ampedwireless.com
Call: 888-573-8830
Web: www.ampedwireless.com
2

SR300 USER’S GUIDE
GETTING STARTED
Package Contents
Check to make sure you have all the contents within your package:
High Power Wireless Smart Repeater
Ethernet Cable
Power Supply
Repeater Stand
CD with Users Guide
Two High Gain 3dBi Antennas
Setup Guide
3
SR300 USER’S GUIDE
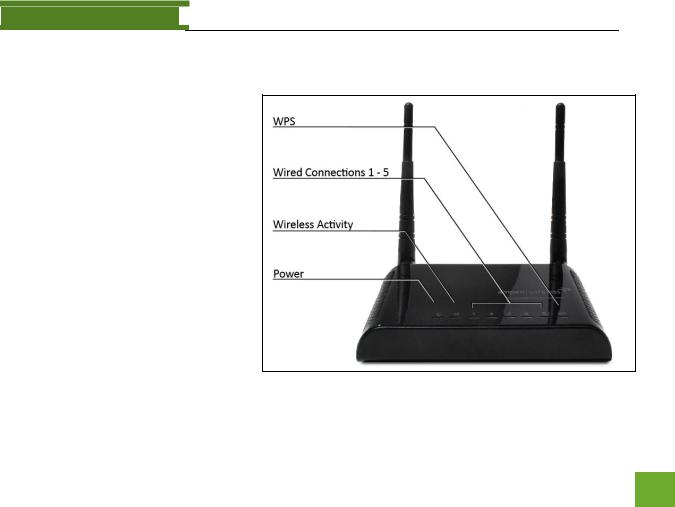
LED Indicators
WPS: Wi-Fi Protected Setup activity. When the WPS mode is activated the WPS LED blinks as it awaits a connection.
Wired Connections: Shows the connection status and data activity of each wired LAN port.
Wireless Activity: Blinks rapidly when wireless data traffic is passing through the Smart Repeater. When there is a problem with the Wi-Fi connection this LED will remain off or blink steadily.
Power: When lit, the power is on.
4

SR300 USER’S GUIDE
Back Panel Description
Antenna Connectors: RJ-SMA antenna connectors. Compatible with all antennas with RP-SMA connectors. Upgradable to high gain antennas for more range.
Reset: Push down once to reboot the Smart Repeater. Hold down for 5-10 seconds to reset the device back to factory settings.
WPS: Hold down for 3 seconds to enable
WPS push button configuration.
Wired Connections: RJ-45 ports for
connecting to wired computers or network devices. Supports up to 5 connections.
Power: Power adapter port. DC 12V 1A.
5

SR300 USER’S GUIDE
SETUP GUIDE
Find a Setup Location
The location of where you install the Smart Repeater is very important to how it will function. The optimal setup location should be halfway between your wireless router and your wireless dead zone.
6

SR300 USER’S GUIDE
Connect your PC to the Smart Repeater
a.Connect the power adapter to the power port on the back of the Smart Repeater
b.Connect the two included high gain antennas by screwing them into the antenna connectors
c.Use the included Ethernet cable to connect one end into any LAN port on the Smart Repeater and use the other end to connect to the network port on your laptop or desktop computer.
Do NOT attempt to connect to the Smart Repeater with a wireless connection at this time.
7
SR300 USER’S GUIDE
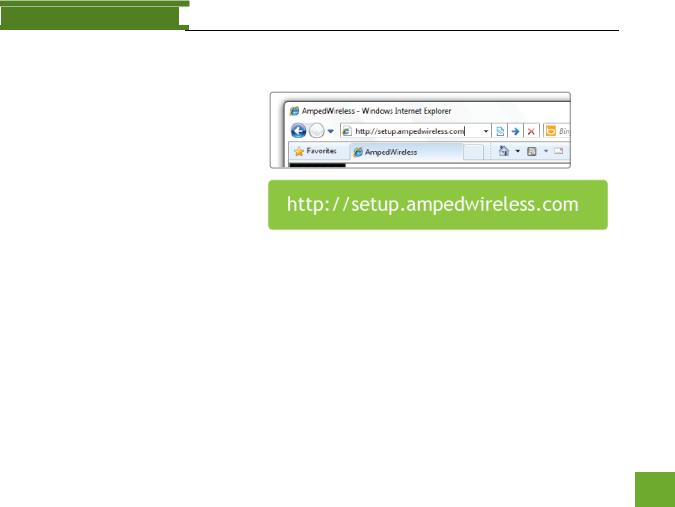
Open your Web Browser to Access the Setup Wizard
a.Open your web browser
b.Type in: http://setup.ampedwireless.com into the web address bar
c.If the web menu fails to open type in the following IP address into your web address bar: http://192.168.1.240
8
SR300 USER’S GUIDE
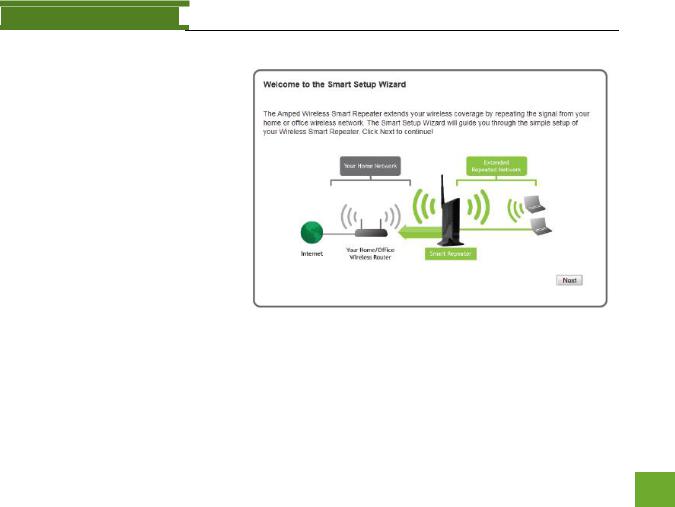
Welcome to the Smart Setup Wizard
When the web menu appears, click Next to continue to the next page.
The diagram on this page displays the terms used to describe:
1)The network you are trying to repeat (Home Network)
2)The network that is rebroadcasted and extended (Extended Network)
Study this diagram carefully as the terms used in the following instructions will refer to these names.
9
SR300 USER’S GUIDE
Scan for a Wireless Network
Click SCAN to begin searching for available wireless networks to repeat.
Highlight your network and click Next to continue.
If you fail to find any wireless networks, the Smart Repeater may be placed too far from the wireless network that you are trying to repeat. Move your Smart Repeater closer to the wireless network that you are trying to repeat and click SCAN again.
The Scan results page will display information regarding the name of the network (SSID), the channel which the wireless network is operating on and the type of network that it is. AP stands for Access Point and is the standard type of wireless
network. The results page will also display whether or not your network has security and what the signal strength is coming from each specific network detected.
10
SR300 USER’S GUIDE
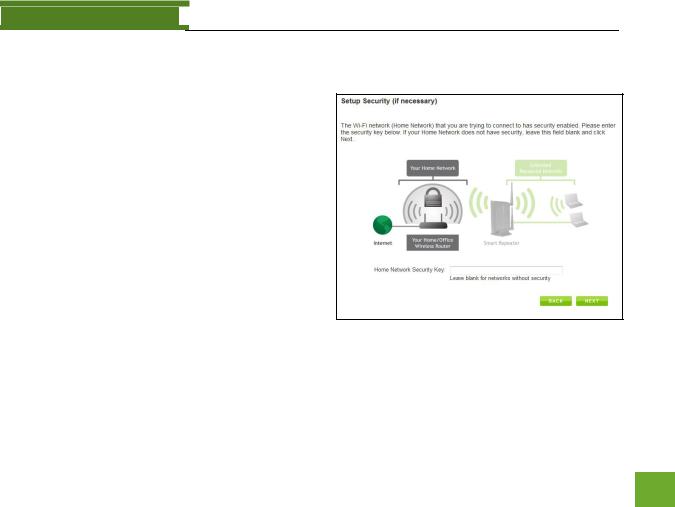
Connecting to a Secure Network
If the wireless network you are trying to repeat has wireless security enabled, you will be prompted to enter a security key. If you did not select a secure network, continue to the next step.
Enter the security key in the space provided. You do not need to select what type of security it is, just simply type in the key and click Next.
The Smart Setup Wizard will automatically take care of the rest. If the key you entered is incorrect it will prompt you to enter the key again. If you do not know the key to the network you are trying to repeat, then click Back and select another network.
11
SR300 USER’S GUIDE
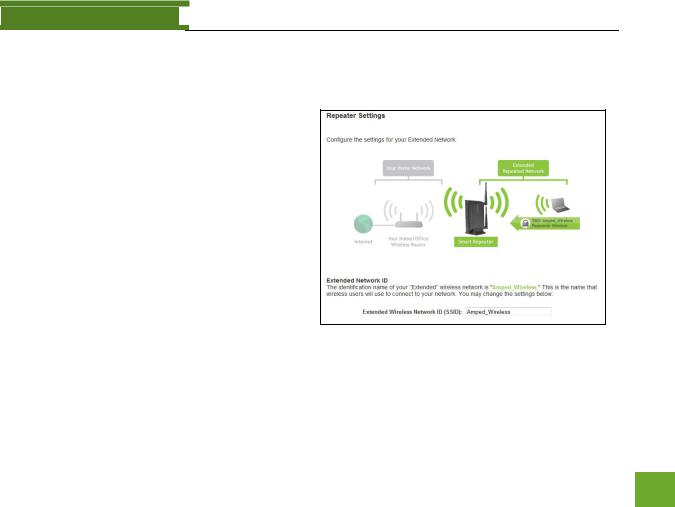
Repeater Settings (SSID)
The default SSID of the Smart Repeater is “Amped_Wireless”
This SSID for the Extended Network may be changed by adjusting the name in the field for the Extended Wireless Network ID.
This ID will be used by wireless users connecting to the Smart Repeater to identify the Smart Repeater’s Extended Network.
It is recommended to use the default settings.
12

SR300 USER’S GUIDE
Repeater Settings (Security)
By default, the Extended Network has security enabled. The WPA security key is
“wireless.” Users trying to connect to the
Smart Repeater wirelessly will be prompted to enter this key.
It is recommended that you use the default settings for the wireless security key.
To change the security key, simply retype your new key in the field and click Next. Write your security key down somewhere safe for future reference.
No security key is necessary for computers connecting to the Smart Repeater using a wired connection to the LAN ports.
After clicking Next, the Smart Repeater will reboot and apply your settings. Be patient and do not make any changes or adjustments to the Smart Repeater at this time.
13
SR300 USER’S GUIDE
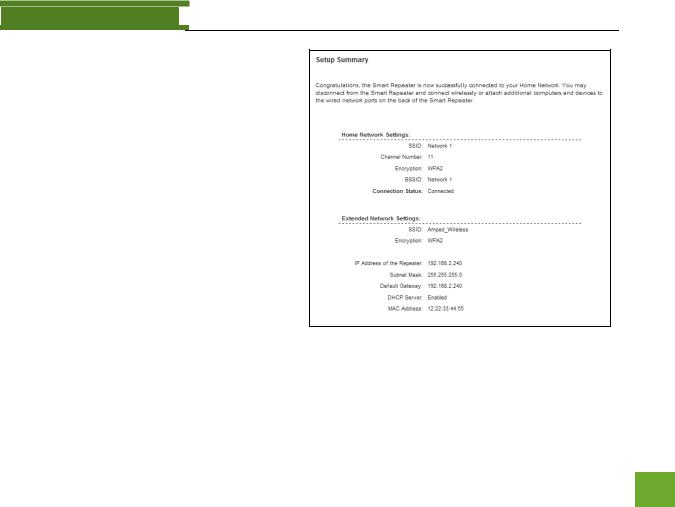
Setup Summary
Once the Smart Repeater has rebooted, It will load the Setup Summary page and provide you with the details of your setup.
At this time, you may disconnect from the Smart Repeater start a wireless connection.
If you have any wired devices that you would like to attach to the Smart Repeater you may do so now as well.
Enjoy your Extended network.
14

SR300 USER’S GUIDE
If the Home Network connection fails try the following…
a.Check to see that your Home Network security settings are correct.
b.Check that your Home Network router’s DHCP server is enabled.
c.Try changing the channel of the Home Network router to a higher channel number (5-11) and run the Setup Wizard again.
d.If possible, check the Internet connection for your Home Network wireless router. Connect directly to your Home Network wireless router. If you are unable to access the internet through the Home Network wireless router you must first fix this problem. The Smart Repeater will not be able to obtain internet access through a router that does not have internet access. Once Internet access is restored, connect to the Smart Repeater again and retry the Smart Setup Wizard.
e.Return to the Smart Setup Wizard and attempt to connect to another Home Network known to have Internet access.
f.Try to reboot (unplug the power from the Smart Repeater and plug it back in) the Smart Repeater and check to see if the connection is established (some networks may be very slow and take longer than the allotted time for the Smart Repeater to successfully connect).
15
 Loading...