


®
©AMERIPHONE products are manufactured by Walker, A Division of Plantronics, Inc. 12082 Western Avenue, Garden Grove, CA 92841
(800) 874-3005 VOICE • (800) 772-2889 TTY/TDD • (714) 897-4703 FAX email: ameriphonecs@plantronics.com website: www.ameriphone.com

E
® N
G
L
AM I
S
H
ALERTMASTER™ AM-6000
The All-In-One Wireless Notification System
E
S
P
A
Ñ
O
L
Users’ Guide
F
R
A N
Ç
A
I
S
M06299 |
AM6000 5220-0761 ∆A |
4/03 |

Instrucciones de seguridad Contents
importantespara el usuario
IMPORTANT SAFETY INSTRUCTIONS ...................................................... |
1 |
INTRODUCTION . . . . . . . . . . . . . . . . . . . . . . . . . . . . . . . . . . . . . . . . . . . 4
PACKAGE CHECKLIST . . . . . . . . . . . . . . . . . . . . . . . . . . . . . . . . . . . . . . . .5
FEATURES IDENTIFICATION . . . . . . . . . . . . . . . . . . . . . . . . . . . . . . . . . . . .6
INSTALLATION AND SET UP . . . . . . . . . . . . . . . . . . . . . . . . . . . . . . . . . . . .7
A.Base unit . . . . . . . . . . . . . . . . . . . . . . . . . . . . . . . . . . . . . . . . .7 B.Doorbell . . . . . . . . . . . . . . . . . . . . . . . . . . . . . . . . . . . . . . . . . .8 C.Clock . . . . . . . . . . . . . . . . . . . . . . . . . . . . . . . . . . . . . . . . . . . .8
OPERATIONS . . . . . . . . . . . . . . . . . . . . . . . . . . . . . . . . . . . . . . . . . . . . .8
A.Monitoring functions . . . . . . . . . . . . . . . . . . . . . . . . . . . . . . . . . .8 B.Master Reset . . . . . . . . . . . . . . . . . . . . . . . . . . . . . . . . . . . . . .11 C.Notification Priority . . . . . . . . . . . . . . . . . . . . . . . . . . . . . . . . .11 D.Security Timer . . . . . . . . . . . . . . . . . . . . . . . . . . . . . . . . . . . . .11 E.Battery . . . . . . . . . . . . . . . . . . . . . . . . . . . . . . . . . . . . . . . . . .12
OPTIONAL ACCESSORIES . . . . . . . . . . . . . . . . . . . . . . . . . . . . . . . . . . . |
.14 |
A.Remote Receiver . . . . . . . . . . . . . . . . . . . . . . . . . . . . . . . . . . . |
14 |
B.Personal Signaler . . . . . . . . . . . . . . . . . . . . . . . . . . . . . . . . . . . |
14 |
C.Personal Tactile Signaler . . . . . . . . . . . . . . . . . . . . . . . . . . . . . . |
14 |
D.Audio Alarm Transmitter . . . . . . . . . . . . . . . . . . . . . . . . . . . . . . |
14 |
E. Baby Sound Monitor . . . . . . . . . . . . . . . . . . . . . . . . . . . . . . . . |
14 |
F. Door Announcer . . . . . . . . . . . . . . . . . . . . . . . . . . . . . . . . . . . |
15 |
IN CASE OF DIFFICULTY . . . . . . . . . . . . . . . . . . . . . . . . . . . . . . . . . . . . . |
16 |
A.Channel Setting . . . . . . . . . . . . . . . . . . . . . . . . . . . . . . . . . . . . |
17 |
REGULATORY COMPLIANCE . . . . . . . . . . . . . . . . . . . . . . . . . . . . . . . . . . .18
UK STATUTORY INFORMATION . . . . . . . . . . . . . . . . . . . . . . . . . . . . . . . . .24
WARRANTY . . . . . . . . . . . . . . . . . . . . . . . . . . . . . . . . . . . . . . . . . . . . .27
INDEX . . . . . . . . . . . . . . . . . . . . . . . . . . . . . . . . . . . . . . . . . . . . . . . .28

Important Safety
Instructions
When using your telephone |
8.Do not cover the slots and |
equipment, basic safety precautions |
openings on this product. |
should always be followed to |
This telephone should never |
reduce the risk of fire, electric |
be placed near or over a |
shock and persons including the |
radiator or heat register. This |
following: |
product should not be |
1.Read and understand all |
placed in a built-in installation |
instructions. |
unless proper ventilation is |
2.Follow all warnings and |
provided. |
instructions marked on the |
9.Operate this product using |
AM6000. |
the electrical voltage as |
3.Do not use this product |
stated on the base unit or the |
near a bathtub, wash basin, |
owner’s manual. If you are |
kitchen sink or laundry tub, in |
not sure of the voltage in your |
a wet basement, near a |
home, consult your dealer or |
swimming pool or anywhere |
local power company. |
else there is water. |
10. Do not place anything on |
4.Avoid using a telephone |
the power cord. Install the |
(other than a cordless type) |
telephone where no one will |
during a storm. There may be |
step or trip on the cord. |
a remote risk of electrical |
11. Do not overload wall outlets |
shock from lightning. |
or extension cords as this |
5.Do not use a telephone to |
can increase the risk of fire or |
report a gas leak in the |
electrical shock. |
vicinity of the leak. |
12. Never push any objects |
6.Unplug this product from |
through the slots in the |
the wall outlets before |
AM6000. They can touch |
cleaning. Do not use liquid |
dangerous voltage points or |
cleaners or aerosol cleaners |
short out parts that could |
on the AM6000. Use a damp |
result in a risk of fire or |
cloth for cleaning. |
electrical shock. Never spill |
7.Place this product on a |
liquid of any kind on the |
stable surface. Serious damage |
product. |
and/or injury may result if the |
13. To reduce the risk of electrical |
AM6000 falls. |
shock, do not take this phone 1 |
E
N G L I S H

InstruccionesImportant Safetyde seguridad importantesparaInstructions el usuario
apart. Opening or removing covers may expose you to dangerous voltages or other risks. Incorrect reassembly can cause electric shock when the appliance is subsequently used.
14. Unplug this product from the wall outlets and refer servicing to the manufacturer under the following conditions:
A. When the power supply cord or plug is frayed or damaged.
B. If liquid has been spilled into the product.
C. If the product has been exposed to rain or water.
D. If the product does not operate normally by following the operating instructions. Adjust only those controls that are covered by the operating instructions. Improper adjustment may require extensive work by a qualified technician to restore the product to normal operation.
E. If the product has been dropped or the case has been damaged.
F. If the product exhibits a
distinct change in performance.
2
15.Never install product wiring during a lightning storm.
16.Never install telephone jacks in wet locations unless the jack is specifically designed for wet locations.
17.Never touch uninsulated telephone wires or terminals unless the telephone line has been disconnected at the network interface.
18.Use caution when installing or modifying telephone lines.
19.Use only the power cord and batteries indicated in this manual. Do not dispose of batteries in a fire. They may explode. Check with local codes for possible special disposal instructions.
ADDITIONAL SAFETY NOTES FOR CANADIAN USERS
The following items are included as part of the CS-03 Requirements. The standard connecting arrangement for the equipment is CA11A. This product meets the applicable Industry Canada technical specifications.
NOTICE: The Canadian
Department of Communications

InstruccionesImportant Safetyde seguridad importantesparaInstructions el usuario
label identifies certified equipment. This certification means that the equipment meets certain telecommunications network protective operational and safety requirements. The Department does not guarantee that the equipment will operate to the user’s satisfaction. Before installing this equipment, users should ensure that it is permissible to be connected to the facilities of the local telecommunications company. The equipment must also be installed using an acceptable method of connection. In some cases, the company’s inside wiring associated with a single line individual service may be extended by means of a certified connector assembly (telephone extension cord). The customer should be aware that compliance with the above conditions may not prevent degradation of service in some situations. Repairs to certified equipment should be made by an authorized Canadian maintenance facility designated by the supplier. Any repairs or alterations made by the user to this equipment, or equipment malfunctions, may give the telecommunications company cause to request the user disconnect the equipment.
|
|
E |
|
|
N |
|
|
G |
Users should ensure for their own |
|
L |
protection that the electrical |
|
I |
ground connections of the power |
|
S |
utility, telephone lines and internal |
|
H |
metallic water pipe system, if |
|
|
present, are connected together. |
|
|
This precaution may be particularly |
|
|
important in rural areas. |
|
|
CAUTION: Users should not |
|
|
attempt to make such connections |
|
|
themselves, but should contact the |
|
|
appropriate electric inspection |
|
|
authority, or electrician, as |
|
|
appropriate. The Ringer Equivalent |
|
|
Number is an indication of the |
|
|
maximum number of terminals |
|
|
allowed to be connected to a |
|
|
telephone interface. The |
|
|
termination on an interface may |
|
|
consist of any combination of |
|
|
devices subject only to the |
|
|
requirement that the sum of the |
|
|
Ringer Equivalent Number of all |
|
|
the devices not exceed five. |
|
|
SAVE THESE INSTRUCTIONS
3

Instrucciones de seguridad INTRODUCTION importantespara el usuario
Thank you for selecting the exciting new ALERTMASTER AM-6000 from AMERIPHONE. It has been designed to meet the highest quality standards to provide you with years of convenient and trouble-free service.
Please read these operating instructions thoroughly before using your notification system. Keep this manual for future
reference.
You must save your sales receipt as proof of purchase in the event that you need warranty service.
If you have any questions about your Alertmaster AM-6000, please call your authorized dealer or our Customer Service Department at: 800-874-3005
E-mail: ameriphonecs@plantronics.com
Website: www.ameriphone.com
4
Instrucciones de seguridad PACKAGE CHECKLIST importantespara el usuario
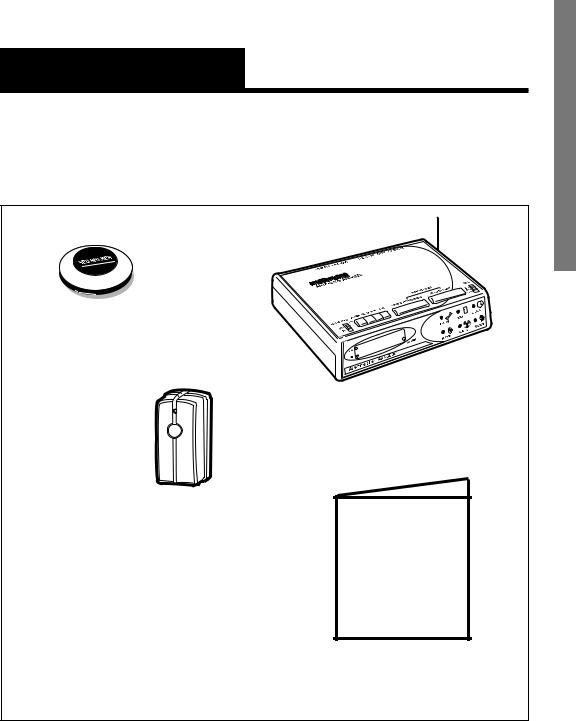
Please make sure your Alertmaster AM-6000 package includes the items as shown below:
Bed Shaker
Alertmaster AM-6000
Base Unit
Doorbell
ALERTMASTER
AM-6000
OPERATING
INSTRUCTIONS
Modular Phone Cord |
Operating Instructions |
Fig. 1- ALERTMASTER AM-6000
base unit, bed shaker, modular phone cord, doorbell, operating instructions.
E
N G L I S H
5

Instrucciones de seguridad
FEATURES IDENTIFICATION importantespara el usuario
Clock Control
Alarm/Page Selector
Jack/Outlet for connecting a lamp as visual signaler.
Distinct flashing pattern for each action
Digital alarm clock
Battery back-up ensures operation during power outage (batteries not included)
Bed shaker awakens you with powerful shaking motion
Two phone jacks for easy connection
Bed shaker jack
Lamp Control/Reset
Antenna
Mic switch |
|
Monitoring functions: |
|
(accessory may be |
|
required) |
|
• |
Telephone ringing |
• |
Doorbell sounding |
• |
Alarm clock/timer |
• |
Activation of other |
|
in-home audio |
|
alarm devices |
• |
Sound monitoring |
Security Timer |
such as baby |
|
crying |
Microphone
Wireless doorbell transmitter. One touch activates the Alertmaster up to 80 feet away
Fig. 2- Features identification for the ALERTMASTER AM-6000
6

Instrucciones de seguridad INSTALLATION AND SET-UP importantespara el usuario
An ideal location for setting up the base unit is in the bedroom. Do not put any of the Alertmaster components on or next to metal surfaces, computers, television, microwaves, or other areas with electronic equipment that can cause interference to the wireless system.
A. Base Unit
U.S. and Canada models
Turn lamp on |
Phone |
Phone |
|
before plugging |
outlet |
||
into the unit |
|
or TTY |
|
|
Put Bedshaker |
|
|
|
under pillow |
BEDSHAKER |
|
Wall outlet |
|
|
|
|
|
Base Unit |
|
E
N
G
L
I
S
H
U.K. model
Turn lamp on |
Phone |
|
outlet |
|
|
before plugging |
|
|
into the unit |
|
|
|
T-adapter |
|
|
(not included) |
|
|
Put Bedshaker |
|
|
under pillow |
BEDSHAKER |
|
|
|
Wall outlet |
|
|
7
INSTALLATION AND SET-UP
B. Doorbell
Mounting back plate
Door Bell
Push latch |
|
|
inward with |
|
|
a small |
+ |
|
screwdriver |
||
– |
||
to release |
12V alkaline battery |
|
|
Fig. 4 - Doorbell and battery installation
C.Clock
1.Press the Time and the Hour (or Minute) buttons simultaneously to change time setting.
2.Press the Alarm button to check the alarm setting.
3.Press Alarm and Hour (or Minute) buttons to change alarm clock setting.
4.Use Alarm/Page selector switch to turn alarm on or off.
OPERATIONS
A. Monitoring Functions
The console has six indicator lights for each of the alerting functions of the Alertmaster AM-6000. Some functions require an optional accessory to be purchased.
Anytime the Alertmaster Notification System is activated by any function(s) the lamp and bed shaker will activate, then stop and reset after 24 seconds, or use the reset button on the console to stop and reset it. The lamp flashes in different patterns for each function.
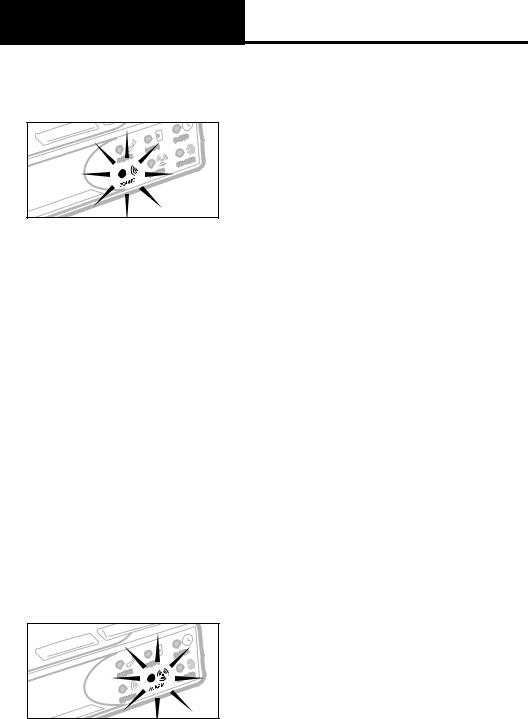
1. Phone
The when
lamp will turn on for two seconds, off for four seconds, and repeat. Answering the phone resets the Phone indicator and any other Alertmaster systems in your home.
8

Instrucciones de seguridad OPERATIONS importantespara el usuario
2. Door
The door indicator light when the doorbell button pressed. The lamp will turn two seconds, off for two and repeat. This function activated when a signal is received from the optional Announcer (Model AM-DX)
3. Clock/Paging
|
E |
|
N |
|
G |
Alarm/Snooze |
L |
When the alarm clock activates, |
I |
the bedshaker will vibrate and the |
S |
lamp will flash for 24 seconds, or |
H |
until the LAMP CONTROL / RESET |
|
button is pushed. When the LAMP |
|
lamp then
minutes pattern
OFF
The clock indicator light illuminates when the alarm clock is activated. The bed shaker will vibrate and the lamp will turn on for one second, off for two seconds, and repeat.
Paging
When the ALARM / PAGE switch is momentarily moved to the PAGE position, it activates the base unit and any remote receivers or personal signalers that are within an 80-foot range. They activate for one 24-second cycle. To repeat the page, move the ALARM / PAGE switch to PAGE again momentarily.
9
Instrucciones de seguridad OPERATIONS importantespara el usuario
4. Sound
Slide the MIC switch to the ON position. The sound indicator light illuminates when continuous sound is detected for 12 seconds or longer in the room by the built-in microphone. After another 10 second delay, the lamp will flash on for one second, off for one second, and repeat. This function is also activated when a signal is received from the optional Baby Sound Monitor (AM-BX).
Note: The built-in microphone remains ON when the MIC switch is moved to the ST (Security Timer) position. See page 7 for details.
5. Alarm
You must purchase the optional Audio Alarm Transmitter (Model AM-AX) from Ameriphone to use this function. When a signal is received from the Audio Alarm Transmitter, the indicator light illuminates, and the lamp will
turn on for one second, off for one second, and repeat.
10

OPERATIONS
B. Master Reset
If you have several Alertmaster system components (such as the AM-6000, the AM-100, the AM-RX2 and accessories), you can save time by using the AM-6000 to reset all of them at once. To do this, press the LAMP CONTROL / RESET button and the SECURITY TIMER button at the same time.
C. Notification Priority
If the Alertmaster system receives two notification signals at the same time, it will display the highest priority signal. For example, if it receives a Motion Sensor signal right after it receives a Phone signal, the indicator will change from PHONE to SENSOR. The priority for each notification signal is shown as follows:
1.Master Reset
2.Audio Alarm
3.Baby Sound
4.Room Sound
5.Phone
6.Door
7.Paging
8.Alarm Clock
9.Random (Security) Timer
D. Security Timer
With this feature, the lamp connected to your Alertmaster system will go on automatically every evening and turn off later in the evening. You can use this to make it look like someone is home. The light will turn on and off at slightly different times each evening so it is not so obvious that a timer is being used.
To activate this feature:
1.Set the MIC switch to ST. The lamp will automatically go on every evening at about 5 PM and turn off at about 11 PM. To confirm this setting, the clock will blink twice every 5 seconds. a.If you want the light to turn on at about 6 PM, press
SECURITY TIMER once for 2 seconds or more. To confirm this setting, the clock will blink 3 times every 5 seconds.
E
N G L I S H
11

Instrucciones de seguridad OPERATIONS importantespara el usuario
b.If you want the light to turn on at about 7 PM, press
SECURITY TIMER twice for 2 seconds or more. To confirm this setting, the clock will blink 4 times every 5 seconds.
c.To return to 5 PM activation, press the SECURITY TIMER button once for 2 seconds or more. To confirm this setting, the clock will blink once every 5 seconds.
d.If you are home and want to turn off the SECURITY TIMER for the evening, press LAMP CONTROL / RESET for more than 2 seconds. The timer will resume normal operation the next evening.
Note: The microphone remains ON when the MIC switch is in the ST position.
2.To turn off the SECURITY TIMER, set the MIC switch to
ON or OFF
E. Battery
The Alertmaster AM-6000 operates on ten “AA” size rechargeable nickel cadmium batteries (not included) during a power outage. DO NOT USE REGULAR BATTERIES! Power is provided for the console and the pillow shaker, but not for the connected lamp. The clock display is blank when operating on back-up batteries, but
correct time will be maintained.
Do not burn or puncture the batteries. Like other batteries of this type, if they are burned or punctured, they could release toxic material which could cause injury. Do not dispose of batteries in household garbage. For information about recycling or proper disposal, consult your local solid waste (garbage) collection or disposal organization.
The doorbell transmitter operates on one “23A” size cigarette lighter
12

OPERATIONS |
|
E |
|
N |
|
|
|
|
|
|
G |
battery (included). It normally lasts |
L |
|
6-12 months and can be tested by |
I |
|
watching the red power indicator |
S |
|
illuminate when the doorbell button |
H |
|
is pressed. If the power indicator is faint or off, replace the battery.
13

Instrucciones de seguridad OPTIONAL ACCESSORIES importantespara el usuario
The Alertmaster AM-6000 is designed to work with optional wireless remote receivers and transmitters, each sold separately.
A.Remote Receiver (AM-RX2)
Plug the receiver into an AC outlet, and plug in a lamp and you’ll be notified wherever the
receiver is placed - kitchen, living room, garage,bathroom, etc. It operates up to 80 feet from the Alertmaster AM-6000 base console.
D. Audio Alarm Transmitter (AM-AX)
Place this next to any audio alarm for notification when the alarm is activated. It activates the Alarm
function of the Alertmaster system and has a range of up to 80 feet.
E.Baby Sound Monitor (AM-BX)
Place this monitor near your infant, and it will transmit a signal to the Alertmaster system when your baby cries.
F.Door Announcer (AM-DX)
Place the Door Announcer next to your existing door-bell, doorchime,
or intercom announcer.
It will transmit a signal activating the Door function of the Alertmaster system from up to 80 feet away. Ideal for apartments, condos or suites with a common security door or gate.
14

Instrucciones de seguridad OPTIONAL ACCESSORIES importantespara el usuario
B.Personal Signaler (AM-PX)
Wear this light weight receiver on your belt anywhere around your house and you’ll be alerted
to any activity in your home. It has an 80-foot range and a miniature console of indicator lights, and also alerts with different vibrating motions for each function.
C.Personal Tactile Signaler (AM-PXB)
Similar to AM-PX plus a touch switch for people who are deaf and blind.
E
N G L I S H
15

Instrucciones de seguridad IN CASE OF DIFFICULTY importantespara el usuario
If any problem should occur during operation of your Alertmaster Notification System, review the "Symptom and Remedy" list below. Make sure no part of the Alertmaster system is on or near metal surfaces or electronic equipment. Should the difficulty persist, contact AMERIPHONE or your authorized dealer for assistance.
SYMPTOM |
CAUSE AND REMEDY |
|
|
|
|
Lamp control button doesn't work |
Lamp is not turned on prior to plugging it |
|
|
into Alertmaster. Turn the lamp’s switch on. |
|
|
Replace bulb if necessary. |
|
|
|
|
Phone rings, lamp doesn't flash |
Check all phone line connections. Make |
|
|
sure you can turn the lamp on or off with |
|
|
the lamp control button. |
|
|
|
|
Alarm clock doesn't work |
Alarm clock is not turned on. Slide the |
|
|
||
|
switch to the ON position. |
|
|
|
|
Bed shaker doesn't vibrate |
Bed shaker is unplugged. Plug it in. Coil |
|
|
the wire once around the plastic loop to |
|
|
prevent accidental unplugging. |
|
|
|
|
Room noise doesn't activate |
Switch is OFF . Slide it to the ON position. |
|
|
Sound must be continuous for twelve sec- |
|
|
onds for room noise to activate. |
|
|
|
|
Lamp flashes constantly |
There is constant noise in the room, and |
|
|
the sound function is on. Slide the switch to |
|
|
OFF . |
|
Doorbell doesn't work |
Dead battery. Depress doorbell button, |
|
|
red light on housing should light up. If not, |
|
|
battery needs to be replaced. If the battery |
|
|
is fully charged, the dipswitches may be |
|
|
incorrectly set. See section on Channel |
|
|
Setting on page 13. |
|
|
|
|
16

Instrucciones de seguridad IN CASE OF DIFFICULTY importantespara el usuario
Channel Setting |
of the doorbell. |
The Alertmaster System uses special radio signals to communicate between the console unit and all its accessories. For the accessories (Door Announcer, Baby Sound Monitor, Audio Alarm Transmitter and Motion Sensor) to activate the base unit, they all have to be on the same "channel." A "DIP Switch" is used for channel selection.
Your system and all the accessories have been preset in the factory to a standard channel setting. Under normal operating conditions, there is no adjustment necessary.
If your system encounters interference and repeatedly activates itself for no obvious reason, it may be
triggered by a system nearby in your neighborhood.
If the interference from another Alertmaster Notification System or other wireless source is present, change channel switch settings on all components.
1.Unplug AC power and locate DIP Switch (a 4-position switch)
on the underside of the Alertmaster AM-6000.
2.Open the battery compartment
3.Change the switch position of each switch on both units using a ball point pen. All settings need to be identical for the system to work. See Figure 5.
4.Change the switch settings on each of your other accessories (Remote Receiver, Audio Alarm Transmitter, Baby Sound Monitor, etc.) to match the new channel setting.
5.Replace all covers and return accessories to their proper
places. Press LAMP CONTROL /
RESET button once to reset the unit.
Use a pen or pencil to set DIP Switches to match exactly
Alertmaster base unit
Doorbell Transmitter
Figure 5 - Channel setting
17
E
N G L I S H
Instrucciones de seguridad Regulatory Compliance importantespara el usuario
Part 68 of FCC Rules
Information
This AM-6000 Notification System complies with Part 68 of the FCC rules and the requirements adopted by the ACTA. On the bottom of this equipment is a label that contains, among other information, a product identifier in the format US:AAAEQ##TXXXX. If requested, this number must be provided to the telephone company.
A plug and jack used to connect this equipment to the premises wiring and telephone network must comply with the applicable FCC Part 68 rules and requirements adopted by the ACTA. A compliant telephone cord and modular plug, RJ11 USOC, is provided with this product. It is designed to be connected to a compatible modular jack that is also compliant. See installation instructions for details.
The REN is used to determine the number of devices that may be
connected to a telephone line. Excessive RENs on a telephone line may result in the devices not ringing in response to an incoming call. In most but not all areas, the sum of RENs should not exceed five (5.0). To be certain of the number of devices that may be connected to a line, as determined by the total RENs, contact the local telephone company. For products approved after July 23, 2001, the REN for this product is part of the product identifier that has the format US:AAAEQ##TXXXX. The digits represented by ## are the REN without a decimal point (e.g., 03 is a REN of 0.3). For earlier products, the REN is separately shown on the label.
If this telephone equipment causes harm to the telephone network, the telephone company will notify you in advance that temporary discontinuance of service may be required. But if advance notice isn’t practical, the telephone company will notify the customer as soon as possible. Also, you will
18

Instrucciones de seguridad Regulatory Compliance importantespara el usuario
be advised of your right to file a complaint with the FCC if you believe it is necessary.
The telephone company may make changes in its facilities, equipment, operations or procedures that could affect the operation of the equipment. If this happens the telephone company will provide advance notice in order for you to make necessary modifications to maintain uninterrupted service.
If trouble is experienced with this telephone equipment, for repair or warranty information, please contact Walker / Ameriphone, 1-800-874-3005. If the equipment is causing harm to the telephone network, the telephone company may request that you disconnect the equipment until the problem is resolved.
This telephone equipment is not intended to be repaired and it contains no repairable parts. Opening the equipment or any attempt to perform repairs will
|
|
E |
|
|
N |
|
|
G |
void the warranty. For service or |
|
L |
|
I |
|
repairs, call 1-800-874-3005. |
|
|
|
S |
|
|
|
|
Connection to party line service is |
|
H |
|
|
|
subject to state tariffs. Contact the |
|
|
state public utility commission, |
|
|
public service commission or |
|
|
corporation commission for |
|
|
|
|
|
information. |
|
|
If your home has specially wired |
|
|
alarm equipment connected to the |
|
|
telephone line, ensure the |
|
|
installation of this telephone |
|
|
equipment does not disable your |
|
|
alarm equipment. If you have |
|
|
questions about what will disable |
|
|
alarm equipment, consult your |
|
|
telephone company or a qualified |
|
|
installer. |
|
|
This telephone equipment is |
|
|
hearing aid compatible. |
|
|
19

Instrucciones de seguridad Regulatory Compliance importantespara el usuario
Customer-Owned Coin/Credit
Card Phones:
To comply with state tariffs, the telephone company must be given notification prior to connection. In some states, the state public utility commission, public service commission or corporation commission must give prior approval of connection.
Part 15 of FCC Rules
Information
This device complies with part 15 of the FCC Rules. Operation is subject to the following two conditions: (1) This device may not cause harmful interference, and (2) this device must accept any interference received, including interference that may cause undesired operation.
Your AM-6000 Notification System has been tested and found to comply with the limits of a Class B digital device, pursuant to Part 15 of FCC rules. These limits are
designed to provide reasonable protection against harmful interference in residential installation.
This equipment generates, uses, and can radiate radio frequency energy and, if not installed and used in accordance with the instructions, may cause harmful interference to radio communications. However, there is no guarantee that interference will not occur in a particular installation; if this equipment does cause harmful interference to radio or television reception, which can be determined by turning the equipment off and on, you are encouraged to try to correct the interference by one of the following measures:
1.Where it can be done safely, reorient the receiving television or radio antenna.
2.To the extent possible, relocate the television, radio or other receiver with respect to the telephone equipment. (This increases the separation
20

Instrucciones de seguridad Regulatory Compliance importantespara el usuario
between the telephone equipment and the receiver.)
3.Connect the telephone equipment into an outlet on a circuit difference from that to which the television, radio, or other receiver is connected.
4.Consult the dealer or an experienced radio/TV technician for help.
CAUTION: Changes or modifications not expressly approved by the manufacturer responsible for compliance could void the user’s authority to operate the equipment.
Industry Canada Technical
Specifications
This product meets the applicable Industry Canada technical specifications.
Before installing this equipment, users should ensure that it is permissible to be connected to the facilities of the local telecommunications company. The equipment must also be installed using an acceptable method of connection. In some cases, the company’s inside wiring associated with a single line individual service may be extended by means of a certified connector assembly (telephone extension cord). The customer should be aware that compliance with the above conditions may not prevent degradation of service in some situations.
Repairs to certified equipment should be made by an authorized Canadian maintenance facility designated by the supplier. Any
E
N G L I S H
21

Instrucciones de seguridad Regulatory Compliance importantespara el usuario
repairs or alterations made by the user to this equipment, or equipment malfunctions, may give the telecommunications company cause to request the user to disconnect the equipment.
Users should ensure for their own protection that the electrical ground connections of the power utility, telephone lines and internal metallic water pipe system, if present, are connected together. This precaution may be particularly important in rural areas.
CAUTION: Users should not attempt to make such connections themselves, but should contact the appropriate electric inspection authority, or electrician, as appropriate.
The Ringer Equivalence Number is an indication of the maximum number of terminals allowed to be connected to a telephone interface. The termination on an interface may consist of any
combination of devices subject only to the requirement that the sum of the Ringer Equivalence Numbers of all the devices does not exceed five.
[The term “IC:” before the certification/registration number only signifies that the Industry Canada technical specifications were met.]
22

E
N G L I S H
23

Instrucciones de seguridad UK STATUTORY INFORMATION importantespara el usuario
The modem that forms the subject of this guide is approved for use with telecommunications systems run by British Telecommunications, Mercury or Kingston Communications in accordance with the conditions in the instruction for use. The following section provides the statutory information that relates to this approval.
Model No.: The unit referred to in this guide as the apparatus is the Ameriphone Alertmaster 2000 / 6000.
Type of circuits: The apparatus is approved for connection to telecommunications systems specified in the instructions for use subject to the conditions set out in them. It is not approved for use on a shared service, 1+1 carrier system, or as an extension to a pay telephone.
Mark of origin: The apparatus is manufactured in China by Ameriphone. Functions: Call Indicator for the Deaf.
REN: The apparatus has a REN of 1.
Explanation of REN: Equipment for attachment to the Public Telephone
network is assessed to determine its “ringer equivalence” number (REN). The REN relates to the performance of the apparatus when used in combination with other items of apparatus. The REN is a customer guide indicating approximately the maximum number of items of apparatus that should be connected simultaneously to the line.
To determine the maximum number of items of apparatus that should be connected simultaneously to an
exclusive line, the total REN obtained by summing the REN values of each of the items of apparatus connected to the exclusive line should not exceed the maximum REN value of 4. This value includes any BT
provided instrument each of which is assumed to have a REN value of 1.0 unless otherwise marked.
The apparatus has a REN of 1 and care must be taken not to use it with other telephone equipment that would result in a maximum figure of 4 REN being exceeded.
Because of the wide spread of ringing detector characteristics, a guarantee of successful operation in an installation of mixed types of
24
 Loading...