

Page 1
Page 2
Page 3
Page 4
Page 5
Page 6

Page 7
Page 8
Page 9

Page 10

Page 11

Page 12

Page 13

Page 14

IN STALLATION & R EPAIR GUIDE
Split Wall-M ounted Air C onditioner
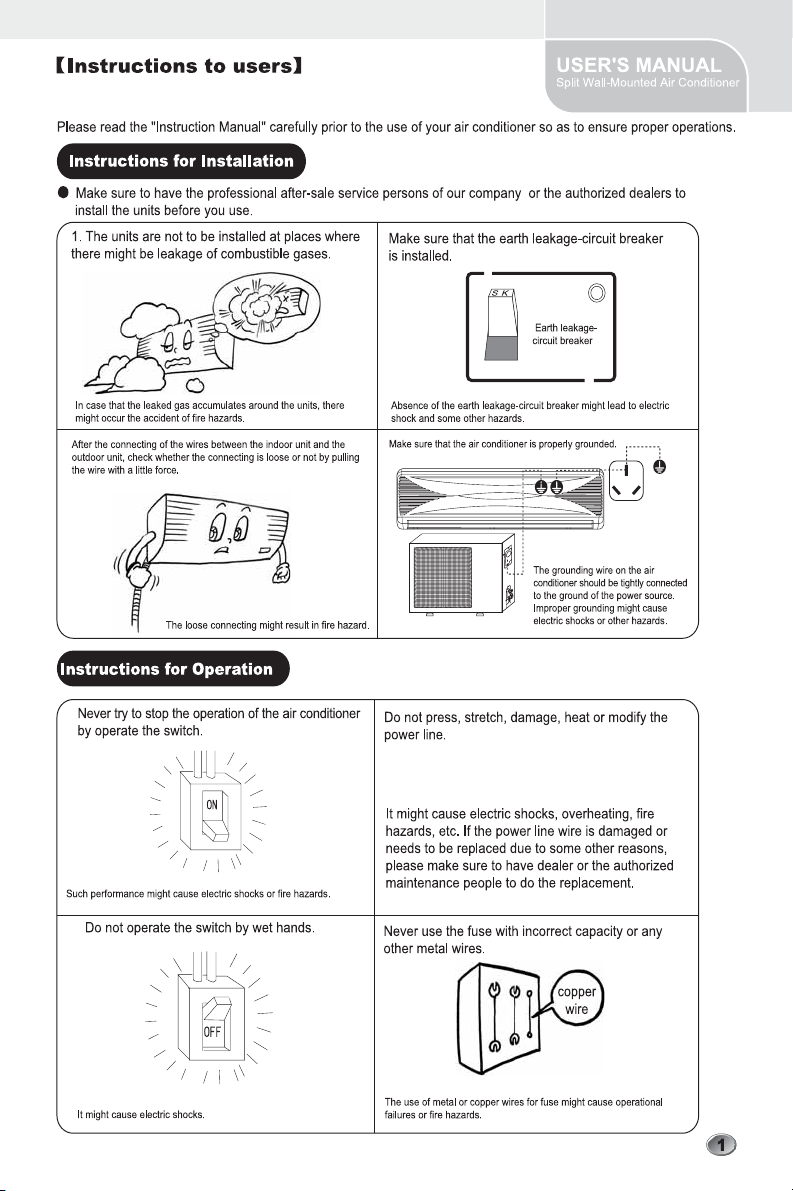
*
Selection of installation positions fo r indoor unit
*
*To be installed at the position w here the air deliver ed from the unit c an reac h ev ery cor ner of
the room ;
*To avoid being affected by the outdoor air;
*To avoid blockage to the air inlet or outlet of the unit;
*To avoid too
much oil sm oke or steam ;
*To avoid possible generation, inflow, lingering or leak age of flam m able gases ;
*To avoid high-frequency facilities (such as high frequency arc welders, etc.);
*To avoid the places where acid solutions are frequently us ed;
*To avoid t
he plac es w here som e special spr ay ers (sulfides) are frequently us ed.
*Not to install a fire alarming device near the air outlet of the unit (during operation, the fire alarm
device might be erroneously triggered by the war
*
M ake sure of enough space for installation and maintenance.
m air from the unit);
*To tak e into cons ideration the operational convenience and saf ety in installation, it is recom m ended
to ens ure enough spac e betw een the unit and the walls.
Ceiling
Above 100m m (4")
Left side: 150m m (6")
and above
Wall hanging plate
2300m m (7'6" )
and above
ground
*
Height limits of indoor and outdoor units.
*Either the indoor unit or the outdoor unit can be higher, but the height differenc e must com ply the stated
requirem ents.
*Try to reduce the bending of the piping line as much as possi ble so as to avoid possible negative im pacts upon the
orm ances of the units.
perf
Indoor unit
5m (16'5" )max.
outdoor
unit
Right side: 150m m (6")
and above
1
Page 15

INSTALLATION & REPAIR GUIDE
Split Wall-Mounted air c onditioner
*
Selection of installation positions fo r outdoor unit
*
*To install the outdoor unit at the places which c an st and the load of the machine weight and will
not cause big vibrations and noises;
*To install the unit at the places not to be expos ed to rain or direc t sunshine, and the places with
good v entilation;
* The noises generated from the unit will not affect the neighboring plac es ;
*Do not install the unit on non-metal fram e;
*Not to install the unit at the places w here there might occur the generation, inflow, stay or
leakage of inflam m able gas es ;
*Pay attention to the drainage of the condensed water from the base plate during operations ;
*To avoid the air outlet being directly against the wind.
Detailed spac e requirem ents around the outdoor unit
1. W hen there are obstacles above
the unit
100mm(4") min
500mm(1'8") min
4. W hen there are obstacles at the front and rear sides.
2. W hen the front (air outlet) is open 3. W hen there are obstacles only in
200mm(8") min
200mm(8") min
300mm(1') min
100mm(4") min
1000mm(3'4") min
the front (air outlet)
500mm(1'8") min
Space for maintenance
Shown as in the follow ing figure. K eep
the maintenance
unit.
200mm
(8")min
5. W hen there are obstacles all ar ound
the unit on four sides.
Although the top side is open, the
installation is not to be done if there
are obstacles all ar ound.
spac e in front of the
500mm
Space for maintenance
(1'8")min
500mm(1'8") min
*At least two sides should
be kept open.
2
Page 16

*
In s ta llation fixture of indoor unit
IN STALLATION & R EPAIR GUIDE
Split Wall-M ounted air conditioner
*
Pipelines c an be connected in the directions of****
****and
*as indicated in Fig.1. W hen the pipelines
are connected to the direc tions of***and
*, a groov e
for the pipes has to be opened at the proper place on
the bas e stand.
1.Installation of wall-m ounting plate
Fix the wall-m ounting plate firmly on the wall with scr ews.
Make sur e of the leveling of the plate. Slanted wall-m ounting
plate might jeopardize the s m ooth disc harge of the c ondens ed
water.
2.Drill holes on the wall
Drill holes at places slightly below the wall-m ounting plate,
with hole diam eter of 65mm(2-3/5") and the outer edge of
the hole 5-10mm(1/5-2/5") low er (Fig.2) so that the condensed
water can sm oothly flow out. Cut the wall penetrating pipe
to proper length accor ding to the thickness of the wall (35mm(1/10-1/5") longer than the wall thickness) and insert
the pipe as indicated in Fig.2.
3.Installation of drain pipe
Ins tall the pipelines of the indoor unit in accor danc e with
the direction of the wall holes. Wrap tightly the drain pipe
and the pipelines with tape. Make sur e that the drain pipe
is underneath the pipelines. (Fig.3) (W hen the drain pipe
passes the room interior, som e c ondens ed water might
occur to its sur faces if the hum idity is ver y high).
Fig.1
*Right outlet
Fig.2
Wall cap
Fig.3
*Bottom outlet
Fix with a tape
Wall pipe
Drain pipe
*Rear outlet
Int erior
*Left out let
*Left rear outlet
5-10mm low er
(1/5-2/5" )
Wall
Exterior
Pipelines of indoor unit
Rear pipe
4.Installation of indoor unit
Pass the connec tion wires, c onnec ting pipelines and drain
pipe through the wall hole. Hang the indoor unit on the
hooks at the top of the wall-m ounting plate so that the
hooks at the bottom of the indoor unit match the hooks of
the wall-m ounting plate. (Fig.4)
3
Fig.4
Bottom hooks
Top hooks
Hook s upports
Page 17

IN STALLATION & R EPAIR GUIDE
Split Wall-Mounted air c onditioner
Inspections:
a. C heck if the hooks at the top and bottom
are firmly fixed.
b. C heck if the position of the master unit is
properly leveled.
c. The drain pipe should not cur ve upward
(Fig.5).
d. The drain pipe
of the wall pipes (Fig. 5).
*
In s ta llation fixture of outdoor unit
*Try to ship the product to the installation location in its original pack age;
*As the gravity center of the unit is not at the installation center, s pec ial caution should be taken
when using hoist ing c ables to lift i
*During shipping, the outdoor unit must not be slanted to over 45 degrees (Do not store the unit
in a horizontal way).
*Use expans ion bolts to fix the m ounting supports on the wall;
*Use bolts and nuts to fix the outdoor unit
*If the unit is ins talled on the wall or at the rooftop, the supports hav e to be firmly fixed so as to
resist earthquake or strong wind.
should be at the lower part
*
t up;
firmly on the s upports and keep on the sam e lev el;
Drai n pi pe
Connecting wires
Fig.5
Connecting pipe
Wall pipe
Drai n pi pe
Dim ensions for parallel units installations
300m m (1')min
*
Pipelines connection
*
Ordinary pipelines connection (it is suitable for non-quick coupler)
No dust ,foreign articles,air or moisture s hould be allow ed to enter the air conditioning system .Careful
attention should be paid when pipeline connection for outdoor unit is m ade.Try t
cur ves as much as possi ble,otherwise hardening or cr acks might be caused to the copper pipes.Suitable
wrenches should be used w hen the pipeline connection is done so as to ensure appr opriate torque(refer
to follow ing torque Table 1).Excessive torque might
lead to leakage.
*
o avoid repeated
dam age the joints while too little torque might
4
Page 18

Table 1 Torque bas ed upon the wrenc h to be used
Outer diam eter of
copper pipe
6.35(1/4")
9.52(3/8")
12.7(1/2")
15.88(5/8")
19.05(3/4")
*
Special pipelines connection(it is suitable for quick c oupler)
Tightening torque
160kgf.cm ( 63kgf.inch)
300kgf.cm ( 118kgf.inch)
500kgf.cm ( 197kgf.inch)
750kgf.cm ( 295kgf.inch)
1200kgf.cm ( 472kgf.inch)
Strengthened tightening torque
200kgf.cm ( 79kgf.inch)
350kgf.cm ( 138kgf.inch)
550kgf.cm ( 216kgf.inch)
800kgf.cm ( 315kgf.inch)
1400kgf.cm ( 551kgf.inch)
In case of the users purc has ing the machine for quick
coupler,there is no need to do the air purging proc edures
and the follow ing pipeline connec tion procedures should
be adopted:
IN STALLATION & R EPAIR GUIDE
Split Wall-M ounted air conditioner
Fig.6
1.Remove the dus t caps from the indoor and out
door units,
and the c onnec ting pipe.
2.Align the joint counter of c onnec ting pipe with the proper
indoor and outdoor joint c onic sur faces,tighten the connecting
nut m anually.Then,make it secur e with a wrench as shown
Fig. 6 ,applying to above torque Table
1.
3.Remove the two valve cor e c aps from the outdoor unit.
4.Turn on the high and low pressur e valve cor es with an
socket wrench,then tighten the two valve cor e caps of the
outdoor unit (Fig.7).
5.Finally ,wrap the hot insulating cot ton around the joints
of indoor and outdoor units.
*
Notes on installation of quick coupler:
1.Connecting pipe bending minimum radius param eters
(Table 2)
2.Quick c oupler assem bly and disassem bly limit:
the assem bly and disassem bly times are inadv isably
more than 7.
5
Fig.7
Low pressure val ve
High pressure val ve
Table 2 Minimum bending radius
Normial
diam eter(mm)
DN8(5/16")
DN 10- 12
(1/2" )
DN 14- 16
(5/8" )
Minimum bending
radius(mm)
80(3")
100(4")
150(6")
Quick c oupler
(wrapping with insulating cot ton)
Valve cor e cap
cooling capacity
2100~2300W
(7000~8000BTU )
2500~5100W
(9000~18000BTU )
6100~7000W
(22000~24000BTU )
Page 19

IN STALLATION & R EPAIR GUIDE
Lo Hi
Split Wall-M ounted air conditioner
*
Air purging
*
Air purging with vacuum pum p
*
1.C heck that pipelines connec tion have been properly
connec ted,rem ove the charging port cap,and connect
the m anifold gauge and the vacuum pum p to the
charging valve by ser vice hoses as s hown Fig.8.
2.O pen the valve of the low pressur e side of m anifold
gauge,then,run the vacuum pum p.Vacuum the i
ndoor
unit and the c onnec ting pipes until the pressur e in
them low ers to below 1.5mmHG(The operation time
for vacuum ing is about 10 minutes ).W hen the desired
vacuum is reached,close the valve of the low pressur e
of the m anifold and stop the vacuum pum p.
3.Disconnec t the ser vice hos es and fit the cap to
the c harging valve.
4.Remove the blank caps ,and fully open the spindles
of the 2-way and 3-w ays valves with a service valve
wrench.
5.Tighten the blank caps of the 2-way and 3-w ays
valves,applying the above torque Table 1.
Indoor unit
Outdoor unit
Pressur e gauge
M anifold gauge
Charging
port
3-way valve
2-way valve
Union nut
Blank cap
Valve stem
Service hose
*
Adding re frigerant
Vacuum pum p
Refrigerant must be added if the piping m easures more
than 5 metres(16'5") in length.This operation can only
be perform ed by a professional technician,for the
additional am ount,see the table 3 below .
Table 3
Liquid pipe diam eter 6.35(1/4")
(p i ping length-5)m x30g
or (p iping length-16)ftx0.3oz
*
G as leakage inspection
Additional refrigerant am ount
Liquid pipe diam eter:
(p i ping length-5)m x65g
or (p iping length-16)ftx0.7oz
9.52(3/8")
Fig. 8
After the pipieline c onnec tion is done,use a leakage inspection device or soap s uds to car efully check
if there is any leakage at the joints.This is an im porant step to ensure the quality of ins tallation.Once
a leakage is detected,proper t
reatm ent should be taken im m ediately.
6
Page 20

IN STALLATION & R EPAIR GUIDE
Split Wall-M ounted air conditioner
*
C onnection of pow er cable
1.Remove the draw er of the outdoor unit.
2.Non-quick coupler:connec t the indoor pow er and control
wires with the matched outdoor wires in accor danc e
with the electric schem atic diagram and make sur e
that the connec tion is firmly done
Quick coupler :directl
indoor and outdoor quick cable couplers after disassem bly
of the outdoor unit connec ting box cover
3.Use a press plate to fix the wires firmly,and re-install
the draw er.
Note:Do not c onnec t the wires in a wrong way,otherwise electric malfunc tions will be caus ed and
even dam ages to the units will occur .The appliance s hall be inst
wiring regulation.If the supply cor d is dam aged,it must be replaced by the m anufacturer or its ser vice
agent or a similarly qualified pers on in order to avoid a hazard.The plug shall be accessible af
installing the applianc e.If the m odel have not plug that a sw itch which hav e a contact separation
of at leas t 3 mm(1/10") in all poles s halled be added in fix ed wiring.
*
Finishing touches
*Use thermal tube to wrap the joints and wrap the tube tightly with ethy lene tapes.
*Fix the wrapped pipelines on the exterior wall with clam ps.
*Fill in the gaps left over by the pipeline hole and wall hole to prevent rain-water from entering.
*
Test running
* Connect to the pow er source, check if the function selection keys on the rem ote controller are
working properly.
* C heck if the room tem perature adjustm ents and timer settings are working properly.
* C heck if the drain is sm ooth.
* C heck if there is any abnormal noise or vibration during operation.
* C heck if there is leakage of refrigerant.
*
Is the unit installed correctly?
*
Suitable Installation Position
*
Isn't there anything which prev ents ventilation or obstructs operation in front of the indoor unit ?
Do not install the unit following plac e .
*
Inflam m able gases may leak .
*
Oil splashes a lot .
*
In case where the unit is used in such places as poisonous or sultry gases are generated or s easide
dist rict expos ed to sea breezes cor ros ion may cause malfunction . C onsult with y our dist ributor .
*
Air conditioner body and rem ote c ontroller must be I m(39-3/4") or more aw ay from a TV or a radio.
Drain the dehum idified water from the indoor unit to a place which drains well .
y connect quick cable couplers with
*
(Fig.9).
*
*
(Fig.10).
*
Fig.9
wire pressing plate
Drawer
screw
Fig.10
alled in accor dance with national
ter
*
Pay attention to operation noise
*
W hen ins talling the unit , choose a place which c an stand the weight of the unit well and does
not increase the operation noise or vibration . E s pec ially w here there is a possibility that vibration
be trans m itted to the house ,
unit and fittings .
fix the unit by inserting attac hed vibration -proof pads between the
7
Page 21

IN STALLATION & R EPAIR GUIDE
Split Wall-M ounted air conditioner
*
Choose the place w here hot air and operation noise from the outlet of the outdoor unit do not annoy
the neighborhood .
*
Things left near the outlet and inlet of the outdoor unit caus e malfunc tion or increased operation
noise . Do not leave obstacles near the outlet and inlet .
*
If irregular sound is heard during operation , consult with y our dist ributor .
*
Inspection and Maintenance
*
Accor ding to the ser vice conditions and operating environm ent , the inside of the air conditioner
will bec om e dirty after sever al seas ons (3 to 5years ) of ser vice , resulting in decreased operating
perform ance .Inspec tion and maintenance are recom m ended in addition to us ual cleaning (The
air conditioner can be used for a longer period and without anxiety .)
*
As to inspection and maintenance , consult your dealer or any one of business offices of dealing
com panies .(Service c harge is required in this case .)
*
We recom m end to perform inspection and maintenanc e during an off s eas ons .
*
Sel f Diagnosis Funct ions
*
Our com pany prov ides the thoughtful ser vices for custom er,air conditioners had been
installed self diagnosis system to display the information for the units.
Self-c heck
information
Hint to defrosting
Hint to defense
against cold wind
Failure of room
tem perature s ens or
Failure of coiled
pipe sensor
Abnormality of
outdoor unit
Without feedback of
internal fan motor
Zero cr ossing signal
without cur rent
External feedbac k
failure
Overheatprotection
Water pum p failure
Self-check c ode of lum inotron/
(Self-check c ode of running lam p)
Flicker 1 time/1s
Flicker 1 time/3s
Flicker 2 times/4s
(Flicker 2 times/8s)
Flicker 3 times/5s
(Flicker 1 time/8s)
Flicker 4 times/6s
(lum inating)
Flicker 5 times/7s
(Flicker 6 times/8s)
6 times/8s
Flicker
Flicker 7 times/9s
Flicker 8 times/10s
Flicker 9 times/11s
Digital self-check c ode/
(Polychr om e scr een self-check c ode)
Indicates "dF"or defro s ting
indicat or displays
Fan motor pict ure not running
E2/(L2)
E3/(L1)
E4/(E5)
E5/(L6)
E6
E7
E8
E9
Note:A bov e self check information is com m only applicable in our most air c onditioners,but som e
are special,you can refer to the User's M anual for information or contact the dealer or authorized
maintenanc e people for help.
8
Page 22

Page 23

Page 24

 Loading...