


CPLMB 9KE-410 12KE-410 15KE-410
GB
NL
F
D
I
E
Portable air conditioner Mobiele airconditioner Climatiseur monobloc mobile Mobiles Klimagerät Climatizzatore d’aria portatile Aire acondicionado movil
PORTABLE AIR CONDITIONER

GB
THANK YOU
Thank you for choosing this innovative Amcor air conditioner. We suggest that you keep this manual in a safe place for future reference. It describes the many benefits and advanced features this unique product has to offer. Before you use your new air conditioner you should carefully read these instructions to maximise this product’s performance.
For over 50 years Amcor has specialised in complete indoor environmental control, manufacturing and marketing; dehumidifiers, portable air conditioners, coolers, air purifiers, ionisers and aroma therapy scent diffusers. These world class products incorporate the latest technological developments.
SAFETY INSTRUCTIONS
IMPORTANT!
•The unit is designed for indoor operation.
•Rating: This unit must be connected to a 220-240 V / 50 Hz earthed outlet.
•The installation must be in accordance with regulations of the country where the unit is used.
If you are in any doubt about the electrical installation, have it checked and if necessary modified by a qualified electrician.
•The air conditioner is safe. However, as with other electrical appliances, use it with care.
•Keep out of the reach of children.
•Do not clean the air conditioner by spraying it or immersing it in water.
•Do not insert any object into openings of the air conditioner.
•Disconnect it from the mains before cleaning the unit or any of its components.
•Never connect the unit to an electrical outlet using an extension cord. If an outlet is not available, one should be installed by a licensed electrician.
•Don’t lift or move by pushing the air conditioner at the rear, but always at the front side.
2

GB
WARNING
•Never operate this appliance if it has a damaged cord or plug. Do not lead the cord over sharp edges.
•A damaged supply cord should be replaced by the manufacturer, its service agent or a qualified person in order to avoid a hazard.
•Any service other than regular cleaning or filter replacement should be performed by an authorized service representative. Failure to do so could result in a loss of warranty.
Do not use your air conditioner under the following conditions:
If the power cable |
When small |
On a slope or |
|
Close to a naked |
||
wires are frayed |
children may be |
uneven surface |
|
flame |
||
or cut |
left unattended |
|
|
|
|
|
|
|
|
|
|
|
|
This products is not made for DIY repair
If there is a risk of |
Inside unit exposed |
Near water |
|||
liquid falling on |
to the weather |
|
|
|
|
the unit |
outdoors |
|
|
|
|
|
|
|
|
|
|
|
|
|
|
|
|
|
|
|
|
|
|
|
|
|
|
|
|
If an extension |
Where the power |
Where it may |
Where there is a |
lead may become |
cable may be |
be damaged by |
risk of interference |
overloaded |
damaged |
chemicals |
by foreign objects |
3

GB
PARTS
1
2
3
4
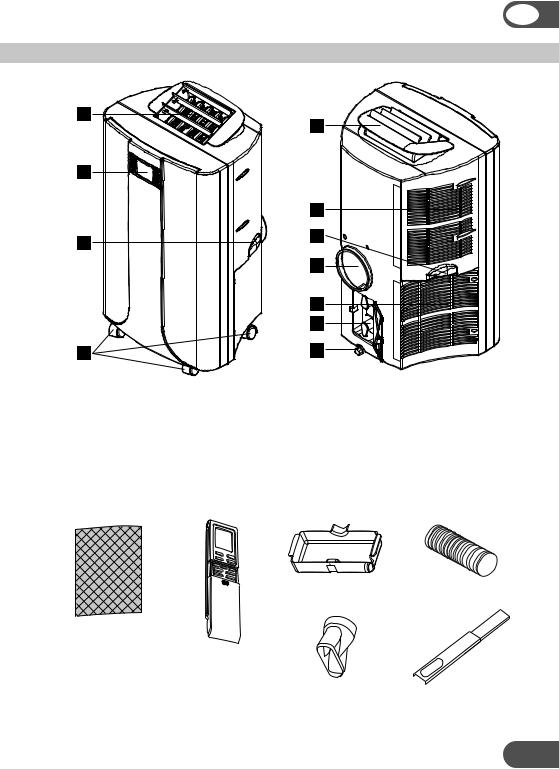
1.Air outlet
2.Control panel
3.Carrying handle
4.Caster wheels
5
6
3
7
8
9
10
5.Grill housing
6.Upper air inlet
7.Exhaust air outlet
8.Lower air inlet
9.Cable storage
10.Drainage point with water stopper
Water container |
Exhaust hose |
Active carbon filter
Remote control with LCD
Slide bar connector |
Telescopic slide bar |
4

GB
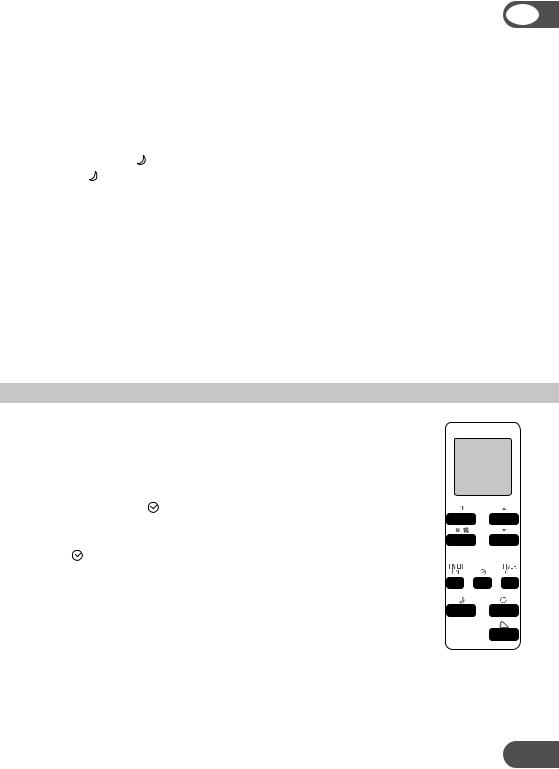
CONTROL PANEL
Clock/ |
Cooling |
Sleep |
Timer |
|
mode |
Fan |
|
Mode |
Timer |
|
Increase |
Sleep mode |
|
Decrease |
|
|
Swing |
Sensor |
|
ON / OFF |
remote |
|
|
control |
|
|
Temperature |
Fan |
Timer |
|
|
settings |
5

GB
INSTALLATION
WARNING!
Before using the air conditioner it should be left in an upright position for at least 2 hours. This unit can easily be moved from one room to another.
In doing so keep this in mind:
–Ensure that the unit is positioned upright, on a level surface and 50 cm away from any obstacles.
–To place the loose filters in the filter holder.
•Take the filter holder out of the air conditioner.
•Open the filter holder and place the active carbon filter (black) in the filter holder.
•Place the filter fixing component back in the holder.
•Place the filter holder back in the air conditioner.
–Do not operate the unit inside the bathroom, shower, or in any other very humid environment.
–Connect the hose to the unit by turning it clockwise (at least 5 turns).
–Similarly, connect the hose to the slide bar connector as far as possible.
–Place the telescopic slide bar in the open window or door and adjust the length to fill as much open space as possible.
–Put the slide bar connector in the opening in the telescopic slide bar.
–Close the window or door as much as possible to prevent outside air entering the room.
–Ensure that the slide bar connector has a free flow outside.
IMPORTANT!
The flexible exhaust hose can be extended from 500 to 1500 mm for mounting. This length has been designed especially according to the specifications of the air conditioner. Do not use an extension or exchange for a different hose as that may lead to malfunctioning. The exhaust air must flow freely, any blockage can lead to overheating of the air conditioner. Take care to prevent any sharp bow or bend in the exhaust.
6

GB
OPERATION
ON/OFF
Press  to switch the unit on or to switch off. A buzzer will beep, and the LCD will display 12:00 o’clock as default.
Setting the clock
Press the  -button for 3 seconds to set the clock. The 2 left digits of the 4 digits on the LCD-display will flash. Press
  or
or  to adjust the hour. Press
  momentarily, the 2 right digits of the 4 digits will flash. Press
  or
or  to adjust the minutes of the clock. Press the
  -button for 3 seconds again to activate the clock.
Setting the temperature
If you want to change the set temperature press the  or
or  -button. The 2 digit display will indicate the set temperature.
Note: Reaching the set temperature depends on the room and outdoor climatic conditions.
Mode
Pressing the  -button to switch the operating mode between 'cooling' and 'fan only'.
Fan speed
If you prefer a constant fan speed instead of the auto fan speed, press the  -button successively; the fan speed icon
  on the LCD-display will rotate accordingly.
• Fast |
- for the turbo speed |
• Normal - for the medium speed |
|
• Slow |
- for the slow speed |
• Auto |
- alternating fast and slow speed |
Timer
For all of the following TIMER programming, proceed firstly with these standard steps:
•Press the  -button briefly; the 2 left digits of the 4 digits on the LCD display are flashing.
•Press  or
or  to adjust the hour.
•Press the  -button briefly again, the 2 right digits of the 4 digits are flashing.
•Press  or
or  to adjust the minutes of the clock in intervals of 5 minutes. The timer is set. After 10 seconds the time display returns.
The timer settings are visualised along the bottom of |
|
the display. |
Timer setting example |
7

GB
Programming the timer for ON - when the unit is OFF.
• Perform the standard steps as described above.
The linear time scale will be on between the ON programmed times until 24:00. The flashing bar on the time scale indicates the real time and moves a segment ahead every 30 minutes until it reaches the ON timer time, then the black segments in the linear time scale will disappear.
Programming the timer for OFF - when the unit is RUNNING.
• Perform the standard steps as described above.
The linear time scale will be on between the present time to the OFF programmed time. The flashing bar on the time scale indicates the real time and moves a segment ahead every 30 minutes until it reaches the OFF timer time, then the black segments in the linear time scale will disappear.
Repeated OFF and ON
Programming the timer for repeat OFF and ON - when the unit is RUNNING.
•Perform the standard steps as described above.
•Repeat the above procedure while the digits are still flashing for setting the ON. The linear time scale will be ON between 00:00 to the time set with the timer to OFF and from the ON time until 24:00. The flashing bar on the time scale indicates the real time and moves a segment ahead every 30 minutes. The unit will operate daily according to the timer setting.
Repeated ON and OFF
Programming the timer for repeat ON and OFF - when the unit is NOT RUNNING.
•Perform the standard steps as described above.
•Repeat the above procedure while the digits are still flashing for setting the OFF. The linear time scale will be OFF between 00:00 to the time set with the timer to ON and from the OFF time until 24:00. The flashing bar on the time scale indicates the real time and moves a segment ahead every 30 minutes. The unit will operate daily according to the timer setting.
After a power failure, or after the unit has been unplugged, you will have to program the timer settings again.
Cancelling the timer function
In order to cancel the timer programming press the  -button momentarily, then it will return to the time display. The daily mode will be cancelled as well. The black segments in the linear time scale will disappear.
LCD blue back light
In order to switch off the blue back light, press the  - and
- and  -buttons at the same time. The blue back light will blink twice and goes off after three seconds.
By pushing any of the buttons the blue back light will come on again.
8
GB
Air flow
On the moment the air conditioner is connected to the mains, the louvres open and close and stay closed.
•When the ON-button is pressed, the louvres open to maximum and return to an angle of 75° above the upper plane of the louvres housing.
•Press the  -button, the louvres will swing continuously up and down between 30° and 80° above the upper plane of the louvres housing.
•By pressing the  -button again the movement will stop and the louvres remain in that position. The direction of the air flow is then constant.
•When the OFF-button is pressed, the louvres close.
This way of directing the air flow is particularly convenient when using the remote control: a user friendly approach to your comfort.
In order to direct the air flow to a lower angle, raise the louvres housing by pulling it up only by the centre of its back rim.
Air outlet down, |
Air outlet up, |
Raising the |
louvres closed |
louvres opened |
louvres housing. |
Sleep mode
The sleep mode function adjusts the set temperature of the unit to the thermal needs of the body falling asleep as follow:
•Default fan speed: LOW
•Press the  -button to operate the sleep mode. Press the
  -button again in order to cancel the sleep mode.
The set temperature will increase 1°C after 1 hour and a further 1°C after 2 hours.
•No FAN mode under SLEEP mode operation.
Dehumidification
If the unit will be used mainly as a dehumidifier just let the warm air return in the room. Continuous drainage (see separate chapter) is then necessary and more efficient.
9

GB
REMOTE CONTROL
The unit responds to all signals that are sent by the remote control. There will be a beep sound from the unit after receiving the signal. The operation of the unit by remote control, is almost identical to the operation by the control panel. The only exception is the clock function.
Instead of the -button for setting the actual time and for programming the timer, there are 3 push buttons on the remote control as follows:
•- for setting the actual time.
•TIMER ON - for programming the time when the unit is ON.
•TIMER OFF - for programming the time when the unit is OFF.
10
GB
AIR FILTERS
This air conditioner is equipped with two filter sets:
1.A multi layer filter in the upper air inlet, to clean the circulated room air, which includes
a.A screen filter, to remove dust particles.
b.An active carbon filter, to remove odours.
2.A screen filter in the lower air inlet, to remove dust particles.
NOTE! The active carbon filter is delivered in a plastic packaging. Don’t forget to install it.
Cleaning the air filters
a.The screen filters in the upper and lower air inlet should be cleaned regularly by rinsing them under running water.
b.The active carbon filter can be cleaned with a vacuum cleaner when dusty, but has to be changed every 3 months.
Filter installation
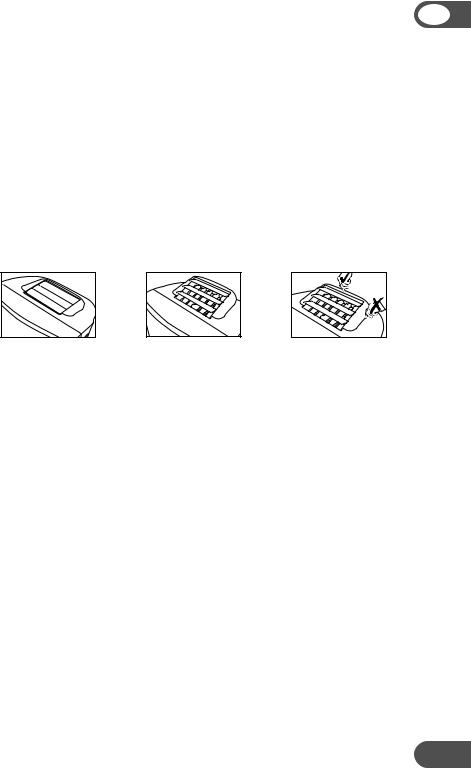
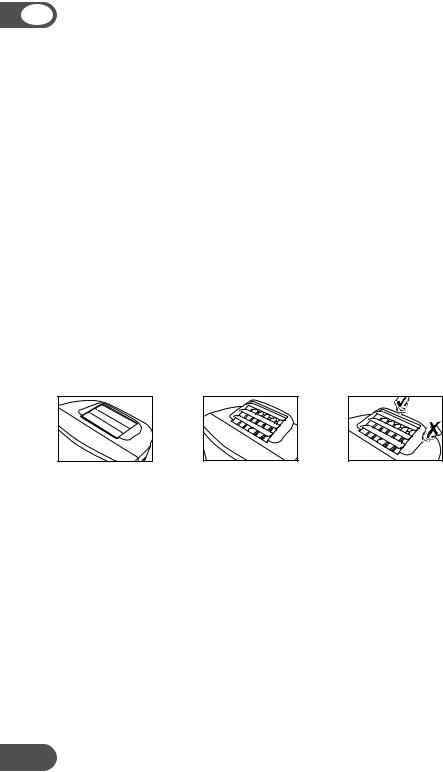
•Slide out the filter frame from the unit.
•Separate the filter fixer from the filter frame (see fig. 1).
•Remove the active carbon filter (black) from its plastic bag.
•Insert the active carbon filter into the filter frame (see fig. 2).
•Fix the filter by reassembling the fixer into the filter frame (see fig. 3)
Filter frame
1 |
Filter fixer |
2 |
3 |
Filter fixer |
|
|
NOTE!
•Remove the active carbon filter before seasonal storage and install new filters at the beginning of the new season. The old filters can be disposed in the ‘Nonbiological garbage container’.
•Replacement filter packages are available directly from Amcor.
•To run the unit without active carbon filter does not do any harm to the air conditioner. In this case odours are not removed from the circulated air.
•The screen filter must always be used.
11
GB
EMPTYING THE INTERNAL WATER CONTAINER
Under high humidity conditions it may be necessary to empty the internal water container. When the internal water container is full the backlight on the LCD-display flashes. The unit will switch off automatically.
To empty the water container do the following:
• Switch off the unit and remove the plug from the wall socket.
Do not move the unit. Doing this can result in water leakage, damaging your floor or carpet.
•Place the water container on the floor underneath the permanent drainage point.
•Remove the water stopper and rubber plug from the drain and let the water run out. The water container has to be emptied several times before all water will be drained (ca. 1.5 litres).
•Replace the rubber plug and water stopper, put the plug into
the wall socket, and switch the unit on. The warning signal should be off.
NOTE! When the air conditioner is in use, under normal circumstances the condensed water will evaporate and then be discharged through the hot air outlet hose.
CONTINUOUS DRAINAGE
•Switch off the unit and remove the plug from the mains.
•Remove the water stopper and rubber plug.
•Connect a drain tube (ø 20 mm inner dimension) onto the water outlet and extend with extra water tube if needed.
•Place the other end in a normal drain. Make sure that the tube is free from twists and bends. The tube must decline over its entire length.
CLEANING
WARNING! First of all switch off the unit and remove the plug from the wall socket.
Clean the housing with a soft, damp cloth. Never use aggressive chemicals, petrol, detergents or other cleansing solutions.
Clean the screen filter regularly with a vacuum cleaner. See also “air filter” section. NOTE! Never use the air conditioner without the screen filter.
12

GB
STORAGE
•Empty the internal water container.
•Clean the screen filter.
•Remove the active carbon filter before end of season storage and install new filters at the beginning of the new season.
•The old filters can be disposed of in the ‘Non-biological rubbish container’.
Replacement filter packages are available from Amcor.
•Put the unit in Fan Only mode for a few hours to ensure that the inside becomes completely dry.
•Store the cable as shown.
Protect the unit against dust and store in a dry place, not accessible to children.
TROUBLE SHOOTING
Never try to repair or dismantle the air condition yourself. Incompetent repairs result in loss of warranty and can endanger the user and the property.
Problem |
Cause |
Solution |
|
|
|
The air |
No power supply. |
Connect to a functioning outlet and switch on. |
conditioner does |
Is the LCD light flashing. |
Empty the internal water container. |
not function. |
Timer function is active. |
Deactivate TIMER function. |
The air |
In direct sunlight. |
Close curtains. |
conditioner does |
Windows or doors open, many |
Close doors and windows, place an extra air |
not seem to |
people or a heat source in the room. |
conditioner. |
perform. |
Dirty filter. |
Clean or replace the filter(s). |
|
Air inlet or air outlet blocked. |
Remove the blockage. |
|
Room temperature lower than the |
Change temperature selection. |
|
selected value. |
|
The unit is noisy. |
Unit stands uneven. |
Place on an even, solid surface (less |
|
|
vibrations). |
The compressor |
The overheat protection is probably |
Wait 3 minutes until the temperature has |
does not work. |
activated. |
decreased, then turn on the unit again. |
The remote |
Distance too great. |
Make sure the remote control is correctly |
control does not |
Remote control signal not detected |
aimed at the control panel. |
function. |
by the control panel. |
|
|
The batteries are drained. |
Replace the batteries. |
To correct problems that have not been described in the table and/or if the recommended solutions fail to solve the problem, contact an authorized service centre.
13

GB
TECHNICAL DATA
Model |
|
CPLMB |
CPLMB |
CPLMB |
|
|
9KE-410 |
12KE-410 |
15KE-410 |
Cooling capacity |
BTU/h |
7500 |
9400 |
11300 |
|
|
|
|
|
measured conform EN 14511 |
kW |
2.2 |
2.75 |
3.3 |
|
||||
Power consumption |
kW |
0.80 |
1.00 |
1.50 |
Mains |
V / Hz / Ph |
|
220 – 240 / 50 / 1 |
|
Fan speeds |
|
|
3 |
|
Thermostatic range |
°C |
|
18 – 32 |
|
Protection class |
|
|
IP 21 |
|
Refrigerant |
type |
|
R410A |
|
Refrigerant load |
g |
420 |
500 |
630 |
Dimensions (w x h x d) |
mm |
|
500 x 840 x 415 |
|
Net weight |
kg |
33.1 |
34.3 |
39.3 |
CPLMB 9KE-410 series can be connected only to a supply with system impedance no more than 0.383 Ohm. CPLMB 12KE-410 series can be connected only to a supply with system impedance no more than 0.247 Ohm. CPLMB 15KE-410 series can be connected only to a supply with system impedance no more than 0.110 Ohm. If necessary, please consult your supply authority for system impedance information.
Subject to modifications without prior notice.
For greater precision, please refer to the rating label placed on the product.
Reminder:
Waste electrical products must not be disposed of with household waste.
This product should be taken to your local recycling centre for safe treatment.
14

NL
DANK U
Wij danken u voor de aanschaf van deze Amcor luchtkoeler met verwarming. Voordat u het apparaat in werking stelt, raden wij u aan deze bijgeleverde handleiding aandachtig te lezen. Er wordt uitgelegd hoe het apparaat te installeren, te gebruiken en de perfect efficiënte werking te handhaven.
Bewaar deze instructies voor het gebruik op een veilige plaats en voeg ze bij het apparaat indien iemand anders het gaat gebruiken.
Amcor is al meer dan 50 jaar gespecialiseerd in de fabricage en marketing van klimaatbeheersing binnenshuis: ontvochtigers, mobiele airconditioners, koelers, luchtverfrissers, ionisatoren en aromatherapie geurverspreiders. Deze producten van wereldklasse worden gemaakt naar de laatste stand van technologische ontwikkelingen.
VEILIGHEIDSASPECTEN
BELANGRIJK:
•Dit apparaat is uitsluitend geschikt voor gebruik binnenshuis.
•Dit apparaat moet op een geaard stopcontact voor 220-240 V/50 Hz worden aangesloten.
•De aansluiting op het elektriciteitsnet dient uitgevoerd te worden in overeenstemming met de veiligheidsnormen inzake de installatie van elektrische huishoudelijke apparatuur, die van kracht zijn in het land van gebruik.
Laat bij twijfel de elektrische installatie controleren en zo nodig aanpassen door een erkend elektricien.
•Dit apparaat is veilig. Zoals met alle elektrische apparaten met zorg gebruiken.
•Uit de buurt van kinderen houden.
•Niet schoonmaken door met water te besproeien of in water te dompelen.
•Niets in de openingen steken.
•Bij schoonmaken altijd eerst de stekker uit het stopcontact halen.
•Nooit met behulp van een verlengsnoer aansluiten. Laat een geaard stopcontact aanleggen door een erkend elektricien als geen geschikt stopcontact voorhanden is.
•Niet optillen over verplaatsen door aan de achterkant te duwen, maar altijd aan de zijkant.
15

NL
WAARSCHUWING
•Gebruik dit apparaat nooit met een beschadigd snoer of stekker. Leg het snoer niet over scherpe kanten.
•Een beschadigd snoer mag uitsluitend door een vakman worden vervangen, om ieder risico te voorkomen.
•Laat eventuele reparaties – buiten het regelmatig onderhoud – altijd uitvoeren door een erkend servicemonteur, anders kan dit leiden tot het vervallen van de garantie.
Gebruik uw airconditioner niet in een van de volgende situaties:
als het snoer |
waar kleine |
als het apparaat |
|
nabij warmtebron |
||
is gerafeld of |
kinderen zonder |
ongelijk of oneven |
|
|
||
beschadigd |
toezicht zijn |
staat |
|
|
||
|
|
|
|
|
|
|
Dit apparaat is |
als er vloeistof op |
als het blootgesteld |
in natte omgeving |
||||
niet geschikt voor |
kan vallen |
staat aan weersin- |
|
|
|
||
DHZ-reparatie |
|
|
vloeden |
|
|
|
|
|
|
|
|
|
|
|
|
|
|
|
|
|
|
|
|
|
|
|
|
|
|
|
|
|
|
|
|
|
|
|
|
als het verleng- |
waar het snoer |
waar chemische mid- |
als er kans is dat |
snoer overbelast |
beschadigd kan |
delen beschadiging |
vreemde objecten in |
kan raken |
worden |
kunnen veroorzaken |
de openingen komen |
16
ONDERDELEN
1
2
3
4
1.Luchtuitlaat
2.Bedieningspaneel
3.Handgreep
4.Zwenkwielen
NL
5
6
3
7
8
9
10
5.Behuizing ventilatierooster
6.Bovenste luchtinlaat
7.Luchtuitlaat
8.Onderste luchtinlaat
9.Opbergruimte snoer
10.Waterafvoerpunt met afsluitdop
Wateropvangbakje Luchtafvoerslang
Actief koolstoffilter
Afstandsbediening met display
Koppelstuk |
Uitschuifbaar raamstuk |
17

NL
BEDIENINGSPANEEL
Klok/ |
Koelen Slaap- |
Tijdklok |
stand |
Ventilator |
Werkstand |
Tiidklok |
Omhoog |
Slaapstand |
Omlaag |
|
Zwaaien |
Sensor |
AAN / UIT |
afstandsbediening
Temperatuur Ventilator Tijdklok 
 instelling
18

NL
INSTALLATIE
WAARSCHUWING!
Voordat u de airconditioner kunt gebruiken, moet hij ten minste twee (2) uur rechtop hebben gestaan. Dit apparaat kan makkelijk van de ene naar de andere kamer worden verplaatst.
Houd daarbij het volgende in de gaten:
–Zorg dat het apparaat rechtop staat, op een vlakke ondergrond en 50 cm verwijderd van andere voorwerpen.
–De losse filters in de filterhouder plaatsen:
•Haal de filterhouder uit de airconditioner.
•Open de filterhouder en plaats het actieve koolstoffilter (zwart) in de filterhouder.
•Plaats het filterdeksel op het filter in de houder.
•Plaats de filterhouder terug in de airconditioner.
–Gebruik het apparaat niet in de badkamer, de douche of een andere vochtige ruimte.
–Sluit de slang aan op het apparaat door deze met de klok mee te draaien (ten minste vijf (5) slagen).
–Steek de andere kant van de slang zo ver mogelijk in het koppelstuk voor de afstandhouder.
–Plaats de telescopische afstandhouder in een geopend raam of een geopende deur en schuif de afstandhouder zo ver mogelijk open.
–Steek het koppelstuk voor de afstandhouder in de opening van de telescopische afstandhouder.
–Sluit het raam of de deur zo ver mogelijk om te zorgen dat zo min mogelijk buitenlucht de ruimte in stroomt.
–Controleer of de vuile lucht ongehinderd door de opening van het koppelstuk naar buiten kan stromen.
BELANGRIJK!
De flexibele uitlaatslang kan worden verlengd van 50 cm tot 150 cm. Deze lengte is specifiek gekozen op grond van de specificaties van de airconditioner. Gebruik geen verlengstuk of andere slang omdat dit tot defecten kan leiden. De vuile uitlaatlucht moet vrij kunnen wegstromen. Blokkering kan leiden tot oververhitting van de airconditioner. Vermijd knikken of scherpe bochten in de uitlaatslang.
19
NL
BEDIENING
ON/OFF
Druk op de  om het apparaat aan of uit te zetten. Er klinkt een zoemer en op de LCD staat de tijdsaanduiding 12.00.
De klok instellen
Houdt de  -toets drie seconden ingedrukt om de klok in te stellen. De linker twee
cijfers van de vier cijfers op de LCD gaan knipperen. Druk op of |
om de uren in |
|
te stellen. Druk kort op |
. De rechter twee cijfers van de vier cijfers op de LCD gaan |
|
knipperen. Druk op of |
om de minuten in te stellen. Houdt de |
-toets opnieuw |
drie seconden ingedrukt om de klok te activeren.
De temperatuur instellen
Druk op de  - of
- of  -toets om de ingestelde temperatuur te wijzigen. De tweecijferige display geeft de ingestelde temperatuur aan.
NB: Of de ingestelde temperatuur wordt bereikt, hangt af van de klimatologische omstandigheden in de ruimte en buitenshuis.
Werkstand
Door op de  -toets te drukken, schakelt u tussen de werkstanden ‘koelen’ en ‘alleen ventilator’.
Ventilatorsnelheid
Als u een vaste ventilatorsnelheid verkiest boven de automatische ventilatorsnelheid, drukt u herhaaldelijk op de  -toets. Het pictogram voor ventilatorsnelheid
  op de LCD wisselt dienovereenkomstig.
•Snel: voor turbosnelheid
•Normaal: voor gemiddelde snelheid
•Langzaam: voor lage snelheid
•Auto - afwisselend snel en langzaam
Tijdklok
Voor alle volgende tijdklokinstellingen dient u eerst de volgende basisstappen uit te voeren:
•Druk kort op de  -toets. De linker twee cijfers van de vier cijfers op de LCD gaan knipperen.
•Druk op  of
of  om de uren in te stellen.
•Druk opnieuw kort op de  -toets. De rechter twee cijfers van de vier cijfers op de LCD gaan knipperen.
20
NL
•Druk op  of
of  om de minuten in te stellen. Dit gaat met sprongen van vijf minuten. De timer is ingesteld. Na 10 seconden springt de display weer terug naar tijdsweergave.
De timerinstellingen worden aan de onderkant van de |
|
|
|
|
Voorbeeld timerinstelling |
||||
display weergegeven. |
||||
|
|
|
||
De timer programmeren voor ON (aan), wanneer het apparaat uitstaat.
• Voer de hierboven beschreven basisstappen uit.
De lineaire tijdschaal staat aan tussen de geprogrammeerde ON-tijden tot 24.00 uur. De knipperende balk op de tijdschaal geeft de tijd aan en verspringt elke 30 minuten een segment vooruit, totdat het tijdstip bereikt wordt van de geprogrammeerde ON-tijd. Dan verdwijnen de zwarte segmenten in de lineaire tijdschaal.
De timer programmeren voor OFF (uit), wanneer het apparaat WERKT.
• Voer de hierboven beschreven basisstappen uit.
De lineaire tijschaal staat aan tussen de huidige tijd tot de geprogrammeerde OFF-tijd. De knipperende balk op de tijdschaal geeft de tijd aan en verspringt elke 30 minuten een segment vooruit, totdat het tijdstip bereikt wordt van de geprogrammeerde OFF-tijd. Dan verdwijnen de zwarte segmenten in de lineaire tijdschaal.
Herhaalde OFF en ON
De timer programmeren voor herhaalde OFF en ON, wanneer het apparaat WERKT.
•Voer de hierboven beschreven basisstappen uit.
•Herhaal de hierboven beschreven procedure terwijl de cijfers nog knipperen voor het instellen van de ON-tijd.
De lineaire tijdschaal staat op ON tussen 00.00 uur tot de met de timer geprogrammeerde OFF-tijd en vanaf de ON-tijd tot 24.00 uur. De knipperende balk op de tijdschaal geeft de tijd aan en verspringt elke 30 minuten een segment vooruit. Op deze manier functioneert het apparaat dagelijks volgens de geprogrammeerde timerinstelling.
Herhaalde ON en OFF
De timer programmeren voor herhaalde ON en OFF, wanneer het apparaat NIET WERKT.
•Voer de hierboven beschreven basisstappen uit.
•Herhaal de hierboven beschreven procedure terwijl de cijfers nog knipperen voor het instellen van de OFF-tijd.
21
NL
De lineaire tijdschaal staat op OFF tussen 00.00 uur tot de met de timer geprogrammeerde ON-tijd en vanaf de OFF-tijd tot 24.00 uur. De knipperende balk op de tijdschaal geeft de tijd aan en verspringt elke 30 minuten een segment vooruit. Op deze manier functioneert het apparaat dagelijks volgens de geprogrammeerde timerinstelling.
Na een stroomonderbreking, bijvoorbeeld omdat u de stekker van het apparaat uit het stopcontact hebt getrokken, dient u de timerinstellingen opnieuw te programmeren.
De timerfunctie uitschakelen
Om de timerfunctie uit te schakelen drukt u even op de  -toets. Daarna wordt weer de tijd afgebeeld. Ook de werkstand dagelijks wordt uitgeschakeld. De zwarte segmenten in de lineaire tijdschaal verdwijnen.
Blauwe achtergrondverlichting van de LCD
Om de blauwe achtergrondverlichting uit te schakelen drukt u tegelijkertijd op de  - en
- en  -toets. De blauwe achtergrondverlichting knippert tweemaal en gaat na drie seconden uit.
Als u opnieuw op een van deze toetsen drukt, gaat de blauwe achtergrondverlichting weer aan.
Geen luchtuitlaat, |
Luchtuitlaat in werking, Optillen van de behuizing |
|
lamellen dicht |
lamellen open |
met de lamellen |
Air flow
Zodra u de stekker van de airconditioner in het stopcontact steekt, gaan de lamellen open en dicht. Ze blijven vervolgens dicht.
•Als u op de ON-toets drukt, gaan de lamellen helemaal open. Vervolgens sluiten ze enigszins, tot ze een hoek van 75° maken met het bovenpaneel van de behuizing van de lamellen.
•Als u op de  -toets drukt, gaan de lamellen voortdurend open en dicht in een bereik tussen 30° en 80° met het bovenpaneel van de behuizing van de lamellen.
•Door opnieuw op de  -toets te drukken, blijven de lamellen in de stand van dat moment staan. De luchtstroom beweegt zich dan in één richting.
•De lamellen gaan dicht als u op de OFF-toets drukt.
Deze manier om de luchtstroom te richten is met name handig als u de afstandsbediening gebruikt: gebruikersvriendelijk en gerieflijk.
Om de luchtstroom in een lagere hoek te richten, tilt u de behuizing met de
22
NL
lamellen aan het midden van de achterrand op.
Slaapstand
Met de functie slaapstand kunt u als volgt de temperatuurinstelling van het apparaat aanpassen aan de temperatuurbehoefte van het lichaam bij het in slaap vallen:
• |
Standaardsnelheid ventilator: LAAG |
• |
Druk op de -toets om de slaapstand in te schakelen. Druk nogmaals op |
|
de -toets om de slaapstand uit te schakelen. |
|
De ingestelde temperatuur neemt na een uur met 1 °C toe en na twee uur met |
|
nog eens 1 °C. |
• |
In de slaapstand functioneert de ventilatorwerkstand niet. |
Ontvochtigen
Indien het apparaat alleen wordt gebruikt om te ontvochtigen, laat u gewoon warme lucht in de ruimte stromen. Permanente condensafvoer (zie apart hoofdstuk) is dan noodzakelijk en efficiënter.
AFSTANDSBEDIENING
De airconditioner reageert op alle signalen die de afstandsbediening verzendt. De airconditioner laat een piepje horen na ontvangst
van een signaal. De bediening van de airconditioner met de afstandsbediening is vrijwel identiek aan die met het bedieningspaneel. De klokfunctie is de enige uitzondering.
In plaats van de -toets voor het instellen van de tijd en het programmeren van de timer, heeft de afstandsbediening drie druktoetsen. Het werkt als volgt:
•voor het instellen van de tijd.
• TIMER ON - voor het instellen van de tijd als het apparaat aanstaat.
• TIMER ON - voor het instellen van de tijd als het apparaat uitstaat.
23

NL
FILTERS
Deze airconditioner is voorzien van twee stellen filters:
1.Een uit meer lagen bestaand filter in de bovenste luchtinlaat, om de lucht te reinigen die door de ruimte heeft gecirculeerd. Dit bestaat uit:
a.een stoffilter om stofdeeltjes te verwijderen;
b.een actief koolstoffilter om geurtjes te verwijderen.
2.Een stoffilter in de onderste luchtinlaat om stofdeeltjes te verwijderen.
NB: Het actieve koolstoffilter wordt geleverd in een kunststof verpakking. Vergeet niet het filter te installeren.
De luchtfilters reinigen:
a.De stoffilters in de bovenste en onderste luchtinlaat moeten regelmatig onder de lopende kraan worden schoongespoeld.
b.Het actieve koolstoffilter kan, indien stoffig, worden gereinigd met de stofzuiger. Het moet in ieder geval elke drie maanden worden vervangen.
Installatie filter
•Schuif de filterhouder uit het apparaat.
•Maak het filterdeksel los van de filterhouder (zie afb. 1).
•Haal het actieve koolstoffilter (zwart) uit de kunststof verpakking.
•Stop het actieve koolstoffilter in de filterhouder (zie afb. 2).
•Zet het filter vast door het filterdeksel terug te plaatsen in de filterhouder (zie afb. 3).
Filterraam
1 |
Filterhouder |
2 |
3 |
Filterhouder |
|
|
NB:
•Als u de airconditioner voor een tijdje opbergt, moet u het actieve koolstoffilter uit het apparaat verwijderen en nieuwe filters installeren wanneer u het apparaat weer gaat gebruiken. De oude filters kunt u het beste in de afvalbak met niet-biologisch afval doen.
•Verpakkingen met nieuwe filters zijn direct bij Amcor verkrijgbaar.
•De airconditioner gebruiken zonder het actieve koolstoffilter is niet schadelijk voor het apparaat. In dat geval worden luchtjes echter niet uit de gebruikte lucht verwijderd.
•Het stoffilter moet altijd worden gebruikt.
24
 Loading...