

Page 1
Owner’s
Manual
Wall Mountable/Portable Heater
Model AMH8
It is important that you read
these instructions before using
your new purchase and we strongly
recommend that you keep them in
a safe place for future reference.
Page 2

Table of Contents
Safety Instructions ……………………………………………… 1
Thank You! ……………………………………………………… 2
Unpacking and Set-up …………………………………………… 2
Parts …………………………………………………………… 3
Specifi cations …………………………………………………… 3
Wall Mounting Installation ……………………………………… 4
Potable Installation ……………………………………………… 5
Operation ……………………………………………………… 6
Maintenance …………………………………………………… 7
Storage ………………………………………………………… 7
Troubleshooting ………………………………………………… 8
Limited Warranty ………………………………………………10
Page 3
Safety Instructions
When using electrical appliances, basic precautions should always be followed to reduce the risk of fi re, electric shock,
and injury to persons, including the following:
• Do not cover or obstruct top and bottom air vents of the heater.
• Read all instructions before using this heater.
• This heater is hot when in use. To avoid burns, do not let bare skin touch hot surfaces.
• Keep combustible materials, such as furniture, pillows, bedding, papers, clothes and curtains
at least 3 feet (0.9m) from the front of the heater and keep them away from the sides and rear.
• Extreme caution is necessary when any heater is used by or near children or handicapped persons.
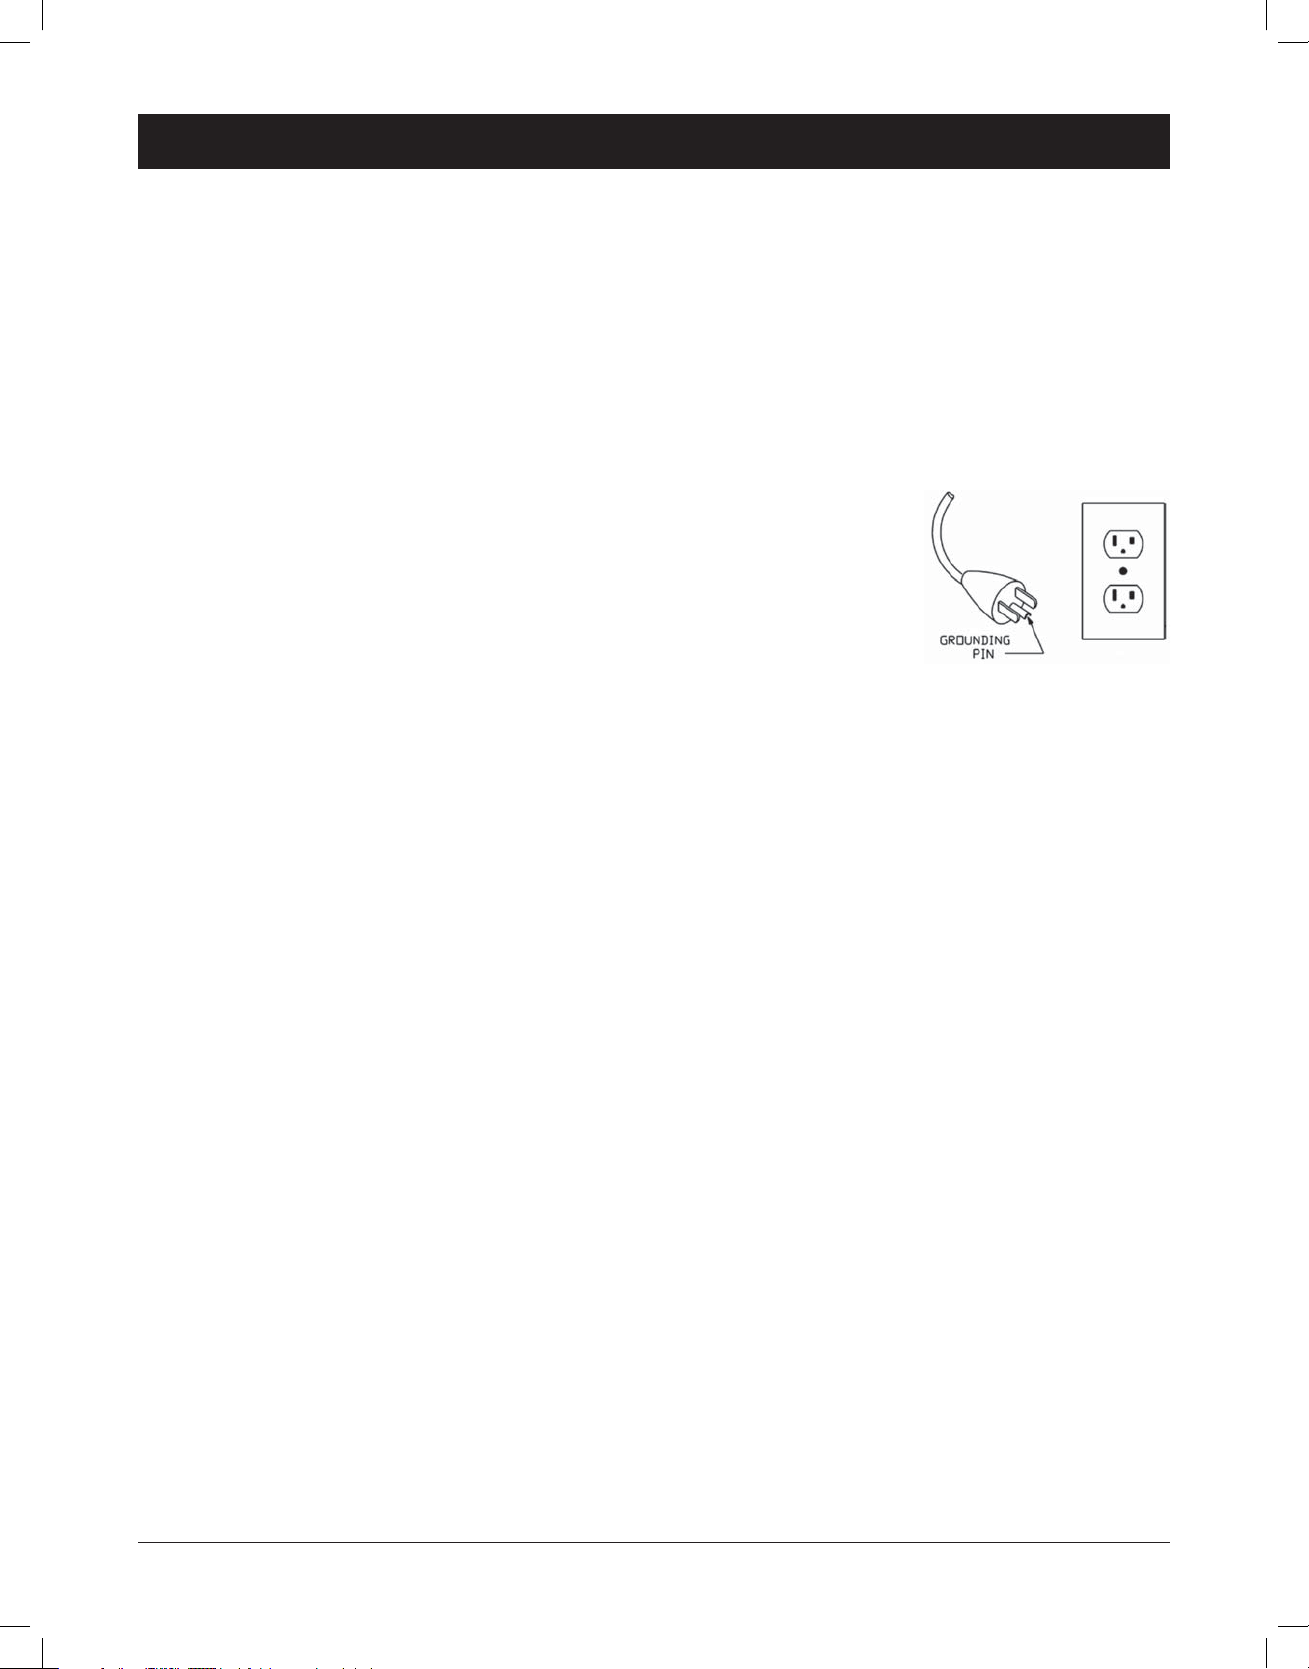
• This heater is equipped with a grounded type plug (see illustration)
and must be pluged into a grounded type outlet as shown.
This is a safety feature: DO NOT REPLACE THIS PLUG!
• Always inspect power cord, and do not operate heater with a damaged cord or plug.
• DO NOT OPEN HEATER. There are no user serviceable parts inside.
• Do not use the heater if the cord or plug is damaged, or if the heater has malfunctioned,
or if it has been damaged or dropped in any way. In such a case, return the heater to an
authorized service facility for examination and/or repair.
• Do not use outdoors – for indoor use only.
• This heater is not intended for use in bathrooms, laundry areas, wet areas or similar indoors areas.
• Never locate heater where it may fall into a bathtub or other water containers.
• Do not run the heater cord under carpeting, or otherwise cover the cord.
Make sure the cord is out of the way so that it does not pose a risk of tripping.
• Turn off heater before unplugging from the electrical outlet.
• Do not insert objects through the air vents of the heater as this may cause an electric shock or fi re.
To prevent fi re do not block air intakes or exhaust in any manner.
• A heater has hot and arcing parts inside. Never use the heater in the vicinity where paint thinners, gasoline, paint or
other fl ammable liquids are used or stored.
• Use this heater only as described in this manual.
Any other use may cause injury to persons, or property damage, or electric shock.
• Avoid using an extension cord to power the heater because the extension cord may overheat and cause a risk of fi re.
However, if you have to use an extension cord, the cord shall be of a No. 14 AWG minimum size, and should be rated no
less than 1875 watts.
• This heater draws 12.5 amps during operation. To prevent overloading a circuit, do not plug the heater into a circuit that
is already being used to power other appliances.
• While it is normal for the heater’s plug to feel warm to the touch, a loose fi t between the plug and the electrical outlet
may cause overheating and warping of the plug. If the outlet is loose, contact a qualifi ed electrician to replace loose or
worn outlets.
• Do not allow water to splash on the heater. If the heater appears to be damp, discontinue its use immediately.
• The output of this heater may vary and its temperature may become intense enough to burn exposed skin.
Use of this heater is not recommended for persons with reduced sensitivity to heat or inability to react to avoid burns.
• Service of the heater other than cleaning should be performed by an authorized service center.
No user serviceable parts inside. Only authorized service personnel shall handle repair work.
• The appliance has an internal over-temperature safety device, which automatically switches the heater off, if an
over-heat situation is detected. Manually reset the unit once the heater cools off.
• When the unit cools off, if you notice the safety device still switches off the heater, unplug the unit, wait 30 seconds to
a minute, and plug in again. This will trigger the unit and it will switch on.
1
Page 4

Thank You!
Thank you for purchasing an AMCOR Flat Panel Heater.
AMCOR is a leading brand in indoor air treatment. We would like you to enjoy the many benefi ts this
unit offers, so please read this manual carefully and take full advantage of the many advanced features
that your AMCOR portable Heater offers you.
AMCOR has specialized in complete indoor environment control, manufacturing world-class heaters,
air conditioners, dehumidifi ers and air purifi ers with innovative technology.
In designing these advanced products, we have listened carefully to our customers and have passed
their views on to our research and development laboratories.
We wish you many years of enjoyable use.
After reading this manual, please keep it in a safe place for future reference.
Read this entire instruction manual before use.
Please keep your receipt. Your receipt is your Proof of Purchase and is
necessary for warranty service.
Unpacking and Set-up
1. Carefully remove your heater from the box (please save the carton for off-season storage).
2. Make sure the unit is in the OFF position before plugging the heater into the outlet.
3. Proceed with the instructions for “Wall mounting” or “Portable Use”.
2
Page 5
Parts
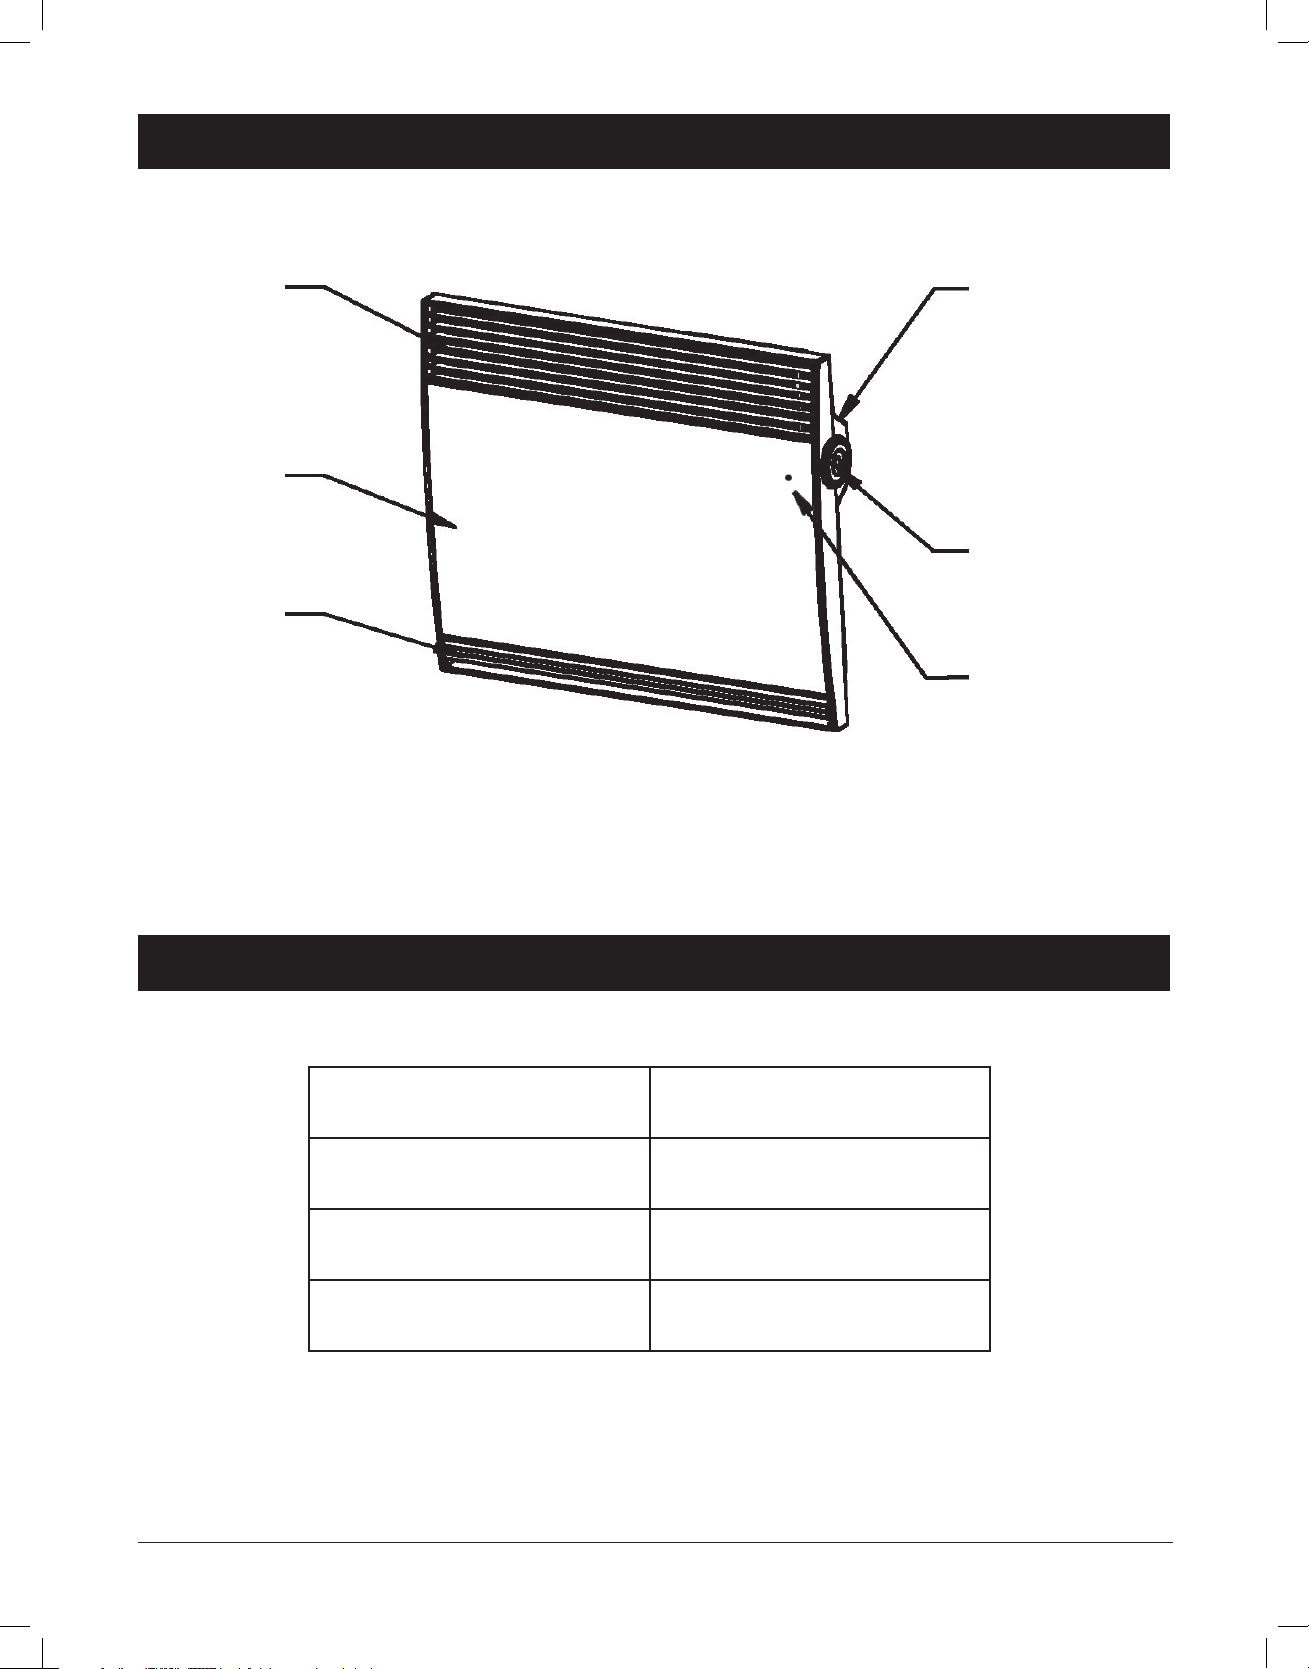
Top
Grille
Heater
Front
Bottom
Grille
Rear Housing
ON/OFF/
Thermostat
Knob
ON/OFF Pilot
Light Indicator
Specifi cations
Model AMH8
Power Supply Voltage 120V~ 60Hz
Power Consumption 1500W
Maximum Current 12.5 Amps
3
Page 6
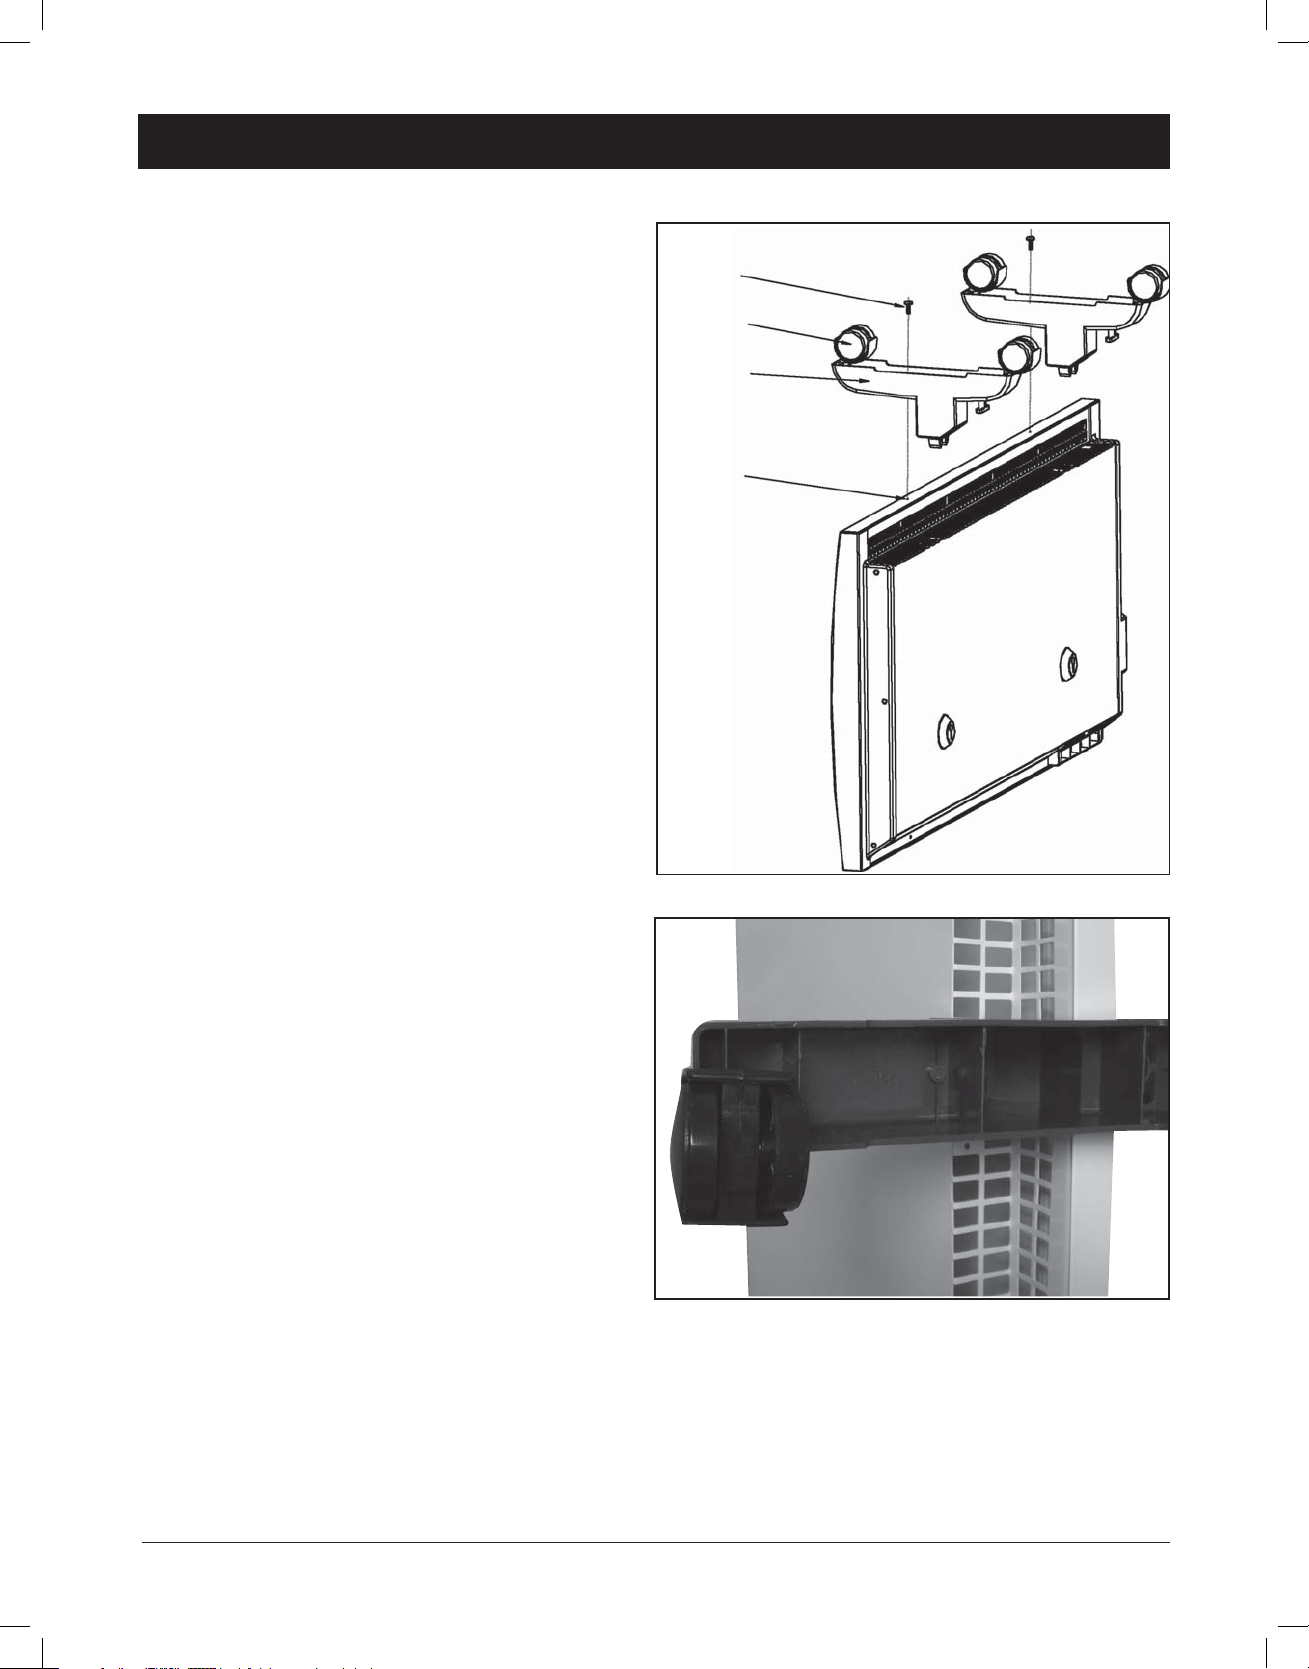
Wall Mounting Installation
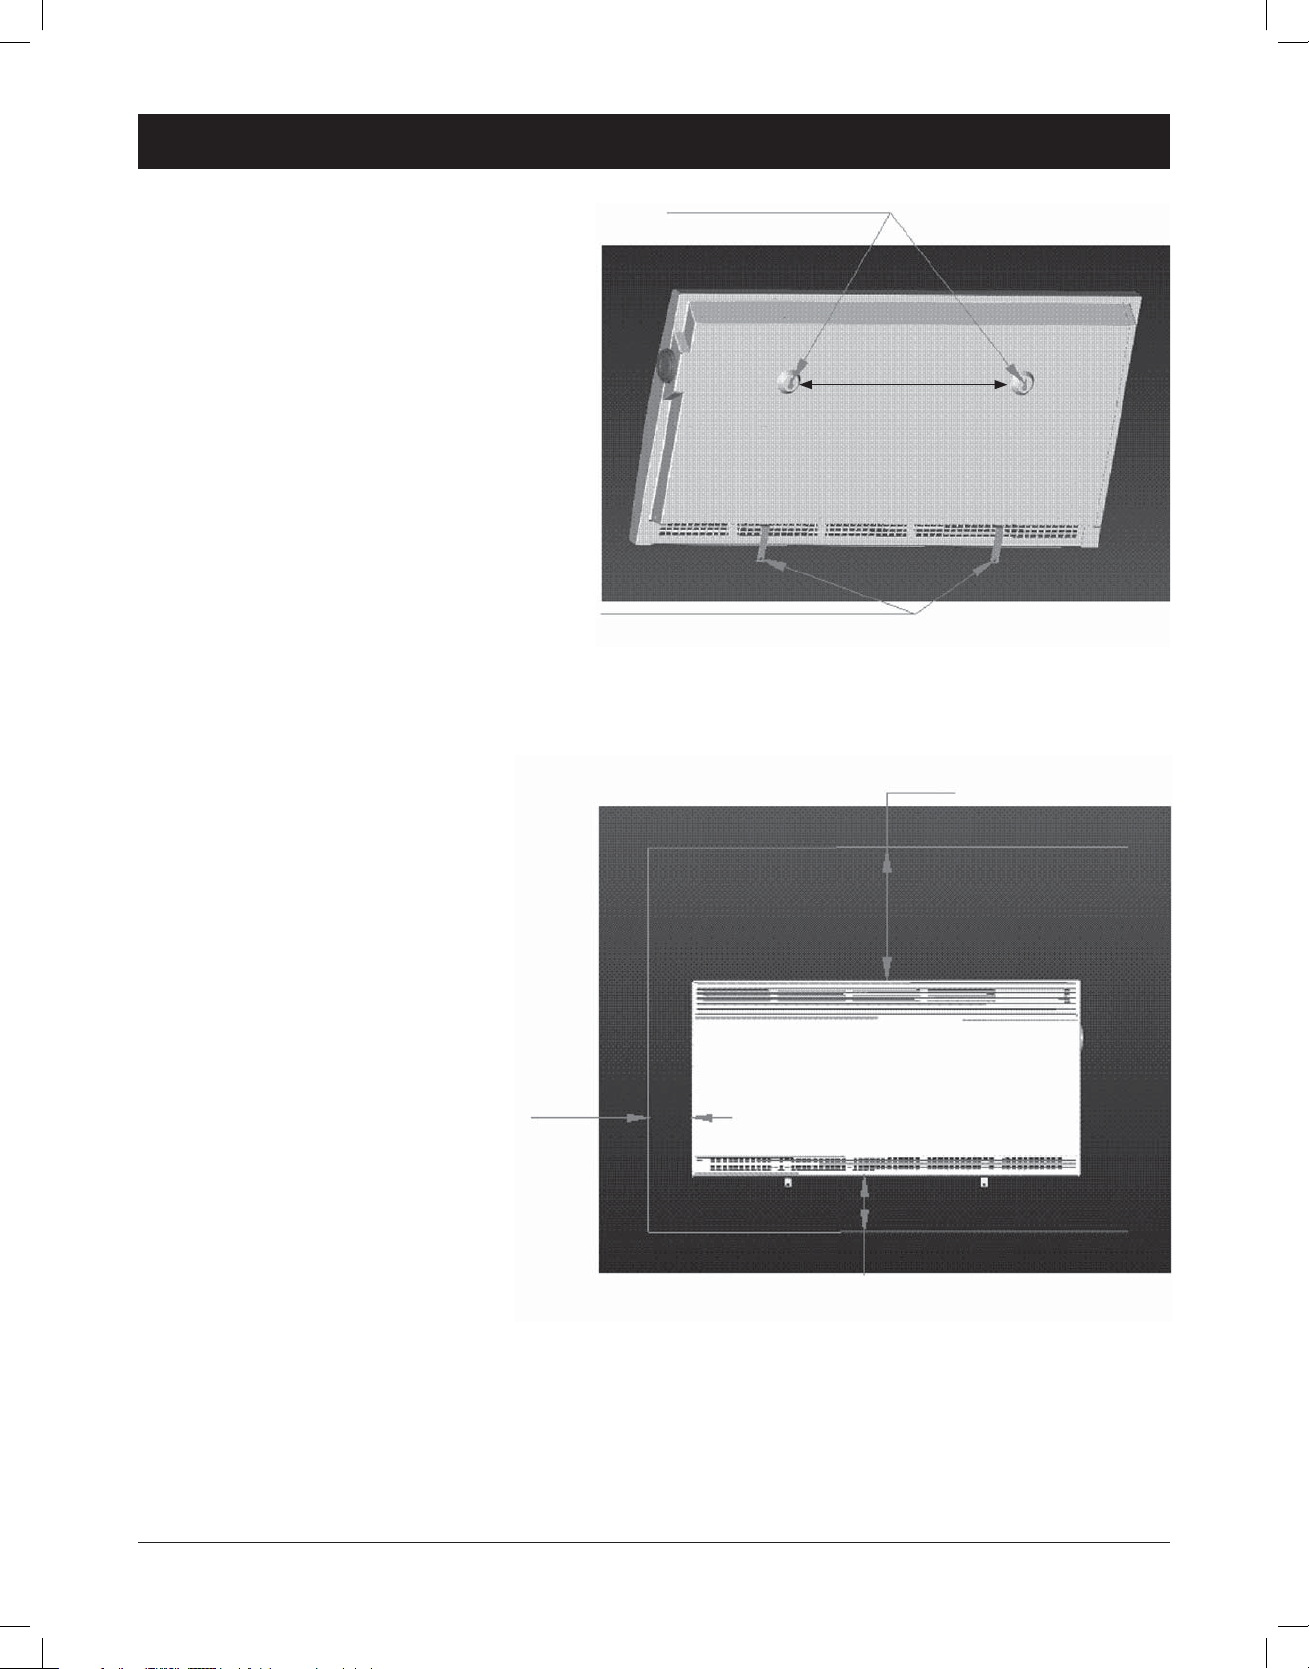
• The heater must be mounted at four
points. Two mounting holes (keyhole
slots) are located on the upper rear of
the heater and two wall mount angle
brackets are provided for securing the
heater’s bottom to the wall.
• Fit the short edges of the angle brackets
to the heater and secure brackets with
the screws provided, ensuring the long
tabs protrude downward (see Fig. 1).
• The heater must be positioned on a wall
away from cold draughts or breezeways
which may interfere with the temperature control system (rotary thermostat).
• A clearance of at least 6" (152mm) to
BOTH sides of the heater, at least 20
inches (508mm) to the front and top of
the heater should be maintained.
• A clearance of at least 8" (205mm) must
be maintained above the fl oor or fl oor
coverings (see Fig. 2).
• The unit must NOT be positioned
directly under a power outlet.
Fig. 1
Two Mounti ng Holes
Approximately 173/4" between
the midpoints of the holes
Two Wall Mount Angle Brackets
At least 20" (508mm)
• The unit should not be located
below air extraction vents.
Installation Instructions:
1. Mark the two screw points for the top
mounting screws on the wall at dimensions shown at right (Fig. 1) 17.75"
(451 mm) apart.
2. Do not Screw Directly into
sheetrock or paneling only.
At least
(152mm)
3. Screws must be securely screwed
into wall studs or by using suitable
anchors (not supplied), not
completely, leaving 4-5 mm’s
(0.16" - 0.2"). Consult a qualifi ed
electrican if in doubt.
4. Slide keyhole slots in heater over these
two screws.
5. Connect the two wall mount angle
brackets at the bottom of the unit as
shown at right (Fig 1).
6"
Fig. 2
Install bottom of Heater not less than 8" (205mm)
above the fi nished fl oor.
6. Mark the two screw points (holes in the
brackets).
7. Repeat steps 2 & 3 above, only this time
screws must be screwed completely.
4
Page 7
Portable Installation
Portable Use
CAUTION:
Risk of fi re – Do NOT operate heater without
the wheel assemblies securely attached.
Operate heater only in upright position (wheel
on bottoms). Any other position of the heater
can create a hazardous condition.
Screw
Castor
Foot
1. Attach the two (included) wheel assemblies
by positioning them as shown in Fig. 3
(one on each side).
2. Secure the wheel assemblies with the
included screws.
Screw
Attach Hole
Fig. 3
5
Page 8
Operation
1. The thermostat maintains the desired room temperature
automatically by switching on and off.
2. Make sure the thermostat is on the “OFF” position
before plugging the heater.
3. Plug the heater.
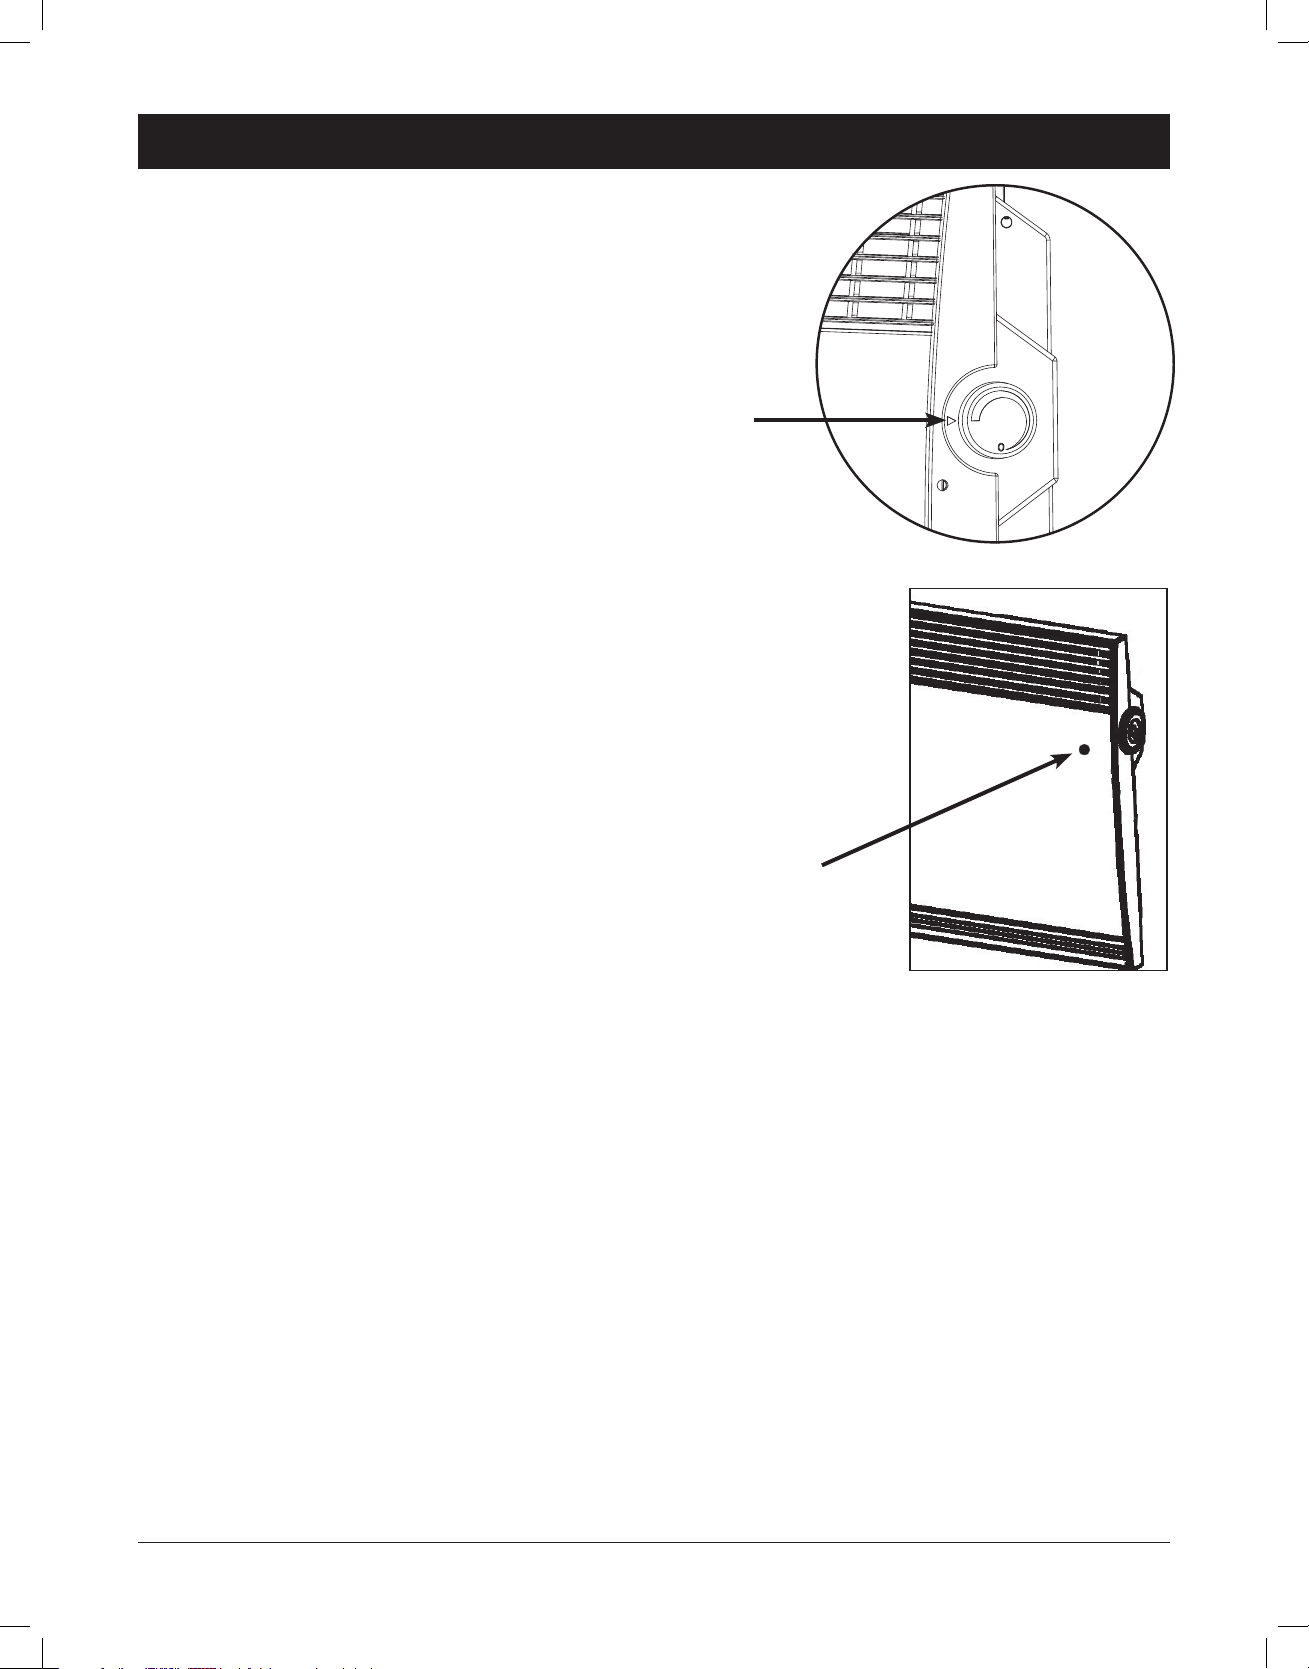
4 ON/OFF Thermostat control knob controls the
temperature setting of the heater, and it also turns
the heater ON/OFF. When the arrow (a) indicated
below lines up with the “0” in the knob, the heater is turned OFF.
Rotating the control clockwise turns the heater ON and increases
the temperature setting of the heater.
5. Adjust the temperature as desired.
Once the heater is turned ON, the power light will illuminate.
6. The further the knob is turned clockwise the higher the
setting temperature – see “Thermostat Setting”
7. Pilot light indicator (b) shown below indicates when the
heater is operating. This indicator will light up when the
heater is ON and heating up and will be OFF when the heater
is unplugged, turned OFF, or has reached the desired temperature.
(a)
(b)
CAUTION:
FRONT GRILL IS HOT WHEN
UNIT IS IN OPERATION
Thermostat Setting
To properly set the heater to the desired temperature we recommend:
• Turn the knob clockwise, starting with a low temperature setting.
• Allow the heater to reach its set temperature.
• If a higher temperature is desired, turn the thermostat knob further clockwise.
If a lower temperature is desired, turn the thermostat knob counter-clockwise.
• Turn again the knob clockwise (just a little): in this position the thermostat will
maintain the comfortable temperature you have selected.
Pilot
Light
6
Page 9

Maintenance
• ALWAYS TURN THE HEATER OFF AND UNPLUG IT BEFORE CLEANING
• It is recommended that the heater be cleaned at least twice during the operating season.
• Air inlet and outlet grilles can be cleaned with a vacuum cleaner to remove dust.
• Use a dry, soft cloth to clean the exterior surfaces.
• In case you need to repair it, please contact an authorized repairing center.
Storage
• Before storage, turn the heater OFF, unplug and wait for the heater to cool down.
Wrap the cord, pack the heater in the original carton and store it in a a cool, dark place.
7
Page 10

Troubleshooting
If your heater fails to operate, follow these instructions:
• Check to make sure that your circuit breaker or fuse is working properly.
• Ensure that the heater is properly plugged in, and that the electrical outlet is working properly.
• DO NOT ATTEMPT TO OPEN OR REPAIR THE HEATER YOURSELF.
DOING SO MAY VOID THE WARRANTY AND COULD CAUSE DAMAGE OR
PROPERTY AND PERSONAL INJURY.
8
Page 11

Don’t forget to register your Amcor purchase online,
and view our broad selection of innovative products.
www.amcorgroupusa.com
9
Page 12

One Year Limited Warranty
Amcor, Inc. (“Amcor”) warrants the original retail purchaser (“Purchaser”) purchasing in the United
States that the Amcor product with which this warranty is enclosed is free from defects in materials
and workmanship.
Amcor’s sole obligation under this warranty is to replace, or at Amcor’s discretion, to repair, free of
charge, all defective parts, for a period of one (1) year from date of original purchase. ANY IMPLIED
WARRANTY OF MERCHANTABILITY IS SIMILARLY LIMITED TO ONE (1) YEAR FROM DATE
OF ORIGINAL PURCHASE AND NO ACTION BASED UPON ANY IMPLIED WARRANTY OF
MERCHANTABILITY OR OTHER-WISE MAY BE COMMENCED AFTER EXPIRATION OF ONE
(1) YEAR FROM DATE OF ORIGINAL RETAIL PURCHASE. Some states do not allow limitations on
how long an implied warranty lasts, so the above limitation may not apply to you.
The provisions of this warranty shall not apply to any product which in Amcor’s judgment has been
(1) subject to misuse or neglect. (2) damaged in an accident. (3) used for a purpose for which it was
not designed, or (4) repaired or altered in any way that adversely affected its performance or reliability.
Do not attempt to “open unit”. Opening unit will void manufacturers warranty.
To obtain warranty service, the defective product or part must be shipped or delivered to: Amcor
the Manufacturer. Shipping charges and insurance are only covered by Amcor during
fi rst 30 day period after purchase, solely for defective product.
AMCOR NEITHER ASSUMES NOR AUTHORIZES ANY PERSON TO ASSUME FOR IT ANY
OTHER ( LIABILITY IN CONNECTION WITH ITS PRODUCTS, THERE ARE NO WARRANTIES
WHICH EXTEND BEYOND THE DESCRIPTION ON THE FACE HEREOF. NO RESPONSIBILITY
IS ASSUMED FOR INCIDENTAL OR CONSEQUENTIAL DAMAGES THAT MAY RESULT FROM
THE USE OF AN AMCOR PRODUCT, NOR FOR THE DAMAGES DUE TO ACCIDENT, ABUSE,
LACK OF RESPONSIBLE CARE, THE AFFIXING OF ANY UNAUTHORIZED ATTACHMENT,
LOSS OF PARTS, OR USE AT A VOLTAGE OTHER THAN SPECIFIED. Some states do not allow
the exclusion of limitation of incidental or consequential damages, so these limitations may not apply to you. Amcor disclaims all liabilities for defects or damages caused by use of replacement parts
obtained from or by service at any service center other than Amcor the Manufacturer.
This warranty gives you specifi c legal rights, and you may also have other rights which vary from state
to state.
Product: AMCOR Wall Mountable/Portable Heater Model: AHM8
Date Purchased:__________________________________ Production Code:_____________
QUESTIONS? Call 1-866-361-2233
www.amcorgroupusa.com
10/20 08
913129090
Dear Customer: Please keep this warranty for your record.
DO NOT return it.
10
Page 13

Manual del
Usuario
Calentador Portátil /
Instalable en la Pared
Model AMH8
Es importante que lea estas instrucciones
antes de utilizar su nueva compra y le
recomendamos ampliamente que las guarde
en un lugar seguro para futuras referencias.
Page 14

Índice
Instrucciones de Seguridad ……………………………………… 1
Gracias ………………………………………………………… 2
Desempaque y Confi guración …………………………………… 2
Partes …………………………………………………………… 3
Especifi caciones ………………………………………………… 3
Instalación en la Pared ………………………………………… 4
Instalación Portátil ……………………………………………… 5
Funcionamiento ………………………………………………… 6
Mantenimiento ………………………………………………… 7
Almacenaje ……………………………………………………… 7
Solución de Problemas ………………………………………… 8
Garantía Limitada ………………………………………………10
Page 15

Instrucciones de Seguridad
Para reducir el riesgo de incendios, descargas eléctricas, o lesiones al utilizar cualquier aparato eléctrico, siempre se deben
tomar medidas de seguridad básicas, incluyendo las siguientes:
• No cubra, tape ni obstruya los conductos de aire superior e inferior del calentador.
• Lea todas las instrucciones cuidadosamente antes de usar el calentador.
• Este calentador se calienta durante su uso. Para evitar quemaduras no toque las superfi cies calientes de este calentador
con las manos descubiertas o con cualquier parte del cuerpo sin protección.
• Mantenga los materiales combustibles, tales como, muebles, almohadas, ropa de cama, papeles, ropa y cortinas por lo
menos a 3 pies (0.9mts) de distancia de la parte frontal del calentador y manténgalos fuera del área lateral y
posterior del calentador.
• Se debe tener mucho cuidado cuando el calentador este siendo utilizado alrededor o
cerca de niños pequeños o personas discapacitadas.
• Este calentador está equipado con un enchufe a tierra (ver ilustración) y
debe ser enchufado en una toma de corriente conectada a tierra como
se muestra más abajo. Esta es una característica de seguridad.
¡NO REEMPLACE O CAMBIE ESTE ENCHUFE!
• Revise siempre el cable de alimentación de energía, y no opere el calentador si el
ordón o enchufe está dañado.
• NO ABRA EL CALENTADOR. El interior de la unidad contiene partes que no son de
utilidad para el usuario.
• NO use el calentador si el cordón o enchufe están dañados, o después que la unidad haya funcionado
mal, o si ha sido dañada o tirada al piso en cualquier forma. En este caso, devuelva el calentador a un
establecimiento de servicio autorizado para su inspección y/o reparación.
• No utilice la unidad en el exterior, es sólo para uso interior.
• Este calentador no es para ser usado en baños, áreas de lavandería o cualquier otra área húmeda o vaporosa.
• Nunca coloque el calentador donde pueda caerse en una tina de baño u otros contenedores de agua.
• No extienda el cordón del calentador por debajo de alfombras o tapetes ni tampoco cubra el cordón.
Asegúrese que el cordón esté fuera del camino y no presente riesgo de tropiezos.
• Apague el calentador antes de desenchufarlo de la toma de corriente.
• No meta objetos en los conductos/rejillas de aire del calentador ya que esto puede causar una descarga
eléctrica o un incendio. Para prevenir un incendio no bloquee las entradas o salidas de aire en ninguna forma.
• El calentador contiene adentro piezas y partes calientes y con arco eléctrico. Nunca use el calentador cerca
del área donde se use o guarde pintura, solvente de pintura, gasolina u otros líquidos infl amables.
• Sólo utilice este calentador como se especifi ca en este manual. Cualquier otro uso podría ocasionar lesiones
a personas o daños a su propiedad o hasta descargas eléctricas.
• Evite el uso de cables de extensión para conectar la unidad ya que la extensión puede sobre calentarse y causar un riesgo
de incendio. Sin embargo, si debe utilizar una extensión, el cable debe ser como mínimo de tamaño Núm. 14 AWG y
debe ser clasifi cado con no menos de 1875 vatios.
• Este calentador toma 12.5 amperios durante su funcionamiento. Para prevenir que el circuito se sobrecargue,
no enchufe la unidad en un circuito que ya se está usando para conectar otros electrodomésticos.
• Mientras que es normal que el enchufe del calentador se sienta caliente al tocarlo, algún cable suelto entre
el enchufe y la toma de corriente puede causar sobrecalentamiento y deformación del enchufe. Si el enchufe esta suelto,
contacte a un electricista califi cado para cambiar enchufes o tomas de corrientes sueltas o desgastadas.
• No permita que agua salpique en el calentador. Si el calentador parece estar húmedo, interrumpa o suspenda
su uso inmediatamente.
• La salida de este calentador puede variar y su temperatura puede llegar a ser lo sufi cientemente alta o intensa para
quemar la piel expuesta. El uso de este calentador no es recomendable para personas con sensibilidad reducida al comer
o inhabilidad de reaccionar para evitar o prevenir quemaduras.
• Cualquier tipo de servicio que no sea de limpieza debe llevarse a cabo por un centro de servicio autorizado.
El interior de la unidad contiene partes que no son de utilidad para el usuario. Solamente personal de servicio autorizado
deberá realizar el trabajo de reparación.
• El aparato tiene un dispositivo interno de la seguridad de la sobre-temperatura, que cambia automáticamente la calentadora lejos, si un recalienta la situación es discernida. Reponga manualmente la unidad una vez la calentadora se calma.
• Cuándo la unidad se calma, si usted advierte que el dispositivo de la seguridad todavía apaga la calentadora, desenchufa
la unidad, la espera 30 segundos a un minuto, y al tapón en otra vez. Esto provocará la unidad y encenderá.
1
Page 16

¡Gracias!
Gracias por comprar un Calentador de Panel Plano AMCOR. AMCOR es una marca líder en el
tratamiento del aire interior. Deseamos que usted disfrute los numerosos benefi cios que esta unidad le
ofrece, así que por favor lea detenidamente este manual y aproveche las muchas ventajas que su
Calentador Portátil AMCOR le brinda. Amcor se ha especializado en el control ambiental interior
fabricando calentadores, aires acondicionados, deshumidifi cadores y purifi cadores de aire de clase y
calidad mundial con tecnología innovadora. En el diseño de estos productos tan avanzados, hemos
prestado mucha atención a nuestros clientes y hemos indicado sus puntos de vista y opiniones a
nuestros laboratorios de investigación y desarrollo.
Le deseamos que disfrute de este producto por muchos años.
Después de leer este manual, consérvelo en un lugar seguro para futuras referencias.
Lea este manual de instrucciones en su totalidad antes de usar la unidad.
Por favor guarde su recibo de compra. Su recibo es su Comprobante de Compra y es
necesario para el servicio de garantía. Desempaque
Desempaque y Confi guración
1. Con cuidado saque su calentador de la caja (por favor guarde la caja para su almacenaje de fuera
de temporada).
2. Asegúrese que la unidad esté en la posición de APAGADO antes de enchufar el calentador a la
toma de corriente.
3. Proceda con las instrucciones para “Instalación en la Pared” o “Uso Portátil”.
2
Page 17

Partes
Rejilla
Superior
Parte
Frontal del
Calentador
Rejilla
Inferior
Cubierta
Posterior
Perilla del
Termo st ato
APAGADO/
ENCENDIDO
Luz indicadora
de APAGADO/
ENCENDIDO
del piloto
Especifi caciones
Modelo AMH8
Voltaje de la Fuente de Energía 120V~ 60Hz
Consumo de Energía 1500W
Corriente de Trabajo 12.5 Amperes
3
Page 18

Instalación en la Pared
• El calentador debe ser montado en cuatro
puntos diferentes. En la parte trasera superior del calentador están ubicados dos hoyos
de montaje y se proporcionan dos soportes
angulares para montaje de pared para sujetar la
parte inferior del calentador a la pared.
• Ajuste los bordes o lados cortos de los
soportes angulares al calentador y sujete los
soportes con los tornillos que se le proporcionan, asegurándose que las lengüetas o pestañas
largas sobresalgan hacia abajo.
• El calentador debe estar posicionado en una
pared lejos de corrientes frías o de corredores
o pasillos que puedan interferir con el sistema
de control de temperatura (termostato
giratorio).
• Se debe mantener un espacio libre de por lo
menos 6" (152mm) en AMBOS lados del calentador, y por lo menos 20 pulgadas (508mm) en
la parte frontal y superior del calentador.
• Se debe mantener una altura o espacio libre de
por lo menos 8" (205mm) sobre el piso o el
recubrimiento del piso. (Ver Fig. 2).
• La unidad NO debe ser colocada directamente
debajo de un enchufe de energía eléctrica.
• La unidad no debe ser colocada debajo de
rejillas de extracción de aire.
Fig. 1
Dos Hoyos de Montaje
Aproximadamente 17¾” entre
ambos centros de los hoyos
Dos Soportes Angulares para Montaje de Pared
Por lo menos 20" (508mm)
Instrucciones de Instalación:
1. Marque en la pared los dos puntos para
los tornillos superiores de montaje con
las dimensiones que se muestran en la
derecha (Fig. 1) con 17.75" (451mm)
de distancia.
2. No atornille directamente en tableros
de yeso o paneles de madera.
3. Los tornillos deben ser atornillados
fi rmemente en soportede pared o utilizando
anclajes adecuados (no proporcionados), pero
no atornille completamente, deje 4-5mm de
espacio (0.16"-0.2"). Si tiene dudas, consulte
a un electricista califi cado.
4. Deslice las ranuras que se encuentran en la
parte trasera de calentador sobre estos
dos tronillos.
5. Sujete o fi je los dos soportes angulares para montaje en la parte inferior
de la unidad como se muestra a la derecha (Fig. 1).
6. Marque los dos puntos a atornillar (hoyos/agujeros en los soportes).
7. Repita los pasos 2 y 3 anteriores, sólo que esta vez los tornillos deben
de ser atornillados completamente.
Por lo
menos
6"
(152mm)
Fig. 2
Instale la parte inferior del Calentador A No Menos
de 8" (205mm) de distancia sobre el piso.
4
Page 19

Uso Portátil
Instalación Portátil
PRECAUCION:
Riesgo de incendio – NO opere el calentador
sin haber fi jado o puesto fi rmemente el
ensamblaje de las ruedas.
Solamente opere el calentador en posición
vertical (con las ruedas en la parte de abajo).
Cualquier otra posición en que coloque el
calentador puede crear una condición peligrosa.
1. Fije los dos ensamblajes de las ruedas
(incluidos) colocándolos como se muestra en
la Fig. 3 (una en cada lado).
2. Sujete los ensamblajes de las ruedas con los
tornillos que se incluyen.
Tornillo
Rueda
Giratoria
Pie
Hoyo para
el Tornillo
Fig. 3
5
Page 20

Funcionamiento
1. El termostato mantiene automáticamente la temperatura
ambiental deseada encendiendo y apagando la unidad.
2. Asegúrese que el termostato esté en “APAGADO” antes de
enchufar el calentador.
3. Enchufe el calentador.
4. La perilla de control de ENCENDIDO/APAGADO
del termostato controla la confi guración de la
temperatura del calentador, y además ENCIENDE/APAGA
el calentador. Cuando la fl echa que se muestra en el inciso (a)
se alinea con el “0” en la perilla de control, el calentador se APAGA.
Girar la perilla de control hacia la derecha ENCIENDE el calentador
y aumenta la confi guración de temperatura del calentador.
5. Ajuste la temperatura según sea deseada.
6. Entre más gire hacia la derecha la perilla del termostato, más alta será
la confi guración de temperatura – ver “Confi guración del Termostato”.
(a)
7. El indicador de luz piloto que se muestra en el inciso (b) indica cuando
el calentador está funcionando. Este indicador se prenderá cuando el
calentador esté ENCENDIDO y operando y se APAGARÁ cuándo el
calentador está desenchufado, APAGADO o ha alcanzado al
temperatura deseada.
PRECAUCION: LA REJILLA FRONTAL
ESTARÁ CALIENTE CUANDO LA UNIDAD
|ESTÈ EN FUNCIONAMIENTO.
Confi guración del Termostato
Para confi gurar correctamente el calentador en la temperatura deseada, le recomendamos:
• Girar la perilla hacia la derecha, empezando con una confi guración de temperatura baja.
• Permita que el calentador alcance la temperatura confi gurada.
• Si desea una temperatura más alta, gire la perilla del termostato más hacia la derecha.
Si desea una temperatura más baja, gire la perilla del termostato hacia la izquierda.
• Gire de nuevo la perilla hacia la derecha (sólo un poco): en esta posición el termostato
mantendrá la temperatura confortable que usted ha seleccionado.
(b)
Piloto
6
Page 21

Mantenimiento
• APAGUE SIEMPRE EL CALENTADOR ANTES DE LIMPIARLO.
• Es recomendable que el calentador se limpie por lo menos dos veces durante
la temporada de operación.
• Las rejillas de entrada y salida de aire pueden limpiarse con una aspiradora para remover el polvo.
• Utilice un trapo o paño suave y seco para limpiar las superfi cies exteriores.
• En caso de que la unidad necesite reparación, por favor contacte a un centro de
reparación autorizado.
Almacenaje
• Antes de almacenar, APAGUE el calentador, desenchúfelo y espere a que el calentador se enfríe.
Enrolle el cordón de electricidad, guarde el calentador en su caja original y almacénelo en un lugar
frio/fresco y oscuro.
7
Page 22

Solución de Problemas
Si su calentador no funciona, siga estas instrucciones:
• Revise para asegúrese que su interruptor eléctrico o fusible este trabajando correctamente.
• Asegúrese que el calentador esté enchufado debidamente y que la toma de corriente esté
funcionando correctamente.
• NO INTENTE ABRIR O REPARAR EL CALENTADOR USTED MISMO(A).
EL HACERLO PUEDE INVALIDAR LA GARANTIA Y PODRIA CAUSAR DAÑOS
A SU PROPIEDAD O LESIONES A SU PERSONA.
8
Page 23

No olvide registrar su producto Amcor en nuestra página de internet y
ver nuestra amplia selección de productos innovadores.
www.amcorgroupusa.com
9
Page 24

Garantía Limitada por Un Año
Amcor, Inc. (“Amcor”) garantiza al comprador original del producto (“Comprador”) que lo adquiere
en los Estados Unidos que el producto Amcor en el que se incluye esta garantía está libre de defectos en materiales y mano de obra. La única obligación de Amcor bajo esta garantía es reemplazar,
o a discreción de Amcor, reparar, sin costo, todas las partes defectuosas, por un período de un (1)
año a partir de la fecha de la compra original (5 años únicamente para el compresor). CUALQUIER
GARANTÍA IMPLÍCITA DE COMERCIABILIDAD ESTÁ DE IGUAL MANERA LIMITADA A UN (1)
AÑO A PARTIR DE LA FECHA DE LA COMPRA ORIGINAL Y NINGUNA ACCIÓN BASADA
SOBRE NINGUNA GARANTÍA IMPLÍCITA DE COMERCIABILIDAD O DE OTRO TIPO PUEDE
SER INICIADA DESPUÉS DE QUE EXPIRE UN (1) AÑO DE LA FECHA DE LA COMPRA ORIGINAL. Algunos estados no permiten limitaciones sobre qué tanto tiempo dura una garantía implícita,
por lo que la limitación anterior puede no ser aplicable a usted.
Las disposiciones de esta garantía no aplicarán a ningún producto el cual, a juicio de Amcor, haya sido
(1) sujeto a mal uso o negligencia, (2) dañado en un accidente, (3) utilizado para algún propósito para
el cual no fue diseñado, o (4) reparado o alterado de alguna manera que haya afectado desfavorablemente su desempeño o fi abilidad. No intente “abrir la unidad”. El abrir la unidad cancelará
e invalidará la garantía del fabricante.
Para obtener el servicio de garantía, el producto o parte defectuosa debe ser enviada o entregada a:
Amcor, el fabricante. Los cargos de envío y seguro son sólo cubiertos por Amcor durante
el periodo de los primeros 30 días después de la fecha de la compra original, y exclusivamente para productos defectuosos.
AMCOR NO ASUME NI AUTORIZA A NINGUNA PERSONA A QUE ASUMA POR ELLA NINGUNA OTRA RESPONSABILIDAD EN CONEXIÓN CON SUS PRODUCTOS, NO HAY GARANTÍAS QUE SE EXTIENDAN MÁS ALLÁ DE LA DESCRIPCIÓN DEL TEXTO PRESENTE. NO
SE ASUME NINGUNA RESPONSABILIDAD POR DAÑOS INCIDENTALES O CONSECUENTES
QUE PUEDAN RESULTAR DEL USO DE UN PRODUCTO AMCOR, DAÑOS DEBIDOS A UN
ACCIDENTE, ABUSO, FALTA DE CUIDADO RESPONSABLE O POR FIJAR ACCESORIOS NO
AUTORIZADOS, PÉRDIDA DE PARTES O AL UTILIZARLO CON UN VOLTAJE DIFERENTE DEL
ESPECIFICADO. Algunos estados no permiten la exclusión de limitación de daños incidentales o
consecuentes, por lo que estas limitaciones pueden no ser aplicables a usted. Amcor rechaza cualquier responsabilidad por defectos o daños causados por el uso de partes de repuesto obtenidas a
través de o por un servicio en cualquier centro de servicio que no sea Amcor, el fabricante.
Esta garantía le otorga derechos legales específi cos y usted puede también tener otros derechos los
cuales varían de estado a estado.
Producto: Calentador Portátil/Instalable en la Pared AMCOR Modelo: AHM8
Fecha de compra:__________________________ Código del Producto: _____________
¿PREGUNTAS? Llame al 1-866-361-2233
www.amcorgroupusa.com
10/20 08
Estimado Cliente: Por favor guarde esta garantía para su archivo.
NO la devuelva.
913129090
10
Page 25

Le Manuel du
Propriétaire
Une Unité de Chauffage Pour l’Installation
des Murs/Une Unité de Chauffage Portatifs
Le Modèle AMH8
C’est important que vous lisiez ces
instructions avant d’utiliser votre nouvel
achat. Nous recommandons fortement
que vous les gardiez dans un endroit sûr
pour la référence future.
Page 26

La Table des Matières
Les Instructions de Sûreté ……………………………………… 1
Merci! …………………………………………………………… 2
Le Déballage et Le Montage …………………………………… 2
Les Parties ……………………………………………………… 3
Les Spécifi cations ……………………………………………… 3
Le Montage Sur Le Mur / L’Installation Sur Le Mur …………… 4
L’Installation Portable …………………………………………… 5
L’Opération ……………………………………………………… 6
Le Maintien ……………………………………………………… 7
Le Stockage ……………………………………………………… 7
Le Dépannage …………………………………………………… 8
La Garantie Limitée ………………………………………………10
Page 27

Les Instructions de Sûreté
Lors de l’utilisation d’appareils électriques, les précautions élémentaires devraient toujours être entendu afi n de réduire le
risque de l’incendie, du choc électrique et de la blessure. Observez les précautions suivantes:
• Ne pas recouvrir ou d’entraver le haut et le bas du ventilateur d’air de l’appareil.
• Lisez toutes les instructions avant l’utilisation de cette unité.
• L’appareil de chauffage est chaud quand il est en usage. Pour éviter les brûlures, ne laissez pas la peau nue de toucher la
surface chaude.
• Gardez les matériaux combustibles, comme les meubles, les oreillers, la literie, les papiers, les vêtements et les rideaux
au moins 3 pieds (0,9 m) à l’avant de l’unité et sur les côtés et de l’arrière.
• La prudence extrême est nécessaire lorsque tout appareil de chauffage est utilisé par ou est utilisé près les enfants ou les
personnes handicapées.
• L’appareil est équipé d’une prise de terre (Voir la photo). Elle doit être branché sur
un type de récipient à terre comme sur l’illustration. C’est une mesure de sécurité.
(NE PAS REMPLACER CETTE PRISE).
• Inspecter toujours le cordon d’alimentation, et ne pas utiliser l’appareil avec un
cordon ou avec un plug qui est endommagé.
• NE PAS OUVRIR L’UNITE. À l’intérieur, il n’existe pas de pièces qui sont de service
à l’utilisateur.
• Ne pas utiliser l’appareil de chauffage si le cordon ou si la fi che est endommagée. Ne pas utiliser si l’appareil a mal
fonctionné. Ne pas utiliser si l’appareil a été endommagé de quelque manière que ce soit ou si l’appareil tombe.
Dans un tel cas, retournez l’appareil à un établissement de service autorisé pour un examen et / ou une réparation.
• Ne pas utiliser en plein air - pour utilisation en intérieur seulement.
• L’appareil de chauffage n’est pas prévu pour l’utilisation dans les salles de bain, les buanderies, les zones humides ou à
l’intérieur des zones qui sont similaires.
• Ne jamais placer l’appareil de chauffage où il pourrait tomber dans une baignoire ou dans d’autres conteneurs d’eau.
• Ne pas déposer l’appareil de chauffage cordon sous la moquette ou autrement couvrir le cordon.
Assurez-vous que le cordon d’alimentation est hors de manière qu’il ne pose pas un risque de déclenchement.
• Éteignez l’appareil de chauffage avant de le débrancher de la prise électrique.
• Ne pas insérer d’objets dans l’air ventilateur de l’appareil de chauffage, car cela peut causer un choc électrique ou de
provoquer un incendie. Pour éviter un incendie, ne bloquez pas les ventilateurs de l’air ou les gaz d’échappement.
• L’appareil a les éléments intérieurs qui sont chauds et sont arc électrique. N’utilisez jamais l’appareil de chauffage dans les
environs où les diluants à peinture, l’essence, la peinture ou d’autres liquides infl ammables sont utilisés ou sont stockés.
• Utilisez l’appareil de chauffage seulement comme il est décrit dans ce manuel. Tout autre utilisation peut causer le
préjudice physique, les dommages de propriété, ou le choc électrique.
• Évitez l’utilisation d’une rallonge électrique pour alimenter l’appareil de chauffage parce que la rallonge peut surchauffer
et causer un risque d’incendie. Toutefois, si vous devez utiliser une rallonge, le cordon doit être d’un numéro 14 AWG
taille minimale, et il doit être évalué pas moins de 1875 watts.
• L’appareil de chauffage attire 12,5 ampères au cours de son application. Pour éviter une surcharge du circuit, ne pas
brancher l’appareil de chauffage dans un circuit qui est déjà utilisé pour d’alimenter d’autres appareils.
• S’il est normal que la prise de l’appareil de chauffage à se sentir chaud au toucher, un raccord desserré entre la prise et la
sortie électrique peut provoquer la surchauffe et la déformation de la prise de l’appareil de chauffage.
Si la sortie électrique est desserrée, contactez un électricien qualifi é afi n de remplacer les sorties électriques qui sont
lâches ou sont usées.
• Ne pas laisser les éclaboussures de l’eau sur l’appareil de chauffage. Si l’appareil de chauffage semble être humide, vous
devez cesser immédiatement son utilisation.
• La sortie de l’appareil de chauffage peut varier et sa température peut devenir assez intense pour brûler la peau exposée.
L’utilisation de l’appareil de chauffage n’est pas recommandée pour les personnes avec la réduction de la sensibilité à la
chaleur ou l’incapacité d’éviter d’être brûlés.
• Le service de l’appareil sauf pour le nettoyage doit être effectué par un centre de service autorisé. Il n’existe pas de parties à l’intérieur qui sont de service à l’utilisateur. Seul le personnel autorisé devrait faire les travaux de réparation.
• L’appareil a un appareil de sécurité de sur-température interne, qui change automatiquement l’appareil de chauffage de,
si un surchauffer la situation est détectée. Manuellement remettre à l’état initial l’unité une fois l’appareil de chauffage se
refroidit.
• Quand l’unité se refroidit, si vous remarquez l’appareil de sécurité commutateurs calmes de l’appareil de chauffage,
débranchez l’unité, l’attente de 30 seconde à une minute, et un bouchon dans encore. Ceci déclenchera l’unité et
il allumera.
1
Page 28

Merci!
Merci pour l’achat d’un appareil de chauffage à écran plat d’AMCOR.
AMCOR est une marque principale dans le traitement de l’air intérieur.
Nous aimerions que vous appréciiez les beaucoup d’avantages que cette unité offre, donc s’il vous plaît
lisez ce manuel soigneusement et prenez l’avantage plein des beaucoup de caractéristiques avancées que
votre GLOBAL Climatiseur Portatif vous offre.
AMCOR spécialisé dans le contrôle complet de l’environnement intérieur.
Nous fabriquons des appareils de chauffage, les climatiseurs, les humidifi cateurs et les purifi cateurs d’air.
Nous utilisons la technologie innovatrice supérieure.
Alors que le concevoir de ces produits avancés, nous avons écouté soigneusement à nos clients et nous
avons donné leurs recommandations à nos laboratoires de la recherche et le développement.
Nous vous souhaitons beaucoup des années de l’usage agréable.
Après la lecture de ce manuel, s’il vous plaît le gardez dans un endroit sûr pour la référence avenir.
Lisez ce manuel d’instruction entièrement avant l’utilisation.
S’il vous plaît garder votre facture de vente. Votre facture de vente est votre preuve
d’achat et est nécessaire pour le service de garantie.
Le Déballage et Le Montage
1. Retirez votre appareil de chauffage de la boîte.
(S’il vous plaît garder le carton pour la saison de stockage).
2. Assurez-vous que l’unité est en position OFF avant l’appareil de chauffage est branché dans la prise.
3. Continuer avec les instructions pour « L’Installation Sur Le Mur » ou « L’Installation Portable ».
2
Page 29

Les Parties
Le haut
de la grille
La face
avant
de l’unité
Le fond
de la grille
Le capot
arrière
ON / OFF
Le bouton de
thermostat
Luz ON / OFF
L’indic ateur
de la veilleuse
Les Spécifi cations
Le Modèle AMH8
La Tension d’Alimentation 120V~ 60Hz
La Consommation Electrique 1500W
Courant fonctionnant 12.5 Ampères
3
Page 30

Le Montage Sur Le Mur / L’Installation Sur Le Mur
• L’appareil doit être monté à quatre points.
Les deux trous de montage (les clous fentes)
sont situés en haut à l’arrière de l’appareil.
Deux supports angulaire qui sont conçus pour
le montage mural sont prévus pour assurer le
bas de l’arrière au mur.
• Montez les bords court angulaire de l’appareil.
Fixez les soutiens avec les vis qui sont fournies.
Cela permettra d’assurer que la longue
onglette saillie vers le bas (Fig. 1).
• L’appareil doit être placé sur un mur en dehors
des zones qui sont froides et venteuses, car
cela peut interférer avec la température du
système de contrôle (thermostat rotatif).
• Une distance d’au moins 6 pouces (152 mm)
de chaque côté de l’appareil devrait être
maintenu. Une distance d’au moins 20 pouces
(508 mm) de l’avant et du haut de l’appareil
devrait être maintenue.
• Une distance d’au moins 8 pouces (205 mm)
doit être maintenue au-dessus du plancher ou
au-dessus du plancher tapis (Fig. 2).
• L’unité ne doit pas être placé directement sous
une source d’énergie électrique.
• L’unité ne doit pas être située au-dessous les
systèmes de ventilation.
Fig. 1
Deux trous de montage
Environ 17 ¾ pouces entre les
fentes des clous
Deux supports angulaire
Au moins 20 pouces (508mm)
Les Instructions D’installation:
1. Marque sur le mur les points de montage
sur le dessus pour l’insertion des deux
vis à une distance de 17,75 pouces (451mm).
2. Ne pas visser dans des domaines
sur le mur qui sont seulement de la
euille de roche ou qui ne sont que
des panneaux.
3. Les vis doivent être solidement vissées
dans les clous ou doit être assurée par
l’utilisation appropriée des ancres (non
fourni). Ne pas insérer complètement les
vis dans le mur. Laissez visible 4mm - 5mm
(0,16 pouces - 0,2 pouces). Consultez un
électricien qualifi é si vous avez des questions.
4. Faites glisser les clous fentes à l’arrière
l’appareil sur les deux vis dans le mur.
5. Connectez les deux supports de l’appareil pour le montage sur le mur
au bas de l’unité affi chée sur la droite (Fig. 1).
6. Marque sur le mur les deux points pour les vis (les trous dans les supports de l’appareil).
7. Répétez les mesures 2 et 3 ci-dessus à l’exception que cette fois les vis doivent êtres vissés
dans le mur complètement.
Au moins
6 pouces
(152 mm)
Fig. 2
Installez le bas de l’appareil pas moins de 8 pouces
(205 mm) au-dessus du plancher.
4
Page 31

L’Installation Portable
L’Ut ilis a tion Por ta ble
ATTENTION :
Le Risque d’Incendie - Ne faites pas fonctionner
l’appareil à moins que les roues sont solidement
fi x é e s .
Fonctionner seulement l’appareil de chauffage
en position verticale (les roues sur le bas).
Tout autre position de l’appareil peut créer une
situation dangereuse
1. Joindre les deux (inclus) roues par leur
positionnement comme ils sont indiqués
dans la Fig. 3 (un de chaque côté).
2. Garantir les roues avec les vis inclus.
Une
Vis
Un Castor
La Base
Le
Trou pour
La Vis de
Fixation
Fig. 3
5
Page 32

L’Opération
1. Le thermostat maintient automatiquement la température
de la chambre en allumant et en désactivant l’appareil.
2. Assurez-vous que le thermostat est à la position «OFF» avant
de la brancher de l’appareil.
3. Branchez l’appareil.
4. Le thermostat bouton ON / OFF contrôle la température
de l’appareil. Aussi, le thermostat bouton active et
désactive l’appareil. Lorsque la fl èche (a) qui est
indiquée ci-dessous correspond à « 0 » sur le bouton,
l’appareil est désactivé. Tourner la droite par le bouton
thermostat active l’appareil et augmente la température.
5. Réglez l’appareil à la température désirée. Lorsque le chauffage
est à la position «ON», la lumière de pouvoir éclairer.
6. Tournez le bouton vers la droite pour une position d’une
température plus élevée – voir « Le Réglage du Thermostat. ».
7. L’indicateur de la veilleuse (b) qui est affi ché ci-dessous indique
quand l’appareil est activé. Cet indicateur s’allume lorsque l’appareil
|est activé et fonctionne. Il ne s’allumerait pas quand l’appareil est
débranché, désactivé, ou si elle a atteint la température désirée.
(a)
ATTENTION :
LA GRILLE EST CHAUDE LORSQUE
L’APPAREIL EST EN SERVICE.
Le Réglage du Thermostat
Pour bien fi xer l’appareil à la température désirée nous vous recommandons:
• Tournez le bouton vers la droite. Commencez par une température basse.
• Laisser l’appareil pour atteindre la température désirée.
• Si une température plus élevée est désirée, tournez le bouton du thermostat d’autres aiguilles
d’une montre. Si une température plus basse est désirée, tournez le bouton de thermostat le sens
anti-horaire.
• Tournez le bouton de nouveau vers la droite (juste un peu).
Dans cette position, le thermostat contrôle la température confortable que vous avez sélectionnée.
(b)
Piloter la
Lumière
6
Page 33

Le Maintien
• TOUJOURS ETEINDRE L’APPAREIL AVANT DE LE DEBRANCHER ET
LE NETTOYAGE.
• Il est recommandé que l’appareil est nettoyé au moins deux fois au cours de la saison d’utilisation.
• Les grilles de ventilation peuvent êtres nettoyés avec un aspirateur pour enlever de la poussière.
• Utilisez un chiffon qui est sec et doux pour nettoyer les surfaces extérieures.
• Pour les réparations, s’il vous plaît contacter un centre de réparation autorisé.
Le Stockage
• Avant le stockage, mettez l’appareil à la position «OFF». Débranchez et laissez l’appareil refroidir.
Enroulez le cordon d’alimentation et stockez l’appareil dans le carton d’origine. Conservez-la dans un
endroit frais et sombre.
7
Page 34

Le Dépannage
• Vérifi ez que votre disjoncteur ou le fusible fonctionne correctement.
• Vérifi ez que l’appareil est branché correctement.
Vérifi ez que la prise électrique fonctionne correctement.
• NE PAS OUVRIR OU TENTER DE REPARER L’APPAREIL. CETTE ACTION
POURRAIT ANNULER LA GARANTIE. CETTE ACTION POURRAIT AUSSI CAUSER
LES DOMMAGES MATERIELS OU LES BLESSURES CORPORELLES.
8
Page 35

N’oubliez pas d’enregistrer votre achat d’Amcor en ligne,
et regardez notre sélection large de produits innovateurs.
www.amcorgroupusa.com
9
Page 36

Une Garantie Limitée d’Une Année
Amcor, Inc. (« Amcor ») mérite l’acheteur original du produit (l’ « Acheteur ») qui achète aux
Etats-Unis qui le produit d’Amcor avec lequel cette garantie est enclose est libre des défauts dans les
matériels et dans l’exécution.
Le devoir seul d’Amcor sous cette garantie est de remplacer, ou à la discrétion d’Amcor, réparer, gratuitement, toutes les parties défectueuses, pour une période de l’un (1) l’année de la date
de l’achat original. LA GARANTIE IMPLICITE DE LA VALEUR MARCHANDE EST LIMITEE DE
MEME A L’UN (1) l’ANNEE DE LA DATE DE L’ACHAT ORIGINAL ET AUCUNE ACTION QUI
EST BASE SUR LA GARANTIE IMPLICITE DE VALEUR MARCHANDE PEUT ETRE COMMENCE
APRES L’EXPIRATION DE L’UN (1) l’ANNEE DE LA DATE DE L’ACHAT DE PRODUIT ORIGINAL.
Quelques états ne permettent pas de limitation sur comment longtemps une garantie implicite dure,
donc la limitation ci-dessus mentionnée ne peut pas vous vous appliquer.
Les provisions de cette garantie ne s’appliqueront pas au produit qui dans le jugement d’Amcor a été
(1) employé improprement ou a été négligé, (2) endommagé dans un accident. 3) utilisé pour un but
pour lequel il n’a pas été conçu, (4) réparé ou a été changé de quelque façon qu’a affecté défavorablement son exécution ou sa fi abilité. Ne tentez pas d’ouvrir l’unité. L’ouverture de l’unité
annulera la garantie du fabricant.
Pour obtenir le service de garantie, le produit défectueux ou la partie défectueuse doit être expédié
ou doit être livré au fabricant, Amcor. Les charges d’expédition et l’assurance sont seulement
couvertes par Amcor pendant la première période de 30 jours après l’achat, seulement
pour le produit défectueux.
AMCOR NI SUPPOSE NI AUTORISE N’IMPORTE QUELLE PERSONNE POUR SUPPOSER AUCUNE AUTRE RESPONSABILITE A PROPOS DE SES PRODUITS. IL N’Y A PAS DE GARANTIE QUI S’ETENDENT AU DELA DE LA DESCRIPTION SUR LA VISAGE DU PRESENT DOCUMENT. AUCUNE RESPONSABILITE EST SUPPOSEE POUR L’ACCESSOIRE OU LES DOMMAGES
CONSEQUENTS QUI RESULTENT DE L’USAGE D’UN PRODUIT D’AMCOR, NI POUR LES
DOMMAGES EN RAISON DE L’ACCIDENT, L’ABUS, LE MANQUE DE SOIN RESPONSABLE,
L’APPOSER D’ATTACHEMENT INAUTORISE, LA PERTE DE PARTIES, OU L’USAGE DE TENSION
AUTREMENT QUE SPECIFIE. Quelques états ne permettent pas l’exclusion de la limitation de dommages accessoires ou conséquents, donc ces limitations ne peuvent pas vous vous appliquer. Amcor
désavoue toutes responsabilités pour les défauts ou les dommages causé par l’usage des parties de
remplacement a obtenu de ou par le service à n’importe quel centre de maintenance autrement que
au fabricant, Amcor.
Cette garantie vous donne des droits légaux spécifi ques, et vous pouvez avoir aussi d’autres droits
qui varie dans les états différents.
Produit: AMCOR Une Unité de Chauffage Pour Modèle: AHM8
l’Installation des Murs Une Unité de Chauffage Portatifs
La Date d’Achat:___________________________ Le Code de Production:________________
QUESTIONS? Appelez 1-866-361-2233 · www.amcorgroupusa.com
10/20 08
Cher Client: S’il vous plaît, gardez cette garantie pour votre rapport.
Ne le retournez pas.
913129090
10
 Loading...