

Page 1

101 Innovation Drive
San Jose, CA 95134
(408) 544-7000
www.altera.com
P25-10351-01
MAX II Development Kit
Getting Started User Guide
Development Kit Version: 1.1.0
Document Version: 1.1.0
Document Date: July 2005
Page 2

Copyright © 2005 Altera Corporation. All rights reserved. Altera, The Programmable Solutions Company, the stylized Altera logo, specific device designations, and all other words and logos that are identified as trademarks and/or service marks are, unless noted otherwise, the trademarks and
service marks of Altera Corporation in the U.S. and other countries. All other product or service names are the property of their respective holders. Altera products are protected under numerous U.S. and foreign patents and pending applications, maskwork rights, and copyrights. Altera warrants
performance of its semiconductor products to current specifications in accordance with Altera's standard warranty, but reserves the right to make
changes to any products and services at any time without notice. Altera assumes no responsibility or liability arising out of the application or use of any information, product, or service described herein except as expressly agreed to in writing by Altera
Corporation. Altera customers are advised to obtain the latest version of device specifications before relying on any published information and before placing orders for products or services.
UG-M292904-1.1
ii Development Kit Version 1.1.0 Altera Corporation
MAX II Development Kit Getting Started User GuidePreliminary July 2005
Page 3

Contents
About This User Guide
Revision History ........................................................................................................................................ v
How to Contact Altera .............................................................................................................................. v
Typographic Conventions ...................................................................................................................... vi
Chapter 1. About This Kit
Features ................................................................................................................................................... 1–1
Chapter 2. Getting Started
System Requirements ............................................................................................................................ 2–1
MAX II Development Kit Contents ............................................................................................... 2–1
Inspect the Board ............................................................................................................................. 2–1
Software Requirements ................................................................................................................... 2–1
Important Considerations ............................................................................................................... 2–2
Installing the MegaCore Function & Reference Designs/Demos .................................................. 2–2
Installing the Quartus II Software ....................................................................................................... 2–3
Quartus II System Requirements ................................................................................................... 2–3
Setting Up Licensing ............................................................................................................................ 2–3
Connecting the Cables and Power to the Board & PC ..................................................................... 2–4
ByteBlaster II Cable .......................................................................................................................... 2–4
Programming the MAX II Device ....................................................................................................... 2–4
Running the Functional Test ................................................................................................................ 2–6
Demo Designs ........................................................................................................................................ 2–7
Power-Up Time Demonstration ..................................................................................................... 2–7
Low Power Demonstration ........................................................................................................... 2–12
Real-Time ISP Demonstration ...................................................................................................... 2–14
Reference Designs ................................................................................................................................ 2–16
Reference Design 1: USB Reference Design ................................................................................ 2–16
Reference Design 2: The Slot Game Reference Design ............................................................. 2–22
Reference Design 3: PCI Reference Design ................................................................................. 2–26
Altera Corporation Development Kit Version 1.1.0 iii
July 2005 MAX II Development Kit Getting Started User Guide
Page 4

Contents
iv Development Kit Version 1.1.0 Altera Corporation
MAX II Development Kit Getting Started User Guide July 2005
Page 5
About This User Guide
Revision History
Chapter Date Version Changes Made
All October 2004 1.0.0 First release of User Guide
All July 2005 1.1.0 Minor updates
The table below displays the revision history for chapters in this user
guide.
f Refer to the readme file on the MAX II Development Kit CD-ROM for
late-breaking information that is not available in this user guide.
How to Contact Altera
Information Type USA & Canada All Other Locations
Technical support www.altera.com/mysupport/ www.altera.com/mysupport/
Product literature www.altera.com www.altera.com
Altera literature services literature@altera.com literature@altera.com
Non-technical customer
service
FTP site ftp.altera.com ftp.altera.com
For technical support or other information about Altera® products, go to
the Altera world-wide web site at www.altera.com. You can also contact
Altera through your local sales representative or any of the sources listed
below.
800-800-EPLD (3753)
7:00 a.m. to 5:00 p.m. Pacific Time
800-767-3753 + 1 408-544-7000
+1 408-544-8767
7:00 a.m. to 5:00 p.m. (GMT -8:00)
Pacific Time
7:00 a.m. to 5:00 p.m. (GMT -8:00)
Pacific Time
Altera Corporation Development Kit Version 1.1.0 v
July 2005 MAX II Development Kit Getting Started User Guide
Page 6

Typographic Conventions
Typographic
This document uses the typographic conventions shown below.
Conventions
Visual Cue Meaning
Bold Type with Initial
Capital Letters
bold type External timing parameters, directory names, project names, disk drive names,
Italic Type with Initial Capital
Letters
Italic type Internal timing parameters and variables are shown in italic type.
Initial Capital Letters Keyboard keys and menu names are shown with initial capital letters. Examples:
“Subheading Title” References to sections within a document and titles of on-line help topics are
Courier type Signal and port names are shown in lowercase Courier type. Examples: data1,
1., 2., 3., and
a., b., c., etc.
● • Bullets are used in a list of items when the sequence of the items is not important.
■
v The checkmark indicates a procedure that consists of one step only.
1 The hand points to information that requires special attention.
c
w
r The angled arrow indicates you should press the Enter key.
f The feet direct you to more information on a particular topic.
Command names, dialog box titles, checkbox options, and dialog box options are
shown in bold, initial capital letters. Example: Save As dialog box.
filenames, filename extensions, and software utility names are shown in bold
type. Examples: f
Document titles are shown in italic type with initial capital letters. Example: AN 75:
High-Speed Board Design.
Examples: t
Variable names are enclosed in angle brackets (< >) and shown in italic type.
Example: <file name>, <project name>.pof file.
Delete key, the Options menu.
shown in quotation marks. Example: “Typographic Conventions.”
PIA
, \qdesigns directory, d: drive, chiptrip.gdf file.
MAX
, n + 1.
tdi, input. Active-low signals are denoted by suffix n, e.g., resetn.
Anything that must be typed exactly as it appears is shown in Courier type. For
example:
actual file, such as a Report File, references to parts of files (e.g., the AHDL
keyword
Courier.
Numbered steps are used in a list of items when the sequence of the items is
important, such as the steps listed in a procedure.
The caution indicates required information that needs special consideration and
understanding and should be read prior to starting or continuing with the
procedure or process.
The warning indicates information that should be read prior to starting or
continuing the procedure or processes
c:\qdesigns\tutorial\chiptrip.gdf. Also, sections of an
SUBDESIGN), as well as logic function names (e.g., TRI) are shown in
vi Development Kit Version 1.1.0 Altera Corporation
MAX II Development Kit Getting Started User Guide July 2005
Page 7

Chapter 1. About This Kit
The MAX®II Development Kit provides everything you need to develop
complete solutions using MAX II devices. Several demos and reference
designs are included to show some of the features and benefits of MAX II
CPLD devices, as well as provide a starting point for custom designs. This
document describes how to install the software provided with the kit and
how to use the demos and reference designs that accompany the MAX II
development board.
Features
The MAX II Development Kit includes:
■ MAX II Development Board—The MAX II development board is a
prototyping and evaluation platform that provides designers with
an easy way to assess the features of the MAX II device and to begin
building custom solutions with the MAX II device. Key features of
the board include an EPM1270 device along with current sense
circuitry, power-up time detection circuitry, SRAM, and an LCD.
Refer to the MAX II EPM1270 Development Board Data Sheet for more
information.
■ Quartus
®
II Development Software, Web Edition—The Quartus II
development software provides a comprehensive environment for
SOPC design. The Quartus II software integrates into nearly any
design environment, with interfaces to industry-standard EDA tools.
You can obtain a 4-month license for the software from the Altera
web site. The Quartus II license allows you to use the product for
four months only. After four months, you must get a renewal to keep
on using the software.
■ MegaCore
MegaCore function with the OpenCore
®
IP Functions—The kit contains the Altera pci_t32
®
Plus feature. This OpenCore
Plus feature lets you quickly and easily verify the IP function by
running a time-limited version in hardware before making a
purchase decision. The OpenCore Plus hardware evaluation feature
is an evaluation tool for prototyping only. You must purchase a
license to use an Altera MegaCore in production designs.
®
Altera Corporation Development Kit Version 1.1.0 1–1
July 2005 MAX II Development Kit Getting Started User Guide
Page 8

Features
■ Reference Designs/Demos—Altera provides several demos and
reference designs with the MAX II Development Kit to help you get
started building applications. See “Demo Designs” on page 2–7 and
“Reference Designs” on page 2–16 for more information on the
designs provided.
1–2 Development Kit Version 1.1.0 Altera Corporation
MAX II Development Kit Getting Started User Guide July 2005
Page 9

Chapter 2. Getting Started
System Requirements
Before using the kit or installing the software, be sure to check the
contents of the kit and inspect the board to verify that you received all of
the items. If any of these items are missing, contact Altera
proceed. You should also verify that your PC meets the software and
system requirements of the kit.
®
before you
MAX II Development Kit Contents
The MAX®II Development Kit contains the following items:
■ MAX II development board with an EPM1270 device
■ ByteBlaster™ II Programming cable
■ USB Type A-B cable
■ MAX II Development Kit CD-ROM
■ Quartus
®
II Development Software Web Edition CD-ROM
Inspect the Board
1 The MAX II development board can be damaged without
proper anti-static handling.
Place the board on an anti-static surface and inspect it to ensure that it has
not been damaged during shipment. Verify that all components are on the
board and appear intact. Note that some components are purposefully
unpopulated. There are several resistors that are unpopulated, as well as
an EEPROM socket (J10).
f Refer to the MAX II EPM1270 Development Board Data Sheet (available on
the MAX II Development Kit CD-ROM) for information on the board
components and their locations.
Software Requirements
You should install the following software before you begin developing
designs for the kit:
■ Internet Explorer 4.01 with Service Pack 2 or later to use Quartus II
Help. You need a web browser to register the Quartus II software and
request license files.
Altera Corporation Development Kit Version 1.1.0 2–1
July 2005 MAX II Development Kit Getting Started User Guide
Page 10

Installing the MegaCore Function & Reference Designs/Demos
■ Altera recommends that you install the software that is on the
MAX II Development Kit CD-ROM. See “Installing the MegaCore
Function & Reference Designs/Demos”.
■ Quartus II software version 4.1 SP1 or later. See “Installing the
Quartus II Software”.
Important Considerations
You need your network identification card (NIC) ID for licensing the
Quartus II software.
Your NIC number is a 12-digit hexadecimal number that identifies the
Windows NT workstation that serves Quartus II licenses. Networked (or
floating node) licensing requires an NIC number or server host ID. When
obtaining a license file for network licensing, you should use the NIC
number from the PC that will issue the Quartus II licenses to distributed
users over a network. You can find the NIC number for your card by
typing ipconfig /all at a command prompt. Your NIC number is the
number on the physical address line, without the dashes.
You need administrative privileges to install the required software.
Installing the
MegaCore
Function &
Reference
Designs/Demos
To install the MegaCore® functions and reference designs, insert the
MAX II Development Kit CD-ROM into your CD-ROM drive. Copy the
files to your hard drive.
1 The pci_t32 MegaCore function installer is available in the
<root>/Examples/HW/ReferenceDesigns/
PCI_ReferenceDesign/PCI_Megacore_Installer directory. To
take advantage of the evaluation version of this MegaCore,
install it in the directory of your choice.
Figure 2–1 shows the directory structure.
2–2 Development Kit Version 1.1.0 Altera Corporation
MAX II Development Kit Getting Started User Guide July 2005
Page 11
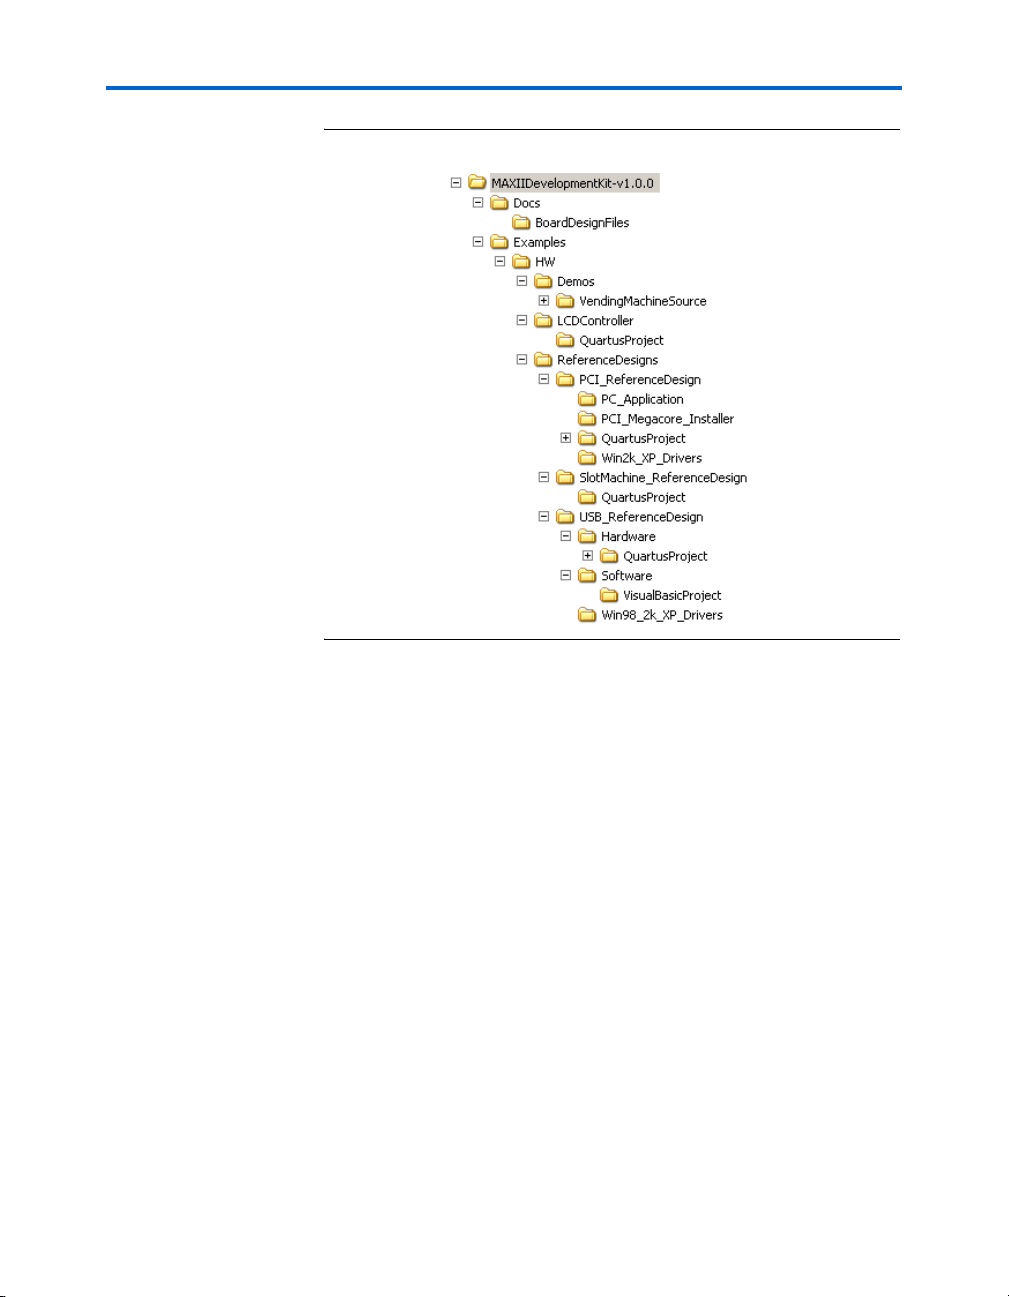
Figure 2–1. MAX II Directory Structure
Getting Started
Installing the Quartus II Software
Refer to “Installing the Quartus II Software” in the Quartus II Installation
& Licensing Manual for PCs, which is included on the MAX II Development
Kit CD-ROM, for the software installation instructions. After the software
finishes installing, you must request and install a license to enable it. See
“Setting Up Licensing ” on page 2–3 for more information.
Quartus II System Requirements
To use the MAX II Development Kit with the Quartus II software
provided with the kit, your system must meet the Quartus II software
minimum requirements. Refer to “System Requirements” in the
Quartus II Installation & Licensing Manual for PCs, which is included on the
MAX II Development Kit CD-ROM, for the software requirements.
Setting Up Licensing
Altera Corporation Development Kit Version 1.1.0 2–3
July 2005 MAX II Development Kit Getting Started User Guide
Before using the Quartus II software, you must request a license file from
the Altera web site at www.altera.com/licensing and install it on your
PC. When you request a license file, Altera e-mails you a license.dat file
that enables the software. To obtain a license, perform the following steps:
1. Log on to the Altera web site at www.altera.com/licensing.
Page 12

Connecting the Cables and Power to the Board & PC
2. Click Quartus II Web Edition Software.
3. Follow the on-line instructions to request your license. A license file
is e-mailed to you.
4. To install your license, refer to “Specifying the License File” in the
Quartus II Installation & Licensing Manual for PCs, included on the
MAX II Development Kit CD-ROM.
Connecting the
Cables and
Power to the
Board & PC
The MAX II Development Board obtains power from either the USB or
PCI interfaces. The three-pin jumper J8 controls whether power is
obtained via USB or PCI. The board ships with the power control option
set to USB (the shunt on J8 connects pins 1-2). To power the board from
the PCI Edge Connector, the shunt should be moved to pins 2-3.
To use the board outside of a PC chassis, you must connect the USB Type
A-B cable (included with the kit) from your PC to the board. The first time
you connect to your PC, the operating system will notify you that it
“Found New Hardware.” Windows XP automatically installs drivers for
you, while Windows NT and Windows 98 do not. The drivers are only
necessary if you are planning to use your PC to transfer data to and from
the MAX II development board. For more information, refer to
“Reference Design 1: USB Reference Design” on page 2–16.
ByteBlaster II Cable
The ByteBlaster II cable is used to download new programming files to
the MAX II device. The board supplies power to the ByteBlaster II
download cable. Connect the ByteBlaster II cable’s 10-pin female plug to
the MAX II device JTAG header on the board (J2) and connect the other
end to your PC to configure the MAX II device directly using a POF file.
1 Align the ByteBlaster II connector so that the red strip is
orientated towards the Altera logo on the board.
Programming the MAX II Device
2–4 Development Kit Version 1.1.0 Altera Corporation
MAX II Development Kit Getting Started User Guide July 2005
In order to program the MAX II device on the MAX II development
board, you must provide power to the board. The MAX II development
board can be powered via the USB or PCI interfaces. This section assumes
the board is being powered via USB. Refer to “Reference Design 3: PCI
Reference Design” on page 2–26 for details regarding programming
when the PCI bus is supplying power.
Page 13

Getting Started
Set Up the MAX II Development Board for Programming
1. Make sure the shunt on jumper J8 is connected to pins 1 and 2 (the
two pins closest to the LCD on the board). This supplies power from
the USB cable to the board power plane.
2. Connect the USB cable from the USB port on your PC to the USB
Type B connector on the MAX II development board.
3. Connect the ByteBlaster II cable from the parallel port of your PC to
the MAX II board header J2.
1 The red stripe on the ByteBlaster cable indicates the side
that pin 1 is on.
Set Up the Quartus II Software for Programming
4. Launch Quartus II and select Open (File menu).
5. In the Open dialog box set the Files of Type field to Programming
Files (*.cdf, *.sof, *.pof, *.jam, *.jbc).
6. Browse to the location of the POF file you want to load into the
MAX II device and open it.
7. Turn on the three check boxes in the Program/Configure and Verify
columns. See Figure 2–2.
1 Note that the CFM refers to the Configuration Flash
Memory—this is the non-volatile portion of the MAX II
device that stores the configuration data and loads it into
the logic portion of the MAX II device. The UFM refers to
the User Flash Memory on the MAX II device. This is
8 Kbits of non-volatile user storage space. For more
information on the MAX II device, the UFM, and the CFM,
refer to the MAX II Device Handbook.
8. Ensure that the Hardware setup box lists the ByteBlaster II cable in
the box. If it doesn’t, click Hardware Setup and select the
ByteBlaster II cable (you may have to add it using the Add button
before you can select it). Refer to the Quartus Help menu for
assistance in setting up the programming hardware.
9. Click Start to program the device.
Altera Corporation Development Kit Version 1.1.0 2–5
July 2005 MAX II Development Kit Getting Started User Guide
Page 14

Running the Functional Test
Figure 2–2. Programmer Window Dialog Box
Running the
Functional Test
The Functional Test is a simple design that exercises each component on
the board to ensure that the board is functioning properly. These tests are
run at the factory before the boards are shipped. They are provided to the
user so the board’s functionality can be verified at any time during the life
of the board.
To run the tests do the following:
1. Program the board with FunctionalTest.pof, located in the
<root>/Examples/HW/Demos directory. (Refer to “Programming
the MAX II Device” on page 2–4 for details on how to load POF files
into the MAX II device.)
2. The LCD should read “MAX II by Altera”.
3. Push S2 to cycle through the tests.
a. After pressing S2 once, the LCD screen should display the
voltage of V
CCINT
. MAX II V
can be set to 2.5 V or 3.3 V.
CCINT
You can test this feature by placing a shunt on J9. If the shunt is
present, the voltage displayed on the LCD should be about 2.5
V; if the shunt is removed, the voltage displayed should be
3.3 V.
b. Pressing S2 a second time will display the value of I
c. Pressing S2 a third time will display the value of the V
INT
.
CCIO
,
which should be ~3.3 V.
2–6 Development Kit Version 1.1.0 Altera Corporation
MAX II Development Kit Getting Started User Guide July 2005
Page 15

Getting Started
d. Pressing S2 a fourth time will display the value of IIO.
e. Pressing S2 a fifth time will display the board temperature,
which should be between 18° C and 23° C, depending on your
room temperature.
f. Pressing S2 a sixth time will display the LED test—LEDs 1-4
should light up and turn off one at a time.
g. Pressing S2 a seventh time will display the SRAM test—the
LCD will indicate Pass or Fail.
h. Pressing S2 for the eighth time will display the LCD test—note
the text: “LCD Does Work!”
i. Pressing S2 for the ninth time returns to the start up screen. The
LCD display reads: “MAX II by Altera”
If all tests pass, the MAX II development board is ready to use.
Altera provides several demos and reference designs with the MAX II
Development Kit to help you get started building applications and to
demonstrate the features of the MAX II device. The next two sections
describe the functionality of these designs.
Demo Designs
The MAX II Development Kit includes three demos that illustrate
features of the MAX II device:
■ “Power-Up Time Demonstration”
■ “Low Power Demonstration”
■ “Real-Time ISP Demonstration”
Power-Up Time Demonstration
MAX II devices power up and configure very quickly and may be used to
perform vital power-up functions. In order to allow users to investigate
the fast power-up time of a MAX II device, the board is equipped with a
circuit that allows users to observe the time it takes for a MAX II device
to power up under a variety of different power supply loading
conditions. This circuit allows users to increase or decrease the load on
the V
rate) of the MAX II V
mimic the load that the MAX II device’s V
on a custom piece of hardware. This knowledge allows you to verify that
the MAX II device will be powered up and configured quickly enough to
perform whatever power up functions are required in the user system.
Altera Corporation Development Kit Version 1.1.0 2–7
July 2005 MAX II Development Kit Getting Started User Guide
voltage plane. As this load is increased, the ramp time (or slew
CCINT
voltage increases. Using this circuit you can
CCINT
voltage plane will have
CCINT
Page 16

Demo Designs
w This test is meant to verify the data provided in the MAX II
Device Data Sheet, not to replace it. All MAX II devices will have
some fluctuation in power-up timing. Designers should ensure
that systems relying on a MAX II device to perform power up
functions are using the MAX II device in accordance with the
specifications given in the Data Sheet.
Before performing a test to verify the power-up time of a MAX II device
under a certain load, you should set the V
supply to 2.5 V or 3.3 V,
CCINT
depending on what it will be in the final system. The shunt on J9 controls
this value. If the shunt is present on J9, the MAX II device’s V
2.5 V; if the shunt is not present on J9, the V
value is 3.3 V.
CCINT
CCINT
is
The MAX II device data sheet specifies that a MAX II device will be
functional less than 300 μs after minimum V
actuality, configuration starts at a voltage below minimum V
level is reached. In
CC
CC
. A MAX II
device on a board where the VCC rise time is greater than 1 ms will be fully
powered-up and configured before the supply reaches minimum VCC.
The Power-up demo allows users to investigate the power-up time in two
different ways. The first is a race against the MAX II device that helps
define what “Instant-on” means. The second is a much more detailed
investigation of the power-up time that requires an oscilloscope, but
provides a thorough understanding of how a MAX II device powers up
under different loads.
On Board Circuit
The circuit on the board consists of a power regulator that provides the
voltage. The power regulator can be set to 2.5 V or 3.3 V by adding
V
CCINT
or removing a shunt on J9. (If the shunt is in place, V
shunt is not in place, V
= 3.3 V.) The load on the regulator can be
CCINT
increased by a variable resistor (POT1). Four test points are also provided
, V
on the board: V
CCINT
, GND, and a MAX II User I/O pin. These four
CCIO
test points are labeled Active I/O Test Points and are located near the
prototyping area on the board. Refer to the MAX II Development Board
Data Sheet if you cannot locate the test points on your board. These test
points allow for oscilloscope probes to be attached so the outputs can be
thoroughly examined.
2–8 Development Kit Version 1.1.0 Altera Corporation
MAX II Development Kit Getting Started User Guide July 2005
= 2.5 V; if the
CCINT
Page 17

Figure 2–3. Active I/O Circuit Diagram
Using the Demo
Test 1: Race Against the MAX II Device
Getting Started
1. Program the MAX II device with the InstantOn.pof demo, located
in the <root>/Examples/HW/Demos directory. (Refer to
“Programming the MAX II Device” on page 2–4 for details on how
to load POF files into the MAX II device.)
2. The following message scrolls across the LCD. Wait for the message
to complete:
The MAX II device is instant= on. What is an instant? The
MAX II device measures and displays T
CONFIG
. It also shows
how much shorter this instant is than the shortest time in which
you can push S2.
3. The LCD displays the following:
TCONFIG = 137us
SW2 low = 000*TCfg
TCONFIG refers to the time it takes the MAX II device to configure
under the current loading conditions. SW2 low refers to the number
of times the MAX II device could have configured itself in the time
that the button was depressed. This time is displayed as a multiple of
the number of times that the MAX II device could have been
Altera Corporation Development Kit Version 1.1.0 2–9
July 2005 MAX II Development Kit Getting Started User Guide
Page 18

Demo Designs
configured. Press S2 and the 000 changes to the number of times that
the MAX II device could have configured itself in that interval
(typical values should be between 300-600 for fast button pushers).
Test 2. Using a Scope to Measure Power-Up Times
1. Program the MAX II device with the InstantOnDemo.pof file that is
located in the <root>/Examples/HW/Demos directory. (Refer to
“Programming the MAX II Device” on page 2–4 for details on how
to load POF files into the MAX II device.)
2. Attach scope probes to the four Active I/O test points located near
the prototyping area on the board.
3. Set the trigger on the scope to the channel connected to the V
CCINT
test point and trigger on the rising edge (LVTTL logic level).
4. Set the load on V
to the desired amount by tuning the variable
CCINT
resistor (potentiometer), labeled POT1.
5. Press S5 on the board to interrupt the power and observe the ramp
time of V
via the provided test point. A sample screen is shown
CCINT
below (see Figure 2–4).
Understanding the Results
The most detailed analysis of the power-up character of a MAX II device
comes from viewing probe points during the power-up cycle with a
digital oscilloscope. The development board has a variable core V
time control. This system uses POT1 to vary the MAX II core VCC rise time
from 80 μs to 150 ms. The on-board test points provide users with an easy
way to examine the ramp time of V
completion time. The ramp time of V
and the resulting configuration
CCINT
can be varied with POT1, thus
CCINT
allowing this circuit to match almost any system’s power-up rise time and
analyze how the MAX II device performs. To make power cycling even
easier, S5 will power cycle the MAX II V
supply any time it is
CCINT
pressed and released. The development board provides four useful probe
points:
■ V_INT = V
■ V_IO = V
■ GND = Board Ground plane
■ ACTIVE_IO = MAX II User I/O pin P12
(MAX II core voltage supply)
CCINT
(MAX II I/O voltage supply)
CCIO
CC
rise
2–10 Development Kit Version 1.1.0 Altera Corporation
MAX II Development Kit Getting Started User Guide July 2005
Page 19

Getting Started
V_INT shows the Core VCC rise time, and the rise time variation caused
by POT1. ACTIVE_IO is driven by a MAX II user I/O pin that helps
demonstrate the instant MAX II becomes functional (powered-up and
configured).
Figure 2–4 shows a typical digital oscilloscope output. For this test the
rise time is 10 ms. The device is functional at 2.18 V, well below the
V
CCINT
minimum VCC level of 3.0 V. The I/O Pin starts out low, and at about a
core VCC of 1.25 V the I/O pull-up becomes active and the I/O goes to the
level.
V
CCIO
1 In the development board setup, the V
supply than V
CCINT
. The V
ring is a constant 3.3 V and does
CCIO
ring is on a different
CCIO
not power cycle when S5 is pressed.
In Figure 2–4, the MAX II representative I/O (labeled Active I/O on the
test point on the board), switches to 0 V when V
is at 2.18 V. It
CCINT
switches after configuration is complete and the core registers are reset,
and released and the I/O are released. Once working, this I/O pin will
begin to oscillate with a high and low period equal to T
CONFIG
, the time
needed to move the configuration data from the Configuration Flash
Memory (CFM) to the configuration SRAM. The first falling edge on this
I/O (shown in the lighter color in Figure 2–4) is when configuration is
complete. Measuring back the T
of the first low pulse width of this
CONFIG
Active I/O will show at approximately what core voltage configuration
started.
Altera Corporation Development Kit Version 1.1.0 2–11
July 2005 MAX II Development Kit Getting Started User Guide
Page 20

Demo Designs
Figure 2–4. Digital Oscilloscope Image of V
and MAX I/O During Power-Up
CCINT
Low Power Demonstration
MAX II devices consume very little power, making them ideal for use in
systems where power is at a premium. The MAX II development board is
equipped with two current sense circuits that allow users to measure the
power consumed by the MAX II device at different design densities and
toggle rates.
This demonstration provides an easy way to increase the number of
registers in the design and the rate at which they are toggling. This gives
you some understanding of the power that a MAX II device requires. The
demonstration measures the current drawn by V
as the number of
CCINT
toggling registers (and the rate at which they toggle) is increased or
decreased.
To calculate the power drawn, multiply the number of toggling registers
by the voltage supply of V
V
= 2.5 V; if the shunt is off, V
CCINT
(if the shunt on J9 is in place,
CCINT
= 3.3 V). Note that the power can
CCINT
always be calculated by measuring the voltage across the current sense
resistors and then using Ohm’s Law to calculate the current. The V
CCINT
current is measured across two parallel 0.33 ohm resistors (R109 and
R113). You can measure the voltage across either one of these resistors and
then divide that by 0.165 ohms (the two 0.33 ohm resistors are in parallel
for a total resistance of 0.165). Use Ohm’s Law to calculate the current and
2–12 Development Kit Version 1.1.0 Altera Corporation
MAX II Development Kit Getting Started User Guide July 2005
Page 21

Getting Started
then the power. Similarly, the current drawn by V
R95 and R99. Using the same technique as described for V
is measured across
CCIO
CCINT
allows
you to calculate the total power being consumed by the MAX II device.
1 This circuit uses resistors with a specified variance of 5%, which
means that the power measurement is not precise. This circuit is
provided to give users a general understanding of the MAX II
device power consumption. Users who need a precise power
measurement should remove the resistors and measure the
current with a multimeter across one of the pads where R109
and R113 reside. Users concerned with power consumption
should also consult the Understanding & Evaluating Power in
MAX II Devices chapter of the MAX II Device Handbook.
On-Board Circuit
The MAX II device current draw is measured across two 0.33 ohm
resistors via a current sense device. The output of this device is fed to an
A/D converter that generates a digital (serial) output to the MAX II
device. The value of this number provides an indication of the current
that is consumed by the MAX II device, allowing you to determine how
much power the MAX II device is consuming.
f Refer to the MAX II Development Board Data Sheet and the MAX II
development board schematics for more information about the on-board
circuitry.
Using the Demo
To use this demo, first program the MAX II device with the
LowPowerDemo.pof file in the <install directory>/Examples/
HW/Demos directory. (Refer to “Programming the MAX II Device” on
page 2–4 for details on how to load POF files into the MAX II device.)
After programming finishes, the LCD will read:
Current Is 24 mA
000 FF’s
The switches control the operation of this demo:
■ Switch 1 = reset
■ Switch 2 = increase the number of flip-flops that are toggling by 150
■ Switch 3 = decrease the number of flip-flops that are toggling by 150
■ Switch 4 = double the rate at which the flip-flops are toggling
Altera Corporation Development Kit Version 1.1.0 2–13
July 2005 MAX II Development Kit Getting Started User Guide
Page 22

Demo Designs
Real-Time ISP Demonstration
MAX II devices provide a feature called real-time ISP. Real-time ISP
allows a device’s Configuration Flash Memory (CFM) to be loaded with
a new design while another design continues to function in the SRAM
(volatile) portion of the device. After a new POF file has been loaded into
the MAX II device with real-time ISP enabled, cycling power causes the
new design to become active in the MAX II device. Further power cycles
simply reload the design residing in the CFM (you cannot switch back
and forth between two different designs).
Using the Demo
w Any two designs will allow for investigation of this feature, with
one important caveat—the design residing in the MAX II device
cannot read from the UFM while the CFM is being overwritten
(while actually programming the device). The example below
holds true whether the designs used are included in this kit or
are custom user designs. Two of the designs included in this kit
continually read from the UFM and thus appear to fail when the
Real-Time ISP option is used and another design is loaded into
the CFM. These two designs are the Vending Machine Demo
and the Functional Test. In order to view the Real-Time ISP
Demo, you should avoid having these designs running in the
MAX II device while loading a second design into the CFM.
However, either of them can be loaded in the CFM while
another design is running.
1. Program the MAX II device with the FunctionalTest.pof file. (Refer
to “Programming the MAX II Device” on page 2–4 for details on
how to load POF files into the MAX II device.)
2. Observe the design functioning as explained in “Running the
Functional Test” on page 2–6.
3. Open the VendingMachineDemo.pof file in the Quartus II
software.
4. Choose Options (Tools menu) and then click Programmer in the list
of options on the left.
5. Check the Enable real-time ISP to allow background
programming check box. See Figure 2–5.
2–14 Development Kit Version 1.1.0 Altera Corporation
MAX II Development Kit Getting Started User Guide July 2005
Page 23

Figure 2–5. Programmer Options Dialog Box
Getting Started
6. Program the MAX II device with the VendingMachineDemo.pof
file.
7. Observe the Functional Test design still functioning as in step 2.
8. Press S5, which interrupts the V
(core voltage) power supply
CCINT
and forces the MAX II device to reconfigure.
9. Observe the Vending Machine Demo functioning as described
below.
1 Pressing S5 again results in the MAX II device reconfiguring
itself with the Vending Machine Demo. The Functional Test
design is now gone and would have to be reloaded into the CFM
via the Quartus II programmer in order to be loaded into the
MAX II device again.
Altera Corporation Development Kit Version 1.1.0 2–15
July 2005 MAX II Development Kit Getting Started User Guide
Page 24

Reference Designs
Vending Machine Functionality
After programming the board, you will see the first screen….”Ice Cold
Drinks:”. The available drinks scroll along the bottom of the screen.
S1 resets the board to this first screen
S2 steps through the different screens in sequence:
Screen 1 : Scrolling Drinks
Screen 2 : Make Drink Selection…Press S3 to scroll through drinks
Screen 3 : Deposit funds…………Press S4 to add money
If not enough money has been added, the following message appears
after pressing S2:
“Insufficient $”
“Press S2”
This takes you back to screen 3. When the full amount has been deposited
and S2 is pressed, you come to the final screen:
“Vending Drink”
“Thank You”
Press S1 or S2 to go back to screen 1. Note that the source code for the
Vending Machine Demo is included. This is the only VHDL design that is
included with the kit. It provides an example of the VHDL language for
users new to programmable logic.
Reference
Designs
The MAX II Development Kit provides three reference designs to show
how the MAX II board (and the MAX II device) can interface with other
systems.
Reference Design 1: USB Reference Design
The USB Reference Design provides an example of how to connect a PC
to the MAX II development board using the on-board USB MAC from
Future Technology Devices International (FTDI). The design consists of a
Visual Basic Application and a Quartus II project. Source code for both
projects is included on the MAX II Development Kit CD-ROM. The Verilog
HDL code that makes up the MAX II design contains many explanatory
comments. This design is appropriate for engineers new to
programmable logic (particularly those with software experience) and
provides an excellent starting point for understanding the way in which
programmable logic devices (PLDs) manipulate data. This design was
built such that both the software and hardware portions would be easy to
understand, not for optimum speed or efficiency.
2–16 Development Kit Version 1.1.0 Altera Corporation
MAX II Development Kit Getting Started User Guide July 2005
Page 25

Getting Started
Using the USB Reference Design
1. Program the board with the USBReferenceDesign.pof file. (Refer to
“Programming the MAX II Device” on page 2–4 for details on how
to load POF files into the MAX II device.)
2. To install the drivers, perform the following steps:
a. When you plug the board into your PC, the message “Found
New Hardware” appears. When that occurs, open your Control
Panel and then open the System Menu. Click the Hardware tab
and then click the Device Manager. In the Device Manager
window look for an item called Other Devices between
Network Adapters and Ports (COM & LPT). If you see Other
Devices, then you must install the drivers. Proceed to Step b.
If you don’t see Other Devices, then expand the Ports (COM &
LPT) item and look for USB Serial Port (COM X), where X is an
integer. If you see the USB Serial Port, then the XP found the
drivers and installed them. Proceed to Step 3.
b. In the Device Manager window, expand the Other Devices
item. Right click on USB <- -> Serial and click Update Driver.
This will launch the Found New Hardware Wizard. In the
Wizard menu select Install from a list or specific location and
click Next.
c. Select Don’t Search. I will choose the driver to install. Click
Next.
d. Leave Show All Devices highlighted and click Next.
e. Click Have Disk.
f. Click Browse and browse to the <root>\Examples\HW
\ReferenceDesigns\USB_ReferenceDesign\Win98_2k_XP_
Drivers directory. Click Open. This will return you to the
Install From Disk menu. Click OK and then select Next in the
Wizard menu. Driver installation should then complete. Click
Finish and note that the COM (Ports & LPT) item in the Device
Manager window now contains an item called USB Serial Port
(COM X), where X is an integer number. You will need to know
the value of X, so make a note of it.
3. Start the USB_Utility.exe application located in the
<root>/Examples/HW/ReferenceDesigns/USB_ReferenceDesign/
Software directory. The user interface shown in Figure 2–6 should
appear.
Altera Corporation Development Kit Version 1.1.0 2–17
July 2005 MAX II Development Kit Getting Started User Guide
Page 26

Reference Designs
Figure 2–6. USB Reference Design Dialog Box
4. On the Control Options menu select the appropriate COM port for
your system. To find the correct COM port, Browse to the Windows
Device Manager (Control Panel > System > Hardware tab > Device
Manager Button). Expand the Ports (COM & LPT) item and you
should see the USB Serial Port (COM<number>). In Figure 2–7 the
board has been assigned COM4. This port number will be different
on each machine.
After you find which COM port your machine has assigned the
MAX II board, select that port in the Current COM Port drop down
box in the MAX II USB Utility user interface (see Figure 2–6). Click
Open Port. The application tries to communicate with the board. If
successful communication is established, the status box on the
application reports Found MAX II Board on port X (where X is the
number of the port). If it was unsuccessful, the status box reports
Could not find MAX II Board.
2–18 Development Kit Version 1.1.0 Altera Corporation
MAX II Development Kit Getting Started User Guide July 2005
Page 27

Figure 2–7. Device Manager Window
Getting Started
5. If successful communication is established, the LCD displays
Connected to PC!.
6. The PC Application allows you to read from and write to most of
the components on the MAX II board. Note the Default Encoding
drop down box in the Control Options section of the user interface.
This controls how the MAX II device interprets the data sent to and
received from the MAX II board. If you select Hexadecimal, the PC
will treat all data as hexadecimal characters. If you select ASCII,
then the PC will interpret all data as ASCII.
1 This demo relies on the appropriate transmission of data
from the PC to the board. If corrupt data is transmitted,
errors will occur. The application on the PC may be
unaware of hardware errors. The board will show hardware
errors by flashing the LEDs. If you see that the LEDs are
flashing, click the Close Port button on the PC application
and press S1 on the development board. You can then
re-open the port and use the demo as normal.
Altera Corporation Development Kit Version 1.1.0 2–19
July 2005 MAX II Development Kit Getting Started User Guide
Page 28

Reference Designs
Note that LED8 remains lit. If this LED is off while the PC
application is idle, an error has occurred. Close the port,
reset the board by pressing S1, and re-open the port. If the
PC application stops responding, disconnect the USB cable
from the board. If that doesn’t solve the problem, you will
have to use the Task Manager in Windows to end the PC
application manually.
7. Using the demo:
Perform the following tests on the USB Reference Design user
interface (see Figure 2–6).
a. Check the LEDs—Click on the LEDs and note that they turn on
and off on the board as they do in the GUI.
b. Write to the LCD—Type some text into the Liquid Crystal
Display text box and click Write to LCD. The same text appears
in the LCD display on the board.
c. Write to the SRAM—First use Notepad to create a text file and
Save the file on your hard drive. In the USB_Utility GUI, click
the Browse button near the SRAM Interface. Browse to the file
you just created. Make sure the default encoding list box says
“ASCII” and click Write to SRAM.
d. Read from the SRAM—First check that the Default Encoding list
box says “ASCII” and then click Read SRAM. Make sure the
SRAM contents text box shows the data that you typed into
your Notepad file. Note that when you read from the SRAM, a
file called SRAMDataBack.txt is created in the same directory
where the USB_Utility.exe file resides. This file is re-created
each time you read from the SRAM. It contains the addresses
and the data read from those addresses.
1 SRAMDataBack.txt must not be open when you try to read
from the SRAM.
2–20 Development Kit Version 1.1.0 Altera Corporation
MAX II Development Kit Getting Started User Guide July 2005
Page 29

Getting Started
e. Read the UFM—The UFM is arranged as 256 locations, each
containing 32 bits of data. Currently residing in the UFM is the
inverse of each address. Set the default encoding to
Hexadecimal and click Read UFM. The data displayed should
be FFFF FFFE FFFD FFFC FFFB and so forth. You can recompile
this design with a different memory initialization file (MIF) to
change the data in the UFM. Note that when you read from the
UFM, a file called UFMDataBack.txt is created in the same
directory where the USB_Utility.exe file resides. This file is
re-created each time you read the UFM. It contains the
addresses and the data read from those addresses.
1 UFMDataBack.txt must not be open when you read from
the UFM.
f. Display the board temperature and push button counts—Press the
S2, S3, and S4 buttons on the board. Note that each time a
button is pressed, the corresponding text box on the GUI
increments. Also note that the board temperature is updated
each time a switch is pressed.
1 The SRAM and UFM read/write options only read or write
384 bytes at a time. This data is always written to or read from
the 384 lowest address locations.
Understanding the Functionality of the USB Reference Design
The USB Reference Design has two pieces:
■ Verilog code written to dictate the functionality of the MAX II device
■ Visual Basic code to control the PC application
The MAX II design consists entirely of state machines. Each individual
design file contains a state machine to control the reading/writing of each
component. These files contain extensive comments and designers are
encouraged to look through the Verilog code to gain a complete
understanding of how the MAXII design functions. The Director.v code
constantly awaits for one of two things to happen: either a button is
pressed or data arrives from the PC. If a button is pressed, the Director
enables the PassivesInterface.v, which takes over control of the output to
the USB MAC FIFO and writes the values of the Switch Counters and
Temperature blocks. If data is received from the PC, then the Director
passes control to the UFMInterface.v, the SRAMInterface.v, or the
LCDInterface.v, depending on the value of the data received. Refer to the
Verilog code itself for more details on the operation of this MAX II design.
Altera Corporation Development Kit Version 1.1.0 2–21
July 2005 MAX II Development Kit Getting Started User Guide
Page 30

Reference Designs
The Visual Basic project consists of the GUI and various pieces of code
that control the transmission and reception of data and control characters
to and from the MAX II board. All data is interpreted based on which
command buttons are pressed. After a command button is pressed, it is
disabled until the PC receives data for the corresponding component.
When this data is received, the PC interprets it based on which command
button is disabled and then processes it appropriately. After all data has
been processed, the command button is enabled again.
The Visual Basic project relies heavily on drivers provided by Future
Technology Devices International (FTDI), the company that
manufactures the USB MAC. FTDI has several drivers available on their
web site along with bits of Visual Basic code, C code, and documentation.
Designers looking to interface to a PC in the same manner as this
application are advised to investigate the driver solutions provided by
FTDI. This application is formed around FTDI’s Virtual COM Port
drivers. These drivers essentially mimic a COM port on the PC, making
the sending and receiving of data relatively easy.
The board is set up so that users can implement designs based on the
other drivers provided by FTDI, but this does require a hardware
modification—the footprint labeled J10 is for an EEPROM socket that can
be added to the board and then populated with the designer’s choice of
EEPROMs. This EEPROM then allows designers to set the USB Product
ID and Vendor ID, as well as allowing for USB 1.1 or USB 2.0 (High Speed)
interfaces to be developed.
Reference Design 2: The Slot Game Reference Design
The MAX II Slot Game Reference Design highlights the high density of
the MAX II device. The reference design uses approximately 1050 logic
elements during implementation This total logic cell usage is equivalent
to roughly 800 macrocells in the legacy MAX architecture. Legacy MAX
devices contained a maximum of 512 macrocells, making designs such as
this impossible to implement without purchasing multiple devices.
Using the Slot Machine Reference Design
The MAX II Slot Game Reference Design is based on standard
casino-style slot machine behavior. It uses a linear feedback shift register
to determine the values of three simulated slot reels on the MAX II
board’s LCD. A player controls the progress of the game using three
buttons on the MAX II board.
The object of the game is to build a total bankroll of $1000 or more by
using three levels of wagering. The game is initiated by hitting the Bet
button (S2), at which time the player is given a default total of $199. By
2–22 Development Kit Version 1.1.0 Altera Corporation
MAX II Development Kit Getting Started User Guide July 2005
Page 31

Getting Started
repeatedly pressing the Bet button, a player can select between three
amounts they wish to wager on a particular turn of the simulated slot
reels. When the player is satisfied with the wager amount, the Spin
button (S4) is selected, initiating the simulated slot action. If all three slot
reels display the same value, the player wins and his total is updated with
the appropriate payoff. If the reels do not match, the wagered amount is
subtracted from his earnings. Wager amounts and payoffs are listed in
Table 2–1. Play continues in this way until the player either reaches $1000
or runs out of money. The player is allowed to select any of the wager
amounts at any point in the game. A new game can be initiated at any
time by recycling the board power plane (button S5).
Table 2–1. Wager Options & Their Payoffs
Wager Payoff
$1 $16
$5 $80
$50 $800
Understanding the Functionality of the Slot Machine Reference Design
A high level view of the reference design can be separated into the basic
areas of functionality shown below.
Overview
The design functionality is based on a block of logic that monitors the
status of two input signals. Based on the state of each of these inputs, the
design sends the appropriate information to an LCD display through one
of two paths. One path provides access to a block of on-chip flash
memory that sends display instructions to the LCD. The other path stores
values for a set of registers that keep track of the game status as it
progresses. An LCD controller interprets the instructions provided by
either path and supplies stimulus to the LCD hardware to render the
appropriate images. See Figure 2–8.
Altera Corporation Development Kit Version 1.1.0 2–23
July 2005 MAX II Development Kit Getting Started User Guide
Page 32

Reference Designs
Figure 2–8. Design Overview
Linear Feedback Shift Register (LFSR)
The LFSR is a 32-bit register chain that uses combinational feedback paths
to generate pseudo-random number values. Nine taps on the 32-bit chain
are used to derive three decimal numbers that represent the value on each
reel (3 taps per reel). The LFSR is fed by a system clock, and the values of
each reel are constantly changing on the rising edge of each clock cycle.
When a player toggles the Spin button during game play, the block
captures the current value of each tap and feeds these values to the
Control block for further processing. See Figure 2–9.
Figure 2–9. Linear Feedback Shift Register Design
Control
This block manages the status and functionality of the player controlled
inputs Bet and Spin. The functionality of this block can be divided into
three major areas:
2–24 Development Kit Version 1.1.0 Altera Corporation
MAX II Development Kit Getting Started User Guide July 2005
Page 33

Getting Started
■ Start-up—When the MAX II device has been successfully
programmed, the Control block automatically accesses a section of
the UFM that prompts an introduction sequence to appear on the
LCD screen. This sequence loops indefinitely until a player presses
the Bet button to begin game play.
■ Bet Selection—The Bet button provides access to three separate
memory spaces within the UFM, representing the three fixed wager
amounts. Each time the button is pressed, a memory pointer cycles
to the next space in the sequence, displaying the corresponding
wager amount on the LCD screen. The Control block keeps track of
the memory pointer, and thus can cycle through the three wager
values repeatedly.
■ Spin Engagement—When the Spin button is toggled, the Control
block state machine is sent through a series of actions that affect the
final display of the LCD. First the LFSR is sampled and three
pseudo-random values are generated from its output. Based on the
commonality of these values, a new bankroll total is calculated and
stored internally. This total is then divided into three separate values
that represent the Hundreds, Tens, and Ones place of the number.
These values, along with the LSFR generated values for each reel, are
mapped to 11-bit codes that prompt the LCD to display the correct
number value.
When the values have been calculated and mapped, the Registers block
(see Figure 2–8) is updated with new bankroll and reel values. The block
then uses the MUX function to access the flash memory block (for
simulated spinning action of the reel), and the Register block (to display
the final bankroll and reel values). Upon completion of this process, the
design cycles back to monitor the status of the Bet signal to prepare for
another spin.
LCD Controller
The MAX II Slot Game Reference Design communicates with the
on-board LCD through a custom-built controller interface. The logic
block performs several functions vital to the game behavior. Upon
successful programming of the device, the block sequentially loads a
series of specific codes that initialize the LCD hardware and configure the
display environment. When initialization is complete, it interprets 11-bit
instructions fed by the design’s Control block, and manages the delivery
of characters to be displayed on the screen. Based on the value of the
11-bit input bus, the controller handles changes to the speed, content, and
direction (read/write) of LCD data.
Altera Corporation Development Kit Version 1.1.0 2–25
July 2005 MAX II Development Kit Getting Started User Guide
Page 34

Reference Designs
f For a detailed explanation of the controller functionality, see White Paper:
MAX II Development Board LCD Controller.
1 The Slot Game Reference Design has added an extra bit to the
bus input of the LCD controller. It is used to vary the speed of
transactions to the LCD display. For more information on this bit
and its functionality, refer to the lcd_controller.v file in the Slot
Game Reference Design Quartus II Project.
Reset Functionality
At any point during game play, pressing the Reset button (S5) will cycle
the board power, stop the game, and reload the design’s programming
file (.pof) into the SRAM (volatile) portion of the MAX II device via the
Configuration Flash Memory. After the file has been reloaded, all
registers are restored to their default value and the design returns to its
initial introduction display.
Reference Design 3: PCI Reference Design
The PCI Reference Design provides an example of how users can
interface the MAX II development board to a PC via the PCI expansion
slots. The design uses Altera’s PCI T32 MegaCore function to interface to
the PCI Bus of any standard PC. All design files are provided in the
<root>/HW/Examples/ReferenceDesigns/PCI_Reference
Design/QuartusProject/DesignFiles directory.
w The MAX II PCI demo shows a simple example of how to
generate interrupts. When a user presses one of the switches, an
interrupt is generated. In a PCI system, the interrupts are shared
between many devices. Special care is required that the user
does not press a switch unless the MAX II PCI application is
active.
Using the Reference Design
1. Program the MAX II device with the PCI_RefDesign.pof file. (Refer
to “Programming the MAX II Device” on page 2–4 for details on
how to load POF files into the MAX II device.)
2. Register the drivers:
a. Open a command prompt (DOS window).
b. CD to the <root>/Examples/HW/ReferenceDesigns/
PCI_ReferenceDesign/Win2k_XP_Drivers directory.
2–26 Development Kit Version 1.1.0 Altera Corporation
MAX II Development Kit Getting Started User Guide July 2005
Page 35

Getting Started
c. Type the following commands:
wdreg.exe -inf <root>\Examples\HW\ReferenceDesigns\
PCI_ReferenceDesign\Win2k_XP_Drivers\windrvr6.inf
install r
wdreg -inf <root>\Examples\HW\ReferenceDesigns\
PCI_ReferenceDesign\Win2k_XP_Drivers\
altera_maxiipci.inf install r
3. Turn off your PC and install the MAX II development board in an
available PCI slot. (Refer to your PC's hardware installation
documentation.)
4. Power-up the PC.
5. Install the drivers:
If you are using the Windows 2000 operating system, the operating
system detects the MAX II development board as new hardware and
prompts you to install a driver. Perform the following steps in the
Found New Hardware Wizard:
a. Click Next to go to the Install Hardware Device Drivers page.
b. Turn on the Search for a suitable driver for my device
(recommended) option.
c. Click Next to go to the Locate Driver Files page.
d. Turn off all of the options under Optional Search Locations.
e. Click Next to go to the Driver Files Search Results page.
f. Click Next to go to the Completing the Found New Hardware
Wizard page.
g. Click Finish to complete the driver installation.
If your PC has the Windows XP operating system, the operating
system detects the MAX II development board as new hardware and
prompts you to install a driver.
Perform the following steps in the Found New Hardware Wizard:
a. Turn on the Install the software automatically
(Recommended) option.
Altera Corporation Development Kit Version 1.1.0 2–27
July 2005 MAX II Development Kit Getting Started User Guide
Page 36

Reference Designs
b. Click Next to go to the Completing the Found New Hardware
Wizard window.
c. Click Finish to complete the driver installation.
6. Launch the maxiipci.exe application located in the
<root>Examples/HW/ReferenceDesigns/PCI_ReferenceDesign/
PC_Application directory.
7. To demonstrate reading from and writing to the SRAM, perform the
following steps:
a. In the MAX II PCI application, choose the command to be
Tar g et Lo o p (default).
b. Set the Address Offset to 0x0 (default).
c. Change the number of bytes to 512.
d. Choose the data type to be Random (default).
e. Click Execute.
f. Review the results in the display window.
8. To demonstrate control of the LEDs, do the following:
a. Click on any one of the check boxes above the LEDs.
b. Verify that the corresponding LED lights up on the board.
9. To demonstrate reading the value from the temperature sensor, do
the following:
a. Click on the Read button (under the temperature control
group) of the application. The data read from the sensor is
displayed in Centigrade.
b. Click the F radio button to convert the value to Fahrenheit.
10. To demonstrate reading the PCI configuration registers, do the
following:
v Click on the Read button (under the Config register group) of
the application. The value of the various configuration registers
is displayed in the application.
2–28 Development Kit Version 1.1.0 Altera Corporation
MAX II Development Kit Getting Started User Guide July 2005
Page 37

Getting Started
11. Push one of the four user-defined push switches on the board to
generate an interrupt. The application reads the corresponding
register to figure out which switch was pushed and clears the
interrupt. A dialog box appears when an interrupt is received (see
Figure 2–10). If multiple switches are pushed at the same time,
multiple dialog boxes appear.
Figure 2–10. Interrupt Received Dialog Box
Altera Corporation Development Kit Version 1.1.0 2–29
July 2005 MAX II Development Kit Getting Started User Guide
Page 38

Reference Designs
2–30 Development Kit Version 1.1.0 Altera Corporation
MAX II Development Kit Getting Started User Guide July 2005
 Loading...