

Alpine INE-W611DU8, INE-W611D, INE-W611DC, INE-W611DU Navigation Manual

User Manual
Navigation software for Alpine Navigation System
UK English
July 2019, ver. 1.0

2
Table of contents
1 Getting started ................................................................................................................5
1.1 Initial set-up ................................................................................................................................................... 5
1.2 Screen controls ............................................................................................................................................. 6
1.2.1 Using the buttons and other controls .................................................................................................. 6
1.2.2 Using the cursor ............................................................................................................................................ 8
1.2.3 Using the keyboard ...................................................................................................................................... 8
1.2.4 Using touch gestures ................................................................................................................................... 9
1.2.5 Manipulating the map .............................................................................................................................. 10
1.3 Navigation view ........................................................................................................................................ 12
1.3.1 Streets and roads ........................................................................................................................................ 14
1.3.2 GPS position markers ............................................................................................................................... 14
1.3.3 Turn preview and next street ............................................................................................................... 15
1.3.4 The planned route ...................................................................................................................................... 15
1.3.5 Manoeuvre icons ........................................................................................................................................ 16
1.3.6 Lane information ........................................................................................................................................ 17
1.3.7 Signposts ........................................................................................................................................................ 17
1.3.8 Junction view ................................................................................................................................................ 18
1.3.9 Tunnel view .................................................................................................................................................. 18
1.3.10 Motorway services .................................................................................................................................. 19
1.3.11 3D object types ......................................................................................................................................... 19
1.3.12 Traffic events ............................................................................................................................................. 20
1.4 Navigation menu ...................................................................................................................................... 20
2 Warnings and safety information ......................................................................... 23
3 Using the navigation .................................................................................................. 24
3.1 Selecting a destination ........................................................................................................................... 24
3.1.1 Using combined search ............................................................................................................................ 24
3.1.2 Selecting an address.................................................................................................................................. 27
3.1.2.1 Entering an address .................................................................................................................................................. 27
3.1.2.2 Selecting a town centre ........................................................................................................................................... 29
3.1.2.3 Selecting the midpoint of a street ....................................................................................................................... 30
3.1.2.4 Selecting an intersection in a town .................................................................................................................... 31
3.1.2.5 Using the postcode to select a destination ...................................................................................................... 32
3.1.3 Selecting a Place of Interest ................................................................................................................... 33
3.1.3.1 Using Quick search categories ............................................................................................................................. 33
3.1.3.2 Searching by category ............................................................................................................................................. 35
3.1.3.3 Searching by name .................................................................................................................................................... 36
3.1.3.4 Finding help nearby .................................................................................................................................................. 38
3.1.4 Selecting a Saved Location ..................................................................................................................... 39
3.1.5 Selecting a History item ........................................................................................................................... 40

3
3.1.6 Selecting a saved route ............................................................................................................................ 42
3.1.7 Entering coordinates ................................................................................................................................ 42
3.1.8 Selecting a location on the map ........................................................................................................... 44
3.1.9 Planning a Multipoint Route ................................................................................................................. 45
3.2 Checking route information and alternatives ............................................................................. 46
3.3 Checking Traffic Events ......................................................................................................................... 47
3.4 Editing the route ....................................................................................................................................... 49
3.4.1 Setting a new starting point .................................................................................................................. 49
3.4.2 Adding an additional destination ........................................................................................................ 50
3.4.3 Modifying the list of destinations ........................................................................................................ 51
3.4.4 Saving the planned route ........................................................................................................................ 51
3.4.5 Deleting the planned route .................................................................................................................... 52
3.4.6 Selecting a route alternative when planning the route ............................................................. 52
3.4.7 Selecting a route alternative for an existing route ...................................................................... 53
3.4.8 Setting a detour ........................................................................................................................................... 54
3.4.9 Pausing guidance ........................................................................................................................................ 55
3.5 Saving a location ...................................................................................................................................... 55
3.5.1 Editing a saved location........................................................................................................................... 56
3.6 Running a Simulation ............................................................................................................................. 57
3.7 Off-road navigation ................................................................................................................................. 58
3.7.1 Switching to off-road navigation ......................................................................................................... 58
3.7.2 Selecting the destination in off-road mode ..................................................................................... 58
3.7.3 Navigating in off-road mode .................................................................................................................. 58
4 Map Update ................................................................................................................... 60
5 Reference guide .......................................................................................................... 62
5.1 Concepts ........................................................................................................................................................ 62
5.1.1 2D/3D GPS reception ............................................................................................................................... 62
5.1.2 Road safety cameras and other proximity Alert Points ............................................................ 62
5.1.3 Route calculation and recalculation ................................................................................................... 63
5.1.4 Smart Zoom ................................................................................................................................................... 63
5.1.5 Speed limit warning .................................................................................................................................. 63
5.1.6 Historical traffic .......................................................................................................................................... 64
5.1.7 Real-time traffic .......................................................................................................................................... 64
5.1.8 Intelligent navigation ............................................................................................................................... 65
5.1.8.1 Real-time alternative routes ................................................................................................................................. 65
5.1.8.2 Hints upon detour ...................................................................................................................................................... 65
5.2 Useful Information menu ...................................................................................................................... 66
5.2.1 Where Am I ................................................................................................................................................... 67
5.3 Settings menu ............................................................................................................................................. 67
5.3.1 Route preferences settings .................................................................................................................... 69

4
5.3.1.1 Route Planning Method types ............................................................................................................................... 69
5.3.1.2 Navigation Mode ........................................................................................................................................................ 70
5.3.1.3 Road types ..................................................................................................................................................................... 70
5.3.2 Sound settings ............................................................................................................................................. 71
5.3.3 Warnings settings ...................................................................................................................................... 72
5.3.4 Navigation View settings ........................................................................................................................ 73
5.3.5 Regional settings ........................................................................................................................................ 75
5.3.6 Display settings ........................................................................................................................................... 75
5.3.7 Traffic settings ............................................................................................................................................. 76
6 Troubleshooting ......................................................................................................... 77
6.1 GPS signal cannot be received ............................................................................................................ 77
6.2 Address cannot be found ....................................................................................................................... 77
6.3 The calculated route is not optimal ................................................................................................. 77
6.4 Disabling the speed limit warning ................................................................................................... 78
6.5 Keyboard buttons are greyed out ..................................................................................................... 78
6.6 The map is hidden behind an image of a junction .................................................................... 79
7 Copyright note ............................................................................................................. 80

5
1 Getting started
Alpine navigation is optimised for in-car use. You can use it easily by tapping the screen
buttons and the map with your fingertips.
When you start using the product, you can download new maps in the next.
1.1 Initial set-up
When using the navigation software for the first time, an initial set-up process starts
automatically.
1. Select your preferred language, then tap to confirm your selection.
Later you can change it in Regional settings (page 75).
2. The Configuration Wizard starts. Tap to continue.
3. Select the language and speaker used for voice guidance messages. Later you can
change it in Regional settings (page 71). Tap to continue.
4. If needed, modify the time format and unit settings. Later you can change them in
Regional settings (page 75). Tap to continue.

6
5. If needed, modify the default route planning options. Later you can change them in
Route Preferences (page 69). Tap to continue.
6. The initial set-up is now complete, tap to enter the Alpine
navigation view.
1.2 Screen controls
The following sections describe the functionality and use of buttons, sliders, and other screen
controls in Alpine navigation.
1.2.1 Using the buttons and other controls
To operate Alpine navigation, tap the buttons on the touch screen.
Type
Example
Description
Function
Button
Opens a new screen
where you can set a
parameter.
Tap it once.
Button
with
value
Displays the current
value of a field or setting
where the value can be
changed. After the
change, the new value is
shown on the button.
Tap it once.

7
Icon
Provides additional
information, for example
traffic summary or
itinerary.
Tap it once to open a
screen with additional
information or options.
List
Shows multiple options.
Grab the list anywhere
and slide your finger up
or down. Depending on
the speed of sliding, the
list scrolls fast or slow,
only a bit or till the end.
Alternatively, move
between items in a list
with the arrows and tap
the value that you want
to select.
Switch
Shows whether a feature
is enabled when there
are only two choices.
Tap it to turn the switch
on or off.
Slider
When a feature can be
set to different values in
a range, Alpine
navigation shows an
indicator on a gauge that
displays and sets the
value.
Drag the handle to
move the slider to its
new position.
Tap the slider where
you want the handle to
appear.
Virtual
keyboard
Used to enter text and
numbers.
Each key is a touch
screen button.
The Navigation menu may contain several menu items on one or more pages.
You need to confirm selections or changes only if the application needs to be restarted, if it
needs to perform a major reconfiguration, or if you are about to lose some of your data or
settings. Otherwise, Alpine navigation saves your selections and applies the new settings
without confirmation as soon as you use the controls.

8
1.2.2 Using the cursor
You can select a map location in the following ways:
• By tapping the map when navigating
• By tapping the map when you are asked to confirm the destination at the end of a
search.
When a map location is selected, the cursor ( ) appears at the selected point on the map.
The location of the cursor can be used as the destination of the route, you can search for
Places around it, or you can add this location to your saved locations.
You can also select some of the objects on the map. If you tap the map at the icon of a Place,
the object is selected, and you can get information about this object or you can use it as a
route point.
1.2.3 Using the keyboard
You can type with your fingertips on the screen keyboards and you can switch between
various keyboard layouts, for example English, Greek or numerical. Only those keyboard
buttons are active that can be used to type a name that is available on the map. The other
keys are greyed out.
Action
Function
Switching to another
keyboard layout, for
example from an English
keyboard to a Greek
keyboard
Tap and select the new keyboard layout from the list.
Correcting your entry on the
keyboard
Tap to remove the unnecessary character(s).
Tap and hold the button to delete several characters or the
entire input string.
Entering a space, for
example between a first
name and a family name or
in multi-word street names
Tap the button at the bottom centre of the
screen.
Entering upper and lower
case letters
By default, when entering a text, the first character appears in
upper case while the rest of the text is in lower case. Tap
to enter an upper case letter or tap it twice to turn on
Caps Lock. Tap again to use lower case letters.
Entering numbers and
symbols
Tap to switch to a keyboard offering numbers and
symbols.

9
Finalising the keyboard
entry
Tap .
Hiding the keyboard
Tap .
1.2.4 Using touch gestures
You usually need to tap the screen only once. However, some useful features can be
accessed with other gestures. See the table below.
Action
Function
Tapping and
holding the
screen
Tap and keep pressing the following buttons to reach extra functions:
• Tap and hold the following button on list and menu screens to
show the Navigation view: .
• Tap and hold any of the following buttons on the Navigation view to
rotate, tilt, or scale the map continuously: , , ,
, , .
• Tap and hold the following button on keyboard screens to quickly
delete several characters: .
• Tap and hold the following buttons in long lists to scroll pages
continuously: , .
Dragging
Drag the screen in the following cases:
• To move the handle on a slider.
• To scroll a list: grab the list anywhere and slide your finger up or
down. Depending on the speed of the sliding, the list scrolls faster
or slower, only a bit or till the end.
• To move the map in map browsing mode: grab the map, and move
it in the desired direction.
Using pinch
zoom
Use pinch zoom on the Navigation view to zoom in and out by moving two
fingers in a pinch gesture.

10
1.2.5 Manipulating the map
If you tap the map anywhere during navigation, the map stops following the current position
(the blue arrow is not locked in a fix position on the screen anymore) and control buttons
appear to help you modify the map view.
You can perform the following actions on the map:
Action
Button(s)
Function
Checking
location
information
No buttons
The top section of the Navigation view shows
information about the selected point (the cursor
).
Moving the
map by
dragging
No buttons
Move the map in any direction: tap and hold the map
and move your finger towards the direction you want
to move the map.
Zooming in
and out
,
Change how much of the map is displayed on the
screen.
Alpine navigation uses maps that let you examine
the locations at various zoom levels, always with
optimised content. It always displays street names
and other text with the same font size, never upsidedown, and you only see the streets and objects that
you need.
Map scaling has a limit in 3D map view mode. If you
zoom out further, the map switches to 2D view
mode.
Tap once to modify the view in a large step, or tap
and hold the button to modify it continuously and
smoothly.
Tilting up and
down
,
Change the vertical view angle of the map in 3D
mode.
Tap once to modify the view in a large step, or tap
and hold the button to modify it continuously and
smoothly.
Rotating left
and right
,
Changes the horizontal view angle of the map.
Tap once to modify the view in a large step, or tap
and hold the button to modify it continuously and
smoothly.

11
Changing 2D,
3D, or 2D
North up views
, ,
Switch between the 3D perspective, 2D Heading up,
and 2D North up map view modes. In Heading up
mode the map is rotated so its top always points in
the current driving direction. This is the default
orientation in 3D map view mode. In North up mode,
the map faces North.
Checking the
compass
The direction of the compass shows North.
Selecting
additional
options
Open a list of additional features like saving a
location, or searching for Places around the cursor.
Selecting a
destination
Select the cursor location as a new destination. The
route is automatically calculated.

12
1.3 Navigation view
The navigation view is the main screen of Alpine navigation that shows the planned route on
a map. Navigation works with digital maps which are not simply the computerised versions of
traditional paper maps. Similarly to paper road maps, the 2D mode of digital maps shows you
streets and roads. Elevation is also illustrated in colour.
The navigation view displays the following screen buttons, data fields, and route information
on the map during navigation:
Note!
Some buttons, fields, or icons may not be available in your product version.
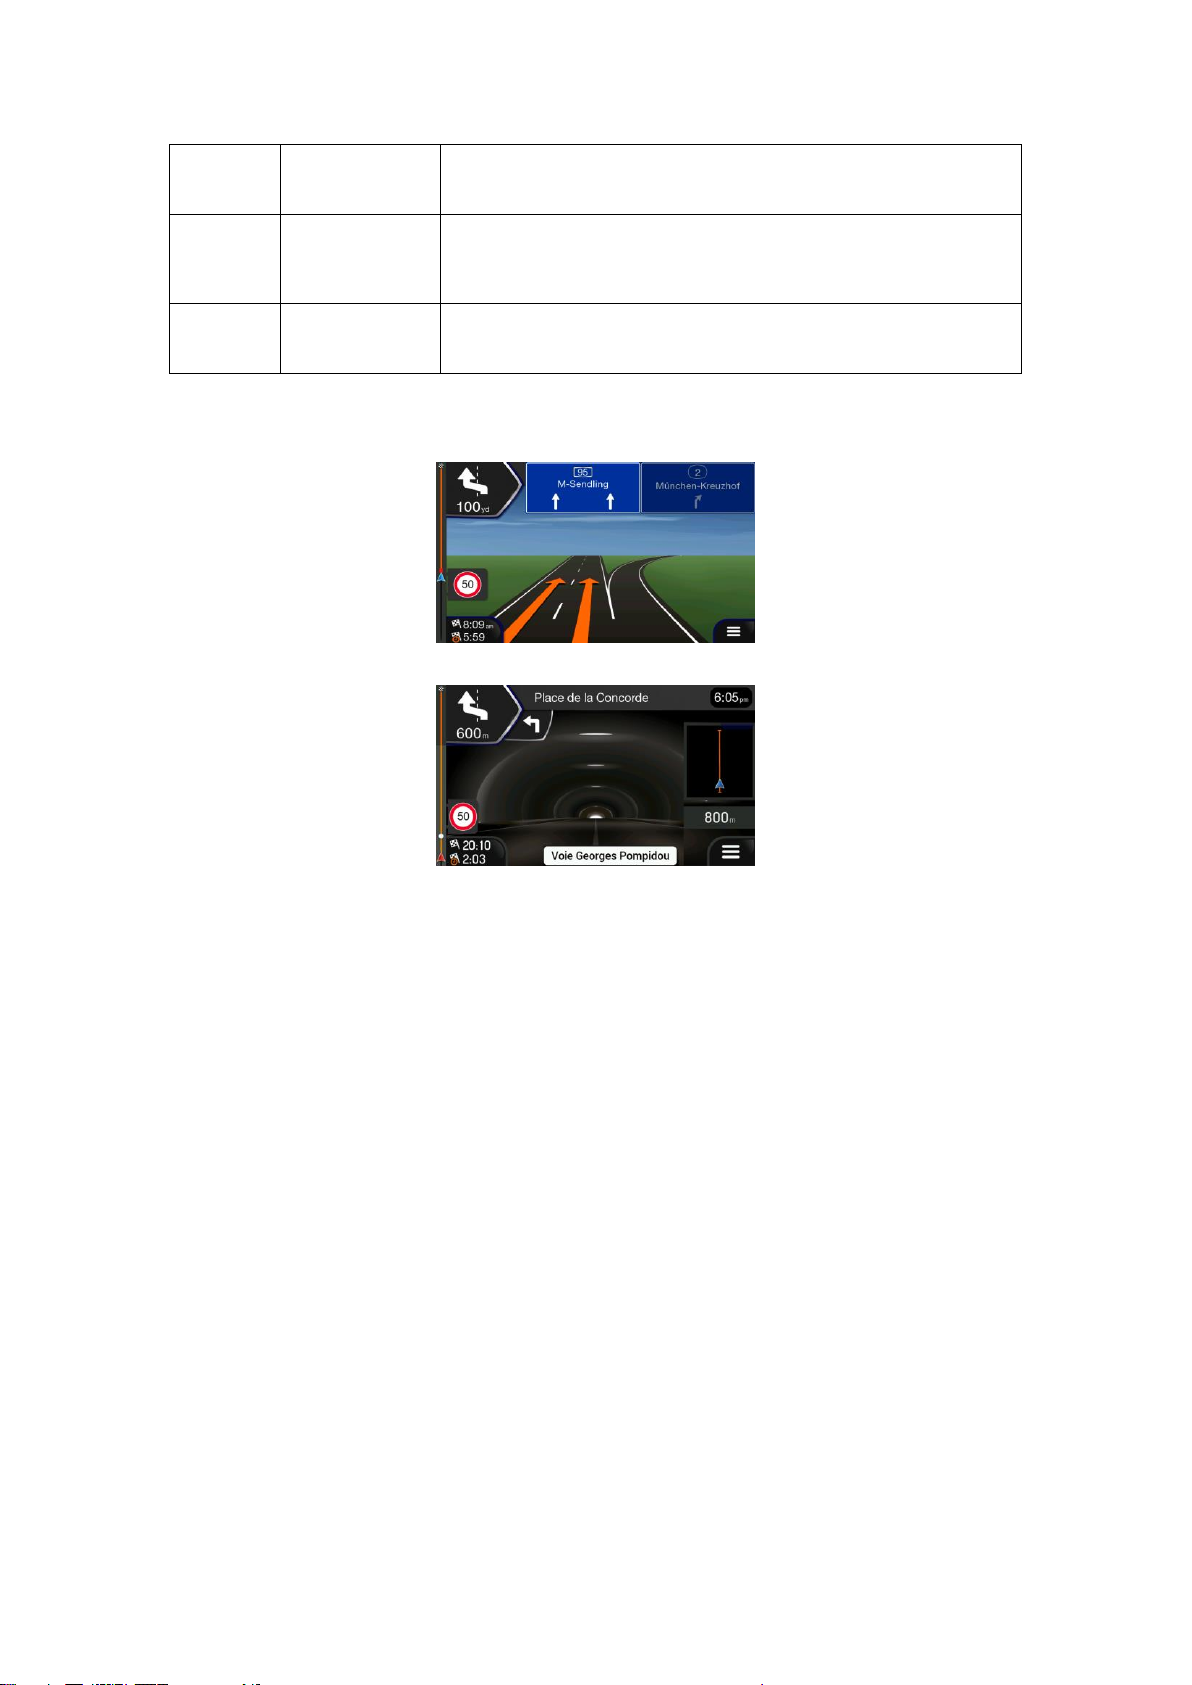
Number
Name
Description
1
Current
position
marker
The current position is displayed as a blue arrow by default.
When there is no GPS position, the current position marker is
transparent and it shows your last known position. See page
14.

13
2
GPS position
The dot near the arrow shows the GPS position as perceived
by the GPS receiver. See page 14.
3
Planned route
The planned route is displayed as an orange line.
4
Data fields
Three data fields show the following information:
• The estimated time of the arrival at the destination.
• The remaining time of the trip.
• The remaining distance to the destination.
You can change the default values in Settings (page 73) or by
tapping and holding the area where the data fields appear.
If you have not selected a destination, you can see your
heading instead of the three data fields.
5
Next turn
preview
It shows the type of the next manoeuvre and its distance. See
page 15.
6
Second next
turn preview
It shows the type of the second next manoeuvre if it is near the
first one. See page 15.
7
Next street
It displays the name of the next street. See page 15.
If you have not selected a route destination, you can see
nearby house numbers, if they are available.
8
Sound
Set the volume or mute the navigation.
9
Destination
menu
It appears near the destination. By tapping it, you can check
the trip summary, find Places around your final destination,
save the current location, or suspend the navigation.
10
Traffic
It shows traffic-related information. See page 47.
11
Lane
information
On multi-lane roads, it shows the lanes ahead and their
directions. The highlighted arrows represent the lanes and
direction you need to take. See page 17.
12
Alert point
warning
It shows the type of the alert points when approaching a road
safety camera or other Alert Points like school zones or
railroad crossings. You must make sure that using this feature
is legal in the country where you intend to use it. See page 72.
13
Speed limit
warning
It shows the current speed and the speed limit when speeding.
See page 72.
14
Warning road
sign
It shows warning for the current road (for example, dangers,
sharp curves). See page 72.
15
Signpost
It shows the available destinations and the road numbers. See
page 17.
16
Motorway
services
By tapping it, you can check the details of the next few service
stations (petrol stations, restaurants) when travelling on a
motorway. See page 19.
14
17
Navigation
menu
By tapping it, you can open the Navigation menu, where you
can reach other parts of Alpine navigation.
18
Street name
It shows the current street name. By tapping it, you can open
the Where Am I screen. See page 67.
19
3D objects
They display hills, mountains, roads, landmarks, and buildings
in 3D.
If you are approaching a motorway exit or a complex intersection and the needed information
exists, the map is replaced with a 3D view of the junction. See page 18.
When entering a tunnel, the map is replaced with a generic tunnel image. See page 18.
1.3.1 Streets and roads
Alpine navigation shows the streets similarly to paper road maps. Their width and colours
correspond to their importance; you can easily tell a motorway from a small street.
1.3.2 GPS position markers
When your GPS position is available, Alpine navigation marks your current position. By
default, this marker is a blue arrow. The dot near the arrow shows the GPS position as
perceived by the GPS receiver.
When on-road navigation is selected, the current position marker may not show your exact
GPS position and heading. If roads are near, it is aligned to the nearest road to eliminate GPS
position errors, and the direction of the icon is aligned to the direction of the road.
If you select off-road navigation, the current position marker is at your exact GPS position.
The direction of the icon shows your current heading.

15
1.3.3 Turn preview and next street
When navigating a route, the top section of the Alpine navigation view shows information
about the next route event (manoeuvre) and the next street or the next town.
There is a field in the top left corner displaying the next manoeuvre. Both the type of the
manoeuvre (turn, roundabout, exiting motorway, and so on) and its distance from the current
position are displayed.
A smaller icon shows the type of the second next manoeuvre if it is near the first one.
Otherwise, only the next manoeuvre is displayed. Tap the icon of the actual manoeuvre to
open the Itinerary screen.
1.3.4 The planned route
The planned route is the currently navigated route. Whenever the destination is set, the route
is active until you delete it, reach your destination or suspend navigation. Alpine navigation
displays the route in the following ways:
Symbol
Name
Description
Current GPS
position
and starting point
It is your current position displayed on the map.
• If a vehicle is selected for route calculation and
roads are near, the arrow jumps to the nearest
road.
• Normally, if GPS position is available, the route
starts from the current position. If there is no valid
GPS position, Alpine navigation uses the last
known position as the starting point.
Waypoint
(intermediate
destination)
It is an intermediate destination of the route before
reaching the final destination.
Destination (end
point)
It is the final destination of the route.
Route colour
The route always stands out with its colour on the map,
both in daytime and night colour modes.

16
Streets and roads
that are excluded
from the navigation
You can choose whether you want to use or avoid certain
road types (page 69). However, when Alpine navigation
cannot avoid such roads, the route includes them and
shows them in a colour that is different from the route
colour.
Streets and roads
that are affected by
traffic events
Road segments may be affected by traffic events. These
streets and roads are displayed in a different colour, and
small symbols displayed along the route show the type of
the traffic event.
1.3.5 Manoeuvre icons
During navigation the next manoeuvre is displayed in the top left corner. Most of the
manoeuvre icons are intuitive. The following table lists some of the frequently shown route
events:
Icon
Function
Turn left.
Turn right.
Turn back.
Bear right.
Turn sharp left.
Keep left.
Continue straight in the intersection.
Enter the roundabout and take the first exit
(next manoeuvre).
Enter the roundabout (second next
manoeuvre).
Enter the motorway.

17
Exit the motorway.
Board the ferry.
Leave the ferry.
Approaching a waypoint on the right.
Approaching the destination.
1.3.6 Lane information
When navigating on multi-lane roads, it is important to take the appropriate lane in order to
follow the planned route. If lane information is available in the map data, Alpine navigation
displays the lanes and their directions using small arrows at the bottom of the map.
Highlighted arrows represent the lanes and the direction you need to take.
1.3.7 Signposts
If necessary information is available, Alpine navigation displays signposts at the top of the
map. The colour and style of the signposts are similar to the real ones you can see above
roads or by roadsides. They show the available destinations and the road numbers.
All signposts look similar when cruising (when there is no planned route). During navigation
only the signpost that points to the lane(s) to be taken is highlighted; all the others are darker.
If you want to hide the currently displayed signposts, tap any of them and the normal
Navigation view returns until new signpost information is received.

18
You can modify the signpost settings in (page 73).
1.3.8 Junction view
If you are approaching a motorway exit or a complex intersection and the needed information
exists, the map is replaced with a 3D view of the junction. The lanes you need to take are
displayed with arrows. At the top of the screen, road signs show you additional information.
If you want to hide the currently displayed junction and return to the Navigation view, tap the
picture.
Junction view can be turned off in . See page 73.
1.3.9 Tunnel view
When entering a tunnel, the map is replaced with a generic tunnel image so that surface
roads and buildings cannot distract you.
The top-down overview of the tunnel displayed in a separate window helps you orientate
yourself. The remaining distance in the tunnel is also displayed.
After leaving the tunnel, the original map view returns.
Tunnel view can be turned off in . See page 73.

19
1.3.10 Motorway services
When you are driving on a motorway, the button appears at the top right corner of the
Navigation view. Tap it to open a panel with the details of the next few service stations (petrol
stations, restaurants).
Tap any of them to display the exit area on the map. You can now easily add this service
station as a waypoint to your route if necessary.
If you want to display other types of Places at the next few service stations, you can change
the icons in . See page 73.
1.3.11 3D object types
Alpine navigation supports the following 3D object types:
Type
Description
3D terrain
Alpine navigation displays 3D hills and mountains in the Navigation view,
and illustrates them by colouring and shading on the 2D map.
Elevated roads
Elevated roads are complex intersections and vertically isolated roads
(such as overpasses or bridges) displayed in 3D.
3D landmarks
Landmarks are 3D representations of prominent or well-known objects.
3D buildings
3D buildings are block representations of full town building data
containing actual building sizes and positions on the map.

20
1.3.12 Traffic events
Road segments affected by traffic events are displayed in a different colour on the map.
The following icons may appear at the top right corner of the screen:
Button
Description
It is displayed when traffic events are not received.
It is displayed when traffic events are received but they do not affect the planned
route.
It shows the type of the next traffic event with the expected delay.
It shows the type of the next traffic event if it does not cause any delay or the delay
is not known.
For more information, see page 47.
1.4 Navigation menu
On the Navigation view, tap to open the Navigation menu.

21
You can see the following menu options when you are navigating without a planned route:
Button
Function
Select your destination by entering an address or its coordinates, or by selecting a
Place, a Saved Location, or a Saved Route. You can also look up your recent
destinations from the History.
Build your route from one or more route points. You can also plan a route
independently of your current GPS position by setting a new starting point.
Check the traffic events affecting your route, or view historical traffic data.
Access additional options and check navigation-related information.
Customise the way the navigation software works.
You can access the latest free map or software updates here.
The About section provides you with product information. Read the Software and
Database End User License Agreement, or check the map and other contents of
the application. You can also access program usage statistics.
With a planned route, the following menu options are also available:
Button
Function
Add an intermediate destination to your route.
See route alternatives to avoid parts of the route, or to avoid a specific road from
your planned route.
View the route in its full length on the map and check route parameters and route
alternatives. Tap to access additional options, like Simulation or Route
Preferences.
Delete your route.

22
Delete the next waypoint or the whole route. It is displayed if there is a multipoint
route.
In the navigation menu, you have the following additional options:
Button
Function
Open the Saved Locations screen where you can save a location as a favourite
destination or edit a saved location.
Set the volume or mute the navigation.
Switch to 2D ( ), 2D North up ( ) view or back to 3D mode.
Suspend navigation.
Resume navigation.
Access the User profiles menu where you can create new profiles or edit the
existing ones. If several drivers are using the navigation system, they can create
their own profiles with their own settings.
The Menu button appears when the Navigation view is displayed. Tap it to open
the Navigation menu.
The More button appears on the screen to display additional features. Tap it to
open the list of additional features on certain screens.
Tap the Back button to return to the previous screen. You can also press and hold
this button to quickly return to the Navigation view from any other screen.

23
2 Warnings and safety information
The navigation system helps you find your way to your destination with the built-in GPS
receiver. Alpine navigation does not transmit your GPS position; others cannot track you.
It is important to look at the display only when it is safe to do so. If you are the driver of the
vehicle, we recommend that you plan and review your route before you start your journey.
Plan the route before your departure and stop if you need to change the route.
You must follow the traffic rules. If you deviate from the planned route, Alpine navigation
changes the instructions accordingly.

24
3 Using the navigation
By default, Alpine navigation calculates routes using the road network of the maps provided
with the product.
You can select the destination and start navigating to it right away (normal navigation) if you
need a route for immediate navigation.
You can also plan a route independently of your current GPS position even without GPS
reception. To achieve this, you need to set a new starting point in the Multipoint Route menu.
It also suspends guidance so that the route is not recalculated when a new position is
received. See Page 49.
You can plan routes with multiple destinations by selecting a first and a second destination
and adding it to your route. You can add as many destinations to your route as you like. See
Page 45.
You can also use Alpine navigation for off-road navigation. See page 58.
3.1 Selecting a destination
You can choose your destination by selecting one of the following options:
• Using combined search to search among different destination types at once, see page
24
• Entering a full address or a part of an address, for example a street name without a
house number, see page 27
• Selecting a Place as your destination, see page 33
• Selecting a previously saved location as your destination, see page 39
• Selecting a location from the History of previously used destinations, see page 40
• Selecting a previously saved route, see page 42
• Entering the coordinate of the destination, see page 42
• Selecting a location on the map, see page 44
• Planning a multipoint route, see page 45.
3.1.1 Using combined search
There are several ways to select your destination. You can initiate a separate search for
addresses, Places, saved locations, or recent destinations, but the fastest way to search for
any of these is to use combined search.
Perform the following steps to use combined search:
1. Tap on the Navigation view to access the Navigation menu.
2. Tap .
 Loading...