

Page 1
MP3/WMA CD Receiver
CDE-9852
• OWNER'S MANUAL
Please read before using this equipment.
• MODE D'EMPLOI
Veuillez lire avant d’utiliser cet appareil.
• MANUAL DE OPERACIÓN
Léalo antes de utilizar este equipo.
R
EN
FR
ES
ALPINE ELECTRONICS MARKETING, INC.
1-1-8 Nishi Gotanda,
Shinagawa-ku,
Tokyo 141-0031, Japan
Phone 03-5496-8231
ALPINE ELECTRONICS OF AMERICA, INC.
19145 Gramercy Place, Torrance,
California 90501, U.S.A.
Phone 1-800-ALPINE-1 (1-800-257-4631)
ALPINE ELECTRONICS OF CANADA, INC.
777 Supertest Road, Toronto,
Ontario M3J 2M9, Canada
Phone 1-800-ALPINE-1 (1-800-257-4631)
Dalian Dongtai Colour Printing Technology Co., Ltd.
No.24 Liaohexisan Road, Dalian Economic&Technical
Development Zone, China
ALPINE ELECTRONICS OF AUSTRALIA PTY. LTD.
161-165 Princes Highway, Hallam
Victoria 3803, Australia
Phone 03-8787-1200
ALPINE ELECTRONICS GmbH
Frankfurter Ring 117, 80807 München, Germany
Fletchamstead Highway, Coventry CV4 9TW, U.K.
B.P. 50016, 95945 Roissy Charles de Gaulle
Phone 089-32 42 640
ALPINE ELECTRONICS OF U.K. LTD.
Alpine House
Phone 0870-33 33 763
ALPINE ELECTRONICS FRANCE S.A.R.L.
(RCS PONTOISE B 338 101 280)
98, Rue de la Belle Etoile, Z.I. Paris Nord Il,
Cedex, France
Phone 01-48638989
ALPINE ITALIA S.p.A.
Viale C. Colombo 8, 20090 Trezzano
Sul Naviglio (MI), Italy
Phone 02-484781
ALPINE ELECTRONICS DE ESPAÑA, S.A.
Portal de Gamarra 36, Pabellón, 32
01013 Vitoria (Alava)-APDO 133, Spain
Phone 945-283588
ALPINE ELECTRONICS (BENELUX) GmbH
Leuvensesteenweg 510-B6,
1930 Zaventem, Belgium
Phone 02-725-13 15
Designed by ALPINE Japan
Printed in China (Y)
68-04123Z45-A
Page 2

ENGLISH
Contents
Operating Instructions
WARNING
WARNING ................................................. 3
CAUTION .................................................. 3
PRECAUTIONS ........................................ 3
Getting Started
Turning Power On and Off ............................... 6
Detaching and Attaching the Front Panel ........ 6
Initial System Start-Up ..................................... 6
Adjusting Volume ............................................. 7
Lowering Volume Quickly ............................... 7
Setting Time ..................................................... 7
Radio
Listening to Radio ............................................ 7
Manual Storing of Station Presets .................... 7
Automatic Memory of Station Presets ............. 8
Tuning to Preset Stations .................................. 8
Frequency Search Function .............................. 8
CD/MP3/WMA
Playback ........................................................... 8
Repeat Play ....................................................... 9
M.I.X. (Random Play) ...................................... 9
Searching from CD Text .................................. 9
File/Folder Name Search
(concerning MP3/WMA) ............................ 10
Quick Search .................................................. 10
About MP3/WMA .......................................... 10
Other Functions
Displaying the Text .........................................13
Displaying Time .............................................14
SETUP
Sound Customizing
Subwoofer On and Off .....................................15
Setting the Subwoofer System .........................15
Visual Customizing
Dimmer Control ...............................................15
Scroll Type Setting ...........................................15
Scroll Setting (TEXT SCROLL) ......................15
Demonstration ..................................................15
MP3/WMA
Playing MP3/WMA Data (PLAY MODE) .......16
External Device
Connecting to an External Amplifier ...............16
iPod™ (Optional)
Playback ..........................................................16
Searching for a desired Song .......................... 17
Searching by Playlist ...................................17
Searching by artist name .............................17
Searching by album name ...........................17
Searching by Song name .............................18
Select Playlist/Artist/Album ...........................18
Quick Search ...................................................18
Random Play Shuffle (M.I.X.) ........................18
Repeat Play .....................................................18
Displaying the Text .........................................19
Information
In Case of Difficulty .......................................19
Specifications ..................................................21
Sound Setting
Adjusting Bass/Treble/Balance (Between Left
and Right)/Fader (Between Front and Rear)/
Defeat .......................................................... 12
Setting the Bass Control ................................. 12
Setting the Treble Control .............................. 13
Turning Loudness On/Off .............................. 13
1-EN
Page 3

Installation and Connections
Warning .................................................. 22
Caution ................................................... 22
Precautions ............................................ 22
Installation ......................................................23
Connections ....................................................24
LIMITED WARRANTY
2-EN
Page 4
Operating Instructions
WARNING
WARNING
This symbol means important instructions.
Failure to heed them can result in serious injury
or death.
DO NOT OPERATE ANY FUNCTION THAT TAKES YOUR
ATTENTION AWAY FROM SAFELY DRIVING YOUR VEHICLE.
Any function that requires your prolonged attention should only be
performed after coming to a complete stop. Always stop the vehicle
in a safe location before performing these functions. Failure to do
so may result in an accident.
KEEP THE VOLUME AT A LEVEL WHERE YOU CAN STILL
HEAR OUTSIDE NOISE WHILE DRIVING.
Failure to do so may result in an accident.
MINIMIZE DISPLAY VIEWING WHILE DRIVING.
Viewing the display may distract the driver from looking ahead of
the vehicle and cause an accident.
DO NOT DISASSEMBLE OR ALTER.
Doing so may result in an accident, fire or electric shock.
CAUTION
This symbol means important instructions.
Failure to heed them can result in injury or
material property damage.
HALT USE IMMEDIATELY IF A PROBLEM APPEARS.
Failure to do so may cause personal injury or damage to the
product. Return it to your authorized Alpine dealer or the nearest
Alpine Service Center for repairing.
PRECAUTIONS
Product Cleaning
Use a soft dry cloth for periodic cleaning of the product. For more
severe stains, please dampen the cloth with water only. Anything
else has the chance of dissolving the paint or damaging the plastic.
Temperature
Be sure the temperature inside the vehicle is between +60°C
(+140°F) and –10°C (+14°F) before turning your unit on.
Moisture Condensation
You may notice the CD playback sound wavering due to
condensation. If this happens, remove the disc from the player and
wait about an hour for the moisture to evaporate.
USE ONLY IN CARS WITH A 12 VOLT NEGATIVE GROUND.
(Check with your dealer if you are not sure.) Failure to do so may
result in fire, etc.
KEEP SMALL OBJECTS SUCH AS BATTERIES OUT OF THE
REACH OF CHILDREN.
Swallowing them may result in serious injury. If swallowed,
consult a physician immediately.
USE THE CORRECT AMPERE RATING WHEN REPLACING
FUSES.
Failure to do so may result in fire or electric shock.
DO NOT BLOCK VENTS OR RADIATOR PANELS.
Doing so may cause heat to build up inside and may result in fire.
USE THIS PRODUCT FOR MOBILE 12V APPLICATIONS.
Use for other than its designed application may result in fire,
electric shock or other injury.
DO NOT PLACE HANDS, FINGERS OR FOREIGN OBJECTS IN
INSERTION SLOTS OR GAPS.
Doing so may result in personal injury or damage to the product.
Damaged Disc
Do not attempt to play cracked, warped, or damaged discs. Playing
a bad disc could severely damage the playback mechanism.
Maintenance
If you have problems, do not attempt to repair the unit yourself.
Return it to your Alpine dealer or the nearest Alpine Service
Station for servicing.
3-EN
Page 5
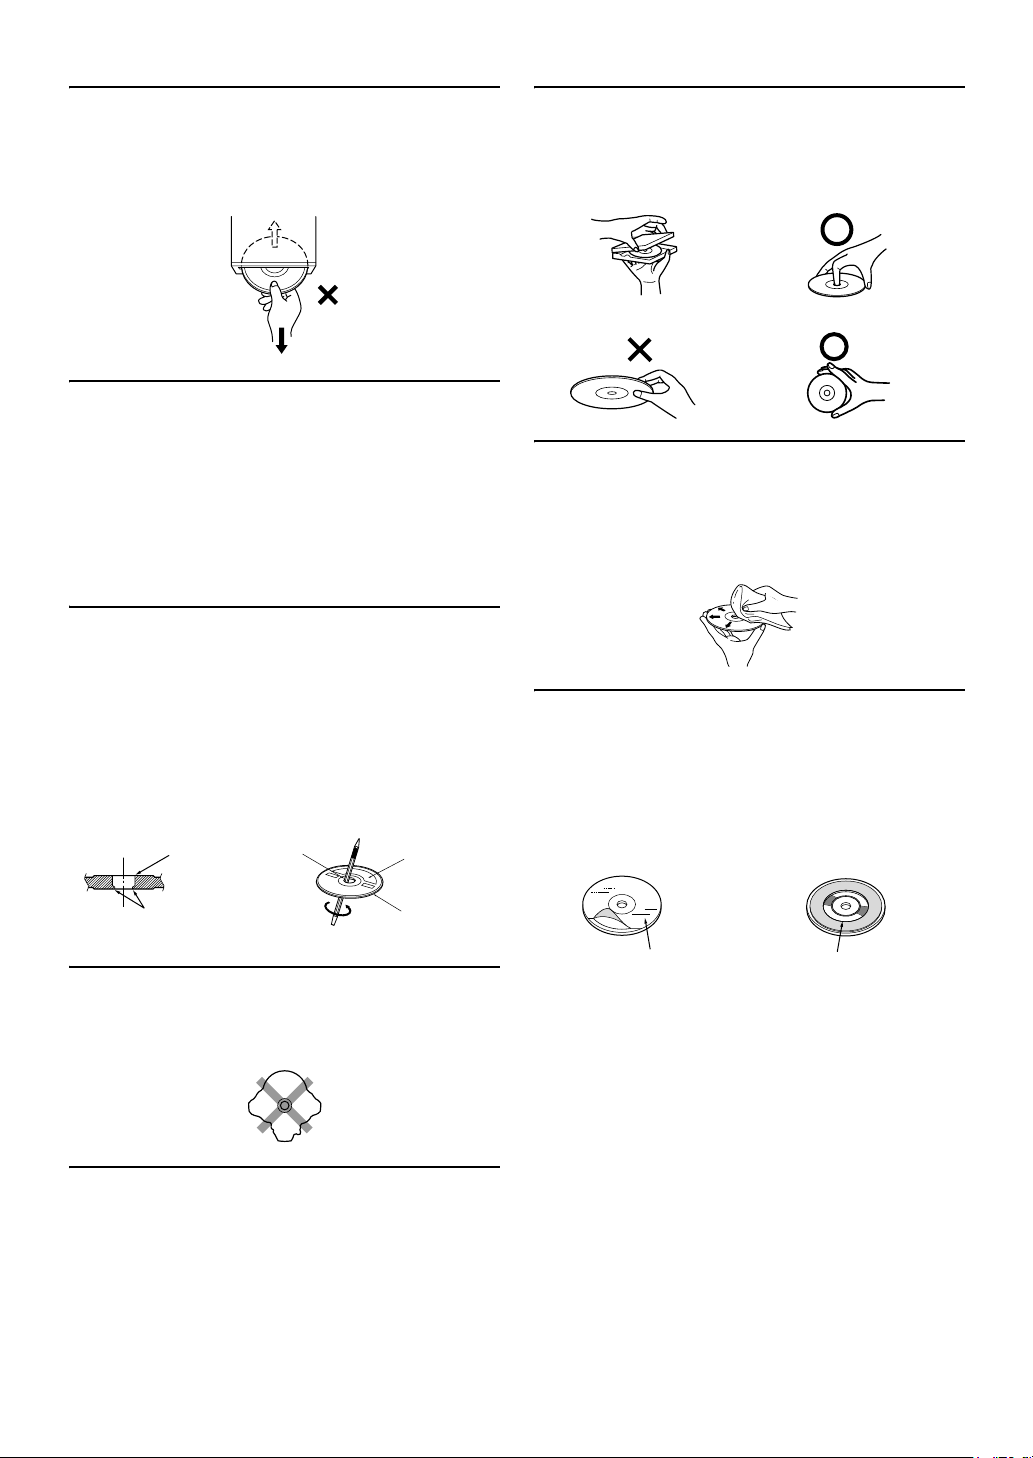
Never Attempt the Following
Do not grip or pull out the disc while it is being pulled back into the
player by the automatic reloading mechanism.
Do not attempt to insert a disc into the unit when the unit power is
off.
Inserting Discs
Your player accepts only one disc at a time for playback. Do not
attempt to load more than one disc.
Make sure the label side is facing up when you insert the disc.
“ERROR” will be displayed on your player if you insert a disc
incorrectly. If “ERROR” continues to be displayed even though the
disc has been inserted correctly, push the RESET switch with a
pointed object such as a ballpoint pen.
Playing a disc while driving on a very bumpy road may result in
skips, but this will not scratch the disc or damage the player.
New Discs
To prevent the CD from jamming, “ERROR” is displayed if discs
with irregular surfaces are inserted or if discs are inserted
incorrectly. When a new disc is ejected immediately after initial
loading, use your finger to feel around the inside of the center hole
and outside edge of the disc. If you feel any small bumps or
irregularities, this could inhibit proper loading of the disc. To
remove the bumps, rub the inside edge of the hole and outside edge
of the disc with a ballpoint pen or other such instrument, then insert
the disc again.
Center Hole
Center Hole
New Disc
Correct Handling
Do not drop the disc while handling. Hold the disc so you will not
leave fingerprints on the surface. Do not affix tape, paper, or
gummed labels to the disc. Do not write on the disc.
CORRECT
INCORRECT CORRECT
Disc Cleaning
Fingerprints, dust, or soil on the surface of the disc could cause the
CD player to skip. For routine cleaning, wipe the playing surface
with a clean, soft cloth from the center of the disc to the outer edge.
If the surface is heavily soiled, dampen a clean, soft cloth in a
solution of mild neutral detergent before cleaning the disc.
Disc Accessories
There are various accessories available on the market for protecting
the disc surface and improving sound quality. However, most of
them will influence the thickness and/or diameter of the disc. Using
such accessories can cause the disc to be out of standard
specifications and may create operational problems. We
recommend not using these accessories on discs played in Alpine
CD players.
Bumps
Outside
(Bumps)
Irregular Shaped Discs
Be sure to use round shape discs only for this unit and never use
any special shape discs.
Use of special shape discs may cause damage to the mechanism.
Installation Location
Make sure the CDE-9852 will not be installed in a location
subjected to:
• Direct sun and heat
• High humidity and water
• Excessive dust
• Excessive vibrations
4-EN
Transparent Sheet Disc Stabilizer
Page 6

On handling Compact Discs (CD/CD-R/CD-RW)
• Do not touch the surface.
• Do not expose the disc to direct sunlight.
• Do not affix stickers or labels.
• Clean the disc when it is dusty.
• Make sure that there are no bumps around the disc.
• Do not use commercially available disc accessories.
Do not leave the disc in the car or the unit for a long time. Never
expose the disc to direct sunlight. Heat and humidity may damage
the CD and you may not be able to play it again.
To customers using CD-R/CD-RW
• If a CD-R/CD-RW cannot be played back, make sure the last
recording session was closed (finalized).
• Finalize the CD-R/CD-RW if necessary, and attempt playback
again.
About media that can be played.
Use only compact discs with the label side showing the CD logo
marks below.
If you use unspecified compact discs, correct performance cannot
be guaranteed.
You can play CD-Rs (CD-Recordable)/CD-RWs (CD-ReWritable)
which have been recorded only on audio devices.
You can also play CD-Rs/CD-RWs containing MP3/WMA
formatted audio files.
• Some of the following CDs may not play on this unit:
Flawed CDs, CDs with fingerprints, CDs exposed to extreme
temperatures or sunlight (e.g., left in the car or this unit), CDs
recorded under unstable conditions, CDs on which a recording
failed or a re-recording was attempted, copy-protected CDs
which do not conform to the audio CD industry standard.
• Use discs with MP3/WMA files written in a format compatible
with this unit. For details, see pages 10-11.
• ROM data other than audio files contained in a disc will not
produce sound when played back.
• Windows Media and the Windows logo are trademarks, or
registered trademarks of Microsoft Corporation in the United
States and/or other countries.
• Apple, the Apple logo and iPod are trademarks of Apple
Computer, Inc., registered in the U.S. and other countries.
• “MPEG Layer-3 audio coding technology licensed from
Fraunhofer llS and Thomson.”
• “Supply of this product only conveys a license for private,
non-commercial use and does not convey a license nor imply
any right to use this product in any commercial (i.e. revenuegeneration) real time broadcasting (terrestrial, satellite, cable
and/or any other media), broadcasting/streaming via internet,
intranets and/or other networks or in other electronic content
distribution systems, such as pay-audio or audio-on-demand
applications. An independent license for such use is required.
For details, please visit http://www. mp3licensing.com.”
5-EN
Page 7
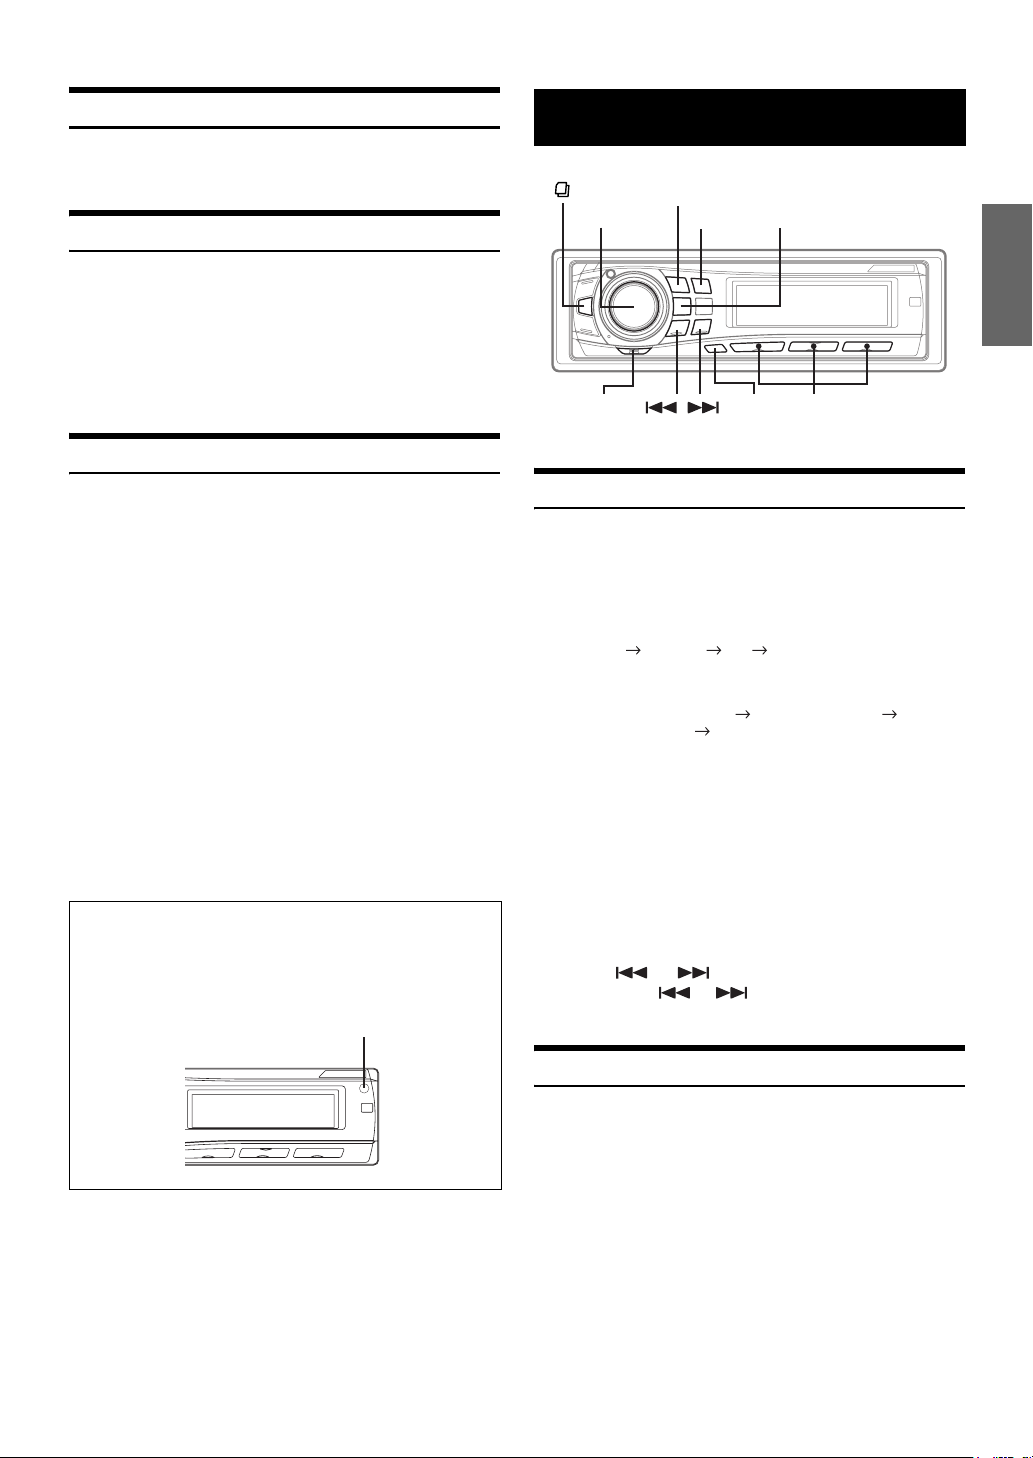
Getting Started
To close the front panel, press the left side until it locks as shown
in the figure below.
(OPEN)
MUTE
SOURCE/
POWER
MODE TITLE
Rotary encoder
Turning Power On and Off
Press SOURCE/POWER to turn on the unit.
• The unit can be turned on by pressing any other button except TITLE,
Rotary encoder and (OPEN).
Press and hold SOURCE/POWER for at least 2 seconds
to turn off the unit.
• The first time power is turned on, the volume will start from level 12.
Detaching and Attaching the Front Panel
Be sure to push the Rotary encoder inside the unit before opening the
front panel so that the front panel will open completely, otherwise it
may be damaged.
3
Grasp the front panel firmly, slide to the left , then
pull to remove.
• The front panel may become hot in normal usage (especially the
connector terminals on the back of the front panel.) This is not a
malfunction.
• To protect the front panel, place it in the supplied carrying case.
• When detaching the front panel, do not apply excessive force as it
may result in malfunction.
• Do not leave the front panel open, or drive the car with the panel
open as it may result in accident or malfunction.
Attaching
1
Insert the right side of the front panel into the main
unit. Align the groove on the front panel with the
projections on the main unit.
2
Push the left side of the front panel until it locks
firmly into the main unit.
Push the Rotary
encoder inside
When you push the Rotary encoder again, it pops back out.
The Rotary
encoder pops out
Detaching
1
Turn off the unit power.
2
Press (OPEN) to open the front panel.
6-EN
• Before attaching the front panel, make sure that there is no dirt or
dust on the connector terminals and no foreign object between the
front panel and the main unit.
• Attach the front panel carefully, holding the sides of the front panel to
avoid pushing buttons by mistake.
Initial System Start-Up
Be sure to press the RESET switch when using the unit for the first
time, after changing the car battery, etc.
1
Turn off the unit power.
2
Press (OPEN) to open the front panel, then
remove it.
3
Press RESET with a ballpoint pen or similar pointed
object.
RESET switch
Page 8
Adjusting Volume
Turn the Rotary encoder until the desired sound is
obtained.
Lowering Volume Quickly
Activating the Audio Mute function will instantly lower the volume
level by 20 dB.
Press MUTE to activate the MUTE mode.
The audio level will decrease by about 20 dB.
Pressing MUTE again will bring the audio back to its
previous level.
Setting Time
Radio
SOURCE/POWER
Rotary
encoder
MODE
BAND
A.ME
TUNE
Preset buttons
(1 through 6)
1
Press TITLE repeatedly until the time is displayed.
For details, see “Displaying the Text” (page 13)
2
Press and hold TITLE for at least 2 seconds while
the time is displayed.
The time indication will blink.
3
Turn the Rotary encoder to adjust the hours while
the time indication is blinking.
4
When the hour has been adjusted, press MODE.
5
Turn the Rotary encoder to adjust the minutes
while the time indication is blinking.
The time is automatically set 5 seconds after the minute
adjustment. The time can also be manually set by pressing
• To synchronize the clock to another clock/watch or radio time
announcement, press and hold MODE for at least 2 seconds after
setting the “hour.” Minutes will reset to “00”. If the display shows
over “30” minutes when you do this, the time will advance one hour.
• Controllable with Remote Control
This unit can be controlled with an optional Alpine remote
control. For details, consult your Alpine dealer.
• Point the optional remote control transmitter at the remote
control sensor.
Remote control sensor
TITLE
Listening to Radio
1
Press SOURCE/POWER until a radio frequency
appears on the display.
2
Press BAND repeatedly until the desired radio band
is displayed.
F1 (FM1) F2 (FM2) AM F1 (FM1)
3
Press TUNE to select the tuning mode.
DX SEEK (Distance mode) SEEK (Local mode)
OFF (Manual mode) DX SEEK
• The initial mode is Distance mode.
.
Distance mode:
Both strong and weak stations will be automatically tuned in
(Automatic Seek Tuning).
Local mode:
Only strong stations will be automatically tuned in (Automatic
Seek Tuning).
Manual mode:
The frequency is manually tuned in steps (Manual tuning).
4
Press or to tune in the desired station.
Holding down or will change the frequency
continuously.
Manual Storing of Station Presets
1
Select the radio band and tune in a desired radio
station you wish to store in the preset memory.
2
Press and hold, for at least 2 seconds, any one of the
preset buttons (1 through 6) into which you wish
to store the station.
The selected station is stored.
The display shows the band, preset number and station
frequency memorized.
7-EN
Page 9
• A total of 18 stations can be stored in the preset memory (6 stations
for each band; FM1, FM2 and AM).
• If you store a station in a preset memory which already has a station,
the current station will be cleared and replaced with the new station.
CD/MP3/WMA
Automatic Memory of Station Presets
1
Press BAND repeatedly until the desired radio band
is displayed.
2
Press and hold A.ME for at least 2 seconds.
The frequency on the display continues to change while the
automatic memory is in progress. The tuner will
automatically seek and store 6 strong stations in the
selected band. They will be stored into buttons 1 to 6 in
order of signal strength.
When the automatic memory has been completed, the tuner
goes to the station stored in preset location No.1.
• If no stations are stored, the tuner will return to the original station
you were listening to before the auto memory procedure began.
Tuning to Preset Stations
1
Press BAND repeatedly until the desired band is
displayed.
2
Press any one of the station preset buttons (1
through 6) that has your desired radio station in
memory.
The display shows the band, preset number and frequency
of the station selected.
Frequency Search Function
You can search for a radio station by its frequency.
1
Press and hold for at least 2 seconds in Radio
mode to activate Frequency Search mode.
2
Turn the Rotary encoder to select the desired
frequency.
3
Press MODE to receive the selected frequency.
• The search mode in Frequency Search mode is canceled by pressing
and holding for at least 2 seconds. Or, the search mode will be
canceled when an operation has not been performed in 10 seconds.
(OPEN)
Rotary
encoder
MODE
SOURCE/POWER
/
A.ME
5
4
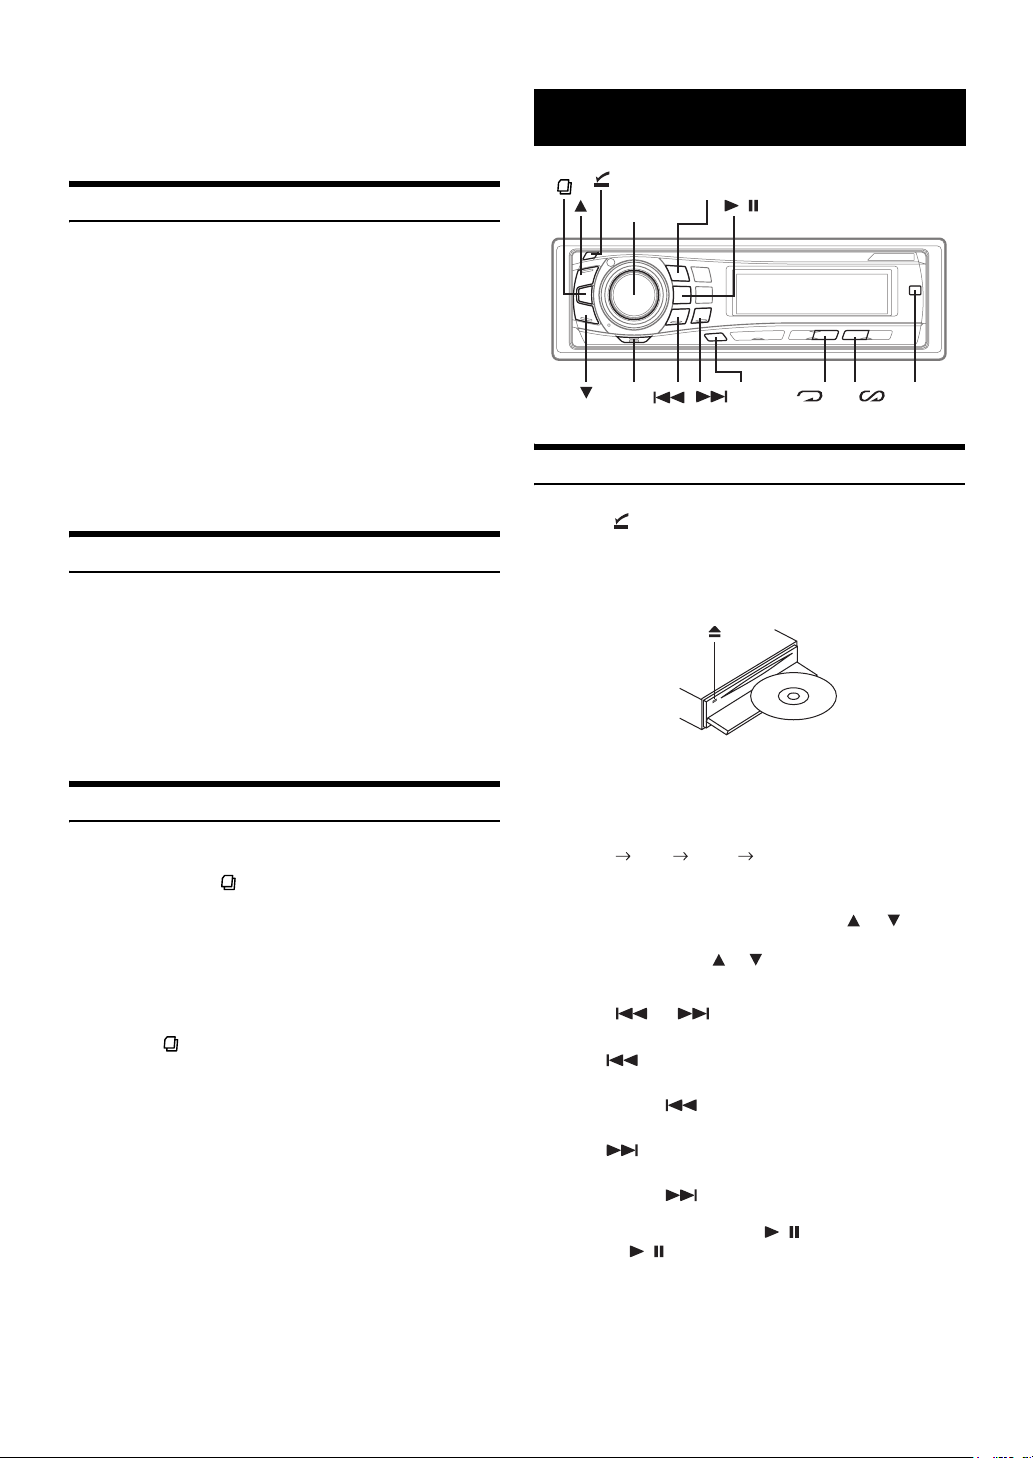
Playback
1
Press (OPEN).
The front panel will open.
2
Insert a disc with the label side facing up.
The disc will be pulled into the unit automatically.
Close the front panel manually.
When a disc is already inserted, press SOURCE/POWER to
switch to the CD mode.
The mode will change every time the button is pressed.
TUNER DISC IPOD* TUNER
* Only when the iPod is connected.
3
While playing back MP3/WMA, press or to
select the desired folder.
Pressing and holding or will change folders
continuously.
4
Press or to select the desired track (file).
Returning to the beginning of the current track (file):
Press .
Fast backward:
Press and hold .
Advancing to the beginning of the next track (file):
Press .
Fast forward:
Press and hold .
TITLE
8-EN
5
To pause playback, press / .
Pressing / again will resume playback.
Page 10

6
After pressing (OPEN) to open the front panel,
press to eject the disc.
• Do not remove a CD during its eject cycle. Do not load more than
one disc at a time. A malfunction may result from doing either.
• If the CD does not eject, press and hold for at least 2 seconds.
• The CD-player can play discs containing audio data, MP3 data and
WMA data.
• A WMA format file that is protected by DRM (Digital Rights
Management) cannot be played back on this unit.
• The track display for MP3/WMA data playback is the file numbers
recorded on the disc.
• The playback time may not be correctly displayed when a VBR
(Variable Bit Rate) recorded file is played back.
MP3/WMA Play Display
The folder number and file number will be displayed as
described below.
M.I.X. (Random Play)
Press 5 in the play or pause mode.
The tracks (files) on the disc will be played back in random
sequence.
To cancel M.I.X. play, press 5 again.
CD mode :
: The tracks are played back in random sequence.
MP3/WMA mode :
F01 T03 10'15
Folder number
display
• Press TITLE to switch the display. Please see “Displaying the Text”
(page 13) for information about display switching.
• If the folder number or file number is three digits, “F” or “T” is not
displayed.
Repeat Play
Press 4 to play back repeatedly the track being
played.
The track (file) will be played repeatedly.
Press 4 again and select off to deactivate repeat play.
CD mode :
: Only a track is repeatedly played back.
MP3/WMA mode :
: Only a file is repeatedly played back.
File number
display
Elapsed time
: Only files in a folder are played back in
random sequence.
: The files are played back in random sequence.
Searching from CD Text
Tracks can be searched and played by using the CD text on the disc. In
the case of discs that do not support text, searches can be made by using
the track numbers.
1
Press during play.
This will set the search mode.
2
Turn the Rotary encoder to select the desired
track, then press MODE.
This will play the selected track.
• Press and hold for at least 2 seconds in the search mode to
cancel. Or, the search mode will be canceled when an operation has
not been performed in 10 seconds.
• CD text search cannot be made during M.I.X. play.
: Only files in a folder are repeatedly played back.
9-EN
Page 11

File/Folder Name Search
(concerning MP3/WMA)
About MP3/WMA
You can display and search the folder and file name while listening to
the file currently being played back.
1
During MP3/WMA playback, press to activate the
search mode.
2
Turn the Rotary encoder to select Folder Name
Search mode or File Name Search mode, then press
.
Folder Name Search mode
3
Turn the Rotary encoder to select the desired
folder.
4
Press / to play back the first file in the selected
folder.
• Press and hold for at least 2 seconds in the search mode to
cancel. Or, the search mode will be canceled when an operation has
not been performed in 10 seconds.
• While in Folder Name Search mode, press to switch to File Name
Search mode.
• While in Folder Name Search mode, press A.ME to return to the
selecting search mode.
• If a disc contains only the root folder, Folder Name Search cannot be
made.
• “NO FILE” is displayed for 2 seconds if the folder that is selected by
the Folder Name Search mode contains no files.
• “ROOT” is displayed for the root folder which does not have folder
name.
• Folder Name search cannot be made during M.I.X. play.
CAUTION
Except for private use, duplicating audio data (including MP3/
WMA data) or distributing, transferring, or copying it, whether
for free or for a fee, without permission of the copyright holder is
strictly prohibited by the Copyright Act and by international
treaty.
What is MP3?
MP3, whose official name is “MPEG-1 Audio Layer 3,” is a
compression standard prescribed by the ISO, the International
Standardization Organization and MPEG which is a joint activity
institution of the IEC.
MP3 files contain compressed audio data. MP3 encoding is
capable of compressing audio data at extremely high ratios,
reducing the size of music files to as much as one-tenth their
original size. This is achieved while still maintaining near CD
quality. The MP3 format realizes such high compression ratios
by eliminating the sounds that are either inaudible to the human
ear or masked by other sounds.
What is WMA?
WMA, or “Windows Media™ Audio,” is compressed audio data.
WMA is similar to MP3 audio data and can achieve CD quality
sound with small file sizes.
Method for creating MP3/WMA files
Audio data is compressed by using MP3/WMA specified
software. For details on creating MP3/WMA files, refer to the
user’s manual for that software.
MP3/WMA files that can be played back by this device have the
file extension “mp3” / “wma”. Files with no extension cannot be
played back. (WMA ver. 7.1 and 8 are supported)
File Name Search mode
3
Press or to select another Folder.
4
Select the desired file by turning the Rotary
encoder.
5
Press MODE to playback the selected file.
• Press and hold for at least 2 seconds in the search mode to
cancel. Or, the search mode will be canceled when an operation has
not been performed in 10 seconds.
• Pressing A.ME will return to the previous mode.
• File Name search cannot be made during M.I.X. play.
Quick Search
You can search for tracks (files).
1
Press and hold for at least 2 seconds in the CD/
MP3/WMA mode to activate Quick Search mode.
2
Turn the Rotary encoder to select a desired track
(file).
The selected track is played back immediately.
• Press and hold for at least 2 seconds in the search mode to
cancel. Or, the search mode will be canceled when an operation has
not been performed in 10 seconds.
Supported playback sampling rates and bit rates
MP3
Sampling rates: 48 kHz, 44.1 kHz, 32 kHz, 24 kHz, 22.05 kHz,
16 kHz, 12 kHz, 11.025 kHz, 8 kHz
Bit rates: 8 - 320 kbps
WMA
Sampling rates: 48 kHz, 44.1 kHz, 32 kHz
Bit rates: 48 - 192 kbps
Note that for sampling rates, this device’s frame display
(Page 13) may not display correctly.
This device may not play back correctly depending on sampling
rates.
ID3 tags/WMA tags
This device supports ID3 tag v1 and v2, and WMA tag.
If tag data is in an MP3/WMA file, this device can display the title
(track title), artist name, and album name ID3 tag/WMA tag data.
This device can only display single-byte alphanumeric
characters (up to 30 for ID3 tags and up to 15 for WMA tags)
and the underscore. For non-supported characters, “NO
SUPPORT” is displayed.
The tag information may not be correctly displayed, depending
on the contents.
Producing MP3/WMA discs
MP3/WMA files are prepared, then written to a CD-R or CD-RW
using CD-R writing software. A disc can hold up to 510 files/
folders (including Root Folders). However, the maximum number
of folders is 255.
10-EN
Page 12
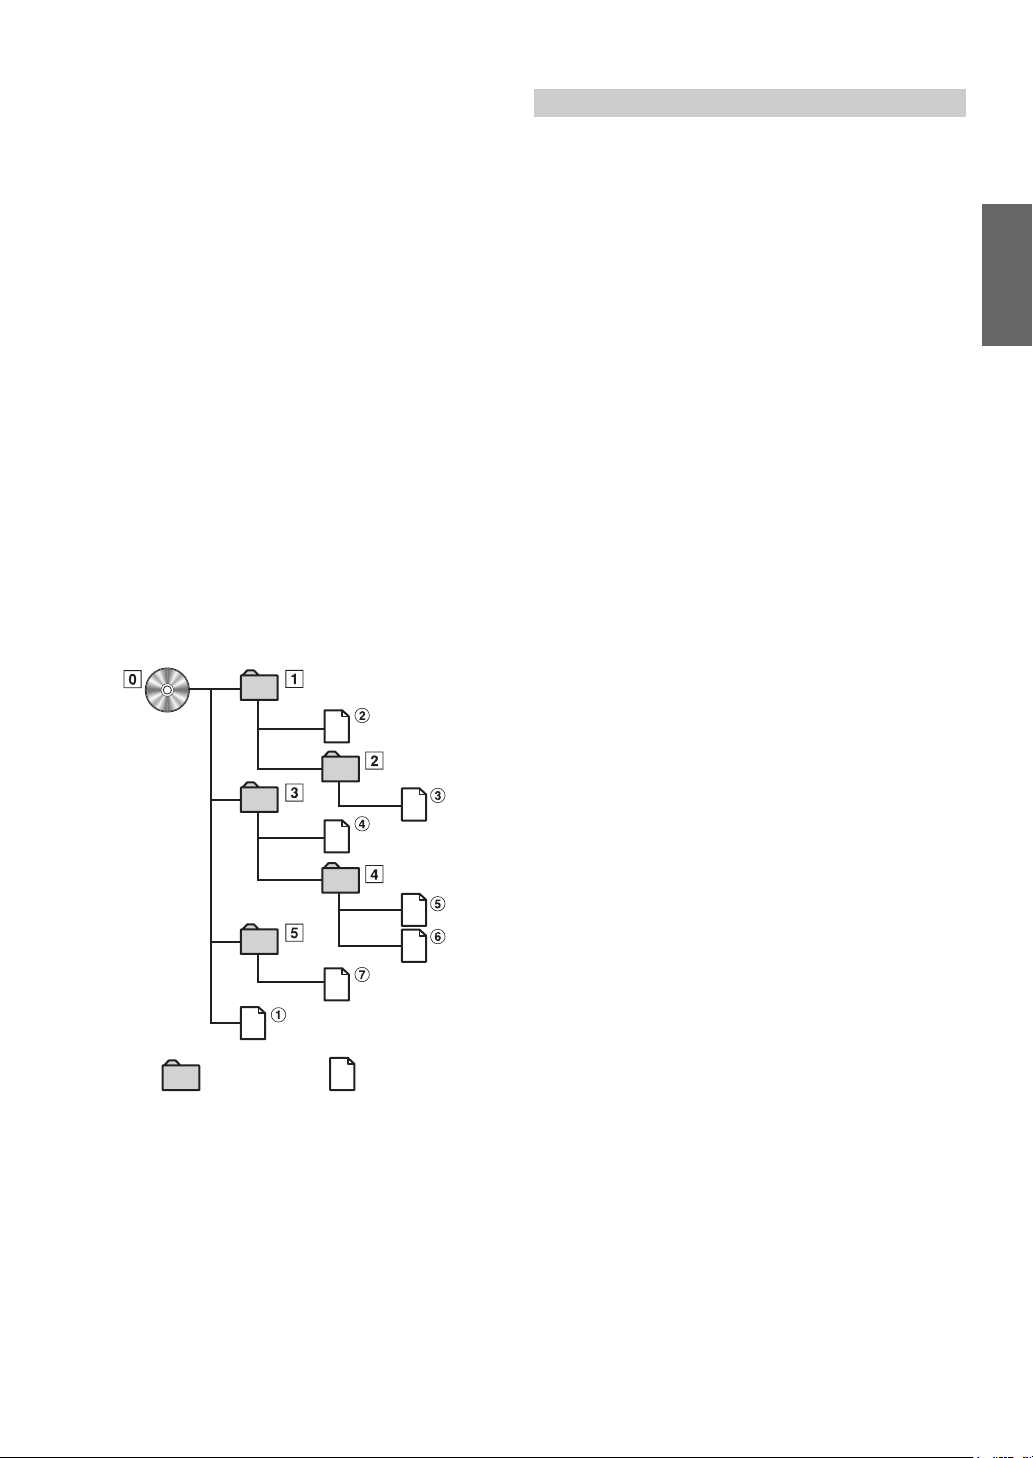
Media supported
The media that this device can play back are CD-ROMs, CD-Rs,
and CD-RWs.
Corresponding File Systems
This device supports discs formatted with ISO9660 Level 1 or
Level 2.
Under the ISO9660 standard, there are some restrictions to
remember.
The maximum nested folder depth is 8 (including the root
directory). The number of folder/file name characters is limited.
Valid characters for folder/file names are letters A-Z (all caps),
numbers 0-9, and ‘_’ (underscore).
This device also can play back discs in Joliet, Romeo, etc., and
other standards that conform to ISO9660. However, sometimes
the file names, folder names, etc., are not displayed correctly.
Formats supported
This device supports CD-ROM XA, Mixed Mode CD, Enhanced
CD (CD-Extra) and Multi-Session.
This device cannot correctly play back discs recorded with
Track At Once or packet writing.
Order of tracks
The unit plays the files in the order that the writing software
writes them. Therefore, the playing order may not be the same
as the order you input. The playback order of the folders and
files is as follows. However, the folder and file playback order
differs from the folder and file number indicated on the display.
Terminology
Bit rate
This is the “sound” compression rate specified for encoding. The
higher the bit rate, the higher the sound quality, but also the larger
the files.
Sampling rate
This value shows how many times per second the data is sampled
(recorded). For example, music CDs use a sampling rate of 44.1 kHz,
so the sound is sampled (recorded) 44,100 times per second. The
higher the sampling rate, the higher the sound quality, but also the
larger the volume of data.
Encoding
Converting music CDs, WAVE (AIFF) files, and other sound files into
the specified audio compression format.
Tag
Song information such as track titles, artist names, album names,
etc., written into MP3/WMA files.
MP3: ID3 tag
WMA: WMA tag
Root folder
The root folder is found at the top of the file system. The root folder
contains all folders and files.
Root folder
Folder MP3/WMA File
11-EN
Page 13
Sound Setting
SOURCE/POWER
Rotary encoder
BAND
MENU
Setting the Bass Center Frequency
3
-1 Press SOURCE/POWER to select the desired bass
center frequency.
80Hz 100Hz 120Hz 60Hz 80Hz
Emphasize the displayed bass frequency ranges.
Setting the Bass Bandwidth
3
-2 Press BAND to select the desired bass bandwidth.
MODE
Adjusting Bass/Treble/Balance (Between
Left and Right)/Fader (Between Front
and Rear)/Defeat
1
Press MODE repeatedly to choose the desired
mode.
Each press changes the mode as follows:
BASS TREBLE SUBW* BALANCE FADER
DEFEAT VOLUME BASS
Bass level: –7 ~ +10
Treble level: –7 ~ +7
Subwoofer : 0 ~ +15
Balance : L15 ~ R15
Fader : R15 ~ F15
Defeat : ON/OFF
Volum e : 0 ~ 3 5
• If MODE is not pressed within 5 seconds after selecting the BASS,
TREBLE, BALANCE, FADER, DEFEAT or SUBW mode, the unit
automatically returns to normal mode.
* When the subwoofer mode is set to OFF, its level cannot be adjusted.
2
Turn the Rotary encoder until the desired sound is
obtained in each mode.
By setting Defeat ON, previously adjusted settings of BASS
and TREBLE will return to the factory defaults.
Change the boosted bass bandwidth to wide or narrow. A
wide setting will boost a wide range of frequencies above
and below the center frequency. A narrower setting will
boost only frequencies near the center frequency.
Setting the Bass Level
3
-3*1Turn the Rotary encoder to select the desired
bass level (–7~+10).
You can emphasize or weaken the bass level.
4
Press MENU to select RETURN.
After 2 seconds, the unit returns to normal mode.
Pressing and holding MENU for at least 2 seconds will
return to normal mode.
• If no operation is performed within 60 seconds, the bass control
setting will be turned off automatically.
• The bass level settings will be individually memorized for each
source (FM, AM, CD, etc.) until the setting is changed. The bass
frequency and bass band width settings adjusted for one source are
effective for all other sources (FM, AM, CD etc.).
• This function is inoperable when DEFEAT is set to ON.
• While in the bass adjusting mode, TREBLE CONTROL adjusting
mode can be recalled by pressing or .
1
*
The adjustment can also be made by pressing MODE. Refer to
“Adjusting Bass/Treble/Balance (Between Left and Right)/Fader
(Between Font and Rear)/Defeat” (page 12).
Bass level indicator’s display
Bass level is usually displayed
Setting the Bass Control
You can change the Bass Frequency emphasis to create your own tonal
preference.
1
Press MENU to select the BASS ENGINE mode, then
press MODE.
BASS ENGINE SETUP RETURN (OFF) BASS ENGINE
2
Press or to select the BASS (Bass Center
Frequency) control mode.
BASS TREBLE
12-EN
Page 14
Setting the Treble Control
You can change the Treble Frequency emphasis to create your own tonal
preference.
1
Press MENU to select the BASS ENGINE mode, then
press MODE.
BASS ENGINE SETUP RETURN (OFF) BASS ENGINE
2
Press or to select the TREBLE (Treble
Center Frequency) control mode.
BASS TREBLE
Setting the Treble Center Frequency
3
-1 Press SOURCE/POWER to select the desired treble
Center frequency.
10.0kHz 12.5kHz 15.0kHz 7.5kHz 10.0kHz
Emphasize the displayed treble frequency ranges.
Setting the Treble Level
3
-2*2Turn the Rotary encoder to select the desired
treble level (–7~+7).
You can emphasize the treble level.
4
Press MENU to select RETURN.
After 2 seconds, the unit returns to normal mode.
Pressing and holding MENU for at least 2 seconds will
return to normal mode.
• If no operation is performed within 60 seconds, the treble control
setting will be turned off automatically.
• The treble level settings will be individually memorized for each
source (FM, AM, CD, etc.) until the setting is changed. The Treble
frequency settings adjusted for one source are effective for all other
sources (FM, AM, CD, etc.).
• This function is inoperable when DEFEAT is set to ON.
• While in the treble adjusting mode, BASS CONTROL adjusting mode
can be recalled by pressing or .
2
The adjustment can also be made by pressing MODE. Refer to
*
“Adjusting Bass/Treble/Balance (Between Left and Right)/Fader
(Between Font and Rear)/Defeat” (page 12).
Turning Loudness On/Off
Loudness introduces a special low- and high-frequency emphasis at low
listening levels. This compensates for the ear's decreased sensitivity to
bass and treble sound.
Press and hold MODE for at least 2 seconds to activate
or deactivate the loudness mode.
“LD” indicator lights.
Other Functions
TITLE
Displaying the Text
Text information, such as the disc name and the track name, will be
displayed if playing a CD text compatible disc. It is also possible to
display the folder name, the file name, and the tag, etc., while playing
MP3/WMA files.
Press TITLE.
The display will change every time the button is pressed.
The display in Radio mode:
FREQUENCY CLOCK FREQUENCY
The display in CD mode:
TRACK NO./ELAPSED TIME TRACK NO./CLOCK
TEXT (DISC NAME)*
TRACK NO./ELAPSED TIME
The display in MP3/WMA mode:
FOLDER NO./FILE NO./ELAPSED TIME
FOLDER NO./FILE NO./CLOCK FOLDER NAME*
FILE NAME ARTIST NAME*
TRACK NAME*
FOLDER NO./FILE NO./ELAPSED TIME
*1Displayed during playback of a disc with CD Text.
*2ID3 tag/WMA tag
If an MP3/WMA file contains ID3 tag/WMA tag information, the ID3
tag/WMA tag information is displayed (e.g., track name, artist name,
and album name). All other tag data is ignored.
If the Scroll setting (page 15) is set to “SCROLL AUTO,” the tag
information will scroll automatically.
*3“ROOT” is displayed for the root folder which doesn’t have folder
name.
*4The recording sampling rate and bit rate of the MP3/WMA file are
displayed. A WMA file of variable bit rate displays the average bit
rate.
1
TEXT (TRACK NAME)*1
2
2
FRAME*4
ALBUM NAME*2
3
13-EN
Page 15
About the indication display
When displaying Text, the following indicators are lit
according to the mode.
The position of a song being played back is shown lit in the
total number of songs shown. The display example is as
shown below. Also lights when operation, such as fast
forward, etc., is performed.
Lights up when a disc is inserted
Song position display example
<First half> <Middle> <Last half>
• For example, when the 5th of 10 songs in the disc is played back,
“ ” is displayed.
Indicator/
Mode
CD Mode MP3/WMA Mode iPod mode
2
––
––
––
Text (Disc
3
) being
Name*
displayed
Text ( Tra c k
3
) being
Name*
displayed
Folder Name*
being displayed
File Name*
being displayed
Artist Name*
being displayed
Album Name*
being displayed
Track Name*
being displayed
2
1
Artist Name*1
being displayed
1
Album Name*1
being displayed
1
Track Name*1
being displayed
––
––
About “Text”
Text:
Text compatible CDs contain text information such as the disc
name and track name. Such text information is referred to as
“text.”
• Some characters may not be displayed correctly with this device,
depending on the character type.
• When the Scroll Setting (page 15) is set to “SCROLL MANU,” press
and hold TITLE for at least 2 seconds to scroll the Text information
only once (TEXT DISPLAY, FOLDER NAME DISPLAY, FILE NAME
DISPLAY or TAG DISPLAY mode).
• “NO SUPPORT” is displayed when the desired text information
cannot be displayed on this unit.
• The text or tag information may not be correctly displayed,
depending on the contents.
Displaying Time
Press TITLE repeatedly until the time is displayed.
Each press changes the display.
For details, see “Displaying the Text” (page 13).
• Selecting any tuner or CD function while in the clock priority mode
will interrupt the time display momentarily. The function selected
will be displayed for about 5 seconds before the time returns to the
display.
• When the power is off but the ignition key is on, press TITLE to
display the time.
1
Tag information
*
If there is no tag information, “ARTIST”/“ALBUM”/“SONG” is
displayed.
*2If there is no folder name or file name, “FOLDER”/“FILE” is
displayed.
3
*
If there is no Text (Disc Name or Track Name), “DISC TEXT”/
“TRACK TEXT” is displayed.
14-EN
Page 16
SETUP
You can flexibly customize the unit to suit your own preferences and
usage. Choose the SETUP menu from Sound Customizing, Visual
Customizing, etc., to select your desired setting.
MENURotary encoder
MODE
A typical SETUP procedure is shown in steps 1 to 4 as
follows. See below for further information about each
SETUP menu.
1
Press MENU to select the SETUP mode, then press
MODE.
BASS ENGINE SETUP RETURN (OFF) BASS ENGINE
Setting the Subwoofer System
SUBW SYS1 (Initial setting) / SUBW SYS2
Select either SYS1 or SYS2 for the desired subwoofer effect.
SUBW SYS1: Subwoofer level changes according to the main
volume setting.
SUBW SYS2: Subwoofer level change is different from the main
volume setting. For example, even at low volume
settings, the subwoofer is still audible.
Visual Customizing
Dimmer Control
DIMMER AUTO (Initial setting) / DIMMER MANU
Set the DIMMER control to AUTO to decrease the illumination
brightness of the unit with the head lights of the vehicle ON. This mode
is useful if you feel the unit's backlighting is too bright at night.
Scroll Type Setting
SCROLL TYPE1 / SCROLL TYPE2 (Initial setting)
Choose from two scrolling methods.
Select the type you prefer.
SCROLL TYPE1: The characters scroll sequentially, appearing
from the right side of the display.
SCROLL TYPE2: The characters are displayed one by one,
and disappear one by one from the left side
of the display after the screen is filled up with
the characters.
2
Press or to select the desired SETUP
menu, then Press MODE.
(e.g. Select SUBWOOFER)
DIMMER SUBWOOFER (SUBW SYSTEM)*
PLAY MODE SCROLL TYPE TEXT SCROLL
POWER IC DEMO DIMMER
* Displayed only when SUBW is ON.
3
Turn the Rotary encoder to change the setting.
(e.g. Select SUBW ON or SUBW OFF.)
4
Press MENU to select RETURN.
After 2 seconds, the unit returns to normal mode.
Pressing and holding MENU for at least 2 seconds will
return to normal mode.
Sound Customizing
Subwoofer On and Off
SUBW ON (Initial setting) / SUBW OFF
When the subwoofer is on, perform the steps below to adjust the
subwoofer output level.
1 In the normal mode, press MODE repeatedly to select the
SUBW mode.
BASS TREBLE SUBW BALANCE FADER
DEFEAT VOLUME BASS
2 Adjust the Level by turning the Rotary encoder.
Scroll Setting (TEXT SCROLL)
SCROLL AUTO / SCROLL MANU (Initial setting)
This CD player can scroll the disc and track names recorded on CDTEXT discs, as well as the text information of MP3/WMA files, folder
names, and tags.
SCROLL AUTO: The CD text information, the text information of
folder and file names, and the tags are
scrolled automatically. Also, tag information is
automatically scrolled without pressing TITLE
in the tag information display mode.
SCROLL MANU: The display is scrolled when a disc is loaded
or when a track is changed, etc.
• The unit scrolls CD text names, folder names, file names or tag
display.
Demonstration
DEMO ON / DEMO OFF (Initial setting)
This unit has a demonstration feature for the display.
• To quit Demo mode, set to DEMO OFF.
15-EN
Page 17
MP3/WMA
Playing MP3/WMA Data (PLAY MODE)
CDDA (Initial setting) / CDDA/MP3
This product can playback CDs containing both CD and MP3/WMA
data. However, in some situations (some enhanced CDs), playback may
be difficult. For these special cases, you can select playback of CD data
only. When a disc contains both CD or the MP3/WMA data, playback
starts from the CD data portion of the disc.
CDDA: Only CD data can be played back.
CDDA/MP3: Both CD data and MP3/WMA file tracks can be
• Perform this setting before inserting a disc. If a disc has already been
inserted, perform the setting after you remove the disc.
played back.
External Device
Connecting to an External Amplifier
POWER IC ON (Initial setting) / POWER IC OFF
When an external amplifier is connected, sound quality can be improved
by stopping the power supply of the built-in amplifier.
POWER IC OFF : Use this mode when the front pre-amplifier of
POWER IC ON : The speakers are driven by the built-in
SPEAKER
RIGHT FRONT
the unit are used to drive an external amplifier
connected to the speakers. In this setting, the
head unit’s internal amplifier has no output to
drive speakers.
Front
Amplifier
amplifier.
left
Front
right
Speakers
Front
right
iPod™ (Optional)
Rotary
encoder
MODE
An iPod™, iPod™ mini or iPod™ nano can be connected to the
CDE-9852 by using the proprietary ALPINE FULL SPEED™
Connection Cable (KCE-422i). When the CDE-9852 is connected by
using the cable, the controls on the iPod™ are not functional.
About iPods™ usable with this unit
The unit can be used with third generation and above iPod™
photo, iPod™ minis or iPod™ nano. iPod™ Shuffle cannot be
used, however.
• Touch wheel or scroll wheel type iPods without the dock
connector cannot be connected to the unit.
• The unit can be used with the following iPod versions.
Correct function of earlier versions cannot be guranteed.
Third generation iPod:Ver. 2.3
Forth generation iPod:Ver. 3.0.2
iPod photo:Ver.1.0
iPod mini:Ver. 1.3
iPod nano:Ver. 1.0
• The unit cannot be used with the software versions earlier
than 22nd Feb.2005. For details about “iPod Software
Update”, refer to the iPod Instruction Manual.
Playback
SOURCE/POWER
/
A.ME
6
5
4
TITLE
SPEAKER
RIGHT REAR
SPEAKER
LEFT REAR
SPEAKER
LEFT FRONT
• No sound is produced by the system when the power output is set to
OFF.
Rear
right
Rear
left
Front
left
16-EN
1
Press SOURCE/POWER to switch to the iPod
mode.
2
Press or to select the desired song.
Return to the beginning of the current song:
Press .
Fast backward:
Press and hold .
Advance to the beginning of the next song:
Press .
Fast forward:
Press and hold .
3
To pause playback, press / .
Pressing / again will resume playback.
• If a song is playing on the iPod when it is connected to the
CDE-9852, it will continue playing after the connection.
Page 18
Searching for a desired Song
An iPod can contain hundreds of songs. By keeping these songs
organized in playlists, the CDE-9852 can use these to ease song
searches.
Searching by Playlist
1
Press to activate the search selection mode.
2
Turn the Rotary encoder to select the PLAYLIST
search mode, then press .
PLAYLIST ARTIST ALBUM SONG PLAYLIST
*1
3
Turn the Rotary encoder to select the desired
Playlist.
4
Press / .
The selected playlist is played back.
To search for a song in the selected playlist
1 After selecting the playlist in step 3*1, press to change
to the song search mode of the selected playlist.
2 Turn the Rotary encoder to select a song and press
MODE.
The selected song is played back.
• Press and hold for at least 2 seconds in the search mode to
cancel. Or, the search mode will be canceled when an operation has
not been performed in 10 seconds.
• In the search mode, pressing A.ME will return to the previous mode.
• All songs in the iPod are played back by selecting the stored “iPod
name” in step 3*
• Playlist search cannot be made during M.I.X. play.
• “NO SONG” will be displayed if there are no songs in the selected
playlist in the PLATLIST search mode.
Searching by artist name
1
Press to activate the search selection mode.
2
Turn the Rotary encoder to select the ARTIST
search mode, then press .
PLAYLIST ARTIST ALBUM SONG PLAYLIST
*2
3
Turn the Rotary encoder to select the desired
Artist.
1
.
To search for a song of the selected album
1 After selecting the album in step 2*1, press to change
to the song search mode of the selected album.
2 Turn the Rotary encoder to select a song and press
MODE.
The selected song is played back.
• Press and hold for at least 2 seconds in the search mode to
cancel. Or, the search mode will be canceled when an operation has
not been performed in 10 seconds.
• In the search mode, pressing A.ME will return to the previous mode.
• If you choose ALL in step 3*
iPod are played back. If you choose ALL, and you press , the
ALBUM search mode for all artists is activated.
• If you choose ALL in step 2*1, and you press / , all songs of the
selected artist are played back. If you choose ALL, and you press ,
the SONG search mode for the selected artist is activated.
• Artist name search cannot be made during M.I.X. play.
2
, and you press / , all songs in the
Searching by album name
1
Press to activate the search selection mode.
2
Turn the Rotary encoder to select the ALBUM
search mode, then press .
PLAYLIST ARTIST ALBUM SONG PLAYLIST
*3
3
Turn the Rotary encoder to select the desired
Album.
4
Press / .
All the songs of the selected Albums are played back.
To search for a song of the selected album
1 After selecting the album in step 3*3, press to change
to the song search mode of the selected album.
2 Turn the Rotary encoder to select a song and press
MODE.
The selected song is played back.
• Press and hold for at least 2 seconds in the search mode to
cancel. Or, the search mode will be canceled when an operation has
not been performed in 10 seconds.
• In the search mode, pressing A.ME will return to the previous mode.
• If you choose ALL in step 3*
iPod are played back. If you choose ALL, and you press , the
SONG search mode for all albums is activated.
• Album name search cannot be made during M.I.X. play.
3
, and you press / , All songs in the
4
Press / .
All the songs of the selected Artist are played back.
To search for an album of the selected artist
1 After selecting the artist in step 3*2, press to change
to the album search mode of the selected artist.
1
2*
Tur n the Rotary encoder to select an album.
3 Press / to play back all songs of the selected album.
17-EN
Page 19
Searching by Song name
1
Press to activate search selection mode.
2
Turn the Rotary encoder to select the SONG
search mode, then Press .
PLAYLIST ARTIST ALBUM SONG PLAYLIST
3
Turn the Rotary encoder to select the desired
Song.
4
Press MODE.
The selected song is played back.
• Press and hold for at least 2 seconds in the search mode to
cancel. Or, the search mode will be canceled when an operation has
not been performed in 10 seconds.
• In the search mode, pressing A.ME will return to the previous mode.
• Song name search cannot be made during M.I.X play.
Select Playlist/Artist/Album
Playlist/Artist/Album can be easily changed.
For example, if you listen to a song from a selected album, the album
can be changed.
1
Press or to select the desired Playlist/Artist/
Album.
• If search selection mode is not activated, only Song is searched, this
operation is not possible.
• If an album is selected from an artist search, the album can be
searched.
• During shuffle (M.I.X.) playback, this operation is not possible.
Quick Search
You can search for songs.
1
Press and hold for at least 2 seconds to activate
Quick Search mode.
2
Turn the Rotary encoder to select a desired song.
The selected song is played back immediately.
• Press and hold for at least 2 seconds in the search mode to
cancel. Or, the search mode will be canceled when an operation has
not been performed in 10 seconds.
• If many songs are in the iPod, it takes time to serch for songs.
1
Press 5 .
The songs will be played back in random sequence.
M.I.X. M.I.X. (off) M.I.X.
(Shuffle Albums) (Shuffle Songs)
2
To cancel M.I.X. play, select (off) with the above
procedure.
• For details of the search mode, refer to “Searching for a desired
Song” (page 17).
• If a song is selected in the album search mode before selecting
Shuffle (M.I.X.), the songs will not play back randomly even when
Shuffle album is selected.
Shuffle ALL:
Shuffle ALL plays all songs in the iPod randomly. Any one song
does not play back again until all songs have been played back.
1
Press 6.
The songs will be played back in random sequence.
M.I.X. (off) M.I.X.
(Shuffle ALL)
2
To cancel M.I.X. play, select (off) with the above
procedure.
• If Shuffle All is selected, the selected ones which being played back in
the search mode are cancelled.
Repeat Play
Only Repeat One is available for the iPod.
Repeat One: A single song is repeatedly played back.
1
Press 4.
The file will be played repeatedly.
RPT (off) RPT
(Repeat One)
2
To cancel repeat play, select (off) with the above
procedure.
• During repeat playback, no other songs are selectable by pressing
or .
Random Play Shuffle (M.I.X.)
The Shuffle function of the iPod is displayed as M.I.X. on the
CDE-9852.
Shuffle Albums:
Album shuffle playback plays back all songs in order, then
randomly selects the next album. All songs of that album are
played back in order, and so on. Any one album is played just
once.
Shuffle Songs:
Song shuffle randomly plays back certain selected songs. Any
one song plays back just once until all songs have been played
back.
18-EN
Page 20

Displaying the Text
You can display the tag information of a song in the iPod.
Press TITLE.
Each press changes the display.
TRACK NO./ELAPSED TIME TRACK NO./CLOCK
ARTIST NAME* ALBUM NAME*
SONG TITLE* TRACK NO./ELAPSED TIME
* TAG information
If the Scroll Setting (page 15) is set to “SCROLL AUTO,” the tag
information will scroll automatically.
“ARTIST”/“ALBUM”/“SONG” is displayed if there is no tag
information.
• When the Scroll Setting (page 15) is set to “SCROLL MANU,”
press and hold TITLE for at least 2 seconds to scroll the tag
information only once.
• Only alphanumeric characters (ASCII) can be displayed.
• If the artist, album or song name, created in iTunes, has too many
characters, songs may not be played back when connected to the
adapter. Therefore, a maximum of 250 characters is recommended.
The maximum number of characters for the head unit is 128
(128 byte).
• Some characters may not be correctly displayed.
• “NO SUPPORT” is displayed when text information is not
compatible with the CDE-9852.
Information
In Case of Difficulty
If you encounter a problem, please turn the power off, then on again. If
the unit is still not functioning normally, please review the items in the
following checklist. This guide will help you isolate the problem if the
unit is at fault. Otherwise, make sure the rest of your system is properly
connected or consult your authorized Alpine dealer.
Basic
No function or display.
• Vehicle's ignition is off.
- If connected following instructions, the unit will not operate
with the vehicle's ignition off.
• Improper power lead (Red) and battery lead (Yellow) connections.
- Check power lead and battery lead connections.
•Blown fuse.
- Check the fuse of the unit; replace with the proper value if
necessary.
• Internal micro-computer malfunctioned due to interference noise
etc.
- Press the RESET switch with a ballpoint pen or other pointed
article.
Radio
Unable to receive stations.
• No antenna or open connection in cable.
- Make sure the antenna is properly connected;
replace the antenna or cable if necessary.
Unable to tune stations in the seek mode.
• You are in a weak signal area.
- Make sure the tuner is in the DX mode.
• If the area you are in is a primary signal area, the antenna may
not be grounded and connected properly.
- Check your antenna connections; make sure the antenna is
properly grounded at its mounting location.
• The antenna may not be the proper length.
- Make sure the antenna is fully extended; if broken, replace the
antenna with a new one.
Broadcast is noisy.
• The antenna is not the proper length.
- Extend the antenna fully; replace it if it is broken.
• The antenna is poorly grounded.
- Make sure the antenna is grounded properly at its mounting
location.
19-EN
Page 21
CD
CD Player not functioning.
• Out of operating temperature range +50°C (+120°F) for CD.
- Allow the vehicle’s interior (or trunk) temperature to cool.
CD playback sound is wavering.
• Moisture condensation in the CD Module.
- Allow enough time for the condensation to evaporate (about 1
hour).
CD insertion not possible.
• A CD is already in the CD player.
- Eject the CD and remove it.
• The CD is being improperly inserted.
- Make sure the CD is being inserted following instructions in
the CD Player Operation section.
Unable to fast forward or backward the CD.
• The CD has been damaged.
- Eject the CD and discard it; using a damaged CD in your unit
can cause damage to the mechanism.
CD playback sound skips due to vibration.
• Improper mounting of the unit.
- Securely re-mount the unit.
• The disc is very dirty.
- Clean the disc.
• The disc has scratches.
- Change the disc.
• The pick-up lens is dirty.
- Do not use a commercial available lens cleaner disc. Consult
your nearest Alpine dealer.
CD playback sound skips without vibration.
• The disc is dirty or scratched.
- Clean the disc; damaged disc should be replaced.
Error displays (built-in CD player only)
• Mechanical error
- Press . After the error indication disappears, insert the disc
again. If the above-mentioned solution does not solve the
problem, consult your nearest Alpine dealer.
CD-R/CD-RW playback not possible
• Close session (finalization) has not been performed.
- Perform finalization and attempt playback again.
MP3/WMA
MP3 or WMA is not played back.
• Writing error occurred. The CD format is not compatible.
- Make sure the CD has been written in a supported format.
Refer to “About MP3/WMA” (page 10-11), then rewrite in the
format supported by this device.
Audio
The sound is not output from the speakers.
• Unit has no output signal of the internal amplifier.
- POWER IC is switched to “ON” (page 16).
Indication for CD Player
• Protective circuit is activated due to high temperature.
- The indication will disappear when the temperature returns to
normal operating range.
• No CD is inserted.
- Insert a CD.
• Although a disc is inserted, “NO DISC” is displayed and the unit
does not start to play or eject the disc.
- Remove the disc by following these steps:
Press the button again for at least 2 seconds.
If the disc still does not eject, consult your Alpine dealer.
• Mechanism error.
1) Press the button and eject the CD.
If not ejecting, consult your Alpine dealer.
2) When the error indication remains after ejecting, press the
button again.
If the error indication still does not turn off after pressing the
button for a few times, consult your Alpine dealer.
• When “ERROR” is displayed:
If that the disc cannot be ejected by pressing , press the RESET
switch (refer to page 6) and press again.
If the disc still cannot be ejected, consult your Alpine dealer.
• A copy-protected WMA file was played back.
- You can only play back non-copy-protected files.
• The disc is not written in a MP3/WMA supported format.
- Use a disc written at the MP3/WMA supported format.
Indication for iPod Mode
• The iPod is not connected.
- Make sure the iPod is correctly connected (refer to
“Connections”).
Make sure the cable is not bent excessively.
• The iPod’s battery remains low.
- Refer to the iPod’s documentation and charge the battery.
20-EN
• There are no songs in the iPod.
- Download songs to the iPod and connect to the adapter.
Page 22

Specifications
• Communication error
- Turn the ignition key off, and then set to ON again.
- Check the display by reconnecting between the iPod and the
adapter, using the iPod cable.
• Caused by the iPod Software Version not being compatible with
the unit.
- Update the iPod Software Version to be compatible with the
unit.
FM TUNER SECTION
Tuning Range 87.7-107.9 MHz
Mono Usable Sensitivity 9.3 dBf (0.8 µV/75 ohms)
50 dB Quieting Sensitivity 13.5 dBf (1.3 µV/75 ohms)
Alternate Channel Selectivity 80 dB
Signal-to-Noise Ratio 65 dB
Stereo Separation 35 dB
Capture Ratio 2.0 dB
AM TUNER SECTION
Tuning Range 530-1,710 kHz
Sensitivity (IEC Standard) 22.5 µV/27 dB
CD PLAYER SECTION
Frequency Response 5 – 20,000 Hz (±1 dB)
Wow & Flutter (% WRMS) Below measurable limits
Total Harmonic Distortion 0.008% (at 1 kHz)
Dynamic Range 95 dB (at 1 kHz)
Signal-to-Noise Ratio 105 dB
Channel Separation 85 dB (at 1 kHz)
PICKUP
Wave length 795 nm
Laser power CLASS I
GENERAL
Power Requirement 14.4 V DC
(11–16 V allowable)
Power Output 16 W RMS × 4*
* Primary amplifier ratings per CEA-2006 Standard
• Power output: measured at 4 Ohms and 1% THD+N
• S/N: 80 dBA (reference: 1 W into 4 Ohms)
Maximum Pre-Output Voltage 2 V/10 k ohms
Bass +20/-14 dB at 100 Hz
Treble ±14 dB at 10 kHz
Weight 1.6 kg (3 lbs. 8 oz)
CHASSIS SIZE
Width 178 mm (7")
Height 50 mm (2")
Depth 162 mm (6-3/8")
NOSEPIECE SIZE
Width 170 mm (6-11/16")
Height 46 mm (1-13/16")
Depth 24 mm (15/16")
• Due to continuous product improvement, specifications and design
are subject to change without notice.
21-EN
Page 23

Installation and Connections
Before installing or connecting the unit, please read the
following and pages 3 and 5 of this manual thoroughly
for proper use.
Warning
MAKE THE CORRECT CONNECTIONS.
Failure to make the proper connections may result in fire or product
damage.
USE ONLY IN CARS WITH A 12 VOLT NEGATIVE GROUND.
(Check with your dealer if you are not sure.) Failure to do so may
result in fire, etc.
BEFORE WIRING, DISCONNECT THE CABLE FROM THE
NEGATIVE BATTERY TERMINAL.
Failure to do so may result in electric shock or injury due to
electrical shorts.
DO NOT ALLOW CABLES TO BECOME ENTANGLED IN
SURROUNDING OBJECTS.
Arrange wiring and cables in compliance with the manual to
prevent obstructions when driving. Cables or wiring that obstruct or
hang up on places such as the steering wheel, gear lever, brake
pedals, etc. can be extremely hazardous.
DO NOT SPLICE INTO ELECTRICAL CABLES.
Never cut away cable insulation to supply power to other
equipment. Doing so will exceed the current carrying capacity of
the wire and result in fire or electric shock.
DO NOT DAMAGE PIPE OR WIRING WHEN DRILLING HOLES.
When drilling holes in the chassis for installation, take precautions
so as not to contact, damage or obstruct pipes, fuel lines, tanks or
electrical wiring. Failure to take such precautions may result in fire.
DO NOT USE BOLTS OR NUTS IN THE BRAKE OR STEERING
SYSTEMS TO MAKE GROUND CONNECTIONS.
Bolts or nuts used for the brake or steering systems (or any other
safety-related system), or tanks should NEVER be used for
installations or ground connections. Using such parts could disable
control of the vehicle and cause fire etc.
KEEP SMALL OBJECTS SUCH AS BATTERIES OUT OF THE
REACH OF CHILDREN.
Swallowing them may result in serious injury.
If swallowed, consult a physician immediately.
DO NOT INSTALL IN LOCATIONS WHICH MIGHT HINDER
VEHICLE OPERATION, SUCH AS THE STEERING WHEEL OR
GEARSHIFT.
Doing so may obstruct forward vision or hamper movement etc.
and results in serious accident.
Caution
HAVE THE WIRING AND INSTALLATION DONE BY EXPERTS.
The wiring and installation of this unit requires special technical
skill and experience. To ensure safety, always contact the dealer
where you purchased this product to have the work done.
USE SPECIFIED ACCESSORY PARTS AND INSTALL THEM
SECURELY.
Be sure to use only the specified accessory parts. Use of other than
designated parts may damage this unit internally or may not
securely install the unit in place. This may cause parts to become
loose resulting in hazards or product failure.
ARRANGE THE WIRING SO IT IS NOT CRIMPED OR
PINCHED BY A SHARP METAL EDGE.
Route the cables and wiring away from moving parts (like the seat
rails) or sharp or pointed edges. This will prevent crimping and
damage to the wiring. If wiring passes through a hole in metal, use
a rubber grommet to prevent the wire’s insulation from being cut by
the metal edge of the hole.
DO NOT INSTALL IN LOCATIONS WITH HIGH MOISTURE OR
DUST.
Avoid installing the unit in locations with high incidence of
moisture or dust. Moisture or dust that penetrates into this unit may
result in product failure.
Precautions
• Be sure to disconnect the cable from the (–) battery post before
installing your CDE-9852. This will reduce any chance of
damage to the unit in case of a short-circuit.
• Be sure to connect the colour coded leads according to the
diagram. Incorrect connections may cause the unit to
malfunction or damage to the vehicle's electrical system.
• When making connections to the vehicle's electrical system, be
aware of the factory installed components (e.g. on-board
computer). Do not tap into these leads to provide power for this
unit. When connecting the CDE-9852 to the fuse box, make sure
the fuse for the intended circuit of the CDE-9852 has the
appropriate amperage. Failure to do so may result in damage to
the unit and/or the vehicle. When in doubt, consult your Alpine
dealer.
• The CDE-9852 uses female RCA-type jacks for connection to
other units (e.g. amplifier) having RCA connectors. You may
need an adaptor to connect other units. If so, please contact your
authorized Alpine dealer for assistance.
• Be sure to connect the speaker (–) leads to the speaker (–)
terminal. Never connect left and right channel speaker cables to
each other or to the vehicle body.
IMPORTANT
Please record the serial number of your unit in the space provided
below and keep it as a permanent record. The serial number or the
engraved serial number is located on the bottom of the unit.
22-EN
SERIAL NUMBER:
INSTALLATION DATE:
INSTALLATION TECHNICIAN:
PLACE OF PURCHASE:
Page 24

Installation
Detachable Front
Panel
Caution
When you install this unit in your car, do not remove the
detachable front panel.
If the detachable front panel is removed during installation, you
might press too hard and warp the metal plate that holds it in
place.
Accessory List
• Head unit .............................................................................1
• Power cable.........................................................................1
• Mounting sleeve ..................................................................1
• Carrying case ......................................................................1
• Bracket key..........................................................................2
• Screw (M5 × 8)....................................................................4
• Owner’s Manual.............................................................1 set
• The main unit must be mounted within 35 degrees of the horizontal
plane, back to front.
Reinforce the head unit with the metal mounting
strap (not supplied). Secure the ground lead of the
unit to a clean metal spot using a screw (
1
*
) already
attached to the vehicle’s chassis.
• For the screw marked “*2”, use an appropriate screw for the chosen
mounting location.
Connect each input lead coming from an amplifier or
equalizer to the corresponding output lead coming
from the left rear of the CDE-9852. Connect all other
leads of the CDE-9852 according to details
described in the CONNECTlONS section.
Slide the CDE-9852 into the dashboard until it clicks.
3
This ensures that the unit is properly locked and will
not accidentally come out from the dashboard.
Install the detachable front panel.
Removal
1. Remove the detachable front panel.
2. Insert the bracket keys into the unit, along the guides
on either side. The unit can now be removed from the
mounting sleeve.
This Unit
Bracket Keys
(Included)
Less than 35°
Mounting Sleeve
1
(Included)
Dashboard
This Unit
Remove the Detachable Front Panel (refer to page 6).
Slide mounting sleeve from main unit (see
“Removal” on page 23).
Screw
2
Hex Nut (M5)
Metal
Mounting
Strap
2
*
Bolt Stud
1
*
3. Pull the unit out, keeping it unlocked as you do so.
<JAPANESE CAR>
Face plate
Screws (M5 × 8)
this unit
Ground Lead
3
*
• Secure the ground lead of the unit to a clean metal spot using a screw
(*3) already attached to the vehicle’s chassis.
(Included)
Mounting Bracket
Ground Lead
This Unit
Chassis
23-EN
Page 25

Connections
To i Po d
Antenna
Blue POWER ANT
Blue/White
Orange ILLUMINATION
Red IGNITION
Ye l l ow BATTERY
Black GND
REMOTE
TURN-ON
SPEAKER
RIGHT FRONT
SPEAKER
RIGHT REAR
SPEAKER
LEFT REAR
Green/Black
White/Black
SPEAKER
LEFT FRONT
Gray
Gray/Black
Violet/Black
Violet
Green
White
To power antenna
To amplifier or equalizer
To the instrument cluster illumination
lead
Ignition Key
Battery
Speakers
Front Right
Rear Right
Rear Left
Front Left
*1When Subwoofer is set to OFF : Output is from Front speakers
When Subwoofer is set to ON : Output is from Subwoofer
24-EN
Amplifier
Speakers
Front/
Subwoofers*
1
Page 26

iPod Direct Connector
iPod control signals.
Connect this to an iPod, using the FULL SPEED™
Connection Cable (KCE-422i) (separately sold).
Antenna Receptacle
Power Antenna Lead (Blue)
Connect this lead to the +B terminal of your power antenna,
if applicable.
• This lead should be used only for controlling the vehicle’s power
antenna. Do not use this lead to turn on an amplifier, or a signal
processor, etc.
Remote Turn-On Lead (Blue/White)
Connect this lead to the remote turn-on lead of your
amplifier or signal processor.
Illumination Lead (Orange)
This lead may be connected to the vehicle’s instrument
cluster illumination lead. This will allow the backlighting of
the unit to dim whenever the vehicle’s lights are turned on.
Switched Power Lead (Ignition) (Red)
Connect this lead to an open terminal on the vehicle’s fuse
box or another unused power source which provides (+)12V
only when the ignition is turned on or in the accessory
position.
Battery Lead (Yellow)
Connect this lead to the positive (+) post of the vehicle’s
battery.
Ground Lead (Black)
Connect this lead to a good chassis ground on the vehicle.
Make sure the connection is made to bare metal and is
securely fastened using the sheet metal screw provided.
Right Front (+) Speaker Output Lead (Gray)
Right Front (–) Speaker Output Lead (Gray/Black)
Right Rear (–) Speaker Output Lead (Violet/Black)
Right Rear (+) Speaker Output Lead (Violet)
Left Rear (+) Speaker Output Lead (Green)
Left Rear (–) Speaker Output Lead (Green/Black)
Left Front (–) Speaker Output Lead (White/Black)
Left Front (+) Speaker Output Lead (White)
Power Supply Connector
Fuse Holder (10A)
Front output/Subwoofer RCA Connectors
RED is right and WHITE is left.
RCA Extension Cable (sold separately)
FULL SPEED™ Connection Cable (KCE-422i) (sold
separately)
To prevent external noise from entering the audio system.
• Locate the unit and route the leads at least 10 cm away from the car harness.
• Keep the battery power leads as far away from other leads as possible.
• Connect the ground lead securely to a bare metal spot (remove any paint, dirt or grease if necessary) of the car chassis.
• If you add an optional noise suppressor, connect it as far away from the unit as possible. Your Alpine dealer carries various noise
suppressors, contact them for further information.
• Your Alpine dealer knows best about noise prevention measures so consult your dealer for further information.
25-EN
Page 27

Page 28

FRANÇAIS
Contenu
Mode d’emploi
AVERTISSEMENT
AVERTISSEMENT .................................... 3
ATTENTION .............................................. 3
PRÉCAUTIONS ........................................ 3
Mise en route
Mise sous et hors tension ................................. 6
Retrait et pose du panneau avant ...................... 6
Mise en service de l’appareil ............................ 6
Réglage du volume ........................................... 7
Diminution rapide du volume .......................... 7
Réglage de l’heure ............................................ 7
Radio
Ecoute de la radio ............................................. 7
Mémorisation manuelle des stations
préréglées ...................................................... 7
Mémorisation automatique des stations
préréglées ...................................................... 8
Accord d’une station préréglée ........................ 8
Fonction de recherche des fréquences .............. 8
CD/MP3/WMA
Lecture .............................................................. 8
Lecture répétée ................................................. 9
M.I.X. (Lecture aléatoire) ................................ 9
Recherche à partir du texte de CD ................... 9
Recherche par nom de fichier/dossier
(MP3/WMA) ............................................... 10
Recherche rapide ............................................ 10
A propos du format MP3/WMA .................... 10
Réglage du son
Réglage des graves/aigus/de la balance droite-
gauche/équilibreur avant-arrière/Defeat ......12
Réglage de commande des graves .................. 12
Réglage de la commande des aigus ................13
Activation/annulation de la correction
physiologique ..............................................13
Autres fonctions
Affichage du texte ...........................................13
Affichage de l’heure .......................................14
SETUP
Personnalisation du son
Mise en et hors service du subwoofer ..............15
Réglage du système du subwoofer ...................15
Personnalisation visuelle
Commande du gradateur ..................................15
Réglage du type de défilement .........................15
Réglage du défilement (TEXT SCROLL) ........15
Démonstration ..................................................15
MP3/WMA
Lecture de données MP3/WMA
(PLAY MODE) .............................................16
Appareil externe
Raccordement à un amplificateur externe ........16
iPod™ (en option)
Lecture ............................................................16
Recherche d’un morceau souhaité ..................17
Recherche par liste de lecture ......................17
Recherche par nom d’artiste ........................17
Recherche par nom d’album ........................17
Recherche par nom de morceau ..................18
Sélection d’une liste de lecture, d’un artiste ou
d’un album ...................................................18
Recherche rapide ............................................18
Lecture aléatoire (M.I.X.) ...............................18
Lecture répétée ................................................18
Affichage du texte ...........................................19
1-FR
Page 29

Informations
En cas de problème .........................................19
Spécifications .................................................. 21
Installation et raccordements
Avertissement ....................................... 22
Attention ................................................ 22
Précautions ............................................ 22
Installation ......................................................23
Raccordements ................................................24
GARANTIE LIMITÉE
2-FR
Page 30

Mode d’emploi
AVERTISSEMENT
AVERTISSEMENT
Ce symbole désigne des instructions
importantes. Le non-respect de ces instructions
peut entraîner de graves blessures, voire la mort.
N’ACTIVER AUCUNE FONCTION SUSCEPTIBLE DE DETOURNER
VOTRE ATTENTION DE LA CONDUITE DU VEHICULE.
Les fonctions requérant une attention prolongée ne doivent être
exploitées qu’à l’arrêt complet du véhicule. Toujours arrêter le
véhicule à un endroit sûr avant d’activer ces fonctions. Il y a risque
de provoquer un accident.
GARDER LE VOLUME A FAIBLE NIVEAU DE MANIERE A
POUVOIR ENTENDRE LES BRUITS EXTERIEURS PENDANT
LA CONDUITE.
Il y a risque d’accident.
MINIMISER L’AFFICHAGE EN COURS DE CONDUITE.
La visualisation de l’affichage peut distraire le conducteur de la
conduite du véhicule et, partant, de provoquer un accident.
NE PAS DESASSEMBLER NI MODIFIER L’APPAREIL.
Il y a risque d’accident, d’incendie ou de choc électrique.
A UTILISER UNIQUEMENT SUR DES VOITURES A MASSE
NEGATIVE DE 12 VOLTS.
(Vérifiez auprès de votre concessionnaire si vous n’en êtes pas
certain.) Il y a risque d’incendie, etc.
GARDER LES PETITS OBJETS COMME LES PILES HORS DE
PORTEE DES ENFANTS.
L’ingestion de tels objets peut entraîner de graves blessures. En cas
d’ingestion, consulter immédiatement un médecin.
UTILISER DES FUSIBLES DE L’AMPERAGE APPROPRIE
Il y a risque d’incendie ou de décharge électrique.
NE PAS OBSTRUER LES SORTIES D’AIR NI LES PANNEAUX
DU RADIATEUR.
Une surchauffe interne peut se produire et provoquer un incendie.
ATTENTION
Ce symbole désigne des instructions
importantes. Le non-respect de ces instructions
peut entraîner des blessures ou des dommages
matériels.
INTERROMPRE TOUTE UTILISATION EN CAS DE
PROBLEME.
Le non-respect de cette précaution peut entraîner des blessures ou
endommager l’appareil. Retournez l’appareil auprès du distributeur
Alpine agréé ou un centre de service après-vente Alpine en vue de
la réparation.
PRÉCAUTIONS
Nettoyage du produit
Nettoyez régulièrement le produit avec un chiffon doux et sec. En
cas de taches tenaces, trempez le chiffon dans l’eau uniquement.
Tout autre produit risque de dissoudre la peinture ou
d’endommager le plastique.
Température
Assurez-vous que la température intérieure du véhicule est
comprise entre +60°C (+140°F) et –10°C (+14°F) avant de mettre
l’appareil sous tension.
Condensation d’humidité
Si le son est irrégulier pendant la lecture de CD, de l’humidité s’est
probablement condensée. Dans ce cas, enlevez le disque du lecteur
et attendez environ une heure pour que l’humidité s’évapore.
Disque endommagé
Ne pas reproduire une disque craquelé, déformé ou endommagé
sous peine de détériorer sévèrement le mécanisme de lecture.
Entretien
En cas de problème, n’essayez pas de réparer l’appareil vousmême. Rapportez l’appareil à votre revendeur Alpine, ou à défaut,
apportez-le dans un centre de réparation Alpine.
UTILISER CET APPAREIL POUR DES APPLICATIONS
MOBILES DE 12 V.
Toute utilisation autre que l’application désignée comporte un
risque d’incendie, de choc électrique ou de blessure.
NE PAS INTRODUIRE LES MAINS, LES DOIGTS NI DE CORPS
ETRANGERS DANS LES FENTES ET LES INTERSTICES.
Il y a risque de blessures ou de dommages à l’appareil.
3-FR
Page 31

Ne tentez jamais d’effectuer les opérations suivantes
Ne saisissez pas ou ne tirez pas sur le disque pendant qu’il est attiré
dans le lecteur par le mécanisme de recharge automatique.
N’essayez pas d’insérer un disque dans l’appareil quand celui-ci est
hors tension.
Insertion des disques
Votre appareil ne peut lire qu’un seul disque à la fois. N’essayez
donc pas de charger plusieurs disques.
Insérez le disque en orientant vers le haut la face imprimée.
L’indication « ERROR » s’affiche sur l’appareil si le disque n’est
pas correctement inséré. Si le message « ERROR » persiste alors
que le disque est correctement inséré, appuyez sur l’interrupteur de
réinitialisation avec un objet pointu comme un stylo à bille.
L’écoute d’un disque sur une route très abîmée peut provoquer des
sautes de son mais ne risque pas de rayer le disque ou
d’endommager le lecteur.
Disques neufs
Pour éviter qu’un disque reste coincé, le message « ERROR »
s’affiche quand un disque n’est pas inséré correctement ou que sa
surface est irrégulière. Si le lecteur éjecte un disque neuf chargé
pour la première fois, touchez le contour de l’orifice central et de la
périphérie du disque avec le doigt. Si le disque contient des résidus
ou des irrégularités, il ne pourra pas être chargé. Pour enlever les
résidus, passez un stylo à bille ou autre objet similaire sur le
contour de l’orifice central et de la périphérie du disque, puis
réinsérez-le.
Orifice central
Orifice central
Disque neuf
Manipulation correcte
Veillez à ne pas faire tomber le disque. Tenez le disque de manière
à ne pas laisser d’empreintes sur la surface. Ne collez pas de ruban
adhésif, papier ou étiquette sur le disque. N’écrivez pas sur le
disque.
CORRECT
NON CORRECT CORRECT
Nettoyage des disques
Des traces de doigts, de poussière ou de saleté sur la surface du
disque peuvent provoquer des sautes de son. Essuyez le disque du
centre vers la périphérie avec un chiffon doux et propre. Si la
surface du disque est vraiment sale, humidifiez le chiffon d’une
solution détergente neutre avant d’essuyer le disque.
Au sujet des accessoires pour disque
Beaucoup d’accessoires sont disponibles sur le marché pour
protéger la surface du disque et améliorer la qualité sonore.
Cependant, certains de ces accessoires peuvent affecter l’épaisseur
et/ou le diamètre du disque. L’utilisation de tels accessoires peut
modifier les spécifications du disque et provoquer des erreurs de
fonctionnement. Nous déconseillons l’utilisation de tels accessoires
avec des disques à reproduire sur les lecteurs CD Alpine.
Résidus
Périphérie
(résidus)
Disques de forme irrégulière
N’utilisez que des disques de forme ronde avec cet appareil à
l’exclusion de tout autre.
L’utilisation de disques de forme spéciale peut endommager le
mécanisme.
Emplacement de montage
N’installez pas le CDE-9852 dans un endroit exposé :
• directement au soleil ou à la chaleur,
• à l’humidité et à l’eau,
• aux poussières excessives,
• aux vibrations excessives.
4-FR
Feuille transparente Stabilisateur de disque
Page 32

Manipulation des disques compacts (CD/CD-R/CD-RW)
• Ne touchez pas la surface du disque.
• N’exposez pas le disque à la lumière directe du soleil.
• N’apposez pas d’autocollants ou d’étiquettes sur le disque.
• Nettoyez le disque lorsqu’il est poussiéreux.
• Assurez-vous que le disque ne présente pas d’irrégularité.
• N’utilisez pas d’accessoires pour disques vendus dans le
commerce.
Ne laissez pas le disque dans la voiture ou dans l’appareil
pendant une longue période. N’exposez jamais le disque à la
lumière directe du soleil. La chaleur et l’humidité risquent de
l’endommager et d’empêcher son fonctionnement ultérieur.
A l’attention des utilisateurs de disques CD-R ou CD-RW
• S’il est impossible de lire un CD-R/CD-RW, assurez-vous que la
dernière session d’enregistrement a bien été fermée (finalisée).
• Finalisez le CD-R ou le CD-RW si nécessaire, puis remettez-le
en lecture.
A propos des supports susceptibles d’être lus
Utilisez exclusivement des disques compacts dont la face de
l’étiquette fait apparaître les marques du logo CD ci-dessous.
Internet, des intranets et/où autres réseaux ou sur tout autre
système de distribution de contenu électronique tel que les
applications audio à péage où à la demande. Une licence
indépendante est requise pour ce type d’utilisation. Pour de
plus amples détails, visitez le site
http ://www.mp3licensing.com. »
Si vous utilisez des CD non spécifiés, les performances risquent de
ne pas être correctes.
Vous pouvez lire des CD-R (CD-Recordable)/CD-RW (CDReWritable) enregistrés exclusivement sur des périphériques audio.
Vous pouvez également lire des CD-R/CD-RW contenant des
fichiers audio au format MP3/WMA.
•
Il est possible que cet appareil ne puisse pas lire certains disques :
CD imparfaits, CD contenant des traces de doigt, CD exposés à
des températures extrêmes ou aux rayons directs du soleil
(abandonnés dans le véhicule ou dans l’appareil), CD enregistrés
dans des conditions défavorables, CD sur lesquels un
enregistrement a échoué ou qui ont fait l’objet d’une tentative de
réenregistrement et CD protégés contre la copie qui ne sont pas
conformes aux normes industrielles applicables aux CD audio.
• Utilisez des disques dont les fichiers MP3/WMA ont été créés
dans un format compatible avec cet appareil. Pour plus
d’informations, voir page 10-11.
• Les données en mémoire ROM, autres que les fichiers audio
contenus sur un disque, n’entraînent la production d’aucun son
en cas de lecture.
• Windows Media et le logo Windows sont des marques déposées
ou des marques déposées enregistrées chez Microsoft
Corporation aux Etats-Unis et /ou dans d’autres pays.
• Apple, le logo Apple et iPod sont des marques d’Apple Computer
Inc., déposées aux Etats-Unis et dans d’autres pays.
• « Technologie de codage audio MPEG Layer-3 sous licence de
Fraunhofer lls et Thomson. »
• « La fourniture de ce produit ne confère qu’une licence pour
une utilisation privée de nature non commerciale, mais ne
confère aucune licence et n’implique aucun droit d’utiliser ce
produit pour une diffusion commerciale (c’est-à-dire générant
des recettes) en temps réel (par voie terrestre, satellite, câble et/
où tout autre support), une diffusion/lecture en transit via
5-FR
Page 33

Mise en route
Pour fermer le panneau avant, poussez sur le côté gauche
jusqu’à ce qu’il se bloque, comme illustré sur la figure ci-dessus.
(OPEN)
SOURCE/
POWER
MUTE
MODE TITLE
Bouton rotatif
Mise sous et hors tension
Appuyez sur SOURCE/POWER pour mettre l’appareil
sous tension.
• Vous pouvez aussi mettre l’appareil sous tension en appuyant sur
n’importe quelle autre touche, excepté TITLE, le bouton rotatif et
(OPEN).
Appuyez sur SOURCE/POWER pendant au moins 2
secondes pour éteindre l’appareil.
• La première fois que l’appareil est mis sous tension, le volume initial
commence au niveau 12.
Retrait et pose du panneau avant
3
Saisissez fermement le panneau avant, faites-le
glisser vers la gauche , puis tirez dessus pour
le retirer.
• Le panneau avant peut devenir chaud en cours de fonctionnement
normal (surtout au niveau des bornes des connecteurs à l’arrière du
panneau avant). Il ne s’agit pas d’un mauvais fonctionnement.
• Afin de protéger le panneau avant, rangez-le dans l’étui fourni.
• N’exercez pas de force excessive quand vous détachez le panneau
avant sous peine de provoquer un mauvais fonctionnement.
• Ne laissez pas le panneau avant ouvert et ne conduisez pas le
véhicule quand le panneau est ouvert sous peine de provoquer un
accident ou un mauvais fonctionnement.
Pose
1
Insérez le côté droit du panneau avant dans
l’appareil. Alignez la rainure du panneau avant sur
les saillies de l’appareil principal.
2
Poussez sur le côté gauche du panneau avant
jusqu’à ce qu’il s’enclenche à fond dans l’appareil.
Appuyez sur le bouton rotatif à l’intérieur de l’appareil avant d’ouvrir
le panneau avant pour permettre son ouverture complète et éviter de
l’endommager.
Appuyez sur le bouton
rotatif à l’intérieur de
l’appareil
Quand vous appuyez à nouveau sur le bouton rotatif, il se
désenclenche.
Le bouton rotatif
se désenclenche
Retrait
1
Mettez l’appareil hors tension.
2
Appuyez sur (OPEN) pour ouvrir le panneau
avant.
• Avant de mettre le panneau avant, vérifiez qu’il n’y a pas de
poussière ou de saleté sur les bornes du connecteur et qu’aucun objet
ne se trouve entre le panneau avant et l’appareil.
• Fixez soigneusement le panneau avant, en le tenant par les côtés
pour éviter d’appuyer sur les touches par inadvertance.
Mise en service de l’appareil
Appuyez sur le commutateur RESET lorsque vous utilisez l’appareil
pour la première fois, après avoir changé la batterie de la voiture, etc.
1
Mettez l’appareil hors tension.
2
Appuyez sur (OPEN) pour ouvrir le panneau
avant, puis retirez-le.
3
Appuyez sur RESET avec un stylo à bille ou un
objet pointu.
6-FR
Commutateur RESET
Page 34

Réglage du volume
Tournez le bouton rotatif jusqu’à ce que vous obteniez
le niveau sonore souhaité.
Diminution rapide du volume
L’activation de la fonction de silencieux diminue instantanément le
volume de 20 dB.
Appuyez sur MUTE pour activer le mode silencieux.
Le niveau sonore diminue d’environ 20 dB.
Appuyez à nouveau sur MUTE pour rétablir le son au
niveau précédent.
Réglage de l’heure
Radio
SOURCE/POWER
Bouton
rotatif
MODE
BAND
A.ME
TUNE
Touches de préréglage
(1 à 6)
1
Appuyez à plusieurs reprises sur la touche TITLE
jusqu’à ce que l’heure s’affiche.
Pour plus de détails, reportez-vous à « Affichage du texte »
(page 13).
2
Maintenez la touche TITLE enfoncée pendant 2
secondes au moins quand l’heure est affichée.
L’indication de l’heure clignote.
3
Tournez le bouton rotatif pour régler les heures
pendant que l’indication de l’heure clignote.
4
Une fois les heures réglées, appuyez sur la touche
MODE.
5
Tournez le bouton rotatif pour régler les minutes
pendant que l’indication de l’heure clignote.
L’heure est automatiquement réglée 5 secondes après le
réglage des minutes. Vous pouvez aussi régler
manuellement l’heure en appuyant sur la touche TITLE.
• Pour synchroniser l’horloge sur une autre horloge/montre ou
annonce de l’heure à la radio, maintenez la touche MODE enfoncée
pendant 2 secondes au moins après avoir réglé les heures. Les
minutes sont remises à « 00 ». Si l’affichage dépasse « 30 » minutes
pendant que vous effectuez cette opération, l’heure avance d’une
heure.
• Commande à distance de l’appareil
Cet appareil peut être commandé à l’aide d’une télécommande
Alpine en option. Pour de plus amples informations, consultez
votre distributeur Alpine.
• Dirigez l’émetteur de télécommande optionnel vers le capteur de
télécommande.
Capteur de
télécommande
Ecoute de la radio
1
Appuyez sur SOURCE/POWER jusqu’à ce qu’une
fréquence radio apparaisse sur l’affichage.
2
Appuyez plusieurs fois sur BAND jusqu’à ce que la
gamme souhaitée soit affichée.
F1 (FM1) F2 (FM2) AM F1 (FM1)
3
Appuyez sur TUNE pour sélectionner le mode de
syntonisation.
DX SEEK (Mode distance) SEEK (Mode local)
OFF (Mode manuel) DX SEEK
• Le mode distance est sélectionné initialement.
Mode distance :
Toutes les stations à signal puissant ou faible sont captées
automatiquement (accord par recherche automatique).
Mode local :
Seules les stations à signal puissant sont captées
automatiquement (accord par recherche automatique).
Mode manuel :
La fréquence est accordée manuellement par étapes (accord
manuel).
4
Appuyez sur ou pour accorder l’appareil
sur la station souhaitée.
Si vous maintenez ou enfoncée, la fréquence
change en continu.
Mémorisation manuelle des stations
préréglées
1
Sélectionnez la gamme d’ondes et accordez la
station que vous voulez mémoriser.
2
Appuyez pendant au moins 2 secondes sur une
touche de préréglage (1 à 6) dans laquelle vous
souhaitez enregistrer la station.
La station sélectionnée est mémorisée.
L’affichage indique la gamme, le numéro de préréglage et
la fréquence de la station mémorisée.
7-FR
Page 35

• Vous pouvez mémoriser 18 stations au total (6 stations sur chaque
gamme : FM1, FM2 et AM).
• Si vous mémorisez une station sur un préréglage qui a déjà été utilisé
pour une autre station, cette station sera effacée et remplacée par la
nouvelle.
Mémorisation automatique des stations
préréglées
1
Appuyez plusieurs fois sur BAND jusqu’à ce que la
gamme souhaitée soit affichée.
2
Appuyez sur A.ME et maintenez cette touche
enfoncée pendant au moins 2 secondes.
La fréquence change continuellement sur l’affichage
pendant que la mémorisation automatique est en cours. Le
tuner recherche et mémorise automatiquement les 6
stations les plus puissantes sur la gamme sélectionnée.
Elles seront mémorisées sous les touches 1 à 6, dans
l’ordre de la puissance des signaux.
Quand la mémorisation automatique est terminée, le tuner
revient à la station mémorisée sur la touche de
préréglage 1.
• Si aucune station n’est mémorisée, le tuner revient à la station que
vous écoutiez avant que la mémorisation automatique ne commence.
Accord d’une station préréglée
CD/MP3/WMA
(OPEN)
Bouton
rotatif
MODE
Lecture
1
Appuyez sur (OPEN).
Le panneau avant s’ouvre.
2
Insérez un disque en orientant vers le haut la face
imprimée.
Le disque pénètre automatiquement dans le lecteur.
SOURCE/POWER
/
A.ME
4
5
TITLE
1
Appuyez plusieurs fois sur BAND jusqu’à ce que la
gamme souhaitée soit affichée.
2
Appuyez sur la touche de préréglage (1 à 6) sur
laquelle la station souhaitée est préréglée.
L’affichage indique la gamme, le numéro de préréglage et
la fréquence de la station sélectionnée.
Fonction de recherche des fréquences
Vous pouvez rechercher une station radio à l’aide de sa fréquence.
1
Maintenez la touche enfoncée pendant 2
secondes au moins en mode radio pour activer le
mode de recherche des fréquences.
2
Tournez le bouton rotatif pour sélectionner la
fréquence souhaitée.
3
Appuyez sur MODE pour recevoir la fréquence
sélectionnée.
• Pour annuler le mode de recherche des fréquences, maintenez la
touche enfoncée pendant 2 secondes au moins. Le mode de
recherche est aussi annulé si aucune opération n’est exécutée dans
les 10 secondes.
Fermez manuellement le panneau avant.
Quand un disque est déjà inséré, appuyez sur SOURCE/
POWER pour passer au mode CD.
Le mode change à chaque pression sur cette touche.
TUNER DISC IPOD* TUNER
* Uniquement quand l’iPod est raccordé.
3
Pendant la lecture d’un fichier MP3/WMA, appuyez
sur ou pour sélectionner le dossier de votre
choix.
Appuyez sur ou et maintenez-la enfoncée pour
parcourir les dossiers.
4
Appuyez sur ou pour sélectionner la piste
(fichier) désirée.
Retour au début de la piste (fichier) en cours :
Appuyez sur .
Recherche rapide vers l’arrière :
Appuyez sur et maintenez-la enfoncée.
Avance jusqu’au début de la piste (fichier) suivante :
Appuyez sur .
Recherche rapide vers l’avant :
Appuyez sur et maintenez-la enfoncée.
8-FR
5
Pour interrompre la lecture, appuyez sur / .
Appuyez de nouveau sur / pour continuer la lecture.
Page 36

6
Après avoir appuyé sur (OPEN) pour ouvrir le
panneau avant, appuyez sur pour éjecter le
disque.
• Ne retirez pas un CD pendant le déroulement de son cycle d’éjection.
Ne chargez pas plus d’un disque à la fois. Dans les deux cas, cela
pourrait entraîner une défaillance de l’appareil.
• Si le CD ne s’éjecte pas, appuyez sur pendant au moins 2
secondes.
• Le lecteur CD peut lire des disques contenant des données audio,
MP3 et WMA.
• Il n’est pas possible de lire sur cet appareil un fichier au format
WMA protégé par DRM (Digital Rights Management).
• L’affichage des pistes pour la lecture de données MP3/WMA
correspond aux numéros des fichiers enregistrés sur le disque.
• Pendant la lecture d’un fichier VBR (Variable Bit rates), le temps
écoulé risque de ne pas s’afficher correctement.
M.I.X. (Lecture aléatoire)
Appuyez sur 5 en mode de lecture ou de pause.
Les pistes (fichiers) du disque sont reproduites dans un ordre
aléatoire.
Pour désactiver la lecture M.I.X., appuyez de nouveau sur
5 .
Mode CD :
: Les pistes sont lues dans un ordre aléatoire.
Affichage pendant la lecture de MP3/WMA
Le numéro de dossier et le numéro de fichier s’affichent de la
manière décrite ci-dessous.
F01 T03 10'15
Affichage du
numéro de dossier
• Appuyez sur TITLE pour basculer l’affichage. Pour plus
d’informations sur la commutation de l’affichage, consultez la
section « Affichage du texte » (page 13).
• Si le numéro de dossier ou de fichier compte trois chiffres, « F » ou
« T » n’est pas affiché.
Lecture répétée
Appuyez sur 4 pour répéter la piste en cours de
lecture.
La lecture de la piste (fichier) est répétée.
Appuyez une nouvelle fois sur la touche 4 et sélectionnez
off pour arrêter la lecture répétée.
Mode CD :
: Une seule piste est lue d’une manière répétée.
Affichage du
numéro de fichier
Temps écoulé
Mode MP3/WMA :
: Seuls les fichiers d’un dossier sont lus dans un
ordre aléatoire.
: Les fichiers sont lus dans un ordre aléatoire.
Recherche à partir du texte de CD
Il est possible de rechercher et de lire des pistes à partir des informations
du texte de CD. Dans le cas des disques qui ne prennent pas en charge
cette fonction, il est possible d’effectuer des recherches à l’aide des
numéros de piste.
1
Appuyez sur pendant la lecture.
Vous passez ainsi en mode de recherche.
2
Tournez le bouton rotatif pour sélectionner la piste
souhaitée, puis appuyez sur MODE.
La lecture de la piste sélectionnée commence.
• Maintenez la touche enfoncée pendant 2 secondes au moins en
mode de recherche pour annuler. Le mode de recherche est aussi
annulé si aucune opération n’est exécutée dans les 10 secondes.
• La recherche à partir du texte de CD n’est pas possible en cas de
lecture M.I.X.
Mode MP3/WMA :
: Un seul fichier est lu d’une manière répétée.
: Seuls les fichiers d’un dossier sont lus d’une
manière répétée.
9-FR
Page 37

Recherche par nom de fichier/dossier
(MP3/WMA)
• Maintenez la touche enfoncée pendant 2 secondes au moins en
mode de recherche pour annuler. Le mode de recherche est aussi
annulé si aucune opération n’est exécutée dans les 10 secondes.
Vous pouvez afficher et rechercher le nom d’un dossier ou d’un fichier
tout en écoutant le fichier en cours de lecture.
1
Pendant la lecture du fichier MP3/WMA, appuyez sur
pour activer le mode de recherche.
2
Tournez le bouton rotatif pour sélectionner le
mode de recherche par nom de fichier ou nom de
dossier, puis appuyez sur .
Mode de recherche par nom de dossier
3
Tournez le bouton rotatif pour sélectionner le
dossier souhaité.
4
Appuyez sur / pour lire le premier fichier du
dossier sélectionné.
• Maintenez la touche enfoncée pendant 2 secondes au moins en
mode de recherche pour annuler. Le mode de recherche est aussi
annulé si aucune opération n’est exécutée dans les 10 secondes.
• En mode de recherche de noms de fichiers, appuyez sur pour
passer au mode de recherche par nom de fichier.
• En mode de recherche de noms de dossier, appuyez sur A.ME pour
revenir au mode de recherche sélectionné.
• La recherche par nom de dossier n’est pas disponible quand le
disque ne contient qu’un dossier racine.
• « NO FILE » s’affiche pendant 2 secondes si le dossier sélectionné
via le mode de recherche par nom de dossier ne contient pas de
fichier.
• « ROOT » s’affiche dans le cas d’un dossier qui ne porte pas de nom.
• La recherche par nom de dossier n’est pas possible en cas de lecture
M.I.X.
Mode de recherche par nom de fichier
3
Appuyez sur ou pour sélectionner un autre
dossier.
4
Sélectionnez le fichier souhaité à l’aide du bouton
rotatif.
5
Appuyez sur MODE pour lire le fichier sélectionné.
• Maintenez la touche enfoncée pendant 2 secondes au moins en
mode de recherche pour annuler. Le mode de recherche est aussi
annulé si aucune opération n’est exécutée dans les 10 secondes.
• Appuyez sur A.ME pour revenir au mode précédent.
• La recherche par nom de fichier n’est pas possible en mode de
lecture M.I.X.
Recherche rapide
Vous pouvez rechercher toutes les pistes (fichiers).
1
Appuyez sur pendant au moins 2 secondes en
mode CD/MP3/WMA pour activer le mode de
recherche rapide.
2
Tournez le bouton rotatif pour sélectionner la piste
(fichier) souhaitée.
La piste sélectionnée est lue immédiatement.
A propos du format MP3/WMA
AT TE NT IO N
A l’exception d’un usage personnel, la copie et le transfert de
données audio (y compris de données MP3/WMA), gratuitement
ou contre rémunération, sans l’autorisation du détenteur du
copyright sont strictement interdits par le Copyright Act et par
un traité international.
Que signifie MP3 ?
MP3, dont le nom officiel est « MPEG-1 Audio Layer 3 », est une
norme de compression prescrite par l’ISO, Organisation
Internationale de Normalisation, et MPEG, une institution
conjointe du CEI.
Les fichiers MP3 contiennent des données audio comprimées.
L’encodage MP3 peut comprimer les données audio à des taux
très élevés en réduisant des fichiers de musique à 10% de leur
taille originale. Et cela en conservant une qualité proche de la
qualité CD. Le format MP3 atteint des taux de compression
aussi élevés en éliminant les sons inaudibles à l’oreille humaine
ou masqués par d’autres sons.
Que signifie WMA ?
WMA ou « Windows Media™ Audio » correspond à des
données audio comprimées.
Les données audio WMA sont semblables aux MP3 et peuvent
offrir une qualité de son CD avec des fichiers de petite taille.
Méthode de création de fichiers MP3/WMA
Les données audio sont compressées à l’aide du logiciel
spécifié MP3/WMA. Pour plus de détails sur la création de
fichiers MP3/WMA, reportez-vous au guide de l’utilisateur du
logiciel.
Les fichiers MP3/WMA pouvant être lus par cet appareil portent
l’extension de fichier « mp3 »/« wma ». Les fichiers sans
extension ne peuvent pas être lus. (WMA ver. 7.1 et 8 sont
supportés)
Taux d’échantillonnage et débit binaire de lecture supportés
MP3
Taux d’échantillonnage : 48 kHz, 44,1 kHz, 32 kHz, 24 kHz,
22,05 kHz, 16 kHz, 12 kHz,
11,025 kHz, 8 kHz
Débit binaire : 8 - 320 kbps
WMA
Taux d’échantillonnage : 48 kHz, 44,1 kHz, 32 kHz
Débit binaire : 48 - 192 kbps
Notez que pour des taux d’échantillonnage, l’affichage de
l’appareil (page 13) peut être incorrect.
En fonction des taux d’échantillonnage, la lecture sur cet
appareil peut être incorrecte.
10-FR
Page 38

Tags ID3/tags WMA
Cet appareil prend en charge les tags ID3 tag v1 et v2 et les
tags WMA.
Si les données de tag ID3/tag WMA sont contenues dans un
fichier MP3/WMA, cet appareil peut afficher le titre (titre de la
piste), le nom de l’artiste et le nom de l’album, les données de
tag ID3/tag WMA.
Cet appareil peut uniquement afficher des caractères
alphanumériques d’un octet (jusqu’à 30 pour les tags ID3 et 15
pour les tags WMA) et le trait de soulignement. Pour les
caractères non supportés, l’indication « NO SUPPORT »
apparaît.
Les informations de tags peuvent ne pas s’afficher correctement
en fonction du contenu.
Production de disques MP3/WMA
Les fichiers MP3/WMA sont préparés, puis écrits sur un CD-R
ou un CD-RW à l’aide d’un logiciel d’écriture CD-R. Un disque
peut contenir jusqu’à 510 fichiers/dossiers (répertoires racines
compris). Le nombre maximal de dossiers peut toutefois
atteindre 255.
Supports acceptés
Les supports pouvant être lus par cet appareil sont les CDROM, les CD-R et les CD-RW.
Dossier
racine
Dossier Fichier MP3/WMA
Systèmes de fichiers correspondants
Cet appareil supporte les disques au format ISO9660 Niveau 1
ou Niveau 2.
Pour la norme ISO9660, certaines restrictions doivent être
respectées.
Le nombre maximal de dossiers imbriqués est 8 (y compris le
répertoire racine). Le nombre de caractères d’un nom de
dossier/fichier est limité.
Les caractères valides pour les noms de dossiers/fichiers sont
les lettres A à Z (en majuscule), les nombres 0 à 9 et « - » (trait
de soulignement).
Cet appareil peut également lire des disques au format Joliet,
Romeo, etc., et d’autres formats normalisés conformes à la
norme ISO9660. Cependant, parfois les noms de fichiers, de
dossiers, etc. n’apparaissent pas correctement.
Formats supportés
Cet appareil peut lire les CD-ROM XA, les Mixed Mode CD
(mixtes), les Enhanced CD (améliorés) (CD-Extra) et les MultiSession.
Cet appareil ne peut pas lire correctement les disques
enregistrés en Track At Once (piste à piste) ou en écriture par
paquets.
Ordre des pistes
L’appareil lit les fichiers dans l’ordre où le logiciel d’écriture les
écrit. Il est par conséquent possible que l’ordre de lecture ne
soit pas celui d’écriture. L’ordre de lecture des dossiers et des
fichiers est le suivant. Cependant, l’ordre de lecture du dossier
et du fichier diffère du numéro de dossier et de fichier indiqué
sur l’écran.
Terminologie
Débit binaire
C’est le taux de compression du « son » spécifié pour l’encodage.
Plus il est élevé, plus la qualité sonore est bonne, mais plus la taille
des fichiers est importante.
Taux d’échantillonnage
Cette valeur indique combien de fois par seconde les données sont
échantillonnées (enregistrées). Par exemple, les CD de musique
utilisent un taux d’échantillonnage de 44,1 kHz, le niveau de son est
donc échantillonné (enregistré) 44 100 fois par secondes. Plus le
taux d’échantillonnage est élevé, plus la qualité du son est bonne,
mais plus le volume des données est important.
Encodage
Conversion des CD de musique, des fichiers WAVE (AIFF) et
d’autres fichiers de son au format de compression audio spécifié.
Tag
Informations concernant les chansons comme les titres des pistes, les
noms d’artiste, les noms d’album, etc., écrites sur les fichiers MP3/
WMA.
MP3 : tag ID3
WMA : tag WMA
Dossier racine
Le dossier racine se trouve au sommet du système de fichiers. C’est
lui qui contient l’ensemble des dossiers et fichiers.
11-FR
Page 39

Réglage du son
SOURCE/POWER
Bouton rotatif
MODE
Réglage des graves/aigus/de la balance
droite-gauche/équilibreur avant-arrière/
Defeat
1
Appuyez plusieurs fois sur la touche MODE pour
choisir le mode souhaité.
A chaque pression, le mode change de la façon suivante :
BASS TREBLE SUBW* BALANCE FADER
DEFEAT VOLUME BASS
Niveau des graves (bass) : –7 ~ +10
Niveau des aigus (treble) : –7 ~ +7
Subwoofer : 0 ~ +15
Balance : L15 ~ R15
Fader : R15 ~ F15
Defeat : ON/OFF
Volum e : 0 ~ 3 5
• Si vous n’appuyez pas sur MODE dans les 5 secondes qui suivent la
sélection du mode BASS, TREBLE, BALANCE, FADER, DEFEAT ou
SUBW, l’appareil repasse automatiquement en mode normal.
* Lorsque le mode du subwoofer est réglé sur OFF, il est impossible de
régler son niveau.
2
Tournez le bouton rotatif jusqu’à ce que le son
désiré soit obtenu dans chaque mode.
En réglant la fonction Defeat sur ON, le réglage de BASS et
TREBLE effectué précédemment revient aux valeurs par
défaut.
BAND
MENU
Réglage de la fréquence centrale des
graves
3
-1 Appuyez sur SOURCE/POWER pour sélectionner la
fréquence centrale des graves souhaitée.
80Hz 100Hz 120Hz 60Hz 80Hz
Accentue les gammes de fréquence des graves affichées.
Réglage de la largeur de bande des graves
3
-2 Appuyez sur BAND pour sélectionner la largeur de
bande des graves.
Fait passer la largeur de la bande des graves de large à
étroite. Un réglage sur large permet une large gamme de
fréquences au-dessus et au-dessous de la fréquence
centrale. Un réglage plus étroit ne permet que des
fréquences proches de la fréquence centrale.
Réglage du niveau des graves
3
-3*1Tou r nez le bouton rotatif pour sélectionner le
niveau de graves souhaité (–7~+10).
Vous pouvez accentuer ou affaiblir la fréquence des graves.
4
Appuyez sur la touche MENU pour sélectionner
RETURN.
Après 2 secondes, le mode normal est rétabli.
Appuyez sur MENU et maintenez cette touche enfoncée
pendant au moins 2 secondes pour revenir au mode
normal.
• Si aucune opération n’est exécutée pendant 60 secondes, le réglage
de commande des graves se désactive automatiquement.
• Les réglages du niveau des graves sont mémorisés séparément pour
chaque source (FM, AM, CD, etc.) jusqu’à ce qu’ils soient modifiés.
Une fois la fréquence des graves et la largeur de bande des graves
réglées pour l’une des sources, ce réglage est appliqué à toutes les
autres sources (FM, AM, CD etc.).
• Cette fonction est inopérante lorsque DEFEAT est réglé sur ON.
• En mode de réglage des graves, le mode de réglage TREBLE
CONTROL peut être rappelé en appuyant sur ou .
*1 Le réglage peut aussi être effectué en appuyant sur MODE.
Consultez la section « Réglage des graves/aigus/de la balance
droite-gauche/équilibreur avant-arrière/Defeat » (page 12).
Réglage de commande des graves
Vous pouvez changer les réglages de commande des graves de manière
à créer la tonalité de votre choix.
1
Appuyez sur MENU pour sélectionner le mode
BASS ENGINE, puis appuyez sur MODE.
BASS ENGINE SETUP RETURN (OFF) BASS ENGINE
2
Appuyez sur ou pour sélectionner le
mode de commande BASS (fréquence centrale des
graves).
BASS TREBLE
12-FR
Affichage de l’indicateur de niveau des graves
Le niveau des graves est généralement affiché
Page 40

Réglage de la commande des aigus
Vous pouvez changer les réglages de la commande des aigus de manière
à créer la tonalité de votre choix.
1
Appuyez sur MENU pour sélectionner le mode
BASS ENGINE, puis appuyez sur MODE.
BASS ENGINE SETUP RETURN (OFF) BASS ENGINE
2
Appuyez sur ou pour sélectionner le
mode de commande TREBLE (fréquence centrale
des aigus).
BASS TREBLE
Réglage de la fréquence centrale des aigus
3
-1 Appuyez sur SOURCE/POWER pour sélectionner la
fréquence centrale des aigus souhaitée.
10,0 kHz 12,5 kHz 15,0 kHz 7,5 kHz 10,0 kHz
Accentue les gammes de fréquence des aigus.
Réglage du niveau des aigus
3
-2*2Tou r nez le bouton rotatif pour sélectionner le
niveau d’aigus souhaité (–7~+7).
Vous pouvez accentuer la fréquence des aigus.
4
Appuyez sur la touche MENU pour sélectionner
RETURN.
Après 2 secondes, le mode normal est rétabli.
Appuyez sur MENU et maintenez cette touche enfoncée
pendant au moins 2 secondes pour revenir au mode
normal.
• Si aucune opération n’est exécutée pendant 60 secondes, le réglage
de commande des aigus se désactive automatiquement.
• Les réglages du niveau des aigus sont mémorisés séparément pour
chaque source (FM, AM, CD, etc.) jusqu’à ce qu’ils soient modifiés.
Une fois la fréquence des aigus réglée pour l’une des sources, ce
réglage est appliqué à toutes les autres sources (FM, AM, CD etc.).
• Cette fonction est inopérante lorsque DEFEAT est réglé sur ON.
• En mode de réglage des aigus, le mode de réglage BASS CONTROL
peut être rappelé en appuyant sur ou .
*2Le réglage peut aussi être effectué en appuyant sur MODE.
Consultez la section « Réglage des graves/aigus/de la balance
droite-gauche/équilibreur avant-arrière/Defeat » (page 12).
Activation/annulation de la correction
physiologique
Autres fonctions
TITLE
Affichage du texte
Des informations de texte, comme le nom du disque et le nom de la
piste, seront affichées si le disque lu est compatible CD Text. Il est
également possible d’afficher le nom du dossier, le nom du fichier et le
tag, etc., en écoutant des fichiers MP3/WMA.
Appuyez sur TITLE.
L’affichage change à chaque pression de la touche.
L’affichage en mode Radio :
FREQUENCE CLOCK FREQUENCE
L’affichage en mode CD :
No.DE LA PISTE/TEMPS ECOULE
No.DE LA PISTE/HORLOGE TEXTE (NOM DU DISQUE)*
TEXTE (NOM DE LA PISTE)*
No.DE LA PISTE/TEMPS ECOULE
L’affichage en mode MP3/WMA :
No.DOSSIER/No.FICHIER/TEMPS ECOULE
No.DOSSIER/No.FICHIER/HORLOGE
NOM DU DOSSIER*
NOM DE L’ARTISTE*
NOM DE LA PISTE*
No.DOSSIER/No.FICHIER/TEMPS ECOULE
*1Affiché pendant la lecture d’un disque avec CD Text.
*2Tag ID3/tag WMA
Si un fichier MP3/WMA contient le tag de ID3/WMA, les
informations de celle-ci sont affichées (le nom de la piste, de l’artiste
et de l’album). Toutes les autres données de tag sont ignorées.
Si le défilement (page 15) est réglé sur « SCROLL AUTO », les
informations de tag défilent automatiquement.
*3« ROOT » est affiché quand le dossier racine ne possède pas de nom.
*4Le taux d’échantillonnage et le débit binaire de l’enregistrement du
fichier MP3/WMA sont affichés. Un fichier WMA dont le débit
binaire est variable affiche un débit binaire moyen.
1
3
NOM DU FICHIER
2
NOM DE L’ALBUM*2
2
IMAGE*4
1
La correction physiologique accentue les basses et hautes fréquences du
son reproduit à faible niveau pour compenser la sensibilité réduite de
l’oreille à ces fréquences.
Appuyez pendant au moins 2 secondes sur la touche
MODE pour activer ou annuler la correction
physiologique.
L’indicateur « LD » s’allume.
13-FR
Page 41

A propos des indicateurs
Lors de l’affichage de texte, les indicateurs suivants s’allument
en fonction du mode sélectionné.
La position du morceau en cours de lecture est illuminée
dans le nombre total de morceaux affiché. Un exemple de
cet affichage est illustré ci-dessous. S’allume aussi
pendant l’exécution d’une opération telle que la recherche
rapide vers l’avant.
S’allume quand un disque est inséré
Exemple d’affichage de la position du morceau
<Première moitié> <Milieu> <Dernière moitié>
• Par exemple, « » s’affiche au moment de la lecture du 5ème
des 10 morceaux du disque.
Indicateur/
Mode
Mode CD Mode MP3/WMA Mode iPod
––
Affichage du
nom de
2
dossier*
––
A propos du « Texte »
Texte :
Les CD compatibles texte contiennent des informations sous
forme de texte telles que le nom de disque et le nom de piste.
De telles informations sont appelées « texte ».
• Certains caractères peuvent ne pas être affichés correctement avec
cet appareil, suivant le type de caractère.
• Lorsque le défilement (page 15) est réglé sur « SCROLL MANU »,
appuyez sur TITLE pendant au moins 2 secondes pour faire défiler
les informations de texte une seule fois (mode AFFICHAGE DU
TEXTE, AFFICHAGE DU NOM DU DOSSIER, AFFICHAGE DU
NOM DU FICHIER ou AFFICHAGE DU TAG).
• L’indication « NO SUPPORT » apparaît lorsque les informations de
texte souhaitées ne peuvent pas être affichées sur cet appareil.
• Les informations de texte ou de tags peuvent ne pas s’afficher
correctement en fonction du contenu.
Affichage de l’heure
Appuyez à plusieurs reprises sur la touche TITLE
jusqu’à ce que l’heure s’affiche.
Chaque fois que vous appuyez, l’affichage change.
Pour plus d’informations, voir « Affichage du texte » (page 13).
• En mode d’horloge prioritaire, l’affichage de l’heure est
momentanément interrompu quand vous sélectionnez une fonction du
tuner ou du CD. La fonction sélectionnée s’affiche pendant 5
secondes environ, puis elle est remplacée par l’heure.
• Quand l’appareil est hors tension, mais que le démarreur se trouve
sur la position ON, appuyez sur TITLE pour afficher l’heure.
––
––
Affichage du
texte (nom du
disque*3)
Affichage du
texte (nom de la
piste*3)
*1Informations sur le tag
S’il n’y a pas d’information sur le tag, « ARTIST »/« ALBUM »/
« SONG » est affiché.
*2S’il n’y a pas de nom de dossier ou de fichier, « FOLDER »/« FILE »
est affiché.
*3S’il n’y a pas de texte (nom du disque ou de la piste),
« DISC TEXT »/« TRACK TEXT » est affiché.
Affichage du
nom de fichier*
Affichage du
nom de
1
l’artiste*
Affichage du
nom de
1
l’album*
Affichage du
nom de la
1
piste*
2
Affichage du
nom de
l’artiste*
Affichage du
nom de
l’album*
Affichage du
nom de la
1
piste*
––
1
1
14-FR
Page 42

SETUP
Vous pouvez facilement personnaliser l’appareil en fonction de vos
préférences et de son utilisation. Choisissez le menu SETUP depuis la
personnalisation du son, la personnalisation visuelle, etc., pour
sélectionner le réglage désiré.
MENUBouton rotatif
MODE
Une procédure de configuration normale est illustrée
aux étapes 1 à 4 ci-dessous. Pour plus d’informations
sur chaque menu SETUP, reportez-vous aux
paragraphes qui suivent.
1
Appuyez sur MENU pour sélectionner le mode
SETUP, puis appuyez sur MODE.
BASS ENGINE SETUP RETURN (OFF) BASS ENGINE
2
Appuyez sur ou pour sélectionner le
menu SETUP souhaité, puis appuyez sur MODE.
(Par exemple, sélectionnez SUBWOOFER.)
DIMMER SUBWOOFER (SUBW SYSTEM)*
PLAY MODE SCROLL TYPE TEXT SCROLL
POWER IC DEMO DIMMER
* Affiché uniquement si SUBW est réglé sur ON.
3
Tournez le bouton rotatif pour modifier le réglage.
(Par exemple, sélectionnez SUBW ON ou SUBW OFF.)
4
Appuyez sur la touche MENU pour sélectionner
RETURN.
Après 2 secondes, le mode normal est rétabli.
Appuyez sur MENU et maintenez cette touche enfoncée
pendant au moins 2 secondes pour revenir au mode
normal.
Réglage du système du subwoofer
SUBW SYS1 (réglage initial) / SUBW SYS2
Sélectionnez SYS1 ou SYS2 pour l’effet du subwoofer souhaité.
SUBW SYS1 : Le niveau du subwoofer varie en fonction du
réglage du volume principal.
SUBW SYS2 : Le niveau du subwoofer est différent du réglage
du volume principal. Par exemple, le subwoofer
demeure audible même lorsque le volume est
réglé à un niveau bas.
Personnalisation visuelle
Commande du gradateur
DIMMER AUTO (Réglage initial) / DIMMER MANU
Réglez la commande DIMMER sur AUTO pour diminuer la luminosité
de l’appareil lorsque les phares du véhicule sont allumés. Ce mode est
utile si vous estimez que le rétroéclairage des touches est trop lumineux
dans l’obscurité.
Réglage du type de défilement
SCROLL TYPE1 / SCROLL TYPE2 (Réglage initial)
Choisissez une des deux méthodes de défilement.
Sélectionnez le type de votre choix.
SCROLL TYPE1 : Les caractères défilent séquentiellement à
partir de la droite de l’affichage.
SCROLL TYPE2 : Les caractères apparaissent et disparaissent
individuellement à partir de la gauche de
l’affichage, une fois que l’écran est rempli de
caractères.
Réglage du défilement (TEXT SCROLL)
SCROLL AUTO / SCROLL MANU (Réglage initial)
Ce lecteur de CD peut faire défiler les noms des disques et des pistes
enregistrés sur les disques CD-TEXT, ainsi que les informations de
texte des fichiers MP3/WMA, les noms des dossiers et les tags.
SCROLL AUTO : Les informations texte CD, les informations
texte des noms de dossiers et de fichiers ainsi
que les tags défilent automatiquement. Les
informations de tag défilent aussi
automatiquement sans appuyer sur la touche
TITLE en mode d’affichage des informations
de tag.
SCROLL MANU :L’affichage défile uniquement au moment où
vous chargez un disque, changez de piste,
etc.
• L’appareil fait défiler les noms de CD de texte, les noms des dossiers,
les noms des fichiers ou les tags.
Personnalisation du son
Mise en et hors service du subwoofer
SUBW ON (Réglage initial) / SUBW OFF
Lorsque le subwoofer est en service, effectuez la procédure ci-dessous
pour régler le niveau de sortie.
1 En mode normal, appuyez plusieurs fois sur MODE pour
sélectionner le mode SUBW.
BASS TREBLE SUBW BALANCE FADER
DEFEAT VOLUME BASS
2 Réglez le niveau en faisant tourner le bouton rotatif.
Démonstration
DEMO ON / DEMO OFF (Réglage initial)
Cet appareil possède une fonction de démonstration de l’affichage.
• Pour quitter le mode de démonstration, choisissez DEMO OFF.
15-FR
Page 43

MP3/WMA
Lecture de données MP3/WMA (PLAY MODE)
CDDA (Réglage initial) / CDDA/MP3
Cet appareil peut lire des CD contenant des données de CD et MP3/
WMA. Toutefois, dans certains cas (certains CD améliorés), la lecture
peut s’avérer difficile. Vous pouvez alors sélectionner la lecture des
données de CD uniquement. Lorsqu’un disque contient à la fois des
données de CD et MP3/WMA, la lecture commence à partir de l’endroit
où débutent les données de CD du disque.
CDDA : Seules les données de CD peuvent être lues.
CDDA/MP3 : Les données de CD et les pistes de fichiers MP3/
• Effectuez ce réglage avant d’insérer un disque. Si un disque est déjà
inséré, retirez-le avant d’effectuer le réglage.
WMA peuvent être lues.
Appareil externe
Raccordement à un amplificateur externe
POWER IC ON (Réglage initial) / POWER IC OFF
Lorsqu’un amplificateur externe est raccordé, la qualité sonore peut être
améliorée en coupant l’alimentation de l’amplificateur intégré.
POWER IC OFF : Utilisez ce mode lorsque le préamplificateur
POWER IC ON : Les enceintes sont pilotées par un
ENCEINTE
AVANT DROITE
ENCEINTE
ARRIERE DROITE
ENCEINTE
ARRIERE GAUCHE
ENCEINTE AVANT
GAUCHE
• Le système n’émet aucun son lorsque l’alimentation est réglée sur
OFF.
avant de l’appareil est utilisé pour piloter un
amplificateur externe raccordé aux enceintes.
Quand ce mode est activé, l’amplificateur
interne de l’appareil principal n’envoie plus
aucun signal capable de piloter les enceintes.
Avant
Amplificateur
amplificateur intégré.
gauche
Avant
droit
Enceintes
Avant
droit
Arrière
droit
Arrière
gauche
Avant
gauche
iPod™ (en option)
Bouton
rotatif
MODE
Un iPod™, iPod™ mini ou iPod™ nano peut être raccordé au
CDE-9852 à l’aide du câble de raccordement propriétaire ALPINE
FULL SPEED™ (KCE-422i). Lorsque le CDE-9852 est raccordé à
l’aide du câble, les commandes du dispositif iPod™ ne fonctionnent
pas.
A propos des iPods™ compatibles avec cet appareil
Cet appareil peut être utilisé avec des iPod™ photo, iPod™ mini
ou iPod™ nano de la troisième génération et plus. L’iPod™
Shuffle n’est toutefois pas reconnu.
• Vous ne pouvez pas raccorder à cet appareil iPod à molette
de défilement ou molette tactile sans le connecteur
d’ancrage.
• L’appareil peut être utilisé avec les iPod ci-dessous. Le
fonctionnement correct avec des versions antérieures n’est
pas garanti.
iPod de la troisième génération : Ver. 2.3
iPod de la quatrième génération : Ver. 3.0.2
iPod photo : Ver. 1.0
iPod mini : Ver. 1.3
iPod nano : Ver. 1.0
• L’appareil n’est pas compatible avec les logiciels antérieurs
à la version du 22 février 2005. Pour plus d’informations sur
la mise à jour du logiciel de l’iPod, consultez le mode
d’emploi de l’iPod.
Lecture
1
Appuyez sur SOURCE/POWER pour passer au
mode iPod.
2
Appuyez sur ou pour sélectionner la
chanson désirée.
Retour au début du présent morceau :
Appuyez sur .
Recherche rapide vers l’arrière :
Appuyez sur et maintenez-la enfoncée.
Avance jusqu’au début du morceau suivant :
Appuyez sur .
Recherche rapide vers l’avant :
Appuyez sur et maintenez-la enfoncée.
3
Pour interrompre la lecture, appuyez sur / .
Appuyez de nouveau sur / pour continuer la lecture.
• Si une chanson est en cours de lecture au moment où l’iPod est
raccordé au CDE-9852, la lecture se poursuit une fois la connexion
effectuée.
SOURCE/POWER
/
A.ME
5
4
6
TITLE
16-FR
Page 44

Recherche d’un morceau souhaité
Un iPod peut contenir plusieurs centaines de morceaux. En les
organisant en listes de lecture, vous facilitez leur recherche par le
CDE-9852.
Recherche par liste de lecture
1
Appuyez sur pour activer le mode de sélection de
recherche.
2
Tournez le bouton rotatif pour sélectionner le
mode de recherche PLAYLIST, puis appuyez sur .
PLAYLIST ARTIST ALBUM SONG PLAYLIST
*1
3
Tournez le bouton rotatif pour sélectionner la liste
de lecture souhaitée.
4
Appuyez sur / .
La lecture de la liste souhaitée commence.
Pour rechercher un morceau dans la liste de lecture
sélectionnée
1 Après avoir sélectionné la liste de lecture à l’étape 3*1,
appuyez sur pour passer en mode de recherche d’un
morceau dans la liste de lecture sélectionnée.
2 Tournez le bouton rotatif pour sélectionner un morceau,
puis appuyez sur MODE.
La lecture du morceau sélectionné commence.
• Maintenez la touche enfoncée pendant 2 secondes au moins en
mode de recherche pour annuler. Le mode de recherche est aussi
annulé si aucune opération n’est exécutée dans les 10 secondes.
• En mode de recherche, appuyez sur A.ME pour revenir au mode
précédent.
• Tous les morceaux présents sur l’iPod sont lus en sélectionnant le
« iPod name » enregistré à l’étape 3*1.
• La recherche par liste de lecture ne peut s’effectuer au cours de la
lecture M.I.X.
• « NO SONG » s’affiche si la liste sélectionnée en mode de recherche
PLATLIST ne contient aucun morceau.
Recherche par nom d’artiste
1
Appuyez sur pour activer le mode de sélection de
recherche.
2
Tournez le bouton rotatif pour sélectionner le
mode de recherche ARTIST, puis appuyez sur .
PLAYLIST ARTIST ALBUM SONG PLAYLIST
*2
3
Tournez le bouton rotatif pour sélectionner
l’artiste souhaité.
4
Appuyez sur / .
Tous les morceaux de l’artiste sélectionné sont lus.
Pour rechercher un album de l’artiste sélectionné
1 Après avoir sélectionné l’artiste à l’étape 3*2, appuyez
sur pour passer en mode de recherche d’album de
l’artiste sélectionné.
2*1Tournez le bouton rotatif pour sélectionner un album.
3 Appuyez sur / pour lire tous les morceaux de
l’album sélectionné.
Pour rechercher un morceau de l’album sélectionné
1 Après avoir sélectionné l’album à l’étape 2*1, appuyez
sur pour passer en mode de recherche d’un morceau
dans l’album sélectionné.
2Tournez le bouton rotatif pour sélectionner un morceau,
puis appuyez sur MODE.
La lecture du morceau sélectionné commence.
• Maintenez la touche enfoncée pendant 2 secondes au moins en
mode de recherche pour annuler. Le mode de recherche est aussi
annulé si aucune opération n’est exécutée dans les 10 secondes.
• En mode de recherche, appuyez sur A.ME pour revenir au mode
précédent.
• Si vous choisissez ALL à l’étape 3*2 et si vous appuyez sur / ,
tous les morceaux enregistrés dans iPod sont lus. Si vous choisissez
ALL et si vous appuyez sur , le mode de recherche ALBUM de tous
les artistes est activé.
• Si vous choisissez ALL à l’étape 2*1 et si vous appuyez sur / ,
tous les morceaux de l’artiste sélectionné sont lus. Si vous choisissez
ALL et si vous appuyez sur , le mode de recherche SONG de
l’artiste sélectionné est activé.
• La recherche par nom d’artiste ne peut s’effectuer au cours de la
lecture M.I.X.
Recherche par nom d’album
1
Appuyez sur pour activer le mode de sélection de
recherche.
2
Tournez le bouton rotatif pour sélectionner le
mode de recherche ALBUM, puis appuyez sur .
PLAYLIST ARTIST ALBUM SONG PLAYLIST
*3
3
Tournez le bouton rotatif pour sélectionner l’album
souhaité.
4
Appuyez sur / .
Tous les morceaux des albums sélectionnés sont lus.
Pour rechercher un morceau de l’album sélectionné
1 Après avoir sélectionné l’album à l’étape 3*3, appuyez
sur pour passer en mode de recherche d’un morceau
dans l’album sélectionné.
2Tournez le bouton rotatif pour sélectionner un morceau,
puis appuyez sur MODE.
La lecture du morceau sélectionné commence.
• Maintenez la touche enfoncée pendant 2 secondes au moins en
mode de recherche pour annuler. Le mode de recherche est aussi
annulé si aucune opération n’est exécutée dans les 10 secondes.
• En mode de recherche, appuyez sur A.ME pour revenir au mode
précédent.
• Si vous choisissez ALL à l’étape 3*3 et si vous appuyez sur / ,
tous les morceaux enregistrés dans iPod sont lus. Si vous choisissez
ALL et si vous appuyez sur , le mode de recherche SONG de tous
les albums est activé.
• La recherche par nom d’album ne peut s’effectuer au cours de la
lecture M.I.X.
17-FR
Page 45

Recherche par nom de morceau
1
Appuyez sur pour activer le mode de sélection de
recherche.
2
Tournez le bouton rotatif pour sélectionner le
mode de recherche SONG, puis appuyez sur .
PLAYLIST ARTIST ALBUM SONG PLAYLIST
3
Tournez le bouton rotatif pour sélectionner le
morceau souhaité.
4
Appuyez sur MODE.
La lecture du morceau sélectionné commence.
• Maintenez la touche enfoncée pendant 2 secondes au moins en
mode de recherche pour annuler. Le mode de recherche est aussi
annulé si aucune opération n’est exécutée dans les 10 secondes.
• En mode de recherche, appuyez sur A.ME pour revenir au mode
précédent.
• La recherche par nom de morceau ne peut s’effectuer au cours de la
lecture M.I.X.
Sélection d’une liste de lecture, d’un
artiste ou d’un album
La liste de lecture, l’artiste ou d’album peut être facilement changé.
Si, par exemple, vous écoutez un morceau d’un album sélectionné, vous
pouvez changer d’album.
1
Appuyez sur ou pour sélectionner la liste de
lecture, l’artiste ou l’album souhaité.
• Si le mode de sélection de recherche n’est pas activé, seul le morceau
est recherché et cette opération n’est pas possible.
• Si la dernière recherche a été effectuée par morceau, la recherche est
maintenant effectuée par liste de lecture/album.
• Cette opération n’est pas possible pendant la lecture aléatoire
(M.I.X.).
Lecture aléatoire (M.I.X.)
La fonction de lecture aléatoire de l’iPod est représentée par M.I.X. sur
le CDE-9852.
Lecture aléatoire des albums :
La lecture aléatoire de l’album lit tous les morceaux dans l’ordre,
puis sélectionne au hasard l’album suivant. Tous les morceaux
de cet album sont lus dans l’ordre, etc. Chaque album n’est lu
qu’une seule fois.
Lecture aléatoire des morceaux :
Cette fonction lit certains morceaux sélectionnés de manière
aléatoire. Chaque morceau n’est lu qu’une seule fois jusqu’à ce
qu’ils soient tous lus.
1
Appuyez sur 5 .
Les morceaux sont lus dans un ordre aléatoire.
M.I.X. M.I.X. (off) M.I.X.
(Lecture aléatoire
des albums)
2
Pour annuler la lecture M.I.X., sélectionnez (off) en
exécutant la procédure ci-dessus.
• Pour plus d’informations sur le mode de recherche, consultez la
section « Recherche d’un morceau souhaité » (page 17).
• Si un morceau est sélectionné en mode de recherche par album avant
que soit sélectionnée la lecture aléatoire (M.I.X.), les morceaux ne
sont pas lus de manière aléatoire, même si la lecture aléatoire de
l’album est sélectionnée.
Lecture aléatoire ALL :
La lecture aléatoire ALL lit tous les morceaux de l’iPod de
manière aléatoire. Chaque morceau n’est lu qu’une seule fois
jusqu’à ce qu’ils soient tous lus.
1
Appuyez sur 6.
Les morceaux sont lus dans un ordre aléatoire.
M.I.X. (off) M.I.X.
(Lecture
aléatoire ALL)
(Lecture aléatoire
des morceaux)
Recherche rapide
Vous pouvez rechercher toutes les morceaux.
1
Appuyez sur pendant au moins 2 secondes pour
activer le mode de recherche rapide.
2
Tournez le bouton rotatif pour sélectionner le
morceau souhaité.
Le morceau sélectionné est lu immédiatement.
• Maintenez la touche enfoncée pendant 2 secondes au moins en
mode de recherche pour annuler. Le mode de recherche est aussi
annulé si aucune opération n’est exécutée dans les 10 secondes.
• Si l’iPod renferme de nombreuses chansons, la recherche peut durer
un certain temps.
18-FR
2
Pour annuler la lecture M.I.X., sélectionnez (off) en
exécutant la procédure ci-dessus.
• Si Shuffle All est sélectionné, le mode de recherche en cours est
annulé.
Lecture répétée
Seul Répéter Un est disponible pour l’iPod.
Répéter Un : Un seul morceau peut être lu de manière répétée.
1
Appuyez sur 4.
La lecture du fichier est répétée.
RPT (off) RPT
(Répéter Un)
2
Pour annuler la lecture répétée, sélectionnez (off) en
exécutant la procédure ci-dessus.
• Pendant la lecture répétée, aucun autre morceau ne peut être
sélectionné en appuyant sur ou .
Page 46

Affichage du texte
Vous pouvez afficher les informations de tag d’un morceau dans l’iPod.
Appuyez sur TITLE.
Chaque fois que vous appuyez, l’affichage change.
No.DE LA PISTE/TEMPS ECOULE
No.DE LA PISTE/HORLOGE NOM DE L’ARTISTE*
NOM DE L’ALBUM* TITRE DU MORCEAU*
No.DE LA PISTE/TEMPS ECOULE
* Informations sur le tag
Si le défilement (page 15) est réglé sur « SCROLL AUTO », les
informations de tag défilent automatiquement.
S’il n’y a pas d’information sur le tag, « ARTIST »/« ALBUM »/
« SONG » est affiché.
• Quand le défilement (page 15) est réglé sur « SCROLL MANU »,
maintenez la touche TITLE enfoncée pendant au moins 2 secondes
pour faire défiler les informations sur le tag une fois seulement.
• Seuls des caractères alphanumériques (ASCII) peuvent être affichés.
• Si le nom de l’artiste, de l’album ou du morceau défini dans iTunes,
compte trop de caractères, les morceaux risquent de ne pas pouvoir
être lus lorsque l’iPod est raccordé à l’adaptateur. Il est donc
recommandé de ne pas dépasser 250 caractères. Le nombre maximal
de caractères est de 128 (128 octets) pour l’unité principale.
• Il est possible que certains caractères ne s’affichent pas
correctement.
• « NO SUPPORT » s’affiche lorsque les informations textuelles ne
sont pas compatibles avec le CDE-9852.
Informations
En cas de problème
En cas de problème, éteignez l’appareil, puis remettez-le sous tension.
Si l’appareil ne fonctionne toujours pas correctement, vérifiez les
éléments de la liste de contrôle ci-dessous. Ce guide devrait vous aider à
résoudre tout problème provenant de l’appareil. Sinon, vérifiez les
connexions du reste du système ou consultez un revendeur Alpine
autorisé.
Base
Fonctions inopérantes ou pas d’affichage.
• La clé de contact du véhicule est sur la position d’arrêt.
- Si l’appareil est raccordé selon les instructions, il ne fonctionne
pas quand la clé de contact est sur la position d’’arrêt.
• Connexions incorrectes du fil d’alimentation (rouge) et du fil de la
batterie (jaune).
- Vérifiez les connexions du fil d’alimentation et du fil de la
batterie.
• Fusible grillé.
- Vérifiez le fusible de l’appareil, et remplacez-le par un fusible
approprié, si nécessaire.
• Disfonctionnement du microprocesseur interne dû à des
interférences de bruit, etc.
- Appuyez sur le commutateur RESET avec un stylo à bille ou
un objet pointu.
Radio
Impossible de recevoir les stations.
• Pas d’antenne ou connexion incorrecte du câble.
- Vérifiez que l’antenne est bien raccordée ;
remplacez l’antenne ou le câble si nécessaire.
Impossible d’accorder les stations en mode de
recherche automatique.
• Les signaux dans la région sont faibles.
- Vérifiez que le tuner est en mode DX.
• Si vous vous trouvez dans une région à signal fort, l’antenne
n’est peut-être pas mise à la terre ou raccordée correctement.
- Vérifiez les connexions de l’antenne ; vérifiez qu’elle est
correctement reliée à l’emplacement du montage.
• La longueur de l’antenne ne convient pas.
- Vérifiez si l’antenne est complètement déployée. Si l’antenne
est cassée, remplacez-la par une neuve.
Réception parasitée.
• La longueur de l’antenne ne convient pas.
- Déployez complètement l’antenne, remplacez-la si elle est
cassée.
• L’antenne n’est pas correctement reliée à l’emplacement du
montage.
- Vérifiez que l’antenne est correctement reliée à l’emplacement
du montage.
CD
Le lecteur de CD ne fonctionne pas.
• La température dépasse +50°C (+120°F) pour CD.
- Laissez la température de l’habitacle (ou du coffre) baisser.
19-FR
Page 47

Le son de lecture du disque est déformé.
• Condensation de l’humidité dans le module CD.
- Attendez que l’humidité s’évapore (environ 1 heure).
Insertion de disque impossible.
• Le lecteur contient déjà un CD.
- Ejectez le disque et enlevez-le.
• Le CD est mal inséré.
- Assurez-vous que le CD est inséré conformément aux
instructions décrites à la section relative au fonctionnement du
lecteur CD.
Avance rapide ou inversion impossible.
• Le CD est endommagé.
- Ejectez le disque et jetez-le. L’emploi d’un disque endommagé
peut abîmer le mécanisme de l’appareil.
Pertes de son dues à des vibrations.
• Mauvais montage de l’appareil.
- Réinstallez l’appareil correctement.
• Disque très sale.
- Nettoyez le disque.
• Disque rayé.
- Remplacez le disque.
• Lentille de lecture sale.
- N’utilisez pas un disque de nettoyage disponible dans le
commerce. Consultez votre revendeur Alpine.
Pertes de son non dues à des vibrations.
• Disque sale ou rayé.
- Nettoyez le disque ; remplacez tout disque endommagé.
Ecrans d’erreur (lecteur CD intégré seulement)
• Erreur mécanique
- Appuyez sur . Après que l’indication d’erreur a disparu,
réintroduisez le disque. Si la solution mentionnée ci-dessus ne
résout pas le problème, consultez votre revendeur Alpine.
Lecture du CD-R/CD-RW impossible.
• La session de fermeture (finalisation) n’a pas été effectuée.
- Effectuez la finalisation et remettez le disque en lecture.
MP3/WMA
• Aucun CD n’a été introduit.
- Introduisez un CD.
• Bien qu’un disque soit inséré dans l’appareil, « NO DISC » est
affiché et le disque ne peut pas être lu ou éjecté.
- Enlevez le disque en procédant de la façon suivante :
Appuyez à nouveau sur la touche et maintenez-la enfoncée
pendant au moins 2 secondes.
S’il s’avère toujours impossible d’éjecter le disque, consultez
votre revendeur Alpine.
• Erreur du mécanisme.
1) Appuyez sur et éjectez le CD.
Si l’éjection n’a pas lieu, consultez le revendeur Alpine.
2) Lorsqu’une indication d’erreur persiste après l’éjection,
appuyez à nouveau sur .
Si une indication d’’erreur persiste toujours après avoir
appuyé plusieurs fois sur , consultez le revendeur Alpine.
• Si « ERROR » est affiché :
S’il n’est pas possible d’éjecter le disque en appuyant sur ,
appuyez sur le commutateur RESET (voir la page 6), puis appuyez à
nouveau sur .
S’il s’avère toujours impossible d’éjecter le disque, consultez votre
revendeur Alpine.
• Un fichier WMA protégé contre la copie a été lu.
- Vous pouvez lire uniquement les fichiers non protégés contre la
copie.
Le format MP3 ou WMA n’est pas reproduit.
• Une erreur de lecture est occasionnée. Le format CD n’est pas
compatible.
- Assurez-vous que le CD a été écrit dans un format supporté.
Reportez-vous à la section « A propos du format MP3/WMA »
(page 10-11), puis procédez à la réécriture dans un format pris
en charge par cet appareil.
Audio
Le son n’est pas reproduit par les enceintes.
• L’appareil ne reçoit pas le signal de sortie de l’amplificateur
interne.
- POWER IC est réglé sur « ON » (page 16).
Indications pour le lecteur de CD
• Le circuit de protection s’est déclenché car la température est
trop élevée.
- L’indication disparaît quand la température revient dans la
plage de fonctionnement.
20-FR
• Le disque n’est pas écrit dans un format MP3/WMA supporté.
- Utilisez un disque écrit dans un format MP3/WMA supporté.
Indication relative au mode iPod
• L’iPod n’est pas raccordé.
- Vérifiez si l’iPod est correctement raccordé (comme décrit à la
section « Raccordements »).
Vérifiez si la courbure du câble n’est pas excessive.
• La batterie de l’iPod demeure faible.
- Reportez-vous à la documentation de l’iPod et chargez la
batterie.
• L’iPod ne comporte aucun morceau.
- Téléchargez des morceaux sur l’iPod et raccordez-le à
l’adaptateur.
Page 48

Spécifications
• Erreur de communication
- Tournez la clé de contact sur OFF, puis de nouveau sur ON.
- Vérifiez l’affichage en rebranchant l’iPod sur l’adaptateur à
l’aide du câble de l’iPod.
• La version du logiciel de l’iPod n’est pas compatible avec
l’appareil.
- Mettez à jour le logiciel de l’iPod vers une version compatible
avec l’appareil.
SECTION TUNER FM
Plage de syntonisation 87,7 - 107,9 MHz
Sensibilité mono utilisable 9,3 dBf (0,8 µV/75 ohms)
Sensibilité silencieuse 50 dB 13,5 dBf (1,3 µV/75 ohms)
Sélectivité de canal alternatif 80 dB
Rapport signal-bruit 65 dB
Séparation stéréo 35 dB
Taux de capture 2,0 dB
SECTION DU TUNER AM
Plage de syntonisation 530 - 1 710 kHz
Sensibilité (norme CEI) 22,5 µV/27 dB
SECTION DU LECTEUR CD
Réponse en fréquence 5 - 20 000 Hz (±1 dB)
Pleurage et scintillement
(% WRMS)
Distorsion harmonique totale 0,008% (à 1 kHz)
Gamme dynamique 95 dB (à 1 kHz)
Rapport signal-bruit 105 dB
Séparation des canaux 85 dB (à 1 kHz)
LENTILLE DE LECTURE
Longueur d’onde 795 nm
Puissance du laser CLASS I
GENERALITES
Alimentation 14,4 V CC
Puissance de sortie 16 W RMS × 4*
* Niveaux d’amplificateur primaire conformes à la norme
CEA-2006
• Puissance de sortie : mesurée à 4 ohms et 1% THD+N
• Signal/bruit : 80 dBA (référence : 1 W en 4 Ohms)
Tension sortie pré-ampli maximum2 V/10 k ohms
Graves +20/-14 dB à 100 Hz
Aigus ±14 dB à 10 kHz
Poids 1,6 kg (3 lbs. 8 oz)
DIMENSIONS DU CHASSIS
Largeur 178 mm (7")
Hauteur 50 mm (2")
Profondeur 162 mm (6-3/8")
Inférieur aux limites
mesurables
(11 - 16 V autorisé)
DIMENSIONS DE L’AVANT
Largeur 170 mm (6-11/16")
Hauteur 46 mm (1-13/16")
Profondeur 24 mm (15/16")
• La conception et les spécifications peuvent être modifiées sans avis
préalable en vue d’améliorer les produits.
21-FR
Page 49

Installation et raccordements
Avant d’installer ou de raccorder l’appareil, liez
attentivement les précautions suivantes ainsi que les
pages 3 et 5 de ce mode d’emploi de manière à en
garantir une utilisation correcte.
Avertissement
EFFECTUER CORRECTEMENT LES CONNEXIONS.
Il y a risque de blessures ou de dommages à l’appareil.
A UTILISER UNIQUEMENT SUR DES VOITURES A MASSE
NEGATIVE DE 12 VOLTS.
(Vérifiez auprès de votre concessionnaire si vous n’en êtes pas certain.)
Il y a risque d’incendie, etc.
AVANT TOUTE CONNEXION, DEBRANCHER LE CABLE DE LA
BORNE NEGATIVE DE LA BATTERIE.
Il y a risque de choc électrique ou de blessure par courts-circuits.
NE PAS COINCER LES CABLES AVEC DES OBJETS VOISINS.
Positionner les câbles conformément au manuel de manière à éviter
toute obstruction en cours de conduite. Les câbles qui obstruent ou
dépassent à des endroits tels que le volant, le levier de changement de
vitesses, la pédale de frein, etc., peuvent s’avérer extrêmement
dangereux.
NE PAS DENUDER LES CABLES ELECTRIQUES.
Ne jamais enlever la gaine isolante pour alimenter un autre appareil. Il y
a risque de dépassement de la capacité de courant et, partant, d’incendie
ou de choc électrique.
NE PAS ENDOMMAGER DE CONDUITES NI DE CABLES LORS DU
FORAGE DES TROUS.
Lors du forage de trous dans le châssis en vue de l’installation, veiller à
ne pas entrer en contact, endommager ni obstruer de conduites, de
tuyaux à carburant ou de fils électriques. Le non-respect de cette
précaution peut entraîner un incendie.
NE PAS UTILISER DES ECROUS NI DES BOULONS DU CIRCUIT DE
FREINAGE OU DE DIRECTION POUR LES CONNEXIONS DE MASSE.
Les boulons et les écrous utilisés pour les circuits de freinage et de
direction (ou de tout autre système de sécurité) ou les réservoirs ne
peuvent JAMAIS être utilisés pour l’installation ou la liaison à la masse.
L’utilisation de ces organes peut désactiver le système de contrôle du
véhicule et causer un incendie, etc.
GARDER LES PETITS OBJETS COMME LES PILES HORS DE
PORTEE DES ENFANTS.
L’ingestion de tels objets peut entraîner de graves blessures.
En cas d’ingestion, consulter immédiatement un médecin.
NE PAS INSTALLER A DES ENDROITS SUSCEPTIBLES
D’ENTRAVER LA CONDUITE DU VEHICULE, COMME LE VOLANT
OU LE LEVIER DE VITESSES.
La vue vers l’avant pourrait être obstruée ou les mouvements gênés,
etc., et provoquer un accident grave.
Attention
FAIRE INSTALLER LE CABLAGE ET L’APPAREIL PAR DES
EXPERTS.
Le câblage et l’installation de cet appareil requiert des compétences
techniques et de l’expérience. Pour garantir la sécurité, faire procéder à
l’installation de cet appareil par le distributeur qui vous l’a vendu.
UTILISER LES ACCESSOIRES SPECIFIES ET LES INSTALLER
CORRECTEMENT.
Utiliser uniquement les accessoires spécifiés. L’utilisation d’autres
composants que les composants spécifiés peut causer des dommages
internes à cet appareil ou son installation risque de ne pas être effectuée
correctement. Les pièces utilisées risquent de se desserrer et de
provoquer des dommages ou une défaillance de l’appareil.
FAIRE CHEMINER LE CABLAGE DE MANIERE A NE PAS LE COINCER
CONTRE UNE ARETE METALLIQUE.
Faire cheminer les câbles à l’écart des pièces mobiles (comme les rails
d’un siège) et des arêtes acérées ou pointues. Cela évitera ainsi de
coincer et d’endommager les câbles. Si un câble passe dans un orifice
métallique, utiliser un passe-cloison en caoutchouc pour éviter que la
gaine isolante du câble ne soit endommagée par le rebord métallique de
l’orifice.
NE PAS INSTALLER A DES ENDROITS TRES HUMIDES OU
POUSSIEREUX.
Eviter d’installer l’appareil à des endroits soumis à une forte humidité
ou à de la poussière en excès. La pénétration d’humidité ou de poussière
à l’intérieur de cet appareil risque de provoquer une défaillance.
Précautions
• S’assurer de déconnecter le câble du pôle (–) de la batterie avant
l’installation du CDE-9852. Ceci reduit les risques d’endommager
l’unité en cas de court-circuit.
• S’assurer de connecter les conducteurs codés en couleur se
conformant au schéma. Des connexions incorrectes peuvent
occasionner le manuvais fonctionnement de l’unité ou le dégât du
système électrique du véhicule.
• Lors de la connexion des câbles au système électrique du véhicule, il
faut être conscient des composants installés en usine (tel qu’un
ordinateur de bord). S’assurer de ne pas brancher à ces conducteurs
pour fournir l’alimentation à cette unité. Lors de la connexion du
CDE-9852 au boîtier à fusible, s’assurer que le fusible du circuit
désigné pour le CDE-9852 a l’ampérage approprié. Sinon, I’unité et/
ou le véhicule peuvent être endommagés. En cas de doute, consulter
le revendeur Alpine.
• Le CDE-9852 utilise des prises femelles de type RCA pour la
connexíon à d’autres unités (par exemple à un amplificateur)
équipées de connecteurs RCA. Un adaptateur peut être nécessaire
pour le connecter d’autres unités. Si c’est le cas, contacter le
revendeur agréé Alpine pour obtenir de l’assistance technique.
• S’assurer de connecter les câbles d’enceinte (–) à la borne d’enceinte
(–). Ne jamais connecter les câbles d’enceinte du canal gauche et
droit l’un à l’autre ou à la carrosserie du véhicule.
IMPORTANT
Veuillez inscrire le numéro de série de votre appareil dans l’espace
prévu ci-dessous et conservez-le soigneusement dans vos archives. Le
numéro de série ou la plaquette sur lequel il est gravé se trouve sur le
dessous de l’appareil.
22-FR
NUMÉRO DE SÉRIE :
DATE D’INSTALLATION :
INSTALLATEUR :
LIEU D’ACHAT :
Page 50

Installation
Panneau avant
amovible
Attention
Quand vous installez cet appareil dans votre véhicule, ne retirez
pas le panneau avant amovible.
Si vous le retirez pendant l’installation, vous risquez d’exercer
une trop forte pression et de plier la plaque en métal qui le
maintient en place.
Liste des accessoires
• Unité principale ...................................................................1
• Câble d’alimentation............................................................1
• Gaine de montage...............................................................1
• Etui.......................................................................................1
• Clé de support.....................................................................2
• Vis (M5 × 8) .........................................................................4
• Mode d’emploi...............................................................1 jeu
• L’unité principale doit être fixée à moins de 35 degrés du plan
horizontal, de l’arrière vers l’avant.
Renforcez l’unité principale avec une attache de
montage métallique (non fournie). Raccordez le fil
de terre de l’appareil à un point métallique propre à
l’aide d’une vis (
1
*
) déjà fixée au châssis du
véhicule.
• Pour la vis « *2», utilisez une vis appropriée à l’emplacement de
montage choisi.
Raccordez chaque fil d’entrée d’un amplificateur ou
d’un égaliseur au fil de sortie correspondant qui
provient du coin arrière du CDE-9852. Raccordez
tous les autres fils du CDE-9852 de la manière
décrite à la section RACCORDEMENTS.
Glissez le CDE-9852 dans le tableau de bord jusqu’à
3
ce qu’il émette un déclic. De cette façon, l’appareil
sera convenablement verrouillé et il ne risquera pas
de tomber accidentellement du tableau de bord.
Installez le panneau avant amovible.
Dépose
1. Déposez le panneau avant amovible.
2. Insérez les clés du support dans l’appareil, le long des
guides situés de part et d’autre. L’appareil peut
maintenant être retiré de la gaine de montage.
Cet appareil
Clés du support
(fournies)
Moins de 35°
Gaine de montage
1
(Fournie)
Tableau de bord
Cet appareil
Enlevez le panneau avant amovible (voir page 6).
Glissez la gaine de montage hors de l’unité
principale (voir « Dépose », page 23).
Vis
2
Ecrou à six pans (M5)
Attache de
montage en
métal
2
*
Filetage de boulon
1
*
3. Extrayez l’appareil, en le maintenant déverrouillé.
<VOITURE JAPONAISE>
Plaque avant
Vis (M5 × 8)
Cet appareil
Fil de terre
3
*
• Raccordez le fil de terre de l’appareil à un point métallique propre à
l’aide d’une vis (*3) déjà fixée au châssis du véhicule.
(Fournie)
Applique de montage
Fil de terre
Cet appareil
Châssis
23-FR
Page 51

Raccordements
ANTENNE ELECTRIQUE
Bleu
Vers l’iPod
Antenne
Vers l’antenne électrique
Bleu/Blanc
Orange ECLAIRAGE
Rouge ALLUMAGE
MISE SOUS TENSION
A DISTANCE
Jaune BATTERIE
Noir TERRE
Gris
ENCEINTE
AVANT DROITE
Gris/Noir
Violet/Noir
ENCEINTE
ARRIERE DROITE
Violet
Ver t
ENCEINTE
ARRIERE GAUCHE
Ver t/ Noi r
Blanc/Noir
ENCEINTE
AVANT GAUCHE
Blanc
Vers l’amplificateur ou l’égaliseur
Vers le fil d’éclairage du combiné
d’instruments
Clé de contact
Batterie
Enceintes
Avant droite
Arrière droite
Arrière gauche
Avant gauche
*1Quand le subwoofer est réglé sur OFF : la sortie provient des enceintes avant.
Quand le subwoofer est réglé sur ON : la sortie provient du subwoofer.
24-FR
Amplificateur
Enceintes
Avant/
Extrêmes
graves*
1
Page 52

Connecteur direct iPod
Signaux de commande iPod.
Raccordez-le à un iPod, en utilisant le câble de
raccordement FULL SPEEDTM (KCE-422i) (vendu
séparément).
Réceptacle d’antenne
Fil d’antenne électrique (Bleu)
Connectez ce fil à la borne +B de l’antenne électrique, si
applicable.
• Ce fil doit uniquement être utilisé pour commander l’antenne
électrique du véhicule. N’utilisez pas ce fil pour mettre sous tension
un amplificateur ou un processeur de signal, etc.
Fil de mise sous tension à distance (Bleu/Blanc)
Connectez ce fil au fil de mise en service à distance de
votre amplificateur ou processeur de signal.
Câble d’éclairage (Orange)
Ce fil peut être raccordé au fil d’éclairage du combiné
d’instruments du véhicule. Cela permettra d’estomper le
rétroéclairage de l’appareil quand les phares du véhicule
sont allumés.
Fil d’alimentation commutée (Allumage) (Rouge)
Connectez ce fil à une borne ouverte sur la boîte à fusible
du véhicule ou à une autre source d’énergie inutilisée qui
fournit (+) 12V uniquement lorsque l’allumage est mis sous
tension ou réglé sur la position accessoire.
Fil de batterie (Jaune)
Connectez ce fil à la borne positive (+) de la batterie du
véhicule.
Fil de mise à la terre (Noir)
Connectez ce fil à une bonne masse du châssis sur le
véhicule. Assurez-vous que la connexion est établie à un
métal nu et solidement fixée en utilisant une vis de feuille
métallique fournie.
Fil de sortie de l’enceinte avant droite (+) (Gris)
Fil de sortie de l’enceinte avant droite (–) (Gris/Noir)
Fil de sortie de l’enceinte arrière droite (–) (Violet/
Noir)
Fil de sortie de l’enceinte arrière droite (+) (Violet)
Fil de sortie de l’enceinte arrière gauche (+) (Vert)
Fil de sortie de l’enceinte arrière gauche (–) (Vert/
Noir)
Fil de sortie de l’enceinte avant gauche (–) (Blanc/
Noir)
Fil de sortie de l’enceinte avant gauche (+) (Blanc)
Connecteur d’alimentation
Porte-fusible (10A)
Connecteurs RCA de sortie avant/subwoofer
ROUGE est droit et BLANC est gauche.
Câble de rallonge RCA (vendu séparément)
TM
Câble de raccordement FULL SPEED
(KCE-422i)
(vendu séparément)
Pour éviter que des bruits extérieurs interfèrent avec le système audio.
• Installez l’appareil et acheminez les câbles à au moins 10 cm de distance du faisceau de câbles de la voiture.
• Eloignez les câbles d’alimentation de la batterie le plus possible des autres câbles.
• Raccordez le fil de terre à un point métallique apparent (enlevez la couche de peinture, de saleté ou de graisse si nécessaire) du châssis
de la voiture.
• Si vous ajoutez un filtre antiparasites en option, raccordez-le le plus loin possible de l’appareil. Contactez votre revendeur Alpine pour
plus de détails sur les divers filtres antiparasites disponibles.
• Consultez votre revendeur Alpine pour plus de détails sur les mesures de prévention contre les parasites.
25-FR
Page 53

Page 54

ESPAÑOL
Índice
Manual de instrucciones
ADVERTENCIA
ADVERTENCIA ........................................ 3
PRUDENCIA ............................................. 3
PRECAUCIONES ..................................... 3
Primeros pasos
Conexión y desconexión de la alimentación .... 6
Extracción y fijación del panel frontal ............. 6
Puesta en funcionamiento inicial del sistema ... 6
Ajuste del volumen ........................................... 7
Reducción rápida del volumen ......................... 7
Ajuste de la hora ............................................... 7
Radio
Funcionamiento de la radio .............................. 7
Almacenamiento manual de emisoras .............. 7
Almacenamiento automático de emisoras ........ 8
Sintonía de emisoras memorizadas .................. 8
Función de búsqueda de frecuencia ................. 8
CD/MP3/WMA
Reproducción ................................................... 8
Modo de repetición .......................................... 9
M.I.X. (Reproducción aleatoria) ...................... 9
Búsqueda en texto de CD ................................. 9
Búsqueda de nombre de archivo/carpeta
(relativo a MP3/WMA) ............................... 10
Búsqueda rápida ............................................. 10
Acerca de MP3/WMA .................................... 10
Ajuste de sonido
Ajuste de graves/agudos/balance (entre los
altavoces derechos e izquierdos)/Fader
(entre los altavoces delanteros y traseros)/
Defeat ..........................................................12
Ajuste del control de graves ............................12
Ajuste del control de agudos ...........................13
Activación/desactivación del efecto de
sonoridad .....................................................13
Otras funciones
Visualización de texto .....................................13
Visualización de la hora ..................................14
SETUP
Personalización de sonido
Activación y desactivación del subwoofer .......15
Ajuste del sistema de subwoofer ......................15
Personalización visual
Control de atenuación .......................................15
Ajuste de tipo de desplazamiento .....................15
Ajuste de desplazamiento (TEXT SCROLL) ...15
Demostración ...................................................15
MP3/WMA
Reproducción de datos MP3/WMA
(PLAY MODE) .............................................16
Dispositivo externo
Conexión a un amplificador externo ................16
iPod™ (opcional)
Reproducción ..................................................16
Búsqueda de la canción deseada .....................17
Búsqueda por una lista de reproducción .....17
Búsqueda por nombre de artista ..................17
Búsqueda por nombre de álbum .................. 17
Búsqueda por nombre de canción ...............18
Selección de lista de reproducción/artista/
álbum ...........................................................18
Búsqueda rápida ..............................................18
Reproducción aleatoria (M.I.X.) .....................18
Modo de repetición .........................................18
Visualización de texto .....................................19
1-ES
Page 55

Información
En caso de dificultad ....................................... 19
Especificaciones .............................................21
Ubicación y conexiones
Advertencia ............................................ 22
Prudencia ............................................... 22
Precauciones ......................................... 22
Instalación .......................................................23
Conexiones .....................................................24
2-ES
Page 56

Manual de instrucciones
UTILICE ESTE PRODUCTO CON APLICACIONES MÓVILES
ADVERTENCIA
DE 12 V.
Si se emplea para otra aplicación distinta de la prevista, podría
producirse un incendio, una descarga eléctrica u otras lesiones.
ADVERTENCIA
Este símbolo indica que las instrucciones son
importantes. De no tenerse en cuenta, podría
ocasionarse heridas graves o muerte.
NO REALICE NINGUNA OPERACIÓN QUE PUEDA DISTRAER
SU ATENCIÓN Y COMPROMETER LA SEGURIDAD DURANTE
LA CONDUCCIÓN DEL VEHÍCULO.
Las operaciones que requieren su atención durante más tiempo sólo
deben realizarse después de detener completamente el vehículo.
Estacione el vehículo en un lugar seguro antes de realizar dichas
operaciones. De lo contrario, podría ocasionar un accidente.
MANTENGA EL VOLUMEN A UN NIVEL QUE NO LE IMPIDA
ESCUCHAR LOS SONIDOS DEL EXTERIOR MIENTRAS
CONDUCE.
De no ser así, podría ocasionar un accidente.
REDUZCA AL MÁXIMO LA VISUALIZACIÓN DE LA
PANTALLA MIENTRAS CONDUCE.
El conductor puede distraer su atención de la carretera mientras
mira la pantalla y ocasionar un accidente.
NO DESMONTE NI ALTERE LA UNIDAD.
Si lo hace, podrá ocasionar un accidente, un incendio o una
descarga eléctrica.
NO INTRODUZCA LAS MANOS, LOS DEDOS NI OTROS
OBJETOS EXTRAÑOS EN LAS RANURAS DE INSERCIÓN O
EN LAS ABERTURAS.
Si lo hiciera, podría sufrir heridas u ocasionar daños al equipo.
PRUDENCIA
Este símbolo indica que las instrucciones son
importantes. De no tenerse en cuenta, podría
ocasionarse heridas graves o daños materiales.
DEJE DE USAR LA UNIDAD INMEDIATAMENTE SI APARECE
ALGÚN PROBLEMA.
Su uso en estas condiciones podría ocasionar lesiones personales o
daños al producto. Lleve la unidad a un distribuidor Alpine
autorizado o al Centro de servicio Alpine más próximo para
repararla.
PRECAUCIONES
Limpieza del producto
Limpie el producto periódicamente con un paño suave y seco. Para
limpiar las manchas más difíciles, humedezca el paño únicamente
con agua. Cualquier otro líquido puede disolver la pintura o
deteriorar el plástico.
UTILICE LA UNIDAD SOLAMENTE EN VEHÍCULOS QUE
TENGAN 12 VOLTIOS CON NEGATIVO A MASA.
(Consulte a su distribuidor en caso de duda.) De no ser así, podría
ocasionar un incendio, etc.
MANTENGA LOS OBJETOS PEQUEÑOS, COMO LAS PILAS,
FUERA DEL ALCANCE DE LOS NIÑOS.
La ingestión de estos objetos puede provocar lesiones graves. Si
esto ocurre, consulte con un médico inmediatamente.
UTILICE EL AMPERAJE CORRECTO CUANDO CAMBIE
FUSIBLES.
De lo contrario, puede producirse un incendio o una descarga
eléctrica.
NO OBSTRUYA LOS ORIFICIOS DE VENTILACIÓN O LOS
PANELES DEL RADIADOR.
Si los bloquea, el calor podría acumularse en el interior y producir
un incendio.
Temperatura
Cerciórese de que la temperatura del interior de vehículo esté entre
+60°C (+140°F) y (+14°F) –10°C antes de conectar la alimentación
de la unidad.
Condensación de humedad
Usted puede oír fluctuaciones en el sonido de reproducción de un
disco compacto debido a la condensación de humedad. Cuando
suceda esto, extraiga el disco del reproductor y espere
aproximadamente una hora hasta que se evapore la humedad.
Disco dañado
No intente reproducir discos rayados, deformados o dañados. La
reproducción de un disco en malas condiciones podría dañar el
mecanismo de reproducción.
Mantenimiento
Si tiene problemas, no intente reparar la unidad por sí mismo.
Devuélvala a su proveedor Alpine o a la estación de servicio Alpine
más cercana para que se la reparen.
3-ES
Page 57

No intente realizar nunca lo siguiente
No tome ni tire del disco mientras esté insertándose en el
reproductor mediante el mecanismo de carga automática.
No intente insertar un disco en el reproductor mientras la
alimentación del mismo esté desconectada.
Inserción de los discos
Su reproductor solamente aceptará un disco cada vez para
reproducción. No intente cargar más de un disco.
Cerciórese de que la cara de la etiqueta esté hacia arriba cuando
inserte el disco. Si inserta un disco incorrectamente, el reproductor
mostrará “ERROR”. Si “ERROR” continúa mostrándose aún
después de insertar el disco correctamente, presione el interruptor
RESET con un objeto puntiagudo, como un bolígrafo.
La reproducción de un disco al conducir por una carretera muy
accidentada puede resultar en salto del sonido, pero el disco no se
rayará ni se dañará el reproductor.
Discos nuevos
Para evitar el atasco del CD, aparece “ERROR” si se insertan
discos con superficies irregulares o no se insertan correctamente.
Cuando se expulse un disco nuevo inmediatamente después de la
carga inicial, utilice un dedo para comprobar los bordes del orificio
central y de la periferia. Si nota abultamientos o irregularidades, es
posible que el disco no pueda cargarse apropiadamente. Para
eliminar los abultamientos, frote el borde interior del orificio
central y de la periferia con un bolígrafo u otro objeto similar y, a
continuación, inserte de nuevo el disco.
Orificio central
Abultamientos
Orificio central
Disco nuevo
Borde exterior
(abultamientos)
Manejo correcto
No deje caer los discos mientras los maneje. Sujete los discos de
forma que no queden huellas dactilares en su superficie. No pegue
cintas, papeles, ni etiquetas engomadas en los discos. No escriba
sobre los discos.
CORRECTO
INCORRECTO CORRECTO
Limpieza de los discos
Las huellas dactilares, el polvo, o la suciedad de la superficie de los
discos podría hacer que el reproductor saltase sus pistas. Para la
limpieza rutinaria, frote la superficie de reproducción con un paño
suave y limpio del centro hacia los bordes. Si la superficie está muy
manchada, humedezca un paño suave y limpio en una solución de
detergente neutro y frote el disco.
Accesorios para discos
Existen varios accesorios disponibles en el mercado para proteger
la superficie de los discos y mejorar la cualidad acústica. Sin
embargo, la mayoría de ellos influirá en el grosor y/o el diámetro de
dichos discos. La utilización de tales accesorios podría cambiar las
especificaciones estándar de los discos y provocar problemas
operacionales. No se recomienda utilizar estos accesorios con
discos reproducidos en reproductores de discos compactos Alpine.
Discos de forma irregular
Asegúrese de utilizar solamente discos de forma redonda en esta
unidad y nunca utilice ningún otro disco de forma especial.
El uso de discos de forma especial podrá causar daños al
mecanismo.
Ubicación de instalación
Cerciórese de no instalar el CDE-9852 en un lugar sometido a:
• La luz solar directa ni el calor
• Gran humedad y agua
• Polvo excesivo
• Vibraciones excesivas
4-ES
Hoja transparente Estabilizador del disco
Page 58

Manejo de discos compactos (CD/CD-R/CD-RW)
• No toque la superficie.
• No exponga el disco a la luz solar directa.
• No adhiera etiquetas ni adhesivos.
• Limpie el disco cuando tenga polvo.
• Asegúrese de que no existen abultamientos en los bordes del
disco.
• No utilice accesorios para discos disponibles en el mercado.
No deje el disco en el automóvil o en la unidad durante mucho
tiempo. No exponga nunca el disco a la luz solar directa. El
calor y la humedad pueden dañar el CD y puede que no sea posible
reproducirlo de nuevo.
Para clientes que utilizan CD-R/CD-RW
• Si no se puede reproducir un CD-R/CD-RW, asegúrese de que la
última sesión de grabación se cerró (finalizó).
• Finalice el CD-R/CD-RW si es necesario y vuelve a intentar
reproducirlo.
Acerca de los medios que se pueden reproducir.
Utilice únicamente discos compactos cuya cara de la etiqueta
muestre debajo las marcas del logotipo del CD.
mediante Internet, intranets y/u otras redes o mediante otros
sistemas de distribución de contenido electrónico, como
aplicaciones de audio de pago o a petición. Es necesaria una
licencia independiente para dicho uso. Si desea obtener más
información visite http://www.mp3licensing.com.”
Si utiliza discos compactos sin especificar, no es posible garantizar
un funcionamiento correcto.
Puede reproducir discos CD-R (CD-Recordable) y CD-RW (CDReWritable) que se hayan grabado únicamente en dispositivos de
audio.
También es posible reproducir discos CD-R/CD-RW que contengan
archivos de audio de formato MP3/WMA.
• Algunos de los siguientes discos pueden no reproducirse en esta
unidad:
CDs defectuosos, CDs con huellas dactilares, CDs expuestos a la
luz del sol o a temperaturas extremas (por ejemplo, discos que se
hayan dejado dentro del coche o dentro de la unidad), CDs
grabados en condiciones inestables, CDs con errores de
grabación o en los que se haya intentado regrabar, CDs
protegidos contra copia que no se ajusten a los estándares de CD
audio.
• Utilice discos con archivos MP3/WMA cuyo formato sea
compatible con esta unidad. Para obtener más información,
consulte la página 10-11.
• Los datos ROM contenidos en un disco que no sean archivos de
audio no producirán sonido al ser reproducidos.
• Windows Media y el logotipo Windows son marcas comerciales
o marcas registradas de Microsoft Corporation en los Estados
Unidos de América y/u otros países.
• Apple, el logotipo de Apple y iPod son marcas comerciales de
Apple Computer, Inc., registradas en EE. UU. y en otros países.
• “Tecnología de codificación de audio MPEG Layer-3 con
licencia de Fraunhofer llS y Thomson.”
• “El suministro de este producto sólo cubre la licencia para uso
privado y no comercial, y no implica una licencia ni ningún
derecho de uso de este producto en ninguna difusión comercial
(es decir, que genere ingresos) en tiempo real (terrestre, por
satélite, por cable y/u otros medios), la difusión/reproducción
5-ES
Page 59

Primeros pasos
Para cerrar el panel frontal, presione la parte izquierda hasta
que se bloquee tal y como se muestra en el dibujo de arriba.
(OPEN)
SOURCE/
POWER
MUTE
MODE TITLE
Codificador rotatorio
Conexión y desconexión de la
alimentación
Pulse SOURCE/POWER para encender la unidad.
• Es posible encender la unidad presionando cualquier otro botón,
excepto TITLE, el codificador rotatorio y (OPEN).
Mantenga pulsado SOURCE/POWER durante, al
menos, 2 segundos para apagar la unidad.
• La primera vez que se activa la alimentación, el volumen comienza
desde el nivel 12.
Extracción y fijación del panel frontal
3
Sujete el panel frontal firmemente, deslícelo hacia la
izquierda y, a continuación, tire para extraerlo.
• El panel frontal podrá calentarse durante el uso normal
(especialmente los terminales del conector del panel frontal.) Esto no
implica un mal funcionamiento.
• Para proteger el panel frontal, métalo en la caja de transporte
suministrada.
• Cuando extraiga el panel frontal, no lo fuerce, ya que podría
provocar un mal funcionamiento.
• No deje el panel frontal abierto ni conduzca con él abierto, ya que
podría provocar un accidente o un mal funcionamiento.
Fijación
1
Inserte la parte derecha del panel frontal en la
unidad principal. Alinee la ranura del panel frontal
con los salientes de la unidad principal.
2
Empuje la parte izquierda del panel frontal hasta que
se bloquee firmemente en la unidad principal.
Pulse el codificador rotatorio del interior de la unidad antes de abrir el
panel frontal de modo que este último se abra completamente. De lo
contrario, se podría dañar.
Pulse el codificador
rotatio hacia dentro
Cuando pulse el codificador rotatorio de nuevo, volverá a salir hacia
fuera.
El codificador rotatorio
sale hacia fuera
Extracción
1
Desconecte la fuente de alimentación de la unidad.
2
Pulse (OPEN) para abrir el panel frontal.
• Antes de fijar el panel frontal, cerciórese de que no haya suciedad ni
polvo en los terminales del conector, y de que no existan objetos
extraños entre el panel frontal y la unidad principal.
• Fije el panel frontal con cuidado, sujetándolo por los lados para
evitar pulsar cualquier botón por equivocación.
Puesta en funcionamiento inicial del
sistema
Asegúrese de presionar el interruptor RESET cuando utilice la unidad
por primera vez, después de cambiar la batería del coche, etc.
1
Desconecte la fuente de alimentación de la unidad.
2
Pulse (OPEN) para abrir el panel frontal y, a
continuación, extráigalo.
3
Pulse RESET con un bolígrafo u otro objeto
puntiagudo.
6-ES
Interruptor RESET
Page 60

Ajuste del volumen
Gire el codificador rotatorio hasta obtener el sonido
deseado.
Reducción rápida del volumen
Si activa la función de silenciamiento del audio, el nivel del volumen se
reducirá de forma instantánea en 20 dB.
Pulse MUTE para activar el modo MUTE
(silenciamiento).
El nivel del audio se reducirá en unos 20 dB.
Si pulsa MUTE de nuevo, el audio volverá a su nivel
anterior.
Radio
Codificador
rotatorio
MODE
SOURCE/POWER
BAND
A.ME
TUNE
Botones de
memorización (del 1 al 6)
Ajuste de la hora
1
Pulse TITLE varias veces hasta que aparezca la
hora.
Para obtener información detallada, consulte “Visualización
del texto” (página 13).
2
Mantenga pulsado TITLE durante, al menos, 2
segundos mientras se muestra la hora.
El indicador de la hora parpadeará.
3
Gire el codificador rotatorio para ajustar la hora
mientras el indicador de la hora parpadea.
4
Una vez ajustada la hora, pulse MODE.
5
Gire el codificador rotatorio para ajustar los
minutos mientras el indicador de la hora parpadea.
La hora se ajusta de forma automática 5 segundos después
del ajuste de los minutos. También puede ajustar la hora de
forma manual pulsando TITLE.
• Para sincronizar el reloj con otro reloj o anuncio horario de la radio,
mantenga pulsado MODE durante, al menos, 2 segundos después de
ajustar la “hora”. Los minutos se restablecerán a “00”. Si la
pantalla muestra un número de minutos superior a “30” cuando lo
haga, el reloj avanzará una hora.
• Controlable desde el mando a distancia
Es posible controlar esta unidad desde un mando a distancia
opcional de Alpine. Para obtener más información, póngase en
contacto con su distribuidor Alpine.
• Apunte el transmisor del mando a distancia opcional hacia el
sensor.
Sensor del mando a distancia
Funcionamiento de la radio
1
Pulse SOURCE/POWER hasta que en el
visualizador aparezca una frecuencia de radio.
2
Pulse repetidamente BAND hasta que se visualice la
banda deseada.
F1 (FM1) F2 (FM2) AM F1 (FM1)
3
Pulse TUNE para seleccionar el modo de
sintonización.
DX SEEK (modo distancia) SEEK (modo local)
OFF (modo manual) DX SEEK
• El modo inicial es modo distancia.
Modo distancia:
Se sintonizarán automáticamente las emisoras de señal intensa
y débil (Sintonización con búsqueda automática).
Modo local:
Sólo se sintonizarán automáticamente las emisoras de señal
intensa (Sintonización con búsqueda automática).
Modo manual:
La frecuencia se sintoniza de forma manual en varios pasos
(Sintonización manual).
4
Pulse o para sintonizar la emisora
deseada.
Si mantiene pulsado o la frecuencia cambiará
continuamente.
Almacenamiento manual de emisoras
1
Seleccione la banda y sintonice la emisora que
desee almacenar en la memoria.
2
Mantenga pulsado, durante al menos 2 segundos,
uno de los botones de memorización (1 a 6) en
el que desee almacenar la emisora.
La emisora seleccionada se guarda.
El visualizador mostrará la banda, el número de
memorización y la emisora almacenada.
7-ES
Page 61

• Es posible memorizar hasta un total de 18 emisoras en los números
de memorización (6 emisoras por cada banda; FM1, FM2 y AM).
• Si almacena una emisora en un número de memorización que ya
contiene otra emisora, la emisora anterior será reemplazada por la
nueva.
Almacenamiento automático de
emisoras
1
Pulse repetidamente BAND hasta que se visualice la
banda deseada.
2
Mantenga pulsado A.ME durante, al menos, 2
segundos.
Durante el proceso de almacenamiento automático, la
frecuencia del visualizador cambiará continuamente. El
sintonizador buscará y almacenará automáticamente 6
emisoras de señal intensa en la banda seleccionada. Se
almacenarán en los botones 1 al 6 según el orden de
intensidad de la señal.
Cuando finalice el almacenamiento automático, el
sintonizador volverá a la emisora almacenada en la
ubicación de memorización 1.
• Si no hay emisoras almacenadas, el sintonizador volverá a la
emisora original que estaba escuchando antes de haber iniciado el
procedimiento de almacenamiento automático.
CD/MP3/WMA
(OPEN)
Codificador
rotatorio
MODE
Reproducción
1
Pulse (OPEN).
Se abrirá el panel frontal.
2
Inserte un disco con la etiqueta hacia arriba.
El reproductor introducirá el disco dentro de la unidad
automáticamente.
SOURCE/POWER
/
A.ME
4
5
TITLE
Sintonía de emisoras memorizadas
1
Pulse repetidamente BAND hasta que se visualice la
banda deseada.
2
Pulse cualquiera de los botones de
memorización (1 a 6) de emisoras que contenga
en memoria la estación de radio que desea.
El visualizador mostrará la banda, el número de
predefinidos y la frecuencia de la emisora seleccionada.
Función de búsqueda de frecuencia
Puede buscar una emisora de radio por su frecuencia.
1
Mantenga pulsado durante, al menos, 2
segundos, en modo Radio para activar el modo de
Búsqueda de frecuencia.
2
Gire el codificador rotatorio para seleccionar la
frecuencia que desee.
3
Pulse MODE para recibir la frecuencia
seleccionada.
• Si mantiene pulsado durante, al menos, 2 segundos, se cancelará
el modo de búsqueda en modo de Búsqueda de frecuencia. El modo
de búsqueda también se cancela cuando no se ha realizado ninguna
operación durante 10 segundos.
Cierre el panel frontal de forma manual.
Una vez insertado el disco, pulse SOURCE/POWER para
cambiar al modo CD.
Cada vez que pulse el botón cambiará el modo.
TUNER DISC IPOD* TUNER
* Únicamente cuando el iPod está conectado.
3
Cuando esté reproduciendo MP3/WMA, pulse o
para seleccionar la carpeta que desee.
Manteniendo pulsado o se cambiarán las carpetas de
forma continua.
4
Pulse o para seleccionar la pista (o
archivo) deseada.
Para volver al principio de la pista (o archivo) actual:
Pulse .
Retroceso rápido:
Mantenga pulsado .
Para avanzar hasta el principio de la pista (o archivo) siguiente:
Pulse .
Avance rápido:
Mantenga pulsado .
5
Para hacer una pausa en la reproducción, pulse
/.
Si vuelve a pulsar / volverá a activarse la
reproducción.
8-ES
Page 62

6
Una vez pulsado (OPEN) para abrir el panel
frontal, pulse para expulsar el disco.
• No extraiga un CD durante su ciclo de expulsión. No cargue más de
un disco a la vez. Cualquiera de estas operaciones pueden provocar
un mal funcionamiento.
• Si el CD no se expulsa, mantenga presionado durante, al menos,
2 segundos.
• El reproductor de CD puede reproducir discos con datos de audio,
MP3 y WMA.
• Los archivos en formato WMA protegidos por DRM (Digital Rights
Management, función de protección de derechos de propiedad
intelectual) no se pueden reproducir en esta unidad.
• El visualizador de pistas en la reproducción de datos MP3/WMA
muestra el número de archivos grabados en el disco.
• El tiempo de reproducción puede no mostrarse correctamente
cuando se reproduce un archivo grabado en VBR (velocidad variable
de bits).
Visualización de reproducción de MP3/WMA
El número de carpeta y el de archivo se mostrarán como se
describe a continuación.
F01 T03 10'15
M.I.X. (Reproducción aleatoria)
Pulse 5 en el modo de reproducción o pausa.
Las pistas (o archivos) del disco se reproducirán en secuencia
aleatoria.
Para cancelar la reproducción M.I.X., pulse 5 de nuevo.
Modo de disco compacto (CD):
: Las pistas se reproducen en secuencia aleatoria.
Modo MP3/WMA:
: Sólo se reproducen en secuencia aleatoria los
archivos incluidos en una carpeta.
: Los archivos se reproducen en secuencia
aleatoria.
Visualización del
número de carpeta
• Pulse TITLE para cambiar la visualización. Consulte
“Visualización de texto” (página 13) para obtener información
acerca del cambio de visualización.
• Si el número de carpeta o archivo es de tres dígitos, “F” o “T” no se
mostrarán.
Visualización del
número de archivo
Tiempo
transcurrido
Modo de repetición
Pulse 4 para reproducir de forma repetida la pista
que esté reproduciéndose.
La pista (o el archivo) se reproducirá de forma repetida.
Pulse 4 de nuevo y seleccione OFF para desactivar el
modo de repetición.
Modo de disco compacto (CD):
: Sólo se reproduce varias veces una pista.
Modo MP3/WMA:
: Sólo se reproduce varias veces un archivo.
Búsqueda en texto de CD
Las pistas se pueden buscar y reproducir usando el texto de CD en el
disco. En el caso de discos que no admitan texto, las búsquedas se
pueden realizar usando los números de pista.
1
Pulse durante la reproducción.
De esta forma, se activará el modo de búsqueda.
2
Gire el codificador rotatorio para seleccionar la
pista que desee y, a continuación, pulse MODE.
Se reproducirá la pista seleccionada.
• Mantenga pulsado durante, al menos, 2 segundos en el modo de
búsqueda para cancelar. El modo de búsqueda también se cancela
cuando no se ha realizado ninguna operación durante 10 segundos.
• Cuando se está reproduciendo en modo M.I.X. no se pueden realizar
búsquedas de texto de CD.
: Sólo se reproducen varias veces los archivos
incluidos en una carpeta.
9-ES
Page 63

Búsqueda de nombre de archivo/carpeta
(relativo a MP3/WMA)
Puede realizar búsquedas y mostrar el nombre de la carpeta y del
archivo que se está reproduciendo actualmente.
1
Durante la preproducción de MP3/WMA, pulse
para activar el modo de búsqueda.
2
Gire el codificador rotatorio para seleccionar el
modo de búsqueda de nombre de carpeta o de
archivo y, a continuación, pulse .
Modo de búsqueda de nombres de carpetas
3
Gire el codificador rotatorio para seleccionar la
carpeta que desee.
4
Pulse / para reproducir el primer archivo de la
carpeta seleccionada.
• Mantenga pulsado durante, al menos, 2 segundos en el modo de
búsqueda para cancelar. El modo de búsqueda también se cancela
cuando no se ha realizado ninguna operación durante 10 segundos.
• Mientras esté en modo de búsqueda de nombres de carpetas, pulse
para cambiar al modo de búsqueda de nombres de archivos.
• Mientras esté en modo de búsqueda de nombres de carpetas, pulse
A.ME para volver al modo de búsqueda de selección.
• Si un disco sólo contiene la carpeta raíz, no se puede realizar la
búsqueda de nombres de carpetas.
• Si la carpeta seleccionada por el modo de búsqueda de nombres de
carpetas no contiene archivos, aparece “NO FILE” (Sin archivos)
durante 2 segundos.
• Se muestra “ROOT” para las carpetas raíz que no tengan nombre de
carpeta.
• Cuando se está reproduciendo en modo M.I.X. no se pueden realizar
búsquedas de nombres de carpetas.
Modo de búsqueda de nombres de archivos
3
Pulse o para seleccionar otra carpeta.
4
Seleccione el archivo que desee girando el
codificador rotatorio.
5
Pulse MODE para reproducir el archivo
seleccionado.
• Mantenga pulsado durante, al menos, 2 segundos en el modo de
búsqueda para cancelar. El modo de búsqueda también se cancela
cuando no se ha realizado ninguna operación durante 10 segundos.
• Si pulsa A.ME, volverá al modo anterior.
• Cuando se está reproduciendo en modo M.I.X. no se pueden realizar
búsquedas de nombres de archivos.
Búsqueda rápida
Es posible buscar pistas (o archivos).
1
Mantenga pulsado durante, al menos, 2 segundos
en el modo CD/MP3/WMA para activar el modo de
búsqueda rápida.
2
Gire el codificador rotatorio para seleccionar la
pista (o archivo) que desee.
Se reproducirá inmediatamente la pista que ha
seleccionado.
• Mantenga pulsado durante, al menos, 2 segundos en el modo de
búsqueda para cancelar. El modo de búsqueda también se cancela
cuando no se ha realizado ninguna operación durante 10 segundos.
Acerca de MP3/WMA
PRECAUCIÓN
Excepto para uso personal, la duplicación de datos de audio
(incluidos datos MP3/WMA) o su distribución, transferencia o
copia, ya sea de forma gratuita o no, sin el permiso del
propietario de copyright están estrictamente prohibidos por las
leyes de copyright y por tratados internacionales.
¿Qué es MP3?
MP3, cuyo nombre oficial es “MPEG-1 Audio Layer 3”, es un
estándar de compresión formulado por ISO (International
Standardization Organization) y MPEG, que es una institución
conjunta de actividades de IEC.
Los archivos MP3 contienen datos de audio comprimidos. La
codificación MP3 puede comprimir los datos de audio a
relaciones notablemente altas comprimiendo archivos de
música a un décimo de su tamaño original. Esto se obtiene
mientras se mantiene una calidad similar a la de CD. El formato
MP3 permite obtener relaciones de alta compresión eliminando
los sonidos que son inaudibles para el oído humano o
enmascarados por otros sonidos.
¿Qué es WMA?
WMA, o “Windows Media™ Audio”, son las siglas para datos de
audio comprimidos.
El formato WMA es similar a los datos de audio MP3 y puede
conseguir la calidad de sonido de un CD en archivos de tamaño
reducido.
Método de creación de archivos MP3/WMA
Los datos de audio MP3/WMA se comprimen mediante el
software especificado. Para obtener información detallada
sobre la creación de archivos MP3/WMA, consulte el manual del
usuario del software.
Los archivos MP3/WMA que pueden reproducirse mediante
este dispositivo tienen la extensión “mp3” / “wma”. Los archivos
sin extensión no podrán reproducirse. (las versiones 7.1 y 8 de
WMA son compatibles)
10-ES
Índices de muestreo y velocidades de bits de reproducción
admitidos
MP3
Índices de muestreo:48 kHz, 44,1 kHz, 32 kHz, 24 kHz,
22,05 kHz, 16 kHz, 12 kHz,
11,025 kHz, 8 kHz
Velocidades de bits: 8 - 320 kbps
Page 64

WMA
Índices de muestreo:48 kHz, 44,1 kHz, 32 kHz
Velocidades de bits: 48 - 192 kbps
Tenga en cuenta que para los índices de muestreo, la
visualización de fotogramas de este dispositivo (página 13)
puede no mostrarse correctamente.
Es posible que este dispositivo no se reproduzca correctamente
según el índice de muestreo.
Etiquetas ID3/etiquetas WMA
Este dispositivo admite las versiones 1 y 2 de la etiqueta ID3 y la
etiqueta WMA.
Si los datos de etiqueta ID3/etiquetas WMA se encuentran en un
archivo MP3/WMA, este dispositivo podrá mostrar los datos de
etiqueta ID3/etiqueta WMA de título (título de pista), de nombre
de artista y de nombre de álbum.
Este dispositivo sólo puede mostrar caracteres alfanuméricos
de un solo byte (hasta 30 para etiquetas ID3 y hasta 15 para
etiquetas WMA) y el subrayado. Con caracteres no admitidos,
aparece “NO SUPPORT”.
La información de etiqueta puede que no se visualice
correctamente, en función del contenido.
Carpeta raíz
Producción de discos MP3/WMA
Los archivos MP3/WMA se preparan y, a continuación, se
escriben en un CD-R o CD-RW mediante un software de
escritura de CD-R. Un disco puede contener hasta 510
archivos/carpetas (incluidas las carpetas raíz). Sin embargo, el
número máximo de carpetas es 255.
Medios admitidos
Los medios que puede reproducir este dispositivo son discos
CD-ROM, CD-R y CD-RW.
Sistemas de archivo correspondientes
Este dispositivo admite discos formateados con ISO9660 nivel 1
ó 2.
En el estándar ISO9660, deben tenerse en cuenta ciertas
restricciones.
La profundidad máxima de carpeta es 8 (incluido el directorio
raíz). El número de caracteres de los nombres de carpeta/
archivo es limitado.
Los caracteres válidos para nombres de carpeta/archivo son
letras A-Z (mayúsculas), números 0-9 y ‘_’ (subrayado).
Este dispositivo también puede reproducir discos en estándar
Joliet, Romeo, etc., y otros que cumplan con ISO9660. No
obstante, ocasionalmente los nombres de archivo, carpeta, etc.
no se muestran correctamente.
Formatos admitidos
Este dispositivo admite CD-ROM XA, discos compactos de
modo mixto, mejorados (CD-Extra) y multisesión.
Este dispositivo no puede reproducir correctamente discos
grabados con “Track At Once” o escritura de paquete.
Orden de las pistas
La unidad reproduce los archivos en el orden en que los escribe
el software de escritura. Por lo tanto, es posible que el orden de
reproducción no sea el mismo que el orden de entrada. El orden
de reproducción de las carpetas y archivos es el siguiente. Sin
embargo, el orden de reproducción de carpetas y archivos
difiere del número de carpeta y de archivo que aparece en el
visualizador.
Carpeta Archivo MP3/WMA
Terminología
Velocidad de bits
Se trata de la velocidad de compresión de “sonido” especificada
para la codificación. Cuanto mayor sea la velocidad de bits, mayor
será la calidad de sonido, aunque los archivos serán más grandes.
Índice de muestreo
Este valor muestra las veces que los datos se muestrean (graban) por
segundo. Por ejemplo, los discos compactos de música utilizan un
índice de muestreo de 44,1 kHz, por lo que el nivel de sonido se
muestrea (graba) 44.100 veces por segundo. Cuanto mayor sea el
índice de muestreo, mayor será la calidad de sonido, aunque el
volumen de datos también será mayor.
Codificación
Conversión de discos compactos de música, archivos WAVE (AIFF) y
demás archivos de sonido en el formato de compresión de audio
especificado.
Etiqueta
Información sobre las canciones como los títulos, nombres de los
artistas, nombres de los álbumes, etc., escrita en archivos MP3/
WMA.
MP3: etiqueta ID3
WMA: etiqueta WMA
Carpeta raíz
La carpeta raíz se halla en el nivel superior del sistema de archivos.
La carpeta raíz contiene todas las carpetas y archivos.
11-ES
Page 65

Ajuste de sonido
SOURCE/POWER
Codificador
rotatorio
MODE
BAND
MENU
Ajuste de la frecuencia central de los
graves
3
-1 Pulse SOURCE/POWER para seleccionar la
frecuencia central de los graves que desee.
80Hz 100Hz 120Hz 60Hz 80Hz
Potencia los márgenes de frecuencias de graves
mostradas.
Ajuste del ancho de banda de graves
3
-2 Pulse BAND para seleccionar el ancho de banda de
graves deseado.
Ajuste de graves/agudos/balance (entre
los altavoces derechos e izquierdos)/
Fader (entre los altavoces delanteros y
traseros)/Defeat
1
Pulse MODE varias veces para elegir el modo que
desee.
Cada vez que presione se cambia el modo, como se indica
a continuación:
BASS TREBLE SUBW* BALANCE FADER
DEFEAT VOLUME BASS
Nivel de graves: –7 ~ +10
Nivel de agudos: –7 ~ +7
Subwoofer: 0 ~ +15
Balance: L15 ~ R15
Silenciador: R15 ~ F15
Defeat: ON/OFF
Volumen: 0 ~ 35
• Si no pulsa MODE dentro de los 5 segundos después de seleccionar
el modo BASS, TREBLE, BALANCE, FADER, DEFEAT o SUBW, la
unidad volverá automáticamente al modo normal.
* Cuando el modo Subwoofer está ajustado en OFF, no es posible
ajustar su nivel.
2
Gire el codificador rotatorio hasta obtener el
sonido deseado en cada modo.
Si ajusta el modo Defeat en ON, la configuración previa de
el modo BASS y TREBLE volverá a la configuración de
fábrica.
Ajuste del control de graves
Cambia el ancho de banda de graves a ancho o estrecho.
Un ajuste de ancho potenciará una amplia gama de
frecuencias superiores e inferiores a la frecuencia central.
Un ajuste de estrecho potenciará sólo las frecuencias
cercanas a la frecuencia central.
Ajuste del nivel de graves
3
-3*1Gire el codificador rotatorio para seleccionar el
nivel de graves deseado (–7~+10).
Puede potenciar o reducir el nivel de los graves.
4
Pulse MENU para seleccionar RETURN.
Después de 2 segundos, la unidad vuelve al modo normal.
Si mantiene pulsado MENU durante, al menos, 2 segundos
volverá al modo normal.
• Si no presiona ningún botón en un espacio de 60 segundos, el ajuste
de control de graves se desactivará automáticamente.
• Los ajustes del nivel de graves se memorizarán individualmente para
cada fuente (FM, AM, CD, etc.) hasta que se cambie el ajuste. Una
vez ajustados los valores de la frecuencia de graves y el ancho de
banda de graves para una fuente, éstos se utilizarán para todas las
demás fuentes (FM, AM, CD, etc.).
• Esta función no puede utilizarse cuando DEFEAT está ajustado en
ON.
• Durante el modo de ajuste de graves, puede recuperar el modo de
ajuste TREBLE CONTROL si pulsa o .
*1 El ajuste también puede realizarse pulsando MODE. Consulte
“Ajuste de graves/agudos/balance (entre los altavoces derechos e
izquierdos)/Fader (entre los altavoces delanteros y traseros)/Defeat”
(página 12).
Visualización del indicador del nivel de graves
Normalmente, se muestra el nivel de graves
Puede cambiar el énfasis de la frecuencia de graves para crear el tono
que prefiera.
1
Pulse MENU para seleccionar el modo BASS
ENGINE y, a continuación, pulse MODE.
BASS ENGINE SETUP RETURN (OFF) BASS ENGINE
2
Pulse o para seleccionar el modo del
control de BASS (frecuencia central de los graves).
BASS TREBLE
12-ES
Page 66

Ajuste del control de agudos
Puede cambiar el énfasis de la frecuencia de agudos para crear el tono
que prefiera.
1
Pulse MENU para seleccionar el modo BASS
ENGINE y, a continuación, pulse MODE.
BASS ENGINE SETUP RETURN (OFF) BASS ENGINE
2
Pulse o para seleccionar el modo de
control TREBLE (frecuencia central de los agudos).
BASS TREBLE
Ajuste de la frecuencia central de los
agudos
3
-1 Pulse SOURCE/POWER para seleccionar la
frecuencia central de los agudos que desee.
10,0kHz 12,5kHz 15,0kHz 7,5kHz 10,0kHz
Potencia los márgenes de frecuencias de agudos
mostradas.
Ajuste del nivel de los agudos
3
-2*2Gire el codificador rotatorio para seleccionar el
nivel de agudos deseado (–7~+7).
Puede potenciar el nivel de los agudos.
4
Pulse MENU para seleccionar RETURN.
Después de 2 segundos, la unidad vuelve al modo normal.
Si mantiene pulsado MENU durante, al menos, 2 segundos
volverá al modo normal.
• Si no presiona ningún botón en un espacio de 60 segundos, el ajuste
de control de agudos se desactivará automáticamente.
• Los ajustes del nivel de agudos se memorizarán individualmente
para cada fuente (FM, AM, CD, etc.) hasta que se cambie el ajuste.
Una vez ajustados los valores de la frecuencia de agudos para una
fuente, éstos se utilizarán para todas las demás fuentes (FM, AM,
CD, etc.).
• Esta función no puede utilizarse cuando DEFEAT está ajustado en
ON.
• Durante el modo de ajuste de agudos, puede recuperar el modo de
ajuste BASS CONTROL si pulsa o .
*2 El ajuste también puede realizarse pulsando MODE. Consulte
“Ajuste de graves/agudos/balance (entre los altavoces derechos e
izquierdos)/Fader (entre los altavoces delanteros y traseros)/Defeat”
(página 12).
Activación/desactivación del efecto de
sonoridad
Otras funciones
TITLE
Visualización de texto
La información de texto, como el título de discos y canciones, aparecerá
al reproducir discos compactos compatibles con texto. También es
posible mostrar el nombre de la carpeta, del archivo y la etiqueta, etc.
mientras se reproducen archivos MP3/WMA.
Pulse TITLE.
El visualizador cambiará cada vez que presione el botón.
Visualizador en modo Radio:
FREQUENCIA CLOCK FREQUENCIA
Visualizador en modo de CD:
No.DE PISTA/TIEMPO TRANSCURRIDO
No.DE PISTA/HORA TEXTO (NOMBRE DEL DISCO)*
TEXTO (NOMBRE DE PISTA)*
No.DE PISTA/TIEMPO TRANSCURRIDO
Visualizador en modo MP3/WMA:
No.CARPETA/No.DE ARCHIVO/TIEMPO TRANSCURRIDO
No.CARPETA/No.DE ARCHIVO/HORA
NOMBRE DE CARPETA*
NOMBRE DE ARTISTA*
NOMBRE DE PISTA*
No.CARPETA/No.DE ARCHIVO/TIEMPO TRANSCURRIDO
*1Se muestra durante la reproducción de un disco con texto CD.
*2Etiqueta ID3/etiqueta WMA
Si un archivo MP3/WMA contiene información de etiqueta ID3 o de
etiqueta WMA, se mostrará toda la información de dichas etiquetas
(por ejemplo, el nombre de pista, de artista o de álbum). Los demás
datos se obviarán.
Si el ajuste de desplazamiento (página 15) se ha establecido en
“SCROLL AUTO,” la información de la etiqueta se desplaza de
forma automática por la pantalla.
*3“ROOT” se muestra para las carpetas que no tengan nombre de
carpeta.
*4Se muestra el índice de muestreo y la velocidad de bits de grabación
del archivo MP3/WMA. Un archivo WMA de velocidad de bits
variable muestra la velocidad de bits media.
1
3
NOMBRE DE ARCHIVO
2
NOMBRE DE ÁLBUM*2
2
FOTOGRAMA*4
1
La sonoridad introduce una acentuación especial de bajas y altas
frecuencias a bajos niveles de escucha. Esto compensa la sensibilidad
reducida del oído humano al sonido de graves y agudos.
Para activar o desactivar el modo de sonoridad,
mantenga pulsado MODE durante, al menos, 2
segundos.
Se ilumina el indicador “LD”.
13-ES
Page 67

Acerca del visualizador
Cuando aparezca el texto, se iluminarán los indicadores
siguientes en función del modo.
La posición de la canción que se está reproduciendo se
muestra iluminada en el número total de canciones
mostradas. El ejemplo de visualización es tal y como se
muestra a continuación. También se ilumina cuando se
realiza una operación, como el avance rápido, etc.
Se ilumina cuando se inserta un disco
Ejemplo de visualización de la posición de una canción
<Primera mitad> <Parte intermedia> <Segunda mitad>
• Por ejemplo, al reproducir la canción la canción número cinco de
diez, aparece en pantalla “ ”.
Indicador/
Modo
Modo CD Modo MP3/WMA Modo iPod
Nombre de
2
––
carpeta*
se muestra
que
––
Acerca de “Texto”
Texto :
Los CDs compatibles con texto contienen texto informativo tal
como el nombre del disco y nombre de las pistas. Este texto
informativo se denomina “texto”.
• Dependiendo del tipo de caracteres, algunos caracteres podrán no
visualizarse correctamente con este aparato.
• Si el ajuste de desplazamiento (página 15) está establecido en
“SCROLL MANU,” mantenga pulsado TITLE durante, al menos, 2
segundos para que el texto informativo sólo se desplace una vez por
la pantalla (modo TEXT DISPLAY, FOLDER NAME DISPLAY, FILE
NAME DISPLAY o TAG DISPLAY).
• “NO SUPPORT” se muestra cuando el texto informativo solicitado
no se puede mostrar en esta unidad.
• La información de texto o de etiqueta puede que no se visualice
correctamente, en función del contenido.
Visualización de la hora
Pulse TITLE varias veces hasta que aparezca la hora.
Cada vez que pulse el botón, la pantalla cambiará.
Para obtener más información, consulte “Visualización de texto”
(página 13).
• Si selecciona cualquier función de sintonización o CD durante el
modo de prioridad de bloqueo, la visualización de la hora se
interrumpirá momentáneamente. La función seleccionada se
mostrará durante unos 5 segundos antes de que la hora vuelva a
mostrarse en la pantalla.
• Cuando la alimentación esté desconectada pero la llave de contacto
esté en la posición ON, pulse TITLE para ver la hora.
––
––
Texto (nombre
de disco*3) que
se muestra
Texto (nombre
de pista*3) que
se muestra
*1Información de etiqueta
Si no existe información de etiqueta, aparece “ARTIST”/“ALBUM”/
“SONG”.
*2Si no existe nombre de carpeta o de archivo, aparece “FOLDER”/
“FILE”.
*3Si no existe texto (Nombre de disco o de pista), aparece
“DISC TEXT”/“TRACK TEXT”.
Nombre de
archivo*2 que se
muestra
Nombre de
artista*1 que se
muestra
Nombre de
álbum*1 que se
muestra
Nombre de
pista*1 que se
muestra
––
Nombre de
artista*1 que se
muestra
Nombre de
álbum*1 que se
muestra
Nombre de
pista*1 que se
muestra
14-ES
Page 68

SETUP
Puede personalizar con flexibilidad la unidad para que se ajuste a sus
propias preferencias de utilización. En la personalización de sonido, en
la personalización visual, etc., vaya al menú SETUP para seleccionar la
configuración que desee.
MENUCodificador rotatorio
MODE
Ajuste del sistema de subwoofer
SUBW SYS1 (Ajuste inicial) / SUBW SYS2
Seleccione SYS1 o SYS2 para conseguir el efecto de subwoofer
deseado.
SUBW SYS1: El efecto de subwoofer depende del ajuste
principal de volumen.
SUBW SYS2: El efecto de subwoofer es independiente del
ajuste principal de volumen. Por ejemplo, incluso
si el volumen está bajo, el subwoofer seguirá
surtiendo efecto.
Personalización visual
Control de atenuación
DIMMER AUTO (Ajuste inicial) / DIMMER MANU
Establezca el control DIMMER en AUTO para atenuar el brillo de la
unidad con las luces del coche encendidas. Este modo resulta útil si cree
que, tras ajustar el nivel de oscurecimiento de la unidad, aún brilla
demasiado por la noche.
El funcionamiento normal de SETUP se describe en
los pasos 1 al 4, tal y como se muestra a
continuación. A continuación encontrará más
información sobre cada menú de SETUP.
1
Pulse MENU para seleccionar el modo SETUP y, a
continuación, pulse MODE.
BASS ENGINE SETUP RETURN (OFF) BASS ENGINE
2
Pulse o para seleccionar el menú SETUP
que desee y, a continuación, pulse MODE.
(por ejemplo, seleccione SUBWOOFER)
DIMMER SUBWOOFER (SUBW SYSTEM)*
PLAY MODE SCROLL TYPE TEXT SCROLL
POWER IC DEMO DIMMER
* Sólo se muestra si SUBW está ajustado en ON.
3
Gire el codificador rotatorio para cambiar la
configuración.
(por ejemplo, seleccione SUBW ON o SUBW OFF).
4
Pulse MENU para seleccionar RETURN.
Después de 2 segundos, la unidad vuelve al modo normal.
Si mantiene pulsado MENU durante, al menos, 2 segundos
volverá al modo normal.
Personalización de sonido
Activación y desactivación del subwoofer
SUBW ON (Ajuste inicial) / SUBW OFF
Cuando el subwoofer está activado, lleve a cabo los pasos que se
muestran más adelante para ajustar el nivel de salida del subwoofer.
1 En modo normal, pulse MODE varias veces para
seleccionar el modo SUBW.
BASS TREBLE SUBW BALANCE FADER
DEFEAT VOLUME BASS
2 Ajuste el nivel girando el codificador rotatorio.
Ajuste de tipo de desplazamiento
SCROLL TYPE1 / SCROLL TYPE2 (Ajuste inicial)
Es posible seleccionar entre dos métodos de desplazamiento.
Seleccione el tipo de desplazamiento que prefiera.
SCROLL TYPE1: Los caracteres se desplazan de forma
secuencial y aparecen desde la parte
derecha de la pantalla.
SCROLL TYPE2: Los caracteres se muestran uno por uno y
desaparecen uno por uno desde la parte
izquierda de la pantalla una vez que no
quepan más caracteres en ella.
Ajuste de desplazamiento (TEXT SCROLL)
SCROLL AUTO / SCROLL MANU (Ajuste inicial)
Este reproductor de CD puede desplazarse por los nombres de los discos
y de las pistas grabadas en discos CD-TEXT, así como por la
información de texto de archivos MP3/WMA, nombres de carpetas y
etiquetas.
SCROLL AUTO: La información de texto del CD, de los
nombres de carpetas y archivos y de las
etiquetas se desplaza automáticamente.
Además, la información de etiqueta se
desplaza automáticamente sin pulsar TITLE
en el modo de visualización de información de
etiqueta.
SCROLL MANU: El visualizador se desplaza cuando se carga
un disco, cuando cambia una pista, etc.
• La unidad desplaza los nombres del texto del CD, los nombres de las
carpetas, archivos y etiquetas.
Demostración
DEMO ON / DEMO OFF (Ajuste inicial)
Esta unidad cuenta con una función de demostración que incluye
visualización.
• Para salir del modo Demo, establezca DEMO OFF.
15-ES
Page 69

MP3/WMA
Reproducción de datos MP3/WMA (PLAY MODE)
CDDA (Ajuste inicial) / CDDA/MP3
Este producto puede reproducir discos compactos que contengan datos
de CD y MP3/WMA. Sin embargo, en algunos casos (ciertos discos
mejorados), la reproducción puede hacerse complicada. Para estos casos
especiales, puede seleccionar sólo la reproducción de datos de CD. Si
un disco contiene datos de CD y MP3/WMA, la reproducción
comenzará por la parte de datos de CD del disco.
CDDA: Únicamente es posible reproducir datos de CD.
CDDA/MP3: Es posible reproducir datos de CD y pistas MP3/
• Realice este ajuste antes de insertar un disco. Si ya lo ha insertado,
realice el ajuste después de extraer el disco.
WMA.
Dispositivo externo
Conexión a un amplificador externo
POWER IC ON (Ajuste inicial) / POWER IC OFF
Al conectar un amplificador externo, la calidad del sonido mejora al
desactivarse la fuente de alimentación del amplificador incorporado.
POWER IC OFF: Utilice este modo cuando el preamplificador
POWER IC ON: Los altavoces reciben la señal desde el
delantero de la unidad se utiliza para
alimentar a un amplificador externo
conectado a los altavoces. Con este ajuste, el
amplificador interno principal de la unidad no
enviará ninguna señal de salida a los
altavoces.
Delantero
Amplificador
amplificador incorporado.
izquierdo
Delantero
derecho
iPod™ (opcional)
Codificador
rotatorio
MODE
Se puede conectar un iPod™, un iPod™ mini o un iPod™ nano al
CDE-9852 utilizando un cable de conexión FULL SPEED™ registrado
por ALPINE (KCE-422i). Si el CDE-9852 está conectado mediante el
cable, los controles del iPod™ no están operativos.
Acerca de los iPods™ que se pueden utilizar con esta
unidad
La unidad se puede utilizar con los iPod™ photo, los iPod™ mini
o los iPod™ nano de tercera generación. Sin embargo, iPod™
Shuffle no se puede utilizar.
• Los iPod de rueda táctil o de rueda de desplazamiento sin el
conector de acople no se pueden conectar a la unidad.
• La unidad se puede utilizar con las siguientes versiones de
iPod. No se garantiza el correcto funcionamiento de
versiones anteriores.
iPod de tercera generación: versión 2.3
iPod de cuarta generación: versión 3.0.2
iPod photo: versión 1.0
iPod mini: versión 1.3
iPod nano: versión 1.0
•
La unidad no se puede utilizar con versiones de software
anteriores al 22 de febrero de 2005. Para obtener información
detallada acerca de la “actualización del software de iPod”,
consulte el manual de instrucciones de iPod.
SOURCE/POWER
/
A.ME
4
TITLE
6
5
Altavoces
ALTAVOZ
DERECHO DELANTERO
ALTAVOZ
POSTERIOR DERECHO
ALTAVOZ
POSTERIOR IZQUIERDO
ALTAVOZ
IZQUIERDO DELANTERO
• Cuando la salida está establecida en OFF, el sistema no produce ni
reproduce ningún sonido.
Delantero
derecho
Trasero
derecho
Trasero
izquierdo
Delantero
izquierdo
16-ES
Reproducción
1
Pulse SOURCE/POWER para cambiar al modo
iPod.
2
Pulse o para seleccionar la canción
deseada.
Para volver al principio de la canción actual:
Pulse .
Retroceso rápido:
Mantenga pulsado .
Para avanzar hasta el principio de la canción siguiente:
Pulse .
Avance rápido:
Mantenga pulsado .
3
Para hacer una pausa en la reproducción, pulse
/.
Si vuelve a pulsar / volverá a activarse la
reproducción.
Page 70

• Si se reproduce una canción en el iPod cuando está conectado al
modelo CDE-9852, la reproducción proseguirá tras la conexión.
Búsqueda de la canción deseada
Un iPod puede contener cientos de canciones. Si las organiza en listas
de reproducción, el CDE-9852 puede utilizarlas para facilitar la
búsqueda de canciones.
Búsqueda por una lista de reproducción
1
Pulse para activar el modo de selección de
búsqueda.
2
Gire el codificador rotatorio para seleccionar el
modo de búsqueda PLAYLIST y, a continuación,
pulse .
PLAYLIST ARTIST ALBUM SONG PLAYLIST
*1
3
Gire el codificador rotatorio para seleccionar la
lista de reproducción que desee.
4
Pulse / .
Se reproducirá la lista de reproducción seleccionada.
Para buscar una canción en la lista de reproducción
seleccionada
1 Una vez seleccionada la lista de reproducción en el paso
3*1, pulse para cambiar al modo de búsqueda de
canciones de la lista de reproducción seleccionada.
2Gire el codificador rotatorio para seleccionar una canción
y, a continuación, pulse MODE.
Se reproducirá la canción seleccionada.
• Mantenga pulsado durante, al menos, 2 segundos en el modo de
búsqueda para cancelar. El modo de búsqueda también se cancela
cuando no se ha realizado ninguna operación durante 10 segundos.
• Si pulsa A.ME en modo de búsqueda, volverá al modo anterior.
• Todas las canciones del iPod se reproducen seleccionando el “iPod
name” almacenado en el paso 3*1.
• Durante la reproducción en modo M.I.X no se pueden realizar
búsquedas por lista de reproducción.
• “NO SONG” aparecerá si no existen canciones en la lista de
reproducción seleccionada en el modo de búsqueda PLAYLIST.
Búsqueda por nombre de artista
1
Pulse para activar el modo de selección de
búsqueda.
2
Gire el codificador rotatorio para seleccionar el
modo de búsqueda ARTIST y, a continuación, pulse
.
PLAYLIST ARTIST ALBUM SONG PLAYLIST
*2
3
Gire el codificador rotatorio para seleccionar el
artista que desee.
4
Pulse / .
Se reproducen todas las canciones del artista
seleccionado.
Para buscar un álbum del artista seleccionado
1 Una vez seleccionado el artista en el paso 3*2, pulse
para cambiar al modo de búsqueda de álbumes del
artista seleccionado.
2*1Gire el codificador rotatorio para seleccionar un álbum.
3 Pulse / para reproducir todas las canciones del
álbum seleccionado.
Para buscar una canción en el álbum seleccionado
1 Una vez seleccionado el álbum en el paso 2*1, pulse
para cambiar al modo de búsqueda de canciones del
álbum seleccionado.
2Gire el codificador rotatorio para seleccionar una canción
y, a continuación, pulse MODE.
Se reproducirá la canción seleccionada.
• Mantenga pulsado durante, al menos, 2 segundos en el modo de
búsqueda para cancelar. El modo de búsqueda también se cancela
cuando no se ha realizado ninguna operación durante 10 segundos.
• Si pulsa A.ME en modo de búsqueda, volverá al modo anterior.
• Si selecciona ALL en el paso 3*2 y pulsa / , se reproducirán
todas las canciones del iPod. Si selecciona ALL y pulsa , se
activará el modo de búsqueda ALBUM para todos los artistas.
• Si selecciona ALL en el paso 2*1 y pulsa / , se reproducirán
todas las canciones del artista seleccionado. Si selecciona ALL y
pulsa , se activará el modo de búsqueda SONG para el artista
seleccionado.
• Durante la reproducción en modo M.I.X no se pueden realizar
búsquedas por nombre de artista.
Búsqueda por nombre de álbum
1
Pulse para activar el modo de selección de
búsqueda.
2
Gire el codificador rotatorio para seleccionar el
modo de búsqueda ALBUM y, a continuación, pulse
.
PLAYLIST ARTIST ALBUM SONG PLAYLIST
*3
3
Gire el codificador rotatorio para seleccionar el
álbum que desee.
4
Pulse / .
Se reproducen todas las canciones del álbum
seleccionado.
Para buscar una canción en el álbum seleccionado
1 Una vez seleccionado el álbum en el paso 3*3, pulse
para cambiar al modo de búsqueda de canciones del
álbum seleccionado.
2Gire el codificador rotatorio para seleccionar una canción
y, a continuación, pulse MODE.
Se reproducirá la canción seleccionada.
• Mantenga pulsado durante, al menos, 2 segundos en el modo de
búsqueda para cancelar. El modo de búsqueda también se cancela
cuando no se ha realizado ninguna operación durante 10 segundos.
• Si pulsa A.ME en modo de búsqueda, volverá al modo anterior.
• Si selecciona ALL en el paso 3*3 y pulsa / , se reproducirán
todas las canciones del iPod. Si selecciona ALL y pulsa , se
activará el modo de búsqueda SONG para todos los álbumes.
• Durante la reproducción en modo M.I.X no se pueden realizar
búsquedas por nombre de álbum.
17-ES
Page 71

Búsqueda por nombre de canción
1
Pulse para activar el modo de selección de
búsqueda.
2
Gire el codificador rotatorio para seleccionar el
modo de búsqueda SONG y, a continuación, pulse
.
PLAYLIST ARTIST ALBUM SONG PLAYLIST
3
Gire el codificador rotatorio para seleccionar la
canción que desee.
4
Pulse MODE.
Se reproducirá la canción seleccionada.
• Mantenga pulsado durante, al menos, 2 segundos en el modo de
búsqueda para cancelar. El modo de búsqueda también se cancela
cuando no se ha realizado ninguna operación durante 10 segundos.
• Si pulsa A.ME en modo de búsqueda, volverá al modo anterior.
• Durante la reproducción en modo M.I.X no se pueden realizar
búsquedas por nombre de canción.
Reproducción aleatoria (M.I.X.)
La función Reproducción aleatoria del iPod aparece como M.I.X. en el
CDE-9852.
Reproducir álbumes en forma aleatoria:
La reproducción aleatoria de álbumes reproduce todas las
canciones en orden y, a continuación, selecciona el siguiente
álbum de forma aleatoria. Todas las canciones de ese álbum se
reproducen en orden y así sucesivamente. Los álbumes se
reproducen una sola vez.
Reproducir canciones en forma aleatoria:
La reproducción aleatoria de canciones reproduce ciertas
canciones seleccionadas. Las canciones sólo se reproducen
una vez hasta que todas se han reproducido.
1
Pulse 5 .
Las canciones se reproducirán en secuencia aleatoria.
M.I.X. M.I.X. (off) M.I.X.
(Reproducir
álbumes en forma
aleatoria)
(Reproducir
canciones en
forma aleatoria)
Selección de lista de reproducción/
artista/álbum
Lista de reproducción, artista y álbum se pueden cambiar fácilmente.
Por ejemplo, si está escuchando la canción de un álbum seleccionado,
éste se puede cambiar.
1
Pulse o para seleccionar la lista de
reproducción/el artista/el álbum que desee.
• Si el modo de selección de búsqueda no está activado, sólo se
buscará la canción y esta operación no será posible.
• Si la última búsqueda se realizó por canción, la búsqueda se hará
por lista de reproducción o álbum.
• Esta operación no es posible durante la reproducción aleatoria
(M.I.X.).
Búsqueda rápida
Puede buscar canciones.
1
Mantenga pulsado durante, al menos, 2 segundos
para activar el modo de búsqueda rápida.
2
Gire el codificador rotatorio para seleccionar la
canción que desee.
Se reproducirá inmediatamente la canción que ha
seleccionado.
• Mantenga pulsado durante, al menos, 2 segundos en el modo de
búsqueda para cancelar. El modo de búsqueda también se cancela
cuando no se ha realizado ninguna operación durante 10 segundos.
• Si en el iPod hay muchas canciones, su búsqueda llevará un tiempo.
2
Para cancelar la reproducción M.I.X., seleccione (off)
con el mismo procedimiento que se describió antes.
• Para obtener información detallada acerca del modo de búsqueda,
consulte “Búsqueda de la canción deseada” (página 17).
• Si se ha seleccionado una canción en el modo de búsqueda por
álbum antes de seleccionar la reproducción aleatoria (M.I.X.), las
canciones no se reproducirán de forma aleatoria aunque se haya
seleccionado Reproducir álbum en forma aleatoria.
Reproducir todo de forma aleatoria:
La reproducción de todo de forma aleatoria reproduce todas las
canciones del iPod de forma aleatoria. Las canciones no se
vuelven a reproducir hasta que todas se han reproducido.
1
Pulse 6.
Las canciones se reproducirán en secuencia aleatoria.
M.I.X. (off) M.I.X.
(Reproducir
todo de forma
aleatoria)
2
Para cancelar la reproducción M.I.X., seleccione (off)
con el mismo procedimiento que se describió antes.
• Si Reproducir todo de forma aleatoria está seleccionado, se cancela
el modo de búsqueda actual.
Modo de repetición
Con el reproductor iPod sólo está disponible la función Repetir Una.
Repetir Una: Una sólo canción se reproducirá repetidamente.
1
Pulse 4.
El archivo se reproducirá en forma repetida.
RPT (off) RPT
(Repetir Una)
18-ES
Page 72

2
Para cancelar el modo de repetición, seleccione (off)
con el mismo procedimiento que se describió antes.
• Durante la reproducción en modo de repetición, no se podrán
seleccionar más canciones pulsando o .
Información
Visualización de texto
Puede visualizar la información de la etiqueta de una canción en el
reproductor iPod.
Pulse TITLE.
Cada vez que pulse el botón, la pantalla cambiará.
No.DE PISTA/TIEMPO TRANSCURRIDO
No.DE PISTA/HORA NOMBRE DE ARTISTA*
NOMBRE DE ÁLBUM* TITULO DE CANCION*
No.DE PISTA/TIEMPO TRANSCURRIDO
* Información de etiqueta
Si el ajuste de desplazamiento (página 15) se ha establecido en
“SCROLL AUTO,” la información de la etiqueta se desplaza de
forma automática por la pantalla.
Si no existe información de etiqueta, aparece “ARTIST”/“ALBUM”/
“SONG”.
• Cuando el ajuste de desplazamiento (página 15) esté establecido en
“SCROLL MANU,” mantenga pulsado TITLE durante, al menos, 2
segundos, para que la información de etiqueta sólo se desplace una
vez por la pantalla.
• Sólo se pueden mostrar caracteres alfanuméricos (ASCII).
• Si el nombre del artista, álbum o canción creados en iTunes tiene
demasiados caracteres, es posible que no se reproduzcan las
canciones cuando estén conectadas al adaptador. Por este motivo, se
recomienda un máximo de 250 caracteres. El número máximo de
caracteres para la unidad principal es de 128 (128 bytes).
• Es posible que algunos caracteres no se visualicen correctamente.
• “NO SUPPORT” se muestra si la información de texto no es
compatible con el CDE-9852.
En caso de dificultad
Si tiene algún problema, desactive y vuelva a activar la alimentación. Si
la unidad sigue sin funcionar correctamente, revise los elementos de la
siguiente lista de comprobación. Esta lista le ayudará a resolver los
problemas de su unidad. Si el problema persiste, compruebe si el resto
de su sistema está adecuadamente conectado o consulte a un proveedor
autorizado por Alpine.
Básica
La unidad no funciona ni hay visualización.
• La llave de encendido del automóvil está en OFF.
- Si ha realizado las conexiones de acuerdo con las
instrucciones, la unidad no funcionará con la llave de
encendido en OFF.
• Las conexiones del conductor de alimentación (rojo) y el
conductor de batería (amarillo) no son adecuadas.
- Compruebe las conexiones del conductor de alimentación y el
conductor de batería.
• Fusible quemado.
- Compruebe el fusible de la unidad. Si fuera necesario,
cámbielo por otro del valor apropiado.
• El microordenador interno funciona mal a causa de
interferencias, ruido, etc.
- Presione el interruptor RESET con un bolígrafo u otro objeto
puntiagudo.
Radio
Es imposible recibir emisoras.
• La antena no está conectada o el cable está desconectado.
- Asegúrese de que la antena está correctamente conectada;
cambie la antena o el cable si es necesario.
Es imposible sintonizar emisoras en el modo de
búsqueda.
• Usted se encuentra en un área de recepción débil.
- Compruebe si el sintonizador está en el modo DX.
• Si se encuentra en una zona de señal intensa, es posible que la
antena no esté puesta a tierra o conectada adecuadamente.
- Compruebe las conexiones de la antena, si está bien conectada
a tierra, y si la ubicación de montaje es correcta.
• Es posible que la longitud de la antena no sea adecuada.
- Compruebe si la antena está completamente desplegada. Si
está rota, reemplácela por otra nueva.
La recepción es ruidosa.
• Es posible que la longitud de la antena no sea adecuada.
- Extienda completamente la antena. Si está rota, reemplácela
por otra.
• La antena está mal conectada a tierra.
- Compruebe si la antena está bien conectada a tierra y si la
ubicación de montaje es correcta.
CD
El reproductor de CD no funciona.
• Se encuentra a más de +50°C de temperatura para CD.
- Deje que se enfríe la temperatura en el interior (o en el
maletero) del vehículo.
19-ES
Page 73

El sonido de reproducción de un CD oscila.
• Condensación de humedad en el módulo de CD.
- Espere el tiempo necesario para que se evapore la humedad
(aproximadamente 1 hora).
La inserción de un CD es imposible.
• Ya hay un CD en el reproductor de CD.
- Expulse el CD y retírelo.
• El CD no está correctamente insertado.
- Asegúrese de insertar el CD de acuerdo con las instrucciones
de la sección Funcionamiento del reproductor de CD.
El CD no avanza ni retrocede.
• El CD está dañado.
- Extraiga el CD y tírelo. La utilización de un CD dañado en su
unidad podría averiar el mecanismo.
El sonido salta debido a las vibraciones.
• Montaje inadecuado de la unidad.
- Vuelva a montar la unidad firmemente.
• El disco está muy sucio.
- Limpie el disco.
• El disco está rayado.
- Cambie el disco.
• La lente del transductor está sucia.
- No utilice un disco limpiador de lentes disponible en el
mercado. Consulte con su distribuidor de Alpine más cercano.
El sonido salta sin haber vibraciones.
• El disco está sucio o rayado.
- Limpie el disco. Los discos dañados deberán reemplazarse.
Aparece Error (sólo reproductor de CD integrado)
• Error mecánico
- Pulse . Una vez desaparezca la indicación de error, vuelva a
insertar el disco. Si el problema no desaparece mediante la
solución mencionada, consulte con el proveedor Alpine más
próximo.
No es posible reproducir el CD-R/CD-RW
• No se ha realizado la sesión de cierre (finalización).
- Finalice el disco y vuelva a intentar reproducirlo.
MP3/WMA
Los archivos MP3 o WMA no se reproducen.
• Se ha producido un error de escritura. El formato de CD no es
compatible.
- Compruebe que el CD se ha grabado en un formato
compatible. Consulte “Acerca de MP3/WMA” (en la página
10-11) y vuelva a grabar en el formato compatible con este
dispositivo.
Audio
No sale el sonido por los altavoces.
• La unidad no recibe señal del amplificador interno.
- POWER IC está en “ON” (página 16).
Indicaciones para el reproductor de CD
• No se ha insertado ningún CD.
- Inserte un CD.
• Aunque hay un disco insertado, se visualiza “NO DISC” y la
unidad no puede reproducir ni expulsar el disco.
- Extraiga el disco siguiendo estos pasos:
Presione el botón y manténgalo presionado durante, al
menos, 2 segundos.
Si el disco no se expulsa, consulte a un distribuidor de Alpine.
• Error del mecanismo.
1) Presione el botón y expulse el CD.
Si el disco no es expulsado, consulte a su distribuidor Alpine.
2) Si la indicación de error no desaparece después de expulsar el
CD, vuelva a pulsar el botón .
Si la indicación de error no desaparece después de pulsar el
botón unas cuantas veces, consulte a su distribuidor
Alpine.
• Cuando aparece “ERROR”:
Si no se puede expulsar el disco presionando el botón , presione el
interruptor RESET (consulte página 6) y presione el botón de
nuevo.
Si el disco no se expulsa, consulte a un distribuidor de Alpine.
• Se ha reproducido un archivo WMA con protección contra
copias.
- Sólo es posible reproducir archivos sin protección contra
copias.
• El disco no se ha grabado en un formato compatible con MP3/
WMA.
- Utilice un disco grabado en un formato compatible con MP3/
WMA.
Indicación del modo de iPod
• El iPod no está conectado.
- Verifique que el reproductor iPod esté debidamente conectado
(consulte “Conexiones”).
Compruebe que el cable no esté doblado en exceso.
• El nivel de carga de la batería del reproductor iPod es bajo.
- Consulte la documentación del reproductor iPod y cargue la
batería.
• Se ha activado el circuito protector debido a la alta temperatura.
- El indicador desaparecerá cuando la temperatura vuelva a la
gama de operación normal.
20-ES
• El reproductor iPod no contiene ninguna canción.
- Descargue canciones en el reproductor iPod y conéctelo al
adaptador.
Page 74

Especificaciones
• Error de comunicación
- Apague el contacto y ajústelo de nuevo en ON.
- Compruebe la pantalla volviendo a conectar el reproductor
iPod y el adaptador mediante el cable de iPod.
• Se debe a que la versión de software del iPod no es compatible
con la unidad.
- Actualice la versión de software del iPod a una compatible con
la unidad.
SECCIÓN DEL SINTONIZADOR DE FM
Rango de sintonía 87,7 - 107,9 MHz
Sensibilidad útil en modo
monoaural
50 dB Sensibilidad de silencio 13,5 dBf (1,3 µV/75 ohmios)
Selectividad de canal alternativo 80 dB
Relación de señal de ruido 65 dB
Separación estéreo 35 dB
Relación de captura 2,0 dB
SECCIÓN DE SINTONIZACIÓN DE AM
Rango de sintonía 530 - 1.710 kHz
Sensibilidad (Norma IEC) 22,5 µV/27 dB
SECCIÓN DEL REPRODUCTOR DE CD
Respuesta de frecuencia 5 - 20.000 Hz (±1 dB)
Fluctuación y trémolo
(% WRMS)
Distorsión armónica total 0,008% (a 1 kHz)
Gama dinámica 95 dB (a 1 kHz)
Relación de señal de ruido 105 dB
Separación de canales 85 dB (a 1 kHz)
RECOGIDA
Longitud de onda 795 nm
Potencia de láser CLASE I
GENERALES
Alimentación 14,4 V CC
Salida de alimentación 16 W RMS × 4*
* Calificaciones del amplificador primario de acuerdo con la
norma CEA-2006
• Salida de alimentación: medida a 4 Ohmios y 1%
THD+N
• Señal/Ruido: 80 dBA (referencia: 1 W en 4 Ohmios)
Tensión de salida de
preamplificación máxima
Grave +20/-14 dB a 100 Hz
Agudo ±14 dB a 10 kHz
Peso 1,6 kg
TAMAÑO DEL CHASIS
Anchura 178 mm
Altura 50 mm
Profundidad 162 mm
TAMAÑO DE LA PIEZA FRONTAL
Anchura 170 mm
Altura 46 mm
Profundidad 24 mm
• Debido a la mejora continua del producto, las especificaciones y el
diseño están sujetos a cambio sin previo aviso.
9,3 dBf (0,8 µV/75 ohmios)
Por debajo de los límites
medibles
(11 - 16 V margen
permisible)
2 V/10 k ohmios
21-ES
Page 75

Ubicación y conexiones
Antes de instalar o conectar la unidad, lea atentamente
lo siguiente y las páginas 3 y 5 de este manual para
emplearla adecuadamente.
Advertencia
REALICE LAS CONEXIONES CORRECTAMENTE.
Una conexión incorrecta puede producir un incendio o dañar el equipo.
UTILICE LA UNIDAD SOLAMENTE EN VEHÍCULOS QUE TENGAN
12 VOLTIOS CON NEGATIVO A MASA.
(Consulte a su distribuidor en caso de duda.) De no ser así, podría
ocasionar un incendio, etc.
ANTES DE EFECTUAR EL CABLEADO, DESCONECTE EL CABLE
DEL TERMINAL NEGATIVO DE LA BATERÍA.
De no hacerlo así, podría ocasionar una descarga eléctrica o heridas
debido a cortocircuitos eléctricos.
IMPIDA QUE LOS CABLES SE ENREDEN CON LOS OBJETOS
SITUADOS ALREDEDOR.
Disponga la instalación eléctrica y los cables conforme a lo descrito en
el manual para evitar obstáculos durante la conducción. Los cables que
obstaculizan la conducción o que cuelgan de partes del vehículo como
el volante de dirección, la palanca de cambios, los pedales de freno, etc.,
se consideran extremadamente peligrosos.
NO EMPALME CABLES ELÉCTRICOS.
Nunca corte el aislamiento de un cable para suministrar energía a otro
equipo. Esto hace que la capacidad portadora del cable se supere y
puede ser la causa de incendios o descargas eléctricas.
EVITE DAÑAR LOS TUBOS Y EL CABLEADO CUANDO TALADRE
AGUJEROS.
Si taladra agujeros en el chasis durante la instalación, tome las
precauciones necesarias para no rozar, dañar u obstruir los tubos, las
tuberías de combustible, los depósitos o el cableado eléctrico. De lo
contrario, podría provocar un incendio.
NO UTILICE TUERCAS O PERNOS EN EL SISTEMA DE FRENOS
O DE DIRECCIÓN PARA REALIZAR LAS CONEXIONES A MASA.
Los pernos o tuercas empleados en los sistemas de freno o de dirección
(o en cualquier otro sistema relacionado con la seguridad del vehículo),
o los depósitos, NUNCA deben utilizarse para instalaciones de cableado
o conexión a masa. Si utiliza tales partes podrá incapacitar el control del
vehículo y provocar un incendio, etc.
MANTENGA LOS OBJETOS PEQUEÑOS, COMO LAS PILAS,
FUERA DEL ALCANCE DE LOS NIÑOS.
La ingestión de estos objetos puede provocar lesiones graves.
Si esto ocurre, consulte con un médico inmediatamente.
NO INSTALE EL EQUIPO EN LUGARES QUE PUEDAN INTERFERIR
CON LA OPERACIÓN DEL VEHÍCULO, COMO EL VOLANTE DE
DIRECCIÓN O LA CAJA DE CAMBIOS DE VELOCIDAD.
Esto podría obstaculizar la visibilidad y dificultar el movimiento, etc. y
provocar accidentes graves.
Prudencia
CONFÍE EL CABLEADO Y LA INSTALACIÓN A PROFESIONALES.
El cableado y la instalación de este equipo requieren una competencia y
experiencia técnica confirmada. Para garantizar la seguridad, póngase
siempre en contacto con el distribuidor al que ha comprado el equipo
para confiarle estas tareas.
UTILICE LOS ACCESORIOS ESPECIFICADOS E INSTÁLELOS
CORRECTAMENTE.
Asegúrese de utilizar los accesorios especificados solamente. La
utilización de otras piezas no designadas puede ser la causa de daños en
el interior de la unidad o de una instalación incorrecta. Las piezas
pueden aflojarse, lo que, además de ser peligroso, puede provocar
averías.
DISPONGA EL CABLEADO DE FORMA QUE LOS CABLES NO SE
DOBLEN, NO SE CONTRAIGAN NI ROCEN UN BORDE
METÁLICO AFILADO.
Aleje los cables y el cableado de piezas móviles (como los raíles de los
asientos) o de bordes puntiagudos o afilados. De esta forma evitará
dobleces y daños en el cableado. Si los cables se introducen por un
orificio de metal, utilice una arandela de goma para evitar que el borde
metálico del orificio corte el aislamiento del cable.
NO INSTALE LA UNIDAD EN LUGARES MUY HÚMEDOS O
LLENOS DE POLVO.
Evite instalar la unidad en lugares con altos índices de humedad o
polvo. Si entra polvo o humedad, el equipo puede averiarse.
Precauciones
• Asegúrese de desconectar el cable del polo (–) de la batería antes de
instalar su CDE-9852. Esto reducirá las posibilidades de averiar la
unidad en caso de cortocircuito.
• Asegúrese de conectar los conductores con clave de colores según el
diagrama. Unas conexiones incorrectas pueden ocasionar un mal
funcionamiento de la unidad o pueden dañar el sistema eléctrico del
vehículo.
• Cuando haga las conexiones al sistema eléctrico del vehículo, tenga
en cuenta los componentes que vienen instalados de fábrica (como
un computador incorporado, por ejemplo). No conecte a estos
conductores para proporcionar alimentación a esta unidad. Al
conectar el CDE-9852 a la caja de fusibles, asegúrese de que el
fusible designado para el circuito del CDE-9852 sea del amperaje
adecuado. De lo contrario, la unidad y/o el vehículo podrán sufrir
daños. Cuando tenga dudas, consulte a su distribuidor Alpine.
• El CDE-9852 emplea conectores hembra tipo RCA para la conexión
de otras unidades (ej.: amplificador) equipadas con conectores RCA.
Algunas veces será necesario usar un adaptador para la conexión de
otras unidades. En este caso, hágase asesorar por su distribuidor
autorizado Alpine.
• Asegúrese de conectar los cables negativos (–) de altavoces al
terminal de altavoces (–). Nunca conecte los cables de altavoces de
los canales derecho e izquierdo uno a otro, ni tampoco a la carrocería
del vehículo.
IMPORTANTE
Anote el número de serie de la unidad en el espacio proporcionado a
continuación y consérvelo como registro permanente. El número de
serie impreso o grabado se encuentra en la base de la unidad.
22-ES
NÚMERO DE SERIE:
FECHA DE INSTALACIÓN:
INSTALADOR:
LUGAR DE ADQUISICIÓN:
Page 76

Instalación
Panel frontal
desmontable
Precaución
Cuando instale esta unidad en el vehículo, no extraiga el panel
frontal desmontable.
Si lo hace durante la instalación, podría presionar demasiado y
deformar la placa de metal que lo sujeta.
Lista de accesorios
• Unidad principal..................................................................1
• Cable de alimentación.........................................................1
• Manguito de montaje...........................................................1
• Maletín de transporte ..........................................................1
• Llave de soporte..................................................................2
• Tornillo (M5 × 8)...................................................................4
• Manual del propietario............................................ 1 unidad
• Monte la unidad principal dentro de un radio de 35 grados del plano
horizontal, desde atrás hacia adelante.
Refuerce la unidad principal con la cinta de montaje
metálica (no suministrada). Fije el cable de tierra de
la unidad en un punto metálico desnudo con un
tornillo (
• Para el tornillo con la marca “*2”, utilice un tornillo adecuado a la
ubicación de montaje elegida.
1
*
) ya fijado al chasis del vehículo.
Conecte cada conector de entrada del amplificador
o el ecualizador al conector de salida
correspondiente de la parte trasera del CDE-9852.
Conecte el resto de los cables del CDE-9852 de
acuerdo con los detalles descritos en la sección
CONEXIONES.
Deslice el CDE-9852 hacia el interior del panel de
3
instrumentos hasta que escuche un chasquido.
Esto asegurará el que la unidad quede
adecuadamente bloqueada y que no se salga
accidentalmente del panel de instrumentos. Instale
el panel frontal desmontable.
Extracción
1. Extraiga el panel frontal desmontable.
2. Inserte las llaves de soporte en la unidad, a lo largo de
las guías de cada lado. Ahora puede extraer la unidad
del manguito de montaje.
Esta unidad
Menos de 35°
Manguito de montaje
1
(Incluido)
Panel de
instrumentos
Esta unidad
Extraiga el panel frontal desmontable (consulte la
página 6).
Deslice el manguito de montaje de la unidad
principal (consulte “Extracción” en la página 23).
Tornillo
2
Tuerca hexagonal (M5)
2
*
Perno
Llaves de soporte
(incluidas)
3. Tire de la unidad hacia fuera y manténgala
desbloqueada mientras lo hace.
<VEHÍCULO JAPONÉS>
Place frontal
Tornillos (M5 x 8)
esta unidad
Cable de tierra
3
*
• Fije el cable de tierra de la unidad en un punto metálico desnudo con
un tornillo (*3) ya fijado al chasis del vehículo.
(incluidos)
Soporte de montaje
Cinta
metálica de
montaje
Cable de tierra
1
*
Chasis
Esta unidad
23-ES
Page 77

Conexiones
Al iPod
Antena
Azul ANTENA ELÉCTRICA
Azul/Blanco
CABLE DE ACTIVACIÓN
AUTO MÁTIC A
Naranja ILUMINACIÓN
Rojo ENCENDIDO
Amarillo BATERÍA
Negro TIERRA
Gris
ALTAVO Z
DERECHO
DELANTERO
Gris/Negro
Violeta/Negro
ALTAVO Z
TRASERO
DERECHO
Violeta
Ver de
ALTAVO Z
TRASERO
IZQUIERDO
Verde/Negro
Blanco/Negro
ALTAVO Z DE LAN TER O
IZQUIERDO
Blanco
A la antena eléctrica
Al amplificador o al ecualizador
Al cable de iluminación del grupo de
instrumentos
Llave de contacto
Batería
Altavoces
Delantero derecho
Trasero derecho
Trasero izquierdo
Delantero izquierdo
*1Si el altavoz de subgraves está en OFF: la salida es desde los altavoces delanteros
Si el altavoz de subgraves está en ON: la salida es desde el altavoz de subgraves
24-ES
Amplificador
Altavoces
Delantero/
Altavoces de
subgraves*
1
Page 78

Conector directo del iPod
Señales del control del iPod.
Conectar esta unidad a un iPod utilizando (en venta por
separado) el cable de conexión FULL SPEEDTM (KCE-422i)
Receptáculo de la antena
Cable para antena eléctrica (Azul)
Conecte este cable al terminal +B de su antena eléctrica, si
aplicable.
• Este cable sólo debe utilizarse para controlar la antena eléctrica del
automóvil. No lo utilice para activar un amplificador o un
procesador de señales, etc.
Toma de conexión remota (azul/blanca)
Conecte este cable al cable de activación automática de su
amplificador o procesador de señales.
Cable de iluminación (naranja)
Este cable puede conectarse al cable de iluminación del
grupo de instrumentos del automóvil. De esta forma se
permitirá que la luz de fondo de la unidad se atenúe
cuando las luces del vehículo estén encendidas.
Cable de alimentación con interruptor (Encendido)
(Rojo)
Conecte este cable a un terminal abierto de la caja de
fusibles del automóvil, o a otra fuente de alimentación
disponible que proporcione (+) 12V, sólo cuando el
encendido sea activado o cuando la llave de encendido se
encuentre en la posición accessoria.
Cable de la batería (Amarillo)
Conecte este cable al terminal positivo (+) de la batería del
vehículo.
Cable de tierra (Negro)
Conecte este cable a una buena tierra del chasis del
vehículo. Asegúrese de conectarlo a una parte metálica
despejada y de fijarlo firmemente usando el tornillo para
plancha metálica proporcionado.
Cable de salida de altavoz derecho delantero (+)
(Gris)
Cable de salida de altavoz derecho delantero (–)
(Gris/Negro)
Cable de salida de altavoz derecho trasero (–)
(Violeta/Negro)
Cable de salida de altavoz derecho trasero (+)
(Violeta)
Cable de salida de altavoz izquierdo trasero (+)
(Verde)
Cable de salida de altavoz izquierdo trasero (–)
(Verde/Negro)
Cable de salida de altavoz izquierdo delantero (–)
(Blanco/Negro)
Cable de salida de altavoz izquierdo delantero (+)
(Blanco)
Conector de fuente de alimentación
Portafusibles (10A)
Conectores RCA de la salida delantera/altavoz de
subgraves
El ROJO es el de la derecha y el BLANCO es el de la
izquierda.
Cable de extensión RCA (vendido por separado)
TM
Cable de conexión FULL SPEED
(KCE-422i)
(en venta por separado)
Para evitar que entre ruido externo en el sistema de audio.
• Coloque la unidad y pase los cables a 10 cm por lo menos del conjunto de cables del automóvil.
• Mantenga los conductores de la batería lo más alejados posible de otros cables.
• Conecte el conductor de puesta a masa con seguridad a un punto metálico desnudo (si es necesario, elimine la pintura, suciedad o
grasa) del chasis del automóvil.
• Si añade un supresor de ruido opcional, conéctelo lo más lejos posible de la unidad. Su proveedor Alpine dispone de varios supresores
de ruido. Solicítele más información.
• Su proveedor Alpine conoce la mejor forma de evitar el ruido. Solicítele más información.
25-ES
 Loading...