

Page 1

TM
FlexPoint
Residential and MDU UPS System for NID/NIU/ONTs
AX
Installation Manual
FlexPoint AX
Effective: May 2008
Alpha Technologies
Page 2

Alpha Technologies
Power
®
Page 3

FlexPoint AX
Installation Manual
010-318-C0-007, Rev. G
Effective Date: May 2008
Copyright
© 2008
Alpha Technologies, Inc.
member of The Group
NOTE:
Photographs contained in this manual are for illustrative purposes only. These photographs may not match
your installation.
NOTE:
Operator is cautioned to review the drawings and illustrations contained in this manual before proceeding. If
there are questions regarding the safe operation of this powering system, please contact Alpha Technologies
or your nearest Alpha representative.
NOTE:
Alpha shall not be held liable for any damage or injury involving its enclosures, power supplies, generators,
batteries, or other hardware if used or operated in any manner or subject to any condition not consistent with
its intended purpose, or is installed or operated in an unapproved manner, or improperly maintained.
TM
Contacting Alpha Technologies: www.alpha.com
or
For general product information and customer service (7 AM to 5 PM, Pacifi c Time), call
1-800-863-3930
For complete technical support, call
1-800-863-3364
7 AM to 5 PM, Pacifi c Time and 24/7 emergency support
3
Page 4

Table of Contents
Safety Information ..........................................................................................................................................5
1. Introduction ........................................................................................................................................9
2. Applications .......................................................................................................................................12
2.1 Outdoor Non-UPS Confi guration ..........................................................................................12
2.2 Indoor to Outdoor Non-UPS Confi guration ...........................................................................12
2.3 Outdoor UPS Confi guration ..................................................................................................13
2.4 Indoor to Outdoor UPS Confi guration ...................................................................................13
3. Specifi cations ....................................................................................................................................14
3.1 General System Specifi cations, Power Supply and Battery Box ..........................................14
3.2 Power-Ring Converter ..........................................................................................................15
3.3 Home Converter ...................................................................................................................16
3.4 7.2Ah and 17Ah Battery Modules .........................................................................................17
4. Installation .........................................................................................................................................19
4.1 Installing the Power-Ring ......................................................................................................19
4.2 Installing the Power-Ring Converter .....................................................................................20
4.3 Installing the Home Converter ..............................................................................................21
4.4 Installing the Battery Module ................................................................................................22
4.4.1 Installing the AX-12D-BBPS-17 ...............................................................................22
4.4.2 Installing the AX-12D-BBPS-7.2 ..............................................................................23
4.5 Component Interconnection .................................................................................................24
4.5.1 Input Cable Wiring ...................................................................................................24
4.5.2 Output Cable Wiring ................................................................................................24
4.5.3 Alternate Connection Method for AX-12D-UPS Module ..........................................25
5. Activation ...........................................................................................................................................26
5.1 Activating the Power-Ring Converter ...................................................................................26
5.2 Activating the Home Converter .............................................................................................27
5.3 System Runtime and Charging .............................................................................................28
5.4 Battery Management ............................................................................................................29
6. Frequently Asked Questions ..............................................................................................................30
7 Glossary ............................................................................................................................................32
Figures & Tables
Fig. 4-1, Interior View, AX-12D-BBPS-17 ..........................................................................................................................22
Fig. 4-2, Front and Rear View, AX-12D-BBPS-7.2 ............................................................................................................23
Fig. 4-3, Input/Output Connection Points ..........................................................................................................................24
Table 4-1, Pin Out, Battery Module 7-pin connector ..........................................................................................................24
Fig. 4-4, Inner Label, AX-12D-BBPS-7.2 ...........................................................................................................................24
Fig. 4-5, Rotating the Microboard ......................................................................................................................................25
Fig. 5-1, Power Ring Installation........................................................................................................................................26
Fig. 5-2, AX-12D-BBPS-7.2 Locking Feature ....................................................................................................................26
Table 5-1, LED Indications.................................................................................................................................................27
Table 5-2, AX-12D-BBPS-7.2 UPS Runtimes as a function of Temperature and Load .....................................................28
Table 5-3, AX-12D-BBPS-17 UPS Runtimes as a function of Temperature and Load ......................................................28
Table 5-4, Battery Capacity Retention and Charging ........................................................................................................29
4
010-318-C0-007, Rev. G
Page 5

Safety Information
Safety Notes
Review the drawings and illustrations contained in this manual before proceeding. If there are any questions
regarding the safe installation or operation of the system, contact Alpha Technologies or the nearest Alpha
representative. Save this document for future reference.
To reduce the risk of injury or death, and to ensure the continued safe operation of this product, the following
symbols have been placed throughout this manual. Where these symbols appear, use extra care and
attention.
ATTENTION:
The use of ATTENTION indicates specifi c regulatory/code requirements that may affect the placement of
equipment and /or installation procedures.
NOTE:
A NOTE provides additional information to help complete a specifi c task or procedure.
CAUTION!
The use of CAUTION indicates safety information intended to PREVENT DAMAGE to material or
equipment.
WARNING!
A WARNING presents safety information to PREVENT INJURY OR DEATH to the
technician or user.
Safety Precautions
• Only qualifi ed personnel may service the system.
• Verify the voltage requirements of the equipment to be protected (load), the AC input voltage to the power
supply (line), and the output voltage of the system prior to installation.
• Verify the utility service panel is equipped with a properly rated circuit breaker for use with this system.
• When connecting the load, DO NOT exceed the output rating of the power supply.
• If batteries are being stored prior to installation, charge at least once every three months to
ensure optimum performance and maximum battery service life.
• The battery pack, which provides backup power, contains dangerous voltages. Only qualifi ed personnel
should inspect or replace batteries.
• In the event of a short-circuit, batteries present a risk of electrical shock and burns from high current .
Observe proper safety precautions.
• Always wear protective clothing, insulated gloves and eye protection (i.e. safety glasses or a face shield)
whenever working with batteries.
• Always carry a supply of water, such as a water jug, to wash the eyes or skin in the event of exposure to
battery electrolyte.
010-318-C0-007, Rev. G
5
Page 6

Safety Information
Battery Maintenance Guidelines
The battery maintenance instructions listed below are for reference only. Battery manufacturer’s instructions
for transportation, installation, storage or maintenance take precedence over these instructions.
• To prevent damage, inspect batteries every 3 months for:
Signs of battery cracking, leaking or swelling. The battery should be replaced immediately by
authorized personnel using a battery of the identical type and rating.
Signs of battery cable damage. Battery cable should be replaced immediately by authorized personnel
using replacement parts specifi ed by vendor.
Loose battery connection hardware. Refer to battery manufacturer’s documentation for the correct
torque and connection hardware for the application.
• Apply battery manufacturer’s specifi ed antioxidant compound on all exposed connections.
• Verify battery terminals and/or exposed connection hardware is not within 2 inches of a conductive
surface. Reposition batteries as necessary to maintain adequate clearance.
• Clean up any electrolyte (battery emission) in accordance with all federal, state, and local regulations or
codes.
• Proper venting of the enclosure is recommended. Follow the battery manufacturer’s approved
transportation and storage instructions.
• Always replace batteries with those of an identical type and rating. Never install old or untested batteries.
• Do not charge batteries in a sealed container. Each individual battery should have at least 0.5
inches of space between it and all surrounding surfaces to allow for convection cooling.
• All battery compartments must have adequate ventilation to prevent an accumulation of potentially
dangerous gas.
Recycling and Disposal Instructions
Spent or damaged batteries are considered environmentally unsafe. Always recycle used batteries or dispose
of the batteries in accordance with all federal, state and local regulations.
Electrical Safety
• Lethal voltages are present within the power supply and electrical boxes. Never assume that an electrical
connection or conductor is not energized. Check the circuit with a volt meter with respect to the grounded
portion of the enclosure (both AC and DC) prior to any installation or removal procedure.
• Always use the buddy system when working under hazardous conditions.
• A licensed electrician is required to install permanently wired equipment.
• Input voltages can range up to 240 Vac. Ensure that utility power is disabled before beginning installation
or removal.
• Ensure no liquids or wet clothes contact internal components.
• Hazardous electrically live parts inside this unit are energized from batteries even when the AC input
power is disconnected.
Mechanical Safety
• Keep hands and tools clear of fans. Fans are thermostatically controlled and will turn on automatically.
• Power supplies can reach extreme temperatures under load.
• Use caution around sheet metal components and sharp edges.
6
010-318-C0-007, Rev. G
Page 7

Safety Information
Battery Safety Notes
WARNING!
Lead-acid batteries contain dangerous voltages, currents and corrosive material. Battery
installation, maintenance, service and replacement must be performed only by authorized
personnel.
Chemical Hazards
Any gelled or liquid emissions from a valve-regulated lead-acid (VRLA) battery contain dilute sulfuric
acid, which is harmful to the skin and eyes. Emissions are electrolytic, and are electrically conductive and
corrosive.
To avoid injury:
• Servicing and connection of batteries shall be performed by, or under the direct supervision of, personnel
knowledgeable of batteries and the required safety precautions.
• Always wear eye protection, rubber gloves, and a protective vest when working near batteries. Remove
all metallic objects from hands and neck.
• Batteries produce explosive gases. Keep all open fl ames and sparks away from batteries.
• Use tools with insulated handles, do not rest any tools on top of batteries.
• Batteries contain or emit chemicals known to the State of California to cause cancer and birth defects
or other reproductive harm. Battery post terminals and related accessories contain lead and lead
compounds. Wash hands after handling (California Proposition 65).
• Wear protective clothing (insulated gloves, eye protection, etc.) whenever installing, maintaining,
servicing, or replacing batteries.
• If any battery emission contacts the skin, wash immediately and thoroughly with water. Follow your
company’s approved chemical exposure procedures.
• Neutralize any spilled battery emission with the special solution contained in an approved spill kit or with
a solution of one pound Bicarbonate of soda to one gallon of water. Report chemical spill using your
company’s spill reporting structure and seek medical attention if necessary.
• Always replace batteries with those of an identical type and rating. Never install old or untested batteries.
• Do not charge batteries in a sealed container. Each individual battery should have at least 0.5
inches of space between it and all surrounding surfaces to allow for convection cooling.
• All battery compartments must have adequate ventilation to prevent an accumulation of potentially
dangerous gas.
• Prior to handling the batteries, touch a grounded metal object to dissipate any static charge that may have
developed on your body.
• Never use uninsulated tools or other conductive materials when installing, maintaining, servicing or
replacing batteries.
• Use special caution when connecting or adjusting battery cabling. An improperly connected battery cable
or an unconnected battery cable can make contact with an unintended surface that can result in arcing,
fi re, or possible explosion.
• A battery showing signs of cracking, leaking, or swelling should be replaced immediately by authorized
personnel using a battery of identical type and rating.
010-318-C0-007, Rev. G
7
Page 8

Safety Information
General Safety Precautions
To avoid injury:
• This enclosure and its associated hardware must be serviced only by authorized personnel.
• Enclosure must remain locked at all times, except when authorized service personnel are present.
• Remove all conductive jewelry or personal equipment prior to servicing equipment, parts, connectors,
wiring, or batteries.
• Read and follow all installation, equipment grounding, usage, and service instructions included in this
manual.
• Use proper lifting techniques whenever handling enclosure, equipment, parts, or batteries.
• Batteries contain dangerous voltages, currents and corrosive material. Battery installation, maintenance,
service and replacement must be performed by authorized personnel only.
• Never use uninsulated tools or other conductive materials when installing, maintaining, servicing or
replacing batteries.
• Use special caution when connecting or adjusting battery cabling. An improperly connected battery cable
or an unconnected battery cable can result in arcing, a fi re, or possible explosion.
• A battery that shows signs of cracking, leaking or swelling must be replaced immediately by authorized
personnel using a battery of identical type and rating.
• Avoid any contact with gelled or liquid emissions from a valve-regulated lead-acid (VRLA) battery.
Emissions contain dilute sulfuric acid which is harmful to the skin and eyes. Emissions are electrolytic and
are electrically conductive and corrosive. Follow the Chemical Hazards notes if contact occurs.
• Do not smoke or introduce sparks in the vicinity of a battery.
• Under certain overcharging conditions, lead-acid batteries can vent a mixture of hydrogen gas that is
explosive. Proper venting of the enclosure is required.
• Follow the battery manufacturer’s approved transportation and storage instructions.
CAUTION!
Enclosure, equipment or parts may be damaged or cause damage if used or installed improperly.
To avoid damage:
• Prior to installation, verify that the AC input voltage to the enclosure and its equipment match with respect
to voltage and frequency.
• Prior to installation, verify that the output voltage from the enclosure or its equipment match the voltage
requirements of the connected equipment (load).
• Prior to installation, verify that the enclosure’s utility service panel is equipped with a properly rated circuit
breaker for use with the equipment inside. Refer to manufacturer’s recommendations.
• Review and upgrade utility service panel circuit breaker requirements whenever the equipment within the
enclosure is changed.
• Prior to installation, contact local utilities, local building maintenance departments, and cable/piping
locator services to ensure that installation does not interfere with existing utility or building cables/piping.
• Do not exceed the output rating of equipment. Verify load requirements prior and during connection
process.
• Prior to handling the batteries, touch a grounded metal object to dissipate any static charge that may have
developed in your body.
8
010-318-C0-007, Rev. G
Page 9
The FlexPoint AX solution is a simple, modular, cost-effective way to provide local power to
Fiber to the Home (FTTH), cable telephony, or other telecom services for Customer Premise
Equipment (CPE). The FlexPoint AX system can be confi gured as a fully accessible outdoor
powering solution, or as a partial outdoor system that keeps critical items, including the battery, outside and available to the service technician.
ATTENTION:
Compatibility Statement -Early Battery Modules with New Power Converters:
Early FlexPoint AX 30Watt 17Ah battery modules (P/N 031-192-20) and new power
converters (P/N 010-318-34 and 010-318-39) are not compatible and if installed together
will result in continuous nuisance AC fail alarms and failed batteries due to an inability
to properly charge deeply discharged batteries. New Power Converters must only be
used with new 30Watt 17Ah battery modules.
1. Introduction
New power converters (P/N 010-318-34 and 010-318-39) are compatible with early
18Watt 7.2Ah battery modules (P/N 031-191-20) provided the cable length between
the power converter and the battery module is less than 15-feet and the wire gauge is
18AWG or heavier.
FlexPoint AX components (outdoor installations)
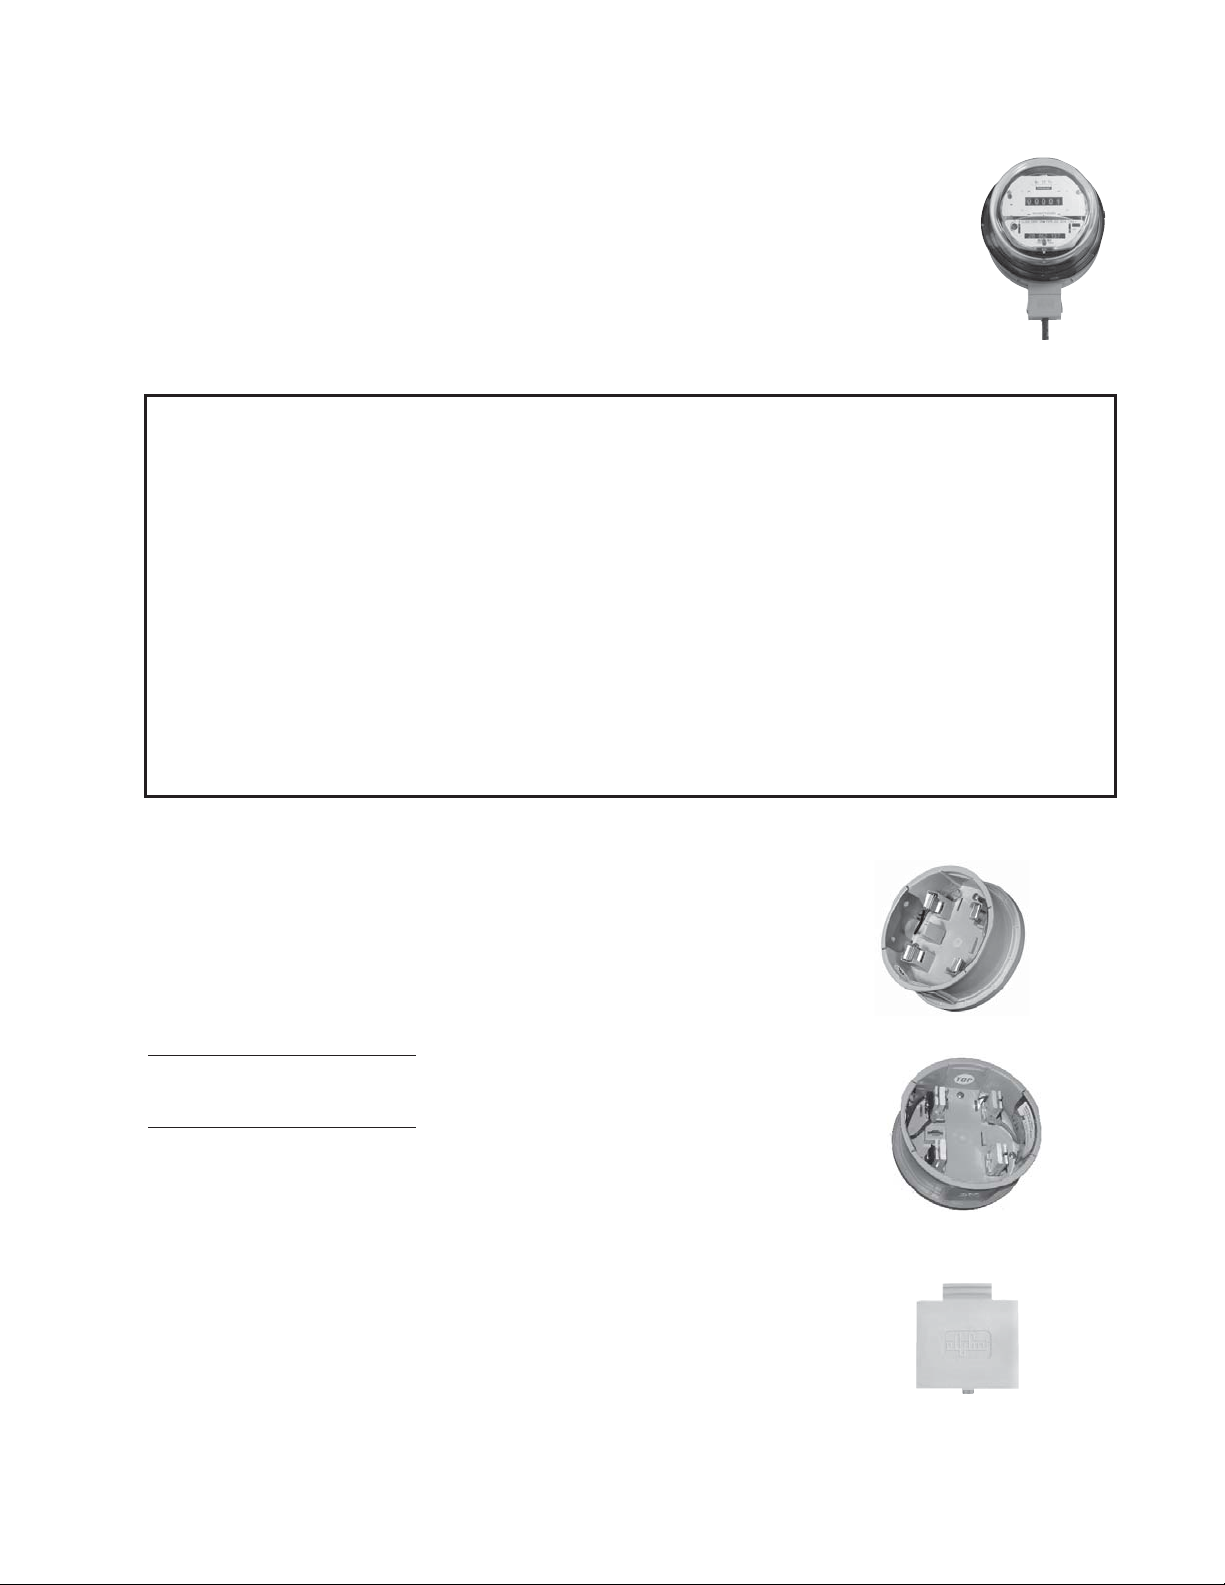
Power-Ring: an electrical utility meter base extender. It fi ts between an
outdoor, subscriber-located electrical utility power meter and the utility meter
socket (or base). The Power-Ring Converter can tap the utility power, either
before or after the meter, and comes supplied with the Blanking Plate (see
below).
200A Continuous, 240A Rated
AX-Power-Ring-A (power tap after meter) — P/N 021-053-21
AX-Power-Ring-B (power tap before meter) — P/N 021-053-20
320A Continuous, 400A Rated
Distinguished by orange collar and more robust connectors
AX-400ARING-A (power tap after meter) — P/N 021-053-30
AX-400ARING-B (power tap before meter) — P/N 021-053-31
200A Model
320A Model
Power-Ring Blanking Plate: covers the opening in the Power-Ring when
the Power-Ring Converter is not used.
Cover Plate, Meter Adapter, AX18/30 — P/N 564-931-10
010-318-C0-007, Rev. G
9
Page 10
1. Introduction
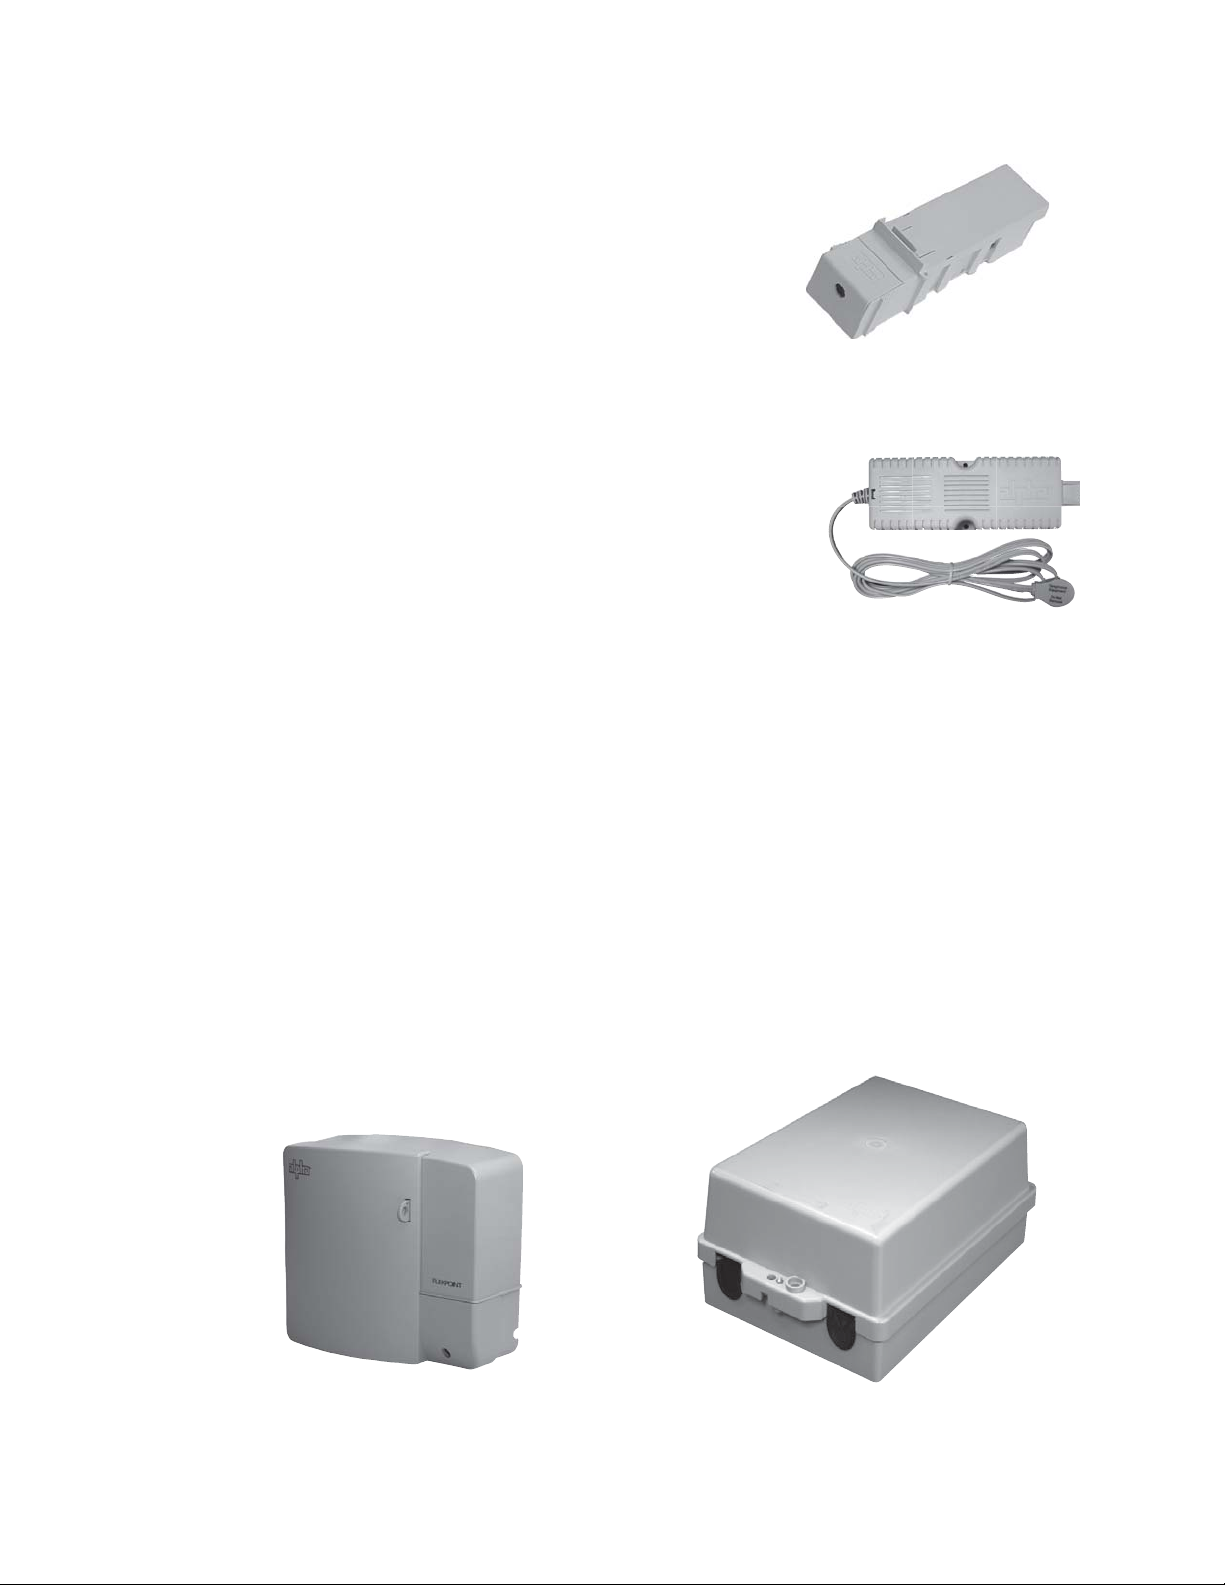
Power-Ring Converter: a modular power converter that slides into the Power-Ring. The
Power-Ring Converter converts 240Vac at the meter to a nominal 12Vdc
which feeds either the outdoor battery module, or when a UPS is not
required, directly to the subscriber’s NID/NIU/ONT.
AX-12D-PC (30 Watts) — P/N 010-318-34
Weight (lb/kg) 0.7/0.32
Dimensions (in/mm) 8.0"H x 2.0"W x 2.0"D/209H x 51W x 51D
FlexPoint AX components (indoor installation)
Home Converter: An indoor version of the Power-Ring Converter. It is located inside the subscriber’s home
and plugs into a standard AC utility outlet to convert the AC voltage into a nominal
12Vdc. Low voltage feeds from the Home Converter to an indoor or outdoor
battery module. When the battery module or NID/NIU/ONT is located outside,
a cable passes through an exterior wall to connect this product to the outdoor
battery module or directly to the subscriber’s NID/NIU/ONT.
AX30-12D-HC, 120Vin, 15V, 30W — P/N 010-318-39
CR-AX30-12D-HC, 240VIN, 15V 30W, EU Line Cord — P/N 010-318-33
CR-AX30-12D-HC, 240VIN, 15V 30W, AU Line Cord — P/N 010-318-40
CR-AX30-12D-HC, 240VIN, 15V 30W, BS1363 — PN 010-318-22
Weight (lb/kg) 0.7/0.32
Dimensions (in/mm) 2.75"H x 8.25"W x 1.5"D/70H x 209W x 38D
Battery Modules: Small plastic clamshell housings for UPS batteries available in two sizes. It is typically
located outdoors on the subscriber's residence. The Battery Module connects to either the Power-Ring
Converter or Home Converter and provides 30 Watts of 12V DC power and alarms to the NID/NIU/ONT.
Battery Backup Power Supply (BBPS) — w/alarms and LED indicators; supports battery to -40°C/-40F
AX-12D-BBPS-7.2 (7.2Ah Battery Backup Power Supply) — 031-264-21
Weight (lb/kg) 1.5/.68
Dimensions: (in/mm) 8.0"H x 9.0"W x 4.0"D/203 x 230 x 102
AX-12D-BBPS-17 (17Ah Battery Backup Power Supply) — 031-192-31
Weight (lb/kg) 4.5/2.04
Dimensions: (in/mm) 14"H x 9.5"W x 5.0"D/355 x 241 x 127
10
7.2Ah Battery Backup Power Supply
AX-12D-BBPS-7.2
17Ah Battery Backup Power Supply
AX-12D-BBPS-17
010-318-C0-007, Rev. G
Page 11
1. Introduction
FlexPoint AX components (outdoor installations)
UPS Modules (Microprocessor Modules): 30 Watt UPS Module 12Vdc w/alarms and indicators.
The FlexPoint AX UPS modules are small microprocessor-based battery management systems providing
UPS power to residential and multiple dwelling FTTp optical network terminals (ONT). The UPS modules
are comprised of the same electronics as used in the AX-12D-BBPS products without battery and without
battery heating. They are used with the three wire FlexPoint AX Home Converter (HC) and Power
Converter (PRC).
AX-12D-7.2Ah (for 7.2Ah battery) — 745-816-23
AX-12D-17Ah (for 17Ah battery) — 745-816-22
AX-12D-7.2Ah UPS Module
(wire harness terminated with Fast-On connectors)
AX-12D-17Ah UPS Module
(wire harness terminated with ring lugs)
Batteries (separately ordered and shipped)
AX-STDBAT-7 — 181-036-10 Weight (lb/kg): 5/2.27 (1-year warranty)
AX-LONGBAT-7 — 181-063-10 Weight (lb/kg): 5/2.27 (3-year warranty)
AX-STDBAT-17 — 181-022-10 Weight (lb/kg): 13/5.9
010-318-C0-007, Rev. G
AX-STDBAT-7
AX-LONGBAT-7
7.2Ah Battery
AX-STDBAT-17
17Ah Battery
11
Page 12

2. Applications
The FlexPoint AX system can be arranged in four basic confi gurations/applications as shown on the following
pages. The cable from the Power-Ring/Home Converter and the Battery Module is a 3-conductor, multiconductor cable. The cable from the Battery Module and the NID/NIU/ONT can be a 4-wire to 7-wire cable
(depending on NID/NIU/ONT requirements). Refer to the accompanying Notes for information regarding the
specifi ed cable lengths.
2.1 Outdoor Non-UPS Confi guration
• Outdoors
• Cable length under 30’
• No UPS
NID/NIU/ONT
NID/NIU/ONT
AX30-12D-PRC
installed in AX-
POWER-RING
11.6Vdc nominal
output voltage
Less than 30' of two wire (+, -) cable
(See NOTE)
2.2 Indoor to Outdoor Non-UPS Confi guration
• Indoors to Outdoors
• Cable length under 30’
• No UPS
Indoor 120Vac or 230Vac Outlet
2-conductor Line Cord
8' in length
11.6Vdc nominal
output voltage
AX18-12-HC
Cable through wall
Less than 30' of two wire (+, -) cable
NID/NIU/ONT
(See NOTE)
NOTE:
Use 14AWG (preferred) to 16AWG (minimum) for the cabling between the Home Converter/Power Converter
and NID/NIU/ONT. Use only cable rated for the outdoor environment. The output voltage of the Home
Converter or Power Converter determines the actual cable length.
12
010-318-C0-007, Rev. G
Page 13

2.3 Outdoor UPS Confi guration
• Outdoors
• Cable length under 100'
• UPS required
AX-POWER-RING
and AX18-12D-PC
Assembly installed in
meter base
11.6Vdc to 16Vdc
nominal output voltage
AX-12D-BBPS
Battery Housing
(shown)
2. Applications
NID/NIU/ONT
Up to 100' of three wire (+, -, and control) cable
(See NOTE 2)
2.4 Indoor to Outdoor UPS Confi guration
• Indoors to Outdoors
• Cable length under 100’
• UPS required
Indoor 120Vac
outlet
8' in length
AX18-12-HC
11.6-16 Vdc output
voltage
Cable through wall
Up to 100' of three wire
(+, -, and control)
cable (See NOTE 1)
Distance Wire Size
0'–50' #16 AWG
50'–100' #14 AWG
Less than 10' of cable
(+/- and Alarms)
(See NOTE 3)
AX-12D-BBPS
Battery Housing
(shown)
NID/NIU/ONT
Less than 10' of cable
(+/- and Alarms)
(See NOTE 2)
NOTE:
1. Use 14AWG (preferred) to 16AWG (minimum) for the cabling between the Home Converter/Power
Converter and battery housing. Use only cable rated for the outdoor environment. The maximum cable
length is determined by the maximum output voltage of the Power Converter/Home Converter minus the
voltage drop required by the Battery Module to properly charge the battery.
2. Use 18AWG (minimum) stranded cable for the +/- connections, and 18AWG to 22AWG cable for the
alarm connections between the battery housing and the NID/NIU/ONT. Use only cable rated for the
outdoor environment. The maximum cable length is calculated such that the minimum input voltage of the
ONT used in the confi guration is less than or equal to the lowest battery voltage (just above battery cutoff)
minus the voltage drop of the cable.
010-318-C0-007, Rev. G
13
Page 14

3. Specifi cations
3.1 System Specifi cations, Power Supply and Battery Box
FlexPoint AX Module
AX30-12D-PC or HC
with AX-12D-BBPS-7.2
AX30-12D-PC or HC
with AX-12D-BBPS-17
Input
AC Input Voltage (120) 85/132
AC Input Voltage (230) 170/264
AC Input Frequency 50/60Hz
Output
DC Output Voltage 10.5 to 14.4
Continuous Output Power 30W at nominal battery fl oat voltage
Maximum Output Power (<10s) 45W (when used in conjunction with Battery Box)
Short Circuit Protection Electronic
Ripple Voltage, Maximum 150mVrms with battery
Nominal Effi ciency (at 75% max load) 75%
Environment
Operating Temperature Range -40°F to +149°F/-40°C to +65°C, 0 to 95% humidity
Battery Storage: +5°F to +149°F/-15°C to +65°C, 0 to 95% humidity
Battery
Type Maintenance free, leak-proof, sealed VRLA (valve regulated lead acid)
Recharge time 12 Hours with 24W load 36 Hours with 24W load
Status Alarms–Local (LED Indicators)
Green Steady Output OK
Green Blinking Standby Operation
Red Steady Replace Battery
Red Blinking Battery Missing/Battery Low
Status Alarms–Remote
AC Fail Output Power drawn from battery
Replace Battery Battery has failed periodic self test
Battery Missing Battery is disconnected
Battery Low Indicates battery has 20% remaining runtime available
Regulatory Approvals
Home Converter UL Listed System, FCC Part 15, Class B, EN55022, Class B
Power Ring UL Recognized Components
Power Ring Converter UL Recognized Components
Battery Box CSA, CENELEC CSA
Warranty
Electronics 2 years
Battery–Standard 1 years
Battery–Long Life 3 years
FlexPoint AX UPS Typical Runtimes (minutes)
7.2Ah 17Ah
Temperature Temperature
°F/°C -40/-40 -4/-20 77/25 °F/°C -40/-40 -4/20 77/25
Load (W) Time (Minutes) Load (W) Time (Minutes)
4 820 1100 1200 10 750 1080 1240
7 360 560 800 15 400 680 940
10 160 360 500 20 260 440 680
15 80 195 320 25 160 340 480
18 N/A 156 240 30 140 232 400
14
010-318-C0-007, Rev. G
Page 15

3.2 Power-Ring Converter
Input
Vmin 170
Vmax 264
Frequency 50/60Hz
Frequency Tolerance ±10%
Acceptable Source Imp. <5% FL equivalent impedance
Max Current Limit 1.6A
Power Factor .60
Max Surge Current 10A RMS
Protection Fuse, MOV
Interface Side Slide Pressured contacts for input power.
Surge Resistance IEEE Std. C62.41-1991 level C
Output Voltage Control
(for use with battery module)
Output
Power Capability
Voltage
Number of Outputs 1
Startup Overshoot Voltage <120% of nominal for 0.5s max
Frequency DC
Transient Response Not to exceed 1s
Ripple Voltage, Maximum 500mV
Nominal Effi ciency 75%
Output Grounding Floating, SELV
Short Circuit Protection Electronic
Overload Protection Integral
Interface
Enclosure
Material Plastic
Mounting Inserted inside a Meter Adapter
Color Gray
Cooling Natural Convection
Physical Size, approximate (in/mm) 8"L x 2"W x 2"D/209/51/51
Weight (lb/kg) 0.7/0.32
Acoustic Noise, All Modes Not to exceed 50dBA at 1 meter.
Environmental
Temperature —UL Rated -40°C to +65°C @ 30W load
Humidity 5% to 95%
Altitude > 5K feet, derate max. temp by 2°C per additional 1K feet
Location Outdoors, all environmental conditions
Reliability
Telcordia Reliability Prediction > 200,000 hours
Agency Compliance
EMC FCC Part 15, Class B
Safety: Mark USR, CNR
Standard UL60950
AX30-12D-PC
5Vdc. 5mA DC Max
30W continuous (if used with battery box)
24W continuous (if used in standalone confi guration)
(11.6 to 16Vdc auto-adjust if used with battery box)
3 position terminal strip or connector suitable for accepting #12 to
15% of life @ 50ºC, 2% of life @t 60ºC
12 Vdc nominal
20AWG wire.
ROHS
3. Specifi cations
010-318-C0-007, Rev. G
15
Page 16

3. Specifi cations
3.3 Home Converter
Input
Vmin 85/170 Selectable (when ordered)
Vmax 132/264 Selectable (when ordered)
Frequency 50/60Hz
Frequency T olerance ±10%
Acceptable Source Imp. <5% FL equivalent impedance
Max Current Limit 1.6A
Power Factor .60
Max Surge Current 10A RMS
Protection Fuse, MOV
Interface Hard-Wired AC Line Cord
Surge Resistance IEEE Std. C62.41-1991 level C
Output Voltage Control
(for use with battery module)
Output
Power Capability
Voltage 12Vdc Nominal
Number of Outputs 1
Startup Overshoot Voltage <120% of nominal for 0.5s max
Frequency DC
Transient Response Not to exceed 1s
Ripple Voltage, Maximum 500mV w/o battery, 150mV with battery
Nominal Effi ciency 75%
Output Grounding Floating, SELV
Short Circuit Protection Electronic
Overload Protection Integral
Interface
Enclosure
Material Plastic
Mounting Wall-mount
Color Gray
Cooling Natural Convection
Physical Size, approximate (in/mm) 2" H x 3" W x 8.5" D/ 51 x 76 x 216
Weight (lb/kg) 1/.45
Acoustic Noise, All Modes Not to exceed 50dBA at 1 meter.
Environmental
Temperature — UL Rated: -40°C to +45°C @ 30W load
Humidity 5% to 95%
Altitude > 5K feet, derate max. temp by 2°C per additional 1K feet
Location Indoors, semi-protected, non-water-dripping environment
Reliability
Telcordia Reliability Prediction: > 200,000 hours
Agency Compliance
EMC FCC Part 15, Class B
Safety: Mark USR, CNR
Standard UL60950
CENELEC
AX30-12D-HC
5Vdc. 5mA DC Max
30W continuous (if used with battery box)
24 W continuous if used in standalone confi guration)
3 position terminal strip or connector
suitable for accepting #12 to 20AWG wire.
EN55022 Class B and EN50082 Class B
ROHS
16
010-318-C0-007, Rev. G
Page 17

3. Specifi cations
3.4 7.2Ah and 17Ah Battery Modules
These specifi cations apply to confi gurations incorporating 30W Home Converters and Power
Converters.
AX-12D-BBPS-7.2 AX-12D-BBPS-17
Input
Voltage
Interface
DC input from Power-Ring or Home Converter
(See Section "2.0 Applications" for maximum
length of interconnecting wire)
3 position terminal strip or connector suitable for
accepting #14 to #20AWG wire.
Output
Power Capability
Voltage 10.5 to 14.4Vdc 10.5 to 14.4Vdc
Number of Outputs 1 1
Frequency DC DC
Transient Response Not to exceed 1s Not to exceed 1s
Ripple Voltage, Maximum 150mV 150mV
Nominal System Effi ciency 77% >77%
Output Grounding Floating, SELV Floating, SELV
Short Circuit Protection Electronic Electronic
Overload Protection Integral Integral
Interface
7 position terminal strip or connector suitable
for accepting #18 to 22AWG wire carrying 12V
30W continuous
45W max. (<10s)
and PacketCable alarms
Charging
Voltage 12Vdc nominal 12Vdc nominal
Charge Current 1.8A maximum Unlimited within the power supply rating
Typical Recharge Time 12 Hours @ 24 Watt load
Charge Voltage Temp. Comp. Range -10°C to +40°C (14ºF to 104ºF) -10°C to +40°C (14ºF to 104ºF)
Charge Compensation Voltage 20mV/°C 20mV/°C
Charge Voltage, Float 13.65V @ 25°C (77ºF) 13.65V @ 25°C (77ºF)
Charge Voltage, Accept 14.40V @ 25°C (77ºF) 14.40V @ 25°C (77ºF)
EOD Voltage before battery disconnection
Quiescent Current < 5mA after EOD < 5mA after EOD
Battery Grounding Float, SELV Float, SELV
Battery Type AGM Valve-Regulated Lead Acid AGM Valve-Regulated Lead Acid
Battery Capacity 7.2Ah 17Ah
Quantity 1 1
Battery Heater Integral—operation to -40°C Integral—operation to -40°C
Less than or equal to 10.5 Vdc for
a minimum of 5s
Alarms
Packet Cable
LEDs Above alarm conditions indicated by LEDs Above alarm conditions indicated by LEDs
AC Line Fail, No Battery, Replace Battery,
Low/missing Battery, Replace Battery
(all signals isolated from output)
DC input from Power-Ring or Home Converter
(See Section "2.0 Applications" for maximum
length of interconnecting wire)
3 position terminal strip or connector suitable for
accepting #14 to #20AWG wire
30W continuous (see Note 1)
45W max., <10s
7 position terminal strip or connector suitable
for accepting #18 to 22AWG wire carrying 12V
and PacketCable alarms
12 hours @ 17 Watt load
<36 hours @ 24 Watt load
Less than or equal to 10.5 Vdc for
a minimum of 5s
AC Line Fail, No Battery, Replace Battery,
Low/missing Battery, Replace Battery
(all signals isolated from output)
Note 1: Due to the temperature differences between indoor and outdoor devices, Alpha recommends a
maximum continuous load of 24W if an indoor home converter (AX30-12-HC) is used with a battery
module located outside.
010-318-C0-007, Rev. G
17
Page 18

3. Specifi cations
3.4 7.2Ah and 17Ah Battery Modules, continued
These specifi cations apply to confi gurations incorporating 18W, and 30W Home Converters
and Power Converters.
AX-12D-BBPS-7.2 AX-12D-BBPS-17
Enclosure
Material, Color Plastic, Gray Plastic, Gray
Mounting Wall-mount Wall-mount
Cooling Natural Convection Natural Convection
Physical Size, approximate (in/mm) 9" W x 8" H x 4" D/230 x 203 x 102 10" W x 14" H x 5" D/254 x 355 x 127
Weight without battery (lb/kg) 1.5/0.68 4.5/2.04
Weight with battery (lb/kg) 6.5/2.95 17.5/7.94
Acoustic Noise, All Modes Not to exceed 50dBA at 1 meter. Not to exceed 50dBA at 1 meter.
Environmental
Designed to Temperature -40°C to 65°C (-40ºF to 149ºF) -40°C to 65°C (-40ºF to 149ºF)
UL-rated -40°C to +63°C (-40ºF to 145ºF) @ 18W load -40°C to +63°C (-40ºF to 145ºF) @ 18W load
Humidity 5% to 95% 5% to 95%
Altitude
Location Outdoors, all environmental conditions Outdoors, all environmental conditions
> 5K feet, derate max. temp
by 2°C per additional 1K feet
Reliability
Telcordia Reliability Prediction 200,000 hours (System Rating) > 200,000 hours (System Rating)
Agency Compliance (Battery Box)
EMC FCC Part 15, Class B FCC Part 15, Class B
Safety: Mark USR, CNR UL/
Standard
UL60950
ROHS
> 5K feet, derate max. temp
by 2°C per additional 1K feet
UL
C
UL60950
ROHS
18
010-318-C0-007, Rev. G
Page 19

4. Installation
4.1 Installing the Power-Ring
ATTENTION:
You MUST secure utility permission and/or assistance prior to installing FlexPoint AX.
WARNING!
Wear electrically insulating gloves! Removing and reinstalling the meter will open and close
the meter’s live 240Vac (non-fused) terminals during the following procedure. Arcing may
occur.
CAUTION!
Adhere to your power utility’s safety procedures. Incorrect installation can result in personal injury or
damage to equipment.
1. Remove security band from meter base or lift cover plate if meter has a ringless base.
2. Carefully pull the meter from its base and set it safely aside.
3. With the Blanking Plate in the 6 o'clock position (aiming toward the ground) , fi rmly push the the
Power Ring in to the meter base.
NOTE:
Ringless meter bases may need to have the cover installed at this time.
4. If you are not installing the Power-Ring Converter at this time, ensure the Blanking Plate is
securely snapped in at the bottom of Power-Ring.
5. Correctly orient the meter over the Power-Ring and fi rmly push it into the Power-Ring.
6. Attach security bands between the meter and Power-Ring, and Power-Ring and meter box (or
close cover plate).
7. Attach security tags to security bands, if required.
Install the Power-Ring along with meter installation or any time thereafter. The Power-Ring Converter
can be installed now, or at a later date.
Equipment Tools & Supplies
AX-POWER-RING-A (power tap after meter) 0.100" Jeweler’s Screwdriver
-OR- Security Ring
AX-POWER-RING-B (power tap before meter) Blanking Plate
Cable Ties
Security Tag
010-318-C0-007, Rev. G
19
Page 20

4. Installation
4.2 Installing the Power-Ring Converter
Two options are available for powering either a battery module or subscriber’s NID/NIU/ONT: the
Power-Ring Converter (for power from the meter) and the Home Converter (plugs into a standard AC
utility outlet).
NOTE:
Prior to powering the converter, verify that the NIU/NID is properly grounded and connected to either
the 12V Lead (pin 2) of the battery module, or the Return Lead (pin 1) of the Power/Home Converter.
The FlexPoint AX does not make contact with Earth Ground through the meter socket; Earth Ground is
provided by connection to the NIU/NID. Prior to connection to the NIU/NID Earth Ground, the FlexPoint AX
output fl oats and may have enough leakage current to cause any one of the output leads to measure high
voltage with reference to Earth Ground. The energy represented by the high voltage does not represent a
safety hazard, but may cause a slight undesirable tingling sensation.
CAUTION!
Improperly connecting these wires will result in equipment damage or non-operation of the unit.
NOTE:
The converter can be installed at the same time as the Power-Ring, or at a later date. Refer to NOTE in
Section 2 on wire size and distance.
1. Loosen the two screws at the rear base of the Power-Ring Converter and
remove the cover plate from the front of the Power-Ring Converter.
2. Remove the keyed, 3-pin plug from the base of the converter.
3. Strip 1/4" from the cable wire ends. Minimize the gap between the outer
jacket of the cable and the end of the insulation for each individual wire.
Connect the cable from the Power-Ring into the 3-pin plug in the following
order:
Pin 1, white (return) [-], Pin 2, black (12V) [+], Pin 3, green (control) [c].
Tighten the plug screws with a 0.100" jeweler’s screwdriver. To reduce the
potential for a short circuit, verify no bare wire is showing, or loose strands
of wire are present between the cables.
4. Insert plug into socket. For strain relief, loop a cable tie through the holes
in the case and replace cover. Do not over-tighten screws.
Loosen
Keyed plug
Pin 1
Minimize Gap
- + c
20
Strain
Relief
010-318-C0-007, Rev. G
Page 21

4.2 Installing the Power-Ring Converter, continued
5. Use fl at-bladed screwdriver to remove blanking plate from Power-Ring.
6. Insert AX-30 module into meter base. The module will lock into place when fully inserted.
4. Installation
Blanking Plate
NOTE:
.
If the Power-Ring Converter is part of an Outdoor Non-UPS confi guration, proceed to Section 6.1, “Activating
the Power-Ring Converter”. Otherwise, continue to Section 5.0, “ Installing the Battery Module”
Insert
screwdriver here,
twist to remove
plate
AX-30
To ONT
4.3 Installing the Home Converter
NOTE:
Refer to the NOTE in Section 2.0, “Applications” for wire size and distance.
1. Mount the Home Converter horizontally in a convenient interior
location near an AC outlet, using two (2) 8-32 pan head screws
(for placement over studs) or Molly bolts (for mounting on
drywall) long enough to support a 1-lb. unit.
2. Strip 1/4" from the cable wire ends. Connect the cable from the
Power-Ring into the 3-pin plug in the following order:
Minimize Gap
Pin 1
Pin 1, white (return), Pin 2, black (12V) Pin 3, green (control).
Tighten the plug screws with a 0.100" jeweler’s screwdriver. To
reduce the potential for a short circuit, verify no bare wire
is showing, or loose strands of wire are present between
the cables.
3. Verify orientation of plug and snap the 3-pin plug into the Home
Converter. Do not force the plug into the converter.
4. Secure the cable to the base of the converter by threading a
cable tie through the two holes on the extension at the base of
the Converter. Tighten the cable tie and trim the excess.
NOTE:
If the Home Converter is part of an Indoor to Outdoor Non-UPS confi guration, proceed to Section 5.2,
“Activating the Home Converter".
010-318-C0-007, Rev. G
Strain
Relief
21
Page 22

4. Installation
4.4 Installing the Battery Module
4.4.1 Installing the AX-12D-BBPS-17
The battery module enables the FlexPoint AX system to be confi gured as an outdoor UPS,
or as an Indoor-to-Outdoor UPS system. The cable length between the Battery Module
and Power Ring Converter must be 100 feet or less. The cable length between the Battery
Module and NID/NIU/ONT should be less than 10 feet.
NOTE:
Refer to the NOTE in Section 2.0, “Applications” for wire size and distance.
1. Select Battery Module installation location.
2. Remove module door and drill mounting holes as indicated for customer-supplied # 12 mounting
hardware (wood screws or Molly-bolts as needed) and secure. For seismic compliance the unit
must be mounted to wall studs.
3. Install 12V, 17Ahr battery with the terminals facing out (do not connect battery at this time).
4. Determine the necessary cable lengths to provide appropriate drip loops from the Power-Ring or
Home Converter assembly to Battery Module and from Battery Module to NID/NIU/ONT.
5. Pierce the Battery Module’s rubber gasket and insert both the converter cable and NID/NIU/ONT
cable ends through the gasket.
1
2
1
LED indications, unit installation label
10.0"
3
6
14.0"
4
4
5
Cable port—input from HC/PRC
4
5
Model information label
2
3
Battery shelf
22
Cable port—output to NID/NIU/ONT
5
UPS module—input/output voltages, alarms
6
Fig. 4-1, Interior view, AX-12D-BBPS-17
010-318-C0-007, Rev. G
Page 23

4.4 Installing the Battery Module, continued
4.4.2 Installing the AX-12D-BBPS-7.2
1. Select a location to install the Battery Module.
2. Determine the necessary cable lengths, providing appropriate drip loops between
the HC/PRC, AX, and NIU/NID/ONT.
3. Route the Home Converter/Power Ring Converter cable in from the rear through
either the side or bottom slot, around the strain relief, and up through the larger
access hole. Alpha Technologies offers a 7-conductor ( 2 x 16AWG, 5 x 24AWG)
cable for use with this product.
4. Mount the BBPS horizontally with two customer-supplied #12 x 2" wood or drywall screws. Direct attachment to a stud is required.
4. Installation
1
3
4
2
9
8
7
11
5
Fig. 4-2, Front and Rear view, AX-12D-BBPS-7.2
6
12
14
13
10
10
Battery Compartment
1
Battery Retaining Strap
2
Battery Locking Clip
3
Battery Heater (beneath shelf)
4
Cable to HC or PRC
5
Cable to NID/NIU/ONT
6
Input, Output Connection Points on
7
Microboard
010-318-C0-007, Rev. G
Battery Wiring Harness (removable)
8
Tab for Locking Door
9
Mounting Holes for Customer-supplied # 12 Hardware
10
Cable to ONT
11
HC or PRC Cable Entry
12
Cable Entry
13
Strain Relief
14
23
Page 24

4. Installation
4.5 Component Interconnection
CAUTION!
Incorrectly connecting these wires will result in non-operation of the unit or cause equipment
damage.
4.5.1 Cable Input Wiring
1. Ensure Power Ring Converter/Home
Converter is disconnected from AC
power, then strip all input wire ends
1/4".
2. Connect the input cable from the
Power-Ring/Home Converter into
the 3-pin "Input 12Vdc" plug in the
following order:
Pin 1, white (return)
Pin 2, black (12V)
Pin 3, green (control).
Tighten the plug screws with a
0.100" jeweler’s screwdriver.
4.5.2 Output Cable Wiring
1. Strip 1/4" from the output cable wire
ends.
2. Install wire ends in 7-wire connector
(Fig. 3-3), Tighten connector screws
with .100" jeweler's screwdriver.
3. Press connector onto "Output
12Vdc" header. The locator pin
prevents misalignment of the
connector. The connector pins are
labeled with their function. Refer
to the specifi c instructions from the
ONT supplier to determine what
alarms are accepted from the BBPS
to the ONT.
Locator Pin
Pin 1
Pin 1
Input 12VDC
CNTRL
Output 12VDC
ALARM RETURN
Status
LEDs
Input from
PRC or HC
Output to
NID/NIU/ONT
Fig. 4-3, Input/Output Connection Points
Pin Function
1 POS (+)
2 NEG (-)
3 TEL COMM
4 AC FAIL
5 REPL BATT
6 BATT MISS
7 BATT LOW
Table 4-1, Pin Out, Battery
Module 7-pin connector
AC FAIL
BATT MISSING
BATTERY LOW
REPLACE BATT
24
4. Connect the ONT cable according to
ONT manufacturer instructions.
5. Once the connections are complete,
the battery may be connected to
the system. The Green Status LED
should light indicating a charged
battery has been installed. Table 5-1
shows a complete list of LED Status
indications.
6. Secure the battery and replace the
battery module door.
Fig. 4-4, Inner Label, AX-12D-BBPS-7.2
010-318-C0-007, Rev. G
Page 25

4.5 Component Interconnection, continued
4.5.3 Alternate connection method for AX-12D BBPS-17
It may be necessary to pivot the microboard assembly slightly to facilitate the installation
or replacement of the input and output cables (Applicable to either the
AX-12D-BBPS-7.2, or AX-12D-BBPS-17 models).
Alternate connection procedure:
1. Disconnect one lead from the battery to assure power to the load is removed.
2. Verify power to load is not currently supplied by the battery.
3. Disconnect one leg of the battery.
4. Loosen the upper mounting screw.
5. Remove the lower mounting screw.
6. Rotate microboard for ease of access.
7. Make necessary connections/repair to input and/or output cables.
8. Return microboard assembly to original position, replace hardware.
9. Reconnect battery.
10. Replace Battery Module Cover.
4. Installation
Loosen
Remove
Fig. 4-5, Rotating the Microboard
010-318-C0-007, Rev. G
25
Page 26

5. Activation
5.1 Activating the Power-Ring Converter
You MUST secure the power utility’s permission and/or assistance prior to installing FlexPoint AX.
Adhere to your power utility’s safety procedures. Poor installation can result in personal injury or
damage to equipment.
1. Remove the security band (and tag, if present) from the meter.
2. Remove the Blanking Plate from the Power-Ring by inserting a slotted screwdriver tip into a slot
located on either side of the Blanking Plate. Slowly twist the screwdriver to lift the Blanking Plate
from the Power-Ring. Set the Blanking Plate aside.
3. Insert the Power-Ring Converter through the Power-Ring base. Ensure the converter “clicks” into
place.
4. Check the LEDs on the Battery Module or NID/NIU/ONT to ensure the Power-Ring converter and
cable are correctly installed. If the Battery Module or NID/NIU/ONT is not receiving power check
the wire connections and/or replace the Power-Ring Converter.
5. Replace the security band on the meter. You can attach a security tag through the band and the
small fl ange extending from the side of the converter.
6. Close the Battery Module and attach a security tag.
1
3
2
Fig. 5-1, Power-Ring Installation
1
Security Band
1
2
5
4
Fig. 5-2, AX30-12D-PC
Locking Feature
AX30-12D-PC Power-Ring Converter
4
6
26
2
Security Tag
Blanking Plate
3
Cable to ONT
5
6
BBPS Locking Tab
010-318-C0-007, Rev. G
Page 27

5.2 Activating the Home Converter
5. Activation
1. Plug the Home Converter into the AC outlet.
2. Check the LEDs on the Battery Module or NID/NIU/ONT to ensure the Home
Converter and cable are correctly installed. If the Battery Module or NID/NIU/ONT is
not receiving power, check the wire connections and/or replace the Home Converter.
The table below provides operation information.
Condition Status LED Status Connector Description
Normal
AC Fail
Replace Battery Red solid
Battery Missing Red blinking
Battery Low Red blinking
Overload
Green solid
Red off
Green
blinking
Green-Red
blinking
Pins 4, 5, 6, 7 are
pulled down to Pin 3.
Pin 4 is in open
collector state
Pin 5 is in open
collector state
Pin 6 is in open
collector state.
Pin 7 is in open
collector state
All conditions normal. AC powers load, charges battery. Battery
is connected and in good condition.
The FlexPoint AX system sets an alarm during an AC line
outage or brownout and if the AC supply voltage is insuffi cient
to maintain battery charge. In order to prevent nuisance alarms
and consequent service disruptions, the FlexPoint AX system
monitors the battery status and sets the alarm when the battery is
discharging. Depending on load conditions, this may take a few
minutes. Conversely, the alarm is cleared when the battery again
receives consistent charge. Please note that this algorithm will also
indicate an alarm when AC is present, but the system is overloaded
to the point where the battery is required to supplement the power
supply to satisfy the load current requirement. If an AC fail alarm is
indicated despite a solid AC line voltage, check if the load is within
specifi cation and if the lead lengths and wire sizes are per the table
in the installation instructions.
The unit will automatically initiate battery test approx. 30 days after
last signifi cant battery discharge (>10% of full energy charge). The
test lasts <30 mins. System notifi es for battery replacement if
voltage changes excessively during test.
Approx. 20 secs after battery removal, system detects for battery,
and repeats every 20 secs, to verify battery disconnection. After 5
seconds, system initiates Battery Missing alarm and maintains this
state until a valid battery (open circuit voltage >12.3V) is
reconnected to the system.
If battery voltage <11V ±100mV >5 secs, system initiates Battery
Low alarm.
This system is in overload, >120% of rated load.
010-318-C0-007, Rev. G
Table 5-1, LED Indications
27
Page 28

5. Activation
5.3 System Runtime and Battery Charging
battery charging capacity retention ratio as a function of storage time and temperature.
The tables below show typical UPS runtimes in minutes as a function of temperature and load and
UPS Runtimes (minutes)
@ -40°F/-40°C @ -4°F/-20°C @ 77°F/25°C
LOAD (W)
4 820 1100 1200
7 360 560 800
10 160 360 500
15 80 195 320
18 156 240
Table 5-2, AX-12D-BBPS-7.2 UPS Runtimes as a function of Temperature and Load
UPS Runtimes (minutes)
@ -40°C/-40°F @ -4°F/-20°C @ 77°F/25°C
LOAD (W)
10 750 1080 1240
15 400 680 940
20 260 440 680
25 160 340 480
30 140 232 400
Table 5-3, AX-12D-BBPS-17 UPS Runtimes as a function of Temperature and Load
28
010-318-C0-007, Rev. G
Page 29

5. Activation
5.4 Battery Management
Batteries have limited shelf life and must be put into service in a timely manner. The chart below
provides general storage guidelines and illustrates the relationship between capacity retention and
storage temperature over time. Consult battery documentation for product specifi c information.
100%
80%
60%
Capacity Retention Ratio %
40%
0
02468 16180141210
Table 5-4, Battery Capacity Retention and Charging
40°C
(104°F)
30°C
(86°F)
Storage Period (Months)
25°C
(77°F)
5°C
(41°F)
No supplementary charge required.
(Carry out supplementary battery
charge before use if 100% capacity is
required).
Supplementary charge required before
use. This charge will help recover the
capacity and should be made as early
as possible.
Supplementary charge may often fail
to recover the capacity. The battery
should never be left standing till this
state is reached.
Supplementary charge and storage guidelines
010-318-C0-007, Rev. G
29
Page 30

6. Frequently Asked Questions
1. What would happen to the FlexPoint AX if the 3 pin connector was turned 180 degrees around
and plugged in?
While the unit would not power the load properly, no damage would occur. The system will
work properly once the connection is corrected.
2. What would happen if the positive and negative leads going to the batteries were reversed (i.e.,
pin 1 & 2 of the three pin connector)?
The design features “reversed battery” protection. Battery back up is not available but no
damage will occur.
3. How long does it take to recharge a battery back to 90% charge after the unit reaches Low
Voltage Disconnect (LVD) value of 10.5V?
10-14 hours under typical load.
4. How long must a battery be charged via trickle charge to reach 100% capacity?
24hrs to 100% capacity.
5. Does this unit have temperature compensation in the design? If so, what is the Voltage Per Cell
(VPRC) voltage?
It does, at a rate of -3.3mV/cell/°C or –19.8mV/battery/C from 0°C to +40°C. Maximum
charged voltage is 14.4V and minimum is 13.3V.
6. If I replace a battery when the replace battery LED is illuminated, why does the LED not go out?
Will the alarm reset itself?
When replacing a battery, it is necessary to wait approximately 20 seconds and allow the
"Replace Battery" LED to change from steady to blinking. Once the LED blinks, the
fully-charged replacement battery can be connected. The LED will go out, indicating the
alarm has been cleared, and the system will begin normal operation.
30
010-318-C0-007, Rev. G
Page 31

6. Frequently Asked Questions
7. If I replace a battery under a “no alarm” condition and the battery voltage was 12.6Vdc, and
an outage occurs and the battery voltage drops to less than 12.2Vdc, will this cause a “replace
battery” alarm, or will the unit try to recharge that battery until the next 40 day test?
No, the “replace battery” indicator will only be activated during the 40 day battery test
routine. Under normal operation, including power failure, the alarm is not activated. Under
these conditions the unit will try to recharge the battery until the next 40 day test.
8. Does the charger disconnect or “ramp back” when a replace battery alarm is illuminated? If not,
how does the unit prevent batteries from being cooked, which may cause a gas build up inside
the enclosure?
No. It will continue to charge the battery to the safe level per the battery manufacturer's
specifi cations. The enclosure provides adequate venting and minimal volume to keep
gas build-up from becoming a concern.
9. If I have a Power-Ring Converter (PRC) reading of 11.8Vdc on the output, is this unit considered
bad? What should be the voltage measured at the output of the device with no cable attached?
There is a high possibility that the voltage-controlled wire, between the battery unit and the
power supply, is not properly connected. Without the control wire, the power supply will only
put out a ~12V; 11.8V is pretty close to that voltage. If the connection is properly verifi ed, then
the unit may have a defective voltage regulation circuitry.
10. What is the line load regulation of the PRC?
Within the proper load, (no overload) the line load regulation of the PRC is excellent. It is
very tightly regulated since it provides the fl oat voltage to charge the battery.
11. Does this unit have a positive disconnect from the utility mains when operating under battery
conditions?
There is no physical disconnect from the main, and no chance for back-feed due to the High-
Frequency (HF) DC isolation transformer. Also, the unit is agency-qualifi ed under stringent
double insulation criteria for SELV (Safety Extra Low Voltage).
12. Does the green wire (control wire for the battery) have a readable voltage that means anything?
The functional voltage on the green wire could be any value between 0V to +4V, depending
on the battery condition and load. Therefore, it is not a very useful troubleshooting tool.
010-318-C0-007, Rev. G
31
Page 32

7. Glossary
BBPS — Battery Backup Power Supply
Provides 12Vdc power to network equipment. Steps down the 48Vdc input voltage from the OPS
(ONT Power Supply) to 12 Vdc, or in the event of loss of line power, by the 7.2Ah battery.
Battery Module
Available in two sizes, houses either a 7.2Ah battery or 17Ah battery.
Blanking Plate
Located at base of power-ring, and is easily removed to facilitate installation of power-ring converter
(PRC). Shipped with power-ring, but also available separately.
CPE — Customer Premise Equipment
Communications equipment (i.e., DSL Modem, cable TV set-top boxes) located on the customer's
premises.
FTTH — Fiber to the Home
A fi ber optic architecture in which deployment of fi ber optic cable extends to the customer's home.
HC — Home Converter
An indoor version of the power-ring converter. Plugs into standard 120Vac outlet and converts the
AC voltage to a nominal 12Vdc. This voltage is supplied to either an indoor or outdoor battery box.
MDU — Multiple Dwelling Unit. Sometimes referred to as MTU (Multiple Tenant Unit)
Building with more than one residence or business.
NIU — Network Interface Unit. May also be referred to as an NID (Network Interface Device)
A device that performs interface functions, to and from a network. A device used primarily within a
local area network (LAN) to allow a number of independent devices to communicate with each other.
ONT — Optical Network Terminal
Provides optical-electrical (O-E) and electrical-optical (E-O) signal conversion. Typically found at
subscriber's end of a Passive Optical Network (PON).
ONU — Optical Network Unit
A form of access node that converts optical signals transmitted via twisted pair wiring into electrical
signals to individual subscribers. Enables large amounts of bandwidth to be delivered to areas
beyond electrical range of a central transmission offi ce.
OPS — ONT Power Supply
Plugs into standard AC outlet and converts 120Vac to 48Vdc. The 48Vdc output voltage is supplied
to the BBPS via low-voltage 24-gauge wires.
PRC — Power Ring Converter
A modular component which plugs into the base of the power-ring and converts 240Vac at the
meter to a nominal 12Vdc.
ROHS — Restriction on Hazardous Substances
EU Directive 2002/95/EC Level 5 of 6
UPS — Uninterruptible Power Supply
Provides battery back up power to the load in the event of loss of line voltage.
32
010-318-C0-007, Rev. G
Page 33

Page 34

Alpha Technologies
Power
Copyright © 2008 Alpha Technologies, Inc. All rights reserved. Alpha is a registered trademark of Alpha Technologies. 010-318-C0-007, Rev. G
Due to continuing product improvements, Alpha reserves the right to change specifi cations without notice.
®
Alpha Technologies
3767 Alpha Way
Bellingham, WA 98226
USA
Tel: +1 360 647 2360
Fax: +1 360 671 4936
Web: www.alpha.com
Alpha Technologies Ltd.
4084 McConnell Court
Burnaby, BC, V5A 3N7
CANADA
Tel: +1 604 430 1476
Fax: +1 604 430 8908
Alpha Technologies
Europe Ltd.
Twyford House
Thorley
Bishop's Stortford
Hertfordshire
CM22 7PA
UNITED KINGDOM
Tel: +44 0 1279 501110
Fax: +44 0 279 659870
Alpha Technologies GmbH
Hansastrasse 8
D 91126 Schwabach
GERMANY
Tel: +49 9122 79889 0
Fax: +49 9122 79889 21
Alphatec, Ltd
P.O. Box 56468
Limassol, Cyprus
CYPRUS
Tel: +357 25 375675
Fax: +357 25 359595
AlphaTEK ooo
Khokhlovskiy Pereulok 16
Stroenie 1
109028 Moscow
RUSSIA
Tel: +7 495 916 1854
Fax: +7 495 916 1349
Alphatec Baltics
S. Konarskio Street 49-201
LT-03123 Vilnius
LITHUANIA
Tel: +370 5 210 5291
Fax: +370 5 210 5292
Alpha Technologies
34, Grande Rue
Bétheny F-51450
FRANCE
Tel: +33 32 64990 54
Fax: +33 32 64990 54
 Loading...