

16
Climatiseur
Climatiseur
Mobile
Mobile
Monobloc
Monobloc
Mobile Air
Mobile Air
Conditioner
Conditioner
ALPACLIM
7503 E
7503 ET
MODE D’EMPLOI
MODE D’EMPLOI
USER MANUAL
USER MANUAL
TROUBLE SHOOTING
TROUBLE SHOOTING
15
CONSIGNES DE SECURITE
CONSIGNES DE SECURITE
DANS TOUTE UTILISATION D’APPAREILS ÉLECTRIQUES, DES PRÉCAUTIONS DE BASE SONT À RESPECTER.
LIRE ATTENTIVEMENT CETTE NOTICE AVANT LA PREMIERE UTILISATION DE L’APPAREIL.
• Vérifier que le voltage indiqué sur la plaque signalétique de l’appareil correspond bien à celui de votre installation
électrique. Si ce n’est pas le cas, adressez-vous au revendeur et ne branchez pas l’appareil. Toute erreur de
branchement annule la garantie.
• Ne pas laisser l’appareil à la portée des enfants.
• Cet appareil est destiné à un usage domestique. Il doit être utilisé selon les instructions du manuel. Ne jamais
l’employer pour d’autres usages.
• Ne jamais laisser l’appareil sans surveillance lorsqu’il fonctionne.
• Si vous devez vous absenter même un court instant, arrêter l’appareil.
• Vérifier régulièrement l’état du cordon d’alimentation. Ne jamais utiliser l’appareil si le cordon d’alimentation, la
prise ou l’appareil sont endommagés.
• La longueur du cordon de cet appareil a été calculée pour réduire les risques d’accidents. S’il est trop court,
utiliser une rallonge et prendre toutes les précautions utiles pour qu’on ne puisse pas se prendre les pieds dedans
ou la tirer accidentellement.
• Ne jamais utiliser l’appareil à l’extérieur.
• Prendre soin de brancher et débrancher la prise correctement pour éviter tout risque de rupture du câble
d’alimentation.
• Ne jamais utiliser d’autres accessoires que ceux livrés et recommandés par le fabricant. Ceci peut être dangereux
et risque d’endommager l’appareil.
• Ne pas exposer directement au soleil. Ne pas placer l’appareil près d’une source de chaleur.
• Ne pas utiliser l’appareil dans ou près de l’eau, afin d’éviter tout choc électrique. Eviter toutes projections d’eau.
• Ne pas placer l’appareil dans un lieu où il peut y avoir des projections de graisses.
• Respecter les instructions pour le nettoyage.
• Ne jamais insérer vos doigts ou tout autre objet métallique dans les orifices de ventilation. Prévenir vos enfants du
danger que cela pourrait engendrer.
• Toujours éteindre l’appareil avant de le débrancher.
• Débrancher la prise de connexion avant toute opération de nettoyage, de maintenance ou de réparation de
l’appareil.
• Ne jamais réparer l’appareil vous-même. Vous perdriez le bénéfice de la garantie. Comme tout appareil électrique,
il doit être réparé par une personne qualifiée. De même, le changement du cordon d’alimentation représente un
réel danger et il est nécessaire de contacter un réparateur agréé.
Précautions spécifiques
• Installer le climatiseur sur une surface plate et dans un endroit spacieux, sans obstacles. Laisser un minimum de
30 cm entre le climatiseur et le mur.
2
ALPATEC vous félicite d’avoir choisi ce produit et vous remercie de votre confiance.
Pour votre confort et votre sécurité, votre article a été vérifié à toutes les étapes de sa
fabrication et a passé avec succès tous nos tests de qualité.
Nos produits sont conçus pour vous plaire tant par leur design
que par leur facilité d’utilisation et dans l’objectif constant
de vous apporter complète satisfaction.
FRANÇAIS
FRANÇAIS
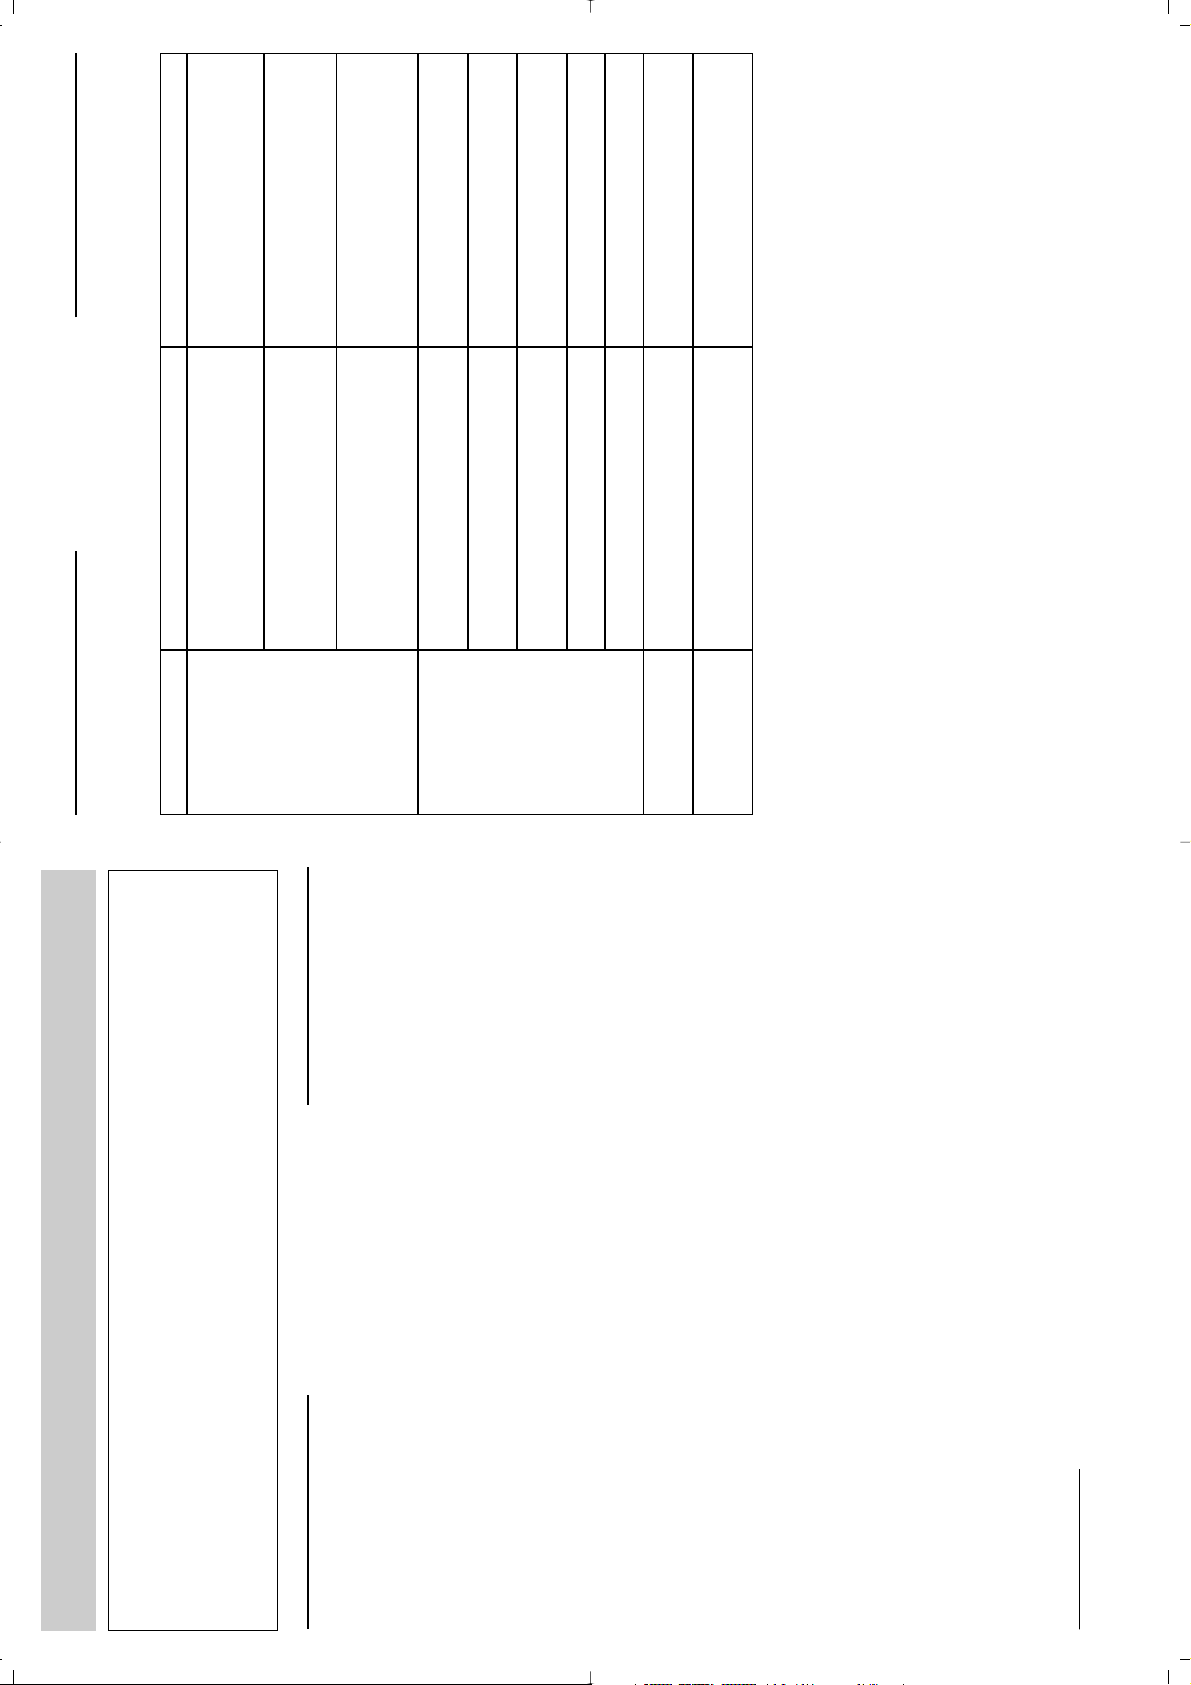
TROUBLES
1• UNIT DOES NOT
START, when
pressing M/A
button.
2• NOT COOL
ENOUGH.
3• NOISY - VIBRATION
- Water full indicator blinks, drain tank is full. Dump the water in the drain tank.
- Green lamp does not light. It is not yet three
minutes after switching off.
Wait until three minutes have passed.
- Room temperature is lower than the tempera-
ture (cooling mode).
Reset the temperature.
- The windows or doors in the room are not clo-
sed.
Make sure all the windows and doors are
closed.
- There are heat sources inside the room. Remove the heat sources if possible.
- Exhaust air duct is not connected or blocked.
Connect the duct and make sure it can
function properly.
- Temperature setting is too high. Decrease the temperature.
- Air filter is blocked by dust Clean the air filter
- The ground is not level or not flat enough. Place the unit on a flat, level ground if possible.
4• GURGLING
SOUND
- The sound comes from the flowing of refrige-
rant inside the air conditioner
That is normal.
POSSIBLE CAUSES SUGGEST REMEDIES
- To stop the movement of louver, press the “SWING” button again.
8• DRAIN TANK INDICATOR.
- When the drain tank is full the water full indicator (13) will blink. The LED
screen turns dark and displays the « PI » letters. The dry process stops
immediately. The fan process continue to operate.
Take out the tank carefully to avoid water splashing and empty the drain tank.
Put the tank back to place properly. Wait 3 minutes before the compressor
starts again. The dry process will automatically resume.
9• CONTINUOUS DRAINAGE.
- Drain water can be collected externally by directing the plastic tube inside the
drain tank cabin through the water tank to any vessel such as bucket. Remove
the plastic tube cap before operating.
- Do not take out the water tank during drainage.
MAINTENANCE
MAINTENANCE
IMPORTANT :
1) Be sure to unplug the unit before cleaning.
2) Do not use gasoline, thinner or other chemicals to clean the unit.
3) Do not wash the unit directly under a tap or a hose. The electrical compo-
nents inside may be damaged and cause danger.
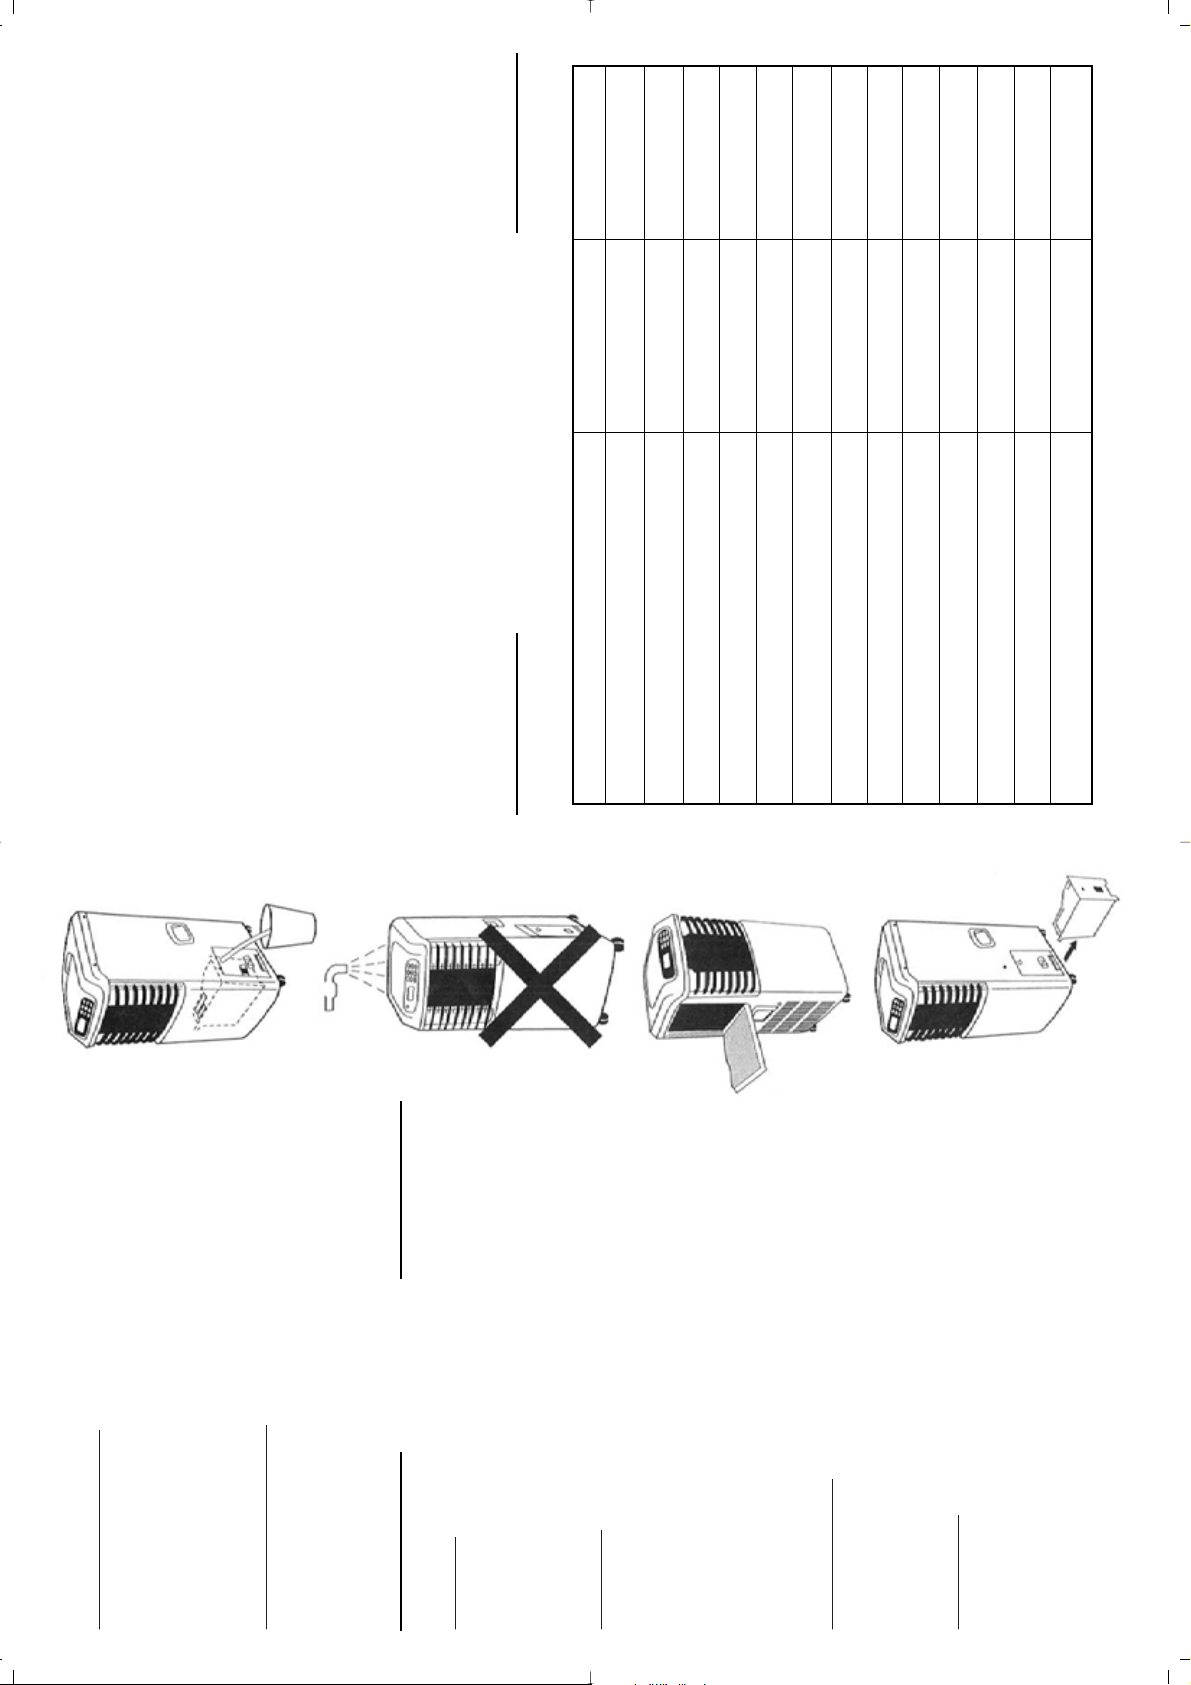
1• AIR FIL
TER.
- Clean the air filter at least once every two weeks to prevent inferior fan oper-
ation because of dust.
- Removal: Pull out the filter cover and remove the air filter from the filter cover.
- Cleaning: Wash the air filter by immersing it gently in warm water (about 40°C)
with a neutral detergent. Rinse the filter and dry it in a shady place.
- Mounting: Attach the air filter to the filter cover using the attachment hook on
the inner surface of the cover. Put the filter cover back to the unit.
2• UNIT ENCLOSURE.
Use a lint-free cloth soaked with neutral detergent to clean the unit enclosure.
Finished by a dry clean cloth.
3• DRAIN TANK.
Wash the tank using warm water (about 40°C) with neutral detergent. Rinse
and then dry in a cool place. Put the tank back after it is dried completely.
14
• La prise de l’appareil doit toujours être accessible après son installation.
• Toujours mettre le climatiseur en position verticale, afin de maintenir le compresseur dans de bonnes conditions.
• Ne jamais utiliser l’appareil sans le filtre.
• Ne jamais placer d’objets sur l’appareil.
• Ne pas utiliser près d’appareils à gaz, ou à proximité de liquides inflammables.
• Eviter toute proximité avec des appareils tels que postes de télévision, radios afin d’éviter des interférences
magnétiques.
• Ne pas couvrir la sortie d’air.
• Ne pas utiliser d’aérosols (insecticides, peinture) ou tout autre produit inflammable à proximité de l’appareil pour
éviter de déformer les parties plastiques ou de provoquer des dommages électriques.
Source d’alimentation
• La prise doit être fiable et ne doit pas être endommagée.
• Ne pas brancher le climatiseur à une prise multiple.
• Insérer la prise dans la prise de terre avant d’allumer l’appareil.
LE FABRICANT NE SAURAIT ÊTRE TENU POUR RESPONSABLE DE LA MAUVAISE UTILISATION
DE L’ APPAREIL.
CONSERVER SOIGNEUSEMENT CE MODE D’EMPLOI.
CARACTÉRISTIQUES TECHNIQUES
CARACTÉRISTIQUES TECHNIQUES
3
AC 7503 E AC 7503 ET
Compresseur rotatif R 407 C R 407 C
Puissance frigorifique maxi 2200 W 2200 W
Puissance frigorifique nominale 1960 W 1960 W
Puissance absorbée nominale 1150 W 1150 W
Puissance de chauffe NON NON
Déshumidification 26,4 l/j 26,4 l/j
Débit d’air 320 m
3
/ h 320 m
3
/ h
Niveau sonore dB (A) 51 51
Vitesses de ventilation 3 3
Longueur max. de la gaine 200 cm 200 cm
Diamètre de la gaine 132 mm 132 mm
EER 1,7 1,7
Classe énergétique F F
OPERA
OPERA
TING INSTRUCTIONS
TING INSTRUCTIONS
Before Starting This Unit :
1. Check the unit is well placed and that you can have an easy access
to the plug.
2• Plug the unit into a 220-240V 50Hz or 220V 60Hz ground electrical
outlet.
3. Install the air outlet duct at the back of the appliance.
4• Make sure the water tank is correctly positioned inside the cabinet
otherwise the unit does not operate.
5• To turn the unit on. Press the M/A key (8) (On/Off switch).
OPERA
OPERA
TION
TION
1• BEFORE USE.
Dehumidifying and cooling operation :
- The operating range for dehumidifying is 10°C - 32°C, and the operating range for cooling is 16°C - 32°C.
- If the cooling or dehumidifying operations have been switched off and need be switched again in a short time,
allow approximately three minutes for the cooling or dehumidifying operations to resume.
- Ensure that the drain tank is placed in the unit.
Power supply :
- Insert the AC power plug to AC socket.
- Do not connect the air conditioner to a multiple socket outlet, which is also being used for other electrical appli-
ance.
- Be sure the power supply is AC 220-240V 50Hz or 220V 60Hz.
2• COOLING OPERA
TION.
- Press the “MODE” (14) button several times until the cooling mode indicator (1) lights up.
- Press the « + » and « -« temperature knob (9 and 10) to select your desired room temperature (16°C – 32°C).
- Press the “FAN” knob (12) to choose the fan speed (low, middle, high).
3• DEHUMIDIFYING OPERATION.
- Press the “MODE” (14) button several times until the dry mode indicator (2) lights up.
- The fan will run at a fixed speed at this setting.
- Keep windows and doors closed for the best dehumidifying effect. Do not put the duct to window.
4• F
AN OPERATION.
- Press the “MODE” (14) button several times until the fan mode indicator (3) lights up.
- Press the “FAN” knob (12) to choose the fan speed (low, middle, high).
5• TIMER OPERA
TION.
- Press the Timer on or off knob (18 and 15) when the air conditioner is off to select the time you need the unit
starts to operate or stops. The range of setting time is 0 and 24 hours. The unit will start and stop automatically.
The functions indicators (16 and 17) light up.
Both Timer on and Timer off can be set simultaneously.
Press the On/Off knob (8) cancel any setting time.
6• AUTOMA
TIC LOUVER.
- Press the “SWING” button (11) and the louver button will automatically move to control direction of airflow.
13
DESCRIPTION DE L
DESCRIPTION DE L
’APP
’APP
AREIL
AREIL
ACCESSOIRES
ACCESSOIRES
• Vérifier que tous les accessoires sont bien dans l’emballage. • Se référer au mode d’emploi pour leur utilisation.
FONCTIONNEMENT DU T
FONCTIONNEMENT DU T
ABLEAU DE BORD
ABLEAU DE BORD
4
Tableau de contôle
Réservoir
d’eau
Cordon
électrique
Orifices de
ventilation
Poignée de
transport
Roulettes
Support du
filtre
Grilles
horizontales
VUE DE FACE
VUE ARRIÈRE VUE DE CÔTÉ
M/A
Oscillation
Ventilation
Prog. Arrêt
Prog. Marche
Marche
Arrêt
Réservoir plein
Mode
Clim. Déshu. Vent. Lent Moyen Fort
-
+
86 74 5311817 2
16 15 13 11 10 9
14 12
DESSIN DES PIECES NOM DES PIECES QUANTITE
Gaine 1
Manchon A (pour le montage permanent de la gaine) 1
Buse de sortie d’air B (pour le montage provisoire de la gaine) 1
Chevilles 4
Vis 4
1. Indicateur mode climatisation
2. Indicateur mode
déshumidification
3. Indicateur mode ventilation
4. Indicateur ventilation lente
5. Indicateur ventilation moyenne
6. Indicateur ventilation forte
7. Ecran LED
8. Bouton M/A
9. Bouton température « - «
10. Bouton température « + »
11. Bouton oscillation
12. Bouton fonction ventilation
13. Indicateur réservoir plein
14. Bouton Mode
15. Bouton PROG arrêt
16. Indicateur fonction PROG Arrêt
17. Indicateur fonction PROG
Marche
18. Bouton PROG marche
INST
INST
ALLA
ALLA
TION
TION
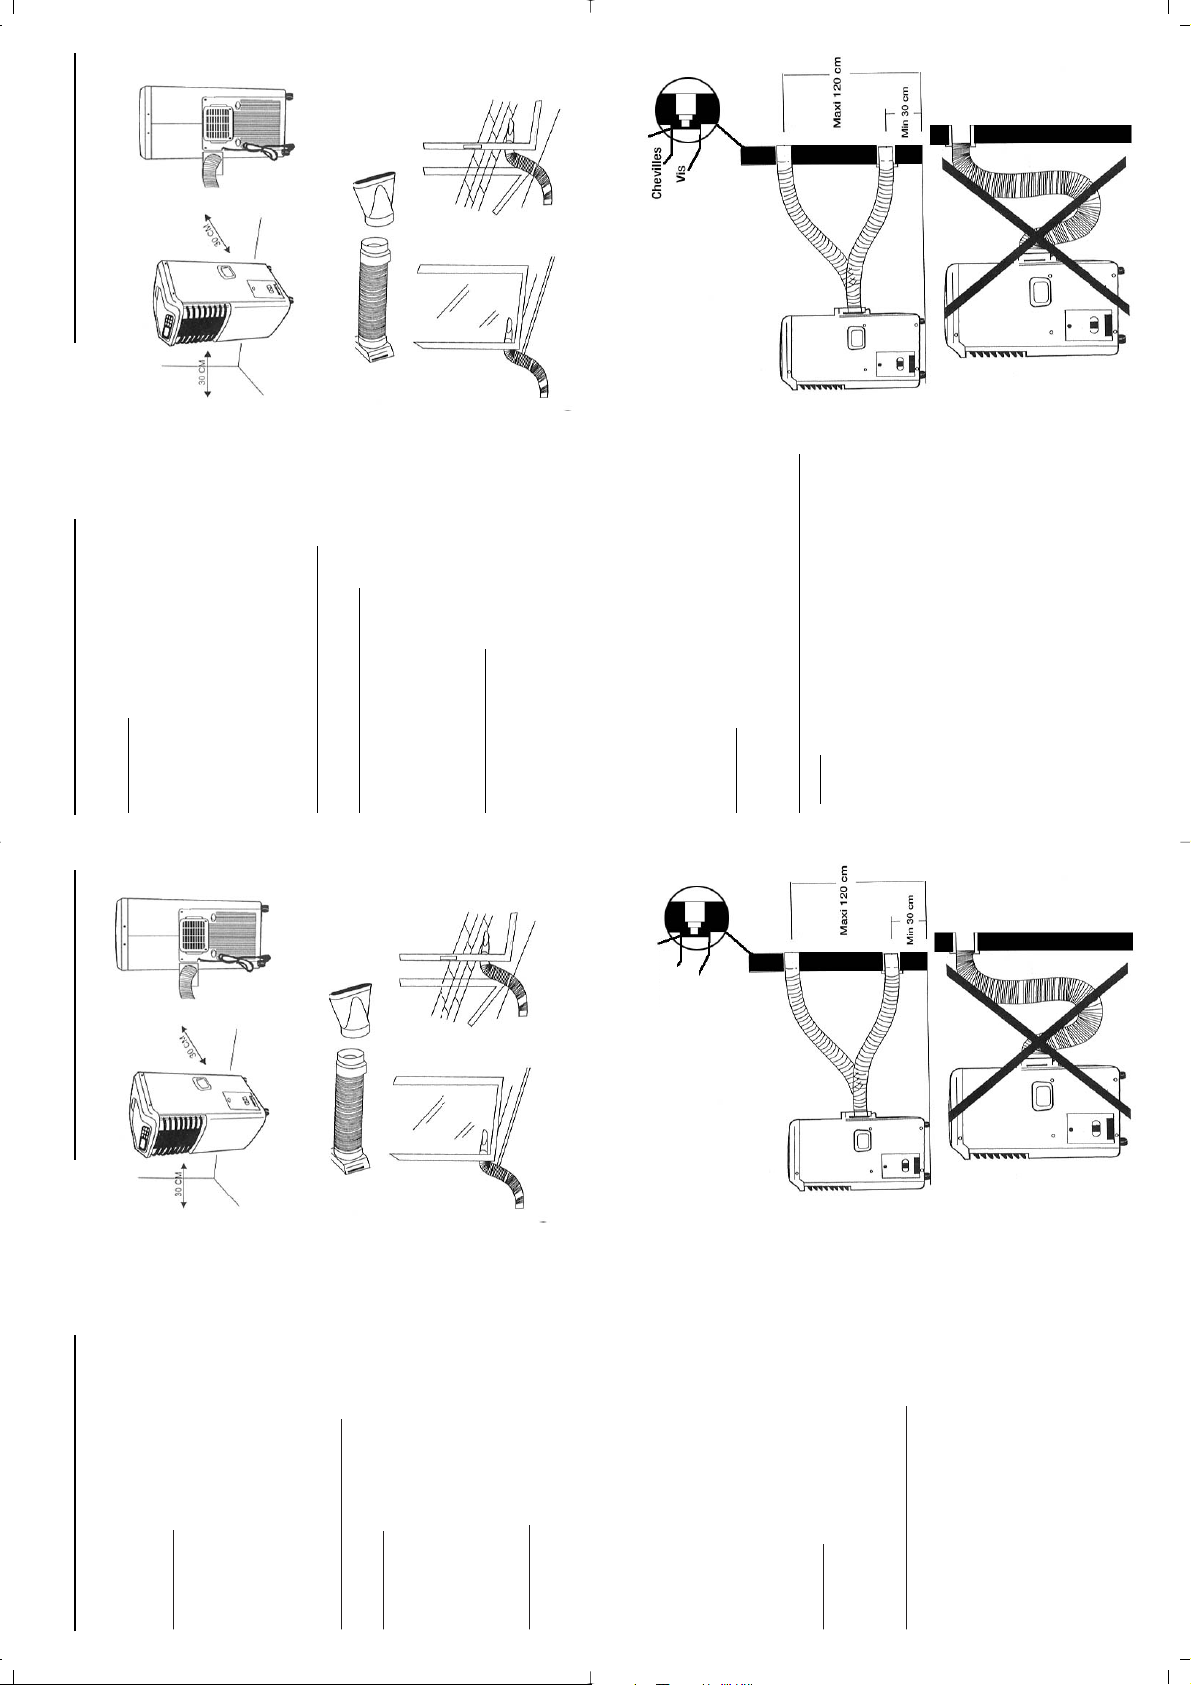
1• IMPORTANT :
Install the mobile air conditioner in a flat and spacious
location where the air outlets will not be covered up.
A minimum clearance of 30 cm from a wall or other
obstacles should be kept.
The plug shall always be accessible after its installation.
2. D
UCT
MOUNTING INSTRUCTIONS :
A- Temporary :
1. Attach one end of the duct to the exhaust air outlet of the
mobile air conditioner.
2. Attach the other end of the duct to the window adapter B.
3. Put the end of duct to nearby window.
B- Per
manent :
1. Attach one end of the product to the exhaust air outlet of
the mobile air conditioner.
2. Install to the wall adapter A onto the wall by using
4 wall plugs and screws.
3. Attach the other end of the duct to the wall adapter A.
4. Cover the hole using the adapter cap when not in use.
• The duct can be compressed or extended between 550mm and
2000mm, but it is desirable to keep the duct length to a minimum.
IMPOR
TANT : Do not over stretch or fold the duct (see picture).
WATER TANK SAFETY FEATURE
This unit is equipped with a fall-safe switch mechanism which
prevents the unit from condensing water in the event the water
tank is accidentally displaced, and / or FULL with water. If this
situation occurs, the unit will signal 8 BEEPS and the WATER
FULL indicator light will flash red continuously until the water
tank is correctly positioned and / or emptied.
NOTE : The fan motor will continue to operate under this
condition. This is normal, but no cooling or dehumidifying will
occur.
12
Wall adapter A
INST
INST
ALLA
ALLA
TION
TION
1• IMPORTANT :
Installer le climatiseur sur une surface plane et dans un
endroit spacieux, où les orifices de ventilation ne seront
pas bouchés. Laisser un espace minimum de 30 cm
entre le climatiseur et le mur ou tout autre objet.
La prise de l’appareil doit toujours être accessible après
son installation.
2• I
NSTRUCTIONS DE MONTAGE DE LA GAINE :
A- Montage fenêtre (temporaire) :
1. Fixer la gaine à la sortie d’air du climatiseur.
2. Mettre la buse de sortie d’air B à l’autre bout de la
gaine.
3. Positionner cette buse dans le cadre d’une fenêtre.
B- Montage per
manent :
1. Fixer la gaine à la sortie d’air du climatiseur.
2. Installer le manchon A dans l’orifice du mur
préalablement percé, en utilisant les 4 chevilles et vis.
3. Fixer l’autre bout de la gaine à l’adaptateur A.
4. Couvrir l’adaptateur avec le cache quand il n’est pas
utilisé.
• Entre le mur et le climatiseur, la gaine peut être espacée
de 500 mm à 2 000 mm, mais il est préférable de laisser
celle-ci la moins longue possible.
IMPOR
TANT : Ne jamais faire de coude prononcé avec la
gaine (voir schéma).
>
CARACTÉRISTIQUE DE SÉCURITÉ DU RÉSERVOIR
D’EAU
Ce produit est équipé d’un mécanisme de sécurité qui
empêche l’appareil de faire déborder le bac de
récupération des condensats au cas où le réservoir d’eau
serait accidentellement mal placé, et / ou plein.
Dans ce cas, l’appareil fera 8 bips et le voyant rouge du
réservoir plein clignotera jusqu’à ce que le réservoir d’eau
soit correctement placé et / ou vidé.
REMARQUE : Le moteur du ventilateur continuera à
fonctionner dans ce cas. Ceci est tout à fait normal mais
l’appareil ne produira pas de froid ni de déshumidification.
5
B
Manchon A
A - Montage fenêtre
B - Montage permanent
B
A - Temporary mounting
B - Permanent mounting
Wall plug
Screw
ACCESSORIES
ACCESSORIES
• Check all the accessories are included in the package. • Please refer to the installation instructions for their use.
OPERA
OPERA
TION P
TION P
ANEL
ANEL
11
MODE D’EMPLOI
MODE D’EMPLOI
Avant de démarrer le climatiseur :
1• Vérifier que l’appareil est correctement positionné et que vous avez
un accès facile à une prise électrique.
2• Brancher le climatiseur à une prise de 220-240V 50Hz.
3. Installer le conduit de sortie d’air à l’arrière de l’appareil.
4• Prendre garde à ce que le réservoir d’eau soit correctement en place
sur le côté du climatiseur, sinon, l’appareil ne fonctionnera pas.
5• Pour mettre le climatiseur en marche, appuyez sur «M/A» (le bouton
Marche/Arrêt (8)).
FONCTIONNEMENT
FONCTIONNEMENT
1• A
VANT L’UTILISATION DU CLIMATISEUR.
Fonctionnement du déshumidificateur et climatiseur :
- Le système de déshumidification fonctionne de 10 °C à 32 °C, et le système de climatisation de 16 °C à 32 °C.
- Si les fonctions déshumidification et climatisation ont été arrêtées et que vous voulez les remettre en marche
rapidement, attendre environ 3 mn avant que ces fonctions se remettent en route.
- Vous assurer que le réservoir de récupération des condensats est correctement positionné dans le climatiseur.
Branchement :
- Insérer la fiche dans la prise électrique
- Ne pas brancher l’appareil sur une multiprise à partir de laquelle fonctionne un autre appareil.
- Vérifier que le courant est bien de 220-240V 50Hz.
2• L
E
SYSTÈME DE
CLIMATISATION
.
- Appuyer plusieurs fois sur le bouton «MODE» (14), jusqu’à ce que l’indicateur de mode climatisation (1) s’allume.
- Appuyer sur les boutons température (9) ou (10) pour sélectionner la température désirée dans la pièce (entre 16
°C et 32 °C).
- Appuyer sur le bouton fonction ventilation (12) pour choisir la vitesse de ventilation (lente, moyenne, forte).
3• L
E SYSTÈME DE DÉSHUMIDIFICATION.
- Appuyer plusieurs fois sur le bouton «MODE» (14), jusqu’à ce que l’indicateur de mode déshumidification (2) s’allume.
- La ventilation fonctionnera à une vitesse fixe.
- Garder les fenêtres et les portes fermées pour obtenir une déshumidification plus performante.
Ne pas faire passer la gaine à travers la fenêtre.
4• L
E SYSTÈME DE VENTILATION.
- Appuyer plusieurs fois sur le bouton «MODE» (14), jusqu’à ce que l’indicateur de mode ventilation (3) s’allume.
- Appuyer sur le bouton fonction ventilation (12) pour choisir la vitesse de ventilation (lente, moyenne, forte).
5• RÉGLAGE DE LA PROGRAMMATION.
Mise en marche automatique :
- Appuyer sur les boutons PROG (18) ou (15) quand l’appareil est éteint pour programmer l’heure à laquelle vous
souhaitez le déclenchement ou l’arrêt du climatiseur. La plage de programmation se situe entre 0 et 24 heures.
L’appareil démarrera et s’arrêtera automatiquement. Les indicateurs de fonction correspondants (16 et 17)
s’allument.
- La programmation du déclenchement et de l’arrêt de l’appareil peuvent se faire simultanément.
- Appuyer sur le bouton M/A (8) annulera toute programmation de déclenchement ou d’arrêt.
6
86 74 5311817 2
16 15 13 11 10 9
14 12
PARTS PARTS NAME QUANTITY
Duct
1
Wall adapter A (for permanent duct mounting) 1
Window adapter B (for temporary duct mounting) 1
Wall plug 4
Screws 4
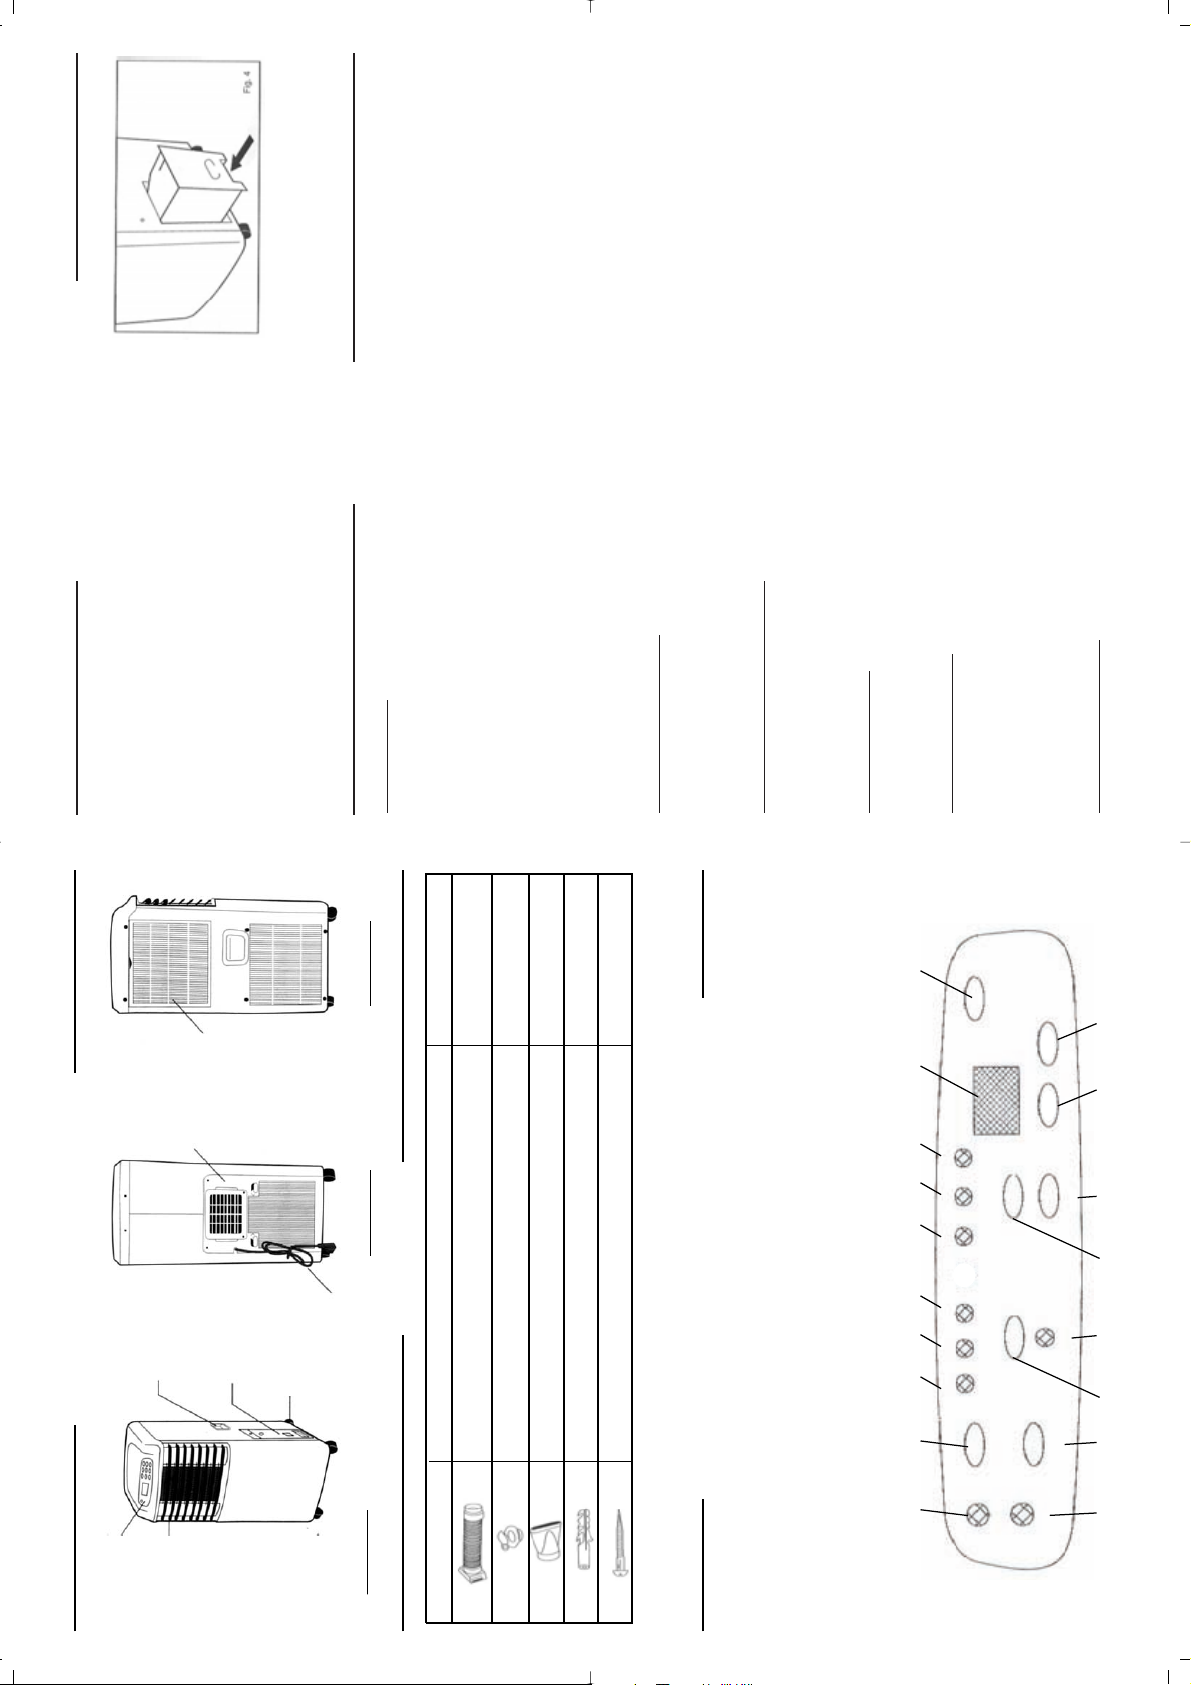
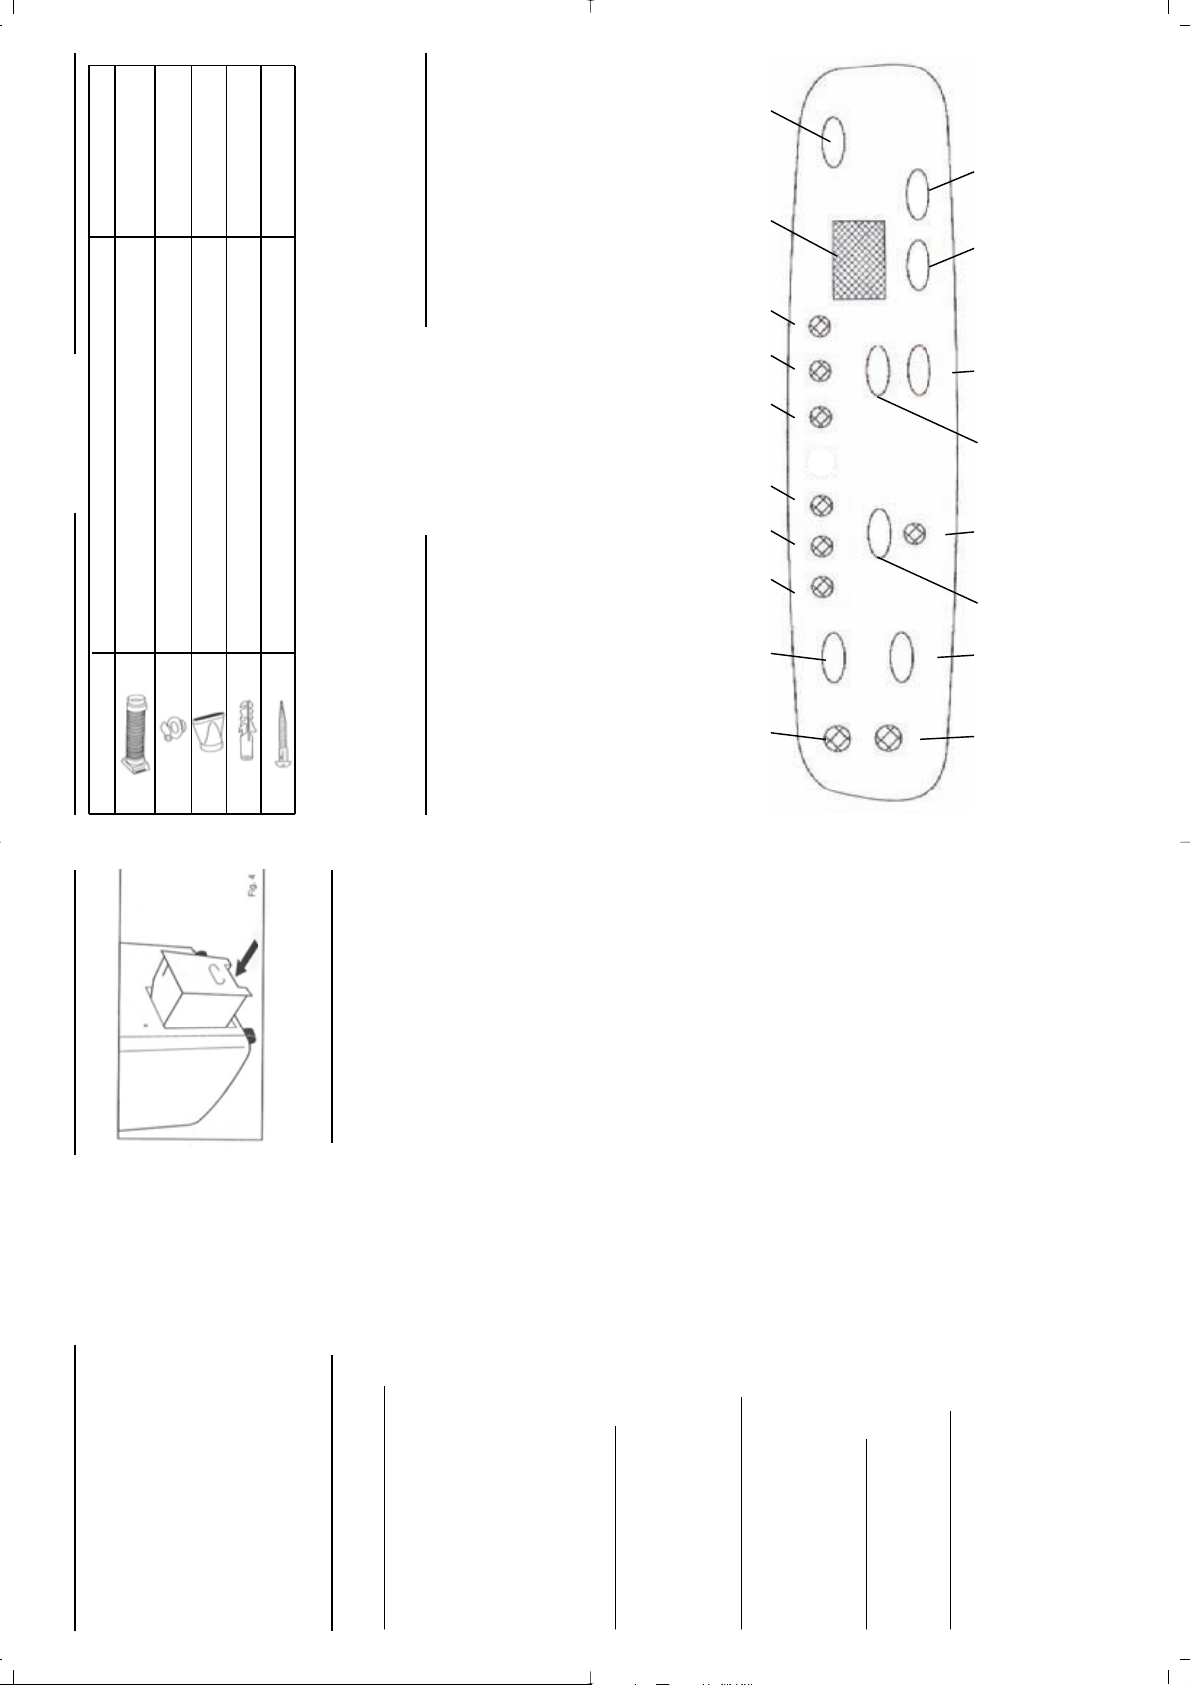
1. Cooling mode indicator
2. Dry mode indicator
3. Fan mode indicator
4. Low fan indicator
5. Middle fan indicator
6. High fan indicator
7. LED screen
8. M/A knob
9. « - » temperature knob
10. « + » temperature knob
11. Swing knob
12. Fan function knob
13. Water full indicator
14. Mode knob
15. Timer off knob
16. Timer on function indicator
17. Timer off function indicator
18. Timer on knob
M/A
-
+
Ventilation
Mode
Clim. Déshu. Vent. Lent Moyen Fort
Prog. Marche
Marche
Oscillation
Réservoir plein
Prog. Arrêt
Arrêt
Power sources : The plug has to be well fixed and should not be damaged.
Do not plug the appliance with an adaptor.
Plug first into the wall socket before switching on the appliance.
THE MANUFACTURER WILL NOT ASSUME ANY RESPONSABILITY IN CASE OF NON ADHERENCE TO
THESE INSTRUCTIONS.
SAVE THIS USER MANUAL CAREFULLY.
SPECIFICA
SPECIFICA
TIONS
TIONS
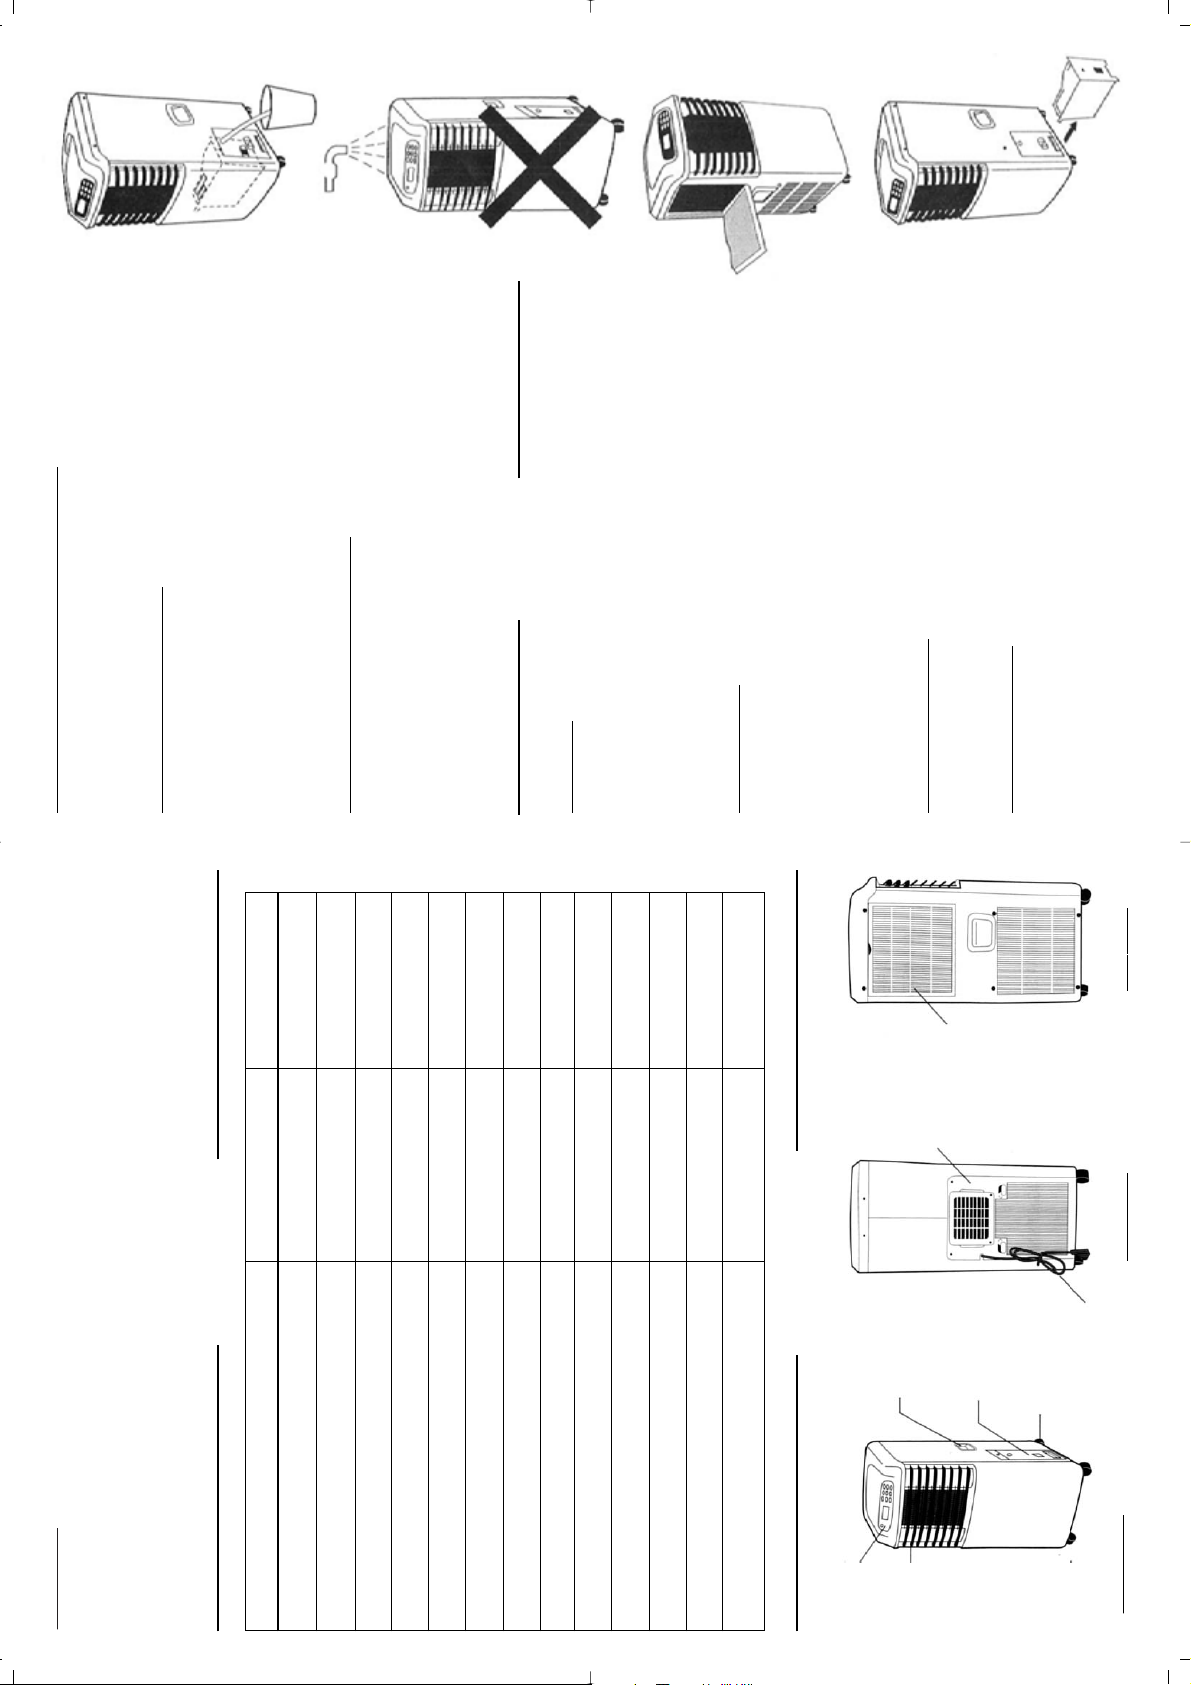
NAMES OF P
NAMES OF P
AR
AR
TS
TS
10
Operation panel
Drain
tank
AC power
cord
Exhaust
air outlet
Handle
recess
Casters
Filter cover
Horizontal
Grilles
FRONT VIEW
REAR VIEW SIDE VIEW
6• LA FONCTION AUTOMATIQUE DE L’ORIENTATION DE L’AIR :
- Appuyer sur le bouton oscillation (11) pour la mise en marche du balayage
automatique de l’air. Pour arrêter les mouvements oscillatoires, appuyer à
nouveau sur le bouton oscillation.
8• L
’INDICATEUR DU RÉSERVOIR PLEIN :
-Quand le réservoir d’eau est plein, l’indicateur de réservoir plein (13) s’allume.
Les lettres « PI » s’affichent sur l’écran LED. Le processus de déshumidification
s’arrête aussitôt. Le moteur du ventilateur continue de fonctionner cependant.
- Retirer le bac prudemment, en évitant de renverser de l’eau sur l’appareil et
vider le réservoir. Attention à le replacer correctement. Le compresseur
redémarrera après une attente de 3 minutes. Le processus de
déshumidification reprendra.
9• L
’ÉVACUATION CONTINUE DES CONDENSATS :
- L’eau canalisée peut être extraite directement par un tube en plastique,
partant du réservoir d'eau jusqu’à un récipient (comme un seau, par exemple).
Enlever le bouchon du tube en plastique avant de procéder à l’évacuation
continue.
- Ne pas sortir le réservoir d’eau pendant l’évacuation.
ENTRETIEN
ENTRETIEN
IMPORT
ANT :
1) Etre sûr que la prise est débranchée avant de nettoyer l’appareil.
2) Ne pas utiliser d’essence, solvant ou autres produits chimiques, pour
nettoyer le climatiseur.
3) Ne pas laver le climatiseur en le mettant sous un robinet ou en utilisant un
tuyau d’arrosage. Ceci risquerait de provoquer des chocs électriques et
pourrait endommager l’appareil.
1. LE FIL
TRE À AIR
- Nettoyer le filtre à air au moins une fois toutes les deux semaines, pour éviter
les problèmes d’inefficacité de la ventilation dus à la poussière.
- Retirer le filtre. Tirer le support du filtre et enlever le filtre à air de son support.
- Nettoyage. Laver le filtre à air délicatement dans de l’eau tiède (environ 40°C),
avec un détergent neutre. Rincer le filtre et le laisser sécher.
- Remontage. Attacher le filtre à son support, en utilisant les crochets. Replacer
le tout sur le climatiseur.
2. CORPS DE L
’APPAREIL
Utiliser un chiffon avec un peu de détergent neutre pour nettoyer l’extérieur.
Sécher avec un autre chiffon sec.
3. LE RÉSER
VOIR D’EAU
Laver le réservoir en utilisant de l’eau tiède (environ 40°), avec un détergent
neutre. Rincer et laisser sécher.
Remettre le bac en place dès qu’il est complètement sec.
7
AC 7503 E AC 7503 ET
Rotary compressor R 407 C R 407 C
Maximum cooling capacity 2200 W 2200 W
Nominal cooling capacity 1960 W 1960 W
Nominal cooling input power 1150 W 1150 W
Heating capacity NO NO
Dehumidifying capacity 26,4 l/day 26,4 l/day
Air flow 320 m
3
/ h 320 m
3
/ h
Noise level min.-max. dB (A) 51 51
Number of fan speeds 3 3
Duct length max. 200 cm 200 cm
Duct diameter 132 mm 132 mm
EER 1,7 1,7
Energetic class F F
PROBLÈMES TECHNIQUES ÉVENTUELS
PROBLÈMES TECHNIQUES ÉVENTUELS
8
PROBLÈMES
1• L’APPAREIL NE
DÉMARRE PAS
quand on appuie
sur le bouton
M/A.
2• NE GÉNÈRE PAS
ASSEZ DE FROID.
3• BRUIT -VIBRATION
- L’indicateur du réservoir d’eau est allumé, le
bac est plein.
Videz le réservoir d’eau.
- Le voyant vert ne s’allume pas. Cela ne fait pas
3 minutes que le climatiseur est allumé.
Attendre que les 3 minutes soient passées.
- La température de la pièce est inférieure à la
température indiquée sur le climatiseur (mode
climatisation).
Indiquez une température inférieure.
- Les fenêtres et les portes ne sont pas fermées. Veillez à bien fermer toutes les fenêtres et portes.
- Il y a des sources de chaleur dans la pièce.
Enlever les sources de chaleur si cela est
possible.
- La gaine n’est pas fixée ou bloquée.
Fixez la gaine et veillez à ce qu’elle fonctionne
correctement
- La température sélectionnée est trop haute. Sélectionnez une température inférieure.
- Le filtre à air est bloqué par la poussière. Nettoyez le filtre à air.
- La surface sur laquelle est placée le climatiseur
n’est pas plane.
Placez le climatiseur sur une zone plate
si possible
4• BRUIT DE
«GARGOUILLIS»
- Le bruit vient du mouvement du réfrigérant à
l’intérieur du climatiseur.
C’est normal.
CAUSES POSSIBLES SUGGESTIONS POUR Y REMÉDIER
CAUTIONS
CAUTIONS
PLEASE READ ALL THESE INSTRUCTIONS CAREFULLY BEFORE USING THIS APPLIANCE.
• Make sure that the voltage rating on the type plate corresponds to your main voltage. Any error in connecting the
appliance invalidates the guarantee.
• Keep out of reach of children.
• Only use this appliance for domestic purposes and in the way indicated in these instructions. Never use for any
other purposes.
• Never let the appliance unsupervised when in use.
• Switch off the appliance if you have to go away even a short time.
• From time to time, check the cord. Never use the cord, the plug or the appliance when they show any sign of damage.
• The cord length of this product has been selected to reduce the possibility of being injured. If more cord length
is needed, an extension cord may be used. Ensure not to let it hang down the working area where someone
could accidentally pull or trip over it.
• Do not use the appliance outside and always place it in a dry environment.
• Never pull the cord to unplug or move the appliance.
• Never use accessories non delivered by the supplier. This could be dangerous and could damage the appliance.
• Keep the appliance far from hot or electric sources and into direct sunlight.
• Never immerse the product in water or any other liquid for any reasons.
• Keep the appliance far from water splashes.
• Do not place the appliance in a place where it can have fat splashes.
• Respect the instructions for cleaning.
• Do introduce neither sharp metallic objects, nor fingers inside the air swinging fins of the appliance. Prevent your
children of this danger.
• Always switch off the appliance before unplugging it.
• Unplug the appliance before cleaning or changing any parts of the appliance or when it’s not in use.
• Never repair the appliance yourself. All interventions made by a non-qualified person can be dangerous ; in this case
guarantee conditions would cancel. As well as the change of the cord has to be done by a competent electrician.
Special recommendations :
• Install the mobile air conditioner on a flat location with a large space, without obstacles. Let a 30 cm minimum
space between the mobile air conditioner and the wall.
• The plug shall be always accessible after its install.
• Always place the appliance in a vertical position, in order to maintain the compressor in good working conditions.
• Never use the appliance without its filter.
• Do not use near gas appliances or near inflammable liquids.
• Keep the unit far from TV sets or radios in order to avoid electromagnetic interferences.
• Do not cover the air outlet.
• Do not use spray (insecticides, painting) or any other inflammable products near the appliance as the plastic case
may be deformed. The unit can have electric damages.
9
ENGLISH
ENGLISH
For your comfort and safety,
ALPATEC has checked all the steps of manufacturing. The products have been
made for you to enjoy their design and easiness to use.
ALPATEC, a complete range of air conditioners, coolers, fans and
heaters for you to be completely satisfied.
 Loading...