

Page 1
CLIMA
CLIMA
TISEUR
TISEUR
MOBILE
MOBILE
MONOBLOC
MONOBLOC
MOBILE
MOBILE
AIR
AIR
CONDITIONER
CONDITIONER
AC 105.1 ETP
MODE D’EMPLOI
MODE D’EMPLOI
USER MANUAL
USER MANUAL
notice AC105.1ETP 5/12/06 17:36 Page 1
Page 2
CONSIGNES DE SECURITE
CONSIGNES DE SECURITE
LORSQUE VOUS UTILISEZ DES APPAREILS ÉLECTRIQUES, DES PRÉCAUTIONS DE BASE SONT À PRENDRE.
LIRE ATTENTIVEMENT CETTE NOTICE AVANT LA PREMIERE UTILISATION DE L’APPAREIL
• Veiller à installer cet appareil en respectant les règles nationales d’installation électrique. Vérifier que le
voltage indiqué sur la plaque signalétique correspond bien à celui de votre installation. Toujours connecter
l’appareil à la terre.
• Installer le climatiseur sur une surface plane et sèche dans un endroit spacieux, sans obstacles. Laisser un
minimum de 50 cm entre le climatiseur et le mur.
• Toujours mettre le climatiseur en position verticale, afin de maintenir le compresseur dans de bonnes
conditions.
• Ne pas laisser cet appareil dans une pièce avec des enfants ou des personnes irresponsables sans
surveillance.
• Ne pas utiliser cet appareil à l’extérieur, dans un environnement humide, près d’une baignoire, d’une douche
ou d’une piscine.
• Ne pas immerger cet appareil ou le cordon d’alimentation.
• Cet appareil est livré avec un câble d’alimentation monté. Ne pas utiliser d’autres connections électriques
que celles livrées et recommandées par le fabricant. Ceci peut être dangereux et risque d’endommager
l’appareil.
• Ne pas utiliser cet appareil si le câble électrique est endommagé ou si une panne a été détectée.
• Cet appareil est destiné à un usage domestique, selon les instructions du manuel.
• Ne jamais débrancher ou déplacer l’appareil en tirant sur le cordon d’alimentation.
• Débrancher l’appareil avant de le nettoyer ou d’effectuer le remplacement d’un élément.
• Ne jamais utiliser l’appareil sans son filtre.
• Eviter toute proximité avec des appareils tels que postes de télévision, radios afin d’éviter des interférences
magnétiques.
• Ne pas placer l’appareil près d’une source de chaleur.
• Ne pas utiliser l’appareil s’il n’est pas entièrement assemblé et veiller en particulier à ce que sa grille de
protection soit correctement fixée, et sa gaine d’évacuation correctement installée.
• Ne pas introduire d’objets dans la grille.
• Ne pas placer d’objet sur l’appareil. Ne pas obstruer les arrivées et sorties d’air.
• Ne jamais réparer l’appareil vous même. Vous perdriez le bénéfice de la garantie. Comme tout appareil
électrique, il doit être réparé par une personne qualifiée. De même, le changement du cordon d’alimentation
représente un réel danger et il est nécessaire de contacter un réparateur agréé.
LE FABRICANT NE SAURAIT ÊTRE TENU POUR RESPONSABLE DE LA MAUVAISE UTILISATION
DE L’ APPAREIL.
CONSERVER SOIGNEUSEMENT CE MODE D’EMPLOI.
2
FRANÇAIS
FRANÇAIS
ALPATEC vous félicite d’avoir choisi ce produit et vous remercie de votre confiance.
Pour votre confort et votre sécurité, votre article a été vérifié à toutes les étapes
de sa fabrication et a passé avec succès tous nos tests de qualité.
Nos produits sont conçus pour vous plaire tant par leur design que par leur facilité
d’utilisation et dans l’objectif constant de vous apporter complète satisfaction.
notice AC105.1ETP 5/12/06 17:36 Page 2
Page 3
CARACTÉRISTIQUES TECHNIQUES
CARACTÉRISTIQUES TECHNIQUES
3
AC 105.1 ETP
Compresseur rotatif R 407 C
Puissance frigorifique maxi 2900 W
Puissance absorbée 1014 W
Puissance de chauffe 2900
Déshumidification 24 l/j
Débit d’air 360 m3/ h
Niveau sonore min.-max. dB (A) 50-54
Vitesses de ventilation 2
Longueur max. de la gaine 150 cm
Diamètre de la gaine 130 mm
notice AC105.1ETP 5/12/06 17:36 Page 3
Page 4
INST
INST
ALLA
ALLA
TION
TION
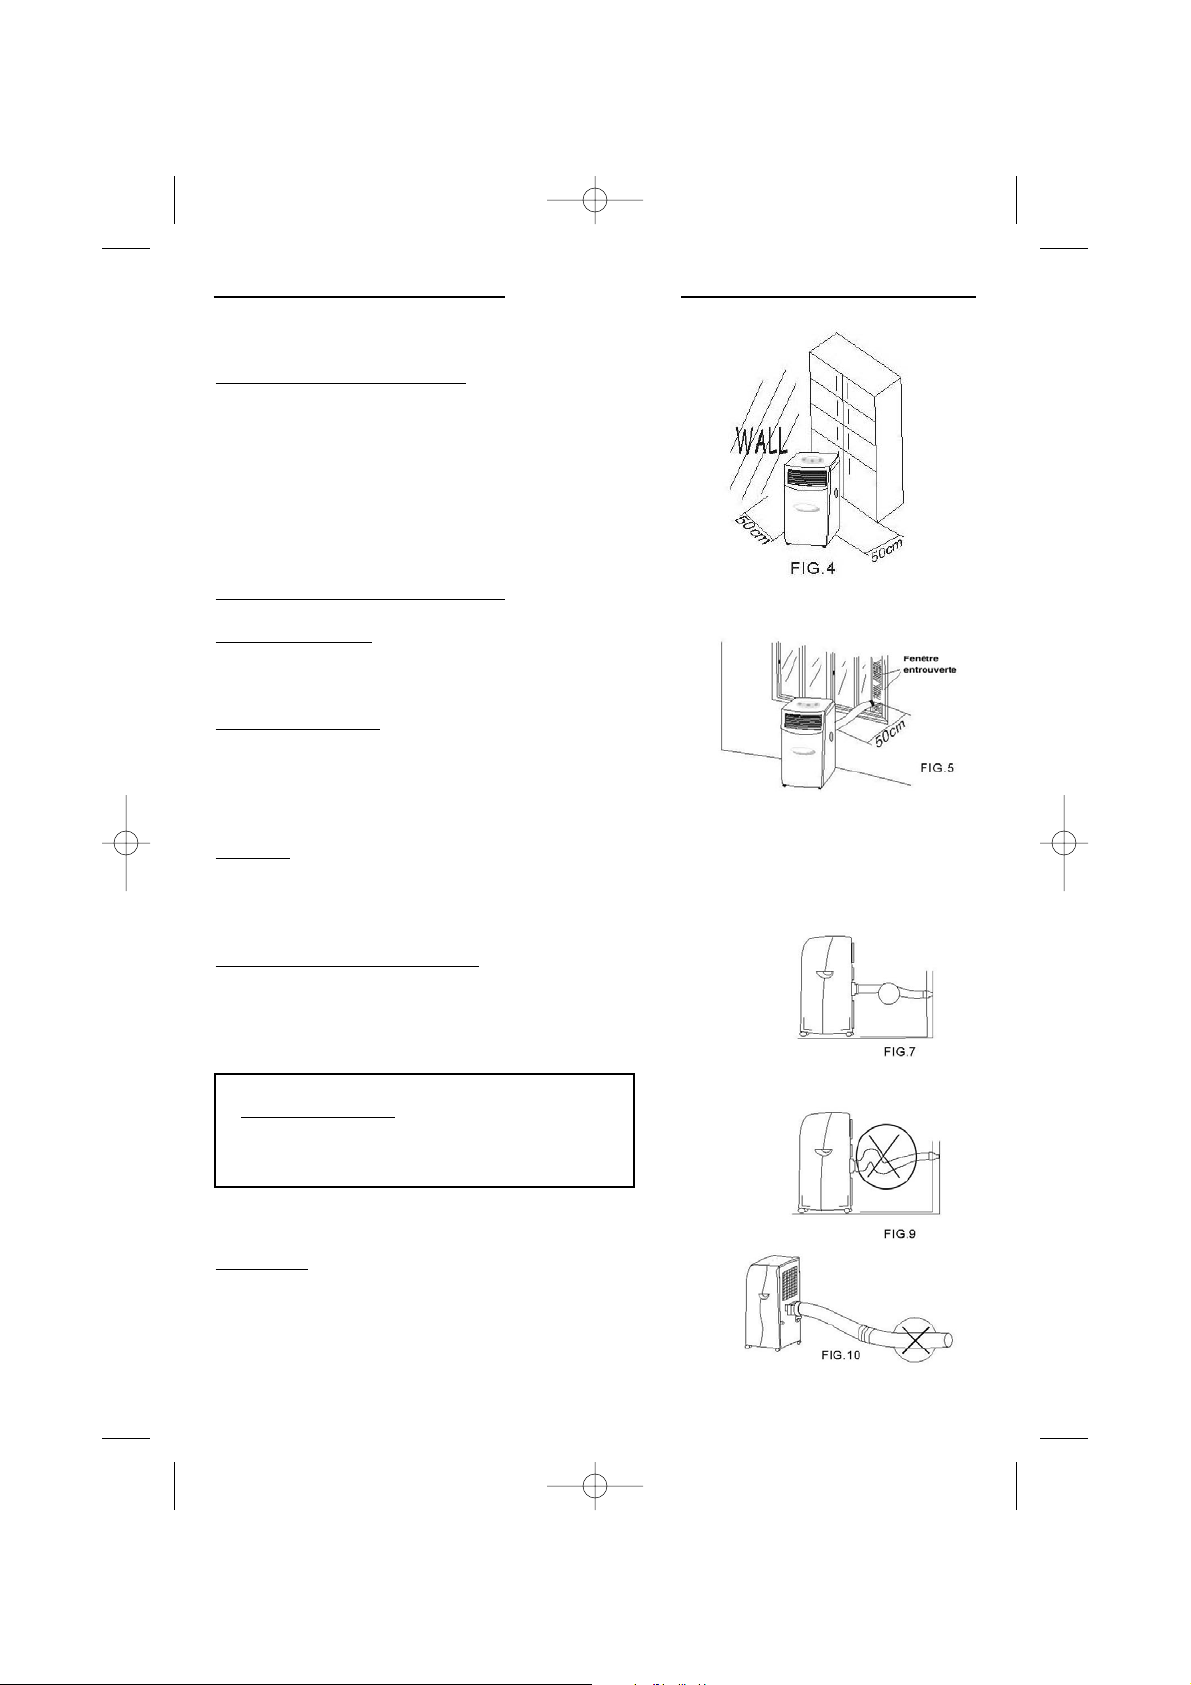
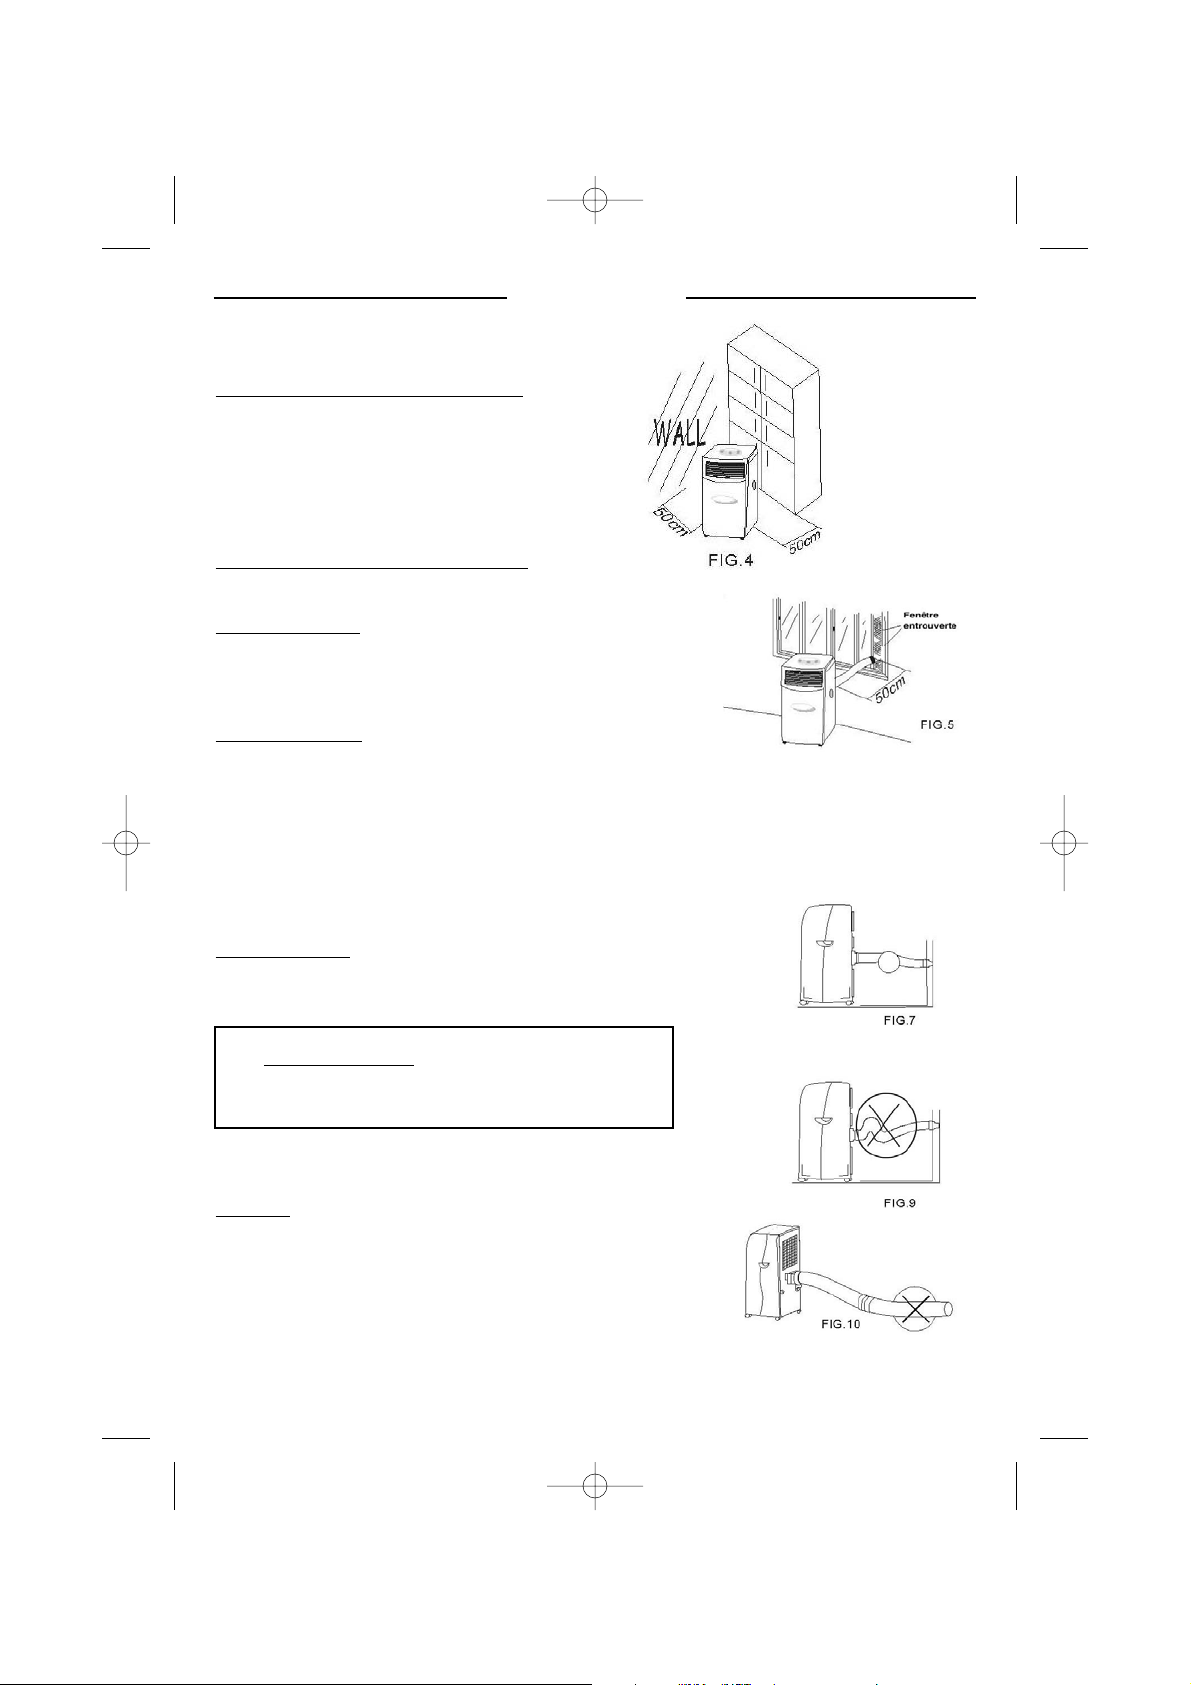
INSTALLATION DU CLIMATISEUR :
• Laisser un espace de 50 cm libre tout autour de l’appareil.
• Après avoir déballé l’appareil, le placer en position verticale
afin de stabiliser le fluide réfrigérant. Attendre 3 heures
avant la première utilisation.
MÉTHODE DE MONT
AGE DE LA GAINE :
1. Méthode temporaire
• Fixer l’embout de la gaine de sortie d’air à l’arrière de l’unité.
• Entrouvrir la fenêtre et faire sortir la gaine de sortie d’air.
2. Méthode permanente
• Fixer l’embout de la gaine de sortie d’air à l’arrière de l’unité.
• Faire un trou dans le mur de 136 mm ou plus.
• Prendre le connecteur rond et l’adapter sur la gaine, puis faire
passer celle-ci dans l’ouverture du mur.
Attention
: la longueur de la gaine de sortie d’air est comprise entre 390 mm et 1500 mm. Utiliser la longueur
minimale possible. Lors du montage, il est conseillé de placer la gaine de sortie d’air en position horizontale.
Bouchez le trou à l’aide du bouchon du connecteur rond quand l’appareil n’est pas utilisé.
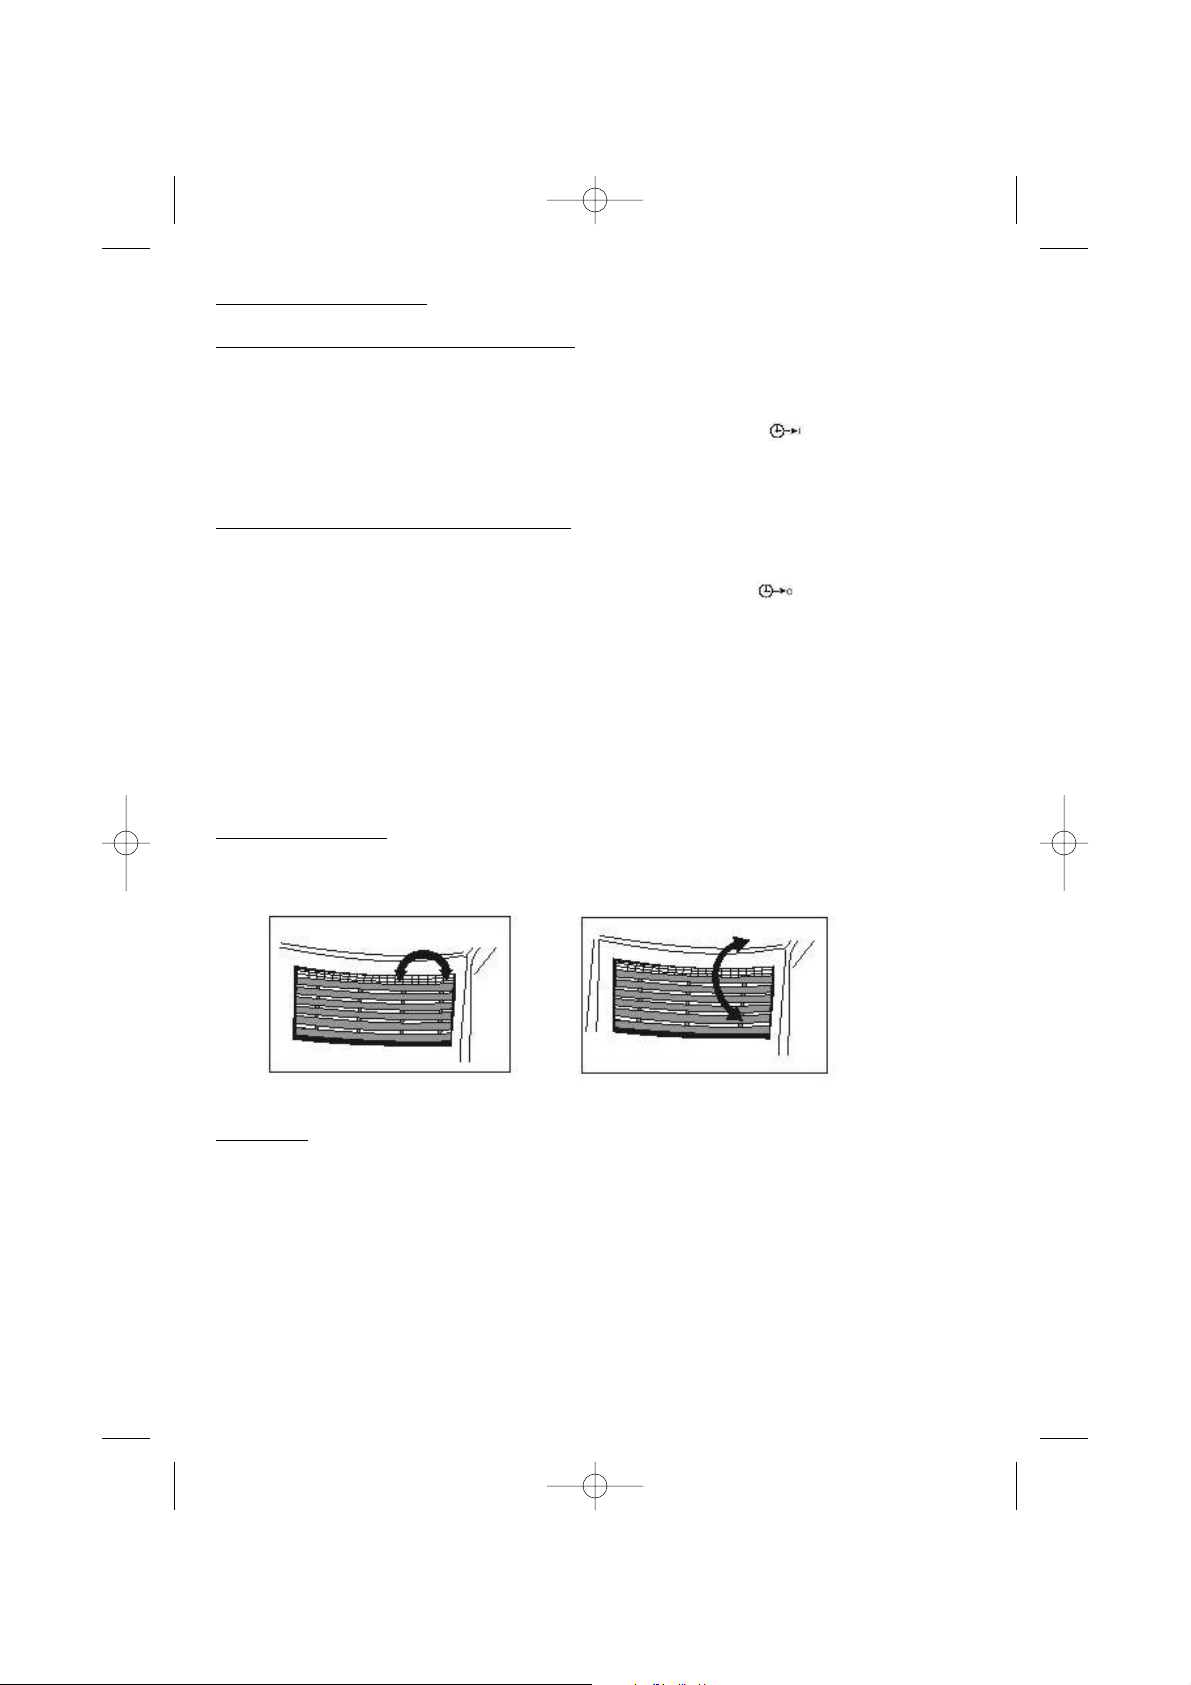
MÉTHODE DE MONT
AGE CORRECTE
• Si la gaine doit être coudée pour l’installation,
procéder comme décrit ci-contre :
(Fig 7)
MAUV
AIS MONT
AGE
• Le coude de la gaine est trop important et peut
provoquer un mauvais fonctionnement. (Fig 9)
A
TTENTION !
La longueur du tuyau de sortie d’air a été spécialement étudiée
pour cet appareil. Ne pas le changer ou ajouter de rallonge,
cela endommagerait l’appareil.
(Fig 10)
4
notice AC105.1ETP 5/12/06 17:36 Page 4
Page 5
DESCRIPTION DE L
DESCRIPTION DE L
’APP
’APP
AREIL
AREIL
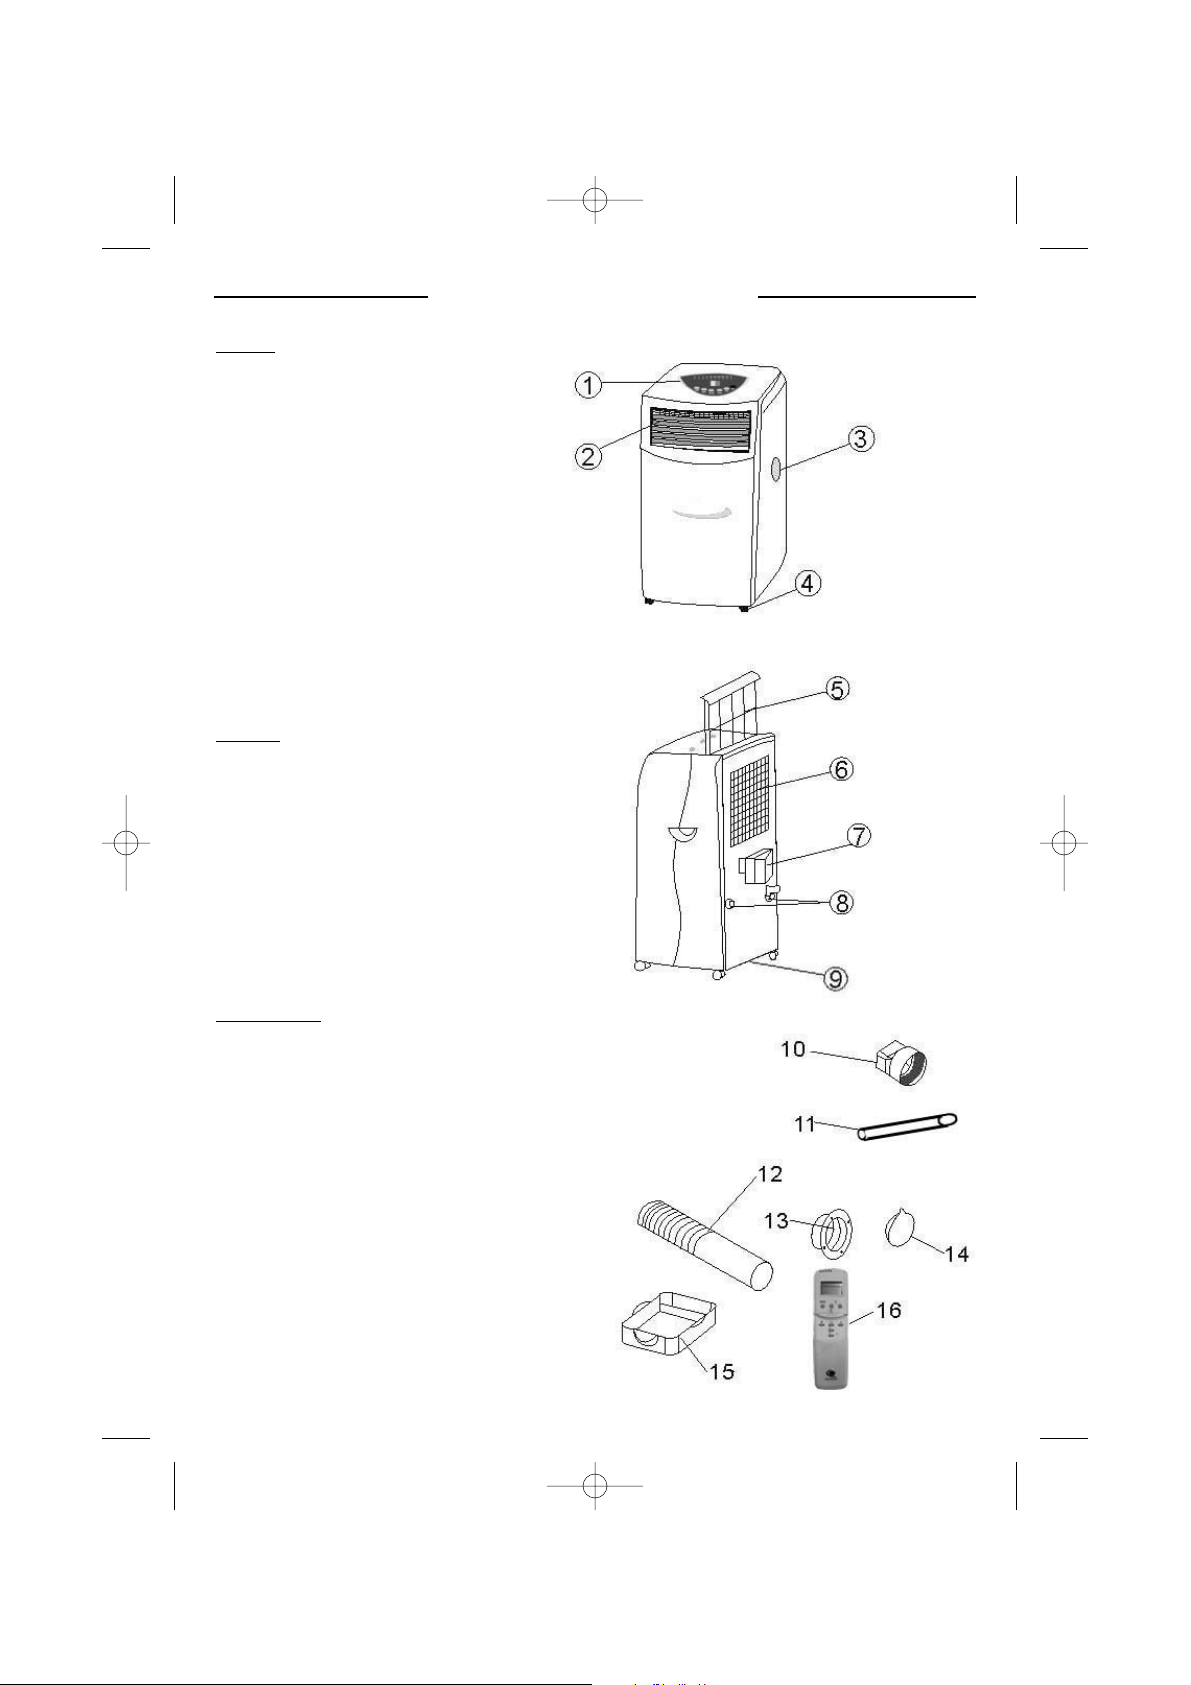
FAÇADE
1. Tableau de commandes
2. Sortie d’air
3. Poignées
4. Roulettes
ARRIÈRE
5. Filtre à air
6. Entrée d’air
7. Emplacement de la gaine de sortie d’air
8. Range cordon
9. Bouchon de vidange
ACCESSOIRES
10. Adaptateur entre l’arrière de l’unité et la gaine
11. Tuyau de drainage
12. Gaine de sortie d’air
13. Connecteur rond de fenêtre ou mur
14. Capot pour trou du mur
15. Bac de récupération d’eau
16. Télécommande
5
notice AC105.1ETP 5/12/06 17:36 Page 5
Page 6
6
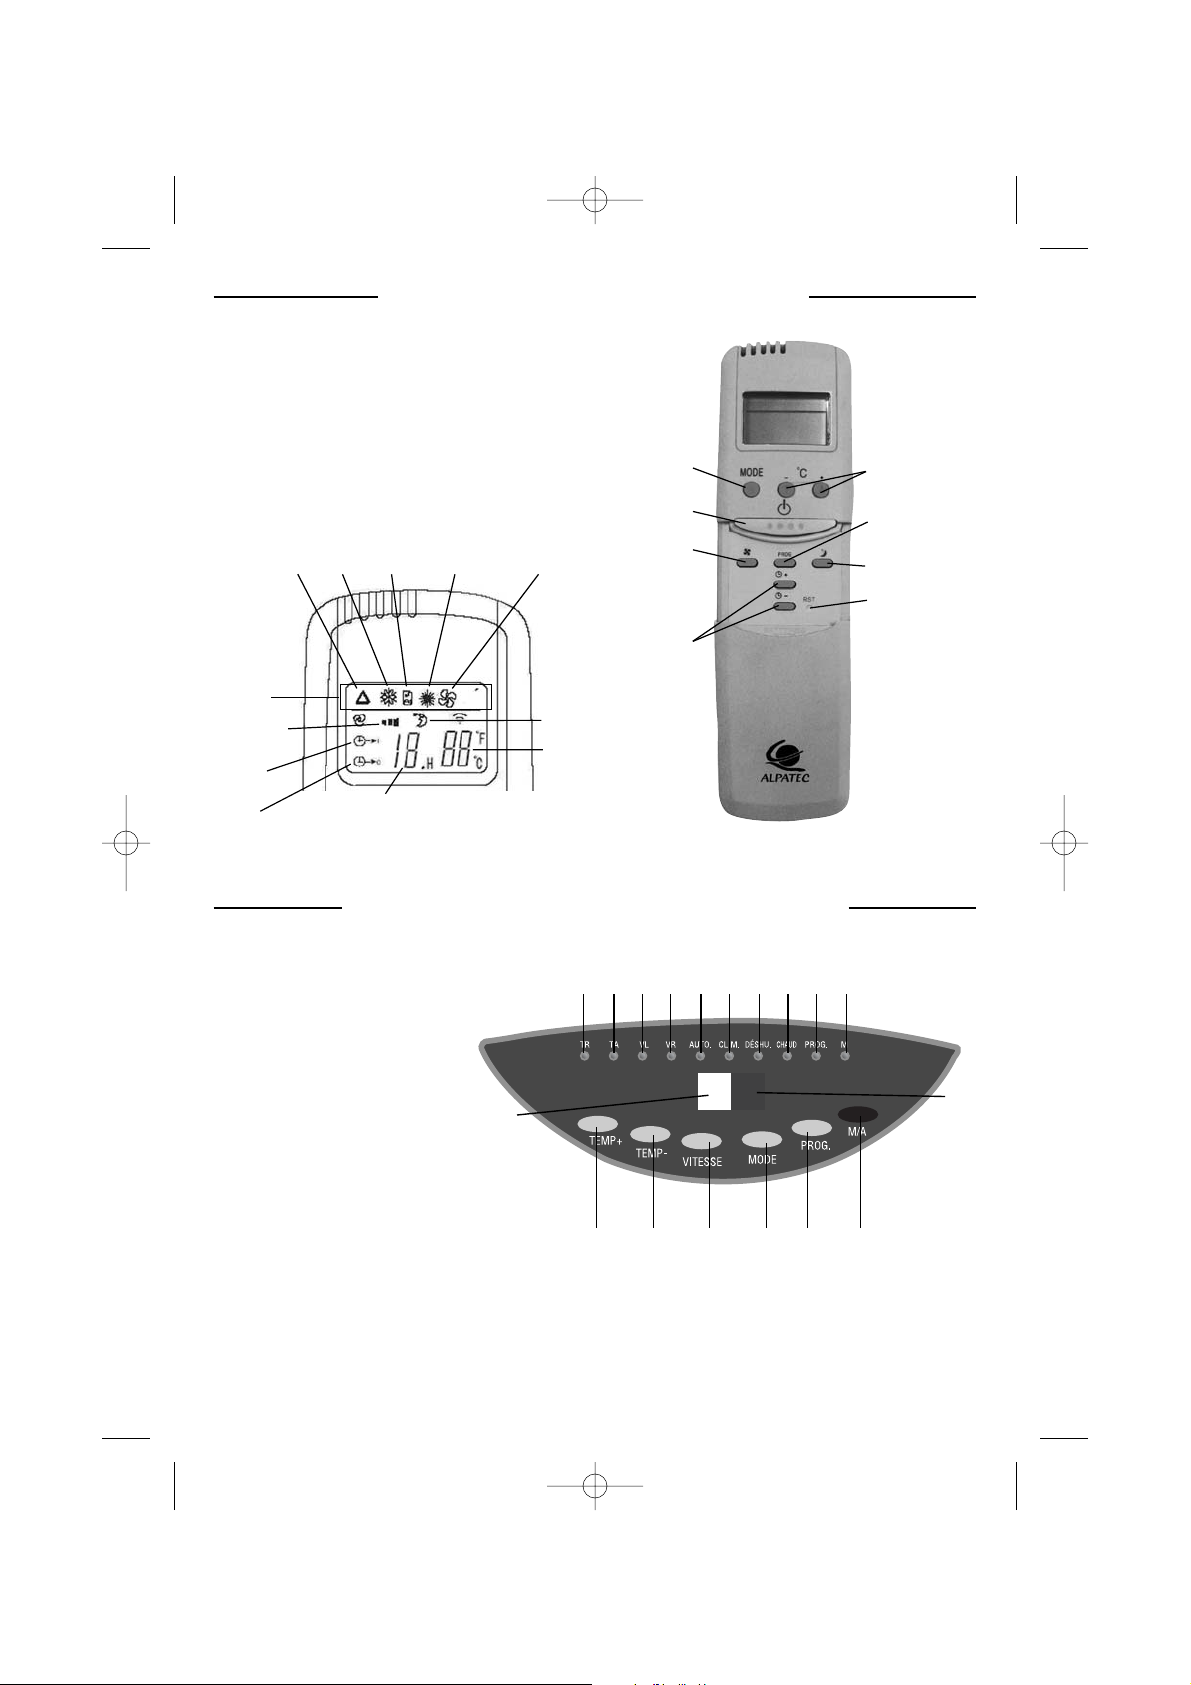
DESCRIPTION DE LA TÉLÉCOMMANDE
DESCRIPTION DE LA TÉLÉCOMMANDE
a. marche / arrêt
b. sélection du MODE de fonctionnement
c. vitesse de ventilation
d. réglage de la température
e. programmation horaire
f. réglage de l’heure de départ ou d’arrêt
g. reset
h. nuit
DESCRIPTION DU T
DESCRIPTION DU T
ABLEAU DE COMMANDES
ABLEAU DE COMMANDES
1. Indicateur de réglage de température
2. Indicateur de température ambiante
3. Indicateur ventilation lente VL
4. Indicateur ventilation rapide VR
5. Indicateur mode automatique
6. Indicateur mode climatisation
7. Indicateur mode
déshumidification
8. Indicateur mode chauffage
9. Indicateur mode programmation
10. Indicateur de fonctionnement
11. Touche température « + »
12. Touche température « - »
13. Touche vitesse de ventilation
14. Touche Mode
15. Touche Prog.
16. Touche M/A
17. Affichage température de consigne / heure (programmation)
18. Récepteur signal télécommande
h
d
e
g
b
c
a
f
1 23456789
10
11 12 13 14 15 16
18
17
auto
clim. déshu. chauffage ventilation
Mode
Vitesse de
ventilation
Départ
différé
Arrêt
différé
Heure
(programmation)
Température
de consigne
Mode nuit
notice AC105.1ETP 5/12/06 17:36 Page 6
Page 7
UTILISA
UTILISA
TION
TION
Insérez les piles dans la télécommande
MISE EN MARCHE
• Appuyer sur la touche M/A (a-16), l’appareil se met en marche automatiquement dans le mode sélectionné
lors de sa dernière séquence de fonctionnement.
•L’écran affiche la température de consigne.
• Pour arrêter l’appareil, appuyer sur la touche M/A (a-16).
• Le voyant de fonctionnement (10) s’allume ou s’éteint.
SÉLECTION DU MODE
Appuyer sur la touche mode (b a 14) pour sélectionner le mode fonctionnement de votre appareil :
automatique ➪climatisation ➪déshumidification ➪chauffage
L’indicateur du mode sélectionné s’allume (5,6,7 ou 8).
Mode automatique
: si la température ambiante est inférieure à 23°C, l’appareil fonctionne en mode chauffage
et si la température ambiante est supérieure à 23°C il fonctionne en mode climatisation.
Mode climatisation
: si la température ambiante est inférieure à la température
demandée, l’appareil ventile uniquement et si la température ambiante est supérieure à la température
demandée il fonctionne en mode
climatisation.
Mode chauffage
: si la température ambiante est supérieure à la température demandée, l’appareil ventile
uniquement et si la température ambiante est inférieure à la température demandée il fonctionne en mode
chauffage.
Mode déshumidification
: l’appareil déshumidifie en continue. Penser à le mettre en évacuation permanente
avec un tuyau ou bien vider régulièrement le bac à eau.
Mode nuit
: sélectionner ce mode lorsque l’appareil fonctionne en climatisation ou chauffage. La ventilation
passera en vitesse lente. En mode climatisation, la température de consigne sera augmentée de 1°C par heure
pendant 2 heures, en mode chauffage elle sera diminuée de 1°C par heure pendant 2 heures.
RÉGLAGE DE LA TEMPÉRA
TURE
• Appuyer sur les touches 11 ou 12 du panneau de commande ou dde la télécommande pour régler la
température désirée (de 16° à 30°C). Chaque pression correspond à 1°C.
•L’écran affichera la température que vous avez sélectionnée.
•La température présélectionnée de l’appareil est de 24°C pour le climatiseur.
RÉGLAGE DE LA VITESSE DE VENTILA
TION
•Appuyer sur la touche vitesse (13) ou sur la touche ventilation (c) de la télécommande pour choisir la vitesse
de ventilation désirée : modérée ou forte. L’indicateur de vitesse modérée (3) ou de vitesse forte (4) s’allumera.
•Si l’appareil est en mode automatique, celui-ci choisira automatiquement la vitesse de ventilation selon la
température ambiante (les indicateurs relatifs à la vitesse s’allumeront).
7
notice AC105.1ETP 5/12/06 17:36 Page 7
Page 8
PROGRAMMATION HORAIRE
Pour programmer un départ différé de votre appareil, le mettre en marche, sélectionner les paramètres
désirés au départ (mode, température, vitesse de ventilation…) et l’arrêter.
- Appuyer alors sur la touche PROG du tableau de commandes jusqu’à ce que l’heure désirée apparaisse à
l’écran. (de 1 à 24 heures).
- Avec la télécommande, appuyer sur la touche PROG, le symbole départ différé clignote sur l’écran de
la télécommande. Utiliser les touches f pour régler l’heure de départ.
Pour programmer un arrêt différé de votre appareil :
- Appuyer alors sur la touche PROG du tableau de commandes jusqu’à ce que l’heure désirée apparaisse à
l’écran. (de 1 à 24 heures).
- Avec la télécommande, appuyer sur la touche PROG, le symbole arrêt différé clignote sur l’écran de la
télécommande. Utiliser les touches f pour régler l’heure d’arrêt.
TOUTES LES FONCTIONS SONT ACCESSIBLES AVEC LA TÉLÉCOMMANDE.
LA TÉLÉCOMMANDE NÉCESSITE 2 PILES TYPE LR03.
ORIENT
ATION DE L’AIR
• Orienter le flux d’air manuellement en tournant de haut en bas ou de droite à gauche les ailettes.
A
TTENTION !
• Pour prolonger la durée de vie du compresseur, après avoir éteint l’appareil, attendre 3 minutes minimum
avant de le rebrancher. Dans le cas contraire, le compresseur se met en sécurité et ne redémarre pas.
• L’appareil doit toujours être utilisé en position verticale.
8
notice AC105.1ETP 5/12/06 17:36 Page 8
Page 9

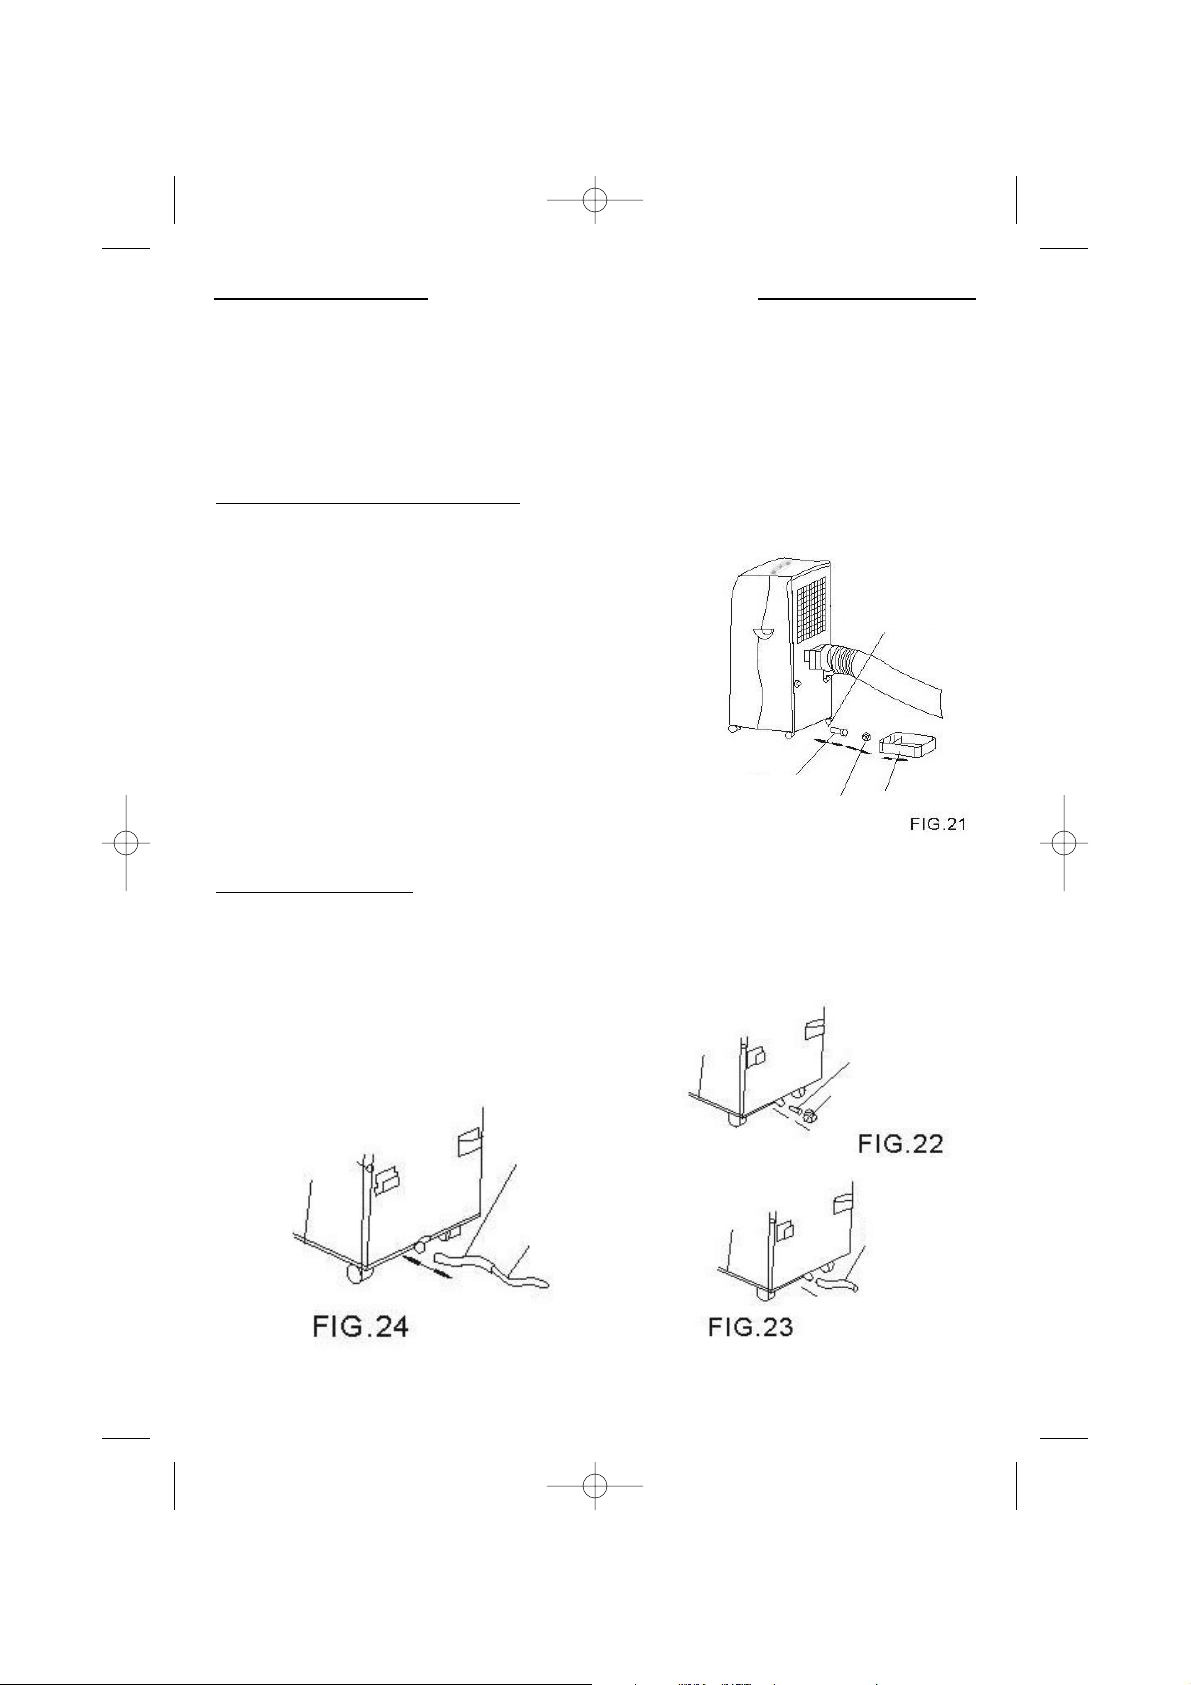
EVEVACUA
ACUA
TION DES CONDENSA
TION DES CONDENSATSTS
• Pendant le processus de climatisation, de l’eau est extraite de l’air et s’écoule dans le réservoir de l’appareil.
Le réservoir est vidé automatiquement par une pompe qui redépose l’eau des condensats sur le
condenseur : elle est évacuée alors avec l’air chaud sous forme de vapeur. Toutefois par temps très humide,
le réservoir peut se remplir.
Quand le réservoir de l’appareil est plein, le compresseur s’arrête, la ventilation seulement continue à
fonctionner, l’indicateur de fonctionnement (10) clignote.
• Vider le bac : le climatiseur fonctionnera à nouveau
A. EV
ACUATION DE L’EAU PAR LE BAC
Fig. 21
1. Eteindre l’appareil.
2. Positionner le bac par terre en dessous de l’orifice d’évacuation.
3. Dévisser le bouchon d’évacuation et le bouchon de caoutchouc de
l’orifice d’évacuation, l’eau de condensation s’évacuera
automatiquement dans le bac.
4. Quand le bac est presque plein, replacer le bouchon de caoutchouc
de l’orifice d’évacuation et le bouchon d’évacuation. Vider le bac
5. Recommencer les opérations 2 – 3 – 4 jusqu’à ce qu’il n’y ait plus
d’eau dans l’unité.
6. Placer ensuite fermement le bouchon de caoutchouc dans l’orifice
d’évacuation. L’indicateur de réservoir plein s’éteint.
B. EV
ACUATION CONTINUE
Fig. 22 et 23
1. Enlever le bouchon d’évacuation et le bouchon de caoutchouc de l’orifice d’évacuation (fig. 22).
Mettez-les de côté.
2. Connecter un tuyau adapté à l’orifice d’évacuation, l’eau de condensation s’évacuera automatiquement
(fig. 23).
3. Vous pouvez utiliser une rallonge au tuyau (diam. 18 mm) (fig. 24).
9
Tuyau
Rallonge de
tuyau
Tuyau
d’évacuation
Bouchon
caoutchouc
Bouchon
d’évacuation
Orifice
d’évacuation
Bac de récupération
Bouchon d’évacuation
Bouchon caoutchouc
notice AC105.1ETP 5/12/06 17:36 Page 9
Page 10
MAINTENANCE
MAINTENANCE
• Débrancher l’appareil avant toute intervention de nettoyage.
• Vérifier qu’il n’y a pas de courant dans l’appareil avant toute opération de maintenance ou de réparation afin
d’éviter tout choc électrique.
• Ne pas utiliser de solvant chimique (tel que benzène, produit lustrant alcoolisé) pour nettoyer la surface de
l’appareil. Ceci endommagerait la carrosserie ou la déformerait.
FIL
TRE À AIR
• Nettoyer régulièrement le filtre à air (toutes les deux semaines) pour une circulation de l’air optimale. Utiliser
l’aspirateur ou taper doucement le filtre pour enlever la poussière et bien rincer sous le robinet (eau tiède).
Sécher dans un endroit à l’ombre.
NETTOY
AGE DE LA CARROSSERIE
• Nettoyer l’extérieur de l’appareil avec un chiffon doux et sec.
MAINTENANCE EN FIN DE SAISON
MAINTENANCE EN FIN DE SAISON
1. Débrancher l’appareil.
2. Vidanger l’appareil complètement.
3. Nettoyer ou changer le filtre.
4. Faire fonctionner l’appareil en mode ventilation pendant 2 heures environ, afin de sécher l’unité
complètement.
5. Remettre l’appareil dans son emballage d’origine et ne pas entreposer d’objets lourds sur le dessus de
l’appareil.
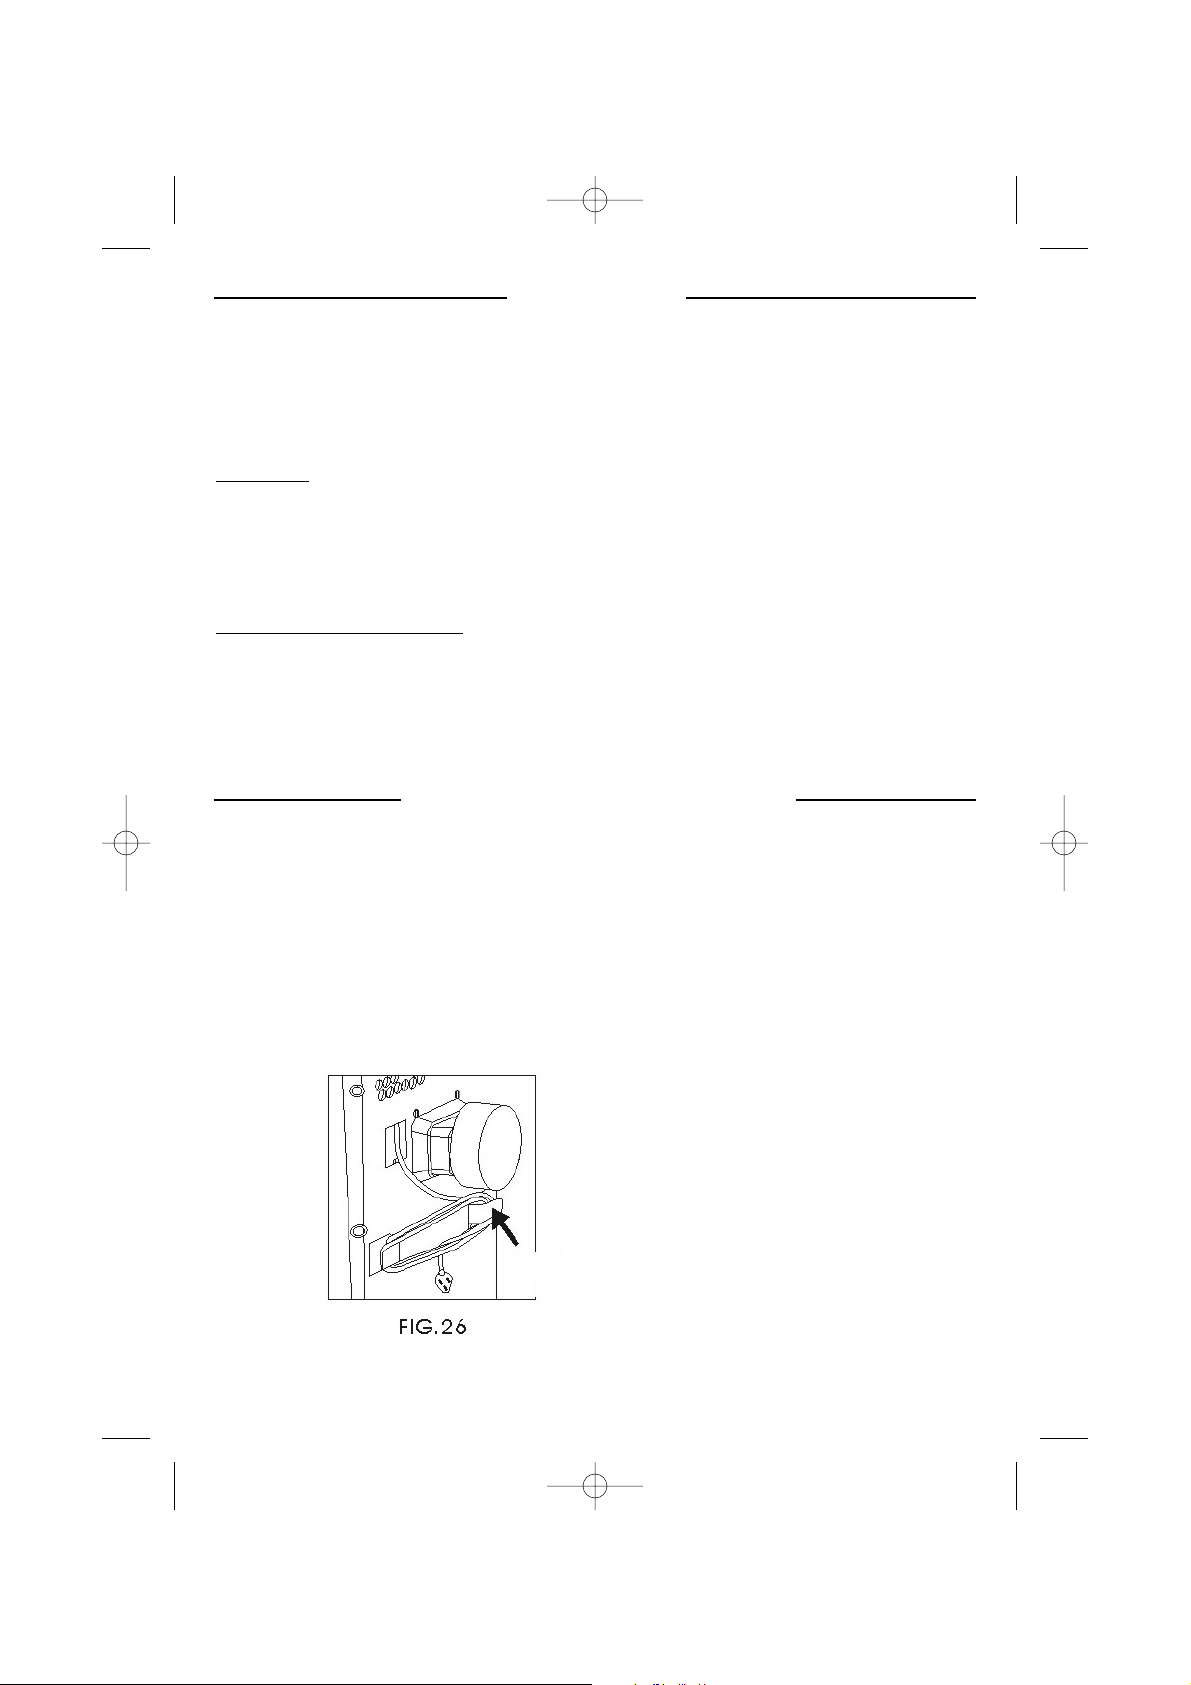
5. Quand l’appareil est inutilisé, ranger le câble d’alimentation comme sur le schéma ci-dessous. (fig. 26 ).
10
Câble d’alimentation
notice AC105.1ETP 5/12/06 17:36 Page 10
Page 11

PROBLEMES
PROBLEMES
Vérifier tout d’abord les symptômes décrits dans le tableau ci-dessous avant de contacter
un réparateur agréé.
11
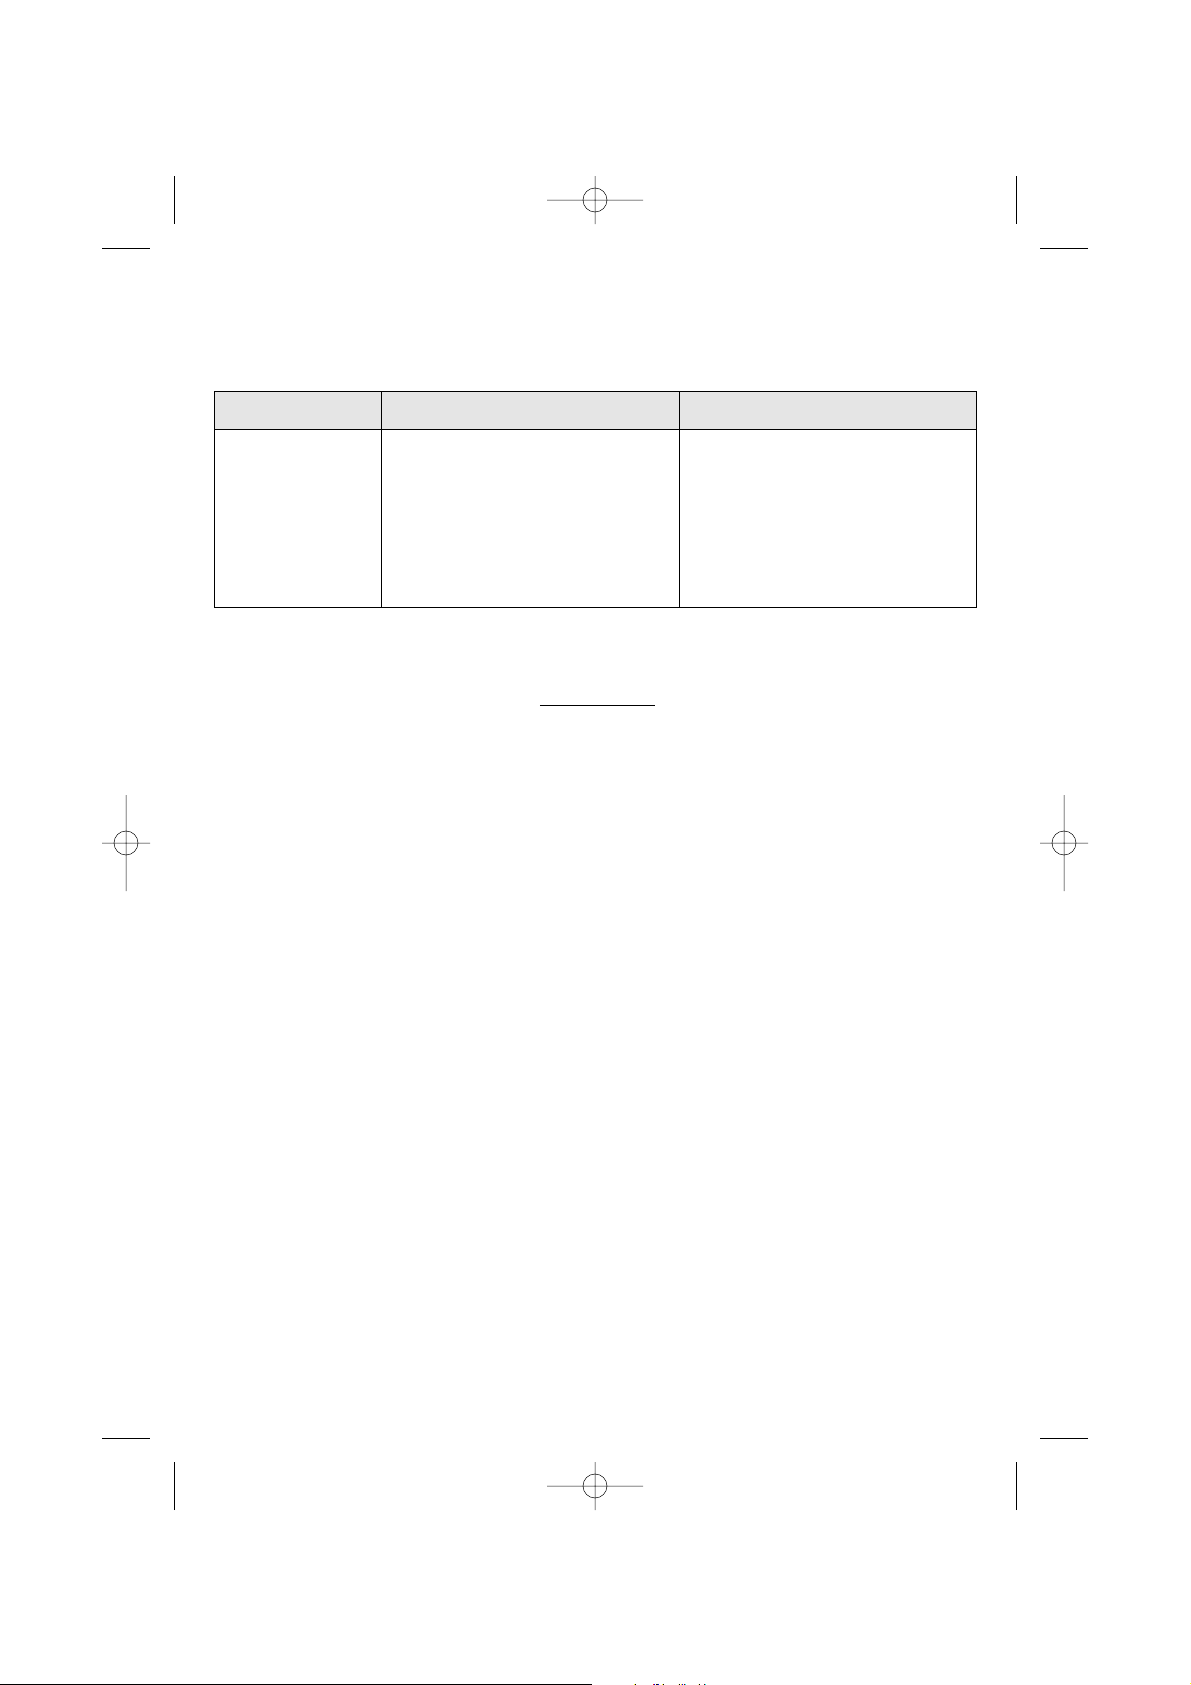
SYMPTÔMES ACTIONSVERIFICATIONS
Y a-t-il un problème avec l’alimentation ?
Vérifier que la prise soit bien branchée.
Les fusibles ont-ils sauté ?
Le voyant de réservoir plein est allumé.
L’heure de programmation est-elle
correcte ?
Est-ce que l’entrée et la sortie d’air sont
bouchés ?
Y a-t-il d’autres sources de chaleur dans
la pièce ?
Est-il en plein soleil ?
Le filtre à air est-il propre ?
La température est-elle bien réglée ?
La vitesse de ventilation est-elle réglée
sur la position lente ?
Y a-t-il trop de fenêtres ouvertes dans la
pièce ?
La température de la pièce est-elle en
dessous de la température
sélectionnée ?
C’est le flux du liquide réfrigérant qui
s’écoule à l’intérieur.
Est-il incliné ?
La puissance d’alimentation est-elle
normale ?
La sortie d’air est-elle fixée correctement
ou est-elle coudée ?
Avez-vous rajouté vous-même une sortie
d’air ?
Le climatiseur ne
fonctionne pas
du tout
Vérifier le branchement.
Brancher la prise.
Remplacer le fusible.
Vider le réservoir d’eau.
Mettre l’appareil à l’heure.
Ne pas obstruer la sortie ou l’entrée d’air.
Déplacer la source de chaleur.
Tirer les rideaux si l’appareil est à
proximité d’une fenêtre.
Nettoyer le filtre à air.
Choisir la bonne température.
Choisir la vitesse de ventilation.
Fermer les fenêtres pour ne pas faire de
courants d’air.
C’est normal.
C’est normal.
Poser l’appareil sur une surface plane.
Vérifier la source d’alimentation.
Vérifier la sortie d’air.
Ne pas ajouter vous-même de sortie
d’air.
L’efficacité du
climatiseur est
faible
Trop de bruit
et
de vibrations
L’appareil démarre
et
s’arrête fréquemment
notice AC105.1ETP 5/12/06 17:36 Page 11
Page 12
ATTENTION
Arrêter et débrancher l’appareil immédiatement dès qu’un problème cité
précédemment survient.
Contacter un réparateur agréé si le problème persiste
ou si quelque chose d’anormal se produit.
12
SYMPTÔMES ACTIONSVERIFICATIONS
Le compresseur ne
fonctionne pas
L’ appareil est équipé d’un coupe-circuit
en cas de surchauffe.
Vérifier que la gaine de sortie d’air n’est
pas coudée.
Attendre que la température de l’appareil
refroidisse.
notice AC105.1ETP 5/12/06 17:36 Page 12
Page 13
CAUTIONS
CAUTIONS
When using electrical appliances, some rules have to be respected.
READ THESE INSTRUCTIONS CARREFULLY BEFORE USING THIS PRODUCT.
• Take care to install this product by complying with the national rules of electric installation. Make sure that
the voltage on the rating plate is same as your main one before plugging. Always connect to earth ground.
• Place the appliance on a dry and level surface, with enough room, without obstacle. Clearance of 50 cm
between product and wall is needed.
• Always place the appliance in a vertical position, in order to maintain the compressor in good working
conditions.
• Never let the appliance in a room with children and handicapped people without supervising.
• Do not use outdoor, in a wet environment, close to a bath-tub, a shower or a swimming pool.
• Do not immerse appliance or power cord
• This product is provided with its own power cord. Do not use any other electrical connection but the one
supplied and recommended by the manufacturer. This could be dangerous and may damage the appliance.
• Do not use if power cord or appliance is damaged
• Only use this appliance for domestic purpose, following the instructions of that manual.
• Never move or unplug by pulling the power cord.
• Unplug before cleaning or replacement of one part.
• Do not use without filter.
• In order to avoid any electrical interference, keep away from electric sources.
• Never use near a hot place.
• Do not use if it is not totally assembled and particularly if the protection grid is not secured, or the exhaust
pipe is not assembled.
• Do not introduce parts through the grid.
• Do not put anything on the appliance. Do not block air inlet and outlet.
• Do not attempt to repair the appliance yourself. Otherwise, guarantee would cancel. It has to be repaired by
a qualified worker. Power cord has to be changed by a qualified person if needed.
THE MANUFACTURER WILL NOT ASSUME ANY RESPONSIBILITY IN CASE OF
NON ADHERENCE TO THESE RECOMMANDATIONS.
KEEP THIS MANUAL CAREFULLY.
13
ENGLISH
ENGLISH
Congratulations for having chosen this ALPATEC product, and thank you
for trusting us. For your comfort and safety, your appliance has been checked
at every step of manufacturing and has successfully gone through all our
tests of quality. ALPATEC creates original products to please you, as far as design
and easiness to use are concerned in order to give you complete satisfaction.
notice AC105.1ETP 5/12/06 17:36 Page 13
Page 14

TECHNICAL DA
TECHNICAL DATTAA
14
AC 105.1 ETP
Rotary compressor R 407 C
Maximum cooling capacity 2900 W
Nominal cooling input power 1014 W
Heating capacity 2900
Dehumidifying capacity 24 l/day
Air flow 360 m3/ h
Noise level min.-max. dB (A) 50-54
Number of fan speeds 2
Duct length max. 150 cm
Duct diameter 130 mm
notice AC105.1ETP 5/12/06 17:36 Page 14
Page 15
INST
INST
ALLA
ALLA
TION
TION
CHOICE OF THE INSTALLATION LOCATION
• Let a 50 cm space all around the unit.
• After unpacking, place the unit upright to allow
the cooling agent to stabilize and wait 3 hours
before use.
AIR EXHAUST DUCT MOUNTING METHOD
Fig. 5
1. T
emporary method
• Fix the end of the exhaust duct to the exhaust terminal of the unit.
• Half-open the window and let the air outlet duct get through.
2. Permanent method
• Fix the end of the exhaust duct to the exhaust terminal of the unit.
• Dig a hole (> 136 mm) on the wall.
• Fit the supplied round window connector on the air outlet duct then let it get through the wall.
BE CAREFUL : the length of the exhaust pipe is between 390 mm and 1500 mm. Use the shortest possible
length. When mounting, we advise to keep the exhaust pipe in a horizontal position.
When the hole is not in use, use the cap to cover the hole.
GOOD MOUNTING
• If the exhaust pipe has to be bended it should be proceeded
as shown on : Fig. 7
WRONG MOUNTING
• The bend of the exhaust pipe is too important and
can occur a wrong working of the unit. : Fig. 8
W
ARNING
• The length of the exhaust pipe is specially designed according to
the specification of this product. Do not replace or prolong with
your own private hose as this could cause the unit to mal-function.
15
notice AC105.1ETP 5/12/06 17:36 Page 15
Page 16

DESCRIPTION OF THE APPLIANCE
DESCRIPTION OF THE APPLIANCE
FRONT
1. Control panel
2. Air outlet
3. Handle
4. Casters
BACK
5. Air filter
6. Air inlet
7. Exhaust air outlet
8. Cord storage
9. Water stopper (exhaust drain pipe)
ACCESSORIES
10. Adaptor between the back of the unit and the
exhaust pipe
11. Water pipe
12. Exhaust pipe
13. Round window connector for window or wall
14. Cap for hole
15. Water tray
16. Remote control
16
notice AC105.1ETP 5/12/06 17:36 Page 16
Page 17

REMOTE CONTROL
REMOTE CONTROL
a. on / off
b. MODE
c. fan speed
d. set temperature
e. timer
f. set timer hour
g. reset
h. sleep
THE CONTROL P
THE CONTROL P
ANEL
ANEL
1- Set temperature indicator
2- Room temperature indicator
3- Low fan indicator
4- High fan indicator
5- Automatic mode indicator
6- Cooling mode indicator
7- Dehumidifying mode indicator
8- Heat mode indicator
9- Timer mode indicator
10- Running mode indicator
11- “+“ temp key
12- “-” temp key
13- Fan speed key
14- Mode key
15- PROG key
16- ON/OFF key
17- Set temperature/hour display
18- Remote control signal receiver
17
1 23456789
10
11 12 13 14 15 16
18
17
h
d
e
g
b
c
a
f
auto
cool dry heat fan
Mode
Fan speed
Timer
for start
Timer
for stop
Timer
Set
temperature
Sleep
screen
notice AC105.1ETP 5/12/06 17:36 Page 17
Page 18

USE OF THE APPLIANCE
USE OF THE APPLIANCE
START - RUN - STOP
• Press the on/off key (a or 16), the unit starts automatically in the last mode used.
• Set temperature is displayed.
• To stop the appliance, press ON/OFF key.
• The running mode indicator is switched on or off.
MODE BUTTON
• Press the “MODE” button (b-14) to select :
- Automatic mode, cooling, dehumidifying or heating functions.
• The selected mode indicator (5 – 6 – 7 or 8) lights up.
Automatique mode: if the ambient temperature is lower than 23°C, the appliance will work in heating mode and
if the ambient temperature is higher than 23°C it will work in cooling mode.
Cooling mode
: if the ambient temperature is lower than the required temperature, the appliance will fan only
and if the ambient temperature is higher than the required temperature, it will work in cooling mode.
Heating mode: if the ambient temperature is higher than the required temperature, the appliance will fan only
and if the ambient temperature is lower than the required temperature, it will heat.
Dehumidifying mode
: the appliance will work like a dehumidifier. It is better to install the permanent drainage.
Sleep mode: use this mode when the appliance is cooling or heating. Fan speed will change to low. In cooling
mode, set temperature will increase 1°C every hour for two hours, in heating mode it will decrease 1°C every
hour for two hours.
SETTING THE TEMPERA
TURE
• Press on the key (11) or (12) of the control panel or the key (d) on the remote control to set the desired
temperature from 16° to 30°C (1 pressure = 1°C).
• The screen displays the temperature you have selected. Otherwise the screen displays the room
temperature.
• The temperature of the unit is selected first to 24 °C for the cooling mode.
SETTING THE FAN SPEED
• Press the fan speed key (13-c) to choose the desired fan speed : low or high.
The low fan indicator or high fan indicator (4) will light up.
• On automatic mode function, the unit will automatically choose the fan speed according to the room
temperature (the speed indicators will light up).
18
notice AC105.1ETP 5/12/06 17:36 Page 18
Page 19

TIMER
To program an automatic start of the appliance, start it, select the required mode, fan speed and temperature
and stop it.
- Press PROG on the control panel until the required time appears on the control panel (from 1 to 24 hour).
- With the remote control, press PROG, the icon flashes on the screen. Use f touches to set the required
time.
T
o program an automatic stop of the appliance:
- Press PROG on the control panel until the required time appears on the control panel (from 1 to 24 hour).
- With the remote control, press PROG, the icon flashes on the screen. Use f touches to set the required
time.
AIR FLOW DIRECTION
• Vertical and horizontal louvers have to be manually adjusted.
WARNING !
• To prolong the life of the compressor, after switching off the unit, wait for 3 minutes minimum before
plugging it again. The unit has a three minute compressor delay protection circuit.
• Your unit must always be used in an upright position because it contains a cooling agent.
19
notice AC105.1ETP 5/12/06 17:36 Page 19
Page 20
WWAATER DRAINAGE METHODS
TER DRAINAGE METHODS
• During the cooling process, water is extracted from the air into the unit. When the water tray of the unit is
full, the compressor stops, the fan only continues to run.
• Empty the water tray : the cooling process will run again.
A. W
ATER DRAINAGE WITH WATER TRAY
Fig 21
1. Switch off the appliance
2. Place the water tray on the floor under the drain hole.
3. Take off the water stopper and the rubber plug of the drain hole, the
condensed water will go automatically into the tray.
4. When the water tray is almost full replace the rubber plug of the
drain hole and the water stopper. Empty the water tray.
5. Do the operations 2 – 3 – 4 again until there is no more water in unit.
6. Place then the rubber plug firmly into the drain hole. The full tank
indicator should be switched off.
B
PERMANENT DRAINAGE
Fig. 22 and 23
1. Take off the water stopper and the rubber plug (fig. 22). Keep
them aside.
2. Connect the adapted pipe to the drain hole, the condensed
water will go automatically (fig. 23).
3. You can add an extension to the water tube (diameter 18 mm)
(fig. 24).
20
Adapted pipe
Extension
Rubber
plug
Water
stopper
Rubber
plug
Drain hole
Water tray
Rubber plug
Water stopper
notice AC105.1ETP 5/12/06 17:36 Page 20
Page 21

MAINTENANCE
MAINTENANCE
• Unplug the appliance before any cleaning operation.
• Check there is no power more into the unit before any maintenance or repairing operation, in order to avoid
any electric shock.
• Do not use chemical solvent (like benzene, alcohol glazer) to clean the surface of the unit. If you do so, the
surface will be scratched, damaged even the whole casing could become deformed.
AIR FIL
TER
• Clean the air filter regularly (every two weeks) for an optimum air flow. Use a vacuum cleaner or tap the filter
lightly to remove dust and then rinse thoroughly under running water (lukewarm water). Dry thoroughly in a
shaded place.
CLEANING OF THE CASE
• Clean the outside part of the unit with a damp and dry cloth.
END SEASON MAINTENANCE
END SEASON MAINTENANCE
1. Unplug the appliance.
2. Drain the condensed water completely.
3. Clean or change the filter.
4. Make the unit working in fan mode about a couple of hours, so that the inside part of the unit can completely
dry.
5. Replace the unit in its original packing and do not stock heavy objects of the top of the appliance.
• When the appliance is not in use put the power cord away as shown in picture beneath. (fig. 26)
21
Câble d’alimentation
notice AC105.1ETP 5/12/06 17:36 Page 21
Page 22

TROUBLESHOOTING
TROUBLESHOOTING
Check first the symptoms following before calling a qualified electrician.
22
SYMPTOMS ACTINGCHECKING
Is power fail ?
Is plug out ?
Is power fuse burned out ?
The drain tank indicator is lit.
Is set time suitable ?
Air conditioner does
not operate at all
Check the cord.
Push the plug into the wall socket.
Change the fuse or switch on.
Pour the water out of the water tank.
Change set time.
Is air inlet or outlet locking ?
Is there any other heat sources in room ?
Is the unit in direct sunshine ?
Are air filters dirty ?
Is set temp suitable ?
Is indoor fan speed set at low ?
Are there too many windows opened ?
Is the room temperature lower than the
selected one ?
Cooling efficiency is
not good
Clear the locking.
Move the heat sources.
Draw the curtains.
Clean the air filter.
Set suitable temperature.
Set suitable fan speed.
Close the windows.
It is normal.
notice AC105.1ETP 5/12/06 17:36 Page 22
Page 23

TROUBLESHOOTING
TROUBLESHOOTING
BE CAREFUL !
Stop and unplug the unit and stop running immediately in case of something below happens.
Then contact a qualified electrician if the problem lasts or as soon as something abnormal occurs.
23
SYMPTOMS ACTINGCHECKING
It is the inner liquid (refrigerant) flowing
inside.
Is it inclined ?
Too noisy
and
many vibrations
It is normal.
Place the unit in a horizontal floor.
Is the voltage of the power source
normal ?
Is the air exhaust rightly fixed or bended ?
Have you added air exhaust yourself ?
The machine starts
and
stops frequently
The compressor
doesn’t run
Keep the power source indicated in the
rating plate.
Try to keep the air exhaust in a horizontal
position.
Don’t add air exhaust yourself and
remove it.
The appliance is equipped with a
overheating protection.
Check the air outlet exhaust is not
bended. Wait until the temperature of the
unit cools.
notice AC105.1ETP 5/12/06 17:36 Page 23
Page 24

24
12/06
Indications relatives à la protection de l’environnement
Au terme de sa durée de vie, ce produit ne doit pas être éliminé avec les ordures ménagères mais doit être remis à un
point de collecte destiné au recyclage des appareils électriques et électroniques. Le symbole figurant sur le produit, la
notice d’utilisation ou l’emballage vous indique cela. Les matériaux sont recyclables conformément à leur marquage.
Vous apporterez une large contribution à la protection de l’environnement par le biais du recyclage, de la réutilisation
matérielle ou par les autres formes de réutilisation des appareils usagés. Veuillez vous adresser à votre municipalité
pour connaître la déchetterie compétente.
Instructions on environment protection
Do not dispose of this product in the usual household garbage at the end of its life cycle ; hand it over a collection point
for the recycling of electrical and electronic appliances. The symbol on the product, the instructions for use or the
packing will inform about the methods of disposal. The materials are recyclable as mentioned in its marking.
By recycling or others forms of re-utilization of old appliances, you are making an important contribution to protect our
environment. Please inquire at the community administration for the authorized disposal location.
notice AC105.1ETP 5/12/06 17:36 Page 24
 Loading...