

Page 1

Getting Started Guide
For Firmware Version V1.9
Before starting please check www.allen-heath.com for the latest Qu
mixer firmware and documentation.
Publication AP10025
Page 2

Limited One Year Manufacturer’s Warranty
Allen & Heath warrants the Allen &Heath -branded hardware product and accessories contained in the
original packaging ("Allen & Heath Product”) against defects in materials and workmanship when used
in accordance with Allen & Heath's user manuals, technical specifications and other Allen & Heath
product published guidelines for a period of ONE (1) YEAR from the date of original purchase by the
end-user purchaser ("Warranty Period").
This warranty does not apply to any non-Allen & Heath branded hardware products or any software,
even if packaged or sold with Allen & Heath hardware.
Please refer to the licensing agreement accompanying the software for details of your rights with
respect to the use of software/firmware (“EULA”).
Details of the EULA, warranty policy and other useful information can be found on the Allen & Heath
website: www.allen-heath.com/legal.
Repair or replacement under the terms of the warranty does not provide right to extension or renewal
of the warranty period. Repair or direct replacement of the product under the terms of this warranty
may be fulfilled with functionally equivalent service exchange units.
This warranty is not transferable. This warranty will be the purchaser’s sole and exclusive remedy and
neither Allen & Heath nor its approved service centres shall be liable for any incidental or
consequential damages or breach of any express or implied warranty of this product.
Conditions of Warranty
The equipment has not been subject to misuse either intended or accidental, neglect, or alteration
other than as described in the User Guide or Service Manual, or approved by Allen & Heath. The
warranty does not cover fader wear and tear.
Any necessary adjustment, alteration or repair has been carried out by an authorised Allen & Heath
distributor or agent.
The defective unit is to be returned carriage prepaid to the place of purchase, an authorised Allen &
Heath distributor or agent with proof of purchase. Please discuss this with the distributor or the agent
before shipping. Units returned should be packed in the original carton to avoid transit damage.
DISCLAIMER: Allen & Heath shall not be liable for the loss of any saved/stored data in products that
are either repaired or replaced.
Check with your Allen & Heath distributor or agent for any additional warranty information which may
apply. If further assistance is required please contact Allen & Heath Ltd.
Any changes or modifications to the equipment not approved by Allen & Heath could void the
compliance of the product and therefore the user’s authority to operate it.
ALLEN&HEATH
Qu Mixer Getting Started Guide 2 AP10025 iss2
Allen & Heath Limited, Kernick Industrial Estate, Penryn, Cornwall, TR10 9LU, UK
Qu Series products comply with the European Electromagnetic
Compatibility directive 2004/108/EC and the European Low Voltage
directive 2006/95/EC.
Qu Mixer Getting Started Guide AP10025 Issue 2
Copyright © 2016 Allen & Heath. All rights reserved
http://www.allen-heath.com
Page 3

IMPORTANT - Read these instructions before starting:
Safety instructions
Before starting, read the Important Safety Instructions printed on the sheet supplied with the
equipment. For your own safety and that of the operator, technical crew and performers, follow
all instructions and heed all warnings printed on the sheet and on the equipment panels.
System operating firmware
The function of the Qu mixer is determined by the firmware (operating software) that runs it.
Firmware is updated regularly as new features are added and improvements made. The
firmware version current when this guide was released is noted in the Contents section.
The latest firmware can be downloaded from the Allen & Heath website, transferred to USB key
and then loaded into the Qu mixer using the Firmware Update utility. Read the Release Notes
that come with the firmware.
Check the Allen & Heath website for the latest version of Qu firmware.
Software licence agreement
By using this Allen & Heath product and the software within it you agree to be bound by the
terms of the relevant End User Licence Agreement (EULA), a copy of which can be found on
the Allen & Heath website ( www.allen-heath.com/legal ). You agree to be bound by the terms of
the EULA by installing, copying, or using the software.
Further information
Please refer to the Allen & Heath website for further information, knowledgebase and technical
support. You can join our Allen & Heath Digital Community to share knowledge and information
with other Qu users.
Check for the latest version of this Getting Started Guide.
Download the Qu Series Reference Guide AP9372.
General precautions
To prevent damage to the controls and cosmetics, avoid placing heavy objects on the
control surface, scratching the surface or touch screen with sharp objects, or rough
handling and vibration.
Protect the equipment from damage through liquid or dust contamination. Cover the
mixer when it is not being used for a long period.
Computer and touch screen technology can be affected by extreme cold. If the
equipment has been stored in sub-zero temperatures allow time for it to reach normal
operating temperature before use at the venue. Recommended operating temperature
for Qu is 5 to 35 degrees Celsius.
Avoid using the equipment in extreme heat and direct sunlight. Make sure the mixer
ventilation slots are not obstructed and that there is adequate air movement around the
equipment.
Clean the surface with a soft brush and dry lint-free cloth. Do not use chemicals,
abrasives or solvents. Avoid the use of spray cleaner in the faders.
It is recommended that servicing is carried out only by an authorised Allen & Heath
agent. Contact details for your local distributor can be found on the Allen & Heath
website. Allen & Heath do not accept liability for damage caused by maintenance, repair
or modification by unauthorised personnel.
Qu Mixer Getting Started Guide 3 AP10025 iss2
Page 4

1. Packed contents
REGISTER YOUR PRODUCT online at: www.allen-heath.com/register
Safety Sheet
AP9240/CL-1
• Read this before starting
Mains lead
• Check this is correct for
your territory
Getting Started Guide AP10025
Remote Audio Racks
Provides remote audio over dSNAKE Cat5 cable digital snake.
AR2412 24 Mic/Line in, 12 Line out AR84 8 Mic/Line in, 4 Line out
Part: GLD-AR2412 Part: GLD-AR0804
AB168 16 Mic/Line in,
8 Line out Remote
Part: AB1608
ME Personal Mixing System
ME-1 Personal Mixer
ME-U 10-port PoE hub
Qu-Pac Mixer
LEDlamp
Right angled 4-pin
XLR LED lamp with
built-in dimmer
Part: LEDlampX
Dust covers
AP9262 Qu-16
AP9548 Qu-24
AP9639 Qu-32
Qu-16 polyester carry bag
Part AP9931
Cat5 cables
For use with dSNAKE remote audio
AH8823 2m (6.6’) patch
AH9651 20m (66’) coil
AH9981 50m (165’) drum
AH9650 100m (330’) drum
19” Rack Ear Kit for Qu-16
To mount the Qu-16 in a standard 19” rack
or flightcase. These fit over the plastic trims.
Part: QU-16-RK19
Qu-Pad app for iPad
Qu-You app for iOS devices and
Android
Qu-Control for iOS devices
Available from the Apple Store / Google
Play
Options and Accessories available
Qu Mixer Getting Started Guide 4 AP10025 iss2
Page 5

2. Contents
About this guide
This is the Getting Started Guide for the Allen & Heath Qu-16, Qu-24
and Qu-32 digital mixers.
For more information about Qu mixer setup and mixing functions
please refer to the Qu Mixer Reference Guide available for download
from the Allen & Heath website:
www.allen-heath.com
Please Note
This guide refers to Qu firmware V1.9. Please refer to the Allen &
Heath website for the latest version of firmware and this guide.
For information on the Qu-Pac, Qu-SB and the AR2412, AR84 and
AB168 remote AudioRacks please refer to their user guides.
1. Packed contents .............................................................................................................................. 4
2. Contents .......................................................................................................................................... 5
3. Introduction to the Qu Series ........................................................................................................... 6
3.1 Differences between the Qu models ....................................................................................... 7
4. Installation........................................................................................................................................ 9
5. Rear Panel ..................................................................................................................................... 10
5.1 Connecting and powering up the mixer ................................................................................ 10
6. Front Panel .................................................................................................................................... 11
7. Audio Signal Processing ................................................................................................................ 12
8. Wireless Control ............................................................................................................................ 13
9. Qu-Start ......................................................................................................................................... 14
9.1 Things to check before starting ............................................................................................ 14
9.2 Set a known starting point .................................................................................................... 14
9.3 Prepare the mixer for your session ....................................................................................... 15
9.4 Set a starting point for processing and mix parameters ....................................................... 17
9.5 Save the settings ................................................................................................................... 18
9.6 Mixing with Qu-16, Qu-24 and Qu-32 .................................................................................... 19
9.7 Security and user access ...................................................................................................... 20
9.8 USB recording and playback ................................................................................................ 21
9.9 A few more functions ............................................................................................................ 22
10. Resetting the Mixer ........................................................................................................................ 23
10.1 Reset Mix Settings – A starting point for mixing .................................................................... 23
10.2 System Hard Reset – Clear everything ................................................................................. 23
Qu Mixer Getting Started Guide 5 AP10025 iss2
Page 6

3. Introduction to the Qu Series
Building on the heritage of the GLD and flagship iLive digital consoles, the Qu Series presents exceptional
performance together with an intuitive analogue style user interface with a motorised fader per channel,
knobs and touch screen, total recall of all settings, full input, output and FX processing and patching,
built-in automatic mic mixer, USB streaming and direct to hard drive multitrack recording, digital snake
capability and remote wireless control using an iPad.
There are five models in the Qu Digital Audio Mixer Series:
Qu-16 – Compact, rack mountable mixer with 16 mic and 3 stereo line input channels.
Qu-24 – Larger model with 24 mic and 3 stereo inputs. Adds stereo Groups, Matrix and more SoftKeys.
Qu-32 – Largest model with 32 mic and 3 stereo inputs. Adds 2 more stereo Groups.
Qu-Pac – Rack mountable version of the Qu-32 without faders, for iPad and front panel control.
Qu-SB – Rack mountable version of the Qu-32 without faders and front panel controls, for iPad control.
Qu-16 Qu-24 Qu-32
16 Mic/Line channels 24 Mic/Line channels 32 Mic/Line channels
3 stereo Line channels 3 stereo Line channels 3 stereo Line channels
24 sources to the mix 32 sources to the mix 40 sources to the mix
12 mixes (4 mono, 3 stereo, LR) 12 mixes (4m, 3(5)st, LR) 12 mixes (4m, 3(7)st, LR)
4 FX (2 send buses) 4 FX (4 send buses) 4 FX (4 send buses)
4 SoftKeys 10 SoftKeys 10 SoftKeys
24 out, 22 in USB streaming 32 out, 30 in USB 32 out, 32 in USB
2 stereo Groups (mix mode) 4 stereo Groups (mix mode)
2 stereo Matrix 2 stereo Matrix
All models
AES digital, Alt Out and 2TRK outputs
Talkback mic input
dSNAKE Cat5 snake to connect optional AudioRacks or ME-1 personal monitor mixers
4 Mute Groups, 4 DCA Groups
4 built-in FX (effects units)
100 Scene memories with channel safes and recall filters
Automatic mic mixing (AMM)
Channel ducking
Qu Mixer Getting Started Guide 6 AP10025 iss2
Page 7

3.1 Differences between the Qu models
32 fader strips
4 Group masters
2 Matrix masters
4 DCA Group masters
4 stereo Group mix selects
Larger Touch Screen
Shelf for iPad
10 SoftKeys
2 Group masters
2 Matrix masters
4 FX sends, 2 stereo Groups
24 fader strips
4 SoftKeys
16 fader strips
LED colour strips to identify layer
2 FX sends, no Groups
All Qu mixers operate in the same way and have a similar touch screen menu structure. The larger
models add Groups and Matrix. Other differences are shown here:
Qu-16 Qu-24
Qu-32
Qu Mixer Getting Started Guide 7 AP10025 iss2
Page 8

Qu-24 24 Mic/Line in
4 Group out
Matrix out
Qu-16 16 Mic/Line
32 out, 30 in USB audio streaming
24 out, 22 in USB audio streaming
Qu-32 32 Mic/Line in
8 Group out
Matrix out
32 out, 32 in USB audio streaming
AudioRacks - All models are compatible with the optional Allen & Heath
AB168, AR2412 and AR84 AudioRacks. These provide remote mic inputs and
line outputs that connect to the mixer using a Cat5 ‘digital snake’ cable up to
100m long. You can connect up to two AudioRacks, the second as an
expander to the first.
The AR2412 AudioRack cannot be used as an expander in a Qu system.
Scene, Library and Show memories - All Qu mixer memories are
compatible. Files created on one model can be transferred via USB key and
loaded on another. The extra features of the bigger models will be ignored
when their file is loaded on a Qu-16. The extra features of the bigger models
will be reset to factory default when a Qu-16 file is loaded.
To be compatible, ensure all your Qu mixers are loaded with the same
version of firmware. Check the Allen & Heath web site for the latest firmware
available.
USB Audio - A USB hard drive formatted on one model can be used on the
other. Stereo and multitrack Qu-Drive recordings are compatible. USB B
audio streaming is compatible, but note that the Qu-16 is 24out/22in, the Qu24 is 32out/30in, and the Qu-32 and Qu-Pac are 32out/32in.
Firmware – The same version but different firmware is needed for each
model. Choose either the Qu-16, Qu-24 or Qu-32 file when downloading
firmware from the Allen & Heath web site. The procedure for updating
firmware is the same for all models.
Qu-Pad, Qu-Control and Qu-You apps - These apps are compatible with all
Qu mixers. They identify the model and load the appropriate controls when
you log in. Qu-Pad and Qu-Control are available for iOS devices. Qu-You is
available for iOS and Android devices.
Make sure the app version and mixer firmware versions are compatible.
Qu Mixer Getting Started Guide 8 AP10025 iss2
Page 9

483
190
440
40
43
43
471
486
30
171
133
186
496
62
70
134
27
20 degrees
Qu-16 = 440 Qu-24 = 632 Qu-32 = 850mm
4. Installation
The Qu mixer can be operated on a flat surface or fitted into a flightcase. The Qu-16 can be mounted in a
19” equipment rack or plinth. The unique shape of the Qu aids heat management without the need for a
fan. It also provides a convenient space to put things when desk area is limited.
Ventilation - Make sure that air flow around the
ventilation slots at the rear and underside of the mixer
is not obstructed. Keep these areas clear when casing,
installing or operating the mixer flight.
Blocking or obstructing the ventilation slots may
cause damage to the mixer through overheating.
Qu-16 Rack Mount Option
Qu Mixer Getting Started Guide 9 AP10025 iss2
A kit of parts is available from Allen &
Heath to mount the Qu-16 in a
standard 19” equipment case.
Rack kit part number QU-16-RK19
Minimum rack space required is 11U.
Allow space for the connectors
and cables at the rear.
The rack ears can be fitted without
the need to remove the plastic side
trims. Simply secure them to the base
of the mixer with the 6x M4x8 screws
supplied (part number AB0332) using
a T20 Torx screwdriver.
Secure the mixer in the 19” rack with
8x M6 screws with plastic cup
washers to protect the mixer surface.
Page 10

5. Rear Panel
AES digital out
2Trk out
Alt out
LR main out
Lamp
Talkback
Mic in
ST1 and ST2
stereo line in
Analogue Mix outputs
Mic and Line inputs
Network
dSNAKE remote audio
USB B streaming
Kensington
Lock
Cable
clamp
Power On/Off
Mains power input
Mains fuse
Once an AudioRack is recognised,
the dSNAKE icon will appear in the
screen toolbar:
This shows the Qu-16 rear panel. The Qu-24 and Qu-32 are similar but include Group and Matrix outputs.
5.1 Connecting and powering up the mixer
If you are using a remote AudioRack then connect it with a Cat5 digital snake. Use STP (shielded twisted
pair) Cat5e or higher spec cable up to 100m (330’) long. Cable with both foil and braided screens provide
shielding from interference and are generally more rugged. Stranded core cables are less prone to
damage when kinked or repeatedly coiled. Plug into the dSNAKE port. If you are connecting a second
AudioRack plug it into the EXPANDER port of the first.
Important - Before starting, read the Safety Instructions
Sheet packed with the mixer. These can also be
downloaded from the Allen & Heath website.
To avoid loud thumps, do not switch the mixer on or off
while the PA speakers are powered. Always switch the
amplifiers on last, and switch them off first.
Switching the mixer on – Press the ON/OFF switch.
The mixer takes just a few seconds to boot up. It restores its
previous settings. LR mix is selected and it’s processing
shown on the screen.
Qu Mixer Getting Started Guide 10 AP10025 iss2
Switching the mixer off – First select the Home
screen. Touch Shut Down to safely complete processes
such as parameter storing and USB data transfer or
recording. Once complete, press the ON/OFF switch to turn
the mixer off.
Page 11

6. Front Panel
Fader Flip
TouchChannel
Screen select
SuperStrip
Fader Strips
Touch Screen
Master Strip
Mix assign
SoftKeys
Layer select
Copy/Paste/Reset
Mix select Mix keys
Channel select Sel keys
Engineer’s monitor
Qu-Drive USB port
Function key (Fn)
This shows the Qu-16 front panel. The Qu-24 and Qu-32 are similar but include more fader strips, Group
mix select keys, more SoftKeys and an iPad tray.
Fader Strips - These provide access to the input and master channel levels and
processing. The faders are motorised and move to present the sends to a mix or FX
when a Mix key is selected. Pressing GEQ Fader Flip presents the graphic EQ across
the faders.
Remember to turn the Mix key off or select LR to return to the main mix on faders.
Mix Assign – While holding down the Assign key, press the strip Sel keys to toggle
the routing to the currently select mix on or off. While holding down the PreFade key,
press Sel keys to toggle the channel sends pre or post fader (key illuminated = prefade). You can assign or set pre/post fade for all channels by pressing the master strip
Sel key.
Layers – There are two layer keys. There strip functions are marked across the panel.
Press both keys together to select the Custom Layer. You can assign any combination
of channels, masters and DCAs to this layer. There is space for a label strip to identify
these.
Copy/Paste/Reset – While holding down the Copy key, press a Sel or Mix key or
touch the top part of the Processing screen to copy the associated processing or mix
parameters. Then hold down the Paste key and press the strip Sel or Mix key of the
channel or mix to paste it to. Hold down Reset and press a key to reset parameters to
factory default. More is described later in this guide.
Fn key – Press to open an option page for the currently selected screen. Its function is
displayed in the lower toolbar. For example, access the input source patching from the
Processing screen Preamp page, or the Mute and DCA Group assignments from the
Routing screen.
Qu Mixer Getting Started Guide 11 AP10025 iss2
Page 12

7. Audio Signal Processing
Mic
Line
L/M
R
Mic/Line Inputs
ST1
L/M
R
ST2
ST3
L/R
Mic
Talkback
Line Inputs
1 ---------- 16
Qu-Drive
USB B
Stream Stream
22 ch 24 ch
Playback
LR, 18 trk
SIGNAL FLOWQu-16
Local Inputs dSNAKE USB
Record
LR, 18 trk
PREAMP
GAIN
48V
MUTE
L R
PAN
FADER
Channel SOURCE
ASSIGN
PRE/POST
SENDS
Input Channels 1-16, ST1-3
dSNAKE
PEQ COMP
DELAY
FX
Insert
MUTE
FADER
GEQ
PEQ COMP
DELAY
FX
Insert
MUTE
FADER
GEQ
Output PATCHMixInputs
Line Outputs
L
R
2Trk
L
R
Alt Out
AES Out
Mix 1-----------10
Main LR
USB dSNAKE
MUTE
FADER
ASSIGN
PRE/POST
SENDS
FX Send 1-2
FX 1-4
Insert
FX
MUTE
L R
PAN
FADER
ASSIGN
PRE/POST
SENDS
PEQ
Local Outputs
Cat5 Digital Snake to AudioRack and ME Personal Monitor System
Sine
Pink
White
Bandpass
DELAY
RTA
PAFL
PHONESPFL TRIM
PAFL MONITOR
LR
MIX Sends
PAFL
FX Sends
DIR OUT
LR
MIX Sends
FX Sends
Route to:
PAFL Route to:
FX Return 1-4
TALK
ASSIGN
TALKBACK
LR
MIX
GAIN HPF
Route to:
ASSIGN
SIG GEN
LR
MIX
LEV
MUTE
Route to:
PAFL
Mix - Mono 1-4, Stereo 5-6, 7-8, 9-10
Main LR
Outputs
PAFL
Route to:
L R
Output BAL
Outputs
PAFL
Route to:
L R
Output BAL
LR post
AMM (CH1-16)
POL
0
TRIM HPF GATE PEQ COMP
DELAY
FX
Insert
or Ducker
Mic
Line
L/M
R
Mic/Line Inputs
ST1
L/M
R
ST2
ST3
L/R
Mic
Talkback
Line Inputs
1 ------ 24(32)
Qu-Drive
USB B
Stream Stream
30 ch 32 ch
Playback
LR, 18 trk
SIGNAL FLOWQu-24(32)
Local Inputs dSNAKE USB
Record
LR, 18 trk
PREAMP
GAIN
48V
POL
0
TRIM
Channel SOURCE
ASSIGN
GRP
LR
MIX Sends
PAFL
PRE/POST
SENDS
FX Sends
DIR OUT
Input Channels 1-24, ST1-3
ASSIGN
LR
MIX Sends
PRE/POST
SENDS
FX Sends
MTX Sends
Group 1-2, 3-4, (5-6, 7-8)
dSNAKE
PEQ COMP
DELAY
FX
Insert
MUTE
FADER
Mix - Mono 1-4, Stereo 5-6, 7-8, 9-10
GEQ
MTX Sends
PEQ COMP
DELAY
FX
Insert
MUTE
FADER
Main LR
GEQ
MTX Sends
PEQ COMP
DELAY
FX
Insert
MUTE
FADER
Matrix 1-2, 3-4
GEQ
Outputs
Output PATCHMixInputs Masters
Line Outputs
Grp 1---4(8)
L
R
2Trk
L
R
Alt Out
AES Out
Main LR
MTX 1---4
USB dSNAKE
MUTE
FADER
ASSIGN
PRE/POST
SENDS
FX Send 1-4
FX 1-4
Insert
FX
MUTE
L R
PAN
FADER
ASSIGN
PRE/POST
SENDS
FX Return 1-4
GRP
LR
MIX Sends
FX Sends
PEQ
TALK
ASSIGN
TALKBACK
GRP
LR
MIX
MTX
GAIN HPF
ASSIGN
SIG GEN
GRP
LR
MIX
MTX
LEV
MUTE
DELAY
RTA
PAFL
PHONESPFL TRIM
PAFL MONITOR
Local Outputs
Sine
Pink
White
Bandpass
Mix 1---------------10
Route to:
PAFL Route to:
Route to:
Route to:
PAFL
Route to:
L R
Output BAL
ASSIGN
PRE/POST
SENDS
Outputs
PAFL
Route to:
L R
Output BAL
Outputs
PAFL
Route to:
Outputs
PAFL
Route to:
PAFL
ASSIGN
PRE/POST
SENDS
L R
Output BAL
ASSIGN
PRE/POST
SENDS
L R
Output BAL
LR post
HPF GATE PEQ COMP
DELAY
FX
Insert
MUTE
L R
PAN
FADER
or Ducker
PEQ COMP
DELAY
Insert
MUTE
FADER
GEQ
L R
PAN
FX or Ducker
Cat5 Digital Snake to AudioRack and ME Personal Monitor System
AMM (CH1-16)
The following diagrams illustrate the Qu signal flow and processing. The Qu-24 and Qu-32 include Group
and Matrix mixes. All models include a built-in automatic mic mixer (AMM) for the first 16 channels. A
more detailed diagram and further information is available within the Qu Mixer Reference Guide which can
be downloaded from the Allen & Heath website.
Qu Mixer Getting Started Guide 12 AP10025 iss2
Page 13

8. Wireless Control
Qu mixer
Qu Network port
Cat5 cable
Wireless router
Control device
The Allen & Heath Qu-Pad, Qu-Control and Qu-You apps are available free from the Apple Store for iOS
devices including iPad, iPhone and iPod Touch. Qu-You is also available for Android devices.
Set up the Qu wireless network - For best performance use a dual band (2.4 and 5GHz) wireless
router (wireless access point) with auto channel selection. Position it high up to avoid obstacles such as
people and equipment. Avoid locating it behind pillars or walls, near metal beams or on top of
loudspeakers. Go to the mixer Setup / Network screen and check that DHCP is enabled.
The Qu mixer firmware and app versions must be compatible. For example, V1.9
app will not run with V1.8 firmware. To avoid unexpected version mismatch we
recommend you turn off ‘auto update’ on your device. Download the latest Qu mixer
firmware from the Allen & Heath web site.
To prevent unauthorised control of your Qu mixer we recommend that you set a
router password to protect your wireless network.
The wireless device remembers the network settings. To prevent a guest
engineer using their own device on your network without password in future, select
your network in their device Settings Wi-Fi menu and use the 'Forget this network'
function.
Connect to the wireless network – Power up the router. Wait a few minutes
for it to establish its broadcast. Go to your wireless device Settings screen, find and
connect to the mixer Wi-Fi network.
Start the app – The app opens in its Login page. You should see your Qu mixer
in the list if it is recognised on the Wi-Fi network. Select this and touch Connect. A
login password is required if one has been set at the mixer. Read the app Help
Manual by touching the ? button on its Login or Setup page.
Qu-Pad is an engineer's mixing tool giving you the freedom
to walk the room or stage and control the sound where it is
needed. Qu-Pad follows the User Profiles and Permissions as
set in the Qu mixer.
Qu-You provides personal monitor mix control for
musicians on stage. The engineer can still keep an eye on
and control each mix at the Qu mixer at any time. A
password for Qu-You users can be set at the mixer.
Qu-Control is a customisable app with up to five screen
tabs and up to 15 control ‘widgets’ per tab. These can be
anything from background music source selection to a
master zone level or microphone paging. A password for QuControl users can be set at the mixer.
Qu Mixer Getting Started Guide 13 AP10025 iss2
Page 14

9. Qu-Start
User
Firmware
Touch and hold for 2 seconds
This section provides a quick guide to get you started setting up and mixing with Qu. For more
information please refer to other sections in this guide and to the Qu Mixer Reference Guide available for
download from www.allen-heath.com/key-series/qu-series.
9.1 Things to check before starting
Mixer firmware version – View current version on the Home
screen. Go to www.allen-heath/key-series/qu-series to check
you are running the latest version. Download and update
using the Setup / Utility / Firmware screen if you are not.
Qu-Pad, Qu-Control and Qu-You app versions – The app
versions must be the same as the Qu mixer firmware version. If
not, the app will not connect to the mixer. The Apple Store will
always have the latest version available for free download.
We recommend you turn off your iOS device Auto Update
function to prevent the app being updated before you have
had a chance to update the mixer firmware.
Network and Wi-Fi settings – Plug a router (wireless access
point) into the Qu Network port. Check that DHCP is enabled
in the Setup / Control / Network screen. Check that your
router has a password set. The network should be
independent of any other Wi-Fi in the building.
Current User – View this on the Home screen. Qu has three
User Profiles. Admin user has access to everything and is
typical for the mixer owner or senior engineer. Standard and
Basic users have restricted access as set by Admin.
Passwords can be set.
Calibration – You can recalibrate the motor faders and touch
screen accuracy using the Setup / Utility / Calibration
screen.
Dimmer – To adjust the brightness of the touch screen and
key illumination press and hold the Setup key and turn the
rotary control. Qu powers up with maximum brightness.
9.2 Set a known starting point
To completely reset the mixer you can perform a power up
System Hard Reset. Only do this if absolutely necessary. This
clears all the memories (Scenes, User Libraries, User Profiles
and passwords) and resets all settings to factory default.
To zero the board as a start for setting up a new session or
event you can use the Reset Mix Settings function on the
Scenes page. This is a special Scene that resets all current
mix parameters to factory default. It does not affect the
memories and system settings and preferences.
This reset is not affected by the Global Scene Filter or channel
Safes. It also resets the Global Filter and clears the Safes.
Touch and hold the Reset Mix Settings button for 2 seconds
and then confirm.
Qu Mixer Getting Started Guide 14 AP10025 iss2
To set your preferred starting point you could set up and
store your own template Scene and keep this on USB key as a
backup to load into this and other Qu mixers you may use.
Page 15

9.3 Prepare the mixer for your session
View Front or Back panel
Choose the FX preset
Touch to name
Patch input sockets
Name the channels and masters – Working from your plot
sheet, use the mixer Processing screens to enter names with
up to 6 characters. Touch the name to open the keypad. The
Qu-Pad app can also be used to enter names.
Choose the sources for the channels – You can choose one
of 3 sources for each mono and stereo channel – Local (rear
panel) socket, dSNAKE (remote) socket, or USB (playback).
The reset default is Local inputs patched.
To change channel source go to the input Processing screen
Fn key Source page.
Select dSNAKE if you are connecting a remote AudioRack via
Cat5 cable digital snake. Touch ‘Patch’ to take you to the
Setup /I/O Patch / dSNAKE In screen if you want to remap
AudioRack sockets to different channels. The default is one-toone mapping.
Set the Global USB Source button to choose either Qu-Drive
or USB B streaming as the USB playback source. This setting
affects all channels.
Check the Mix routing and pre/post fade – Mixes 1-10 can
be set pre or post fader, channels can be assigned, and you
can choose the send point within the channel signal path.
You can quickly set up a starting point with all on or off, and all
pre or post for each mix using its master Routing screen.
The reset default is all pre fade, all channels assigned and the
sends post-EQ (not affected by the compressor). This is ideal
for using the mixes as monitor sends. For effects and other
sends you could change this to post fade, post Delay (after all
processing).
Set up the Groups * – Groups can be configured as audio
subgroups or additional stereo mixes, for example when
working with many in-ear monitors. Use its master Routing
screen to check or change its operating mode. If you are using
subgroups to LR then remember to turn off the assignments of
those channels to the LR mix.
* = Groups and Matrix are not available on the Qu-16.
Set up the Matrix sends * - Use the Matrix Routing screen Fn
key Matrix View page to work with its send levels and routing.
Set up the FX – Go to the FX screen to set up the 4 built-in FX
units. The reset default sets up one reverb and a delay (Qu-
16), or two reverbs, a delay and an ADT effect (other Qu
models). To change these use the Fn key Library page to
select and recall the FX type and preset for each.
Use the Back Panel view to check the FX patching. Effects
such as reverb and delay use Mix->Return patching. You can
also insert an FX into a channel or mix.
Set up Mute and DCA Groups – Use the Routing screen Fn
key Mute/DCA page to access the masters and to name and
assign the groups. You can also access mute group masters
on the Home screen. It can be useful to assign a mute or DCA
group to the FX returns providing a quick way to silence or
reduce the effects between songs.
For quick access the group mutes can be assigned to
SoftKeys.
Qu Mixer Getting Started Guide 15 AP10025 iss2
Page 16

+1 increment
SoftKeys
Custom Layer
Patching – The reset default patch is a simple one-to-one
mapping of local sockets to the channels, and a traditional
patch of outputs suitable for the typical PA application.
However, Qu offers flexible patching letting you route signals
anywhere you want.
Many of the patching screens use the Fn key as a ‘+1’
increment to let you quickly step through a range of sockets.
Most require confirmation to Apply or Cancel the changes
you make.
Patch the Alt Out and AES outputs – Use the Setup / I/O
Patch Surface screen to patch any of the available Qu output
sources to these mixer rear panel sockets. Alt Out can provide
a useful stereo recording or zone feed with front panel rotary
control.
Patch the dSNAKE remote outputs - Use the Setup / I/O
Patch / dSNAKE Out screen to patch Qu outputs to any of the
connected AudioRack sockets.
Choose the Direct Output application - Think about how you
want to use the channel direct outputs for example for USB
recording, ME-1 personal monitoring, channel Ducker trigger
or single channel FX. Set your source preference in the
Routing screen of any input channel. This setting is global
and affects all direct outputs.
Patching to the optional ME-1 personal monitor system Go to the Setup / I/O Patch / Monitor screen to patch Qu
outputs to the 40 ME-1 sends. It is typical to send the input
channel direct outputs. Recommended direct out setting is
post delay, pre fader, post mute.
Patch the USB outputs – Use the Setup / I/O Patch / USB
Audio screen to patch any of the Qu outputs to the Qu-Drive
multitrack and rear panel USB B streaming port. These share
the same patch. USB streaming uses all 32 outputs (24 on Qu-
16). Qu-Drive recording is fed from the first 18 outputs. QuDrive stereo recording is fed from outputs 17-18.
Live show multitrack recording typically uses the channel
Insert Sends so that live mixing does not affect the recording.
You may wish to change this to Direct Outputs for studio
recording and other applications.
Assign the SoftKeys – The SoftKeys can be user assigned for
various functions such as mute, tap tempo, scenes, Qu-Drive
transport and more. Assign these using the Setup / Control /
SoftKeys screen. Use the rotary to scroll through the list of
options. Confirm using the Apply button.
Assign the Custom Layer – A third fader strip layer can be
user assigned for any combination of channel, FX, mix, DCA
and MIDI select. This can give you quick access to just the
channels you are using for your show. Assign these using the
Setup / Control / Custom Layer screen. Use the Fn key as a
‘+1’ increment to let you quickly step through a range of
assignments.
Assign the Qu-Pad app Custom Layers – If you are using the
iPad app for wireless mixing you can assign up to 3 custom
layers to present the fader strips and SoftKeys you are using in
the order you prefer. Select the Setup icon in the top toolbar.
Qu Mixer Getting Started Guide 16 AP10025 iss2
Page 17

9.4 Set a starting point for processing and mix parameters
Copy parameters
Paste parameters
Reset parameters
Start by using the Processing screen Preamp page Linking
button to link parameters for any odd/even stereo pairs of
channels you may need. For example, stereo keyboards or
backing tracks. Adjusting Pan on one channel will set the
width for the pair.
There are several ways to quickly set up the input and mix
channel processing ready to start your sound check:
Processing Libraries – Use the Processing screen Fn key to
open the Library page for the related block, for example the
PEQ.
Factory Libraries provide presets as examples and a typical
starting point. They cannot be overwritten or deleted. User
Libraries can be stored, named and edited.
Channel Library – This preset recalls all processing (Gate,
PEQ, Comp, Delay) for the input channel. Turn on ‘Recall
Preamp’ if you want this to also include the preamp settings
(Gain, Pad, 48V, Polarity). Channel libraries do not include the
linking or ducker settings.
Channel libraries can provide a very quick and complete way
to set a starting point before sound check once you have
named your channels.
Copy / Paste / Reset – These keys provide a powerful tool for
quickly setting up your processing. They work in a similar way.
Press and hold the key down. While holding, press or touch
another item to perform the action:
+ Front panel Sel key = all related processing (not preamp)
+ SuperStrip ‘In’ key = just that block, eg PEQ
+ SuperStrip ‘USB’ key = Preamp
+ Processing top of screen = just that block
+ Processing top of screen Gain knob = Preamp
+ Channel Mix Select Mix button = its mix levels, pan, assign
These actions do not affect channel linking or ducker settings.
Reset - Sets related parameters to factory default. For
example PEQ flat, Gate out, Mix levels off, pans mid,
assignments on.
Copy / Paste – Hold Copy and press/touch the item you want
to copy. Then hold Paste and press/touch the channel Sel
key, Select box, or Mix button you want to paste it to. You can
quickly paste settings to multiple channels or mixes. For
example, to copy CH2 PEQ only to CH3, 4 and 5:
Copy+CH2 PEQ top of screen, then
Paste+CH3, then CH4, then CH5 Sel keys
Qu-Pad app – You can also name channels, set channel
linking and recall the Libraries using the Qu-Pad app.
Qu Mixer Getting Started Guide 17 AP10025 iss2
Page 18
9.5 Save the settings
Groups of parameters
A dot shows one or more assigned
Touch and hold for reset
Scene memories – Once you have set up the mixer ready for
the session, go to the Scenes screen to name and store the
current mix settings as a scene.
You could name and store a scene as a template starting point
for future shows, for each band after you sound check them,
theatre show cues, recording sessions and so on.
You can store up to 100 scenes within the Qu mixer. You can
copy and clear existing scenes. To copy a scene hold down
the Copy key and touch a scene in the list. Then hold down
the Paste key and touch the scene position to copy to. This
copies all scene parameters, its name and filter.
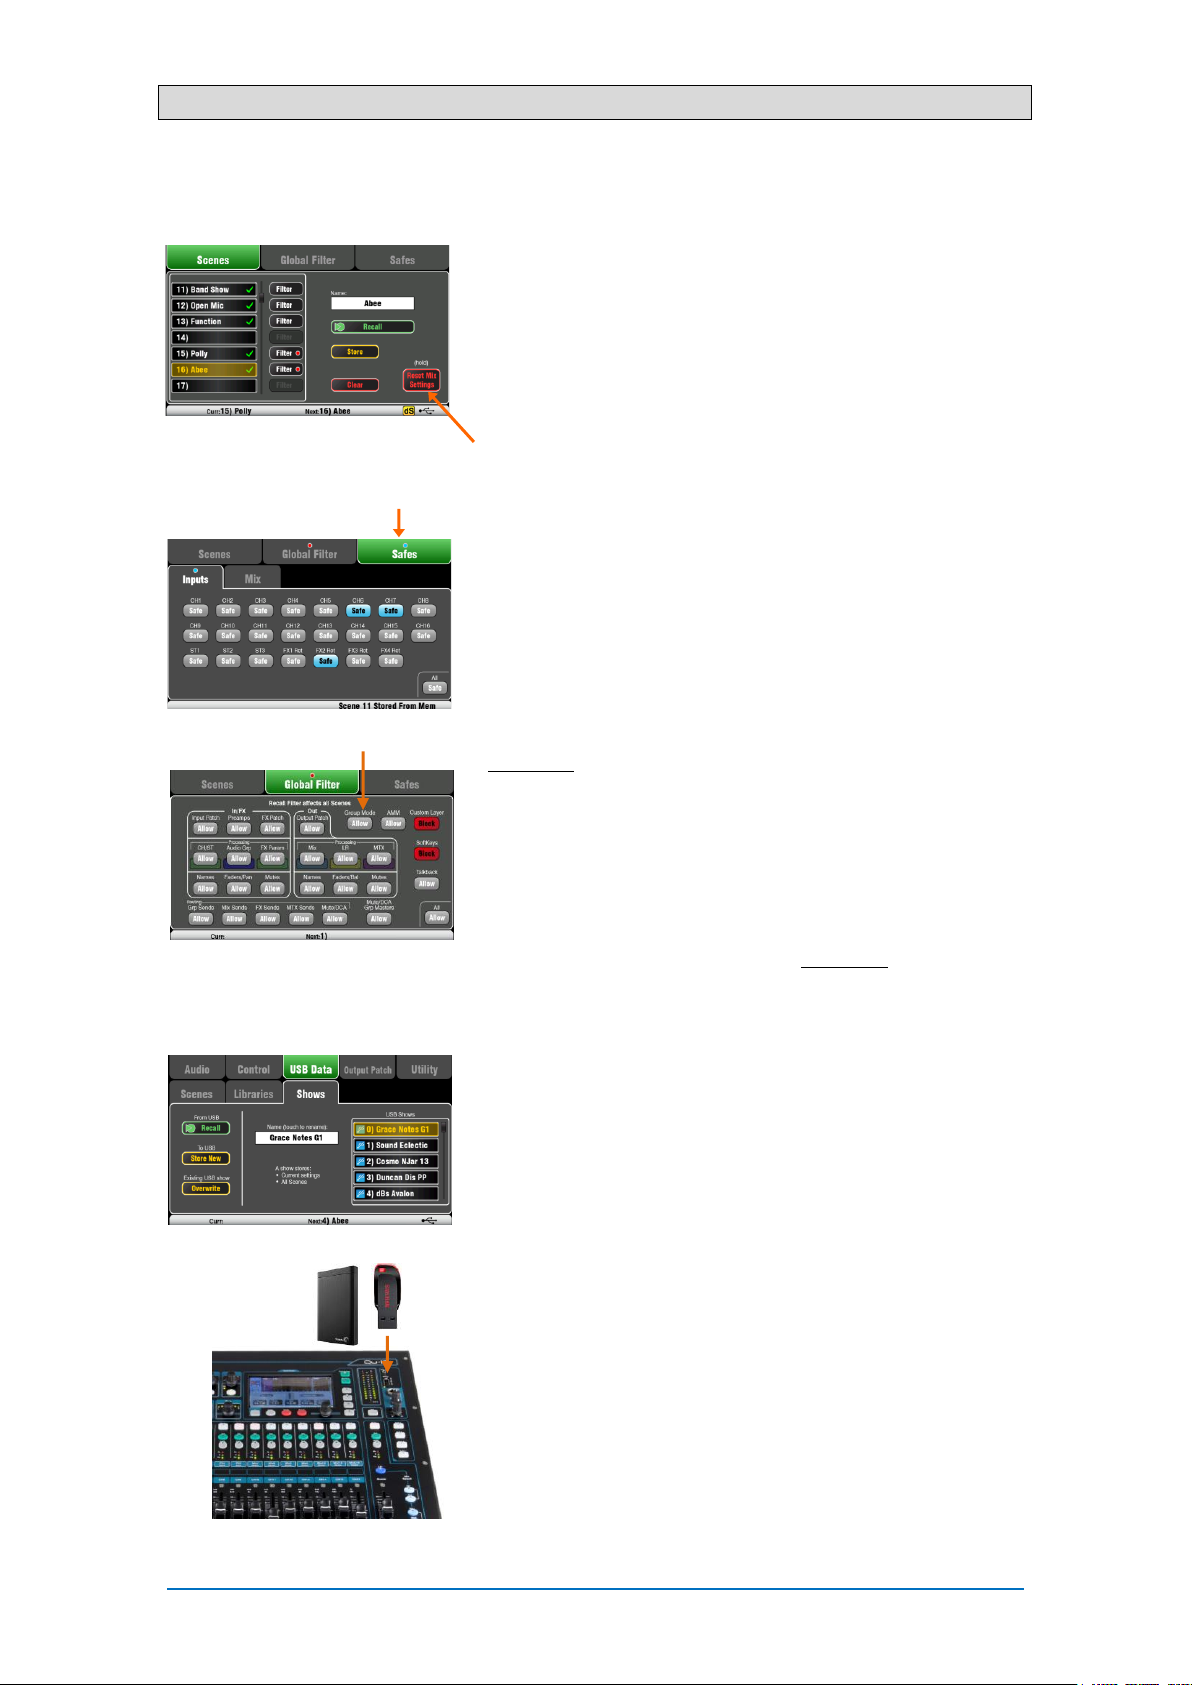
Reset Mix Settings – This lets you zero the desk ready to start
a new mixing session. It resets all mixing parameters and
clears existing Safes and Global Filter settings. It does not
affect scenes, libraries and user preferences.
Scene Safes – This function protects all parameters of a
selected channel or mix from being overwritten when a scene
is recalled. For example, walk-in music, DJ or presenter. This
means that any changes you make on those channels after
the sound check has been stored will not be lost when you
recall that scene later. Use the Scenes / Safes screen. The
reset default is no safes set.
Global Scene Filter – This function protects selected
parameters of all channels or mix from being overwritten when
any scene is recalled. For example, the SoftKey or Custom
Layer assignments that you may make after sound check, or
the LR mix processing including GEQ which you may change
as the audience fills the room. Use the Scenes / Global Filter
screen. This presents a grid of buttons to block different
groups of parameters for different channel types. The reset
default is Custom Layer and SoftKeys blocked.
Per Scene Filter – This is similar to the global filter but
protects selected parameters for just one scene recall. Each
scene has its own filter. This can be a powerful tool, for
example when recalling cues in a theatre show, or effects
changes during songs. You can copy and clear individual
scene filters. The reset default is Custom Layer and SoftKeys
blocked.
Show memories – A Show stores everything including the
current mix settings, all 100 scenes, libraries and setup.
Shows are not stored within the mixer. They are created
directly to a USB drive in the Qu-Drive socket.
Do not edit file names or locations on the USB key.
Archiving and transferring data via USB – You can use a
USB device such as key or drive to archive Qu settings or
transfer them between Qu mixers. The memories are
compatible with all Qu models. Start by formatting the USB
device on the Qu mixer. Use the Setup / Utility / Qu-Drive
screen Format function.
Qu Mixer Getting Started Guide 18 AP10025 iss2
Formatting will erase any existing data and create a Qu
directory on the device. You only need to format the USB
device once on the Qu mixer. Do not attempt to edit the Qu
data or file names using a computer. Keep the USB device for
use with the Qu mixer only.
Go to the Setup / USB Data screen to transfer Scenes, User
Libraries and Shows files.
Page 19

9.6 Mixing with Qu-16, Qu-24 and Qu-32
Press the Processing key and touch the top part of
the screen to access preamp and processing
parameters for the selected channel using the screen.
Press a green Sel key to work with channel processing
and pan using the SuperStrip controls. Press Fader Flip
to work with the mix GEQ using the faders.
Press a layer key to
access inputs, FX and
master fader strips.
Press both for the
Custom Layer. Any
combination of inputs,
FX, masters, DCAs and
MIDI strips can be
assigned here. Use the
space provided to label
the strips.
Press the Routing key to
access routing parameters
for the selected channel.
Press the Fn key to work
with DCA and Mute Group
assignments and masters.
Press a blue Mix key to
work with mix sends,
routing and pre/post
fade settings.
The Master strip follows
the selected Mix.
Remember to return
to the main LR mix once
you have finished
adjusting monitor or
effects levels.
Press PAFL to listen to
individual signals using
headphones and view
their levels on the main
meters.
Pre/Post
Assign
Toggle individual sources
Toggle all sources
Hold and then press Sel
Sends on faders
Press a Group Mix key to assign its routing
and access its master fader and processing.
The channel faders remain active. Groups are
not available on the Qu-16.
The Grp key lights purple if it is set to Group
mode. It lights blue if set to Mix mode.
Qu Mixer Getting Started Guide 19 AP10025 iss2
Page 20

Processing screen – This screen lets you work with the
processing for the selected channel or master.
Touch the top part to open the related parameters in the
section below. The top part can also be used with the
Copy/Paste/Reset keys to quickly copy or reset different
processing blocks.
Touch a parameter box to highlight it, then use the rotary
control to change its value.
Use the Fn key to open any available extra pages for the
current processing view:
Preamp = Source select (input patching)
Gate, PEQ, GEQ, Comp = Library
FX Parameters – Select an FX Send or Return channel and
open the Processing screen to view and work with its effects
parameters. Touch ‘Expert’ if you wish to experiment with
many more of its advanced parameters. Use the Fn key to
open the Library page to change the FX type and store or
recall presets.
Routing screen – This screen lets you work with the sends
from one channel to all the mixes, or access global settings
and routing options for the mixes. To work with the sends from
all channels to one mix use the Mix keys.
You can also use the Routing screen Fn key to access the
Matrix sends while a Matrix is selected, or the Mute/DCA group
assignments and naming while anything else is selected.
9.7 Security and user access
Qu features several functions that protect the system from
unauthorised mixer or app access, and restrict how much
control is given to certain operators. For example, to prevent a
regular event operator from changing the configuration, or to
limit non-technical bar staff to simple control of just the
background music and paging.
Lock Surface – Use this button on the Home screen to
protect the surface controls while the mixer is unattended. If a
password has been set then this will be needed to enter and
exit surface lock.
User Permissions -There are three User Profiles available:
Admin – Has access to everything. Can configure the mixer
and set user permissions and passwords.
Standard – Can control the live mix but is locked out of system
setup functions.
Basic – Can control faders and mutes only, and be locked out
of certain channels by being restricted to Custom Layer only.
Passwords can be set for each of these three users. These are
required at login and surface lock. The Qu-Pad app follows the
same User Permissions. Admin can set a separate password
for Qu-You and Qu-Control users. A scene range and login
scene can be set for the Standard and Basic users.
Qu Mixer Getting Started Guide 20 AP10025 iss2
Page 21

9.8 USB recording and playback
Patch recording sources
Patch recording sources
USB B Streaming – Connect an Apple® Mac or Windows® PC
computer to the rear panel USB B port to stream up to 32
channels of audio in both directions and send MIDI messages.
You can download the Allen & Heath DAW Control driver (for
Mac computer only) to convert the Qu MIDI Strip messages
into HUI or Mackie Control protocol. Download the Allen &
Heath Qu Windows driver to stream standard MIDI messages
to a PC.
Set the Qu MIDI channel number using the Setup / Control /
MIDI screen.
Qu-Drive recording direct to USB drive – You can record
stereo or 18-track multitrack direct to a USB storage device
plugged into the front panel Qu-Drive port.
Note - Qu-Drive recording requires the USB storage device to
support high sustained transfer rates. Not all USB devices will
guarantee flawless performance. To find out more please refer
to the ‘Understanding Qu-Drive and USB’ document in the Qu
Knowledgebase on the Allen & Heath web site. Use the USB
storage device with the Qu mixer only. Do not use it for other
applications.
Format the USB device on the Qu mixer before recording
using the Setup / Utility / Qu-Drive screen. This clears the
drive and sets up the Qu directory structure.
Patch the sources to record using the Setup / I/O Patch /
USB Audio screen. Use the rotary to spin through available
sources to each of the 18 tracks. Press the Fn key ‘+1’ to
increment quickly through the tracks. Choose channel sources
to be from Insert Sends or Direct Out.
Stereo recording uses the same source as multitrack CH17
and 18.
Record Stereo or Multitrack using the Home / Qu-Drive
screen. Recording creates WAV files in Qu directories on the
USB device.
Do not edit the name or contents of files on the USB
device. To avoid errors, we recommend you reformat the
device on the Qu mixer before your next session if you copy or
delete files using a computer.
Play back Stereo or Multitrack using the Processing screen
Preamp page Fn key view. Choose ‘USB’ as the source to the
channels. Select ‘Qu-Drive’ as the Global USB Source.
Using SoftKeys for transport control – You can assign
transport controls for stereo or multitrack recording or
playback using the Setup / Control / SoftKeys screen. For
example, to arm, start and stop recordings while using the
screen for other mixing functions.
Qu Mixer Getting Started Guide 21 AP10025 iss2
Page 22

9.9 A few more functions
Start with the level turned down
Use the Signal Generator to test speakers - After plugging up
the PA check that all the amplifier and speaker levels are correctly
set. Turn the system on in the correct sequence:
Turn the mixer on first, amplifier/speakers on last.
Pink noise is an excellent source for testing speakers. It
generates equal energy per octave across all frequencies. It
can be used to check that all speaker drivers are working and
to listen for phasing and polarity issues.
Set the LR and monitor master faders to their normal operating
position. Go to the Setup / Audio / SigGen screen. Select
Pink Noise and make sure its Level is fully off. Now select LR
and slowly raise the SigGen level to hear the noise in the PA
speakers. Also test the monitor speakers in this way.
Inserted FX – You can insert an internal FX (reverb, delay or
modulation) directly into an input channel or mix master signal
path. Balance between the unaffected (dry) signal and the
effect (wet) using the D/W control in the FX screen.
Channel Ducker – You can insert a ducker into input channels
or groups. This lets you use any Qu signal to automatically
duck (attenuate) other channels when active. For example,
use a paging mic as a trigger to duck the background music
channel. Adjust how fast it ducks and recovers.
Automatic Mic Mixing (AMM) – This is very useful for speech
applications such as conferences and seminars involving
several microphones around a table. The Qu AMM can
automatically take over the level of these mics to improve
clarity and reduce the risk of feedback caused by many open
microphones.
To set up the AMM, start with the mix master fader turned
down. Use PAFL to check each mic signal and set preamp
gain for a healthy meter reading for speech at the expected
distance from the mic. Go to the Setup / Audio / AMM screen
and turn on the associated mic channels. Their fader levels will
jump to their ‘0’ open position. Now slowly bring up the mix
master fader. We recommend you use a DCA or audio Group
as a master fader for the speech mics if you are also mixing
other audio sources.
Refer to the Qu Mixer Reference Guide for more about how the
AMM works and can be used.
Ringing out the monitors – The Qu-Pad app gives you the
freedom to stand in front of a vocal mic on stage and use the
iPad to dial the vocal into the monitor speaker and tune out
any ringing (feedback) you hear using the mix GEQ. Touch the
Master strip Mix button for the monitor mix. The strip becomes
the master for that monitor mix. Touch to select it and open
the GEQ tab. Touch its PAFL button to send the signal to the
RTA. The fader strips present the sends to that monitor mix.
Raise the vocal channel send fader to hear your voice in the
monitor. Carefully raise the fader until you just start to hear a
frequency ring. A red dot in the RTA display above the GEQ
will show which frequency is ringing. Pull back its GEQ slider a
few dB until the ring stops. Slowly raise the vocal level again
until you hear the next frequency ring. To avoid degrading the
overall tone of the sound do not tune out too many
frequencies in this way.
Qu Mixer Getting Started Guide 22 AP10025 iss2
Page 23

10.Resetting the Mixer
Refer to the Qu Mixer Reference
Guide for further information on the
reset functions.
Hold for 5 seconds
while powering up
the mixer
Refer to the Qu Mixer Reference Guide for more information
on these and other Qu hardware and operational functions.
There are two ways to reset the Qu settings to give you a known starting point:
10.1 Reset Mix Settings – A starting point for mixing
This button in the Scenes screen instantly resets the
mixer to a known starting point for mixing. It provides a
quick way to reset the processing, mixes and patching
before a show or after another user has finished with it.
All parameters that can be saved in scenes are reset to
a factory default to ‘zero the board’ ready for the new
mixing session.
If you want to keep your current settings then save
these as a Scene before resetting the mixer.
This reset only affect parameters that are stored in
Scenes. It does not affect existing scenes and libraries
stored in the mixer.
This reset is not affected by the Global Filter and
Safes settings. However, it does reset the filter and
clear any channel safes that were previously set.
Touch and hold the Reset Mix Settings button for 1
second until the confirmation screen appears.
Creating your own start settings – You can
start by resetting the mixer and then editing the
patching, levels and parameters to suit your starting
preferences. Name and store this as a Scene, for
example Scene 1 “Reset Board”.
10.2 System Hard Reset – Clear everything
A power up reset is available if you need to fully reset
the Qu mixer settings and its memories. This could be
done to clear the system out before sending the mixer
to a client, or if you suspect a system problem.
To reset mix parameters before starting a show or
sound check, use a Scene or the Reset Mix Settings
function.
A hard reset sets all current settings to factory
default, and clears all Scenes, User Libraries, User
Permissions and passwords.
First turn off the system including amplifiers and
powered speakers.
To hard reset the Qu mixer - Press and hold the
touch screen Reset and Setup keys together and then
power up the mixer. Keep the keys pressed for at least
5 seconds while the mixer boots. Release the keys.
Qu Mixer Getting Started Guide 23 AP10025 iss2
Page 24

Qu Mixer Getting Started Guide 24 AP10025 iss2
 Loading...