

Page 1
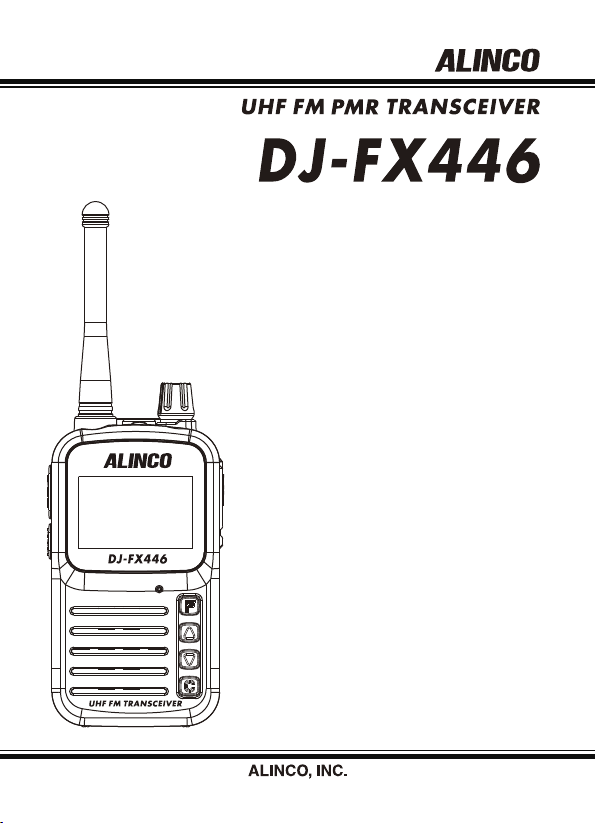
Instruction Manual
Thank you for purchasing your new Alinco transceiver.
This instruction manual contains important safety and
operating instructions. Please read this manual
carefully before using the product and keep it for future
reference.
Page 2

Introduction
Please read this manual completely from the first page to the last, to learn
all the functions the product offers. It is important to note that some of the
operations may be explained in relationto information in previous chapters.
By reading just one part of the manual, you may risk not understanding the
complete explanation of the function. In addition, please understand that
your radio may be programmed by the dealer according to the local
regulation, masking some offeatures mentioned in this manual. Please
consult your dealer for details of programming.
2
Page 3

Before transmitting
There are many radio stations operating in proximity to the frequency ranges
this product covers. Be careful not to cause interference when transmitting
around such radio stations.
■ Lightning
Any person is not safe outdoor during thunderstorm and lightning. This condition
is getting worse if somebody keeps a handheld radio; chances of being hit by
lightning are doubled since lightning may hit a radio antenna as well. At this time,
there is no handheld radio having any kind of protection against lightning current
(which is higher than10 kA.). Note also that no car provides adequate protection
of its passengers or drivers against lightning as well. Therefore, Alinco will not
take responsibility for any danger associated with using its handheld radios
outdoor or inside the car during lightning.
■ Covering ranges
You may expect a range of up to 2 km at high-power when located on a flat,
noise-free place like on a beach. However, it may vary drastically depending
on how to wear and carry the radios,surrounding locations/conditions and static
noise levels (below or near power transmission lines), etc. In urban areas with
many buildings or inside a building, such covering range will become drastically
short even to several tens of meters.
■ About enclosure protection
This transceiver is NOT water and dust protected of any degrees. Avoid
contacts with water and dust, and if wet or dirty, immediately wipe them with a
clean dry cloth. Please also note that the body is small and thin; DO NOT carry
it in your pants pocket to avoid cracking.
3
Page 4
NOTICE/Compliance Information Statement
For your safe and efficient use of the transceiver, please read the following
safety information.
Conformity Information
Alinco, Inc. Electronics Division hereby declares on our sole responsibility that the products
listed belowcomply with the essential requirements of the Directive 1999/5/EC. The council
of 3/9/99 on RadioEquipment and Telecommunication Terminal Equipument and the mutual
recognition of their conformityand with the provisions of Annex, after having performed the
required measuremens at Notified Bodies perStandards, and relative certificates (or documents)
can be reviewed at http://www.alinco.com/Ce/
DJ-FX446: PMR446 HANDHELD TRANSCIVER / 446.00625~446.09375MHz (PMR446 / 8
channels)
Manufacturer:
ALINCO,Inc. Electronics Division
Yodoyabashi Dai Bldg 13F, 4-4-9, Koraibashi, Chuo-ku, Osaka 541-0043 JAPAN
This device is authorized for use in all EU and EFTA member states.
4
Page 5

Features
This transceiver has the following main features:
● Computer-programmable with free software downloadable
from Alinco website (with optional ERW-8 interface cable)
● Works with 3.7V 1000mAh li-ion cell yet powerful legal-limit TX output and
clear, crisp 300mW Audio output
● Compact size 50W x 157H x 19D mm(with antenna)
● Weight less than 90g inclusive of 3.7V 1000mAh li-ion cell and antenna
● Ultra-compact antenna for better portability
● Scan functions
● 50 CTCSS tones and 105 DCS Tones
● Simple, easy-to-use interface and Back-lit, large LCD screen with Channel-
display mode, suitable for commercial-applications.
● Includes VOX function, APO, Low Battery indication, Key lock function, Tone
Call and more!
5
Page 6

Warning
To prevent any hazard during operation of Alinco’s radio product, in this manual
and on the product you may find symbols shown below. Please read and
understand the meanings of these symbols before starting to use the product.
This symbol is intended to alert the user to an immediate danger that may
Danger
cause loss of life and property if the user disregards the warning.
This symbol is intended to alert the user to a possible hazard that may
Alert
cause loss of life and property if the user disregards the warning.
This symbol is intended to alert the user a possible hazard that may
Caution
cause loss of property or injure the user if the warning is disregarded.
Alert symbol. An explanation is given.
Warning symbol. An explanation is given.
Instruction symbol. An explanation is given.
Alert
Environment and condition of use
Use of this product may be prohibited or illegal outside of your country. Be
informed in advance when you travel.
It is recommended that you check local traffic regulations regarding the use
of a radio equipment while driving. Some countries prohibit or apply restrictions
for the operation of radios and mobile-phones while driving.
Do not use this product in close proximity to other electronic devices, especially
medical ones. It may cause interference to those devices.
Keep the radio out of the reach of children.
6
Page 7
In case a liquid leaks from the product, do not touch it. It may damage your skin.
Rinse with plenty of cold water if the liquid contacted your skin.
Never operate this product in facilities where radio products are prohibited for
use such as aboard aircraft, in airports, in ports, within or near the operating
area of business wireless stations or their relay stations.
The manufacturer declines any responsibilities against loss of life and/or a
property due to a failure of this product when used to perform important tasks
like life-guarding, surveillance, and rescue.
Do not use multiple radios in very close proximity. It may cause interference
and/or damage to the product(s).
Risk of explosion if battery is replaced with an incorrect type. Dispose of, or
recycle used batteries according to your local regulations.
The manufacturer declines any responsibilities against loss of life and property
due to a failure of this product when used with or as a part of a device made by
third parties.
Use of third party accessory may result in damage to this product. It will void our
warranty for repair.
Handling this product
Be sure to reduce the audio output level to minimum before using an earphone or
a headset. Excessive audio may damage hearing.
Never open the radio unless you are authorized.Internal modification or external,
non-certified attachments to the PMR radio cansels the CE certification of the
radio and voids authorization for operating the radio.
Do not operate this product in a wet place such as in a shower room. It may result
in electric shock, fire and/or malfunction.
Do not place the product in a container carrying conductive materials, such as
water or metal in close proximity. A short-circuit to the product may result in electric
shock, fire and/or malfunction.
Warning
7
Page 8
Warning
About chargers
Do not use adapters other than having the specified voltage. It may result in
electric shock, fire and/or malfunction. Never turn on the radio while charging.
Do not plug multiple devices using an adapter into a single wall outlet. It may
result in overheating and/or fire.
Do not handle adapter with a wet hand. It may result in electric shock.
Securely plug the adapter into the wall outlet. Insecure installation may result in
short-circuit, electronic shock and/or fire.
Do not use the adapter if the plug or socket contacts are dirty. Overheating
and/or short-circuiting may result in fire, electric shock and/or damage to the
product.
In case of emergency
In case of the following situation(s), please turn off the product, switch off the source
of power, then remove or unplug the power-cord. Please contact your local dealer of
this product for service and assistance. Do not use the product until the trouble is
resolved. Do not try to troubleshoot the problem by yourself.
● When a strange sound, smoke and/or strange odor comes out of the product.
● When the product is dropped or the case is broken or cracked.
● When a liquid penetrated inside.
● When a power cord (including DC cables, AC cables and adapters) is damaged
For your safety, turn off then remove all related AC lines to the product and its
accessories from the wall outlet if a thunderstorm is likely.
Maintenance
Do not open the unit and its accessories. Please consult with your local dealer
of this product for service and assistance.
8
Page 9
Caution
Environment and condition of use
Do not use the product in proximity to a TV or a radio. It may cause interference
or receive interference.
Do not install in a humid, dusty or insufficiently ventilated place. It may result in
electric shock, fire and/or malfunction.
Do not install in an unstable or vibrating position. It may result in electric shock,
fire and/or malfunction when/if the product falls to the ground.
Do not install the product in proximity to a source of heat and humidity such as
a heater or a stove. Avoid placing the unit in direct sunlight.
Be cautious of a dew formation. Please completely dry the product before use
when it happens.
Do not carry the radio in a hip pocket. It may damage and/or cause injury when
you sit down.
About transceiver
Be cautious of the whip antenna when carried in your shirt-pocket etc. It may
make contact with your eye and cause injury.
Do not connect devices other than specified ones to the jacks and ports on the
product. It may result in damage to the devices.
Turn off and remove the power source (AC cable, DC cable, battery, cigar cable,
charger adapter etc.) from the product when the product is not in use for
extended period of time or in case of maintenance.
Never pull the cord alone when you unplug AC cable form the wall outlet.
Use a clean, dry cloth to wipe off dirt and condensation from the surface of the
product. Never use thinner or benzene for cleaning.
Warning
9
Page 10

Warning
Check with your local waste officials for details on recycling or proper disposal
of the electronics product, battery-packs and accessories in your area.
Copyright © All rights reserved. No part of this document may be reproduced, translated or
transcribed in any form or by any means without the prior permission of Alinco. Inc., Osaka,
Japan. Alinco and ALINCO logo are registered trademarks of Alinco incorporated, Japan in
United States, EU States, Russia, China and many other countries. Windows is a registered
trademark of Microsoft Corporation in the United States and other countries. All other
trademarks are the properties of their respective holders.ALINCO and authorized dealers
are not responsible for any typographical errors there may be in this manual. The contents
of this manual may be updated without any notice or obligation.Alinco cannot be liable for
pictorial or typographical inaccuracies. Changes or modifications not expressly approved
by the party responsible for compliance could void the user's authority to operate the
equipment.
10
Page 11

Contents
Introduction -----------------------------------------------------------------------
Before transmitting ------------------------------------------------------------
NOTICE/Compliance Information Statement --------------------------
Features ---------------------------------------------------------------------------
Warning ----------------------------------------------------------------------------
Contents ---------------------------------------------------------------------------
Accessories ----------------------------------------------------------------------
Names and Operations of Parts -------------------------------------------
Basic Operation -----------------------------------------------------------------
Function key operation / Quick chart ------------------------------------
Trouble shooting Guide ------------------------------------------------------
Maintenance and Reference ------------------------------------------------
Specifications -------------------------------------------------------------------
Appendix --------------------------------------------------------------------------
2
3
4
5
6
11
12
16
18
25
27
28
30
31
11
Page 12

Accessories
DJ-FX446
EBP-90 Li-Ion 3.7V
1000mAh Battery pack
EDC-201 Adapter
(CEE 7/2 PIN)
12
Instructions(This booklet
EBC-40 Belt clip
)
with hand strap
Page 13

Accessories
Battery Information
Disassembly and Reassembly of the battery
Slide down the battery cover by pushing notches. The battery cover will open.
Observe that the battery terminals are located on the upper left side of the case.
Be cautious to the polarity of the battery pack,and place it as shown below.
Slide upward the battery cover until it clicks.
Charging Operation
The battery pack is not charged when shipped. It must be charged before using.
Connect the AC adapter and USB connecter as shown below. TURN OFF the
unit. It will take approx. 3.5 hours to completely charge an empty battery pack.
While charging, the bars inside the icon moves.
The icon shows the battery state in 4 levels, empty is shown without bars, full
with 3 bars.The battery icon stays lit showing 3 bars when the charge is full.
Important
【
・
It can't charge the battery pack
correctly if turned on.
・
using a provided AC adapter.
The adapter is to charge the
battery pack only.
】
Turn off the unit while charging.
You can't operate the unit with
13
Page 14

Accessories
Caution
• Risk of explosion, generation of heat or leak of chemicals inside if the battery is replaced by
an incorrect type or reverse polarity. Use always the recommended types of batteries in this
manual only.
• The battery pack isn't fully charged when shipped. It must be charged before use.
• Charging should be conducted in a temperature range of +5ºC to +40ºC (+41ºF to +104ºF).
• Be sure to remove the battery when not in use. It consumes the battery even the power is off.
Leaving it inside the radio will cause over-discharge and may cause damages to the battery pack.
• Never leave the battery pack in a heated place like inside a car or close to a window
in summer. Heated Li-Ion battery pack may catch fire.
• Don't modify, dismantle, incinerate or immerse the battery pack in the water as this can be
dangerous.
• Never short-circuit the battery pack terminals, as this can cause damage to the equipment
or lead to heating of the battery which may cause burns.
• Unnecessary prolonged charging (overcharging) can deteriorate battery performance.
• The battery pack should be stored in a dry place where temperature is in -10ºC to +45ºC
(+14ºF to +113ºF) range. Temperatures outside this range can cause the battery liquid to leak.
Exposure to prolonged high humidity can cause corrosion of metal components.
• Battery-packs are a consuming part. When its operating time becomes considerably short
after a normal charge, please consider that the pack is exhausted and replace it with a new one.
• The battery pack is recyclable.Check with your local waste officials for details on recycling
options or proper disposal in your area.
• Use specified genuine chargers only to charge battery packs. Use of other chargers may
cause damage to products, you and your property.
• Never carry battery packs together with conductive articles such as metals in a same bag
to prevent from short-circuiting. Put the packs only in nylon bags to carry them safely.
14
Page 15

1.Installation of the belt clip
Attach the clip as shown by sliding in
the smaller piece to the frame on the
back of the unit. It clicks when
attached correctly.
2.Detaching the belt clip
Observe a small projection as shown.
While pusing it with a tool like a screw
driver slightly toward the belt clip,
push the clip upward to remove it.
3.Installation of optional accessories
Open the rubber cap on top of the unit and connect
with the plug of the optional accessory. Be sure to
close the cap when the accessory is not in use.
Refer to P.29 for how to fit the cable around your
body. To remove it, never pull the cable but by
holding the plug.
Accessories
4. Hand Strap
Attach the hand strap as shown.
15
Page 16

Names and Operations of Parts
Antenna
Not removable.
Power/
volume switch
LCD screen
PTT
(Push-to-talk)
MONI key
Microphone
Note : Please do not close the microphone hole.
Speaker/Mic jack
(below the cover)
Stereo-miniplug port
is very fragile. Please
use with care.
16
USB port
Function key
and Key lock
UP key
DOWN key
Call tone key
Strap hole
Jack cover :
Be sure to cover the jack
when accessories are not
in use.
Page 17

Names and Operations of Parts
Stand-by
Receiving
Transmitting
Channel
display
Tx/Rx
Roger tone
VOX
(Voice operated
transmission)
Priority scan
KEY Lock
Voice Scrambling
Battery capacity
indication in 4 levels
DCS
CTCSS
Tone code
Squelch
Function beep
Auto Power OffDual watch
17
Page 18

Basic Operation
Function introduction
1. To turn on/off
Attach the battery pack. Turn on the power by turning the dial clockwise. A beep
sounds and the icons appear on the display. Turn the
dial counterclockwise gently until locks to turn off. Stop
rotating the dial when it's turned off otherwise the dial
may be damaged and cause malfunction.
2. To select channel and transmit
Press or key to select a desired, clear channel to operate. All units in the
same group should use the same channel and same selective calling settings that
the instruction will follow. It is a good practice to monitor the channel to make sure
no one is using it before transmitting. Press then start speaking in a normal
voice level.
Don't talk too loud, too undertone nor too close to
the microphone otherwise the audio may be distorted.
3. Scan function
Press and hold or key for 2 seconds to start scanning. A scan icon appears
on the display. While scanning, press another triangle key to change the scanning
direction. Press any key other than or key to stop.
Scan stops when a signal is detected, and resumes
scanning after the receiving signal is gone.
18
Page 19

Basic Operation
4. CTCSS/DCS
CTCSS and DCS are used to filter receiving audio, and sometimes effective to
eliminate receiving noise. Their functions are practically the same, just different
technology is used. All users in the same group should set the same CTCSS or
DCS code to the units. After setting, only the matching code signal is heard. This
is not a voice scrambling, but just to reduce chances hearing unwanted signals.
Press key and press triangle keys to select CodE menu.
・
Press key again, CTCSS and flashing 2 digit code appears on the display.
・
Press triangle keys to select desired CTCSS (50 codes) or DCS (105 codes)
・
codes.
Press or leave it for 10 seconds to set, or press key to return to the
・
menu. When set, The CTCSS/DCS code remains displayed as shown.
Note:
If there may be a signal that is different from your CTCSS/DCS code on your
・
channel, even you don't hear it because of CTCSS/DCS function, you can't
transmit. A warning beep sounds in this condition when you press .
Observe the radio icon to see if it shows receiving, or press key to
temporary release the CTCSS/DCS to hear the actual audio. Press key
again to go back to the CTCSS/DCS operation.
There may be a delay and you miss hearing a word at the beginning of
・
transmission when CTCSS/DCS is used. To avoid this, press , wait
just an instant then start speaking.
19
Page 20

Basic Operation
5: CALL TONE tune setting
Press key to transmit a call tone to attract an attention of users in your group.
The tone is selectable from 5 different tunes.
Press key and press triangle keys to select CALL
・
menu.
Press key again, and use triangle keys to select a
・
desired parameter. Different tunes sound as you change the parameter.
Press or leave it for 10 seconds to set and exit, or press key to return
・
to the menu.
Call tone is also a subject to CTCSS/DCS squelch operation. You can't hear the
・
receiving sound if different tone squelch setting is applied.
6. VOX function
When this function is activated, the transmitting can be started by voice and not
necessary to press and hold the key.
Press key and press triangle keys to select VOX menu. VOX icon and OF
・
or 2 digit number is displayed.
Press key again, and use triangle keys to select a parameter from 01 to 05.
・
The code stands for VOX sensitivity, lower the number, lower the sensitivity so
needs louder voice to start transmitting.
Press or leave it for 10 seconds to set, or press key to return to the
・
menu, or repeat the sequence and select OF to deactivate VOX.
20
Page 21

Basic Operation
Note:
VOX doesn't work properly in a noisy place, as the noise cause transmitting.
・
VOX doesn't work properly when the battery level is low.
・
7. DW (Dual Watch) function
This function enables to manage transmitting and receiving 2 channels of your
choice easily.
Select the channel you wish to operate as a main channel and press key,
・
then press triangle keys to select DW menu. DW icon and CH is displayed.
Press key again, then use triangle keys to select
・
another channel number you wish to operate as a sub
channel.
Press or leave it for 10 seconds to set,
・
or press key to return to the menu.
When DW is activated, 2 channels are scanned automatically. To transmit on the
main CH, press . To transmit on the sub CH, press key. During the
DW, key is deactivated for monitor function. Repeat the sequence and
select OF to turn off the DW function.
Settings such as CTCSS/DCS on both main and sub channels remain valid
during the DW operation.
21
Page 22

Basic Operation
8. SQL function
Squelch is a function that eliminates the noise when no signals are being received.
Setting the higher squelch level allows you to monitor only stronger signals.
Usually start from level zero (the squelch is open and hear the noise), increasing
the level and when the noise is gone, set just 1 level higher than the current level.
For example the noise is cut at level 2, set the level to 3 and exit.
Press key and press triangle keys to select SQL menu. SQL icon and OF or
・
2 digit number is displayed.
Press key again, and use triangle keys to
・
select a parameter from 01 to 05.
Press or leave it for 10 seconds to set,
・
or press key to return to the menu.
9. Voice scrambling
An analog scrambling is provided for better security of your communication.
Please note that this scrambling can be decoded easily, so not suitable for
confidential communications.
Press key and press triangle keys to select SCRM menu. SCRM icon and
・
OF or ON is displayed.
Press key again, and use triangle keys to
・
select a desired parameter.
Press or leave it for 10 seconds to set,
・
or press key to return to the menu.
All units within your group should set the same parameter.
・
22
Page 23

Basic Operation
10. Function beep
When ON is selected, a beep sounds at any key operation except PTT.
Press key and press triangle keys to select Beep menu. A note icon and OF
・
or ON is displayed.
Press key again, and use triangle keys to
・
select a desired parameter.
Press or leave it for 10 seconds to set and exit,
・
or press key to return to the menu.
11. Roger beep
When ON is selected, a beep sounds at the end of every transmission.
Press key and press triangle keys to select Roger beep menu. A Rog icon
・
and OF or ON is displayed.
Press key again, and use triangle keys to select
・
a desired parameter.
Press or leave it for 10 seconds to set and exit,
・
or press key to return to the menu.
23
Page 24

Basic Operation
12. APO function
When activated, it will automatically turn off the power after a preset time is
elapsed without being key operated.
Press key and press triangle keys to select APO
・
menu. An APO icon and OF or 01-06 is displayed.
Press key again, and use triangle keys to select a desired parameter. the
・
unit of parameter is "hour(s)".
Press or leave it for 10 seconds to set and exit, or press key to
・
return to the menu.
When the unit is turned off by APO, rotate the dial to off position once, then turn on.
13. Key lock
When activated, it will lock keys to avoid accidental key operations.
Press and hold key for 3 seconds. A lock icon is
・
displayed.
Repeat it to unlock. A lock icon dissapears.
・
In key-lock state, and triangle keys are blocked.
14. Low battery warning
When the battery is about to be empty, a waring sign "Lo BA" will appear on the
display and beeps sound. Replace or charge the
battery pack when it appears, or the unit will
automatically shut off.
24
Page 25

Function key operation / Quick chart
Function key
(F key)
CODE
“ ” key
CALL
“ ” key
VOX
“ ” key
DW
“ ” key
SQL
“ ” key
SCRM
“ ” key
“ ” key
Parameter Operation
F key
F key
F key
F key
F key
F key
F key
01-105/OF
Default: OF
01-05
Default: 01
01-05/OF
Default: OF
01-08/OF
Default: OF
01-05/OF
Default: 03
ON/OF
Default: OF
ON/OFKEY tone
Default: ON
Press the “ ” or “ ” key to
select, Press the “ ” to save
and back to previous menu
Press the “ ” or “ ” key to
select, Press the “ ” to save
and back to previous menu
Press the “ ” or “ ” key to
select, Press the “ ” to save
and back to previous menu
Press the “ ” or “ ” key to
select, Press the “ ” to save
and back to previous menu
Press the “ ” or “ ” key to
select, Press the “ ” to save
and back to previous menu
Press the “ ” or “ ” key to
select, Press the “ ” to save
and back to previous menu
Press the “ ” or “ ” key to
select, Press the “ ” to save
and back to previous menu
25
Page 26

Function key operation / Quick chart
Rog
“ ” key
APO
F key
F key
ON/OF
Default: OF
01-06/OF
Default: OF
Press the “ ” or “ ” key to
selectPress the “ ” to save
and back to previous menu
Press the “ ” or “ ” key to
selectPress the “ ” to save
and back to previous menu
Returns to CODE
Frequency Chart (in MHz)
Ch. Freq.
1 446.00625 5 446.05625
2 446.01875 6 446.06875
3 446.03125 7 446.08125
4 446.04375 8 446.09375
Ch. Freq.
26
Page 27

Trouble shooting Guide
Problem
No Power
Battery doesn't last
enough
Scan doesn't work Squelch is open. Adjust the level.
All channels are noisy Adjust squelch level.
No sound when
using earphone
Communication
distance becomes
short, and Low
sensitivity
Can't communicate
with other group
members.
The audio sound level
is low or intermittent
Receiving signal is
intermittent
Receiving audio is
distorted
Can't transmit
Receive icon appears
but can't hear the audio
Corrective Action
A. The battery may be exhausting. Recharge or replace the
battery.
B. The battery may not be installed correctly. Remove the
battery and install it again.
C. The power switch is broken; send it to local dealers to repair.
D. Battery life is end; contact to local dealers to replace.
The battery is exhausted. Replace the battery pack with a new
one.
Earphone or the jack is broken. Please contact with local
dealers for inspection.
A. Check whether the antenna is in good conduction and the
antenna is fixed securely to the body.
B. Antenna may be broken. Consult your local dealer for
services.
A. Make sure all units are set with the same channels,
CTCSS or DCS tones.
B. Out of communication range.
Consult with local dealers for inspection.
A. Out of communication range or obstruct by walls,
buildings etc. Change position to transmit.
B. Internal components may be in trouble, please contact with
local dealers to repair.
An internal speaker may be in trouble. If the audio from an
earphone is clear,consult your dealer for repair.
Press MONI key to monitor the channel. Transmission is
prohibited when the channel is busy.
A. Audio level too low, increase the audio level.
B. Wrong CTCSS or DCS is set. Press MONI key for monitoring.
C. Earphone port may be damaged, please contact with local
dealers for repair.
27
Page 28

Maintenance and Reference
1. Never grab the antennas, earphones or microphones to carry the units. It may
cause damage to the accessories and/or units.
2. Periodically clean the surface of the unit with a clean cloth. Those cleaning kits
for digital cameras are ideal also to clean the radio products.
3. Remove the battery pack from the unit to store the unit. The unit should be kept
in a clean, dry place without direct sunlight.
Resetting
When you reset the unit, all settings will return to the initial factory settings.
Turn on the unit with the key pressed.
①
All the icons appear on the display after a second.
②
Keep holding key for another second, then release it.
28
Page 29

Maintenance and Reference
Optional / Spare accessories
・EBP-90
・EBC-40
・EDC-200
・EDC-201
・EME-24
・EME-61
・EMS-60
Li-ion Battery Pack (DC 3.7V 1000mAh)
Belt Clip
AC Adaptor (NEMA Type A)
AC Adaptor (CEE 7/2 PIN)
Earphone Microphone (Can't operate VOX)
Earphone Microphone with VOX
Speaker microphone (Can't operate VOX)
Recommened installation of earphone
microphone
Earphone
Use a clip to fix with collar
Clip the PTT unit closer to your mouth
Carry the radio on the side or the back of your body
and the cable should go around the back as shown.
Clamp the excessive length of cable at your waist
,
29
Page 30

Specifications
Frequency range
Output Power
CTCSS/DCS tone
Frequency stability
Rx Sensitivity
Audio output
Supply Voltage
Operating Temperature
Battery type
Dimensions
Weight
* All specifications are subject to change without notice or obligation.
* ALINCO and Alinco logo are registered trademarks of Alinco, Inc in many
countries including USA, Russia, EU states and China.
446.00625-446.09375MHz 8 channels
Max. 0.5W
50CTCSS/105DCS
±2.5ppm
-9dBu EMF
300mW
3.7V
-20
+65
℃
℃
~
1000mAh(Li-ion)
50W x 157H x 19D mm(with antenna)
approx. 90g (with battery pack)
30
Page 31

Appendix
50 Group of CTCSS Frequency(Hz)
67.0
69.3
71.9
74.4
77.0
79.7
82.5
85.4
88.5
91.5
11
12
13
14
15
16
17
18
19
20
01
02
03
04
05
06
07
08
09
10
105 Group of DCS Codes
19
01
023
02
025
03
026
04
031
05
032
06
036
07
043
08
047
09
051
10
053
11
054
12
065
13
071
14
072
15
073
16
074
17
114
18
115
116
20
122
21
125
22
131
23
132
24
134
25
143
26
145
27
152
28
155
29
156
30
162
31
165
32
172
33
174
34
205
35
212
36
223
94.8
97.4
100.0
103.5
107.2
110.9
114.8
118.8
123.0
127.3
21
22
23
24
25
26
27
28
29
30
37
225
38
226
39
243
40
244
41
245
42
246
43
251
44
252
45
255
46
261
47
263
48
265
49
266
50
271
51
274
52
306
53
311
54
315
131.8
136.5
141.3
146.2
151.4
156.7
159.8
162.2
165.5
167.9
55
56
57
58
59
60
61
62
63
64
65
66
67
68
69
70
71
72
325
331
332
343
346
351
356
364
365
371
411
412
413
423
431
432
445
446
31
32
33
34
35
36
37
38
39
40
73
74
75
76
77
78
79
80
81
82
83
84
85
86
87
88
89
90
171.3
173.8
177.3
179.9
183.5
186.2
189.9
192.8
196.6
199.5
452
454
455
462
464
465
466
503
506
516
523
526
532
546
565
606
612
624
41
203.5
42
206.5
43
210.7
44
218.1
45
225.7
46
229.1
47
233.6
48
241.8
49
250.3
50
254.1
91
627
92
631
93
632
94
645
95
654
96
662
97
664
98
703
99
712
100
723
101
731
102
732
103
734
104
743
105
754
31
Page 32

Yodoyabashi Dai-bldg 13F
4-4-9 Koraibashi, Chuo-ku, Osaka 541-0043 Japan
Phone: +81-6-7636-2362 Fax: +81-6-6208-3802
http://www.alinco.com
E-mail:export@alinco.co.jp
UHF FM transceiver 8 PMR446 channels.
Use of this device is authorized in all EU and EFTA
member states (CH/ICE/LI/NOR).
Copyright Alinco, lnc. PS0845/FNEI-NI
Printed in China
 Loading...