

Page 1

Quick Start Guide
Thank you for buying Alcatel ONETOUCH P330X. We hope you will enjoy your high-quality mobile communication experience.
Important:
Your device is a unibody device, so the back cover and battery are not removable.
Your device only support micro-SIM card. Do not attempt to insert other SIM type like mini and nano card, otherwise may cause device
damage.
If your device meets any unexpected system crash, try to press and hold the Powe r key for a while until power-on animation appears.
For more information about how to use the device, please go to www.alcatelonetouch.com to download complete user manual. Moreover,
from the website you can also consult FAQ, realize software upgrade, etc.
English - CJB19C0ALAAA
IP4931_P330X_QG_Eng_GB_12_140604.indd 1IP4931_P330X_QG_Eng_GB_12_140604.indd 1 2014-6-4 下午 3:52:362014-6-4 下午 3:52:36
1
Page 2
Table of contents
1 Your device ..................................................................... 3
2 Text input ..................................................................... 12
3 Phone call ..................................................................... 13
4 People ........................................................................... 14
5 Messaging...................................................................... 15
6 Email .............................................................................16
7 Getting connected ....................................................... 17
8 Find my location using GPS satellites ........................19
9 Data backup ................................................................. 19
10 Factory data reset .......................................................20
11 Applications & Internal storage ................................. 20
12 Making the most of your device .................................21
Safety and use ........................................................................22
General information .............................................................27
Warranty ................................................................................28
Troubleshooting.....................................................................29
www.sar-tick.com
PROTECT YOUR HEARING
To prevent possible hearing damage, do not listen at high
volume levels for long periods. Exercise caution when
using the headset mode or when using the hands-free
mode with an external loudspeaker connected to your
device and where the external loudspeaker may be
located close to your ear.
2
IP4931_P330X_QG_Eng_GB_12_140604.indd 2IP4931_P330X_QG_Eng_GB_12_140604.indd 2 2014-6-4 下午 3:52:362014-6-4 下午 3:52:36
This product meets applicable
national SAR limits of 2.0 W/kg. The
specific maximum SAR values can be
found on page 25 of this user guide.
When carrying the product or using
it while worn on your body, either
use an approved accessory such as
a holster or otherwise maintain a
distance of 1.5 cm from the body to
ensure compliance with RF exposure
requirements. Note that the product
may be transmitting even if you are
not making a call.
Page 3

Your device ..................
1
1.1 Keys and connectors
Headset connector
Front camera
micro-USB/Charger connector
IP4931_P330X_QG_Eng_GB_12_140604.indd 3IP4931_P330X_QG_Eng_GB_12_140604.indd 3 2014-6-4 下午 3:52:362014-6-4 下午 3:52:36
Infrared
Blaster
Light sensor
Power key
3
Camera
Micro-SIM card slot
Micro-SD card slot
Volume up
Volume down
Back key
• Touch to go back to the previous screen, or to close
a dialog box, options menu, the notification panel, etc.
Home key
• While on any application or screen, touch to return
to the Home screen.
Page 4

Option key
• Touch: As Menu key, touch to manage home screen,
add widgets, set wallpaper, etc.
• Touch and hold: Open a list of thumbnail images of
apps you've worked with recently. Touch one of them
to open. Swipe it upwards to remove a thumbnail
from the list.
Power key
• Press: Lock the screen/Light up the screen.
• Press and hold: Show the pop-up menu to select
from Power off/Restart/Airplane mode/Quick start/
Silent mode.
Press and hold: Power on.
• Press to mute the ringtone when there’s an incoming call.
• Press and hold for more than 7 seconds to restart the
device when the system halted.
• Press and hold Power key and Volume down key to
capture a screenshot.
• Press and hold Power key and Volume up key under
power off mode to restore factory set.
Volume keys
• Under call mode, adjust the earpiece or headset
volume.
• In Music/Video/Streaming mode, adjust the media
volume.
• In general mode, adjust the ring tone volume.
• Mute the ringtone of an incoming call.
• Press to light up the screen when it dims during a call.
• In Camera mode, using it as the capture key allows
you to take a photo.
4
IP4931_P330X_QG_Eng_GB_12_140604.indd 4IP4931_P330X_QG_Eng_GB_12_140604.indd 4 2014-6-4 下午 3:52:362014-6-4 下午 3:52:36
Page 5
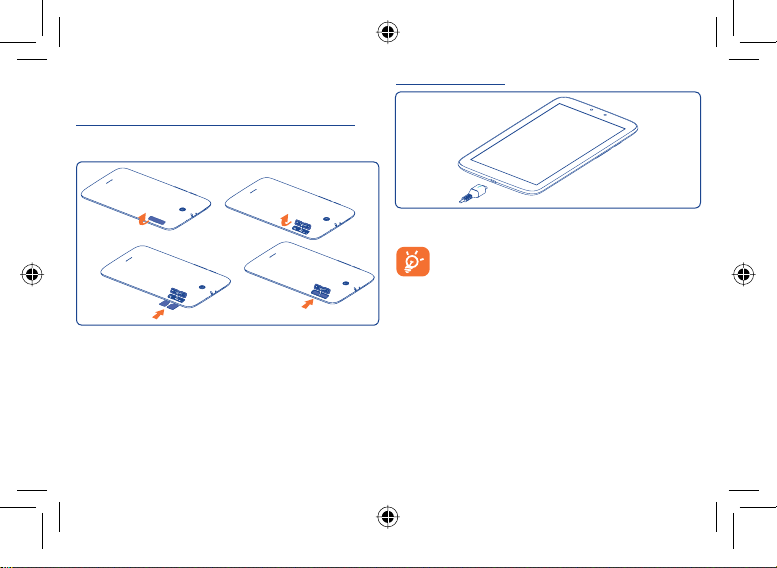
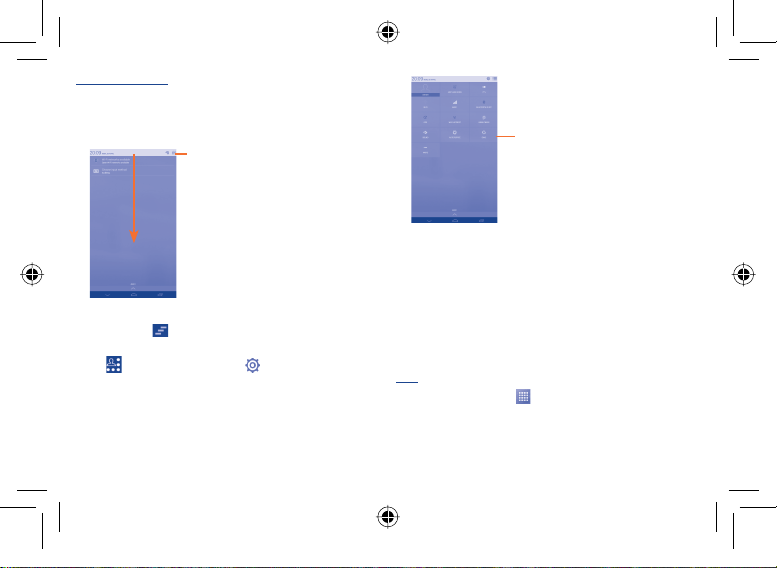
1.2 Getting started
Charging the battery
1.2.1 Set-up
Inserting or removing the SIM card and microSD card
You must insert your SIM card to make calls. Please power off your
device before inserting or removing the SIM card and microSD card.
Connect the battery charger to your device and mains socket
respectively.
The charging status bar will not float if your battery
is fully consumed. To reduce power consumption and
energy waste, when battery is fully charged, disconnect your
charger from the plug; switch off Wi-Fi, GPS, Bluetooth or
background-running applications when not in use; reduce
the backlight time, etc.
Your device only support micro-SIM card. Please contact network
operator and use professional scissors prune SIM card to micro-SIM card.
To install, take off micro-SIM card protector, insert the micro-SIM
card into the slot with chip facing downward, and then cover the slot.
To remove the card, open micro-SIM card protector, gently press it
out, and then cover the slot.
Steps for removing and installing microSD card are the same with
steps for micro-SIM card.
5
IP4931_P330X_QG_Eng_GB_12_140604.indd 5IP4931_P330X_QG_Eng_GB_12_140604.indd 5 2014-6-4 下午 3:52:362014-6-4 下午 3:52:36
Page 6
1.2.2 Power on your device
Hold down the Powe r key until the device powers on. It will take
some seconds before the screen lights up.
Set up your device for the first time
The first time you power on the device, you should set following
options: language, input method, date & time, Google account, etc.
If you power on your device with no SIM card inserted, you can
connect to a Wi-Fi network to sign into your Google account and
to use some features.
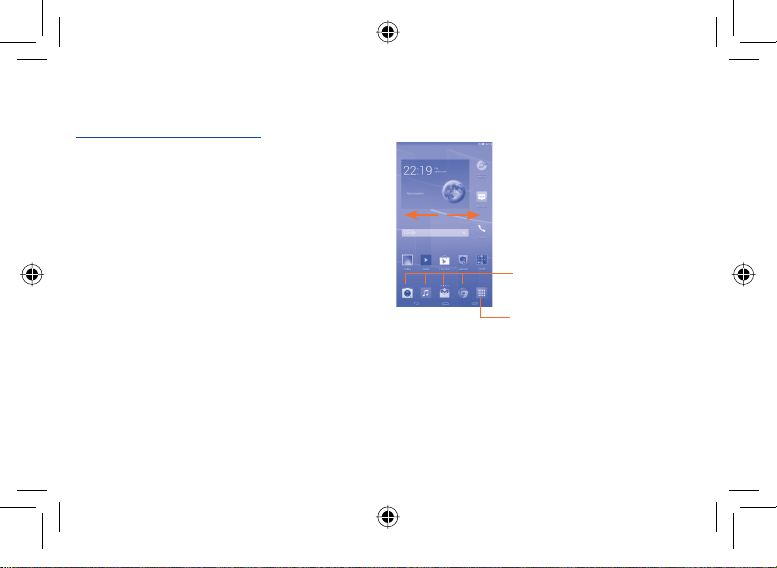
1.3 Home screen
You can bring all the items (applications, shortcuts, folders and
widgets) you love or use most frequently to your Home screen
for quick access. Touch the Home key to switch to Home screen.
1.2.3 Power off your device
Hold down the Power key from the Home screen until the options
appear, select Power off.
Home screen is provided in an extended format to allow more
space for adding applications, shortcuts etc. Slide the Home screen
horizontally left and right to get a complete view of the Home
screen. The white point at the lower part of the screen indicates
which screen you are viewing.
Favorite tray applications
• Touch to enter the application.
• Touch and hold to move or change
applications.
Application tab
• Touch to open main menu.
6
IP4931_P330X_QG_Eng_GB_12_140604.indd 6IP4931_P330X_QG_Eng_GB_12_140604.indd 6 2014-6-4 下午 3:52:362014-6-4 下午 3:52:36
Page 7
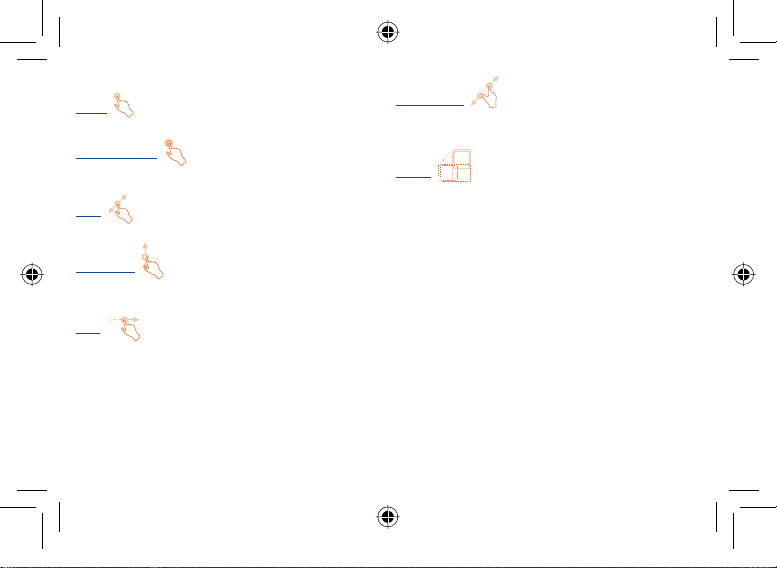
1.3.1 Using the touchscreen
Touch
To access an application, touch it with your finger.
Touch and Hold
Touch and hold the home screen to access the available options for
setting the wallpaper.
Drag
Place your finger on any item to drag it to another location.
Slide/Swipe
Slide the screen to scroll up and down the applications, web pages…
at your convenience.
Flick
Similar to swiping, but flicking makes it move quicker.
Pinch/Spread
Place your fingers of one hand on the screen surface and draw them
apart or together to scale an element on the screen.
Rotate
Automatically change the screen orientation from portrait to
landscape by turning the device sideways to have a better view.
1.3.2 Status bar
From status bar, you can view both device status and notification
information.
7
IP4931_P330X_QG_Eng_GB_12_140604.indd 7IP4931_P330X_QG_Eng_GB_12_140604.indd 7 2014-6-4 下午 3:52:372014-6-4 下午 3:52:37
Page 8
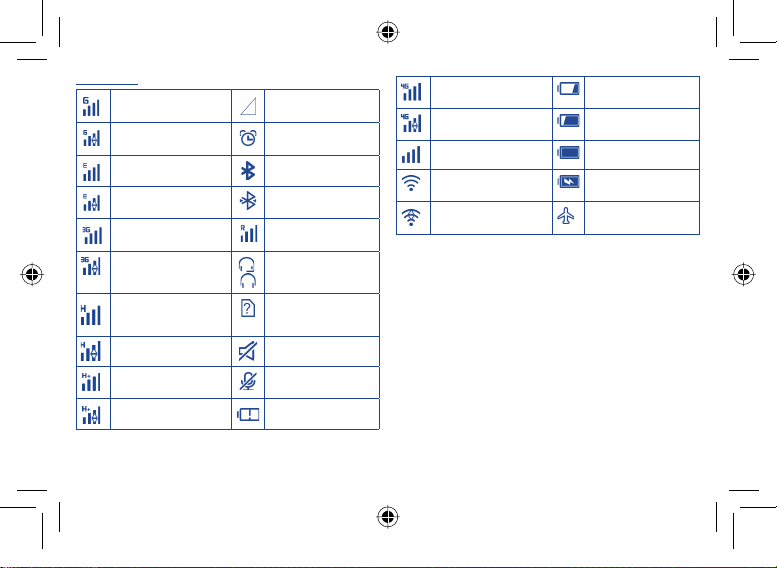
Status icons
GPRS connected No signal
GPRS in use Alarm is set
EDGE connected Bluetooth is on
EDGE in use
3G connected Roaming
3G in use
HSPA (3G+) connected No SIM card installed
HSPA (3G+) in use Ringer is silenced
HSPAP connected
HSPAP in use Battery is very low
Connected to a
Bluetooth device
/
Headset connected
Device microphone
is mute
4G connected Battery is low
4G in use
Signal strength Battery is full
Wi-Fi is on Battery is charging
Connected to a Wi-Fi
network
Battery is partially
drained
Airplane mode
8
IP4931_P330X_QG_Eng_GB_12_140604.indd 8IP4931_P330X_QG_Eng_GB_12_140604.indd 8 2014-6-4 下午 3:52:372014-6-4 下午 3:52:37
Page 9
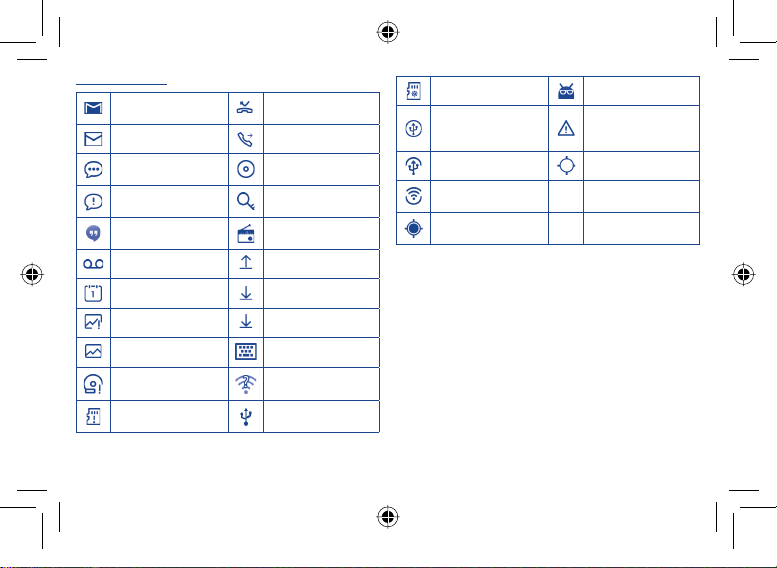
Notification icons
New Gmail message Missed call
New Email message Call forwarding is on
New text or multimedia
message
Problem with SMS or
MMS delivery
New Google Hangouts
message
New voicemail Uploading data
Upcoming event Downloading data
Screenshot error Download finished
Screenshot captured Select input method
microSD card is full
safe to remove SD card
Song is playing
Connected to VPN
Radio is on
An open Wi-Fi network
is available
Device is connected via
USB cable
preparing SD card System update available
Both USB tethering and
portable hotspot are on
USB tethering is on GPS is on
Portable Wi-Fi hotspot
is on
Receiving location data
from GPS
Carrier data use
threshold approaching
or exceeded
9
IP4931_P330X_QG_Eng_GB_12_140604.indd 9IP4931_P330X_QG_Eng_GB_12_140604.indd 9 2014-6-4 下午 3:52:372014-6-4 下午 3:52:37
Page 10
Notification panel
Touch and drag down the Status bar to open the notification panel.
Touch and drag up to close it. From the Notification panel, you can
open items and other reminders indicated by notification icons or
view wireless service information.
Touch to access Quick setting bar.
Quick setting bar
• Touch icons to enable/disable
functions or to change modes.
1.3.3 Search bar
The device provides a Search function which can be used to locate
information within applications, the device or the web.
Touch one notification and slide it sideways to delete it.
Touch the icon
ongoing notifications will remain).
Touch
to clear all event–based notifications (other
and then the Settings icon to access Settings.
1.3.4 Lock/Unlock your screen
To protect your device and privacy, you can lock the device screen
by creating a variety of patterns, PIN or password etc.
1.3.5 Personalize your Home screen
Add
Touch the application tab
widget to activate the Move mode, and drag the item to any Home
screen as you prefer.
, touch and hold an application or a
10
IP4931_P330X_QG_Eng_GB_12_140604.indd 10IP4931_P330X_QG_Eng_GB_12_140604.indd 10 2014-6-4 下午 3:52:372014-6-4 下午 3:52:37
Page 11

Reposition
Touch and hold the item to be repositioned to activate the Move
mode, drag the item to the desired position and then release. You can
move items both on the Home screen and the Favorite tray. Hold
the icon on the left or right edge of the screen to drag the item to
another Home screen.
Remove
Touch and hold the item to be removed to activate the Move mode,
drag the item up to the top of Remove icon, and release after the
item turns red.
Create folders
To improve the organization of items (shortcuts or applications) on
the Home screen and the Favorite tray, you can add them to a folder
by stacking one item on top of another. To rename a folder, open it,
touch the folder’s title bar to input the new name.
Wallpaper customization
Touch Settings\Display\Wallpaper to customize wallpaper.
1.3.6 Application tab
from the Home screen to enter applications list.
Touch
To return to the Home screen, touch the Home ke y.
Consult recently-used applications
To consult recently-used applications, you can touch and hold the
Option key. Touch a thumbnail in the window to open the related
application.Touch one thumbnail and slide it upwards to delete it.
1.3.7 Volume adjustment
You can set ringer, media and device ringtone volume to your
preference by pressing Volume up/down key or touching
Settings\Sound.
11
IP4931_P330X_QG_Eng_GB_12_140604.indd 11IP4931_P330X_QG_Eng_GB_12_140604.indd 11 2014-6-4 下午 3:52:372014-6-4 下午 3:52:37
Page 12

1.4 Applications and widgets list
The list contains all pre-embedded and newly installed applications
and widgets.
To access the list, touch
Home screen, touch the Home key or the Back key.
Touch the icon
Text input ....................
2
from the Home screen. To return to the
to access the Google Play Store.
2.1 Using Onscreen Keyboard
Onscreen Keyboard settings
Touch application tab from the home screen, select Settings\
Language & input, touch the Settings icon
SwiftKey, a series of settings are available for your selection.
Adjust the Onscreen Keyboard orientation
Turn the device sideways or upright to adjust the Onscreen
Keyboard orientation. You can also adjust it by changing the settings
(Drag down the notification panel, touching settings icon
select A UTO ROTAT E).
IP4931_P330X_QG_Eng_GB_12_140604.indd 12IP4931_P330X_QG_Eng_GB_12_140604.indd 12 2014-6-4 下午 3:52:372014-6-4 下午 3:52:37
on the right of
2.1.1 SwiftKey
Touch to enter text or numbers.
Touch to switch between "abc/
Abc" mode; Touch & hold to switch
between "abc/ABC" mode.
Touch & hold, then select to enter
symbols/emoticons.
Touch & hold to show input options; When Wi-Fi or data
connection is on, touch to enter voice input.
Touch to switch between symbol and numeric keyboard.
2.2 Text editing
You can edit the text you have entered.
• Touch and hold or double-tap within the text you would like
to edit.
• Drag the tap to change the high-lighted selection.
, and
• Following options will show: Select all
and Paste .
• Touch the icon
12
to confirm.
, Cut , Copy
Page 13

If you make a mistake, you can delete the incorrect digits by touching
Phone call ...............
3
3.1 Placing a call
You can easily launch a call using Phone. Touch the Application
tab from the Home screen and select Phone. The device has no
internal loudspeaker, only support headset mode and hands-free
mode for call.
Display the
suggested
number(s).
Touch and
hold to access
voicemail.
Touch to hide/
display keyboard
Enter the desired number from the keyboard directly or select a
contact from Contacts or Call log by sliding or touching tabs, then
touch to place the call.
The number you entered can be saved to Contacts by touching
and then touching Create new contact.
IP4931_P330X_QG_Eng_GB_12_140604.indd 13IP4931_P330X_QG_Eng_GB_12_140604.indd 13 2014-6-4 下午 3:52:382014-6-4 下午 3:52:38
Touch to call the
previewed number.
Slide to access
the Call log and
Contacts.
.
To hang up a call, touch
Call settings\Power key ends call option is activated).
or the Powe r key (when the
3.2 Answering or rejecting a call
When you receive a call, touch .
• Slide rightward to answer;
• Slide leftward to reject;
• Slide upward to reject the call by sending a preset message.
To mute the incoming calls, press the Volume up/down key or turn
the device face down if Turn over to mute is activated. To activate,
touch Settings\Gestures\Turn over to mute.
13
Page 14

3.3 Consulting your call memory
You can access your call memory by touching from the Dial
screen to view call history in categories of Incoming calls, Outgoing
calls, and Missed calls.
3.4 Speed dial settings
You can access this settings screen by touching the Option key
and the n touching Speed dial on the Dial s creen. Sele ct contact s
to def ine the 2-9 scr een keys as a spe ed dialer s.
People .....................
4
You can view and create contacts on your device and synchronize
these with your Gmail contacts or other applications on the web
or on your device.
4.1 Adding a contact
Touch on the Home screen, select Contacts, then touch the
icon in the contact list and select Add contact.
If no contacts in the list, touch the icon
new contacts.
IP4931_P330X_QG_Eng_GB_12_140604.indd 14IP4931_P330X_QG_Eng_GB_12_140604.indd 14 2014-6-4 下午 3:52:382014-6-4 下午 3:52:38
to create
4.2 Importing, exporting and sharing
contacts
From Contacts screen, touch to open options menu, touch
Import/export, then select to Import from SIM card, Export to
SIM card, Import from device storage, Export to device storage or
Share visible contacts.
To import /export a s ingle cont act from/ to your SIM c ard, selec t
the con tact you wa nt to impor t/expor t, and to uch the
to confirm.
To import /export a ll contac ts from/t o your SIM ca rd, selec t
Select all and touch the
You can shar e a single con tact or con tacts wi th others by s ending
the con tact's vC ard to them v ia Blueto oth, Gma il, etc.
Touch a cont act you want t o share, to uch the Option key
and Share from th e contact d etails sc reen, the n select th e
appli cation to pe rform th is action .
Touch a contact you want to share, touch
contact details screen, then select the application to perform this
action.
14
icon to confirm.
, and Share from
icon
Page 15

4.3 Synchronizing contacts in
multiple accounts
Contacts, data or other information can be synchronized from
multiple accounts, depending on the applications installed on your
device.
Messaging ................
5
You can create, edit and receive SMS and MMS with this device.
To access this feature, touch Application tab from the Home screen,
then select Messaging.
All messages you receive or send out can be saved in
device memory or SIM card. To consult the SMS messages
stored in SIM card, touch from Messaging screen, then
touch Settings\Manage SIM messages.
IP4931_P330X_QG_Eng_GB_12_140604.indd 15IP4931_P330X_QG_Eng_GB_12_140604.indd 15 2014-6-4 下午 3:52:382014-6-4 下午 3:52:38
5.1 Write message
On message list screen, touch the new message icon to write text/
multimedia messages.
• Touch to view the whole message
thread.
• Touch & hold message threads to
delete messages or to add shortcut.
Touch to search in all messages.
Touch to create a new message.
Sending a text message
Enter the number of the recipient on To bar or touch
recipients, touch Type text message bar to enter the text of the
message. When finished, touch
An SMS of more than 160 characters will be charged as
several SMS. Specific letters (accent) will also increase the
size of the SMS, this may cause multiple SMS to be sent to
your recipient.
15
to send the text message.
to add
Page 16

Sending a multimedia message
MMS enables you to send video clips, images, photos, animations,
slides and audio to other compatible devices and e-mail addresses.
An SMS will be converted to MMS automatically when media files
(image, video, audio, slides, etc .) are attached or Subject or email
addresses are added.
Email .......................
6
Besides your Gmail account, you can also set-up external POP3 or
IMAP email accounts in your device.
To access this function, touch Application tab from Home screen,
then select Email.
An email wizard will guide you through the steps to set-up an
email account.
• Enter the email address and password of the account you want
to set-up.
• Touch Next. If the account you entered is not provided by your
service provider in the device, you will be prompted to go to
the email account settings screen to enter settings manually. Or
you can touch Manual setup to directly enter the incoming and
outgoing settings for the email account you are setting up.
IP4931_P330X_QG_Eng_GB_12_140604.indd 16IP4931_P330X_QG_Eng_GB_12_140604.indd 16 2014-6-4 下午 3:52:382014-6-4 下午 3:52:38
• Enter the account name and display name in outgoing emails.
• To add another email account, you can touch
Touch ADD ACCOUNT on the right of the title to create.
To create and send emails
• Touch the icon
• Enter recipient(s) email address(es) in To field.
• If necessary, touch
blind copy to the message.
• Enter the subject and the content of the message.
• Touch
• Finally, touch
• If you do not want to send the mail right away, you can touch
Save draft or touch Back key to save a copy.
16
from Inbox screen.
and touch Add Cc/Bcc to add a copy or a
, touch Attach file to add an attachment.
to send.
and Settings.
and
Page 17

Getting connected ......
7
To connect to the Internet with this device, you can use GPRS/
EDGE/3G/4G networks or Wi-Fi, whichever is most convenient.
7.1 Connecting to the Internet
7.1.1 GPRS/EDGE/3G/4G
The first time you turn on your device with SIM card inserted, it will
automatically configure network service: GPRS, EDGE, 3G or 4G. If
the network is not connected, you can touch on Quick setting
bar, or touch the settings icon , and select More…\Mobile
networks\Data enabled.
To check the network connection you are using, touch Application
tab on the Home screen, then touch Settings\More...\Mobile
networks\Access Point Names or Network operators.
7.1.2 Wi-Fi
Using Wi-Fi, you can connect to the Internet when your device is
within range of a wireless network. Wi-Fi can be used on the device
even without a SIM card inserted.
IP4931_P330X_QG_Eng_GB_12_140604.indd 17IP4931_P330X_QG_Eng_GB_12_140604.indd 17 2014-6-4 下午 3:52:382014-6-4 下午 3:52:38
To turn Wi-Fi on and connect to a wireless network
on Quick setting bar to get to Settings.
• Touch
• Touch the switch
• Touch Wi-Fi, detailed information of all detected Wi-Fi networks
is displayed in the Wi-Fi networks section.
• Touch a Wi-Fi network to connect to it. If the network you selected
is secured, you are required to enter a password or other credentials
(contact network operator for details). When finished, touch Connect.
beside Wi-Fi to turn on/off Wi-Fi.
7.2 Browser ....................................
Using Browser, you can enjoy surfing the Web.
To access this function, touch Application tab from Home screen,
then touch Browser.
To go to a web page
On Browser screen, touch the URL box at the top, enter the address
of the web page, then touch
17
to confirm.
Page 18

7.3 Connecting to a computer
With the USB cable, you can transfer media files and other files
between microSD card/internal storage and computer.
Before using MTP or PTP you should firstly mark USB debugging.
• To access this function, touch Settings\About device, then
touch Build number 7 times. Now you may touch Settings\
Developer options\USB debugging.
To connect/disconnect your device to/from the computer:
To connect:
• Use the USB cable that came with your device to connect
the device to a USB port on your computer. You will receive a
notification that the USB is connected.
• If you use MTP or PTP, your device will be automatically
connected.
To disconnect (for mass storage):
• Drag down the Notification panel and touch USB connected.
• Touch to cancel Media device (MTP) in the dialog that opens.
Before using MTP, make sure that the driver (Windows
Media Player 11 or higher version) has been installed.
To locate the data you have transferred or downloaded in
the internal storage/microSD card:
• Touch Application tab from the Home screen to open the
applications list.
• Touch File Manager.
All data you have downloaded is stored in File Manager, where you
can view media files (videos, photos, music and others), rename files,
install applications into your device, etc.
7.4 Sharing your device's mobile data
connection
You can share your device's mobile data connection with a single
computer via a USB cable (USB tethering) or with up to eight
devices at once by turning your device into a portable Wi-Fi hotspot.
To turn on USB tethering or Portable Wi-Fi hotspot
on Quick setting bar to get to Settings.
• Touch
• Touch More...\Tethering & portable hotspot.
• Mark the checkbox of USB tethering or turn on Portable
Wi-Fi hotspot to activate this function.
These functions may incur additional network charges
from your network operator. Extra fees may also be
charged in roaming areas. You can check data usage by
touching Settings\Data usage.
18
IP4931_P330X_QG_Eng_GB_12_140604.indd 18IP4931_P330X_QG_Eng_GB_12_140604.indd 18 2014-6-4 下午 3:52:382014-6-4 下午 3:52:38
Page 19

Find my location using
8
GPS satellites
To activate your device’s global positioning system (GPS) satellite
receiver:
• Touch on Quick setting bar to get to Settings.
• Touch Location access.
• Turn on the swit ch
then appear a dialogue of location consent, touch Agree.
Find your location by opening Maps:
IP4931_P330X_QG_Eng_GB_12_140604.indd 19IP4931_P330X_QG_Eng_GB_12_140604.indd 19 2014-6-4 下午 3:52:382014-6-4 下午 3:52:38
besides Access to my location,
Use your d evice’s GPS sa tellite re ceiver to pi npoint you r location
withi n an accura cy as close a s several m eters ("s treet leve l"). The
process of accessing the GPS satellite and setting your device's
precis e locatio n for the fir st time will r equire up to 5 m inutes.
You will nee d to stand in a p lace with a c lear view of t he sky and
avoid movi ng. After t his, GPS w ill only nee d 20-4 0 seconds t o
ident ify your pre cise locat ion. Then yo u can star t the navig ation
to find the target location.
Data backup ................
9
This device enables you to back up your device’s settings and
other application data to Google Servers, with your Google
Account.
If you rep lace your dev ice, the se ttings an d data you’ve b acked up
are rest ored onto t he new device t he first t ime you sign in w ith
your Google Acco unt.
To activate this function:
• Touc h
on Quic k setting b ar to get to Settings.
• Touc h Backup and reset\Back up my data to mark the
checkbox.
19
Page 20

Activated this function, a wide variety of settings and data are
backed up, including your Wi-Fi passwords, bookmarks, a list of
the applications you’ve installed, the words you’ve added to the
dictionary used by the onscreen keyboard, and most of the settings
that you configure with the Settings application. If you deactivated
this option, you stop backing up your settings, and any existing
backups are deleted from Google Servers.
10
To activate factory data reset:
• Touch
• Touch Backup and reset\Factory data reset.
• Touch Reset device\Erase everything.
Device reset will erase all of your personal data from internal device
storage, including information about your Google Account, any other
accounts, your system and application settings, and any downloaded
applications. Resetting the device does not erase any system
software updates you’ve downloaded. If you reset the device in this
way, you’re prompted to re-enter the same kind of information as
when you first started Android.
When you are unable to power on your device, there is another way
to perform a factory data reset by pressing the Volume up key and
the Pow er key at same time until the screen lights up.
IP4931_P330X_QG_Eng_GB_12_140604.indd 20IP4931_P330X_QG_Eng_GB_12_140604.indd 20 2014-6-4 下午 3:52:382014-6-4 下午 3:52:38
Factory data reset
on Quick setting bar to get to Settings.
11
11.1 Applications
With this device, some built-in Google applications and other third
party applications are available for your convenience.
With the built-in applications, you can:
• Communicate with friends.
• Exchange messages or emails with friends.
• Track your location, view traffic situations, search for locations and
get navigation information to your destination.
• Download more applications from Google Play Store and more.
For more information about these applications, please check user
manual online: www.alcatelonetouch.com.
11.2 Internal storage
Touch Settings\Storage to display the amount of internal device
storage used by the operating system, its components, applications
(including those you downloaded), permanent and temporary data.
All personal music, pictures, applications, and files will be saved in
device storage or SD card.
20
Applications &
Internal storage ....
Page 21

If a warning message comes up saying that device memory
is limited, you are required to free up space by deleting
some unwanted applications, downloaded files, etc.
12
Making the most
of your device ........
You can download software upgrade for free from the website
(www.alcatelonetouch.com).
12.1 Smart Suite
Smart Suite includes:
• Contacts
It allows you to back up contact entries so that you don't have
to worry about losing, breaking, switching devices or changing
service providers.
• Messages
It frees you from painstakingly inputting text on the keypads. All of
your messages are easily accessible and well-organized.
• Calendar
It allows you to sync events freely between your device and
Outlook and create and edit new events from a PC.
IP4931_P330X_QG_Eng_GB_12_140604.indd 21IP4931_P330X_QG_Eng_GB_12_140604.indd 21 2014-6-4 下午 3:52:382014-6-4 下午 3:52:38
• Photos
It allows you to easily import photos from PC or the handset and
organize them in different albums for better management.
• Videos
It allows you to insert video files from PC for playback and then
upload to handset folder.
• Music
It allows you to quickly search your favorites in PC, manage the
ultimate Library, and enjoy the easiest digital jukebox in your
own mobile way.
• Application
It allows you to import downloaded mobile applications and have
them installed into your handset upon synchronization.
• Backup
It allows you to back up your contacts, messages, calendar, photos
and applications, then import the backup files to your device.
Supported Operating Systems
Windows XP/Vista/Windows 7/Windows 8.
12.2 Upgrade
You can use Mobile Upgrade tool or FOTA Upgrade tool to update
your device's software.
21
Page 22

12.2.1 Mobile Upgrade
Download Mobile Upgrade from ALCATEL ONETOUCH website
(www.alcatelonetouch.com) and install it on your PC. Launch
the tool and update your device by following the step by step
instructions (refer to the User Guide provided together with the
tool). Your device’s software will now have the latest software.
All personal information will be permanently lost following
the update process. We recommend you backup your
personal data using Smart Suite before upgrading.
12.2.2 FOTA Upgrade
Using FOTA Upgrade tool you can update your device's software.
To access System Updates, please open notification panel and
and then , then press About device\System
touch
updates. Or you can directly touch and access Settings\
About device\System updates. Touch Check for updates, and
the device will search for the latest software. If you want to update
the system, please touch the button Download, after it's done
please touch Install to complete the upgrade. Now your device's
software will have the latest version.
You should turn on data connection before searching for updates.
Settings for auto-check intervals and reminders about upgrades are
also available once you restart the device.
If you have chosen auto-check, when the system discovers the
new version, the icon
notification to access the System Updates directly.
During FOTA downloading or updating, to avoid errors in
locating the correct update packages, do not change your
default storage location.
will appear in the status bar. Touch the
Safety and use .....................
We recommend that you read this chapter carefully before using your
device. The manufacturer disclaims any liability for damage, which
may result as a consequence of improper use or use contrary to the
instructions contained herein.
• TRAFFIC SAFETY:
Given that studies show that using a device while driving a vehicle
constitutes a real risk, even when the hands-free kit is used (car kit,
headset...), drivers are requested to refrain from using their mobile when
the vehicle is not parked.
When driving, do not use your device and headphone to listen to music
or to the radio. Using a headphone can be dangerous and forbidden
in some areas.
When switched on, your device emits electromagnetic waves that can
interfere with the vehicle’s electronic systems such as ABS anti-lock
brakes or airbags. To ensure that there is no problem:
- do not place your device on top of the dashboard or within an airbag
deployment area,
- check with your car dealer or the car manufacturer to make sure that
the dashboard is adequately shielded from device RF energy.
22
IP4931_P330X_QG_Eng_GB_12_140604.indd 22IP4931_P330X_QG_Eng_GB_12_140604.indd 22 2014-6-4 下午 3:52:382014-6-4 下午 3:52:38
Page 23

• CONDITIONS OF USE:
You are advised to switch off the device from time to time to optimise
its performance.
Switch the device off before boarding an aircraft.
Switch the device off when you are in health care facilities, except in
designated areas. As with many other types of equipment now in regular
use, this device can interfere with other electrical or electronic devices,
or equipment using radio frequency.
Switch the device off when you are near gas or flammable liquids. Strictly
obey all signs and instructions posted in a fuel depot, petrol station, or
chemical plant, or in any potentially explosive atmosphere.
When the device is switched on, it should be kept at least 15 cm
from any medical device such as a pacemaker, a hearing aid or insulin
pump, etc.
To avoid hearing impairment, move an external loudspeaker which may
be connected to your device away from your ear while using the "handsfree" mode because the amplified volume might cause hearing damage.
Do not let children use the device and/or play with the device and
accessories without supervision.
Please note that your device is a unibody device, the back cover
and battery are not removable. Do not attempt to disassemble your
device. If you disassemble your device the warranty will not apply. Also
disassembling the device may damage the battery, and may cause leakage
of substances that could create an allergic reaction.
Always handle your device with care and keep it in a clean and dust-free place.
Do not allow your device to be exposed to adverse weather
or environmental conditions (moisture, humidity, rain, infiltration of
liquids, dust, sea air, etc). The manufacturer’s recommended operating
temperature range is -10°C to +55°C.
At over 55°C the legibility of the device’s display may be impaired,
though this is temporary and not serious.
Emergency call numbers may not be reachable on all cellular networks.
You should never rely only on your device for emergency calls.
Do not open, dismantle or attempt to repair your device yourself.
Do not drop, throw or bend your device.
Do not use the device if the glass made screen, is damaged, cracked or
broken to avoid any injury.
Do not paint it.
Use only batteries, battery chargers, and accessories which are
recommended by TCT Mobile Limited and its affiliates and are
compatible with your device model. TCT Mobile Limited and its affiliates
disclaim any liability for damage caused by the use of other chargers
or batteries.
Remember to make back-up copies or keep a written record of all
important information stored in your device.
Some people may suffer epileptic seizures or blackouts when exposed to
flashing lights, or when playing video games. These seizures or blackouts
may occur even if a person never had a previous seizure or blackout. If
you have experienced seizures or blackouts, or if you have a family history
of such occurrences, please consult your doctor before playing video
games on your device or enabling a flashing-lights feature on your device.
Parents should monitor their children’s use of video games or other
features that incorporate flashing lights on the devices. All persons
should discontinue use and consult a doctor if any of the following
symptoms occur: convulsion, eye or muscle twitching, loss of awareness,
involuntary movements, or disorientation. To limit the likelihood of such
symptoms, please take the following safety precautions:
- Do not play or use a flashing-lights feature if you are tired or need sleep.
- Take a minimum of a 15-minute break hourly.
- Play in a room in which all lights are on.
- Play at the farthest distance possible from the screen.
- If your hands, wrists, or arms become tired or sore while playing, stop
and rest for several hours before playing again.
- If you continue to have sore hands, wrists, or arms during or after
playing, stop the game and see a doctor.
23
IP4931_P330X_QG_Eng_GB_12_140604.indd 23IP4931_P330X_QG_Eng_GB_12_140604.indd 23 2014-6-4 下午 3:52:382014-6-4 下午 3:52:38
Page 24

When you play games on your device, you may experience occasional
discomfort in your hands, arms, shoulders, neck, or other parts of your
body. Follow the instructions to avoid problems such as tendinitis, carpal
tunnel syndrome, or other musculoskeletal disorders.
PROTECT YOUR HEARING
To prevent possible hearing damage, do not listen at high
volume levels for long periods. Exercise caution when
using the headset mode or when using the hands-free
mode with an external loudspeaker connected to your
device and where the external loudspeaker may be
located close to your ear.
• PRIVACY:
Please note that you must respect the laws and regulations in force in
your jurisdiction or other jurisdiction(s) where you will use your device
regarding taking photographs and recording sounds with your device.
Pursuant to such laws and regulations, it may be strictly forbidden to
take photographs and/or to record the voices of other people or any of
their personal attributes, and duplicate or distribute them, as this may be
considered to be an invasion of privacy. It is the user's sole responsibility
to ensure that prior authorisation be obtained, if necessary, in order to
record private or confidential conversations or take a photograph of
another person; the manufacturer, the seller or vendor of your device
(including the operator) disclaim any liability which may result from the
improper use of the device.
• BATTERY:
Please note your device is a unibody device, the back cover and battery
are not removable. Observe the following precautions:
- Do not attempt to open the back cover,
- Do not attempt to eject, replace and open battery,
- Do not punctuate the back cover of your device,
- Do not burn or dispose of your device in household rubbish or store
it at temperature above 60°C.
Device and battery as a unibody device must be disposed of in
accordance with locally applicable environmental regulations.
This symbol on your device, the battery and the accessories
means that these products must be taken to collection
points at the end of their life:
- Municipal waste disposal centres with specific bins for
these items of equipment
- Collection bins at points of sale.
They will then be recycled, preventing substances being disposed of in
the environment, so that their components can be reused.
In European Union countries:
These collection points are accessible free of charge.
All products with this sign must be brought to these collection points.
In non European Union jurisdictions:
Items of equipment with this symbol are not to be thrown into ordinary
bins if your jurisdiction or your region has suitable recycling and
collection facilities; instead they are to be taken to collection points for
them to be recycled.
CAUTION: RISK OF EXPLOSION IF BATTERY IS REPLACED BY AN
INCORRECT TYPE. DISPOSE OF USED BATTERIES ACCORDING TO
THE INSTRUCTIONS.
• CHARGERS
Mains powered chargers will operate within the temperature range
of: 0°C to 40°C.
The chargers designed for your device meet with the standard for
safety of information technology equipment and office equipment
use. They are also compliant to the ecodesign directive 2009/125/EC.
24
IP4931_P330X_QG_Eng_GB_12_140604.indd 24IP4931_P330X_QG_Eng_GB_12_140604.indd 24 2014-6-4 下午 3:52:382014-6-4 下午 3:52:38
Page 25

Due to different applicable electrical specifications, a charger you
purchased in one jurisdiction may not work in another jurisdiction. They
should be used for this purpose only.
• RADIO WAVES:
Proof of compliance with international standards (ICNIRP) or with
European Directive 1999/5/EC (R&TTE) is required of all device models
before they can be put on the market. The protection of the health and
safety for the user and any other person is an essential requirement of
these standards or this directive.
THIS DEVICE MEETS INTERNATIONAL GUIDELINES FOR
EXPOSURE TO RADIO WAVES
Your mobile device is a radio transmitter and receiver. It is designed
not to exceed the limits for exposure to radio waves (radio frequency
electromagnetic fields) recommended by international guidelines. The
guidelines were developed by an independent scientific organization
(ICNIRP) and include a substantial safety margin designed to assure the
safety of all persons, regardless of age and health.
The radio wave exposure guidelines use a unit of measurement known
as the Specific Absorption Rate, or SAR. The SAR limit for mobile
devices is 2 W/kg.
Tests for SAR are conducted using standard operating positions with
the device transmitting at its highest certified power level in all tested
frequency bands. The highest SAR values under the ICNIRP guidelines
for this device model are:
Maximum SAR for this model and conditions under which
Body-worn SAR LTE Band 7 + Wi-Fi + Bluetooth 0.772 W/kg
it was recorded.
During use, the actual SAR values for this device are usually well below
the values stated above. This is because, for purposes of system efficiency
and to minimize interference on the network, the operating power of
your mobile device is automatically decreased when full power is not
needed for the call. The lower the power output of the device, the
lower its SAR value.
Body-worn SAR testing has been carried out at a separation distance of
1.5 cm. To meet RF exposure guidelines during body-worn operation, the
device should be positioned at least this distance away from the body.
If you are not using an approved accessory ensure that whatever product
is used is free of any metal and that it positions the device the indicated
distance away from the body.
Organizations such as the World Health Organization and the US Food
and Drug Administration have statesd that if people are concerned and
want to reduce their exposure they could use a hands-free device to
keep the device away from the body during calls, or reduce the amount
of time spent on the device.
For more information you can go to www.alcatelonetouch.com
Additional information about electromagnetic fields and public health are
available on the following site: http://www.who.int/peh-emf.
Your device is equipped with a built-in antenna. For optimal operation,
you should avoid touching it or degrading it.
As the device offer a range of functions, it will be compliant with the
guidelines when used with headset or usb data cable. If you are using
another accessory ensure that whatever product is used is free of any
metal and that it positions the device at least
1.5 cm away from the body.
25
IP4931_P330X_QG_Eng_GB_12_140604.indd 25IP4931_P330X_QG_Eng_GB_12_140604.indd 25 2014-6-4 下午 3:52:392014-6-4 下午 3:52:39
Page 26

• Regulatory information
The following approvals and notices apply in specific regions as noted.
• LICENCES
microSD Logo is a trademark.
The Bluetooth word mark and logos are owned by
the Bluetooth SIG, Inc. and any use of such marks by
TCT Mobile Limited and its affiliates is under license.
Other trademarks and trade names are those of their
respective owners.
ALCATEL ONETOUCH P330X
Bluetooth Declaration ID
D022040
The Wi-Fi Logo is a certification mark of the Wi-Fi
Alliance.
The Android robot is reproduced or modified from work created
and shared by Google and used according to terms described in the
Creative Commons 3.0 Attribution License (the text will show when
you touch and hold Google legal in Settings\About device\Legal
information)
You have purchased a product which uses the open source (http://
opensource.org/) programs mtd, msdosfs, netfilter/iptables and initrd in
object code and other open source programs licensed under the GNU
General Public License and Apache License.
(1)
It may not available according to the countries.
26
IP4931_P330X_QG_Eng_GB_12_140604.indd 26IP4931_P330X_QG_Eng_GB_12_140604.indd 26 2014-6-4 下午 3:52:392014-6-4 下午 3:52:39
Google, the Google logo, Android, the Android logo,
Google Search TM, Google MapsTM, Gmail TM, YouTube,
Google Play Store, Google Latitude
are trademarks of Google Inc.
(1)
.
TM
and Hangouts
TM
Page 27

We will provide you with a complete copy of the corresponding source
codes upon request within a period of three years from the distribution
of the product by TCT.
You may download the source codes from http://sourceforge.net/
projects/alcatel/files/. The provision of the source code is free of charge
from internet.
General information ..........
• Internet address: www.alcatelonetouch.com
• Hot Line Number: see "TCT Mobile Services" leaflet or go to
our website.
• Address: Room 1910-12A, Tower 3, China HK City, 33 Canton Road,
Tsimshatsui, Kowloon, Hong Kong
On our website, you will find our FAQ (Frequently Asked Questions)
section. You can also contact us by e-mail to ask any questions you may have.
An electronic version of this user guide is available in English
and other languages according to availability on our server:
www.alcatelonetouch.com
Your device is a transceiver that operates on GSM in quad-band
(850/900/1800/1900 MHz) or UMTS in tri-band (850/900/2100 MHz),
LTE in six-band (B1/3/5/7/8/20).
This equipment is in compliance with the essential requirements and
other relevant provisions of Directive 1999/5/EC. The entire copy of the
Declaration of Conformity for your device can be obtained through our
website: www.alcatelonetouch.com.
Protection against theft
Your device is identified by an IMEI (serial number) shown on the
packaging label and in the device’s memory. We recommend that you
note the number the first time you use your device by entering * #
0 6 # and keep it in a safe place. It may be requested by the police or
your operator if your device is stolen. This number allows your device
to be blocked preventing a third person from using it, even with a
different SIM card.
Disclaimer
There may be certain differences between the user manual description
and the device’s operation, depending on the software release of your
device or specific operator services.
TCT Mobile shall not be held legally responsible for such differences, if
any, nor for their potential consequences, which responsibility shall be
borne by the operator exclusively.This handset may contain materials,
including applications and software in executable or source code
form, which is submitted by third parties for inclusion in this handset
("Third Party Materials"). All third party materials in this handset are
provided "as is", without warranty of any kind, whether express or
implied, including the implied warranties of merchantability, fitness for
a particular purpose or use/third party application, interoperability with
other materials or applications of the purchaser and non-infringement of
copyright. The purchaser undertakes that TCT Mobile has complied with
all quality obligations incumbent upon it as a manufacturer of mobile
devices and handsets in complying with Intellectual Property rights. TCT
Mobile will at no stage be responsible for the inability or failure of the
Third Party Materials to operate on this handset or in interaction with
any other devices of the purchaser. To the maximum extent permitted
(1)
Contact your network operator to check service availability.
27
(1)
IP4931_P330X_QG_Eng_GB_12_140604.indd 27IP4931_P330X_QG_Eng_GB_12_140604.indd 27 2014-6-4 下午 3:52:392014-6-4 下午 3:52:39
Page 28

by law, TCT Mobile disclaims all liability for any claims, demands, suits
or actions, and more specifically – but not limited to – tort law actions,
under any theory of liability, arising out of the use , by whatever means,
or attempts to use, such Third Party Materials. Moreover, the present
Third Party Materials, which are provided free of charge by TCT Mobile ,
may be subject to paid updates and upgrades in the future; TCT Mobile
waives any responsibility regarding such additional costs, which shall be
borne exclusively by the purchaser. The availability of the applications
may vary depending on the countries and the operators where the
handset is used; in no event shall the list of possible applications and
software provided with the handsets be considered as an undertaking
from TCT Mobile; it shall remain merely as information for the
purchaser. Therefore, TCT Mobile shall not be held responsible for
the lack of availability of one or more applications wished for by the
purchaser, as its availability depends on the country and the operator
of the purchaser. TCT mobile reserves the right at any time to add or
remove Third Party Materials from its handsets without prior notice; in
no event shall TCT Mobile be held responsible by the purchaser for any
consequences that such removal may have on the purchaser regarding
the use or attempt to use such applications and Third Party Materials.
Warranty .............................
Your device is warranted against any defect or malfunctioning which
may occur in conditions of normal use during the warranty period of
twelve (12) months
original invoice.
Batteries
against any defect which may occur during the first six (6) months
the date of purchase as shown on your original invoice.
In case of any defect of your device which prevents you from normal
use thereof, you must immediately inform your vendor and present your
device with your proof of purchase.
If the defect is confirmed, your device or part thereof will be either
replaced or repaired, as appropriate. Repaired device and accessories
are entitled to a one (1) month warranty for the same defect. Repair
or replacement may be carried out using reconditioned components
offering equivalent functionality.
This warranty covers the cost of parts and labor but excludes any
other costs.
This warranty shall not apply to defects to your device and/or accessory
due to (without any limitation):
(1)
The warranty period may vary depending on your country.
(2)
The life of a rechargeable battery in terms of conversation time
standby time, and total service life, will depend on the conditions
of use and network configuration. Batteries being considered
expendable supplies, the specifications state that you should obtain
optimal performance for your device during the first six months after
purchase and for approximately 200 more recharges.
28
(1)
from the date of purchase as shown on your
(2)
and accessories sold with your device are also warranted
(1)
from
IP4931_P330X_QG_Eng_GB_12_140604.indd 28IP4931_P330X_QG_Eng_GB_12_140604.indd 28 2014-6-4 下午 3:52:392014-6-4 下午 3:52:39
Page 29

1) Non-compliance with the instructions for use or installation, or with
technical and safety standards applicable in the geographical area
where your device is used,
2) Connection to any equipment not supplied or not recommended by
TCT Mobile Limited,
3) Modification or repair performed by individuals not authorised by
TCT Mobile Limited or its affiliates or your vendor,
4) Modification, adjustment or alteration of software or hardware
performed by individuals not authorized by TCT Mobile Limited,
5) Inclement weather, lightning, fire, humidity, infiltration of liquids or
foods, chemical products, download of files, crash, high voltage,
corrosion, oxidation…
Your device will not be repaired in case labels or serial numbers (IMEI)
have been removed or altered.
There are no express warranties, whether written, oral or implied, other
than this printed limited warranty or the mandatory warranty provided
by your country or jurisdiction.
In no event shall TCT Mobile Limited or any of its affiliates be liable for
indirect, incidental or consequential damages of any nature whatsoever,
including but not limited commercial or financial loss or damage,
loss of data or loss of image to the full extent those damages can be
disclaimed by law.
Some countries/states do not allow the exclusion or limitation of
indirect, incidental or consequential damages, or limitation of the
duration of implied warranties, so the preceding limitations or exclusions
may not apply to you.
Troubleshooting..................
Before contacting the service centre, you are advised to follow the
instructions below:
• You are advised to fully charge ( ) the battery for optimal
operation.
• Avoid storing large amounts of data in your device as this may
affect its performance.
• Use Factory data reset and Mobile Upgrade tool to perform
device formatting or software upgrading (to reset factory data,
hold down the Power key and the Volume up key at the same
time under power off mode). ALL User device data: contacts,
photos, messages and files, downloaded applications will be lost
permanently. It is strongly advised to fully backup the device data
and profile via Smart Suite before doing formatting and upgrading.
and carry out the following checks:
My device is frozen or cannot be switched on
• When the device cannot be switched on, charge for at least 20
minutes to ensure the minimum battery power needed, then try
to switch on again.
• When the device falls into a loop during power on-off animation
and the user interface cannot be accessed, press and hold the
Volume down key to enter Safe Mode. This eliminates any
abnormal OS booting issues caused by 3rd party APKs.
• If neither method is effective, please reset the device using the
Powe r key and the Volume up key, (holding both together).
29
IP4931_P330X_QG_Eng_GB_12_140604.indd 29IP4931_P330X_QG_Eng_GB_12_140604.indd 29 2014-6-4 下午 3:52:392014-6-4 下午 3:52:39
Page 30

My device has not responded for several minutes
• Restart your device by pressing and holding the Power key.
• If it still does not work, please use Factor y data reset to reset the
device or FOTA/Mobile Upgrade to upgrade software.
My device turns off by itself
• Check that your screen is locked when you are not using your
device, and make sure the Powe r key is not mis-contacted due
to unlocked screen.
• Check the battery charge level.
• If it still does not work, please use Factor y data reset to reset the
device or FOTA/Mobile Upgrade to upgrade software.
My device cannot charge properly
• Make sure you are using an ALCATEL ONETOUCH charger
from the box.
• Make sure that your battery is not completely discharged; if the
battery power is empty for a long time, it may take around 20
minutes to display the battery charger indicator on the screen.
• Make sure charging is carried out under normal conditions (0°C
to +40°C).
• When abroad, check that the voltage input is compatible.
My device cannot connect to a network or "No service"
is displayed
• Tr y connecting in another location.
• Verify the network coverage with your operator.
• Check with your operator that your SIM card is valid.
• Try selecting the available network(s) manually.
• Tr y connecting at a later time if the network is overloaded.
My device cannot connect to the Internet
• Check that the IMEI number (press *#06#) is the same as the one
printed on your warranty card or box.
• Make sure that the internet access service of your SIM card is available.
• Check your device's Internet connecting settings.
• Make sure you are in a place with network coverage.
• Tr y connecting at a later time or another location.
Invalid SIM card
• Make sure the SIM card has been correctly inserted (see "Inserting
or removing the SIM card").
• Make sure the chip on your SIM card is not damaged or scratched.
• Make sure the service of your SIM card is available.
Unable to make outgoing calls
• Make sure you have dialed a valid number and have touched
.
• For international calls, check the countr y and area codes.
• Make sure your device is connected to a network, and the network
is not overloaded or unavailable.
• Check your subscription status with your operator (credit, SIM
card valid, etc.).
• Make sure you have not barred outgoing calls.
• Make sure that your device is not in airplane mode.
Unable to receive incoming calls
• Make sure your device is switched on and connected to a network
(check for overloaded or unavailable network).
• Check your subscription status with your operator (credit, SIM
card valid, etc.).
• Make sure you have not forwarded incoming calls.
• Make sure that you have not barred certain calls.
• Make sure that your device is not in airplane mode.
30
IP4931_P330X_QG_Eng_GB_12_140604.indd 30IP4931_P330X_QG_Eng_GB_12_140604.indd 30 2014-6-4 下午 3:52:392014-6-4 下午 3:52:39
Page 31

The caller’s name/number does not appear when a call
is received
• Check that you have subscribed to this service with your operator.
• Your caller has concealed his/her name or number.
I cannot find my contacts
• Make sure your SIM card is not broken.
• Make sure your SIM card is inserted properly.
• Import all contacts stored in SIM card to device.
The sound quality of the calls is poor
• You can adjust the volume during a call by pressing the Volume
Up/Down key.
• Check the network strength
• Make sure that the audio connector on your device or the
connector of the headset or external loudspeaker is clean.
I am unable to use the features described in the manual
• Check with your operator to make sure that your subscription
includes this service.
• Make sure this feature does not require an ALCATEL ONETOUCH
accessory.
When I select a number from my contacts, the number
cannot be dialed
• Make sure that you have correctly recorded the number in your file.
• Make sure that you have selected the country prefix when calling a
foreign country.
I am unable to add a contact in my contacts
• Make sure that your SIM card contacts are not full; delete some
files or save the files in the device contacts (i.e. your professional
or personal directories).
.
My callers are unable to leave messages on my voicemail
• Contact your network operator to check service availability.
I cannot access my voicemail
• Make sure your operator’s voicemail number is correctly entered
in "Voicemail number".
• Tr y later if the network is busy.
I am unable to send and receive MMS
• Check your device memory availability as it might be full.
• Contact your network operator to check service availability and
check MMS parameters.
• Verify the server centre number or your MMS profile with your operator.
• The server centre may be swamped, try again later.
SIM card PIN locked
• Contact your network operator to obtain the PUK code (Personal
Unblocking Key).
I am unable to connect my device to my computer
• Install Smart Suiter.
• Check that your USB driver is installed properly.
• Open the Notification panel to check if the Smart Suite Agent
has been activated.
• Check that you have marked the checkbox of USB debugging.
• Check that your computer meets the requirements for Smart
Suite Installation.
• Make sure that you’re using the right cable from the box.
I am unable to download new files
• Make sure there is sufficient device memory for your download.
• Select the microSD card as the location to store downloaded files.
• Check your subscription status with your operator.
31
IP4931_P330X_QG_Eng_GB_12_140604.indd 31IP4931_P330X_QG_Eng_GB_12_140604.indd 31 2014-6-4 下午 3:52:392014-6-4 下午 3:52:39
Page 32

The device cannot be detected by others via Bluetooth
• Make sure that Bluetooth is turned on and your device is visible
to other users.
• Make sure that the two devices are within Bluetooth’s detection range.
How to make your battery last longer
• Make sure you follow the complete charge time (minimum 2.5
hours).
• After a partial charge, the battery level indicator may not be exact.
Wait for at least 20 minutes after removing the charger to obtain
an exact indication.
• Adjust the brightness of screen as appropriate.
• Extend the email auto-check interval for as long as possible.
• Update news and weather information on manual demand, or
increase their auto-check interval.
• Exit background-running applications if they are not being used
for a long time.
• Deactivate Bluetooth, Wi-Fi, or GPS when not in use.
The device will become warm following prolonged calls,
game playing, internet surfing or running other complex
applications.
• This heating is a normal consequence of the CPU handling
excessive data. Ending above actions will make your device return
to normal temperatures.
ALCATEL is a trademark of Alcatel-Lucent
and is used under license by
TCT Mobile Limited.
© Copyright 2014 TCT Mobile Limited
All rights reserved
TCT Mobile Limited reserves
the right to alter material
or technical specification
without prior notice.
All "S ignature" r ington es embedd ed in this dev ice have been
compos ed, arran ged and mixed by N U TROPIC (Am ar
Kabouche).
32
IP4931_P330X_QG_Eng_GB_12_140604.indd 32IP4931_P330X_QG_Eng_GB_12_140604.indd 32 2014-6-4 下午 3:52:392014-6-4 下午 3:52:39
 Loading...