

Alcatel OmniVista 2500-2700 Service Manual

Using Discovery
Using Discovery
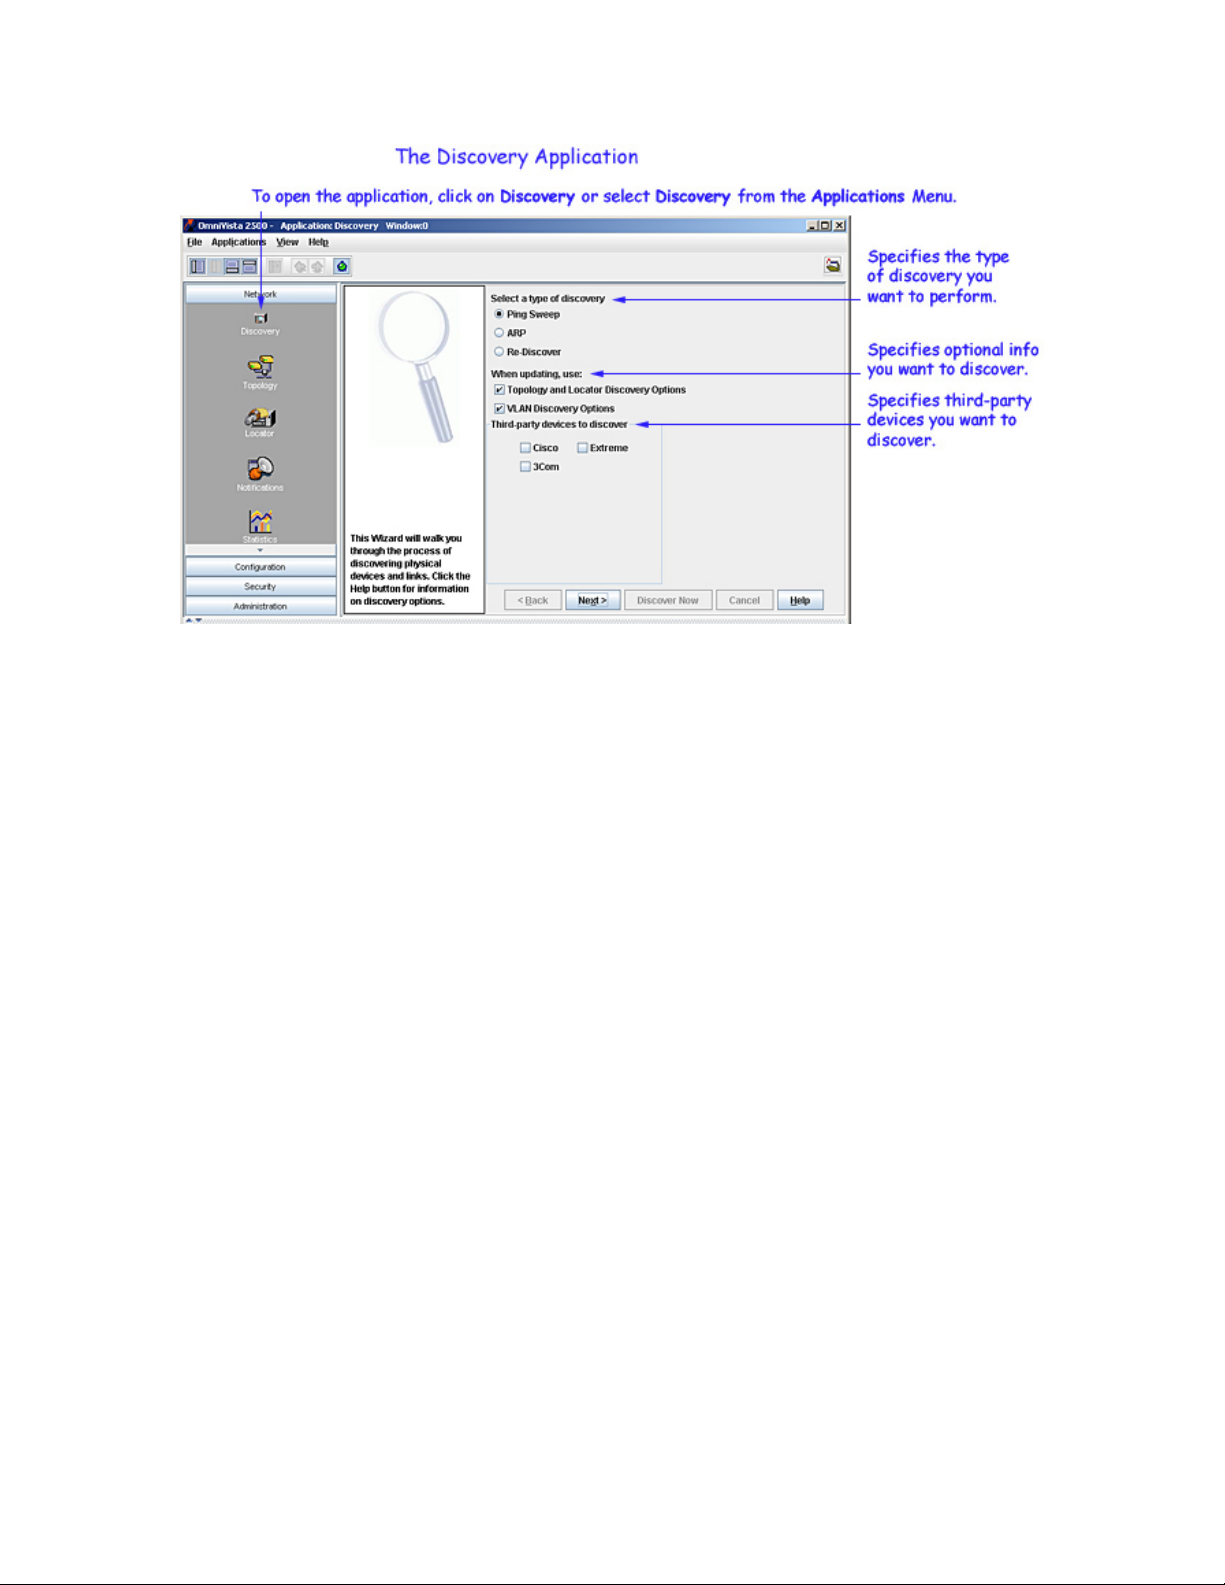
Open the Discovery application by clicking Discovery in the Task Bar, selecting Discovery from the
Applications menu, or by clicking the Discovery icon
application provides a wizard-like interface that enables you to easily discover the following:
• Alcatel devices in the network.
• The links between devices in the network. This information is used to display network links in
graphical maps of network regions.
• Additional link information required by OmniVista's Locator application.
• VLAN information required by OmniVista's VLAN application.
• Third-party devices built by Cisco, 3Com, and Extreme.
• Any additional third-party devices for which support has been added via the Third Party Device
Support Preferences window in the Preferences application.
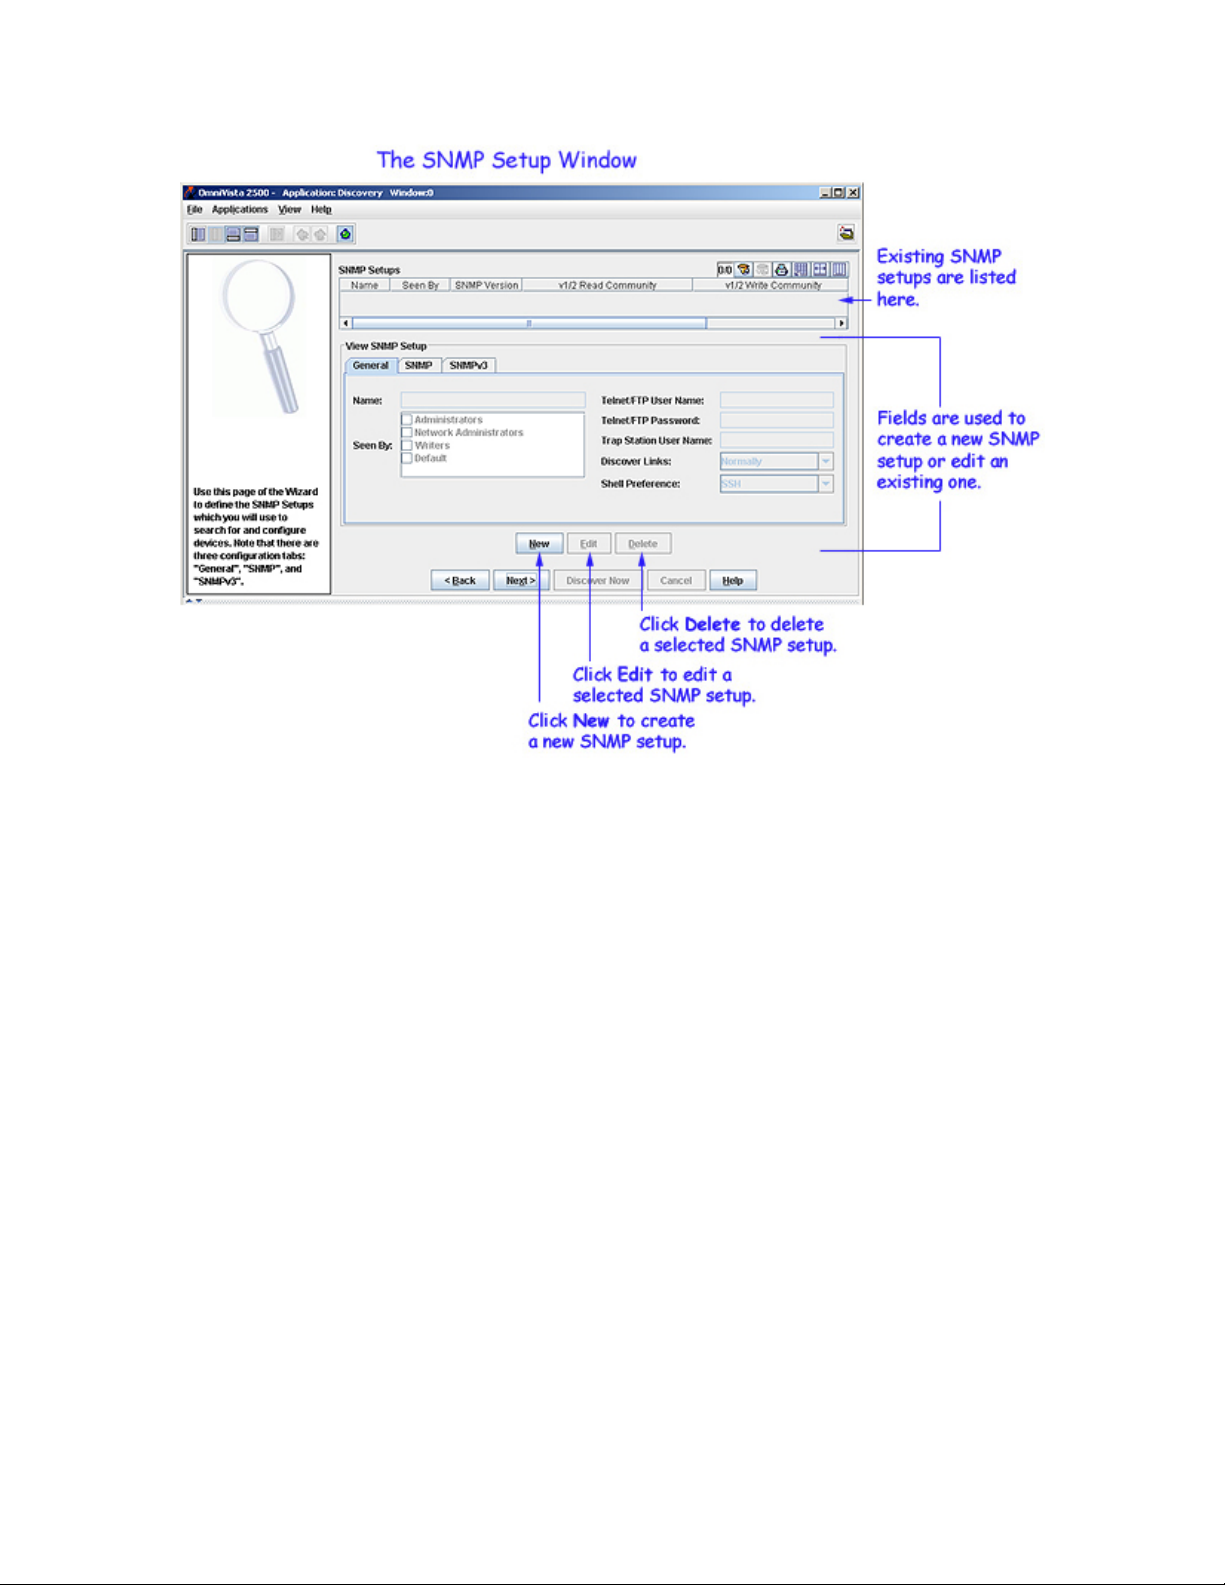
SNMP Setups
The Discovery Wizard now provides the ability to create SNMP Setups that can be selected for individual
discoveries. An SNMP Setup specifies:
in the Topology Toolbar. The Discovery
• The version of SNMP to be used for the discovery (SNMPv1, SNMPv2, or SNMPv3) and the
parameters the selected version of SNMP requires.
• Information about the switches to be discovered. This information includes the switch Telnet/FTP
user name and password, Trap Station User Name, Shell Preference (Telnet or SSH), and the
manner in which the switch's associated links should be discovered. In previous releases of
OmniVista, this information had to be specified via a separate, additional "editing" operation after
the discovery was complete.
The second page of the Discovery Wizard, SNMP Setups, enables you to create SNMP Setups. The SNMP
Setups you create will be available for your selection in subsequent pages of the Discovery Wizard. Click
here for more information on SNMP Setups.
Discovery Options
The opening window of the Discovery Wizard enables you to specify the type of discovery you want to
perform and optional information you want to discover, as explained below.
1
Using Discovery
Specifying the Type of Discovery
Enable one of the following buttons to select the type of discovery you want to perform:
Ping Sweep. A Ping Sweep discovery enables you to discover all switches with an IP address that falls
within user-specified ranges of IP addresses.
ARP. An ARP (Address Resolution Protocol) discovery enables you to connect to one or more gateway
devices, which then use ARP to return a list of subnets known to each gateway. Each subnet is then
discovered.
Re-Discover. This button enables you to select one or more devices that you wish to rediscover. For
example, you might wish to rediscover a device to learn VLAN information that was not gathered during
the first discovery. You might also wish to rediscover a device if that device was reconfigured outside of
OmniVista. If you enable this button, the Discovery Wizard will display a window that enables you to
select the devices you wish to rediscover.
Specifying Discovery Options
Select the following checkboxes if you wish to learn additional information during the discovery:
Topology and Locator Discovery Options. Enable this checkbox if you wish to learn information about
network links. Link information is maintained by adjacency protocols - such as PNNI for ATM, or AMAP
and XMAP for Ethernet - which are active by default in devices that support such protocols. Information
about network links is necessary to display the links between devices when the network and its regions are
displayed. If you enable this checkbox, the Discovery Wizard will later display a window that allows you to
specify the link information you want learned.
2

Using Discovery
Note: As stated, link information is discovered via adjacency protocols, which are
supported by all AOS switches, XOS switches, and 61xx devices. However, OmniCore
5xxx devices, the OmniPCX, and most third-party devices do not support such adjacency
protocols. You can specify that you want link information gathered for these devices
using an alternative method - functionality from OmniVista's Locator application - by
creating and using an SNMP Setup that has the Discover Links combo box set to As
OEM Device. (Click here for more information on SNMP Setups.) You can also specify
this after the devices themselves are discovered, by editing the devices to enable the
Handle as an OEM Device checkbox on the Edit Discovery Manager Entry window.
When this checkbox is enabled, link information will be gathered for the device during
each subsequent polling cycle, using logic from the Locator application.
VLAN Discovery Options. Enable this checkbox if you wish to learn VLAN information required by the
VLAN application. If you enable this checkbox, the Discovery Wizard will later display a window that
allows you to specify the precise VLAN information you want learned.
Specifying Third-Party Devices for Discovery
By default, OmniVista provides support for third-party devices built by Cisco, 3Com, and Extreme.
Support for additional third-party devices can be added via the Third Party Device Support Preferences
window in the Preferences application. To discover third-party devices, ensure that the device's checkbox is
enabled on the opening window of the Discovery Wizard, as shown above.
Click the Next button when you have made your selections.
3

Creating SNMP Setups
Creating SNMP Setups
Creating SNMP Setups is not required unless you wish to change OmniVista's default behavior (which is
described below). If you accept the default behavior, click the Next button to display the next page of the
Discovery Wizard. If you do create SNMP Setups, they will display for your selection in subsequent
windows of the Discovery Wizard.
Overview
By default, OmniVista uses SNMP Version 1 to discover switches. If OmniVista discovers an AOS device,
it sets the default to SNMP Version 2 automatically (that is, any further communication between
OmniVista and the AOS device will be performed using SNMP Version 2). The SNMP Setups window of
the Discovery Wizard enables you to change this default operation and perform the discovery using SNMP
Version 1, Version 2, or Version 3.
Note: For AOS switches, you can only change the SNMP version after Discovery is
complete.
The SNMP Setups window also enables you to inform OmniVista of certain information about the switches
to be discovered BEFORE the discovery takes place. This information includes the switch Telnet/FTP user
name and password, Trap Station user name, Shell Preference (Telnet or SSH), and the manner in which
the switch's associated links should be discovered. In previous releases of OmniVista, this information had
to be specified via a separate, additional "editing" operation after the discovery was complete. This
additional editing operation will still be required if you do not use the SNMP Setups window to specify this
information to OmniVista before the discovery.
The SNMP Setups window enables you to create SNMP "Setups" that specify the SNMP functionality and
switch information described above. You can then associate selected SNMP Setups with an individual ping
sweep range (if you are using Ping Sweep Discovery) or an individual gateway device (if you are using
ARP Discovery). The SNMP Setups will apply to all switches discovered in the ping sweep range or all
switches discovered via the gateway device.
Note for Previously Discovered Switches. If a switch was discovered previously, and a
new discovery is then performed using an SNMP Setup that specifies General parameters
(such the Telnet/FTP user name and password, etc.), the General parameter values
specified in the SNMP Setup will NOT overwrite the General parameter values already
specified to OmniVista for that switch. The General parameter values specified in the
SNMP Setup will apply to newly-discovered switches only.
4
Creating SNMP Setups
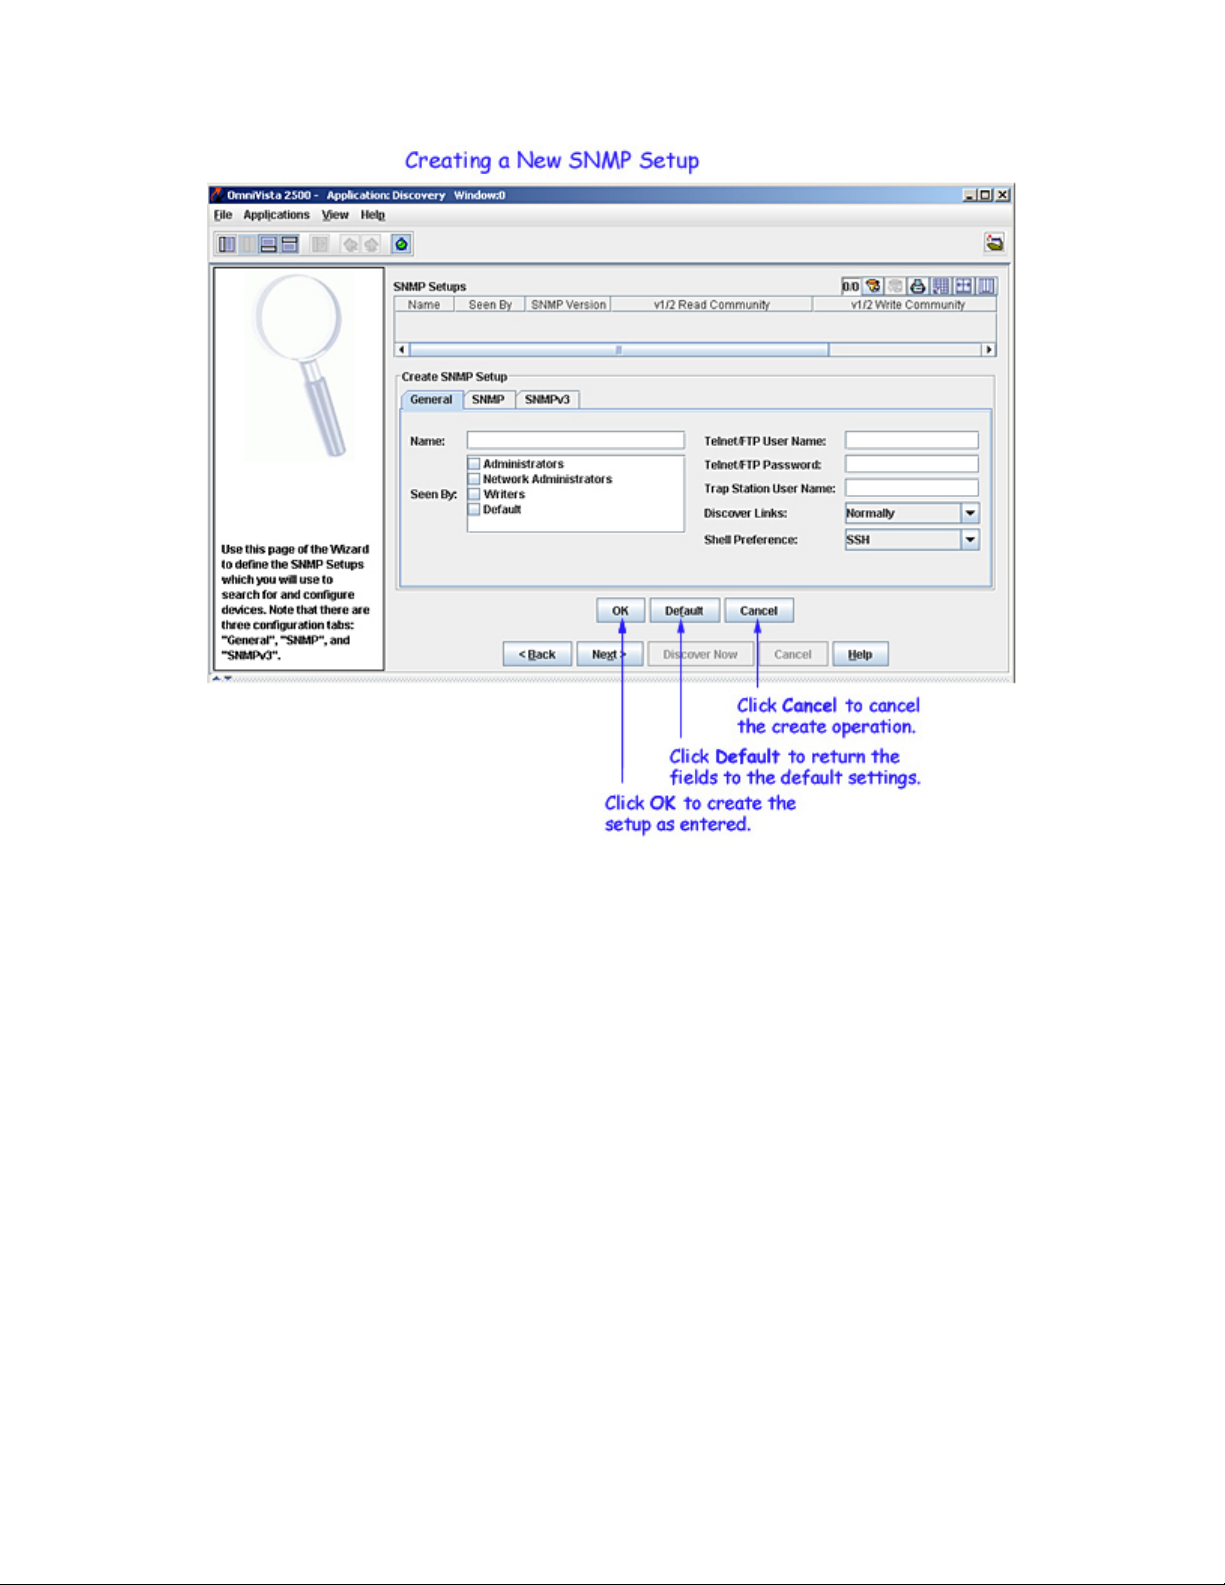
Creating a New SNMP Setup - General Tab
Follow the steps below to create a new SNMP Setup.
1. Click the New button. The Create SNMP Setup panel activates, as shown below. If you select an existing
SNMP Setup and then click New, the parameters of the selected Setup will display in the Create SNMP
Setup panel for your convenience. You can then edit fields as desired.
5
Creating SNMP Setups
2. If it is not already displayed, click the General tab. The General tab of the SNMP Setups window enables
you to specify a name for the new SNMP Setup and to specify information about the devices to be
discovered.
3. Enter a name for the new SNMP Setup in the Name field.
4. The Seen By field defines the security permissions that will be required for viewing the switches in the
list of All Discovered devices AFTER they are discovered. OmniVista is shipped with four pre-defined
user groups -- Administrators, Network Administrators, Writers, and Default -- that have different security
permissions. (The Security application Users and Groups enables you to view and configure security
permissions.) Click the checkboxes in the Seen By field to define who will be able to view the switches
after they are discovered. Alternatively, if you do not click any checkbox, the switches will be viewable by
everyone.
Administrators checkbox. This group has all administrative access rights granted to the
Network Administrators group AND full administrative rights to edit the groups and
users defined in the Security application Users and Groups.
6

Creating SNMP Setups
Network Administrators checkbox. This group has full administrative access rights to
all switches on the network. Members of this group can run discovery and can manually
add, delete, and modify entries in the list of All Discovered Devices. Members of this
group also have full read and right access to entries in the Audit and Control Panel
applications. Members of this group can do everything EXCEPT edit the groups and
users defined in the Security application Users and Groups.
Writers checkbox. This group has both read and write access to switches in the list of All
Discovered Devices that are configured to grant access to this group. However, members
of this group cannot run discovery nor can they manually add, delete, or modify entries in
the list of All Discovered Devices.
Default checkbox. This group has read-only access to switches in the list of All
Discovered Devices that are configured to grant access to this group.
5. In the Telnet/FTP User Name and Telnet/FTP Password fields, enter the user name and password that
OmniVista will use to establish FTP and Telnet sessions with the discovered devices. The user name and
password specified will be used to auto-login to devices when Telnet sessions are established. They will
also be used to perform FTP with the device when configuration files are saved and restored, as explained
below.
Firmware configuration files for XOS and AOS devices can be saved to the OmniVista server and restored
when desired. When files are saved, they are FTPed from the switch to the OmniVista server. When files
are restored, they are FTPed from the server to the switch. New configuration files can also be installed via
FTP. In order to FTP files, OmniVista must know the FTP login name and password that is defined on the
switch. The Telnet/FTP User Name and Password fields enable you to specify this information to
OmniVista.
Please Note:
• If you do not define the Telnet/FTP login name and password, and you attempt to save, restore, or
upgrade configuration files for XOS or AOS devices, you will be individually queried for the FTP
login name and password of each individual switch for which configuration files are being saved,
restored, or upgraded.
• If you do not define the Telnet/FTP login name and password, OmniVista will be unable to autologin to the device when establishing Telnet sessions.
• For OmniCore devices, the login name and password specified in these fields will be used to
establish Telnet sessions and will be passed to the TrackView Element Manager automatically
whenever TrackView is invoked.
6. (AOS Devices only) In the Trap Station User Name field, enter the switch user name that will be used
when an AOS device is configured to send traps to OmniVista. AOS devices require that a valid switch
user name be specified with the trap station configuration entry. If this field is left blank, the following
switch user names will be used by default for trap station configuration entries:
• If OmniVista is configured to use SNMP version 3 with this device, the SNMP version 3 user
name entered for the device will be used as the switch user name in the trap station configuration
entry.
• If OmniVista is configured to use SNMP version 1 or SNMP version 2 with this device, the read
community string for the device will be used as the switch user name in the trap station
configuration entry.
7

Creating SNMP Setups
When using SNMP version 1 or 2, switch user names are interchangeable with community strings AS
LONG AS community string mapping is not in use on the switch. If community string mapping is not in
use, and an AOS switch is discovered using SNMP version 1 or 2 with a default read community string of
"public", or even with a non-default read community string such as "thomas", these community strings are
valid switch user names for trap station configuration entries. In this case, no further configuration is
required and this field can be left blank.
However, if community string mapping is enabled on the switch, the community string with which the
switch is discovered is not guaranteed to be a valid switch user name, and thus is not guaranteed to be a
valid switch user name for a trap station configuration entry. In this case, you should enter a valid switch
user name in the Trap Station User Name field.
7. Set the Discover Links combo box to Normally or As OEM Device to specify how OmniVista should
discover the physical links associated with the discovered devices. Links to other switches are displayed
graphically on OmniVista's Topology maps. Set the Discover Links combo box to Normally for devices
that support adjacency protocols, such as XOS devices, AOS devices, 61xx, and 6300-24 devices.
Adjacency protocols (such as XMAP and AMAP) enable OmniVista to discover the physical links
associated with specific devices. In previous releases of OmniVista, devices that did not support adjacency
protocols -- such as the OmniPCX, OmniCore 5xxx switches, and third party devices -- were discovered
and displayed on Topology maps, but links from these devices to other switches had to be added manually.
The Discover Links combo box's As OEM Device setting enables you to use the new "end station search"
functionality from the Locator application to automatically discover links for devices that do not support
adjacency protocols. When the Discover Links combo box is set to As OEM Device, and the device does
not support an adjacency protocol that enables OmniVista to discover physical links, the end station search
algorithms used by the Locator application are invoked at each polling cycle to discover the device's links.
All links discovered are displayed on Topology maps automatically.
Note. This approach works well for switches located at the edge of the network that do
not support adjacency protocols. However, when a series of such switches are
interconnected at the core of a network, this approach may "discover" more links than are
meaningful. As an example, consider a series of such switches connected in a chain. Use
of the Locator end station search algorithms, without benefit of any actual knowledge of
how the switches are connected, will result in showing links between all the switches as a
"cloud" instead of a chain. Such situations can be corrected by adding explicit manual
links. For example, in the situation described, adding manual links for the actual
connections will solve the problem by giving OmniVista the knowledge it needs to show
the connections accurately.
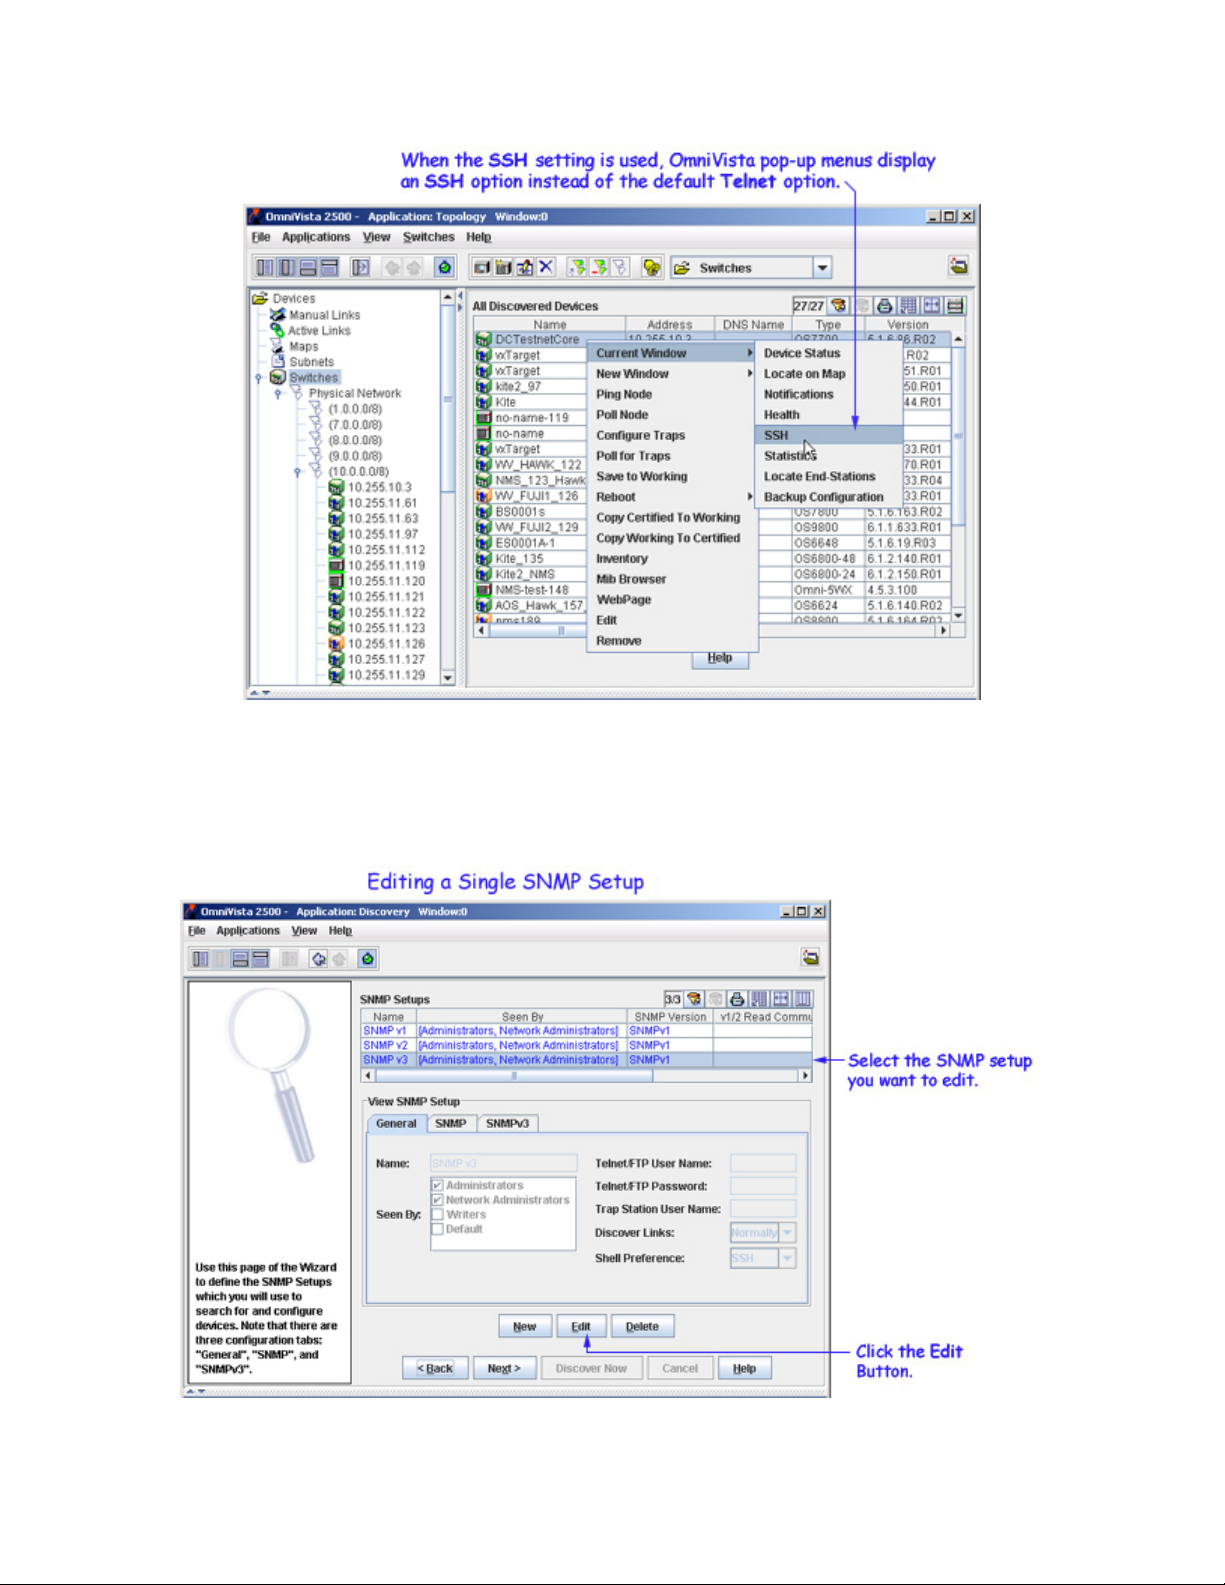
8. Set the Shell Preference combo box to Telnet or SSH to specify the default command line interface to
be used for the discovered devices. OmniVista's Telnet application supports both the Telnet and SSH
command line interfaces. SSH (Secure Shell) is a Telnet-like utility that provides encryption and is far
more secure than Telnet. When the SSH setting is used, SSH will be used as the default command line
interface for the device. If the Telnet setting is used, Telnet will be used as the default command line
interface for the device. OmniVista pop-up menus, such as the one shown below, will automatically display
the default command line interface for the device: Telnet or SSH. When selected, the Telnet application
will open and a connection of the configured type will be established automatically.
Note. Ensure that devices are capable of SSH before you use the SSH setting. OmniVista
does not verify devices' SSH capabilities. All AOS devices are SSH-capable. XOS
devices, OmniCore devices, and OmniStack 6124/6148 devices are not SSH-capable.
8
Creating SNMP Setups
Editing a Single SNMP Setup Row
To edit an existing SNMP setup, select the desired setup and click the Edit button. You can edit any field.
Click OK when your changes are complete.
9
Creating SNMP Setups
Editing Multiple SNMP Setup Rows
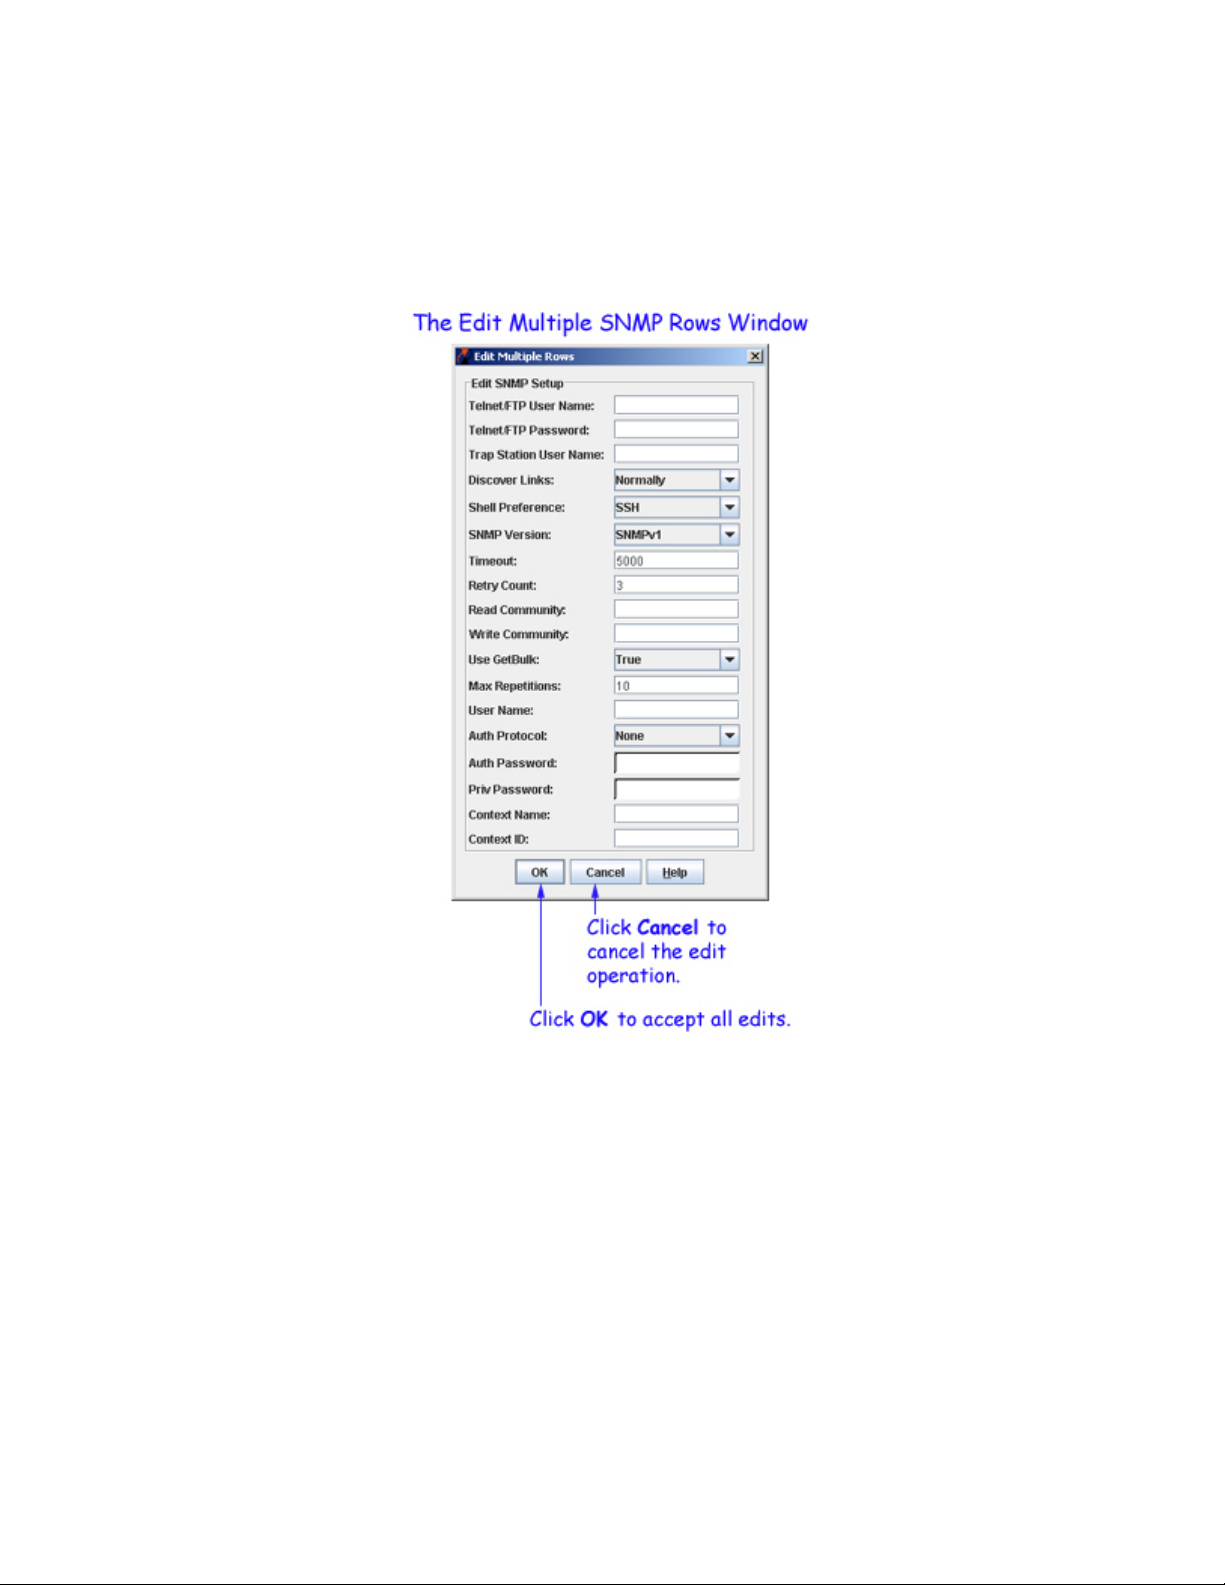
To edit multiple existing SNMP setups, select the desired setups and click the Edit button. The Edit
Multiple Rows panel displays, as shown below. You can edit any field (where appropriate). Click here for
more information on these fields. Click OK when your changes are complete.
When all fields on the SNMP Setups window's General tab are
complete, click the SNMP tab. The SNMP tab enables you to
configure the SNMP version that will be used for the discovery.
Click the Help button on the SNMP tab to continue.
10
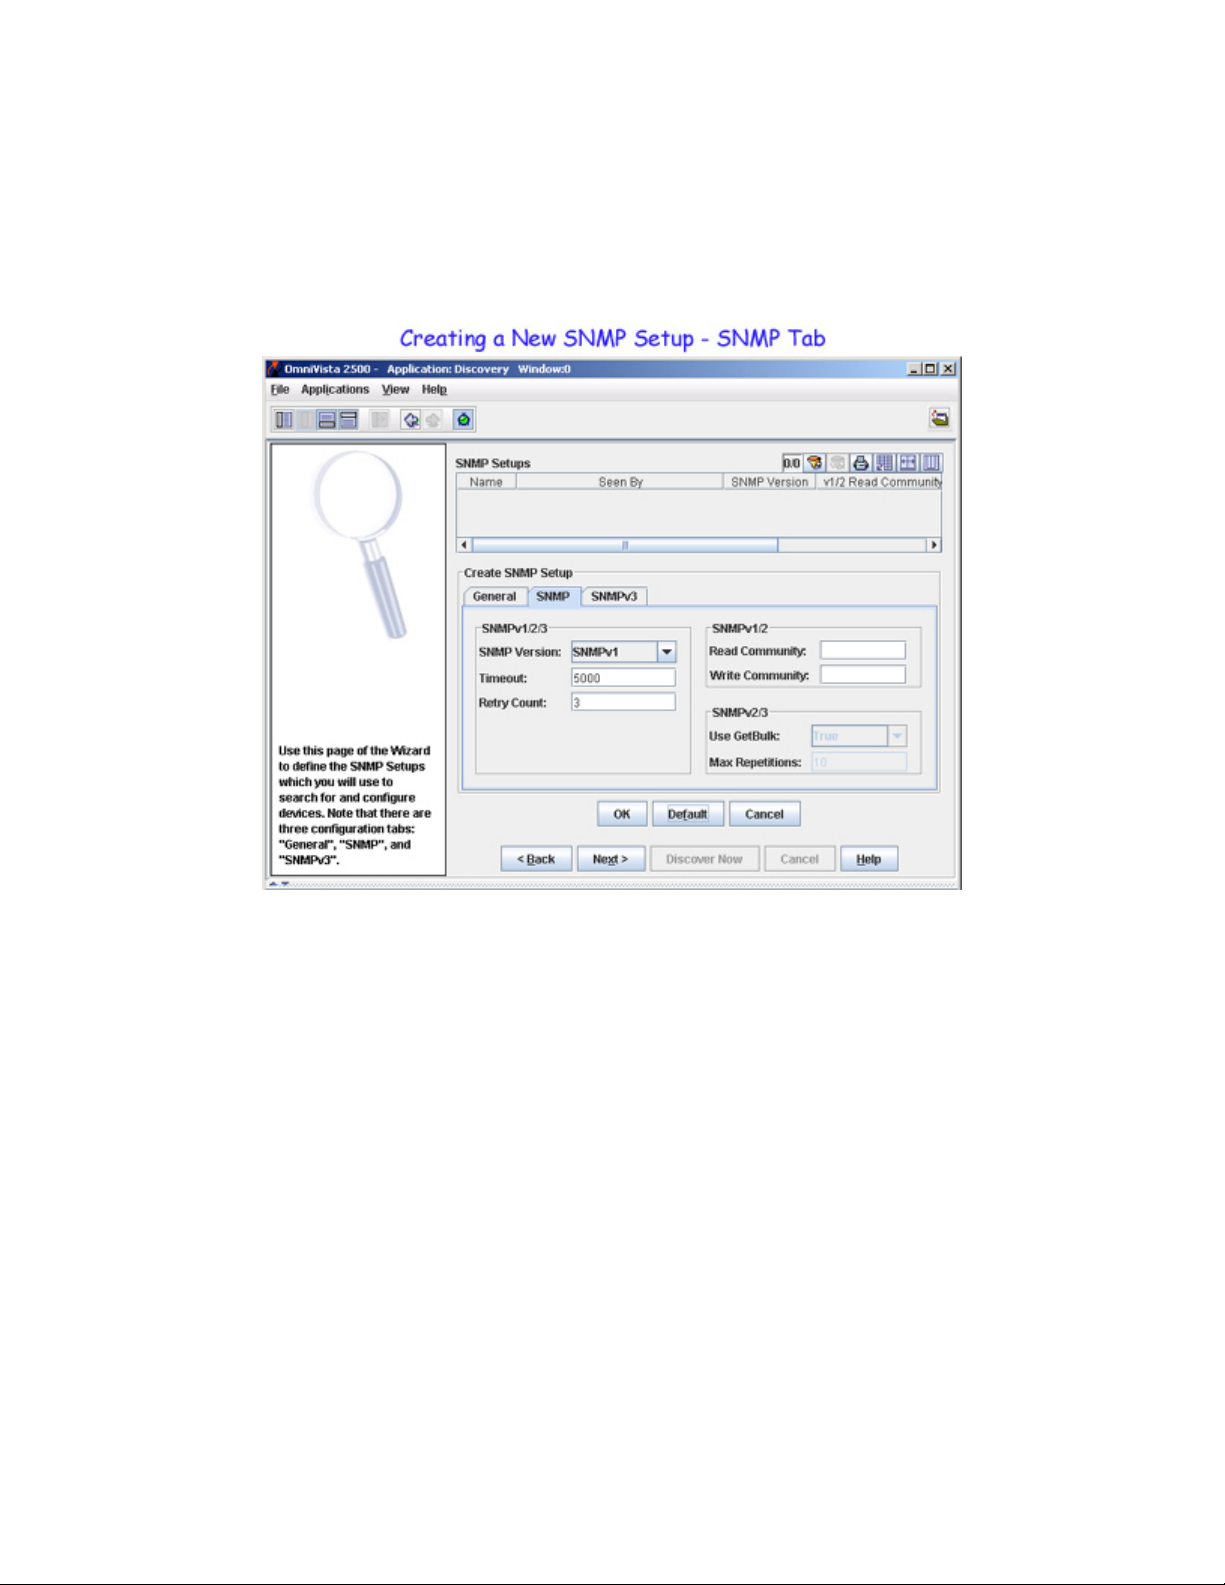
Creating a New SNMP Setup - SNMP Tab
Creating a New SNMP Setup - SNMP Tab
The SNMP Setup window's SNMP tab enables you to specify the version of SNMP you want used for this
SNMP Setup. It also enables you to configure parameters for the specified version of SNMP. Click on the
SNMP tab, click the New button, and follow the steps below to complete the fields in the SNMP tab.
1. Set the SNMP Version combo box to SNMPv1, SNMPv2, or SNMPv3 to specify the version of SNMP
you want used for this SNMP Setup. Note that XOS devices support SNMP version 1 only. AOS devices
support SNMP version 1, SNMP version 2, or SNMP version 3.
The SNMP version that you select determines the SNMP parameters that need to be configured. SNMP
parameters are cumulative in that SNMP version 1 supports only version 1 parameters, SNMP version 2
supports version 1 and version 2 parameters, and SNMP version 3 supports version 1, version 2, and
version 3 parameters. Only those parameters that are supported by the selected version of SNMP will
activate in the SNMP tab.
2. (SNMPv1, SNMPv2, SNMPv3) In the Timeout field, enter the desired time period, in milliseconds, that
OmniVista will wait for a switch to respond to a connection request before assuming that the request has
timed-out.
3. (SNMPv1, SNMPv2, SNMPv3) In the Retry Count field, enter the number of times that you want
OmniVista to attempt to connect to a switch.
11

Creating a New SNMP Setup - SNMP Tab
4. (SNMPv1, SNMPv2) In the Read Community field, enter the switch's get community name. The get
community name enables you to read information from the switch. In the Write Community field, enter
the switch's set community name. The set community name enables you to write information to the switch.
If the switch's get and set community names are public, the default, you can leave these fields blank
(OmniVista uses the default name, public, when the field is blank.)
Please Note:
• Get and set community names are not configurable from OmniVista.
Get and set community names can only be configured by logging onto
the switch.
• When you use SNMP Version 3, get and set community names are
ignored.
5. (SNMPv2, SNMPv3) Set the Use GetBulk combo box to True or False. When enabled, the Get Bulk
operation is used for retrieving large amounts of data, particularly from large tables. The Get Bulk
operation performs continuous Get Next operations, each time requesting the number of table rows
specified by the value in the Max Repetitions field (described below). For example, if the value in the
Max Repetitions field is ten, each Get Next operation will request 10 rows of table data. Note that the
number of rows of data actually returned by the switch will be determined by the amount of memory the
switch has available at that time.
6. (SNMPv2, SNMPv3) Enter the desired value in the Max Repetitions field. The value in the Max
Repetitions field determines the number of rows of table data that the Get Bulk operation will request in
each Get Next operation.
7. If you specified SNMPv1 or SNMPv2 for this SNMP Setup, the SNMP Setup is now complete. Click the
OK button to create the SNMP Setup as specified. All SNMP Setups that you create will display for your
selection in subsequent windows of the Discovery Wizard.
If you clicked OK to create an SNMP Setup that specifies SNMPv1 or SNMPv2, click
the Next button to display the next page of the Discovery Wizard.
If you specified SNMPv3 for this SNMP Setup, click the SNMPv3 tab to specify
parameters used for SNMPv3 only. Click the Help button on the SNMPv3 tab to
continue.
12
Creating a New SNMP Setup - SNMPv3 Tab
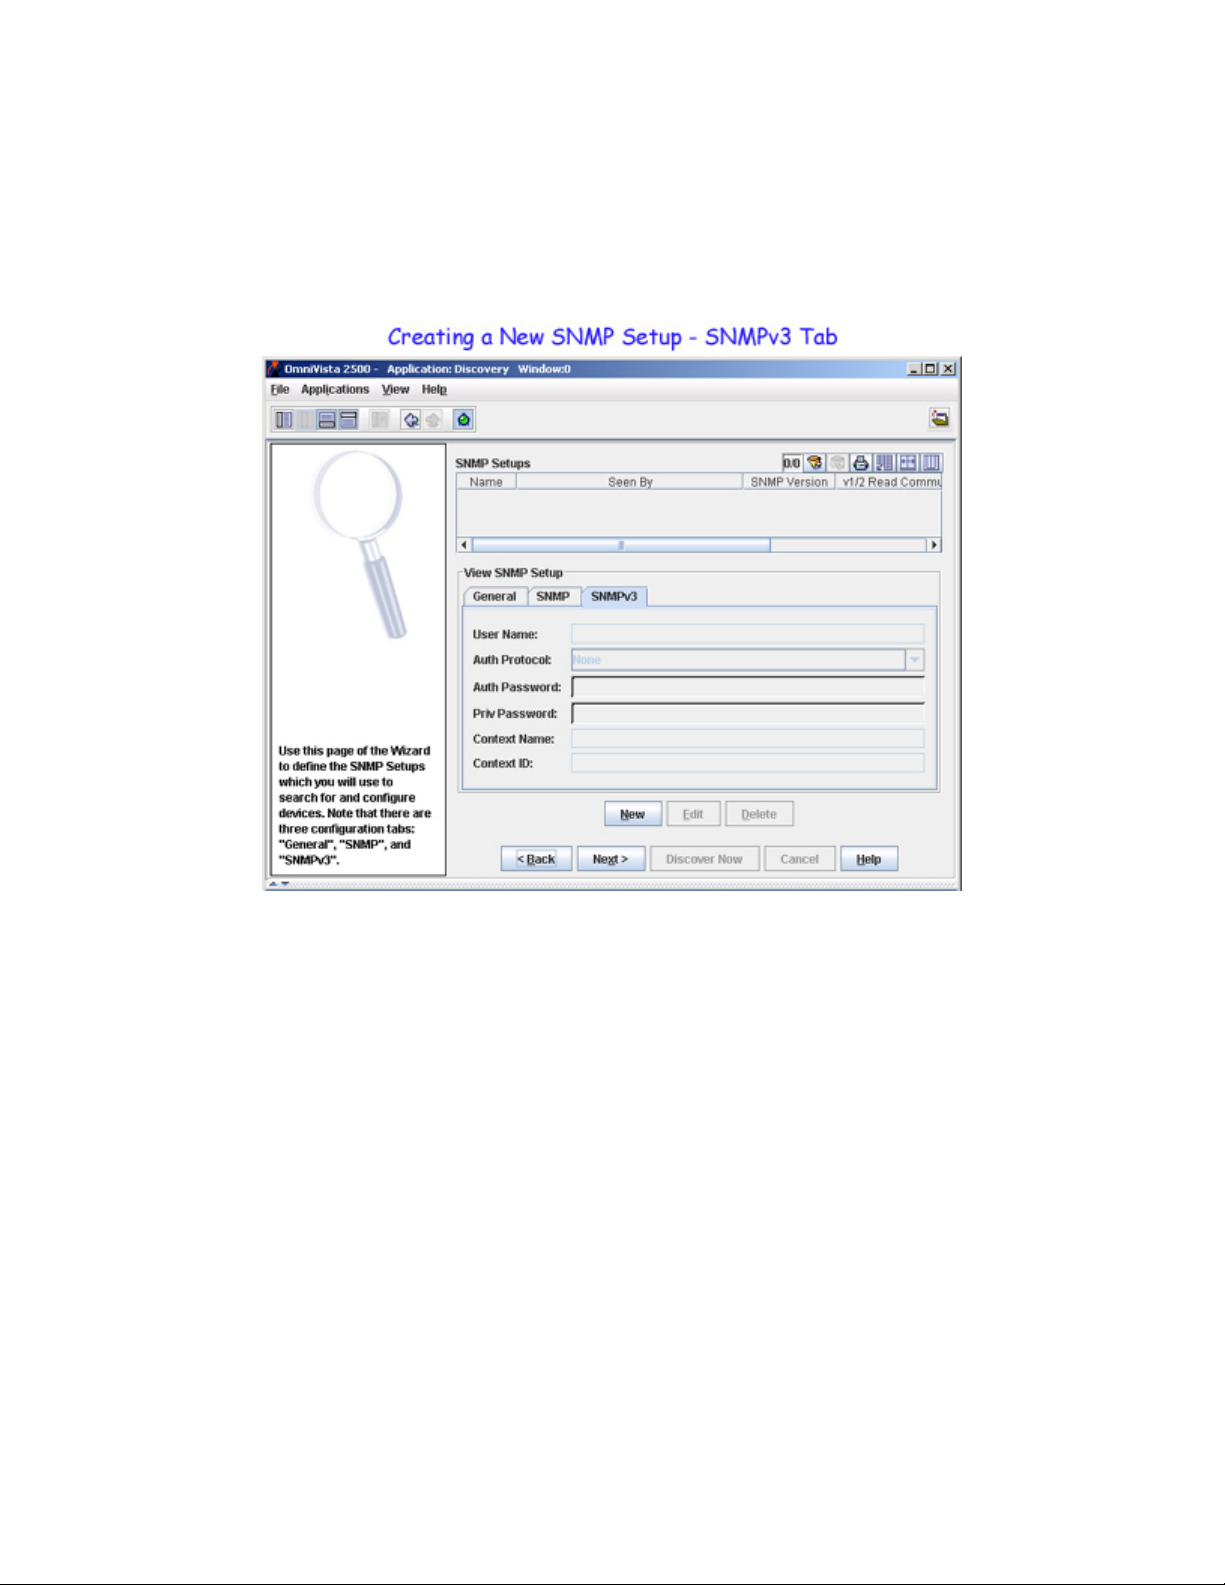
Creating a New SNMP Setup - SNMPv3 Tab
The SNMP Setup window's SNMPv3 tab enables you to configure parameters specific to SNMP Version 3. After completing the SNMP tab for SNMPv3, click on the SNMPv3 tab, click on the New button, and follow the steps below to complete the fields in the SNMPv3 tab.
1. Enter the SNMP version 3 user name in the User Name field.
2. Set the Auth Protocol combo box to None, MD5, or SHA to specify the authentication protocol
OmniVista will use for SNMP communications with the discovered switches. MD5 (or HMAC-MD5-96)
and SHA (or HMAC-SHA-96) are the two authentication protocols that have been defined for SNMP
version 3.
Authentication uses a secret key to produce a "fingerprint" of the message. The fingerprint is included
within the message. The device that receives the message uses the same secret key to validate that the
fingerprint is correct. If it is, and if the message was received in a timely manner, then the message is
considered authenticated. Otherwise, the message is discarded. The fingerprint is called a Message
Authentication Code, or MAC. The MD5 and SHA authentication protocols produce the MAC in a similar,
but not an identical, manner.
Note that the Auth Password and Priv Password fields activate when the authentication protocol is set to
something other than None. The Auth Password field activates because the authentication password is
used as the "secret key" mentioned above. For MD5 the secret key should be 16 octets; for SHA the secret
key should be 20 octets. Note that this implies that stronger authentication is provided by the SHA protocol,
and SHA should be used instead of MD5 when possible. The Priv Password field activates because
privacy encryption can only be used when authentication is also used. SNMP version 3 uses the CBC-DES
Symmetric Encryption Protocol for privacy.
13
 Loading...