


ONE TOUCH
500
501
700
701

USER’S
GUIDE

CONTENTS
Safety and precautions 4
1 Your telephone 8
1 - 1 Keys 9
1 - 2 Status icons 10
1 - 3 Conventions used in this User’s Guide 11
2 Getting started 12
2 - 1 Initial operation 12
2 - 2 Switching your phone on 14
2 - 3 Switching your phone off 15
2 - 4 Fitting the pocket clip 15
3 First steps 16
3 - 1 Making a call 16
3 - 2 Receiving a call 16
3 - 3 Accessing your voice mail 17
3 - 4 Displaying your number 17
3 - 5 Accessing the functions and scrolling 18
3 - 6 Functions structure 19
3 - 7 Creating a directory file 21
3 - 8 Changing the ring tone 22
3 - 9 Reading your new short messages 23
4 Directory 24
4 - 1 Accessing the directory 24
4 - 2 Creating a file 25
4 - 3 Options 27
4 - 4 Creating a new directory 28
4 - 5 Copying files 29
5 Consult information 30
6 Calls 32
6 - 1 Making a call 32
6 - 2 Receiving a call 34
6 - 3 During a call 35
7 Call memory 38
7 - 1 Accessing the call memory and calling back 38
7 - 2 Options 39
8 Short messages 40
8 - 1 Accessing short messages 40
8 - 2 Reading your short messages 41
2

8 - 3 Options 42
8 - 4 Writing a short message 43
8 - 5 Parameters 48
9 Scheduler 50
9 - 1 Accessing the scheduler 50
9 - 2 Consulting your scheduler 50
9 - 3 Creating an appointment 51
9 - 4 Scheduling an alarm 52
9 - 5 Creating a task 53
9 - 6 Options 54
9 - 7 Description of scheduler icons 54
9 - 8 Configuring the scheduler 55
9 - 9 Advanced scheduler functions 56
10 Voice functions 58
10 - 1 Handsfree 58
10 - 2 Voice recognition 58
10 - 3 Voice memo 60
11 Mobile Internet 62
11 - 1 Accessing Internet ser vices 62
11 - 2 Options 64
12 Calculator / Currency converter 66
12 - 1 Accessing the calculator and currency converter 66
12 - 2 Calculator 66
12 - 3 Currency converter 67
12 - 4 Currency selection 68
13 Menu 70
13 - 1 Ser vices 70
13 - 2 Settings 75
13 - 3 Billing 80
13 - 4 Available memory 82
13 - 5 Security 83
14 Audios 84
14 - 1 Accessing the “Audios” function 84
14 - 2 Options 84
15 Personal key 86
15 - 1 Features offered by personal key 86
15 - 2 Setting the personal key 86
16 Warranty 88
16 - 1 Warranty 88
16 - 2 Information 90
17 Accessories 92
CONTENTS
3

SAFETY AND
PRECAUTIONS
We recommend that you read this chapter carefully
before use.
CONDITIONS OF USE
Switch the phone off before boarding an aircraft. Use could lead to legal action
against the user.
Switch the phone off when in health care facilities except in areas specified. Like
many other types of equipment now in regular use, mobile telephones can
interfere with other electric or electronic devices.
Persons with a medical device (such as a pacemaker, hearing aid, insulin pump)
should not carry the phone in a place close to the device.
When placing or receiving a call, persons with a pacemaker or hearing aid
should use the ear on the opposite side to the device.
Switch your phone off when near gas or flammable liquids.
Strictly obey all signs and instructions when in a fuel depot, service station,
chemical plant or any potentially explosive atmosphere.
Do not let small children use the phone without supervision.
Do not attempt to open or repair it yourself.
Do not expose the phone to unfavourable environmental conditions (humidity,
rain, ingress of liquid, dust, sea air, etc.)
Outside the manufacturer’s recommended operating temperature range
(-20° C +55° C), the legibility of the phone’s display may be impaired and the
battery may not work, though this is temporary.
4

CONDITIONS OF USE FOR BATTERIES:
Only use batteries, battery chargers and accessories approved by the
manufacturer. The manufacturer disclaims any liability for damage caused by
use of other batteries, chargers or accessories.
Before removing the battery from your phone, please make sure that the
phone is switched off.
Do not attempt to open the battery because it contains chemical substances.
Do not dispose of used batteries in household waste.
Batteries must be disposed of in accordance with locally applicable
environmental legislation.
Do not place battery in fire or in water.
Do not store above 60 ºC.
Do not allow + and - terminals to contact each other. Keep them away from
metal objects as nickel or coins.
Charge the battery in an area where the temperature is from 0º C to 45º C.
The battery discharges below -20º C and above 60º C.
The battery may discharge if it is not used for a sufficiently long period of time.
Do not let small children handle batteries without supervision.
SAFETY AND PRECAUTIONS
5

TRAFFIC SAFETY:
Remember to always check whether local legislation allows operation of a
mobile phone while driving a vehicle.
It is vital to connect the phone to an external antenna when it is used in a
vehicle. Electromagnetic waves may otherwise interfere with the vehicle
electronics.
Check that the antenna is mounted and located away from the driver and
passengers or separated from them by a metal screen (e.g. car roof).
We recommend that you park your car before using the phone. However if you
intend to use your phone while driving, you must use it connected to the “Fullduplex handsfree vehicle kit” (cf. chapter entitled “Accessories”, page 92).
Electromagnetic waves from the telephone may interfere with the operation of
the car’s electronic systems such as anti-lock brakes (ABS), airbags, etc.
Check with your car dealer or car manufacturer that these systems are
adequately shielded from mobile phone RF energy before using it in the vehicle.
Always avoid placing the phone on the dashboard.
GENERAL INFORMATION:
As with all radio transceivers, your mobile phone emits electromagnetic waves.
This phone conforms to international regulations when used under normal
conditions and in accordance with the instructions contained herein.
There has been speculation about the safety of mobile phones.
6

Several expert groups belonging to or having been appointed by official national
or international bodies have analysed all the existing publications and, to date,
have concluded that there is a lack of evidence as to any credible or convincing
hazardous effects of mobile phones on health.
These studies have, in particular, focused on the fact that mobile handsets
receive and emit electromagnetic waves via their antenna.
Experts from such organizations as the European Commission and the
International Commission on Non-Ionising Radiation Protection (ICNIRP) have
established thresholds on a handset’s emissions to the human body. The main
measurement standard is known as SAR (Specific Absorption Rate). ALCATEL
can formally state that all its GSM mobile phones generate a SAR that is
significantly below these thresholds.
Furthermore, ALCATEL actively supports national and international research
into this issue carried out by authoritative and independent organizations.
If you still have concerns on this issue, you may use your mobile phone with a
headset, or use the handsfree feature integrated in the phone and, while
driving, use the full-duplex handsfree vehicle kit (cf. chapter entitled
“Accessories”, page 92).
The part numbers of these accessories can be found in the “Accessories”
chapter on page 92.)
The manufacturer disclaims any liability for damage which may
result as a consequence of improper use or use contrary to the
instructions contained herein.
Icons and other illustrations shown in this User’s Guide are for information
only.
07/02/2000
SAFETY AND PRECAUTIONS
7
06-09
2000
Network name
1
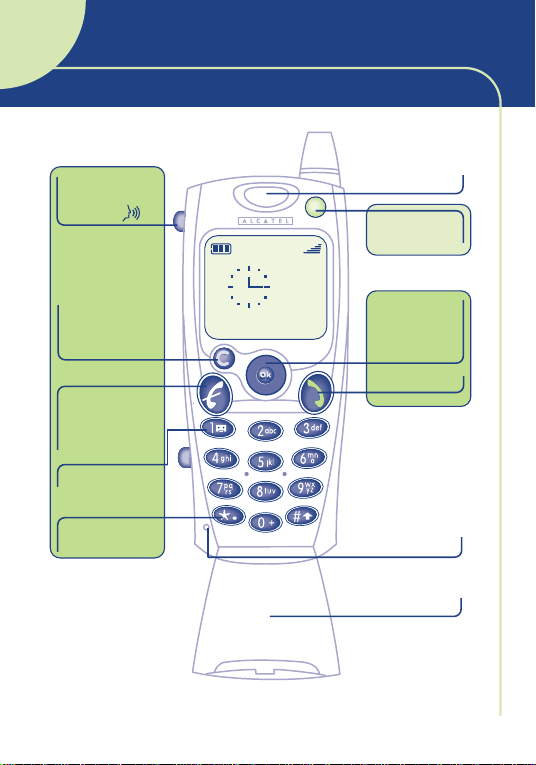
YOUR TELEPHONE
Activate
voice
functions
Delete
Lock keypad
(long keypress)
Switch on
Switch off
Hang up
Voice mail
Your
number
Loudspeaker
Personal
key
MENU
Scroll
Confirm
Off-hook
(2)
Microphone
(1)
Flap
8
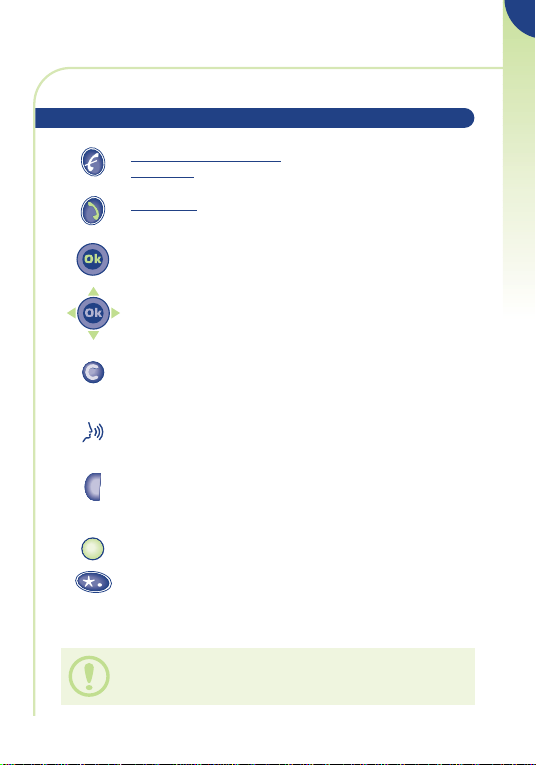
1 • 1 Keys
Switch on/switch off (long keypress)
Hang up (short keypress)
Off hook
Access call memory (Redial)
Access the MENU (directory, short messages, etc.)
Confirm an option
Volume control
Scroll to select an option
Delete (short keypress)
Return to standby screen (long keypress)
Lock the keypad (long keypress)
Use voice functions:
Activate built-in “handsfree”
•
(short keypress during a call)
Activate “voice recognition”
•
(short keypress in standby mode)
Record “voice memos”
•
(long keypress in standby mode)
Your personal key
Display your number (long keypress)
1
YOUR TELEPHONE
(1) Flap (depending on your model): to open flap, press
button (2) on the left-hand side of the phone. You can also
go off hook by opening the flap and hang up by closing it.
9
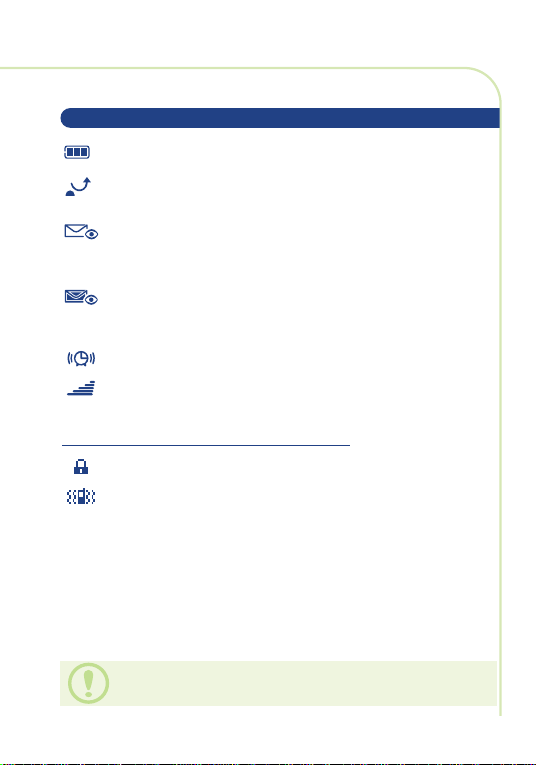
1 • 2 Status icons
Battery charge level.
Call forwarding activated: your calls are forwarded
(see Chapter 13, page 70).
Consult information: Consult your voice mail,
unanswered incoming calls, unread short messages and
voice memos.
Short message list (SIM card) is full: your terminal
cannot store any more messages. You must access the
short message list and delete at least one message.
Appointment scheduled. (See Chapter 9, page 55).
Signal strength indicator.
Icons displa
yed at the bottom of the screen:
Keypad locked.
Vibrating system activated. (See Chapter 14, page
85).
Icons and other illustrations shown in this User’s Guide are for
information only.
10
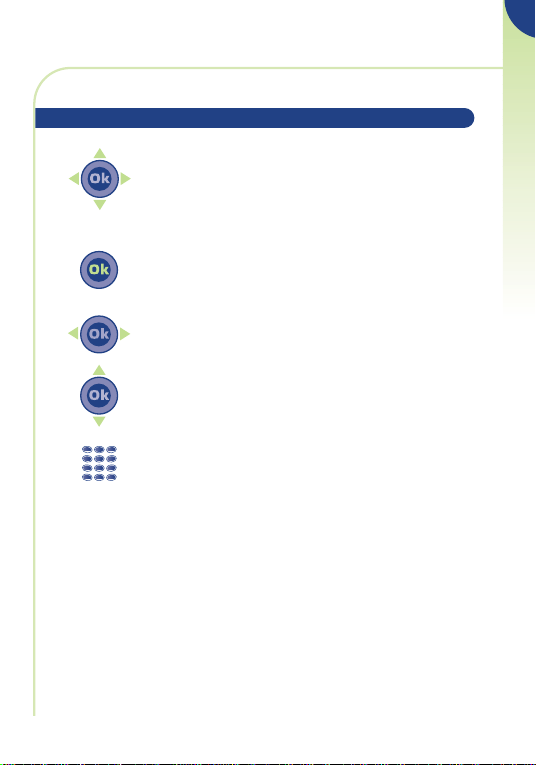
1 • 3 Conventions used in this User’s Guide
You can use the scroll key to move between your
phone’s options in four directions: up, down, left,
right.
1
The following symbols are used in the text which follows:
Briefly press the centre of the scroll key to
confirm an option.
Move the scroll key left or right.
Move the scroll key up or down.
Use the keypad keys to enter digits and/or letters.
11
YOUR TELEPHONE
2
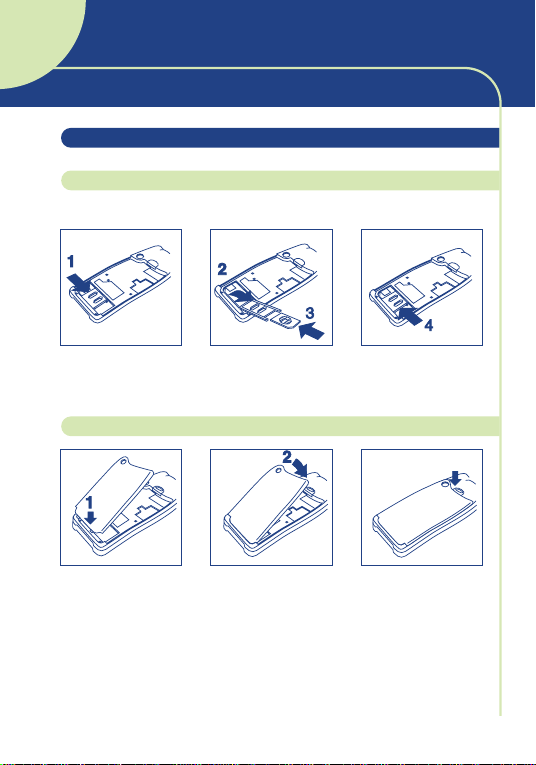
2 • 1 Initial operation
Insert the SIM card
You must insert your SIM card in order to use your phone.
GETTING STARTED
Open the cover Slide the SIM card
Fit the battery
Insert the battery Close the battery Click into place
into its compartment
12
Close the cover
CLICK
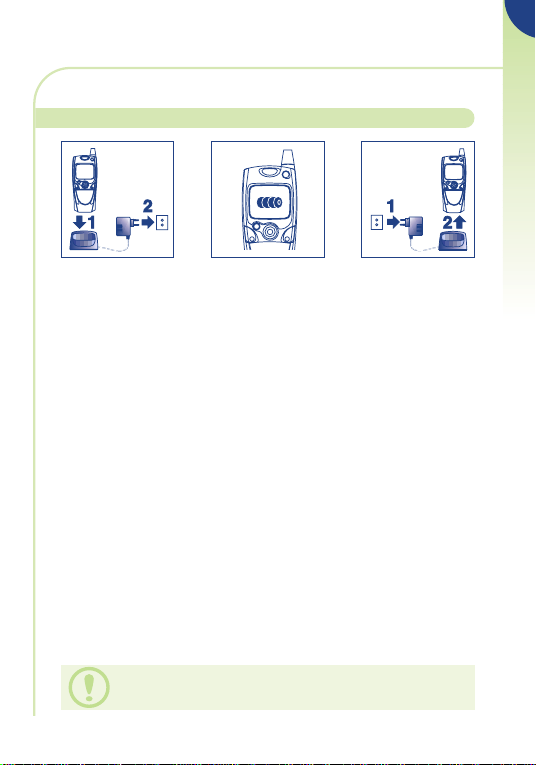
Charge the battery
Connect the battery
charger
Wait for the onscreen indicator to
stop flashing
Disconnect the
battery charger
once charging is
complete
A beep will sound when charging begins.
It takes a few seconds before the charging indicator icon starts
to flash (charging time may be longer with a new battery, or
when the battery level is very low).
The mains socket-outlet must be close to the phone and easily
accessible.
2
GETTING STARTED
When you first use your phone you must charge the
battery for approximately 3 hours.
13

PIN code?
____
06-09
2000
Network name
2 • 2 Switching your phone on
Switch your
phone on
(long keypress)
Enter your
PIN code
Confirm Standby screen
If you do not know your PIN code, please contact your
network operator.
Do not leave your PIN code near your phone and keep your
SIM card in a safe place when you are not using it.
You are prompted to enter the time and the date, enter new data
if necessary, then confirm by .
If cell broadcast messages are displayed, use the key to
browse through them in full or press the key to return to
the standby screen.
While the phone is searching for a network, <<<–>>> is
displayed (???-??? is displayed if your SIM card is rejected by the
network, in this case please contact your operator).
14
2 • 3 Switching your phone off
Press the key (long keypress).
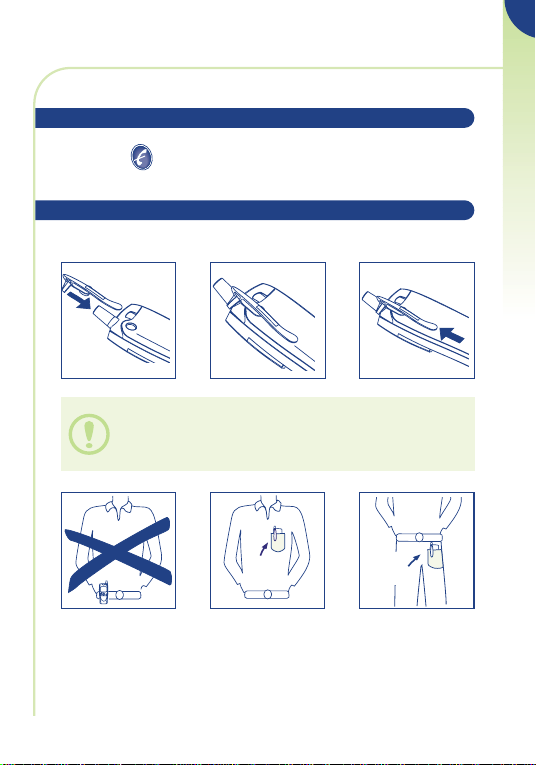
2 • 4 Fitting the pocket clip
This accessory is only available on certain models.
The pocket clip helps you keep your telephone in your shirt
or jacket pocket.
The pocket clip is not designed to be worn on a belt.
2
GETTING STARTED
OK
15
OK
Karine
3
In order to make or receive a call, you must switch your phone
on.
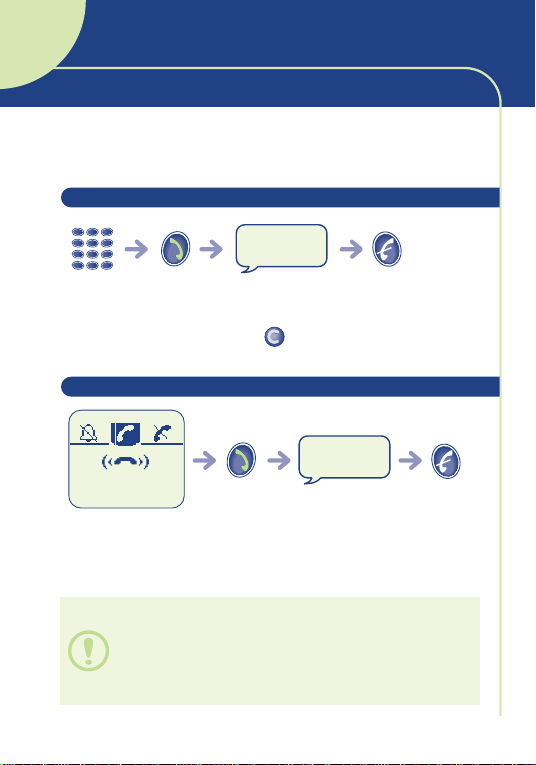
3 • 1 Making a call
FIRST STEPS
Hello
Dial the
number
If you make a mistake, use the key to delete digits.
3 • 2 Receiving a call
Make the
call
Talk Hang up
Hello
Incoming call
(1)
Flap (depending on your model): to open the flap, press the
button on the left-hand side of the phone. You can also
answer a call by opening the flap.
(1) The caller’s number or name is displayed if it is provided
by the network (check the availability of this service with
your operator).
Ta ke
the call
Talk Hang up
16
Voice mail
Call ?
(c) to cancel
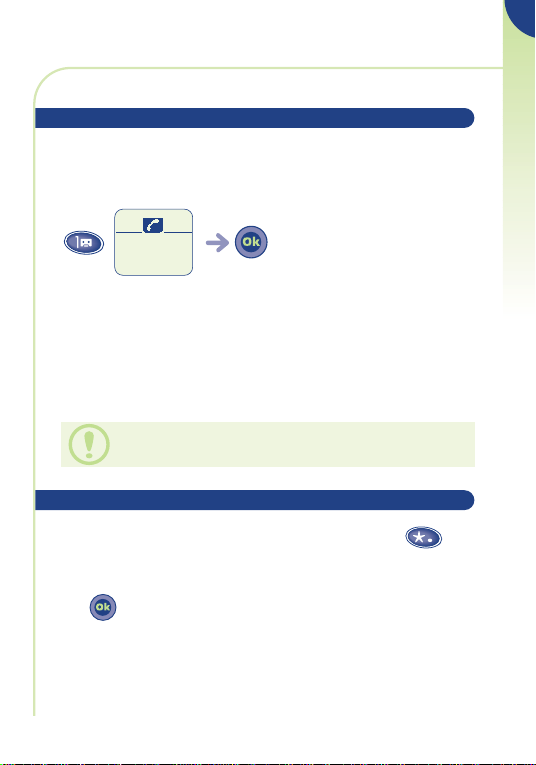
3 • 3 Accessing your voice mail
The network provides a voice mail service to ensure that you
do not miss any calls: it works like an answering machine which
you can interrogate at any time.
3
FIRST STEPS
Access voice mail
(long keypress)
Make the call
If your operator’s voice mail access number is not shown, dial
the number that your operator supplied to you. To later modify
this number see the “Voice Mail” option in the “Menu”, page
75.
To use your voice mail abroad, contact your operator
before setting out on your trip.
3 • 4 Displaying your number
You can display your own number by pressing the key
(long keypress).
If your number is not displayed, enter it and confirm by pressing
the key.
To later modify it, see the “Your number” option in the
“Menu”, page 75.
17
Directory
Events
Fr d rique
Hlne
Sophie
St phanie
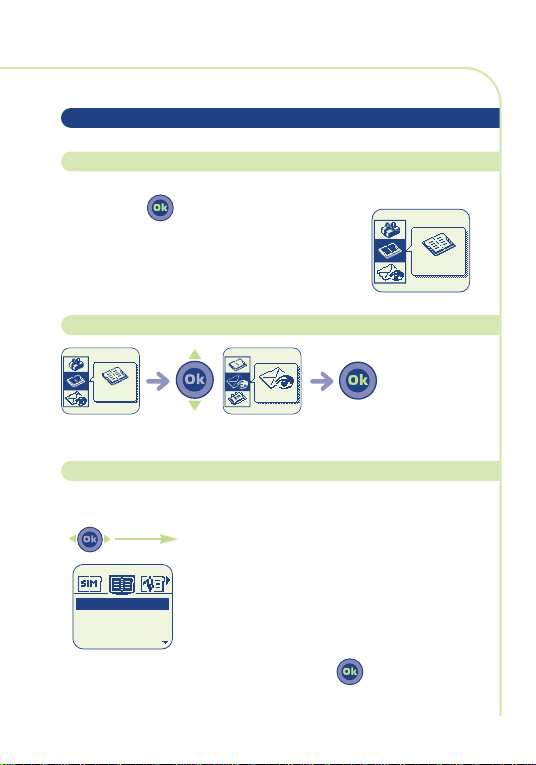
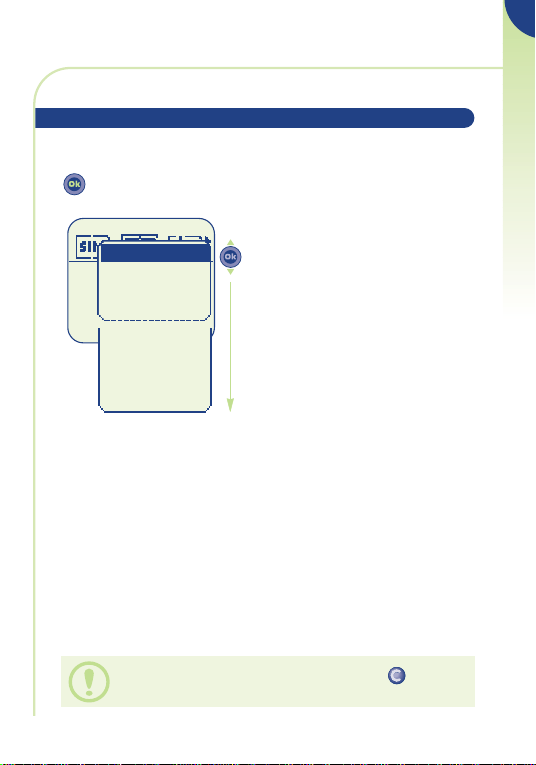
3 • 5 Accessing the functions and scrolling
Directory
Accessing the functions
The functions can be accessed from the standby screen by
pressing the key.
This takes you to the following screen:
Choosing a function
Select a function
Scrolling within a function
You can scroll horizontally to the various icons:
To access all the proposed options, press .
18
Confirm
Return to previous screen
Press (short keypress).
Return to standby screen
Press (long keypress).
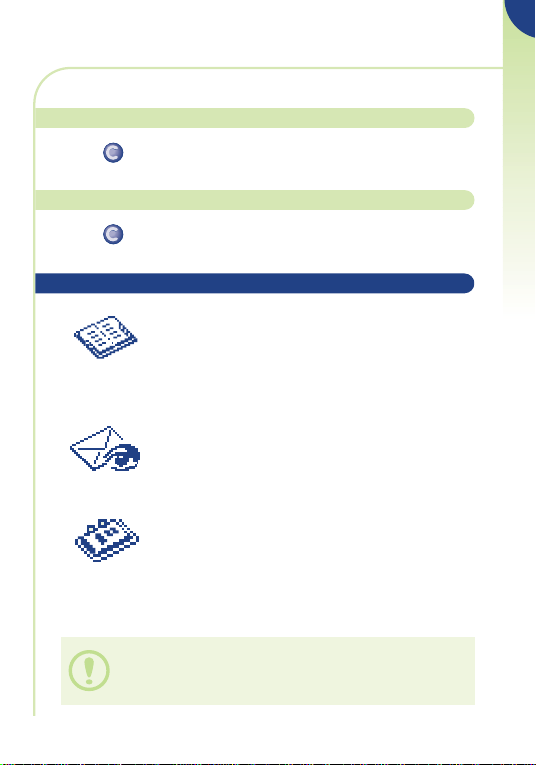
3 • 6 Functions structure
Directory:
Manage your phone numbers. For each name,
you can enter several phone numbers (home,
mobile, office, etc.).
You can create your own directories.
Consult information (Events):
Access your voice messages, unanswered
incoming calls, unread short messages and voice
memos.
Scheduler:
Manage your timetable by organizing all your
appointments and important events.
3
FIRST STEPS
The information in the directory and scheduler can be
transferred to a computer by using the DATA/PC Sync kit
(cf. “Accessories”, page 93). For more information, visit our
website www.alcatel.com.
19

Messages:
Access or write your short messages.
Menu:
Adjust and personalise your phone.
Voice memos:
Play back previously recorded conversations or
voice messages.
Audios:
Personalise the sounds made by your phone
(melody, key beep, etc.).
Calculator/Currency converter:
Perform basic operations (addition, etc.) and
currency conversions (euros, etc.).
Internet
Services
(1)
: Access Internet services.
(1)
:
Use the functions provided by your operator.
(1) Access to this function depends on your operator and
the SIM card that you use.
20
Number
0614
Continue
Prefixes
Country list
Save
Mobile:
061425
First name:
Alic
Last name:
Ceci
Fr d rique
Hlne
Sophie
St phanie
Create dir.
Classify
View
Create file
Fr d rique
Hlne
Sophie
St phanie
Directory
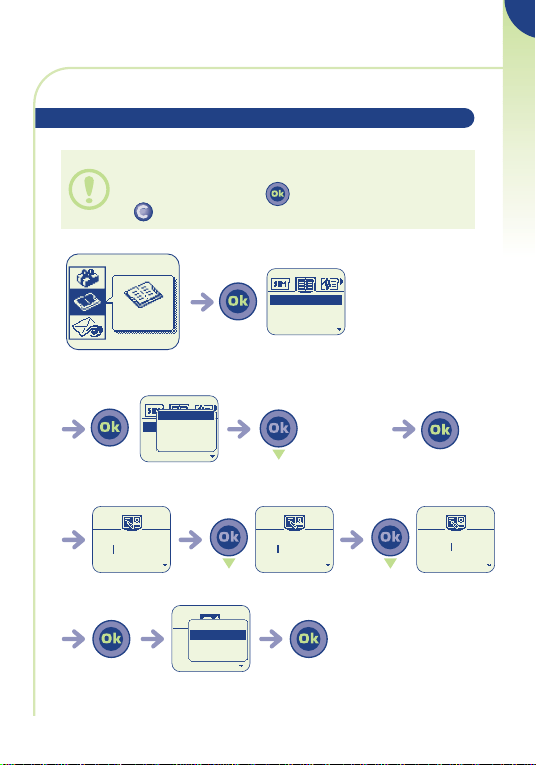
3 • 7 Creating a directory file
If your directory is empty, you will see the prompt:
“Directory empty, OK to create”.
Create by pressing the key or decline by pressing the
key.
3
FIRST STEPS
Enter the surname
“Directory” icon
(1)
ConfirmSelect the
Enter the first name
ConfirmSelect “Save”Confirm
21
ConfirmSelect “Create file”Confirm
(1)
Enter the number
(1)
Melody 1
Melody 4
Melody 3
Melody 2
Discreet
Vibrator&Melody
Vibrator
Normal
Audios
You can store entered information at any time by pressing
Melody 1
Melody 4
Melody 3
Melody 2
and selecting “Save”.
If you wish to use your telephone abroad, store numbers in
the directory in international format with “+”.
(1) You do not have to fill in all the information but you
must enter information in at least one field.
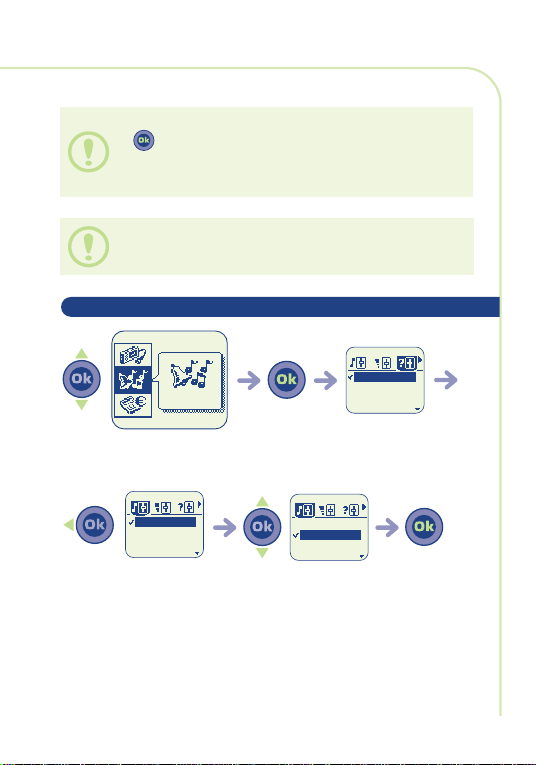
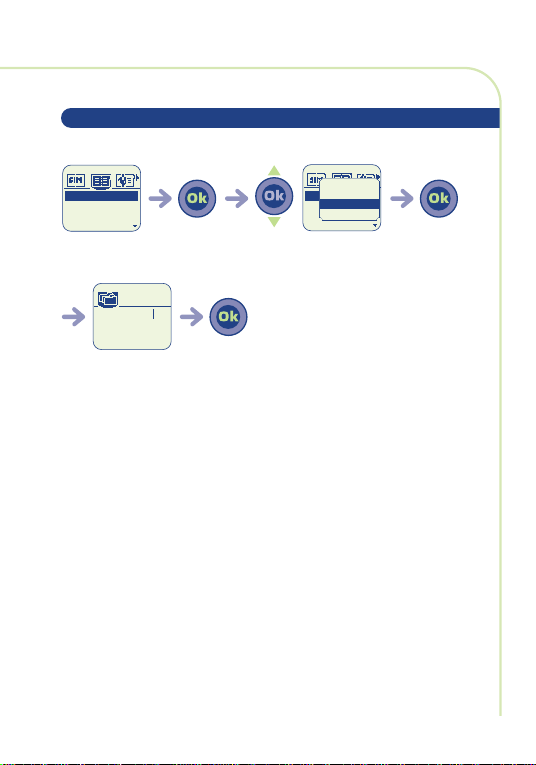
3 • 8 Changing the ring tone
“Audios” icon
Scroll to the
left-hand icon
22
ConfirmSelect the
melody
ConfirmSelect the desired
3
03/06/99
FLORENCE
Appointment with
Paul about meet
Read Msg. 0
Unread Msg. 2
2 Voice
1 Calls
3 Msg.
Events
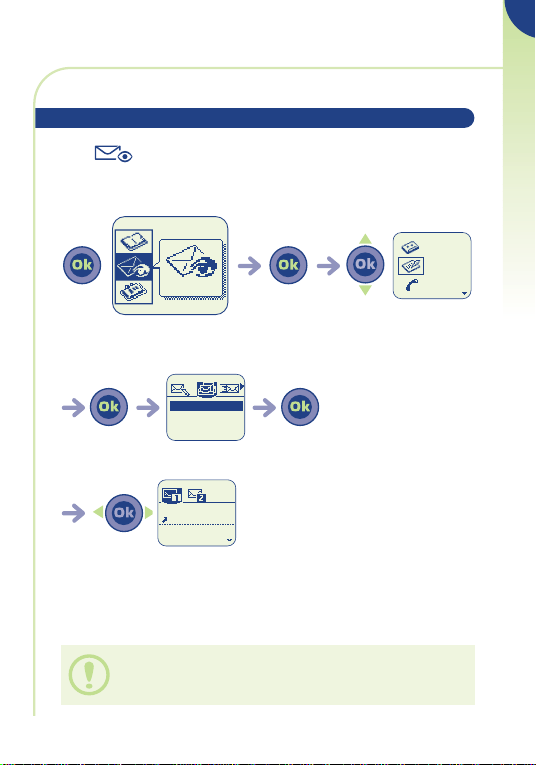
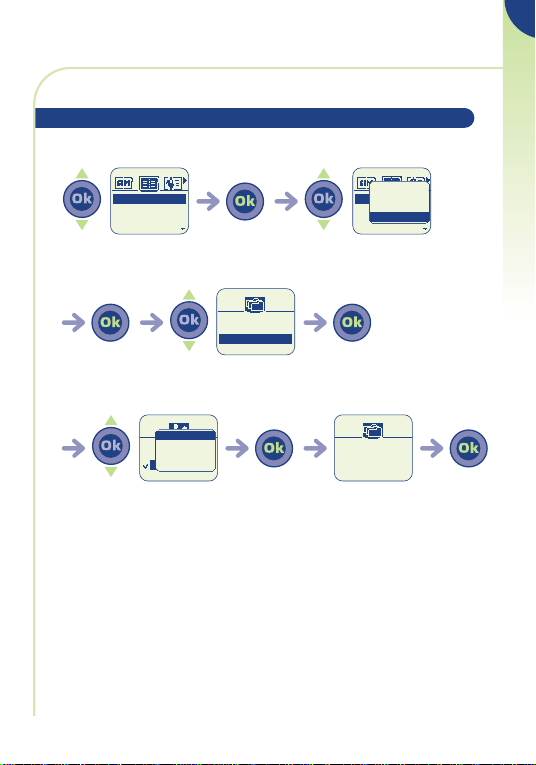
3 • 9 Reading your new short messages
The icon and a beep
received.
From the standby screen:
“Events” option
Scroll to the desired
message
(1) Check the availability of this service with your operator.
(2) To deactivate the beep, see the “Audios” icon,
page 85.
(1)
(2)
indicate that a message has been
ConfirmAccess the
Select the desired
message type
ConfirmConfirm
23
FIRST STEPS
Alex
Alfred
Robert
Smith
Create file
Create dir.
Classify
View
Alex
Alfred
Robert
Smith
4
DIRECTORY
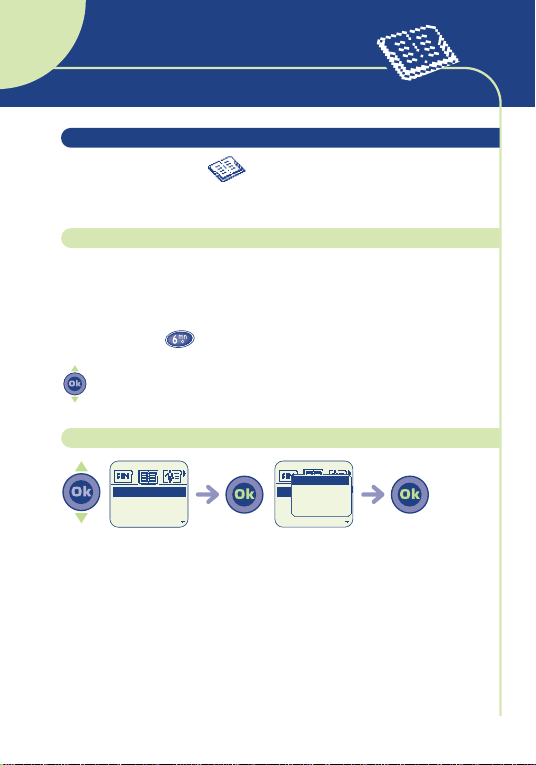
4 • 1 Accessing the directory
Select the Directory icon to access the directory from
the standby screen.
Searching for a name by its first letter
You can search for the name of the person you wish to contact
by pressing the key associated with the first letter of his/her
name.
Example: press twice to find the first name beginning with
“N”. Then scroll the list to the name you want by using the
key.
Displaying a phone number
ConfirmSelect a name
“View”
ConfirmSelect
24

Calling the person
Press the key while the name is selected.
If several numbers are assigned to the name of the person to be
called, you must first use the key to make a selection from
the number list (GSM, office, home, etc.).
Press to make the call.
The information in the directory and scheduler can be
transferred to a computer by using the DATA/PC Sync kit
(cf. “Accessories”, page 93). For more information, visit our
website www.alcatel.com.
4 • 2 Creating a file
See the chapter entitled “Creating a file” in the “First steps”
chapter, page 21.
4
DIRECTORY
25
4
3
2
1
1
2
3
4
4
3
2
1
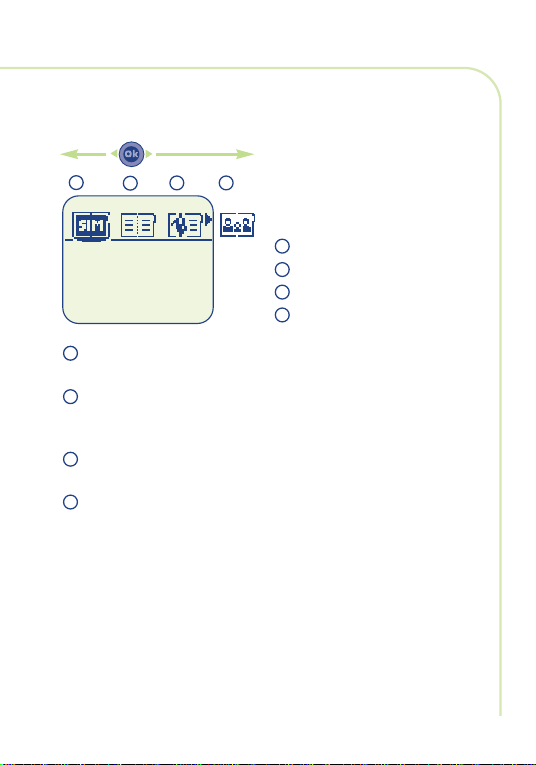
There are 4 directories:
SIM
General directory
Work directory
Personal directory
SIM directory: The capacity of your SIM card depends on
your operator. Only one number can be assigned to a name.
GENERAL directory: This contains all the files created. SIM
card files are not automatically created in the general
directory but you can copy them.
WORK directory: You can place your work numbers
(companies, etc.) in this directory.
PERSONAL directory: You can place your personal numbers
in this directory (family, friends, etc.).
First select the icon you want.
In addition to the directories that come with your phone, you
can also create directories yourself (see the section entitled
“Creating a new directory”, page 28).
26
4 • 3 Options
From the list of names in your general, work and personal
directories, you can access the following options by using the
key:
View: display a complete file: name,
View
Create file
Create dir.
Classify
Voice recog.
Delete
Back
Exit
numbers, address, voice mail, etc.
Create file: create a file (name, numbers,
address, voice mails, etc.). You can save this
file in one of your directories.
Create dir.: create your own directories
for files apart from the SIM directory.
Classify: move a file from one directory to
another.
Voice recog.: record a voice recognition
command.
Delete: delete the selected file.
Back: return to the list of names in your
directory
Exit: return to the standby screen.
4
DIRECTORY
To return to the standby screen, press the key (long
keypress).
27
Restaurants
Dir. name?
Fr d rique
Hlne
Sophie
St phanie
Create file
Classify
Create dir.
View
Fr d rique
Hlne
Sophie
St phanie
4 • 4 Creating a new directory
This option lets you create your own directories.
ConfirmSelect “Create dir.”ConfirmSelect a name
of the directory
to be created
ConfirmEnter the name
28
Move Fr d riqu
to Restaurants
directory?
(c) to exit
Personne
Restaturants
Professionn
Create dir.
Exit
Back
Validate
Work
Personal
Restaurants
Fr d rique
Hlne
Sophie
St phanie
Create file
Create dir.
View
Classify
Fr d rique
Hlne
Sophie
St phanie
4 • 5 Copying files
You can copy files from one directory to another.
4
DIRECTORY
copied
Confirm
directory
Select “Classify”ConfirmSelect the file to be
ConfirmChoose the destination
ConfirmConfirmSelect “Validate”
29

CONSULT
1 Alert
1 Memos
2 Voice
1 Calls
3 Msg.
2 Voice
1 Calls
3 Msg.
Events
5
INFORMATION
You can access all the events that have occurred on your
telephone while you were away and which you are not yet aware
of.
Unlistened voice mails, unanswered incoming calls and unread
short messages are gathered under this icon.
“Events” icon
ConfirmSelect the
1
2
3
Select the type of event to be accessed
30
4
5

Voice mail (Voice):
543
2
1
Access your received voice mails.
(See Chapter 3, page 17).
Short message (Msg.):
Access your received short messages.
(See Chapter 8, page 41).
Unanswered incoming calls (Calls):
Display the phone numbers of people who have tried to
contact you while you were away.
(See Chapter 7, page 38).
(1)
Internet alert
(Alert):
View information sent via the Internet.
(See Chapter 11, page 62).
Voice memos (Memos):
Listen to voice memos that you have recorded.
(See Chapter 10, page 60).
5
CONSULT INFORMATION
(1) Check the availability of this service with your operator
depending on your phone model.
31

3
2
1
1
2
3
6
6 • 1 Making a call
CALLS
Hello
Dial the
number
If you make a mistake, you can delete digits by pressing the
key.
Making an emergency call
If your telephone is within the area covered by a network, to
make an emergency call, dial 112 or any other number
provided by your operator.
Making an international call or a call with a prefix
Long keypress
the call
To enter the characters “+” or “P” (pause), make a long
keypress on the key (the following characters scroll:
O, +, •, P).
List of international codes
Your call
List of prefixes
32
Hang upTalkMake

6
International call
Once you have selected and confirmed the country code, you
can complete the rest of the person’s number and make the call.
Call with prefix
In some firms, all numbers start with the same digits. Using this
function you can store the fixed part of the number and then
simply dial the variable part. You must create these prefixes
yourself.
Ring back
If this function is activated or if it is implemented by the network
(cf. “Menu”, page 75), the person you call will be called back
automatically if you do not manage to reach them.
Handsfree
During a call you can activate the handsfree mode:
by using the scroll key to select the icon on the call
•
screen.
or by pressing the key (short keypress).
•
CALLS
33

Karine
6 • 2 Receiving a call
Hello
(1)
Ta lkTake the callIncoming call
Hang up
When there is an incoming call, the volume of your phone’s ring
tone gradually increases. If the icon is displayed, the
vibrating system is activated and no ring tone is heard.
(1) The caller’s number or name is displayed if provided by
the network (check the availability of this service with
your operator).
Flap (depending on your model): to open the flap, press the
button on the left-hand side of the phone. You can answer a
call by opening the flap.
Switching the ring tone off
Press the key when the phone is ringing: you can still answer
the call by pressing the key.
You can also use the scroll key to go to the icon (when
you receive the call).
Rejecting a call
Pressing the key rejects the call.
34

6
6
5
4
3
2
1
1
2
3
4
5
6
6 • 3 During a call
Available functions
During a call, you can access your directory, scheduler or short
messages without losing the call by pressing the key.
First choose the icon you want:
Press the key to return to the call-in-progress screen.
(1) CAUTION: move the handset away from your ear
before activating this mode because the amplified
volume could cause hearing damage.
35
Call hold
Call in progress
(1)
Handsfree
Directory
Messages
Scheduler
CALLS

2nd call
Michel
Changing the volume
During a call, you can adjust the sound volume by using the scroll
key.
Handling a second incoming call
You already have a call:
OR
Second
incoming call
call
RefuseTake the
If you press the key, the incoming call is accepted and the
ongoing call is automatically put on hold: you can then swap
between calls by pressing the key.
36

6
Karine
03 12
Karine
Retrieve call?
02 57
Michel
00 18
CALLS
to Michel
Confirm
Go to the left-hand iconYou are talking
You are talking
to Karine
The caller’s number or name is displayed if provided by the
network (check the availability of this service with your
operator).
37

3
2
1
1
2
3
123456
Alexandra
Karine
Alexandra
Karine
123456
7
CALL MEMORY
7 • 1 Accessing the call memory and calling back
Access the call memory
First choose the icon you want:
Select the number
you want
Dialled numbers (Redial)
Unanswered incoming calls
Answered incoming calls
38
Make the
call

7 • 2 Options
From a stored number, you can access the following options by
using the key:
7
View: view the call details (number, date,
View
See duration
To directory
Delete Num.
Empty list
Back
Exit
To return to the standby screen you can also press the
key (long keypress).
time, etc.).
See duration: consult the call duration.
To directory: store the selected phone
number in one of your directories.
Delete Num.: delete the selected number.
Empty list: clear the entire list of
numbers.
Back: return to the list of numbers.
Exit: return to the standby screen.
39
CALL MEMORY

SHORT
4
3
2
1
CreatePredefined
Create message
Messages
8
MESSAGES
You can send text messages to other mobiles from your
(1)
phone
.
8 • 1 Accessing short messages
To access short messages (SMS) from the standby screen:
(1)
Select the
“Messages” icon
First choose the icon you want:
2
1
(1) Check the availability of this service with your operator.
Confirm
3
4
Write a message
Received messages
Sent messages
Parameters
40

Call me back
ASAP for jogging
tonight.
03/06/99
FLORENCE
Appointment with
Paul about meet
Read Msg. 0
Unread Msg. 2
8 • 2 Reading your short messages
The messages are stored and classified in 2 categories: Unread
and Read messages (see chapter entitled “First steps”, page
23).
8
SHORT MESSAGES
Confirm
Read the message
in full
Scroll within the
message
Select the
desired message
by scrolling to
the left or right
The capacity of your SIM card depends on your operator.
The icon is displayed when too many messages have
been stored: delete some of them.
41

Messages may be preceded by the following symbols:
Message sent and acknowledgement received.
Message sent but no acknowledgement received or
message not delivered (in this case you must try to send
the message again).
Message sent.
Message not sent.
Message received.
Message stored.
8 • 3 Options
While reading a message, you can access the following options by
using the key:
Reply to: reply to the person who sent the
selected message.
Reply to
Forward
Save
Delete
Save Number
Back
Exit
Forward: forward the selected message to
another recipient without changing it.
Save: store the selected message in the
phone’s memory.
Delete: delete the selected message.
Save Number: store the number of the
person who sent the selected message in
your directory.
Back: return to the list of written messages.
Exit: return to the standby screen.
42

8 • 4 Writing a short message
You can create a completely new message or supplement a
(canned) stored message.
Easy way to write a message
To make it easier to write short messages, your phone has a
predictive text input system. To create a word, all that is
needed is a single keypress on the key for every letter that the
word contains. The system then suggests the most common
word.
While composing the message and depending on the selected
mode (predictive or normal), you can use the key to
access the following options:
Send: send the message.
Directory: find a name in the directory.
Scheduler: copy the details of the appointment.
Save: select the current word or letter being entered.
Validate word: select the word suggested.
Other words: access the list of other suggested words.
Insert digits: insert figures in the text.
Predictive or normal: choose the data input mode - predictive or
normal.
Punctuation: insert a punctuation mark or a symbol in the text.
Add word: store a new word in your dictionary.
Back: return to the message.
Exit: return to the standby screen.
8
SHORT MESSAGES
43

To confirm the entered word, push the key downwards
bl
bleu
bl
bleu
bleu
twice.
Example: you want to write “bleu”:
(1)
Go to the next wordConfirm word
(1) At this stage you can make grammatical agreements if they
are not suggested (e.g. in this case add an “s” in normal mode:
4 successive keypresses on 7 to display “bleus” before moving to
the next word.
The cursor shape varies with the selected entry mode:
• predictive mode
• normal mode
44

You can also use the following shortcut keys:
Delete
Space
8
Access to options
SHORT MESSAGES
Confirm displayed
word or letter
Scroll in the text
Punctuation
Other words
Upper case/lower
case/number
There is a dictionary in which you can add, modify or delete
words. Add a word while writing a message by pressing the
key and selecting the “Add word” option.
45

Friends
Grp name?
Group list is
empty
Create?
(c) to cancel
Parameters
Groups
CreatePredefine
Create message
Canned messages
Your phone suggests a certain number of messages: you can
simply select one and supplement it.
Sending a message to several recipients
You can send the same short message to several recipients.
Creating a broadcast list (group)
hand icon
Confirm
Enter the name
of the group
46
ConfirmSelect “Groups”Go to the right-
Confirm

8
Colleagues
Friends
In directory
1 recipient
Several reci.
Predef. Group
Do you want to
have dinner at
our place
Send to
Directory
Scheduler
Save
Do you want to
have dinner at
our place
061256
Member
Continue
Validate
Directory
Prefixes
061256
Member
Friends
Grp name?
Complete
Back
Exit
Using a group
“Complete”
“Continue”
message
Group”
ConfirmSelect
of the group
members
ConfirmEnter the numbers
SHORT MESSAGES
ConfirmSelect
ConfirmSelect “Send to”ConfirmWrite your
ConfirmSelect “Predef.
broadcast list
47
ConfirmSelect the desired

SC:0123456
Val.:Unlimite
Typ:SMS
Ackn:Activate
Groups
Parameters
CreatePredefine
Create message
You can choose the recipients of your messages:
ValLID:Illimi
Typ:SMS
Ackn
SC:0123456
Modify
Back
Exit
Directory Select the recipient’s number from the
directory.
1 recipient Enter the recipient’s number manually.
Several recip. Send a message to several recipients from the
directory.
Predef. Group Send a message to a group of recipients (cf.
Creating a broadcast list).
8 • 5 Parameters
right-hand icon
to be filled in
ConfirmSelect the field
You can assign parameters for the following items:
The number of the service centre for sending SMS messages
provided by your operator.
Whether an acknowledgement of receipt is sent.
The time during which the short message (SMS) will be
presented to the recipient’s number.
The type of message to be sent.
48
ConfirmScroll to the

Number of keypresses to get characterKey
1 23456789101112
"
ØÖ
Character set
In normal data input mode, you can access the following
character set:
8
SHORT MESSAGES
: space.
To enter a word, press the key which corresponds to the
desired letter several times until the wanted letter appears
(normal mode).
A short keypress on this key toggles between lower
and upper case letters.
49

543
2
1
Empty
(OK) to create
Scheduler
9
SCHEDULER
Your phone includes a sophisticated personal organizer which
lets you manage your time efficiently. You can organize your
appointments by time (day, week, month) and by type (meeting,
birthday, call). You can also store a “Task list” (things to do).
9 • 1 Accessing the scheduler
“Scheduler” icon
9 • 2 Consulting your scheduler
First choose the icon you want.
2
1
ConfirmSelect the
3
5
4
Tasks to do
Daily timetable
Weekly timetable
Monthly timetable
Parameters
50

Marketing meet
Alarm
Punctuation
Predictive
Validate
Marketing meet
Date:15/07/2000
Start:09:00
End:12:0
0
Birthday
Call
Appointment
Empty
(OK) to create
Press the key to scroll the dates in the calendar.
Date:15/07/2000
Start:09:00
End:12:0
0
Alarm
Back
Exit
Validate
9
The information in the directory and scheduler can be
transferred to a computer by using the DATA/PC Sync kit
(cf. “Accessories”, page 93). For more information, visit our
website www.alcatel.com.
9 • 3 Creating an appointment
You can create one or several appointments.
Confirm
Confirm
appointment
Fill in the
data fields
51
of event
SCHEDULER
ConfirmSelect the type
Confirm
ConfirmSelect “Validate”ConfirmEnter the

Date 04.03.2000
Start 12 00
End mm00
Sat 04 Mar 2000
12:00-14:00
Lunch Pierre
Graphic view
Create
Go to
Alarm
Sat 04 Mar 2000
12:00-14:00
Lunch Pierre
9 • 4 Scheduling an alarm
You can schedule an alarm to remind you of your appointment
just before it is due.
event
an alarm
ConfirmSelect the
“Alarm”
ConfirmSelect
ConfirmSchedule
52

Book the hotel
List empty
(OK) to create?
Create Todo
Create call
Back
Exit
Empty
(OK) to create
Sat 04 Mar 2000
12:00-14:00
Lunch Pierre
9 • 5 Creating a task
9
SCHEDULER
right-hand icon
“Create Todo”
option
ConfirmSelect the
the task to be done
This list can be detailed, sorted according to due dates or
priorities and be defined by category (work, personal or
unclassified).
When a task falls due, it is shown in bold.
53
ConfirmScroll to the
ConfirmEnter the text for

9 • 6 Options
For a selected event, you can use the key to access the
following options:
View: consult the task to be done.
View
Check
By category
Create Todo
Create call
Delete
Back
Exit
Check: indicate the status of the task
(done or not done).
By category: select the category of the
tasks to be displayed.
Create Todo: create a new task.
Create call: reminder about a call that
must be made.
Delete: delete the selected task
Back: return to the selected task.
Exit: return to standby screen.
9 • 7 Description of scheduler icons
Alarm
Birthday
Call to be made
High priority
Low priority
Clashing appointments
Private
54

Scheduler
To Do
Confidentiality
Alarm
Sat 04 Mar 2000
12:00-14:00
Lunch Pierre
To Do
Confidentiality
Alarm
Scheduler
9 • 8 Configuring the scheduler
Scroll to the
right-hand icon
9
SCHEDULER
You can change the parameters for alarm, timetable, tasks and
confidentiality.
Activate and deactivate a parameter by pressing .
Exit this configuration function by pressing .
be configured
ConfirmSelect the function to
55

9 • 9 Advanced scheduler functions
Graphical view
Sat 13 May 200
MTWTFSS
MTWTFSS
Monthly calendarWeekly calendarDaily calendar
Single appointment scheduled.
At least 2 appointments are scheduled during this time
band.
Week number.
An appointment is scheduled before this time band.
An appointment is scheduled after this time band.
Appointments or events are stored.
Today’s date.
56
May 2000

9
SCHEDULER
57

Fr d rique
Hlne
Sophie
St phanie
Create file
Create dir.
Classify
Voice recog.
Fr d rique
Hlne
Sophie
St phanie
Florence
Deactivate
handsfree?
06 08
Florence
Activate
handsfree?
06 08
10
VOICE FUNCTIONS
Three functions (handsfree, voice recognition, memo) are
accessed by pressing the key located on the top left-hand
side of the phone.
10 • 1 Handsfree
(1)
During a call: pressing the key activates and deactivates
the handsfree mode.
ConfirmPress
CAUTION: move the handset away from your ear before
activating this mode because the amplified volume could
cause hearing damage.
10 • 2 Voice recognition
Storing a voice recognition command
Select a contact from the directory.
ConfirmSelect a file
“Voice recog.”
58
ConfirmSelect

10
Fr d rique
Repeat a second
time after
the Bip !
Fr d rique
Say the name
Say the name againSay the name
Contacts for which you have stored a voice recognition
command are identified by the icon.
Ten names (or more, depending on the model) can be
accessed by using the voice recognition function.
This function can be used from any directory apart from the
SIM card directory.
Using a voice recognition command
Say the name of the
person to be called.
Voice key
(short keypress)
VOICE FUNCTIONS
59

SHOPPING
23.04.2000 14:
COURSES
23.04.2000 14:
Validate
Name
Delete
Back
SHOPPING
23.04.2000 14:05
VoiceMemo
10 • 3 Voice memo
Recording a voice memo
You can record a memo from the standby screen or during a call.
Appointment
with Jack
When you have finished
talking, release the key.
Keep the key pressed throughout the time you are recording.
The total duration of all your voice memos must not exceed
15 seconds (or more depending on the model).
Listening to a voice memo
“VoiceMemo” icon
ConfirmSelect the
Select the voice memo to
60
be listened to
ConfirmConfirmConfirm

10
VOICE FUNCTIONS
61

Internet
INTERNET
11
MOBILE INTERNET
Depending on the model, your phone has a mobile Internet
browser (WAP) which allows you to connect to your operator’s
Internet services
11 • 1 Accessing Internet services
From the standby screen you can access Internet services by
pressing the key and then selecting the “Internet” option.
(1)
.
“Internet” icon
ConfirmSelect the
(1) Check the availability of this service with your operator.
When you first use this service, you may be asked to enter
your phone number in international format.
62

Scroll up
Scroll down
11
Delete
Back to previous
page
Return to standby
screen
Access previous
page
Access items
(short keypress)
Access your
bookmarks
(long keypress)
(1)
(2)
Access the
options
Forward to next
page
Make a call
Upper/lower case
Long press: the
information bar
appears
(1) Only if they are numbered.
(2) Check the availability of this service with your operator depending
on your phone model.
63
MOBILE INTERNET

11 • 2 Options
When you view an Internet page, you can access a number of
options by pressing the key.
Option: options relating to the page.
Option
Help
Bookmark
Home page
Alert list
Connect.status
Exit Internet
Quit
Help: display online Help message.
Bookmark: add the current page to your
favourites list
Home page: return to your home page.
Alert list: access your list of alerts
Connect. status: display the information
bar.
Exit Internet: close the context-sensitive
MENU and return to your current page.
Quit: finish viewing Internet services.
(1)
.
(1)
.
(1) Check the availability of these options with your
operator (operations are available depending on the
network).
64

Information bar
This information bar appears whenever you connect to the
Internet, call up an Internet page or whenever an alert occurs.
You can also display the information bar by confirming the
“Connect. status” item in the context-sensitive MENU.
An alert has
occurred
Connection
time
11
MOBILE INTERNET
There is a
message in
your out box
Current
connection is
not secure
65
Animated “on
line” display,
indicates
sending/receiving
data

12
Converter
Calculator
Calculator
15
3
5
*
=
+
-
*
3
=
+
-
*
CALCULATOR/CURRENCY
CONVERTER
12 • 1 Accessing the calculator and currency converter
“Calculator”
icon
ConfirmSelect the
12 • 2 Calculator
Key in a number
Enter a second number
To enter a decimal point (“.”), press the key (long
keypress). To return to the standby screen, press the
key (long keypress).
Use the key to make corrections.
“Calculator”
option
Confirm
Confirm
66
ConfirmSelect the
Select the type of
operation to be
performed
Select “=”
option and
confirm
Confirm
Result is
displayed

12 • 3 Currency converter
Calculator
Converter
Calculator
Euros converter
Other currencies
FF->Euros
Euros->FF
Set up
Amount?
100
100 FF
15.24
Using the currency converter, you can:
• Convert a currency directly into euros and vice versa.
• Convert an amount into another currency (e.g. convert dollars
to French francs).
Conversion example
12
Select the
“Calculator”
icon
Select the type
of conversion to
be performed
Enter the value
to be converted
Confirm
Confirm
Confirm
Select the
“Converter”
option
Select
conversion type
Display result
67
Confirm
CALCULATOR/CURRENCY CONVERTER
Confirm

12 • 4 Currency selection
FF Francs
FB Francs B
FLU Francs L
CHF Francs S
FF->Euros
Euros->FF
Currencies
1 = 1.56 CHF
Recorded!
Rate?
1.56
FF Francs
FB Francs B
FLU Francs L
CHF Francs S
Validate
Create cur.
Back
Quit
Currency 1
FF Francs
FB Francs B
FLU Francs L
CHF Francs S
Rate?
3.5
Currency 2
DM D.Marks
US$ Dollars
DR Drachma
ESC Escudo
If you convert into Euros, you must choose your currency from
a list of European currencies. The change rate is predetermined.
Select “Currencies”
option
Confirm
Select the currencyConfirm
Confirm
If you convert into other international currencies, you must
select two currencies and enter the change rate for these.
Select the first
currency
Select the
second currency
Confirm
Confirm
conversion rate
68
Confirm
Enter the

12
1 FF = 3.5 DR
Recorded!
Confirm
Validate
Add
Modify
Back
Exit
Result is displayed
Validate: Select currency
Add: Add currency (which can eventually be
modified or erased.
Modify: Modify a currency added.
Back: Go back to the previous screen.
Exit:Go back to the standby screen.
CALCULATOR/CURRENCY CONVERTER
69

13
MENU
13 • 1 Services
Call forward
Voice Activates/cancels call forwarding to a
Unconditional All your calls are forwarded. The icon
Conditional Calls are forwarded if your line is busy, the
If busy Calls are forwarded only if your line is busy.
If no reply Calls are forwarded only if the call isn’t
If unreachable Calls are forwarded only if the phone is out of
Data Data calls are forwarded to the specified
Fax Fax calls are forwarded to the specified
(1) Check the availability of this service with your operator.
(1)
specified number (enter the number confirm by ). This option applies in the
following cases:
is displayed.
call isn’t answered or the phone is out of
range of the network.
answered.
range of the network.
number.
number.
70

13
Activated List of call forwarding operations activated
from this phone.
Cancel all Cancels all activated call forwarding.
Call barring
Outgoing calls Activates/cancels call barring. This option
applies in the following cases:
Except directory Calls to a number not stored in one of the
phone’s directories are barred.
All outgoing calls
International
(1)
All outgoing calls are barred.
(1)
Outgoing international calls are barred.
Except to home Outgoing calls except those to the
subscription country are barred.
(1) Check the availability of this service with your operator.
MENU
71

Except FDN dir.
(1)
Filter outgoing calls compared to a specific
“FDN” directory stored in the SIM card.
Activate/ All calls which do not start with numbers
Deactivate stored in the “FDN” directory are barred.
Change If the “Exc. FDN” option is activated, you
can update the “FDN” directory after
entering the PIN2 code (update “FDN”
directory by ).
Incoming calls Activates/cancels incoming call barring. This
option applies in the following cases:
Except directory All calls from a number not stored in the
phone’s directory are barred.
(1)
All inc. calls
(1)
If abroad
All incoming calls are barred.
Incoming calls are barred if you are abroad.
Activated List of call barring operations activated from
this phone.
(1) Check the availability of this service with your operator.
72

13
Networks
SMS CB
CB list List of network codes used to monitor the
Reception Depending on the selected option, the
Search Search for a home network.
Available Networks available in the radio
Mode Depending on the selected option, search
(1)
Full reception The phone permanently scans the network
Partial The phone intermittently scans the network
reception and displays certain messages in accordance
No reception The phone receives no message.
Automatic First searched network is the last one used.
(1) Check the availability of this service with your operator.
Messages broadcast over the network
(weather, traffic, etc.) are automatically
displayed on the standby screen.
broadcast messages.
phone displays broadcast messages.
and displays received messages in
accordance with your list (see “CB list”
option).
with your list (see “CB list” option).
environment.
mode is:
MENU
73

Manual User chooses the home network.
Preferred list List of networks for priority connection
(update this list by ).
Calls
Call waiting
(1)
Activates/cancels signalling of a second
incoming call by a beep.
Conceal ID
(1)
Activates/cancels the option which makes
(CLIR) your calls anonymous (your number is no
longer provided to recipients).
(1)
Caller ID
Activates/cancels presentation of the caller’s
(CLIP) number (or name if it is stored in the
directory) with every call.
Pick up Used to choose the way in which a call is
answered.
Netw.auto. Allows automatic ring-back of last number if
(1)
redial
(1) Check the availability of this service with your operator.
it was busy.
74

13
Automatic redial
Activate/deactivateActivates/cancels automatic ring-back if the
first call was unsuccessful.
View list List of numbers where automatic ring-back
was unsuccessful (10 unsuccessful attempts).
Empty list Reset the blacklist.
13 • 2 Settings
Personal info.
Welcome msg Store the message that is displayed every
time the phone is switched on.
Your number Display your telephone number, which is
generally stored in your SIM card (enter the
number and confirm by ).
Voice Mail Modify the number used to access your
voice mail.
Keypad One-touch dial numbers: once they have
been programmed, these numbers can be
called from the standby screen simply by
making a long keypress on one of the keypad
keys “2” to “9”.
MENU
75

Your list
3 Vide !
4 Vide !
5 Empty!
2 vide !
Create
Back
Exit
3 Empty!
4 Empty!
5 Empty!
2 Empty!
0147
Number?
0147
Number?
Validate
Directory
Exit
Eric
Name?
3 Empty!
4 Empty!
5 Empty!
2 Eric
is empty
Confirm
Select the
“Create”
option
Confirm
Enter the
telefon
number
Enter the
name
Confirm
Select the
“Validate”
option
The name is
associated to
key 2
Dictionnary
There is a dictionary to which you can add your own words to
those in the data entry help system. When you consult your
dictionary you can add, modify or delete words using the options
available with the key.
76
Confirm

13
Time 04 0
0
Local clock
Remote clock
Place?
Paris
Date 13/08/2000
Time 21 0
0
Local clock
Remote clock
Place?
Tokyo
Display
Backlight Backlighting intensity (use to adjust it):
we recommend minimum intensity in order
to save battery power.
Contrast Contrast of the display (use to adjust
it).
Clock
You can display 2 clocks simultaneously (the local clock and the
remote clock)
Setting the clocks
Select “Local
clock”
Enter the city
Confirm
Confirm
Confirm
Enter the time
Enter the date
and time
Confirm
77
Select “Remote
Confirm
clock”
Enter the city and
confirm
MENU

Analogic
Digital
2 clocks
Setting the display of the two clocks
28-09
2000
21 00
04 00
Paris
Tokyo
Network name
28-09
2000
21 00
Network name
28-09
Network name
Local clock
Remote clock
Move to the central icon and
select the “2 clocks” clock
option
Confirm
Setting the time format
Your clock can display the time in analogue or digital formats.
Analogic clock
Digital clock
Setting the date format
Select the format for the date (day/month/year or
month/day/year).
78
The two
clocks are
displayed

(1)
Update
Automatic Without any action from you.
Manual After you have accepted an update.
None
No updating is possible apart from that
produced by the “Clock/Date/Time” option.
13
MENU
Languages
(1)
Message display language (use to select it).
“Automatic” option selects the language which corresponds
to the subscribed network (if available in the terminal).
Headset
(1)
Select the answering method and the ringing mode.
Answer
Automatic Automatically (without any keypress) after
pickup roughly 2 rings (this option is only taken into
account if your phone is connected to an
audio accessory or handsfree kit).
key pickup Only after pressing the key.
Any key After pressing any keypad key (1 to #).
(1) Check the availability of this service with your operator.
79

Messages
Personal key
Program your personal key (see Chapter 15, page 86).
Beginner mode and expert mode
If you are familiar with the use of your phone, you can choose a
different display mode.
Expert modeBeginner mode
The same icons are used regardless of the selected mode.
13 • 3 Billing
Expense
(1)
Management of call charges.
Total cost Cost of charged calls.
Available credit
(1)
Remaining credit compared to “Maximum
credit”.
(1)
Maximum credit
Maximum credit beyond which all charged
calls are barred (enter credit - confirm with
).
(1) Check the availability of this service with your operator.
80

13
Reset Reset the total cost of charged calls.
Unit Cost of one Telecom unit in the chosen
currency (select the “Change?” option for
another currency and press the key to
enter a decimal point).
Duration Management of call time.
Total duration Total duration of calls made.
Available duration Remaining time available compared to the
time under “Set max.duration” (for
user’s information only).
Set max.duration Duration of subscription (enter the time -
confirm by ).
Reset Reset (immediately or periodically) the total
duration of calls made.
Cost sum up
Last call Duration and cost of the last call.
Cumulative cost Duration and cost of all calls.
Bip duration Activates/cancels the beep which sounds
during a call at an interval set by the user
(enter the interval - confirm by ).
(1) Check the availability of this service with your operator.
MENU
81

Memory used
73%
Memory used
Directory
Scheduler
Messages
146
70
12
13 • 4 Available memory
Displays the available memory capacity.
This can be shown in two ways: text or graphics
Your phone’s memory capacity is shared by the directory,
scheduler, short messages, voice memos and voice recognition
commands.
For instance, if you use a lot of memory for voice memos, you
will have less memory available for your directory.
Remember to delete your voice memos in order to free up
memory space.
82

13
13 • 5 Security
(1)
PIN1
Code Protection code for the SIM card, requested
every time the phone is switched on if the
code is activated.
Activate/deactivate Activates (or cancels) the code.
Change Updates the code (4 to 8 digits).
(1)
PIN2
Code Protection code for certain functions of the
SIM card (Billing/Cost/FDN etc.), requested
when functions are used if the code is
activated.
Change Updates the code (4 to 8 digits).
Network code
(1)
Password requested for the “Call barring”
options associated with the network.
Menu code Protection code for certain MENU options
(Services, Set up/Languages), requested
when these options are used and the code is
activated.
Activate/deactivate Activates (or cancels) the code.
Change Updates the code (4 to 8 digits).
Telephone code Phone protection code, requested every
time the phone is switched on if the code is
activated.
Activate/deactivate Activates (or cancels) the code.
Change Updates the code (4 to 8 digits).
(1) Contact your operator if necessary.
MENU
83

Discreet
Vibrator&Melody
Vibrator
Normal
Audios
4
3
2
1
14
AUDIOS
14 • 1 Accessing the “Audios” function
Select the
“Audios” icon
Confirm
14 • 2 Options
2
1
3
4
Melodies
Melodies (use to select and press to confirm).
Volume
Volume of the ring tone (use the key to adjust it).
84
Melodies
Volume
Ring mode
Beep

(1)
Mode
Depends on the model and the connected accessory:
Normal Normal ring tone (incremental).
Discreet Normal ring tone (incremental) preceded by
vibrating system.
Vibrator Vibrating system is activated but no sound is
heard (ring tone, message or appointment
beep, battery low). The icon is
displayed.
Vibrat...Melody Vibrating system alert followed by normal
ring tone (incremental).
Vibrator& Vibrating system alert and normal ring tone
Melody (incremental).
Beep then vibr. Warning beep followed by vibrating system
alert.
Key beep
Activate or deactivate key beeps, message beeps, voice
recognition beeps, and voice memos beeps.
14
AUDIOS
To return to the standby screen, press the key (long
keypress).
(1) The mode may be deactivated by using certain
accessories (car kit, etc.).
85

15
Clock
Languages
Headset
Personal key
Services
Settings
Duration
AvailableMemory
Menu
Short keypress
Long keypress
j
PERSONAL KEY
15 • 1 Features offered by personal key
This key can be assigned with services provided by the operator,
or customized for a specific function for example access to the
directory, SMS, vibrating system, etc..
(1)
By default
•
•
:
Short keypress: access the directory.
Long keypress: activate/deactivate vibrating system.
15 • 2 Setting the personal key
This key can have 2 settings: one with a short keypress, one with
a long keypress.
“Menu” icon
Select “Personal
ConfirmSelect the
key” option
(1) Depending on your phone model and subscription.
(2) This screen is displayed only if the operator has not
assigned this key with services.
Confirm
Select the
“Settings” option
Confirm
Select the
keypress
(2)
mode
86

15
Directory
Audios
Scheduler
Messages SMS
j
Confirm
to be set up on the
personal key
You must choose one of the following functions:
- Directory
- Audios
- Scheduler
- Messages SMS
- Events
- Call forwarding
- Calculator/converter
- Personal information
- Vibrator
- Voice mail
87
ConfirmChoose the function
PERSONAL KEY

16
WARRANTY
16 • 1 Warranty
Congratulations on choosing this mobile phone - we hope that this product will
satisfy all your needs.
We would like to remind you that this mobile phone has been approved in
accordance with European regulations, certified by the CE mark.
Notwithstanding any other applicable statutory warranties, this mobile phone
(and the battery charger) are guaranteed for parts and workmanship for a
period of ONE (1) year from the date of purchase shown on your invoice.
Nevertheless, if the statutory warranty in force in your country exceeds one (1)
year, the statutory warranty will apply in place of the manufacturer’s warranty.
Under the terms of this warranty, you must inform your dealer or any
maintenance centre (see list of maintenance centres at our website www.alcatel.com) without delay of any defect and present the invoice given to
you at the time of purchase.
The manufacturer or dealer reserves the right to deny service under this
warranty in respect of any equipment on which markings or serial numbers have
been removed or altered.
The dealer will decide whether to replace or repair, as appropriate, all or any
part of the equipment found to be defective. This warranty covers the cost of
parts and labour but excludes any other costs.
Servicing under the terms of this warranty, especially repair, modification or
replacement of parts shall not extend the warranty period unless there are
statutory provisions to the contrary. Repair or replacement may be carried out
using reconditioned components offering equivalent functionality.
All defective parts replaced under the terms of this warranty will become the
manufacturer’s property.
88

This warranty shall not apply to damage or defects caused by:
- Misuse or improper use, including but not exhaustively (a) use of the
equipment for a purpose other than that for which it was designed or not
in conformity with the manufacturer’s or dealer’s instructions regarding use
and maintenance of the equipment and (b) installation or use of the
equipment not in conformity with applicable technical and safety standards
in the country where the equipment is used;
- Accidents, force majeure or any other external cause outside the
equipment, especially the consequences of theft, acts of vandalism, lightning,
fire, humidity, ingress of liquid, atmospheric influences, RF interference
produced by other equipment, fluctuations in mains voltage and/or voltages
on telephone lines, etc.;
- Combination or integration of the equipment in hardware not supplied by
the manufacturer or dealer unless the latter gave written, explicit consent
for such;
- Defects and deterioration caused by normal wear;
- Modifications or alterations made to the equipment even if they are
mandatory due to changes in regulations and/or modification of network
parameters;
- Connection faults resulting from unsatisfactory radio propagation or caused
by the absence of radio relay coverage.
Apart from the statutory warranty, the above provisions constitute the only
claims which can be made against the manufacturer and dealer on the grounds
of equipment defects, this warranty excluding any other explicit or implied
warranty associated with sale of the equipment.
16
WARRANTY
89

Guarantee for batteries and accessories other than battery charger
Notwithstanding any other applicable statutory warranty, the battery of your
phone and accessories other than the battery charger are guaranteed for a
period of 3 months from the date of purchase shown on your invoice.
Nevertheless, if the statutory warranty in force in your country exceeds 3
months, the statutory warranty will apply in place of the manufacturer’s
warranty.
In case of defect, return the battery to your dealer for replacement.
This warranty shall not, however, apply in the case of use not conforming with
the instructions in this User’s Guide, damage due to external causes or repairs
or modifications carried out by parties not authorised by the manufacturer or
dealer.
Unless there are statutory provisions to the contrary, batteries and accessories
that are replaced under the terms of this warranty shall not be covered by any
specific warranty extending beyond the initial warranty period.
The CE mark indicates that your telephone and battery comply with applicable
EC directives, namely:
- directive 73/23/EEC (electrical safety)
- directive 89/336/EEC (electromagnetic compatibility)
- directive 1999/5/EEC (R&TTE)
16 • 2 Information
• Website: www.alcatel.com
• Alcatel Hot Line No.: see “Alcatel Services” leaflet (calls charged at
applicable local rate in your country).
Your telephone is designed to emit and receive calls. It operates on GSM
networks with 900 MHz and 1800 MHz bands.
90

16
WARRANTY
91

17
New Alcatel GSM phones have a handsfree feature so that you
can hear and talk using the phone when it is located a certain
distance away from you, e.g. placed on a desk. For those who
wish to maintain the privacy of their conversations, a combined
earphone and microphone is available: the headset.
Headset
ACCESSORIES
Cigar lighter
charger
M 11
C 51
(1)
Ni-MH
battery
B 51
Travelling
charger
C 52
92
Superlight
battery
B 52
Mini desktop
charger
C 54
(1) There are several versions depending on country of use.

17
Basic
car kit
MP 76
Antenna cable A 1
Buy on line: www.alcatel.fr
Data/Synchro PC kit
TD5
Full duplex
hands-free
car kit
MP 78
MA
Antenna kit A 2
This kit allows you to connect
your terminal to a PC in order to
use advanced functions such as
data transmission, fax
transmission and swapping
information between your
phone’s electronic scheduler and
your PC’s electronic scheduler
(directory, scheduler, etc.).
93
+
-
ACCESSORIES

SERVICES
Call forward
Voice
Unconditional
Conditional
If busy
If no reply
If unreachable
Data
Fax
Activated
Cancel all
Call barring
Outgoing calls
Except directory
All outgoing calls
International
Except to Home
Except FDN dir.
Incoming calls
Except Directory
All inc. calls
If abroad
Activated
Networks
SMS CB
CB list
Reception
Search
Available
Mode
Preferred list
Calls
Call waiting
Conceal ID
Caller ID
Pick up
Netw.auto.redial
Automatic redial
Activate/deactivate
View list
Empty list
SETTINGS
Personal info.
Welcome msg.
Your number
Voice mail
Keypad
Dictionnary
Display
Backlight
Contrast
Clock
Local clock
Remote clock
Format
Update
Languages
Headset
Personal key
Beginner/expert mode
BILLING
Expense
Total cost
Available credit
Maximum credit
Reset
Unit
Duration
Total duration
Available duration
Set max. duration
Reset
Cost sum up
Last call
Cumulative cost
Bip duration

AVAILABLE MEMORY
SECURITY
PIN1 Code
Activate/Deactivate
Change
PIN2 Code
Change
Network code
Menu code
Activate/Deactivate
Change
Telephone code
Activate/cancel
Change

English - 3DS06961AAAA 01

 Loading...