


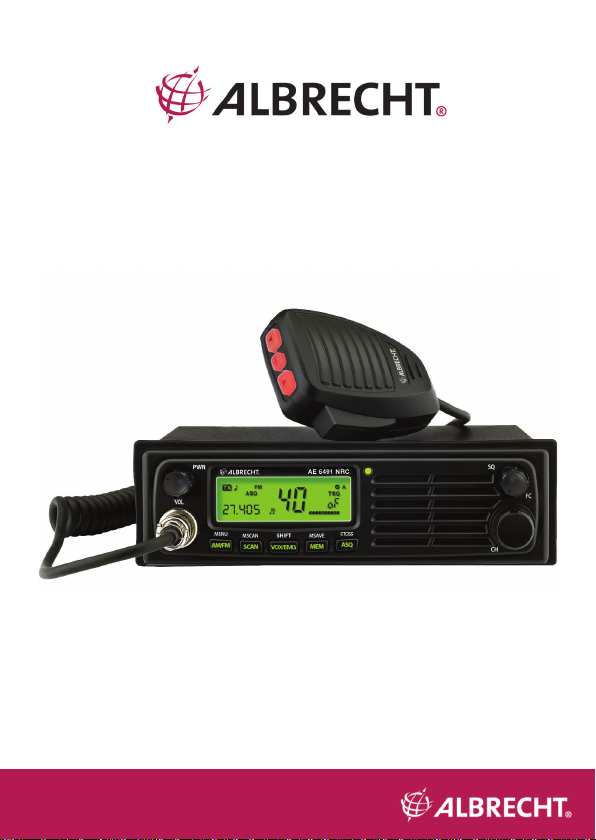
CB Funkgerät AE 6491 NRC
CB radio AE 6491 NRC
Bedienungsanleitung / Manual
Deutsch / English / Français / Italiano

Inhaltsverzeichnis
Deutsch
1. Wichtige Informationen .........................................................................3
2. Bedienelemente und Anschlüsse .........................................................4
3. Lieferumfang.........................................................................................6
4. Installation des Gerätes ........................................................................6
4.1. Installation der Antenne .................................................................6
4.2. 12 V / 24 V DC-Stromversorgung ................................................7
4.3. Montage mit DIN-Einschubhalterung ............................................7
4.4. Funkgerät aus der DIN-Halterung ausbauen ................................8
5. Ein- und Ausschalten ............................................................................9
5.1. Ländercode Einstellung .................................................................9
6. Bedienung / Tasten .............................................................................10
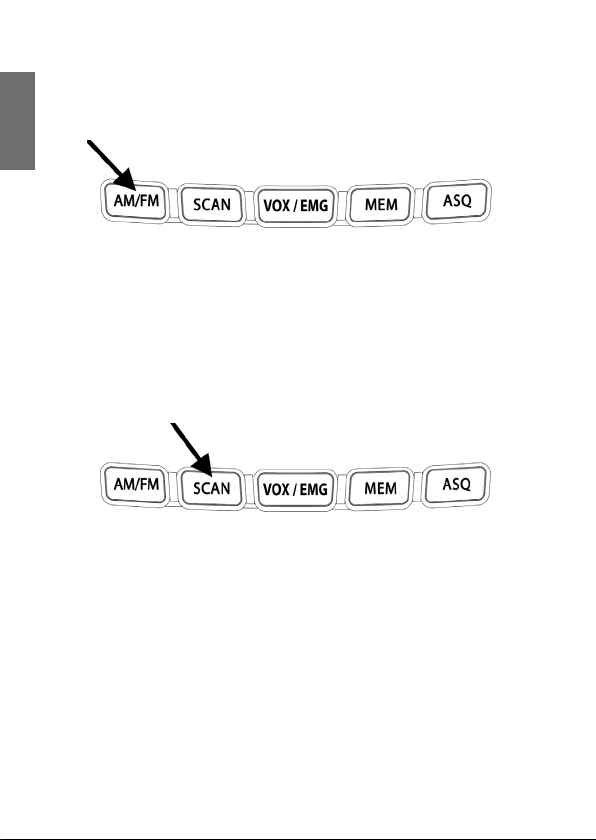
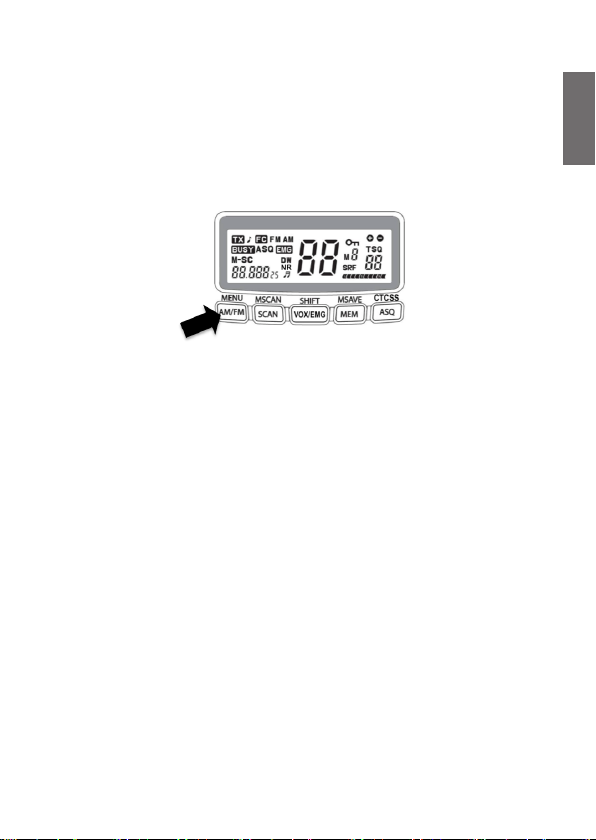
6.1. AM/FM Umschaltung ...................................................................10
6.2. SCAN ..........................................................................................10
6.3. VOX-Funktion / Kanal 9 Direktzugriff (EMG) ...............................11
6.4. Kanalspeicher (MEM) ..................................................................11
6.5. Rauschsperre (Squelch) .............................................................12
6.5.1. Automatische Rauschsperre (ASQ) ......................................12
6.5.2. Manuelle Rauschsperre ........................................................13
6.5.3. CTCSS / Tonsquelch .............................................................13
7. Zweitbelegung der Tasten / Funktionsumschalter (FC) ......................14
7.1. MENU ..........................................................................................15
7.1.1. Mikrofonempndlichkeit .........................................................16
7.1.2. VOX Empndlichkeit .............................................................16
7.1.3. VOX Verzögerung .................................................................16
7.1.4. Tastentöne ............................................................................17
7.1.5. Roger Beep ...........................................................................17
7.1.6. Farbe der LCD-Hintergrundbeleuchtung umschalten ...........18
7.1.7. LCD-Helligkeit einstellen ......................................................18
7.1.8. ASQ Empndlichkeit .............................................................18
7.1.9. NRC Geräuschlter ...............................................................18
7.2. MSCAN .......................................................................................19
7.3. SHIFT (Kanal 19) ........................................................................19
7.4. MSAVE ........................................................................................19
8. Spezikationen ...................................................................................20
8.1. CTCSS Ton Frequenztabelle ......................................................22
9. Problembehebung ..............................................................................23
10. Sicherheitshinweise ..........................................................................23
11. Garantie und Informationen zum Recycling ......................................24
12. CE-Konformitätserklärung ...............................................................25
12.1. EEAG und Recycling .................................................................25
13. Serviceadresse ................................................................................26
2

1. Wichtige Informationen
Bitte lesen Sie diese Hinweise vor Installation und Betrieb Ihres
AE 6491 NRC Funkgeräts aufmerksam durch.
Die Bedienung ist auf die wesentlichen Funktionen eines LKW
Einbau-Funkgeräts abgestimmt und erlaubt damit intuitive
Bedienung.
Bitte verwenden Sie nur das Originalmikrofon an dem CBFunkgerät, da ansonsten die einwandfreie Funktion der VOX
Freisprechfunktion nicht gewährleistet sein könnte.
Das Gerät ist mit folgenden Standardfunktionen ausgestattet:
• PLL Frequenzerzeugung mit Mikroprozessor
• Großes Weitwinkeldisplay für Kanal, Frequenz, Funktionen
und S-Meter
• Display-Beleuchtung rot/grün umschaltbar
• VOX Freisprechfunktion
• NRC Geräuschlter für glasklaren Empfang und höchste
Audioqualität
• automatische (ASQ) und manuelle Rauschsperre
• CTCSS (38 Töne)
• Direktzugriff auf Kanal 9 oder 19
• AM/FM Umschaltung
• Separate Drehknöpfe für Kanal, Lautstärke und
Rauschsperre
• Externe Lautsprecherbuchse (3,5 mm Mono) und
Antennenbuchse (SO-239)
• DIN Abmessungen zum Einbau im Armaturenbrett
• Hintergrundbeleuchtung 2 farbig umschaltbar, RX/TX
Anzeige mit zweifarbiger LED
• Unterstützt alle europäischen CB-Funkstandards
• 12 V / 24 V Bordnetzanschluss ohne Umschalten möglich
Deutsch
3

Deutsch
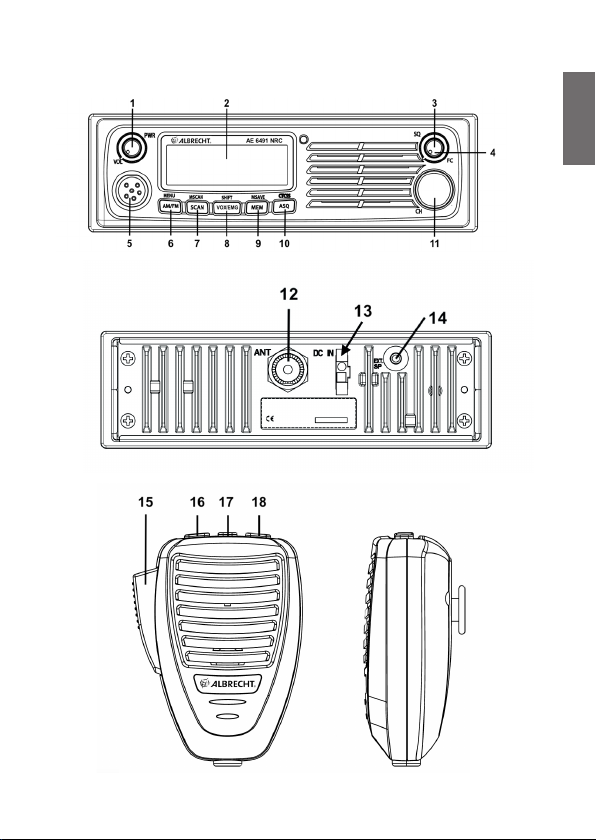
2. Bedienelemente und Anschlüsse
Nr. Beschreibung
1 Ein-/Ausschalter und Lautstärkeregler
2 LCD-Display
3 Rauschsperre
4 Funktionsumschalter mit Tastendruck
5 Mikrofonbuchse
6 AM/FM (Menü)
7 SCAN, MSCAN (Speicherscan)
8 VOX ein/aus, EMG (Kanal 9), SHIFT (Kanal 19)
9 MEM (Speicheraufruf), MSAVE (Speicherung)
10 ASQ (Automatische Rauschsperre), CTCSS
11 Kanalwahl-Drehknopf
12 Antennenbuchse
13 12/24V DC Anschluss
14 Buchse für externe Lautsprecher 3,5 mm
Mikrofon
Nr. Beschreibung
15 Sendetaste (PTT)
16 Abwärtstaste
17 ASQ ein/aus
18 Aufwärtstaste
4
Deutsch
5

Deutsch
3. Lieferumfang
1. AE 6491 NRC CB Funkgerät
2. Handmikrofon
3. Stromversorgungskabel mit Sicherung
4. Mikrofonhalterung
5. DIN Einbaurahmen und 2 Ausbauschlüssel
6. Bedienungsanleitung
4. Installation des Gerätes
Bei der Installation Ihres Funkgeräts im Fahrzeug vergewissern
Sie sich, dass Sie keine Verkabelung oder sonstige
Fahrzeugkomponenten beschädigen, die sich möglicherweise
versteckt im Bereich der Montageposition benden.
4.1. Installation der Antenne
Für beste Leistung Ihres CB Funkgeräts ist die Installation einer
hochwertigen Antenne von großer Bedeutung.
• Verwenden Sie nur Antennen, die für den Frequenzbereich
26-27 MHz geeignetet sind.
• Schließen Sie die Antenne über das mitgelieferte
Antennenkabel an die Antennenbuchse auf der
Geräterückseite mit einem PL259 Stecker an.
• Für optimale Reichweite montieren Sie die Antenne
möglichst hoch und mit freier Abstrahlung in alle Richtungen.
• Standard CB-Funk-Mobilantennen funktionieren nicht
ohne eine gut leitende Verbindung zur metallischen
Befestigungsäche.
• Für Camping-Fahrzeuge oder LKW mit Kunststoffaufbauten
gibt es spezielle massefreie Antennen. Diese funktionieren
dafür jedoch nicht unmittelbar auf metallischen Oberächen.
• Nicht ohne angeschlossene Antenne senden.
6
4.2. 12 V / 24 V DC-Stromversorgung
Das AE 6491 NRC kann ohne Umschaltung sowohl an ein 12 V
oder 24 V Bordnetz angeschlossen werden.
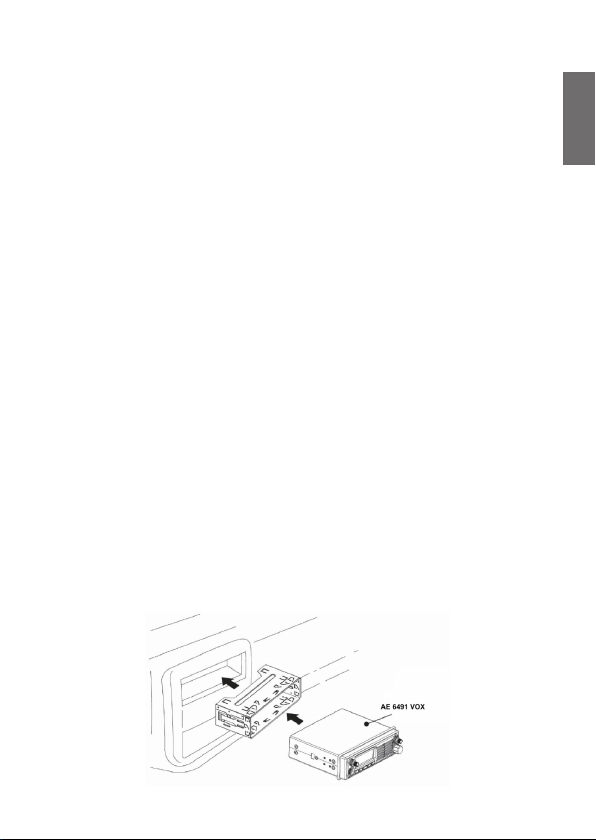
4.3. Montage mit DIN-Einschubhalterung
Vor der Installation vergewissern Sie sich, dass das Funkgerät
in das Einbaufach passt und dass Sie alle notwendigen
Installationsmaterialien zur Hand haben.
• Setzen Sie den mitgelieferten Rahmen in das Einbaufach
des Armaturenbretts.
• Drücken Sie die, oben und unten im Rahmen vorhandenen
Blechlaschen nach außen, um den Rahmen im Einbaufach
zu befestigen.
• Vor dem Einschieben des Funkgeräts in den Rahmen
müssen alle erforderliche Kabel an das Funkgerät
angeschlossen werden.
• Schließen Sie das Stromversorgungskabel an. Das
rote Kabel geht zu einer positiven (+) Klemme in
Ihrem Sicherungskasten, das schwarze Kabel an die
Fahrzeugmasse (-). Oft liegen bei LKW die Kabel schon
vorbereitet im Armaturenbrettausschnitt.
• Achten Sie darauf, dass die Verkabelung nicht durch
Metallteile eingeklemmt oder eingeschnitten wird.
• Schieben Sie das Funkgerät vorsichtig in die Halterung, bis
dieses einrastet.
Deutsch
7
Deutsch
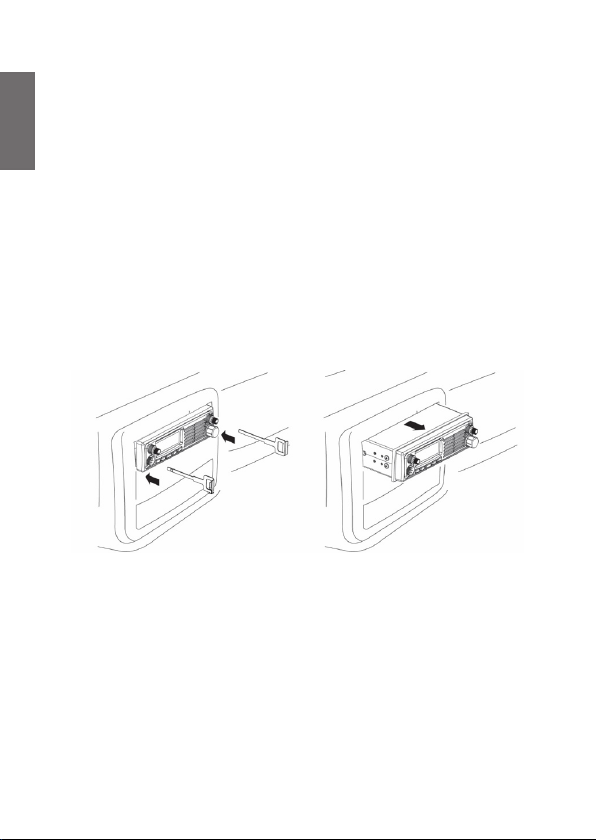
4.4. Funkgerät aus der DIN-Halterung ausbauen
Möchten Sie das Funkgerät aus der DIN-Halterung ausbauen,
so benutzen Sie hierzu die beiden mitgelieferten AusbauSchlüssel wie folgt:
• Setzen Sie die beiden Schlüssel gerade in die Schlitze im
Gummiring links und rechts von der Blende des Funkgeräts
ein.
• Beide Schlüssel ganz hineinschieben, damit das Funkgerät
entriegelt wird.
• An beiden Schlüsseln gleichmäßig ziehen und das Gerät
ohne Verkanten aus dem Rahmen herausziehen.
• Bewahren Sie die Schlüssel auf für späteren Gebrauch.
8
5. Ein- und Ausschalten
Zum Einschalten oder Einstellen der Lautstärke drehen Sie den
Lautstärkeregler nach rechts im Uhrzeigersinn.
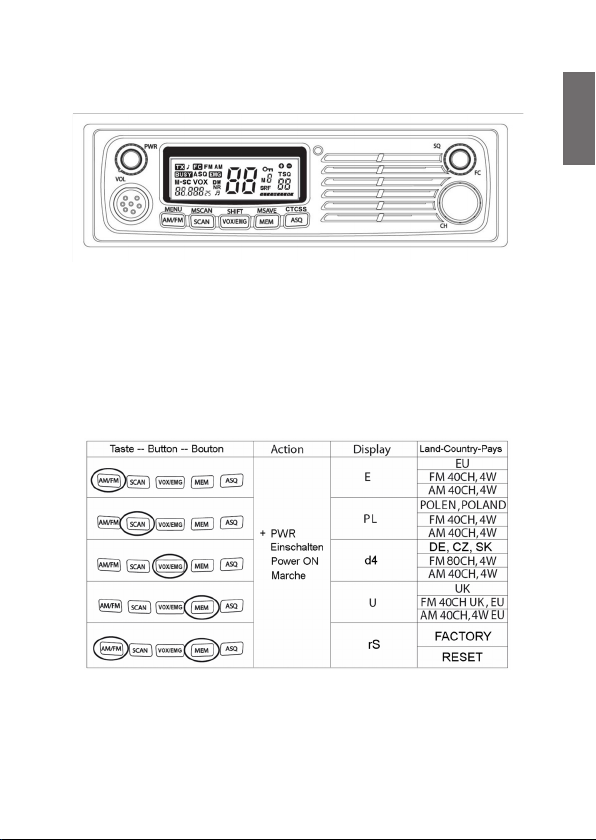
5.1. Ländercode Einstellung
Das AE 6491 NRC unterstützt alle aktuellen europäischen CBFunk Standards.
Halten Sie die Taste für das entsprechende Land entsprechend
der Tabelle gedrückt und schalten Sie dann das Gerät ein.
Deutsch
Die werkseitige Standard-Einstellung ist „EU“.
Mit der letzte Tastenkombination wird das Gerät auf die
Werkseinstellungen zurück gesetzt (Reset).
9
Deutsch
6. Bedienung / Tasten
6.1. AM/FM Umschaltung
Mit AM/FM schalten Sie zwischen AM- und FM- Modulation um.
Bitte beachten Sie, dass es bei der deutschen Ländereinstellung
möglich ist, auch auf den Kanälen 41-80 in AM zu empfangen.
Sie können auf diesen Kanälen in AM aber nicht senden,
sondern nur auf Kanal 1-40. Die Balkenanzeige im Display zeigt
bei Empfang die Signalstärke (S-Werte) und bei Senden die
relative Sendeleistung.
6.2. SCAN
Ihr Funkgerät ist mit einer Suchlauf (Scan) - Funktion
ausgestattet. Das Funkgerät scannt durch alle Kanäle und stoppt
beim nächsten aktiven Kanal (auf dem ein Signal empfangen
wird). Der Kanal bleibt bis sieben Sekunden nach Beendigung
des Gesprächs eingestellt, dann wird weiter gescannt.
• Stellen Sie vor dem Start des Suchlaufs zunächst die
Lautstärke und Rauschsperre ein.
• Mit SCAN starten Sie den Suchlauf. Das SC Icon wird im
Display angezeigt und die Kanalnummer läuft durch.
• Zur Beendung des Suchlaufs erneut die Taste SCAN oder
die PTT Taste drücken.
10
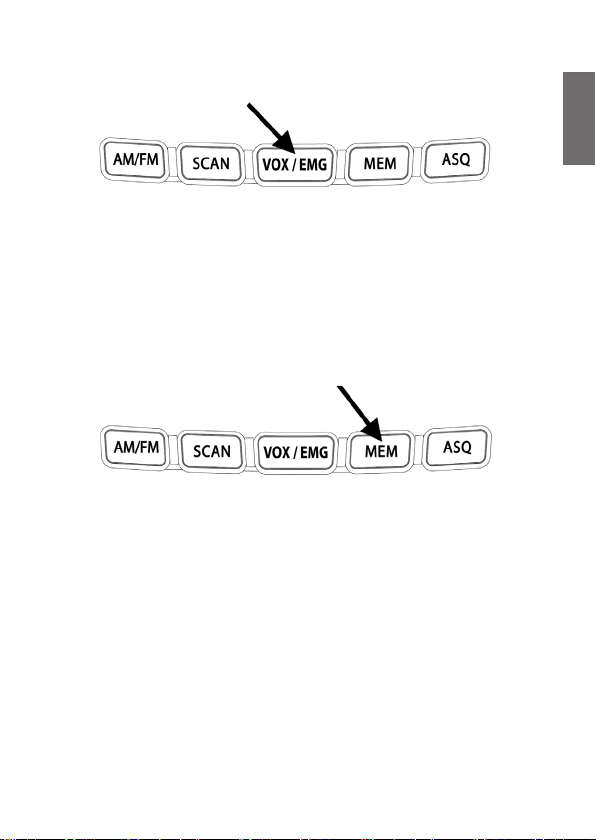
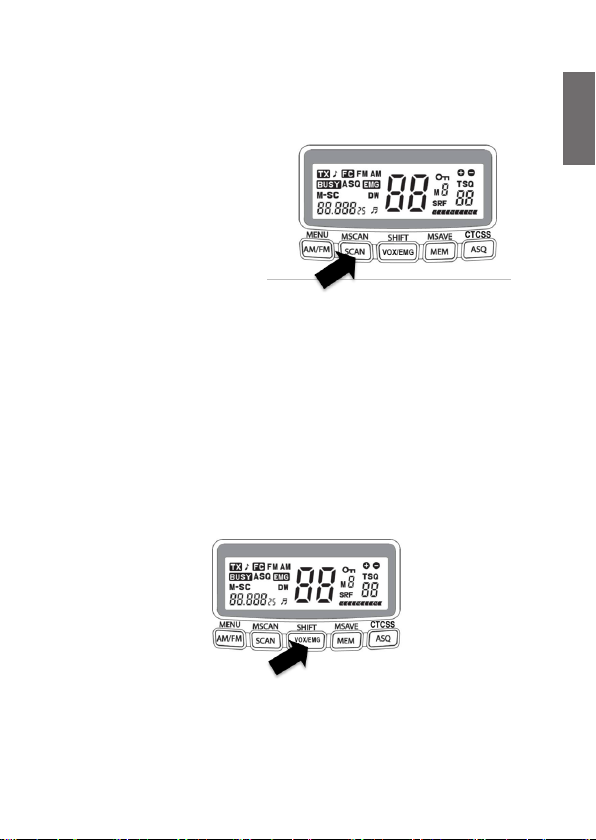
6.3. VOX-Funktion / Kanal 9 Direktzugriff (EMG)
Drücken Sie die Taste VOX/EMG kurz, um die VOX-Funktion
ein- oder auszuschalten. Wenn die VOX-Funktion aktiviert ist,
schaltet das Funkgerät automatisch auf Sendung, sobald es
Sprache erkennt. Sie müssen das Mikrofon nicht mehr zum
Senden in die Hand nehmen.
Drücken Sie die Taste VOX/EMG lang, um zwischen dem aktuell
verwendeten Kanal und Kanal 9 hin und her zu schalten.
6.4. Kanalspeicher (MEM)
Zum Aufrufen gespeicherter Kanäle drücken Sie einfach MEM
und wählen Sie dann den gewünschten Kanalspeicher von M1
bis M5, indem Sie eine der Tasten AM/FM bis ASQ drücken.
Deutsch
11

Deutsch
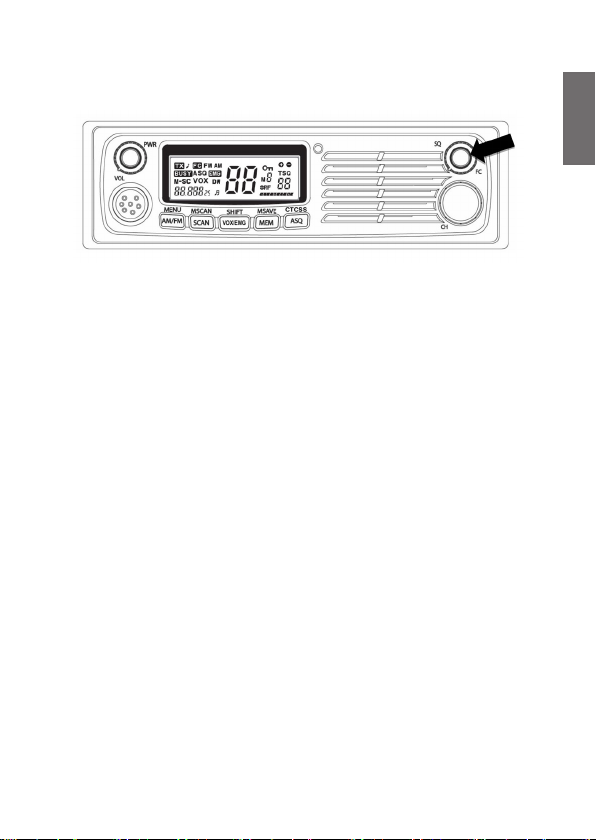
6.5. Rauschsperre (Squelch)
Das AE 6491 NRC verfügt über 3 Rauschsperren
• Automatische Rauschsperre (ASQ)
• Manuelle Rauschsperre (SQ)
• Tonsquelch (CTCSS)
Jede blendet das Kanalrauschen aus, indem der Lautsprecher
stumm geschaltet wird. Nur wenn bestimmte Kriterien erfüllt
werden, öffnet die Rauschsperre den Lautsprecher und das
Empfangssignal wird gehört.
6.5.1. Automatische Rauschsperre (ASQ)
Die automatische Rauschsperre wertet kontinuierlich den
Rauschpegel aus. Wird ein Signal empfangen, sinkt dieser und
die ASQ gibt den Lautsprecher frei.
Drücken des ASQ Knopfes schaltet die ASQ ein oder aus. Der
aktuelle Status wird durch das ASQ Symbol auf dem Display
angezeigt.
Die ASQ kann ich 3 Stufen eingestellt werden, Stufe 1 ist die
empndlichste.
Vorteil: höchste Empndlichkeit und damit größte Reichweite
Nachteil: kann durch Interferenzen wie z.B.
Sonneneckenaktivität, andere elektronische Geräte etc. gestört
werden, so dass der Lautsprecher aktiviert wird, selbst wenn
kein Signal empfangen wird. In diesem Fall sollte die manuelle
Rauschsperre bzw. der Tonsquelch verwendet werden.
12
6.5.2. Manuelle Rauschsperre
Durch Drehen des Squelchreglers wird das Kanalrauschen
ausgeblendet. Je weiter der Regler gedreht wird, umso stärker
muss ein Empfangssignal sein, um die Rauschsperre zu öffnen.
Üblicherweise wird die Rauschsperre so eingestellt, dass sie
gerade so den Lautsprecher stumm schaltet.
Vorteil: die manuelle Rauschsperre kann so eingestellt werden,
so dass nur noch Stationen aus dem Nahbereich zu hören sind.
Nachteil: muss manuell eingestellt werden. Wird die
Rauschsperre aus Versehen zu hoch eingestellt, so sinkt die
Empfangsempndlichkeit und damit die Reichweite.
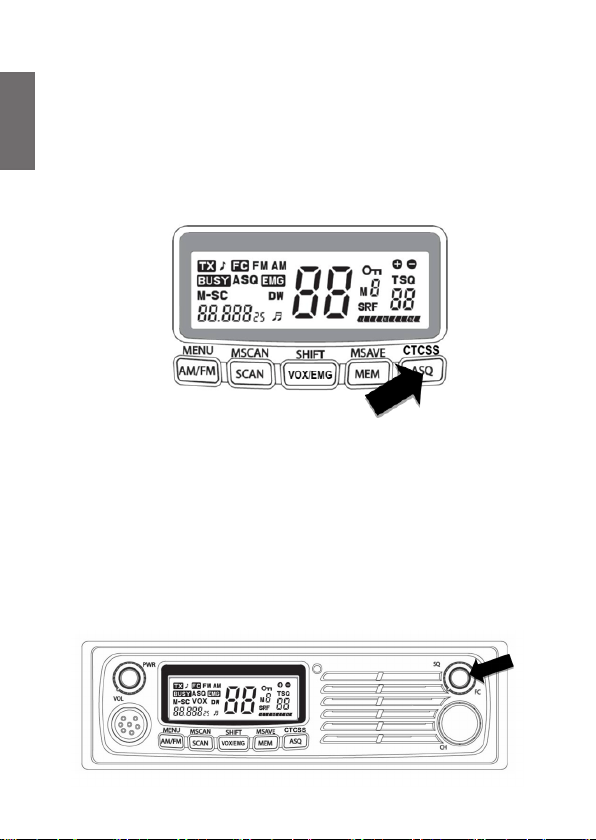
6.5.3. CTCSS / Tonsquelch
Neben dem manuellen und automatischen Squelch, verfügt das
AE 6491 NRC außerdem über CTCSS Töne. CTCSS fügt der
Übertragung einen unhörbaren Ton hinzu. Sofern aktiviert, öffnet
sich die Rauschsperre nur, wenn das Signal einer Gegenstation
mit dem gleichen Ton empfangen wird. CTCSS kann für jeden
Kanal separat eingestellt werden und ist nur in FM verfügbar.
• Kanal mit Hilfe des Kanaldrehwahlschalter auswählen
• FC + CTCSS / ASQ
• Auswahl des CTCSS Tons mit dem Kanaldrehwahlschalter
• Es stehen 38 Töne und „off“ zur Verfügung
• Zur Bestätigung kurz die PTT betätigen.
Deutsch
13
Deutsch
Vorteil: ermöglicht den selektiven Empfang bestimmter
Stationen innerhalb eines Kanals.
Nachteil: alle Gegenstationen müssen ebenfalls mit CTCSS
ausgerüstet sein. Niedrigere Empfangsempndlichkeit und
damit weniger Reichweite
7. Zweitbelegung der Tasten / Funktionsum-
schalter (FC)
Der Drehknopf der Rauschsperre hat eine wichtige zweite
Funktion.
Drücken Sie den Knopf FC kurz, so aktivieren Sie die
Zweitbelegung der Tasten, deren Funktion oberhalb der Tasten
aufgedruckt ist.
14
7.1. MENU
• Drücken Sie zunächst den Funktionsumschalter FC
(Rauschsperre).
• Im Display wird FC angezeigt.
• Drücken Sie nun MENU (AM/FM).
Sie können unter MENU acht verschiedene Einstellungen
vornehmen:
7.1.1. Mikrofonempndlichkeit
7.1.2. VOX Empndlichkeit
7.1.3. VOX Verzögerung
7.1.4. Tastenton ein/aus
7.1.5. Roger Beep ein/aus
7.1.6. Auswahl der Farbe der LCD-Hintergrundbeleuchtung
7.1.7. LCD-Hintergrundbeleuchtung
7.1.8. ASQ Empndlichkeit
7.1.9. NRC Geräuschlter
Deutsch
Die Auswahl treffen Sie mit den Tasten AUFWÄRTS oder
ABWÄRTS am Mikrofon oder durch Drehen des Kanalwahl-
Drehknopfes.
Drücken Sie einmal oder mehrmals MENU, um Ihre Auswahl zu
speichern und um das nächste Untermenü aufzurufen
15

Deutsch
7.1.1. Mikrofonempndlichkeit
Stellen Sie die Höhe der Mikrofon-Vorverstärkung (Mic
Gain) ein. Je größer der Abstand zwischen Sprecher und
Mikrofon, umso höher muss der Wert gewählt werden. Bei
höherer Verstärkung werden auch Nebengeräusche, wie z.B.
Wind- und Motorengeräusche mit übertragen. Sie können
die Vorverstärkung in 9 Stufen einstellen. Der voreingestellte
Standardwert ist Stufe 6.
7.1.2. VOX Empndlichkeit
Mit dem VOX Level wird die Lautstärkestufe gewählt, ab welcher
die automatische VOX Übertragung aktiviert wird.
1= niedrige Empndlichkeit, VOX reagiert erst auf sehr hohe
Lautstärken
9= hohe Empndlichkeit, VOX reagiert bereits auf sehr niedrige
Lautstärken
Der voreingestellte Standardwert ist Stufe 6.
7.1.3. VOX Verzögerung
Mit der VOX Verzögerung stellen Sie ein, nach welcher Zeit
ohne Sprache der automatische Sende-Modus beendet wird:
16
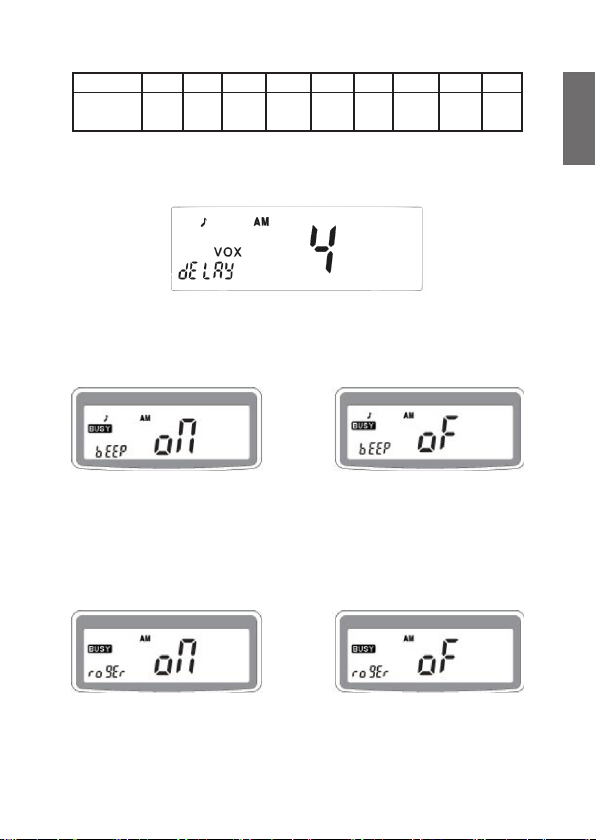
Stufe 1 2 3 4 5 6 7 8 9
Zeit
(Sek)
Sie können die Verzögerung in 9 Stufen einstellen. Der
voreingestellte Standardwert ist Stufe 4.
7.1.4. Tastentöne
Hier aktivieren/deaktivieren Sie die Tastentöne (Beep on/off).
7.1.5. Roger Beep
Roger Beep ist ein kurzer Signalton der nach Beendigung der
Sendung mit ausgestrahlt wird. Dies signalisiert dem Empfänger,
dass die Gegenseite den Funkspruch beendet hat.
0,5 1,0 1,5 2,0 2,5 3,0 3,5 4,0 4,5
Deutsch
17

Deutsch
7.1.6. Farbe der LCD-Hintergrundbeleuchtung umschalten
Wählen Sie zwischen der grünen oder roten
Hintergrundbeleuchtung.
7.1.7. LCD-Helligkeit einstellen
Wählen Sie zwischen dunkler (di) oder heller (br) Helligkeit.
7.1.8. ASQ Empndlichkeit
Sie können die ASQ Empndlichkeit in drei Stufen 1 bis 3
einstellen.
7.1.9. NRC Geräuschlter
Schalten Sie den NRC Geräuschlter ein oder aus. Im Display
wird NR angezeigt.
Der Geräuschlter unterdrückt Störgeräusche beim Empfang.
18
7.2. MSCAN
Der Kanalspeicher-Suchlauf durchsucht die 5 gespeicherten
Kanäle.
• Mit FC und MSCAN
rufen Sie die Funktion
auf.
• M-SC wird im LCD
angezeigt.
Das Funkgerät scannt
nun nur die gespeicherten
Kanäle und stoppt, wenn
ein Funksignal erkannt
wird.
Die Beschreibung der Speicherung von Kanälen in den
Kanalspeicher nden Sie unter der Überschrift MSAVE auf der
folgenden Seite.
7.3. SHIFT (Kanal 19)
Kanal 19 FM ist ein Info- und Hilfekanäle für Truckfahrer.
Mit FC + SHIFT schalten Sie direkt zwischen diesem Fernfahrer-
Anrufkanal und Ihrem vorher benutztem Kanal hin und her.
Deutsch
7.4. MSAVE
MSAVE dient der Speicherung von Kanälen in die Kanalspeicher
M1 bis M5.
19

Deutsch
Zum Speichern von Kanälen gehen Sie wie folgt vor:
• Wählen Sie eine Modulationsart
• Wählen Sie den gewünschten Kanal mit dem Drehregler
oder den Up/Down Tasten.
• Drücken Sie FC und dann MSAVE / MEM.
• Wählen Sie eine Speicherkanalnummer mit den Tasten
MENU (M1) bis CTCSS (M5).
8. Spezikationen
Allgemein
Betriebsspannung 12 V/24 V DC
Temperaturbereich -10 ˚C bis +55 ˚C
Kanalschritt 10 kHz
Abmessungen 188 (B) x 57 (H) x 131 (T) mm
Gewicht 1,9 kg mit Standardzubehör
Buchse für externen
Lautsprecher
3,5 mm Klinke
20
UHF Typ (PL)
Antennenbuchse
SO 239 (50-Ohm-Buchse für PL
259 Stecker)
Mikrofonbuchse 6-polig nach GDCH Standard
Sender
Sendeleistung FM/AM 4 Watt
Frequenzbereich 26,565-27,405 MHz
Frequenztoleranz +/- 100 Hz
Modulationsempndlichkeit 2,5 mV (1250 Hz Eingang)
Modulationsfähigkeit AM 85 % / FM 2,0 kHz
Empfänger
Empndlichkeit
Rauschsperre schließen Bis zu 1000 µV
Automatische Rauschsperre 0,5 µV
Rauschabstand 40 dB
Klirrfaktor 3 %
S-Meter Empndlichkeit S9 100 µV
Audio Ausgangsleistung 4 Watt an 8 Ohm
AM: 0,5 µV (SINAD 10 dB),
FM: 0,5 µV (SINAD 20 dB)
Deutsch
21

Deutsch
8.1. CTCSS Ton Frequenztabelle
Nr. Freq. (Hz) Nr. Freq. (Hz)
Of CTCSS aus 19 127.3
01 67.0 20 131.8
02 71.9 21 136.5
03 74.4 22 141.3
04 77.0 23 146.2
05 79.7 24 151.4
06 82.5 25 156.7
07 85.4 26 162.2
08 88.5 27 167.9
09 91.5 28 173.8
10 94.8 29 179.9
11 97.4 30 186.2
12 100.0 31 192.8
13 103.5 32 203.5
14 107.2 33 210.7
15 110.9 34 218.1
16 114.8 35 225.7
17 118.8 36 233.6
18 123.0 37 241.8
38 250.3
22

9. Problembehebung
Unsere Empfehlung für den Fall eines technischen Problems:
Führen Sie einen Reset-Vorgang durch.
• Trennen Sie dazu das Gerät für ca. 10 sek. von der
Stromversorgung.
• Halten Sie AM/FM und MEM gedrückt und schalten Sie
gleichzeitig das Funkgerät wieder ein.
• Das Display zeigt kurzzeitig rS und dann wieder den
normalen Betrieb an.
• In den meisten Fällen funktioniert ein Gerät nach einem
Reset wieder wie gewohnt – ggf. muss der Ländercode
erneut eingegeben werden
Lässt sich eine Fehlfunktion auch durch einen Reset-Vorgang
nicht beheben, rufen Sie unsere Hotline an.
10. Sicherheitshinweise
Fahrzeuge mit Airbags
• Montieren Sie das Funkgerät nicht im Bereich über einem
Airbag oder im Entfaltungsbereich der Airbags.
Potenzielle explosive Umgebungen
• Das Funkgerät nicht in einen Bereich mit
explosionsgefährdeter Atmosphäre benutzen.
Umgebungen von Sprengungen
• Schalten Sie das Funkgerät in der Nähe von
Sprengbereichen aus.
Benutzung während der Fahrt
• Informieren Sie sich Sie sich über die unterschiedlichen
nationalen Bestimmungen und beachten Sie diese.
Deutsch
23

Deutsch
11. Garantie und Informationen zum Recycling
Wir sind gesetzlich verpichtet, jedem Gerät Informationen zur
Entsorgung und Garantie, sowie eine EU-Konformitätserklärung
mit den Anweisungen für die Verwendung in verschiedenen
Ländern beizufügen. Diese Informationen nden Sie auf den
folgenden Seiten.
2 Jahre Garantie ab Kaufdatum
Der Hersteller/Händler gibt für dieses Produkt zwei Jahre
Garantie ab Kaufdatum. Diese Garantie umfasst alle Ausfälle
durch defekte Bauteile oder fehlerhafte Funktionen innerhalb
der Garantiefrist, ausgenommen Abnutzung wie leere Batterien,
Kratzer auf dem Display, defekte Gehäuse, defekte Antenne
und Defekte aufgrund externer Einüsse wie Korrosion,
Überspannung durch unsachgemäße externe Stromversorgung
oder die Verwendung ungeeigneter Zubehörteile. Mängel,
die durch nicht bestimmungsgemäßen Gebrauch verursacht
werden, sind ebenfalls von der Garantie ausgeschlossen.
Wenden Sie sich im Fall eines Garantieanspruches bitte an
Ihren Händler. Der Händler repariert oder tauscht das Gerät aus
oder er leitet es an ein autorisiertes Service-Center weiter.
Sie können sich auch direkt an unseren Service-Partner wenden.
Bitte fügen Sie dem Gerät Ihren Kaufbeleg bei und beschreiben
Sie die Fehlfunktion so genau wie möglich.
24

12. CE-Konformitätserklärung
Standards und Richtlinien
Hiermit erklärt Alan Electronics GmbH, dass das
Radiogerät Modell AE 6491 NRC in Einklang mit
der Verordnung 2014/53/EU steht. Der vollständige
Text der EU-Konformitätserklärung kann unter
nachstehender Internetadresse abgerufen werden:
http://service.alan-electronics.de/CE-Papiere/
Deutsch
12.1. EEAG und Recycling
Die europäischen Gesetze verbieten die Entsorgung
von alten oder defekten elektrischen oder
elektronischen Geräten über den Hausmüll. Zur
Entsorgung geben Sie das Gerät zwecks Recycling
an eine Sammelstelle in Ihrer Gemeinde. Dieses
System wird von der Industrie nanziert und stellt eine
umweltgerechte Entsorgung und die Wiederverwertung von
wertvollen Rohstoffen sicher.
25

Deutsch
13. Serviceadresse
Technische Hotline (für in Deutschland verkaufte Geräte)
Alan Electronics GmbH
Service
Daimlerstraße 1g
D-63303 Dreieich
Wenden Sie sich telefonisch an unsere Servicehotline
+49 (0) 6103/9481 - 66 (normaler Tarif im deutschen Festnetz)
oder schreiben Sie uns eine E-Mail:
service@albrecht-midland.de
Bevor Sie das Gerät zurücksenden, lesen Sie bitte Kapitel 8
„Problembehebung“.
Dort erfahren Sie einige Tipps und Tests. Alternativ wenden Sie
sich an unsere Hotline.
Druckfehler vorbehalten.
© 2020 Alan Electronics GmbH
Daimlerstraße 1g - 63303 Dreieich - Deutschland
26
CB RADIO AE 6491 NRC
Manual / English

Table of contents
1. Important Information .........................................................................29
2. Controls and Connectors ....................................................................30
3. Delivery Conent ..................................................................................32
4. Installation CB radio ...........................................................................32
4.1. Installation antenna .....................................................................32
English
4.2. DC power connection 12 V / 24 V ...............................................33
4.3. Mounting using DIN Sleeve .........................................................33
4.4. Removing the radio from DIN Sleeve ..........................................34
5. Turn on/off ..........................................................................................35
5.1. Country switching .......................................................................35
6. Operation / Buttons.............................................................................36
6.1. AM/FM switch ..............................................................................36
6.2. SCAN ..........................................................................................36
6.3. VOX function / EMG Channel selection ......................................37
6.4. Memory channels (MEM) ............................................................38
6.5. Squelch control (SQ) ...................................................................38
6.5.1. Automatic Squelch (ASQ) .....................................................38
6.5.2. Manual squelch .....................................................................39
6.5.3. Tone Squelch (CTCSS) .........................................................40
7. Operation for secondary functions / Function Selector (FC) ..............40
7.1. MENU ..........................................................................................41
7.1.1. Microphone Gain ...................................................................42
7.1.2. VOX Sensitivity Level ............................................................42
7.1.3. VOX Delay Time ....................................................................42
7.1.4. Keytones ..............................................................................43
7.1.5. Roger Beep ..........................................................................43
7.1.6. LCD backlighting color selection ..........................................43
7.1.7. LCD backlighting brightness control .....................................44
7.1.8. ASQ Sensitivity .....................................................................44
7.1.9. NRC noise reduction function ...............................................44
7.2. MSCAN .......................................................................................44
7.3. SHIFT ..........................................................................................45
7.4. MSAVE ........................................................................................45
8. Technical Specications ....................................................................46
8.1. CTCSS Tone frequency chart .....................................................48
9. Trouble shooting .................................................................................49
10. Safety Warnings ...............................................................................50
11. Warranty and information on recycling .............................................51
12. CE declaration of conformity ...........................................................52
12.1. EEAG and Recycling .................................................................52
13. Service address ................................................................................52
28

1. Important Information
Please read before operating your AE 6491 NRC Radio.
This High Tech CB radio combines the latest circuit design
with microprocessor control system. Very easily and advanced
user features make it the premier radio for your mobile
communications.
Please only use the original microphone on the CB radio,
otherwise the proper functioning of the VOX hands-free function
could not be guaranteed.
The following standard features are included.
• Fully synthesized system with microprocessor
• Large & wide angle readout for multi-function display (STN
technology)
• VOX function for free hands communication
• NRC noise reduction function in RX
• Two color choices by green and red color
• Full channels or memory channel scanning
• Automatic squelch control System (ASQ)
• CTCSS (38 tones)
• Instant access to channel 9 or 19
• AM/FM selection
• Single rotary knobs for channel, volume and squelch
• External speaker connector (3.5 mm mono) and coaxial
antenna socket (SO-239)
• All metal cabinet and ideal size for easy installation in dash
mount.
• Supports all European CB-radio standards.
• AE 6491 NRC supports 12 V and 24 V car power supply
without switching
English
29

2. Controls and Connectors
No. Description
1 Power ON/OFF Switch & volume control
English
2 LCD Display
3 Squelch control
4 Function selector by short press
5 Microphone connector
6 AM/FM (Menu button)
7 SCAN, MSCAN (Memory Scan)
8 VOX on/off, EMG (Emergency channel 9/19), SHIFT
9 MEM (Memory recall), MSAVE (Memory save)
10 ASQ (Automatic Squelch), CTCSS
11 Rotary channel control
12 Antenna Connection with PL 259 coaxial Connector
13 12/24V DC power input
14 External Speaker Socket (for 3.5 mm mono plug)
Microphone
No. Description
15 Push-to-talk Switch (PTT)
16 DOWN key
17 ASQ on/off
18 UP key
30

31
English

3. Delivery Conent
1. AE 6491 NRC CB Radio
2. Microphone
3. DC power cord with inline fuse
English
4. Microphone hanger
5. DIN Mounting kit (1 DIN Sleeve and 2 Removal keys)
6. User manual
4. Installation CB radio
When installing your CB radio in your vehicle, check that during
installation you do not damage any wiring or vehicle components
that may be hidden around the mounting position.
4.1. Installation antenna
To obtain the best performance from your CB radio is important
to install a good quality antenna.
• You should purchase a suitable mobile antenna designed
for the 27MHz frequency band.
• Connect the antenna to the rear antenna socket using a
PL259 coaxial connector. Where necessary, solder the
connector carefully at the inner connector of the coaxial
cable and avoid any short circuit with one of the thin copper
wires of the outer coaxial shielding.
• To obtain maximum performance from the transceiver,
mount the antenna in a suitable position for good and free
radiation from the metallic car surface.
• Standard mobile antennas need a good car body ground
connection for best efciency. Most standard mobile
antennas cannot work without car body ground connection!
• Special ground less antennas are obtainable for motor
homes or trucks in cases where the antenna position is
32

made from plastic or berglass or where a grounding is
not possible. Such antennas do only work on berglass or
plastic car body structures and do not work immediately on
metallic structures.
• Do not use any transmit function (e.g. PTT) before installing
the antenna
4.2. DC power connection 12 V / 24 V
The AE 6491 NRC version can operate at both 12 or 24 V voltage
systems. A switching is not necessary.
4.3. Mounting using DIN Sleeve
Before installing, conrm that this radio ts in the desired
mounting area and you have all the necessary kits to complete
the installation
• Remove the bracket if previously installed.
• Install DIN Sleeve into the opening in your dashboard, lip
facing out.
• Push out the top and bottom tabs to hold the sleeve rmly
in place.
• Before inserting this radio in the sleeve, wire the cable from
the previously mounted antenna
• Connect the DC power leads. The RED wire goes to a
positive( + ) connection on your fuse block, while BLACK
English
33

connects to the car body ground ( - ).
• Make sure all the connections are routed away from any
potentially pinching or slicing other metallic parts.
• Slowly slide the radio into the sleeve until it locks in place.
• The rubber ring will act as a seal against DIN Sleeve. At the
English
left and right sides of the ring a slot space will be provided
by pulling slowly the left and right side of the ring.
4.4. Removing the radio from DIN Sleeve
If you plan to remove the radio from DIN Sleeve, you should do it
using the provided two removal keys as explained below:
• Fully insert both removal keys straight into the slot spaces
provided by rubber ring on the left and the right edges of
the radio front panel.
• You cannot remove the radio if only one key is used.
• Press in fully and the radio will unlock from the sleeve
making withdrawal from the sleeve possible.
• Store the keys in a safe place for future use.
34

5. Turn on/off
Turn the rotary volume switch clockwise to power on and adjust
the sound level for comfortable reception.
5.1. Country switching
The AE 6491 NRC supports all current european CB radio
standards.
• Switch the Power on, while keeping the required button
(see below table) pressed for each country setting
• Then release button(s) again
English
The factory default setting is „EU“.
This last key combination is used to perform a Factory Reset (to
default settings). This may be a useful action in cases where the
radio may perhaps react abnormal.
35

6. Operation / Buttons
6.1. AM/FM switch
English
You can select AM or FM modulation by pressing the AM/FM
button.
Please note that in the German 80 CH system it is possible (and
allowed) to listen in AM on all 80 channels, but transmission
is only possible on CH 1-40 in AM. During receive mode, the
bar graph shows the strengths of the received signal, during
transmission, it shows the relative output power. In dE and EU
settings, the AM power depends on the jumper setting on the
lower printed circuits board side (see country switching).
6.2. SCAN
Your AE 6491 NRC incorporates a scanning feature. The radio
will scan through all channels and will stop at BUSY channels. It
will stay on that channel further seven seconds after conversation
has stopped and then it will resume scanning.
• To start scanning, turn on the power rst and adjust the
volume and squelch.
• Press the SCAN button to start scanning. The word SC will
appear in the LCD display and the unit will start scanning.
• If you want to stop scanning you can push the scan button
again or press the push to talk switch.
36

6.3. VOX function / EMG Channel selection
Short press VOX/EMG button to activate or deactivate the
VOX function. The VOX function allows to communicate hands
free. When the VOX function is activated, the radio recognizes
speech and automatically starts transmitting.
Long press VOX/EMG (Emergency) button for instant access
to the international Calling & Emergency channel 9, which
is monitored by all truckers and many CB users and in some
regions even by road safety organizations. If you need any help
or assistance, it is a good idea to call on this channel 9. Truckers
can be reached in most cases in AM mode.
The emergency channel is also used on the German highways
as warning system in case of accidents, road maintenance or
serious trafc jams with collision danger. If you pass a special
beacon on your lane and a dangerous situation may be in front of
you, you will be warned by alarm tones and voice announcement.
With the VOX/EMG key you can toggle between CH 9 and your
previously used channel.
The other, often used calling channel is Channel 19. If you want
to use CH 19, please use FC and the second function button
SHIFT.
English
37

6.4. Memory channels (MEM)
English
To access memorized channels simply press the „MEM“ button
and choose the desired memory channel from M1 to M5 by
pressing one of the buttons AM/FM to ASQ.
6.5. Squelch control (SQ)
The AE 6491 NRC features 3 different squelch systems:
• Automatic squelch (ASQ)
• Manual squelch
• Tone squelch (CTCSS)
All of them are masking the noise of the channel by muting the
speaker. Only when certain criterias are met, the squelch is
opening the speaker so the received signal can be heard.
6.5.1. Automatic Squelch (ASQ)
The ASQ is constantly checking the noise level on the channel.
Once a signal is received, the noise level reduces and the ASQ
opens. Pressing the ASQ button activates or deactivates the
ASQ function.
The current status is indicated by the ASQ symbol in the display.
The ASQ can be adjusted in 3 levels, level 1 has the highest
sensitivity.
38

Advantage: highest sensitivity and thus highest communiction
range
Disadvantage: due to interferences e.g. sunspot activity,
electronic devices, etc., it may open without actually receiving
any signal. In this case either the manual or tone squelch will
work better.
6.5.2. Manual squelch
By turning the manual squelch clockwise it eliminates the
background noise. The further the squelch is turned, the stronger
the receiving signal has to be to open the squelch.
The normal setting is usually the point at which the squelch
barely mutes the speaker.
Advantage: when set to a high level it can be used to only hear
near stations and block all stations further away.
Disadvantage: needs to be set manually. When accidentally set
too high, it results in a loss of sensitivity and thus range
English
39

6.5.3. Tone Squelch (CTCSS)
Besides of the RF-level controlled Squelch and the ASQ, the
radio is also equipped with CTCSS. CTCSS adds an unhearable
tone to the transmission. If enabled, the squelch of a receiving
radio only opens, when it receives a transmission from a radio
with the same CTCSS setting. There are 38 different tones
English
available. The CTCSS can be set separately for each channel
and is only available in FM.
• Select the desired channel with Rotary knob or UP/DOWN
• Press FC + CTCSS / ASQ
• With the Rotary knob or UP/DOWN key select the CTCSS
tone from 1 to 38 or “of” to disable CTCSS
• Shortly press the PTT key
Advantage: allows selective reception of certain stations.
Disadvantage: all communication partners need radios with
CTCSS. Lower sensitivity and thus lower range compared to
ASQ
7. Operation for secondary functions / Function
Selector (FC)
The FC button also has a second function:
If you short press the FC button, you activate the second function
of each button, which is written above the keys.
40

7.1. MENU
This MENU button can control eight SUB MENU functions in
sequence.
To start the MENU, please consider that it is a secondary function
like all others, which will be described in this chapter.
• You must press the FUNCTION knob (squelch button FC)
rst.
• The display will show FC
• Now press the MENU (AM/FM) button
You can set the following:
7.1.1. Microphone gain
7.1.2. VOX sensitivity
7.1.3. VOX delay gain
7.1.4. Keytones on/off
7.1.5. Roger Beep on/off
7.1.6. LCD backlighting color select
7.1.7. LCD backlighting (dimmed and bright).
7.1.8. ASQ Level
7.1.9. NRC noise reduction function
Selection will be made by UP or DOWN buttons on the
microphone or by the rotating channel switch.
Press MENU one or several times for xing your selection and
going to the next step.
English
41

7.1.1. Microphone Gain
Set the level of the microphone gain in VOX mode. The bigger
the distance between the speaker and the microphone, the
higher the value must be selected. With an higher value, noises
such as e.g. wind and engine noise will be transmitted.
English
You can set the delay time in 9 levels.
The default setting is level 6.
7.1.2. VOX Sensitivity Level
The VOX level sets the noise level at which the automatic VOX
transmission is activated.
1 = low sensitivity, VOX only reacts to very loud noise
9 = high sensitivity, VOX already reacts to very low noise
The default setting is level 6.
7.1.3. VOX Delay Time
The VOX delay time determines the time after which the
automatic VOX transmission turns off without any sound being
detected:
42

Level 1 2 3 4 5 6 7 8 9
Time
(Sec)
You can set the delay time in 9 levels.
The default setting is level 4.
0,5 1,0 1,5 2,0 2,5 3,0 3,5 4,0 4,5
7.1.4. Keytones
Activate/deactivate the keytones (Beep on/off).
7.1.5. Roger Beep
The Roger Beep function signals the receiver that the other end
has ended the radio message.
7.1.6. LCD backlighting color selection
Select the green or red background color.
English
43

7.1.7. LCD backlighting brightness control
Select a background illuminiation: dimmed (di) or bright (br) .
7.1.8. ASQ Sensitivity
Select an ASQ sensitivity level: 1 to 3.
English
7.1.9. NRC noise reduction function
It lters out static noise in receiving mode.
Turn the noise reduction function on or off. If active the display
shows NR.
7.2. MSCAN
The Memory channel Scan feature allows the radio to
automatically scan through your 5 favorite channels.
• To access, press FC
and MSCAN
• M-SC will appear in the
LCD.
44

Now the radio scans automatically only the favorite channels
and stops where radio trafc is detected.
Note: To program channels of your choice see the chapter under
MSAVE on the next page
7.3. SHIFT
The SHIFT function button for
instant access to the alternative
Trucker Emergency or calling
channel 19.
With FC + SHIFT you can
toggle between CH 19 and
the previously used normal
operating channel.
7.4. MSAVE
This MSAVE button is used to store any channel in the each
memory buttons at M1 to M5.
To store channels:
• Select the desired channel with Rotary knob or UP/DOWN
• Press FC + MSAVE / MEM
• You can choose any memory channel number with a button
from MENU (M1) to CTCSS (M5)
English
45

8. Technical Specications
General
Voltage Operation 12 V/24 V DC
English
Temperature -10 ˚C bis +55 ˚C
Channel Step 10 kHz
Dimension 188 (B) x 57 (H) x 131 (T) mm
Weight 1,9 kg with accessory
External Speaker Jack 3,5 mm mono type
UHF type (PL) antenna
connector
Microphone socket GDCH 6 pin standard
Transmitter
Output Power FM/AM 4 Watt
Frequency Range 26,565-27,405 MHz
Frequency Tolerance +/- 100 Hz
Modulation Sensitivity 2,5 mV (1250 Hz Input)
Modulation Capability AM 85 % / FM 2,0 kHz
SO 239 (50 Ohms socket for PL 259 plugs)
46

Receiver
Sensitivity
Squelch close up to 1000µV
Auto Squelch 0.5µV
S/N ratio 40dB
Distortion 3%
S-meter sensitivity of S9 100µV
Audio Output power minimum 4 Watts at 8 Ohms
AM: 0.5µV (SINAD 10dB), FM: 0.5µV
(SINAD 20dB)
English
47

8.1. CTCSS Tone frequency chart
No. Freq. (Hz) No. Freq. (Hz)
Of CTCSS off 19 127.3
01 67.0 20 131.8
02 71.9 21 136.5
English
03 74.4 22 141.3
04 77.0 23 146.2
05 79.7 24 151.4
06 82.5 25 156.7
07 85.4 26 162.2
08 88.5 27 167.9
09 91.5 28 173.8
10 94.8 29 179.9
11 97.4 30 186.2
12 100.0 31 192.8
13 103.5 32 203.5
14 107.2 33 210.7
15 110.9 34 218.1
16 114.8 35 225.7
17 118.8 36 233.6
18 123.0 37 241.8
38 250.3
48

9. Trouble shooting
Check at rst the power supply and the fuse. A problem may be
caused through power supply, when no light or display appears
after switching on. If the unit works in a strange way, disconnect
the power supply cable (or take out the fuse from the holder),
while the radio remains switched on, wait some time (minimum
10 seconds), and then reconnect power cord again.
Another method is to make a “Factory Default“-reset. This reset
may also reset the country switching and the last channel usedthe radio just starts again like a brand new radio which had not
yet been connected.
• Switch the radio off
• Press AM/FM and MEM button and keep them pressed
during switching the radio on
• Release buttons
• The display shows rS and after a short time the radio starts
again. In most cases the functions of the radio will be
restored now.
• Check the microphone and antenna connector
If the reset procedure does not help, please contact our service
hotline.
English
49

10. Safety Warnings
Vehicles with air bags:
• Do not place your radio in the area over an air bag or in the
English
air bag deployment area.
• Air bags inate with great force.
• If a radio is placed in the air bag deployment area and
the air bag inates, the radio may be propelled with great
force and can cause serious injury to the occupants of the
vehicle.
Potentially Explosive Atmospheres
• Turn you radio off when in any area with a potentially
explosive atmosphere, unless it is a type especially qualied
for such use (for example, by intrinsic safe approvals)
• Sparks in such areas could cause an explosion or re
resulting in injury or even death.
Blasting caps areas
• To avoid possible interference with blasting operations turn
your radio OFF near electrical blasting caps or in a „blasting
area“ or in areas posted: „Turn off any two way radio.“ Obey
all signs and instructions.
•
Use While Driving
• Check the laws regarding the use of radios while driving
and always obey them.
• • In some European countries it is forbidden for the
driver to keep any microphone in hands or to operate a
radio during driving.
• • Some countries (like Germany) make a difference
between mobile phones and 2 way radios. Mobile phones
50

are only allowed to be operated in handsfree mode, while
CB & commercial two way radios are still allowed even with
hand microphone
11. Warranty and information on recycling
We are legally obligated to enclose for each device information
on disposal and warranty, as well as an EU declaration of
conformity with the instructions for use in different countries.
You will nd this information on the following pages.
2-year warranty from the date of purchase
The manufacturer/dealer provides a two-year warranty from
the date of purchase for this product. This warranty covers
all failures due to defective components or faulty functions
within the warranty period, except for wear and tear such as
empty batteries, scratches on the display, defective housing,
defective antenna and defects due to external inuences such
as corrosion, overvoltage due to improper external power
supply or the use of unsuitable accessories. Defects caused by
improper use are also excluded from the warranty.
In the event of a warranty claim, please contact your dealer.
The dealer will repair or replace the device or pass it on to an
authorised service centre.
English
51

12. CE declaration of conformity
Standards and directives
Alan Electronics GmbH hereby declares that the
radio device model AE 6491 NRC is in accordance
English
following Internet address:
http://service.alan-electronics.de/CE-Papiere/
with Regulation 2014/53/EU. The full text of the EU
declaration of conformity can be found at the
12.1. EEAG and Recycling
European laws prohibit the disposal of old or defective
electrical or electronic equipment via household waste.
To dispose of the device, return it to a collection point in
your municipality for recycling. This system is nanced
by the industry and ensures environmentally friendly
disposal and recycling of valuable raw materials.
13. Service address
Technical hotline (for devices sold in Germany)
Alan Electronics GmbH
Service
Daimlerstraße 1g
D-63303 Dreieich
Germany
Call our service hotline +49 (0) 6103/9481 - 66 (normal rates on
the German landline network) or send us an e-mail:
service@albrecht-midland.de
Printing errors may occur.
© 2020 Alan Electronics GmbH, Daimlerstraße 1g - 63303 Dreieich - Germany
52

RADIO CB AE 6491 NRC
Manuel / Français

Table des matières
1. Informations importantes ....................................................................55
2. Boutons et connecteurs ......................................................................56
3. Contenu du paquet .............................................................................58
4. Installation de la radio CB...................................................................58
4.1. Installation d’antenne ..................................................................58
4.2. Connexion d’alimentation CC 12 V/24 V .....................................59
4.3. Montage avec manchon DIN .......................................................60
4.4. Retrait de la radio du manchon DIN ............................................61
5. Instructions d'utilisation ......................................................................62
5.1. Allumer/Éteindre ..........................................................................62
5.2. d'un sélecteur de pays, ..............................................................62
Français
5.3. Contrôle du silencieux (SQ) ........................................................63
5.3.1. Silencieux automatique (ASQ) ..............................................63
5.3.2. Silencieux manuel .................................................................64
5.3.3. Silencieux de tonalité (CTCSS) .............................................64
5.4. Sélecteur de fonction (FC) ..........................................................65
5.5. Commutateur AM/FM .................................................................65
5.6. BALAYAGE..................................................................................66
5.7. Fonction VOX/Sélection du canal EMG ......................................67
5.8. Canaux de mémoire (MEM) ........................................................68
6. Utilisation des fonctions secondaires .................................................68
6.1. MENU ..........................................................................................68
6.1.1. Gain du micro ........................................................................69
6.1.2. Niveau VOX ..........................................................................70
6.1.3. Temps de retard VOX ............................................................70
6.1.4. Activer/désactiver le bip .......................................................70
6.1.5. Activer/désactiver le bip Roger .............................................70
6.1.6. Sélection de la couleur du rétroéclairage du LCD ................71
6.1.7. Contrôle de la luminosité du rétroéclairage LCD .................71
6.1.8. Sensibilité ASQ (niveau 1 à 3) ..............................................71
6.1.9. NRC Fonction de réduction du bruit ......................................72
6.2. MSCAN .......................................................................................72
6.3. CHANGEMENT ...........................................................................72
6.4. MSAVE ........................................................................................73
7. Spécications techniques ..................................................................73
7.1. Tableau des fréquences de tonalité CTCSS ...............................75
8. Assistance ..........................................................................................76
9. Avertissements de sécurité .................................................................77
10. Garantie et informations relatives au recyclage ...............................78
11. Déclaration de conformité CE ..........................................................79
11.1. Directive DEEE et recyclage .....................................................79
12. Contacts du service d’assistance .....................................................80
54

1. Informations importantes
Lisez avant d’utiliser votre radio AE 6491 NRC.
Cette radio CB de haute technologie combine la dernière
conception de circuit avec un système de contrôle à
microprocesseur. Très simple et grâce aux fonctionnalités
avancées, il s’agit de la radio par excellence pour vos
communications mobiles.
Veuillez n‘utiliser que le microphone d‘origine sur la radio CB,
sinon le bon fonctionnement de la fonction mains libres VOX ne
pourra être garanti.
Les normes standard suivantes sont incluses
• Système entièrement synthétisé avec microprocesseur
• Grand et large angle pour afchage multifonction
(technologie STN)
• Fonction VOX pour une communication mains libres
• Balayage complète des canaux ou des canaux mémoire
• Système de contrôle automatique du silencieux (ASQ)
• CTCSS (38 tonalités)
• Accès instantané au canal 9 ou 19
• Bouton rotatif simple pour le canal, le volume et le silencieux
• Connecteur de haut-parleur externe (3,5 mm mono) et
prise d’antenne coaxiale (SO-239)
• Armoire tout en métal et taille idéale pour une installation
facile dans un montage sur tableau de bord.
• Indication RX/TX facile avec voyant bicolore.
• Prend en charge toutes les normes européennes de radio
CB.
• AE 6491 NRC prend en charge l’alimentation de voiture
12 V et 24 V sans commutation
Français
55

2. Boutons et connecteurs
N° Description
1 Bouton Allumer/Éteindre et régler le volume
2 Écran LCD
3 Bouton silencieux
4 Sélecteur de fonction par simple appui
Français
5 Connecteur micro
6 AM/FM (bouton Menu)
7 SCAN, MSCAN (balayage mémoire)
VOX activé/désactivé, EMG (canal d’urgence 9/19),
8
CHANGEMENT
MEM (rappel de mémoire), MSAVE (sauvegarde de
9
mémoire)
10 ASQ (silencieux automatique), CTCSS
11 Contrôle de canal rotatif
12 Connexion d’antenne avec connecteur coaxial PL 259
13 Entrée d'alimentation 12/24V
14 Prise de haut-parleur externe (pour che mono 3,5 mm)
Microphone
N° Description
15 Commutateur Push-to-talk (PTT)
16 Bouton BAS
17 Activer/désactiver ASQ
18 Bouton HAUT
56

57
Français

3. Contenu du paquet
1. Radio CB VOX AE 6491
2. Microphone
3. Cordon d’alimentation CC avec fusible en ligne
4. un support pour microphone
5. Kit de montage DIN (1 manchon DIN et 2 clés de retrait)
6. Guide d’utilisation
Français
4. Installation de la radio CB
Lors de l’installation de votre radio CB dans votre véhicule,
vériez que vous n’endommagez pas le câblage ou les
composants du véhicule qui peuvent être cachés autour de la
position de montage.
4.1. Installation d’antenne
Pour obtenir les meilleures performances de votre radio CB, il
est important d’installer une antenne de bonne qualité.
• Vous devez acheter une antenne mobile appropriée conçue
pour la bande de fréquences 27 MHz.
• Connectez l’antenne à la prise d’antenne arrière à l’aide
d’un connecteur coaxial PL259. Le cas échéant, soudez
soigneusement le connecteur sur le connecteur intérieur du
câble coaxial et évitez tout court-circuit avec l’un des ls de
cuivre ns de blindage coaxial extérieur.
• Pour obtenir des performances maximales de l’émetteurrécepteur, montez l’antenne dans une position appropriée
pour un bon rayonnement libre de la surface métallique de
la voiture.
• Les antennes mobiles standard ont besoin d’une bonne
connexion à la masse de la carrosserie pour une meilleure
efcacité. La plupart des antennes mobiles standard ne
58

peuvent pas fonctionner sans connexion à la masse de la
carrosserie !
• Des antennes spéciales sans terre sont disponibles pour les
camping-cars ou les camions dans les cas où la position de
l’antenne est en plastique ou en bre de verre ou lorsqu’une
mise à la terre n’est pas possible. De telles antennes
ne fonctionnent que sur les structures de carrosserie
en bre de verre ou en plastique et ne fonctionnent pas
immédiatement sur les structures métalliques.
• N’utilisez aucune fonction de transmission (ex. PTT) avant
d’installer l’antenne
4.2. Connexion d’alimentation CC 12 V/24 V
La version AE 6491 NRC peut fonctionner sur des systèmes de
tension 12 ou 24 V. Une commutation n’est pas nécessaire.
Français
59

4.3. Montage avec manchon DIN
Avant l’installation, vériez que cette radio s’insère dans la zone
de montage souhaitée et que vous disposez de tous les kits
nécessaires pour terminer l’installation
• Retirez le support s’il a été précédemment installé.
• Installez le manchon DIN dans l’ouverture de votre tableau
de bord, lèvre tournée vers l’extérieur.
• Poussez les languettes supérieure et inférieure pour
maintenir fermement le manchon en place.
• Avant d’insérer cette radio dans le manchon, câblez le
Français
câble de l’antenne précédemment montée
• Connectez les ls d’alimentation CC. Le l ROUGE se
connecte à la connexion positive (+) sur votre bloc de
fusibles, tandis que le NOIR se connecte à la masse de la
carrosserie (-).
AE 6491 NRC
• Assurez-vous que toutes les connexions sont éloignées
de tout pincement ou tranchage potentiel d’autres parties
métalliques.
• Glissez lentement la radio dans le manchon jusqu’à ce
qu’elle se verrouille en place.
• L’anneau en caoutchouc agit comme un joint contre le
manchon DIN. Sur les côtés gauche et droit de l’anneau,
un espace est fourni en tirant lentement les côtés gauche
et droit de l’anneau.
60

4.4. Retrait de la radio du manchon DIN
Si vous prévoyez de retirer la radio de la manche DIN, vous
devez le faire à l’aide des deux clés de retrait fournies, comme
expliqué ci-dessous:
• Insérez complètement les deux clés de retrait directement
dans les emplacements prévus par l’anneau en caoutchouc
sur les bords gauche et droit du panneau avant de la radio.
• Vous ne pouvez pas retirer la radio avec une seule clé.
• Appuyez à fond et la radio se déverrouille du manchon, ce
qui rend possible le retrait du manchon.
• Conservez les clés dans un endroit approprié pour une
toute référence future.
Français
61

5. Instructions d'utilisation
5.1. Allumer/Éteindre
Tournez le bouton rotatif de volume dans le sens horaire pour
allumer et réglez le niveau sonore pour une réception confortable.
Français
5.2. d'un sélecteur de pays,
L’AE 6491 NRC prend en charge toutes les normes de radio CB
européennes actuelles.
• Allumez, tout en maintenant le bouton requis (voir le tableau
ci-dessous) appuyé pour chaque paramètre de pays
• Relâchez ensuite les boutons
62

Cette dernière combinaison de boutons est utilisée pour
effectuer une réinitialisation d’usine (aux paramètres par défaut).
Cela peut être une action utile dans les cas où la radio peut
réagir anormalement.
Une réinitialisation peut restaurer les fonctions si le CPU semble
être bloqué.
5.3. Contrôle du silencieux (SQ)
L’AE 6491 NRC dispose de 3 systèmes de silencieux différents :
• Silencieux automatique (ASQ)
• Silencieux manuel
• Silencieux de tonalité (CTCSS)
Tous masquent le bruit du canal en coupant le son du hautparleur. Ce n’est que lorsque certains critères sont remplis que
le silencieux ouvre le haut-parleur pour que le signal reçu puisse
être entendu.
5.3.1. Silencieux automatique (ASQ)
Le Silencieux automatique (ASQ) vérie constamment le niveau
de bruit sur le canal. Une fois un signal reçu, le niveau de bruit
diminue et l’ASQ s’ouvre. Appuyer sur le bouton ASQ active ou
désactive la fonction ASQ.
L’état actuel est indiqué par le symbole ASQ à l’écran.
Avantage : sensibilité la plus élevée et donc plage de
communication la plus élevée
Désavantage : en raison d’interférences, par ex. l’activité des
taches solaires, les appareils électroniques, etc., il peut s’ouvrir
sans recevoir de signal. Dans ce cas, le silencieux manuel ou de
tonalité fonctionnera mieux.
Français
63

5.3.2. Silencieux manuel
Français
En tournant le silencieux manuel dans le sens horaire, il élimine
le bruit de fond. Plus le silencieux est tourné, plus le signal de
réception doit être fort pour ouvrir le silencieux.
Le réglage normal est généralement le point auquel le silencieux
coupe à peine le haut-parleur.
Avantage : lorsqu’il est réglé sur un niveau élevé, il peut être
utilisé pour entendre uniquement les stations proches et bloquer
toutes les stations les plus éloignées.
Désavantage : doit être réglé manuellement. Lorsqu’il est
accidentellement réglé trop haut, il en résulte une perte de
sensibilité et donc de portée
5.3.3. Silencieux de tonalité (CTCSS)
Outre le silencieux contrôlé par niveau RF et l’ASQ, la radio est
également équipée de CTCSS. Le CTCSS ajoute une tonalité
non écoutable à la transmission. S’il est activé, le silencieux
d’une radio réceptrice ne s’ouvre que lorsqu’elle reçoit une
transmission d’une radio avec le même réglage CTCSS. Il existe
38 tonalités différentes disponibles. Le CTCSS peut être réglé
séparément pour chaque canal et n’est disponible qu’en FM.
• Sélectionnez le canal souhaité avec le bouton rotatif ou
HAUT/BAS
• Appuyez sur FC + CTCSS/ASQ
64

• Avec le bouton rotatif ou le bouton HAUT/BAS, sélectionnez
la tonalité CTCSS de 1 à 38 ou «off» pour désactiver
CTCSS
• Appuyez sur le bouton PTT
Avantage : permet la réception sélective de certaines stations.
Désavantage: tous les partenaires de communication doivent
avoir une radio avec CTCSS. Une sensibilité plus faible et donc
plage inférieure par rapport à l’ASQ
5.4. Sélecteur de fonction (FC)
Le bouton FC a également une deuxième fonction :
Si vous appuyez sur le bouton FC, vous activez la deuxième
fonction de chaque bouton, qui est écrite au-dessus des boutons.
5.5. Commutateur AM/FM
Français
Vous pouvez sélectionner la modulation AM ou FM en appuyant
sur le bouton AM/FM.
Notez que dans le système allemand 80 CH, il est possible (et
autorisé) d’écouter en AM sur les 80 canaux, mais la transmission
65

n’est possible que sur les canaux 1-40 en AM. Pendant le mode
de réception, le graphique à barres montre les forces du signal
reçu, pendant la transmission, il montre la puissance de sortie
relative. Dans les réglages dE et EU, la puissance AM dépend
du réglage du cavalier sur le côté inférieur de la carte de circuits
imprimés (voir commutation de pays).
5.6. BALAYAGE
Français
Votre AE 6491 NRC intègre une fonction de recherche. La
radio balaye tous les canaux et s’arrête sur les canaux BUSY.
Il reste sur ce canal encore sept secondes après la n de la
conversation, puis reprendra le balayage.
• Pour commencer le balayage, allumez d’abord l’appareil et
réglez le volume et le silencieux.
• Appuyez sur le bouton SCAN pour lancer le balayage. Le
mot SC apparaît sur l’écran LCD et l’appareil commencera
le balayage.
• Si vous souhaitez arrêter le balayage, vous pouvez appuyer
à nouveau sur le bouton scan ou appuyer sur le bouton
Push-To-Talk.
Cela désactive la fonction de balayage et transmet sur ce canal.
66

5.7. Fonction VOX/Sélection du canal EMG
Appuyez sur le bouton VOX/EMG pour activer ou désactiver
la fonction VOX. La fonction VOX permet de communiquer
les mains libres. Lorsque la fonction VOX est activée, la
radio reconnaît la parole et commence automatiquement la
transmission.
Maintenez appuyé le bouton VOX/EMG (Urgence) pour un accès
instantané au canal international d’appel et d’urgence 9, qui est
surveillé par tous les camionneurs et de nombreux utilisateurs
CB et dans certaines régions, même par les organisations de
sécurité routière. Si vous avez besoin d’aide ou d’assistance,
n’hésitez pas appeler sur ce canal 9. Les camionneurs peuvent
être joints dans la plupart des cas en mode AM.
Le canal d’urgence est également utilisé sur les autoroutes
allemandes comme système d’alerte en cas d’accident,
d’entretien routier ou d’embouteillages graves avec danger de
collision. Si vous passez une balise spéciale sur votre voie et
qu’une situation dangereuse peut être devant vous, vous serez
averti par des tonalités d’alarme et une annonce vocale.
Avec le bouton VOX/EMG, vous pouvez basculer entre le canal
CH 9 et votre canal précédemment utilisé.
L’autre canal d’appel souvent utilisé est le canal 19. Si vous
souhaitez utiliser CH 19, veuillez utiliser FC et le deuxième
bouton de fonction SHIFT.
Français
67

5.8. Canaux de mémoire (MEM)
Pour accéder aux canaux mémorisés, appuyez simplement sur
le bouton «MEM» et choisissez le canal de mémoire souhaité de
M1 à M5 en appuyant sur l’un des boutons AM/FM à ASQ.
Français
6. Utilisation des fonctions secondaires
6.1. MENU
Ce bouton MENU peut contrôler huit fonctions SOUS MENU en
séquence.
Pour démarrer le MENU, considérez qu’il s’agit d’une fonction
secondaire comme toutes les autres, qui sera décrite dans ce
chapitre.
• Vous devez d’abord appuyer sur le bouton FUNCTION
(bouton de silencieux FC).
• L’écran afche FC
• Appuyez maintenant sur le bouton MENU (AM/FM)
68

Vous allez régler les éléments suivants :
6.1.1. Gain du micro
6.1.2. Sensibilité VOX
6.1.3. Gain de retard VOX
6.1.4. Activer/désactiver les boutons
6.1.5. Activer/désactiver le bip Roger
6.1.6. Sélection de la couleur du rétroéclairage du LCD
6.1.7. Rétroéclairage LCD (atténué et lumineux).
6.1.8. Niveau ASQ (silencieux automatique)
6.1.9. NRC Fonction de réduction du bruit
La sélection se fera par les boutons HAUT ou BAS du micro ou
par le commutateur de canal rotatif.
Appuyez une ou plusieurs fois sur MENU pour xer votre
sélection et passer à l’étape suivante.
6.1.1. Gain du micro
Réglez le niveau du gain du micro en mode VOX. Plus la distance
entre le haut-parleur et le micro est grande, plus une valeur
élevée doit être sélectionnée. Avec une valeur plus élevée, des
bruits tels que par ex. le bruit du vent et du moteur sera transmis.
Vous pouvez régler le temps de retard sur 9 niveaux. Le
paramètre par défaut est le niveau 6.
Français
69

6.1.2. Niveau VOX
Le niveau VOX dénit le niveau de bruit auquel la transmission
automatique VOX est activée.
1 = faible sensibilité, VOX ne réagit qu’aux bruits très forts
9 = haute sensibilité, VOX réagit déjà à un bruit très faible
Français
Le paramètre par défaut est le niveau 3.
6.1.3. Temps de retard VOX
Le temps de retard VOX détermine le temps après lequel la
transmission VOX automatique s’éteint sans qu’aucun son ne
soit détecté :
Niveau 1 2 3 4 5 6 7 8 9
Temps (s) 0,5 1,0 1,5 2,0 2,5 3,0 3,5 4,0 4,5
Vous pouvez régler le temps de retard sur 9 niveaux. Le
paramètre par défaut est le niveau 4.
6.1.4. Activer/désactiver le bip
Activer/désactiver les tonalités
6.1.5. Activer/désactiver le bip Roger
Cela signale au récepteur que l’autre interlocuteur a terminé le
message radio.
70

6.1.6. Sélection de la couleur du rétroéclairage du LCD
6.1.7. Contrôle de la luminosité du rétroéclairage LCD
(atténué ou lumineux)
6.1.8. Sensibilité ASQ (niveau 1 à 3)
Français
71

6.1.9. NRC Fonction de réduction du bruit
Activez ou désactivez la fonction de réduction du bruit.
Il ltre le bruit statique en mode réception.
6.2. MSCAN
Français
La fonction de balayage des canaux mémoire permet à la radio
de parcourir automatiquement les 5 canaux préférés.
• Pour y accéder, appuyez sur FC et MSCAN
• M-SC apparaît sur l’écran LCD.
Désormais, la radio ne
balaye automatiquement
que les canaux favoris et
s’arrête là où le trac radio
est détecté.
Remarque : Pour
programmer les canaux de
votre choix, voir le chapitre
sous MSAVE à la page
suivante
6.3. CHANGEMENT
Le bouton de la fonction
SHIFT pour un accès
instantané à l’autre canal
Urgence du camionneur ou au
canal d’appel 19.
Avec le bouton FC + SHIFT,
vous pouvez basculer entre
le canal CH 19 et votre canal
normal précédemment utilisé.
72

6.4. MSAVE
Le bouton MSAVE est utilisé pour stocker tout canal dans
chacun des boutons de mémoire de M1 à M5.
Pour stocker des canaux :
• Sélectionnez le canal souhaité avec le bouton rotatif ou
HAUT/BAS
• Appuyez sur FC + MSAVE/MEM
• Vous pouvez choisir tout numéro de canal mémoire avec
un bouton de MENU (M1) à CTCSS (M5)
7. Spécications techniques
Spécications générales
Utilisation de tension 12/24 VCC
Température -10˚C bis +55˚C
Pas de canal 10 kHz
Dimensions 188 (B) x 57 (H) x 131 (T) mm
Français
73

Poids 1,9 kg (avec les accessoires)
Prise de haut-parleur externe 3,5 mm mono
Connecteur d’antenne de type
UHF (PL)
Connecteur pour microphone GDCH 6 broches standard
Émetteur
Français
Puissance en sortie FM/AM 4 Watt
Plage de fréquences 26,565-27,405 MHz
Tolérance de fréquence +/- 100 Hz
Sensibilité à la modulation 2,5 mV (entrée 1250 Hz)
Capacité de modulation AM 85 % / FM 2,0 kHz
Récepteur
Sensibilité
Silencieux fermé jusqu'à 1000µV
Silencieux automatique 0,5µV
Rapport signal/bruit 40dB
Distorsion 3%
Sensibilité S-mètre de S9 100µV
Puissance de sortie audio minimum 4 Watts avec 8 Ohms
SO 239 (prise 50 Ohms pour ches PL 259)
AM : 0,5µV (SINAD 10dB), FM : 0,5µV
(SINAD 20dB)
74

7.1. Tableau des fréquences de tonalité CTCSS
N° Fréq. (Hz) N° Fréq. (Hz)
Désactivé CTCSS Désactivé 19 127,3
01 67,0 20 131,8
02 71,9 21 136,5
03 74,4 22 141,3
04 77,0 23 146,2
05 79,7 24 151,4
06 82,5 25 156,7
07 85,4 26 162,2
08 88,5 27 167,9
09 91,5 28 173,8
10 94,8 29 179,9
11 97,4 30 186,2
12 100,0 31 192,8
13 103,5 32 203,5
14 107,2 33 210,7
15 110,9 34 218,1
16 114,8 35 225,7
17 118,8 36 233,6
18 123,0 37 241,8
38 250,3
Français
75

8. Assistance
Avant tout, vériez l'alimentation électrique et le fusible. Un
problème peut être dû à l’alimentation, lorsqu’aucun voyant ou
afchage n’apparaît après l’allumage. Si la radio ne fonctionne
pas normalement, laissez-la en position marche et débranchez
son cordon d'alimentation de la prise secteur (ou retirez le
fusible du support). Attendez un instant (au-moins 10 secondes)
puis rebranchez le cordon d'alimentation.
Vous pouvez également essayer de rétablir les "réglages en
Français
usine" (réinitialiser la radio CB). Cette opération peut également
réinitialiser le code de pays et le dernier canal que vous avez
utilisé, ramenant la radio exactement dans l'état où elle était
lorsque vous l'avez achetée, avant de l'allumer pour la première
fois.
• Éteignez la radio
• Maintenez les boutons AM/FM et MEM et pendant
l’allumage de la radio
• Libérez les boutons
• L’écran afche rS et après un court instant, la radio
redémarre. Dans la plupart des cas, cette opération suft
pour établir le fonctionnement normal de votre radio CB.
• Vériez le connecteur du micro et de l’antenne
Si la procédure de réinitialisation n’est d’aucune aide, contactez
notre service d’assistance téléphonique.
76

9. Avertissements de sécurité
Véhicules avec airbags :
• Ne placez pas la radio dans la zone au-dessus d’un airbag
ou dans la zone de déploiement de l’airbag.
• Les airbags se gonent avec une grande force.
• Si une radio est placée dans la zone de déploiement
de l’airbag et que l’airbag se gone, la radio peut être
propulsée avec une grande force et peut blesser gravement
les occupants du véhicule.
Atmosphère potentiellement explosifs
• Éteignez votre radio lorsque vous vous trouvez dans
une zone à atmosphère potentiellement explosive, sauf
s’il s’agit d’un type spécialement qualié pour une telle
utilisation (par exemple, par des approbations de sécurité
intrinsèque)
• Les étincelles dans de telles zones risquent de provoquer
une explosion ou un incendie entraînant des blessures ou
même les morts
Zones de dynamitage
• Pour éviter toute interférence possible avec les opérations
de dynamitage, éteignez votre radio près des zones
de dynamitage électriques ou dans une «zone de
dynamitage» ou dans des zones signalées : « Éteignez
toute radio bidirectionnelle. » Respectez tous les panneaux
et instructions.
Français
77

Utilisation en conduisant
• Consultez les lois concernant l’utilisation des radios en
conduisant et les respecter toujours.
• Dans certains pays européens, il est interdit au conducteur
de garder un micro en main ou d’utiliser une radio pendant
la conduite.
• Certains pays (comme l’Allemagne) font la différence entre
les téléphones portables et les radios bidirectionnelles.
Les téléphones portables ne sont autorisés qu’en mode
Français
mains libres, tandis que les radios bidirectionnelles CB
et commerciales sont toujours autorisées même avec un
micro à main
10. Garantie et informations relatives au
recyclage
Nous sommes légalement tenus de joindre à chaque appareil
des informations sur l’élimination et la garantie, ainsi qu’une
déclaration de conformité de l’UE avec les instructions
d’utilisation dans les différents pays. Vous trouverez ces
informations aux pages suivantes.
2 ans de garantie à partir de la date d’achat
Le fabricant/revendeur offre une garantie de deux ans à
compter de la date d’achat de ce produit. Cette garantie couvre,
pendant la période de garantie, toutes les défaillances dues à
des composants défectueux ou à des fonctions défectueuses,
à l’exception de l’usure normale telle que les piles vides,
les rayures sur l’écran, un boîtier défectueux, l’antenne
défectueuse et les défauts dus à des conditions extérieures
telles que la corrosion, la surtension due à une mauvaise
alimentation électrique externe ou à l’utilisation d’accessoires
non adaptés. Les défauts causés par une mauvaise utilisation
sont également exclus de la garantie.
78

En cas de réclamation au titre de la garantie, veuillez
contacter votre revendeur. Le revendeur réparera l’appareil, le
remplacera ou le transmettra à un centre de service agréé.
11. Déclaration de conformité CE
Normes et directives
Alan Electronics GmbH déclare par la présente
que le modèle d’appareil radio AE 6491 NRC est
conforme à la règlementation 2014/53/UE. Le texte
intégral de la déclaration de conformité UE est
disponible à l’adresse Internet suivante :
http://service.alan-electronics.de/CE-Papiere/
11.1. Directive DEEE et recyclage
La législation européenne interdit l’élimination des
appareils électriques ou électroniques anciens ou
défectueux avec les ordures ménagères. Lorsque vous
souhaitez vous débarrasser de l’appareil, retournezle à un point de collecte de votre municipalité pour
le recyclage. Ce système est nancé par l’industrie
et garantit une élimination et un recyclage écologiques des
matières premières précieuses.
Français
79

12. Contacts du service d’assistance
Ligne d’assistance technique (pour les appareils vendus en
Allemagne)
Alan Electronics GmbH
Service
Daimlerstraße 1g
D-63303 Dreieich
Allemagne
Français
Appelez notre ligne d’assistance téléphonique +49 (0)
6103/9481 - 66 (tarifs normaux sur le réseau xe allemand) ou
envoyez-nous un e-mail à l’adresse :
service@albrecht-midland.de
Des erreurs d’impression peuvent se produire.
© 2020 Alan Electronics GmbH - Daimlerstraße 1g - 63303 Dreieich - Allemagne
80

RADIO CB AE 6491 NRC
Manuale / Italiano

Indice
1. Informazioni importanti .......................................................................83
2. Comandi e connettori .........................................................................84
3. Contenuto della fornitura ....................................................................86
4. Installazione radio CB.........................................................................86
4.1. Installazione antenna ..................................................................86
4.2. Connessione alimentazione CC 12 V / 24 V ...............................87
4.3. Montaggio usando un supporto DIN ...........................................87
4.4. Rimozione della radio dal supporto DIN ......................................89
5. Funzionamento ...................................................................................90
5.1. Accensione/spegnimento ............................................................90
5.2. Commutazione del paese ..........................................................90
5.3. Controllo squelch (SQ) ................................................................91
5.3.1. Squelch automatico (ASQ) ....................................................91
5.3.2. Squelch manuale ..................................................................92
5.3.3. Squelch tono (CTCSS) ..........................................................92
5.4. Selettore funzione (FC) ...............................................................93
5.5. Interruttore AM/FM ......................................................................93
Italiano
5.6. SCANSIONE ...............................................................................94
5.7. Funzione VOX / Selezione canale EMG .....................................95
5.8. Canali memoria (MEM) ...............................................................96
6. Funzionamento delle funzioni secondarie ..........................................96
6.1. MENU ..........................................................................................96
6.1.1. Guadagno microfono .............................................................97
6.1.2. Livello VOX ...........................................................................97
6.1.3. Tempo ritardo VOX ................................................................98
6.1.4. Accensione/spegnimento bip ...............................................98
6.1.5. Attivare/disattivare il Roger Bip ............................................98
6.1.6. Selezione colore retroilluminazione LCD .............................99
6.1.7. Controllo luminosità retroilluminazione LCD ........................99
6.1.8. Sensibilità ASQ (Livello da 1 a 3) ..........................................99
6.1.9. NRC funzione di riduzione del rumore ..................................99
6.2. MSCAN .....................................................................................100
6.3. SPOSTARE ...............................................................................100
6.4. MSAVE ......................................................................................101
7. Speciche tecniche ..........................................................................102
7.1. Tabella frequenza tono CTCSS .................................................103
8. Risoluzione dei problemi ..................................................................104
9. Avvertenze per la sicurezza ..............................................................105
10. Garanzia e informazioni sul riciclaggio ...........................................106
11. Dichiarazione di conformità CE .....................................................107
11.1. WEEE e riciclaggio ..................................................................107
12. Indirizzo assistenza ........................................................................107
82

1. Informazioni importanti
Leggere prima di utilizzare la propria radio AE 6491 NRC.
La radio CB High Tech combina il più recente design del circuito
con il sistema di controllo del microprocessore. Funzionalità
utente molto semplice e avanzate la rendono la radio principale
per le comunicazioni mobili.
Si prega di utilizzare solo il microfono originale sulla radio CB,
altrimenti non è possibile garantire il corretto funzionamento
della funzione vivavoce VOX.
Sono incluse le seguenti funzionalità standard.
• Sistema completamente sintetizzato con microprocessore
• Lettura grandangolo e ampia per display multifunzione
(tecnologia STN)
• Funzione VOX per comunicazione vivavoce
• Due scelte di colore in verde e rosso
• Sistema controllo squelch automatico (ASQ)
• CTCSS (38 toni)
• Accesso istantaneo a canale 9 o 19
• Selezione AM/FM
• Manopole singole per canale, volume e squelch
• Connettore altoparlante esterno (3,5 mm mono) e presa
antenna coassiale (SO-239)
• Cabinet completamente in metallo e dimensioni ideali per
facile installazione per montaggio cruscotto.
• Facile indicazione RX/TX con LED a due colori.
• Supporta tutti gli standard radio CB europei.
• AE 6491 NRC supporta alimentazione per auto 12 V e 24 V
senza commutazione
Italiano
83

2. Comandi e connettori
N. Descrizione
1 Interruttore accensione/spegnimento e controllo volume
2 Display LCD
3 Controllo squelch
4 Selettore funzione con pressione breve
5 Connettore microfono
6 AM/FM (Pulsante Menu)
7 SCAN, MSCAN (Scansione memoria)
Italiano
Accensione/spegnimento VOX, EMG (Canale di
8
emergenza 9/19), SHIFT
9 MEM (Richiamo memoria), MSAVE (Salvataggio memoria)
10 ASQ (Squelch automatico), CTCSS
11 Manopola canale
12 Connessione antenna con connettore coassiale PL 259
13 Ingresso alimentazione CC 12/24V
Presa altoparlante esterno (per connettore mono da
14
3,5 mm)
Microfono
N. Descrizione
15 Interruttore Push-to-talk (PTT)
16 Tasto GIÙ
17 Accensione/spegnimento ASQ
18 Tasto SU
84

85
Italiano

3. Contenuto della fornitura
1. Radio CB AE 6491 NRC
2. Microfono
3. Cavo di alimentazione CC con fusibile integrato
4. Supporto microfono
5. Kit di montaggio DIN (1 manicotto DIN e 2 chiavi di
rimozione)
6. Manuale dell'utente
4. Installazione radio CB
Quando si installa la propria radio CB nel veicolo, controllare
che durante l'installazione non si danneggi alcun cablaggio
Italiano
o componenti del veicolo che può nascondersi intorno alla
posizione di montaggio.
4.1. Installazione antenna
Per ottenere le migliori prestazioni dalla propria radio CB è
importante installare un'antenna di buona qualità.
• È necessario acquistare un'antenna mobile idonea
progettata per la banda di frequenza 27MHz.
• Collegare l'antenna alla presa antenna posteriore usando
un connettore coassiale PL259. Quando necessario,
saldare il connettore con attenzione al connettore interno
del cavo coassiale ed evitare qualsiasi corto circuito con
uno dei li di rame sottili della schermatura coassiale
esterna.
• Per ottenere prestazioni massime dal ricetrasmettitore,
montare l'antenna in una posizione idonea per una
radiazione buna e libera dalla supercie metallica dell'auto.
• Antenne mobili standard necessitano una buona messa
a terra della carrozzeria dell'auto per migliore efcienza.
86

La maggior parte delle antenne mobili standard non
funzionano senza messa a terra della carrozzeria dell'auto.
• Antenne a terra speciali sono ottenibili per caravan o
camion in alloggiamento in cui la posizione dell'antenna è
realizzata in plastica o bre di vetro o dove la messa a terra
non è possibile. Tali antenne funzionano solo su strutture
di carrozzeria per auto in bre di vetro o plastica e non
funzionano immediatamente su strutture metalliche.
• Non utilizzare alcuna funzione di trasmissione (ad es. PTT)
prima di installare l'antenna.
4.2. Connessione alimentazione CC 12 V / 24 V
La versione AE 6491 NRC può funzionare su entrambi i sistemi
di tensione 12 o 24 V. Una commutazione non è necessaria.
4.3. Montaggio usando un supporto DIN
Prima dell'installazione, confermare che questa radio sia idonea
all'area di montaggio desiderata e si hanno a disposizione tutti i
kit necessari per completare l'installazione.
• Rimuovere la staffa se installate in precedenza.
• Installare il supporto DIN all'apertura del proprio cruscotto,
con bordo rivolto verso l'esterno.
• Estrarre le linguette superiore e inferiore per tenere il
supporto fermamente in posizione.
• Prima di inserire questa radio nel supporto, collegare il
cavo dell'antenna montata in precedenza
• Collegare i cavi di alimentazione CC. Il lo ROSSO va a
una connessione positiva ( + ) sul proprio blocco fusibile,
mentre il NERO si collega alla terra della carrozzeria
dell'auto ( - ).
Italiano
87

AE 6491 NRC
• Assicurarsi che tutte le connessioni siano lontane da
qualsiasi altra parte metallica che può rompere o tagliare.
• Far scorrere la radio nel supporto no a quando non scatta
in posizione.
Italiano
• L'anello di gomma agirà come tenuta contro il supporto
DIN. Sul lato sinistro e destro dell'anello vi è uno spazio
scanalato che permette di tirare lentamente il lato sinistro
e destro dell'anello.
88

4.4. Rimozione della radio dal supporto DIN
Se si desidera rimuovere la radio dal supporto DIN, si può far
ciò usando le due chiavi di rimozione fornite come spiegato di
seguito:
• Inserire completamente entrambe le chiavi di rimozione
dritte nelle scanalature create dall'anello di gomma sui
bordi sinistro e destro del frontalino della radio.
• Non è possibile rimuovere la radio se si utilizza solo una
chiave.
• Inserire completamente e la radio si sblocca dal supporto
permettendo l'estrazione dal supporto stesso.
• Conservare le chiavi in un luogo sicuro per utilizzo futuro.
Italiano
89

5. Funzionamento
5.1. Accensione/spegnimento
Ruotare la manopola del volume in senso orario per accendere e
regolare il livello del suono per una ricezione confortevole.
Italiano
5.2. Commutazione del paese
AE 6491 NRC supporta tutti gli standard radio CB europei
correnti.
• Accendere mentre si tiene premuto il pulsante richiesto (si
veda la tabella seguente) per ogni impostazione paese
• Quindi rilasciare nuovamente i pulsanti
90

Quest'ultima combinazione di tasti è usata per eseguire
un ripristino alle impostazioni di fabbrica (alle impostazioni
predenite). Questa può essere un'azione utile in casi in cui la
radio può reagire in modo anomalo.
Un ripristino può ripristinare le funzioni se la CPU sembra essere
bloccata.
5.3. Controllo squelch (SQ)
AE 6491 NRC è caratterizzato da 3 diversi sistemi di squelch:
• Squelch automatico (ASQ)
• Squelch manuale
• Squelch tono (CTCSS)
Tutti mascherano il rumore del canale disattivando l'altoparlante.
Solo quando sono soddisfatti alcuni criteri, lo squelch apre
l'altoparlante in modo da poter sentire il segnale ricevuto.
5.3.1. Squelch automatico (ASQ)
L'ASQ controlla costantemente il livello di rumore sul canale.
Una volta ricevuto il segnale, il livello di rumore si riduce e
l'ASQ si apre. Premendo il pulsante ASQ si attiva o disattiva la
funzione ASQ.
Lo stato corrente è indicato mediante il simbolo ASQ sul display.
Vantaggio: la sensibilità più alta e quindi l'intervallo di
comunicazione più alto
Svantaggio: a causa di interferenze, ad es. attività di macchie
solari, dispositivi elettronici ecc., potrebbe aprirsi senza ricevere
alcun segnale. In questo caso lo squelch manuale o tono
funzionano meglio.
Italiano
91

5.3.2. Squelch manuale
Ruotando lo squelch manuale in senso orario si elimina il rumore
di sottofondo. Più si ruota lo squelch, più forte è il segnale
ricevuto.
Italiano
L'impostazione normale è solitamente il punto in cui lo squelch
silenzia l'altoparlante.
Vantaggio: quando si imposta un livello alto può essere usato
solo per ascoltare le stazioni vicine e bloccare tutte le stazioni
lontane.
Svantaggio: deve essere impostato manualmente. Quando
impostato accidentalmente troppo alto, comporta una perdita di
sensibilità e quindi di gamma
5.3.3. Squelch tono (CTCSS)
Oltre allo Squalch controllato dal livello RF e all'ASQ, il radio è
dotata anche di CTCSS. CTCSS aggiunge un tone non udibile
alla trasmissione. Se abilitato, lo squelch di una radio ricevente
si apre solo quando riceve una trasmissione da una radio con la
stessa impostazione CTCSS. Ci sono 38 diversi toni disponibili.
Il CTCSS può essere impostato separatamente per ogni canale
ed è disponibile solo in FM.
• Selezionare il canale desiderato con la manopola o SU/GIÙ
• Premere FC + CTCSS / ASQ
92

• Con la manopola o con i tasti SU/GIÙ selezionare il tono
CTCSS da 1 a 38 o “off” per disabilitare il CTCSS
• Premere brevemente il tasto PTT
Vantaggio: consente la ricezione selettiva di determinate
stazioni.
Svantaggio: tutti i partner di comunicazione necessitano di
radio con CTCSS. Sensibilità più bassa e quindi gamma più
bassa rispetto a ASQ
5.4. Selettore funzione (FC)
Il pulsante FC ha anche una seconda funzione:
Se si preme brevemente il pulsante FC, si attiva la seconda
funzione di ogni pulsante, che è scritta sopra i tasti.
5.5. Interruttore AM/FM
Italiano
È possibile selezionare una modulazione AM o FM premendo il
pulsante AM/FM.
Si noti che nel sistema tedesco 80 CH è possibile (e consentito)
ascoltare in AM su tutti gli 80 canali, ma la trasmissione è
93

possibile solo su CH 1-40 in AM. Durante la modalità di ricezione,
il graco a barre mostra la potenza del segnale ricevuto, durante
la trasmissione, esso mostra la relativa potenza in uscita. Nelle
impostazioni dE e UE, la potenza AM dipende dall'impostazione
del jumper sul lato della scheda del circuito stampato inferiore (si
veda la differenza tra paesi)
5.6. SCANSIONE
AE 6491 NRC integra una funzionalità di scansione. La radio
scansionerà tutti i canali e si arresterà sui canali OCCUPATI.
Italiano
Resterà su tale canale altri sette secondi dopo l'interruzione
della conversazione e quindi riprenderà la scansione.
• Per avviare la scansione, prima accendere la radio e
regolare volume e squelch.
• Premere il pulsante SCAN per avviare la scansione.
La parola SC apparirà sul display LCD e l'unità avvia la
scansione.
• Se si vuole arrestare la scansione, premere nuovamente il
pulsante Scan o premere l'interruttore PTT.
Ciò interromperà la funzione di scansione e trasmetterà su tale
canale.
94

5.7. Funzione VOX / Selezione canale EMG
Premere brevemente il pulsante VOX/EMG per attivare o
disattivare la funzione VOX. La funzione VOX permette di
comunicare in viva voce. Quando la funzione VOX è attivata,
la radio riconosce la conversazione e avvia automaticamente la
trasmissione.
Pressione prolungata del pulsante VOX/EMG (Emergenza) per
accesso immediato al canale internazionale di Chiamata ed
Emergenza 9, che è monitorato da tutti i camionisti e molti utenti
CB e in alcune regioni anche da organizzazioni di sicurezza
stradale. Se si necessita di aiuto o assistenza, può essere una
buona idea effettuare una chiamata sul canale 9. I camionisti
possono essere raggiunti nella maggior parte dei casi in modalità
AM.
Il canale di emergenza è anche utilizzato sulle autostrade
tedesche come sistema di avviso in caso di incidenti,
manutenzione stradale o trafco intenso con pericolo di
collisione. Se si supera una luce intermittente gialla sulla propria
corsia e ci può essere una situazione di pericolo davanti, si verrà
avvertiti da segnali di allarme e annuncio vocale.
Con il tasto VOX/EMG è possibile commutare tra CH 9 e il
canale usato in precedenza.
L'altro canale di chiamata usato di frequente è il Canale 19. Se
si vuole utilizzare CH 19, utilizzare FC e il secondo pulsante
funzione SHIFT.
Italiano
95

5.8. Canali memoria (MEM)
Per accedere ai canali memorizzati basta premere il pulsante
"MEM" e scegliere il canale memoria desiderato da M1 a M5
premendo uno dei pulsanti da AM/FM a ASQ.
6. Funzionamento delle funzioni secondarie
6.1. MENU
Il pulsante MENU può controllare in sequenza sotto funzioni
Italiano
SOTTO MENU.
Per avviare il MENU, considerare che si tratta di una funzione
secondaria come tutte le altre, che saranno descritte in questo
capitolo.
• Prima si deve premere la manopola FUNZIONE (pulsante
squelch FC).
• Il display mostrerà FC
• Ora premere il pulsante MENU (AM/FM)
96

Impostare quanto segue:
6.1.1. Guadagno microfono
6.1.2. Sensibilità VOX
6.1.3. Guadagno ritardo VOX
6.1.4. Accensione/spegnimento tono tasti
6.1.5. Attivare/disattivare il Roger Bip
6.1.6. Selezione colore retroilluminazione LCD
6.1.7. Retroilluminazione LCD (oscurato o luminoso)
6.1.8. Livello ASQ
6.1.9. NRC funzione di riduzione del rumore
La selezione sarà effettuata mediante i pulsanti SU o GIÙ sul
microfono o ruotando l'interruttore canale.
Premere una o più volte MENU per bloccare la selezione e
andare al passo successivo.
6.1.1. Guadagno microfono
Impostare il livello di guadagno di microfono in modalità VOX.
Maggiore è la distanza tra l'altoparlante e il microfono, più alto
è il valore che deve essere selezionato. Con un valore più alto,
rumori come ad es. il rumore del vento e del motore saranno
trasmessi.
È possibile impostare il tempo di ritardo in 9 livelli. L'impostazione
predenita è livello 6.
Italiano
6.1.2. Livello VOX
Il livello VOX imposta il livello di rumore a cui la trasmissione
VOX automatica si attiva.
1 = sensibilità bassa, VOX reagisce solo a rumore molto forte
97

9 = sensibilità alta, VOX reagisce solo a rumore molto basso
L'impostazione predenita è livello 3.
6.1.3. Tempo ritardo VOX
Il tempo di ritardo VOX determina il tempo dopo il quale la
trasmissione VOX automatica si spegne senza il rilevamento di
alcun suono:
Italiano
Livello 1 2 3 4 5 6 7 8 9
Tempo (Sec) 0,5 1,0 1,5 2,0 2,5 3,0 3,5 4,0 4,5
È possibile impostare il tempo di ritardo in 9 livelli. L'impostazione
predenita è livello 4.
6.1.4. Accensione/spegnimento bip
Attivare/disattivare i toni dei tasti
6.1.5. Attivare/disattivare il Roger Bip
Ciò segnala al ricevitore che l'altro lato ha terminato il messaggio
radio.
98

6.1.6. Selezione colore retroilluminazione LCD
6.1.7. Controllo luminosità retroilluminazione LCD
(oscurato o luminoso)
6.1.8. Sensibilità ASQ (Livello da 1 a 3)
6.1.9. NRC funzione di riduzione del rumore
Attiva o disattiva la funzione di riduzione del rumore.
Filtra il rumore statico in modalità di ricezione.
Italiano
99

6.2. MSCAN
La funzionalità Scansione canale memoria consente alla radio di
scansire automaticamente tra i propri 5 canali preferiti.
• Per accedere, premere FC e MSCAN
• M-SC appare sull'LCD.
Ora la radio scansiona
automaticamente solo i canali
preferiti e si arresta quando è
rilevato trafco radio.
Nota: Per programmare i
canali di propria si veda il
capitolo sotto MSAVE sulla
pagina seguente
Italiano
6.3. SPOSTARE
Il pulsante funzione SHIFT per
l'accesso istantaneo al canale
19 di chiamata o emergenza
camionista alternativo.
Con FC + SHIFT è possibile
commutare tra CH 19 e il canale
operativo normale usato in
precedenza.
100
 Loading...