

Page 1

PERCEPTION
User Instructions ..............p.2
Please read the manual before using the equipment!
Moded’emploi...............p.14
Veuillez lire cette notice avant d’utiliser le système!
400
Page 2

Table of Contents
Page
1 Precaution/Unpacking............................3
1.1 Precaution .................................3
1.2 Unpacking .................................3
2 Description .....................................3
2.1 Introduction ................................3
2.2 Features ...................................3
2.3
Optional Accessories .........................5
3 Interfacing......................................6
3.1 General....................................6
3.2 Pinout.....................................6
3.3 Connecting the Microphone ...................6
2
Page
4 Using Your Microphone...........................7
4.1 GeneralHints...............................7
4.2 Selecting Polar Patterns ......................8
5 Cleaning .......................................8
6 Troubleshooting .................................9
7 Specifications..................................11
The International Page ............................26
PERCEPTION
400
Page 3

1
Precaution/Unpacking
1.1 Precaution
piece of equipment your microphone
will be connected to fulfills the safety
regulations in force in your country
and is fitted with a ground lead.
1.2 Unpacking
Check that the packaging contains all of
the items listed below:
• Microphone
• Spider suspension
• Carrying case
• Mini poster
Should any item be missing, please contact your AKG dealer.
Please make sure that the
PERCEPTION
400
2 Description
2.1 Introduction
AKG product. This Manual contains
important instructions for setting up and
operating your equipment. Please take a
few minutes to read the instructions
below carefully before operating the
equipment and keep the Manual for
future reference. Have fun and impress
your audience!
The
rugged true condenser microphone built
to the same strict quality standards as all
other AKG products.
Designed on the basis of AKG’s decades
of know-how and feedback from sound
engineers around the world using AKG
studio microphones every day, this general-purpose 1-inch large-diaphragm
microphone brings AKG studio quality to
the worlds of recording, live sound, and
broadcasting.
Thank you for purchasing an
PERCEPTION
400 is a heavy-duty,
2.2 Features
• Cardioid polar pattern: The microphone is most sensitive to sounds
arriving from in front of it while picking up much less of sounds arriving
from the sides or rear (from monitor
speakers or neighboring instruments). This makes the microphone
equally suited for recording and
onstage use.
• Gold-sputtered diaphragm: The
diaphragm is made of a plastic foil
that is gold-sputtered on one side
only to prevent shorting to the back
electrode even at extremely high
sound pressure levels.
• All-metal body: The all-metal body
adds to the rejection of RF interference so you can use the microphone
near transmitter stations and along
with wireless microphones or other
communications equipment. The
extremely rugged, heavy body and
3
Page 4
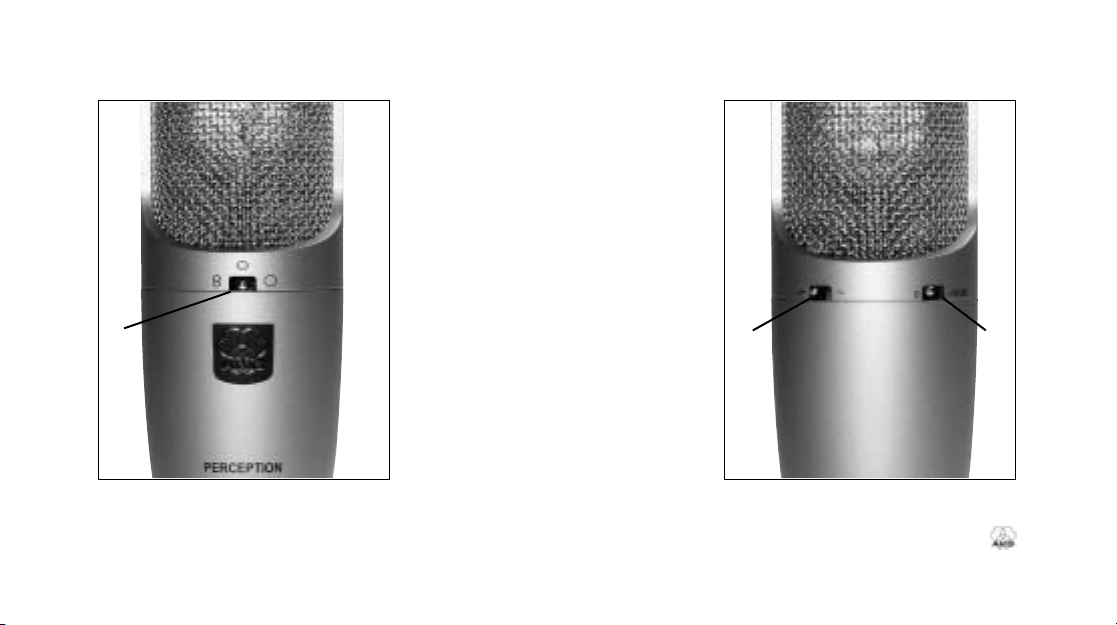
1
Fig. 1: Polar pattern selector (1) on
PERCEPTION
4
400 front.
sturdy front grill protect the microphone from damage from tough handling on stage.
• High headroom, minimum distor-
tion: Capable of handling sound
pressure levels up to 135 dB without
introducing perceptible distortion and
built to resist high temperatures and
humidity, the microphone will give
excellent results in a wide range of
applications.
• Polar pattern selector: Selector 1 on
the microphone front (refer to fig. 1)
sets the microphone polar pattern to
figure eight, cardioid, or omnidirectional.
• Switchable preattenuation pad:
Selector 2 on the microphone rear
(refer to fig. 2) lets you increase the
headroom by 10 dB for distortionfree close-in recording. The preattenuation pad prevents the microphone's output level, particularly at
3 2
Fig. 2: Preattenuation (2) and bass cut
(3) switches on
PERCEPTION
PERCEPTION
400 rear.
400
Page 5

low frequencies, from overloading the
miniature transformers used in many
mixer input stages, etc.
• Bass cut filter: Selector 3 on the
microphone rear (refer to fig. 2 on
page 4) further reduces low-end distortion caused by footfall or wind
noise, etc. The filter also minimizes
the proximity effect that close-in miking from less than 4 inches causes in
any unidirectional microphone.The
filter rolls off at 12 dB/octave from
300 Hz downward.
2.3 Optional Accessories
• PF 80 studio pop screen
• ST 305 floor stand
• W 4000 external windcscreen
PERCEPTION
400
5
Page 6
3 Interfacing
3.1 General
The microphone uses a true
condenser transducer designed for 48volt phantom powering to DIN 45 596/
IEC 268-15. Neither the diaphragm nor
the backplate are permanently polarized,
so the microphone needs an external
power supply.
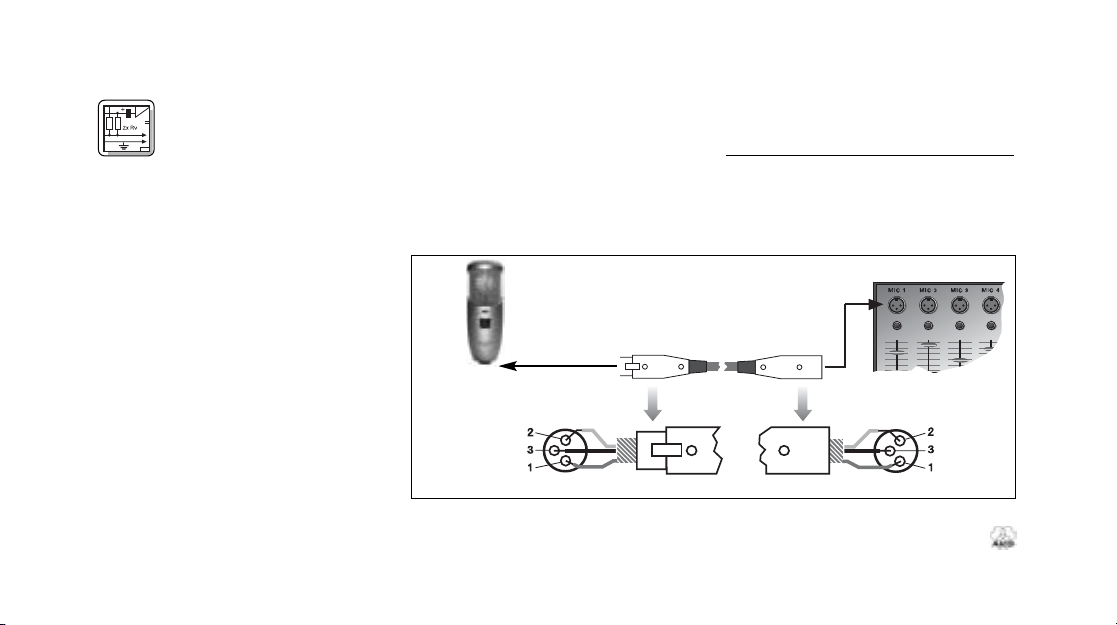
3.2 Pinout
The microphone provides a balanced
output on a 3-pin male XLR connector:
Pin 1: ground
Pin2:hot
Pin3:return
6
3.3 Connecting the Microphone
Refer to fig. 2 below.
1. Use an XLR cable to connect the
microphone to a balanced XLR input
with phantom power.
Fig. 2: Connecting to a balanced input with phantom power.
2. Switch the phantom power on. (Refer
to the user manual of the unit to which
you connected your microphone.)
PERCEPTION
400
Page 7
4 Using Your
Microphone
4.1 General Hints
The
PERCEPTION
pose multipattern microphone for recording, broadcast, and onstage use.
Every instrument radiates its sound in a
specific way. Therefore, to get the best
sound it is crucial to experiment with
microphone placement.
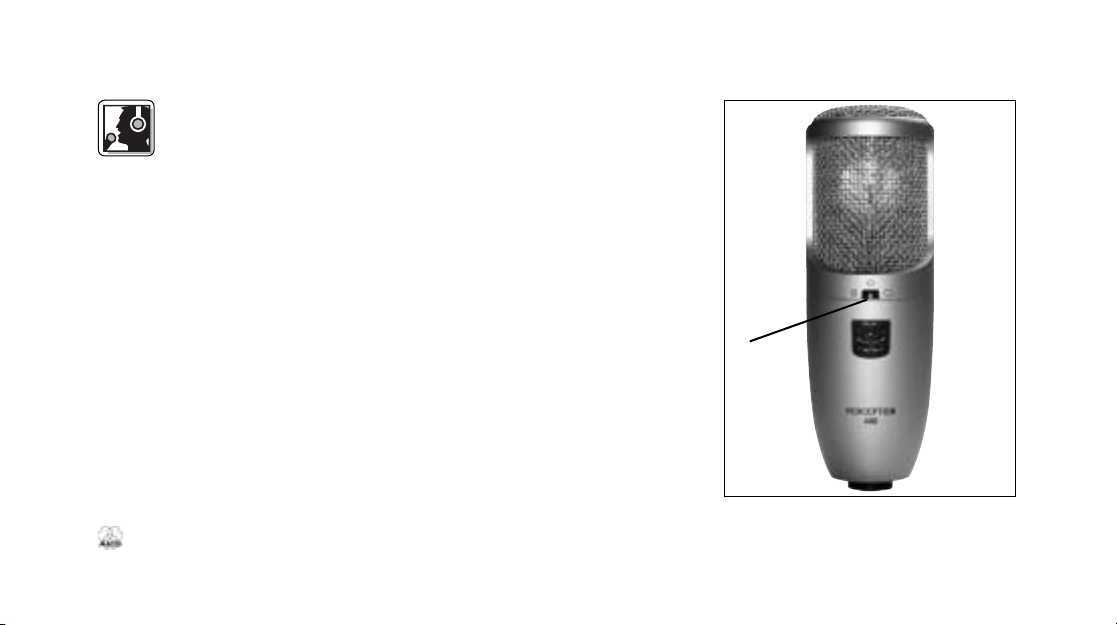
• Whichever polar pattern you selected, it may be good to know which
way the transducer axis is facing: the
front of the microphone is the side of
the body with the AKG logo and
polar pattern selector (1) on it.
• When recording wind instruments or
vocals, make sure not to blow or
sing directly into the microphone.
To avoid unwanted wind and pop
noise or moisture problems, place an
PERCEPTION
400 is a general-pur-
400
optional PF 80 pop screen from AKG
between the microphone and vocalist/instrument.
• Keep the microphone dry. Moisture
from blowing or singing directly at the
capsule from a short distance, or
extremely high humidity may cause
the microphone to start crackling or
go very quiet due to partial short circuits in the polarization voltage.
• If you use the microphone in the
open, use an optional AKG W 4000
windscreen to protect the micro-
phone from moisture and reduce
wind noise.
• High volume instruments: You can
use this microphone for close-in
recording of very loud instruments
(brass instruments, kick drum, etc.).
Just switch the preattenuation pad in
to increase the microphone’s capability of handling sound pressure levels to
145 dB.
1
Fig. 5: Microphone front.
7
Page 8

• Low-frequency noise: To suppress
low-frequency noise such as air conditioning rumble, footfall noise, or
traffic sounds, switch the bass cut filter in.
Selecting Polar Patterns
4.2
Each of the PERCEPTION 400’s selectable polar patterns is virtually frequency
independent so that reflected sound, too
will be reproduced accurately and uncolored.
• Cardioid (center setting): This is a
standard setting for recording and
gives excellent results on all kinds of
voices and a wide range of instruments. Remember to aim the microphone front (see fig. 5 on page 6) at
the sound source.
• Figure eight (left-hand setting): The
microphone will pick up sounds arriving from the front and rear with equal
8
sensitivity. Use this mode to mic up
the side signal in M/S stereo recording or to record two sound sources
(talkers, instruments) facing each
other. It is also a good choice for
cymbal overhead miking.
• Omnidirectional (right-hand setting):
This is the preferred setting for "all
around the mic" recording, high quality ambience (audience sound) miking, or far-field recording in exceptionally good-sounding large or small
recording rooms, etc.
5 Cleaning
To clean the surface of the
microphone body, use a soft
cloth moistened with water.
PERCEPTION
400
Page 9
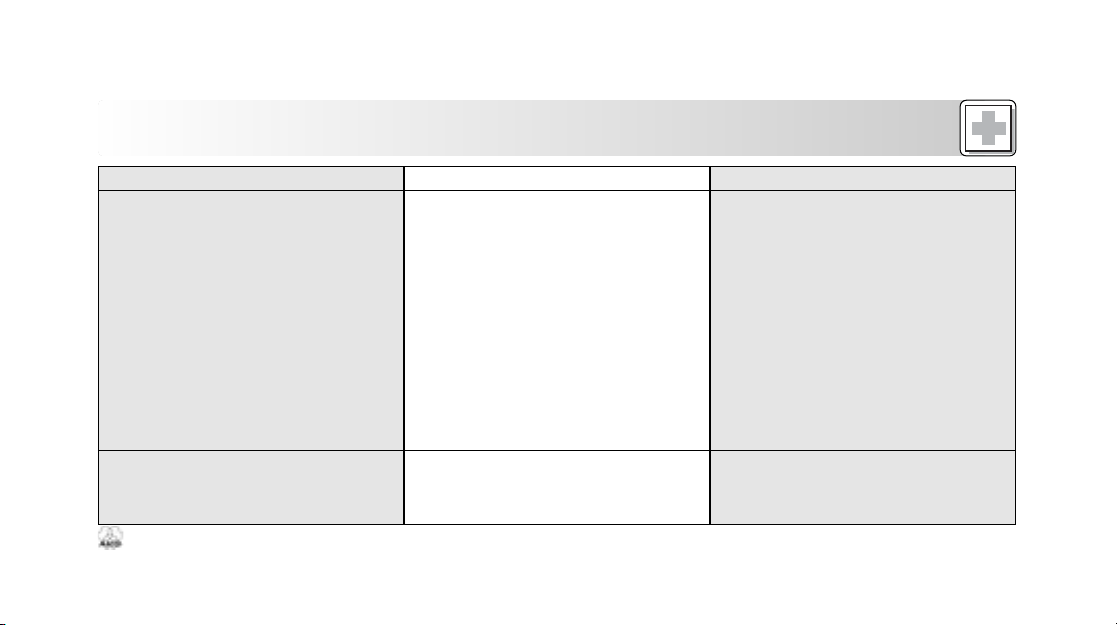
6 Troubleshooting
Problem Possible Cause Remedy
No sound.
Distortion.
PERCEPTION
400
1. Power to mixer and/or amplifier is off.
2. Channel or master fader on mixer, or
volume control on amplifier is at zero.
3. Microphone is not connected to mixer
or amplifier.
4. Cable connectors are seated loosely.
5. Cable is defective.
6. No supply voltage.
1. Channel gain control on mixer set too
high.
1. Switch power to mixer or amplifier on.
2. Set channel or master fader on mixer
or volume control on amplifier to desired level.
3. Connect microphone to mixer or amplifier.
4. Check cable connectors for secure
seat.
5.
Check cable and replace if damaged.
6. Switch phantom power on.
Phantom power supply: insert
batteries.
Check cable and replace if necessary.
1. Turn gain control down CCW.
9
Page 10

6 Troubleshooting
Problem Possible Cause Remedy
(Distortion)
Crackling noises or low output.
10
2. Microphone too close to sound
source.
3. Microphone sensitivity set too high.
• Partial short circuits due to excessive
humidity.
2. Move microphone further away from
sound source.
3. Switch preattenuation pad in.
• Place microphone in warm, dry room
and allow to dry.
PERCEPTION
400
Page 11

t
7 Specifications
Type: 1-inch dual-diaphragm, true con-
Polar patterns: cardioid, omnidirectional,
Open-circuit sensitivity
at 1kHz (cardioid): 28 mV/Pa (-31 dBV ±2 dB)
Frequency range: 20 Hz to 20 kHz
Impedance: ≤ 200 ohms
Recommended load impedance:
Equivalent noise level
to CCIR 468-2: 26 dB
Equivalent noise level
to IEC 60268-4 (A-weighted): 16 dB-A
Signal/noise ratio
re 1 Pa (A-weighted): 78 dB
Max. SPL for 0.5% THD: 135 / 145 dB SPL (0 / -10 dB)
Preattenuation pad: -10 dB (switchable)
PERCEPTION
400
denser pressure-gradient microphone
figure eight
(see frequency response graphs)
≥ 1000 ohms
Bass cut filter slope: 12 dB/octave, 300 Hz
Environment: temperature: -10°C to +60°C
Powering: 48 V ±4 V phantom power
Current consumption: ≤ 2mA
Connector: 3-pin XLR (pin 2 hot)
Dimensions: 53 dia. x 160 mm high / 2 x 6.3 in.
Net weight: 525 g / 1.2 lbs.
The device complies with part 15 of the FCC rules. Operation is
subject to the following two conditions:
(1) this device may not cause harmful interference, and
(2) this device must accept any interference received, includ-
ing interference that may cause undesired operation.
R.H.: 80% (+25°C)
to DIN 45 596 / IEC 268-15
FFCCCC SSttaatteemmeennt
11
Page 12

7 Specifications
Frequency Response (cardioid)
Cardioid
12
Polar Diagram
Frequency Response (omnidirectional)
Omnidirectional Polar Diagram
PERCEPTION
400
Page 13

Frequency Response (figure eight)
7 Specifications
PERCEPTION
Figure Eight
400
Polar Diagram
13
Page 14

Table des matières
Page
1 Précautions/Déballage .....................................................15
1.1 Précautions ...............................................................15
1.2 Déballage ..................................................................15
2 Description ........................................................................15
2.1 Introduction ...............................................................15
2.2 Caractéristiques communes .....................................15
2.3 Accessoires optionnels .............................................17
3 Raccordement...................................................................18
3.1 Généralités ................................................................18
3.2 Brochage...................................................................18
3.3 Comment connecter le microphone .........................18
14
Page
4 Utilisation du microphone................................................19
4.1 Conseils généraux ...................................................19
4.2 Sélection du diagramme polaire ...............................20
5 Nettoyage ..........................................................................20
6 Dépannage.........................................................................21
7 Spécifications....................................................................23
La page internationale.........................................................26
PERCEPTION
400
Page 15

1 Précautions/Déballage
1.1 Précautions
Assurez-vous que le matériel
auquel vous aller connecter votre
microphone répond bien aux règlements de sécurité en vigueur dans
votre pays et qu’il possède une mise à
la terre.
1.2 Déballage
Vérifiez si l’emballage contient bien tous
les articles indiqués ci-dessous:
• Microphone
• Spider
• Mallette
• Mini-poster
S’il manque un de ces articles veuillez
contacteur votre fournisseur AKG.
PERCEPTION
400
2 Description
2.1 Introduction
Nous vous remercions d’avoir
acheté un produit AKG. Vous trouverez
dans la présente notice des instructions
importantes pour l’installation et l’utilisation de votre matériel. Accordez-vous
quelques minutes pour lire attentive-
ment les instructions ci-dessous
avant la mise en service et conservez
la notice pour pouvoir la consulter le cas
échéant. Nous vous souhaitons bon
divertissement, à vous et à votre public !
Le PERCEPTION 400 est un microphone électrostatique véritable, particulièrement robuste et résistant aux manipulations brutales, qui répond en même
temps aux critères de qualité extrêmement stricts valables pour tous les autres produits AKG.
Conçu sur la base du savoir-faire amassé par AKG pendant des dizaines d'an-
nées ainsi que du feed-back provenant
d’ingénieurs du son du monde entier, qui
utilisent quotidiennement les micros de
studio AKG, ce microphone tous usages
à diaphragme de 25 mm fait entrer la
qualité studio d’AKG dans l’univers de
l’enregistrement, du son 'live' et de la
radiodiffusion.
2.2 Caractéristiques
• Diagramme polaire cardioïde : Ce
microphone est extrêmement sensible aux sons arrivant sur l’avant alors
qu’il capte beaucoup moins les sons
arrivant sur le côté ou sur l’arrière
(venant p.ex. des enceintes de référence ou des instruments voisins). Il
convient donc aussi bien pour l’enregistrement que pour l’utilisation sur
scène.
• Diaphragme plaqué or : Le diaphragme consiste en une feuille de
plastique plaqué or sur une face seu-
15
Page 16

lement afin d’éviter un court-circuit
sur l’électrode arrière même pour les
niveaux de pression sonore extrêmement élevés.
• Corps entièrement métallique : Le
corps entièrement métallique contribue à la réjection d’interférences RF
ce qui vous permet d’utiliser le micro
à proximité de stations émettrices et
en même temps que des microphones ou autres matériels de communication sans fil. Le corps de micro
massif et extrêmement résistant ainsi
que la grille avant robuste protègent
le microphone contre les manipulations brutales courantes sur la scène.
• Importante marge avant saturation, distorsion minimum : Capable
de restituer sans distorsion perceptible des niveaux de pression sonore
allant jusqu’à 135 dB et construit
pour résister aux températures élevées et à l’humidité, le microphone
16
1
Fig. 1 : Sélecteur de diagramme polaire
(1) sur la face avant.
donne d’excellents résultats pour une
large gamme d’applications.
• Sélecteur de diagramme polaire :
Le sélecteur 1 sur la face avant du
microphone (voir fig. 1) permet de
choisir pour le micro un diagramme
polaire en huit, cardioïde ou omnidirectionnel.
• Pré-atténuateur de sensibilité
commutable : Le commutateur de
pré-atténuation (2) au dos du microphone (voir fig. 2, page 17) permet
d’augmenter de 10 dB la marge avant
saturation pour un enregistrement de
proximité exempt de distorsions. Le
pré-atténuateur de sensibilité permet
d’éviter que le niveau de sortie du
microphone n’occasionne, en particulier à basses fréquences, une surcharge des transformateurs miniatures fréquemment utilisés sur les
étages d’entrée des tables de mixage, etc.
PERCEPTION
400
Page 17

• Filtre coupe-bas : Le sélecteur 3 sur
la face avant du micro (voir fig. 2)
réduit encore les distorsions dans l’extrême grave causées par les bruits de
pied ou de vent, etc. Ce filtre minimise
par ailleurs l’effet de proximité apparaissant dans tout micro unidirectionnel en cas de prise à moins de 10 cm
de distance. Le filtre apporte une atténuation de 12 dB/octave à 300 Hz et
au-dessous.
3 2
Fig. 2 : Commutateurs pré-atténuation
(2) et coupe-bas (3) sur la face arrière.
PERCEPTION
400
2.3 Accessoires optionnels
• Ecran anti-pops de studio PF 80
• Pied ST 305
• Ecran antivent W 4000
17
Page 18

3 Raccordement
3.1 Généralités
Le microphone est doté d’un
transducteur électrostatique véritable
conçu pour une alimentation fantôme de
48 V selon DIN 45 596/CEI 268-15. Ni le
diaphragme, ni la contre-électrode ne
sont polarisés de façon permanente ; le
microphone a donc besoin d’une alimentation externe.
3.2 Brochage
Le microphone fournit une sortie équilibrée sur connecteur mâle 3 points type
XLR :
Broche 1 : terre
Broche 2 : point chaud
Broche 3 : point froid
18
3.3 Comment connecter le microphone
Voir fig. 2 ci-dessous.
1. Utilisez un câble XLR pour connecter
le microphone à une entrée XLR
symétrique avec alimentation fantôme.
Fig. 2: Connexion sur une entrée symétrique avec alimentation fantôme.
2. Mettez l’alimentation fantôme sous
tension. (Consultez le manuel de l’utilisateur de l’appareil auquel vous
connectez votre microphone.)
PERCEPTION
400
Page 19

4 Utilisation du
microphone
4.1 Conseils généraux
Le PERCEPTION 400 est un microphone à diagrammes polaire multiples toutes applications pour l’enregistrement, la
radio et la scène.
Chaque instrument a une façon spécifique d’irradier le son. Si l’on veut obtenir
les meilleurs résultats il est donc extrêmement important d’essayer divers
positionnements du micro.
• Quel que soit le diagramme polaire
que vous avez choisi, il importe de
savoir comment est orienté l’axe du
transducteur : la face avant du
microphone est le côté du corps de
micro sur lequel se trouvent le logo
AKG et le sélecteur de diagramme
polaire (1).
• Pour l’enregistrement d’instruments à
PERCEPTION
400
vent ou de la voix, faites attention de
ne pas souffler ou chanter directement dans le micro.
• Pour éviter les bruits de vents ou
pops indésirables ainsi que la projection de salive, intercalez un écran
anti-pops optionnel PF 80 d’AKG
entre le micro et le chanteur ou l’instrument.
• Veillez à ce que le micro soit tou-
jours sec. Les projections de salive
lorsqu’on souffle ou chante de près
directement sur la capsule de même
qu’une extrême humidité ambiante
peuvent occasionner des craquements dans le micro ou le son peut
devenir quasi inaudible du fait de
court-circuits partiels de la tension de
polarisation.
• Si vous vous servez du microphone
en plein air, utilisez un écran antivent optionnel AKG W 4000 pour
protéger le micro de l’humidité et
1
Fig. 5: Face avant du micro.
19
Page 20

réduire les bruits de vent.
• Instruments à haut volume sonore :
vous pouvez utiliser ce micro pour
enregistrer de près des instruments à
très haute intensité sonore (cuivres,
grosse caisse, etc.). Mettez le préatténuateur en service pour permettre au micro de mieux gérer les
niveaux de pression sonore allant
jusqu’à 145 dB.
• Bruit à basse fréquence : Pour supprimer les bruits à basse fréquence
tels que bruit d’une climatisation,
bruits des pieds sur la scène ou bruit
de la circulation, mettez le coupe-bas
en service.
4.2 Sélection du diagramme polaire
Chacun des diagrammes polaires pouvant être sélectionné sur le
400 est virtuellement indépendant de la
fréquence, ce qui fait que les sons réfléchis sont eux aussi reproduits avec pré-
20
PERCEPTION
cision et sans coloration.
• Cardioïde (sélecteur au centre) :
Cette position correspond au réglage
standard pour l’enregistrement et
donne d’excellents résultats pour
tous les types de voix et une vaste
gamme d’instruments. Veillez à bien
orienter la face avant du micro (voir
fig. 5, page 17) vers la source sonore.
• En huit (sélecteur à gauche) : Le
micro captera avec une égale sensibilité les sons venant de l’avant et de
l’arrière. Vous utiliserez ce mode pour
la prise du signal latéral en enregistrement stéréo M/S ou pour enregistrer deux sources sonores (parole,
instruments) situées en face l’une de
l’autre. Il est également intéressant
pour la prise overhead des cymbales.
• Omnidirectionnel (sélecteur à droite)
: Le réglage préféré pour l’enregistrement de l’environnement complet du
micro, une prise d’ambiance de
haute qualité (son audience), ou l’enregistrement grand champ dans un
local d’enregistrement grand ou petit
ayant une acoustique exceptionnelle,
etc.
5 Nettoyage
Pour nettoyer la surface du
corps du microphone, utilisez
un chiffon doux humide sans
autre produit que de l’eau.
PERCEPTION
400
Page 21

6 Dépannage
Problème Cause possible
Pas de son
PERCEPTION
400
1. La table de mixage et/ou l’ampli ne
sont pas sous tension.
2. Le canal ou le potentiomètre maître
sur la table de mixage, ou bien le
contrôle de volume de l’ampli est sur
zéro.
3. Le micro n’est pas connecté à la table
de mixage ou à l’ampli.
4. Les connecteurs de câble ne sont pas
bien enfoncés.
5. Le câble est défectueux.
6. Le micro n’est pas alimenté.
Remède
1. Mettez la table de mixage ou l’ampli
sous tension.
2. Réglez le canal ou le potentiomètre
maître sur la table de mixage, ou bien
le contrôle de volume de l’ampli sur le
volume souhaité.
3. Connectez le micro à la table de
mixage ou à l’ampli.
4. Assurez-vous que les connecteurs de
câble sont bien enfoncés.
5. Contrôlez le câble et remplacez-le s’il
est abîmé.
6. Mettez l’alimentation fantôme sous
tension.
Contrôlez le câble et remplacez-le le
cas échéant.
21
Page 22

6 Dépannage
Problème Cause possible Remède
Distorsion
Craquements ou son trop faible
22
1. Le contrôle de gain du canal sur la
table de mixage est trop élevé.
2. Le micro est trop près de la source
sonore.
3. La sensibilité du micro est réglée trop
haut.
• Courts-circuits partiels dus à une humidité excessive.
1. Abaissez le contrôle de gain en tournant le bouton dans le sens opposé à
la montre.
2. Eloignez le micro de la source sonore.
3. Mettez le pré-atténuateur en service.
• Mettez le micro dans une pièce chaude
et sèche pour le faire sécher.
PERCEPTION
400
Page 23

7 Spécifications
Type: véritable microphone électrosta-
Diagrammes polaires : cardioïde, omnidirectionnel,
Sensibilité en circuit ouvert :
Gamme de fréquences : de 20 Hz à 20 kHz (voir courbe de
Impédance: ≤ 200 ohms
Impédance de charge
recommandée : ≥ 1000 ohms
Niveau de bruit équivalent
selon CCIR 468-2: 26 dB
Niveau de bruit équivalent selon
CEI 60268-4 (pondéré A): 16 dB-A
Rapport signal/bruit
rapp. à 1 Pa (pondéré A) : 78 dB
Niveau maxi. de pression sonore
(d.t.h. = 0.5%) : 135 / 145 dB SPL (0 / -10 dB)
PERCEPTION
400
tique à gradient de pression,
diaphragme double de 25 mm
en huit
28 mV/Pa (-31 dBV)
réponse en fréquence)
Pré-attenuation : -10 dB (commutable)
Pente filtre coupe-bas: 12 dB/octave, 300 Hz
Environnement : température: -10°C à +60°C
H.R.: 80% (+25°C)
Alimentation : alimentation fantôme de 48 V ±4 V
selon DIN 45 596 / CEI 268-15
Consommation : ≤ 2 mA
Connecteur : XLR 3 points
(broche 2 point chaud)
Dimensions : 53 mm de diam. x 160 mm de haut
Poids net : 525 g
23
Page 24

7 Spécifications
Réponse en fréquence (cardioïde)
Diagramme polaire cardioïde
24
Réponse en fréquence (omnidirectionnel)
Diagramme polaire omnidirectionnel
PERCEPTION
400
Page 25

Réponse en fréquence (en huit)
Diagramme polaire en huit
7 Spécifications
PERCEPTION
400
25
Page 26

The International Page
English
This product conforms to the standards
listed in the Declaration of Conformity.
To order a free copy of the Declaration of
Conformity, visit http://www.akg.com or
contact sales@akg.com
Deutsch
Dieses Produkt entspricht den in der
Konformitätserklärung angegebenen
Normen. Sie können die Konformi tätserklärung auf http://www.akg.com
oder per E-Mail an sales@akg.com
anfordern.
26
Français
Ce produit est conforme aux normes
citées dans la Déclaration de Con formité, dont vous pouvez prendre connaissance en consultant le site
http://www.akg.com ou en adressant un
e-mail à sales@akg.com.
Italiano
Questo prodotto corrisponde alle norme
elencate nella dichiarazione di conformità, che è disponibile al sito
http://www.akg.com oppure all'indirizzo
email sales@akg.com.
Español
Este aparato corresponde a las normas
citadas en la declaración de conformidad. Esta última está disponible en el
sitio http://www.akg.com o puede ser
solicitada al correo electrónico
sales@akg.com.
Português
Este produto corresponde às normas
citadas na declaração de conformidade,
que pode pedir na nossa página da web
http://www.akg.com, ou enviando-nos
um email para sales@akg.com.
PERCEPTION
400
Page 27

Notizen • Notes • Notes • Note • Notas • Notas
PERCEPTION
400
27
Page 28

Mikrofone · Kopfhörer · Drahtlosmikrofone · Drahtloskopfhörer · Kopfsprechgarnituren · Akustische Komponenten
Microphones · Headphones · Wireless Microphones · Wireless Headphones · Headsets · Electroacoustical Components
Microphones · Casques HiFi · Microphones sans fil · Casques sans fil · Micros-casques · Composants acoustiques
Microfoni · Cuffie HiFi · Microfoni senza filo · Cuffie senza filo · Cuffie-microfono · Componenti acustici
Micrófonos · Auriculares · Micrófonos inalámbricos · Auriculares inalámbricos · Auriculares con micrófono · Componentes acústicos
Microfones · Fones de ouvido · Microfones s/fios · Fones de ouvido s/fios · Microfones de cabeça · Componentes acústicos
Technische Änderungen vorbehalten. Specifications subject to change without notice. Ces caractéristiques sont susceptibles de modifications.
Ci riserviamo il diritto di effettuare modifiche tecniche. Nos reservamos el derecho de introducir modificaciones técnicas. Especificações sujeitas a mudanças sem aviso prévio.
AKG Acoustics GmbH
Lemböckgasse 21–25, A-1230 Vienna/AUSTRIA, phone: (+43-1) 86654-0*
e-mail: sales@akg.com
AKG Acoustics, U.S.
8500 Balboa Boulevard, Northridge, CA 91329, U.S.A., phone: (+1 818) 920-3212
e-mail: akgusa@harman.com
Printed in Austria on recycled paper. 09/06/9100 U 1194
For other products and distributors worldwide visit www.akg.com
 Loading...