

AKG D-770 Owners manual
AKG.EMOTION
D 770
Bedienungshinweise . . . . . . . . . . . . . . . . . . S. 2
Bitte vor Inbetriebnahme des Gerätes lesen!
User Instructions . . . . . . . . . . . . . . . . . . . . p. 16
Please read the manual before using the equipment!
Mode d’emploi . . . . . . . . . . . . . . . . . . . . . . p. 29
Veuillez lire cette notice avant d’utiliser le système!
Istruzioni per l’uso . . . . . . . . . . . . . . . . . . . p. 42
Prima di utilizzare l’apparecchio, leggere il manuale!
Modo de empleo . . . . . . . . . . . . . . . . . . . . p. 55
Antes de utilizar el equipo, lea por favor el manual!
Instruções de uso . . . . . . . . . . . . . . . . . . . p. 68
Por favor leia este manual antes de usar o equipamen
to!
EMOTION
MICROPHONE
SERIES

1 Sicherheitshinweis/Beschreibung
1.1 Sicherheitshinweis
1.2
Lieferumfang
1.3
Empfohlenes
Zubehör
1.4 Besondere
Merkmale
Überprüfen Sie bitte, ob das Gerät, an das Sie das
Mikrofon anschließen möchten, den gültigen Sicherheitsbestimmungen entspricht und mit einer
Sicherheitserdung versehen ist.
1 D 770 1 SA 44
Kontrollieren Sie bitte, ob die Verpackung alle
oben angeführten Teile enthält. Falls etwas fehlt,
wenden Sie sich bitte an Ihren AKG-Händler.
• Mikrofonkabel MK 9/10: 10 m 2-polig geschirmtes Kabel mit XLR-Stecker und XLRKupplung
• Bodenstative ST 102A, ST 200, ST 305
• Windschutz W 880
• Frequenzgang speziell für Instrumentenübertragung ausgelegt
• Integriertes Wind- und Popfilter unterdrückt
wirkungsvoll Pop- und Atemgeräusche
• Elastische Doubleflex™ Lagerung des Wandlersystems reduziert Griff- und Kabelgeräusche
• Gute Rückkopplungsunterdrückung durch frequenzunabhängige nierenförmige Richtcharakteristik
• Brillante Übertragungsqualität durch neue Varimotion™ Membrantechnologie
2

1 Beschreibung
Das D 770 ist ein dynamisches Richtmikrofon
(Druckgradientenempfänger). Es wurde speziell
für die Abnahme bestimmter Instrumente sowie
für Begleitchor im harten Bühneneinsatz entwickelt. Der weite Frequenzgang des D 770 betont leicht die mittleren und hohen Frequenzen
und gewährleistet dadurch auch eine gute
Sprachverständlichkeit. Das Mikrofon besitzt eine
nierenförmige Richtcharakteristik, d. h. das D 770
ist für Schall, der von vorne einfällt, am empfindlichsten, während es auf von hinten auftreffenden
Schall kaum anspricht. Diese Richtcharakteristik
ist bei allen Frequenzen, also von den tiefsten bis
zu den höchsten Tönen, annähernd gleich ("frequenzunabhängig"). Zum Schutz des Wandlersystems vor Beschädigungen besitzt das D 770 einen stabilen inneren Stützkorb. Das massive
Druckgussgehäuse und der Aussengrill aus Stahldrahtgitter schützen das System zusätzlich. Der
Aussengrill dient zusammen mit dem darunterliegenden Spezialgewebe als Windschutz, der
Windgeräusche, z.B. beim Einsatz auf Open AirBühnen, zuverlässig ausschaltet. Das D 770 besitzt einen vergoldeten 3poligen XLR-Stecker für
optimalen elektrischen Kontakt. Sie können das
D 770 sowohl an symmetrischen als auch asymmetrischen Mischpult- und Verstärkereingängen
betreiben.
1.5 Kurzbeschreibung
3
1 Beschreibung
1.6 ”MikrofonPraxis”
2 Anschluss
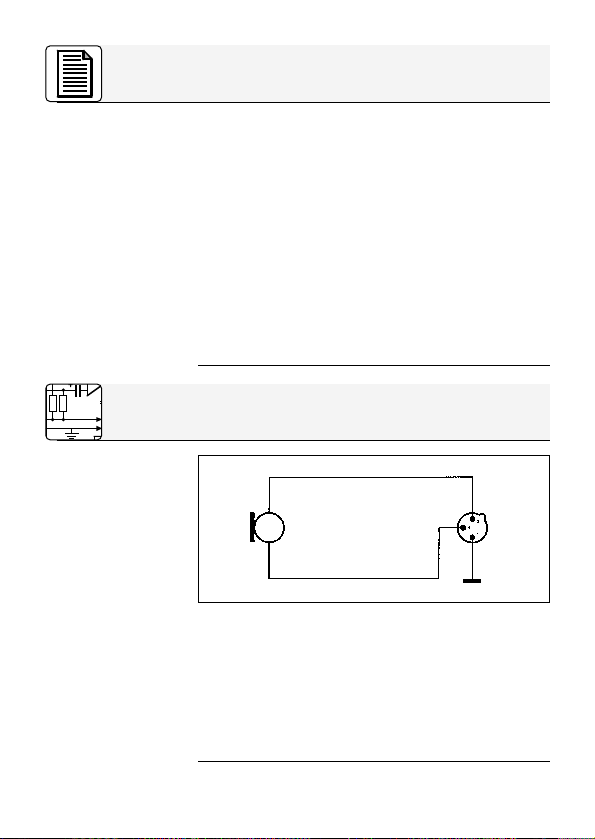
2.1 Schaltung
Abb. 1: Schaltung
des Mikrofons
Wenn Sie mehr über Mikrofone und ihre Anwendung wissen wollen, empfehlen wir Ihnen das
Buch ”Mikrofon-Praxis” von Norbert Pawera.
Norbert Pawera, selbst Gitarrist, wendet sich speziell an Musiker und beschreibt die verschiedenen
Arten von Mikrofonen, raumakustische Grundlagen, klangspezifische Eigenschaften der Musikinstrumente und welche Mikrofone für welche
Instrumente am besten geeignet sind. Selbstverständlich finden Sie darin auch Tipps zur optimalen Mikrofonaufstellung auf der Bühne und im
Studio.
”Mikrofon-Praxis” ist im Franzis-Verlag erschienen und im guten Musikfachhandel erhältlich.
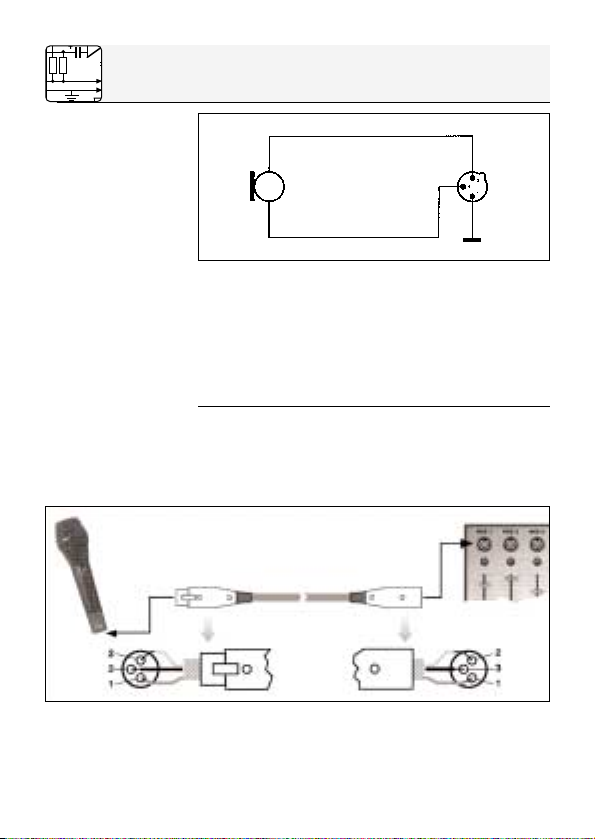
Das Mikrofon besitzt einen symmetrischen Ausgang mit 3-poligem XLR-Stecker:
Stift 1 = Masse
Stift 2 = Tonader (inphase)
Stift 3 = Tonader
Sie können das Mikrofon sowohl an symmetrische
als auch asymmetrische Mikrofoneingänge
anschließen.
4
2 Anschluss
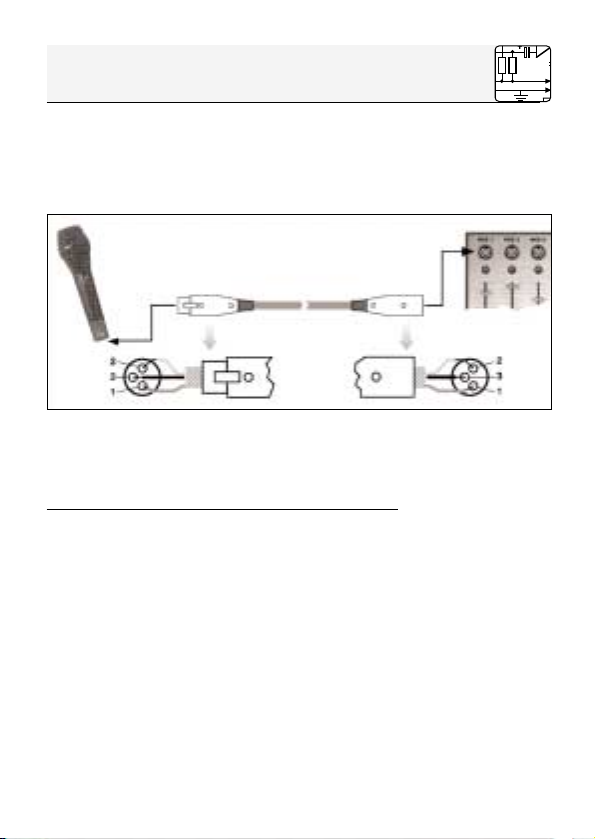
1. Verwenden Sie ein handelsübliches XLRKabel, z.B. MK 9/10 von AKG (optionales Zubehör).
Die Länge dieses Kabels hat keinen Einfluss
auf die Signalqualität.
2. Stecken Sie die XLR-Kupplung des Mikrofonkabels an den XLR-Stecker des Mikforons an.
3. Stecken Sie den anderen Stecker des Mikrofonkabels an den gewünschten Mikrofoneingang Ihres Mischpults oder Verstärkers an.
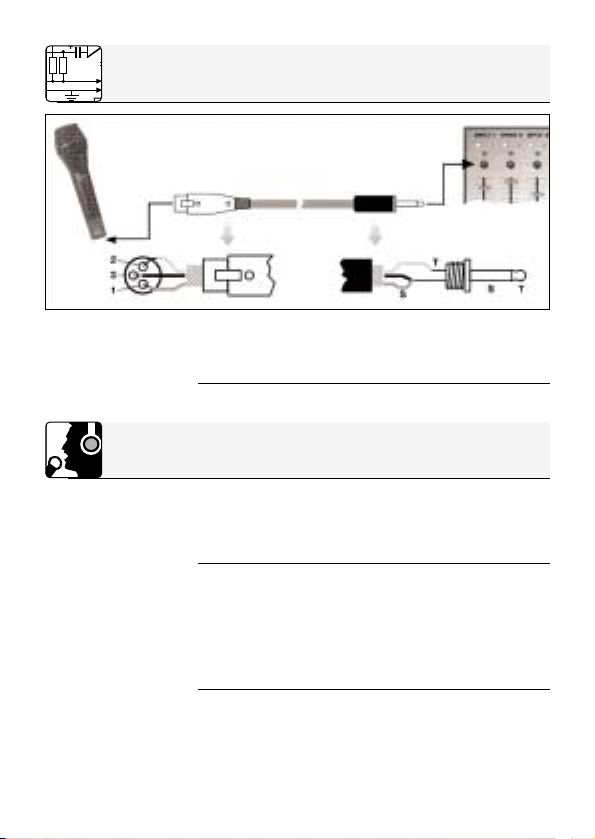
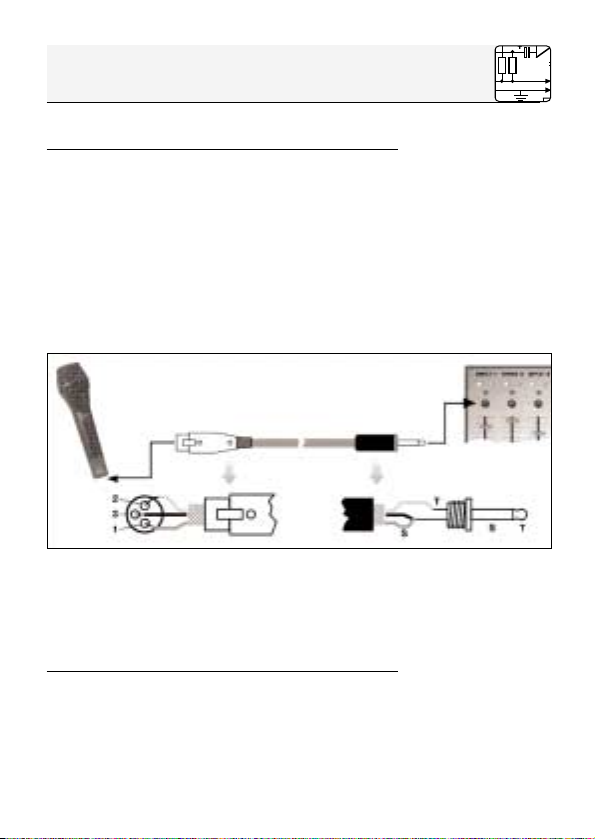
1. Wenn Sie das Mikrofon an einen asymmetrischen Mikrofoneingang (6,3 mm-Klinkenbuchse) anschließen wollen, verwenden Sie
ein Kabel mit XLR-Kupplung und 6,3 mmMono-Klinkenstecker. Solche Kabel sind im
Musikfachhandel erhältlich.
Beachten Sie, dass asymmetrische Kabel Einstreuungen aus Magnetfeldern (von Netz- und
Lichtkabeln, Elektromotoren usw.) wie eine Antenne aufnehmen können . Bei Kabeln, die länger als 5 m sind, kann dies zu Brumm- und
ähnlichen Störgeräuschen führen.
2. Stecken Sie die XLR-Kupplung des Mikrofonkabels an den XLR-Stecker des Mikforons an.
2.2 Anschluss
an symmetrischen Eingang
Abb. 2: Anschluss
über symmetri-
sches XLR-Kabel
2.3 Mikrofon an
asymmetrischen
Eingang anschließen
5
2 Anschluss
Abb. 3: Anschluss
über asymmetrisches Kabel
3 Anwendung
3.1 Naheffekt
3.2 Rückkopplung
6
3. Stecken Sie den Klinkenstecker des Mikrofonkabels an den gewünschten Mikrofoneingang
Ihres Mischpults oder Verstärkers an.
Um den ”richtigen” Sound zu finden, müssen Sie
in jedem Fall mit der Mikrofonaufstellung experimentieren. Hinweise dazu finden Sie in den folgenden Kapiteln.
Beachten Sie, dass bei geringen Abständen zwischen Schallquelle und Mikrofon die Bässe im Mikrofonsignal stärker betont werden. Sie können
also den Klang des Instruments bzw. der Stimme
bereits durch die Wahl des Mikrofonabstands gestalten.
Die Rückkopplung kommt dadurch zustande,
dass ein Teil des von den Lautsprechern abgegebenen Schalls vom Mikrofon aufgenommen und
verstärkt wieder den Lautsprechern zugeleitet
3 Anwendung
wird. Ab einer bestimmten Lautstärke beginnt die
Anlage zu heulen und zu pfeifen und kann nur
durch Absenken des Pegels wieder unter Kontrolle gebracht werden.
Um dieser Gefahr zu begegnen, hat das Mikrofon
eine nierenförmige Richtcharakteristik. Das bedeutet, dass es für Schall, der von vorne einfällt,
am empfindlichsten ist, während es auf seitlich
oder von hinten (z.B. von Monitorlautsprechern)
einfallenden Schall kaum anspricht.
Minimale Rückkopplungsneigung erreichen Sie,
indem Sie die PA-Lautsprecher vor den Mikrofonen (am vorderen Bühnenrand) aufstellen.
Lassen Sie das Mikrofon nie direkt auf die Monitore oder die PA-Lautsprecher zeigen.
Rückkopplung kann auch durch Resonanzen (als
Folge der Raumakustik), besonders im unteren
Frequenzbereich, ausgelöst werden, also indirekt
durch den Naheffekt. In diesem Fall brauchen Sie
oft nur den Mikrofonabstand zu vergrößern, um
die Rückkopplungsgrenze anzuheben.
Abb. 4: Mikrofonaufstellung für
minimale Rückkopplung
7
3 Anwendung
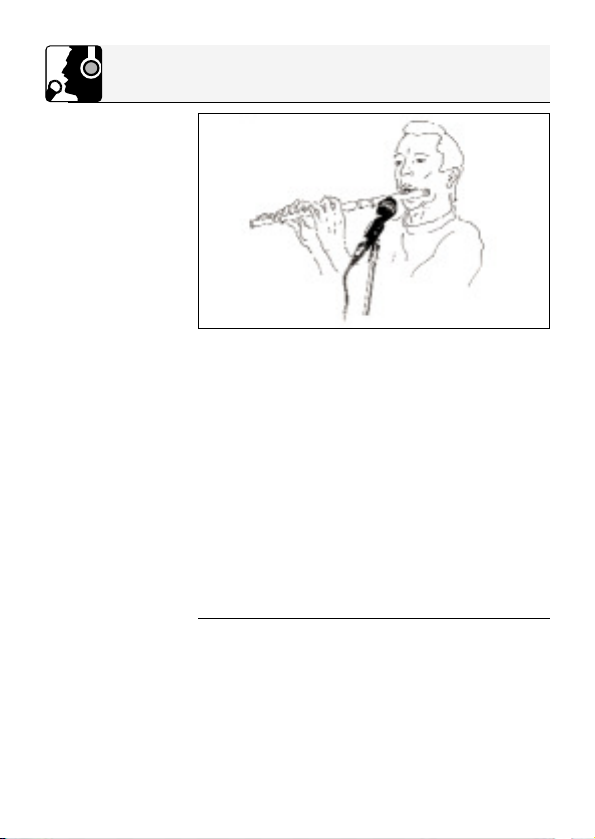
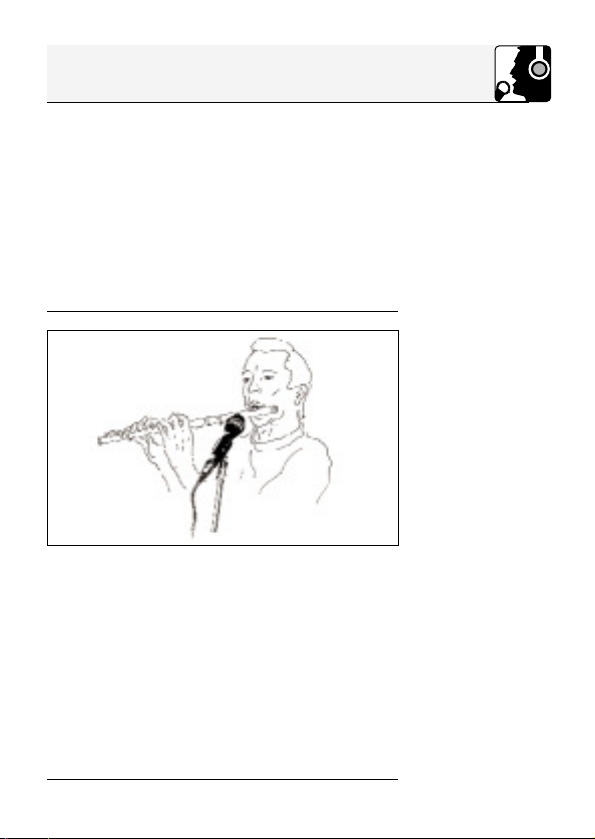
3.3 Querflöte
Abb. 5: Mikro-
fonaufstellung für
Querflöte
Der Mikrofonabstand hängt primär von der Art des
Musikstückes ab. Bei Popmusik und Jazz können
Sie sehr nahe (2–5 cm) an das Mikrofon herangehen, da bei geringem Abstand zum Mikrofon der
Anteil der Blas- und Atemgeräusche steigt. Blasen
Sie in diesem Fall etwas unter das Mikrofon, um
diese Geräusche nicht übermäßig zu betonen
bzw. das Mikrofon durch Anblasen aus kürzester
Entfernung zu überfordern.
Klassische Musik verlangt nach einer weniger direkten, dafür eher räumlichen Wiedergabe. Stellen
Sie das Mikrofon etwas oberhalb des Instruments
in einem Abstand von ca. 10 bis 20 cm auf. Richten Sie das Mikrofon nach unten und im rechten
Winkel zum Instrument aus.
8
3 Anwendung
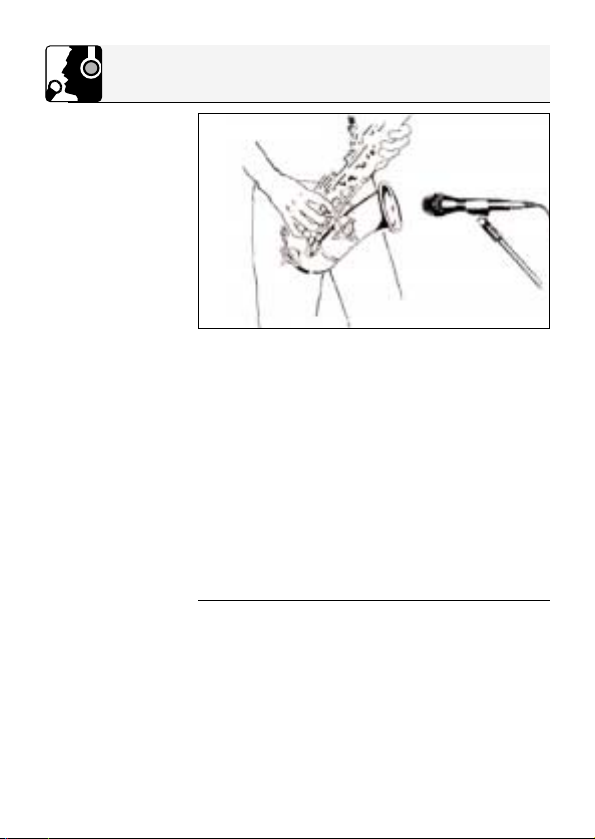
Wenn Sie das Klappengeräusch als charakteristisch für den Saxophonklang oder das Musikstück empfinden, richten Sie das Mikrofon auf die
Mitte des Instruments.
Erscheinen Ihnen die Klappengeräusche jedoch
als störend, richten Sie das Mikrofon auf den vorderen äusseren Rand des Schallbechers.
Wenn Sie das Mikrofon in den Schallbecher hinein
zeigen lassen, werden Sie einen hohen Anteil an
Luftgeräuschen erhalten.
Der optimale Mikrofonabstand beträgt 20 bis
30 cm.
Auf der Bühne müssen Sie eventuell näher zum
Mikrofon gehen (bis 5 cm), um Rückkopplungen
und Übersprechen von anderen Instrumenten zu
vermeiden. Achten Sie in diesem Fall besonders
darauf, nicht direkt in das Mikrofon zu blasen.
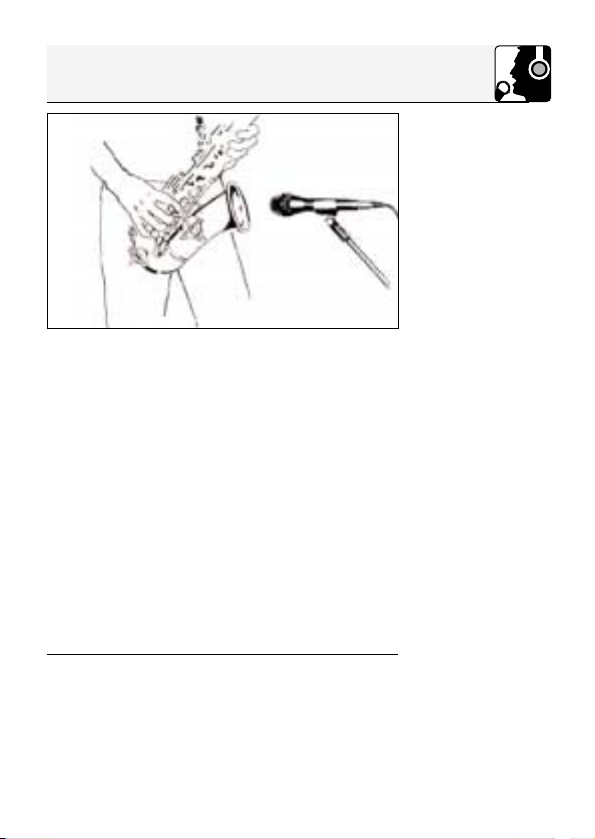
3.4 Saxophon
Abb. 6: Mikrofonaufstellung für
Saxophon
9
3 Anwendung
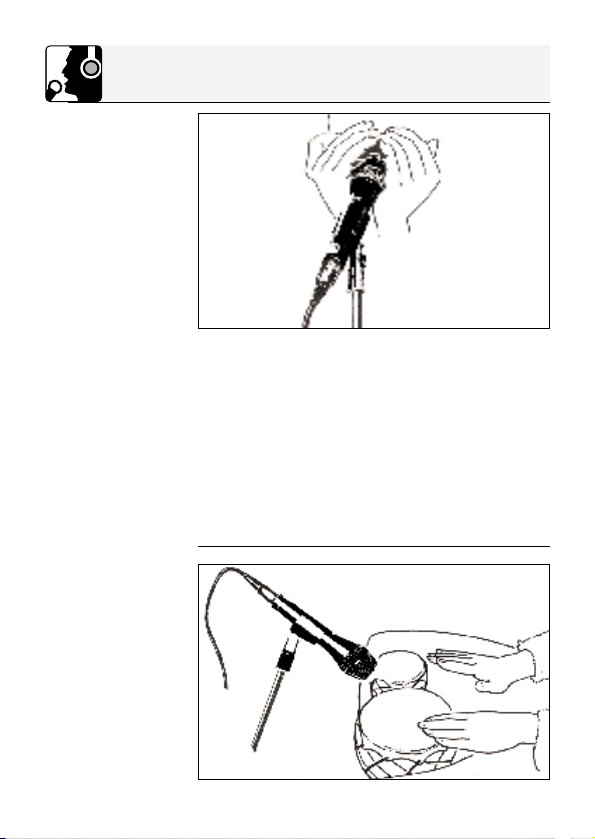
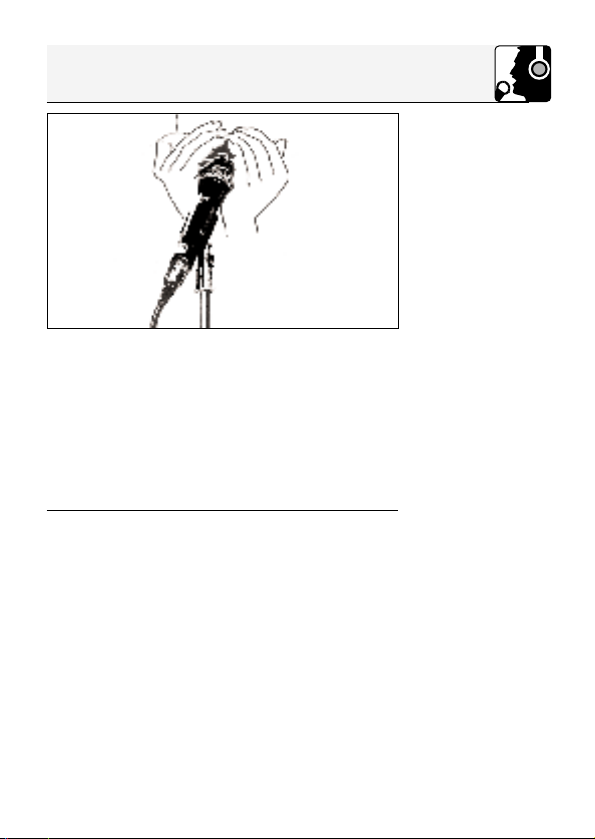
Mundharmonika
3.5
Abb. 7:
Mikrofontechnik
für Mund-
harmonika
3.6 Bongos,
Congas,
Timbales
Die meisten Mundharmonikaspieler bilden mit den
Händen einen Resonanzraum hinter dem Instrument.
Sie können besondere Klangeffekte erzielen, indem Sie das Hohlraumvolumen verändern. Klemmen Sie das Mikrofon zwischen die Hände.
Das D 770 ist für diese Technik besonders geeignet, weil es dank des runden Kopfes nicht herausrutschen kann und der eingebaute Pop- und
Windschutz Pop- und Blasgeräusche zuverlässig
unterdrückt.
Abb. 8: Mikrofon-
aufstellung für
Bongos
10
3 Anwendung
Stellen Sie das Mikrofon so nahe wie möglich bei
den Trommeln auf und richten Sie das Mikrofon
zwischen die beiden Trommeln.
Sie können auch zwei Mikrofone verwenden:
Stellen Sie die Mikrofone in einem Winkel von 45°
zueinander auf und richten Sie sie auf den äusseren Schlagfellrand aus.
Richten Sie sich beim Mikrofonabstand danach,
wieviel oder wie wenig Anschlaggeräusch Sie
übertragen wollen. Je kürzer der Mikrofonabstand, umso stärker das Anschlaggeräusch.
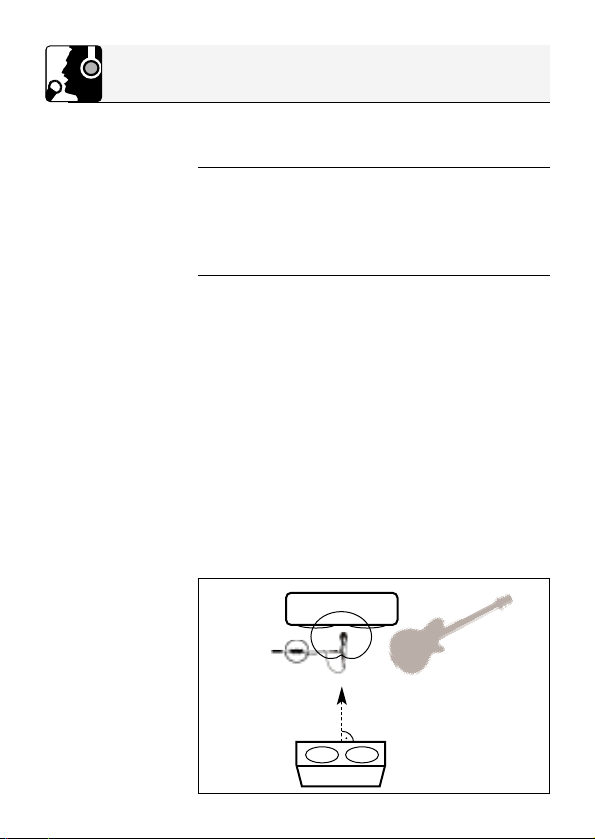
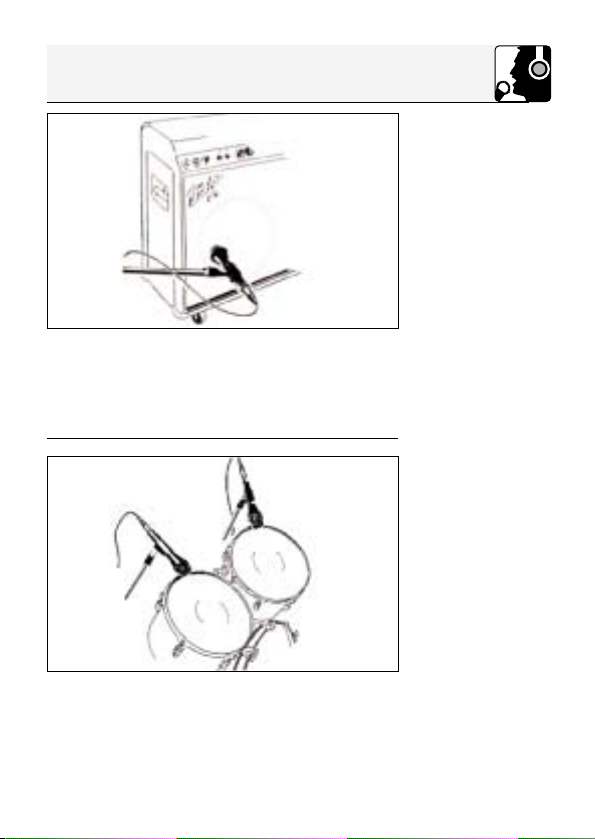
Lautsprecher strahlen die hohen Frequenzen sehr
stark gebündelt aus.
Stellen Sie das Mikrofon in einer Entfernung von 5
bis 15 cm vor der Lautsprechermembran auf und
richten Sie es auf den Mittelpunkt der Membran
aus.
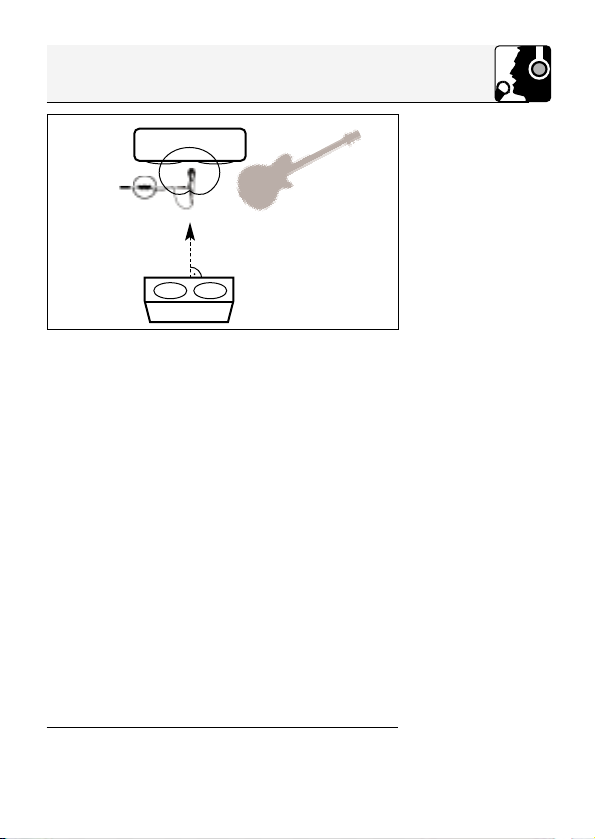
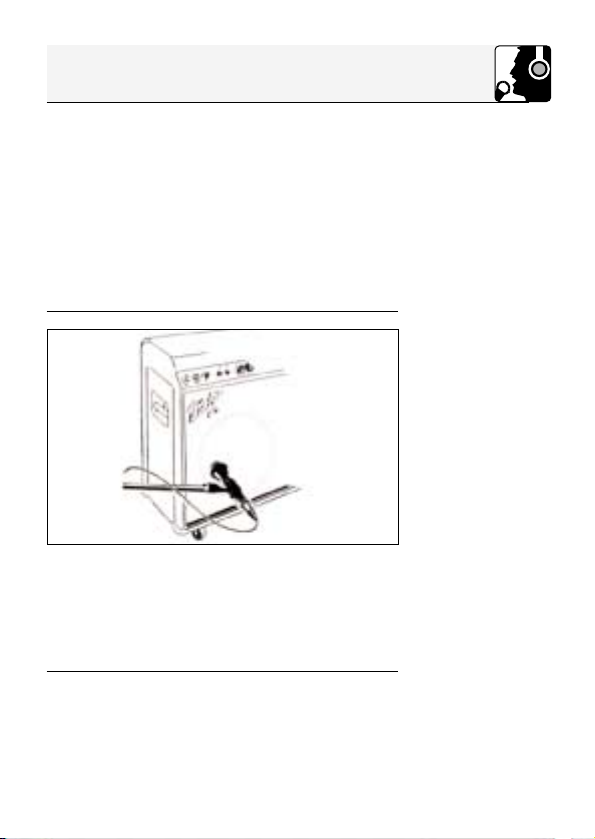
3.7 Gitarrenverstärker
Abb. 9: Mikrofonaufstellung für
Gitarrenverstärker
11
3 Anwendung
3.8 Tom-Toms,
Roto-Toms,
Snare
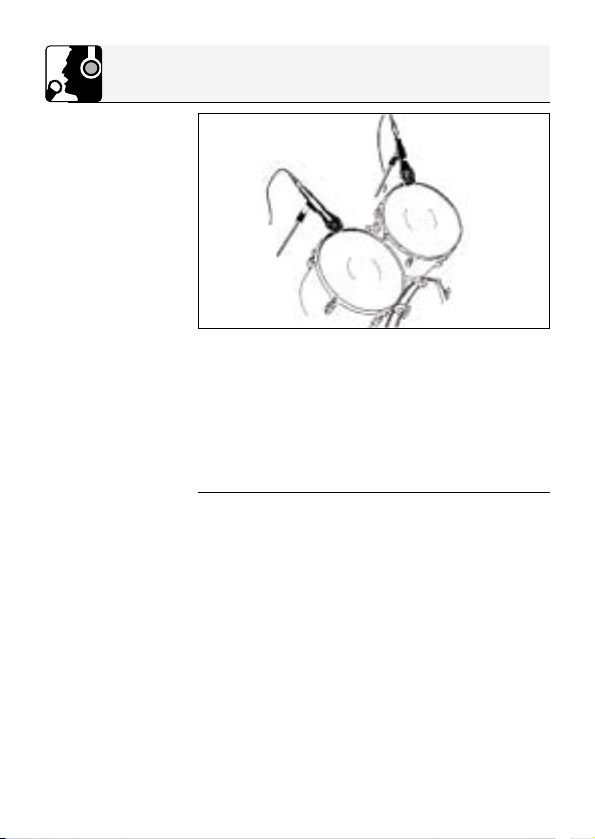
Abb. 10: Mikrofon-
aufstellung für
Tom-Toms
1. Um zu langes Nachschwingen des Schlagfells
zu verhindern, befestigen Sie einen Filzstreifen
oder ein Papiertaschentuch mit Klebeband
seitlich auf dem Schlagfell.
2. Stellen Sie pro Tom ein D 770 etwa 5–10 cm
vom Fell entfernt auf.
3. Richten Sie das Mikrofon auf den äusseren
Rand des Schlagfells aus.
12
3 Anwendung
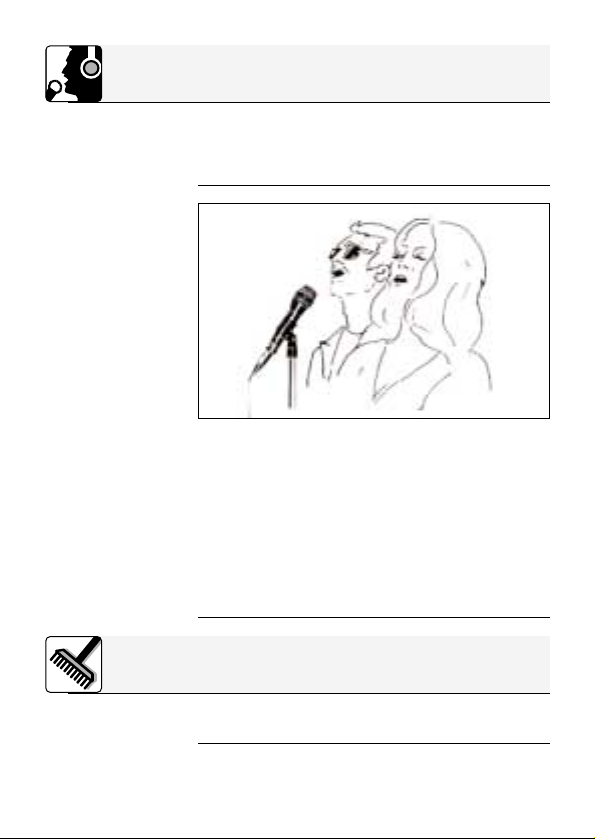
1. Lassen Sie nie mehr als zwei Personen in ein
gemeinsames Mikrofon singen.
2. Achten Sie darauf, dass der Schalleinfallswinkel nie größer als 35° ist.
Das Mikrofon ist für seitlich einfallenden Schall
sehr unempfindlich. Wenn die beiden VokalistInnen aus einem größeren Winkel als 35° auf
das Mikrofon singen, müssten Sie den Pegelregler des Mikrofonkanals so weit aufziehen,
dass die Rückkopplungsgefahr zu groß würde.
3.9 Begleitchor
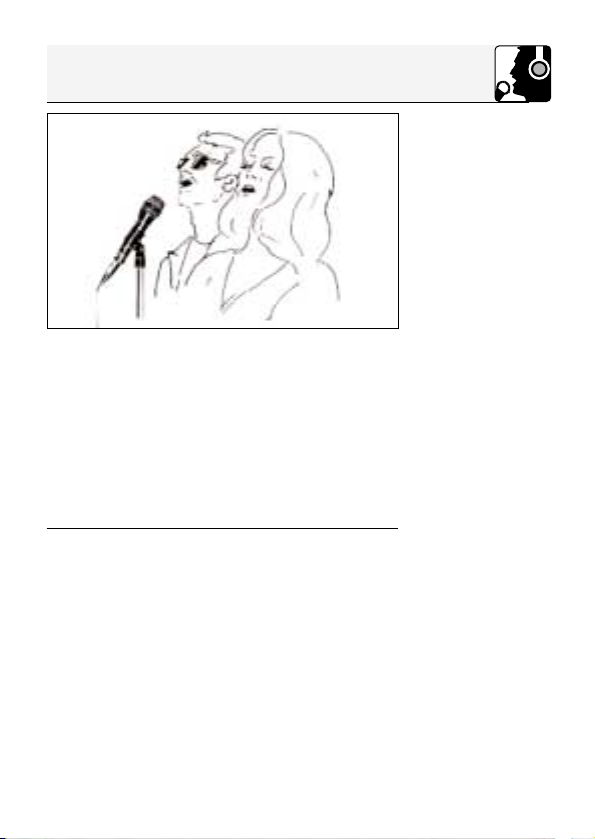
Abb. 11: Mikrofonaufstellung für
Begleitduo
13
4 Reinigung
Reinigen Sie das Gehäuse des Mikrofons mit einem mit Wasser befeuchteten Tuch.
5 Fehlerbehebung
Kein Ton:
14
Fehler
Mögliche Ursache
1. Mischpult
und/oder Verstärker ausgeschaltet.
2. Kanal-Fader oder
Summenpegelregler am Mischpult oder Lautstärkeregler des Verstärkers steht auf
Null.
3. Mikrofon nicht an
Mischpult oder
Verstärker angeschlossen.
4. Kabelstecker nicht
richtig angesteckt.
5. Kabel defekt.
Abhilfe
1. Mischpult
und/oder Verstärker einschalten.
2. Kanal-Fader oder
Summenpegelregler am Mischpult oder Lautstärkeregler des Verstärkers auf gewünschten Pegel
einstellen.
3. Mikrofon an
Mischpult oder
Verstärker anschließen.
4. Kabelstecker
nochmals anstecken.
5. Kabel überprüfen
und falls nötig ersetzen.
6 Technische Daten
Arbeitsweise: dynamisches Druckgradientenmikrofon
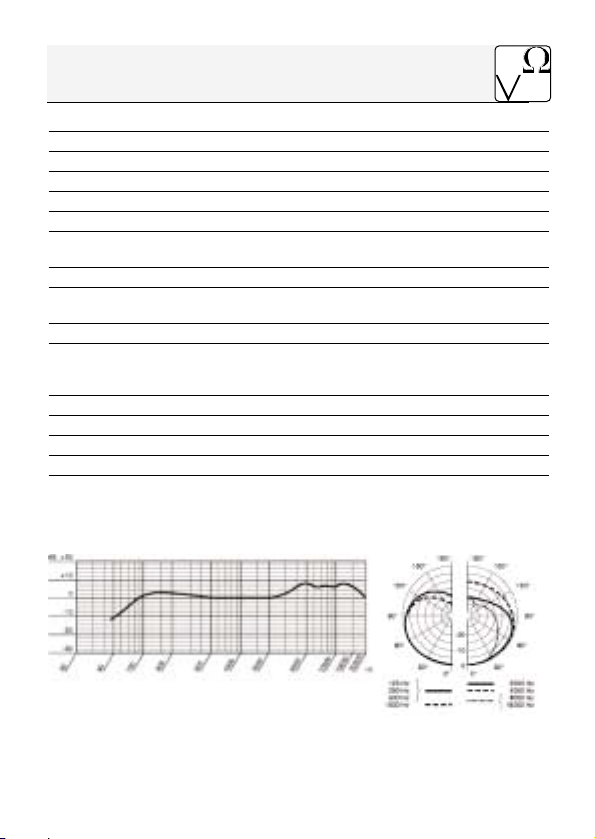
Richtcharakteristik: nierenförmig
Übertragungsbereich: 60 bis 20.000 Hz, bei 1 cm: 20 bis 20.000 Hz
Empfindlichkeit bei 1000 Hz: 2,5 mV/Pa (- 52dBV bez. auf 1V/Pa)
Elektrische Impedanz bei 1000 Hz: ≤600 Ω
Empfohlene Lastimpedanz: ≥2000 Ω
Grenzschalldruck
für 1% / 3% Klirrfaktor: 147 dB SPL / 156 dB SPL
Äquivalentschalldruckpegel: 22 dB(A) (DIN 45412)
Zulässige klimatische Verhätlnisse: Temperaturbereich: -10°C bis +60°C
Steckerart: 3-poliger Standard XLR-Stecker
Steckerbeschaltung: Stift 1: Masse
Gehäusematerial: Druckguss
Oberfläche: mattschwarz lackiert
Abmessungen: L: 180 mm; max. ø: 50 mm
Gewicht (netto/brutto): 290 g / 650 g
Dieses Produkt entspricht der Norm EN 50 082-1.
Frequenzgang Polardiagramm
rel. Luftfeuchtigkeit bei +20°C: 95%
Stift 2: Tonader (inphase)
Stift 3: Tonader
15

1 Precaution/Description
1.1 Precaution
1.2 Unpacking
1.3 Optional
Accessories
1.4 Features
Please make sure that the piece of equipment
your microphone will be connected to fulfills the
safety regulations in force in your country and is
fitted with a ground lead.
1 D 770 1 SA 44
Check that the packaging contains all of the components listed above. Should anything be
missing, please contact your AKG dealer.
• MK 9/10 microphone cable: 10 m (30 ft.) 2-
conductor shielded cable with 3-pin male and
3-contact female XLR connectors
• ST 102A, ST 200 floor stands
• ST 1, ST 12, ST 45 table stands
• W 880 windscreen
• Frequency response tailored to miking instruments and backing vocals.
• Built-in windscreen/pop filter for effective suppression of pop and breath noise.
• Doubleflex™ f transducer shock mount reduces handling and cable noise.
• Frequency-independent cardioid polar response for high gain before feedback.
• New Varimotion™ diaphragm technology for
brilliant sound.
16

1 Description
The D 770 is a cardioid dynamic microphone. It
has been designed primarily as an instrument
microphone for rough stage use and for miking up
backing vocals. The wide frequency response of
the D 770 slightly favors the midfrequency and
treble regions and thus ensures good intelligibility.
Having a cardioid polar response, the D 770 is
most sensitive to sound arriving from in front of it,
less sensitive to sound arriving from the sides, and
least sensitive to sound arriving from the rear. This
polar pattern is virtually the same for all frequencies ("frequency independent"). The D 770 is fitted
with a shock absorbing inner grille for transducer
protection against damage. The outer grille and a
layer of special fabric beneath it form a very effective windscreen that will suppress blowing and
wind noise on open-air stages. The D 770 features
a gold plated 3-pin male XLR-type connector for
optimum electrical contact. You can connect the
microphone either to a balanced or an unbalanced
microphone input.
1.5 Brief
Description
17
2 Wiring
2.1 Circuit
Diagram
Fig. 1: Microphone
circuit diagram.
The microphone provides a balanced output on a
3-pin male XLR connector:
Pin 1: ground
Pin 2: hot
Pin 3: return
You can connect the microphone either to a
balanced or an unbalanced microphone input.
2.2 Connecting
the Microphone
to a Balanced
Input
Fig. 2: Using a
balanced connecting cable.
18
1. Use a commercial XLR cable such as the op-
tional MK 9/10 from AKG.
The length of these cables does not affect audio quality.
2. Plug the female XLR connector on the micro-
phone cable into the male XLR connector on
the microphone.
3. Plug the other connector on the microphone
cable into the desired microphone input socket
on your mixer or amplifier.
2 Wiring
1. To connect the microphone to an unbalanced
microphone input (1/4" jack), use a cable with a
female XLR connector and a 1/4" TS jack plug.
These cables are available at music stores.
Please note that unbalanced cables may pick
up interference from stray magnetic fields near
power or lighting cables, electric motors, etc.
like an antenna. This may cause hum or similar
noise when you use a cable that is longer than
16 feet (5 m).
2. Plug the female XLR connector on the microphone cable into the male XLR connector on
the microphone.
3. Connect the 1/4" jack plug on the microphone
cable to the desired microphone input jack on
your mixer or amplifier.
2.3 Connecting
the Microphone
to an Unbalanced
Input
Fig. 3: Using an
unbalanced cable.
19
3 Using Your Microphone
The best way to get the "right" sound is to experiment with microphone placement. The following
sections contain useful suggestions.
3.1 Proximity
Effect
3.2 Feedback
Fig. 4: Microphone
placement for
maximum gain
before feedback.
20
Please note that moving the microphone closer to
the instrument will boost the bass range of the
microphone signal. Using this effect, you can
create your personal sound by varying the working distance.
Feedback is the result of part of the sound projected by a speaker being picked up by a microphone,
fed to the amplifier, and projected again by the
speaker. Above a specific volume or "system
gain" setting called the feedback threshold, the
signal starts being regenerated indefinitely, making the sound system howl and the sound engineer desperately dive for the master fader to reduce the volume and stop the howling.
To increase usable gain before feedback, the
microphone has a cardioid polar pattern. This means that the microphone is most sensitive to
sounds arriving from in front of it while picking up
much less of sounds arriving from the sides or rear
(from monitor speakers for instance).
3 Using Your Microphone
To maximize gain before feedback, place the main
("FOH") speakers in front of the microphones
(along the front edge of the stage).
Be sure never to point any microphone directly at
the monitors, or at the FOH speakers.
Feedback may also be triggered by resonances
depending on the acoustics of the room or hall.
With resonances at low frequencies, proximity effect may cause feedback. In this case, it is often
enough to move away from the microphone a little
to stop the feedback.
Working distance primarily depends on the kind of
music played. For popular and jazz pieces, relatively short distances may be desirable (1 or 2 in.),
as the amount of wind and breath noise rises with
decreasing working distance. In this case, blow a
little below the microphone in order to avoid
getting too much noise by blowing at it from an extremely short distance. For classical music, which
calls for spatial reproduction, place the microphone about 4 to 8 inches away from the instrument and slightly above it. Aim the D 770 down toward and roughly at right angles to the flute.
3.3 Flute
Fig. 5: Microphone
placement for the
flute.
21
3 Using Your Microphone
3.4 Saxophone
Fig. 6: Microphone
placement for the
saxophone.
If you consider the noise produced by the keys as
characteristic of the saxophone sound or the
song, point the microphone at the middle of the instrument.
However, if you want no key noise, direct the
microphone toward the front outer rim of the bell.
If you aim the microphone into the bell, you will get
too much wind noise.
Optimum working distance is 8 to 12 inches.
On stage, you may have to move as close as
2 inches to the microphone in order to avoid
getting feedback or spillover from other instruments. In this situation, make sure not to blow
right into the microphone.
22
3 Using Your Microphone
Many harmonica players form a resonant cavity
behind the instrument with their hands.
You can achieve certain effects by changing the
cavity. Hold the microphone inside the cup you
form with your hands.
The D 770 is particularly well suited for this playing
technique since it cannot slip away because of the
shape of its head, and the built-in windscreen will
effectively suppress pop and wind noise.
3.5 Harmonica
Fig. 7: Using the
microphone on the
harmonica.
23

3 Using Your Microphone
3.6 Bongos,
Congas,
Timbales
Fig., 8: Micro-
phone placement
for the bongos.
Place the microphone as close as possible to the
drums, aiming it between the two drums.
Alternatively, you could use two microphones:
Set the microphones up in a "V" forming an angle
of about 45 degrees and aim the microphones at
the perimeters of the top heads.
Experiment to find out at what working distance
you get exactly the amount of attack you want.
The closer you place the microphone(s), the
punchier the sound will get.
24
3 Using Your Microphone
Loudspeakers radiate high frequencies within a
very narrow angle.
Place the microphone about 2 to 6 inches in front
of the loudspeaker diaphragm and aim the microphone at the center of the diaphragm.
3.7 Guitar Amp
Fig. 9: Microhone
placement for a
guitar amp.
3.8 Tom-toms,
Roto Toms,
Snare Drum
Fig. 10: Microhone
placement for tomtoms.
1. To prevent the top head from ringing
excessively, use adhesive tape to fix a strip of
felt or a Kleenex to the skin in an off-center
position.
25
3 Using Your Microphone
2. Place one D 770 about 2 to 4 inches from the
head of each tom.
3. Align the microphone with the perimeter of the
top head.
3.9 Backing
Vocals
Fig. 11: Micro-
phone placement
for backing vocals.
1. Never let more than two persons share a
microphone.
2. Ask your backing vocalists never to sing more
than 35 degrees off the microphone axis.
The microphone is very insensitive to off-axis
sounds. If the two vocalists were to sing into
the microphone from a wider angle than
35 degrees, you may end up bringing up the
fader of the microphone channel far enough to
create a feedback problem.
26
4 Cleaning
To clean the microphone case, use a soft cloth
moistened with water.
 Loading...