

Page 1
AKAI
you
Thank
To
ensure optimum
operator's manual
purchasing
for
Operator's Manual
this AKAI video
performance
thoroughly.
ol this unit,
cassette
please
recorder.
read this
l+c!
HIGH
QUALITY
NES]
-
PAT
Akai-Creative
At Heart.
f, t-l^fll'lE
vvur
-r
Page 2
Table
contents
of
Features
Initial setting
playback
NTSC
Blank Skip Play
lndex codes..........
lntro scan and
Recording
Blank search
index search ..............
programmes
TV
.................... 23
......................
.................................
... 14
22
22
23
24-26
25
G-CODE
NTSC
4 video heads
Audio dubbing
2
Super
Centre
Quick
One
Remaining tape
Blank Skip
Programmable
lntro scan
Edit search
MultFlanguage
Next-mode
Auto tracking
Blank search system
Quick
Automatic
timer recording
playback
recording and
speed
Intelligent-HQ system
cassette loading
servo drive
Touch Recording
Play
finder
tuning
Programmable
tamer)
Auto head cleaning
power
Auto
The VCR
serted.
on
power
PAL TV
on
playback
(OTR)
time
display
infrared remote control
programmable
on-screen
timer recording
is automatically
turned on
jog
with
and shuttle
display
(8-programme/1-year
when the tape is in-
The Super
Intelligent-HQ
Troubleshooting
Specitications
Maintenance
feature
Auto rewind
The video tape
is reached during the
tape
waro mooe.
Auto tape reiect
36
37
38
38
lf a videotape
the VCR willautomatically eject
presseo.
ton rs
play
Auto
video tape's recording defeat
ll the
playback
into the
will begin automatically
VCFI.
Power off eiect
when the VCR'S
Even
will turn the
power
power
will be
Auto counter display
the
When
played
rewtnd.
Auto
The VCR can be set so that
cally
display
on the
power
off
if the VCFI
Auto head cleaning
When a tape
cleaned
is loaded or ejected
automatically.
is automatically
with its recording defeattab
rewound when the end
play,
recording or
it when the
tab has been
when
power
on and eject
turned otf automaticall,.
is
mode
TV
screen
is not being used
on,
automatically during
pressing
is
off,
the tape.
the tape counter
power
the
is turned off automati-
(refer
the VCR video
quick
removed
record ortimer but-
of the
for-
finder
is loaded,
removed,
the tape is inserted
the eject button
Once ejected,
the
will be dis-
forward or
fast
"Mode
to
teature").
head drum
is
2
Page 3
Warnings
and
WARNING
prevent
To
pliance
fire
or shock hazard, do
to rain or moisture.
Power requirements
requirements for
Power
areato
Power
The
operating
V,
50 Hz.
Please
area.
requirements
voltage
electrical appliances differ from
ensure
your
in
this appliance is fixed
of
precautions
not
expose this ap-
1-En
thatyour appliance meets the
area.
AC 240
at
2-En
Never touch the
Always
cord.
Only
pullthe power
qualified professional
let
a
power
cord
cord's
out by the
plug
with wet hands.
plug
repair
and never by the
or
video cassette recorder. An inexperienced
touch the
Never
sette recorder.
internal
put
anything, especially metal, into the video cas-
parts
and
get
a
serious electric shock.
reassemble the
person
might
This
equipment conlorms
EEC standards.
This appliance is not equipped with a main
Even when
the appliance is turned off, the
notcompletely turned otfwhen the
in. Pull out the
for long
power
periods.
to N0. 82I4991EEC,
powercord
cord when not using the appliance
power
power
87 l30a/
3A-En
switch.
supply is
plugged
is
4-En
Power tailure backup
This VCR
failure. The back-up capacitor
and
recording) in the event of a
minutes. (When this VCR
60 minutes are required to
in
utilizes a back-up capacitor
programme
loss
of
order to
provide
60 minutes of back-up time).
information
power
first
is
charge
prevents
plugged
possible power
for
clock stoppage
(for
timercontrolled
failure lasting up to 60
in,
approximately
the back-up capacitor
Power lailure indication
power
lf a
'r-:-r'will
clock
tion.
lf
a
recording, the clock willflash on the TV screen when the
TV
powerfailure
terrupted.
trolto setthe
Use only
failure
be flashing on the FL display. In this case the
must
be
power
failure
VCR
and
Press
video tapes marked
more than 60 minutes has
of
re-set. Flefer to the
less than 60 minutes
of
"Setting
are turned back on.
has occurred and the recording has been in-
DISPLAY
the
clockto
its normal mode
button on
"VHS"
the
This indicates that
the remote
(flashing
with this VCR.
occurred
clock" sec-
occurs during
con-
willstop).
Use a household AC
power
source.
place
Do not
ll water is spilled on
once and
lvlake sure that the
anything
anything heavy on top of the VCR.
consult
top of the ventilation holes.
on
To avoid damage to
surface,
light, etc.).
Avoid
damage the linish or cause sudden
To
other similar chemicals
Place the VCR on a flat and solid surtace.
lf
disconnect
Avoid using the
places.
keep the VCR away from heat
aerosol sprays near the VCR as this could
using
avoid damaging
do not
plan
you
the
Avoid using the VCR
magnelic fields.
Avoid using the VCR near
shorten
Avoid violent shocks to the
a
portation.
Before
the
operating
packing,
power
source only. Never use a DC
the VCR,
your
VCR is well ventilated, and
the internal
disconnect
dealer.
circuits
(stoves,
ignition
the finish, never use
to use
oower
VCFI in
to
the VCR for a long
cord.
extremely
near
the VCR.
clean
hot,
appliances
cold,
lluorescent lamps
range of the remote control unit.
VCB
during
remove the
video tape from the VCR.
power
the
do
and the
direct sun-
the
of
paint
thinner or
period
humid
generating
as
packing
and
cord
place
not
external
spray.
ot time,
or dusty
strong
this may
trans-
at
Avoid moisture condensation
Moving the
warm
and the
in this state, the heads
out
may be damaged.
prevent
To
plugged
before
This is
serted
sette recorder.
video
place
can cause dew condensation on
video heads inside the unit. lf
this from occurring, the
in for about one
playback
particularly
for
first time after
the
cassette
recorderfrom a cold
playback
may
become dirty and
power plug
hour with the POWER button otf,
or recording ol a
important
video
when avideo
Durchase
place
to a
the
drum
is carried
the tape
must
be
cassette tape.
cassette
of the video cas-
is in-
3
Page 4

AIAI
%
ffi
E6r
lJ, v
4
Page 5
Gontrols
& terminals
Front
A
R
n
v
MIC
For
AUDIO/VIDEO
For connection
r
To stop
ejected even when the VCR'S
>
Play button
To
<< Rewind
To rewind thevideo
ing
>>
To fast forward
der during
POWER/standby
To
CHANNEL button
To
SPEED button
To set the tape
ll
/
To set the VCR to
ding
l-HO
To improve
REC/OTR (Recording/One
To start recording.
the OTR stop time.
panel
Cassette.lolding
LOaO rne vH5
(Fluorescent)
FL
Provides visual reference
Femote
For
(Microphone)
connection of a microphone
/
a Stop/eiect
start
sensor window
reception
playback
video
tape
button
playback.
Fast forward
the video tape. Also
playback.
turn the VCR on
TV
select
*{
or stop mode, or to freeze
channels.
Pause/still button
button
picture
slot
vtoeo taoe nere.
display
the remote
of
socket
lN
terminals
of a second VCR
button
and eject the video
playback.
tape.Alsoto
button
button
(standby
or off
speed for recording.
the recording
quality
during
Also used to
of the VCR's
control's
during audio
video
or
power
start reverse
to start forward
mode).
pause
playback
the
recording
Touch
Recording)
enter
operating modes.
signal.
dubbing.
camera.
tape. The tape
is
off.
quick
mode lrom
picture.
playback.
or
button
the
OTR mode and
can be
finder
dur-
quick
fin-
the recor-
set
Rear
ll
-
RF.OUT switch
To
RF.OUT
To
ANT.IN
For TV antenna
VIDEO/AUDIO
For connection
audio connection cord.
panel
power
AC
Connect the
select the outout channel
connect the
socket
terminal
VCR
terminal
connection.
lN/OUT lerminals
of a
orovided Dower cable here.
TV
the VCR.
of
to the TV's ANTENNA lN
or second VCR when
terminal.
using a video/
5
Page 6
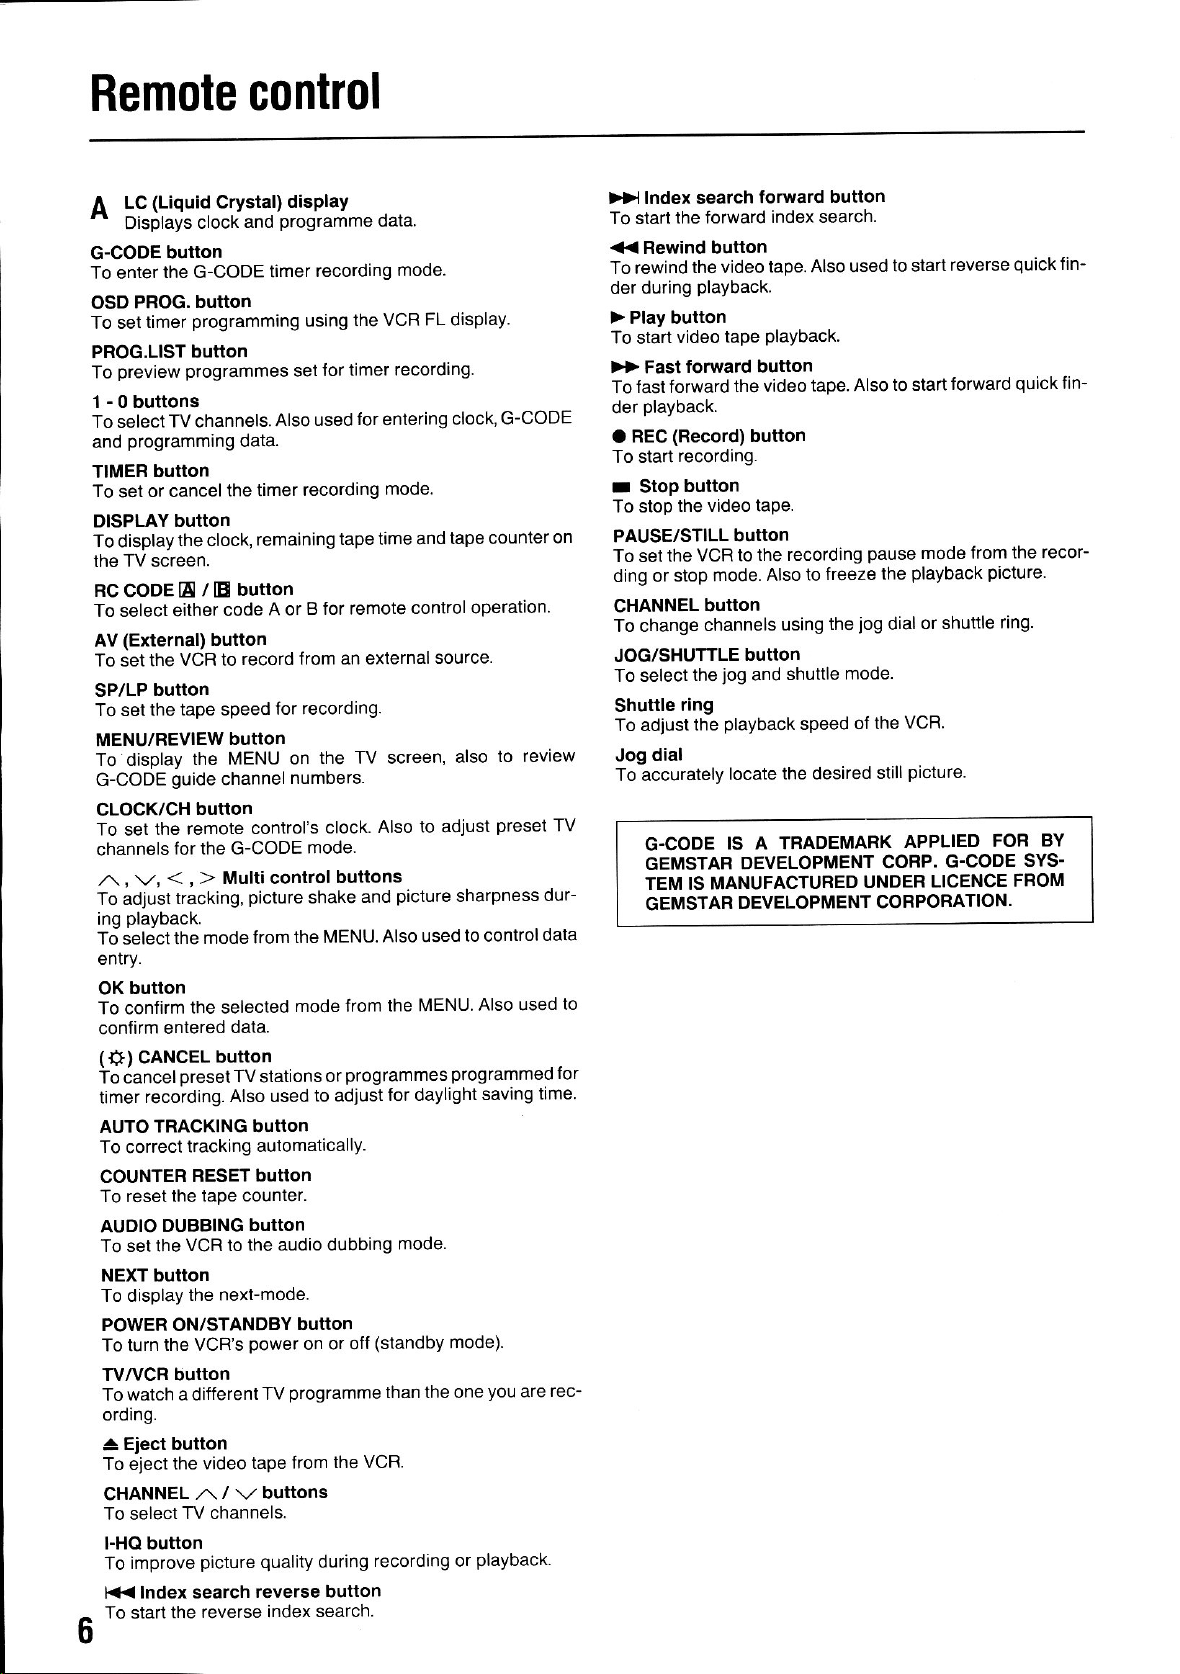
Remote
control
(Liquid
LC
A
^
Oisplays
G-CODE
To enter
PROG.
OSD
timer
To set
PROG.LIST button
preview
To
-
1
0 buttons
To select
programming
and
TIMER
To
DISPLAY
To
the TV screen.
button
or cancel
set
display
Crystal)
clock
button
the G-CODE
button
programming
programmes
TV channels.
the timer
button
the clock,
RCCODEE/Ebutton
To select either
(External) button
AV
To set the
button
SP/LP
To set the
MENU/REVIEW
To display
G-CODE
CLOCK/CH
the remote
To set
channels
/^\, v,
To adjust
playback.
ing
To selectthe
entry.
button
OK
To confirm
confirm
(
CANCEL
+)
To cancelpresetTV
recording.
timer
TRACKING button
AUTO
To
correct
COUNTER
To reset the
AUDIO
To set the
NEXT button
To display
POWER ON/STANDBY
To turn
W/VCR button
To
^
o
DUBBING
watch a different
ordrng.
Eiect button
A
To eject
CHANNEL
To select
l-HO button
improve
To
Index search
14<
To
start
code
VCR to
tape speed
button
MENU on
the
guide
channel
button
for the G-CODE
<
> Multi control
,
tracking,
mode from
the selecled
entered
data.
button
Also used
tracking
BESET
tape counter.
VCR to the
the nexFmode.
the VCR'S
the video
/
,^
\,,
TV channels.
picture quality
reverse
the
disPlay
programme
and
recording
timer
using
for timer
set
Also used
data.
recording
remaining
B for
A or
from an external
record
lor recording.
the TV screen
numbers.
control's
picture
stations
clock.
mode.
shake
the MENU.
mode lrom
or
to adjust
automatically.
button
button
audio dubbing
button
power
on or oif
programme
TV
tape from
buttons
during
reverse button
index search
data
mode.
VCR FL display.
the
recording.
for entering clock,
mode.
tape time and
remote control operation.
tape counter
source.
also
Also to adjust
buttons
picture
and
Also used
the lVlENu.
programmes
for daylight
(standby mode).
than the one
the VCR.
recording or
sharpness
to controldata
Also used
programmeo
saving
mode
you
playback.
G-CODE
on
to review
preset
TV
dur-
lor
time.
rec-
are
>> lndex search
To start
<< Rewind button
To rewind
der during
> Play button
To start
>> Fast
fast forward
To
playback.
der
BEC
a
To start
r Stop
To stop
PAUSE/STILL
To set the
ding or stop
CHANNEL
To change
JOG/SHUTTLE
To select
Shuttle
To adjust
dial
Jog
To accurately
G.CODE
GEMSTAR
TEM IS MANUFACTUFED
GEMSTAR
to
forward
the torward
the video
playback.
video
tape. Also used
tape
Playback.
forward button
the video
(Record)
recording.
button
button
the video tape.
button
VCR to
the recording
mode.
Also to
button
channels
bUttON
jog
the
and
ring
playback
the
locate
IS A TRADEMARK
DEVELOPMENT
DEVELOPMENT
button
index search.
tape. Also
freeze the
the
using
mode.
shuttle
of the
speed
the desired
reverse
to start
forward
to start
pause
mode from
playback
jog
dial
still
or shuttle
VCR.
picture.
APPLIED
COFP.
UNDER
CORPORATION.
G.CODE
LICENCE
quick
quick
the recor-
picture.
ring.
FOF
SYS-
FFOM
fin-
lin-
BY
Page 7
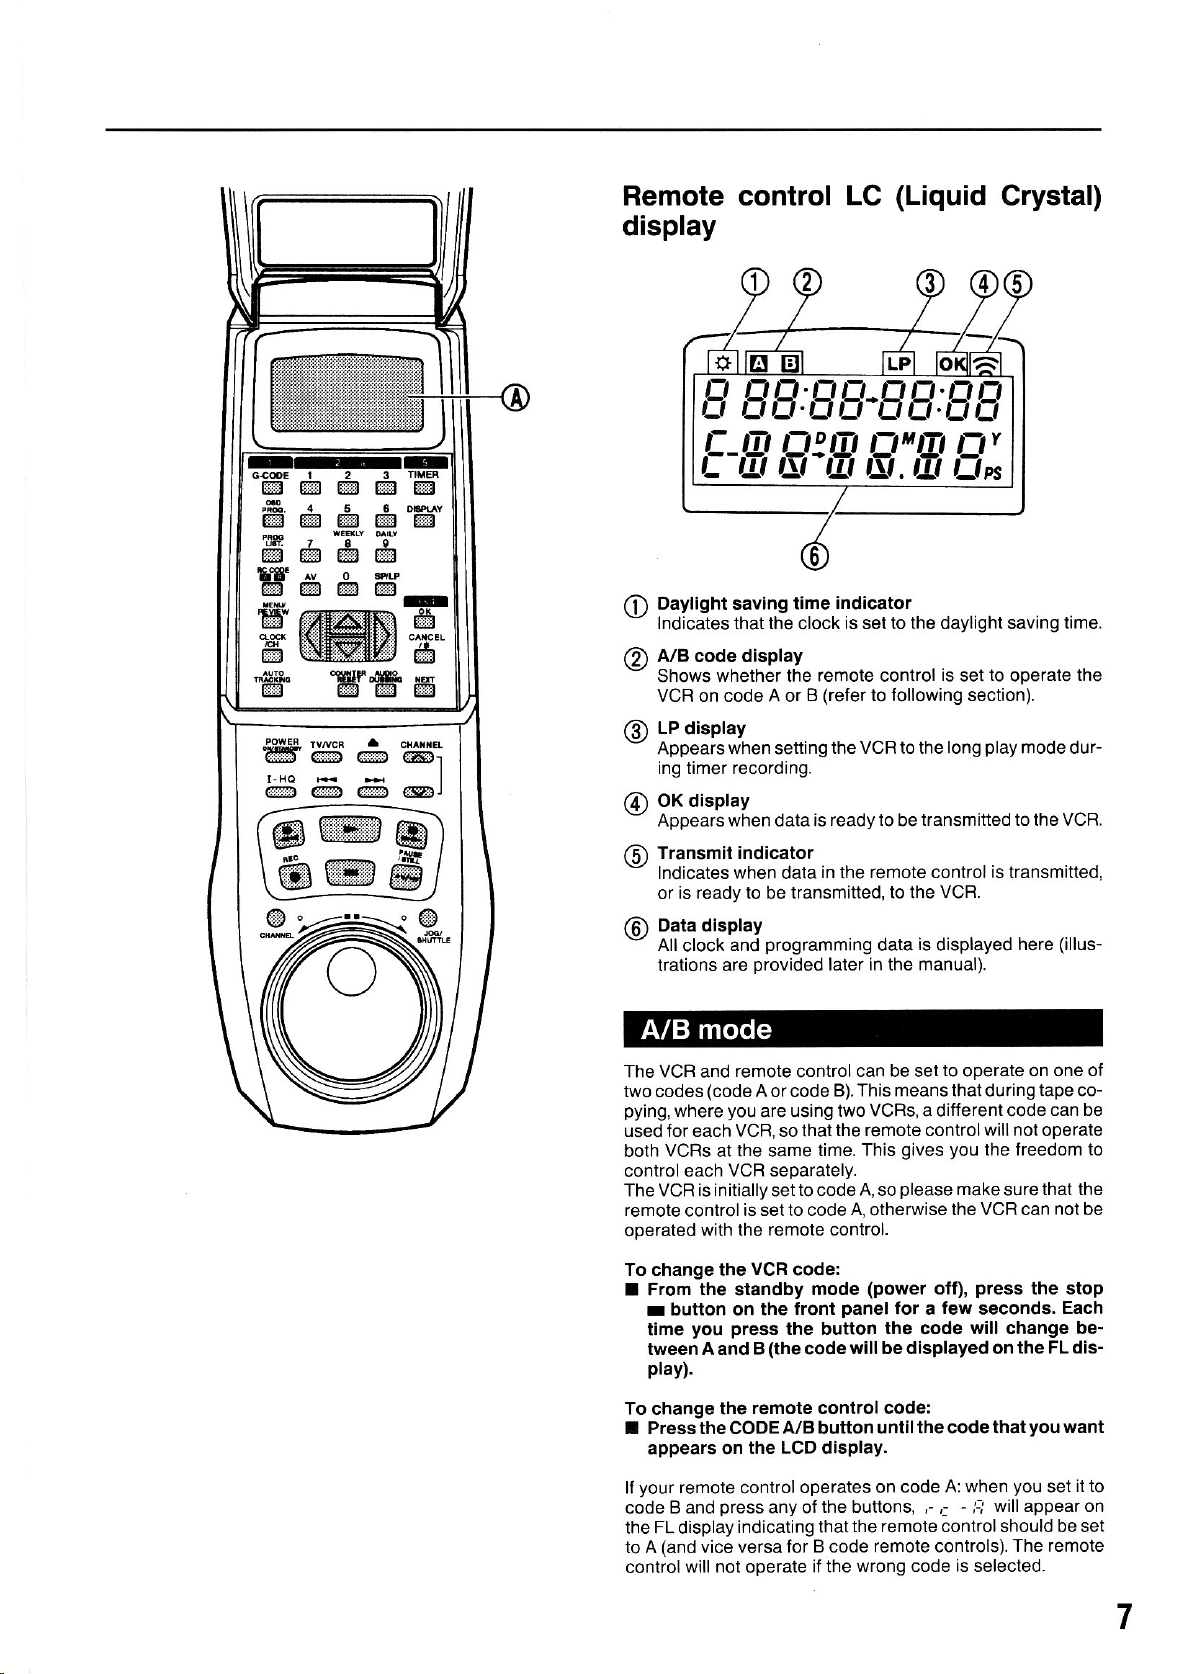
Remote control LC
display
E
Efr:EE.EE:EE
(Liquid
Crystal)
4560r,|Y
@@@@
7ae
ffi@@
ttr
^"
@** @ @ @al
o
eP
Hffiffi
..*19. ffIF"rflC ,*
et
'ffies
I-Ha
@@m@r
@ffi@
gt
Et El
# ffii
}-
ffiffi6
E-E
(i) Daylight saving time
Indicates that the clock is set to the daylight saving
-
(E
A/B code display
whether the
Shows
-
VCR on code A or
(O LP
|
(D
(5)
6)
display
Appears
-
ing timer recording.
OK display
Appears when data
-
Transmit indicator
Indicates when data
-
or is ready
Data display
All
clock
-
trations are
E2Tfl
when
setting
to
be
programming
and
provided
E:Fi
indicator
remote
B
is ready to
transmitted, to the
control
(refer
to following section).
the VCR to the
in the remote control is lransmitted,
data
later in the manual).
E:
is
to
set
ooerate
play
long
transmitted to the VCR.
be
VCR.
is
displayed
here
mode
time.
the
dur-
(illus-
The VCR and
two
codes
pying,
where
used for each VCR, so thatthe
both VCFIS at the same
control each
The VCR is initially set
remote
operated with the
To change the
From the
I
button on the
r
time
tween Aand B
plav).
To change the
remote
(code
you
VCR separately.
is set to code
control
VCR
standby
you press
A or code
using two VCRS, a different code
are
remote control.
code:
lront
the button
(the
remote control code:
can be set
control
B). This means that during
time. This
to
code
A,
mode
panel
codewill
I Pressthe CODEA/B button
appears on
your
remote control operates on
ll
codeBand
the FL display
(and
to A
controlwill
the LCD display.
press
any of
indicating thatthe
vice versa
not
for B code remote controls).
operate
the buttons,
wrong code is selected.
if the
to
operate
remote controlwillnot operate
A, so
otherwise
(power
you
gives
please
make
the VCR can not be
of0,
tew
for a
on one of
tape
can be
the freedom to
that the
sure
press
the stop
seconds.
Each
the code will change be-
bedisplayed on
untilthe code
code A: when
r.
remote controlshould be set
the FL dis'
you
ihat
you
want
set
-il will appear on
The remote
co-
it to
7
Page 8
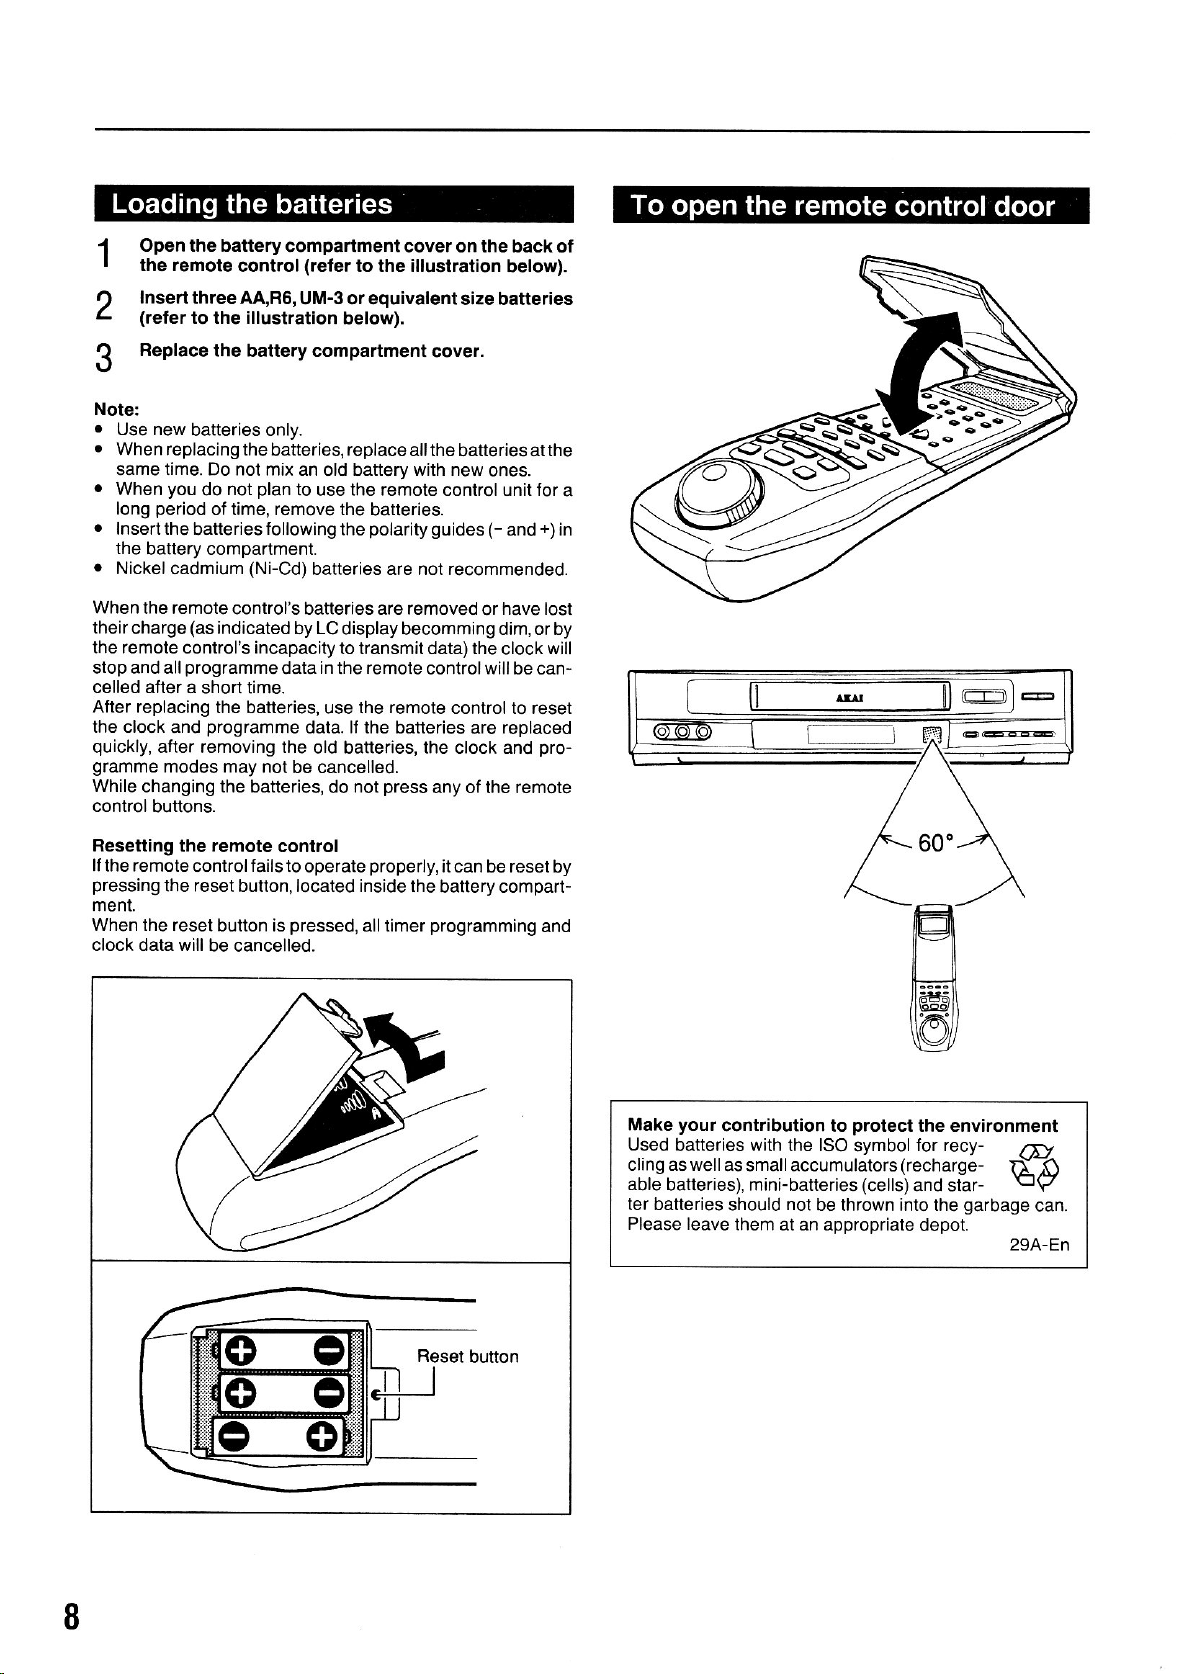
Open the battery
1
the remote
Insert
2
3
Note:
.
Use new
.
When replacing the
same time.
.
When
long
.
Insert the
the
.
Nickel cadmium
three AAB6,
(refer
to the illustration
Replace
batteries only.
you
do
period
batteries
battery compartment.
compartment cover on the back of
batteries,
plan
following
(Ni-Cd)
(refer
to the illustration
or
UM-3
equivalent size batteries
below).
cover.
replace
to
use the remote control unit for
the
batteries are not recommended.
allthe batteries atthe
batteries.
polarity guides
control
the battery compartment
Do not mix an old battery with new
not
of time, remove the
below)-
ones.
(-
and
+)
a
in
When the remote
theircharge
the remote control's incapacity
stop and all
celled after a
After replacing
the clock
quickly,
gramme
While
control
Resetting
lfthe
pressing
ment.
When the reset
clock data will
and
after removing the
modes may
changing the batteries,
buttons.
remote controlfails to
lhe reset button,located inside the
control's batteries are removed
(as
indicated by LCdisplay
programme
short time.
the batteries,
programme
remote
the
button is
be cancelled.
data
data. lf the batteries
old batteries, the clock and
not be cancelled.
control
operate
pressed,
to transmit data) the
in
the
use
do
becomming dim, or by
remote
controlwill be can-
the remote
press
not
properly,
all timer
any of the remote
itcan be reset
battery compart-
programming
have lost
or
will
clock
control to reset
replaced
are
pro-
by
and
your
Make
Used
cling as well
able
ter batteries
Please leave
contribution to
batteries with the ISO
as small accumulalors
batteries). mini-batteries
should
them at an appropriate
protect
symbol
(cells)
not
be thrown into the
the environment
.ecy-
for
(recharge-
and star
garbage
depot.
,@^
fI
D
\J
can.
29A-En
I
Page 9
Connections
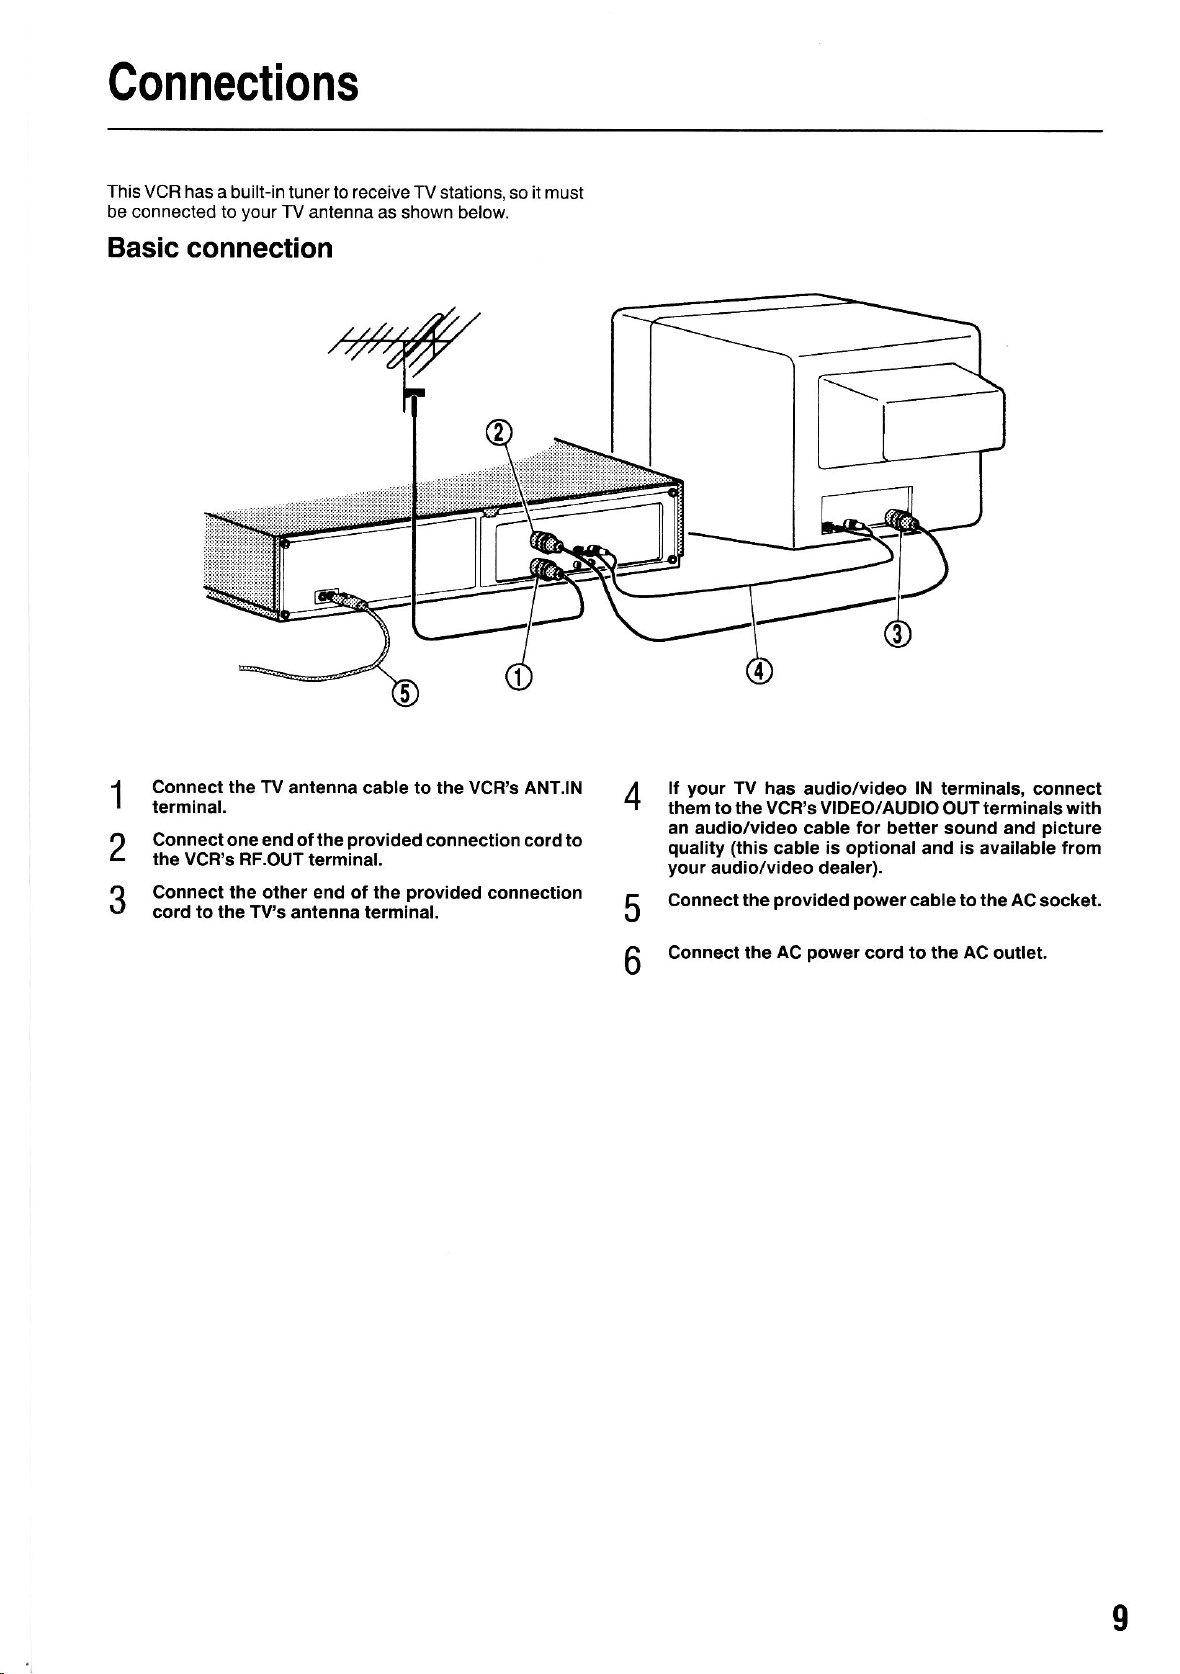
This VCR has
be connected to
a built-in tuner to receive TV
your
TV
Basic connection
antenna as shown below.
stations, so
it must
Connect the Tv
1
terminal.
Connectone end ofthe
2
the VCF'S RF.OUT
Connect the other end
3
cord to the T\/s
antenna cable to the VCB'S ANT.IN
provided
terminal.
of
antenna terminal.
connection cord to
provided
the
connection
your
lf
4
them totheVCF's VIDEO/AUDIO
an audio/video cable for better sound and
quality
your
Connect the
5
Connect the
6
Tv has
(this
audio/video dealer).
audio/video lN terminals, connect
is
cable
provided powercableto
AC
optional and
power
cord to the AC outlet.
terminals with
OUT
is
available
the ACsocket.
picture
trom
I
Page 10
The
I lnseri
video
the video
centre of the
The VCFI
will
willbe turned
be loaded
tape
tape as shown
gently
tape
automatically.
on automatically
Whenavideotapeisinserted,the"
pear
on the
FL display.
Note:
When
(tor
start
example
a video tape
immediately.
with the recording
prerecorded
a
Quick start mode
When a video
button
ton is not
leased
pressed
ton is
short time
tape is inserted
pressed
from the
willoperate
pressed
before the VCR resoonds
within
quick
start mode. lfthe
after
the 5 minute
5 minutes,
page
on
into the VCR.
@
tape) is inserted,
into
immediately.It
defeal tab removed
this VCR any
the VCR will
play
period
push
4,
and
and the
videotape
"indicatorwillap-
playback
lunction
a function
or record
there will
but-
be re-
but-
be a
the
will
In
case
A large
amount
malfunction
pressthe
and
ton
resetbutton
programme
is
Dressed.
malfunction
of
of static
or stop functioning
datawill be
electricity may
to resetthe
cancelled when the
Reset
button
causethis VCR
completely. In
micro-processor.
to
this case,
Clock
reset but-
I Press
the
When
theVCR is in
eject the
also
be used).Duringthe
the button
elect
it).
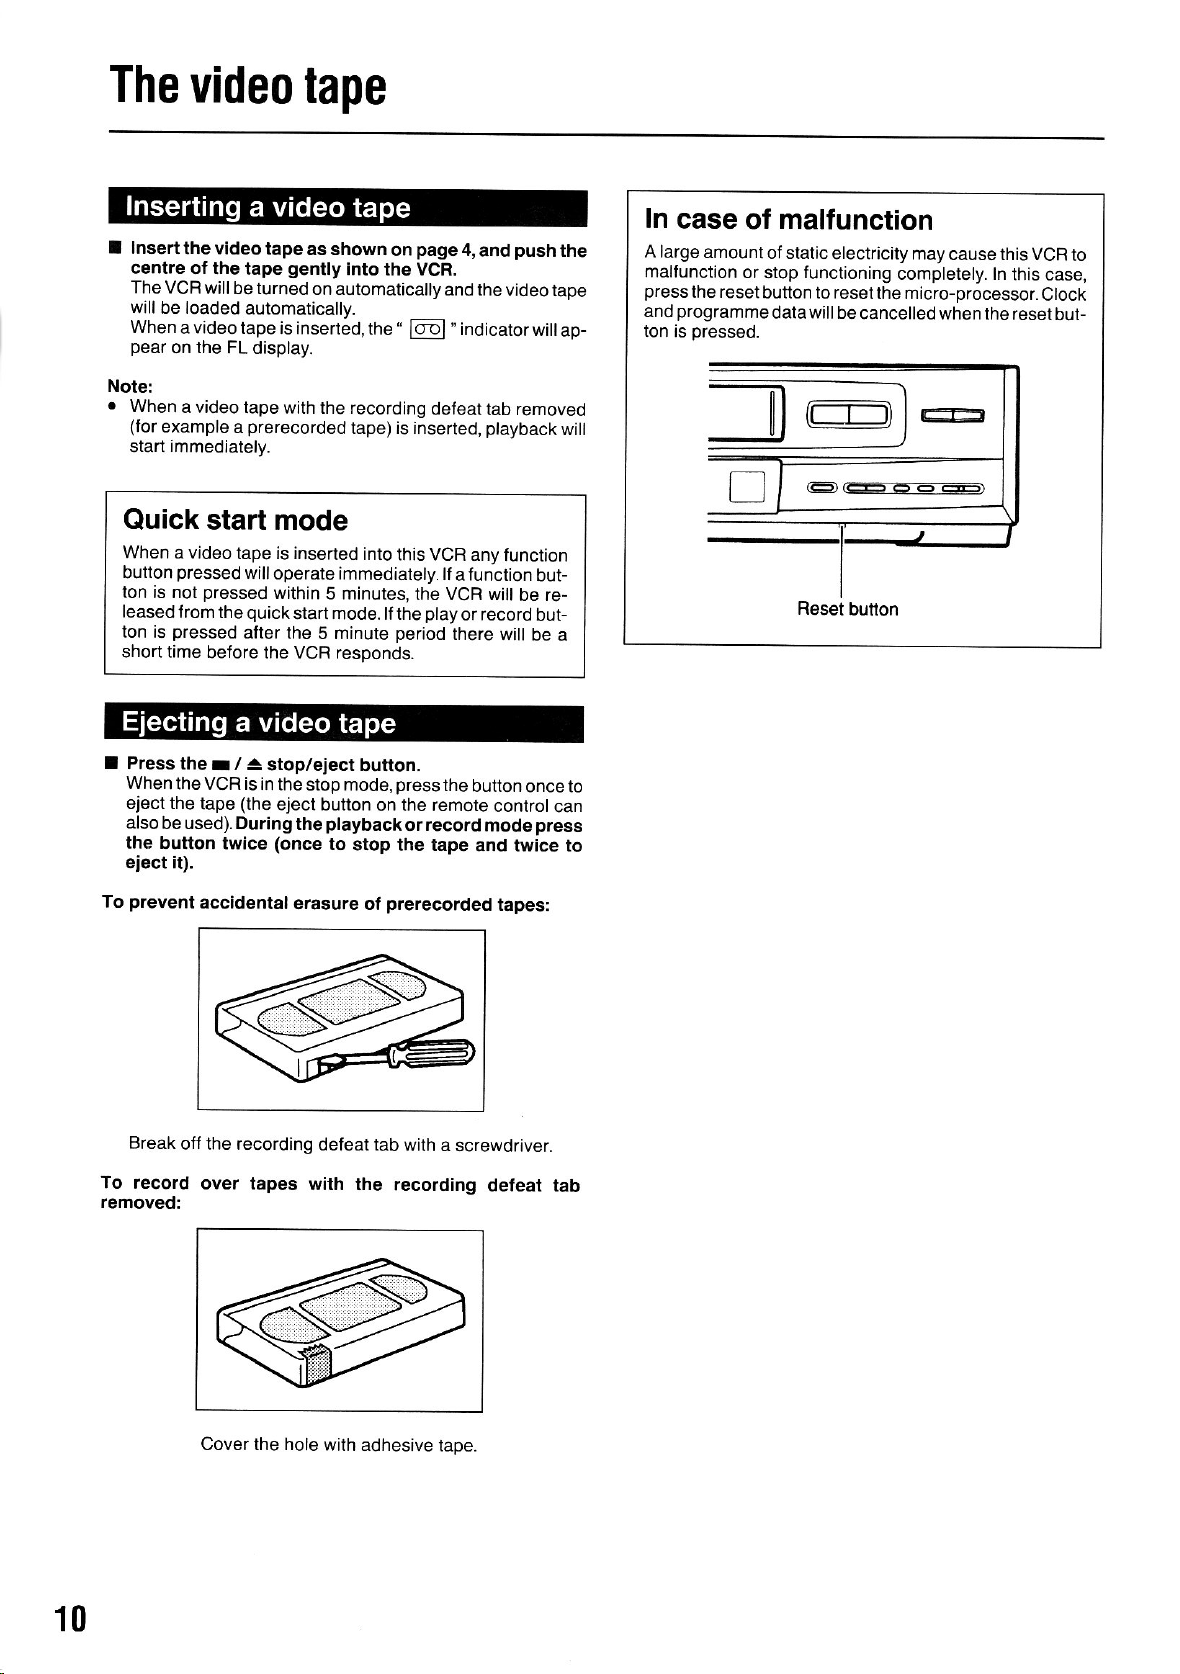
prevent
To
Break
off the recording
To record
removed:
r / 4
stop/eiect button.
the
(the
tape
twice
eject button
(once
accidental
over tapes
mode,
stop
playback
to
erasure
defeat tab
with the
pressthe
on the remote
or record
stop the tape
pretecorded
ot
with a screwdriver.
recording
button
once to
control
can
press
mode
and twice to
tapes:
deleat
10
Cover the hole
with adhesive
taoe.
Page 11
Displays
(Fluorescent)
FL
display
,trt tt,, ,trt
n En'
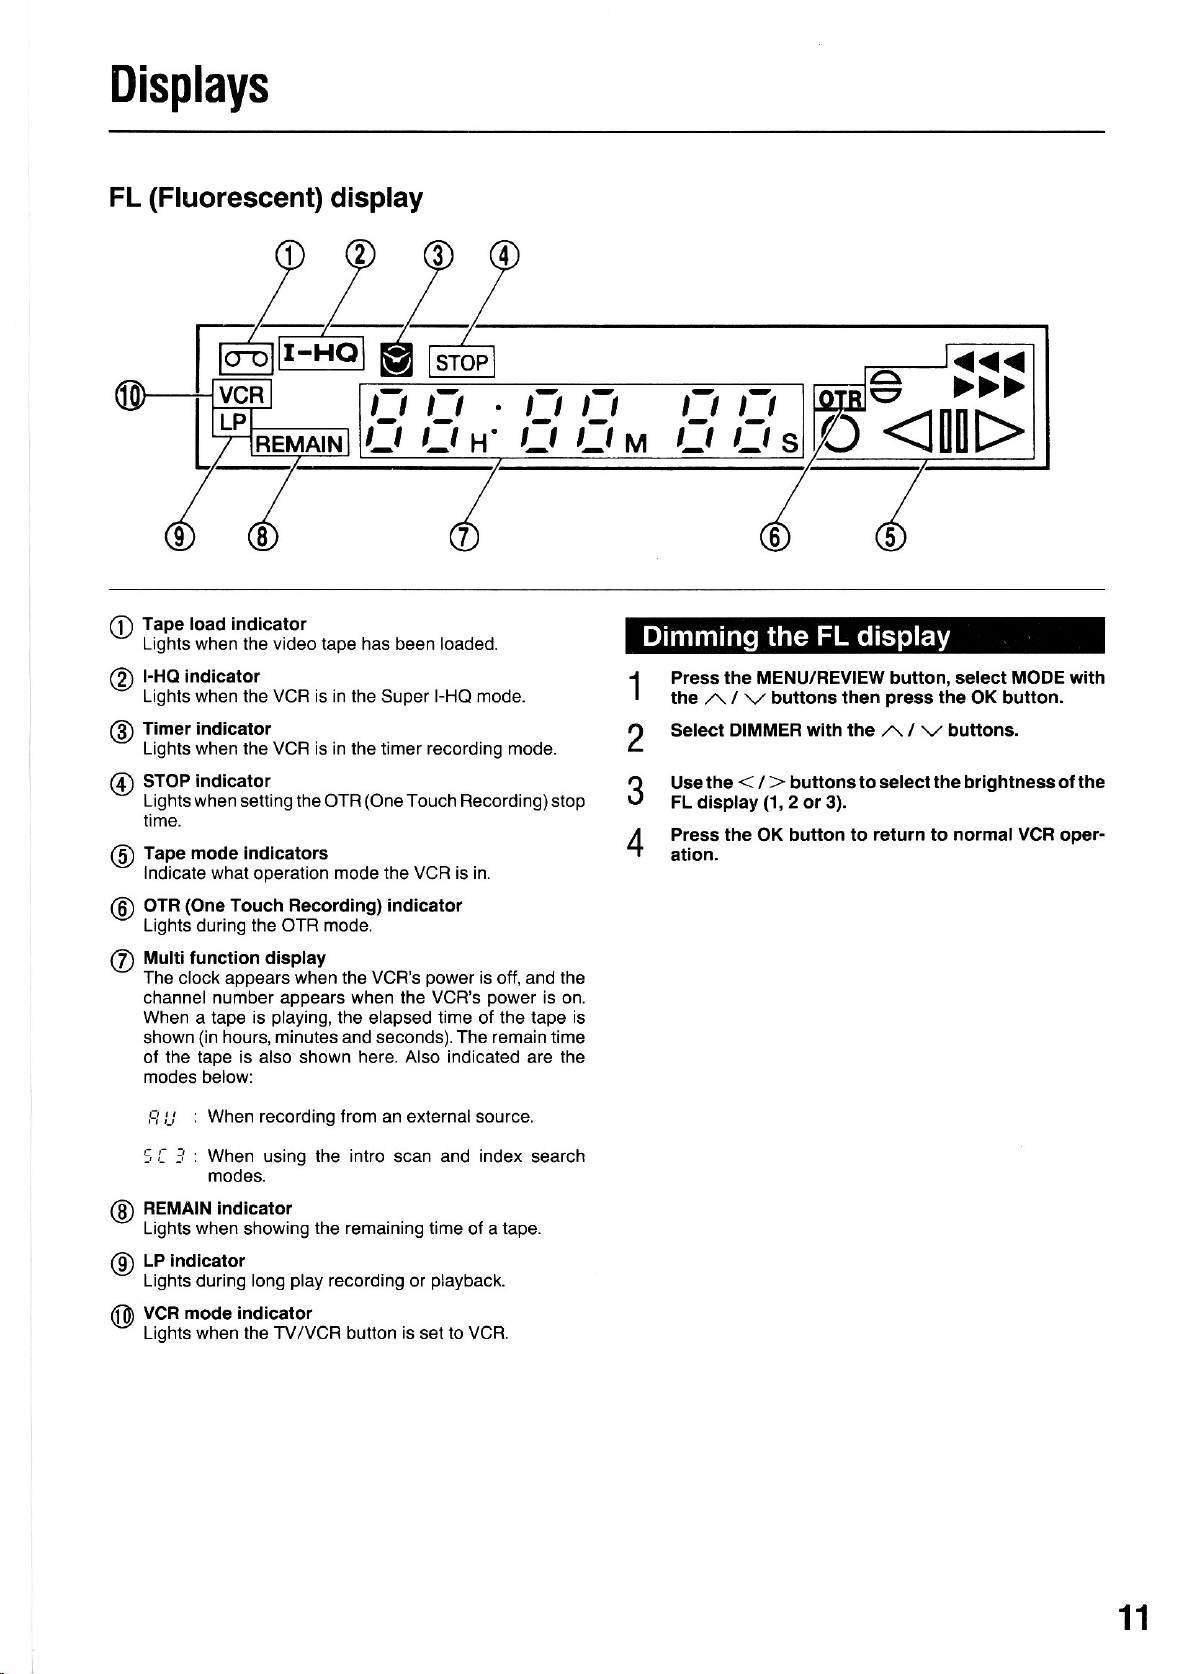
Tape load indicator
o
Lights when the video tape has been loaded.
FHO indicator
@
Lights when the VCR is in the Super FHQ mode.
Timer indicator
@
Lights when the VCR is in the timer recording mode.
indicator
STOP
@
Lights when setting the OTR(OneTouch Recording)stop
ttme.
Tape mode indicators
@
Indicate what
/;\
\9/
@
(One
OTR
Lights during the OTR mode.
Multifunction display
The
clock appears when the VCR'S
channel number appears when the VCR'S
When a tape is
shown
of the tape is also shown here.
modes
operation
Touch Fecording) indicator
playing,
(in
hours, minutes and seconds). The remain time
below:
mode the VCFI is in.
power
is otf, and the
power
the elapsed time ol the tape
Also indicated
ri
is on.
are the
Etu
1
2
3
4
is
t7 t]s
Press the MENU/REVIEW button, select MODE with
the
/ \,/ buttons then
,\
DIMMEF with the ,^\ /
Select
<
Use the
FL display
Press the
ation.
>
/
buttonstoselect
(1,
2 or 3).
button to return to normal VCF oDer-
OK
<il>
press
the OK button.
\,/
buttons.
the brightnessolthe
: When recording from an external
fl ij
: When using the intro
5 [
-]
modes.
BEMAIN indicator
@
Lights when
LP indicator
rd)
Lights
VCR mode indicator
@
Lights when the TV/VCR button is set to VCR.
during
showing
long
the remaining time
play
recording or
scan
source.
and index
of a
playback.
search
tape.
11
Page 12
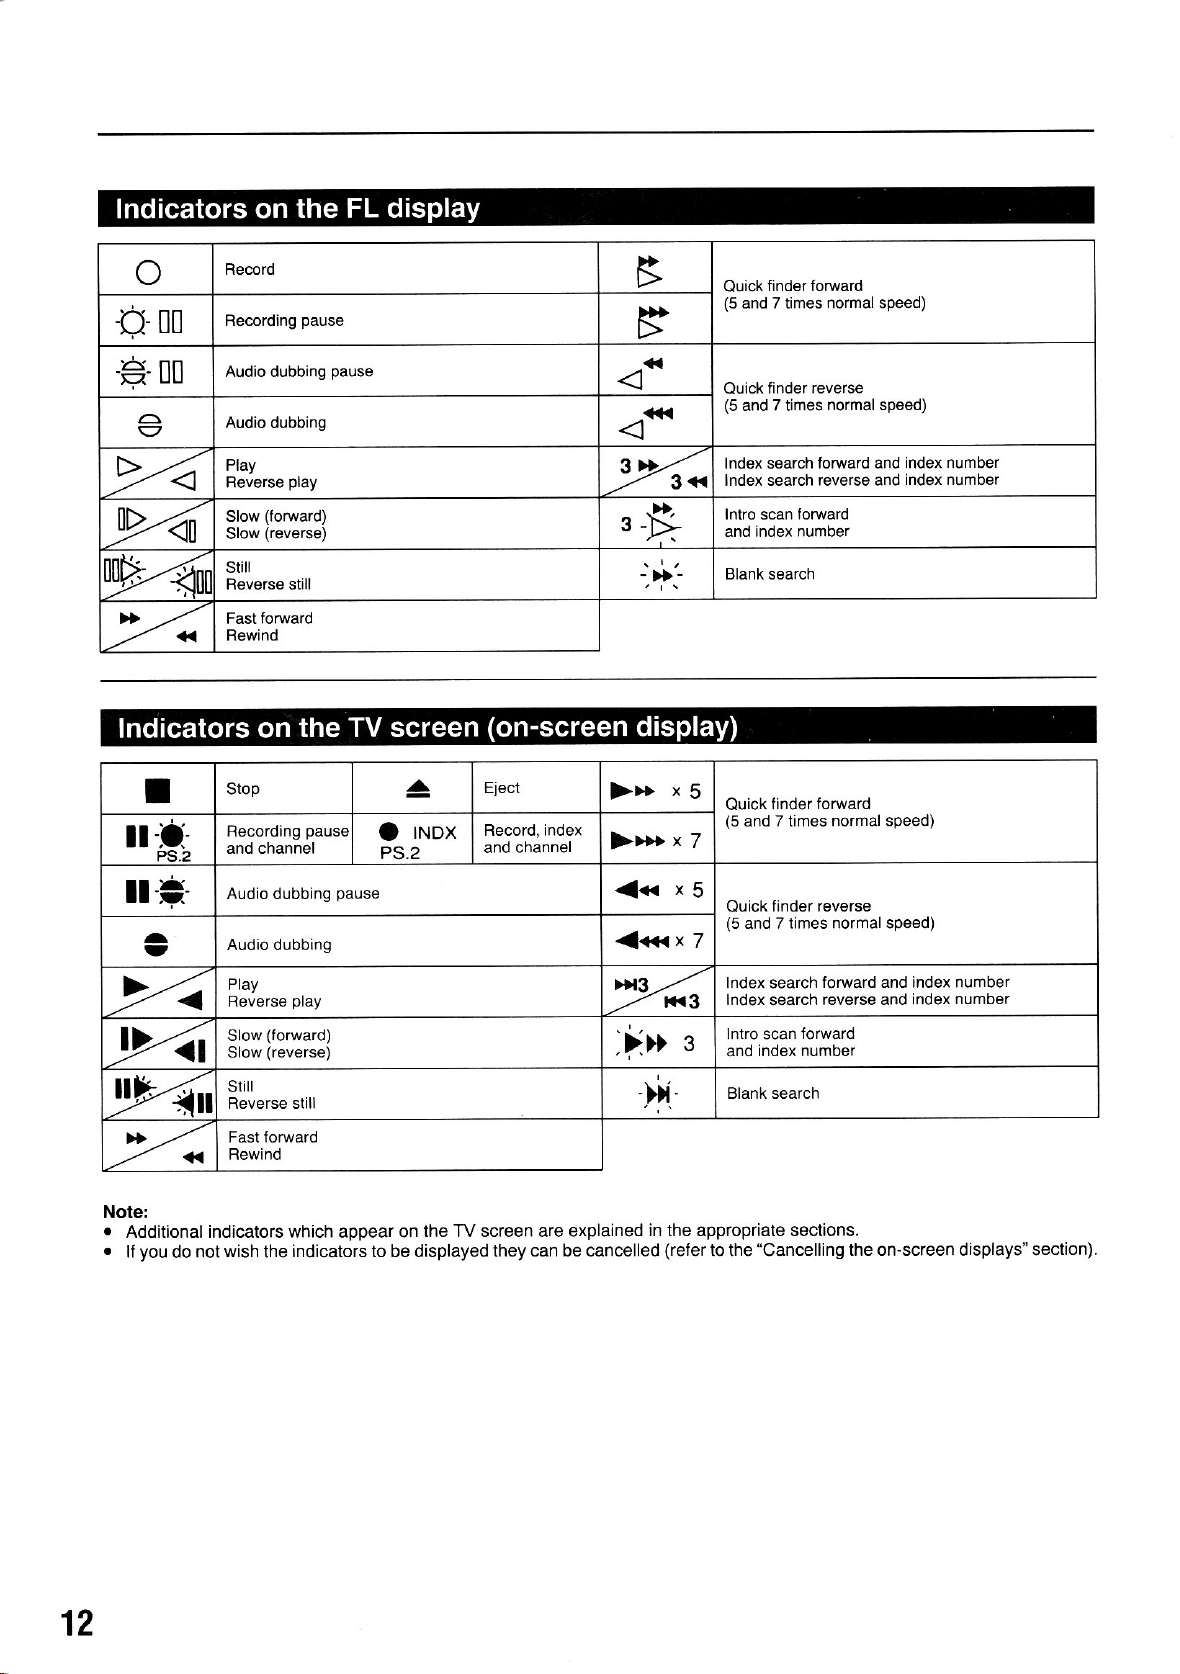
finder foMard
Quick
(5
and 7 times normal speed)
finder reverse
Quick
(5
and 7 times
normal speed)
T
il-!l-
PS.2
il-=-
tt
^
>;>/a
.D/<t
,W,
>>
<ll
Stop
Recording
and channel
Audio dubbing
Audio dubbing
Play
Reverse
Slow
Slow
stitl
Reverse still
Fast forward
Rewind
pause
play
(forwa.d)
(reverse)
pause
O
PS.2
.^
INDX
Eject
Record, index
and channel
>D
x5
)>>x7
<<<
{<<<
>x3
x5
x
rK3
.frD
-Dl'
Index
search
lndex search reverse and
Intro scan forward
index number
and
tinder torward
Ouick
(5
and 7 times normal speed)
finder reverse
Ouick
(5
and 7 times normal speed)
7
lndex search
lndex search revers€ and
lntro scan
s
and index number
Blank search
forward
forward and index number
index number
forward and indgx number
index number
Note:
.
Additional indicators which appear on
.lfyoudonotwishtheindicatorstobedisplayedtheycanbecancelled(refertothe"Cancellingtheon-screendisplays'section).
the TV screen are explained
in the appropriate sections.
12
Page 13
Video
channel
your
It
TV
should be used to assure the
As this
check
channel for
For
setthe
TV and tune the TV
channel
1
2
3
4
already
channel
your
example, if
TV to
is
Turn
Press the W/VCR
FL
display.
lltheVCR indicator is
Set the Tv to VHF
When
become
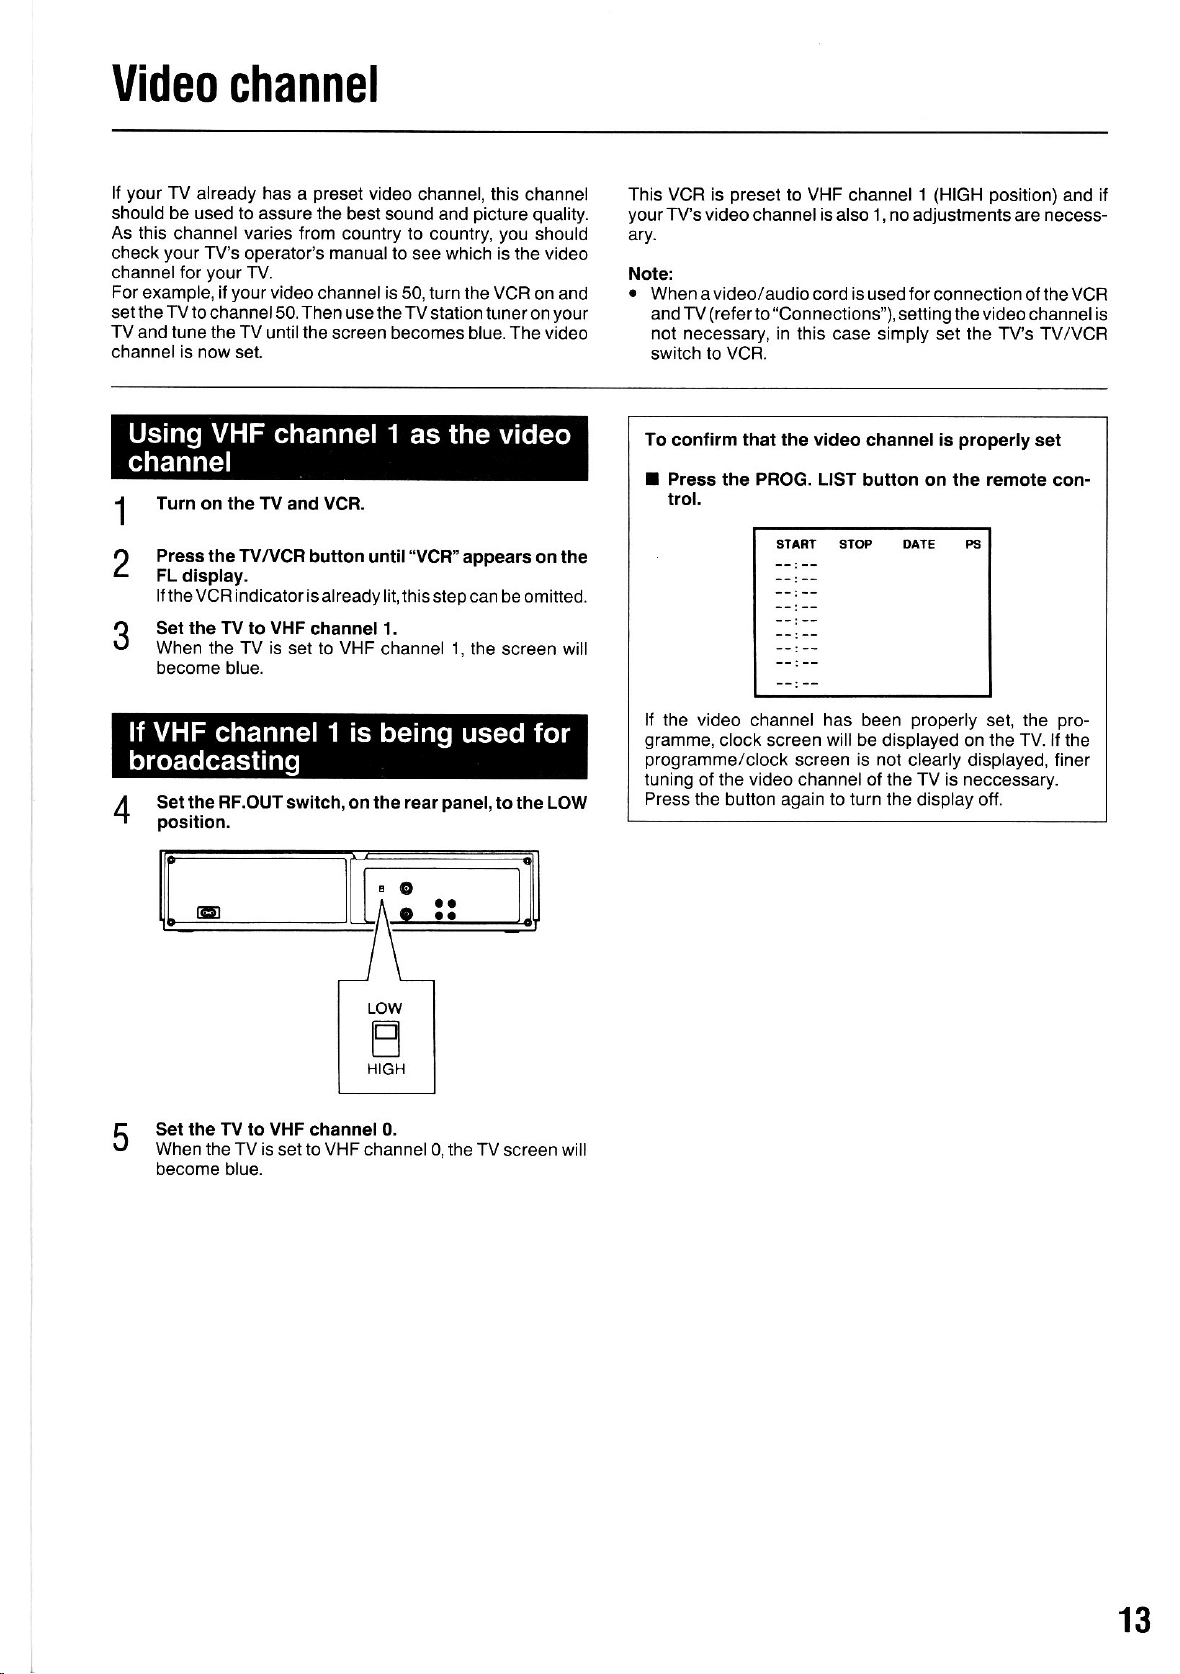
Set the RF.OUTswitch,
varies
rys
operator's
your
TV.
your
channel50. Then use the TV
now set.
the TV
on
the TV is set to VHF
blue.
position.
preset
has
a
from country to
video
channel is 50, turn the VCR
until the screen becomes
and VCR.
button until
already
channel 1.
video
best sound and
manual
on
channel, this channel
to see which is the video
'VCR"
lit,
this step can be omitted.
channel
the rear
picture quality.
country,
station tuner on
you
The video
blue.
appears
1.
the screen will
panel,
to the LOW
on and
should
your
the
on
This VCFI is
yourTV's
4ry.
Note:
.
When a video/audio cord is used for
and TV
not necessary, in this case
switch to VCR.
To
I Press
preset
to VHF
video channelis also 1, no adjustments
(referto "Connections"),
confirm that the
PROG.
the
channel
video
channel is
LIST button on the remote
trol.
SIART
lf
the video channel has been
gramme,
programme/clock
tuning of the video channel
Press
clock screen
the button again to turn the display off.
will be
screen
is
of
1
connection of the VCR
setting the video channelis
simply set
the TV's
propefly
are
set
and if
necess-
TV/VCR
position)
(HIGH
con-
properly
displayed on
nol clearly displayed, finer
the TV is neccessary.
set, the
the TV.
pro-
ll the
Set the Tv to VHF
5
When
the TV is set to VHF channel 0, the TV
become blue.
channel 0.
screen will
13
Page 14

Initial setting
VCR will automatically
This
turned
operation
This means that
VCR is
etc.)
only
usino
(ore;s
display)
VIDEO
VCR and
tions
("VCR" will light on
on
(playback
if
turned otf,
the TV
be
picture
interference
the TV s
the
tuner
TV/VCR button
you
want to
il
(AV)
mode
TV are
(RF lN/OUT),
picture
you
are
when
may become
on the screen.To
vou
watch avideo,
with the
only connected
you
(channel 1, for example.
you
lf
e;ch
with normal
etc.)follow
I
I
to change
want
time the
pow;r
TV viewing
the stePs
Pressthe
trol. setect
is
below.
MENU/REVIEW
MODE
the OK button.
.)
L
Select
Select
W/VCR
wwith
3
Pressthe MENU/REVIEW
4
mal mode.
return to
To
set to
the VCB
VCR in step
be set
the FL display)
viewing
watching
you
turn the
have to set
VCR
until
TV'sTV/AV
must set
Refer to
the VCR so
turned on
you
turn it on
if
with the ./\/
with the ,^\
< / > buttons
the
mode, repeat
3.
VCR mode
to the
etc
).
programme
a ry
VCR on
(to
very unclear
viewthe
VCR to
the
disappears
yourTV
using
the
the
that
(so
must be
(TV/VCR) button.lf
the antenna
TV to the
previous
it is set
it
that
just
on the
button
\,/
buttons
/ \,/ buttons.
buttonto
return
the above
when
for VCR
ready
when
rewind
there
or
programme
TV
the TV
lrom the FL
set to
connec-
video channel
page).
to the TV
doesn't
to
interfere
rewind a
remote con-
and
tothe
steps
it is
the
atape
may
mode
the
the
mode
tape
press
nor-
and
is an on-screen
This
gramme
via the
LANGUAGE:
PS PRESET:
PS CANCEL:
CLOCK
SET:
MODE:
SEARCH:
Detailed
in the
1
I
a)
4
information
manual.
Press
Select
indicatortotheappropriatepositionwiththe,'\or
display
TV screen.
language
preset
the clock.
modes.
appears
a
TV
stations
preset
the SPEED,
DIMMER
the BLANK
in
To select
prays.
To
To cancel
To set
To select
TV/VCB,
To select
SCAN
the MENU/REVIEW
IIENU
LANGUAGE
>
PRESET
P3
PS CAI{CEL
CL@K SEI
rcoE
SEAACH
you
that
mode
the
TV stations
the respective
various
ofthe
modes
lor the
BSP,
AUTO OFF
and
SEARCH
bution.
want by setting
button.
Press the OK
O
O
The selected
screen.
button.
function screen
willbe
displayed
you
on-screen
AV MUTE,
oSD,
modes.
and
sections
the
can
INTRO
arrow
on the
pro-
dis-
later
\,/
TV
language of
The
display.
screen
guages:
nish or Swedish.
lect English
.l
,
4
Q
\,
English, German,
Pressthe
I
trol. select
oress
ihe
screen.
Set
the
Press the OK
The
onds.
> LANGUAGE
automaticallY.
the OK button.
language
the arrow
\,/
butlon.
language
trENU
PRESET
PlI
PlI CANCEL
clctcx
uooE
SEARCH
your
choice
You can
lf a
MENU/REVIEW
choose
Spanish,
language
LANGUAGE
list
screen
indicator
button.
list screen
sET
can be
is not selected,
selected
any one of
French,
on the
button
with the ,/\
will be displayed
to the desired
will disappear
LANGUAGE
ENGUSH
>
OEUTSCH
€SPANOL
FRAI{CAIS
ITALIANO
NEOESLAI{DS
s{ro||l
SVENSKA
for the on-
following
the
Dutch' Fin-
ltalian,
VCR will se-
the
remote con'
/ \'/ buttons
the
on
language
a few sec-
after
lan-
and
TV
with
I Press
the MENU/REVIEW
normal screen.
butlon
again to
return
to the
14
Page 15

Presetting
This
VCR contains a
ceive TV
tuner,
tions. This
can be
Channels 0-4,5a,6-1 1 have
tory, local
channels. The lollowing
maining 33
replaced
broadcasts in
the VCR must
procedure
preset.
stations will automatically
channels. The tactory
with new
TV
built-in tuner which can
place
tuned
be
is called
procedure
channels
stations
ry
ofyour
to the locally available
"presetting". Up to 45
already been
be available on these
is for
preset
if
desired.
be used
set.In orderto use this
preset
presetting
channelscan also be
to
re-
ry sta-
stations
at the fac-
the re-
Before
Turn
Make sure thatthe TV is setto thevideo
TV's TV/VCR
nel").
Presetting TV
control.
proceeding
the TV
on
and
switch
stations can only be done with the remote
VCR.
is
set to VCR
channel or that the
to
'Video
(refer
chan-
Press the MENU/REVIEW
with
the
/
,.\
you
I ll
want
(V-H
button
\,/
the
to select another wave
for example),
to choose the band that
button to return
PS PFESET
:..............
PSt
Tune in the
,
L
lf
a band
low
band and
Danos.
The tuning
shown on the TV
Scanning
want to store that
again
station by
is
not selected TV
bar
willstop
to
continue scanning.
''Ii
button,
Dress OK.
PflESET
\,/
buttons and
't..............
PSi
p.ess
the ,^\ button then use the >
to the tuning
pressing
proceed
indicator
screen.
when astation is tuned in.lf
particular
scanning
through the VHF high
and the
PlI PRESET
band
you
:r..............
the
programme
station,
PS
select
presetting
for
want. Then
position.
PS
PBESET
>
button.
willstan
press
on the VHF
itself will
you
the
PRESET
press
and UHF
do not
>
button
be
Press the
4
Once the station is
pear
number. lf a station has already
lected
the newly tuned
continue to search forthe next station automatically
stoo when the next
OK button.
and the PS number will change to the next highest
channel number, that station will be replaced with
preset,
station
station
PS PNESET
"EMPTY"
the
been
at this moment.
is tuned in.
':....
PSi i2 €TPTY
preset
To
5
steps 3 and 4.
Press the MENU/REVIEW
6
tions have been
After the
called by
The
channel
FL display during
you
lf
grammes
AUTO
OFF
lf
set to ON, the
watching the
more stations into the memory, repeat
button after all the sta-
preset.
stations
pressing
are
have
the CHANNEL
number
presetting.
watching
and
preset,
been
wave
band
(and
not recording)
they can easily be re-
buttons.
willalso
using the VCR's tuner, make sure that the
mode is
powerwill
to
set
OFF.
be turned oif while
programme.
sign will disap-
preset
at the se-
Scanning will
aoDear on the
pro-
Tv
you
and
are
't-!i....
PS
Assign
3
the tuned in station with the
The
tion has not alreadv
a channel number
"ENTPTY"
sign will appear on the TV
'-....
PS 11
't
("PS
t'1" for
CHANNEL buttons.
been Dreset at that channel.
PS PRESET
example) to
screen
if
a sta-
Band
VHF low band L
VHF high
UHF band UHF U
band
TV screen FL display
V-H H
15
Page 16

2
Press the
with the
"PS
The
screen.
the channel
Select
CHANNEL
MENU/REVIEW
.v
buttons and
/
a\
CANCEL"
screen
that
buttons.
PS
>PS9
button,
will be
you
want to cancel
CArcEL
select
press
displayed
PS CANCEL
OK.
on the
with
TV
the
For reception
This VCR has a
ception of
viewing and
preset
to
TV
not by
but
used to cancel
Press the
{
I
with the
Select
O
L
ton.
Set
Q
built-in shut-otf
TV
weak
proper
aweakTV
the VCFI,
the shut-otf
MENU/REVIEW
or
,,\
the AV
torhe'OFF"
stations
VCB operation.
station
MUTE mode
weak
of
system
in
order
that
the following
system.
\./ buttons
position
TV stations
which cancels
to ensure
However,
is
with the < or
received
being
procedure
button,
and
with the ,^\ or
select
press
enjoyable
you
if
by
can be
MODE
OK'
\,/
>
button.
re-
want
your
but-
the
Press
3
station.
The channelnumber
preset
channel
PS CAI{CEL
--
'PS
To continue
4
3.
Press the
5
ished cancelling
TV
stations
Using
Press the,^\
I
the
can
the CHANNEL -/\
.',/
button
(+)
CANCEL
willbe
number.
cancelling
MENU/REVIEW
the stations.
be selected
button to
in three
/
\,,
increase
buttons.
to decrease
button
replaced by
stations,
button
ways:
the channel
number.
the
to cancelthe
the next
Pg CANCEL
-....
repeat steps
you
when
number or
preset
highest
2 and
have
fin-
Press the
/4
-t
I During
the AV
that
Note:
.
To reset
in
step
MENU/REVIEW
normal
the mute mode,
3 set to
programme leception,
MUTE mode
-ON"
the
is
set
repeat
Position.
button.
to the "ON"
the above
make sure
position.
process
but
-
l
Usingthe
0 buttons.
I To select channel2lor
for channel
2, and
jog
the
Using
I Press
dialto
increase
or shuttle
the CHANNEL
left or right.Turning
the
the channel
left will decrease
red LED indicator
The
this
during
agarn.
16
example,
press
23
dials on
button
number
number.
the
nextto
mode, to cancel
press0andthen
2 and then
the remote
and turn
the
eitherdialto
and turning
the CHANNEL
the
mode
press
3.
conlrol.
or shuttle
iog
the rightwill
them
button
the button
press
to the
will light
Page 17

Setting
the
clock
This VCR has
present
the
timer recording.
19:30 on the FL
There are two ways
.
Setting the clock via the LC
remote
.
Setting the clock via the TV
Both ways use the remote
gest
setting the clock on the LC display of the remote
and transmitting the time to the VCR,
remote
Press the
The
The
a built-in digitaltimer clock which must
time. This
The VCR uses a 24 hour clock: 7:30
display.
to set the VCR clock:
control.
control and VCR.
CLOCK,/CH button.
clock set screen will appear on the LC
point
ready for
is
clock
E
used to keep the time and for
(Liquid
crystal) display of the
screen.
control
data entry will be flashing.
to
enter the data. We sug-
thus synchronizing the
l,nr'*nn
&JIJJUU
[-5El
.v
count up.
button.
2
Set the
,,\
\,/
hour
: Press this button to
: Press
with the ,,\ or
this button to count down.
B
be set to
control
display.
pm
proceeding
sure thatthe ry
Set the date,
buttons.
The weekday is
month
is
set to the
and
set automatically.
E
8:
video
yearwith
l5
channel or that the
(refer
to
the
a\
=
Before
Turn on the TV and VCR.
Make
TV's TV/VCR switch is set to VCB
nel").
6
l,l" !J.g{
Daylight
saving
I When setting the clock during the daylight saving time
period,
"+"
The
Press the
7
t
The clock will start and the
Clock data can
time
press
indicator will be displayed on the LC display.
({:}
the
OK button
CANCEL button.
lo start the clock.
transmit indicator
now be tlansmitted to the VCR.
"Video chan-
\,/, <
or
will flash.
>
ffiffi00
to
I l'1\',
Press the
3
The minutes will flash.
Set the minutes with the ,^ or \,/ button.
4
When the
minutes will increase or decrease at 5 minute intervals.
>
button.
,.\ or
\,/
button
pressed
is
continuously, the
a
8,ffi
l'
i"g \'
5
Press the
The
>
date will
button.
flash.
6
B:
!5
i"9
\',
E
B:
lry Il'g1'
Pointthe remote
8
window and
clock dala.
The time will appear on the
Press the
I
remote control to the
Note:
2 to 6
Steps
ot using the
To
set a single digit
press
For
example
then 5. lf
need to
you
lf
data
enter the data with the ,^\ or
To correct clock data
proceoure.
can
,,\
the number.
to
you
use the 1
press
make a mistake
you
want to
controlatthe
press
CLOCK/CH
also be set using the 1
\,/
and
number
8:15;
set
the > button to start the next data flashing.
correct
l5
VCR'S remote sensor
the OK button to transmit the
VCR's FL
button twice to return the
normal mode.
buttons.
press
press
-
0 buttons
while
at a later date. reoeat the above
0
setting
with the
\,/
for
button or
display.
-
0 buttons. Instead
(zero)
the 0
(zero)then
data entry
the
clock,
<
>
or
button then re-
1
first then
I then 1 and
you
do
move to the
-
0
buttons.
not
17
Page 18

Clock data
mitted to the VCR.
cause of a
data
1
I
4
a
Q
L,
is retained in the
powerfailure,
in the remote control can
Press
"C-SEl''
The
lf tho VCR'S clock data
the CLOCK/CH button
display
Pointthe remote controlatthe
window and
the clock
Press the
press
data.
CLOCK/CH
normal mode.
remote control after
if the data is
etc), or
be re-transmitted
will appear.
VCR'S remote sensor
the OK
button twice
button twice
it is trans-
to the
(be-
VCR.
is cancelled
wrong, the clock
to transmit
to return to
the
you
lf
set the
remote control's
j
Press the
I
with the /^\ or
The
dataentry.
to start
VCR'S clock via the
flashing cursor indicates
the
TV
the
oo
(JAl{)/ea
$l'tuTE
>
screen,
press
may not be synchronized.
clock
MENU/REV|EW button,
\,/ buttons and
lfthe clock
data
is already set
llashing.
CLOCK SEI
l:
sal r/ r
HOt'R
--
YEAR
<
VCR'S and
the
select CLOCK
OK.
point
press
is ready for
that
the > button
SET
To adjust
can
1
I
t
L
Q
tJ
for the daylight saving
easily be set one
Press the CLOCK/CH
"C-SET'display
The
Press the
lf the clock is set to
vance one
the LC display.
on
Itthe clock
be set one
pear.
hour ahead, or
(+)
CANCEL
hour ahead and the "+"
is
to the daylight saving
set
hour back and
Pointthe remote controlatthe
windorvand
presstheOK
clock data.
the
Press
/,1
-a
normal mode,
CLOCK/CH
period
time
one hour back.
button.
will appear.
button.
the normal time
the
indicator
"+'indicator
VCR'S remotesensor
buttonto
button
twice
the VCR'S clock
the
time the clock
transmitlhe
clock
willappear
will disap-
will ad-
nerv
to return to the
will
Note:
.
The display on the bottom
\./, <
the,^\
you
that
that is
the
,
a-
Note:
.
lf
and wish to correctthe
repeatedly
the correct data
Daylight saving time
wish to enter.
ready for
data).
the hour, minutes, date,
Set
,^\ or
you
make a mistake during
I When setting
period, press
"S"
indicator will be displayed
Press the OK button
ing the date.
The clock
screen
Q
v
The
>
or
programming (use
<
\,/.
Or
go
to
to the data
with the
the clock during
the
will
start
will disappear.
halfof the screen
buttonsyou can
The + and - signs
>
buttons.
input dat4
({:)
CANCEL
and after a
month and
the clock setting
to
be
or
,,\
\./
the daylight saving
you
when
showswhich
pressto
these buttons
pressthe
corrected,
button.
reach the data
indicate the
to enter
year
with the
procedure
<
or > button
then re-enter
button.
on the TV screen.
have finished enter-
few
seconds
the clock
of
point
time
18
Page 19

To adjust for daylight
ily
set one hour ahead, or one hour
.1
Press the MENU/REVIEW
I
with
the ,^\ or
Press
,
L
lf the
vance one hour ahead
on the TV
lfthe
will
pear.
(
the
+)
is
clock
clock is already setto
be set one
set to the normal time the
screen.
hour
time,the
saving
\,/
buttons and
CANCEL
back and the
cLocK s€l
S 11 :dl
wED 2/ rr
< ? t
VCR'S clock can
to normal
back
button, select CLOCK
Dress OK.
be eas-
time.
SET
button.
will
and the "S" indicalor will aooear
daylightsaving time the clock
"S"
/ 9il
{NOV)
clock
indicator will
ad-
disap-
"ou"
Mode feature
you
After
cally be selected each time that
button.
Always
have
check this mode before recording
After
The mode
the
set
pressing
screen
the MODE feature
clock,
LANGUAGE
PS PRES€T
PS CA
ctocK sET
> l|oDE
SEARCH
the MENU/REVIEW button,
will
appear.
>
3PEED
8AP
oao otl
AV IUrE Ofl
DITTEF I
AUTOOFF
you pressthe
IIENU
CET
9P
OFF
OfF
will automatF
MENU/FIEVIEW
playback.
or
press
OK.
Pressthe MENU/REVIEW
3
mal
screen,
button to return lothe nor-
Selectthe
t
.-
tons and use the < or > button to set the mode
ON or OFF etc..
Press
?
l,
oDeration.
mode that
MENU/REVIEW
the
SPEED: To set the speed for recording
BSP: Automatically rewinds
you
wantwiththe
button to return to normal
(SP/LP).
and starts
tapes that have the recording
removeo.
OSD: To cancelthe on-screen displays.
AV MUTE:
TVIVCR: To
DIMMER: To
AUTO
Note:
.
Full
tive sections later in the manual.
Should be set to'ON" for normal TV receotion
and viewing.
OFF: When set to ON, the
turned
not being used. Set to OFF it
power
you
lf
grammes
the AUTO OFF mode is
lfsetto
are watching the
explanations of these
VCR
set the
brighten the FL
dim or
(atter
off
turned
are watching
using
the
ON,
to the TV or VCR mode
display.
power
will automatically
10 minutes) if
about
off automatically.
(and
the VCR's tuner,
power
programme.
modes
you
not recording) TV
to
set
willbe
OFF.
turned otf while
given
are
,/\ or
playback
\./
but-
defeat tab
the VCR is
do notwant the
make sure that
in the respec-
be
pro-
you
to
of
19
Page 20

Playback
Before
.
Turn on the TV and VCR.
.
Make
TV's ry/VCR
nel".)
proceeding:
sure that the TV is set to the video channelor that the
switch
is
IMPORTANT
Before starting
teature
the settings are in the
that
(refer
you
Load
want to use.
a
lf the video tape's recording
removed,
Press
2
The l-HQ
L-
indicator will flash until auto tracking is
lf there
"Tracking/Picture/Stability"
the
Press
3
I Press the
video
tape.
I Press
I Press
the
the
wind.
playback,
to "Menu mode") and make sure that all
pre-recorded
playback
play
the >
and
are disturbances in lhe
the
>>
<
r
button to
D- indicators
r
stop button to stop
fast torward
rewind button to rewind the video tape.
stop button to stop fast torward
to VCR.
set
set
correct
video tape.
will begin automatically.
(Befer
to
the VCF to the MODE
position
start
will light on the FL display, the
button to
tor
defeat
playback picture
section.
tab has
playback.
playback.
fast lorward
"Video
chan-
the modes
been
completed.
refer to
or
the
re-
Playback of E-300 tapes is not recommended.
To
correct
mooes:
tracking
during the
I Press the AUTO TFACKING
corrected satistactorily
peatedly
During
shown on
iustment
To
correct tracking during the
I Press
clear.
The
until the
manual tracking
the
has
the < or > button repeatedly
tracking
picture
TV, this will disappear automatically atter ad-
been comoleted.
position
will not
playback
and
button.lfthe tracking is not
press
is clear.
adjustment
still and slow
be shown on the
the
<
or > builon
the
tracking
until the
quick
modes:
position
picture
TV.
finder
re-
is
is
Note:
.
The
video tape will automatically
same
.
lfthevideotapeendsduringplaybackitwillstopandrewind
automatically.
.
The Super l-HQ feature
playback.lt
button.
playback
During
playback
the
frame
at a
I Press the PAUSE/STILL
to lreeze the
I
Press the PAUSE/STILLIU><
vance
Each time the button is
frame.
one
I Press
Note:
.
"noise
lf
section
.
After a frame has
mode will
it was
speed
can be cancelled, or reset, by
picture.
time.
the
still
recorded at.
operates automatically during
picture
picture
The
MK button
Dicture.
frames,
the
play
>
the
bars"
appear on
in
the following section.
disengage to
pressed
button to resume
the
frozen for
been
protect
feature can be used to freeze
can then be advanced one
screen,
played
be
button repeatedlyto ad-
the
stillpicture will advance
playback.
refer
approx.5 minutes, the still
the video tape.
back at the
pressing
during
playback
to the tracking
the l-HQ
To
correct the
I Press
press
or
During adjustment the
the TV, this
has been completed.
To
correct
I Press the
rected.
picture
the
button repeatedly
/\
\,/
the
will disappear automatically
picture
a\ or
sharpness during the
-....
control
x....
to sharpen the
button to soften the
picture
PTCTURE
shake
during the slow motion or still mode:
\,/
button until the
playback
picture.
position
after adjustment
+
picture
mode:
picture
is shown on
shake is
cor.
20
Page 21

With
the shuttle ring, the
by step in
1
I
t
L
Q
The ligures
the
to
both the forward and reverse
Press
theJOG/SHUTTLE
or still mode.
The red LED indicator will
press
mode,
Turn
the shuttle ring tothe
decrease the
playback
For
left. For
the right.
turns to the
Press the
playback
achieve the speeds.
playback
When the ring is released
play
in the illustration
speed, and the approximate
playbackspeed
the button again.
playback
in the reverse
in theforward
centre
button
light. To
speed.
position.
>to
show multiples
can be adjusled
directions.
button during
cancel the
left or rightto increase
direction, turn the ring
direction,turn the ring to
it automatically
return
to normalplayback.
position
playback
the
jog
and lractions of
of
step
/shuttle
to the
re-
the ring
or
jog
The
you
motion
1
)
4
?
v
Note:
.
o
dial helps
wish
to
playback
Pressthe
I
quick
or
The red LED
mode,
Tu'n the
counterclockwise
tape, field by field
Turning
reverse the tape
Turning
reverse the tape
Press
back mode.
jog
The
Noise
bars may appear
the
"Tracking/Picture/stability adjustment"
rection.
norse
bars.
you
precisely
to
view,
and then
mode
JOG/SHUTTLE button
tinder mode
press
iog
the dial one
the dialat4 rotations
play
the
dial can also be used from the
lt may not be
givesyou
(in
the forward
(forward
indicator willlight. To
the
button again.
dial clockwise
(reverse
in
or
"click" position
one field.
normal
at
button to return to the normal
during
possible
locate the
totalcontrolover
still
or reverse
during
the
or reverse).
cancel the
(forward
playback)
playback)
to advancethe
slow motion.
will advance
per
second willadvance
playback
jog
to
Speed.
mode.
still
dial operation, refer to
completely eliminate the
section
picture
that
the
slow
directjons).
playback
jog/shuttle
play-
for
cor-
or
or
or
Review
O
Reverse
@
Reverse
@
still
@
Forward
O
Forward
@
Cue
O
Note:
The forward
minutes
stop mode.
Reverse
VCR will
The
a few
frames).
playback
playback
slow motion
playback
slow motion
playback
playback
protect
to
slow motion will
go
to the
reverse still mode willgo
seconds
1/12
A
HE
V
playback
playback
motion
slow
the video tape. The
stop mode.
(the
tape may advance
1/10
/-.
7
_,-
mode will be
be cancelled after
to the forward still mode
cancelled after 5
VCR will
or reverse a few
go
'1
minute. The
to
the
after
To
save
make sure that the
tons
are off
they will automatically
the
power
when
of the remote control
JOG/SHUTTLE and CHANNEL buF
you
batteries,
are not using them. lf
left on,
cancel after about 1 minute.
21
Page 22

playback
During
locate any
ually
playback
Disturbances
indicate a
picture
the
in the
problem
I During any
thefast
There are
way
that
starts automatically.
quickly
press
Note:
.
The
from the
wind button
torward
two ways
is to keep the button
you
want to watch,
and
the
PlaY
quick
tinder
quick
quick
the
point
finder tunction
a recorded
on
go
will
quickfinder
with the VCR.
playback
mode
(cue)>>or rewind
to
operate
The second
you
when
and
button.
reverse
forward
finder
vice versa.
reach
can be
During
tape.
forwards or backwards
picture
are normaland
(play,
still, slow,
(review) << button.
quick
you
way
that
can be
linder
release
press
is to
you
switched
by
pressing
reach the
wantto watch,
the
held down untilyou
and when
part
the
playback
playback
used to
quick
tinder
rapidly.
do
press
etc.)
mode One
playback
it
button
the
directly
the
vis-
not
part
re-
feature
This
taDes.
When
VCR, it is automatically
The blank
playback
When the
is reached.
end
ejected
.l
I
O Select
Z
Q
To cancel
is
especially
power
space at
begins
movie is
is off and a
the beginning
automatically
finished and
the
the tape will be
power
the
and
Press the
the ,"r or
MENU/REVIEW
rz
button
BSP with
with ihe < or > button.
the MENU/REVIEW
Press
the BSP
mode, set to
uselul when
rental
rewound to
the unrecorded
switched
and
Press
the
./\
or
playing
tape is inserted
the beginning
tape is skipped
ol the
the recorded
from
rewound
off.
OK.
\,/
button and
select
button,
button.
OFF in step
rental
back
the
into
tape
ot the
and
section.
at the
space
to the beginning,
with
MODE
to ON
set
2.
The VCR automatically
NTSC
tape is
played
Note:
.
The vertical size
picture
some
In this case, adjust
clearest
playback picture
The
turewith
justment
The colour of
inal.
In the cue,
depending
There will be
mode.
"noise"
Picture.
the TV's
may
verticalhold
not be
playback
the
review and still
on the
no colour during
switchestothe
back.
playback picture
of lhe
may appear
tracking
the
may roll. ln
Possible).
picture
modes,
combination
NTSCsystemwhen
the scleen.
on
manually until
this case, adjust
(with
knob
of TV and
someTVsthisad-
may differtrom
there may be
the NTSC
will shrink
you get
the
the orig-
no colour,
VCR.
(long
EP
an
and
the
pic-
play)
22
Page 23

Index
Each time recording
cally added to the video tape.
the recording
added.)This index code is later used during the inlro scan
and index
While recording, additional index codes can be added by
pressing
point
The index indicator will
codes
pause/standby
search operations
the BEC
you
want.
begins,
button on
aDoear on
an index code is automati-
(lf
recording
mode, no indexcodewillbe
the remote
the ry
is
started lrom
control at any
screen.
The intro
play
back, using the index codes as a
The intro
corded
onds of the
gramme.
or until another mode
Press
1
I
with the
,'l
Select
L
Press the OK button.
3
Scanning
The tape counter appears on the
Press the
4
gramme
feature
scan
fast forwards
scan
programme,
programme,
procedure
This
the
searches
briefly
then fast forwards it to the next
is repeated until the
(such
MENU/REVIEW
.'/
/
./\
buttons and
the INTRO mode with the
'
will
that
>
start
play
you
automatically.
button when
want to
programmes you
for
guide.
the tape to the beginning ot a
plays
as
play
approximately 8
back
or stop) is engaged.
end of
want to
the tape
button, select SEABCH
press
OK.
tind
button.
the
SEARCH
ELANK
I{TFO
play
,\ or \,/
TV
screen.
you
back.
re-
sec-
pro-
pro-
the index
Use
any recorded section marked by an
many index
as
you
like until
sectionsof
you
your
mode to
search
in the forward or reverse direction,as
codes,
find the section
starting
I Press the remote control's
button or
mode, the number ot
The tape
The taoe will fast torward or
and
Note:
When the index search reverse button
the middle ol a
ginning
These features will not operate
index codes.
During the intro scan and
number
display.
There mustbe
these functions lo operate
K< reverse button, during the stop or
counter
playback
that
of
will
The
appears on the TV screen.
will
begin
programme, playback
programme.
be displayed
'SC"
indicator
morethan 1 minute between indexcodesfor
go
directly to the beginning of
you
point).
Playback begins automatically.
>> index search torward
index
codes
rewind to the
automatically.
with tapes that
index
on the TV screen and on the FL
will light
properly.
index
wish to view
you
willstart lrom the be-
search
on
You
code.
want to skip.
desired section
pressed
is
do
modes, the index
the FL
display.
can skip
(within
once
not have
99
play
in
23
Page 24

Recording TV
programmes
programmes
Only
the following
slations, refer to the
The use of E-300 tapes
operation.
presetTV
on
you
lf
"Presetting
stationscan
have not already
TV
stations"
is
recommended.
not
IMPORTANT
Before starting recording, set the
feature
(reter
to "Menu
mode")
thesettingsare in the correct
you
that
Note:
.
As the Super
complete
tion referto the Super l-HO section)skip step
to
want to use.
l-HQ feature takes approx.15 seconds to
the Auto Tape Tuning
record
Load a blank
programme
a
instantly.
video tape.
lf the video tape's recording deteat
removed, cover
loading.
Selectthe
2
CHANNEL ,^\ /
the tape speed with the SP/LP or SPEED button.
Set
3
"LP'will
is
play
Pressthe FHQ button then the
4
buttonsdown untilthe
FL display.
The l-HO
AutoTapeTuning
cess is completed the
main lit. The VCR will then be in the
mooe.
To
5
recording
The REC button must be
light on
selected.
is selected.
start
other buttons, this
cidental
To
6
To temporarily stop recording,
button.
recording.
recording,
stop
To resume recording,
the
cavity
preset
stalion
..,/
buttons.
the FL
There will be no indication when standard
indicator
recording,
display
l-HQ indicator appears on the
on the
process
indicator will stop flashing and re-
press
indicator lights on the FL display.
is
a built-in
press
VCR
make sure that all
and
positions
process
with adhesive tape before
you
wantto
when the long
REC
FL
display
isin operation.
REC
the
pressed
feature to
the
stop button.
r
press
press
be recorded with
preset
the TV
section.
the MODE
to
for
modes
the
(for full informa-
you
4 it
want
tab has
record with
button.
will tlash while the
When the
recording
play
hold
been
mode
both
pause
button until
slightly
longer than
prevenl
the PAUSE/STILL
the REC button.
the
pro-
the
ac-
Before
Turn on the TV and
Make
TV's TV/VCR switch
nel").
Unless otherwise specified, the lollowing operation can
done
the remote control.
Two recording speeds are available on
(Standard
SP
Provides the best
time
(Long
LP
Provides twice the
ding
1
2
3
proceeding:
VCR.
thatthe TV is setto the video channel or that
sure
with
either
Play)
an E-240 tape is 240 minules.
of
Play)
time
an E-240 tape is 480 minutes.
of
SettheVCR
display) with the
your
Set
TV to the TV mode.
Set the Tv's channel selector
wish to vvatch.
you
When
corded, set
is
to VCR
set
the
controls
picture
recording time
to theTv mode
want to return to the
the TV
on the front
and sound
of
("VCR"
TV/VCF
back
button.
to the video channel.
(reter
Danel
this VCR.
quality.
the
mode. The recor-
SP
is not lit on the
to the
programme
to
"Video
or those on
The recording
channel
chan-
being
the
be
FL
you
re-
24
Note:
you
lf
skip step 4, to setthe
the PAUSE/STILL buttbn.When
the BEC button.
Dress
Recording standby
minutes to
It the video tape ends during
wind automatically.
The video tape cannot be ejected
ding
orotect
mode. The stop button must be
VCR to recording
will
the video taoe.
pressed
standby
recording
lirst.
you
want to start
released after approx.3o
be
recording it will stop and re-
directly from the recor-
press
Page 25
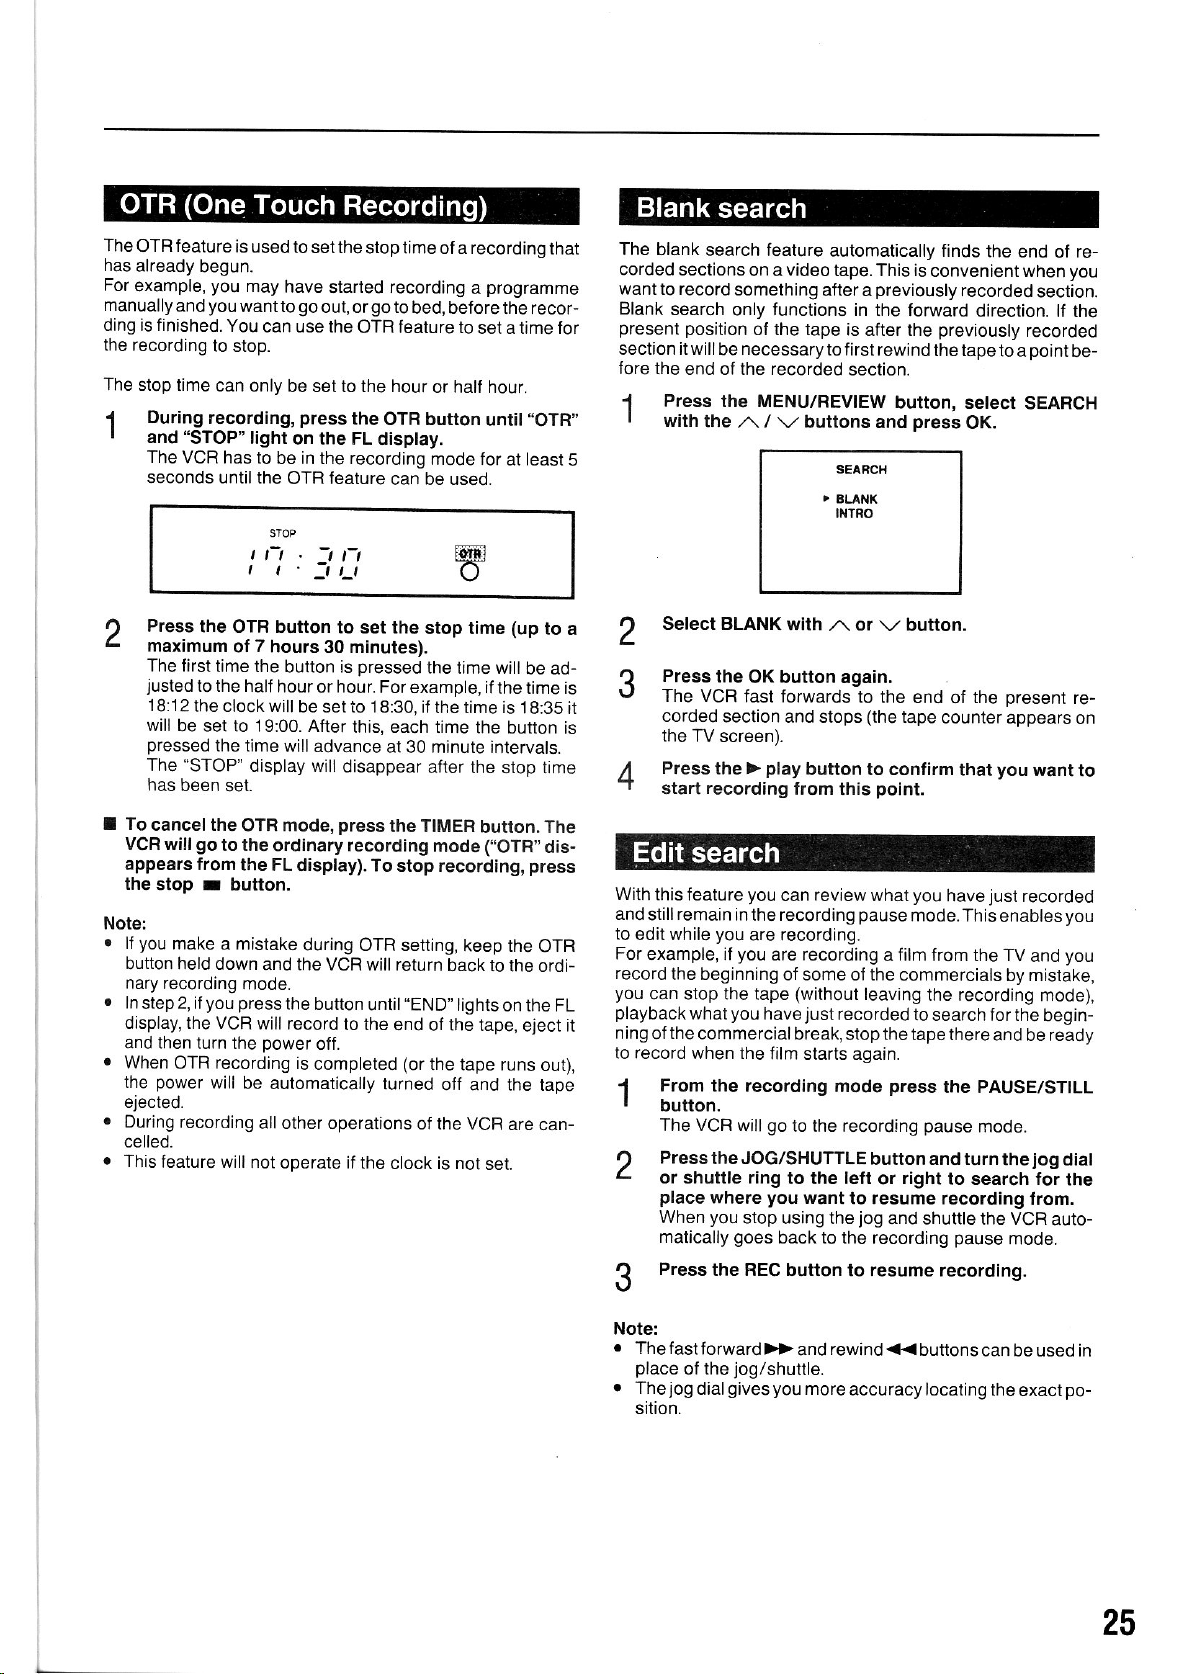
TheOTRfeature
has
already
For
example,
manuallyand you
ding is finished.
the
recording
The stop time
I
I
begun.
you
to stop.
can
During
and
The
seconds until the
recording,
"STOP" light
VCR has to
is
used to setthe
may
have
go
wantto
You
can use the
only be set to the hour
press
on the FL display.
be in the recording
OTR feature
stoptimeof a recording
started
out, orgo to
OTFI feature to
the
recording
bed, before the
or half hour.
OTR button
mode for
can be used.
programme
a
recor-
set a time for
"OTR'
until
at least
that
The blank
corded sections
wantto record
Blank
search
present position
section itwillbe necessary
fore the
.1
5
end ol the recorded
Press
I
with
the ,,\ /
search feature
on a
something
only
of the tape
automatically tinds
video
tape. This is
aftera
lunctions
to tirst rewind
the MENU/REVIEW
\,/ buttons and
SEARCH
BLANK
'
tftTRo
previously
in the
is after the
loMard
section.
button, select
press
lhe end
convenient when
recorded
direction. It the
previously
the tape
OK.
recorded
to a
SEARCH
section.
pointbe-
of
re-
you
Press
,
L
I To
VCR will
appears from
ihe
Note:
.
lf
button held down
nary recording
.
Instep2,if
display, the VCR
and then turn the
.
When
the
eiected.
.
During
celled.
o
This
the OTR button
maximum
The first
justedtothe
18:12
the clock will
will
be set to 19:00. After
pressed
"STOP"
The
has
been set.
cancel ihe
go
stop r button.
you
make
OTR
power
recording
feature will
t
,
of 7 hours 30 minutes),
time the
halfhouror
the time
display will
OTR mode,
to the
the FL display).
a mistake
mode.
-l
l-t
t
will advance
:t,_l
to set the
button is
hour.
be set io 1
press
t-l
stop time
Dressed
this, each time
disappear
the time will
Forexample, il
8:30, if the time is
at 30 minute intervals.
after the stop
the TIMER
ordinary recording
To stop recording,
during OTR setting,
and the VCR will return
mode
keep the
back to
(up
be ad-
the time is
l8;35 it
the button
button. The
(,,OTR',
press
the ordi-
youpressthebuttonuntil"END"lightsonthe
will record
power
recording
will
be automatically
all other operations
notoperate if the
to the end
off.
is
completed
of the tape,
(or
the tape runs
turned
off and the tape
of the VCFI
clock is not
eject it
are can-
set.
to a
time
dis-
OTR
FL
out),
2
3
is
4
With
and
stillremain in the recording
to
edit while
For
example, if
record
you
can stop the tape
playback
ning
of
to record when the
1
I
,
L
?
Select BLANK
Press
the
The VCR
corded
the
Press
start
this feature
the beginning
the
From
OK button again.
fast forwards
section and stops
TV screen).
the >
recording
you
you
are recording.
you
you
what
commercialbreak,
recording
the
button.
The VCR will
Press
the JOG/SHUTTLE
or shuttle ring
place
where
you
When
matically
Press
stop using the
goes
the BEC button
with
,,\
or
\,/ button.
to the end of the
(the
play
button to contirm
from this
review
can
are recording a film
of some of the
(without
just
have
film starts again.
go
to the recording
to the left
yyant
you
back to the
point.
what
pause
leaving
recorded to
stop the tape there
press
mode
button and turn
or
to resume tecording
jog
and
recording
resume
to
present
tape
counter appears
you
that
you
mode. This
commercials by mistake,
the recording
just
have
enables
trom the TV
search for the
and be ready
want
recorded
you
you
and
mode),
begin-
re-
on
the PAUSE/STILL
pause
mode.
jog
right
to search for
the
dial
the
lrom.
shuttle the VCR
pause
auto-
mode.
recording.
to
Note:
The fastforward
place
Thejog
sition.
of
the
dial
>>
jog/shuttle.
gives you
rewind <
and
more
accuracy locating
buttons
can be used in
the exact
po-
25
Page 26

The tape
minutes
works
during recording
tape
counter will
@r-fto
VCn
counter
and
seconds)
shows the
not
count unrecorded
,
tn
elapsed
of the video tape.
playback.
and
-,
,-
ll
L-r
FL
display
u
playback
-t
jls
_-r
During
spaces
t-
time
The tape
playback
on the tape.
(in
hours,
counter
the
I To reset
FESET
The
serted in
the
button.
tape counter
the VCR.
Remaining
counter
The remaining
played
play
("REMAlN"
The
clock and tape
screen.
I Press
counter
display
(during
the DISPLAY
and remaining
counter to zero,
willalso
tape
time
of the tape that
recording
will
also appear
counter
Current time
be resetwhen
time,
playback)
or
can also
Remaining
button
tape time.
press
clock
you
are
on the TV
on the FL
be displayed
Tape counter
time
once to
display the
the
COUNTER
a video tape
and tape
usjng can
and FL dis-
display).
on the TV
is in-
be dis-
tape
26
I Press
I Press
I Press
Forthe
will
counter.
Note:
.
the
button twice
the button
counter, remaining
the
screen.
alternate
Owing to
tapes,
time twice.
The first
minute, the
minute
button once more
FL
display, each
between the
the varying
this VCR has
check will
second
later.
to display
three times
tape
time and
time the
been
appear
(final)
button is
remaining
thickness
designed to
on the
check will
the clock.
to display
clock.
to return
and length
to the normal
pressed
time and
check the remaining
screen after
appear about
the tape
the
display
the tape
ol different
about 1
another
Page 27

Next-mode
This
feature
from
one mode to anotherwithout the need
plogrammes
the VCR to automatically
yourself.
For
example: You can
eject and then
from the
Press the NEXT
1
Choose the number
t
L
with
Press
2
v
The mode
seconds and then
begin.
I To
cancel the engaged mode,
operation
switch
on-screen disDlav.
the n or \,/ butlons
the
buttons.
Note:
.
you
lf
make
the NEXT
with
the ,^\ or \,/ buttons.
.
Some next-modes
(such
once the
.
The next-mode
the NEXT
a mistake when
button again and reselect the
as modessetfrom recording
present
button.
programme
itself
otf by selecting
button on the remote
of the next-mode that
button.
OK
chosen willaoDearon the TVscreen
disappear, the next-mode will
will start immediately. The
mode is finished
group
display can be cancelled
to set each mode
the VCR
play,
to
only one
control. From the
you
remote
continue The next modes
on the
press
setting lhe next mode,
playback)
and
control.
for afew
any ot the VCR'S
correct number
other modes
willbegin
pressing
by
rewind,
number
want
now
press
displayed depends
NEXT
button
playback
1.
playback
2.
3. Playback
From the
are displayed in 3
pressed.
is
playback
(to
end
(to
end ol tapel -t continuous'playback
(to
end of tape) i Return to
fast forward
stop,
the mode that
on
mode:
(l
>1
>.
2>iq>
3>.qO rl
tape) i Rewind
of
and
r
11
4
a(
2C)
3q,Orl
{
a
rewind
.
O
groups,
I
the
the VCR is in when the
o
Eject
9
zero
J
modes:
group
power
+
Stop
that is
off
(( Rew nd
q>
Continuous
Playback
Record qo
o
playback
T
d)
.-,
Stop
Eject
Return
to zero
1. Rewind
2. Continuous Playback
3. Return to zero
From
the
1. Record
2. Record
3. Record
Eject + Power
+
Stop
9
recording
+
Continuous Playback
+
Return to zero
t
mode;
Rewind + Eject + Power
otf
11
a.(raro
q)
2ar
3arCo.l
+
off
Stop
27
Page 28

G-C0DE
G-CODE isa
recording.
next
to the
into
the remote
times
Note:
Make
correctly
Press
Enler
2
you
Pressthe
that
number
To
quick
All
TV
are
entered
surethatthe
before
the
the
want
you
cancelthe
you
programme
control
G-CODE
code number
to record
<
entered,
to the
timer
and
easy
have to
automatically.
do is
in
and
remote
programming.
button
6
left
whole
with
each time
will
be cancelled.
number,
button ilyou
n
i
E5
\E*
In
recording
way
of setting
enter
the TV
the TV
controland
Ir
a few numbers
magazine
channel/datefstartfito!
VCR,S
on the remote
xE
of the Tv
-
the
1
0
wantto
buttons.
cancelthe
you press
press
the
xE
your
VCR
for
or newspaper)
clocksare
control.
programme
last
number
the
button,
CANCEL
button.
timer
(shown
set
that
the
Press
7
mooe.
Press
8
The
timer
FL
display.
ding
willstartand
Ime.
Note:
The
Super I-HQ
recordrng.
lf the
loaded
removed,
TIMER
and will
and
lf
w|||
Step 4
channel).
matically
button is
lf a tape
is not
return
press
the video
auromattca y
only has
enter
code number
case).
The
following
shown
in
the
G-CODE
the
TIMEB
and l-HO
The
VCR is
stop
feature
video
the
the TIMER
tape
as the remote
tape's
tape wi
pressed.
loaded,
to the
runs
eject
to
be
the
channel
is
entered
normal
display
step
3, and
E
i9:0a-
button
button.
indicators
now in
automatically
works
recording
automaticalty
the
VCR will
mode.
button
aoain.
out
durin-g timer
lhe tape
performed
control
step 4
for
wilt
number
that
appear
can
will memorize
to return
will
the timer
automatically
not
In this
and
once
channel (ABC
be omitted.
to the
appear
mode
at the
defeat
be ejected
enter the
case. load
recording.
turn itself
(for
the
next
place
in
t9:
normal
on
the VCR
and
programmed
during
tab has
when
timer
a taoe
the VCR
off.
each
oreset
and
auto_
time that
in this
ot that
s
recor-
timer
been
the
mode
a
3
4
5
Press
programme
The
"Err'will
this
case,
programme
lf the
you
can record
WEEKLY
Enter
the PS
gramme
For
example,
ABC.
lf
enter
0 then
Set the
"LP"
will
the
OK button.
appear
re-enter
button
is being
your
tape
appear
date,
start/stop
if
a non recognizable
the
correct
is on
il
every
automatically
E
E0:80-E t55
Y'lcrE3,
number
the
VCR
2.
speed with
for
E
P0:00-? t:55
of the
shown
programme
is
on,
set so that
the
ptay
long
Ll',
lP'
LP
time
code.
day or
pressing
by
channel
you
want
ABC is
Sp/Lp
recording.
e
will
be displaved.
code is
enlere-d.In
once every
lhe DAILy
that
the
to record
pS
on
2. then
button.
week,
pro-
is
on
vou
the
data is
area,
because
areato
procedure
ll'
area.In
correct.
the
guide
l"
pS
number
channeland
this
on the
APPLIED
CORP.
UNDER
CORPORATION-
G-CODE
LICENCE
mav
st;tion
case, reset
next
page.
FOR
SYS-
FROM
not
the
BY
r\"
Note:
.
Always
.
or
lf
be
numbers
remote
G-CODE
GEMSTAB
TEM
GEMSTAR
check
you
move
correct. This
IS MANUFACTUREO
that
to
a different
is
differfrom
control
using the
IS
A
TRADEMARK
DEVELOPMENT
DEVELOPMENT
28
6
Pointthe
button.
The
data will
"FULL
already
remote
be transferred
will
appear
have
data
controlatthe
on the
entered.
to the VCR.
FL
display if
VCR
press
and
programmes
a 8
the
OK
Page 29

procedure
This
channel numbers are
trol.
It can also be used to reset
another
different.
In order to
signed a G-CODE
may
guide
programme
prevaous
The
ceive SBS on PS
ber
area where the PS and
be assigned to
channel numbers, in
example below supposes that
is
28.
can be used to check that the PS
correctly entered
operate G-CODE recording, each TV station is
page
guide
channel
guide
the remote control in advance
can be omitted.
channel 0 and that the G-CODE ouide num-
G-CODE
guid€
remote
the
guide
number.
channel 28. lf
your
TV
magazine etc.,
you
-
[H
channel number
into
the remote con-
control it
channel
you
have
you
numbers
For example, SBS
have
and step 4 on the
settheVCRto
and
move to
list
a
you
guide
are
as-
the
oI
can
re-
Note:
.
you
lf
ever change the
must reset the remote
instructions,
above
go
to
to the
3-5.
.
youwanttocheckthatthePSandguidechannelnumbers
lf
are correct: Press the
pressing
again to return to the normal mode.
Below is an example
These may
GUIDE CHANNEL NUMBER ASSIGNEMENT
Station
ABC
SEVEN Network 7
NINE Network
TEN
Network 10 10
SBS 28
original
the
REViEW button. Press the CLOCK/CH
vary according to the area.
name
preset
TV channels
control's
but in step 2
PS number,
CLOCK/CH button twice and keeo
TV
of
station and
PS number:
press
then continue with steps
guide
Guide ch. PS ch.
2 2
the VCR,
on
the REVIEW
channel numbers.
I I
you
Flepeat the
button
button
7
0
Pressthe remote
guide
The
Enter
2
etc.) with
To
enter a single
number. To
Using the
3
the 1-0 buttons.
Now
(PSo)
0
channel setting
control's CLOCK./CH button twice.
E
IHErP5--
Elll
the
G-CODE
the 1-0 buttons.
enter 1,
I
example mentioned above,
G-CODE
your
on
I
guide
channel number
number
digit
press
0,0 and then 1
E
HOPB.Ps
-
Et-t
guide
|
channel 28
VCR.
6
H0?
E-P5
display
-
[.H
press
P5
(SBS)
fim
will
appear.
0,0 and then the
(001)
enter
preset
=
00
(28
etc..
00 with
channel
= SBS
Press
/4
-T
"FULL"
I lf
ory is full.
To
tor
press
erased, then continue with
A
r.,t
the OK button.
To
continue
lo
4.
continue setting the
an unwanted
the
Press
mode.
memorizing
appears in the
programme
(+)
CANCEL button and the data will
the CLOCK./CH
guide
channels. repeat
display it means thatthe mem-
guide
channelnumbers, search
with the REVIEW
2 - 4.
steps
button to
return
steps 2
button,
to the normal
be
29
Page 30

Timer recording
Up to eight
and
Only
using timer recording. lf
stations, refer to the "Presetting
The VCR
LC display of the remote control or
There are three
One time
To record a
Weekly recording
To record a
every
Daily
To record a
MON J SUN.
lf
the
time, set the clock before
clock").
.l
I
programmes
programming
programmes
programmed
can be
recording
programme
programme
monday
recording
LC
Press
(E-MON),
programme
display clock
the G-CODE button
can be
done up to one
can be
preset
on
types
of
TV stations can be
you
have not
TV stations" section.
tortimer recording eitherviathe
timer recording to choose
is
that
only broadcast
that is
broadcast
every tuesday
that is broadcast daily:MON
has not been set or shows
proceeding
E-
WDD--
PF
NE
programmed
already
via the TV screen.
twice.
tor recording,
year
in
preset
once.
once every week:
(E-TUES)
(reter
to
-:- -
advance.
recorded
the TV
from:
etc.
FRlor
+
the wrong
"Setting
the
Before
Turn
Make sure thalthe VCR and remote control clocks
Make sure that a taDe
Make sure that the TV is set to the
TV's TV/VCR switch
nel").
4
proceeding
the TV
on
Set the start time
minutes with the
When lhe
minutes will increase
,,,\
and
or
VCR.
is
<
\,/
is loaded.
set
minutes
,
button
or
video
to VCR
>,
decrease at 5 minute
(refer
stop time hour and
and
and
n
pressed
is
v
channelorthat
to
buttons.
continuously, the
['
lE:10- l''i:00
D I
Press
5
6
the > button.
The date will flash.
Set the dale
When the
untilit
weekly recording
by
(E-MON
ding
When the
for recording with the,,\or
button is
./\
reachesthe
+
.v
button is
EI
time recording
One
oressed.
same day
(E-MON
FRI/E-MON
pressed
tE:10-
the
etc.) and
SUN/.
J
the order
date
then
otthe next month,followed
t1:00
tt
-a
-
I
are set.
"Video
chan-
intervals.
buttons.
\,,
will advance
recor-
daily
will reverse.
the
Set the start
2
,/\
.v
: Press to count up.
Press
:
time hour with the ,^\ onw button.
to count down.
6
ITEInn
lrrclluu--
_o_
-
Note:
.
Numbers can be entered with
the ,,\ and
To
set a single
the number. Forexample,
then
lfyou use the 1
press
Press the
Q
v
The minutes will flash.
1,
and
the
\./
buttons.
digit number
then 5.
-
>
button
>
0 buttons
to start the next data
button.
_r_ _
press
to
set
for
dataentry
-.- -
the 1-0
buttons,
(zero)
0
8:15;press
at
first, then
(0)
zero, then 8,
you
do not need to
flashing.
in
place
press
a
,
I
Weekly recording
,n-nn
t
t.uu
6
,
,
of
Daily recording
Press the
7
I
The channel number will flash.
Note:
.
To set the
<
button
then continue from step
Set
Q
>
button.
month manually: from the PS
and enter the month with the ,,\
the channel number
EI
tE:10-
7.
,n.nn
I I.UU
with
!1:08
position
the ,^\ or
press
.',,
/
buttons,
\,, button.
the
30
i ?",Jm
Page 31

Sel the tape speed with
9
"LP"
will
appear tor long
6
lE:lE-
the
SP/LP button.
play
recording.
LP
lrl:00
Pressing
the VCR is
grammes
Press
the PROG
in the timer mode)
together
the button again to return
LIST button at anytime
will display
on the TV
screen.
to the normal
(exceptwhen
pro-
the
all
screen.
Press
I n
I
U
the OK
The
transmit indicator
programmed
the
Note:
.
you
lf
wantto change
>
button to reach
tons to correct the
Pointthe remotecontrolat
I {
| |
window
lf all 8
programme
the
"FULL"
are no
Press the
1 ,
I L
trol
to the normal mode.
Press the TIMEF
1 ?
I
v
The timer
play.
Unless released,
mode
press
and
programmes
will
appear
programmes
G-CODE button
and l-HQ indicators
until alltimer recording
lry
il.D
button.
and
is
data
E
tE:10-
l\"
data before transmitting,
the data,
and use the
data. Then
wittflashtoindicatethat
OK
now ready to
LP
t
lr"
press
the OK
the VCR'S remote
the OK button.
have
list
been set for
display will
the FL
on
available.
appear on the TV
display to
return
to
button.
will aDDear
the VCR
will remain in
is finished.
l"
be transmitted.
L
use the <
\,/
/\or
or'1
button.
timer recording,
show thal there
the remote
on the FL
-0
but-
sensor
and
con-
dis-
the timer
or
9:00-t0r30
+
23 :00
23 r30
9:OO+r0:tx,
14 :00 +
12:o0+t2:30
19 r00 +
12:14
WED
you
lf
programmes
dates overlap
nesday) the
seconds) and an
In this
unwanted
cancel
lf exactly the
cated, the VCR will automatically
programme.
programmed
have
programme
case,
programme/s
with
the CANCEL
have the
(ie:
E-WED,
"x'will flash next to the
press
the PRoG LlsT
same times, dates
START STOP
9:dr+10:lo
rra
:30
-
9:oit-10:lxl 2/DEC
r1a
+
:00
{
t2: l,O
12 i ltl
WED 2/l{OV/ta
20
t0 : a5
20 :00
2/NOV/94
the VCR as shown
same start/stop times
and a date that is
list
screen will appear
with the
button.
OATE
a/Lov
ql
15:
9/i|ov
t5 r 30 E- IVEO
gt
12:
E-SAT
4/NOV
/
NOV
2/oEc
-WED
E
E-SAT
ilO-SU
below, where
also a wed-
programmes.
button and
/ \,/
/^
buttons and
and channel are
cancel the
duplicated
and the
(for
few
a
select the
dupli
I To release
TIMER
The
TIMER indicator
will come
the VCR is released
is
ding
stop button is
Note:
During
be suspended (except
leased
The
Super l-HQ feature works
recordrng.
lf the loaded
removed, the
TIMER
lf a tape is not
and will return to
press
and
It the video tape
will
automatically
the VCR
button.
back on, and timer recording
progress,
in
pressed
the timer mode
from the
video tape's
tape will automatically
button is
loaded, the VCR
the TIMER
trom the timer
ofthe FL
from the timer
the VCFI
timer mode.
oressed.
the normal mode.
button again.
runs out
eject the tape
display willdisappear,
will continue
or the video
all other
for the
clock) until
automatically
recording
will not
during timer recording,
mode,
will
be suspended. lf
mode while
to record until
tape runs
operations
of
the VCR is re-
defeat tab has
be
ejected when the
enter the timer mode
In this case. load
and turn itself
press
the
power
timer recor-
out.
the VCR
the
will
during timer
been
a taoe
the VCFI
off.
31
Page 32

The
display
lhe
thatyou
is readylor
.l
I
\,/, <
,,\
wish to
Press the
The
lfthe
Setthe clock
button
Set the
2
minutes
When the
minutes
on the bottom half
>
or
buttons
enter. The
prog.amming
OSD PROG.
programme
clock is notset,
you
+
and - signs indicate
(use
these
button.
screen will
the CLOCK
(reterto "Setting
aoain.
PiCIGFAI/|
START
I:
PS
oo
--
STOP
*--:--
SP
STABf
<
f
start time hour/minutes
with the <, >,
,^\ or
will increase
\,/ button is
or
decrease at 5 minute inteivals.
of the screen
press
can
buttonsto
appear on the TV
the clock")then
DATE
shows which
to reach
the
enterthe data).
SETscreen willaoDear.
--l--{---)
: H
stenr,
>
,^\ and \,/ buttons.
pressed
u
and
stop time hour/
continuously, the
the data
pointthat
screen.
press
the
Press
5
The cursor
of
Set the channel
6
NEL
Set the
7
"SP"
>
the
button,
moves to the
STAAT
la:00
Psl
o^Y
buttons.
tape speed with
"LP'will
or
number with
START STOP
14 ro0 - 16 :
PS 06 SP
aDoear.
channel number.
P;locFAX
STOP DATE
+
16: a5
E-WEO
sP
PS
< > SfART: H
the
PNOGFAM
DATE
E-WED
'15
PS
STAFT
>
the SP/LP
,,"\
rH
button.
or \,/
or CHAN-
Press
3
4
the > button.
The
cursor moves
Set the date for
with
the ,^ or \,/
When
the
day by day untilthe
display will
SUN..Every Sunday
FRl.. N,londay
through
When the
As
the month is
nually move
the <
button. Then
monln.
START
+
14 :0O
PS
--
sToP:H
to the
START
1a: tb +
F3'
STOP
: I
one time, weekly
button.
,.\ button is
same day ofthe next
change to
through Friday
Sunday).
\,/ button is
set automatically, if
the cursor to
use the
START STOP OATE
14 :00 + 16 :45 E"WED
Pli a sP
PROGAAf
STOP
16 : 45
stoP
<
PROGRAX
+
date.
--
:
> oAy
DATE
/
--(---)
STOP DATE
la: a5
l/1t(t|oq
3P
rr^Y
< >P9
or daily recording
pressed,
the date will
month. Then the
once a week recording (E-
etc.), then
pressed
the PS
,^\ or
PROGRAX
recording (MON-
daily
MON-SUN..Monday
the order will reverse.
you
want to
positionandthen press
\,/
button to
advance
it ma-
set
set the
Press
tl
I lf
steps 1
I Press
grammes
Press
O
w
I lI
all 8
the
you
want
to continue
to 8.
the PROG.LIST
together.
the button
Press the TIMEB
The
timer and l-HO indicators
play.
To
cancel the timer
programmes
and the OSD PROG.
list
display
grammes
will appear
available,
Nole:
.
During
the timer
be suspended.
o
lf the loaded
removed,
TIMER
lf
atape is not loaded,
and will return
press
and
.
lf the video
will
automatically
video tape's
the tape
button is
the TIMER
tape runs
PROGRAf
STAAI
la :00
STOP DATE
+
16 :45
PS6 LP
OK button.
button
again to return
button.
have
button is
to show that
mode
all other operations
will automatically
pressed.
the VCR will not
to the
normal mode. In this
button again.
out during timer
eject the tape
E-WED
PS
STABT
>
setting
programmes,
to display
to the normal
will
aooear on the FL
press
mode,
been set for
pressed
recording
defeat tab has
be ejected when
and turn itsetf
rH
repeat
all the
screen.
the
button again.
timer recording
programme
the
there are no
of the VCR witl
been
enter the timer
case, load
recording, the VCR
mode
a
otf.
pro-
dis-
pro-
the
tape
32
sloP:u<
+
>Ps
Page 33

lfyou
programmed
have
programmes
dates overlap
nesday)
programme
In this
\,/
"x"willflash
an
case, select
/
,/\ buttons and
have
the same
(ie:
E-WED,
list
screen is
the unwanted
STAAT STOP
9:00-10:30
Ila
:30
a:oo-10:00
na :30 +
12:00 +
the VCR
as
start/stop times
and a date that
nextto the
displayed).
cancel with the
programmes
programme,/s
DATE
+
4/tlOV 4
i5 :30 9 /
2/oEc 2
15 :30 E.
12: to
E-saI
llOV
tvED 6
shown below, where
and the
is also
a wed-
(when
the
with
CANCEL
Pli
1
6
the
button.
Press
the PROG.LIST
grammes
together.
START
9:00 +
23: O0
9:00-10:(X,
14:00
12:00 +
19
:00 +
12:la
10:30
23 :30
-
t6 :45
-
12 | 30
20 :00
WEO
bufton
STOP
2/NOV/94
to display
OATE
4/NOV
20/NOV
2/OEC
-WED
E
-SAT
E
O-SU
pro-
all the
PS
4
1
2
6
6
7
You
can
change timer
Programme
Press the PROG.
1
Press the \,/
t
.-
The
cursor will
Select the
?
r/
with the
Press
4
6
v
I
programme
Ine
Correct
tons.
Press
6
Pressthe
7
I
mal screen.
lvEo
programming
list
screen,
button.
appear.
programme
,.\ or \,/ button.
the OK
the
button.
the data
OK button.
OSD PROG.
screen wt
using the <, >,
2/Nov/e/r
LIST
button.
that
aoDear.
button to return
data
you
by usingthe
want
change
,\
and
to the nor-
\,/
but-
I lf
and 3.
,/,1
T
Select the
the
,.\
Press
the
programme
The
below it will
you
want to
Press
the PFOG.
screen.
programme
or \,/
button.
STAAT
9:00-10:30
23:00 +
9:00+r0:(x)
1a:
12:00 +
19
12:14
(+)
all move uo
START
9 :00
23i00-23:l0
>r4:00
12:OO +
19 :00 a
12: lil
cancel more
STOP
23:
OO
16:
-
12:30
:OO +
20 I lX,
lryED
CANCEL
will
be cancelled
STOP
+
10 r30
+
16:45
12: t
20 :
IVED
LIST button
you
that
!O 20/llOV
a5 E-WEO
2/llOV/94
OATE
{/NOV
2/DEc
E-SAT
[O-SU
want
button.
OATE
4/NOV
20/NOV
-
E
IVED
E. SAT
I|O+SU
and the
one space.
q)
2/ilOV/9{
programmes
to return to
to
cancel rvith
programmes
repeat
steps
the normal
2
33
Page 34

Gopying
video
tapes
IMPORTANT
Before
feature
the
that
The
VCR
1
'
2
3
v
A
I
5
v
A
v
7 :tart
'
I lr::"
v
starting
(refer
settings
you
want
instructions
Co.nne.ct
ustng
rne
Connect
gramme
Turn
on
Load-a
blank
tape
into
Press
the AV
mode.
"AU"
will light
Set the
"LP"
is
play
Press
tape
will
selected.
is
selected.
the
buttons
FL
disptay.
The l-HQ
process
the indicator
will
then
playback
back
side VCR.
playback
lf the
be switched
theREC
rights
on
When
recording
\,/
buttons
T;
recording,
to
"Menu
are in
the
to use.
below
ptayback
the
aDove
the
TV
to this
being
recorded.
both VCRS
tape
playback
the
button
on
speed
light
on the
There
FHO
button
down
untilthe
indicator
ts In
operation.
wilt
on
to
release
stop
the
ofthe
VCR
during
bution
display.
has
be in
the FL
set
mode',)
correct
are for
using
O
connection.
VCR in
and the
intothis
side VCR.
to set
the FL
disptay.
with
the
FL
display
will
be no indication
then
l-He
wi
flash
When
flashing
recording
prerecorded
has
the
Super
playback.
untit
finished. press
the
VCR
or'
the VCB
and make
positions
this VCR
and recording
order
Tv.
VCR
the VCR
Sp/Lp
when
the
REC
indicator
while
the
and remain
pause
the
from
to
forthe
as
to
monitor
and the
to
or SPEED
the tong
wh;n
button,
appears
the Auto
process
mode.
tape
l-HO feature,
recording
the
CHANNEL
the
external
the
MODE
sure
that all
modes
the recording
VCRS,
O
the
prerecorded
the
external
button.
ptay
mode
standard
hotd
both
on the
Tape
Tuning
is
completed
tit.
The
VCR
with
the
it
shoutd
ptay_
indicaror
,^ /
mode.
pro_
When
this
VCR
dubbrng,
screen,
desired.
Press
1
I
lhe
Select
,
L-
Set to
Q
Press
4
.
to rerurn
back
lf this
VCR
on the
front
During
the
inputs.have priority
nars.
r nrs
nected
you
to
want
to the
connected
I
VIDEO/AUDIO
nected
on-screen
willbe
recorded.
the
/^\
or \,/
the
OFF with
the
to the
js
being
panel
(external)
AU
means
both
the rear
to the
to
use
terminals,
front
is
MENU/REVIEW
the
that
being
used
These
mode
the <
posi
on.
as the
be
used for
mode.
you
have
and front
etc.
make
as the
indicators
and
with
or >
indicators,
the front
rear
can
connected
mode
MENU/REV|EW
bufions
OSD
on-screen
ON
used
can
over the
if
front inputs
a VCFI
panelterminals.
playback
that
indicators
button,
press
the
button.
button.
recording
dubbinq.
panet
VIDEO/AUDIO
two
VCRs
panel
be used.
sure
there is
deck
aooear
can be
setect MODE
OK.
/\
\,,
or
set the
VCFI,
the
pa-nel
VIDEO/AUDtO
(for
example)
inputs
only ihe
to the
nothing
during tape
on
tne iV
cancelled
with
button.
OSD
mode
AV inputs
termi_
con_
VCFI
panel
rear
con_
if
34
Page 35

Audio
dubbing
Audio
prerecorded
on a
phone
Note:
.
Only use
.
Disconnect
Note:
.
The
terminal
dubbing
or music from
audio system
allows
tape
a microphone with
the
microphone when
To audio syslem's
TAPE
or
OUT
on the rear
you
to replace
with a new
an
audio svstem.
AUX/VoR
OUT terminals
can also be
panel.
the
original
soundtrack,
an impedance
it is not
connected to the
being used.
soundtrack
using a micro-
of 600
ohms.
AUDIO lN
To record
the
I Press
For
cally when the
you
lf
bing trom
you
1
I
,
4?
L,
/,1
'T
6,
v
A
\.,
7
t
I To
Note:
o
Audio
mode.
.
The
.
After dubbing is
ternal
.
The audio
mrnutes.
the audio
VCR'S tuner.
the CHANNEL
nel that
As long
no other
convenience,
you
as the TV
connections are necessarv.
want to
step 4, afler first
want audio
Playback
you
want
Press
the COUNTER RESET
The tape
Rewind
start audio
Press
the AV button.
of a
want to record.
and antenna are
audio dubbing can
tape counter reaches
stop audio dubbing manually,
dubbing to begin.
and set the
audio dubbing
counter will be reset to
the videotape
dubbing.
The'AU indicator
Select the source that
phone,
Press the
The
Press the
Audio
counter reaches
stop audio dubbing manually,
CD, cassette etc.)
AUDIO DUBBING
VCR will
dubbing can be started from
original soundtrack will
mode by
enter the audio dubbing
play
dubbing will
dubbing
button to
"00H00M00S"
completed, release the
pressing
pause
TV
channel that is
or 1-0 buttons to
setting the tape
videotape to
being received
select the
connected to the VCR,
be set to stop
"00H00M00S".
start
to the
the
to stop.
button.
00H00N400S'.
point
to the
will light
you
on
and start
where
the FL
display.
want to record (micro-
playback.
button.
pause
start audio dubbing.
stop automatically when
pressthe
playback
the
replaced
be
the
CHANNEL buttons.
mode will
with the new
VCR from the
be cancelled
chan-
automatF
audio dub-
point
where
point
where
you
want
mode.
the tape
stop button.
or still
one.
ex-
after 5
by
to
35
Page 36

The
Super
Intelligent-H0
(Super
l-HQ) leature
in
AKAI was the first company
vide
achieves high
The new "Super
now developed includes the features of the
gent-HQ" (FHQ)
The main advantages ofthe high
"Super
First, a newly developed circuit achieves cleaner, clearer
tures with less
Second, togetherwith the newlydeveloped "PRO GX4
(Long
LP
high
(Standard
VCFI the
on a
unique 'lntelligentHQ"
piclure
qualityfor
lntelligent-HQ" technology which AKAI has
but achieves even
Intelligent-HQ" are as follows:
noise.
picture quality
Play)
picture quality
Play)
is almost as
picture quality,
world
the
to develope and
feature which
both recording and
previous
picture quality.
higher
picture qualityachieved
greatly
is
good
an area
increased,
as that ol Akai's SP
in which Akai has a
playback.
"lntelli-
that the
so
well-established reputation.
Furthermore, the new head
assure optimum recording regardless ol the characteris-
ogy
tics of individual tapes and head
time, thus maintaining the same high
years.
the new Super FHQ technoF
and
wear
or other changes
quality
picture
over
I-HQ
This technology for achieving
ording and
bringsoutthe
S-VHS tapes,
playback,
centering on
best in the superior
providing
excellent
high
an auto tape tuning system,
qualities
picture quality.
in both rec-
high-grade
of
picture quality
Newly developed circuit
The newly developed circuit
picture quality
leature achieves
PRO
The
timized
back
and
GX4
gap-depth
and
improved, thereby reducing edge
providing
high
head
and track
the high range response
high
width
picture quality
for the
"Super
with less noise.
the LP head have been op-
of
for recording and
in the LP mode.
IntelligentHQ"
noise and crosstalk
pro-
with
pic-
Head',
over
the
and
play-
During recording:
you press
When
Auto Tape Tuning
onds.
Thisoperation optimizes the tapes fullpolential, and the tapes
characteristics are stored
untilthe tape is ejected, or the
VCR.
During
you
When
automatically
optimizes noise cancellation and the
This function
cal direction
unavoidable Droblem
use.
This displacement
unnatural
tunction, however,
rection ofthese coloursignals, no matter how
maoe.
AKAI is the first
ogy tor home VHS VCRs.
Note:
.
This VCFI is
l-HQ VCRs.
Please take care
labeled
in doubt use
made
by the same company
tween E-'180 and E-240 tor example) we
use ol E- 180 tapes
lf
tape is
a
cess maytake alittle longer, as
tics once
A tape recorded by S-VHS
not be
systems
Although
we recommend that it always be
or off,
back and recording.
the record
process
button
begins. This takes about
in the microprocessor's memory
playback:
play
adjusts
eliminates displacement
(called
picture.
company
perfectly
"High Grade"
damaged,
more.
played
are not interchangeable.
you
tape
back a
"vertical
using
to the recorded condition olthelape and
aberration") during
with
conventional
increases with
When copying from VCRS including
is no
there
in the world to
compatible
when
choosing
"S-VHS"
can chooseto
are really high
"PRO'tapes.
or
for the very
or faulty, the Auto Tape
back on an
l-HQ VCR and vice versa, these
and the FHQ button the
15
sec-
power
supply is cutofftrom the
the
reproduction
each copy,
FHQ feature, it
Super
of details.
of colours in the vertF
VHS VCRS for home
playback,
resulting in an
this
displacement
with l-HQ and non Super
yourtapesas
differ in characteristics
best
in the vertical di-
many
provide
grade
tapes.
Also, as
recommend the
results.
copies are
this technol-
notalltapes
you
lf
tapes
even
(be-
Tuning
pro-
itwill'read" the characteris-
(on
format
have the Super l-HQ teature on
an S-VHS
left
VCR) can
on during
play-
are
an
36
Page 37

Troubleshooting
you
Should
that allcables are
and
oetow.
problem
lltho
garding
warranty coverage, as well as a clear description of the
have
can
problems
any
properly
not
be corrected
the
during
connected
operation ofthis VCR,
(reler
with the instructions
to this manualforthe correct
below,
please
write
problem,
that
check
allthe controls
procedures),lf
the modeland serialnumberand allpertinent data
down
and contact
PROBLEM CHECK
There is no
The
eiect button does
There is no
The VCB will not record. ls the recording defeat tab ofthe
The VCR
trol.
Poor
The videotape is ejected when the record button is
presseo.
There are disturbances
The FL
The
Timer recording
"Err
"Err
does
quality
display is
quick
finder does not function. Check that
1, 2 or 5" appears on the FL display Press the POWEF|button afewtime9
3"
appears on
to the VCR. ls the mains lead
oower
oicture
not
ot all
does
not work. lf the
on the TV screen. ls the TV set to the video channel?
operate using
TV
stations. Chgck
in the
flashing.
not function. ls the clock set to
the remote con-
playback picture.
TIMER
lf the VCR
ls the antenna connected
ls the
bunons to cancel il.
ls the VCFI in the
cavity
The record button must be
drng.
ls the
buttons lo cancel
Replace the
Check the antenna connections.
ls the
ls lhe recording defeal
lf
Adjust with the AUTO
Adiust with the multi control buttons.
A
The clock
Are
the
centre.
the FL
display
This usually indicates condensation
press
VCR
button to cancel-
"AU"
with adhesive tape.
"AU"
that the TV is
TV/VCR switch set
so cover
power
failure
the date, start and stop
display
the POWER button afew
the display
cenlre.
power
The
gramme
goes
while watching
olf
a
TV
pro-
"AUTO
ls the
VCR'S tuner to watch
plugged
is in the timer modethe ejeci button willnot work,press
is
the
and
recording mode
in the
indicator lit on the FL display?
correct
indicator on the FL display lit?
batteries
cavity
has occured
programme
the VCR is in the
mode?
it,
in the remote control.
properly
tab removed on the video tape?
with adhesive tape.
TRACKING button.
the
correct time?
remains on the FL display, conlact
remains on the FL display, contact
mode set to ON? lf so set
OFF"
programmes.
TV
are set to their
problom persists,
a
your
nsarest AKAI service centre.
proper
refer to the
POINT
in?
press
the stop button then eiect.
correctly?
video tape removed? lf so cover the
Dressed
to VCR?
data will
for a few
to
tuned
(exceeding
have to
olavback
the
mode.
times correctly set?
The display should disappear.lf
in the VCR. Wait t hour and then
times. The display should disappear.lf
press
lf
so
seconds
press
lf
so
video channel.
60 minutes).
reset
be
your
your
I to
OFF
the
lo
the
Akai
Akai
when
positions
advice
CHANNEL
recor-
start
CHANNEL
servica
service
using
re-
the
the
Note:
.
.
you
When
The VCFI may become warm during operation, this
wellventilated,
have finished
and do
not
the VCR eject the cassette and turn the
using
place
anything
on top
ls
normaland does
of the ventilation holes.
not indicate a fault. However, make sure that
power
otl.
the VCR
is
37
Page 38

Specifications
FlF. output
Recording
Playback
(line
(line
output)
input)
........
Video
Line inpul
Line output
S/N
Horizonlal
level
level
ratio ......................
resolution .,...
Audio
Line input level
Llns output
ratio ................-.....
S/N
Frequency
--...........
level ...........
response ......
Recording/playback lime
SP mode ......................
LP mode .---.....-,...........
VHS standard
Rotary, slant azimuth
helical scan system
4 video heads
System B, G
VHF
UHF ch 21
System
VHF
ch
PAL
.......
PAL
simulated
0.5 - 2.0
anced
'l,0
More than 45 dB
More than 250 lines
-6dBm/50
-5dBm/'l
More than
0-5, 5A, 6-11
ch
-
69
B type modulation
0, 1 swilchable
ch
1)
PAL
Vp-p/75
Vp-p/75
ohms,
Kohms, unbalanced
K ohms, unbalanced
40
dB
70-10,000 Hz
240 min. with
E-240
480 min. with E-240 cassetto
(NTSC
ohms,
unbalanced
cassette
two-h€ad
(proset
Tapo)
unbal-
Maintenance
a
When
heads. This will cause disturbances on
cannol be eliminated
rysline
as other internalparts must bo
don6 byaqualitied service
csntre.
tains no cuslomer s€rviceable
yoursgll.
AKAI service centre
tape is used, dirt will accumulate on the video
dirty
with the VCR'S lracking control or the
tuning control.It this should occuj, the
This VCR is a finely
Take itto aqualified service shop orto an
to
cleaned.VCR cleaning must be
shop or an authorized AKAlservice
prscisioned
parts,
so never open the VCFI
b€ cleaned.
ths TV
screon
heads as well
inslrum€nt,
which
and con-
authorized
Tape speed
SP mod6
LP mode
FF,
BEW
tiME
Timer
Programme
relerence .....---....
Clock
Display ........................
Power rsquirements .........
Power consumplion
Oporating
temperature
.......... 19
......
Dimensions
Woight
Standard accesaories
AC
Antenna cable
Remote
Batleries
.
............................
power
cable
control
For improvement
subject
unil
lor
remote control
to
change
purposes,
without notice.
23.39 mm/sec
1
mm/sec
1.695
Approx.
Approx.
T times normal speed
2
with E-180 cas-
min.
sene
programme
8
crystal
Quartz
/ 1
year
and
TV screen and FL
counter,
240 V AC, 50 Hz
5'C
425(W) x 90(H)
4.0
................
Timer
w
-
40"C
kg
specifications
etc.)
x
276(D)
and design
OTR
(Tape
mm
are
1
1
,l
38
Page 39

Page 40

AKAI
AKAI ELEC]TdC CO.,LID.
r 2- 1 4, Hiqr.hl-Kojiy6. 2{hom.
Tokyo, J.p.n
ohb-ku,
418771J
E
*rtrd
ff\\
F,t
.-,'i"{{,.-
940620-A-1
APC
Printed in Japan
Page 41

IMPORTANT
THE FOLLOWING IS AN ALTERATION
YOUB OPERATOR'S MANUAL
"Timer
ln
the
Even though
control's LC display
programme
use the "Programming using the TV screen" operation
not the "Programming by remote conlrol" operation.
recording" section:
you
can select E-l\.4O-SU on the remote
(in
step 6), if
Monday through Sunday
you
want to record a
(N.4ONtSUN)
TO
please
IMPORTANTE
DI
SEGUITO
DEL
VOSTRO MANUALE DELL'OPERATORE
Nella sezione
Anche se
del
lelecomando
programma
la funzione
televisivo" e non la funzione
il telecomando".
E' RIPORTATA
"Registrazione
possibile
d
da Lunedi a Domenica (MONtSUN),
selezionare
(punto
6), se
"Programmazione usando
UNA CORREZIONE
attivata
con il timer":
E-MO-SU suldisplay
volete registrars
lo schermo
"Programmazione
LCD
un
utilizzale
usando
IMPORTANT
VOICI UNE MODIFICATION APPORTEE
A VOTRE MODE
Dans
M6me si vous
LC
chapitre
le
de la
16l6commande
"Enregistrement par
pouvez
s6lectionner
(dans
enregistrer une 6mission du
([,4ONtSUN),
veuillez utiliser l'op6ration
utilisant l'6cran du t616viseur" et
"Programmalion
e
I'aide
D'EMPLOI
minuterie":
E-MO-SU sur l'atfichage
point
la
6),
si vous voulez
Lundi
au
"Programmalion
Dimanche
Das I'oo'iralion
de la t6l6commande".
UNIQUEMENT SEG
Dans le chapitre
MAme
l'affichage
vous voulez enregistrer
si vous
Dimanche
"Programmalion
I'op6ration
t6l6commande".
"Enregistrement par
pouvez
de la t6l6commande (dans
LC
(LUt
s6lectionner C-LU-Dl sur
6mission
une
veuillez
Dl),
via l'6cran
de
"Programmalion
minuterie":
point
la
6), si
du Lundi au
utiliser I'op6ration
t6l6vision" et
d
l'aide de la
pas
BELANGRIJK
WAT VOLGT
IN UW HANDLEIDING
ln het hoofdstuk
Hoewel
kristalle ndisp lay van de afstandsbediening (in
wanneer u een
m
TV-beeld" te
de alstandsbediening".
het mogelijk
zondag
SEHEN SIE
"Timeropname":
programma
(MON.'SUN),
gebruiken
DIE NACHFOLGENDE ANDERUNG
ZU IHRER BEDIENUNGSAN LEITU
lm Abschnitt
"Timer-Auf
Obwohl Sie E-l\,4O-SU auf dem LC-Display des
Fernbedienung anwdhlen konnen
Sie bei der Aufnahme eines Programmes von Monlag bis
Sonnlag
(MON+SUN),
mit dem Fernse hbildsch irm" und nicht den Betrieb
"Programmieren
IS EEN WIJZIGING
is
E-l'/O-SU te kiezen op de vloeibare
dient
in
wil
opnemen
"Programmeren
u
plaats
van
van
maandag t/
"Programmeren via
WICHTIG
nahme":
(in
Schritt 6), wenden
bitte den Betrieb
mit der Fernbedienung"
"Programmieren
an.
stap 6)
via het
NG
IMPORTANTE
LA
SIGUIENTE ES
MANUAL
SU
En la secci6n
Aun cuando usled
visualizador LC de la unidad de control
6), si desea
(MONISUN),
"Programaci6n a lrav6s de
procedimiento
unidad de control
"Grabaci6n
puede
grabar
un
signa el
descrilo en
procedimi€nto
remolo".
RECTIFICACIoN
UNA
DE INSTRUCCIONES
con temporizador":
seleccionar E-MO-SU
programa
"Programaci6n
de lunes a domingo
descrito en la secci6n
pantalla
la
VIKTIGT
BBUKSANVISN
I avsnitlet
FastAn det ar
MO-SU
mendag till och med sdndag
anvisningarna i avsnittet
"Timerinspelning":
mdjligt att via fjarrkontrollens
(i
sleg 6), om du vill spela
skermen" och inte avsnittet
fjarrkontrollen".
INGEN HAR ANDRATS
ENLIGT FOJANDE
(MON)SUN),
"Timerprogrammering
"Programmering
TARKEAA
ALLA
"Ajastinnauhoiius"
Vaikka voitkin valita
(vaiheessa
sunnunlaihin
6),
ohielmointi TV-kuvaruudun
"Ohjelmointi
MUUTOS
ON
kohdassa:
E-N4O-SU kaukoseetimen
jos
haluat nauhoittaa ohjelman
(l,4ONtSUN),
KAYTTOHJEISIIN
kayta
"Aiastinnauhoituksen
avulla" toimntaa,
kaukoseatimen avulla" toimintaa.
remoto
de TV",
a trav6s
display valja E-
programmet
in
mAste du
maanantaista
DE
en la
(en
el
Daso
y
no el
de la
frAn
liilja
via TV-
via
LC-neytdlle
ei
v11 8289540
4291 63J
94't030
APC
Printed
in Japan
 Loading...