

AJA io HD installation Guide

www.aja.com
Installation and Operation
Guide
Because it matters.
Published: 5/4/11

ii
Trademarks
®
AJA
, KONA
™
Io
are trademarks of AJA Video, Inc.
Apple, the Apple logo, AppleShare, AppleTalk, FireWire and Macintosh are registered trademarks
of Apple Computer, Inc. Final Cut Pro, QuickTime and the QuickTime Logo are trademarks of
Apple Computer, Inc. TASCAM is a registered trademark of TEAC Corporation.
All other trademarks are the property of their respective holders.
Notice
Copyright © 2011 AJA Video, Inc. All rights reserved. All information in this manual is subject to
change without notice. No part of the document may be reproduced or transmitted in any form,
or by any means, electronic or mechanical, including photocopying or recording, without the
express written permission of AJA Inc.
FCC Emission Information
This equipment has been tested and found to comply with the limits for a Class A digital device,
pursuant to Part 15 of the FCC Rules. These limits are designed to provide reasonable protection
against harmful interference when the equipment is operated in a commercial environment. This
equipment generates, uses and can radiate radio frequency energy and, if not installed and used in
accordance with the instruction manual, may cause harmful interference to radio
communications. Operation of this equipment in a residential area is likely to cause harmful
interference in which case the user will be required to correct the interference at his own expense.
Changes or modifications not expressly approved by AJA Video can effect emission compliance
and could void the user’s authority to operate this equipment.
®
, Ki Pro® and XENA
®
are registered trademarks of AJA Video, Inc. Io HD
™
and
Contacting Support
To contact AJA Video for sales or support, use any of the following methods:
180 Litton Drive, Grass Valley, CA. 95945 USA
Telephone: +1.800.251.4224 or +1.530.274.2048
Fax: +1.530.274.9442
Web: http://www.aja.com
Support Email: support@aja.com
Sales Email: sales@aja.com
When calling for support, first read the Chapter on Troubleshooting at the back of this manual. You
can often save time and effort by looking there first for simple remedies and information on how
to get support from AJA and Apple Computer Inc.

Limited Warranty
Io HD Installation and Operation Manual — Limited Warranty
AJA Video warrants that this product will be free from defects in materials and workmanship
for a period of three years from the date of purchase. If a product proves to be defective during
this warranty period, AJA Video, at its option, will either repair the defective product without
charge for parts and labor, or will provide a replacement in exchange for the defective product.
In order to obtain service under this warranty, you the Customer, must notify AJA Video of
the defect before the expiration of the warranty period and make suitable arrangements for the
performance of service. The Customer shall be responsible for packaging and shipping the
defective product to a designated service center nominated by AJA Video, with shipping
charges prepaid. AJA Video shall pay for the return of the product to the Customer if the
shipment is to a location within the country in which the AJA Video service center is located.
Customer shall be responsible for paying all shipping charges, insurance, duties, taxes, and
any other charges for products returned to any other locations.
This warranty shall not apply to any defect, failure or damage caused by improper use or
improper or inadequate maintenance and care. AJA Video shall not be obligated to furnish
service under this warranty a) to repair damage resulting from attempts by personnel other
than AJA Video representatives to install, repair or service the product, b) to repair damage
resulting from improper use or connection to incompatible equipment, c) to repair any
damage or malfunction caused by the use of non-AJA Video parts or supplies, or d) to service
a product that has been modified or integrated with other products when the effect of such a
modification or integration increases the time or difficulty of servicing the product.
THIS WARRANTY IS GIVEN BY AJA VIDEO IN LIEU OF ANY OTHER
WARRANTIES, EXPRESS OR IMPLIED. AJA VIDEO AND ITS VENDORS
DISCLAIM ANY IMPLIED WARRANTIES OF MERCHANTABILITY OR FITNESS
FOR A PARTICULAR PURPOSE. AJA VIDEO’S RESPONSIBILITY TO REPAIR OR
REPLACE DEFECTIVE PRODUCTS IS THE WHOLE AND EXCLUSIVE REMEDY
PROVIDED TO THE CUSTOMER FOR ANY INDIRECT, SPECIAL, INCIDENTAL
OR CONSEQUENTIAL DAMAGES IRRESPECTIVE OF WHETHER AJA VIDEO OR
THE VENDOR HAS ADVANCE NOTICE OF THE POSSIBILITY OF SUCH
DAMAGES.
1
iii
Important Safety Information
Warning!
This symbol, when used in the manual, indicates a serious risk or threat to
personal safety.
Caution!
This symbol, when used in the manual, indicates important safety and
compliance information.

iv

Io HD Installation and Operation Manual — Table of Contents
Table of Contents
Trademarks . . . . . . . . . . . . . . . . . . . . . . . . . . . . . . . . . . . . . . . . . . . . . . . . . . . . . . . . . . . . . . . . . . . ii
Notice . . . . . . . . . . . . . . . . . . . . . . . . . . . . . . . . . . . . . . . . . . . . . . . . . . . . . . . . . . . . . . . . . . . . . . . ii
FCC Emission Information . . . . . . . . . . . . . . . . . . . . . . . . . . . . . . . . . . . . . . . . . . . . . . . . . . . . . . . ii
Contacting Support . . . . . . . . . . . . . . . . . . . . . . . . . . . . . . . . . . . . . . . . . . . . . . . . . . . . . . . . . . . . . ii
Limited Warranty . . . . . . . . . . . . . . . . . . . . . . . . . . . . . . . . . . . . . . . . . . . . . . . . . . . . . . . . . . . . . iii
Important Safety Information . . . . . . . . . . . . . . . . . . . . . . . . . . . . . . . . . . . . . . . . . . . . . . . . . . . . iii
Table of Contents . . . . . . . . . . . . . . . . . . . . . . . . . . . . . . . . . . . . . . . . . . . . . . . . . . . . . . . . . . . . . . 1
1
Chapter 1: Introduction
Overview . . . . . . . . . . . . . . . . . . . . . . . . . . . . . . . . . . . . . . . . . . . . . . . . . . . . . . . . . . . . . . . . . . . . . 1
Features . . . . . . . . . . . . . . . . . . . . . . . . . . . . . . . . . . . . . . . . . . . . . . . . . . . . . . . . . . . . . . . . . . . . . . 2
Hardware . . . . . . . . . . . . . . . . . . . . . . . . . . . . . . . . . . . . . . . . . . . . . . . . . . . . . . . . . . . . . . . . . 2
Broadcast-Quality Conversion . . . . . . . . . . . . . . . . . . . . . . . . . . . . . . . . . . . . . . . . . . . . . . 3
Stand Alone Mode . . . . . . . . . . . . . . . . . . . . . . . . . . . . . . . . . . . . . . . . . . . . . . . . . . . . . . . 3
Software . . . . . . . . . . . . . . . . . . . . . . . . . . . . . . . . . . . . . . . . . . . . . . . . . . . . . . . . . . . . . . . . . . 3
What’s In The Box? . . . . . . . . . . . . . . . . . . . . . . . . . . . . . . . . . . . . . . . . . . . . . . . . . . . . . . . . . . . . 4
System Requirements . . . . . . . . . . . . . . . . . . . . . . . . . . . . . . . . . . . . . . . . . . . . . . . . . . . . . . . . . . . 5
Recommended System and Software Requirements . . . . . . . . . . . . . . . . . . . . . . . . . . . . . . . . . 5
Understanding Disk Storage Methods . . . . . . . . . . . . . . . . . . . . . . . . . . . . . . . . . . . . . . . . . . . 6
About RAIDs . . . . . . . . . . . . . . . . . . . . . . . . . . . . . . . . . . . . . . . . . . . . . . . . . . . . . . . . . . . 6
Software For Striping . . . . . . . . . . . . . . . . . . . . . . . . . . . . . . . . . . . . . . . . . . . . . . . . . . . . . 7
Xserve RAID . . . . . . . . . . . . . . . . . . . . . . . . . . . . . . . . . . . . . . . . . . . . . . . . . . . . . . . . . . . . 7
Storage capacity . . . . . . . . . . . . . . . . . . . . . . . . . . . . . . . . . . . . . . . . . . . . . . . . . . . . . . . . . . 7
In This Manual . . . . . . . . . . . . . . . . . . . . . . . . . . . . . . . . . . . . . . . . . . . . . . . . . . . . . . . . . . . . . . . . 8
1
Chapter 2: Controls and Indicators
Controls and Indicators . . . . . . . . . . . . . . . . . . . . . . . . . . . . . . . . . . . . . . . . . . . . . . . . . . . . . . . . . . 9
Front Panel . . . . . . . . . . . . . . . . . . . . . . . . . . . . . . . . . . . . . . . . . . . . . . . . . . . . . . . . . . . . . . . . . . 10
Alphanumeric and Graphics Display . . . . . . . . . . . . . . . . . . . . . . . . . . . . . . . . . . . . . . . . . . . 10
LED Indicator Descriptions . . . . . . . . . . . . . . . . . . . . . . . . . . . . . . . . . . . . . . . . . . . . . . . . . . 11
Power and Status LED Indicators . . . . . . . . . . . . . . . . . . . . . . . . . . . . . . . . . . . . . . . . . . . 11
Audio VU LED Indicators . . . . . . . . . . . . . . . . . . . . . . . . . . . . . . . . . . . . . . . . . . . . . . . . 12
Rear Panel . . . . . . . . . . . . . . . . . . . . . . . . . . . . . . . . . . . . . . . . . . . . . . . . . . . . . . . . . . . . . . . . . . . 12
About Inputs and Outputs . . . . . . . . . . . . . . . . . . . . . . . . . . . . . . . . . . . . . . . . . . . . . . . . . . . 12
About BNC Connectors . . . . . . . . . . . . . . . . . . . . . . . . . . . . . . . . . . . . . . . . . . . . . . . . . . . . 13
Connectors . . . . . . . . . . . . . . . . . . . . . . . . . . . . . . . . . . . . . . . . . . . . . . . . . . . . . . . . . . . . . . 13
Connector Descriptions . . . . . . . . . . . . . . . . . . . . . . . . . . . . . . . . . . . . . . . . . . . . . . . . . . . . . 14
LTC Timecode Input And Output . . . . . . . . . . . . . . . . . . . . . . . . . . . . . . . . . . . . . . . . . . 14
SDI Input and Outputs . . . . . . . . . . . . . . . . . . . . . . . . . . . . . . . . . . . . . . . . . . . . . . . . . . . 14
Component YPbPr . . . . . . . . . . . . . . . . . . . . . . . . . . . . . . . . . . . . . . . . . . . . . . . . . . . . . . 14
S-Video (Y/C) . . . . . . . . . . . . . . . . . . . . . . . . . . . . . . . . . . . . . . . . . . . . . . . . . . . . . . . . . . 15
Composite NTSC/PAL . . . . . . . . . . . . . . . . . . . . . . . . . . . . . . . . . . . . . . . . . . . . . . . . . . . 15
Reference Video (looping) . . . . . . . . . . . . . . . . . . . . . . . . . . . . . . . . . . . . . . . . . . . . . . . . . 15

2
HDMI . . . . . . . . . . . . . . . . . . . . . . . . . . . . . . . . . . . . . . . . . . . . . . . . . . . . . . . . . . . . . . . .15
8 Channel AES/EBU Digital Audio Inputs And Outputs . . . . . . . . . . . . . . . . . . . . . . . . .16
Analog 4 Channel Balanced Audio Inputs and Outputs . . . . . . . . . . . . . . . . . . . . . . . . . . .16
Analog 2 Channel Unbalanced Audio Output . . . . . . . . . . . . . . . . . . . . . . . . . . . . . . . . . .16
RS422 Machine Control . . . . . . . . . . . . . . . . . . . . . . . . . . . . . . . . . . . . . . . . . . . . . . . . . .16
FireWire . . . . . . . . . . . . . . . . . . . . . . . . . . . . . . . . . . . . . . . . . . . . . . . . . . . . . . . . . . . . . . .16
AC Power . . . . . . . . . . . . . . . . . . . . . . . . . . . . . . . . . . . . . . . . . . . . . . . . . . . . . . . . . . . . . .16
Chapter 3: Getting Started
Io HD And Your Workflow . . . . . . . . . . . . . . . . . . . . . . . . . . . . . . . . . . . . . . . . . . . . . . . . . . . . . .17
Understanding Typical Workflows . . . . . . . . . . . . . . . . . . . . . . . . . . . . . . . . . . . . . . . . . . . . . . . . .18
DV/DV25 (SD) . . . . . . . . . . . . . . . . . . . . . . . . . . . . . . . . . . . . . . . . . . . . . . . . . . . . . . . . . . .19
DV50 (SD) . . . . . . . . . . . . . . . . . . . . . . . . . . . . . . . . . . . . . . . . . . . . . . . . . . . . . . . . . . . . . . .19
Uncompressed 8-bit 4:2:2 (SD) . . . . . . . . . . . . . . . . . . . . . . . . . . . . . . . . . . . . . . . . . . . . . . .19
Uncompressed 10-bit 4:2:2 (SD) . . . . . . . . . . . . . . . . . . . . . . . . . . . . . . . . . . . . . . . . . . . . . .20
DVCPRO HD . . . . . . . . . . . . . . . . . . . . . . . . . . . . . . . . . . . . . . . . . . . . . . . . . . . . . . . . . . . .20
Apple ProRes 422 and Apple ProRes 422 HQ (SD or HD) . . . . . . . . . . . . . . . . . . . . . . . . . .20
Workflow General Notes . . . . . . . . . . . . . . . . . . . . . . . . . . . . . . . . . . . . . . . . . . . . . . . . . . . . . . . .21
Mixing and Matching Formats in Final Cut . . . . . . . . . . . . . . . . . . . . . . . . . . . . . . . . . . . . . . . . . .21
Chapter 4: Installation and Configuration
Installation Overview . . . . . . . . . . . . . . . . . . . . . . . . . . . . . . . . . . . . . . . . . . . . . . . . . . . . . . . . . . .23
Unpacking . . . . . . . . . . . . . . . . . . . . . . . . . . . . . . . . . . . . . . . . . . . . . . . . . . . . . . . . . . . . . . . . . . .24
Shipping Box Contents . . . . . . . . . . . . . . . . . . . . . . . . . . . . . . . . . . . . . . . . . . . . . . . . . . . . . .24
Installing Io HD Software . . . . . . . . . . . . . . . . . . . . . . . . . . . . . . . . . . . . . . . . . . . . . . . . . . . . . . .24
Software Installation Procedure . . . . . . . . . . . . . . . . . . . . . . . . . . . . . . . . . . . . . . . . . . . . . . . .25
Io HD Chassis Placement . . . . . . . . . . . . . . . . . . . . . . . . . . . . . . . . . . . . . . . . . . . . . . . . . . . . . . .29
Cabling the System . . . . . . . . . . . . . . . . . . . . . . . . . . . . . . . . . . . . . . . . . . . . . . . . . . . . . . . . . . . .30
Where to Place Io HD . . . . . . . . . . . . . . . . . . . . . . . . . . . . . . . . . . . . . . . . . . . . . . . . . . . . . .30
System Video/Audio Cable Connections . . . . . . . . . . . . . . . . . . . . . . . . . . . . . . . . . . . . . . . . . . . .30
Typical Digital System . . . . . . . . . . . . . . . . . . . . . . . . . . . . . . . . . . . . . . . . . . . . . . . . . . . .30
Typical Analog System . . . . . . . . . . . . . . . . . . . . . . . . . . . . . . . . . . . . . . . . . . . . . . . . . . . .32
Genlock and Your System . . . . . . . . . . . . . . . . . . . . . . . . . . . . . . . . . . . . . . . . . . . . . . . . . . . . . . .33
Understanding Io HD and FireWire 800 . . . . . . . . . . . . . . . . . . . . . . . . . . . . . . . . . . . . . . . . . . . .33
Using 8-bit Versus 10-bit Video in Standard Definition . . . . . . . . . . . . . . . . . . . . . . . . . . . . . . . .34
Chapter 5: Using the System with Final Cut Pro
Final Cut Pro . . . . . . . . . . . . . . . . . . . . . . . . . . . . . . . . . . . . . . . . . . . . . . . . . . . . . . . . . . . . . . . . .35
Using The AJA Control Panel . . . . . . . . . . . . . . . . . . . . . . . . . . . . . . . . . . . . . . . . . . . . . . . . . . . .35
Control Panel Basics . . . . . . . . . . . . . . . . . . . . . . . . . . . . . . . . . . . . . . . . . . . . . . . . . . . . . . . .36
Input Tab Screen . . . . . . . . . . . . . . . . . . . . . . . . . . . . . . . . . . . . . . . . . . . . . . . . . . . . . . . . . .40
Input Tab Screen Settings . . . . . . . . . . . . . . . . . . . . . . . . . . . . . . . . . . . . . . . . . . . . . . . . .40
Formats Tab Screen . . . . . . . . . . . . . . . . . . . . . . . . . . . . . . . . . . . . . . . . . . . . . . . . . . . . . . . .41
Format Tab Screen Settings . . . . . . . . . . . . . . . . . . . . . . . . . . . . . . . . . . . . . . . . . . . . . . . .42
Digital Out Tab Screen . . . . . . . . . . . . . . . . . . . . . . . . . . . . . . . . . . . . . . . . . . . . . . . . . . . . . .45

Io HD Installation and Operation Manual — Table of Contents
Digital Out Tab Screen Settings . . . . . . . . . . . . . . . . . . . . . . . . . . . . . . . . . . . . . . . . . . . . 46
Analog Out Tab Screen . . . . . . . . . . . . . . . . . . . . . . . . . . . . . . . . . . . . . . . . . . . . . . . . . . . . . 46
Analog Out Tab Screen Settings . . . . . . . . . . . . . . . . . . . . . . . . . . . . . . . . . . . . . . . . . . . . 47
HDMI Tab Screen . . . . . . . . . . . . . . . . . . . . . . . . . . . . . . . . . . . . . . . . . . . . . . . . . . . . . . . . . 47
HDMI Tab Screen Settings . . . . . . . . . . . . . . . . . . . . . . . . . . . . . . . . . . . . . . . . . . . . . . . . 48
Control Tab Screen . . . . . . . . . . . . . . . . . . . . . . . . . . . . . . . . . . . . . . . . . . . . . . . . . . . . . . . . 48
Control Tab Screen Settings . . . . . . . . . . . . . . . . . . . . . . . . . . . . . . . . . . . . . . . . . . . . . . . 49
Setup Tab Screen . . . . . . . . . . . . . . . . . . . . . . . . . . . . . . . . . . . . . . . . . . . . . . . . . . . . . . . . . . 52
Setup Tab Screen Settings . . . . . . . . . . . . . . . . . . . . . . . . . . . . . . . . . . . . . . . . . . . . . . . . . 53
Codec Tab Screen . . . . . . . . . . . . . . . . . . . . . . . . . . . . . . . . . . . . . . . . . . . . . . . . . . . . . . . . . 54
Codec Tab Screen Settings . . . . . . . . . . . . . . . . . . . . . . . . . . . . . . . . . . . . . . . . . . . . . . . . 55
Timecode Tab Screen . . . . . . . . . . . . . . . . . . . . . . . . . . . . . . . . . . . . . . . . . . . . . . . . . . . . . . 55
1
Timecode Tab Screen Settings . . . . . . . . . . . . . . . . . . . . . . . . . . . . . . . . . . . . . . . . . . . . . 56
Timelapse Tab Screen . . . . . . . . . . . . . . . . . . . . . . . . . . . . . . . . . . . . . . . . . . . . . . . . . . . . . . 57
Info Tab Screen . . . . . . . . . . . . . . . . . . . . . . . . . . . . . . . . . . . . . . . . . . . . . . . . . . . . . . . . . . . 58
Saving Your Control Panel Presets . . . . . . . . . . . . . . . . . . . . . . . . . . . . . . . . . . . . . . . . . . . . . 59
Who is Controlling Io HD? . . . . . . . . . . . . . . . . . . . . . . . . . . . . . . . . . . . . . . . . . . . . . . . . . . 59
QuickTime Application—1st Priority . . . . . . . . . . . . . . . . . . . . . . . . . . . . . . . . . . . . . . . . 59
AJA Control Panel—2nd Priority . . . . . . . . . . . . . . . . . . . . . . . . . . . . . . . . . . . . . . . . . . . 60
Control Recommendations . . . . . . . . . . . . . . . . . . . . . . . . . . . . . . . . . . . . . . . . . . . . . . . . 61
Using Multiple AJA Products . . . . . . . . . . . . . . . . . . . . . . . . . . . . . . . . . . . . . . . . . . . . . . . . . . . . 61
Easy Setups for Typical Uses . . . . . . . . . . . . . . . . . . . . . . . . . . . . . . . . . . . . . . . . . . . . . . . . . . . . . 61
Easy Setups Menu . . . . . . . . . . . . . . . . . . . . . . . . . . . . . . . . . . . . . . . . . . . . . . . . . . . . . . . . . 62
Easy Setups For Use With Io HD . . . . . . . . . . . . . . . . . . . . . . . . . . . . . . . . . . . . . . . . . . . 63
Audio/Video Settings Menu . . . . . . . . . . . . . . . . . . . . . . . . . . . . . . . . . . . . . . . . . . . . . . . . . . 65
To Create A New Easy Setup . . . . . . . . . . . . . . . . . . . . . . . . . . . . . . . . . . . . . . . . . . . . . . 66
The Sequence Presets Window . . . . . . . . . . . . . . . . . . . . . . . . . . . . . . . . . . . . . . . . . . . . . 68
Checking the System with a Simple Test Project of Bars and Tone . . . . . . . . . . . . . . . . . . . . . . . . 73
3
Chapter 6: Troubleshooting
If You Run Into Problems . . . . . . . . . . . . . . . . . . . . . . . . . . . . . . . . . . . . . . . . . . . . . . . . . . . . . . . 77
Updating Software . . . . . . . . . . . . . . . . . . . . . . . . . . . . . . . . . . . . . . . . . . . . . . . . . . . . . . . . . . . . 79
Support . . . . . . . . . . . . . . . . . . . . . . . . . . . . . . . . . . . . . . . . . . . . . . . . . . . . . . . . . . . . . . . . . . . . . 79
Apple Resources . . . . . . . . . . . . . . . . . . . . . . . . . . . . . . . . . . . . . . . . . . . . . . . . . . . . . . . . . . . 79
Index
Appendix A: Specifications
Appendix B: Safety and Compliance

4
Chapter 1:
Introduction
Overview
AJA's Io HD is an easy to use, transportable, plug-in solution for working with HD
and SD in Final Cut Studio 2 or newer. Connecting to a Mac Pro or MacBook Pro
with a single FireWire 800 connection, Io HD uniquely supports the amazing new
Apple ProRes 422 Codecs natively, in hardware, to bring production-quality HD
editing to the desktop. Io HD is the only device in the world that supports Apple’s
ProRes 422 in hardware, enabling true 10-bit video editing in Final Cut Studio 2—
all in full-raster and at 4:2:2 quality.
Like other members of the Io family, Io HD offers unparalleled video and audio
connectivity. Within its portable and rugged form factor, Io HD offers SD/HD
analog I/O, SD/HD digital I/O including HD-SDI and HDMI, balanced analog
and digital AES audio, as well as RS-422, genlock, and even LTC timecode
connections. Io HD also includes AJA’s realtime hardware 10-bit up/down/cross
conversion.
Io HD allows a Mac Pro or MacBook Pro to be configured as a professional editing
suite, corporate/industrial video center, or high-powered desktop video setup—or
just about anything in between. Both analog and digital sources are offered,
allowing connection to just about every kind of video/audio peripheral from the
most current digital decks to older legacy devices.
1
1
1

2
Features
Io HD does all of this with unique simplicity, using a single FireWire connection
between it and the Mac—while serving simultaneous realtime connection for all
audio and video sources. How does Io HD transfer 10-bit full-raster HD video/
audio over FireWire? It efficiently uses the IEEE 1394b 800Mbps FireWire port
on the Mac for all data transfer—and since Apple ProRes 422 is optimized for 145
Mbps (normal quality) and 220 Mbps (high quality, HQ) there is plenty of
bandwidth. Only Io HD can do this since it has the Apple ProRes 422 codec
implemented in hardware inside the box, allowing incoming media to be made
smaller before it’s transmitted over the FireWire connection to the Mac. Standard
definition video is also easily transmitted by Io HD, since uncompressed 10-bit is
only 270Mbps, so FireWire 800 can easily handle its bandwidth.
The Io HD product offers a large number of unique features for connectivity,
control, and ease of installation in any environment.
Hardware
Apple ProRes 422, Apple ProRes 422 HQ Codec (including LT and Proxy
•
versions)—SD, HD 720/1080, full-raster 10 bit 4:2:2, realtime, implemented
in hardware
•
Up/down/cross-conversion, 10-bit, realtime, implemented in hardware
•
SD-SDI and HD-SDI I/O (2)
•
Component I/O (SD and HD)
Composite and S-video I/O
•
HDMI video with 8-channel audio I/O
•
Embedded SDI 8-channel audio I/O
•
AES/EBU 8-channel unbalanced audio I/O
•
Analog 4-channel balanced audio I/O (XLR)
•
Analog 2-channel unbalanced audio output (RCA)
•
Reference Video/Genlock with loop through
•
RS-422 machine control
•
•
LTC Timecode I/O
•
Connects to Mac via a single FireWire 800 cable (cables supplied)
•
All outputs are active—all the time.
Stand Alone Mode—use as a converter without a computer attached
•
Chassis styling compliments Apple’s Mac Pro computers for a stylish desktop
•
video suite appearance.
•
Front Panel LED Status Indicators: Power On/Off, FireWire (active/
inactive), Ref (Genlock), Video (detected at selected input).

Io HD Installation and Operation Manual — Features
•
Front Panel Audio VU LEDs: 8-channels (green/orange/red showing
normal, over-limit, and clipping).
•
Front Panel Alphanumeric display: shows input and output settings and
other system information and alerts.
3-year International Warranty, with unlimited Technical Support.
•
Broadcast-Quality Conversion
Io HD features hardware based full 10 bit broadcast quality motion adaptive SD
to HD upconversion, HD to SD downconversion and HD to HD
crossconversion. The quality of the conversion features found in the Io HD is
1
virtually identical to AJA's award winning KONA 3 and stand-alone converter
products used throughout the video industry. The built-in upconverter uses a
full 10 bit path, fully motion adaptive de-interlacing, and large multi-point
digital interpolators. Downconversion uses large multi-point digital
interpolators, anti-alias filtering and interpolation.
High-quality hardware-based crossconversion provides the capability to
streamline dailies and offer realtime broadcast picture quality. Because these
functions are in the Io HD hardware, they are available full time, all the time—
with no CPU load. Such conversions are useful for cost effective monitoring,
making standard definition dubs of an HD project, or upconverting from a
standard definition Final Cut Pro project to an HD deliverable.
3
Software
Stand Alone Mode
While connected to the Mac, Io HD can be configured for a set of parameters
and then disconnected from the Mac for use by itself as a stand-alone converter.
An example would be using the Io HD in Stand Alone Mode as an SD to HD
upconverter.
To use the Io HD in this way, select the Io HD Stand Alone Mode from the
Control tab of the Control Panel application (see Chapter 5, Control Tab Screen ).
After configuring the Io HD parameters as desired, click the Burn... button.
After doing so, there will be a short time to complete the internal process—and
then you may power down and disconnect the Io HD. From this point, the Io
HD is a stand alone converter and will retain the parameters selected when it is
powered back on. The Io HD remains in Stand Alone Mode until it is once
again connected to a Mac via FireWire. Turning it ON and OFF will not take it
out of Stand Alone Mode until is connected again to a Mac via FireWire.
Note: The AJA Io HD can also be used as a converter device while it is
connected to a host computer if the Default Video Output in the Control tab of
the Control Panel application is set to Input Passthrough .
AJA’s Io HD was codeveloped with Apple for use with Final Cut Studio on Mac
OS X for powerful SD and HD video/audio capture, editing, and video
production—all in a single integrated system. Io HD runs on an AJA-built
driver, similar to the AJA KONA driver, which provides features such as Core
Audio support and very low latency capture and playback.
4
What’s In The Box?
The Io HD driver also provides RGB support, allowing for direct video output of
applications such as Adobe After Effects,™ and Apple Motion™ to name a few.
To make Io HD even more useful, we’ve included a number of AJA utility
applications: AJA TV, AJA System Test, AJA Data Rate Calculator, AJA
QTtoDPXtranslator, and AJA DPXtoQTtranslator.
Note: These utilities are also available for free download at www.aja.com/html/
support_iohd_swd.html as well as being part of the Io HD installer.
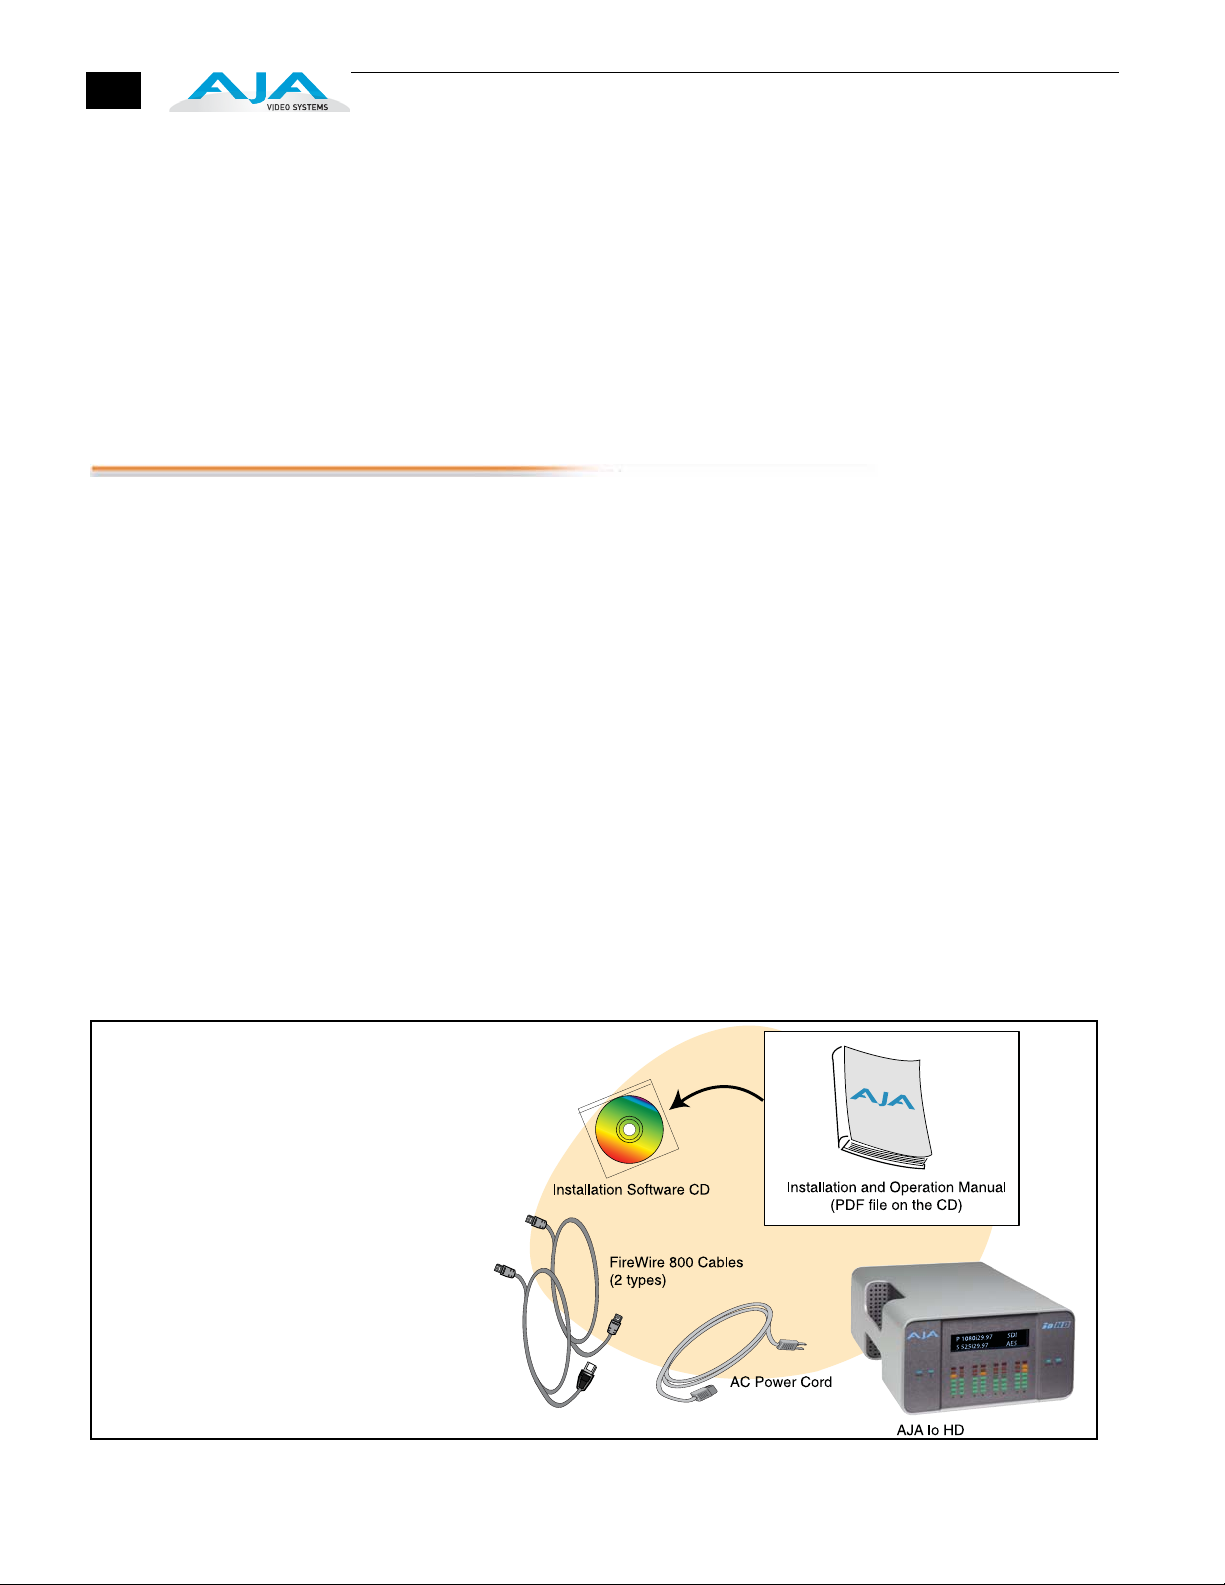
When you unpack your AJA Io HD, you’ll find the following components:
•
AJA Io HD Installation Software CD-Rom—this CD contains the software
installer to place drivers on an Apple Mac Pro or MacBook Pro for use with
Final Cut Studio 2. Install the software as discussed in this manual in Chapter
4: Installation and Configuration. The CD also contains a wide variety of
useful information, including this manual you’re reading (PDF format).
•
Io HD chassis
•
AC Power cord.
•
2 FireWire cables. Either cable can be used to connect an Io HD and a Mac
Pro or Mac Book Pro. Both are FireWire 800 cables, one with a FW800
connector on one end and a FW400 on the other, and the other having
FW800 connectors on both ends.
•
Read Me First note and any Late-breaking News and/or errata (where
applicable, AJA may include additional bulletins related to your product and
software).
Io HD Shipping Box Contents

Please save the Io HD shipping box and all packaging materials. If you ever require
service or want to move your system—use the packaging materials and box for safe
shipment.
System Requirements
AJA Video recommends that your system meet minimum hardware and software
requirements to achieve a satisfactory level of performance. Here, we provide
minimum and recommended requirements and then discuss disk storage issues that
should be understood for proper system configuration.
Recommended
System and
Software
Requirements
The following table outlines the system hardware and software needed.
Io HD Installation and Operation Manual — System Requirements
1
Item Recommended
Recommended Software: FCP 7.0.x - KONA driver version 9.0.1 (Snow Leopard and
Leopard OS compatible version)
FCP 7.0.x - KONA driver version 7.5.1 (Snow Leopard and
Leopard OS compatible version)
FCP 7.0.x - KONA driver version 7.1 (Snow Leopard and
Leopard OS compatible version)
FCP 7.0.x - KONA driver version 7.0 (Snow Leopard and
Leopard OS compatible version)
FCP 7.0.x - KONA driver version 6.5 (Leopard OS
compatible version)
FCP 6.0.x - KONA driver version 6.0.3 (Leopard and Tiger
OS compatible version)
5
Macintosh configurations
supported:
Internal Storage (SATA inside
Mac):
MacPro 2.8GHz (MA970LL/A) or 3.0GHz or 3.2GHz build to
orders
2GB or more of RAM
MacPro 2.66GHz (MA356LL/A) or 2.0GHz or 3.0GHz build
to orders
2GB or more RAM
MacPro 2.66Ghz 8 core (MA356LL/A) or 2.0GHz or 3.0GHz
build to orders
2GB or more RAM
MacBook Pro
2GB or more of RAM
ExpressCard/34 FireWire 800 card or
ExpressCard/34 Sata Controller
Power Mac G5 Quad 2.5GHz (M9592LL/A)
2GB or more RAM
Note:
unlisted Macintosh G5 configurations may not provide
the full functionality or features that the Io HD in combination
with the listed configurations (in this table) can provide.
Intel XServe Quad 2.0Ghz (MA409LL/A)
2GB or more of RAM
Desktop configurations only.
External Storage:
Note:
see Storage Methods
topic that follows later in this
Chapter
Ideally a RAID configuration with Fibre Channel or SCSI
connection to the Mac via qualified host bus adapter

6
Understanding
Disk Storage
Methods
The Io HD with an Apple Mac Pro or Apple MacBook Pro and Final Cut Pro 6,
along with a suitable storage system, offer an unprecedented level of features and
performance for all audio/video production applications. However, to ensure
performance and quality, the disk storage system used with the Mac Pro or
MacBook Pro must be able to meet the demands of storing realtime uncompressed
SD media and ProRes 422 HD media. There are a variety of system configurations
and peripherals that can provide this level of performance.
For uncompressed SD, AJA recommends that at a minimum, the disk storage
system must be able to provide and maintain a consistent 50 MB/sec transfer rate
from the Apple computer to disk (read/write). There are a variety of system
configurations and peripherals that can provide this level of performance.
For Apple ProRes 422, AJA recommends that at a minimum, the disk storage
system must be able to provide and maintain a consistent 40 MB/sec transfer rate
from the Apple computer to disk (read/write) for normal quality. For HQ quality
Apple ProRes 422, we recommend at least a 50 MB/sec transfer rate. There are a
variety of system configurations and peripherals that can provide these levels of
performance.
Io HD users wishing to configure storage for a system should also be aware that raw
benchmark numbers alone do not necessarily reflect the performance of a drive
solution. Other factors, such as drive seek time and controller cache can also affect
performance.
FireWire drive solutions are not supported in use with AJA Io HD when plugged
into the same system bus. Since Io HD connects to the host Mac Pro or MacBook
Pro via FireWire 800 and uses the FireWire bus bandwidth extensively, that same
Apple system bus cannot also be used for storage—at the same time. You can
however attach and use FireWire drives on the computer whenever the Io HD is not
powered or attached to the system. To use FireWire storage and the Io HD at the
same time, you can add a FireWire HBA (host bus adapter) card to the computer
(or ExpressCard/34 FireWire card if using a MacBook Pro) and then connect
storage drives to this separate FireWire bus.
About RAIDs
Redundant Array of Independent Disks, or RAID, is a group of hard drives that
appears to the host Mac as a single high-speed storage unit. RAID systems enable
you to increase storage capacity and get the performance, reliability, and data
protection needed for video production that is not possible when using a single hard
drive. RAID drives inside the array operate simultaneously, increasing overall
throughput. RAID technology is comprised of these techniques (some or all):
•
Striping data across multiple drives for storage performance (RAID 0).
•
Mirroring for redundancy (RAID 1).
•
Parity for data protection (RAID 5 [plus other types]).
Most RAID configurations, or RAID levels, combine these to provide a balance of
protection and performance.

Io HD Installation and Operation Manual — System Requirements
Striping divides a logical drive into data blocks, or stripes, that are distributed across
an array of physical drives. Striping a set of disks improves storage performance
because each drive operates concurrently. However, striping alone, known as RAID
level 0, offers no data protection.
Mirroring involves writing identical copies of all data to a pair of physical drives. This
results in very high data reliability: If one drive fails, the data is still available on the
remaining disk drive. However, it also results in a storage efficiency of only 50 percent,
because two physical drives are required to achieve a single drive’s capacity. Mirroring
alone is known as RAID level 1.
Parity provides data protection without requiring complete duplication of the drive
contents. In the event of a drive failure, parity information can be used with data on
surviving drives to reconstruct the contents of a failed drive. Parity data can be stored
1
on a dedicated drive, as in RAID 3, or distributed across an array of drives, as in
RAID 5. Parity provides much greater storage efficiency than mirroring—up to 85
percent for a set of seven drives.
Software For Striping
AJA recommends the Disk Utility software provided by Apple with OS X for creating
and striping RAIDs, including 3rd-party disk arrays and Xserve RAIDs. This
application is very easy to use and has been tested to work well. The utility can be
found in Macintosh HD/Applications/Utilities, where “Macintosh HD” is the name of
the system drive.
7
Xserve RAID
Xserve RAID is designed for non-stop operation. Redundant hot-swap power and
cooling modules allow the system to keep functioning even if one module fails. A
high-availability architecture and dual independent RAID controllers support RAID
levels 0, 1, 3, 5, and 0+1. In addition, Xserve RAID supports hybrid RAID levels 10,
30, and 50 when used in conjunction with host-based software RAID. Remote Xserve
RAID management capabilities are provided via Apple’s Java-based RAID Admin
application.
Note: When creating and striping an Xserve RAID for Io HD using the Apple Disk
Utility provided with OS X, use RAID 50: in other words, the internal Xserve RAID
drives are set up as RAID 5; the Xserve RAID then shows up in Disk Utility as two
drives (regardless of the number of internal drives) which must be configured together
as RAID 0. Apple calls this configuration “RAID 50.”
Storage capacity
No matter which storage system you choose, pick one that can scale to meet your
needs over time. Ideally, you should be able to increase storage capacity or switch to a
RAID level offering increased data protection in the future. Balance current and
future storage needs with your budget and choose accordingly.
8
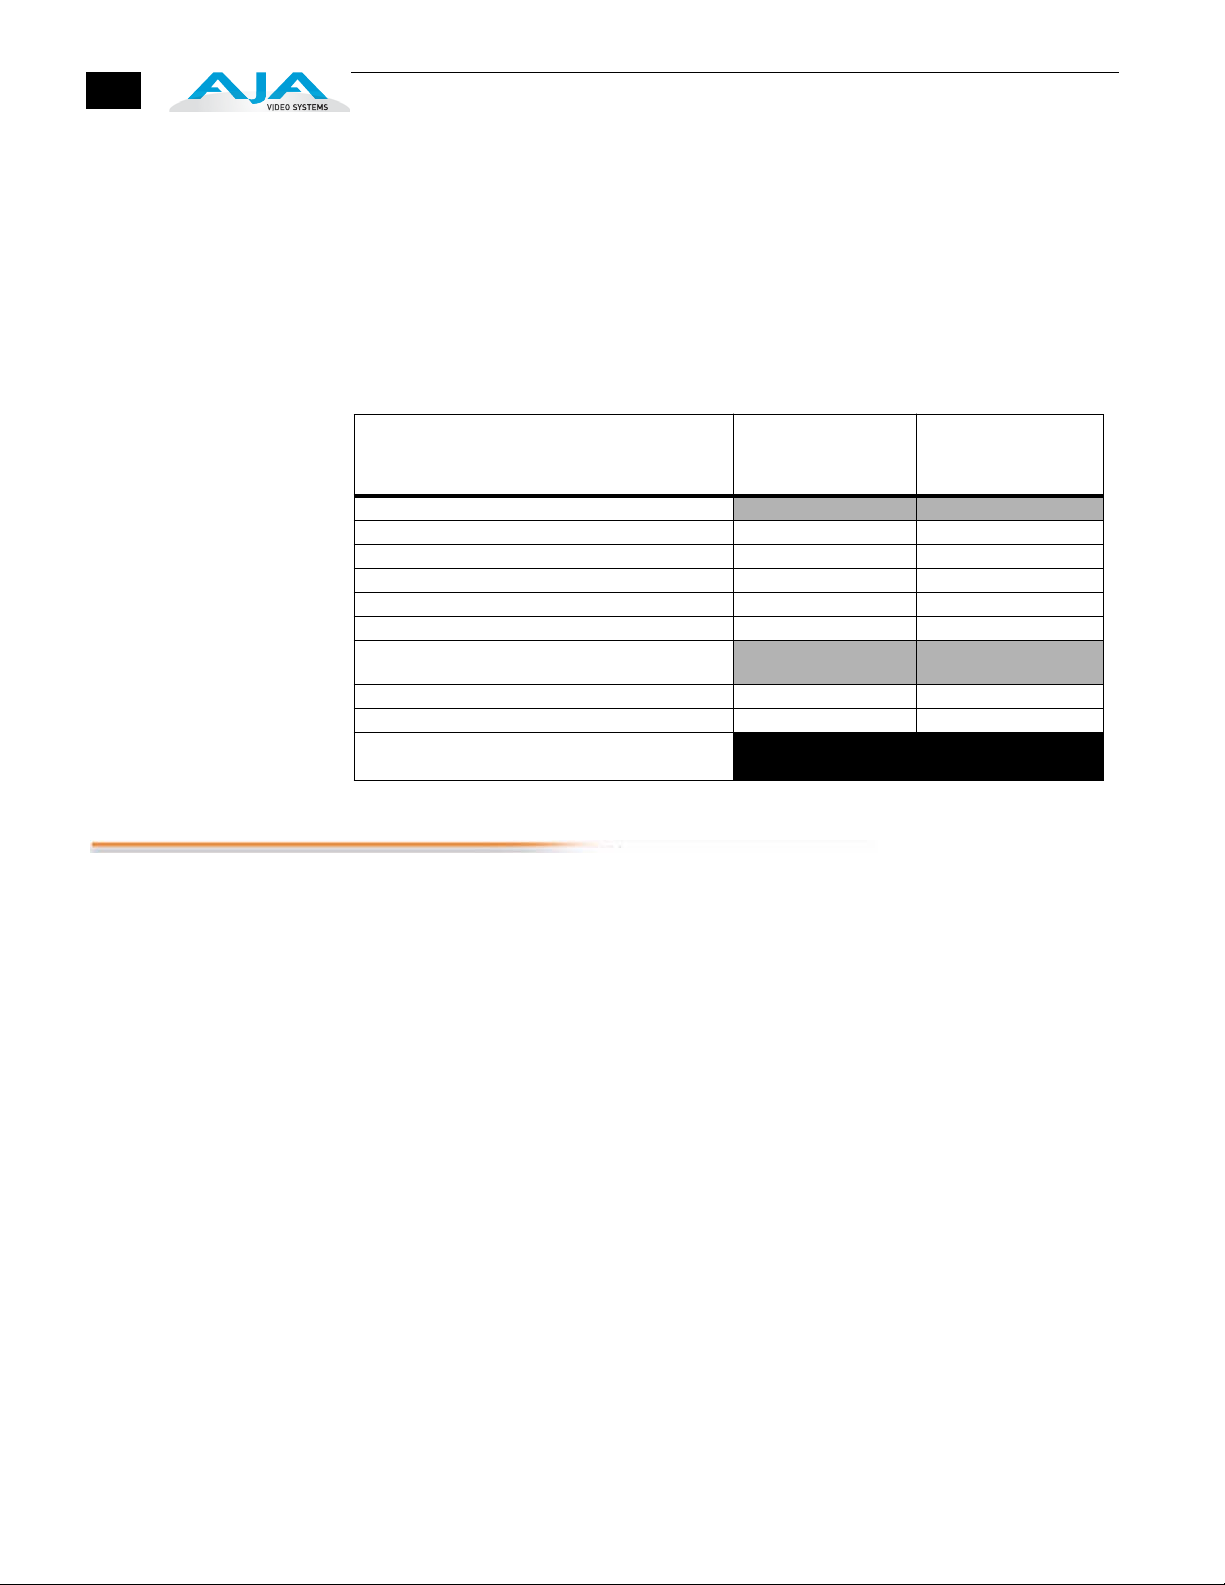
Note: All of the following numbers are approximations based on 2 channels of
48kHz audio. More audio channels can increase data rates. AJA also provides a
freeware application called the AJA Data Rate Calculator that can be used to help
determine the amount of storage space and bandwidth requirements needed for a
selected format, frame rate, audio setting and compression. The AJA Data Rate
Calculator can be found in the AJA Utilities folder which installs in the Applications
folder of the Mac OS. The AJA Data Rate Calculator application can also be
downloaded from the AJA website and used on any OSX computer.
In This Manual
FORMAT
SD Formats
10 bit 4:2:2 SD (NTSC/PAL) 28 101
8 bit 4:2:2 SD (NTSC/PAL) 21 76
DV50(NTSC/PAL) 7 27
DV25(NTSC/PAL) 3.6 14
Photo JPEG SD (NTSC/PAL) 2.5 9
HD Formats
(varies by format and frame rate)
Apple ProRes 422 8 to 21 31 to 75
Apple ProRes 422 HQ 12 to 31 45 to 112
MB = MegaBytes
GB = GigaBytes
Data Rate in MB/
sec
Storage
Requirement in
GB/Hour
Chapter 1 is the introduction you’re reading, listing features, box contents, and system
requirements.
Chapter 2 discusses the AJA Io HD front and rear panel connections and indicators.
Illustrations point out the various connectors and indicators with text discussions of
each.
Chapter 3 gets you started with using Io HD in a typical video environment.
Workflows for analog component or composite, standard definition SDI (Serial
Digital), DV, ProRes 422 and offline are all discussed.
Chapter 4 provides complete instructions for configuring the AJA Io HD, from
unpacking, locating the chassis, installing Io HD software from CD, cabling the
system and then getting it up and running. Important configuration information is
also provided on video settings and use of genlock/external reference.
Chapter 5 discusses operational aspects of Io HD when used with Final Cut Studio
2 or Final Cut Pro 6.
Chapter 6 discusses troubleshooting problems with your system and what to do
when there’s a problem you can’t solve.
Appendix A presents a list of technical specifications for the product.
Appendix B provides regulatory compliance statements, advisories and warnings.
The remainder of the manual consists of appendices listing specifications and an
index section to help you rapidly find topics in the manual.
\
Chapter 2:
Controls and Indicators
Controls and Indicators
When installing the AJA Io HD system, you’ll make media cable connections to a
variety of equipment. After installation, the front panel indicators will be useful in
monitoring what is happening on the system as well as troubleshooting problems
that can occur. Becoming familiar with the Io HD front and rear panels will
simplify installation, setup, and operation of the system.
On the following pages are front and rear panel illustrations with notations that
summarize all of the connectors and indicators. Detailed descriptions of each of the
connectors and indicators follow afterward.
Full installation instructions are provided in Chapter 4 later in this manual. Be sure
to read that chapter before attempting to install the product.
LTC SDI 1
Out
100-240VAC
50/60Hz .4A
In 1 In 2 In 3 In 4 Out 1 Out 2 Out 3 Out 4
SDI 2 Y/G Pb/B Pr/R
In
S-Video CVBS Ref
In
Out
Audio
Mon
HDMI OutHDMI InRS-422
In
Out
AES 1/2 AES 3/4 AES 5/6 AES 7/8
In
Out
In
Out
In
Out
Note: The AJA Io HD should be plugged into a 3-prong AC power jack before
you make connections to other equipment — although it should not be switched
on. The AC cord provides a path to ground for accidental static discharge and
protects system equipment.
2
1
1
10
yp
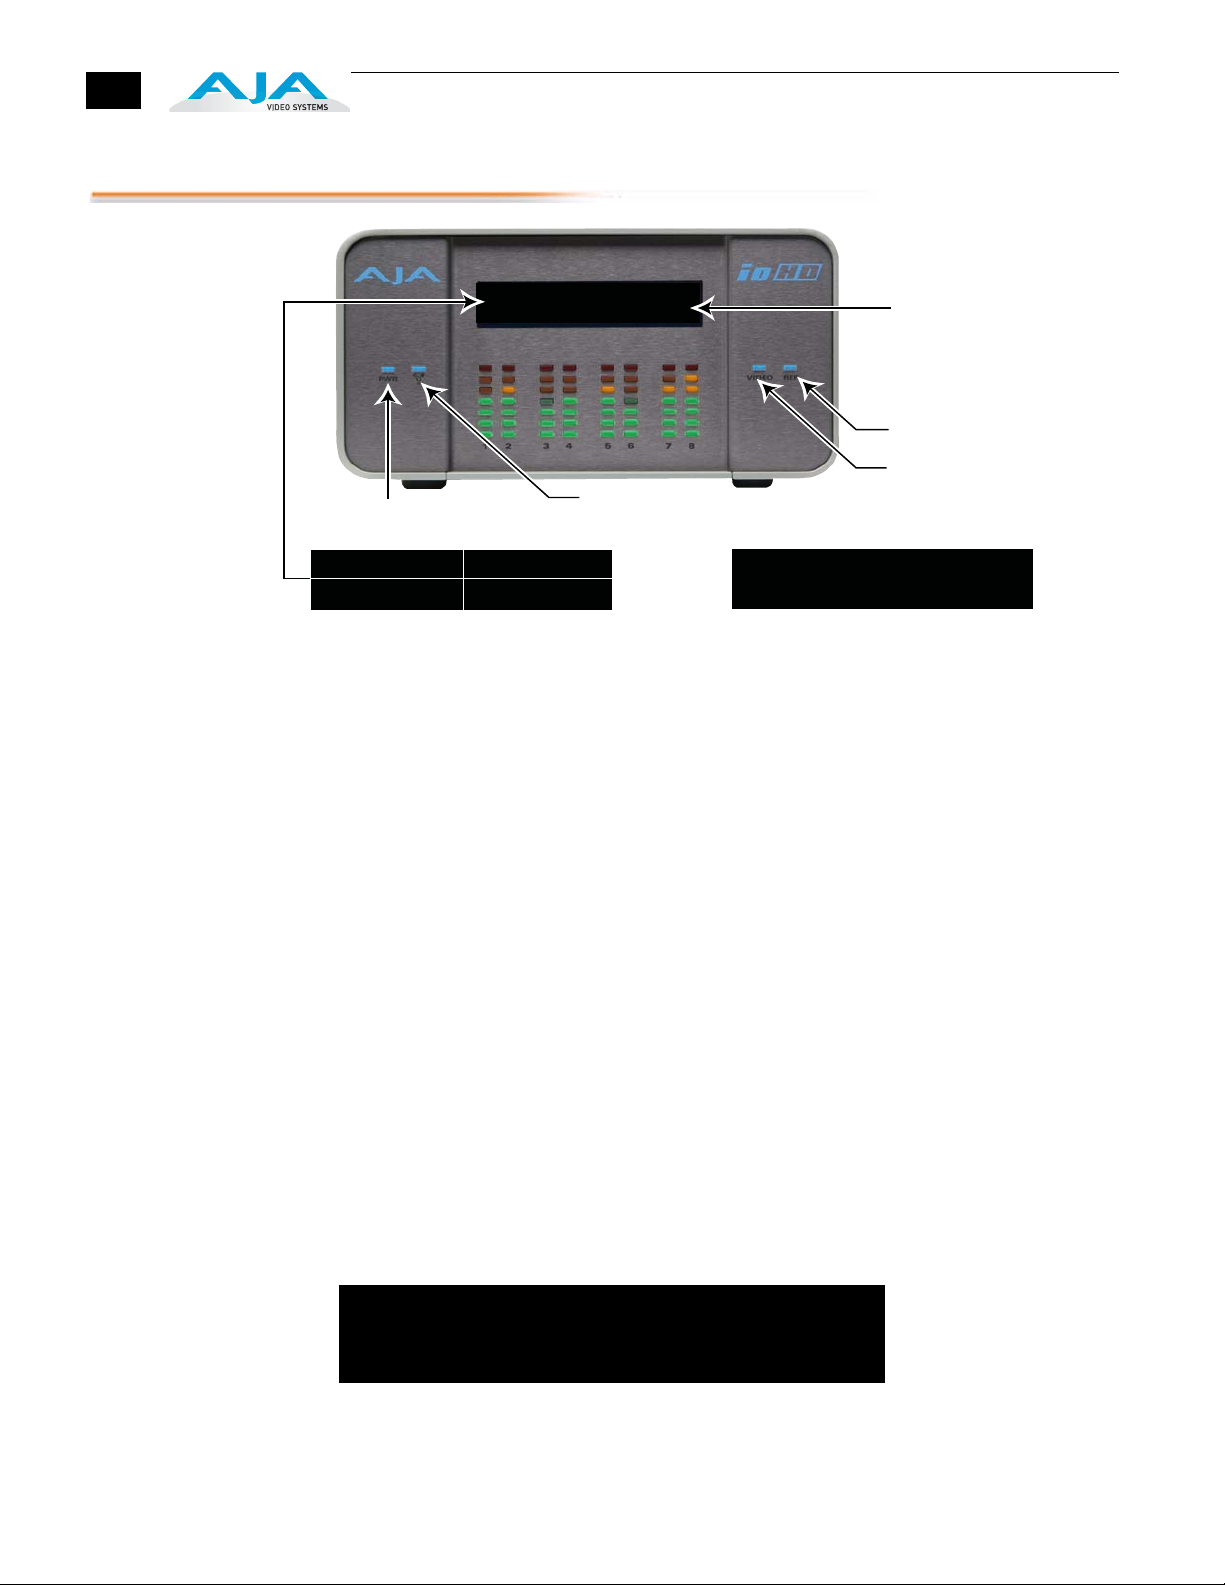
Front Panel
Power Indicator
P 1080i29.97 SDI
S 525i29.97 AES
Shows IoHD is connected
to an active FireWire port
on a host computer
Alphanumeric display
shows current state
of input and output
selection. It’s also used
for status messages when
appropriate.
When lit, active video
is present at Reference
video input (for Genlock)
When lit, active video
is present at selected
input
Alphanumeric and
Graphics Display
Primary Video Video Source
Secondary Video Audio Source
The alphanumeric display has four screen fields
as shown here
Primary Video Video Source
Timecode Display
It can also display the Primary Video on top
and the current Timecode t
e and value at bottom
AJA Io HD Front Panel Indicators
The Io HD front panel provides a variety of visual indicators to tell you exactly
the state of the system and how video and audio are being handled. The topics on
the next few pages discuss these indicators:
• Alphanumeric and Graphics display
• Status and Power LEDs
• Audio VU LEDs
The alphanumeric and graphics display provides a view into the current Io HD
system status. When first powered up, the Io HD display shows an AJA logo,
followed by all the LED indicators lighting up (showing they’re functioning), and
then finally the current system status screen is displayed.
Information contained in the status screen shows:
• Primary source selection and format (SD or HD format and framerate)
• Secondary source selection and format (SD or HD format and framerate)
For example, if Io HD is currently set up to do a downconvert from 1080i 29.97
to 525i 29.97, the display would look similar to this:
P 1080i29.97 SDI
S 525i29.97 AES
The primary video is P1080i at 29.97 framerate and the video source is the SDI
input. The secondary source is 525i at 29.97. The audio source selected is from
the AES inputs.

Io HD Installation and Operation Manual — Front Panel
Although the default is to show Primary and Secondary formats, you can instead
configure the Io HD to show the Primary format on the top line of the display
and the currently configured timecode on the second line. If in an input mode,
this will display the timecode at input. If set for play out, then the timecode
display is what is output. If you see a semi-colon in the timecode display, then it
means the timecode is drop-frame. If all colons, then it’s non-drop frame.
11
LED Indicator
Descriptions
P 1080i29.97 SDI
VITC1 01:00:07;02
Front Panel Display
Primary video format and source
Timecode display
(; = drop frame := non-drop frame)
1
See Chapter 5, Io HD LED Display under the IoHD Screen topic.
Indicators on the front panel are LEDs that illuminate when a condition is
present. The following indicators are conveniently arranged in groups to show
specific subjects:
• Power and Status LEDs—Blue LEDs to the right and left of the
alphanumeric/graphics display
• Audio VU LEDs—Green, yellow, and red LEDs located underneath the
alphanumeric/graphics display
Each group of indicators are discussed below.
Power and Status LED Indicators
Power—shows that Io HD is connected to AC mains power and that the power
switch on the rear panel has been turned on.
FireWire—shows Io HD has an active data communications link over the
FireWire connection with a host computer.
Video—shows that a valid video source has been detected.
Ref—shows that the panel has an external reference video source applied
(Genlock). Please refer to the “Genlock and Your System” topic in Chapter 4
for additional information on the use of this connector and the effect of
Genlock/External Reference sources on the system.
12
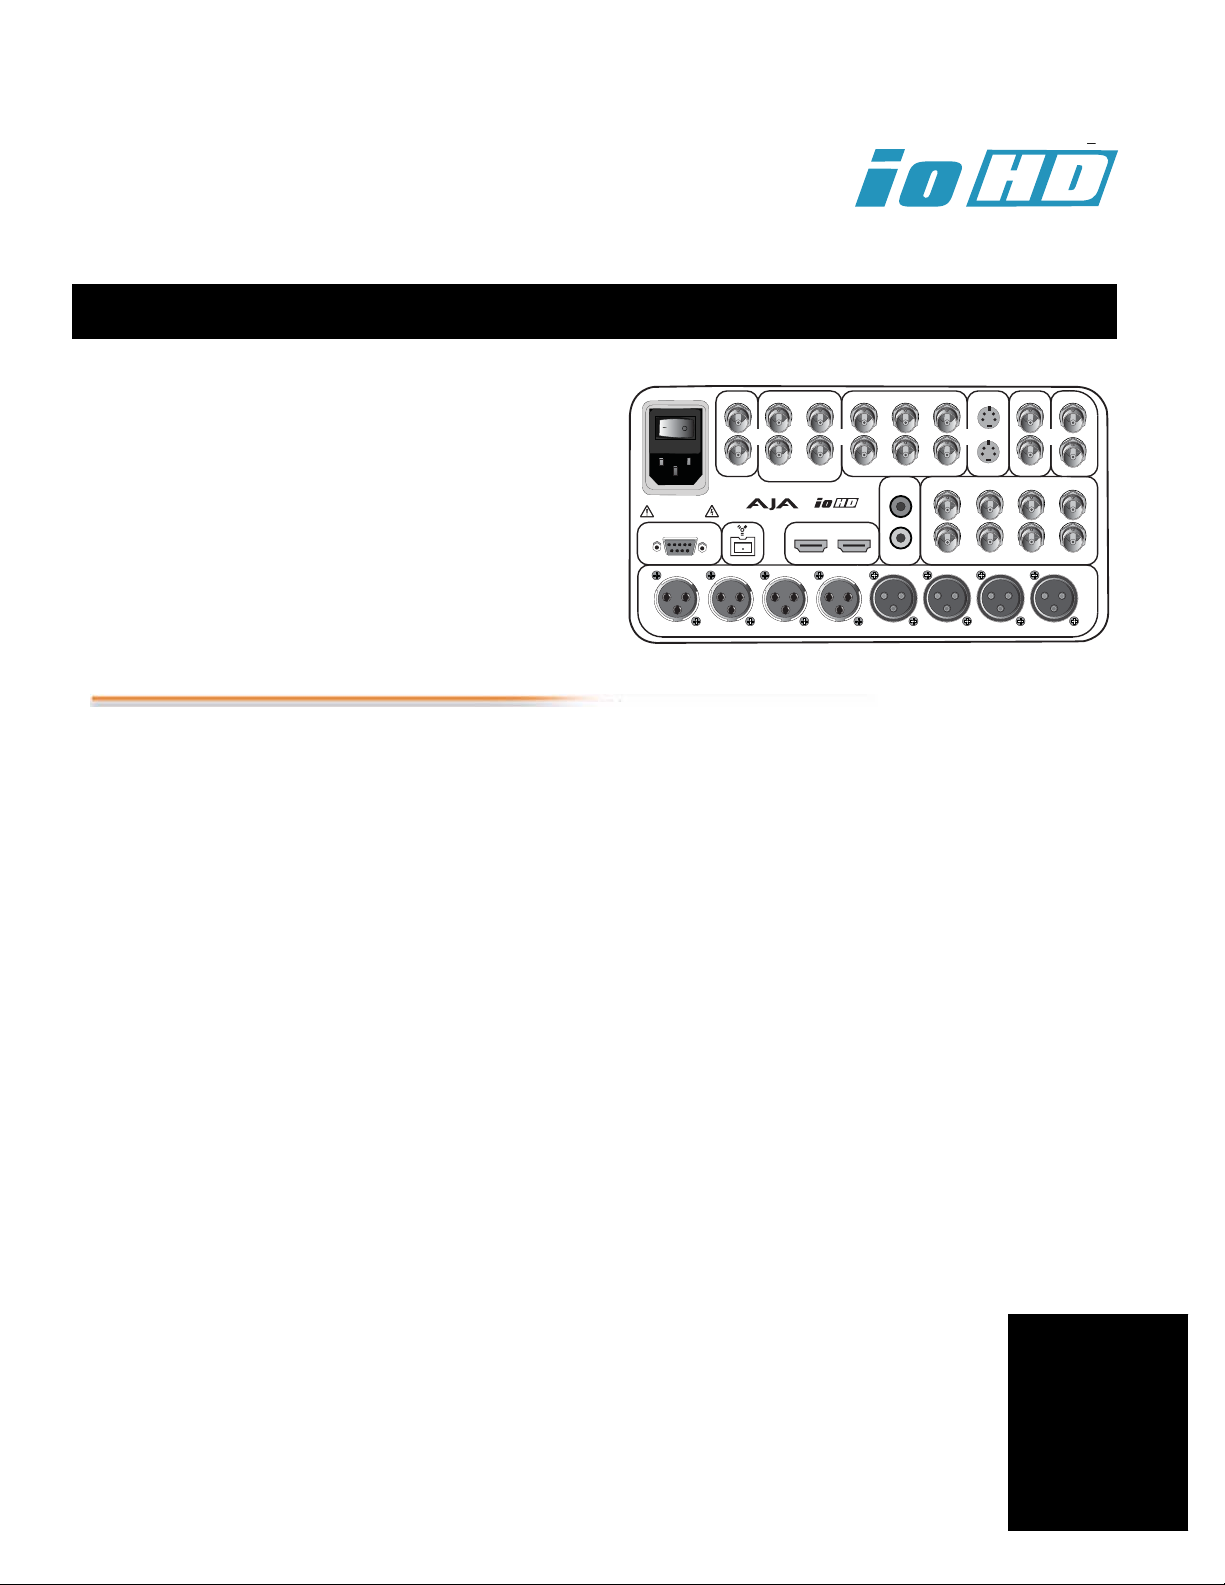
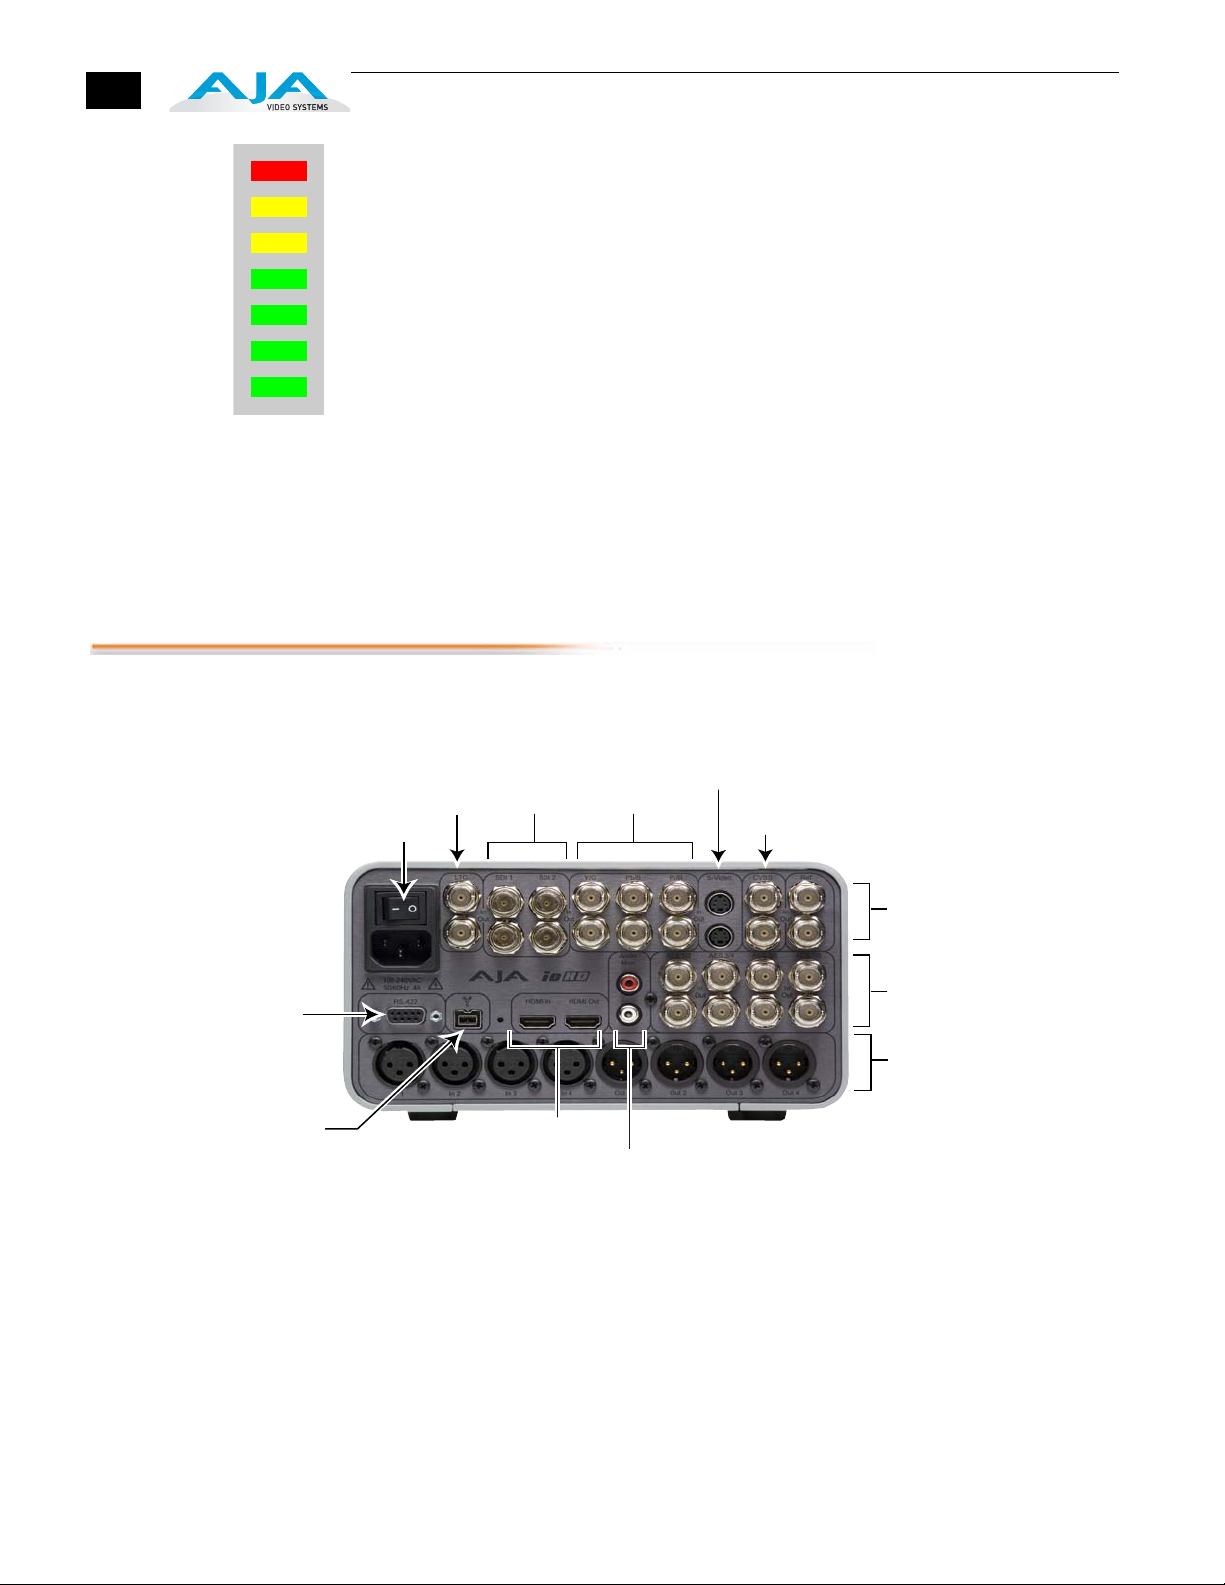
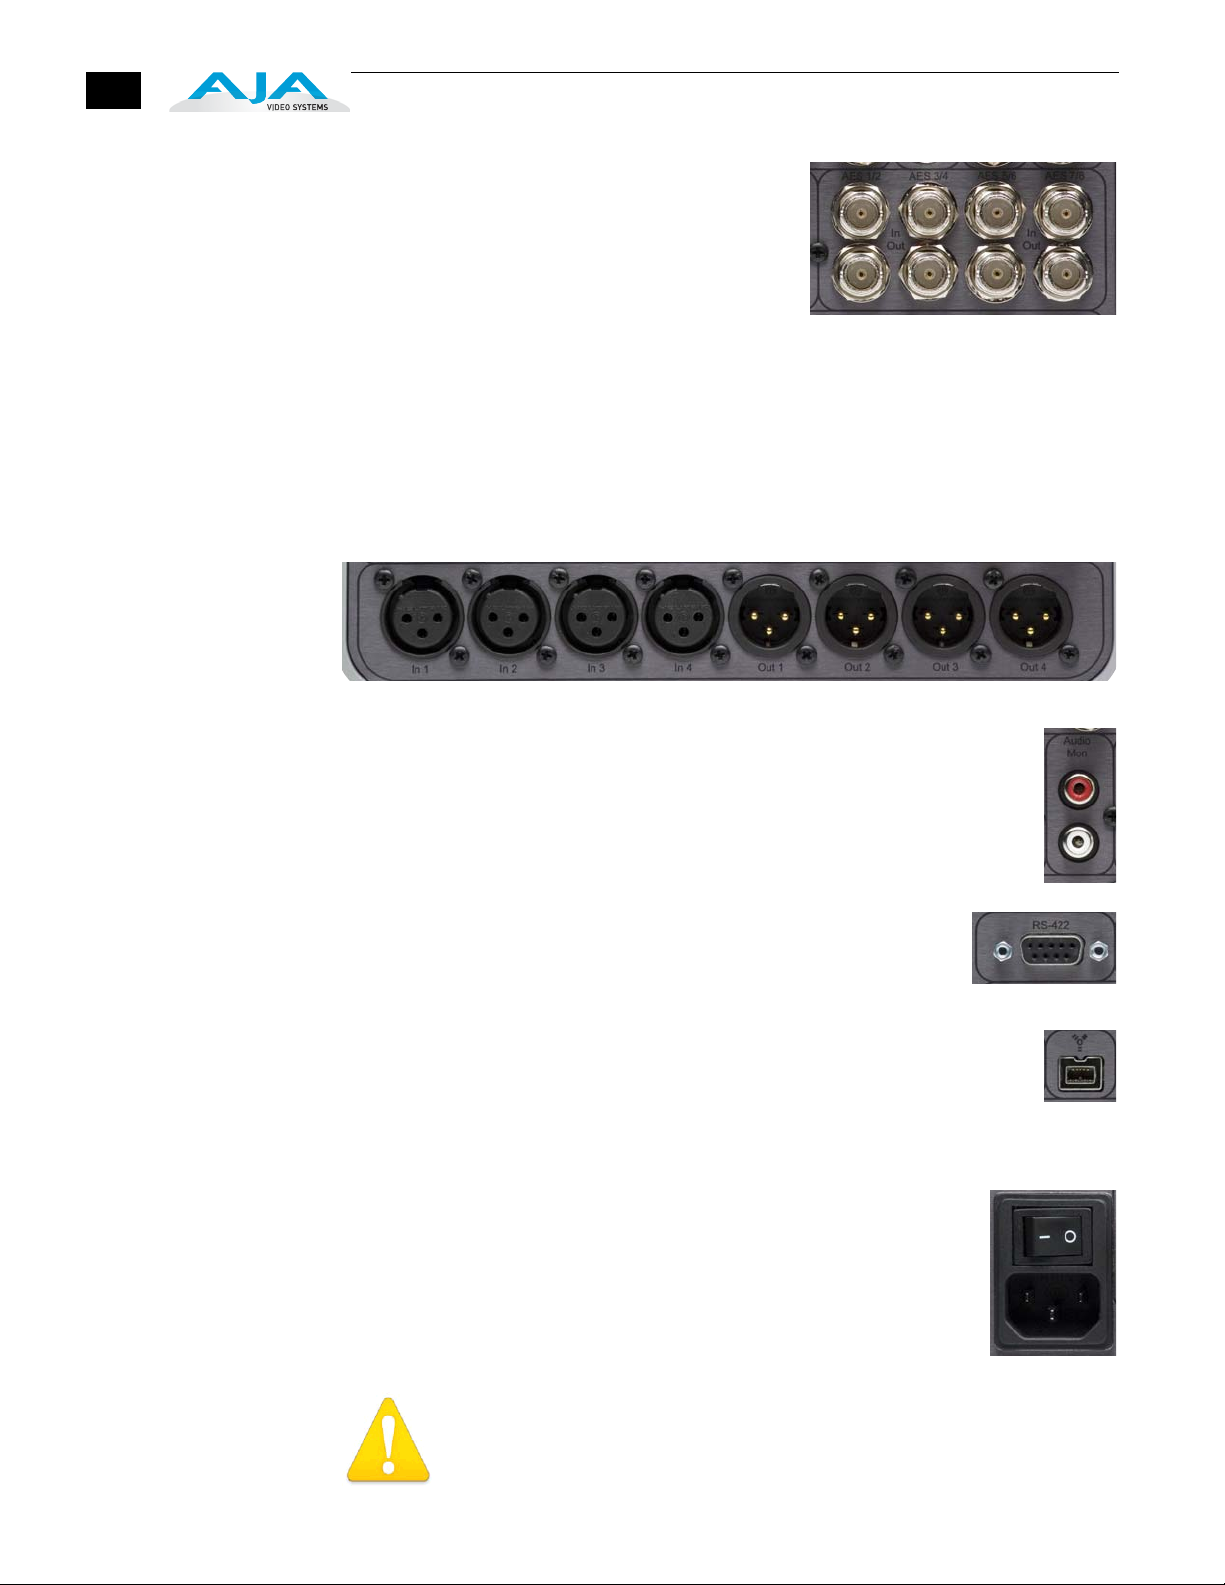
Rear Panel
Audio VU LED Indicators
These LEDs show the audio signal strength of the selected audio input sources
(embedded SDI audio, AES/EBU audio, analog 4-Channel balanced, or
2-Channel unbalanced) or the values for audio being played back during editorial.
The LEDs show a standard VU-style display, with the LEDs having the following
meanings:
Green—audio source signal level is in the “safe” area (no clipping). Vertically, the
green LEDs also show the signal strength, so you can see if the signal level is
low. Generally, it’s preferred to have the signal near the top of the green or
even occasionally peaking into the orange LEDs.
Yellow—audio source signal levels are at the peak edge of the safe area before
clipping will occur.
Red—audio source amplitude is too hot and the signal is clipping at it’s signal
peaks. You should reduce the input gain at its source (mixer or source
equipment supplying the signal).
100 to 240VAC, 0.3A
RS422
Machine
Control
FireWire 800
Connector
(to Host)
About Inputs and
Outputs
AC Power Supply
Autosensing
50/60Hz
With ON/OFF
Switch
AJA Io HD Rear Panel Connectors
The function of Io HD’s inputs and outputs depend on the operational mode. In
the capture mode, Io HD’s inputs are selected by Final Cut Pro’s Audio Video
LTC
Timecode
In/Out
Serial
Digital
In/Out
(SD-SDI
HD-SDI)
HDMI In/Out
Unbalanced Outputs
Component
YPbPr and
RGB In/Out
Analog Audio
(stereo RCA)
S-Video
In/Out
Composite
In/Out
External Reference Input
with Loop-through
AES/EBU Digital
Audio In/Out
Channels 1 through 8
Analog 4-Channel
Balanced Audio I/O
XLRs

Io HD Installation and Operation Manual — Rear Panel
Settings menus (or Easy Setups). While capturing, the selected inputs are mirrored at Io
HD’s outputs. When not in the capture mode, outputs change to reflect the output of
Final Cut Pro. In all cases, all Io HD’s outputs are active all the time. In other words,
the same output video appears simultaneously on the HDMI, SDI, composite, Svideo, and component outputs. (Note: S-video and composite are SD only formats, so
they will not output HD material.) This method of operation allows simultaneous
connection to VTRs and monitoring equipment.
13
About BNC
Connectors
Although most video professionals are used to BNC connectors, you may not have
seen them if you’ve been using primarily desktop video equipment. BNC connectors
ensure a positive connection by the act of locking the connectors together via pins in
one connector that fit into slots in the corresponding connector.
1
To make a BNC connection, slide the cable connector over the connector on the Io
rear panel and then when seated, rotate the barrel of the cable connector 90˚ clockwise
until the connectors are locked together. When properly locked, the cable cannot
accidentally be pulled out.
Pins (2) on BNC Connector
(connector on Io Rear Panel)
Align slots in
cable connector
barrel with connector
pins, then slide it over the pins
and rotate the barrel
to lock the connectors
together
Connectors Connectors on the rear panel are arranged in groups for easy installation and
maintenance. Connectors provided are:
• LTC (2x BNC) for longitudinal timecode input and output.
• SD-SDI and HD-SDI video with embedded audio, 2x BNCs for input and 2x
BNCs for output.
• SD/HD Component YPbPr/RGB Video, 3x BNCs for input, and 3x BNCs for
output.
• S-Video In/Out (Y/C), 1x 4-pin mini-DIN for input, and 1x 4-pin mini-DIN
for output.
• Composite NTSC/PAL video, 1x BNC for input, and 1x BNC for output.
• Genlock/Reference Video (looping), 2x BNCs.
• HDMI video with embedded audio (8 channels), 1x connector for input and 1x
connector for output.
• 8 channel AES/EBU digital audio inputs via 4x BNCs and outputs via 4x BNCs.
14
• 2 channel unbalanced audio outputs (2x RCA) for monitoring.
• 4 channel analog balanced audio inputs and outputs. 4x female XLRs are
provided for input and 4x male XLRs for output.
• IEEE 1394b FireWire™ 800Mbps connector for data between Io HD and
Apple Mac.
• RS-422 Control Port, 9-pin D-sub, for machine control.
• AC power connector with ON/OFF switch, 3 pin (with ground).
Each of these groups of connectors are discussed on the following pages.
Note: Io HD does not require synchronous digital audio inputs.
Connector
Descriptions
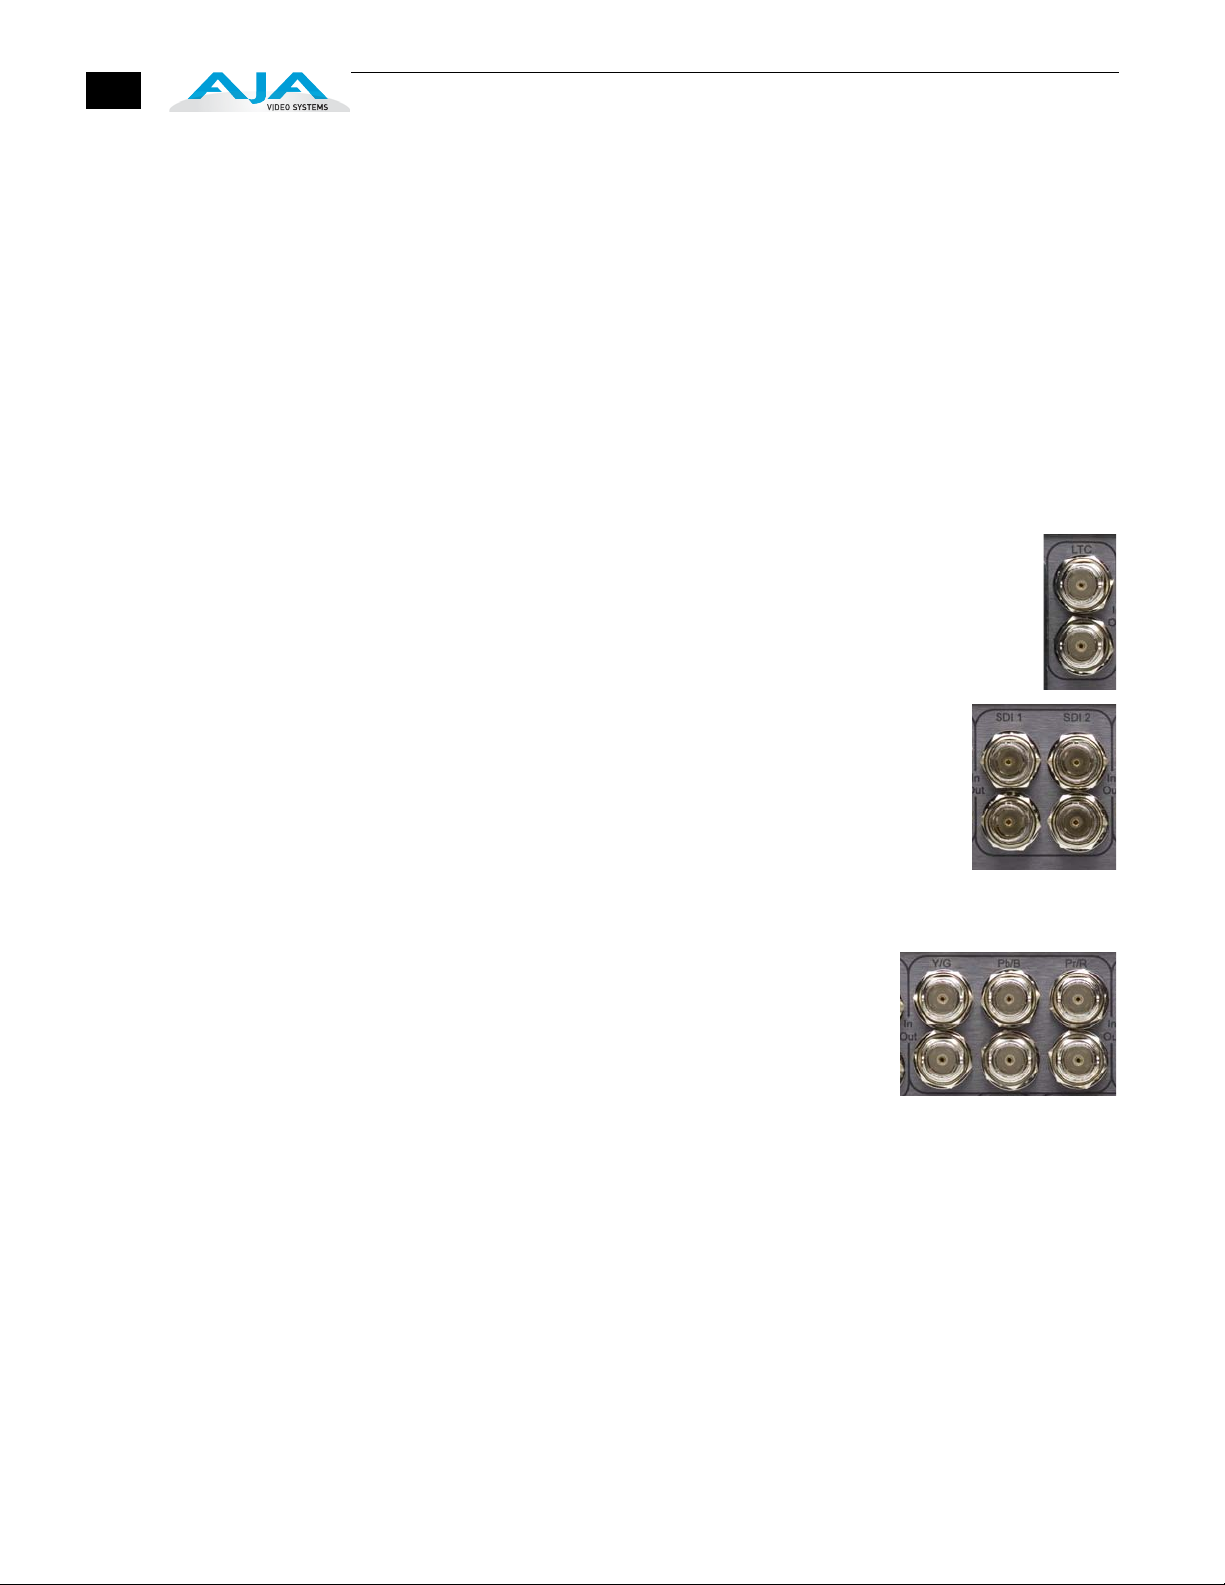
LTC Timecode Input And Output
Two BNCs provide connections to the house LTC timecode generator or
source. Connections are high impedance. One BNC is for input and the
other for output.
SDI Input and Outputs
BNC connectors are provided for two SDI inputs (only one can be
selected and routed through the Io HD at a time) and two SDI
outputs (independent of the input). SDI inputs and outputs
support SD-SDI and HD-SDI video and embedded 24-bit digital
audio. If peripheral equipment has a variety of inputs/outputs,
look to see if it has SDI I/O, and use it where possible for the
highest quality.
Component YPbPr
Connect component YPbPr video cables from a VTR,
Camera, or other source to the three YPbPr input BNCs:
Y/G, Pr/R, and Pb/B. Then connect the YPbPr Out BNCs
to a monitor, or other component device. Component
input video signals are A/D (input) converted (10-bit).
Similarly, component output video signals are D/A converted (10-bit). Component
video signals are higher quality than composite.
A Note About RGB—Although RGB is used less in today’s video systems, Io HD
supports it at both input and output. Because Io HD’s (and SMPTE SDI)
native format is YPbPr, AJA recommends the use of YPbPr whenever possible.
Although component video monitors often have RGB inputs, it’s better to use
YPbPr when the monitor supports it. The YPbPr format provides “headroom”
for “superwhite” and “superblack”—and these video levels will be clipped when
transcoding to RGB. Also, the RGB/YPbPr transcoding involves a level
translation that results in mathematical round-off error. Within Final Cut Pro,
RGB can be configured in the Audio/Video Settings or Easy Setups menus.
Io HD Installation and Operation Manual — Rear Panel
A Note About YPbPr—Component Video, or YPbPr, has been given several names
over time. YUV, Y/R-Y/B-Y, and YCbCr, are just some examples. Although these
various formats have some differences in levels, they are all basically the same. Io
HD uses the modern YPbPr terminology exclusively. Io HD supports three
different types of YPbPr: SMPTE/EBU N10, Betacam (NTSC), and Betacam
(NTSC Japan). These three formats differ in level only and are configured in
Final Cut Pro within the Audio/Video Settings and/or via the AJA Control Panel
application.
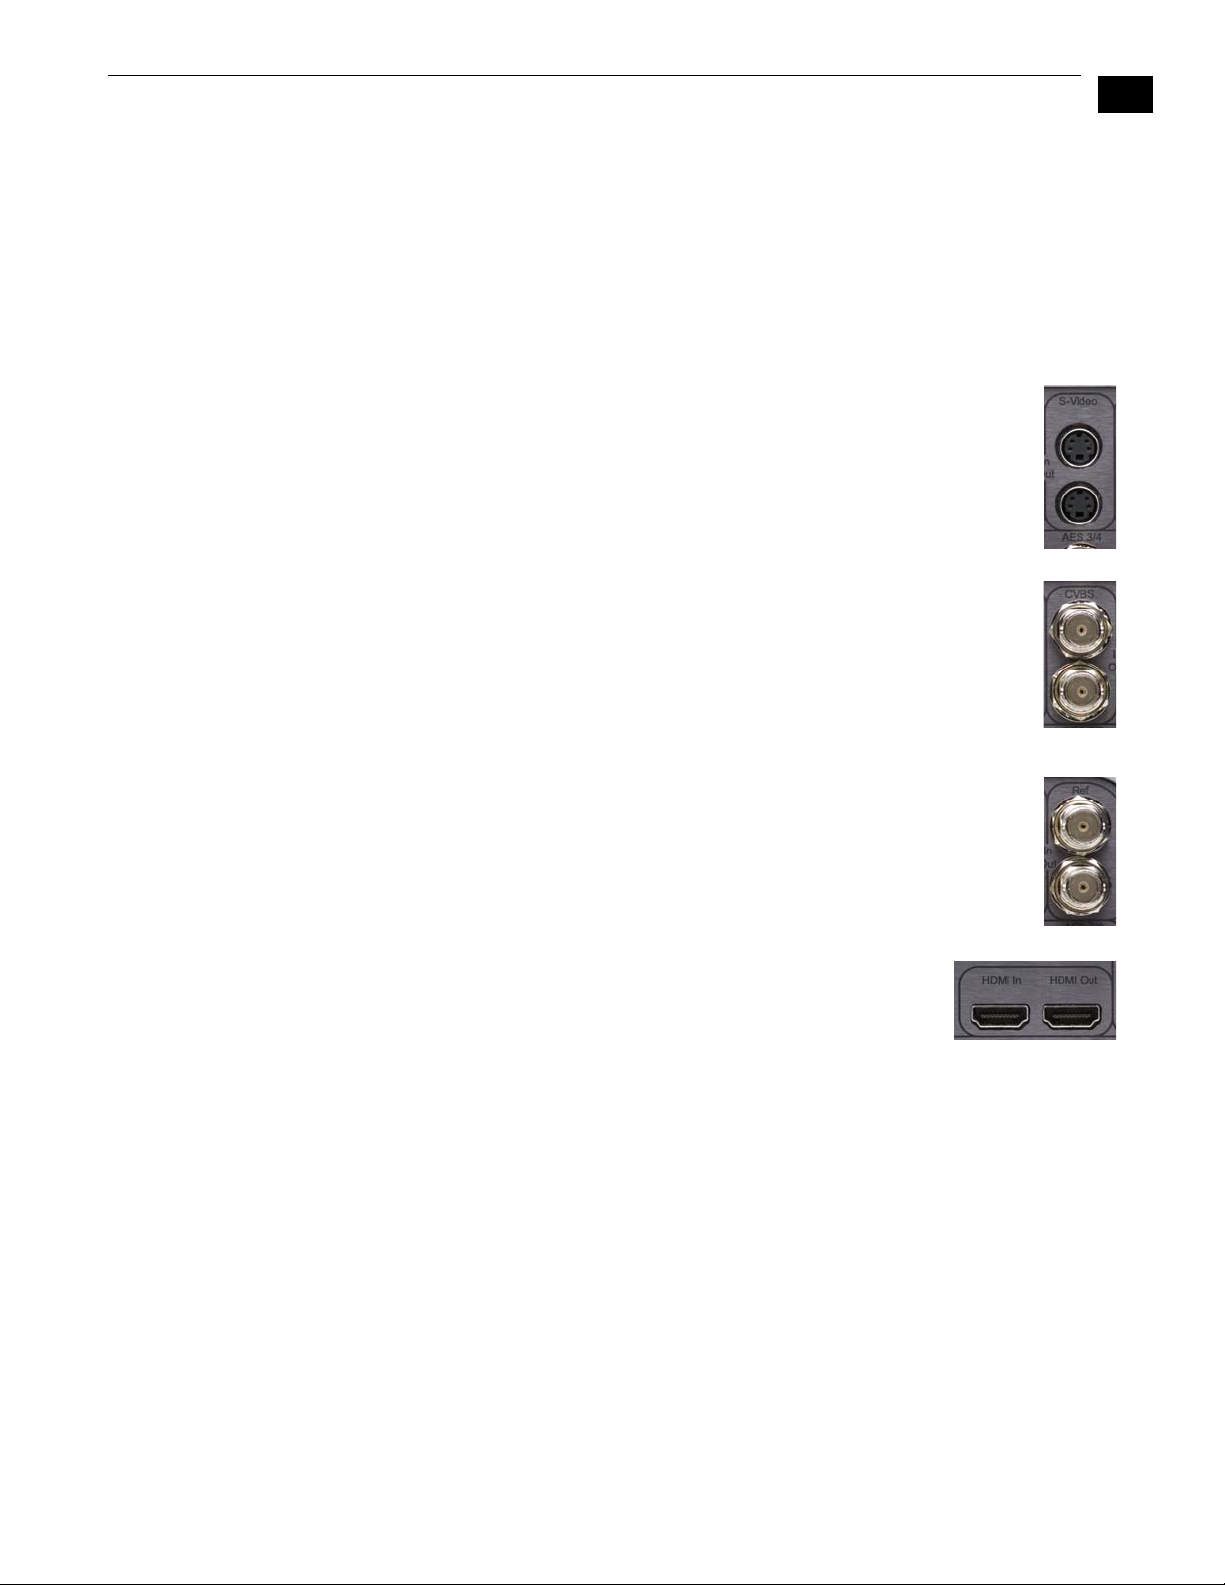
S-Video (Y/C)
S-Video 4-pin mini-DIN connectors provide for connection of desktop
video/pro-sumer level equipment, including camcorders, VCRs/VTRs, and
1
monitors—to name a few. Use high quality shielded S-Video cables when
making connections. S-video signals are converted internally to 10-bit
digital.
Composite NTSC/PAL
BNC connectors support composite NTSC or PAL input and output.
Connect an NTSC or PAL composite video cable from a VTR, Camera, or
other source to the CPST in BNC. Then connect the CPST Out BNC to a
monitor, or other Composite video device. Composite video signals are A/D
(input) and D/A (output) converted (10-bit).
15
Reference Video (looping)
These two BNC connectors allow you to synchronize Io HD outputs to your
house reference video signal (blackburst or composite sync for SD, or Trilevel for HD).
HDMI
Two HDMI connectors provide for input and output of HDMI
compatible video (version 1.1) and multi-channel (8) embedded
audio. HDCP is not supported on either input or output. Io HD’s
HDMI output does not have HDCP, and input sources having HDCP are not
supported. The HDMI input is designed to support long cable runs:
up to 100 ft when using 22 or 24AWG HDMI cable, or up to 50 ft using 28 or
30AWG HDMI cable. The HDMI output supports standard HDMI cables only.
Formats supported (video only):
525i, 625i, 720p 50/59.94/60, and 1080i 50/59.94/60 are supported on input
and output.
1080p23.98, 1080p24, 1080p25, 1080p29.97, and 1080p30 are supported for
output only.
The Io HD control panel allows selection and adjustment of some HDMI
parameters; please see Chapter 5—Io HD and Final Cut Pro for more information on
Control Panel operation.
16
8 Channel AES/EBU Digital Audio
Inputs And Outputs
One BNC connector is provided for both the
channel 1 and 2 inputs, similarly input channels
3/4, 5/6, and 7/8 are also each grouped on 3
additional BNCs. Another group of 4 BNCs
provides the same channel groups for AES/EBU
outputs. In order to connect equipment having AES/EBU digital audio XLR
connectors, use appropriate adapters (not supplied).
Analog 4 Channel Balanced Audio Inputs and Outputs
Eight XLRs, 4 female for input and 4 male for output, provide 4 channels of
balanced audio. Audio is high-quality 24-bit A/D input and D/A output at 48kHz.
Level adjustments are provided via software for +15/18/24 dBu (full scale digital).
Analog 2 Channel Unbalanced Audio Output
Two RCA connectors provide an unbalanced stereo audio output pair for
driving inexpensive audio monitoring systems or for connection via Yadapter (not provided) for use with headphones.
RS422 Machine Control
A female DB9 connector provides connection for VTRs, digital
disk recorders, and other devices using RS422 SMPTE protocol.
FireWire
IEEE 1394b FireWire™ connector for connecting to the 800 Mb/s
FireWire connector on an Apple Mac Pro or MacBook Pro for passing
data. This connector does not support connection to any other FireWire
devices such as cameras or harddrives.
AC Power
A standard male AC power socket provides connection to the
3-conductor power cable. Ensure the Io HD is plugged into a
grounded socket. The internal Io HD power supply is autosensing,
meaning that it adjusts automatically to a mains supply from 100 to
240VAC at either 50 or 60Hz. A power switch is part of the
connector, allowing easy ON/OFF control.
Warning!
The Io HD chassis has no user-serviceable parts. An internal fuse protects the
circuitry; however, it can only be replaced by AJA service centers or AJA dealers.
To remove power from the unit, remove the AC line cord to ensure disconnection.

Io HD Installation and Operation Manual — Rear Panel
Warning!
Do not defeat the safety purpose of the polarized or grounding-type plug. A
polarized plug has two blades with one wider than the other. A grounding type
plug has two blades and a third grounding prong. The wide blade or the third
prong are provided for your safety. If the provided plug does not fit into your outlet,
consult an electrician for replacement of the obsolete outlet.
Warning!
Since the Mains plug is used as the disconnection for the device, it must remain
readily accessible and operable.
Warning!
Protect the power cord from being walked on or pinched particularly at plugs,
convenience receptacles, and the point where they exit from the device.
Warning!
Disconnect the external AC power supply line cord(s) from the mains power before
moving the unit.
17
1

18

Io HD And Your Workflow
There are many possible ways to think about your video/audio workflow. Your
workflow setup might be categorized by the end product you produce,
whether it be corporate video, professional broadcast media, film work, or
desktop video. Or your workflow might be categorized by the type of
equipment used rather than the nature of the work produced. Today's nonlinear editing systems often consist of a mixture of equipment from high-end
professional to prosumer and are used to create a variety of programs and
projects. This chapter hopes to show how Final Cut Pro and Io HD can fit
into the variety of workflows you currently have—and make them more
efficient. Even though Apple desktops and laptops come equipped to handle
FireWire interfaces for formats such as DV or HDV, or file based structures
such as P2 or XDCamHD, there are many formats and tape based recordings
that do not have a FireWire interface that you might wish to capture and work
with in Final Cut Pro. AJA's Io HD and Apple's ProRes 422 codec make high
quality ingest via FireWire possible.
Chapter 3:
Getting Started
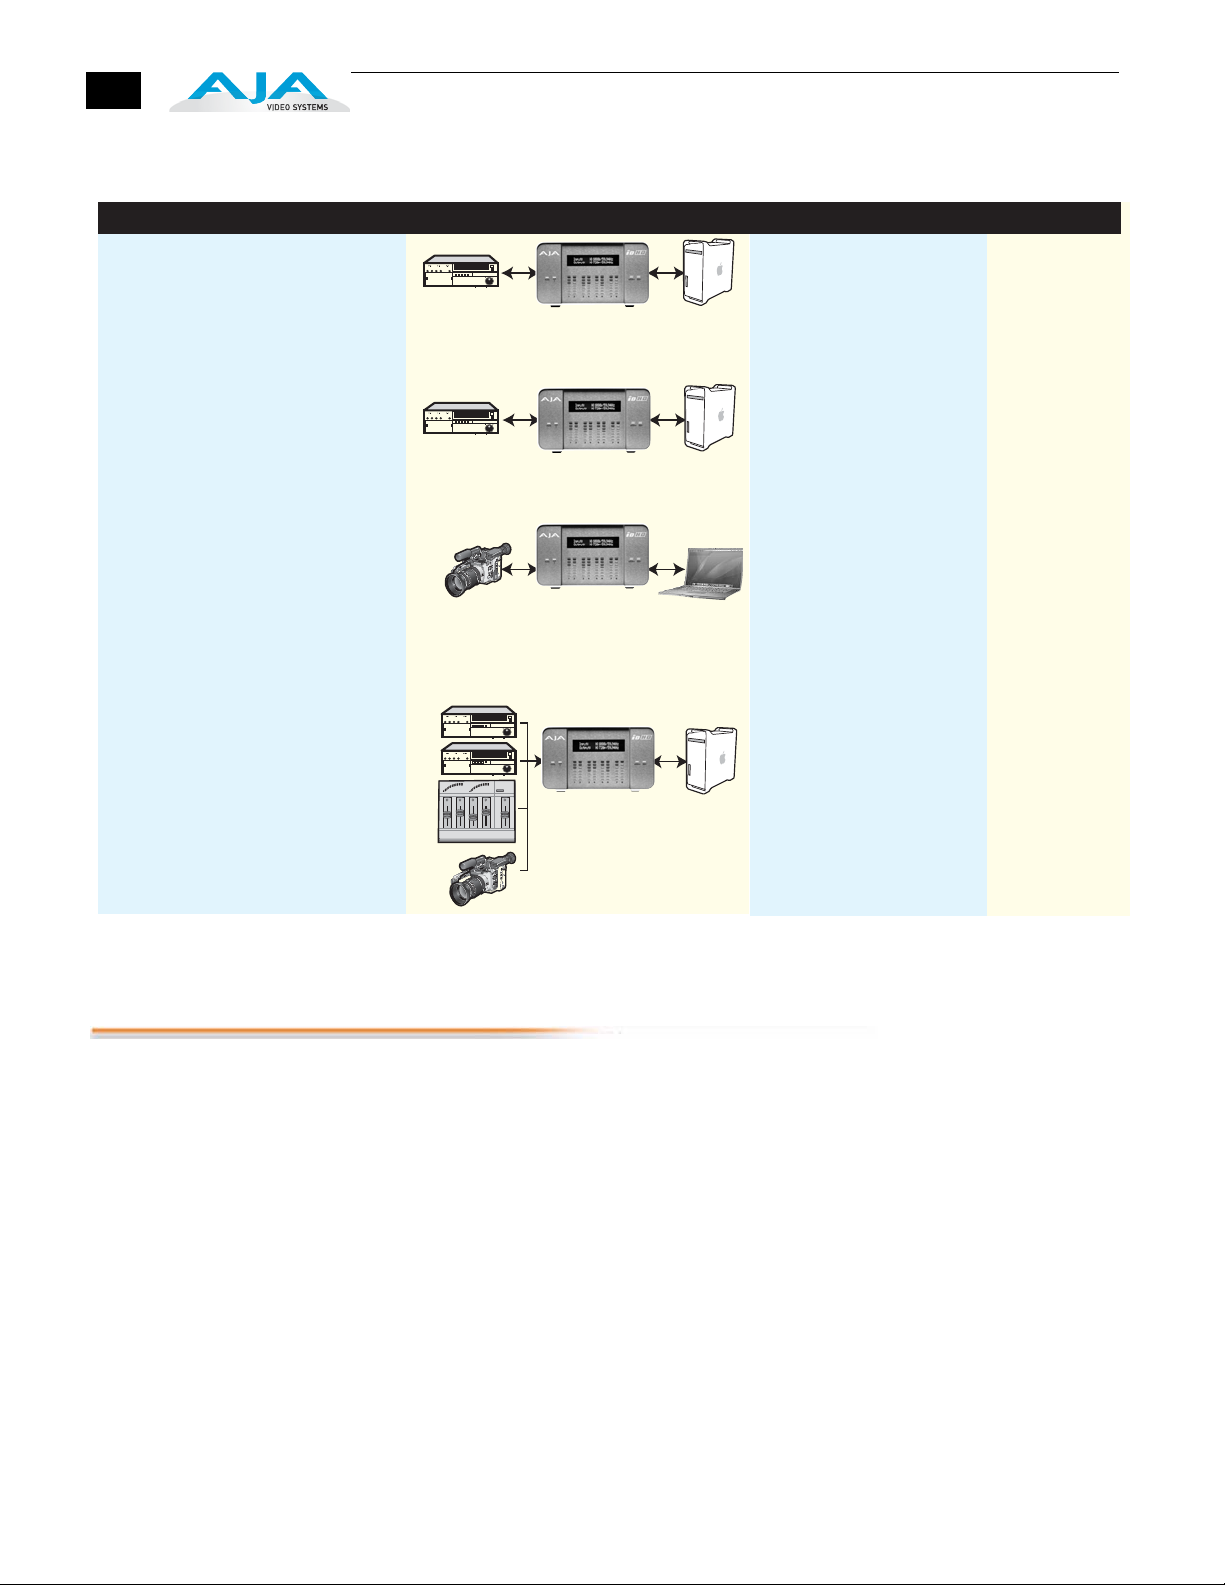
A Workflow Scenarios diagram on the following page shows types of
equipment, sorted by VTR source, and the types of workflow attributes and
applications supported. After the diagram, we also discuss some typical
applications.
1
3
1
18
Source Deck Type(s)
Analog
Examples: Beta, VHS, and U-matic
Digital
Examples: Digibeta, DV50, DVCPRO, and DVcam
Field or Remote Capture and Editing
Capture HD via ProRes 422 with a MacBook Pro
Monitoring one of many video/audio sources
Examples: monitoring studio equipment
or using older legacy equipment in an edit
suite
Workflow Attributes
Io HD captures and outputs
S-video, component video (HD & SD),
and composite video, with
multi-channel audio
Io HD captures and outputs
SDI video with embedded
audio. Optionally, Application
can use AES/EBU 8 channel (in/out)
and/or SDI embedded 8 channel
(in/out)
IoHD captures via HD-SDI
to Apple ProRes 422 and Final Cut 6
is used to do field editing of the
material.
Monitoring a variety of legacy and
current devices for playback or
conversion can be a challenge. ,
AJA Io HD can use all of its I/O ports
simultaneously, supporting a
wide range of old and new analog
SD and HD equipment
configurations.
Applications
Corporate/Industrial
Pro Broadcast
On-site Editing
Pro Broadcast
Corporate/Industrial
On-site Editing
Desktop Video
Corporate/Industrial
On-site Editing
Pro Broadcast
Video Podcasting
Offline Editing,
On-site Editing,
Archival
Workflow Scenarios
Understanding Typical Workflows
Io HD and Final Cut Pro allow more workflow flexibility than ever before. Users
can independently select different formats and frame rates for capture. Io HD's
full array of SD and HD, analog and digital connectors—with all outputs active
simultaneously—make video preview and mastering an easy task. Capture can
range from compressed or uncompressed SD to ProRes 422 and ProRes 422
(HQ) for SD and HD.
Captured media can be stored on disk as:
• on-line quality at moderate bit rates
• offline quality at low bit rates
• 8 or 10 bit uncompressed (SD-only)
• or visually lossless, 10 bit, full raster ProRes 422 SD or HD

Io HD Installation and Operation Manual — Understanding Typical Workflows
As quality and codecs improve, the lines between offline and online are blurring.
For example, with the DVCPRO HD codec introduced in FCP HD (v.4.5),
native HD editing in the codec became possible, providing very high quality
results (true HD editing) at low data rates. Compare this to 100MB/sec and
higher for uncompressed HD formats, and you can immediately see the
benefits. ProRes 422 and ProRes 422 (HQ) take this equation one step further
by providing attributes for a compressed codec that exceed DVCProHD—with
full size video (not scaled) at 10 bit quality (as opposed to 8 bit) that is visually
lossless.
Following are summaries of the most common workflows, listing data rates and
relative quality levels. Some workflows require a RAID array and some will work
using the host Apple computer's internal system drive—it's noted where this is
1
supported in the following discussions.
DV/DV25 (SD) Data rate: 3+ MB/second (megabyte/second) standard definition only—
supported by internal system drive
Quality: Good
DV is commonly input to an Apple computer via FireWire. Io HD can capture
directly to DV compressed media from an uncompressed SDI source. For
devices that may not have FireWire (IEEE1394 or i.Link) connections, this
allows the user to capture to this low data rate, yet good quality codec. While
DV does offer good quality, it has lower chroma resolution when compared to
DV50, JPEG, or uncompressed. The Io HD can be used to convert DV projects
to uncompressed-in real time-for monitoring and/or output even if you haven't
captured the footage using the Io HD.
19
DV50 (SD) Data rate: 6+ MB/second standard definition only—supported by internal
system drive
Quality: Very Good
Like DV25, Final Cut Pro also supports the Panasonic DV50 standard
definition codec. DV50 is a 4:2:2 compressed format and therefore has higher
chroma resolution when compared to DV25. Also like DV25, you can use Io
HD to convert DV50 projects to uncompressed—in real time—for monitoring
and/or output. Io HD can capture from its SDI input, directly to DV50
compression.
Uncompressed
8-bit 4:2:2 (SD)
Data rate: 21 MB/sec for standard definition—external storage recommended
Quality: Excellent, broadcast quality
Capturing in uncompressed results in clearly defined video, at full raster size and
4:2:2 chroma sampling. Using uncompressed maintains high quality from
capture all the way through effects rendering. Final Cut Pro supports RT with
uncompressed media using RT Extreme. Io HD supports capture of
uncompressed standard definition video through its SDI input. Uncompressed
media can output via all of the Io HD outputs simultaneously.

20
Uncompressed
10-bit 4:2:2 (SD)
Data rate: 28 MB/second standard definition—external storage recommended
Quality: Excellent, broadcast quality
Capturing in an uncompressed format results in clearly defined video, and
maintains the full raster size with 4:2:2 chroma sampling. Using an uncompressed
format maintains high quality video from the capture stage of the timeline all the
way through effects rendering stage. Offering all the benefits noted previously for
8-bit uncompressed, 10-bit additionally offers higher color specificity for
compositing and color correction. With Uncompressed 10-bit 4:2:2 media, video
quality is second to none-at any price point - for non-linear post production.
DVCPRO HD Data rate: 6 to 14 MB/second high definition—supported by internal system
drive
Quality: Excellent
Io HD can capture to DVCPro HD media via computer processing. DVCProHD
can be played back from a mixed format ProRes 422 codec timeline for
monitoring and/or output in both SD and HD.
Apple ProRes 422
and Apple ProRes
422 HQ
Data rate: 18 MB/second ProRes 422, 31 MB/second ProRes 422 HQ—
supported by internal system drive or attached storage
Quality: Excellent, broadcast quality
(SD or HD)
Captured media is virtually indistinguishable from pristine uncompressed sources.
Better yet, ProRes maintains the quality during editing, surviving multiple
encoding/decoding generations without degradation. It was designed by Apple for
editing, rather than as a transmission/distribution codec as are most popular
codecs. For HD, this is the preferred workflow for Io HD ingest into Final Cut
Pro 6. Some of the advantages include:
• Full-size 1920-by-1080 and 1280-by-720 HD resolutions.
• Full-size 720-by-486 and 720-by-576 SD resolutions.
• 4:2:2 chroma sampling. Provides precise compositing and blending at sharp
saturated-color boundaries.
• 10-bit sample depth. Preserves subtle gradients of 10-bit sources (perfect for
green-screen compositing, graphics or color correction) with no visible
banding artifacts.
• I frame-only encoding. Ensures consistent quality in every frame and no
artifacts from complex motion.
• Variable bit-rate (VBR) encoding. “Smart” encoding analyzes the image and
allocates more bits to complex frames.
• Low data rate requirements make for more storage options and require less
drive space to store high quality video.
 Loading...