

AJA Io Operation Manual

Io
Installation
and
Operation Guide
May 14, 2004 P/N 101524

ii
Trademarks
AJA, Io, and Kona are trademarks of AJA Video, Inc.
Apple, the Apple logo, AppleShare, AppleTalk, FireWire and Macintosh are registered trademarks
of Apple Computer, Inc. Final Cut Pro, QuickTime and the QuickTime Logo are trademarks of
Apple Computer , Inc. ADAT and the ADAT logo are r egistered trademarks of Alesis Corporation.
TASCAM is a r egister ed trademark of TEAC Corporation. TOSLINK is a registered trademar k of
Toshiba Corporation.
All other trademarks are the property of their respective holders.
Notice
Copyright © 2003/2004 AJA Video, Inc. All rights reserved. All information in this manual is
subject to change without notice. No part of the document may be reproduced or transmitted in
any form, or by any means, electronic or mechanical, including photocopying or recording,
without the express written permission of AJA Inc.
FCC Emission Information
Contacting Support
This equipment has been tested and found to comply with the limits for a Class A digital device,
pursuant to Part 15 of the FCC Rules. These limits are designed to provide reasonable protection
against harmful interference when the equipment is operated in a commercial environment. This
equipment generates, uses and can radiate radio frequency energy and, if not installed and used in
accordance with the instruction manual, may cause harmful interference to radio
communications. Operation of this equipment in a residential area is likely to cause harmful
interference in which case the user will be required to correct the interference at his own expense.
Changes or modifications not expressly approved by AJA Video can effect emission compliance
and could void the user’s authority to operate this equipment.
To contact AJA Video for sales or support, use any of the following methods:
443 Crown Point Circle, Grass Valley, CA. 95945 USA
Telephone: +1.800.251.4224 or +1.530.274.2048
Fax: +1.530.274.9442
Web: http://www.aja.com
Support Email: support@aja.com
Sales Email: sales@aja.com
When calling for support, first read the Chapter on T roubleshooting at the back of this manual. You
can often save time and effort by looking there first for simple remedies and information on how
to get support from AJA and Apple Computer Inc.

Limited Warranty
Io Installation and Operation Manual — Limited Warranty
AJA Video warrants that this product will be free from defects in materials and workmanship
for a period of three years from the date of purchase. If a product prov es to be defective during
this warranty period, AJA Video, at its option, will either repair the defective product without
charge for parts and labor, or will pro vide a replacement in ex change for the defective pr oduct.
In order to obtain service under this warranty, you the Customer, must notify AJA Video of
the defect before the expiration of the warranty period and make suitable arrangements for the
performance of service. The Customer shall be responsible for packaging and shipping the
defective product to a designated service center nominated by AJA Video, with shipping
charges prepaid. AJA Video shall pay for the return of the product to the Customer if the
shipment is to a location within the country in which the AJA Video service center is located.
Customer shall be responsible for paying all shipping charges, insurance, duties, taxes, and
any other charges for products returned to any other locations.
This warranty shall not apply to any defect, failure or damage caused by improper use or
improper or inadequate maintenance and care. AJA Video shall not be obligated to furnish
service under this warranty a) to repair damage resulting from attempts by personnel other
than AJA Video representatives to install, repair or service the product, b) to repair damage
resulting from improper use or connection to incompatible equipment, c) to repair any
damage or malfunction caused by the use of non-AJA Video parts or supplies, or d) to service
a product that has been modified or integrated with other products when the effect of such a
modification or integration increases the time or difficulty of servicing the product.
THIS WARRANTY IS GIVEN BY AJA VIDEO IN LIEU OF ANY OTHER
WARRANTIES, EXPRESS OR IMPLIED. AJA VIDEO AND ITS VENDORS
DISCLAIM ANY IMPLIED WARRANTIES OF MERCHANTABILITY OR FITNESS
FOR A PARTICULAR PURPOSE. AJA VIDEO’S RESPONSIBILITY TO REPAIR OR
REPLACE DEFECTIVE PRODUCTS IS THE WHOLE AND EXCLUSIVE REMEDY
PROVIDED TO THE CUSTOMER FOR ANY INDIRECT, SPECIAL, INCIDENTAL
OR CONSEQUENTIAL DAMAGES IRRESPECTIVE OF WHETHER AJA VIDEO OR
THE VENDOR HAS ADVANCE NOTICE OF THE POSSIBILITY OF SUCH
DAMAGES.
1
iii
Important Safety Information
There are no user-serviceable parts inside. Opening the chassis will void the warranty unless
performed by an AJA service center or licensed facility.
Cautionary Notice—Possible Damage to Equipment from Phantom Power
Do not connect Io, Io LA, or Io LD, to any equipment having phantom
power turned ON. Phantom power may cause damage to Io, Io LA/Io LD,
!
or other audio equipment connected.

iv

Io Installation and Operation Manual — Table of Contents
Table of Contents
Trademarks . . . . . . . . . . . . . . . . . . . . . . . . . . . . . . . . . . . . . . . . . . . . . . . . . . . . . . . . . . . . . . . . . . . ii
Notice . . . . . . . . . . . . . . . . . . . . . . . . . . . . . . . . . . . . . . . . . . . . . . . . . . . . . . . . . . . . . . . . . . . . . . . ii
FCC Emission Information . . . . . . . . . . . . . . . . . . . . . . . . . . . . . . . . . . . . . . . . . . . . . . . . . . . . . . . ii
Contacting Support . . . . . . . . . . . . . . . . . . . . . . . . . . . . . . . . . . . . . . . . . . . . . . . . . . . . . . . . . . . . . ii
Limited Warranty . . . . . . . . . . . . . . . . . . . . . . . . . . . . . . . . . . . . . . . . . . . . . . . . . . . . . . . . . . . . . iii
Important Safety Information . . . . . . . . . . . . . . . . . . . . . . . . . . . . . . . . . . . . . . . . . . . . . . . . . . . . iii
Chapter 1: Introduction
Overview . . . . . . . . . . . . . . . . . . . . . . . . . . . . . . . . . . . . . . . . . . . . . . . . . . . . . . . . . . . . . . . . . . . . . 1
Features . . . . . . . . . . . . . . . . . . . . . . . . . . . . . . . . . . . . . . . . . . . . . . . . . . . . . . . . . . . . . . . . . . . . . . 2
Hardware . . . . . . . . . . . . . . . . . . . . . . . . . . . . . . . . . . . . . . . . . . . . . . . . . . . . . . . . . . . . . . . . . 2
Software . . . . . . . . . . . . . . . . . . . . . . . . . . . . . . . . . . . . . . . . . . . . . . . . . . . . . . . . . . . . . . . . . . 3
What’s In The Box? . . . . . . . . . . . . . . . . . . . . . . . . . . . . . . . . . . . . . . . . . . . . . . . . . . . . . . . . . . . . 3
System Requirements . . . . . . . . . . . . . . . . . . . . . . . . . . . . . . . . . . . . . . . . . . . . . . . . . . . . . . . . . . . 4
Minimum and Recommended System and Software Requirements . . . . . . . . . . . . . . . . . . . . . 4
Understanding Disk Storage Methods . . . . . . . . . . . . . . . . . . . . . . . . . . . . . . . . . . . . . . . . . . . 5
About RAIDs . . . . . . . . . . . . . . . . . . . . . . . . . . . . . . . . . . . . . . . . . . . . . . . . . . . . . . . . . . . 8
Software For Striping . . . . . . . . . . . . . . . . . . . . . . . . . . . . . . . . . . . . . . . . . . . . . . . . . . . . . 8
AJA Io and Xserve RAID . . . . . . . . . . . . . . . . . . . . . . . . . . . . . . . . . . . . . . . . . . . . . . . . . . 8
Storage capacity . . . . . . . . . . . . . . . . . . . . . . . . . . . . . . . . . . . . . . . . . . . . . . . . . . . . . . . . . . 9
In This Manual . . . . . . . . . . . . . . . . . . . . . . . . . . . . . . . . . . . . . . . . . . . . . . . . . . . . . . . . . . . . . . . 10
1
i
Chapter 2: Controls and Indicators
Controls and Indicators . . . . . . . . . . . . . . . . . . . . . . . . . . . . . . . . . . . . . . . . . . . . . . . . . . . . . . . . . 11
Front Panel . . . . . . . . . . . . . . . . . . . . . . . . . . . . . . . . . . . . . . . . . . . . . . . . . . . . . . . . . . . . . . . . . . 12
Indicator Descriptions . . . . . . . . . . . . . . . . . . . . . . . . . . . . . . . . . . . . . . . . . . . . . . . . . . . . . . 12
Status Indicators . . . . . . . . . . . . . . . . . . . . . . . . . . . . . . . . . . . . . . . . . . . . . . . . . . . . . . . . 12
Mode Indicators . . . . . . . . . . . . . . . . . . . . . . . . . . . . . . . . . . . . . . . . . . . . . . . . . . . . . . . . 13
Video In Indicators . . . . . . . . . . . . . . . . . . . . . . . . . . . . . . . . . . . . . . . . . . . . . . . . . . . . . . 13
Audio In Indicators . . . . . . . . . . . . . . . . . . . . . . . . . . . . . . . . . . . . . . . . . . . . . . . . . . . . . . 13
Rear Panel . . . . . . . . . . . . . . . . . . . . . . . . . . . . . . . . . . . . . . . . . . . . . . . . . . . . . . . . . . . . . . . . . . . 14
About Inputs and Outputs . . . . . . . . . . . . . . . . . . . . . . . . . . . . . . . . . . . . . . . . . . . . . . . . . . . 14
About BNC Connectors . . . . . . . . . . . . . . . . . . . . . . . . . . . . . . . . . . . . . . . . . . . . . . . . . . . . 15
Connectors . . . . . . . . . . . . . . . . . . . . . . . . . . . . . . . . . . . . . . . . . . . . . . . . . . . . . . . . . . . . . . 15
Connector Descriptions . . . . . . . . . . . . . . . . . . . . . . . . . . . . . . . . . . . . . . . . . . . . . . . . . . . . . 16
4 Channel AES/EBU Audio Inputs And Outputs . . . . . . . . . . . . . . . . . . . . . . . . . . . . . . . 16
Analog 4 Channel Balanced/Unbalanced Audio . . . . . . . . . . . . . . . . . . . . . . . . . . . . . . . . 16
ADAT Audio Inputs And Outputs . . . . . . . . . . . . . . . . . . . . . . . . . . . . . . . . . . . . . . . . . . 16
Audio Monitor Output . . . . . . . . . . . . . . . . . . . . . . . . . . . . . . . . . . . . . . . . . . . . . . . . . . . 16
Audio Word Clock . . . . . . . . . . . . . . . . . . . . . . . . . . . . . . . . . . . . . . . . . . . . . . . . . . . . . . 17
RS422 Machine Control . . . . . . . . . . . . . . . . . . . . . . . . . . . . . . . . . . . . . . . . . . . . . . . . . . 17
FireWire . . . . . . . . . . . . . . . . . . . . . . . . . . . . . . . . . . . . . . . . . . . . . . . . . . . . . . . . . . . . . . 17
SDI Input and Outputs . . . . . . . . . . . . . . . . . . . . . . . . . . . . . . . . . . . . . . . . . . . . . . . . . . . 17

ii
S-Video (Y/C) . . . . . . . . . . . . . . . . . . . . . . . . . . . . . . . . . . . . . . . . . . . . . . . . . . . . . . . . . .17
Composite NTSC/PAL . . . . . . . . . . . . . . . . . . . . . . . . . . . . . . . . . . . . . . . . . . . . . . . . . . .18
YPbPr . . . . . . . . . . . . . . . . . . . . . . . . . . . . . . . . . . . . . . . . . . . . . . . . . . . . . . . . . . . . . . . .18
Reference Video (looping) . . . . . . . . . . . . . . . . . . . . . . . . . . . . . . . . . . . . . . . . . . . . . . . . .18
AC Power . . . . . . . . . . . . . . . . . . . . . . . . . . . . . . . . . . . . . . . . . . . . . . . . . . . . . . . . . . . . . .19
Chapter 3: Getting Started
Io And Your Workflow . . . . . . . . . . . . . . . . . . . . . . . . . . . . . . . . . . . . . . . . . . . . . . . . . . . . . . . . .21
Understanding Typical Workflows . . . . . . . . . . . . . . . . . . . . . . . . . . . . . . . . . . . . . . . . . . . . . . . . .22
DV (DV25) . . . . . . . . . . . . . . . . . . . . . . . . . . . . . . . . . . . . . . . . . . . . . . . . . . . . . . . . . . . . . .23
DV50 . . . . . . . . . . . . . . . . . . . . . . . . . . . . . . . . . . . . . . . . . . . . . . . . . . . . . . . . . . . . . . . . . . .23
PhotoJPEG . . . . . . . . . . . . . . . . . . . . . . . . . . . . . . . . . . . . . . . . . . . . . . . . . . . . . . . . . . . . . . .23
Uncompressed 8-bit . . . . . . . . . . . . . . . . . . . . . . . . . . . . . . . . . . . . . . . . . . . . . . . . . . . . . . . .23
Uncompressed 10-bit . . . . . . . . . . . . . . . . . . . . . . . . . . . . . . . . . . . . . . . . . . . . . . . . . . . . . . .23
Mixing and Matching Formats in Final Cut . . . . . . . . . . . . . . . . . . . . . . . . . . . . . . . . . . . . . . . . . .24
Chapter 4: Installation and Configuration
Installation Overview . . . . . . . . . . . . . . . . . . . . . . . . . . . . . . . . . . . . . . . . . . . . . . . . . . . . . . . . . . .25
Unpacking . . . . . . . . . . . . . . . . . . . . . . . . . . . . . . . . . . . . . . . . . . . . . . . . . . . . . . . . . . . . . . . . . . .26
Shipping Box Contents . . . . . . . . . . . . . . . . . . . . . . . . . . . . . . . . . . . . . . . . . . . . . . . . . . . . . .26
Installing Io Software . . . . . . . . . . . . . . . . . . . . . . . . . . . . . . . . . . . . . . . . . . . . . . . . . . . . . . . . . . .27
Software Installation Procedure . . . . . . . . . . . . . . . . . . . . . . . . . . . . . . . . . . . . . . . . . . . . . . . .27
Configuring the Io Chassis for Desk or Rackmount . . . . . . . . . . . . . . . . . . . . . . . . . . . . . . . . . . . .32
Physical Requirements . . . . . . . . . . . . . . . . . . . . . . . . . . . . . . . . . . . . . . . . . . . . . . . . . . . . . .32
Desk Mounting . . . . . . . . . . . . . . . . . . . . . . . . . . . . . . . . . . . . . . . . . . . . . . . . . . . . . . . . . . . .32
Front Rackmounting . . . . . . . . . . . . . . . . . . . . . . . . . . . . . . . . . . . . . . . . . . . . . . . . . . . . . . .32
Rear Rackmounting . . . . . . . . . . . . . . . . . . . . . . . . . . . . . . . . . . . . . . . . . . . . . . . . . . . . . . . .32
Cabling the System . . . . . . . . . . . . . . . . . . . . . . . . . . . . . . . . . . . . . . . . . . . . . . . . . . . . . . . . . . . .33
Where to Place Io . . . . . . . . . . . . . . . . . . . . . . . . . . . . . . . . . . . . . . . . . . . . . . . . . . . . . . . . . .33
Power Requirements . . . . . . . . . . . . . . . . . . . . . . . . . . . . . . . . . . . . . . . . . . . . . . . . . . . . . . . .33
System Video/Audio Cable Connections . . . . . . . . . . . . . . . . . . . . . . . . . . . . . . . . . . . . . . . . .34
Typical Digital System . . . . . . . . . . . . . . . . . . . . . . . . . . . . . . . . . . . . . . . . . . . . . . . . . . . .34
Typical Analog System . . . . . . . . . . . . . . . . . . . . . . . . . . . . . . . . . . . . . . . . . . . . . . . . . . . .37
Video and FireWire . . . . . . . . . . . . . . . . . . . . . . . . . . . . . . . . . . . . . . . . . . . . . . . . . . . . . . . . . . . .38
Important Features of FireWire and Video as Implemented in Io . . . . . . . . . . . . . . . . . . . . . .38
Using 8-bit Versus 10-bit Video . . . . . . . . . . . . . . . . . . . . . . . . . . . . . . . . . . . . . . . . . . . . . . . . . . .38
Genlock and Your System . . . . . . . . . . . . . . . . . . . . . . . . . . . . . . . . . . . . . . . . . . . . . . . . . . . . . . .39
Chapter 5: Using the System with Final Cut Pro 4
Final Cut Pro . . . . . . . . . . . . . . . . . . . . . . . . . . . . . . . . . . . . . . . . . . . . . . . . . . . . . . . . . . . . . . . . .41
A Note About Io Audio Levels and Final Cut . . . . . . . . . . . . . . . . . . . . . . . . . . . . . . . . . . . . .41
First Time You Run Final Cut . . . . . . . . . . . . . . . . . . . . . . . . . . . . . . . . . . . . . . . . . . . . . . . .42
Easy Setups for Typical Uses . . . . . . . . . . . . . . . . . . . . . . . . . . . . . . . . . . . . . . . . . . . . . . . . . . . . .42
Adding and Deleting Default Easy Setups . . . . . . . . . . . . . . . . . . . . . . . . . . . . . . . . . . . . . . . .42
Easy Setups Menu . . . . . . . . . . . . . . . . . . . . . . . . . . . . . . . . . . . . . . . . . . . . . . . . . . . . . . . . . .43

Io Installation and Operation Manual — Table of Contents
Easy Setups For Use With Io . . . . . . . . . . . . . . . . . . . . . . . . . . . . . . . . . . . . . . . . . . . . . . . 45
Audio/Video Settings Menu . . . . . . . . . . . . . . . . . . . . . . . . . . . . . . . . . . . . . . . . . . . . . . . . . . 49
To Create A New Easy Setup . . . . . . . . . . . . . . . . . . . . . . . . . . . . . . . . . . . . . . . . . . . . . . 51
The Sequence Presets Window . . . . . . . . . . . . . . . . . . . . . . . . . . . . . . . . . . . . . . . . . . . . . 52
Checking the System with a Simple Test Project of Bars and Tone . . . . . . . . . . . . . . . . . . . . . . . . 57
Chapter 6: Troubleshooting
If You Run Into Problems . . . . . . . . . . . . . . . . . . . . . . . . . . . . . . . . . . . . . . . . . . . . . . . . . . . . . . . 59
Updating Software . . . . . . . . . . . . . . . . . . . . . . . . . . . . . . . . . . . . . . . . . . . . . . . . . . . . . . . . . 61
Support . . . . . . . . . . . . . . . . . . . . . . . . . . . . . . . . . . . . . . . . . . . . . . . . . . . . . . . . . . . . . . . . . 61
Apple Resources . . . . . . . . . . . . . . . . . . . . . . . . . . . . . . . . . . . . . . . . . . . . . . . . . . . . . . . . 61
1
Appendix A: Specifications
iii

iv

Io
Chapter 1:
Introduction
Overview
AJA Io brings a wide variety of high quality video and audio to an Apple Power Mac
running Final Cut P ro 4 softwar e. Offering unsurpassed 10-bit uncompr essed video
and multi-channel audio, Io allows a Power Mac to be configured anywhere from a
professional editing suite, corporate/industrial video center, or high-powered
desktop video setup—and just about anything in between. Both analog and digital
sources are offered, allowing connection to just about every kind of video/audio
peripheral from the most current digital decks to old legacy devices. It does this with
unique simplicity, using a single FireWire connection between Io and the Apple
Po wer M ac—while serving simultaneous realtime connection for all audio and video
sources. How does Io transfer uncompressed video over FireWire? It efficiently uses
the IEEE 1394a 400Mb/s FireWire port on the Power Mac for all data transfer—
since uncompressed is only 270Mb/s (and it has filler data included), FireWire can
easily handle the bandwidth.
In addition to all the video and audio connections, Io also provides the following
professional features:
•
A/V presets for Final Cut Pro 4.n
•
RS422 machine control for professional control of VTRs
Audio word clock for synchronization
•
Video Genlock for synchronizing with reference sources
•
1
1
1

2
Features
The Io product offers a large number of unique features for connectivity, control,
and ease of installation in any environment.
Hardware
All outputs are active—all the time.
•
Single IEEE 1394a FireWire® connection between Apple Power Mac and Io
•
for all audio/video and control.
Brackets (rack ears) are provided for front mounting the two-rack-unit chassis
•
in a standard 19” (48 cm) equipment rack. You can also mount the Io chassis
via the same brackets attached at the rear panel for industrial-style equipment
racks. Alternatively, you can use the chassis without any brackets at all, instead
placing supplied rubber feet on the bottom of the chassis for use on a desk.
•
Chassis styling compliments Apple’s Xserve and Xserve RAID for a stylish
desktop video suite appearance.
•
RS-422 Control Port (Sony), 9-pin D, for machine control.
•
10-bit uncompressed SDI with embedded audio In/Out.
•
Analog (10-bit A/D and D/A) video inputs/outputs.
—S-Video In/Out
—Composite NTSC/PAL Video In/Out
—Component YPbPr/RGB Video In/Out
—Genlock/Reference Video (looping)
24-bit digital/optical/analog multi-channel audio.
•
—4 channel AES/EBU audio In/Out
—4 channel balanced/unbalanced analog audio In connectors
support XLR or TRS-type connections
—4 channel balanced analog audio Out connectors (XLR)
—8 channel ADAT® optical audio In/Out
—8 channel TASCAM®-style balanced audio monitor Out
—8 channel embedded audio over SDI
•
Audio word clock connector (BNC) for audio synchronization
•
Front Panel Status Indicators: Power On/Off, FireWire (active/inactive), Ref
(Genlock), NTSC or PAL.
•
Front Panel Mode Indicators: Input/Output.

Software
What’s In The Box?
Io Installation and Operation Manual — What’s In The Box?
•
Front Panel Video/Audio Input Source Indicators.
—Video: Present, SDI, Component, Composite, and S-video
—Audio: Present, SDI, ADAT, AES/EBU, and Analog
AJA’s Io was codeveloped with Apple for use with Final Cut Pro 4 for powerful
video/audio capture, editing, and video production—all in a single integrated
system. Many Final Cut Pro features in version 4 can be better utilized through
use of Io.
When you unpack your AJA Io chassis, you’ll find the following components:
AJA Io Installation Software CD-Rom—this CD contains the software
•
1
installer to place Io drivers on an Apple Power Mac for use with Final Cut
Pro. Install the software as discussed in this manual in Chapter 4:
Installation and Configuration. The CD also contains a wide variety of useful
information, including a softcopy of this manual you’re reading (PDF
format).
3
•
Io Chassis with rackmount brackets (rack ears) already installed. These may
be removed for desktop use, or re-installed at the back of the chassis for
alternate rack-mounting (see Chapter 4—Installation and Configuration for
further details).
•
Rubber Feet (4) for optional desk use of the Io chassis (see Chapter 4—
Installation and Configuration for further details.
AC Power cord.
•
•
FireWire cable for connection between Io and a Power Mac or Xserve.
•
Io Installation and Operation Manual (the manual you’re reading).
•
Late-breaking News and/or errata (where applicable, AJA may include
additional bulletins related to your product and software).
Please save all packaging for shipping the Io should you wish to do so when
moving or sending it in for service.
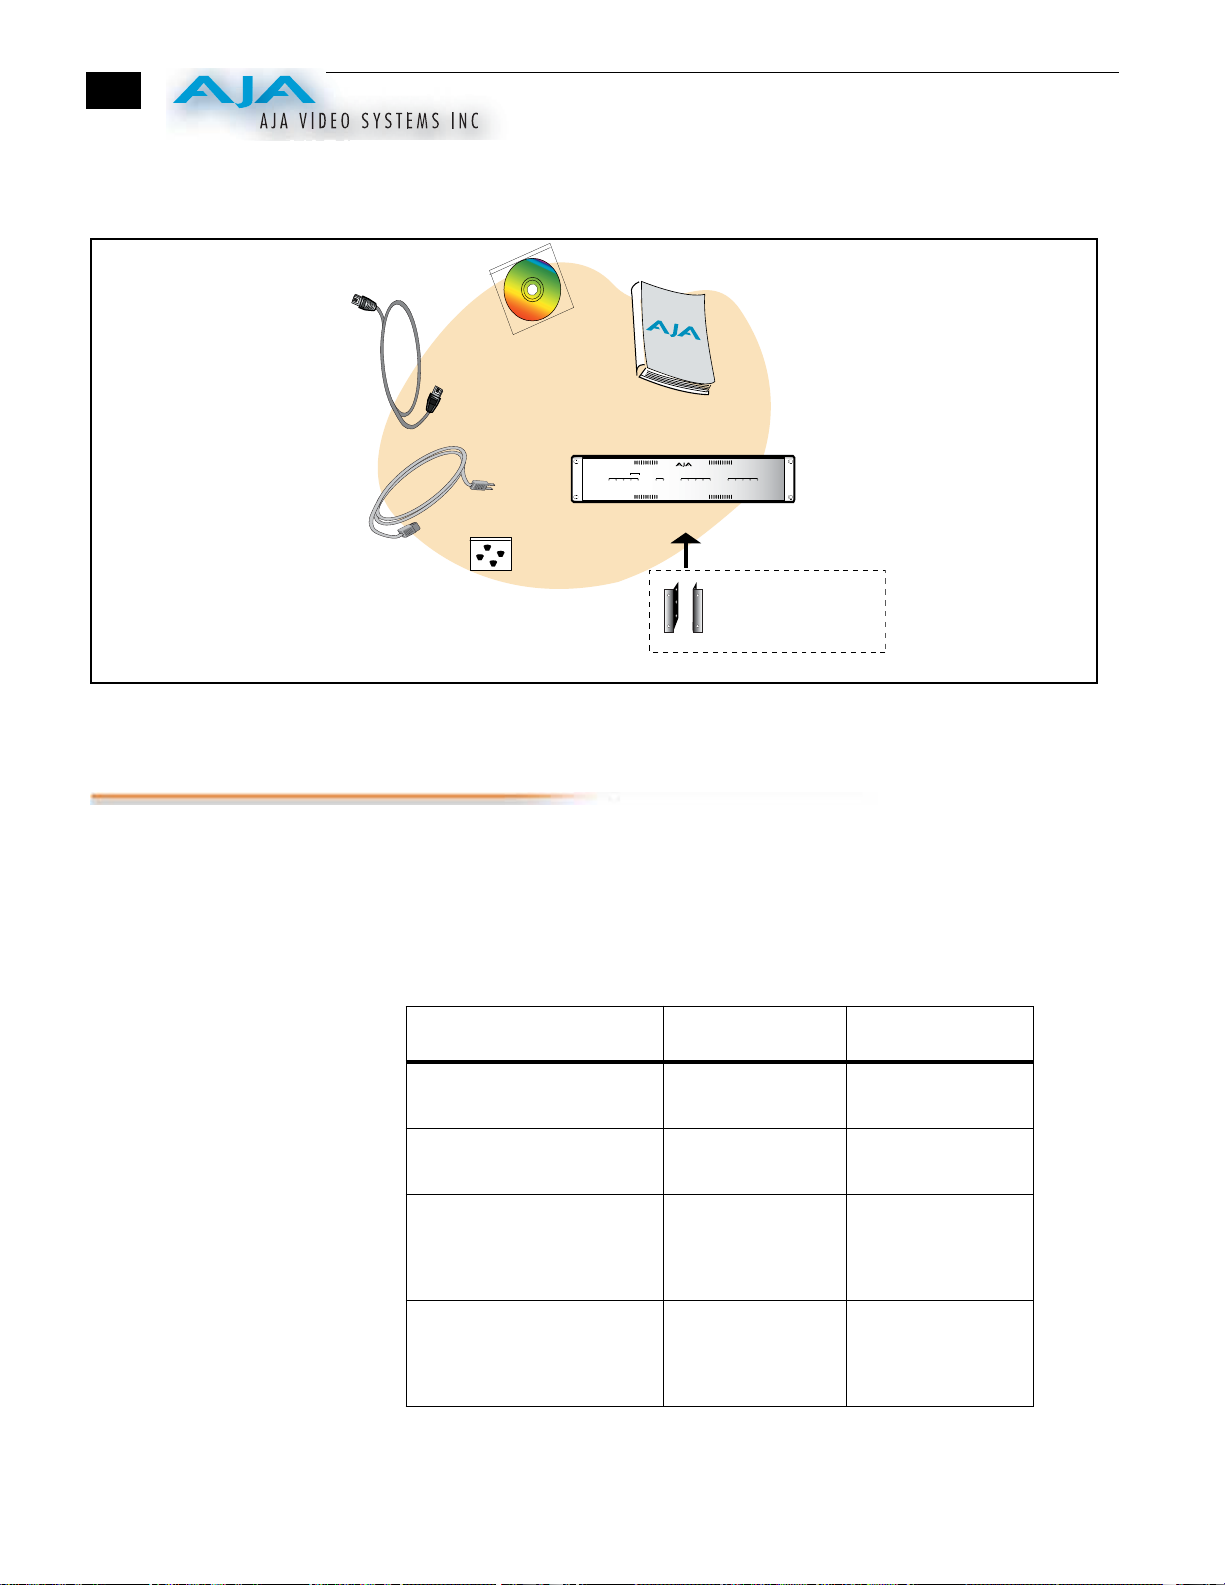
4
Installation Software CD
FireWire
Cable
AC Power Cord
Rubber Feet
For Bottom of
Chassis
Installation and Operation Manual
Status
Mode
Video In
Audio In
FireWire Ref NTSCPower PAL
AJA Io
SDI Component S-VideoPresent Composite
OutIn
™
Panel Chassis
SDI ADAT AES/EBUPresent Analog
Io
Chassis
Rackmount
Brackets
(already installed on Chassis)
Io Shipping Box Contents
System Requirements
AJA Video recommends that your system meet minimum hardware and software
requirements to achieve a satisfactory level of performance when operating it.
Here, we provide minimum and recommended requirements and then discuss
disk storage issues that should be understood for proper system configuration.
Minimum and
Recommended
System and
Software
Requirements
The following table outlines the system hardware and software needed.
Item Minimum Recommended
Macintosh
Operating System
Editing/Production
Software Suite
Macintosh Power Mac G4,
OS X, version
10.2.5
OS X, version
10.2.6 or newer
Final Cut Pro 4 Final Cut Pro 4
Power Mac G5
dual 800 MHz
(or single 933 MHz
G4)
RAM as recommended
by Final Cut Pro for
your system
configuration
as recommended by
Final Cut Pro for
your system
configuration

Understanding
Disk Storage
Methods
Io Installation and Operation Manual — System Requirements
Item Minimum Recommended
Disk Storage (external RAID)
Note:
see Storage Methods
topic that follows later in this
Chapter
4 ATA/IDE or
4 SCSI Hard Drives
Apple Xserve RAID
The Io chassis, an Apple Power Mac, and Final Cut Pro 4, together offer an
unprecedented level of features and performance for all Video/Audio production
applications. However, to ensure performance and quality, the disk storage system
used with the Apple P o wer M ac must be able to meet the demands of storing realtime
1
uncompressed media. At the very minimum, the disk storage system must be able to
provide and maintain a consistent 50 MB/s transfer rate from the Power Mac to disk
(read/write). There are a variety of system configurations and peripherals that can
provide this level of performance. Possible system configurations are listed below:
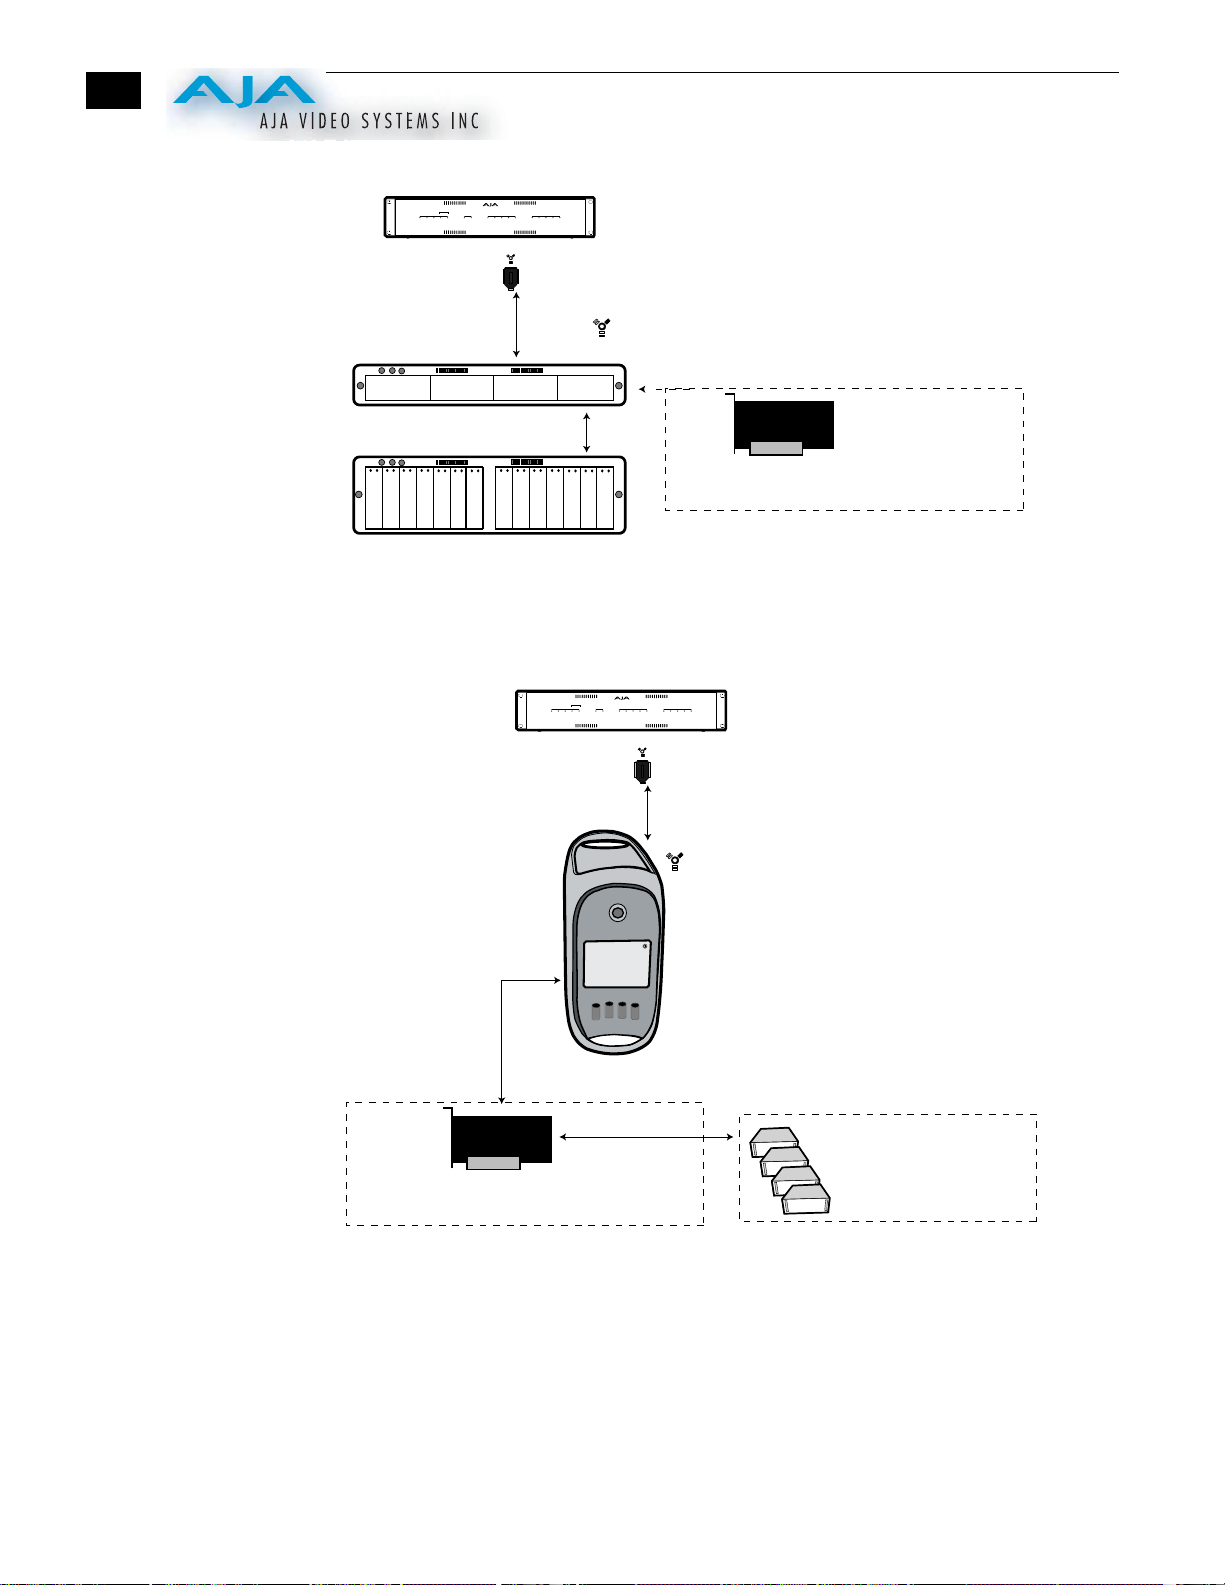
Storage Method Features/Limitations Cost
Xserve RAID Features up to 14 ATA/100
drive channels, dual
independent RAID controllers,
and a dual 2Gb Fibre Channel
host interface. Xserve provides
up to 2.5TB of storage with
throughput of up to 400
megabytes per second.
Expensive, although
the cost per
gigabyte is excellent
when large storage
is needed
5
External ATA/IDE or SCSI
RAID
Note:
FireWire drive solutions are not supported in use with AJA Io. Since Io
Scalable. Performance almost
as good as Xserve, although it
can be more complex to set up
and maintain. Many vendors
offer solutions (too many to list
here; check with your Apple
dealer for SCSI Storage
solutions for details). Although
the connection to the external
RAID chassis is SCSI, the
drives themselves may be
SCSI or ATA. A pure SCSI
array will offer higher
performance at a higher cost.
Moderately
Expensive
connects to the host Power Mac via FireWire and uses the FireWire bus bandwidth
extensively, it cannot also be used for storage—at the same time. You can however
attach and use FireWire drives on the Power Mac whenever Final Cut Pro is not in
use. Their presence on the bus will not affect Io performance as long as they aren’t
being actively used.
6
Status
Mode
Video In
Audio In
FireWire Ref NTSCPower PAL
AJA Io
Apple Xserve
Apple Xserve RAID
SDI Component S-VideoPresent Composite
OutIn
Io
•
•
•
•
•
•
•
•
•
•
•
•
•
•
•
•
•
•
•
•
•
•
•
•
•
•
•
•
•
•
•
•
•
•
•
•
SDI ADAT AES/EBUPresent Analog
Firewire
Connection
Firewire
Connection
Dual-port 2Gb Apple Fibre Channel PCI card
(installed in the Xserve
Disk Storage Solutions—Xserve and Xxerve RAID
Status
Mode
Video In
Audio In
FireWire Ref NTSCPower PAL
AJA Io
Apple Power Mac with OS X
SCSI Controller PCI card
(installed in the Power Mac)
SDI Component S-VideoPresent Composite
OutIn
Io
SDI ADAT AES/EBUPresent Analog
Firewire
Connection
Firewire
Connection
External to
Power Mac
4 or more ATA/IDE or
SCSI Drives in
RAID Array
Disk Storage Solutions—External ATA/IDE or SCSI RAID

Io Installation and Operation Manual — System Requirements
About RAIDs
Redundant Array of Independent Disks, or RAID, is a group of hard drives that
appears to the host Power Mac as a single high-speed storage unit. RAID systems
enable you to increase storage capacity and get the performance, reliability, and data
protection needed for video production, but not possible from a single hard drive.
RAID drives inside the array operate simultaneously, increasing overall throughput.
RAID technology is comprised of these techniques (some or all):
•
Striping data across multiple drives for storage performance (RAID 0).
•
Mirroring for redundancy (RAID 1).
•
Parity for data protection (RAID 5 [plus others]).
1
Most RAID configurations, or RAID levels, combine these to provide a balance of
protection and performance.
Striping divides a logical drive into data blocks, or stripes, that are distributed across
an array of physical drives. Striping a set of disks improves storage performance
because each drive operates concurrently. However, striping alone, known as RAID
level 0, offers no data protection.
Mirroring involves writing identical copies of all data to a pair of physical drives. This
results in very high data reliability: If one drive fails, the data is still available on the
remaining disk drive. Howev er , it also results in a storage efficiency of only 50 percent,
because two physical drives are required to achieve a single drive’s capacity. Mirroring
alone is known as RAID level 1.
7
Parity provides data protection without requiring complete duplication of the drive
contents. In the event of a drive failure, parity information can be used with data on
surviving drives to reconstruct the contents of a failed drive. Parity data can be stored
on a dedicated drive, as in RAID 3, or distributed across an array of drives, as in
RAID 5. Parity provides much greater storage efficiency than mirroring—up to 85
percent for a set of seven drives.
Software For Striping
AJA recommends the Disk Utility softwar e pro vided b y Apple with OS X for cr eating
and striping RAIDs, including 3rd-party, SCSI, and Xserve RAIDs. It is very easy to
use and has been tested to work well. The utility can be found in Macintosh HD/
Applications/Utilities, where “Macintosh HD” is the name of the system drive.
AJA Io and Xserve RAID
For the optimum in disk storage with Final Cut Pro 4 and AJA Io, we recommend
Apple’s Xserve RAID. Xserve RAID holds up to 14 hot-swap Apple Drive Modules—
2.5TB of storage—in a rack-optimized 3U enclosure. Each 7200-RPM hard drive
connects to a dedicated ATA/100 drive channel, eliminating a traditional source of
bottlenecks and maximizing the 2Gb/s Fibre Channel host connection(s). By adding
more Xserve RAID systems, you’ll have very large expansion capabilities: A standard
42U rack can hold over 35TB of Xserve RAID storage.
8
Xserve RAID is designed for nonstop operation. Redundant hot-swap power and
cooling modules allow the system to keep functioning even if one module fails. A
high-availability architecture and dual independent RAID controllers support
RAID levels 0, 1, 3, 5, and 0+1. In addition, Xserve RAID supports hybrid RAID
levels 10, 30, and 50 when used in conjunction with host-based software RAID.
Remote Xserve RAID management capabilities are provided via Apple’s Java-based
RAID Admin application.
Note: When creating and striping an Xserve RAID for Io using the Apple Disk
Utility provided with OS X, use RAID 50: in other wor ds, the internal Xserve RAID
drives are set up as RAID 5; the Xserve RAID then shows up in Disk U tility as two
drives (regardless of the number of internal drives) which must be configured
together as RAID 0. Apple calls this configuration “RAID 50.”
Storage capacity
No matter which storage system you choose, pick one that can scale to meet your
needs over time. Ideally, you should be able to increase storage capacity or switch to
a RAID level offering increased data protection in the future. Balance current and
future storage needs with your budget and choose accordingly.
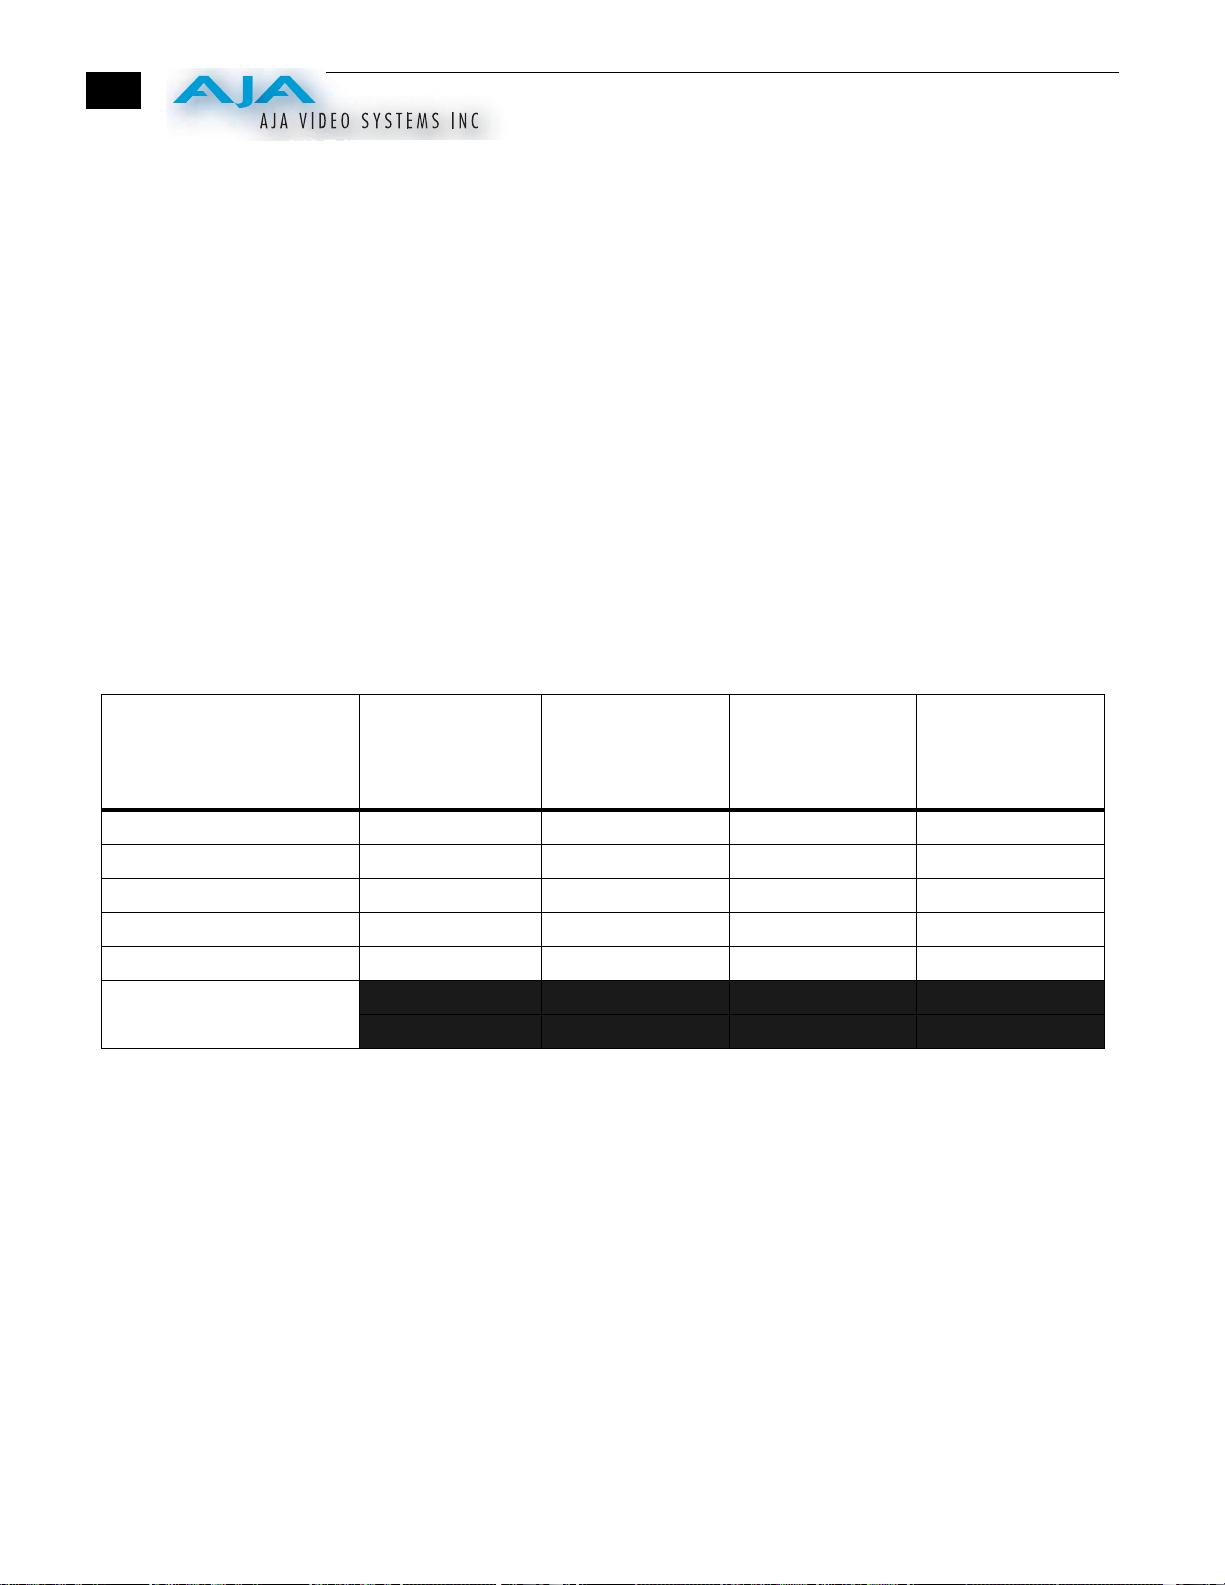
FORMAT
10 bit Uncompressed 28 101 2.9 4.8
8 bit Uncompressed 21 76 3.9 6.3
DV50 6.3 23 12.9 21.2
DV25 3.1 11 26.2 43.0
Photo JPEG 2.5 9 32.4 53.3
MB = MegaBytes
GB = GigaBytes
Transfer Rate in
MB/sec
Storage
Requirement in
GB/Hour
Capacity of
Typical 4 x 73GB
SCSI RAID in
Hours
Capacity of
Typical 4 x
120GB ATA RAID
in Hours
Note: for uncompressed formats, PAL and NTSC transfer rates and storage
requirements are the about the same because PAL has a lower frame rate, but more
lines.

In This Manual
Io Installation and Operation Manual — In This Manual
Chapter 1 is the introduction you’re reading, listing features, box contents, and system
requirements.
Chapter 2 discusses the AJA Io front and rear panel connections and indicators.
Illustrations point out the various connectors and indicators with text discussions of
each.
Chapter 3 gets you started with using Io in a typical Video environment. Workflows
for Analog component or composite, Digital SDI (Serial Digital), D V, and offline are
all discussed.
1
Chapter 4 provides complete instructions for installing and configuring the AJA Io
panel, from unpacking, installing the chassis, installing Io Mac Software From CD,
cabling the system and then getting it up and running. Important configuration
information is also provided on video settings and use of genlock/external reference.
Chapter 5 discusses operational aspects of Io when used with Final Cut Pro.
Chapter 6 discusses troubleshooting problems with your system and what to do when
there’s a problem you can’t solve.
9
Appendix A presents a list of technical specifications for the product.
The remainder of the manual consists of appendices listing specifications and an index
section to help you rapidly find topics in the manual.

10
Io
Chapter 2:
Controls and Indicators
Ch. 1/2 In Ch. 3/4 In
AES/EBU Audio
Ch. 1/2 Out Ch. 3/4 Out
Ch. 1 In Ch. 2 In Ch. 3 In Ch. 4 In
PUSH
PUSH
PUSHPUSH
Ch. 1 Out Ch. 2 Out Ch. 3 Out Ch. 4 Out
Analog Audio
Controls and Indicators
When installing the AJA Io system, you ’ll make media cable connections to a v ariety
of equipment. After installation, the front panel indicators will be useful in
monitoring what is happening on the system as well as troubleshooting problems
that can occur. Becoming familiar with the Io front and rear panels will simplify
installation, setup, and operation of the system.
On the following pages are front and rear panel illustrations with notations that
summarize all of the connectors and indicators. Detailed descriptions of each of the
connectors and indicators follow afterward.
Full Installation instructions are pro vided in Chapter 4 later in this manual. Be sur e
to read that chapter before attempting to install the product.
In
This class A digital apparatus complies
ul
with Canadian ICES-003. Cet appareil
numerique de la classe A est conforme
a la norme NMB-003 du Canada.
In
In
S-Video
Loop Out
Out
Loop
Out 1
100 - 240V~
50/60Hz 0.3A
Ref
SDI
Loop
Out 2
This device complies with Part 15 of FCC Rules. Operation is subject
to the following two conditions: (1) this device may not cause harmf
Io
PUSH
PUSH
Ch. 1-8
Optical
Ch. 1-8
Audio
www.aja.com
In
Out
Channels 1-8 Out
Analog Audio Monitor
RS-422
interference and (2) this device must accept any interference received,
including interference that may cause undesired operation.
101351
Audio
Word Clock
Out
Pr/R In
Pr/R Out
Y/G In
Component
Y/G Out
Pb/B In
Pb/B Out
Composite
Out
Note: The AJA Io should be plugged into 3-prong AC power before you make
connections to other equipment — although it should not be switched on. The A C
cord provides a path to ground for accidental static discharge and protects system
equipment.
2
1
1
12
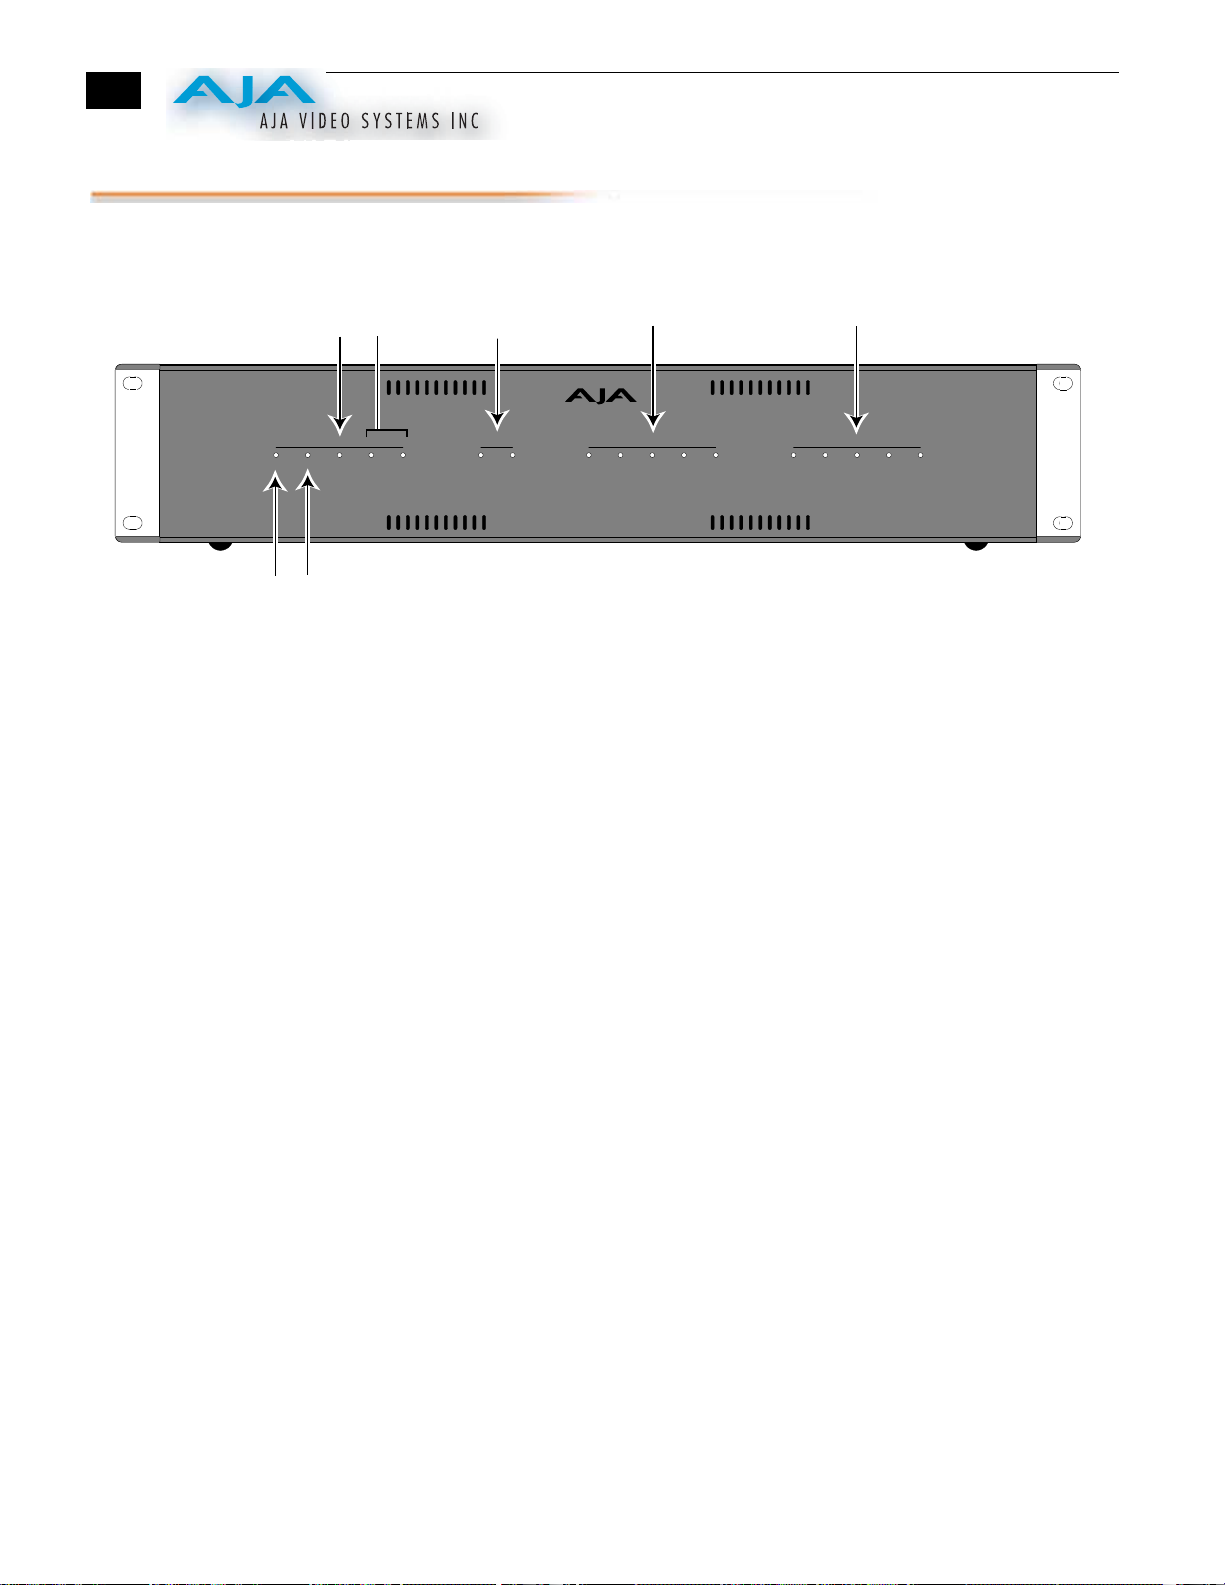
Front Panel
Indicator
Descriptions
Power
On/Off
Indicator
External
Reference
Present
Indicator
FireWire Ref NTSCPower PAL
NTSC
or PAL
Indicator
Status
Mode Indicator
(shows input or
outut operational
status)
Mode
OutIn
Video Input
Source Indicator
Video In
SDI Component S-VideoPresent Composite
Audio Input
Source Indicator
Audio In
SDI ADAT AES/EBUPresent Analog
Io
Firewire
Connection
(present or not)
AJA Io Front Panel Indicators
Indicators on the front panel are LEDs that illuminate when a condition is
present. The following indicators are conveniently arranged in groups to show
specific subjects:
• Status
• Mode
• Video In
• Audio In
Each of these groups of indicators are discussed on the following pages.
Status Indicators
Power—shows that Io is connected to AC mains power and that the power switch
on the rear panel has been turned on. It may also blink or not light at all in
the case of a boot error.
FireWire—shows audio/video is flowing over the FireWire connection (capture or
playback are occurring).
Ref—shows that the panel has an external reference video source applied
(Genlock), usually black burst. Please refer to the “Genlock and Your System”
topic in Chapter 4 for additional information on the use of this connector and
the effect of Genlock/External Reference sources on the system.
NTSC—shows that the system is configured for NTSC/525-line standards.

Io Installation and Operation Manual — Front Panel
PAL—shows that the system is configured for PAL/625-line standards.
Mode Indicators
In—shows that Io is configured to capture video/audio.
Out—shows that Io is currently selected to playback video/audio.
If you’re not running Final Cut Pro, both Mode LEDs will be off.
Video In Indicators
13
Present—shows that the selected video source has been detected.
1
SDI—shows that the serial digital video input is selected. The related SDI LED
(Audio In group) shows whether embedded audio is selected.
Component—shows that the component RGB/YPbPr video input is selected.
S-Video—shows that the S-Video digital video input is selected.
Composite—shows that the composite video input, in either NTSC or PAL, is
selected.
Audio In Indicators
Present—shows that audio signals have been detected at the selected input
connector(s).
SDI—shows that audio embedded in the SDI video input is selected.
ADAT—shows that the ADAT optical data audio input is selected.
AES/EBU—shows that the AES/EBU audio inputs are selected.
Analog—shows that balanced or unbalanced analog audio input is selected.
14
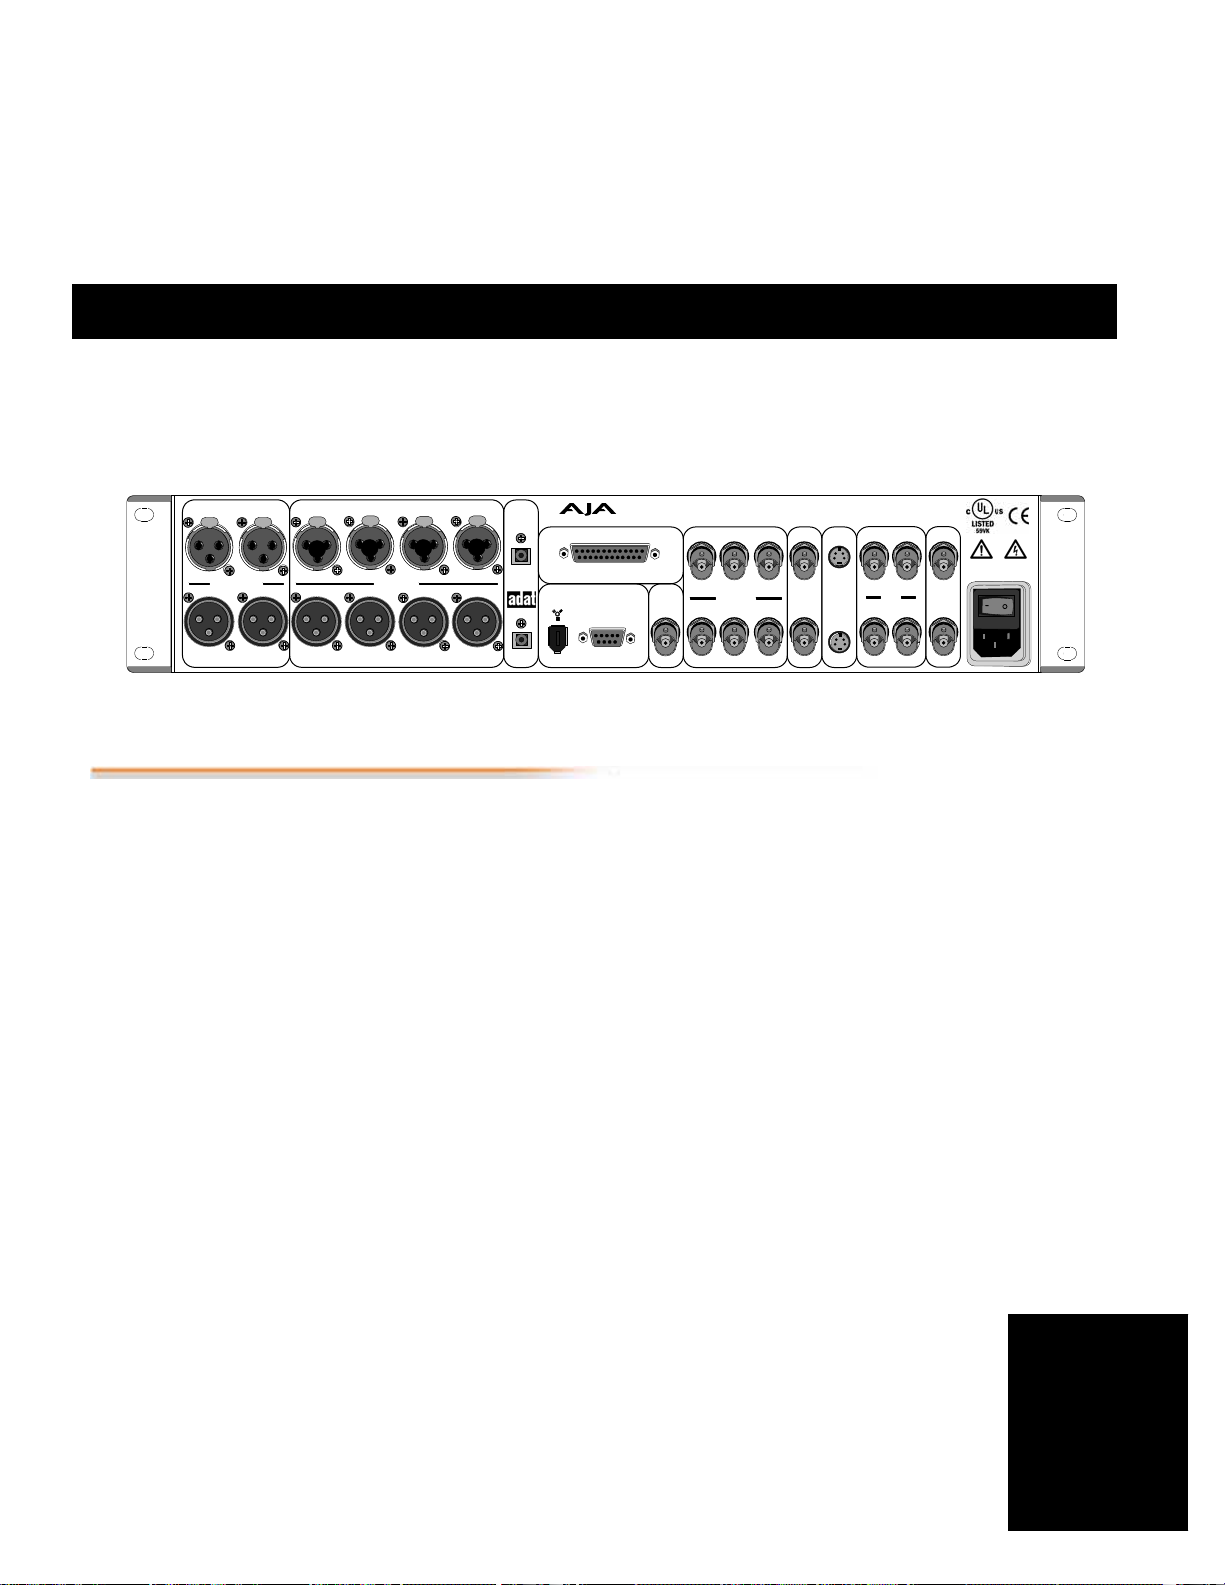
Rear Panel
AES/EBU Audio In
Channels 1 through 4
Ch. 1/2 In Ch. 3/4 In
AES/EBU Audio
Ch. 1/2 Out Ch. 3/4 Out
Ch. 1 In Ch. 2 In Ch. 3 In Ch. 4 In
PUSHPUSH
Ch. 1 Out Ch. 2 Out Ch. 3 Out Ch. 4 Out
AES/EBU Audio Out
Channels 1 through 4
About Inputs and
Outputs
Analog Audio In
Channels 1 through 4
PUSH
PUSH
PUSH
Analog Audio
Analog Audio Out
Channels 1 through 4
AJA Io Rear Panel Connectors
The function of Io’s Inputs and Outputs depend on the operational mode. In the
capture mode, Io’s inputs are selected by Final Cut Pro’s Audio Video Settings
menus (or Easy Setups). While capturing, the selected inputs are mirrored at Io’s
outputs. When not in the capture mode, Io’s outputs change to reflect the output
of Final Cut P r o. In all cases, all I o’s outputs are active all the time. In other words,
the same output video appears simultaneously on the Composite, S-Video,
Component, and SDI outputs. This method of operation allows simultaneous
connection to VTRs and monitoring facilities.
Optical Digital Audio
ADAT
8 Channels
In/Out
PUSH
Ch. 1-8
In
Optical
Audio
Ch. 1-8
Out
FireWire
to Mac
8 Channels Out
Analog Audio
For Monitoring
www.aja.com
Channels 1-8 Out
Analog Audio Monitor
RS-422
RS422
Machine
Control
This device complies with Part 15 of FCC Rules. Operation is subject
to the following two conditions: (1) this device may not cause harmf
Io
interference and (2) this device must accept any interference received,
including interference that may cause undesired operation.
101351
Audio
Word Clock
Out
Audio
Word
Clock
Pr/R In
Pr/R Out
Y/G In
Component
Y/G Out
Component
YPbPr and
RGB In/Out
Pb/B In
Pb/B Out
Out
In
Composite
Out
S-Video
In/Out
Composite
In/Out
Serial
Digital
In Out
This class A digital apparatus complies
ul
with Canadian ICES-003. Cet appareil
numerique de la classe A est conforme
a la norme NMB-003 du Canada.
In
In
S-Video
Loop Out
Out
Digital
(Loop Out)
SDI
Serial
In
Out 1
Out 2
External
Reference
Loop
100 - 240V~
50/60Hz 0.3A
Ref
Loop
Autosensing
100 to 240VAC
50/60Hz
AC Power Supply
Socket
with On/Off Switch
Io Installation and Operation Manual — Rear Panel
15
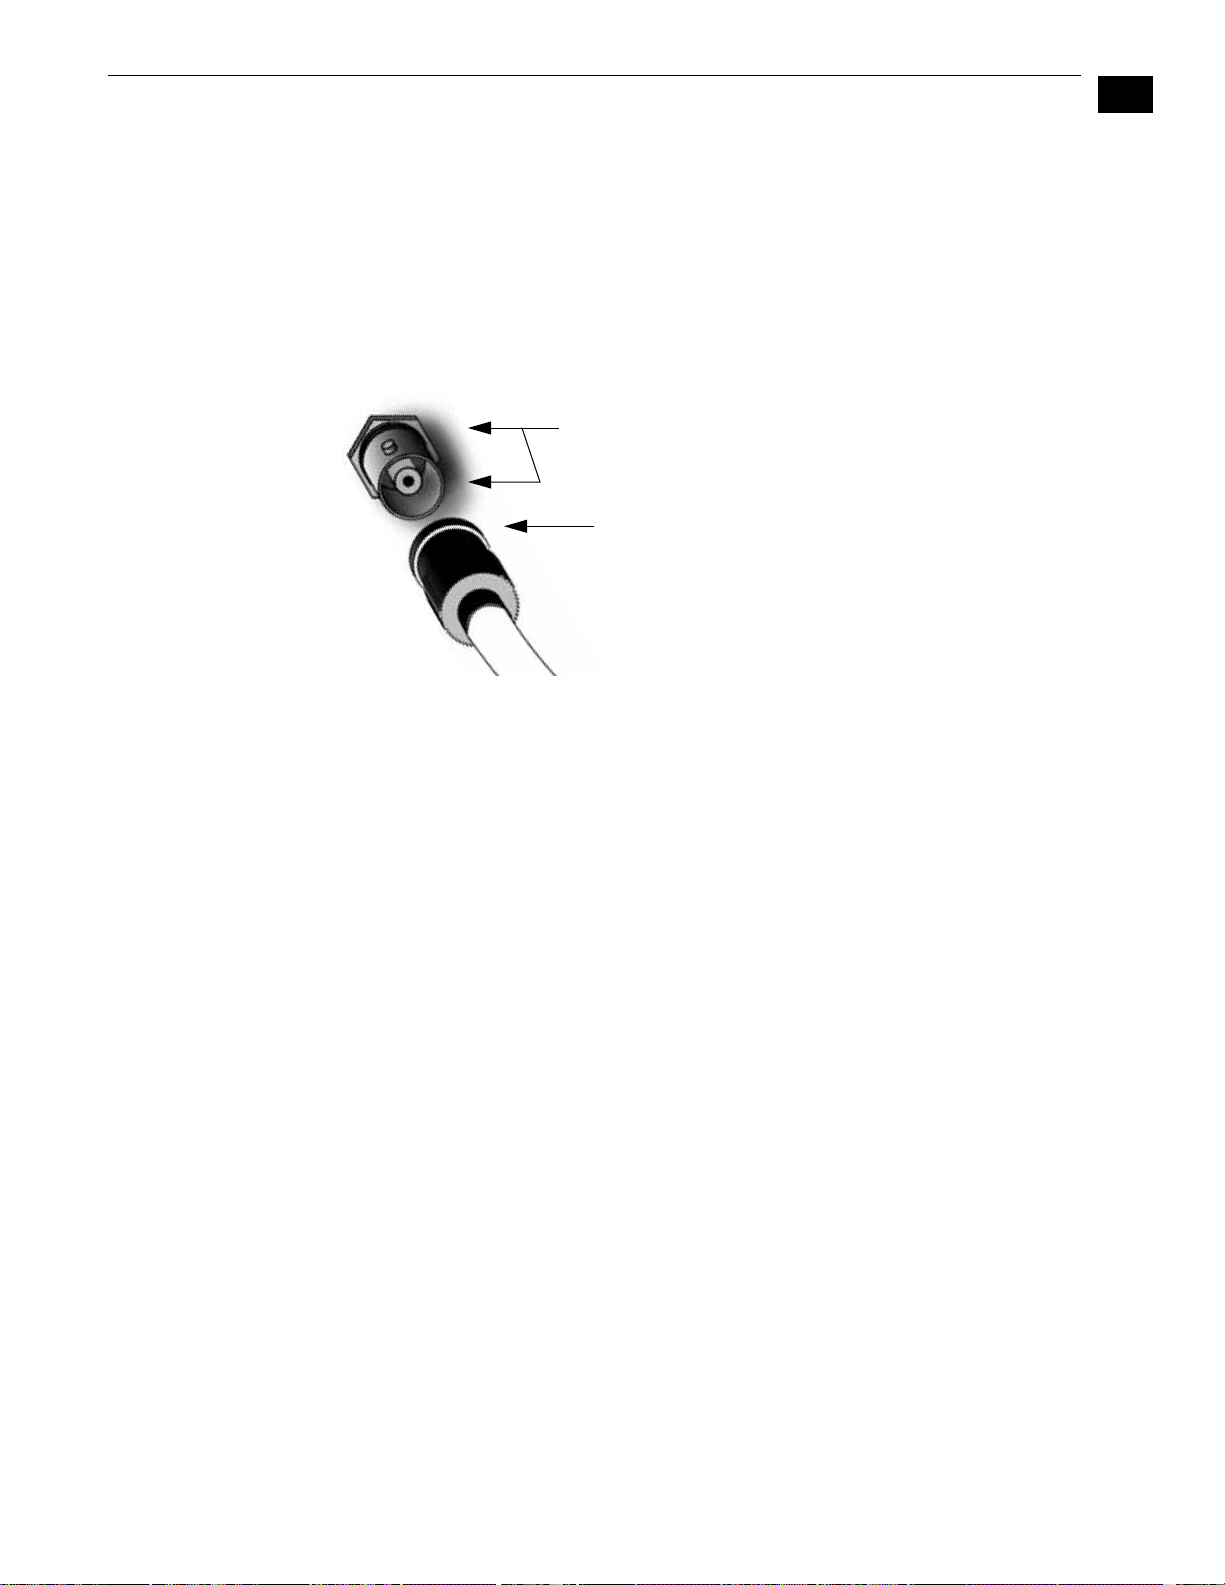
About BNC
Connectors
Although most video professionals are used to BNC connectors, you may not have
seen them if you’ve been using primarily desktop video equipment. BNC connectors
ensure a positive connection by the act of locking the connectors together via pins in
one connector that fit into slots in the corresponding connector.
To make a BNC connection, slide the cable connector over the connector on the Io
rear panel and then when seated, rotate the barrel of the cable connector 90˚ clockwise
until the connectors are locked together. When properly locked, the cable cannot
accidentally be pulled out.
Pins (2) on BNC Connector
(connector on Io Rear Panel)
Align slots in
cable connector
barrel with connector
pins, then slide it over the pins
and rotate the barrel
to lock the connectors
together
1
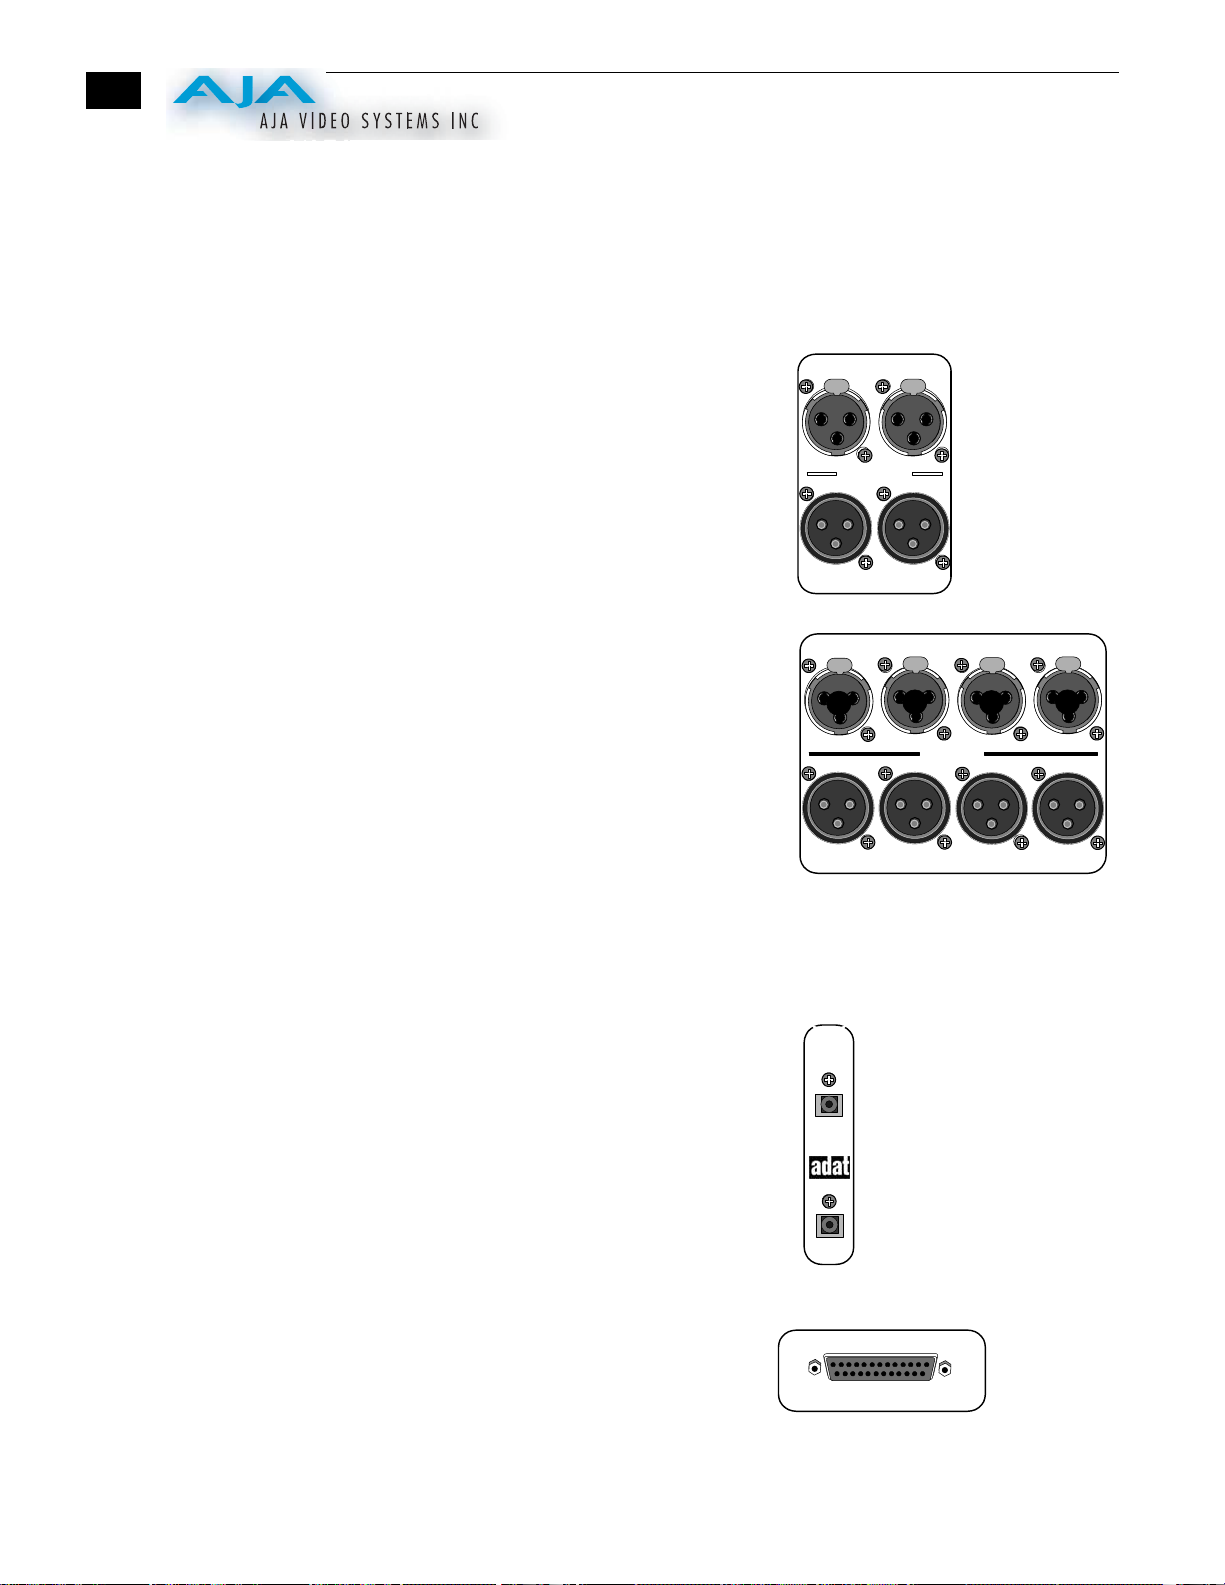
Connectors Connectors on the rear panel are arranged in groups for easy installation and
maintenance. Connectors provided are:
• 4 channel AES/EBU audio inputs (2 XLRs) and outputs (2 XLRs).
• 4 channel balanced/unbalanced analog audio In connectors support XLR or
TRS-type connections. 4 channel balanced analog audio Out connectors are
XLR.
• 8 channel ADAT audio In/Out. Connectors are optical TOSLINK.
• 8 channel TASCAM-style balanced audio monitor Out is a DB25 connector.
• Audio word clock connector (BNC) for audio synchronization (optional)
• RS-422 Control Port (Sony), 9-pin D, for machine control.
• IEEE 1394a FireWire connector for audio/video and control data between Io and
Apple Power Mac.
• SDI video with embedded audio In/Out
• S-Video In/Out (Y/C), one 4-pin mini-DIN for input, and one 4-pin mini-DIN
for output.
• Composite NTSC/PAL Video In/Out, 1 BNC for input, and 1 BNC for output.
• Component YPbPr/RGB Video, 3 BNCs for input, and 3 BNCs for output.
16
AES/EBU Audio
Ch. 1/2 Out Ch. 3/4 Out
Ch. 1/2 In Ch. 3/4 In
PUSHPUSH
Analog Audio
Ch. 1 Out Ch. 2 Out Ch. 3 Out Ch. 4 Out
Ch. 1 In Ch. 2 In Ch. 3 In Ch. 4 In
PUSH
PUSH
PUSH
PUSH
Ch. 1-8
Out
Ch. 1-8
In
Optical
Audio
• Genlock/Reference Video (looping), two BNCs
• AC power connector with ON/OFF switch, 3 pin (with Ground)
Each of these groups of connectors are discussed on the following pages.
Note: Io does not require synchronous digital audio inputs.
Connector
Descriptions
4 Channel AES/EBU Audio Inputs
And Outputs
One female XLR connector is provided for
the channel 1 and 2 inputs, while another
female XLR connector carries channel 3
and 4 inputs. Similarly, outputs are also
grouped on two XLRs—but instead are
male connectors. AES/EBU signals are
handled by Io internally as 24-bit digital.
Analog 4 Channel Balanced/Unbalanced Audio
The four analog input connectors, one for
each channel, support either balanced XLR
or unbalanced TRS-type connections. The
four analog outputs are balanced XLRs
(male). Balanced audio (differential)
connections use XLR connectors and cables
for better analog audio quality over longer
cable runs. Most professional quality VTRs
and audio equipment have XLR style
connectors for analog audio. Analog audio signals are converted internally by Io to
24-bit digital.
ADAT Audio Inputs And Outputs
The optical TOSLINK connectors use
special fiberoptic cables to carry 8 channel
ADAT audio inputs/outputs as configured
by Final Cut Pro. ADAT signals are
handled internally as 24-bit digital.
Audio Monitor Output
A DB25 female connector provides
attachment for a balanced 8 channel
T ASCAM-style audio “snake” or “octopus”
cable. Depending on the cable used, the
Channels 1-8 Out
Analog Audio Monitor
other ends break out into 8 separate TRS or
XLR connectors for connection with an audio monitor, patch-panel or mixer
subsystem.
 Loading...