

Page 1
Mini Hi-Fi Component System
JAX-N5
4-245-531-01
030113AMI-DS-SO
Page 2
WARNING
To prevent fire or shock hazard, do not expose
the unit to rain or moisture.
To avoid electrical shock, do not open the cabinet.
Refer servicing to qualified personnel only.
Do not install the appliance in a confined space, such
as a bookcase or built-in cabinet.
To prevent fire, do not cover the ventilation of the apparatus
with newspapers, table-cloths, curtains, etc. And don't
place lighted candles on the apparatus.
To prevent fire or shock hazard, do not place objects filled
with liquids, such as vases, on the apparatus.
En
CAUTION
RISK OF ELECTRIC SHOCK
DO NOT OPEN
“CAUTION:TO REDUCE THE RISK OF
ELECTRIC SHOCK,
DO NOT REMOVE COVER (OR BACK).
NO USER-SERVICEABLE PARTS INSIDE.
REFER SERVICING TO QUALIFIED
SERVICE PERSONNEL.”
This symbol is intended to alert the user to
the presence of uninsulated "dangerous
voltage" within the product's enclosure that
may be of sufficient magnitude to constitute
a risk of electric shock to persons.
This symbol is intended to alert the user
to the presence of important operating and
maintenance (servicing) instructions in
the literature accompanying the appliance.
CAUTION
The use of optical instruments with this product will
increase eye hazard.
PRECAUTIONS
WARNING
This equipment has been tested and found to comply with the
limits for a Class B digital device, pursuant to Part 15 of the
FCC Rules. These limits are designed to provide reasonable
protection against harmful interference in a residential
installation.
This equipment generates, uses, and can radiate radio frequency
energy and, if not installed and used in accordance with the
instructions, may cause harmful interference to radio
communications. However, there is no guarantee that
interference will not occur in a particular installation. If this
equipment does cause harmful interference to radio or television
reception, which can be determined by turning the equipment
off and on, the user is encouraged to try to correct the
interference by one or more of the following measures:
- Reorient or relocate the receiving antenna.
- Increase the separation between the equipment and receiver.
- Connect the equipment into an outlet on circuit different
from that to which the receiver is connected.
- Consult the dealer or an experienced radio/TV technician
for help.
CAUTION
You are cautioned that any changes or modifications not
expressly approved in this manual could void your authority to
operate this equipment.
Note to CATV system installer:
This reminder is provided to call the CATV system installer's
attention to Article 820-40 of the NEC that provides guidelines
for proper grounding and, in particular, specifies that the cable
ground shall be connected to the grounding system of the
building, as close to the point of cable entry as practical.
2
Page 3

On operating voltage
Before operating the system, check that the operating voltage
of your system is identical with the voltage of your local power
supply.
On safety
•The unit is not disconnected from the AC power source
(mains) as long as it is connected to the wall outlet, even if
the unit itself has been turned off.
•Unplug the system from the wall outlet (mains) if it is not to
be used for an extended period of time. To disconnect the
cord (mains lead), pull it out by the plug. Never pull the
cord itself.
•Should any solid object or liquid fall into the component,
unplug the stereo system and have the component checked
by qualified personnel before operating it any further.
•The AC power cord must be changed only at a qualified
service shop.
On placement
•Place the unit in a location with adequate ventilation to
prevent heat build-up the unit.
•Do not place the unit in an inclined position.
•Do not place the unit in locations where it is;
- Extremely hot or cold
- Dusty or dirty
-Very humid
-Vibrating
- Subject to direct sunlight.
On heat buildup
•Although the unit heats up during operation, this is not
malfunction.
•Place the unit in a location with adequate ventilation to
prevent heat build-up in the unit.
If you continuously use this unit at a large volume, the cabinet
temperature of the top, side and bottom rises considerable.
To avoid burning yourself, do no touch the cabinet.
On operation
•If the system is brought directly from a cold to a warm
location, or is placed in a very damp room, moisture may
condense on the lens inside the CD player. Should this occur,
the system will not operate properly. Remove the CD and
leave the system turned on for about an hour until the
moisture evaporates.
•When you move the system, take out any discs.
Notes on discs
•Discs recorded on CD-R/RW drives may not be played back
because of scratches, dirt., recording condition or the drive's
characteristics.
•CD-R/RW discs which are not finalized at the end of
recording cannot be played back.
•Do not attach adhesive label, etc. to either side of a CD-R/
RW disc, as doing so may cause malfunction.
•Do not load an unrecorded CD-R/RW disc. The disc may be
damaged.
•Discs with non-standard shapes (e.g., heart, square, star)
cannot be played on this unit. Attempting to do so may
damage the unit. Do not use such discs.
•DVD, SACD, CD-ROM, VCD, and CD with MP3 files cannot
be played on this unit.
Music discs encoded with copyright protection
technologies
This product is designed to playback discs that conform to
the Compact Disc (CD) standard. Recently, various music
discs encoded with copyright protection technologies are
marketed by some record companies. Please be aware that
among those discs, there are some that do not conform to the
CD standard and may not be playable by this product.
If you have any questions or problems concerning your stereo
system, please consult your nearest Aiwa dealer.
TABLE OF CONTENTS
PRECAUTIONS .................................... 2
PREPARATIONS ................................... 4
PARTS AND CONTROLS ......................... 5
ADJUSTMENTS BEFORE OPERATIONS ........ 8
CD OPERATIONS ................................ 10
TUNER OPERATIONS........................... 12
TAPE OPERATIONS ............................. 14
SOUND ADJUSTMENTS........................ 17
TIMER OPERATIONS ........................... 18
REFERENCE ..................................... 20
En
3
Page 4
PREPARATIONS
Connection
Plug in the AC power cord to the AC power outlet after all other
connections are made.
1
Connect the front speakers.
Connect the right front speaker (marked with "R") to the
SPEAKERS R terminals and place it on the right side of
the unit. Connect the left (marked with "L") to the
SPEAKERS L terminals and place it on the left side. The
speaker cords with the black stripes go to the 9 terminals.
2
Connect the supplied antennas.
Connect the FM antenna to the
the AM antenna to the AM LOOP terminals.
AM antenna
FM 75 Ω terminal and
Remote
Detach the battery compartment lid at the rear of the remote
and insert two R6 (size AA) batteries with correct polarity.
R6(AA)
En
•Replace the batteries with new ones when the operational
FM antenna
3
Connect the AC power cord to a wall outlet.
When the AC power cord is connected to a wall outlet for
the first time, DEMO appears in the display.
To deactivate the DEMO, press c (c/don the
remote).
•Do not short-circuit the 0 and 9 speaker cord leads.
•Do not leave objects generating magnetism or objects
affected by magnetism near the speakers.
distance between the remote and main unit becomes shorter.
•Remove the batteries if the unit is not going to be used for
an extended period of time.
•The remote may not operate if it is used under intense
sunlight, etc., or if its line of sight is obstructed.
4
Page 5
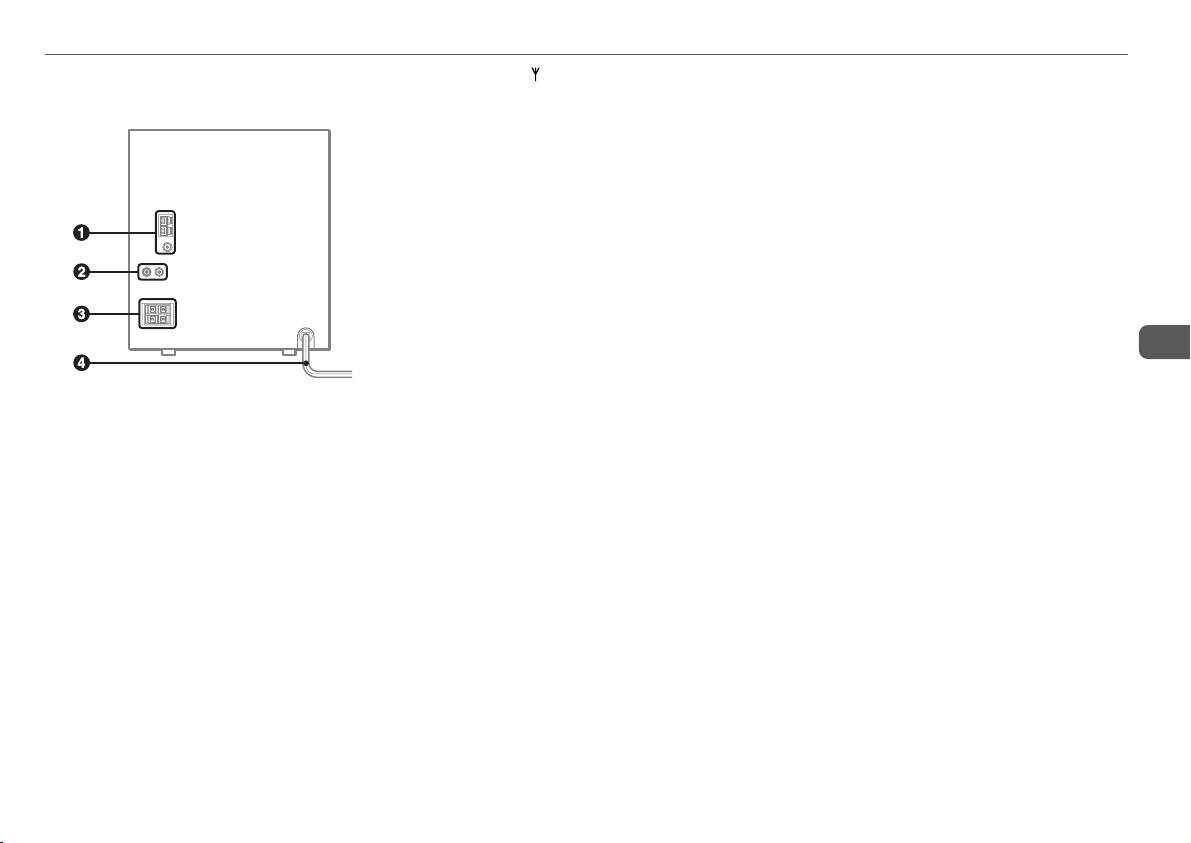
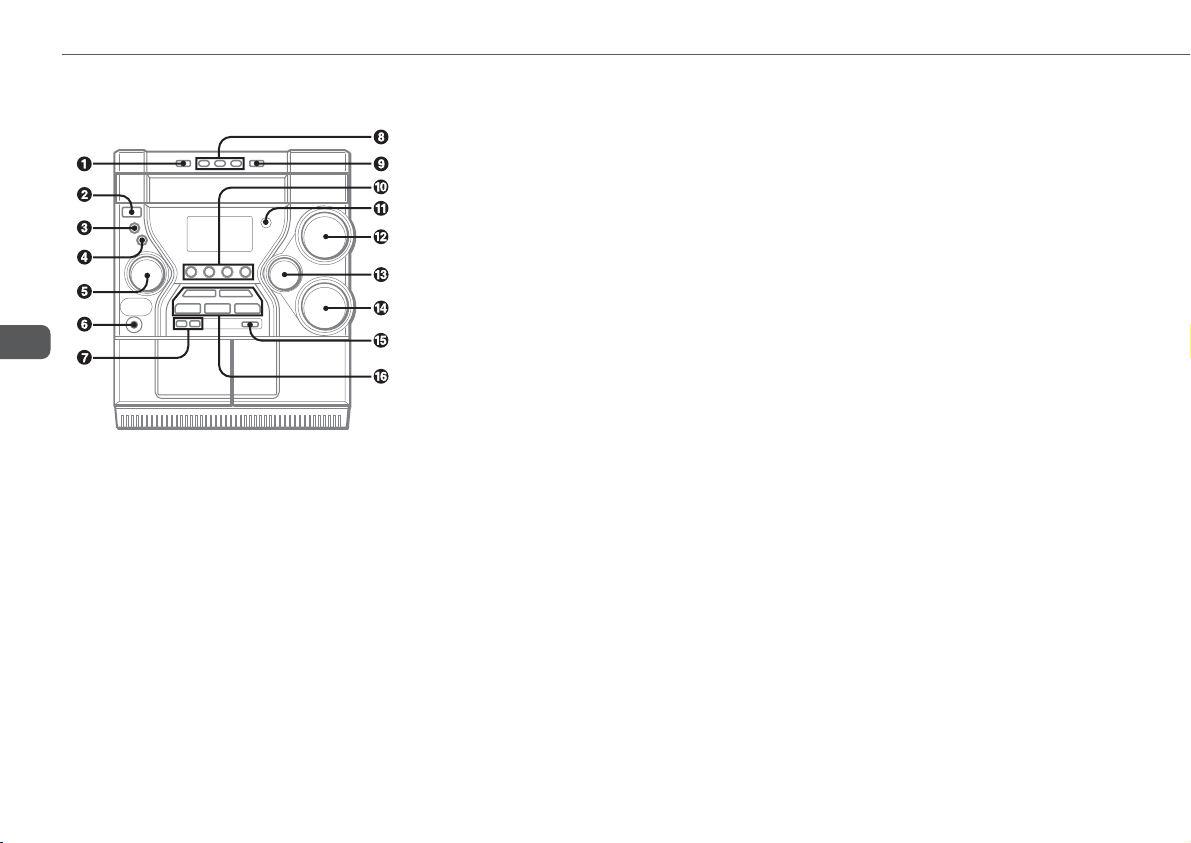
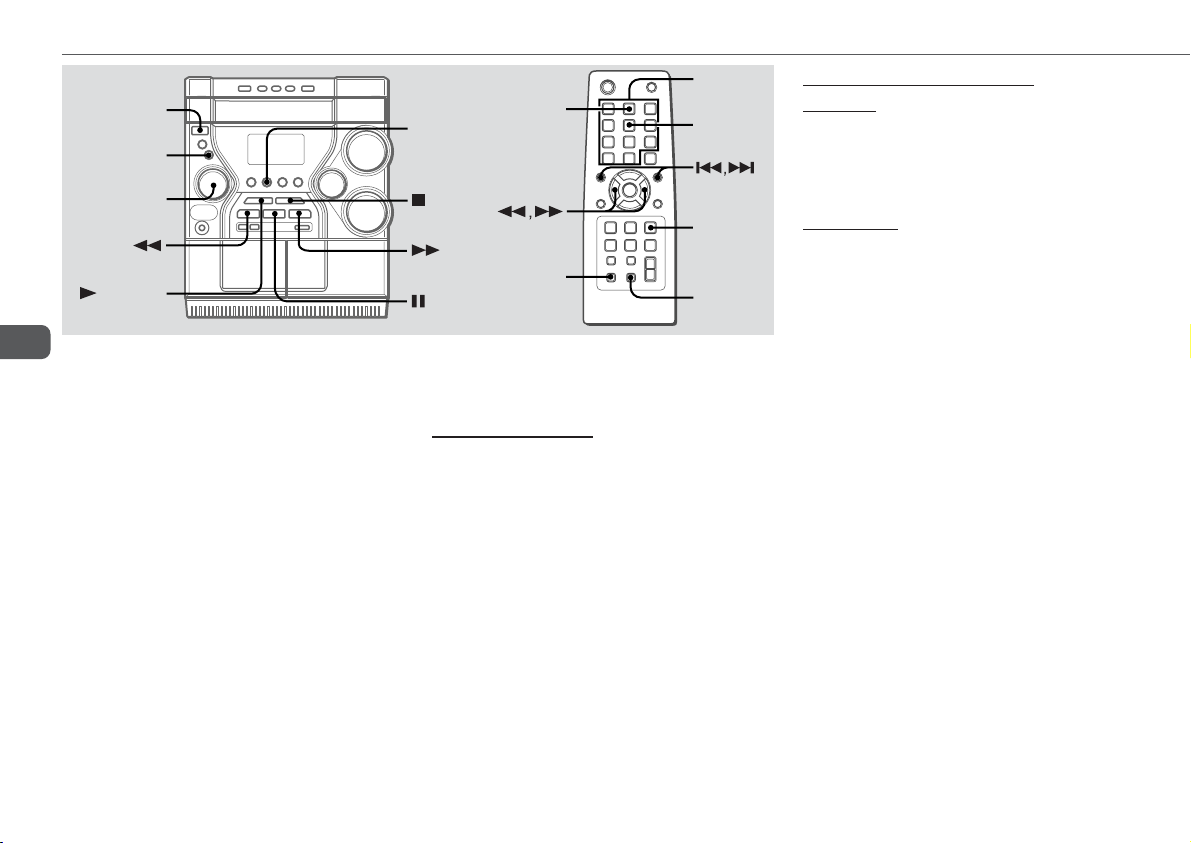
PARTS AND CONTROLS
Main unit: rear
Refer to the pages indicated in parentheses for details.
1 AM LOOP,
Plug in the supplied AM and FM antennas here.
2 VIDEO/AUX jacks
Accepts analog sound signals from external equipment.
Connect using an optional connecting cable with RCA
phono plugs (red plug to R jack, white plug to L jack).
Refer also to the operating instructions of your equipment.
To switch function to external input, press VIDEO/AUX.
Tip:
To change the displayed name for this function, turn the
unit on, then hold down VIDEO/AUX and press POWER
on the unit. Repeat the procedure to select "VIDEO",
"AUX" or "TV".
3 # SPEAKER terminals (4)
Connect the speaker cord of the supplied front speakers
here.
4 AC power cord (4)
FM 75 Ω terminals (4)
En
5
Page 6
Main unit: front
Refer to the pages indicated in parentheses for details.
En
1 DISC CHANGE (10)
Rotates the CD trays.
2 POWER 6STANDBY/ON (8)
Switches the unit on and off (standby).
The red indicator flashes when receiving a signal from
the remote.
3 MODE (8-11, 17)
Selects various modes (ECO and Repeat/Shuffle/
Programed playback, etc.) when used in combination with
ENTER and MULTI JOG.
4 ENTER (8-12, 17-19)
Fixes the modes and the time (ECO, Repeat/Shuffle/
Programed playback, clock, and timer, etc.) when used
in combination with ENTER and MULTI JOG.
5 MULTI JOG (8-12, 14-19)
When used in combination with ENTER and MULTI JOG,
CD: selects a track and Repeat/Shuffle/Programed
playback.
Tuner: selects a preset station.
Tape: specifies tape length.
Clock and Timer: sets the time.
i-Bass: selects a frequency range.
Spectrum analyzer, ECO and Dimmer: selects the mode.
6 PHONES jack
Plug in here an optional headphones set with a mini
stereo plug (ø3.5 mm). Speaker output is canceled.
7 SYNC DUB (15)
Starts dubbing a whole tape.
wREC/REC MUTING (14, 15)
Starts recording.
8 DISC DIRECT PLAY 1-3 (10)
Selects a disc.
9 zOPEN/CLOSE (10)
Opens or closes the disc compartment.
0 TAPE A/B (14)
Selects Tape function, and deck A or B.
TUNER/BAND (12)
Selects Tuner function and the radio band.
VIDEO/AUX (5)
Selects the function of external equipment connected to
VIDEO/AUX jacks.
CD (10)
Selects CD function.
! Remote sensor
Receives a signal from the remote.
@ VOLUME (8)
Adjusts the volume.
# TREBLE (17)
Enhances high frequency sound.
$ BASS (17)
Emphasizes low frequency sound.
% i-Bass (17)
Produces rich and clear low frequency sound.
^ cPLAY/PRESET (8, 10, 12, 14)
When the unit is turned off: activates or deactivates
DEMO.
CD and Tape: starts playback.
Tuner: tunes into a preset station.
sSTOP/CLEAR (10, 12, 14)
CD and Tape: stops playback.
Tuner: clears a station preset.
fTUNING DOWN, gTUNING UP
(10, 12, 14)
CD: searches a track in fast forward or fast reverse
playback when held down.
Tape: fast forwards or rewinds the tape.
Tuner: manually tunes down or up within the band.
aPAUSE/SET (10, 12, 14)
CD and Tape: pauses playback.
Tuner: stores the received station in to preset.
6
Page 7
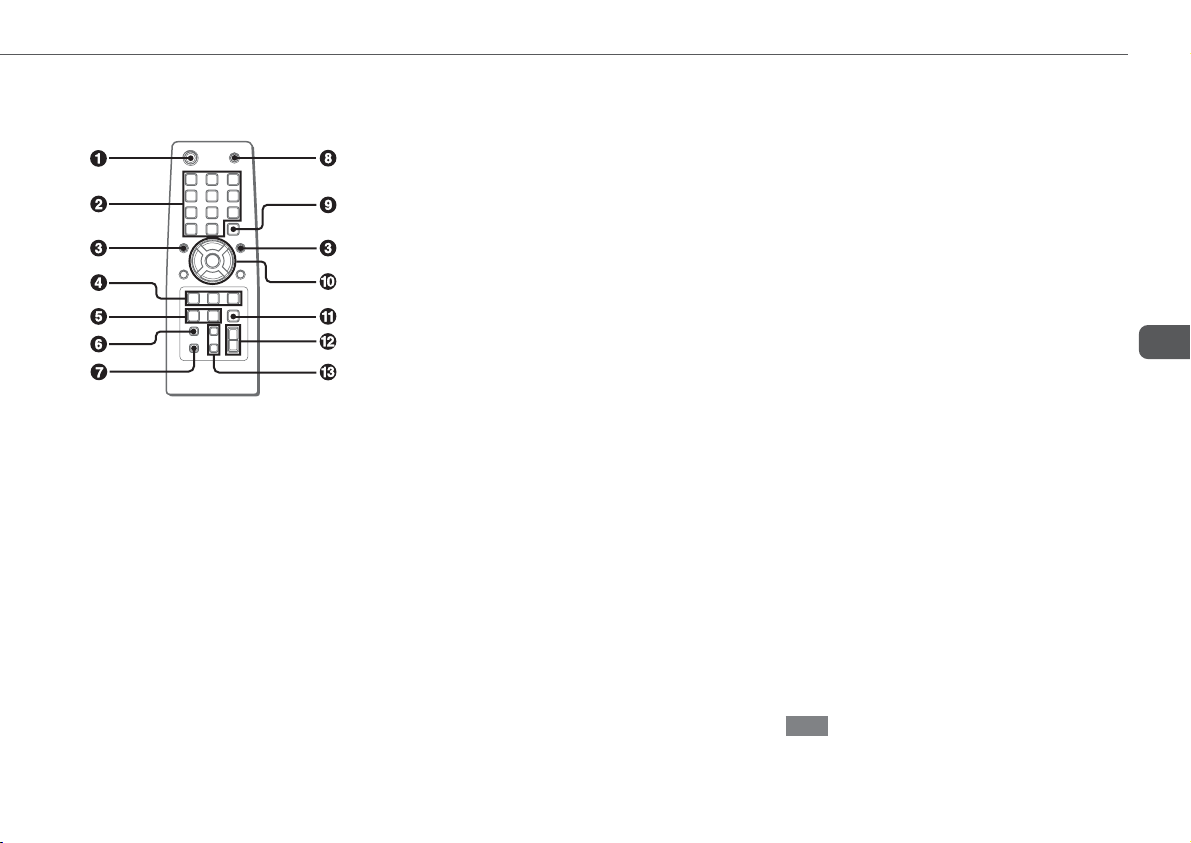
Remote control
Refer to the pages indicated in parentheses for details.
Buttons with the same or similar names with the main unit
basically have the same function.
1 POWER (8)
2 1-0/10, +10 (10-12)
CD: selects a CD track of the specified number.
Tuner: tunes in to the station with the specified preset
number.
The numbered buttons take on these functions below when pressed
together with SHIFT held down
EDIT (15, 16)
Enters AI Edit Recording or Programed Edit Recording
mode when pressed in stop mode.
BAND (12)
Selects Tuner function and the radio band.
:
TAPE A/B (14)
SPECTRUM (8)
Changes the spectrum analyzer display.
TUNER MODE (13)
Switches between stereo or monaural FM reception.
3 r, t (9-12, 15-19)
CD: selects a track.
Tuner: selects a preset station.
Tape: specifies tape length.
BASS and TREBLE: adjusts the level.
Clock and Timer: sets the time.
4 PLAY MODE (11)
Selects Shuffle or Programed playback in CD function.
REPEAT (10)
Enters CD repeat playback mode.
ENTER (8-12, 17-19 )
5 CLOCK/TIMER/SET (18, 19)
Enters timer setting mode.
CLOCK/TIMER/SELECT (18, 19)
Selects timer playback, timer recording or timer off.
6 DISPLAY (9, 10)
Displays the time and the remaining time for CD.
7 SHIFT
Hold down when pressing a numbered button to change
its function to that printed above the number.
e.g.)
"Press SHIFT+BAND on the remote" indicates "Hold
down SHIFT and press '2' (BAND)". Doing so makes you
be able to select Tuner function and the radio band.
8 FUNCTION
Switches the active function among CD, TAPE, TUNER
and VIDEO (AUX or TV).
9 DISC SKIP (10)
Select a disc.
0 c/d (8, 10, 14)
When the unit is turned off: activates or deactivates
DEMO.
CD and Tape: starts playback.
s (10, 14)
CD and Tape: stops playback.
f,g (10, 12, 14)
CD: searches a track in fast forward or fast reverse
playback when held down.
Tape: fast forwards or rewinds the tape.
Tuner: manually tunes down or up within the band.
a (10, 14)
CD and Tape: pauses playback.
! SLEEP (18)
Switches the sleep-timer on/off and selects the duration.
@ VOLUME (+, -) (8)
Adjusts the volume.
# SOUND (17)
Selects BASS or TREBLE setting mode.
CLEAR (11, 12)
Clears a track of the CD programed playback and a Radio
preset station.
Note
The buttons not explained above (ALBUM N, M and
KARAOKE) do not operate for this unit.
En
7
Page 8
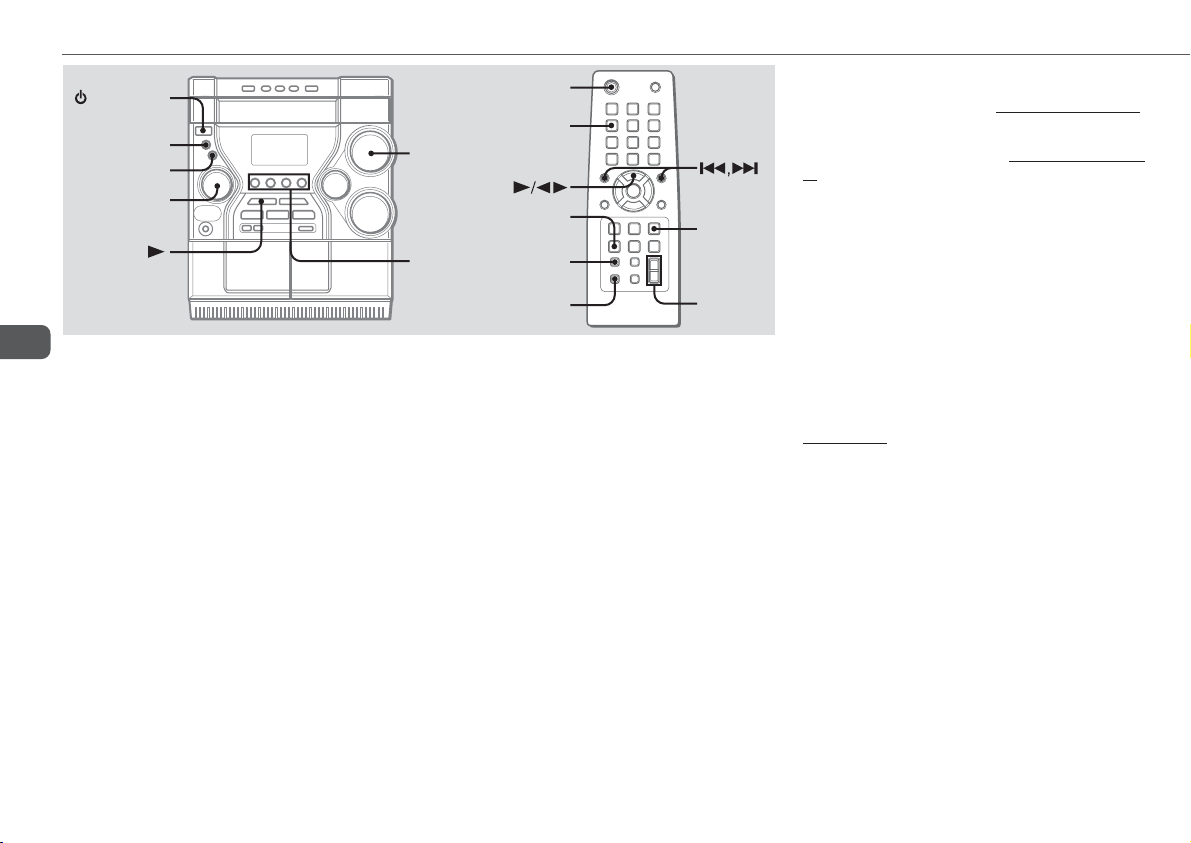
ADJUSTMENTS BEFORE OPERATIONS
POWER
STANDBY / ON
MODE
ENTER
MULTI JOG
En
Power
Tur ning the unit on
Press POWER 6STANDBY/ON (POWER on the remote).
Pressing TAPE A/B, TUNER/BAND, VIDEO/AUX or CD also
turns the unit on (Direct Play Function.) When a disc or tape
is inserted, the playback will start automatically.
Tur ning the unit off
Press POWER 6STANDBY/ON again.
The unit goes into standby.
POWER
SPECTRUM
VOLU ME
TA P E A/B,
TUNER/BAND,
VIDEO/AUX,
CD
CLOCK/
TIMER/SET
DISPLAY
SHIFT
ENTER
VOLU ME
+,–
Volume
Turn VOLUME (Press VOLUME +, - on the remote).
Adjust from 0 (minimum) to 30 and MAX (maximum).
Tip:
Volume level setting is retained during power-off standby:
If the unit is turned off with the volume set to 17 or more, it is
automatically set to 16 the next time the unit is turned on.
DEMO
You can enjoy DEMO in the display when the unit is turned off.
To activate or deactivate the DEMO
Press c (c/don the remote)
off.
when the unit is turned
Spectrum analyzer display
You can change the spectrum analyzer display.
1
Press MODE repeatedly until "SPECTRUM?"
appears in the display when the unit is turned on
and then press ENTER.
2
Turn MULTI JOG to select one of the three
spectrum analyzer displays (PATTERN 1, 2 and 3).
If there is no MULTI JOG or button operation within 6
seconds, the setting is canceled.
On the remote, press SHIFT+SPECTRUM repeatedly.
8
Page 9

ECO mode
Saves the power consumption while the unit is turned off (in
standby mode).
1
Press MODE repeatedly until "ECO MODE?"
appears in the display and then press ENTER.
2
Turn MULTI JOG to select "ECO ON" and then
press ENTER.
In the ECO ON mode, the unit blacks out when the unit is
turned off. Only the red indicator on POWER button lights
up.
If there is no MULTI JOG or button operation within 6
seconds, the setting is canceled.
To cancel the ECO mode
Repeat the above and select "ECO OFF" in step 2.
Dimmer
Adjusts the brightness of the display.
1
Press MODE repeatedly until "DIMMER ?"
appears in the display when the unit is turned on
and then press ENTER.
2
Turn MULTI JOG to select one of the three dimmer
modes or "OFF" and then press ENTER.
"OFF" is the brightest and "DIMMER 3" is the dimmest.
In DIMMER 3 mode, the spectrum analyzer display does
not appear.
If there is no MULTI JOG or button operation within 6
seconds, the setting is canceled.
To cancel the dimmer
Repeat the above and select "OFF" in step 2 .
Setting the clock
Use the remote.
1
Press CLOCK/TIMER/SET.
Go to step 3 when the time appears and the 'hour' flashes.
2
Press r or t repeatedly until "CLOCK
SET" appears in the display and then press
ENTER.
3
Press r or t repeatedly to set the hour
and then press ENTER.
4
Press r or t repeatedly to set the minute
and then press ENTER.
The time display stops flashing and the clock starts from
00 seconds.
•MULTI JOG is also available in place of r or t.
To display the time
Press DISPLAY on the remote. The time will be displayed for
6 seconds.
Tip:
"AM 12:00" indicates midnight and "PM 12:00" noon.
If "- -:- -" appears when the unit is turned off
There has been a power interruption. Re-set the clock.
En
9
Page 10
CD OPERATIONS
DISC DIRECT
PLAY 1-3
DISC CHANGE
MODE
ENTER
MULTI JOG
En
This unit plays back finalized CD-R/RW discs as well as audio
CDs.
Playback
1
Press CD and load disc(s).
Press zOPEN/CLOSE to open the disc compartment and
place one or two disc(s) with the labelled side up.
To place three discs, press DISC CHANGE so that the trays
rotate, then place the third one. Lastly, close the
compartment with zOPEN/CLOSE.
•When loading an 8-cm (3-inch) disc, place it on the
inner circle of the tray.
2
To play all discs, press c (c/don the
remote), then "ALL DISCS" lights up in the
display
To play one desired disc, press DISC DIRECT
PLAY 1-3, then "1 DISC" lights up in the display
A playing disc indicator flashes in the display.
To stop playback
Press s.
OPEN/CLOSE
CD
PLAY MODE
DISPLAY
CLEAR
To pause playback
Press a. Press again to resume playback.
To select a track
Turn MULTI JOG or press r or t on the remote
repeatedly.
With the numbered buttons on the remote,
-To select track 10, press 0/10.
-To select track 20, press +10, +10 and 0/10.
-To select track 25, press +10, +10 and 5.
To search (playback in fast forward or fast reverse)
Hold down f or g. Release at the desired point.
To select a disc
Press DISC DIRECT PLAY 1-3 or DISC SKIP on the remote.
To display the remaining time of the track or the disc
Press DISPLAY on the remote repeatedly during playback.
The display changes cyclically as follows:
Track number and elapsed playing time of the current track
Track number and remaining time of the current track
Remaining time of the current disc
Clock display (for 6 seconds)
1–0/10,
+10
DISC SKIP
REPEAT
To replace disc(s) during playback without
interruption
While one disc is being played back, press DISC CHANGE so
that the compartment opens, replace disc(s) with other one(s),
and press DISC CHANGE to close the compartment.
Repeat playback
Plays all the tracks or one track on the discs repeatedly.
1
Press MODE repeatedly until "REPEAT?" appears
in the display and then press ENTER.
2
Turn MULTI JOG to select one of the two repeat
modes as below or "REPEAT OFF", and then
press ENTER.
-"REPEAT ALL":
For all the tracks on one desired disc or all discs up to
5 times. """ lights up.
-"REPEAT 1":
For a single track only. ""1" lights up.
If there is no MULTI JOG or button operation within 6
seconds, the setting is canceled.
3
To play one desired disc, press DISC DIRECT
PLAY 1-3.
To play all discs, press c (c/don the
remote).
On the remote, press REPEAT repeatedly until """ or ""1"
appears and carry out step 3.
To cancel repeat playback
Carry out step 1 and 2, and select "REPEAT OFF" in step 2.
On the remote, press REPEAT repeatedly until """ and
""1" disappear.
10
Page 11

Shuffle playback
Plays the tracks on one desired disc or all discs in random
order.
1
Press MODE repeatedly until "PLAY MODE?"
appears in the display in stop mode and then
press ENTER.
2
Turn MULTI JOG to select "SHUFFLE" and then
press ENTER.
"
" lights up.
SHUF
If there is no MULTI JOG or button operation within 6
seconds, the setting is canceled.
3
To play one desired disc, press DISC DIRECT
PLAY 1-3.
To play all discs, press c (c/don the
remote).
On the remote, press PLAY MODE repeatedly until "
lights up and carry out step 3.
To cancel shuffle playback
Carry out step 1 and 2, and select "CONTINUE" in step 2.
On the remote, press PLAY MODE repeatedly until "
and "
PGM
" disappear.
SHUF
SHUF
Programed playback
Plays back up to 30 selected tracks in programed order.
1
Press MODE repeatedly until "PLAY MODE?"
appears in the display in stop mode and then
press ENTER.
2
Turn MULTI JOG to select "PROGRAM" and then
press ENTER.
"
" lights up.
PGM
If there is no MULTI JOG or button operation within 6
seconds, the setting is canceled.
3
Press DISC DIRECT PLAY 1-3 to select a disc.
Go to the next step when the tray stops rotating.
On the remote, press DISC SKIP.
4
Turn MULTI JOG to select a track and then press
ENTER.
The selected track number and the program number appear
"
in the display.
On the remote, press r or t and then press ENTER
or press the numbered buttons:
-To select the 10th track, press 0/10.
-To select the 20th track, press +10, +10 and 0/10.
"
-To select the 25th track, press +10, +10 and 5.
5
Repeat step 3 and 4 to program other tracks.
6
Press c(c/don the remote).
•You cannot program more than 30 tracks. "FULL" is
displayed.
To clear a track
Press CLEAR on the remote in stop mode. A track is cleared
from the end of the program.
To clear the entire program
Press s in stop mode.
To add tracks to the program
Repeat step 2 and 3 before starting playback. The tracks are
added to the end of the program.
To cancel programed playback
Carry out step 1 and 2, and select "CONTINUE" in step 2.
On the remote, press PLAY MODE repeatedly until "
and "
•The program contents are retained even if the program is
canceled or after programed playback finishes. The same
program plays back if you carry out step 1, 2 and 6.
Notes on CDs
•Do not place more than one disc on one tray.
•Do not tilt the unit with discs loaded.
SHUF
" disappear.
PGM
En
"
On the remote, press PLAY MODE repeatedly until "
lights up and carry out step 3 to 6.
•During programed playback, you cannot select a disc or a
track with the numbered buttons.
•If the total playback time of the program exceeds 99:59
minutes, or if a track with a track number exceeding 30 is
programed, the playing time is displayed as "- -:- -".
PGM
"
11
Page 12
TUNER OPERATIONS
POWER
ENTER
MULTI JOG
PRESET
En
Manual tuning
1
Press TUNER/BAND (SHIFT+BAND on the
remote) repeatedly to select a band (FM or AM).
2
Press f or g to tune in to a station.
"TUNE" appears when a station is tuned in.
"1" lights up for FM stereo reception.
To search for a station automatically (Auto Search)
Hold down f or g.
The unit searches for a station up or down the band and stops
at reception.
To stop the search manually, press f or g.
•Auto Search may not stop at stations with weak signals.
1–0/10,
BAND
TUNER/
BAND
CLEAR
SHIFT
PAUSE/SET
+10
TUNER
MODE
ENTER
CLEAR
Preset tuning
Preset your favorite stations and tune them in directly.
Presetting stations
1
Press TUNER/BAND to select a band.
2
Press f or g to tune in to the desired
station.
3
Press ENTER (or a PAUSE/SET on the unit) to
store the station.
The preset number, beginning from "1", appears in the
display.
4
Repeat step 1 to 3 to preset other stations.
•You cannot store more than a total of 32 preset stations.
"FULL" appears.
Tuning in to preset stations
On the unit
1
Press TUNER/BAND to select a band.
2
Press cPRESET repeatedly or turn MULTI JOG.
With each press, the station with the succeeding preset
number is tuned in.
On the remote
1
Press SHIFT+BAND to select a band.
2
Press the numbered buttons for the preset
number of your desired station.
-To select preset number 10, press 0/10.
-To select preset number 15, press +10 and 5.
-To select preset number 20, press +10, +10 and 0/10.
• Pressing r or t repeatedly can also select the
preset number.
To clear a preset station
1Tune in to the station by preset tuning.
2 Press sCLEAR on the unit (CLEAR on the remote), then
press ENTER within 6 seconds.
Preset numbers of preset stations in the band with higher
numbers decrease by one.
12
Page 13

Adjustments
Antennas
Keep antennas away from metallic objects, electrical equipment
and cords.
FM antenna: Extend fully and position for the best reception.
If receiving condition is poor, connect optional outdoor antenna
to
FM 75 Ω terminal. Use an adapter as required.
AM antenna: Rotate to find best reception.
To switch to monaural FM reception
Press SHIFT+TUNER MODE on the remote. With each press,
"MONO" and "STEREO" appear alternately in the display.
Tip:
When FM stereo reception is poor, switching to monaural
reduces noise.
To switch the AM tuning interval
Hold down TUNER/BAND and press POWER on the unit. With
each press, the AM tuning interval alternates between 9 kHz/
step and 10 kHz/step.
Tip:
The default is 10 kHz/step. Change it only when using the
unit in a 9 kHz/step area. Switching AM tuning interval clears
all the preset stations.
En
13
Page 14
TAPE OPERATIONS
TA PE A /B
MULTI JOG
DISC DIRECT
PLAY 1-3
EDIT
1–0/10,
+10
TAPE A/B
DISC SKIP
Notes on cassettes
•Use of a tape longer than 90 minutes is not recommended
since they are extremely thin and easily damaged. If you
should use it, do not change the tape operations such as
play and stop frequently.
•Take up any slack in the tape with a pencil or similar tool
before use. Slack tape may get entangled in the deck
mechanism and become damaged.
PUSH EJECT
Deck A Deck B
SYNC DUB
En
Playback
Use only TYPE I (normal) tapes.
1
Press TAPE A/B (SHIFT+TAPE A/B on the remote)
and insert the tape in either deck.
Press zPUSH EJECT to open the cassette holder, and
insert with the exposed side down and playback side
facing out from the unit. Push zPUSH EJECT to close.
PUSH EJECT
2
Press c(c/don the remote).
14
PUSH EJECT
REC/
REC MUTING
To stop playback
Press s.
To pause playback (deck B only)
Press a. Press again to resume.
To fast forward or rewind
Press f or g.
To select a deck (deck A or deck B)
Press TAPE A/B (SHIFT+TAPE A/B on the remote) in stop mode
when tapes are loaded in both decks.
"TP A" (deck A) or "TP B" (deck B) is displayed.
To reset the tape counter
Press s in stop mode, and the tape counter in the display is
reset to "0000". Opening and closing the cassette holder
will also reset the tape counter.
To play continuously (deck A to deck B)
Load tapes in both decks and start playback on deck A. Then,
as soon as playback on deck A finishes, playback on deck B
will start without interruption.
•The both decks play one side of the tapes.
SHIFT
Basic recording
Use only TYPE I (normal) tapes. Deck B is the recording deck.
Only one side of the tape can be recorded at a time.
1
Insert the recordable tape in deck B.
Press zPUSH EJECT to open the cassette holder, and
insert with the exposed side down and the side to be
recorded on facing out from the unit.
Wind up the tape to the desired point if needed.
2
Prepare the source.
To record CD(s), select the CD function and load disc(s).
To record a radio program, tune in to the desired station.
To record a tape, insert the source tape in deck A and
select the TAPE (deck A) function.
To record from connected external equipment, select the
VIDEO/AUX function and prepare the equipment.
3
Press wREC/REC MUTING to start recording.
When recording a CD or tape, playback starts
automatically.
When recording input from connected equipment,
manually start playback of the source.
•Volume or tone adjustment does not affect recording.
•"NO TAB" is displayed if you attempt to record a tape
with the tab broken off.
Page 15

To stop recording
Press s.
To pause recording (only for TUNER or VIDEO/AUX
source)
Press a. Press again to resume.
To record a selected set of tracks from a CD
Program the desired tracks (see "Programed playback") and
then press wREC/REC MUTING.
To record a 4-second blank space (only for TUNER
or VIDEO/AUX source)
1Press w REC/REC MUTING during recording or in
recording pause mode.
"REC MUTING" flashes in the display for 4 seconds (a
blank space is made in the meantime) and then the unit
enters recording pause mode.
To record less than a 4-second blank space, press wREC/
REC MUTING again while "REC MUTING" flashes.
Recording resumes so that do not carry out step 2 below.
To record more than a 4-second blank space, press wREC/
REC MUTING again after the unit enters recording pause
mode. Each time the button is pressed, a 4-second blank
space is added.
2 Press a to resume recording.
To erase a tape
1 Insert the tape in deck B. Set the tape to the desired point if
needed.
2Press TAPE A/B to select "TP B".
3 Press wREC/REC MUTING.
Whole tape dubbing
1
Press TAPE A/B to select the TAPE function.
2
Insert the original tape in deck A and the
recordable tape in deck B.
3
Press SYNC DUB.
The tapes are rewound to the beginning of the front side
and recording starts.
•Dubbing cannot start from a point halfway in the tape.
•Only one side of the tape can be recorded at a time.
To stop dubbing
Press s.
Edited CD recording
AI Edit Recording
When recording a whole CD, AI Edit Recording takes the length
of your tape into account and rearranges the recording order of
the tracks if necessary, so that no track is cut short at the end
of the side. Prepare a tape long enough to record the CD.
1
Insert the recordable tape in deck B.
2
Select the CD function and load disc(s).
3
Press SHIFT+EDIT once on the remote.
"AI C-00" appears.
4
Press DISC DIRECT PLAY 1-3 to select a disc.
•DISC SKIP on the remote can also be used to select a
disc.
5
Press the numbered buttons on the remote to
enter the length of the recordable tape.
10 to 99 minutes can be specified.
- For a 60-minute tape press 6 and 0/10.
In a few seconds, the unit determines the tracks to be
recorded for each side.
The recording time left for side A appears in the display.
•r or t on the remote or MULTI JOG can also
be used to specify tape length.
6
Press wREC/REC MUTING to start recording on
side A.
The tape is rewound to the beginning of side A and
recording starts.
Go to the next step when recording on side A finishes.
7
Press SHIFT+EDIT on the remote.
The recording time left for side B appears in the display.
8
Turn over the tape and press w REC/REC
MUTING to start recording on side B.
•AI Edit Recording cannot be used with discs with more than
30 tracks. "TR OVER" appears.
•Recording cannot start from a point halfway in the tape.
En
15
Page 16

Programed Edit Recording
As you program the CD tracks to record, Programed Edit
Recording displays the remaining recording time for each side
of the tape, so you can easily select a set of desired tracks
within the length of your tape.
1
Insert the recordable tape in deck B.
2
Select the CD function and load disc(s).
3
Press SHIFT+EDIT twice on the remote.
"PRGM C-00" is displayed and "PGM" lights up.
4
Press the numbered buttons on the remote to
enter the length of the recordable tape.
En
10 to 99 minutes can be specified.
•r or t on the remote or MULTI JOG can also
be used to specify tape length.
5
Press DISC DIRECT PLAY 1-3 to select a disc.
Then, press the numbered buttons on the remote
to select the first track to be recorded on side A.
-To select the 10th track, press 0/10.
-To select the 20th track, press +10, +10 and 0/10.
-To select the 25th track, press +10, +10 and 5.
•DISC SKIP on the remote can also be used to select a
disc.
6
Repeat step 5 to select the rest of the tracks for
side A.
The remaining recording time of side A is displayed. You
cannot select a track with a longer playing time.
7
Press SHIFT+EDIT on the remote to switch to side
B and select the tracks for the side.
8
Press SHIFT+EDIT on the remote to switch back
to side A.
9
Press wREC/REC MUTING to start recording on
side A.
The tape is rewound to the beginning of side A and
recording starts.
Go to the next step when recording on side A finishes.
10
Press SHIFT+EDIT on the remote to switch to
side B.
11
Turn over the tape, and press wREC/REC
MUTING to start recording on side B.
•You cannot program more than 30 tracks. "FULL" is
displayed.
•You cannot program a track with a track number larger than
30.
•Recording cannot start from a point halfway in the tape.
To stop recording
Press s. Recording and CD playback stop simultaneously.
To check the program
1 Before recording, press SHIFT+EDIT on the remote to select
side A or B.
2Press r or t on the remote repeatedly or turn MULTI
JOG . The track number and program number are displayed
in succession.
To change the program of each side
Press SHIFT+ EDIT on the remote to select side A or B, and
press s to clear the program for the selected side. Then,
select tracks again.
To clear the edit program
Press s twice in stop mode.
To prevent accidental erasure
Remove the plastic tab of the cassette tape with a screwdriver
or other pointed tool. To record on the tape again, cover the
detection slot with adhesive tape.
Side A
Tab for side A
16
Page 17

SOUND ADJUSTMENTS
MODE
ENTER
MULTI JOG
BASS
Emphasizes low frequencies for a powerful sound.
Turn BASS to adjust from 0 to 5.
On the remote, press SOUND repeatedly until "BASS"
appears in the display and then press r or t repeatedly
within 6 seconds.
•When the sound becomes distorted with the BASS effect,
cancel it.
TREBLE
BASS
SOUND
i-Bass
TREBLE
Enhances high frequency for sound clarity .
Turn TREBLE to adjust from 0 to 5.
On the remote, press SOUND repeatedly until "
appears in the display and then press r or t repeatedly
within 6 seconds.
•When the sound becomes distorted with the TREBLE effect,
cancel it.
TREBLE
i-Bass
Produces rich and clear low frequency sound besides BASS effect.
1
Press i-Bass to select "I-BASS ON".
The red indicator on i-Bass button lights up.
2
Turn BASS to adjust from 1 to MAX(5).
To select the frequency range for i-Bass effect
1 Press i-Bass to select "I-BASS ON".
2 Press MODE repeatedly until "IBAS FREQ?" appears in
the display and then press ENTER.
3Turn MULTI JOG to select one of the three frequency ranges
(FREQ 1, 2 and 3).
- FREQ 1: Low range
- FREQ 2: Middle range
- FREQ 3: High range
After step 3, adjust the i-Bass level by turning BASS if
needed.
"
If there is no MULTI JOG or button operation within 6
seconds, the setting is canceled.
To cancel i-Bass
Press i-Bass to select "I-BASS OFF".
Note
When "I-BASS ON" is selected, BASS is deactivated; therefore,
you cannot select "BASS" with SOUND on the remote.
To activate BASS, cancel i-Bass.
En
17
Page 18

TIMER OPERATIONS
POWER
ENTER
MULTI JOG
En
Sleep timer
Turns off the unit automatically after a specified time.
Press SLEEP on the remote repeatedly.
With each press, the timer duration changes cyclically as
follows:
"*
"AUTO
The unit turns off after the selected time.
* "AUTO
finishes the playback (for up to 100 minutes).
Tip:
The display is dimmed while the sleep timer is active.
To check the remaining time until the unit turns off
Press SLEEP on the remote once. The remaining time is
displayed for 6 seconds.
To cancel the sleep timer
Press SLEEP on the remote repeatedly until "SLEEP OFF"
appears.
"
"80" - - -
90"
":
The unit turns off when the current CD or tape
18
"10"
"OFF"
POWER
VOLUME
CLOCK/TIMER/
Deck B
CLOCK/TIMER/
SET
SELECT
Timer playback
Turns on the unit at a specified time every day.
Make sure the clock is set correctly.
Use the remote from step 2.
1
Prepare the source.
To play CD(s), load disc(s).
To play the radio, select the band and tune in to the desired
station or tune in to a preset station (see "Tuning in to
preset stations").
To play a tape, insert the tape and select the deck.
2
Press VOLUME +, - to set the volume level.
3
Press CLOCK/TIMER/SET to display "DAILY
PLAY" and then press ENTER.
"5" indicator lights up and "ON TIME" appears for a
moment.
If "DAILY PLAY" is not displayed, set the clock (see
"Setting the clock") and carry out from this step again.
4
Press r or t repeatedly to set the timer-
on hour and then press ENTER.
ENTER
SLEEP
VOLUME
+,–
5
Press r or t to set the timer-on minute
and then press ENTER.
"OFF TIME" appears for a moment.
6
Repeat step 4 and 5 to set the timer-off hour and
minute.
7
Press r or t to select the source (CD,
TAPE and TUNER) and then press ENTER.
The timer-on time, the timer-off time and source are
displayed.
8
Press POWER to turn the unit off.
The unit turns on at the specified timer-on time and plays
the selected source and then turns off at the specified
timer-off time.
•To stop timer setting in step 3 to 6, press CLEAR on the
remote. Timer standby mode is also canceled.
•The Timer playback will not begin unless the unit is turned
off first.
•Turning VOLUME on the unit is also available in step 2.
•MULTI JOG is also available in place of r or t.
To display the timer setting
Press CLOCK/TIMER/SELECT on the remote repeatedly until
"DAILY PLAY" appears. The timer-on time, the timer-off
time and the source are displayed.
To change the timer setting
Re-set the timer again.
To cancel the timer
Press CLOCK/TIMER/SELECT on the remote repeatedly until
"TIMER OFF" appears. "5" disappears from the display.
Page 19

Timer recording
Turns on the unit and makes recording once at a specified time.
Timer recording is available only for TUNER source.
Use the remote from step 3.
1
Prepare the TUNER source.
Select the band and tune in to the desired station or tune
in to a preset station (see "Tuning in to preset stations").
2
Prepare the recording destination.
Insert the recordable tape in deck B.
3
Press CLOCK/TIMER/SET to display "DAILY
PLAY".
If "DAILY PLAY" is not displayed, set the clock (see
"Setting the clock") and carry out from this step again.
4
Press r or t repeatedly until "ONCE REC"
appears in the display and then press ENTER.
"REC 5" indicator lights up and "ON TIME" appears
for a moment.
5
Carry out step 4 to step 6 described in "Timer
playback" to set the timer-on time and timer-off
time.
The timer-on time, the timer-off time and source (TUNER)
are displayed.
6
Press POWER to turn the unit off.
The unit turns on at the specified timer-on time and records
the source (TUNER) and then turns off at the specified
timer-off time.
•To stop timer setting in step 3 to 4, press CLEAR on the
remote. Timer standby mode is also canceled.
•The Timer recording will not begin unless the unit is turned
off first.
•Volume level is automatically set to 0 (minimum) when the
Timer recording is activated.
•MULTI JOG is also available in place of r or t.
To display the timer setting
Press CLOCK/TIMER/SELECT on the remote repeatedly until
"ONCE REC" appears. The timer-on time, the timer-off time
and the source (TUNER) are displayed.
To change the timer setting
Re-set the timer again.
To cancel the timer
Press CLOCK/TIMER/SELECT on the remote repeatedly until
"TIMER OFF" appears. "REC 5" disappears from the
display.
Notes
•The Timer playback performs every day at the specified time
unless you cancel it. However, the Timer recording performs
only once: it automatically cancels itself when the recording
finishes.
•You cannot set the same time for timer-on time and timeroff time. "SET NG" is displayed if you do that. In this
case, reset the time.
•You cannot select both the Timer playback and the Timer
recording at the same time. You must select either one with
CLOCK/TIMER/SELECT on the remote.
•When you use the sleep timer, the timer playback/recording
will not turn on the unit until the sleep timer turns it off.
En
19
Page 20

REFERENCE
Care and maintenance
Occasional care and maintenance of the unit and the software
are needed to optimize the performance of your unit.
To clean the cabinet
Use a soft and dry cloth. If the unit surfaces are extremely
dirty, use a soft cloth lightly moistened with mild detergent
solution. Do not use strong solvents such as alcohol, benzine
or thinner.
To clean the tape heads
Dirty tape heads cause sound deterioration. After every 10
hours of use, clean the tape heads by using sold dry-type or
wet-type head cleaning cassette separately. Refer to the
instructions of the cleaning cassette.
En
To demagnetize the tape heads
Use a sold demagnetizing cassette after every 20 to 30 hours
of use. Refer to the instructions of the demagnetizing cassette.
Care of CDs
When a CD becomes dirty, wipe it from the center out with a
cleaning cloth. However, do not use solvents. After playing a
CD, store it in its case. Do not expose a CD to direct sunlight
or heat sources.
Care of tapes
Store tapes in their cases after use. Do not leave tapes near
magnets, motors, television sets, or any source of magnetism.
Do not expose tapes to direct sunlight, or leave them in a car
parked in direct sunlight.
Troubleshooting
If your unit fails to perform properly, check the following guide
and the relevant sections of the Operating Instructions.
First, check that the AC power cord and the speakers are
connected correctly and firmly.
Should any problem persist, consult your nearest Aiwa dealer.
General
There is no sound.
•Are the speakers and AC power cord connected properly?
•Turn VOLUME clockwise and hold.
•The headphones are connected.
•Insert only the stripped portion of the speaker cord into the
SPEAKER terminal. Inserting the vinyl portion of the speaker
cord will obstruct the speaker connections.
The unit shut off suddenly.
•Possibly a short circuit in the speaker terminals. Disconnect
the AC power cord from the wall outlet and reconnect the
speaker cords correctly. After a while, connect the AC power
cord to the wall outlet.
The unit blacks out when the unit is turned off.
•ECO mode is set to on (See "ECO mode" on page 9 ).
Erroneous display.
•Reset the unit (see "Resetting the unit" on page 21 ).
There is severe hum or noise.
•A TV or VCR is placed too close to the stereo system. Move
the stereo system away from the TV or VCR.
The clock indication does not show the correct time.
•A power interruption occurred. Set the clock and timer
settings again.
The clock setting/radio presetting/timer is canceled.
•The AC power cord is disconnected or a power failure occurs
longer than half a day.
Redo the following:
- "Setting the clock" on page 9
- "Presetting stations" on page 12
If you have set the timer, also redo "Timer playback/
recording" on page 18 and 19.
The timer does not function.
•Set the clock correctly.
•When you used the Sleep timer, the Timer playback/
recording will not turn on the unit until the Sleep timer turns
it off.
The remote does not function
•There is an obstacle between the remote and the unit.
•The remote is not pointing in the direction of the unit's
remote sensor.
•The Batteries have run down. Replace the batteries.
Speakers
Sound comes from one channel or unbalanced left
and right volume.
•Check the speaker connection and speaker placement.
Sound lacks bass.
•Check that the Speaker's 0 and 9 terminals are connected
correctly.
CD player
The disc compartment does not close.
•The CD is not placed properly.
The sound drops out.
•The lens is dirty. Clean it with a commercially available
blower.
20
Page 21

The CD will not play.
•The CD is not lying flat in the disc compartment.
•The CD is dirty.
•The CD is inserted label side down.
•Moisture condensation has built up. Remove the CD and
leave the system turned on for about an hour until the
moisture evaporates.
Tape Deck
The tape does not record.
•No tape in deck B.
•The tab has been removed from the cassette tape.
•The tape has reeled to the end.
The tape does not record nor play or there is decrease
in sound level.
•The heads are dirty. Clean them (see "To clean the tape
heads" on page 20).
•The record/playback heads are magnetized. Demagnetize
them (see "To demagnetize the tape heads" on page 20).
The tape does not run.
•Is the deck in pause?
The tape does not erase completely.
•The record/playback heads are magnetized. Demagnetize
them (see "To demagnetize the tape heads" on page 20).
There is excessive wow or flutter, or the sound drops
out.
•The capstans or pinch rollers are dirty. Clean them (see "To
clean the tape heads" on page 20).
Noise increases or the high frequencies are erased.
•The record/playback heads are magnetized. Demagnetize
them (see "To demagnetize the tape heads" on page 20).
Poor tape sound.
•Use TYPE I (normal) tapes.
Tuner
Noise is heard or poor reception.
•Check the antenna connections.
•For FM, move the FM antenna to reduce the noise.
•For AM, re-rotate the AM antenna to reduce the noise.
•Move the unit and the antennas away from other electric
appliances and cords.
En
Resetting the unit
If an unusual condition occurs in the display window or the
cassette deck, reset the unit as follows:
1Press POWER to turn off the power.
If the power cannot be turned off, disconnect the AC power
cord, then plug it in again.
2 Hold down s and press POWER.
Everything stored in memory after purchase is cleared.
21
Page 22

Specifications
MAIN UNIT CX-JN5
TUNER
FM tuning range 87.5 MHz to 108 MHz
FM usable sensitivity (IHF) 13.2 dBf
FM antenna terminal 75 ohms (unbalanced)
AM tuning range 530 kHz to 1710 kHz (10 kHz step)
AM usable sensitivity 350 µV/m
AM antenna Loop antenna
AMPLIFIER
Power output 96 W + 96 W (40 Hz - 20 kHz, THD
En
Total harmonic distortion 0.08 % (45 W, 1 kHz, 6 ohms)
Input VIDEO/AUX: 400 mV
Outputs SPEAKERS: 6 ohms or more
CASSETTE DECK
Track format 4 tracks, 2 channels stereo
Frequency response 50 Hz – 8 kHz
Recording system AC bias
Heads Deck A: playback x 1
CD PLAYER
Laser Semiconductor laser (λ = 780 nm)
D/A converter 1 bit dual
Signal-to-noise ratio 85 dB (1 kHz, 0 dB)
Harmonic distortion 0.05 % (1 kHz, 0 dB)
531 kHz to 1710 kHz (9 kHz step)
less than 1 %, 6 ohms)
120 W + 120 W (1 kHz, THD less
than 10 %, 6 ohms)
PHONES: 32 ohms or more
Deck B: recording/playback x 1,
erase x 1
Emission duration:
continuous
GENERAL
Power requirements 120 V AC, 60 Hz
Power consumption 100 W
Power consumption With ECO mode on: 0.25 W
in standby mode With ECO mode off: 20 W
Dimensions (W x H x D) 280 x 330 x 392.5 mm
(11 1/8 x 13 x 15 1/2 in.)
Weight 8.0 kg (17 lbs 10 oz)
FRONT SPEAKERS SX-JN5
Speaker system 3 way, bass reflex
Speaker units Woofer: 140 mm (5 5/8 in.) cone x 2
Tweeter: 60 mm (2 3/8 in.) cone
Super tweeter: 20 mm (13/16 in.)
ceramic
Impedance 6 ohms
Dimensions (W x H x D) 298 x 327 x 278 mm
(11 3/4 x 12 7/8 x 11 in.)
Weight 5.1 kg (11 lbs 4 oz)
Supplied accessories
Remote commander (1)
Batteries (2)
FM antenna (1)
AM antenna (1)
Specifications and external appearance are subject to change
without notice.
COPYRIGHT
Check copyright laws relevant to recordings from discs, tuner
or tape for the country where the unit is to be used.
Licensed by BBE Sound, Inc. under USP4638258, 5510752
and 5736897.
22
Page 23

ADVERTENCIA
Para evitar un incendio o peligro de descarga,
no exponga la unidad a la lluvia ni a la humedad.
Para evitar descargas eléctricas, no abra la cubierta.
Dirija las reparaciones únicamente a personal de servicio
cualificado.
No instale el aparato en un espacio cerrado, como una
estantería o armario empotrado.
Para evitar un incendio, no cubra la ventilación del aparato
con periódicos, manteles, cortinas, etc., y no coloque velas
encendidas sobre el aparato.
Para evitar un incendio o peligro de descarga, no coloque
objetos llenos de líquido, como floreros, sobre el aparato.
E
"PRECAUCIÓN: PARA REDUCIR EL RIESGO DE DESCARGAS
“CAUTION:TO REDUCE THE RISK OF
ELÉCTRICAS, NO RETIRE LA CUBIERTA (O PARTE POSTERIOR).
NO HAY PIEZAS REPARABLES POR EL USUARIO EN EL
DO NOT REMOVE COVER (OR BACK).
NO USER-SERVICEABLE PARTS INSIDE.
REFER SERVICING TO QUALIFIED
DIRIJA LAS REPARACIONES A PERSONAL DE SERVICIO
CAUTION
RISK OF ELECTRIC SHOCK
DO NOT OPEN
ELECTRIC SHOCK,
INTERIOR.
SERVICE PERSONNEL.”
CUALIFICADO."
24
Este símbolo tiene la finalidad de avisar
al usuario de la presencia de "voltaje
peligroso" sin aislar en el interior del
producto que podría ser de suficiente
magnitud como para constituir un riesgo
de descarga eléctrica para las personas.
Este símbolo tiene la finalidad de avisar
al usuario de la presencia de
instrucciones de funcionamiento y
mantenimiento (reparación) importantes
en el material impreso suministrado con
el aparato.
PRECAUCIÓN
El uso de instrumentos ópticos en este producto puede
incrementar el riesgo de lesiones oculares.
PRECAUCIONES
ADVERTENCIA
Este equipo ha sido ensayado y se ha concluido que cumple
con las restricciones establecidas para un dispositivo digital
de Clase B con arreglo a la Sección 15 de la Reglamentación
FCC. Estas restricciones se han diseñado para proporcionar
una protección razonable contra las interferencias dañinas en
una instalación residencial.
Este equipo genera, usa y puede emitir energía de
radiofrecuencia y, si no se instala y se usa de acuerdo con las
instrucciones, puede provocar interferencias dañinas a las
comunicaciones radiofónicas. Sin embargo, no existe garantía
de que no se produzcan interferencias dañinas en una
instalación particular. Si este equipo causa interferencias
dañinas en la recepción de emisiones radiofónicas o televisivas,
lo cual puede determinarse encendiendo y apagando el aparato,
se recomienda al usuario que intente corregir la interferencia
siguiendo una o más de las siguientes medidas:
-Vuelva a orientar o colocar la antena de recepción.
- Aumente la separación entre el equipo y el receptor.
- Conecte el equipo a una toma en un circuito distinto al que
está conectado el receptor.
- Consulte al distribuidor o técnico experto en radio/
televisión.
PRECAUCIÓN
Se advierte de que cualquier cambio o modificación no
aprobado expresamente en este manual podría invalidar la
autoridad del usuario para manejar este equipo.
Nota para el instalador del sistema de TV por cable:
Este recordatorio se proporciona para llamar la atención del
instalador del sistema DE TV POR CABLE sobre el Artículo 82040 del NEC que proporciona pautas para una puesta en tierra
adecuada y, en particular, especifica que el cable de toma de
tierra deberá conectarse al sistema de toma de tierra del edificio,
tan cerca del punto de entrada del cable como sea posible.
Voltaje de funcionamiento
Antes de encender el sistema, compruebe que el voltaje de
funcionamiento de su sistema es idéntico al voltaje de su
suministrador de energía local.
Page 24

Seguridad
•La unidad no estará desconectada de la fuente de
alimentación de CA (red de suministro) mientras esté
conectada a la toma de la pared, incluso si se ha apagado la
unidad.
•Desenchufe el sistema de la toma de la pared (red de
suministro) cuando no se vaya a utilizar en un largo periodo
de tiempo. Para desconectar el cable (cable de la red de
suministro), sáquelo del enchufe. Nunca estire directamente
del cable.
•Si algún objeto sólido o líquido se introduce en la unidad,
desconecte el sistema estéreo y haga chequear la unidad
por personal cualificado antes de ponerlo nuevamente en
funcionamiento.
•El cable de alimentación de CA debe cambiarse únicamente
en un taller de servicio cualificado.
Colocación
•Coloque la unidad en un lugar con ventilación adecuada
para evitar acumulación de calor en la unidad.
•No coloque la unidad en posición inclinada.
•No coloque la unidad en lugares donde haya:
- Calor o frío extremo
- Polvo o suciedad
-Mucha humedad
-Vibraciones
- Luz solar directa.
Acumulación de calor
•Aunque la unidad se caliente durante el funcionamiento, no
se trata de un mal funcionamiento.
•Coloque la unidad en un lugar con ventilación adecuada
para evitar que se acumule calor en la unidad.
Si utiliza continuamente esta unidad a alto volumen, la
temperatura de la cubierta superior, lateral e inferior aumentará
considerablemente. Para evitar quemarse, no toque la cubierta.
Funcionamiento
•Si el sistema se traslada directamente de un lugar frío a
otro caliente, o se sitúa en una habitación muy húmeda, la
humedad se condensará en la lente del interior del
reproductor CD. En ese caso, el sistema no funcionará
correctamente. Retire el CD y deje el sistema encendido
durante aproximadamente una hora hasta que la humedad
se evapore.
•Cuando traslade el sistema, saque los discos.
Notas sobre los discos
•Es posible que los discos grabados en unidades de CD-R/
RW no se reproduzcan a causa de rayas, suciedad, la
condición de grabación o las características de la unidad.
•Los discos CD-R/RW no finalizados al término de la
grabación no podrán reproducirse.
•No pegue etiquetas adhesivas, etc., a ninguna de las caras
de un disco CD-R/RW, ya que podrían ocasionar fallos en
el funcionamiento.
•No cargue un disco CD-R/RW sin grabar. El disco podría
resultar dañado.
•Los discos con formas no estándar (p.ej.: corazón, cuadrado,
estrella) no podrán reproducirse en esta unidad. Si lo intenta
podría dañar la unidad. No utilice esos discos.
• Los discos DVD, SACD, CD-ROM, VCD y CD con archivos
MP3 no pueden reproducirse en esta unidad.
Discos de música codificados mediante tecnologías
de protección de los derechos de autor
Este producto se ha diseñado para reproducir discos que
cumplen con el estándar Compact Disc (CD). Recientemente,
algunas compañías discográficas comercializan discos de
música codificados mediante tecnologías de protección de
derechos de autor. Tenga en cuenta que, entre estos discos,
algunos no cumplen con el estándar CD, por lo que no podrán
reproducirse mediante este producto.
Si tiene cualquier pregunta o problema relacionado con su
sistema estéreo, consulte a su distribuidor Aiwa más cercano.
ÍNDICE
PRECAUCIONES ................................ 24
PREPARATIVOS ................................. 26
PARTES Y CONTROLES ........................ 27
AJUSTES PREVIOS AL FUNCIONAMIENTO.. 30
FUNCIONAMIENTO DEL CD ................... 32
FUNCIONAMIENTO DEL SINTONIZADOR .... 34
FUNCIONAMIENTO DE LA CINTA ............. 36
AJUSTES DEL SONIDO ......................... 39
FUNCIONAMIENTO DEL TEMPORIZADOR ... 40
REFERENCIA .................................... 42
E
25
Page 25

PREPARATIVOS
Conexión
Enchufe el cable de alimentación de CA a una toma de corriente
después de haber efectuado todas las demás conexiones.
1
Conecte los altavoces frontales.
Conecte el altavoz frontal derecho (marcado con una "R")
a los terminales SPEAKERS R y colóquelo al lado derecho
de la unidad. Conecte el altavoz frontal izquierdo (marcado
con una "L") a los terminales SPEAKERS L y colóquelo al
lado izquierdo de la unidad. Los cables de altavoces con
franjas negras se conectan a los terminales 9.
2
Conecte las antenas suministradas.
Conecte la antena de FM al terminal FM 75 Ω y la
antena de AM a los terminales AM LOOP.
Antena de AM
Control remoto
Retire la tapa del compartimiento de las pilas que se encuentra
en la parte posterior del control remoto e introduzca dos pilas
R6 (tamaño AA) con las polaridades colocadas en las
posiciones correctas.
Antena de FM
•Reemplace las pilas por otras nuevas cuando la distancia
E
3
Conecte el cable de alimentación de CA a la toma
de la pared.
Cuando el cable de alimentación de CA se conecte a la
toma de la pared por primera vez, aparecerá la DEMO en
la pantalla.
Para desactivar la DEMO, pulse c (c/den el
mando a distancia).
•No cortocircuite los cables de los altavoces 0 y 9.
•No deje objetos que generen magnetismo ni objetos
afectados por el magnetismo cerca de los altavoces.
de funcionamiento entre el control remoto y la unidad
principal sea menor.
•Retire las pilas si la unidad no va a ser utilizada durante un
largo periodo de tiempo.
•El control remoto puede que no funcione si se utiliza bajo
una luz solar intensa, etc., o si su línea de visión queda
obstruida.
R6(AA)
26
Page 26

PARTES Y CONTROLES
Unidad principal: panel posterior
Consulte las páginas indicadas entre paréntesis para más
información.
1 Terminales AM LOOP, FM 75 Ω (26)
Conecte aquí las antenas de AM y FM suministradas.
2 Tomas VIDEO/AUX
Aceptan la señal de sonido analógica procedente de un
equipo exterior.
Haga la conexión a estas tomas utilizando un cable de
conexión opcional con clavijas fono RCA (clavija roja a
toma R y clavija blanca a toma L). Consulte también el
manual de instrucciones de su equipo.
Para cambiar la función a la entrada externa, pulse VIDEO/
AUX.
Consejo:
Para cambiar el nombre visualizado para esta función,
encienda la unidad y, a continuación, mantenga pulsados
VIDEO/AUX y POWER de la unidad. Repita el
procedimiento para seleccionar "VIDEO", "AUX" o
"TV".
3 Terminales # SPEAKER (26)
Conecte los cables de los altavoces frontales
suministrados a estos terminales.
4 Cable de alimentación de CA (26)
E
27
Page 27

Unidad principal: Panel frontal
Consulte las páginas indicadas entre paréntesis para más
información.
E
1 DISC CHANGE (32)
Gira las bandejas del CD.
2 POWER 6STANDBY/ON (30)
Enciende y apaga (pone en espera) la unidad.
El indicador rojo parpadea al recibirse una señal del
mando a distancia.
3 MODE (30-33, 39)
Selecciona varios modos (ECO y reproducción repetida,
aleatoria y programada, etc.) cuando se utiliza en
combinación con ENTER y MULTI JOG.
4 ENTER (30-34, 39-41)
Determina el modo y la hora (ECO, reproducción repetida,
aleatoria y programada, reloj y temporizador, etc.) cuando
se utiliza en combinación con ENTER y MULTI JOG.
5 MULTI JOG (30-34, 36-41)
Cuando se utiliza en combinación con ENTER y MULTI
JOG.
CD: selecciona una pista y la reproducción repetida,
aleatoria y programada.
Sintonizador: selecciona una emisora preajustada.
Cinta: especifica la duración de la cinta.
Reloj y temporizador: ajusta la hora.
i-Bass: selecciona un rango de frecuencias.
Analizador de espectro, ECO y regulador de luz:
selecciona el modo.
6 Toma PHONES
Enchufe aquí unos auriculares opcionales con miniclavija
estéreo (ø 3,5 mm). La salida del altavoz se cancela.
7 SYNC DUB (37)
Empieza a copiar una cinta completa.
wREC/REC MUTING (36, 37)
Inicia la grabación.
8 DISC DIRECT PLAY 1-3 (32)
Selecciona un disco.
9 zOPEN/CLOSE (32)
Abre o cierra el compartimiento de discos.
0 TAPE A/B (36)
Selecciona la función de cinta y la pletina A o B.
TUNER/BAND (34)
Selecciona la función sintonizador y la banda de radio.
VIDEO/AUX (27)
Selecciona la función de un equipo externo conectado a
las tomas VIDEO/AUX.
CD (32)
Selecciona la función CD.
! Sensor remoto
Recibe una señal del control remoto.
@ VOLUME (30)
Ajusta el volumen.
# TREBLE (39)
Realza el sonido de alta frecuencia.
$ BASS (39)
Realza el sonido de baja frecuencia.
% i-Bass (39)
Produce un sonido de baja frecuencia intenso y nítido.
^ cPLAY/PRESET (30, 32, 34, 36)
Cuando la unidad está apagada: activa o desactiva la
DEMO.
CD y cinta: inicia la reproducción.
Sintonizador: sintoniza una emisora preajustada.
sSTOP/CLEAR (32, 34, 36)
CD y cinta: detiene la reproducción.
Sintonizador: borra una emisora preajustada.
f TUNING DOWN, gTUNING UP
(32, 34, 36)
CD: busca una pista en reproducción con avance rápido
o retroceso rápido cuando se mantiene pulsado.
Cinta: avanza o rebobina rápidamente la cinta.
Sintonizador: sintoniza manualmente hacia arriba o abajo
en la banda.
aPAUSE/SET (32, 34, 36)
CD y cinta: hace una pausa en la reproducción.
Sintonizador: guarda la emisora recibida.
28
Page 28

Control remoto
Consulte las páginas indicadas entre paréntesis para más
información.
Los botones cuyos nombres son idénticos o similares a los de la
unidad principal realizan básicamente las mismas funciones
que ellos.
1 POWER (30)
2 1-0/10, +10 (32-34)
CD: seleccionan una pista del CD del número
especificado.
Sintonizador: sintonizan la emisora con el número
preajustado especificado.
Los botones realizan las siguientes funciones cuando se pulsan
junto con SHIFT.
EDIT (37, 38)
Activa el modo de grabación de edición de IA o el modo
de grabación con edición programada cuando se pulsa
en el modo de parada.
BAND (34)
Selecciona la función de sintonizador y la banda de radio.
TAPE A/B (36)
SPECTRUM (30)
Cambia la pantalla del analizador de espectro.
TUNER MODE (35)
Cambia entre recepción de FM estéreo o monoaural.
3 r, t (31-34, 37-41)
CD: selecciona una pista.
Sintonizador: selecciona una emisora preajustada.
Cinta: especifica la duración de la cinta.
BASS y TREBLE: ajusta el nivel.
Reloj y temporizador: ajusta la hora.
4 PLAY MODE (33)
Selecciona reproducción aleatoria o programada en la
función CD.
REPEAT (32)
Activa el modo de reproducción repetida de un CD.
ENTER (30-34, 39-41)
5 CLOCK/TIMER/SET (40, 41)
Activa el modo de ajuste del temporizador.
CLOCK/TIMER/SELECT (40, 41)
Selecciona la reproducción con temporizador, la
grabación con temporizador o desactiva el temporizador.
6 DISPLAY (31, 32)
Aparece en pantalla la hora y el tiempo restante en un CD.
7 SHIFT
Manténgalo pulsado cuando pulse un botón numerado para
cambiar su función por la que está impresa sobre el número.
Por ejemplo:
"Pulse SHIFT+BAND en el control remoto" indica
"Mantenga pulsado SHIFT y pulse '2' (BAND)". Esto le
permite seleccionar la función de sintonizador y la banda
de radio.
8 FUNCTION
Cambia la función activada entre CD, TAPE, TUNER y
VIDEO (AUX o TV).
9 DISC SKIP (32)
Selecciona un disco.
0 c/d (30, 32, 36)
Cuando la unidad está apagada: activa o desactiva la
DEMO.
CD y cinta: inicia la reproducción.
s(32, 36)
CD y cinta: detiene la reproducción.
f,g (32, 34, 36)
CD: busca una pista en reproducción con avance rápido
o retroceso rápido cuando se mantiene pulsado.
Cinta: avanza o rebobina rápidamente la cinta.
Sintonizador: sintoniza manualmente hacia arriba o hacia
abajo la banda.
a (32, 36)
CD y cinta: hace una pausa en la reproducción.
! SLEEP (40)
Activa y desactiva el temporizador de apagado y
selecciona la duración.
@ VOLUME (+, -) (30)
Ajusta el volumen.
# SOUND (39)
Selecciona el modo de ajuste BASS o TREBLE.
CLEAR (33, 34)
Borra una pista de la reproducción programada del CD y
una emisora preajustada de radio.
Note
Los botones no explicados arriba (ALBUM N, M y
KARAOKE) no funcionan con esta unidad.
29
E
Page 29

AJUSTES PREVIOS AL FUNCIONAMIENTO
POWER
STANDBY / ON
MODE
ENTER
MULTI JOG
Alimentación
Encendido de la unidad
E
Pulse POWER 6STANDBY/ON (POWER en el control remoto).
Al pulsar TAPE A/B, TUNER/BAND, VIDEO/AUX o CD también
se enciende la unidad (función de reproducción directa).
Cuando se inserte un disco o una cinta, la reproducción
empezará automáticamente.
Apagado de la unidad
Vuelva a pulsar POWER 6STANDBY/ON.
La unidad se pone en el modo de espera.
POWER
SPECTRUM
VOLU ME
TA P E A/B,
TUNER/BAND,
VIDEO/AUX,
CD
CLOCK/
TIMER/SET
DISPLAY
SHIFT
ENTER
VOLU ME
+,–
Volumen
Gire VOLUME (pulse VOLUME +, - en el control
remoto).
Ajuste de 0 (mínimo) a 30 y MAX (máximo).
Consejo:
El ajuste del nivel del sonido se mantiene mientras la unidad
está apagada en modo de espera:
Si la unidad se apaga con el volumen ajustado a 17 o más, se
ajustará automáticamente a 16 la próxima vez que se enciende
la unidad.
DEMO
Puede disfrutar de la DEMO en la pantalla cuando la unidad
esté apagada.
Para activar o desactivar la DEMO
Pulse c (c/d en el control remoto)
esté apagada.
cuando la unidad
Pantalla del analizador de espectro
Puede cambiar la pantalla del analizador de espectro.
1
Pulse repetidamente MODE hasta que
"SPECTRUM?" aparezca en pantalla cuando la
unidad esté encendida y, a continuación, pulse
ENTER.
2
Gire MULTI JOG para seleccionar una de las tres
pantallas del analizador de espectro (PATTERN
1, 2 y 3).
En el control remoto, pulse repetidamente SHIFT+SPECTRUM.
30
Page 30

Modo ECO
Reduce el consumo de energía mientras la unidad está apagada
(en modo de espera).
1
Pulse repetidamente MODE hasta que "ECO
MODE?" aparezca en pantalla y, a continuación,
pulse ENTER.
2
Gire MULTI JOG para seleccionar "ECO ON" y, a
continuación, pulse ENTER.
En el modo ECO ON, la iluminación de la unidad se apaga
cuando se apaga la unidad. Sólo se enciende el indicador
rojo en POWER.
El ajuste se cancela si no se utiliza MULTI JOG o cualquier
otro botón de operación antes de que transcurran 6
segundos.
Para cancelar el modo ECO
Repita los pasos anteriores y seleccione "ECO OFF" en el
paso 2.
Regulador de intensidad de
iluminación
Ajusta el brillo de la pantalla.
1
Pulse repetidamente MODE hasta que
"DIMMER ?" aparezca en pantalla cuando la
unidad esté encendida y, a continuación, pulse
ENTER.
2
Gire MULTI JOG para seleccionar uno de los tres
modos de intensidad de iluminación u "OFF", y,
a continuación, pulse ENTER.
"OFF" es el modo de intensidad más alta y
"DIMMER 3" el de intensidad más baja.
En modo DIMMER 3 no verá aparecer la pantalla del
analizador de espectro.
El ajuste se cancela si no se utiliza MULTI JOG ni ningún
otro botón de operación antes de que transcurran 6
segundos.
Para cancelar el regulador de intensidad de
iluminación
Repita el procedimiento anterior y seleccione "OFF" en el
paso 2.
Puesta en hora del reloj
Utilice el control remoto.
1
Pulse CLOCK/TIMER/SET.
Vaya al paso 3 cuando aparezca la hora y vea parpadear
la 'hora'.
2
Pulse repetidamente r o t hasta que
"CLOCK SET" aparezca en pantalla y, a
continuación, pulse ENTER.
3
Pulse repetidamente r o t para ajustar la
hora y, a continuación, pulse ENTER.
4
Pulse repetidamente r o t para ajustar
los minutos y, a continuación, pulse ENTER.
La pantalla de la hora deja de parpadear y el reloj empieza
a funcionar a partir de 00 segundos.
•En lugar de r o t también se puede utilizar MULTI
JOG.
Para visualizar la hora
Pulse DISPLAY en el control remoto. La hora aparecerá en
pantalla durante 6 segundos.
Consejo:
"AM 12:00" indica medianoche y "PM 12:00" indica
mediodía.
Si aparece "- -:- -" al apagar la unidad
Se ha producido una interrupción en el suministro de
alimentación. Vuelva a poner en hora el reloj.
E
31
Page 31

FUNCIONAMIENTO DEL CD
DISC DIRECT
PLAY 1-3
DISC CHANGE
MODE
ENTER
MULTI JOG
Esta unidad reproduce discos CD-R/RW finalizados así como
también CDs de audio.
E
Reproducción
1
Pulse CD e introduzca el(los) disco(s).
Pulse zOPEN/CLOSE para abrir el compartimiento de
discos y ponga un disco o dos discos con el lado de la
etiqueta hacia arriba.
Para poner tres discos, pulse DISC CHANGE para que giren
las bandejas, y, a continuación, ponga el tercer disco. Para
terminar, cierre el compartimiento con zOPEN/CLOSE.
•Cuando introduzca un disco de 8 cm, póngalo en el
círculo interior de la bandeja.
2
Para reproducir todos los discos, pulse c(c/
d en el control remoto) y, a continuación,
"ALL DISCS" se iluminará en la pantalla
Para reproducir un disco deseado, pulse DISC
DIRECT PLAY 1-3 y, a continuación, "1 DISC" se
iluminará en la pantalla
Un indicador del disco en reproducción parpadeará en la
pantalla.
32
OPEN/CLOSE
CD
PLAY MODE
DISPLAY
CLEAR
Para detener la reproducción
Pulse s.
Para hacer una pausa en la reproducción
Pulse a. Púlselo de nuevo para reanudar la reproducción.
Para seleccionar una pista
Gire MULTI JOG o pulse repetidamente r o t en el
control remoto.
Con los botones numerados en el control remoto,
- Para seleccionar la pista 10, pulse 0/10.
- Para seleccionar la pista 20, pulse +10, +10 y 0/10.
- Para seleccionar la pista 25, pulse +10, +10 y 5.
Para buscar (reproducción en avance rápido o
retroceso rápido)
Mantenga pulsado f o g. Suéltelo en el punto deseado.
Para seleccionar un disco
Pulse DISC DIRECT PLAY 1-3 o DISC SKIP en el control remoto.
Para visualizar el tiempo restante de la pista o del
disco
Pulse repetidamente DISPLAY en el control remoto durante
la reproducción.
1–0/10,
+10
DISC SKIP
REPEAT
La pantalla cambia cíclicamente del siguiente modo:
Número de pista y tiempo de reproducción transcurrido
de la pista actual
Número de la pista y tiempo restante de la pista actual
Tiempo restante del disco actual
Pantalla del reloj (durante 6 segundos)
Para reemplazar uno o varios discos durante la
reproducción sin interrupción
Mientras se esté reproduciendo un disco, pulse DISC CHANGE
para que se abra el compartimiento de discos, reemplace el
disco o discos por otro u otros, y pulse DISC CHANGE para
cerrar el compartimiento de discos.
Reproducción repetida
Reproduce repetidamente todas las pistas o una pista de los
discos.
1
Pulse repetidamente MODE hasta que
"REPEAT?" aparezca en pantalla en función CD
y, a continuación, pulse ENTER.
2
Gire MULTI JOG para seleccionar uno de los dos
modos de repetición de abajo o "REPEAT OFF"
y, a continuación, pulse ENTER.
-"REPEAT ALL":
Para todas las pistas de un disco deseado o todos los
discos hasta 5 veces. """ se ilumina.
-"REPEAT 1":
Para una sola pista. ""1" se ilumina.
El ajuste se cancela si no se utiliza MULTI JOG o cualquier
otro botón de operación antes de que transcurran 6 segundos.
3
Para reproducir un disco deseado, pulse DISC
DIRECT PLAY 1-3.
Para reproducir todos los discos, pulse c(c/
d en el control remoto).
En el control remoto, pulse repetidamente REPEAT hasta que
""" o ""1" aparezcan y realice el paso 3.
Page 32

Para cancelar la reproducción repetida
Realice los pasos 1 y 2, y seleccione "REPEAT OFF" en el
paso 2. En el control remoto, pulse repetidamente REPEAT
hasta que """ y ""1" desaparezcan.
Reproducción aleatoria
Reproduce las pistas de un disco deseado o todos los discos en
orden aleatorio.
1
Pulse MODE repetidamente hasta ver aparecer
"PLAY MODE?" en la pantalla en modo de parada
y, a continuación, pulse ENTER.
2
Gire MULTI JOG para seleccionar "SHUFFLE" y,
a continuación, pulse ENTER.
"
" se iluminará.
SHUF
El ajuste se cancela si no se utiliza MULTI JOG o cualquier
otro botón de operación antes de que transcurran 6
segundos.
3
Para reproducir un disco deseado, pulse DISC
DIRECT PLAY 1-3.
Para reproducir todos los discos, pulse c(c/
d en el control remoto).
En el control remoto, pulse repetidamente PLAY MODE hasta
que "
Para cancelar la reproducción aleatoria
Realice los pasos 1 y 2, y seleccione "CONTINUE" en el
paso 2. En el control remoto, pulse repetidamente PLAY MODE
hasta que "
" se ilumine y realice el paso 3.
SHUF
" y "
SHUF
PGM
" desaparezcan.
Reproducción programada
Reproduce hasta 30 pistas seleccionadas en orden programado.
1
Pulse MODE repetidamente hasta ver aparecer
"PLAY MODE?" en la pantalla en modo de parada
y, a continuación, pulse ENTER.
2
Gire MULTI JOG para seleccionar "PROGRAM"
y, a continuación, pulse ENTER.
"
" se iluminará.
PGM
El ajuste se cancela si no se utiliza MULTI JOG o cualquier
otro botón de operación antes de que transcurran 6
segundos.
3
Pulse DISC DIRECT PLAY 1-3 para seleccionar
un disco.
Vaya al siguiente paso cuando la bandeja de discos deje
de girar.
En el control remoto, pulse DISC SKIP.
4
Gire MULTI JOG para seleccionar una pista y, a
continuación, pulse ENTER.
El número de pista seleccionada y el número de programa
aparecen en la pantalla.
En el mando a distancia, pulse r o t y, a
continuación, pulse ENTER o pulse los botones
numerados:
- Para seleccionar la pista 10, pulse 0/10.
- Para seleccionar la pista 20, pulse +10, +10 y 0/10.
- Para seleccionar la pista 25, pulse +10, +10 y 5.
5
Repita los pasos 3 y 4 para programar otras
pistas.
6
Pulse c(c/d en el control remoto).
En el control remoto, pulse repetidamente PLAY MODE hasta
que "
•Durante la reproducción programada, no puede seleccionar
•Si el tiempo total de reproducción del programa supera los
•No se pueden programar más de 30 pistas. "FULL"
" se ilumine y realice los pasos 3 a 6.
PGM
un disco ni una pista con los botones numerados.
99 minutos y 59 segundos, o si se programa una pista con
un número de pista superior a 30, el tiempo de reproducción
aparecerá en pantalla como "- -:- -".
aparecerá en pantalla.
Para borrar una pista
Pulse CLEAR en el control remoto en el modo de parada.
Borrará una pista del final del programa.
Para borrar todo el programa
Pulse s en el modo de parada.
Para añadir pistas al programa
Repita los pasos 2 y 3 antes de iniciar la reproducción. Las
pistas se añadirán al final del programa.
Para cancelar la reproducción programada
Realice los pasos 1 y 2, y seleccione "CONTINUE" en el
paso 2. En el control remoto, pulse repetidamente PLAY MODE
hasta que "
•Los contenidos del programa permanecen incluso si el
programa se cancela o después de que la reproducción
programada finalice. El mismo programa se reproducirá si
realiza los pasos 1, 2 y 6.
Notas sobre los CDs
•No inserte más de un disco en la bandeja de discos.
•No incline la unidad con discos cargados.
PGM
" y "
SHUF
" desaparezcan.
33
E
Page 33

FUNCIONAMIENTO DEL SINTONIZADOR
POWER
ENTER
MULTI JOG
PRESET
Sintonización manual
1
Pulse repetidamente TUNER/BAND
E
(SHIFT+BAND en el control remoto) para
seleccionar una banda (FM o AM).
2
Pulse f o g para sintonizar una emisora.
"TUNE" aparece en pantalla cuando se sintoniza una
emisora.
"1" se ilumina para la recepción estéreo en FM.
Para buscar automáticamente una emisora
(Búsqueda automática)
Mantenga pulsado f o g.
La unidad busca una emisora hacia arriba o hacia a bajo de la
banda y se para al recibirla.
Para detener manualmente la búsqueda, pulse f o g.
•La búsqueda automática tal vez no se detenga cuando las
emisoras emitan señales débiles.
1–0/10,
BAND
TUNER/
BAND
CLEAR
SHIFT
PAUSE/SET
+10
TUNER
MODE
ENTER
CLEAR
Sintonización de emisoras
preajustadas
Preajuste sus emisoras favoritas para poder sintonizarlas luego
directamente.
Preajuste de emisoras
1
Pulse TUNER/BAND para seleccione una banda.
2
Pulse f o g para sintonizar la emisora
deseada.
3
Pulse ENTER (o aPAUSE/SET en la unidad) para
almacenar la emisora.
El número de preajuste, empezando por el "1", aparece
en la pantalla.
4
Repita los pasos 1 a 3 para preajustar otras
emisoras.
•No puede memorizar más de 32 emisoras de preajuste. Si
lo intenta aparecerá en pantalla "FULL".
Sintonización de emisoras preajustadas
En la unidad
1
Pulse TUNER/BAND para seleccione una banda.
2
Pulse repetidamente cPRESET o gire MULTI
JOG.
Cada vez que pulse se sintoniza la emisora con el número
de preajuste posterior.
En el control remoto
1
Pulse SHIFT+BAND para seleccionar una banda.
2
Pulse los botones numerados correspondientes
al número de preajuste de su emisora deseada.
- Para seleccionar la pista 10, pulse 0/10.
- Para seleccionar la pista 15, pulse +10 y 5.
- Para seleccionar la pista 20, pulse +10 y +10 y 0/10.
• Al pulsar repetidamente r o t también se puede
seleccionar el número preajustado.
Para borrar una emisora preajustada
1 Sintonice la emisora mediante la sintonización de preajuste.
2 Pulse sCLEAR en la unidad (CLEAR en el control remoto)
y, a continuación, pulse ENTER antes de que transcurran 6
segundos.
Los números de preajuste de las emisoras preajustadas
pertenecientes a la misma banda disminuyen en uno.
34
Page 34

Ajustes
Antenas
Mantenga las antenas alejadas de objetos metálicos, equipos
y cables eléctricos.
Antena de FM: Extiéndala completamente hasta la posición
que ofrezca la mejor recepción. Si las condiciones de
recepción no son adecuadas, conecte una antena exterior
opcional al terminal
necesario.
Antena de AM: Gírela para obtener la mejor recepción.
Para cambiar a la recepción de FM monofónica
Pulse SHIFT+TUNER MODE en el control remoto. Cada vez
que pulse, "MONO" y "STEREO" aparecerán
alternativamente en la pantalla.
Consejo:
Cuando la recepción estéreo por FM no sea adecuada, el
cambio a la recepción mono reducirá el ruido.
Para cambiar el intervalo de sintonización de AM
Mantenga pulsado TUNER/BAND y pulse POWER en la
unidad. Cada vez que pulse, el intervalo de sintonización de
AM cambiará entre 9 kHz/paso y 10 kHz/paso.
Consejo:
El ajuste predeterminado es de 10 kHz/paso. Cámbielo sólo
cuando se utilice la unidad en un área de 9 kHz/paso. El cambio
del intervalo de sintonización de AM borra todas las emisoras
preajustadas.
FM 75 Ω. Utilice un adaptador si es
E
35
Page 35

FUNCIONAMIENTO DE LA CINTA
DISC DIRECT
PLAY 1-3
TA PE A /B
MULTI JOG
EDIT
1–0/10,
+10
TAPE A/B
DISC SKIP
Notas sobre los casetes
•No se recomienda utilizar cintas de más de 90 minutos
porque son sumamente delgadas y se estropean fácilmente.
Si tiene que utilizarlas, no cambie las funciones de la cinta,
como la reproducción y parada.
•Tense las cintas con un lapicero o herramienta similar antes
de utilizarlas. Las cintas no tensadas podrían engancharse
en el mecanismo de la pletina y estropearse.
PUSH EJECT
Platina A Platina B
SYNC DUB
Reproducción
Utilice solamente cintas TYPE I (normales).
E
1
Pulse TAPE A/B (SHIFT+TAPE A/B en el control
remoto) e introduzca la cinta en una de las
pletinas.
Pulse zPUSH EJECT para abrir el portacasete, e inserte
el casete con el lado donde está expuesta la cinta hacia
abajo y la cara de reproducción hacia el exterior de la
unidad. Empuje zPUSH EJECT para cerrar.
PUSH EJECT
2
Pulse c(c/d en el control remoto).
36
PUSH EJECT
REC/
REC MUTING
Para detener la reproducción
Pulse s.
Para hacer una pausa en la reproducción (sólo
pletina B)
Pulse a. Púlselo de nuevo para reanudar la reproducción.
Para avanzar o rebobinar rápidamente la cinta
Pulse f o g.
Para seleccionar una pletina (pletina A o pletina B)
Pulse TAPE A/B (SHIFT+TAPE A/B en el control remoto) en el
modo de parada cuando haya cintas cargadas en ambas pletinas.
"TP A" (pletina A) o "TP B" (pletina B) aparecerá en pantalla.
Para reponer el contador de cinta
Pulse s en el modo de parada y el contador de cinta de la
pantalla se pondrá en "0000". La abertura y el cierre del
portacasete también repondrán el contador de cinta.
Para reproducir continuadamente (pletina A a pletina B)
Introduzca cintas en ambas pletinas e inicie la reproducción
en la pletina A. A continuación, tan pronto como termine la
reproducción en la pletina A, la reproducción en la pletina B
empezará sin interrupción.
•Ambas pletinas reproducen un lado de las cintas.
SHIFT
Grabación básica
Utilice solamente cintas TYPE I (normales). La pletina B es la
pletina de grabación. Sólo puede grabarse una cara de la cinta
cada vez.
1
Inserte la cinta grabable en la platina B.
Presione zPUSH EJECT para abrir el portacasete, e
inserte el casete con la parte expuesta hacia abajo y la
cara que va a ser grabada hacia el exterior de la unidad.
En caso necesario, bobine la cinta hasta el punto deseado.
2
Prepare la fuente.
Para grabar CDs, seleccione la función CD e introduzca
el/los disco(s).
Para grabar un programa de radio, sintonice la emisora
deseada.
Para grabar una cinta, inserte la cinta de reproducción en
pletina A y seleccione la función TAPE (pletina A).
Para grabar de un equipo externo conectado, seleccione
la función VIDEO/AUX y prepare el equipo.
3
Pulse wREC/REC MUTING para empezar a
grabar.
Cuando grabe un CD o una cinta, la reproducción
empezará automáticamente.
Cuando grabe la entrada desde el equipo conectado,
empiece a reproducir manualmente la fuente.
•El ajuste del volumen o el tono no afecta a la grabación.
•Si intenta grabar una cinta con la lengüeta rota se visualizará
"NO TAB".
Page 36

Para detener la grabación
Pulse s.
Para hacer una pausa en la grabación (sólo para una
fuente TUNER o VIDEO/AUX)
Pulse a. Púlselo de nuevo para reanudar la grabación.
Para grabar un grupo seleccionado de pistas de un
CD
Programe las pistas deseadas (consulte "Reproducción
programada") y, a continuación, pulse wREC/REC MUTING.
Para grabar un espacio en blanco de 4 segundos
(sólo para la fuente TUNER o VIDEO/AUX)
1 Pulse wREC/REC MUTING durante la grabación o en el
modo de pausa de grabación.
"REC MUTING" parpadeará en la pantalla durante 4
segundos (mientras tanto se deja un espacio en blanco en
la cinta) y la unidad entra luego en el modo de pausa de
grabación.
Para grabar un espacio en blanco de menos de 4 segundos,
pulse de nuevo wREC/REC MUTING mientras parpadea
"REC MUTING".
La grabación se reanuda de manera que no es necesario
realizar el paso 2 siguiente.
Para grabar un espacio en blanco de más de 4 segundos,
pulse de nuevo wREC/REC MUTING después de que la
unidad entre en el modo de pausa de grabación. Cada vez
que se pulsa el botón se agrega un espacio de 4 segundos.
2 Pulse a para reanudar la grabación.
Para borrar una cinta
1 Inserte la cinta en la pletina B. En caso necesario, ponga la
cinta en el punto deseado.
2 Pulse TAPE A/B para seleccionar "TP B".
3 Pulse wREC/REC MUTING.
Copiado de toda la cinta
1
Pulse TAPE A/B para seleccionar la función TAPE.
2
Inserte la cinta original en la platina A y la cinta
grabable en la platina B.
3
Pulse SYNC DUB.
Las cintas se rebobinan hasta el comienzo de la cara
delantera y comienza la grabación.
•El copiado no puede empezar desde un punto intermedio
en la cinta.
•Sólo se puede grabar una cara de la cinta cada vez.
Para detener el copiado
Pulse s.
Grabación de CDs editados
Grabación con edición de AI
Cuando graba un CD completo, la función de grabación con
edición de AI tiene en consideración la duración de su cinta y
cambia el orden de grabación de las pistas en caso de ser
necesario, para que ninguna de ellas quede interrumpida al
final de la cara de grabación. Prepare una cinta de duración
suficiente para grabar el CD.
1
Inserte la cinta grabable en la platina B.
2
Seleccione la función CD e introduzca el(los)
disco(s).
3
Pulse una vez SHIFT+EDIT en el control remoto.
Aparecerá "AI C-00".
4
Pulse DISC DIRECT PLAY 1-3 para seleccionar
un disco.
•DISC SKIP en el control remoto también puede utilizarse
para seleccionar un disco.
5
Pulse los botones numerados del mando a
distancia para introducir la longitud de la cinta
grabable.
Se puede especificar un tiempo de 10 a 99 minutos.
- Para un tiempo de 60 minutos, pulse 6 y 0/10.
En unos pocos segundos, la unidad determina las pistas
que van a ser grabadas en cada lado.
El tiempo de grabación restante para la cara A aparece en
la pantalla.
•Para especificar la duración de la cinta también se
pueden utilizar r o t en el control remoto o
MULTI JOG.
6
Pulse wREC/REC MUTING para empezar a
grabar en la cara A.
La cinta se rebobina hasta el comienzo de la cara A y
empieza la grabación.
Vaya al paso siguiente cuando termine la grabación en la
cara A.
7
Pulse SHIFT+EDIT en el control remoto.
El tiempo de grabación restante para la cara B aparece en
la pantalla.
8
Dé la vuelta a la cinta y pulse wREC/REC MUTING
para empezar a grabar en la cara B.
•La grabación con edición de AI no puede utilizarse con
discos que tienen más de 30 pistas. En este caso se visualiza
"TR OVER".
•La grabación no puede empezar desde un punto intermedio
de la cinta.
E
37
Page 37

Grabación con edición programada
Según programa las pistas del CD que van a ser grabadas, la
función de grabación con edición programada muestra el tiempo
de grabación restante para cada cara de la cinta, de esta forma
usted podrá seleccionar fácilmente un grupo de pistas deseadas
que quepa en su cinta.
1
Inserte la cinta grabable en la platina B.
2
Seleccione la función CD e introduzca un(os)
disco(s).
3
Pulse dos veces SHIFT+EDIT en el control remoto.
"PRGM C-00" aparecerá en pantalla y "PGM" se
iluminará.
4
Pulse los botones numerados del mando a
distancia para introducir la longitud de la cinta
grabable.
E
Se puede especificar un tiempo de 10 a 99 minutos.
•Para especificar la duración de la cinta también se
pueden utilizar r, t en control remoto o MULTI
JOG.
5
Pulse DISC DIRECT PLAY 1-3 para seleccionar
un disco. A continuación, pulse los botones
numerados del control remoto para seleccionar
la primera pista que vaya a grabar en la cara A.
- Para seleccionar la pista 10, pulse 0/10.
- Para seleccionar la pista 20, pulse +10, +10 y 0/10.
- Para seleccionar la pista 25, pulse +10, +10 y 5.
•También puede utilizarse DISC SKIP en el control remoto
para seleccionar un disco.
6
Repita el paso 5 para seleccionar el resto de las
pistas para la cara A.
El tiempo de grabación restante de la cara A se visualizará.
Usted no puede seleccionar una pista con un tiempo de
grabación superior.
7
Pulse SHIFT+EDIT en el control remoto para
cambiar a la cara B y seleccione las pistas para
esa cara.
8
Pulse SHIFT+EDIT en el control remoto para
cambiar a la cara A.
9
Pulse wREC/REC MUTING para empezar a
grabar en esa cara A.
La cinta se rebobina hasta el comienzo de la cara A y
empieza la grabación.
Vaya al paso siguiente cuando termine la grabación de la
cara A.
10
Pulse SHIFT+EDIT en el control remoto para
cambiar a la cara B.
11
Dé la vuelta a la cinta y pulse wREC/REC MUTING
para empezar a grabar en la cara B.
•No puede programar más de 30 pistas. En caso contrario
se visualizará "FULL".
•No podrá programar una pista con un número de pista que
sea superior al 30.
•La grabación no puede empezar desde un punto intermedio
de la cinta.
Para detener la grabación
Pulse s. La grabación y la reproducción del CD se detienen
simultáneamente.
Para chequear el programa
1 Antes de grabar, pulse SHIFT+EDIT en el control remoto
para seleccionar la cara A o la B.
2 Pulse repetidamente r o t en el control remoto o
gire MULTI JOG. El número de la pista y el número del
programa se visualizarán en orden.
Para cambiar el programa para cada cara
Pulse SHIFT+EDIT en el control remoto para seleccionar la
cara A o la B, y pulse s para cancelar el programa para la
cara seleccionada. A continuación, vuelva a seleccionar las
pistas.
Para borrar el programa editado
Pulse dos veces s en modo parada.
Para impedir el borrado accidental
Rompa la lengüeta de plástico del casete con un destornillador
u otra herramienta puntiaguda. Para grabar de nuevo en la
cinta, tape el agujero de detección con cinta adhesiva.
Cara A
Lengüeta de la cara A
38
Page 38

AJUSTES DEL SONIDO
MODE
ENTER
MULTI JOG
BASS
Realza las frecuencias bajas para obtener un sonido potente.
Gire BASS para ajustar de 0 a 5.
En el control remoto, pulse repetidamente SOUND hasta que
"BASS" aparezca en pantalla y, a continuación, pulse
repetidamente r o t antes de que transcurran 6
segundos.
•Cuando el sonido se distorsione con el efecto BASS, cancele
este efecto.
TREBLE
BASS
SOUND
i-Bass
TREBLE
Realza las frecuencias altas para obtener un sonido más claro.
Gire TREBLE para ajustar de 0 a 5.
En el control remoto, pulse repetidamente SOUND hasta que
"
repetidamente r o t antes de que transcurran 6
segundos.
•Cuando el sonido se distorsione con el efecto TREBLE,
" aparezca en pantalla y, a continuación, pulse
TREBLE
cancele este efecto.
i-Bass
Proporciona sonido de graves intenso y nítido, además del efecto
BASS.
1
Pulse i-Bass para seleccionar "I-BASS ON".
El indicador rojo del botón i-Bass se iluminará.
2
Gire BASS para ajustar de 1 a MAX(5).
Para seleccionar el rango de frecuencias del efecto
i-Bass
1 Pulse i-Bass para seleccionar "I-BASS ON".
2 Pulse repetidamente MODE hasta que "IBAS FREQ?"
aparezca en pantalla y, a continuación, pulse ENTER.
3 Gire MULTI JOG para seleccionar uno de los tres rangos de
frecuencias (FREQ 1, 2 y 3).
- FREQ 1: Gama baja
- FREQ 2: Gama media
- FREQ 3: Gama alta
Después del paso 3, ajuste el nivel de i-Bass girando BASS
si es necesario.
El ajuste se cancela si no se utiliza MULTI JOG o cualquier
otro botón de operación antes de que transcurran 6
segundos.
Para cancelar i-Bass
Pulse i-Bass para seleccionar "I-BASS OFF".
Nota
BASS se desactiva al seleccionarse "I-BASS ON" y por lo
tanto no podrá seleccionar "BASS" con SOUND en el mando
a distancia. Para activar BASS, cancele i-Bass.
E
39
Page 39

FUNCIONAMIENTO DEL TEMPORIZADOR
POWER
POWER
"OFF"
VOLUME
CLOCK/TIMER/
Platina B
CLOCK/TIMER/
Para cancelar el temporizador de apagado
Pulse SLEEP en el control remoto hasta que se visualice
"SLEEP OFF".
SET
SELECT
Reproducción con temporizador
Enciende la unidad a una hora especificada todos los días.
Verifique que el reloj está ajustado correctamente.
Utilice el control remoto a partir del paso 2.
1
Prepare la fuente.
Para reproducir uno o varios CDs, cargue el disco o los
discos.
Para escuchar la radio, seleccione la banda y sintonice la
emisora deseada o sintonice una emisora preajustada
(consulte "Sintonización de emisoras preajustadas").
Para reproducir una cinta, inserte la cinta y seleccione la
pletina.
2
Pulse VOLUME +, - para ajustar el nivel del
volumen.
ENTER
MULTI JOG
Temporizador de apagado
Apaga temporalmente la unidad después de transcurrir un
E
tiempo especificado.
Pulse repetidamente SLEEP en el control remoto.
Cada vez que pulse, la duración del temporizador cambiará
cíclicamente como sigue:
"*
"AUTO
La unidad se apaga transcurrido el tiempo seleccionado.
* "AUTO
finaliza la reproducción (hasta 100 minutos).
Consejo:
La iluminación de la pantalla se reduce mientras el
temporizador de apagado está activado.
Para chequear el tiempo restante hasta que se
apague la unidad
Pulse una vez SLEEP en el control remoto. El tiempo restante
se visualizará durante 6 segundos.
"
"80" - - -
90"
":
La unidad se apaga cuando la cinta o CD actual
"10"
ENTER
SLEEP
VOLUME
+,–
3
Pulse CLOCK/TIMER/SET hasta que aparezca en
pantalla "DAILY PLAY" y, a continuación, pulse
ENTER.
El indicador "5" se iluminará y "ON TIME" aparecerá
por unos instantes.
Si "DAILY PLAY" no aparece en pantalla, ajuste el reloj
(consulte "Puesta en hora del reloj") y realice de nuevo
este paso.
4
Pulse repetidamente r o t en el control
remoto para ajustar la hora de encendido del
temporizador y, a continuación, pulse ENTER.
5
Pulse r o t para ajustar los minutos de
encendido temporizado y, a continuación, pulse
ENTER.
"OFF TIME" aparecerá por unos instantes.
6
Repita los pasos 4 y 5 para ajustar la hora y el
minuto de apagado temporizado.
7
Pulse r o t para seleccionar la fuente (CD,
TAPE o TUNER) y, a continuación, pulse ENTER.
La hora de encendido temporizado, la hora de apagado
temporizado y la fuente aparecerán en pantalla.
8
Pulse POWER para apagar la unidad.
La unidad se enciende a la hora de encendido temporizado,
reproduce la fuente seleccionada y, a continuación, se
apaga a la hora de apagado temporizado.
•Para detener el ajuste del temporizador en los pasos 3 a 6,
pulse CLEAR en el control remoto. El modo de espera del
temporizador también se cancelará.
•La reproducción con temporizador no empezará si no se
apaga primero la unidad.
•El ajuste VOLUME en la unidad también se encuentra
disponible en el paso 2.
•En lugar de r o t también se puede utilizar MULTI
JOG.
40
Page 40

Para visualizar el ajuste del temporizador
Pulse repetidamente CLOCK/TIMER/SELECT en el control
remoto hasta que "DAILY PLAY" aparezca. La hora de
encendido temporizado, la hora de apagado temporizado y la
fuente aparecerán en pantalla.
Para cambiar el ajuste del temporizador
Reponga de nuevo el temporizador.
Para cancelar el temporizador
Pulse repetidamente CLOCK/TIMER/SELECT en el control
remoto hasta que "TIMER OFF" aparezca. "5" desaparecerá
de la pantalla.
Grabación con temporizador
Enciende la unidad y graba una vez a la hora especificada.
La grabación con temporizador sólo se encuentra disponible
para la fuente TUNER.
Utilice el control remoto a partir del paso 3.
1
Prepare la fuente TUNER.
Seleccione la banda y sintonice la emisora deseada o
sintonice una emisora preajustada (consulte "Sintonización
de emisoras preajustadas").
2
Prepare el destino de la grabación.
Inserte la cinta grabable en la platina B.
3
Pulse CLOCK/TIMER/SET hasta que "DAILY
PLAY" aparezca en pantalla.
Si "DAILY PLAY" no aparece en pantalla, ajuste el reloj
(consulte "Puesta en hora del reloj") y realice este paso
de nuevo.
4
Pulse repetidamente r o t hasta que
"ONCE REC" aparezca en pantalla y, a
continuación, pulse ENTER.
El indicador "REC 5" se iluminará y "ON TIME"
aparecerá por unos instantes.
5
Realice los pasos 4 a 6 descritos en
"Reproducción con temporizador" para ajustar la
hora de encendido temporizado y la hora de
apagado temporizado.
La hora de encendido temporizado, la hora de apagado
temporizado y la fuente (TUNER) aparecerán en pantalla.
6
Pulse POWER para apagar la unidad.
La unidad se enciende a la hora de encendido temporizado,
graba la fuente (TUNER) y, a continuación, se apaga a la
hora de apagado temporizado.
•Para detener el ajuste del temporizador en los pasos 3 a 4,
pulse CLEAR en el control remoto. El modo de espera del
temporizador también se cancelará.
•La grabación con temporizador no empezará si no se apaga
primero la unidad.
•El nivel del volumen se ajusta automáticamente a 0 (mínimo)
cuando está activada la grabación con temporizador.
•En lugar de r o t también se puede utilizar MULTI
JOG.
Para visualizar el ajuste del temporizador
Pulse repetidamente CLOCK/TIMER/SELECT en el control
remoto hasta que "ONCE REC" aparezca. La hora de
encendido temporizado, la hora de apagado temporizado y la
fuente (TUNER) aparecerán en pantalla.
Para cambiar el ajuste del temporizador
Vuelva a ajustar de nuevo el temporizador.
Para cancelar el temporizador
Pulse repetidamente CLOCK/TIMER/SELECT en el control
remoto hasta que "TIMER OFF" aparezca. "REC 5"
desaparecerá de la pantalla.
Notas
•La reproducción con temporizador se mantiene cada día a
la hora especificada a no ser que la cancele. Sin embargo,
la grabación con temporizador se mantiene sólo una vez:
se cancela automáticamente cuando finaliza la grabación.
•No puede ajustar la misma hora para la activación y
desactivación del temporizador. Si lo hace "SET NG"
aparecerá en pantalla. En este caso, reajuste la hora.
•No puede seleccionar la reproducción con temporizador y
la grabación con temporizador al mismo tiempo. Deberá
seleccionar una de las dos con CLOCK/TIMER/SELECT en
el control remoto.
•Cuando utilice el temporizador de apagado, la reproducción/
grabación con temporizador no encenderá la unidad hasta
que se desactive el temporizador de apagado.
E
41
Page 41

REFERENCIA
Cuidados y mantenimiento
El mantenimiento y el cuidado ocasional de la unidad y del
software son necesarios para optimizar las prestaciones de su
unidad.
Para limpiar la carcasa
Utilice un paño blando y seco. Si las superficies de la unidad
están muy sucias, utilice un paño blando humedecido un poco
en una solución de detergente suave. No utilice disolventes
fuertes tales como alcohol, bencina o diluyente.
Para limpiar los cabezales magnetofónicos
Los cabezales sucios deterioran el sonido. Después de cada
10 horas de utilización, limpie los cabezales con una cinta
limpiadora de cabezales de tipo seco o húmedo
indistintamente. Consulte las instrucciones del casete de
limpieza.
Para desmagnetizar los cabezales magnetofónicos
E
Utilice un casete desmagnetizador cada 20 a 30 horas de
funcionamiento. Consulte las instrucciones del casete
desmagnetizador.
Cuidados de los CDs
Cuando se ensucie un CD, límpielo pasando un paño de
limpieza desde el centro hacia fuera. Sin embargo, no utilice
disolventes. Después de reproducir un CD, guárdelo en su
caja. No exponga un CD a la luz solar directa o fuentes de
calor.
Cuidados de las cintas
Guarde las cintas en sus cajas después de utilizarlas. No las
deje cerca de imanes, motores, televisores o cualquier otra
fuente de magnetismo. No exponga las cintas a la luz solar
directa, ni las deje en el interior de un automóvil estacionado
bajo la luz solar directa.
42
Solución de problemas
Si su unidad no funciona correctamente, compruebe los puntos
siguientes y las secciones pertinentes del manual de
instrucciones.
En primer lugar, compruebe que el cable de alimentación de CA
está conectado firmemente y que los altavoces están conectados
correctamente y firmemente.
Si el problema persiste, consulte a su distribuidor Aiwa más
cercano.
General
No hay sonido.
•¿Están conectados correctamente los cables de los altavoces
y el cable de alimentación de CA?
•Gire VOLUME en el sentido horario y manténgalo.
•Los auriculares están conectados.
•Inserte sólo el trozo de cable desnudo del altavoz en el
terminal SPEAKER. Si inserta el trozo de vinilo del cable
del altavoz dificultará las conexiones del altavoz.
La unidad se apaga repentinamente.
•Posiblemente haya un cortocircuito en los terminales de
los altavoces. Desconecte el cable de alimentación de CA
de la toma de la pared y vuelva a conectar correctamente
los cables de los altavoces. Después de un tiempo, enchufe
el cable de alimentación de CA en el tomacorriente de la
pared.
La iluminación de la unidad se apaga cuando se
apaga la unidad.
•Está activado el modo ECO (Consulte "Modo ECO" en la
página 31).
Pantalla errónea.
•Reponga la unidad (Consulte "Reposición de la unidad" en
la página 43).
Hay muchas interferencias o ruido.
•Un televisor o VCR está colocado demasiado cerca del
sistema estéreo. Aleje el sistema estéreo del televisor o VCR.
El reloj no muestra la hora correcta.
•Hubo una interrupción en la alimentación. Ajuste de nuevo
el reloj y el temporizador.
El ajuste del reloj/preajuste de la radio/temporizador
se cancelan.
•El cable de alimentación de CA está desconectado o se ha
producido un corte en el suministro eléctrico de más de
medio día.
Haga lo siguiente:
- "Puesta en hora del reloj" en la página 31
- "Preajuste de emisoras" en la página 34
Si ha ajustado el temporizador, vuelva a "Reproducción/
grabación con temporizador" en la página 40 y 41.
El temporizador no funciona.
•Ajuste el reloj correctamente.
•Cuando utilice el temporizador de apagado, la reproducción/
grabación con temporizador no encenderá la unidad hasta
que se apague el temporizador de apagado.
El control remoto no funciona.
•Hay un obstáculo entre el control remoto y la unidad.
•El control remoto no apunta en la dirección en el sensor
remoto de la unidad.
•Las pilas se han acabado. Reemplace las pilas.
Altavoces
El sonido procede de un canal o el volumen derecho
e izquierdo está desequilibrado.
•Chequee la conexión de los altavoces y la colocación de
los altavoces.
Falta de graves en el sonido.
•Compruebe que los terminales 0 y 9 del altavoz están
conectados correctamente.
Page 42

Reproductor CD
El compartimiento de discos no se cierra.
•El CD no está colocado correctamente.
El sonido se entrecorta.
•La lente está sucia. Límpiela con un aerosol disponible en
comercios.
El CD no se reproduce.
•El CD no está bien colocado en el compartimiento de discos.
•El CD está sucio.
•El CD está cargado con la etiqueta hacia abajo.
•Se ha acumulado condensación de humedad. Retire el CD
y deje el sistema encendido alrededor de una hora hasta
que se evapore la humedad.
Pletina
La cinta no graba.
•No hay cinta en la pletina B.
•Se ha retirado la lengüeta de protección de la cinta de casete.
•La cinta de protección se ha hundido hasta el fondo.
La cinta no se graba ni se reproduce o disminuye el
nivel del sonido.
•Los cabezales están sucios. Límpielos (consulte "Para
limpiar los cabezales magnetofónicos" en la página 42).
•Los cabezales de grabación/reproducción están
magnetizados. Desmagnetícelos (consulte "Para
desmagnetizar los cabezales magnetofónicos" en la página
42).
La cinta no funciona.
•¿Está la pletina en modo de pausa?
La cinta no se borra completamente.
•Los cabezales de grabación/reproducción están
magnetizados. Desmagnetícelos (consulte "Para
desmagnetizar los cabezales magnetofónicos" en la página
42).
Hay excesiva fluctuación y trémolo, o el sonido se
entrecorta.
•Los cabrestantes o rodillos están sucios. Límpielos
(consulte "Para limpiar los cabezales magnetofónicos" en
la página 42).
El ruido aumenta o se borran las frecuencias de
agudos.
•Los cabezales de grabación/reproducción están
magnetizados. Desmagnetícelos (consulte "Para
desmagnetizar los cabezales magnetofónicos" en la página
42).
Defectuoso sonido de la cinta.
•Utilice cintas TYPE I (normal).
Sintonizador
Se oye ruido o la recepción es débil.
•Compruebe las conexiones de la antena.
•Para FM, mueva la antena de FM para reducir el ruido.
•Para AM, reoriente la antena de AM para reducir el ruido.
•Aleje la unidad y las antenas de otros aparatos y cables
eléctricos.
E
Reposición de la unidad
Si se produce una condición anormal en la pantalla o en la
pletina de casete, reponga la unidad de la forma siguiente:
1 Pulse POWER para desconectar la alimentación.
Si la alimentación no puede desconectarse, desconecte el
cable de alimentación de CA y, a continuación, vuelva a
conectarlo.
2 Mantenga pulsado s y pulse POWER.
Todo lo que haya sido almacenado en la memoria después
de la adquisición de la unidad se borrará.
43
Page 43

Especificaciones
UNIDAD PRINCIPAL CX-JN5
SINTONIZADOR
Rango de sintonización FM 87,5 MHz a 108 MHz
Sensitividad útil para FM (IHF)
Terminal para antena de FM 75 ohmios(desequilibrados)
Rango de sintonización de AM
Sensitividad útil para AM 350 µV/m
Antena AM Antena de bucle
AMPLIFICADOR
Salida 96 W + 96 W (40 Hz - 20 kHz,
E
Distorsión armónica total 0,08% (45 W, 1 kHz, 6 ohmios)
Entrada VIDEO/AUX: 400 mV
Salidas SPEAKERS: 6 ohmios más
PLATINA DE CASETES
Formato de la pista 4 pistas, 2 canales estéreo
Respuesta de frecuencia 50 Hz - 8 kHz
Sistema de grabación Preferencia CA
Cabezales Platina A: reproducción × 1
13,2 dBf
530 kHz a 1710 kHz (pasos de
10 kHz)
531 kHz a 1710 kHz (pasos de
9 kHz)
distorsión armónica total - DAT
inferior a 1%, 6 ohmios)
120 W + 120 W (1 kHz, distorsión
armónica total - DAT inferior a
10%, 6 ohmios)
PHONES: 32 ohmios o más
Platina B: reproducción/
grabación × 1, borrado × 1
REPRODUCTOR DE DISCOS COMPACTOS
Láser Semiconductor láser (λ = 780 nm)
Duración de la emisión: continua
Convertidor D/A 1 bit doble
Relación señal/ruido 85 dB (1 kHz, 0dB)
Distorsión armónica 0,05% (1 kHz, 0 dB)
GENERAL
Requisitos de potencia 120 V CA, 60 Hz
Consumo 100 W
Consumo en modo de espera Con modo ECO activado: 0,25 W
Con modo ECO desactivado: 20 W
Dimensiones (An × Al × Lg) 280 × 330 × 392.5 mm
Peso 8 kg
ALTAVOCES FRONTALES SX-JN5
Sistema de altavoces 3 vías, reflejo de graves
Unidad del altavoz Realzador de subgraves: 140 mm,
cono x 2
Realzador de agudos: 60 mm,
cono
Superrealzador de agudos: 20 mm,
cerámico
Impedancia 6 ohmios
Dimensiones (An × Al × Lg) 298 × 327 × 278 mm
Peso 5,1 kg
Accesorios suministrados
Mando a distancia (1)
Pilas (2)
Antena FM (1)
Antena AM (1)
Las especificaciones y la apariencia externa están sujetos a
modificaciones sin previo aviso.
COPYRIGHT
Compruebe que las leyes de derechos de autor en relación a
la grabación de discos, sintonizador o cintas en el país en el
que vaya a utilizarse la unidad.
Bajo licencia de BBE Sound Inc. registrado como
USP4638258, 5510752 y 5736897.
44
Page 44

Printed in ChinaSony Corporation http://www.aiwa.com/
 Loading...