

Page 1
FR=C150W
RADIO RECEIVER
RECEPTOR DE RADIO
OWNER’S RECORD
For your convenience, record the model number and serial
number (you will find it in the battery compartment) in the
space provided below. Please refer to ihem when you contact
your AIWA dealer in case of difficulty.
Model No.
‘eria’‘“ ~
FR-CI 50W
Page 2
PRECAUTIONS
mm
To maintain good performance
● Do not use the unit in places which are extremely hot, cold,
dusty or humid.
In particular, do not keep the unit:
● in a high humidity area such as a bathroom
● near a heater
● in an area exposed to direct sunlight (inside a parked car,
where there could be a considerable rise in temperature)
● Keep cassette tapes, magnetic cards and other magnetic
recorded materials away from the speaker as the recorded
information may be erased or noise may occur on cassette
tapes.
MAINTENANCE
To clean the cabinet
Use a soft cloth lightly moistened with a mild detergent
solution.
Do not use the strong solvents such as alcohol, benzine or
cleaner.
Page 3
PRECAUCIONES
H
PRECAUTIONS
-
Para mantener sus buenas prestaciones
● No utilice el aparato en Iugares muy calientes, fries, con
polvo o humedad,
Especialmente, no debe dejar el aparato:
● en Iugares muy humedos, por ejemplo en el bario.
● cerca de la calefaccion
● en un Iugar expuesto a Ios rayos del sol (dentro de un
coche estacionado, donde puede aumentar mucho la
temperature)
● Mantenga Ias cintas de casete, tarjetas magneticas y demas
material grabado magnet icamente Iejos del altavoz porque la
information grabada puede borrarse o pueden aparecer
ruidos en Ias cintas de casete.
Pour maintenir de bonnes performances
● Ne pas utiliser cet appareil a un emplacement tres chaud,
froid, poussiereux ou humide.
En particulier, ne pas Ie conserver
● a un endroit tres humide, par exemple une sane de bains
● pres d’un appareil de chauffage
* a un endroit en plein soleil (clans une voiture garee, ou la
temperature peut considerablement augmenter, par
exemple)
● Conserver Ies cassettes, Ies cartes magnet iques et Ies
autres materiaux enregistres magnetiquement loin du hautparleur, car Ies information enregistrees pourraient &re
effacees ou des parasites pourraient apparaltre sur Ies
cassettes.
MANTENIMIENTO ENTRETIEN
Para Ihnpiar e! rmueble
Utilice un pario suave em papado en una solution detergence
neutra.
No utilice disolventes fue ties tales como alcohol, bencina o
Iimpiador.
Nettoyage du coffret
Utiliser un chiffon doux humecte de solutiondetergence deuce.
Ne pas utiliser de solvant fort, tel qu’alcool, benzine ou Iiquide
de nettoyage.
3
Page 4
PREPARATION
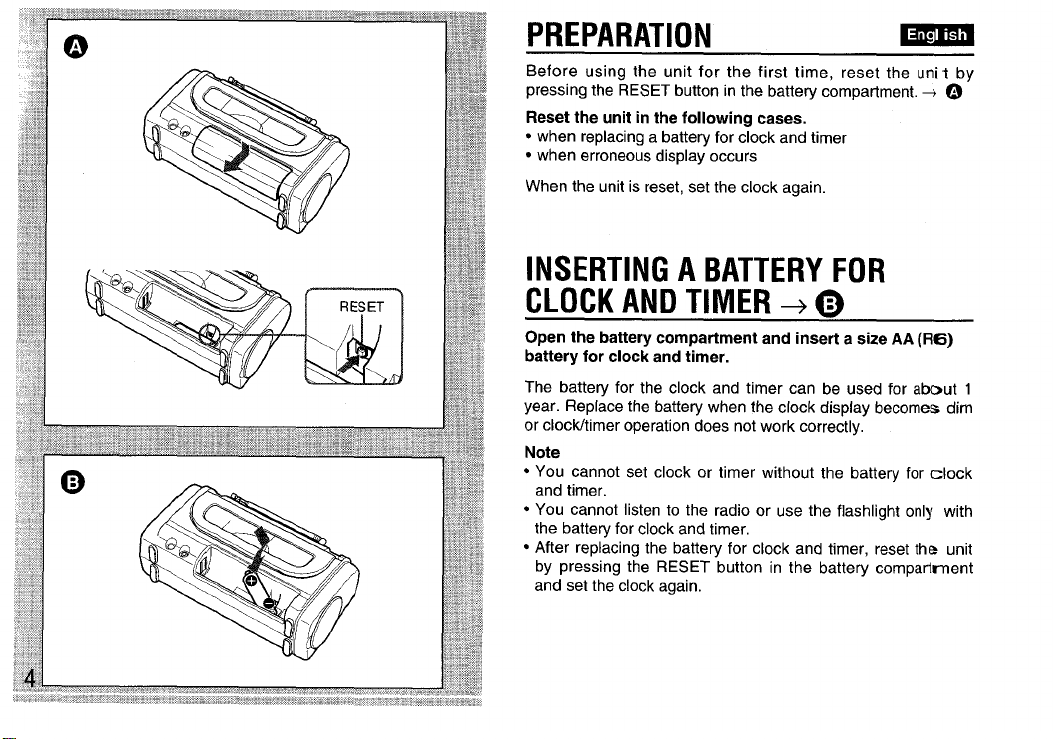
Before using the unit for the first time, reset the unit by
pressing the RESET button in the battery compartment. + @
Reset the unit in the following casea.
● when replacing a battery for clock and timer
● when erroneous display occurs
When the unit is reset, set the clock again.
mm
INSERTING A BATTERY FOR
CLOCK AND TIMER + @
Open the battery compartment and insert a size AA (R6)
battery for clock and timer.
The battery for the clock and timer can be used for abcmt 1
year. Replace the battery when the clock display becomes dim
or clocldtimer operation does not work correctly,
Note
● You cannot set clock or timer without the battery for clock
and timer.
● You cannot listen to the radio or use the flashlight only with
the battery for clock and timer,
QAfter replacing the battery for clock and timer, reset the unit
by pressing the RESET button in the battery compartment
and set the clock again.
Page 5
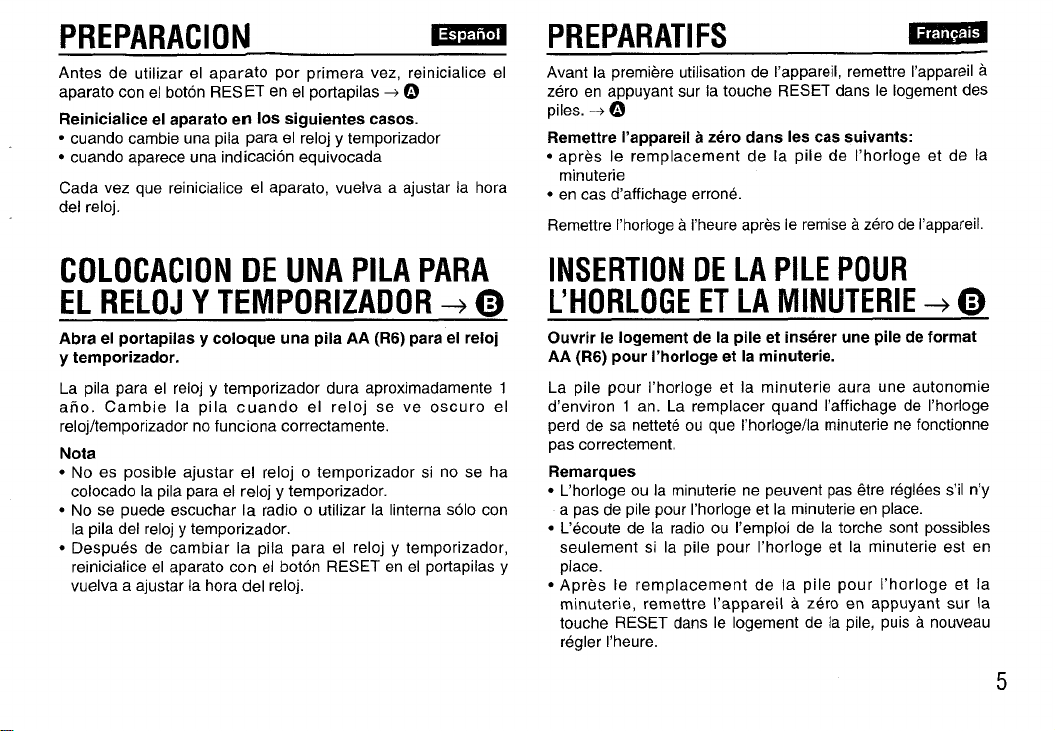
PREPARATION
Antes de utilizar el aparato por primers vez, reinicialice el
aparato con el boton RESET en e[ portapilas + O
Reinicialice el aparato
● cuando cambie una pila para el reloj y temporizador
● cuando aparece una indication equivocada
Cada vez que reinicialice el aparato, vuelva a ajustar la hors
del reloj.
en IOS siguientes cases.
Emm
PREPARATIFS
Avant la premiere utilisation de I’appareil, remettre I’appareil a
zero en appuyant sur la touche RESET clans Ie Iogement des
piles. + @
Remettre I’appareil a zero clans Ies cas suivants:
● apres Ie replacement de la pile de I’horloge et de la
minuterie
● en cas d’affichage errone.
Remettre I’horlogea I’heure apres Ie remise a zero de I’appareil.
mm
COLOCACION DE UNA PILA PARA
EL RELOJ Y TEMPORIZADOR + @
Abra el portapilas y coloque una pila AA (R6) para ei reloj
y temporizador.
La pila para el reloj y temporizador dura aproximadamente 1
aho, Cambie la pila cuando el reloj se ve oscuro el
reloj/temporizador no funciona correctamente.
Nota
● No es posible ajustar el reloj o tempo rizador si no se ha
colocado la pila para el reloj y temporizador.
● No se puede escuchar la radio o utilizar la Iinterna solo con
la pila del reloj y temporizador.
● Despues de cambiar la pila para el reloj y tempo rizador,
reinicialice el aparato con el boton RESET en el portapilas y
vuelva a ajustar la hors del reloj.
INSERTION DE LA PILE POUR
L’HORLOGE ET LA IVIINUTERIE + @
Ouvrir Ie Iogement de la pile et inserer une pile de format
AA (R6) pour I’horloge et la minuterie.
La pile pour I’horloge et la minuterie aura une autonomic
d’environ 1 an. La remplacer quand I’affichage de I’horloge
perd de sa nettete ou que l’horloge/la minuterie ne fonctionne
pas correctement
Remarques
● L’horloge ou la minuterie ne peuvent pas i5tre reglees s’il n’y
a pas de pile pour I’horloge et la minuterie en place.
● L’ecoute de la radio ou I’emploi de la torche sent possibles
seulement si la pile pour I’horloge et la minuterie est en
place.
● Aprbs Ie replacement de la pile pour I’horloge et la
minuterie, remettre I’appareil a zero en appuyant sur la
touche RESET clans Ie Iogement de la pile, puis a nouveau
regler I’heure.
5
Page 6
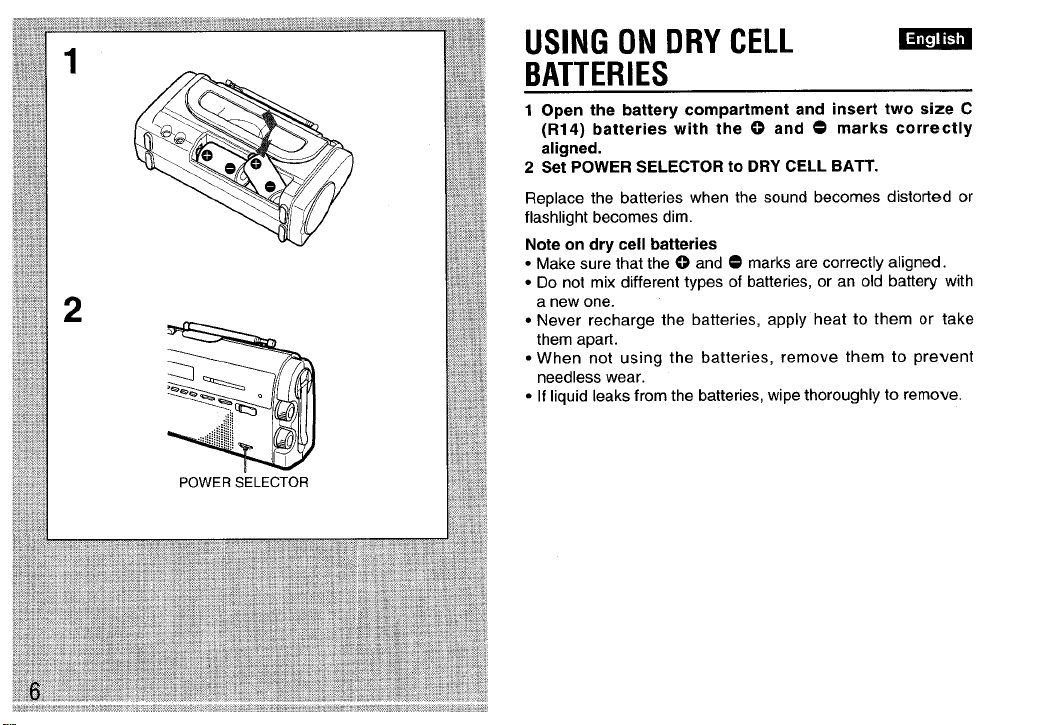
USING ON DRY CELL
mm
BATTERIES
1 Open the battery compartment and insert two size C
(R14) batteries with the ~ and
aligned.
2 Set POWER SELECTOR to DRY CELL BATT.
Replace the batteries when the sound becomes distorted or
flashlight becomes dim.
Note on dry cell batteries
● Make sure that the C) and O marks are correctly aligned.
● Do not mix different types of batteries, or an old battery with
a new one.
● Never recharge the batteries, apply heat to them or take
them apart.
● When not using the batteries, remove them to prevent
needless wear.
● If liquid leaks from the batteries, wipe thoroughly to remove.
O marks correctly
Page 7
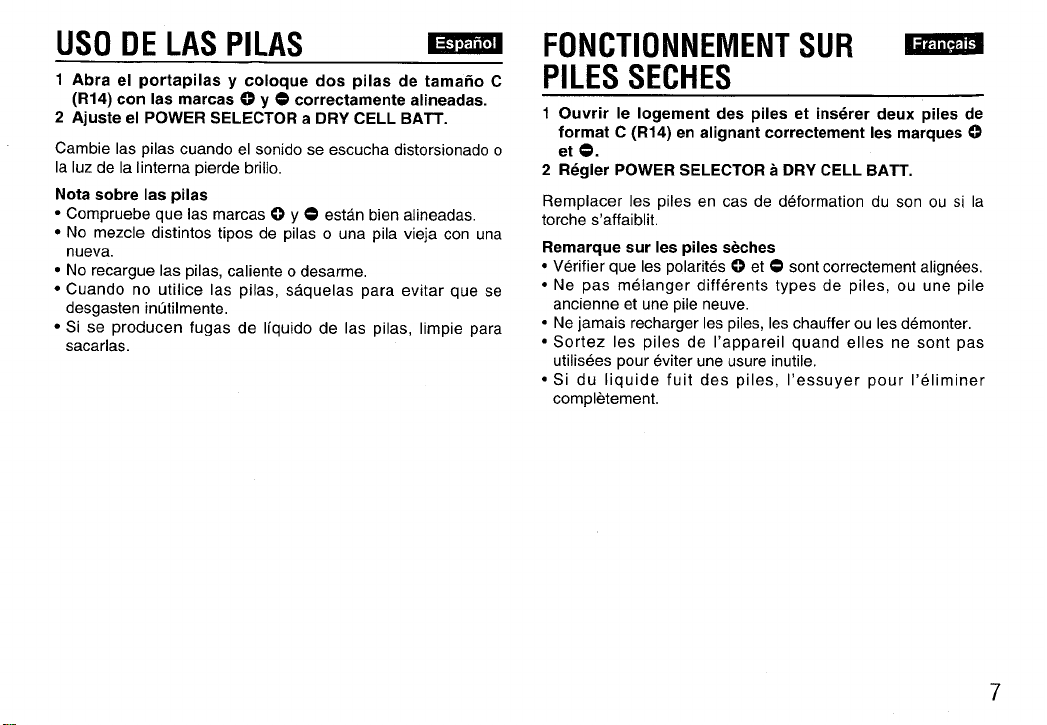
USO DE LAS PILAS
1 Abra el portapilas y coloque dos pilas de tamailo C
(R14) con Ias marcas C) y O correctamente alineadas.
2 Ajuste el POWER SELECTOR a DRY CELL BATT.
Cambie Ias pilas cuando el sonido se escucha distorsionado o
la Iuz de la linterna pierde brillo.
Nota sobre Ias pilas
● Compruebe que Ias marcas 0 y O estan bien alineadas.
● No mezcle distintos tipos de pilas o una pila vieja con una
nueva.
● No recargue Ias pilas, caliente o desarme,
● Cuando no utiiice Ias pilas, saquelas para evitar que se
desgasten intitilmente,
● Si se producen fugas de Iiquido de Ias pilas, Iimpie para
sacarlas.
FONCTIONNEMENT SUR PILES SECHES
1 Ouvrir Ie Iogement des piles et inserer deux piles de
format C (R14) en alignant correctement Ies marques ~
O.
et
2 Regler POWER SELECTOR a DRY CELL BATT.
Remplacer Ies piles en cas de deformation du son ou si la
torche s’affaiblit.
Remarque sur Ies piles seches
● Verifier que Ies polarites 0 et e sent correctement alignees,
● Ne pas melanger different types de piles, ou une pile
ancienne et une pile neuve.
● Ne jamais recharger Ies piles, Ies chauffer ou Ies demonter,
● Sortez Ies piles de I’appareil quand elles ne sent pas
utilisees pour eviter une usure inutile.
● Si du Iiquide fuit des piles, I’essuyer pour I’eliminer
completement.
7
Page 8
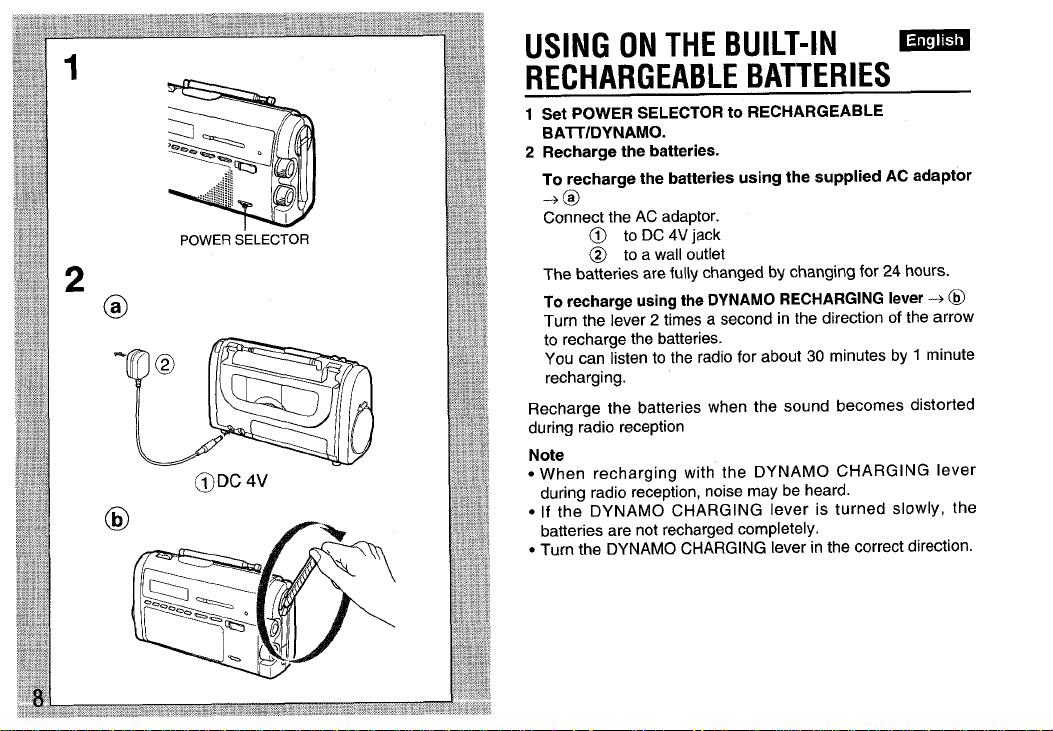
USING ON THE BUILT-IN m
RECHARGEABLE BATTERIES
1
Set POWER SELECTOR to RECHARGEABLE
BAIT/DYNAMO.
Recharge the batteries.
2
To recharge the batteries using the supplied AC adaptor
-+@
Connect the AC adaptor.
@) to DC4Vjack
@ toawall outlet
The batteries are fully changed by changing for 24 hours.
To recharge using the DYNAMO RECHARGING lever+@
Turn the lever 2 times a second in the direction of the arrow
to recharge the batteries.
You can listen to the radio for about 30 minutes by 1 minute
recharging.
Recharge the batteries when the sound becomes distorted
during radio reception
Note
● When recharging with the DYNAMO CHARGING lever
during radio reception, noise may be heard.
● If the DYNAMO CHARGING lever is turned slowly, the
batteries are not recharged completely.
● Turn the DYNAMO CHARGING lever in the correct direction.
Page 9

USO DE LAS BATERIAS RECARGABLES INCORPORADAS
Mueva el POWER SELECTOR a RECHARGEABLE
1
BAITIDYNAMO.
Cargue Ias baterias.
2
Para cargar Ias baterias con el adaptador de CA
suministrado + @
Conecte el adaptador de CA.
@ alatoma DC4V
@ altomacorriente
Las baterias se cargan completamente en 24 horas.
Para recarga con la palanca DYNAMO RECHARGING
+@
Gire la palanca 2 veces por segundo en el sentido de la
flecha para recargar Ias baterias.
Se puede escuchar la radio durante 30 minutes con una
carga de 1 minute,
Cargue Ias baterias cuando Ios sonidos se escuchan
distorsionados durante la recepcion de la radio.
Nota
. Cuando cargue con la palanca DYNAMO CHARGING
durante la recepcion de la radio, puede escucharse un ruido.
● Si se gira Ientamente la palanca DYNAMO CHARGING, Ias
baterias no se cargaran completamente.
● Gire la palanca DYNAMO CHARGING en el sentido correcto.
FONCTIONNEMENT SUR LES PILES RECHARGEABLE INTEGREES
1 Regler POWER SELECTOR a RECHARGEABLE
BAIT/DYNAMO.
2 Charger Ies piles.
Pour recharger [es piles avec I’adaptateur secteur
fourni + @
Raccorder I’adaptateur secteur.
@ ala prise DC 4V
@ a une prise murale.
Les piles sent entierement chargees apres une charge de
24 heures.
Pour recharger avec [e levier DYNAMO RECHARGING
+@
Tourner deux fois Ie levier pendant une seconde clans la
direction de la fleche pour recharger Ies piles.
Une minute de recharge permet d’ecouter la radio pendant
environ 30 minutes.
Recharger la batterie quand Ie son s’affaiblit ou est deteriore
pendant la reception radio.
Remarques
● Un bruit peut ~tre audible pendant la reception radio en cas
de recharge avec Ie levier DYNAMO CHARGING.
● Les piles ne seront pas completement chargees si Ie levier
DYNAMO CHARGING est tourne Ientement.
● Tourner Ie levier DYNAMO CHARGING clans Ie sens correct.
9
Page 10

USINGONTHE BUILT-IN RECHARGEABLE
m
BATTERIES
Note on the rechargeable battery
● Use only the supplied AC adaptor or the DYNAMO
CHARGING lever to recharge the battery.
● The built-in rechargeable batteries can be used about 300
times, if the batteries cannot be recharged, contact your
Aiwa dealer.
To take out the rechargeable batteries+@
Open the rechargeable battery compartment with a coin @
and pullthe connection plug pressing the lever.
Disposing of Ni-Cd batteries
To properly dispose of your spent Ni-Cd batteries, please call
1-800-289-2492. “US residents only”.
Note: In some areas disposing of Ni-Cd batteries in household
or business trash may be prohibited.
Caution: Do not handle damaged or leaking Ni-Cd batteries.
AITENTION
This product that you purchased
contains rechargeable batteries. The
batteries are recyclable. At the end of
their useful life, it may be illegal to
dispose the batteries into the
municipal waste stream under various
state and local laws. Check with your
local solid waste officials in your area
for details about recycling options or
proper disposal.
Page 11

USODE LASBATERIASRECARGABLES
-
INCORPORADAS
Nota sobre la bateria recargable
● Utilice solo el adaptador de CA suministrado o la palanca
DYNAMO CHARGING para cargar la bateria.
● Las baterias recargables incorporadas pueden utilizarse
unas 300 veces. Si no puede cargar Ias baterias, habie con
su concesionario Aiwa.
Saque Ias baterias recargables + @
Abra el compartimiento de bater~as recargables una moneda
@ Y tire del enchufe de conexion presionando la palanca.
Desecho de Ias baterias de Ni-Cd
Para el desecho de Ias baterias Ni-Cd gastadas, Ilame al 1800-289-2492, “Solo para Ios residences en EE UU”.
Nota: En algunas regiones puede estar prohibido el desecho
de Ias baterias de Ni-Cd con la basura domesticar comercial o
industrial.
Precaution: No vuelva a utilizar baterias de Ni-Cd dar7adas o
con fugas.
ATENCION
Este producto viene con baterias
recargables. Las baterias son
reciclables. Al final de su viola util,
puede ser ilegal incluirlas con e{ resto
@
de su basura; estudie Ias leyes
nacionales, federales o locales.
Q@
X
Consulte con su oficina de residues
Ni-Cd &
solidos local para mas detalles sobre
Ias opciones de reciclado o desecho
correctas.
FONCTIONNEMENTSURLESPILES
Emsia
RECHARGEABLElNTEGREES
Remarque sur Ies piles rechargeable
* Utiliser uniquement I’adaptateur secteur fourni ou Ie levier
DYNAMO CHARGING pour recharger Ies piles.
* Les piles rechargeable integrees sent rechargeable
environ 300 fois. Contacter son revendeur Aiwa si elles ne
peuvent pas &re chargee.
Pour retirer ies piies rechargeable + @
Ouvrir ie Iogement des piles rechargeabies avec une piece @’
et tirer sur Ie bouchon de connexion en appuyant sur Ie levier.
Mise au rebut des piles Ni-Cd
Pour jeter correctement ies piles Ni-Cd epuisees, faire Ie 1800-289-2492. “Residents americains seulement”.
Remarque: Dans certaines zones, ia mise au rebut des piles
Ni-Cd clans Ies ordures menageres ou de bureau peut i%re
interdite,
Attention: Ne pas manipuler des piles Ni-Cd endommagees ou
fuyantes.
AITENTiON
Ce produit contient des piles
rechargeable et recyclable, Les Iois
de certains etats ou Iois locales
interdisent la mise au rebut des piles a
la fin de Ieur vie de service clans Ies
ordures municipales. Contacter Ie
service de voirie de votre region pour
Ies details sur Ies possibilities de
recyclage ou ia rejet correct,
11
Page 12
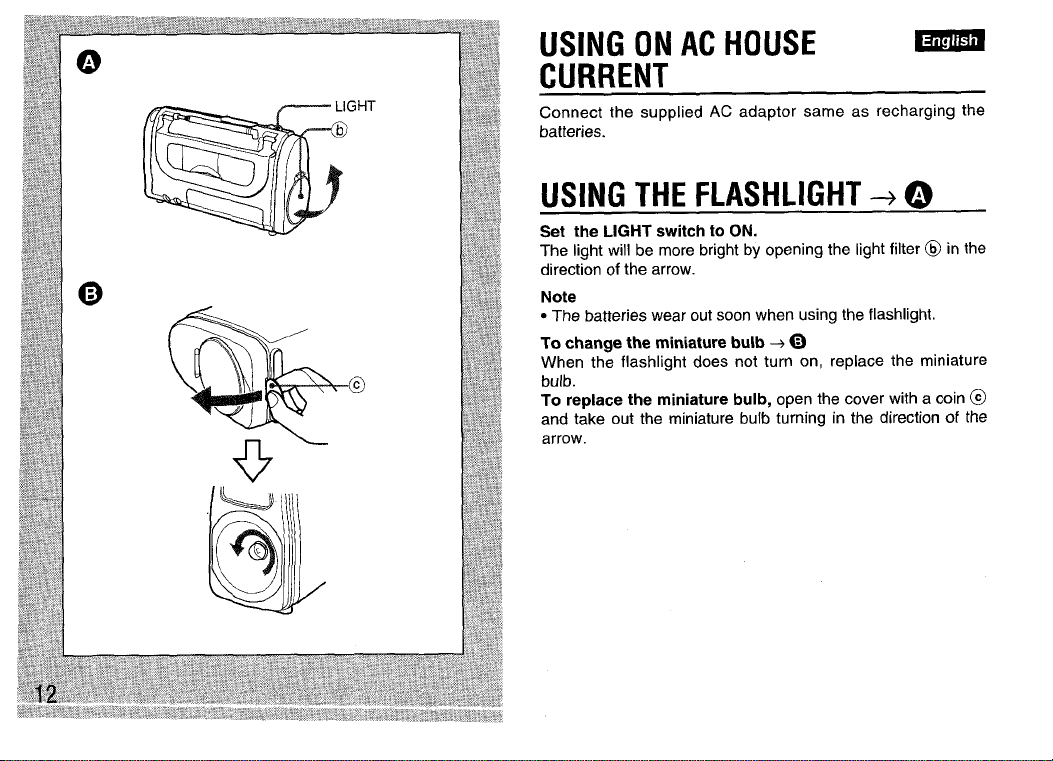
USING ON AC HOUSE
CURRENT
Connect the supplied AC adaptor same as recharging the
batteries.
USING THE FLASHLIGHT +0
Set the LIGHT switch to ON.
The light will be more bright by opening the light filter@ in the
direction of the arrow.
Note
● The batteries wear out soon when using the flashlight.
To change the miniature bulb -+@
When the flashlight does not turn on, replace the miniature
bulb.
To replace the miniature bulb, open the cover with a coin @
and take out the miniature bulb turning in the direction of the
arrow.
Page 13

USO CON LA ALIMENTACION DE CA DEL TOMACORRIENTE
Conecte el adaptador de CA suministrado de la misma forma
que para cargar Ias baterias,
FONCTIONNEMENT SUR -
LE SECTEUR
Raccorder I’adaptateur secteur fourni comme pour la recharge
des piles.
USO DE LA LINTERNA + 0
Mueva el interruptor LIGHT a ON.
La Iuz se ve mas brillante cuando se abre el filtro de Iuz @ en
el sentido de la flecha.
Nota
● Las pilas se agotan rapidamente cuando utiliza la Iinterna.
Para cambiar su bombilla diminuta + @
Cuando no se encienda la Iinterna, cambie la bombilla
diminuta.
Para cambiar la bombilia diminuta, abra la tapa con una
moneda @ y saque la bombilla diminuta girando en el sentido
de la flecha.
UTILISATION DE LA TORCHE + 4!3
Regler Ie w$lecteur LIGHT a ON.
La Iumiere deviendra plus forte en ouvrant Ie filtre Iumineux @
clansIe sens de la fleche.
Remarque
● Les piles s’usent rapidement en cas d’utilisation de la torche.
Pour remplacer I’ampoule miniature + @
Quand la torche ne s’allume pas, remplacer I’ampoule
miniature.
Pour cela, ouvrir Ie couvercle avec une piece @ et retirer
I’ampoule miniature en la tournant clansIe sens de la fleche.
13
Page 14

SETTING THE CLOCK
After inserting a battery for clock and timer, set the clock to
use the timer function.
1 Keeping CLOCK down, press HOUR to set the hour.
AM 12:00 midnight
PM 12:00 noon -
2 Keeping CLOCK down, press MINUTE to set the minute.
The clock starts from 00 second when the CLOCK button is
released.
Note
You cannot set the clock without a battery for clock and timer.
To change the hourlminute rapidly
Keeping CLOCK down, keep HOUR or MINUTE pressed.
Emm
To turn the backlight of the display
Press LCD LIGHT.
About the front panel
The luminous paint is used on the front panel.
It keeps brightness for a while even if the unit is carried from a
bright room to a dark place.
Page 15
AJUSTE DEL RELOJ
Despues de colocar una pila para el reloj y temporizador,
ajuste la hors para poder utilizar la funcion del temporizador.
12Mantenga presionado CLOCK y presione HOUR para
ajustar la hors.
AM 12:00 medianoche
PM 12:00 mediod(a
Mantenga presionado CLOCK y presione MINUTE psra
ajustar 10s minutes.
El reloj empieza a funcionar desde 00 segundos cuando se
suelta el boton CLOCK,
Nota
No puede ajustar la hors si no hay una pila instalada para el
reloj y temporizador.
Para cambiar rapidamente la hordminutos
Mantenga presionado CLOCK y mantenga presionado HOUR
o MINUTE.
Para que se encienda la Iuz de fondo de
mm
la
pantalla
Presione LCD LIGHT,
Sobre el panel frontal
Se utiliza una pintura Iuminosa en el panel frontal. Esto
mantiene la Iuminosidad durante un tiempo incluso aunque se
Ileve el aparato de una habitation bien iluminada a otra
oscura.
MISE A L’HEURE DE
L’HORLOGE
— —
Apres I’insertion d’une pile pour I’horloge et la minuterie,
mettre I’horloge a I’heure pour pouvoir utiliser la minuterie,
mm
1 Maintenir CLOCK presse et appuyer sur HOUR pour
regler Ies heures.
AM 12:00 minuit
PM 12:00 midi
2 Maintenir CLOCK presse et appuyer sur MINUTE pour
regler les minutes.
L’horloge demarre a 00a la liberation de la touche CLOCK.
Remarque
L’hor[oge ne peut pas 6tre mise a I’heure si aucune pile n’est
inseree pour I’horloge et la minuterie.
Pour faire changer rapidement Ies heures/minutes
Maintenir CLOCK presse, et HOUR ou MINUTE egalement
Pour allumer Ie retro-eclairage de I’ecran
Appuyer sur LCD LIGHT.
Apropos du panneau avant
Une peinture Iumineuse est utilisee sur Ie panneau avant. Elle
reste Iumineuse un moment, m@.mesi I’appareil est transport
d’une piece claire a une piece sombre.
15
Page 16

RADIO RECEPTION
1 Set RADIO to ON.
2 Set BAND to select FM or AM.
1
3
4
3 Turn the TUNING control to tune in to a station.
4 Adjust the volume.
To turn off the radio
Set RADIO to OFF/ALARM OFF.
For better reception + @
FM: Extend the FM antenna fully.
AM: Turn the unit to find the position which gives the best
reception.
mm
FM
AM
Page 17

RECEPCION DE LA RADIO -
1 Mueva el RADIO a ON.
2 Mueva el BAND para seleccionar entre FM o AM.
Gireelcontrol TUNING para sintonizar una emisora.
3
4 A@ste el volumen.
Para desconectar la radio
Mueva el RADIO a OFF/ALARM OFF
Para una mejor recepcion + 43
FM: Extienda completamente la antena de FM,
AM: Gire el aparato para encontrar la position donde la
recepcion sea la mejor posible.
RECEPTION RADIO
1 Placez RADIO sur ON.
2 Choisissez FM ou AM avec BAND.
3 Tournez la commande TUNING pour faire I’accord sur
une station.
4 Reglez Ie volume.
Pour arr~ter la radio
Placez RADIO sur OFF/ALARM OFF.
Pour ameliorer la reception + @
FM: Deployez completement I’antenne FM.
AM: Tournez I’appareil pour trouver la position offrant la
meilleure reception.
17
Page 18
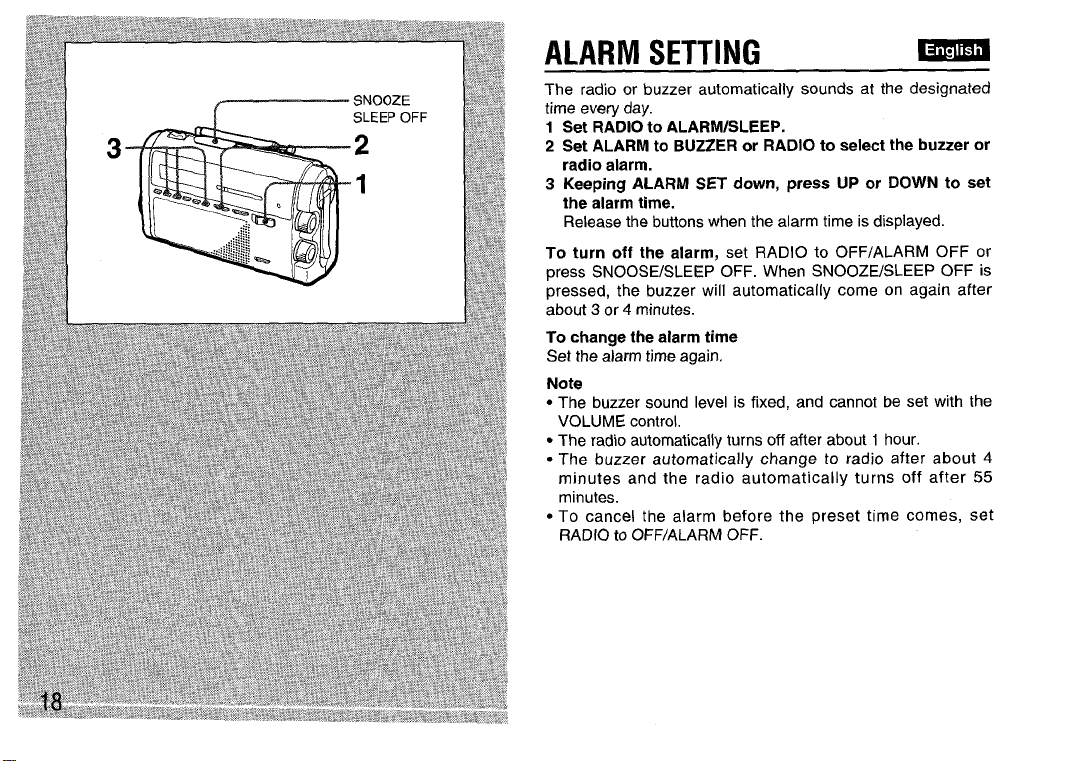
ALARM SETTING
The radio or buzzer automatically sounds at the designated
time every day.
1 Set RADIO to ALARM/SLEEP.
2 Set ALARM to BUZZER or RADIO to select the buzzer or
radio alarm.
3 Keeping ALARM SET down, press UP or DOWN to set
the alarm time.
Release the buttons when the alarm time is displayed.
To turn off the alarm, set RADIO to OFF/ALARM OFF or
press SNOOSE/SLEEP OFF. When SNOOZE/SLEEP OFF is
pressed, the buzzer will automatically come on again after
about 3 or 4 minutes.
To change the alarm time
Set the alarm time again.
Note
● The buzzer sound level is fixed, and cannot be set with the
VOLUME control.
● The radio automatically turns off after about 1 hour.
● The buzzer automatically change to radio after about 4
minutes and the radio automatically turns off after 55
minutes.
● To cancel the alarm before the preset time comes, set
RADIO to OFF/ALARM OFF.
mm
Page 19

AJUSTE DE LA ALARMA -
La radio o la alarma suenan automaticamente a la hors
especificada todos Ios alias,
1 Ajuste RADIO a ALARMISLEEP.
2 Ajuste ALARM a BUZZER
alarma del despertador o con la radio.
3 Mantenga presionado ALARM SET y presione UP o
DOWN para ajustar la hors de la alarma.
Suelte Ios botones cuando aparezca la hors de la alarma.
Para desactivar la alarma, ajuste RADIO a OFF/ALARM OFF
o presione SNOOZE/SLEEP
SNOOZE/SLEEP OFF, la campana suena nuevamente
despues de unos 304 minutes.
Para cambiar la hors de la alarma
Ajuste nuevamente la hors de la alarma.
Nota
● El nivel de sonido de la campana esta fijo y no puede
ajustarse con el control VOLUME.
● La radio se apaga automat icamente despues de
aproximadamente 1 hors.
● La alarma cambia automaticamente a la radio despues de
unos 4 minutes y se desconecta automaticamente la radio
despues de 55 minutes.
● Para cancelar la alarma antes de la hors prefijada, mueva el
RADIO a OFF/ALARM OFF.
o RADIO para seleccionar la
OFF. Cuando se presiona
REGLAGE DU REVEIL
mm
La radio ou Ie signal sonore se fait entendre automatiquement
chaque jour a I’heure programmed.
1 Regler RADIO a ALARM/SLEEP.
2 Regler ALARM a BUZZER ou RADIO pour selectionner
Ie reveil par Ie signal sonore ou [a radio.
3 Maintenir ALARM SET presse, et appuyer sur UP ou
DOWN pour regler I’heure du r6veil.
Re15cher Ies touches quand I’heure du reveil s’affiche.
Pour arr6ter I’alarme, regler RADIO a OFF/ALARM OFF ou
appuyer sur SNOOZE/SLEEP OFF. Si vous appuyez sur
SNOOZE/SLEEP OFF, Ie signal sonore se fera a nouveau
entendre apres 3 ou 4 minutes environ.
Pour changer I’heure de I’alarme
Reglez a nouveau I’heure de I’alarme.
Remarques
● Le niveau du signal sonore est fixe et ne peut 6tre regle avec
la commande VOLUME.
● La radio se coupe automatiquement aubout dl heure.
● Le signal sonore passe automatiquement a la radio au bout
denviron 4 minutes et la radio se coupe automatiquement au
bout de 55 minutes.
● Pour annuler I’alarme avant qu’elle se fasse entendre a
I’heure programmed, placez RADIO sur OFF/ALARM OFF.
19
Page 20

2,3
SLEEP TIMER SETTING -
SNOOZE
SLEEPOFF
2
1
You can use the sleep timer to turn the radio off automatically
after up 59 minutes.
● Before setting, tune in to a station. (See page 16.)
1 Set RADIO to SLEEP.
2 Keeping SLEEP down, press UP or DOWN to set the
time.
3 Press SLEEP.
SLEEP flashes in the display.
To cancel the sleep timer, press SNOOZE/SLEEP OFF.
To use both the sleap timer and the alarm
You can fall asleep listening to the radio and still be awakened
by the radio/buzzer alarm at a preset time.
Set RADIO to ALARM/SLEEP in step 1.
Note
You cannot check the remaining time of the sleep timer.
When SLEEP is pressed, the sleep timer is set again from 59
minutes.
Page 21

AJUSTE DEL
Emim
REGLAGE DE LA
TEMPORIZADOR PARA DORMIR
Se puede utilizar el temporizador para dormir para
desconectar automaticamente la radio despues de 59 minutes
● Antes de este ajuste, sintonice una emisora. (Consulte la
pagina 17.)
1 Muevael RADIO a SLEEP.
2 Mantenga presionado SLEEP y presione UP o DOWN
para ajuatar la hors.
3 Presione SLEEP.
Destella SLEEP en la pantalla.
Para cancelar el temporizador para dormir, presione
SNOOZE/SLEEP OFF.
Para utilizar tanto el temporizador para dormir como la
alarma
Puede quedarse dormido escuchando la radio y sin embargo
despertarse con la alarma de la radio/campana a la hors
prefijada.
Ajuste RADIO a ALARM/SLEEP en el paso 1.
Nota
No es posible verificar el tiempo remanente del temporizador
para dormir.
Si se presiona et SLEEP, el tiempo del temporizado para
dormir vuelve a contar 59 minutes.
MINUTERIE D’ARRET DIFFERE
Vous pouvez utiliser la minuterie d’arr& differe pour que la
radio s’eteigne automatiquement apres 59 minutes,
● Avant de proceder au reglage, syntonisez une station.
(Voyez page 17.)
1 Placez RADIO
2 Maintenir SLEEP presse, et appuyer sur UP ou DOWN
pow regler I’heure.
3 Appuyer sur SLEEP.
SLEEP clignote clans I’affichage.
Pour annuler la minuterie d’arr~t differe, appuyez sur
SNOOZE/SLEEP OFF.
Pour utiliser a la fois la minuterie d’arr~t differe et I’alarme
Vous pouvez vous endormir au son de la radio et vous faire
reveiller par la radio/signal sonore a I’heure programmed.
Regler RADIO a ALARM/SLEEP a I’etape 1.
Remarque
II n’est pas possible de verifier Ie temps restant de la minuterie
d’arr& differe.
Quand SLEEP est presse, Ie temps de sommeil est remis a 59
minutes.
sur SLEEP.
21
Page 22

SPECIFICATIONS
Power source
output
Speaker
Frequency range
Battery life
Dimensions (W x H x D)
Weight
Accesory
The specifications and external appearance are subject to
change without notice.
DC 3V using two size C (R14) batteries
AC 120 V, 60Hz using the supplied AC
adaptor
120 mW (EIAJ/8 ohms)
diameter 50 mm, 16 ohms (2)
FM: 87.5-108 MHz
AM: 530-1,710 kHz
Using two size C (R14) manganese
batteries
FM reception: Approx. 70 hours
AM reception: Approx. 84 hours
216.5 (W) x 119 (H) x 72 (D) mm
51, x 4 3/4x 2718in.)
(8
Approx. 841 g (1.8 Ibs.)
AC adaptor(1)
mm
Page 23
ESPECIFICACIONES
Fuente de alimentacion
Salida 120 mW (EIAJ) 8 ohmios
Altavoz
Gama de frecuencias
Duration de la pila
Dimensioned (An. x Al. x Prof.)
Peso Aprox. 841 g
Accesorio
Las especificaciones y aspecto exterior estan sujetos a
cambios sin previo aviso.
CC de 3V utilizando dos pilas de tamaho
C (R14)
CA de 120 V, 60 Hz utilizando el
adaptador de CA incluido
diametro 50 mm, 16 ohmios (2)
FM: 87,5 – 108 MHz
AM: 530 – 1.710 kHz
Con dos pilas de manganeso de tamaho C
(R14)
Sintonizacion en FM: Aprox. 70 horas
Sintonizacion en AM: Aprox. 84 horas
216,5 xl19x72mm
Adaptador de CA (1)
- FICHE TECHNIQUE
-
Source d’alimentation
Courant de sortie
Haut-parleur
Plage de frequencies
Autonomic des piles
Dimensions (1x h x p)
Poids Env. 841 g
Accessoire Adaptateur secteur (1)
Les caracteristiques et I’aspect exterieur sent susceptible
d’&re modifies saris preavis.
3 V CC avec deux piles format C (Rl 4)
120 V CA, 60 Hz avec I’adaptateur secteur
fourni
120mW (EIAJ) 8 ohms
diametre 50, 16 ohms (2)
FM: 87,5 – 108 MHz
AM: 530 – 1.710 kHz
avec deux piles au manganese format C
(R14)
Reception FM: env. 70 heures
Reception AM: env. 84 heures
216,5 xl19x72mm
23
Page 24

AIWA CO.,LTD.
87-RT2-90i -01
971oo9AYO-OX
Printed in Hong
Kong
 Loading...