

Page 1

ePhone-2000S
VoIP IP Phone
Quick Setup Guide
English ● ● ●
Português ● ● ●
Deutsch ● ● ●
Español ● ● ●
Slovensky ● ● ●
日本語 ● ● ●
Česky ● ● ●
1
16
31
46
61
76
91
Page 2
S
Package Contents
z One AirLive ePhone-2000S VoIP IP phone
z One power adaptor
z One RJ-45 Ethernet cable
z Quick Installation Guide
z Installation CD
English
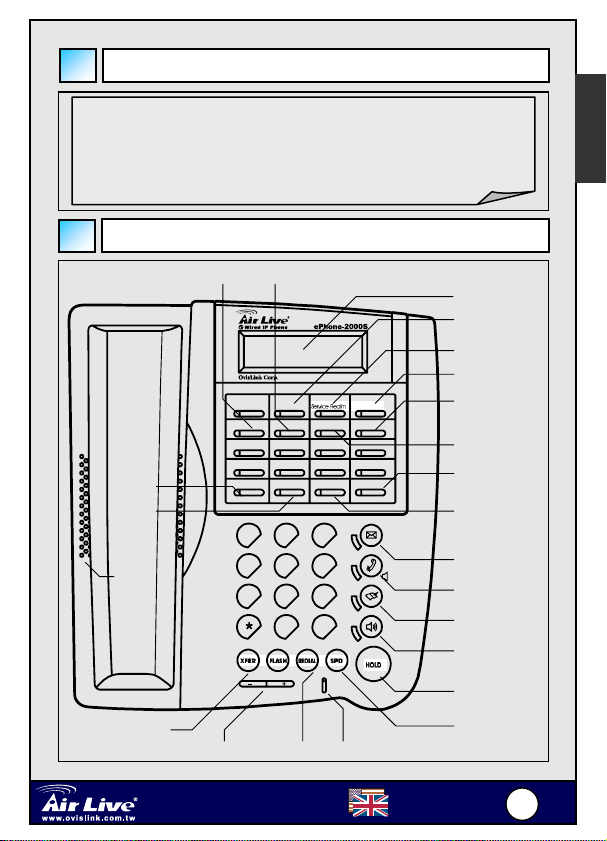
ePhone-2000S Functions
Auto-Redial
DND
Forward
Speak
A Call
Auto-Redial
1
5
DND
1
4
7
Registration
B Call
Registration
3
2
7
6
Conference
Forward
2
ABCABC
5
JKLGHI
MNO
8
TUVPQ RS
WXYZ
0
Reject
URL
Addr. Book
4
8
Call History
3
DEF
6
9
#
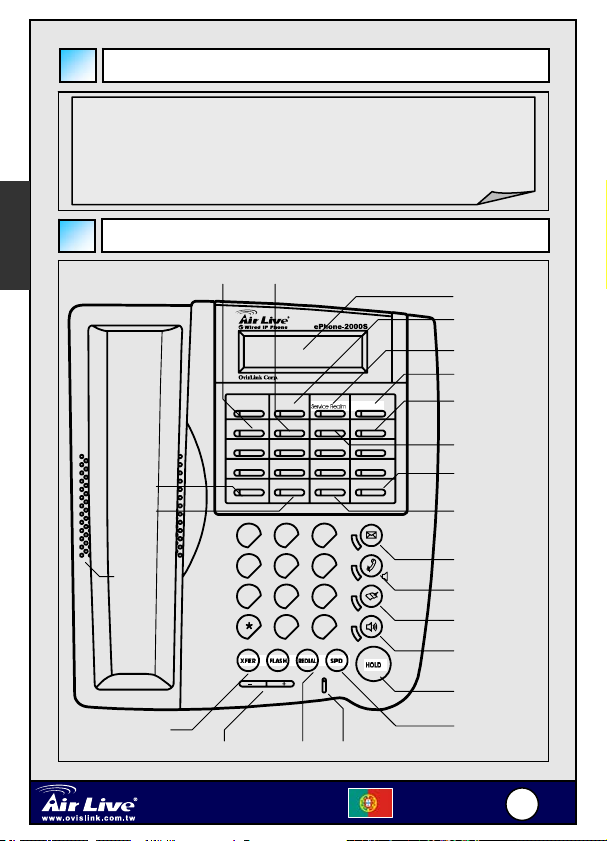
2 x 16 LCD
A B Channel
Service Realm
Reject
Addr. Book
URL
Call History
Conference
MWI
Mute
Func.
Hand Free
Hold
XFER FLASH
Speed Dial
REDIALVolume +/-
Wired VoIP Phone
ePhone-2000
Microphone
English
1
1
Page 3

S
r
English
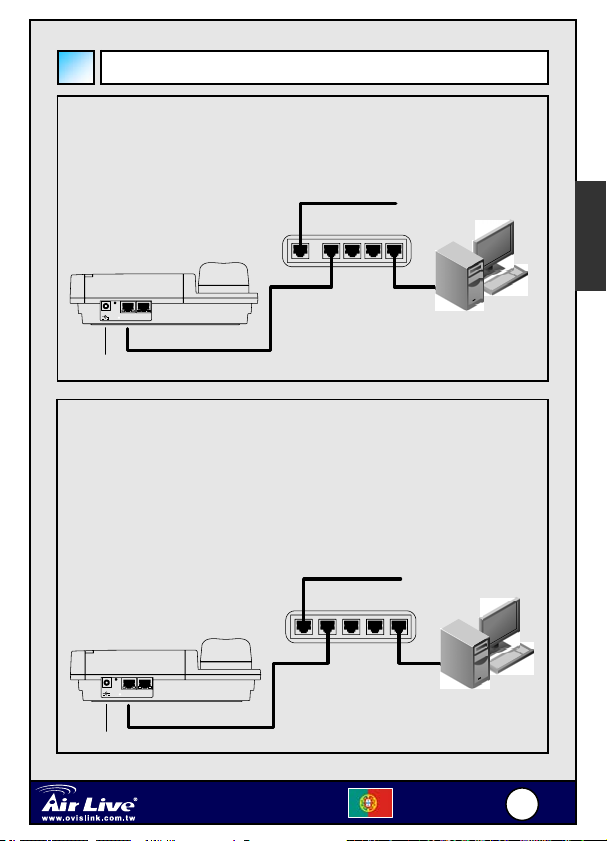
Hardware Installation
Connection with route
Plug one end of the RJ-45 to your AirLive ePhone -2000S LAN
port, and plug another end to one of the LAN port of your router.
Cable. ADSL Modem
Router
LAN
PC
DC IN
AC Adapter
WAN
LAN PC
RJ45
Connection without routers
Plug one end of the RJ-45 to your AirLive ePhone -2000S LAN
port, and plug another end to one of the LAN port of your HUB.
If you wish to configure the ePhone-2000S using the web
browser, you must refer to page 6 to set a IP address for your
ePhone-2000S first.
DC IN
LAN PC
RJ45AC Adapter
Wired VoIP Phone
ePhone-2000
Cable. ADSL Modem
Hub
LAN
English
PC
2
2
Page 4

S
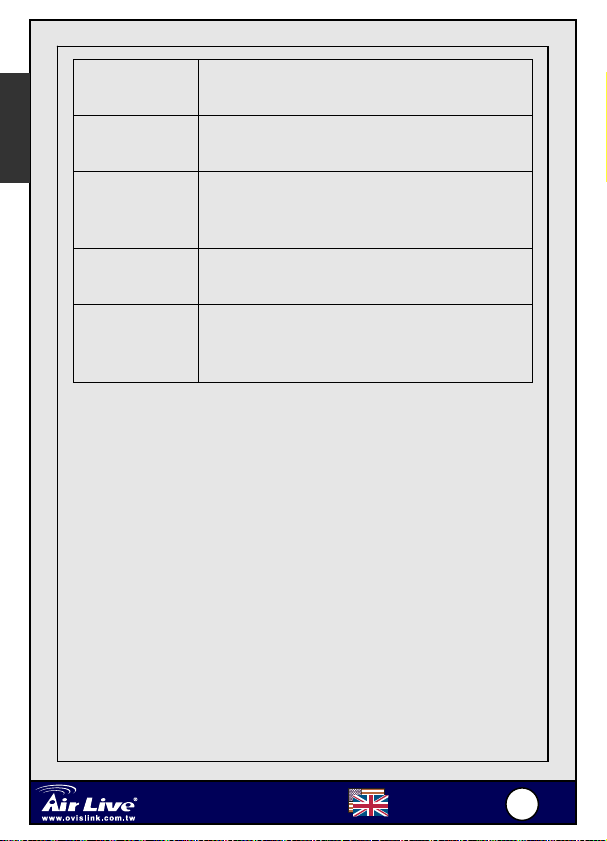
Keypad Configuration
English
【Name】:Functions in Call Mode
【A/B Channel】:Call lines (2 concurrent calls at most) / Review the calling
information on this channel during conversation.
【Service Realm】:Display the registration status of each active service
domain on idle; switch target service domain (ISP)
while making calls.
【Reject】:Reject incoming waiting calls
【MWI】:Message Waiting Indication, MWI: Access to voice mail system.
【MUTE】:Mute
【FUNC】:Menu
【SPK】:Hands-free
【HOLD】:Hold
【SPD】:Speed Dial
【REDIAL】:Redial the last dialed number.
【Flash】:Take back transferring calls/Exit Conference mode
【XFER】:Transfer
【+】:Volume UP (Ringer, headset, handset, speaker)
【-】:Volume Down (Ringer, headset, handset, speaker)
【Registration】:Re-register. The LED indicates the registration status of
each active service domain
Wired VoIP Phone
ePhone-2000
English
3
3
Page 5
S
English
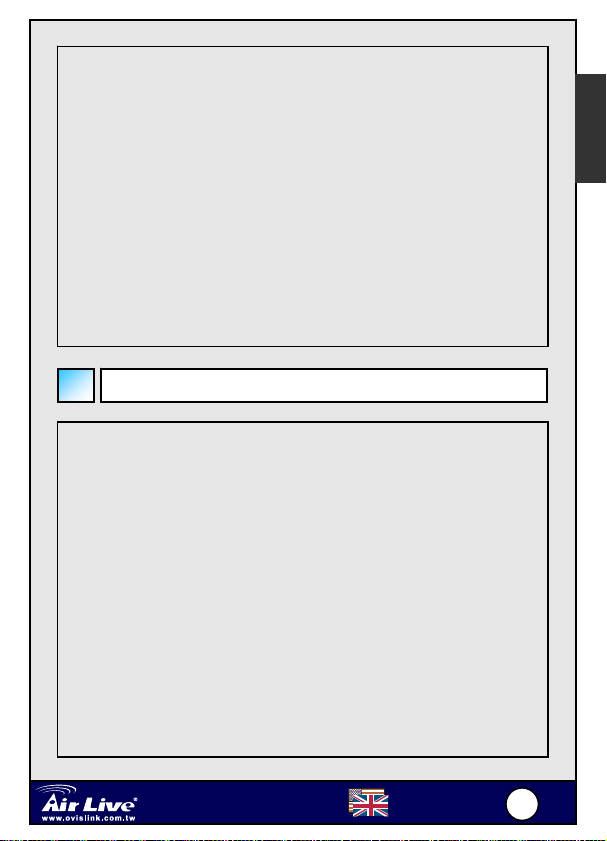
Green LED On
Red LED On
Green LED
Flashes
Red LED
Flashes
LED is off
Successfully register to all activated service
domains
At least one activated service domain could not be
registered
Registration is in progress. Note, IP SIP Phone will
regularly refresh SIP Address-of-Record
registration as necessary
None of those activated service domains can be
successfully registered
Users explicitly logs out all SIP service and goes
off-line ‘till user presses the 【Registration】key
again to go on-line (re-register to all SIP service)
【Auto-redial】:Auto-redial the last dialed number ‘till connected (ringing).
【DND】:Do Not Disturb (red LED indicates on)
【Forward】:Forward incoming waiting calls
【URL】:Use keypad to enter alphabets and numbers (red LED on).
【Address Book】:Access to address book (search an entry or list all
【Call History】:Missed calls/Received calls/Dialed Number. If the red
【Conference】:3-party local conferencing
This feature can be activated when busy tone is heard or
as a shorthand of 【Redial】+ 【Auto-redial】. Once
activated, the corresponding LED will be on.
entries).
LED is flashing, it indicates there are unread records of
missed calls.
Wired VoIP Phone
ePhone-2000
English
4
4
Page 6
S
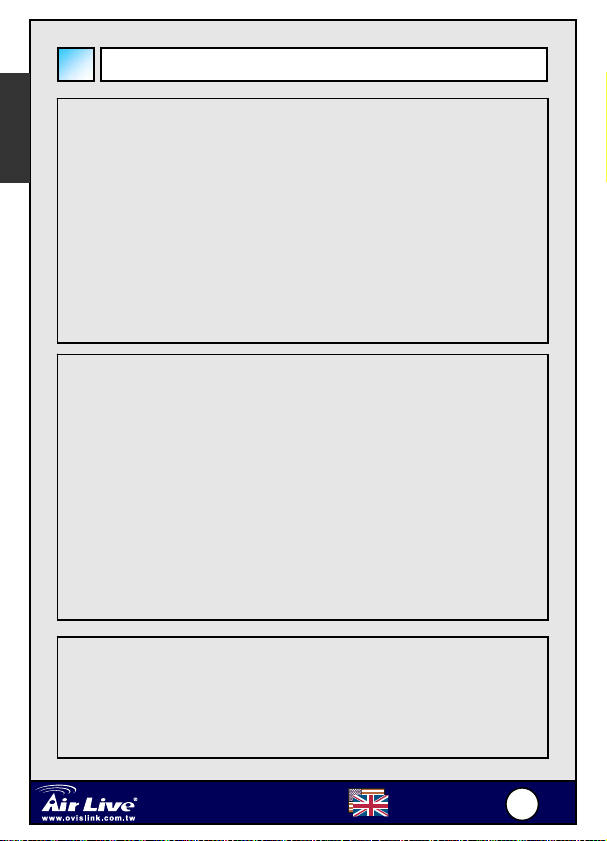
【Name】:Functions in Menu Mode
English
【MUTE】:Delete character
【FUNC】:Return to upper level submenu
【SPK】:Exit menu
【HOLD】: Confirm, Save
【+】:Next item、Move cursor to right
【-】: Previous item、Move cursor to left
How to activate 『Main Menu』?
1. Press 【FUNC】+ 【#】 to configure via keypad。
2. After configuring the IP and network mask of your terminal, you may
point any modern web browser from you PC to configure it by HTTP.
The default login password for both privileged and user-level account
is “0000”.
3. TELNET into the phone on TCP port 23. The login password is same
as phone lock password, which default is “0000”.
4. Initially, your phone can only be configured via keypad since it bears
no valid IP yet. After finishing configuring your network, you can use
either a web browser (HTTP port 80) or a TELNET client (TCP port
23) to configure your phone.
Wired VoIP Phone
ePhone-2000
English
5
5
Page 7
S
English
Network Settings
The default setting for AirLive ePhone-2000S is DHCP.
Therefore, AirLive ePhone-1000S will be able to connect to the
internet under any DHCP environment.
If the network environment is either PPPoE or Static IP, please
change the networking setting of AirLive ePhone-2000S to its
corresponding network environment.
Please go to『Main Menu』= press【FUNC】+ # >【6.Network】
+【HOLD】 >【1.General】+【HOLD】to configure your phone
based on your network environment: DHCP, static IP or PPPoE.
1. DHCP
z Press【FUNC】+ # >【6.Network】+【HOLD】 >【1.General】
+【HOLD】 >【1.Mode】+【HOLD】 >【1.DHCP】+【HOLD】
z Disable【4.Use Static DNS】by choosing 【4.Use Static DNS】+
【HOLD】>【2.DHCP】+【HOLD】
1. If you want to assign a different domain name server instead
of using those obtained by DHCP, you should choose
【1.Static DNS】 and set the IP of your specific DNS into
【6.Network】/【1.General】/【5.Static DNS】, such as
“1.Primary DNS” =168.95.1.1*
2. Static IP Environment(Fixed IP)
z Press【FUNC】+ # >【6.Network】+【HOLD】 >【1.General】
+【HOLD】 >【1.Mode】+【HOLD】 >【2.Static Assign】+【HOLD】
Wired VoIP Phone
ePhone-2000
English
6
6
Page 8
S
z Go to【2.Static Settings】, and enter your network configurations
based on your ISP. For example:
1. Host IP = 210.201.210.132*
2. Network mask = 255.255.255.0*
3. Gateway IP = 210.201.210.128*
z Enable【4.Use Static DNS】by choosing Press【4.Use Static
DNS】+【HOLD】 >【1.Static DNS】+【HOLD】
z Assign【5. DNS Server】by choosing Press【5. DNS Server】+
【HOLD】 >【1.Primary DNS】+【HOLD】, such as: “1.Primary
DNS = 168.95.1.1*”
English
3. PPPoE
z Press【FUNC】+ # >【6.Network】+【HOLD】 >【1.General】
+【HOLD】 >【1.Mode】+【HOLD】 >【1.DHCP】+【HOLD】
>【3.PPPoE Setting】+【HOLD】
z Enter your PPPoE authentication information, such as:
1. Login ID = MyPPPoEAccount*
2. Password = PPPoEDialupPassword*
3. Service Name = Optional, some ISPs may require it.
【*】Value should be adjusted to your real network environment
Note:
If you reside on a LAN without gateway, you should specify the
gateway IP as “0.0.0.0” rather than assigning a non-existent or an
invalid IP.
symbols key could be circle by 2->a->b->c->A->B->C->2
@ : press*and + let cursor move to find it
Wired VoIP Phone
ePhone-2000
English
7
7
Page 9
S
English
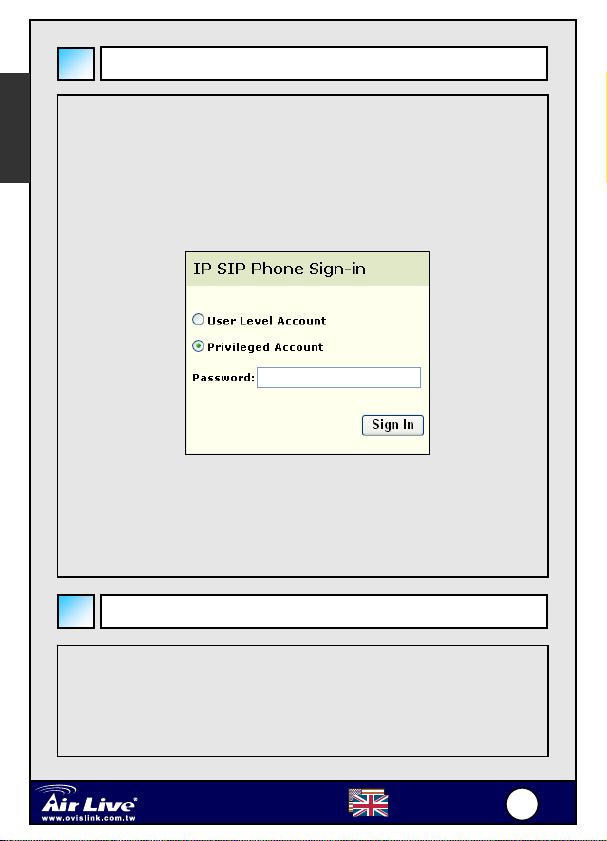
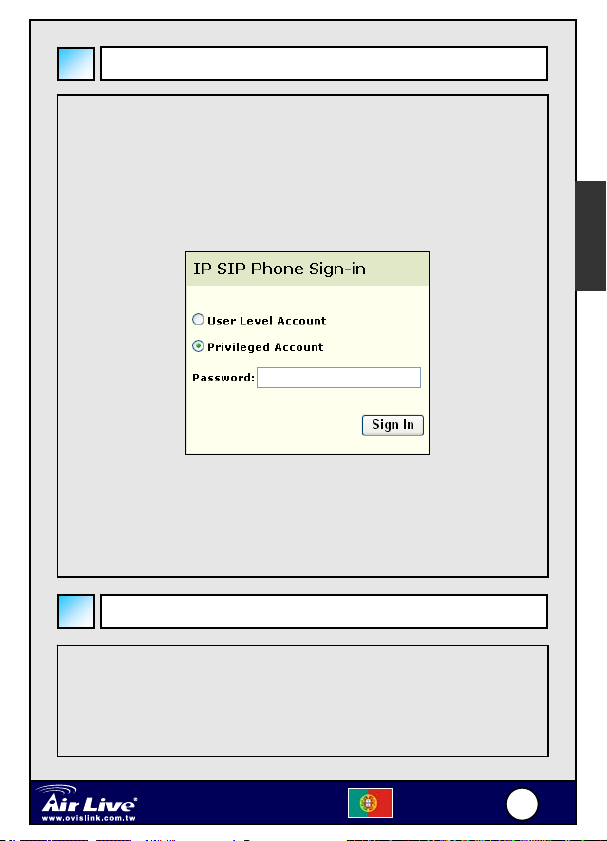
WEB Configuration
z Press the Function key【7】, the LCD will shows its IP address.
z Start a Web browser, such as Microsoft’s Internet Explorer (IE), and
enter the AirLive ePhone-2000S’s IP address on the web browser.
Address. The AirLive ePhone-2000S login screen is displayed:
(Please make sure your PC’s IP address and the ePhone-2000S are on the
same subnet.)
The AirLive ePhone-2000S web configuration password comes with two
categories: User password and Administrator password.
The default User Level Account and Privileged Account is “0000”
Please input the password, then click “Sign In” button.
Registration Message
The flashing green LED of【Registration】key indicates that the registration
is undergoing.
Once the green LED stops flashing, you could know the registration result
by the LED:
Wired VoIP Phone
ePhone-2000
English
8
8
Page 10
S
Green LED
On
Red LED
On
Green LED
Flashes
Red LED
Flashes
LED is off
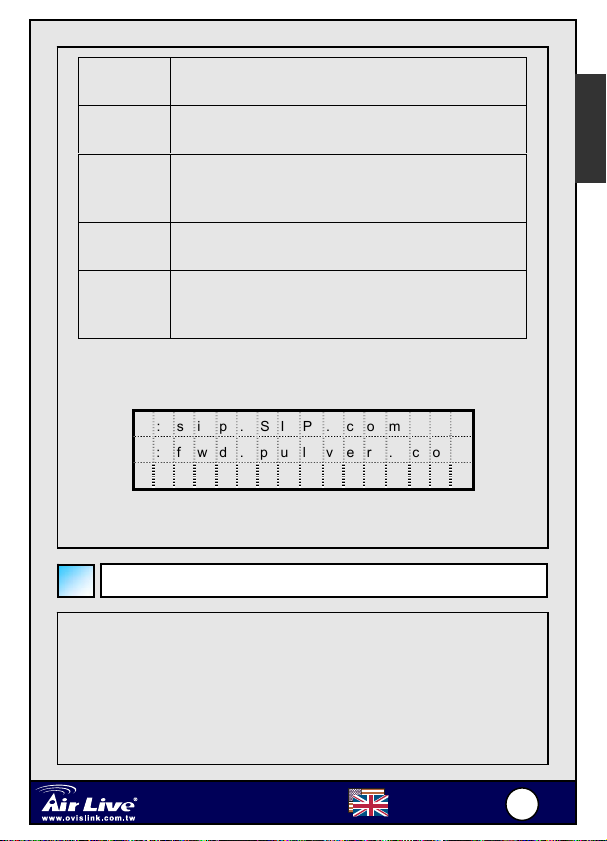
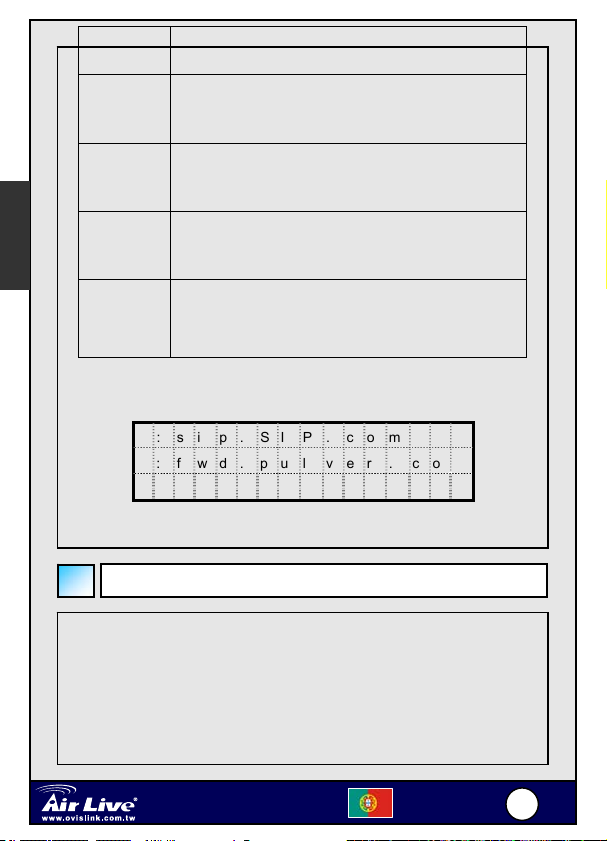
Or press【Service Realm】to show registration status of each active service
domain:
Successfully register to all activated service domains
At least one activated service domain could not be
registered
Registration is in progress. Note, IP SIP Phone will
regularly refresh SIP Address-of-Record registration
as necessary
None of those activated service domains can be
successfully registered
Users explicitly logs out all SIP service and goes
off-line ‘till user presses the 【Registration】key again
to go on-line (re-register to all SIP service)
0 : s i p . S I P . c o m
0 : f w d . p u l v e r . c o m
X : u n k n o w n . c o m
0: Registered domain
X: Registration failed domain (Retry after 90 seconds).
English
Using ePhone-2000S
Press【SPK】to switch between hands-free and handset mode. However, if
you switch to hands-free mode with handset lifted (off-hooked), the phone
will be in loud-speaker mode: it continues transmitting voice from handset,
not from microphone, and played voice to both speaker and handset
receiver simultaneously. It will help clarify the voice of talker while letting all
persons in the same room listen. The phone will activate microphone for
Wired VoIP Phone
ePhone-2000
English
9
9
Page 11

S
English
voice transmission only when it is on hands-free mode and the handset is
on hook. This applies to ear-phone mode as well. In loud speaker mode
with ear-phone enabled, the ear-phone could hear voice but not
speak-able.
1. Address book
『Main Menu』 =>『1.Address Book』/『1.Search』(By default
【F4】 is programmed to access address book).
Pick the target number and press【REDIAL】to dial out.
2. Call History
Press【Call History】to choose desired call
lists:Missed/Received/Dailed numbers.
Traverse the list and pick up the target entry.
Press【REDIAL】to dial out.
Note: if you press【Call History】while its red LED is flashing
(indicating there are unviewed missed calls), it will enter the
“Missed calls” list directly.
3. IP Dialing
Use【*】for 『@』 and『.』
Use【**】for “:” if the target SIP agent does not listen on UDP
port 5060.
Dial【#】to finish dialing.
E.g. 1: to call sip:192.168.10.200
200”.
E.g. 2: to call sip:192.168.10.200:5070, please dial ”192*168*10
*200**5070”.
, please dial “192*168*10*
※ Refer to the AirLive ePhone-2000S Manual for detailed
configuration.
Wired VoIP Phone
ePhone-2000
English
110
0
Page 12
S
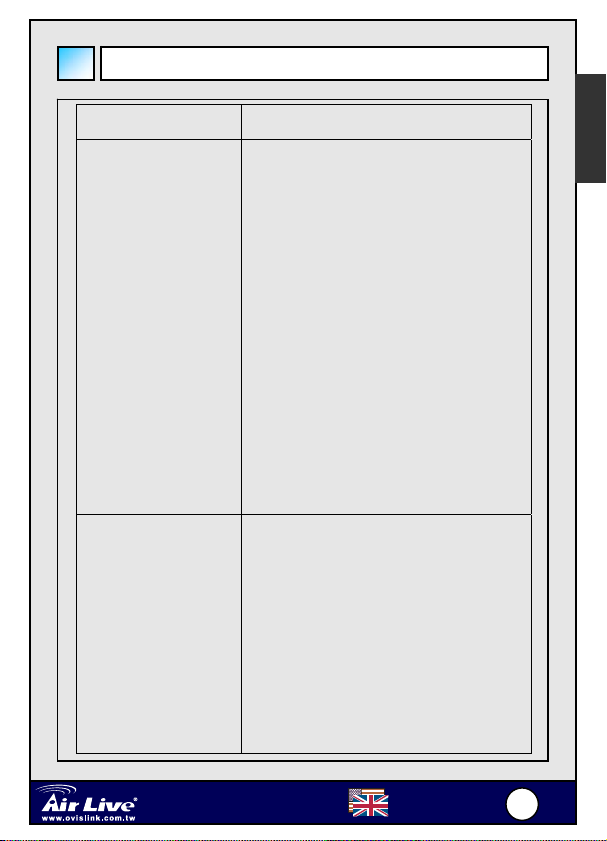
Some Simple Troubleshooting
English
Problem: Troubleshooting:
【Registration】is
shown Red light
1. Please check the Internet
connection of the RJ-45 is ok.
2. Please check if the ePhone-2000S
is able to acquire an IP address. If
not, please check the Network
Setting and see if the configuration
is correct.
3. Please verify that the account is
valid. Please contact you VoIP
service provider for the account
information.
Set to the factory
default setting
Wired VoIP Phone
ePhone-2000
1. Press 【FUNC】+ 【#】
2. Pick【8.Advanced】/【3.System
Admin】/【4.Factory value】
3. LCD will be shown “Reset to
Default”
4. Press 1 to reset default or 2 to
cancel
English
111
1
Page 13
S
English
Appendix A: Using IPtel Free SIP Serivce
Note: AirLive is not affiliated with IPtel. The IP Phone also
work with majority of other SIP proxy service. The
following instruction is for your own information only.
1. Apply a IPtel account at http://sip.iptel.org/user/reg/index.php
2. As shown below, fill in your personal information (First
Name/LastName …), then click “Register”.
Note: Please make sure that your email address is correct in order for
you to receive the account activation email.
Note: The user name must be composed with numbers. Please do not
compose it with characters.
3. After you have registered with the IPtel, you will see the following
confirmation message:
Thank you for registering with iptel.org
Your application was forward for approval.
Expect a confirmation message shortly
We are reserving the following SIP address for you:
sip:8635295000@iptel.org.
If you have any further questions feel free to send an email to
info@iptel.org
Check your email for the IPtel account activation email. Please click the
link in that email to finalize the registration.
Wired VoIP Phone
ePhone-2000
English
112
2
Page 14
S
Thank you for registering with iptel.org.
We are reserving the following SIP address for you: 8635295000@iptel.org
To finalize your registration please check the following URL within 24 hours:
http://sip.iptel.org/user/reg/confirmation.php?nr=e70ab197948118a101516b
d2992c7d7 (If you confirm later you will have to re-register)
4. Login the AirLive ePhone-2000S Web Configuration page
5. The AirLive ePhone-2000S configuration depends on your
network environment. Please refer to the Network Settings for the
network configuration.
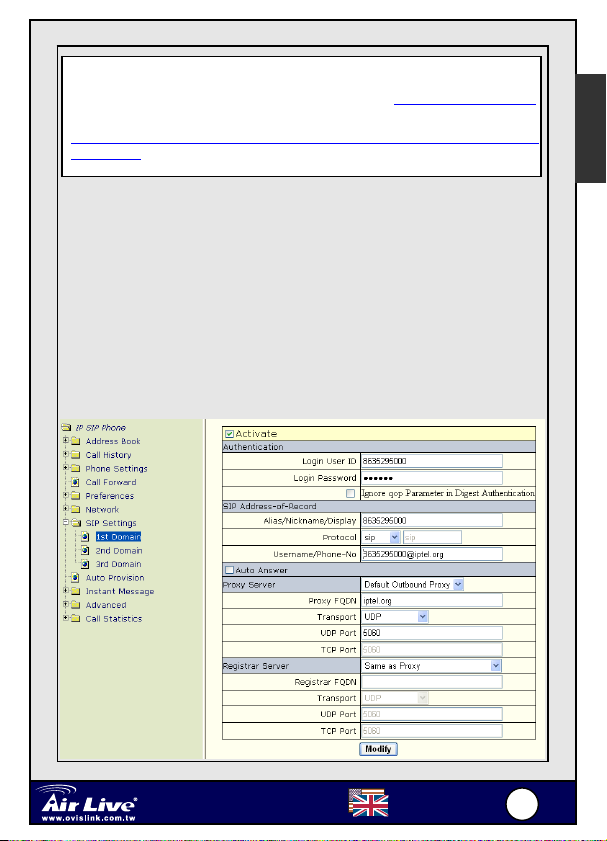
In the following example we have iptel Number as 8635295000 and
iptel Service Password as 123456. Please check the related
configuration as follows:
z WEB Main page ->【SIP Settings】->【1st Domain】
English
Wired VoIP Phone
ePhone-2000
English
113
3
Page 15

S
English
Activate checked
Authentication
Login User ID your iptel username
(For example: 8635295000)
Login Password your iptel password
(For example: 123456)
SIP Address-of-Record
Alias/Nickname/Display your iptel username
(For example: 8635295000)
Protocol SIP
Username/Phone-No your iptel SIP URI
(For example:8635295000@ iptel.org)
Proxy Server Default Outbound Proxy
Proxy FQDN iptel.org
Transport UDP
UDP Port 5060
Registrar Server Same as Proxy
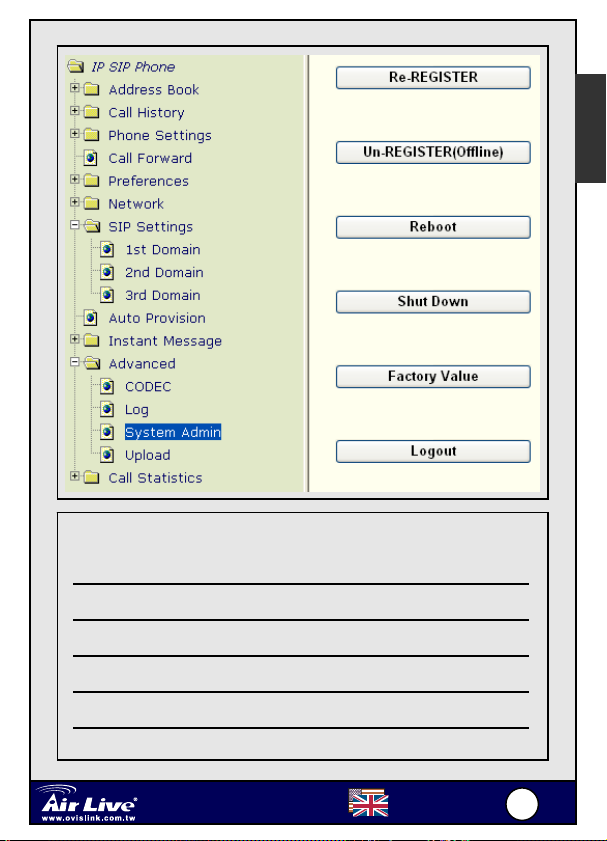
z Click Modify to save your settings
z Click 【Advanced】->【System admin】->【Re-REGISTER】to
re-register Proxy Server
z Start dialing your friends and family. Be sure to tell everyone about
your iptel username! The more people in the iptel community, the
more people you can call for free!
z For more information, please go to http://www.iptel.org/phpBB/
Wired VoIP Phone
ePhone-2000
English
114
4
Page 16
S
English
MEMO
Wired VoIP Phone
ePhone-2000
English
115
5
Page 17
-
S
Conteúdos do pacote
Português
z 1 Telefone IP AirLive ePhone-2000S VoIP
z 1 Transformador
z 1 Cabo Ethernet RJ-45
z 1 Guia de Instalação Rápida
z 1 CD de Instalação
Funções do ePhone-2000S
Auto-Redial
DND
Forward
Speak
A Call
Auto-Redial
1
5
DND
1
4
7
Registration
B Call
Registration
3
2
7
6
Conference
Forward
2
ABCABC
5
JKLGHI
MNO
8
TUVPQ RS
WXYZ
0
Reject
URL
Addr. Book
4
8
Call History
3
DEF
6
9
#
2 x 16 LCD
A B Channel
Service Realm
Reject
Addr. Book
URL
Call History
Conference
MWI
Mute
Func.
Hand Free
Hold
XFER FLASH
Telefone IP VoIP de ligação por
cabo ePhone
2000
Speed Dial
REDIALVolume +/-
Microphone
Português
116
6
Page 18
-
S
Instalação do Hardware
Ligação ao router
Ligue a porta RJ-45 LAN do seu AirLive ePhone -2000S à porta
RJ45 LAN do seu router através do cabo Ethernet fornecido.
Cable. ADSL Modem
Router
Português
LAN
PC
DC IN
AC Adapter
WAN
LAN PC
RJ45
Ligação sem routers
Ligue uma porta RJ-45 LAN do seu AirLive ePhone -2000S à
porta LAN do seu HUB.
Se pretender configurar o ePhone-2000S usando o web
browser, deve consultar a página 6 para definir primeiro um
endereço IP para o seu telefone ePhone-2000S.
Cable. ADSL Modem
Hub
LAN
DC IN
LAN PC
RJ45AC Adapter
Telefone IP VoIP de ligação por
cabo ePhone
2000
Português
PC
117
7
Page 19
-
S
Configuração do Teclado
【Name】:Funções em modo Call (Chamada)
【A/B Channel】:Linhas de chamada (2 chamadas no mínimo) / Rever a
Português
【Service Realm】:Exibe o estado de registo de cada domínio de serviço
【Reject】:Rejeita entrada de chamadas em espera
【MWI】:Message Waiting Indication, Acede ao sistema de voice mail.
【MUTE】:Som nulo
【FUNC】:Menu
【SPK】:Mãos-Livres
【HOLD】:Aguardar
【SPD】:Marcação Rápida
【REDIAL】:Volta a marcar o ultimo número marcado.
【Flash】:Retoma chamadas transferidas /Sai do modo Conferência
【XFER】:Transfere
informação de chamada neste canal durante a
conversação.
activo; comuta o domínio de serviço pretendido (ISP)
enquanto faz chamadas.
【+】:Sobe volume (campainha, auscultador, mãos-livres, altifalante)
【-】:Desce volume (campainha, auscultador, mãos-livres, altifalante)
【Registration】:Volta a registar. LED indica estado de registo de cada domínio de
serviço activo.
Telefone IP VoIP de ligação por
cabo ePhone
2000
Português
118
8
Page 20

-
S
LED Verde
Aceso
LED Encarnado
Ligado
LED Verde
Cintila
Registo com sucesso para todos os domínios de serviço
activados
Pelo menos um domínio de serviço activado não pôde ser
registado
Registo em progresso. Note, o telefone IP SIP actualiza
regularmente o registo do endereço de registo SIP à
medida que é necessário
Português
LED Encarnado
cintila
LED apagado
Nenhum dos domínios de serviço activados pode ser
registado
Utilizador faz log out a todos os serviços SIP, fica
desligado ‘até premir tecla Registration】e ficar de novo em
linha (novo registo de todos os serviços SIP)
【Auto-redial】:Chamada Automática do último número marcado ‘até
【DND】:Do Not Disturb/Não incomodar (LED Encarnado aceso)
【Forward】:Apanha chamadas em espera
【URL 】:Use o teclado para dar entrada de alfabeto/números (LED
Encarnado aceso).
【Address Book】:Acesso a agenda (procure entrada ou liste todas as
【Call History】:Chamadas perdidas/Recebidas/Número marcado. Se o
estar ligado (a chamar). Esta função pode ser activada
quando ouve som de interrompido ou não faz Redial】+
【Auto-redial】. Uma vez activada, acende-se o LED
correspondente.
entradas).
LED Encarnado está a cintilar, isso indica que existem
registos de chamadas perdidas não lidos.
Telefone IP VoIP de ligação por
cabo ePhone
2000
Português
119
9
Page 21
-
S
【Name】:Funções em modo Menu
【MUTE】:Apagar caracter
【FUNC】:Voltar ao sub menu anterior
Português
【SPK】:Sair do menu
【HOLD】: Confirmar, Guardar
【+】:Item seguinte、Mover cursor para a direita
【-】: Item anterior、Mover cursor para a esquerda
Como activar 『Main Menu』?
1. Prima 【FUNC】+ 【#】 para configurar via teclado。
2. Após configurar o IP e a mascara de rede do seu terminal, pode apontar para
qualquer modem web browser a partir do seu PC para o configurar via HTTP. A
palavra-chave de login por defeito para ambas as contas Privileged e
User-Level é “0000”.
3. TELNET no telefone na porta 23 TCP. A palavra-chave de login é igual à
palavra-chave de bloqueio do telefone, que é por defeito “0000”.
4. Inicialmente, o seu telefone só pode ser configurado via teclado uma vez que
ainda não possui um IP válido. Após finalizar a configuração da sua rede, pode
usar ou um web browser (porta 80 HTTP) ou TELNET client (porta 23 TCP) para
configurar o telefone.
Telefone IP VoIP de ligação por
cabo ePhone
2000
Português
220
0
Page 22
-
S
Definições de Rede
A definição por defeito para o AirLive ePhone-2000S é DHCP. Logo, o
AirLive ePhone-2000S será capaz de se ligar à Internet sob qualquer
ambiente DHCP.
Se o ambiente de rede é PPPoE ou IP Fixo, mude a definição de rede do
AirLive ePhone-2000S para o ambiente de rede correspondente.
Vá para『Main Menu』= prima【FUNC】+ # >【6.Network】+【HOLD】 >
【1.General】+【HOLD】para configurar o seu telefone com base no seu
ambiente de rede: DHCP, IP Fixo ou PPPoE.
1. DHCP
z Prima【FUNC】+ # >【6.Network】+【HOLD】 >【1.General】
+【HOLD】 >【1.Mode】+【HOLD】 >【1.DHCP】+【HOLD】
z Desactive【4.DNS Estáticos usados】escolhendo 【4.Use Static
DNS】+【HOLD】>【2.DHCP】+【HOLD】
1. Se pretende alocar um servidor de domínio de nome
diferente em vez de usar os obtidos por DHCP, deve
escolher 【 1.Static DNS】 e definir o IP do seu DNS
específico em 【6.Network】/【1.General】/【5.Static DNS】,
como “1.Primary DNS” =168.95.1.1*
Português
2. Static IP Environment(IP Fixo)
z Prima【FUNC】+ # >【6.Network】+【HOLD】 >【1.General】
+【HOLD】 >【1.Mode】+【HOLD】 >【2.Static Assign】+【HOLD】
Telefone IP VoIP de ligação por
cabo ePhone
2000
Português
221
1
Page 23
-
S
Português
z Vá para【2.Static Settings】e dê entrada das suas configurações
de rede com base no seu ISP. Por exemplo:
1. Host IP = 210.201.210.132*
2. Network mask = 255.255.255.0*
3. Gateway IP = 210.201.210.128*
z Active【4.Use Static DNS】escolhendo: Prima【4.Use Static DNS】
+【HOLD】 >【1.Static DNS】+【HOLD】
z Assignar【5. DNS Server】escolhendo: Prima【5. DNS Server】
+【HOLD】 >【1.Primary DNS】+【HOLD】, como: “1.Primary DNS
= 168.95.1.1*”
3. PPPoE
z Prima【FUNC】+ # >【6.Network】+【HOLD】 >【1.General】
+【HOLD】 >【1.Mode】+【HOLD】 >【1.DHCP】+【HOLD】
>【3.PPPoE Setting】+【HOLD】
z Dê entrada da sua informação de autenticação PPPoE, como:
1. Login ID = MyPPPoEAccount*
2. Password = PPPoEDialupPassword*
3. Service Name = Opcional, alguns ISPs podem solicitar.
【*】O valor deve ser ajustado ao seu ambiente de rede real.
Nota:
Se reside numa LAN sem gateway, deve especificar o IP gateway
como “0.0.0.0” em vez de alocar um IP não existente ou um IP
inválido.
Tecla de símbolos pode rodar: 2->a->b->c->A->B->C->2
@ : prima*e +deixe o cursor mover-se para encontrar
Telefone IP VoIP de ligação por
cabo ePhone
2000
Português
222
2
Page 24
-
S
Configuração WEB
z Prima a tecla Function【7】, o LCD mostrará o seu endereço IP.
z Inicie um Web browser, tal como o Microsoft’s Internet Explorer (IE), dê
entrada do endereço IP do AirLive ePhone-2000S no web browser. O
ecrã de login AirLive ePhone-2000S é exibido:
(Certifique-se que o endereço IP do seu PC e do ePhone-2000S se
encontram na mesma subnet.)
Português
A palavra-chave de configuração web do AirLi ve ePhone-2000S apresenta-se em
duas categorias: Utilizador (User) e Administrador (Administrator).
O valor por defeito das contas User Level e Privileged é “0000”
Dê entrada da palavra-chave e depois clique no botão “Sign In”.
Mensagem de Registo
O LED Verde cintilante da tecla【Registration】indica que o registo está em
curso.
Assim que este LED deixe de cintilar, pode ver o resultado do registo
através do LED:
Telefone IP VoIP de ligação por
cabo ePhone
2000
Português
223
3
Page 25
-
S
Português
LED Verde
Aceso
LED
Encarnado
Aceso
LED Verde
Cintila
LED
Encarnado
Cintila
LED
apagado
Ou prima【Service Realm】para mostrar o estado de registo de cada
domínio de serviço activo:
Registo efectuado para todos os domínios de serviço activados
Pelo menos um domínio de serviço activado não pôde ser
registado
Registo em curso. Note, o telefone IP SIP irá actualizar
regularmente o registo de Endereço de Registo SIP à medida
das necessidades
Nenhum dos domínios de serviço activados pôde ser registado
Utilizador faz log out a todos os serviços SIP, fica desligado ‘até
premir tecla Registration】e ficar de novo em linha (novo registo
de todos os serviços SIP)
0 : s i p . S I P . c o m
0 : f w d . p u l v e r . c o m
X : u n k n o w n . c o m
0: Domínio registado
X: Domínio não registado (Volte a tentar após 90 segundos).
Utilização do ePhone-2000S
Prima【SPK】para comutar entre modo Mãos-Livres e Atendedor. Se comutar para
modo mãos-livres com o atendedor levantado (fora do apoio), o telefone fica em modo
alta-voz: continua a transmitir voz a partir do atendedor, não a partir do microfone, e a
voz é reproduzida para o altifalante e receptor de atendedor simultaneamente. Ajuda a
definir a voz de quem liga, ao mesmo tempo que permite que todas as pessoas na
mesma sala estejam a ouvir. O telefone irá activar o microfone para transmissão de
Telefone IP VoIP de ligação por
cabo ePhone
2000
Português
224
4
Page 26
-
S
voz só quando está em modo mãos-livres e o atendedor está apoiado. Isto aplica-se
também ao modo auricular. Em modo alta-voz com auricular activado, o auricular pode
ouvir voz mas não pode falar.
1. Agenda
『Main Menu』 =>『1.Address Book』/『1.Search』(By default 【F4】 está
programado para aceder à agenda).
Seleccione o número pretendido e prima【REDIAL】para chamar.
2. Historial de Chamadas
Prima【Call History】para escolher as listas de chamadas pretendidas:
Chamadas pedidas/Recebidas e Números marcados.
Analise a lista e escolha a entrada pretendida.
Prima【REDIAL】para chamar.
Nota: Se premir【Call History】enquanto o LED Encarnado está a cintilar
(indicando que há chamadas perdidas não visualizadas), entrará
directamente na lista “Missed calls”.
3. Chamada IP
Use【*】para 『@』 e『.』
Use【**】para “:” se o agente SIP pretendido não ouve na porta UDP 5060.
Marque【#】para terminar a chamada.
Ex. 1: para chamar sip:192.168.10.200
Ex. 2: para chamar sip:192.168.10.200:5070, marque ”192*168 *10*
200**5070”.
, marque “192*168*10*200”.
※ Consulte o Manual do telefone AirLive ePhone-2000S
para detalhes sobre configuração.
Português
Telefone IP VoIP de ligação por
cabo ePhone
2000
Português
225
5
Page 27
-
S
FAQs – Perguntas Mais Frequentes
Problema: Acção:
Português
【Registration】
aparece a Encarnado
Claro
Reponha as definições
de fábrica
1. Verifique se a ligação RJ45 à
Internet está correcta.
2. Verifique se o ePhone-2000S é
capaz de obter um endereço IP. Se
não, verifique a definição de rede e
veja se a configuração está
correcta.
3. Verifique se a conta é válida.
Contacte o prestador do serviço
VoIP para obter informação sobre a
conta.
1. Prima 【FUNC】+ 【#】
2. Escolha【8.Advanced】/【3.System
Admin】/【4.Factory value】
3. LCD exibirá “Reset to Default”
4. Prima 1 para repor definição
defeito ou 2 para cancelar
Telefone IP VoIP de ligação por
cabo ePhone
2000
Português
226
6
Page 28
-
S
Anexo A: Usar Serviço IPtel Free SIP
Nota: AirLive não está afiliada à IPtel. O Telefone IP também
trabalha com a maioria de outros serviços proxy SIP.
As instruções seguintes são só para sua informação.
1. Solicite uma conta IPtel em http://sip.iptel.org/user/reg/index.php
2. Conforme mostrado abaixo, preencha a sua informação pessoal
(Nome Próprio/Nome de Família, …), depois clique “Register”.
Nota: Certifique-se que o seu endereço de email está correcto para que
possa receber o email de activação da conta.
Nota: O nome de utilizador deve ser composto por números. Não o
componha com caracteres.
3. Após ter efectuado o registo com a IPtel, irá ver a seguinte
mensagem de confirmação:
Thank you for registering with iptel.org
Your application was forward for approval.
Expect a confirmation message shortly
We are reserving the following SIP address for you:
sip:8635295000@iptel.org.
If you have any further questions feel free to send an email to
info@iptel.org
Português
Verifique se recebeu no seu email a informação de activação de conta
da IPtel (abaixo). Clique no link nesse email para finalizar o registo.
Telefone IP VoIP de ligação por
cabo ePhone
2000
Português
227
7
Page 29
-
S
Thank you for registering with iptel.org.
We are reserving the following SIP address for you: 8635295000@iptel.org
To finalize your registration please check the following URL within 24 hours:
http://sip.iptel.org/user/reg/confirmation.php?nr=e70ab197948118a101516bd2992c7
d7 (If you confirm later you will have to re-register)
Português
4. Faça o login na página Web Configuration do AirLive ePhone-2000S.
5. A configuração do AirLive ePhone-2000S depende do seu ambiente de
rede. Consulte Definições de Rede relativamente à configuração da rede.
No seguinte exemplo temos o número IPtel como 8635295000 e a Palavra-Chave
do serviço IPtel como 123456. Verifique a configuração:
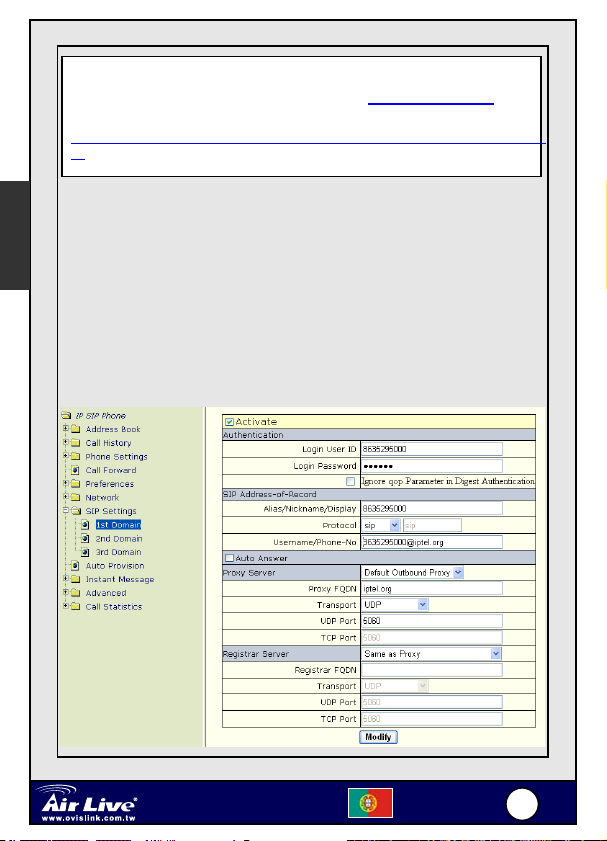
z Página WEB principal ->【SIP Settings】->【1st Domain】
Telefone IP VoIP de ligação por
cabo ePhone
2000
Português
228
8
Page 30

-
S
Activar Verificado
Autenticação
Login User ID O seu nome de utilizador IPtel
(Por exemplo: 8635295000)
Login Password A sua palavra-chave IPtel
(Por exemplo: 123456)
Endereço de Registo SIP
Alias/Nickname/Display O seu nome de utilizador IPtel
(Por exemplo: 8635295000)
Protocol SIP
Username/Phone-No O seu URI SIP IPtel
(Por exemplo:8635295000@ iptel.org)
Servidor Proxy Default Outbound Proxy
Proxy FQDN iptel.org
Transport UDP
UDP Port 5060
Servidor Registrar O mesmo que Proxy
z Clique em Modify para guardar as suas definições
z Clique em 【Advanced】->【System admin】->【Re-REGISTER】
para voltar a registar o servidor Proxy
z Comece a ligar para toda a gente. Certifique-se que informa todas as
pessoas do seu nome de utilizador IPtel! Quanto mais pessoas na
comunidade IPtel, a tantas mais pode ligar sem pagar nada!
z Para mais informações, consulte http://www.iptel.org/phpBB/
Português
Telefone IP VoIP de ligação por
cabo ePhone
2000
Português
229
9
Page 31

-
S
Português
MEMO
Telefone IP VoIP de ligação por
cabo ePhone
2000
Português
330
0
Page 32

S
Packungsinhalt
z 1 x AirLive ePhone-2000S VoIP-IP-Phone
z 1 x Netzteil
z 1 x RJ-45-Ethernetkabel
z Kurzanleitung zur Installation
z Installations-CD
Funktionen des ePhone-2000S
Auto-Redial
DND
Forward
Speak
A Call
Auto-Redial
1
5
DND
1
4
7
Registration
B Call
Registration
3
2
7
6
Conference
Forward
2
ABCABC
5
JKLGHI
MNO
8
TUVPQ RS
WXYZ
0
Reject
URL
Addr. Book
4
8
Call History
3
DEF
6
9
#
2 x 16 LCD
A B Channel
Service Realm
Reject
Addr. Book
URL
Call History
Conference
MWI
Mute
Func.
Hand Free
Deutsch
Hold
XFER FLASH
Wired VoIP Phone
ePhone-2000
Speed Dial
REDIALVolume +/-
Microphone
Deutsch
331
1
Page 33

S
r
Hardware-Installation
Kabelverbindung mit einem Route
Verbinden Sie ein Ende des RJ-45-Kabels mit dem LAN-Port
Ihres AirLive ePhone. Das andere Ende verbinden Sie bitte mit
einem der LAN-Ports Ihres Routers.
Cable. ADSL Modem
Router
LAN
Deutsch
DC IN
AC Adapter
WAN
LAN PC
RJ45
Kabelverbindung ohne Router
Verbinden Sie ein Ende des RJ-45-Kabels mit dem LAN-Port
Ihres AirLive ePhone. Das andere Ende verbinden Sie bitte mit
einem der LAN-Ports Ihres Hubs.
Wenn Sie Ihr ePhone-2000S mit einem Webbrowser
konfigurieren möchten, so vergeben Sie bitte zunächst
IP-Adresse für Ihr ePhone-2000S gemäß Seite 6.
Cable. ADSL Modem
Hub
LAN
DC IN
LAN PC
RJ45AC Adapter
Wired VoIP Phone
ePhone-2000
Deutsch
PC
PC
332
2
Page 34

S
Konfiguration per Tastenfeld
【Name】:Funktionen im Anruf-Rufmodus
【A/B Channel】:Anrufleitungen (max. 2 gleichzeitig) /
Verbindungsinformationen während eines Gesprächs
auf diesem Kanal abrufen.
【Service Realm】:Anzeige des Registrierungsstatus jeder aktiven
Servicedomäne im Wartemodus; Servicedomäne des
Ziels (ISP) während dem Anrufen ändern.
【Reject】:Wartende eingehende Gespräche ablehnen
【MWI】:Message Waiting Indication, MWI: Zugriff auf Voice-Mail-System.
【MUTE】:Stummschaltung
【FUNC】:Menu
【SPK】:Freisprechen
【HOLD】:Gespräch halten
【SPD】:Schnellwahl
【REDIAL】:Wahlwiederholung der letzten Nummer
【Flash】:Gesprächtransfer zurücknehmen/Konferenzmodus verlassen
【XFER】:Transfer
Deutsch
【+】:Lautstärke + (Klingel, Headset, Handset (Hörer), Lautsprecher)
【-】:Lautstärke - (Klingel, Headset, Handset, Lautsprecher)
【Registration】:Neuregistrierung. Die LED zeigt den
Registrierungsstatus jeder aktiven Servicedomäne an.
Wired VoIP Phone
ePhone-2000
Deutsch
333
3
Page 35

S
Grüne LED an
Rote LED an
Grüne LED
blinkt
Rote LED
blinkt
Deutsch
LED ist aus
【Auto-redial】:Automatische Neuanwahl der letzten gewählten Nummer
【DND】:Nicht stören (Do Not Disturb) - wird durch rote LED angezeigt.
【Forward】:Wartende eingehende Gespräche weiterleiten.
【URL】:Tastenblock zur Eingabe von Buchstaben und Nummern benutzen
(rote LED leuchet).
【Address Book】:Zugriff aufs Adressbuch (Einen Einitrag suchen oder
【Call History】:Verpasste Gespräche/Angenommene Gespräche/
【Conference】:Lokale Konferenzschaltung mit 3 Parteien
Eine erfolgreiche Registrierung für alle aktivierten
Servicedomänen ist erfolgt.
Mindestens eine aktivierte Servicedomäne konnte
nicht registriert werden.
Registrierung wird durchgeführt. Bitte beachten:
IP-SIP-Phone wird regelmäßig wenn nötig die
SIP-Address-of-Record-Registrierung auffrischen.
Keine der aktivierten Servicedomänen konnte
erfolgreich registriert werden.
Benutzer haben sich explizit bei allen
SIP-Services ausgeloggt. Offline bis ein Benutzer
die Registrierungstaste erneut betätigt.
(Neuregistrierung aller SIP-Services)
bis eine Verbindung aufgebaut wird (klingeln). Dies kann
benutzt werden wenn ein Besetzton gehört wird oder als
Abkürzung für 【Redial】+ 【Auto-redial】. Einmal aktiviert,
wird die entsprechende LED leuchten.
alle Einträge auflisten).
Gewählte Nummern. Anzeige vorhandener Einträge für
verpasste Gespräche durch blinken der roten LED.
Wired VoIP Phone
ePhone-2000
Deutsch
334
4
Page 36

S
【Name】:Funktionen im Menü-Modus
【MUTE】:Zeichen löschen
【FUNC】:Rückkehr zum darüberliegenden Untermenü
【SPK】:Menü verlassen
【HOLD】: Bestätigen/Sichern
【+】:Nächster Menüpunkt、Cursor nach rechts bewegen
【-】:Vorheriger Menüpunkt、Cursor nach links bewegen
Aktivierung des Hauptmenüs
1. Drücken Sie 【FUNC】+ 【#】 um die Konfiguration über das
Tastenfeld vorzunehmen.。
2. Nachdem Sie die IP und die Netzwerkmaske Ihres ePhone
2000QSG konfiguriert haben können Sie dieses mit jedem modernen
Webbrowser von Ihrem PC aus über HTTP konfigurieren.
Das werkseitige Login-Passwort für privilegierte und normale
Benutzer ist “0000”.
3. Zugriff über TELNET auf TCP-Portt 23. Das Login-Passwort ist
ebenfalls “0000”.
4. Anfänglich kann Ihr Telefon nur über das Tastenfeld konfiguriert
werden, da es noch über keine gültige IP verfügt. Nach Beenden der
Netzwerkkonfiguration kann es mit einem Webbrowser (HTTP-Port
80) oder einem TELNET-Client (TCP-Port 23) konfiguriert werden.
Wired VoIP Phone
ePhone-2000
Deutsch
335
5
Deutsch
Page 37

S
Deutsch
Netzwerkeinstellungen
Die Voreinstellung für das AirLive ePhone-2000S ist DHCP.
Somit kann sich das AirLive ePhone-1000S in jeder
DHCP-Umgegung mit dem Internet verbinden.
In Netzwerkumgebungen mit PPPoE oder einer statischen IP
ändern Sie bitte die Netzwerkeinstellungen für Ihr AirLive
ePhone-2000S auf die entsprchende Netzwerkumgebung.
Um das Telefon dementsprechend einzustellen wählen Sie『Main
Menu』= drücken Sie 【FUNC】+ # >【6.Network】+【HOLD】
>【1.General】+【HOLD】DHCP, statische IP oder PPPoE.
1. DHCP
z Drücken Sie【FUNC】+ # >【6.Network】+【HOLD】 >
【1.General】+【HOLD】 >【1.Mode】+【HOLD】 >【1.DHCP】
+【HOLD】
z Deaktivieren Sie statisches DNS durch Auswahl von 【4.Use
Static DNS】+【HOLD】>【2.DHCP】+【HOLD】
1. Wenn Sie andere DNS als die per DHSP vergebenen
zuweisen möchten, so wählen Sie 【1.Static DNS】 und
setzen Sie die IP Ihres DNS in 【6.Network】/【1.General】
/【5.Static DNS】, wie z.B. “1.Primary DNS” =168.95.1.1*
2. Statische IP-Umgebung(Feste IP)
z Drücken Sie 【FUNC】+ # >【6.Network】+【HOLD】 >
【1.General】+【HOLD】 >【1.Mode】+【HOLD】 >【2.Static
Assign】+【HOLD】
Wired VoIP Phone
ePhone-2000
Deutsch
336
6
Page 38

S
z Gehen Sie zu 【2.Static Settings】, und geben Sie Ihre
Netzwerkkonfiguration gemäß den Angaben Ihres ISPs ein:
1. Host IP = 210.201.210.132*
2. Network mask = 255.255.255.0*
3. Gateway IP = 210.201.210.128*
z Aktivieren Sie 【4.Use Static DNS】 durch drücken von【4.Use
Static DNS】+【HOLD】 >【1.Static DNS】+【HOLD】
z Weisen Sie einen 【5. DNS Server】 durch Drücken von 【5. DNS
Server】+【HOLD】 >【1.Primary DNS】+【HOLD】, wie z.B.:
“1.Primary DNS = 168.95.1.1*”
3. PPPoE
Deutsch
z Drücken Sie 【FUNC】+ # >【6.Network】+【HOLD】 >
【1.General】+【HOLD】 >【1.Mode】+【HOLD】 >【1.DHCP】
+【HOLD】>【3.PPPoE Setting】+【HOLD】
z Geben Sie Ihre PPPoE-Authentifizierung ein, wie z.B.:
1. Login ID = Mein-PPPoE-Account*
2. Password = PPPoE-Einwahl-Passwort*
3. Service Name = Optional, manche ISPs benötigen diesen.
【*】Der Wert sollte derjenige Ihrer realen Netzwerkumgebung sein.
Bitte beachten Sie:
Wenn Sie sich in einem LAN ohne Gateway befinden, so sollten
Sie statt einer nicht existierenden oder ungültigen IP-Adresse
“0.0.0.0” als Gateway-IP zuweisen.
Zwischen den Zeichen kann weitergeschaltet werden:
2->a->b->c->A->B->C->2
@ : drücken, und der Cursor bewegt sich um etwas zu finden.
Wired VoIP Phone
ePhone-2000
Deutsch
337
7
Page 39

S
WEB-Konfiguration
z Drücken Sie die Funktionstaste 7: Die IP-Adresse wird angezeigt.
z Starten Sie Ihren Webbrowser und geben Sie dort die IP-Adresse des
AirLive ePhone-2000S ein. Das Login-Fenster des AirLive
ePhone-2000S wird nun angezeigt:
(Stellen Sie bitte sicher, dass sich die IP-Adresse des Phone-2000S und
diejenige Ihres PCs im selben Subnetz befinden.)
Deutsch
Das AirLive ePhone-2000S hat zwei Passwörter für die Webkonfiguration:
Ein Benutzerpasswort und ein Administratorpasswort.
Die Vorgabe für diese beiden Passwörter ist “0000”
Bitte geben Sie das Passwort ein bestätigen Sie mit dem Button “Sign In”.
Registrierungs-Anzeige
Eine grün blinkende LED der Registrierungstaste zeigt an, dass die
Registrierung durchgeführt wird.
Sobald die grüne LED aufhört zu blinken sehen Sie das Ergebnis der
Registrierung an der LED:
Wired VoIP Phone
ePhone-2000
Deutsch
338
8
Page 40

S
Grüne LED
An
Rote LED
An
Grüne LED
Blinkt
Rote LED
Blinkt
LED ist
aus
Um den Registrierungsstatus aller aktiven Service-Domänen einzusehen
können Sie auch 【Service Realm】 betätigen:
0: Registrierte Domäne
X: Registrierung fehlgeschlagen (Neuversuch nach 90 Sekunden).
Eine erfolgreiche Registrierung für alle aktivierten
Servicedomänen ist erfolgt.
Mindestens eine aktivierte Servicedomäne konnte
nicht registriert werden.
Registrierung wird durchgeführt. Bitte beachten:
IP-SIP-Phone wird regelmäßig wenn nötig die
Registrierung der SIP-Address-of-Record auffrischen.
Keine der aktivierten Servicedomänen konnte
erfolgreich registriert werden.
Benutzer haben sich explizit bei allen SIP-Services
ausgeloggt. Offline bis die Registrierungstaste erneut
betätigt wird (Neuregistrierung. aller SIP-Services).
0 : s i p .SIP.com
0 : f w d . p u l v e r . c o m
X : u n k n o w n . c o m
Deutsch
Benutzung des ePhone-2000S
Drücken Sie .SPK】 um zwischen Freisprechen und dem Hörer-Modus
umzuschalten. Wenn Sie auf Freisprechen umschalten während der Hörer
abgehoben ist, wo wird der Lautsprechermodus aktiviert. Die Sprache wird
dann weiter vom Hörer übertragen und nicht vom Mikrofon - während sie
von Hörer und Lautsprecher simultan ausgegeben wird. Dadurch wird die
Stimme des Sprechenden klarer während alle im Raum mithören können.
Wired VoIP Phone
ePhone-2000
Deutsch
339
9
Page 41

S
Das Telefon wird die Sprachübertragung nur aktivieren wenn es sich im
Freisprechmodus befindet und der Hörer aufgelegt ist. Das gilt ebenso für
das Modell mit Ohrhörer. Im Lautsprechermodus mit eingeschaltetem
Ohrhörer wird darüber zwar Sprache gehört, aber das Mikrofon ist inaktiv.
1. Addressbuch
『Main Menu』 =>『1.Address Book』/『1.Search』(Als Vorgabe
Wählen Sie die Zielnummer und Drücken Sie zum Wählen
2. Gesprächs-Historie
Deutsch
Drücken Sie 【Call History】 um eine Liste verpasster,
Gehen Sie die Liste durch und wählen Sie den Eintrag mit der
Um zu wählen betätigen Sie 【REDIAL】.
Bitte beachten: Wenn Sie 【Call History】 auswählen während die rote
3. IP-Anwahl
Benutzen Sie 【*】 für 『@』 und『.』
Benutzen Sie 【**】 für “:” falls das SIP des Ziels nicht auf dem
Wählen Sie 【#】 um die Eingabe der Adresse zu beenden.
z.B. 1: für sip:192.168.10.200
z.B. 2: für sip:192.168.10.200:5070 wählen Sie bitte ”192*168*10*
ist【F4】 für den Zugriff auf das Adressbuch programmiert).
【REDIAL】
entgegengenommener oder gewählter Nummern einzusehen.
Zielnummer.
LED blinkt (was uneingesehene verpasste Anrufe anzeigt), so
wird die Liste der verpassten Anrufe direkt aufgerufen.
UDP-Port 5060 lauscht.
wählen Sie bitte “192*168*10*200”.
200**5070”.
※ Weitere Informationen zur Konfiguration entnehmen Sie
bitte dem ausführlichen Benutzerhandbuch.
Wired VoIP Phone
ePhone-2000
Deutsch
440
0
Page 42

S
g
Fehlerbehebung
Problem: Fehlerbehebung:
【Registration】 wird
durch ein rotes Licht
angezeigt.
Zurücksetzen auf
Werksvoreinstellung
1. Überprüfen Sie bitte die
Verbindung zum Internet über über
RJ-45 .
2. Überprüfen Sie bitte, ob das
ePhone-2000S eine IP-Adresse
entgegennehmen kann. Falls nicht,
so überprüfen Sie bitte die
Korrektheit der Netzwerk-
einstellungen.
3. Überprüfen Sie bitte die Gültigkeit
Ihres Zugangs. Kontaktieren Sie
ggf. Ihren VoIP-Serviceprovider
wegen der Zugangsdaten.
1. Drücken Sie 【FUNC】+ 【#】
2. Wählen Sie 【8.Advanced】/
【3.System Admin】/【4.Factory
value】
3. Die LCD wird “Reset to Default”
anzeigen.
4. Drücken Sie 1 für die Werksvorein-
oder 2 zum Abbruch.
stellun
Deutsch
Wired VoIP Phone
ePhone-2000
Deutsch
441
1
Page 43

S
Deutsch
Anhang A: IPtels freier SIP-Service
Anmerkung: OvisLink hat keine besondere Verbindung zu
IPtel. Das IP-Phone lässt sich ebenso mit den meisten
anderen SIP Proxy-Diensten betreiben.
1. Richten Sie sich unter http://sip.iptel.org/user/reg/index.php einen
Zugang für IPtel ein.
2. Geben Sie wie unten gezeigt Ihre persönlichen Informationen ein
(Vorname/Nachname …), dann klicken Sie auf “Register”.
Anmerkung: Um die Zugangsdaten korrekt empfangen zu können stellen
Sie bitte sicher, dass Ihre Email-Adresse korrekt angegeben ist.
Anmerkung: Der Benutzername muss ausschlißlich aus Zahlen bestehen.
3. Nach Ihrer Registrierung bei Iptel sehen Sie die folgende
Bestätigungsmeldung:
Thank you for registering with iptel.org
Your application was forward for approval.
Expect a confirmation message shortly
We are reserving the following SIP address for you:
sip:8635295000@iptel.org.
If you have any further questions feel free to send an email to
info@iptel.org
Sehen Sie in Ihrer Email nach der IPtel-Aktivierungsmail und klicken
Sie zur Bestätigung auf den darin enthaltenen Link.
Wired VoIP Phone
ePhone-2000
Deutsch
442
2
Page 44

S
Thank you for registering with iptel.org.
We are reserving the following SIP address for you: 8635295000@iptel.org
To finalize your registration please check the following URL within 24 hours:
http://sip.iptel.org/user/reg/confirmation.php?nr=e70ab197948118a101516bd
2992c7d7 (If you confirm later you will have to re-register)
4. Gehen Sie in die Web-Konfiguration Ihres AirLive
ePhone-2000S .
5. Die Konfiguration des AirLive ePhone-2000S richtet sich nach der
Art Ihrer Netzwerkverbindung. Gehen Sie bitte gemäß den weiter
oben aufgeführten “Netzwerkeinstellungen” vor.
Im folgenden Beispiel benutzen wir als IPtel-Number 8635295000 und
als iptel Service Passwort 123456. Vergleichen Sie bitte die damit
verbundene Konfiguration wie folgt:
z WEB Main page ->【SIP Settings】->【1st Domain】
Deutsch
Wired VoIP Phone
ePhone-2000
Deutsch
443
3
Page 45

S
Deutsch
Aktiviert Ausgewählt
Authentication
Login User ID Ihr Benutzername bei iptel
(For example: 8635295000)
Login Password Ihr Passwort bei iptel
(z.B.: 123456)
SIP Address-of-Record
Alias/Nickname/Display Ihr Benutzername bei iptel
(z.B.: 8635295000)
Protocol SIP
Username/Phone-No Ihre SIP URI bei iptel
(z.B.: 8635295000@iptel.org)
Proxy Server Vorgegebener Outbound-Proxy
Proxy FQDN iptel.org
Transport UDP
UDP Port 5060
Registrar Server identisch mit Proxy
z Um die Einstellungen zu speichern klicken Sie auf "Modify".
z Klicken Sie auf 【Advanced】->【System admin】->【Re-REGISTER】
um den Proxyserver neu zu registrieren.
z Rufen Sie jetzt Ihre Freunde und Ihre Familie an. Erzählen Sie jedem
von Ihrem Benutzernamen bei IPtel! Je mehr Mitglieder der IPtel
Community beitreten, umso mehr Leute können Sie kostenlos
anrufen!
z Weitere Informationen erhalten Sie auf http://www.iptel.org/phpBB/
Wired VoIP Phone
ePhone-2000
Deutsch
444
4
Page 46

S
Deutsch
Notizen
Wired VoIP Phone
ePhone-2000
Deutsch
445
5
Page 47

S
Contenido del Paquete
z 1 teléfono IP AirLive ePhone-2000S VoIP
z 1 adaptador de alimentación
z 1 cable Ethernet RJ-45
z Guía de Instalación Rápida
z CD de Instalación
Español
Funciones del ePhone-2000S
Auto-Redial
DND
Forward
Speak
A Call
Auto-Redial
1
5
DND
1
4
7
Registration
B Call
Registration
3
2
7
6
Conference
Forward
2
ABCABC
5
JKLGHI
MNO
8
TUVPQ RS
WXYZ
0
Reject
URL
Addr. Book
4
8
Call History
3
DEF
6
9
#
2 x 16 LCD
A B Channel
Service Realm
Reject
Addr. Book
URL
Call History
Conference
MWI
Mute
Func.
Hand Free
Hold
XFER FLASH
Wired VoIP Phone
ePhone-2000
Speed Dial
REDIALVolume +/-
Microphone
Español
446
6
Page 48

S
Instalación del Hardware
Conexión con el enrutador
Conecte un extremo del RJ-45 al puerto LAN del AirLive ePhone
-2000S y enchufe el otro extremo al Puerto LAN del enrutador.
Cable. ADSL Modem
Router
WAN
DC IN
LAN PC
AC Adapter
RJ45
Conexión sin enrutadores
LAN
PC
Español
Conecte un extremo del RJ-45 al Puerto LAN del AirLive
ePhone-2000S y enchufe el otro extremo al Puerto LAN del
HUB.
Si desea configurar el ePhone-2000S con un navegador web,
primero debe ir a la página 6 a objeto de obtener una dirección
IP para su ePhone-2000S.
DC IN
LAN PC
RJ45AC Adapter
Wired VoIP Phone
ePhone-2000
Cable. ADSL Modem
Hub
LAN
Español
PC
447
7
Page 49

S
Español
Configuración del teclado
【Name】:Funciones en Modo Llamada
【A/B Channel】:líneas de llamadas (máximo 2 llamadas concurrentes) /
Revise la información de la persona que llama por este
canal mientras dura la conversación.
【Campo de Servicio】:Despliega el estatus de cada dominio de servicios
activos mientras no hay conversación; en caso de
que hayan llamadas despliega el dominio de
conmutación de servicios objetivo (ISP).
【Rechazo】:Rechazo de llamadas en espera entrantes
【MWI】:Indicación de Mensaje en Espera, MWI: Acceso al sistema de
correo de voz.
【MUTE】:Silenciar
【FUNC】:Menú
【SPK】:Manos Libres
【HOLD】:Retener
【SPD】:Velocidad de Discado
【REDIAL】:Rediscar el último número
【Flash】:Retomar llamadas en transferencia/Salir del Modo Conferencia
【XFER】:Transferir
【+】:Subir volumen (Timbre, audífono, aparato, altoparlante)
【-】:Bajar volumen (Timbre, audífono, aparato, altoparlante)
Wired VoIP Phone
ePhone-2000
Español
448
8
Page 50

S
LED en Verde
encendido
LED en Rojo
encendido
LED en Verde
titila
LED en Rojo
titila
LEDs están
apagadas
【Rediscado Automático】:Rediscar automáticamente el ultimo número
【DND】:No molestar (LED en rojo indica encendido)
【Forward】:Enviar hacia adelante de llamadas en espera entrantes
【URL】:Usar el teclado para ingresar letras y números (LED en rojo
encendido).
Registro exitoso de que todos los dominios de
servicios están activos.
Al menos un dominio de servicios activado no
puede ser registrado
El registro está en progreso. Note que el teléfono
IP SIP refresca regularmente y mientras sea
necesario, la dirección del registro SIP
No puede registrarse ninguno de los dominios de
servicios activados.
Los usuarios explícitamente no están usando
ninguno de los servicios SIP y están fuera de línea
hasta que algún usuario presione la tecla de
[Registration】de nuevo para estar en línea
(re-registrar todos los servicios SIP)
marcado hasta que esté conectado (repicando). Esta
opción puede ser activada cuando se escuche el tono de
ocupado o abreviando las teclas de【Redial】 +
Auto-redial】. Una vez activada, el LED correpondiente se
encenderá.
Español
【Address Book】:Acceder al libro de direcciones (buscar una entrada o
listar todas las entradas).
【Call History】:Llamadas perdidas/Llamadas Recibidas/Números
Discados. El LED en rojo titilando, indica que existen
registros no leídos de llamadas perdidas.
Wired VoIP Phone
ePhone-2000
Español
449
9
Page 51

S
【Name】:Funciones en Modo Menú
【MUTE】:Cancelar caracter
【FUNC】:Retornar al submenú de nivel superior
【SPK】:Salir del Menú
【HOLD】: Confirmar, Salvar
【+】:Próximo item、Mover el cursor a la derecha
【-】:Item previo. Mover el cursor a la izquierda.
¿Cómo activar『Main Menu』?
1. Presionar 【FUNC】+ 【#】 para configurar a través del teclado
Español
2. Después de configurar la dirección IP y la máscara de red en su
terminal, Ud. puede utilizar cualquier navegador web para, desde su
PC, programarlo vía HTTP. La contraseña de login por defecto tanto
para los usuarios privilegiados como para los usuarios con cuentas
es “0000”.
3. Usar TELNET para acceder al teléfono por el Puerto 23 TCP. La
contraseña de login, es la misma utilizada para bloquear el teléfono,
siendo por defecto “0000”.
4. Al inicio, su teléfono sólo puede ser configurado a través del teclado
porque todavía no posee una dirección IP válida. Después de que
finalice de configurar su red, puede usar o un navegador Web (HTTP
puerto 80) o un cliente TELNET (TCP puerto 23) para configurar su
teléfono.
Wired VoIP Phone
ePhone-2000
Español
550
0
Page 52

S
Parámetros de Red
La configuración por defecto del teléfono AirLive ePhone-2000S
es DHCP. Por lo tanto, el equipo sera capaz de conectarse a
Internet a cualquier ambiente DHCP.
Si el ambiente de red PPPoE o IP estático, por favor cambie los
parámetros de red del AirLive ePhone-2000S a los que
correpondan al ambiente de red.
Por favor ir a『Main Menu』= presionar【FUNC】+ # >
【6.Network】+【HOLD】 >【1.General】+【HOLD】 para
configurar el teléfono basándose en su ambiente de red: DHCP,
IP estático o or PPPoE.
1. DHCP
z Presionar【FUNC】+ # >【6.Network】+【HOLD】 >【1.General】
+【HOLD】 >【1.Mode】+【HOLD】 >【1.DHCP】+【HOLD】
z Desactivar【4.Use Static DNS】eligiendo 【4.Use Static DNS】+
【HOLD】>【2.DHCP】+【HOLD】
1. Si quiere asignar un nombre diferente de servidor de
dominio, en vez de usar aquellos obtenidos por DHCP, Ud.
deberá elegir【1.Static DNS】y programar la dirección IP de
su DNS específico en 【6.Network】/【1.General】/【5.Static
DNS】, tal como “1.Primary DNS” =168.95.1.1*
Español
2. Ambiente IP Estático(IP Fijo)
z Presionar【FUNC】+ # >【6.Network】+【HOLD】 >【1.General】
+【HOLD】 >【1.Mode】+【HOLD】 >【2.Static Assign】+【HOLD】
Wired VoIP Phone
ePhone-2000
Español
551
1
Page 53

S
z Ir a【2.Static Settings】, e ingrese sus configuraciones de red de
acuerdo a su proveedor de Internet. Por ej:
1. Host IP = 210.201.210.132*
2. Network mask = 255.255.255.0*
3. Gateway IP = 210.201.210.128*
z Habilitar【4.Use Static DNS】 presionando【4.Use Static DNS】
+【HOLD】 >【1.Static DNS】+【HOLD】
z Asignar【5. DNS Server】presionando【5. DNS Server】+【HOLD】
>【1.Primary DNS】+【HOLD】, tal como: “1.Primary DNS =
168.95.1.1*”
3. PPPoE
z Presionar【FUNC】+ # >【6.Network】+【HOLD】 >【1.General】
+【HOLD】 >【1.Mode】+【HOLD】 >【1.DHCP】+【HOLD】
Español
>【3.PPPoE Setting】+【HOLD】
z Ingrese la información PPPoE de autenticación, tal como:
1. Login ID = MyPPPoEAccount*
2. Password = PPPoEDialupPassword*
3. Service Name = Opcional, algunos ISPs pueden requerirla.
【*】Los valores deben estar ajustados a su ambiente de red real
Nota:
Si forma parte de una LAN sin gateway, debería especificar la
dirección IP del gateway como “0.0.0.0” en vez de asignar una
dirección IP inválida o no existente.
Las teclas de símbolos podrían estar encerradas en círculos por
2->a->b->c->A->B->C->2
@ : presionar*y + deje que el cursor se mueva para
encontrarlo
Wired VoIP Phone
ePhone-2000
Español
552
2
Page 54

S
Configuración WEB
z Presionar la tecla de función【7】, el LCD le mostrará su dirección IP
z Con un navegador web como Microsoft’s Internet Explorer (IE) ingrese
la dirección IP del AirLive ePhone-2000S’sen la barra de direcciones del
navegador. La pantalla de login del AirLive ePhone-2000S se
desplegará:
(Asegúrese que las direcciones IP de su PC y la del ePhone-2000S están
en la misma subred)
Español
Existen dos tipos de contraseñas para realizar la configuración del AirLive
ePhone-2000S desde la web: la del Usuario y la del Administrador.
La correspondiente, por defecto , tanto para las Usuarios normales
con cuentas como los privilegiados es “0000”
Por favor, ingrese la contraseña y haga click en el botón “Sign In”.
Mensaje de Registro
Un titilante LED verde de la tecla de【Registration】indica que el registro se
está efectuando.
Una vez que el LED verde ya no titila, Ud. puede conocer el resultado del
registro a través del LED.
Wired VoIP Phone
ePhone-2000
Español
553
3
Page 55

S
Español
LED Verde
encendido
LED Rojo
encendido
Led Verde
titila
RLED Rojo
titila
LED está
apagada
O presione【Service Realm】para visualizar el estatus del registro de cada
dominio de servicios activo:
Registro exitoso en todos los dominios de servicio
activados
Al menos uno de los dominios de servicio activados
no está registrado
Registro en progreso. Note que el teléfono IP SIP,
mientras sea necesario, regularmente refrescará la
activación SIP del registro de dirección.
Ninguno de los dominios de servicio acfivados pudo
ser registrado exitosamente.
Los usuarios explícitamente dejan de usar todos los
servicios SIP y quedan fuera de línea hasta que un
usuario presiona la tecla【Registration】 de nuevo para
estar en línea (re-registrar todos los servicios SIP)
0 : s i p .SI P.com
0 : f w d . p u l v e r . c o m
X : u n k n o w n . c o m
0: Dominio Registrado
X: Dominio con Registro Fallido (Reintenta después de 90
segundos).
Usando el Phone-2000S
Presionar【SPK】para cambiar entre los modos manos libres y
microteléfono. Sin embargo, si Ud. cambia al modo manos libres con el
microteléfono descolgado, el teléfono estará en modo altoparlante y
continuará transmitiendo voz desde el microteléfono, no desde el
micrófono y emitirá la voz tanto por el altoparlante como por el
microteléfono. Esto ayudará a clarificar la voz del hablante para todas
aquellas personas que la escuchan. El teléfono activará el micrófono para
Wired VoIP Phone
ePhone-2000
Español
554
4
Page 56

S
transmisión de voz sólo cuando está en modo manos libres y el
microteléfono está colgado. Esto también aplica para los audífonos. En
modo altoparlante con los audífonos habilitados, éstos podrán oir la voz
pero no estarán habilitados para hablar a través de ellos.
1. Libro de Direcciones
『Main Menu』 =>『1.Address Book』/『1.Search』(Por defecto
【F4】está programada para acceder al libro de direcciones).
Escoja el número objetivo y presione REDIAL】para discar.
2. Historia de LLamadas
Presionar【Call History】para elegir la lista deseada de
llamadas:Números de las Perdidas/Recibidas/Discadas.
Recorrer la lista y escoger la entrada buscada.
Presionar【REDIAL】para discar.
Nota: Si Ud. presiona【Call History】mientras el LED rojo está
titilando (indicando la existencia de llamadas perdidas que
no han sido vistas), entrará directamente a la lista de
llamadas perdidas.
3. Discado IP
Use【*】para 『@』 and『.』
Use【**】para “:” Si el agente SIP objetivo no escucha en el
PuertoUDP 5060.
Discar【#】para finalizar el discado.
Ejemplo 1:para llamar SIP:192.168.10.200
“192*168*10*200”.
Ejemplo 2:para llamar SIP:192.168.10.200:5070, por favor,
disque ”192*168*10*200**5070”.
Español
, por favor, disque
※ Refiérase al Manual del AirLive ePhone-2000S para
detallles de configuración.
Wired VoIP Phone
ePhone-2000
Español
555
5
Page 57

S
Algunas Soluciones a Problemas Simples
Problema: Solución:
Español
【Registration】es
mostrada con luz
roja
Programar los
parámetros por
defecto de fábrica
1. Por favor, revise que esté bien el
conector RJ-45 hacia Internet.
2. Por favor, revise si el
ePhone-2000S está habilitado para
obtener una dirección IP. Si no,
revise los parámetros de red y
observe si la configuración está
correcta.
3. Por favor, verifique que la cuenta
es válida. Contacte su proveedor
de servicios de VoIP para esta
información.
1. Presione 【FUNC】+ 【#】
2. Escoja【8.Advanced】/【3.System
Admin】/【4.Factory value】
3. Aparecerá en el LCD “Reset to
Default”
4. Presione 1 para borrar el valor por
defecto o 2 para cancelar
Wired VoIP Phone
ePhone-2000
Español
556
6
Page 58

S
Apéndice A: Usando el Servicio IPtel Free SIP
Nota: AirLive no está afiliada a IPtel. El teléfono IP también
trabaja con la mayoría de los otros servicios proxy
SIP. La instrucción siguiente es sólo para su
información.
1. Solicite una cuenta IPtel en
http://sip.iptel.org/user/reg/index.php
2. Como se muestra abajo, ingrese su información personal
(Nombre/Apellido …), luego haga click en “Register”.
Nota: Por favor, asegúrese que su dirección electrónica está correcta
para que pueda recibir el mensaje electrónico de activación de
cuenta.
Nota: El nombre del usuario debe estar formado por números. No utilice
otros tipos de caracteres.
3. Luego que Ud. se haya registrado en IPtel, verá el siguiente
mensaje de confirmación:
Thank you for registering with iptel.org
Your application was forward for approval.
Expect a confirmation message shortly
We are reserving the following SIP address for you:
sip:8635295000@iptel.org.
If you have any further questions feel free to send an email to
info@iptel.org
Español
Revise su correo electrónico para constatar la recepción del mensaje
de IPtel de activación de cuenta. Haga click en el enlace que aparece
en ese mensaje para finalizar el registro.
Wired VoIP Phone
ePhone-2000
Español
557
7
Page 59

S
g
Español
Thank you for registering with iptel.org.
We are reserving the following SIP address for you: 8635295000@iptel.org
To finalize your registration please check the following URL within 24 hours:
http://sip.iptel.org/user/reg/confirmation.php?nr=e70ab197948118a101516bd
2992c7d7 (If you confirm later you will have to re-register)
4. Ingresar a la página de Web de Configuración del AirLive
ePhone-2000S
5. La configuración del AirLive ePhone-2000S depende del
ambiente de su red. Refiérase a los Parámetros de Red de la
configuración de la red.
En el ejemplo siguiente tenemos el número IPtel 8635295000 y la
contraseña IPtel de servicio 123456.Revise la configuración
relacionada se
z WEB Main page ->【SIP Settings】->【1st Domain】
ún lo indicado:
Wired VoIP Phone
ePhone-2000
Español
558
8
Page 60

S
q
y
Activado Revisado
Autenticación
Identificación de Login del usuario Su nombre de usuario IPtel
(Por ejemplo: 8635295000)
Contraseña de Login Su contraseña IPtel
(Por ejemplo: 123456)
Registro-de-dirección SIP
Alias/Apodo Su nombre de usuario IPtel
(Por ejemplo: 8635295000)
Protocolo SIP
Nombre del usuario/N° de Teléfono Su URI SIP IPtel
(Por ej.:8635295000@
iptel.org)
Servidor Proxy Proxy por defecto
Proxy FQDN iptel.org
Transporte UDP
Puerto UDP 5060
Servidor de Registro El mismo
z Hacer click en Modify para salvar su configuración
z Hacer click 【Advanced】->【System admin】->【Re-REGISTER】
para registrar el servidor Proxy
z Comience llamando a sus amigos y familia. Asegúrese de comentar
con todos su nombre de usuario IPtel. Mientras más gente tenga
la comunidad IPtel con más gente Ud. puede hablar gratis!
z Para mayor información diríjase a http://www.iptel.org/phpBB/
Wired VoIP Phone
ePhone-2000
ue el del Prox
Español
9
559
Español
Page 61

S
Español
MEMO
Wired VoIP Phone
ePhone-2000
Español
660
0
Page 62

S
Obsah balenia
z 1ks AirLive ePhone-2000S VoIP IP telefón
z 1ks sieťový napájací adaptér
z 1ks RJ-45 Ethernet kábel
z príručka Quick Installation Guide
z Inštalačné CD
Funkcie ePhone-2000S
Auto-Redial
DND
Forward
Speak
A Call
Auto-Redial
1
5
DND
1
4
7
Registration
B Call
Registration
3
2
7
6
Conference
Forward
2
ABCABC
5
JKLGHI
MNO
8
TUVPQ RS
WXYZ
0
Reject
URL
Addr. Book
4
8
Call History
3
DEF
6
9
#
2 x 16 LCD
A B Channel
Service Realm
Reject
Addr. Book
URL
Call History
Conference
MWI
Mute
Func.
Hand Free
Slovensky
Hold
XFER FLASH
Wired VoIP Phone
ePhone-2000
Speed Dial
REDIALVolume +/-
Microphone
Slovensky
661
1
Page 63

S
HW inštalácia
Pripojenie k smerovaču
Pripojte jeden koniec RJ45 kábla k LAN portu vášmho AirLive
ePhone -2000S a druhý koniec k LAN portu vášho smerovača.
Cable. ADSL Modem
Router
LAN
DC IN
AC Adapter
WAN
LAN PC
RJ45
Pripojenie bez smerovača
Pripojte jeden koniec RJ45 kábla k LAN portu vášmho AirLive
ePhone -2000S a druhý koniec k LAN portu vašej siete.
Pred nastavením parametrov ePhone-2000S cez WEB
Slovensky
prehliadač je potrebné nastaviť jeho IP adresu – viď strana 6.
Cable. ADSL Modem
Hub
LAN
DC IN
LAN PC
RJ45AC Adapter
Wired VoIP Phone
ePhone-2000
Slovensky
PC
PC
662
2
Page 64

S
Nastavenie klávesnice
【Meno】:Funkcie v móde Call
【A/B Channel】:Volané linky (max. 2 súčasné hovory) / Informácie o
hovore na danom kanáli počas hovoru.
【Service Realm】:Zobrazí stav registrácie každej služby operátora v
neaktívnom stave; prepne cieľovú službu operátora
(ISP) počas hovoru.
【Reject】:Zamietne prichádzajúce čakajúce hovory
【MWI】:Indikácia prijatého odkazu, MWI: Prístup k odkazovaču.
【MUTE】:Odpojenie mikrofónu
【FUNC】:Menu
【SPK】:Hands-free, aktivácia reproduktoru
【HOLD】:Podržanie hovoru
【SPD】:Rýchla voľba
【REDIAL】:Opakovaná voľba posledného volaného čísla
【Flash】:Spätné prevzatie prepnutých volaní /Ukončenie konfer. módu
【XFER】:Prepnutie hovoru (transfer)
【+】:Pridať hlasitosť (zvonenie, náhlavná sada, slúchadlo, reproduktor)
【-】:Ubrať hlasitosť (zvonenie, náhlavná sada, slúchadlo, reproduktor)
【Registration】
:Opätovná registrácia. LED indikuje stav registrácie
aktívnych služieb operátora
Wired VoIP Phone
ePhone-2000
Slovensky
663
3
Slovensky
Page 65

S
Zelená LED
svieti
Červená LED
svieti
Zelená LED
bliká
Červená LED
bliká
LED nesvieti
Úspešná registrácia všetkých aktivovaných
slušieb operátora
Zlyhala registrácia aspoň jednej z aktívnych
služien operátora
Prebieha registrácia. Poznámka, IP SIP telefón
bude v prípade potreby pravidelne obnovovať
adresu registračného záznamu SIP
Žiadnu z aktivovaných služieb operátora sa
nepodarilo úspešne registrovať
Používateľ odhlásil všetky SIP služby a je
odpojený, kým nebude stlačená klávesa
【Registration】 (opätovná registrácia SIP služieb)
Slovensky
【Auto-redial】:Automatická voľba naposledy volaného čísla kým nedôjde
【DND】:Nerušiť (rozsvieti sa červená LED)
【Forward】:Prepojenie čakajúcich prichádzajúcich hovorov
【URL】:Klávesnica pre zadanie písmen aj číslic (svieti červená LED).
【Address Book】:Prístup k adresáru (vyhľadávanie alebo listovanie
【Call History】:Zmeškané hovory /Prijaté hovory/Volané číslo. Červená
【Conference】:Lokálny konferenčný hovor s 3mi účastníkmi
k spojeniu (zvonenie). Môže byť aktivovaná ak je počuť
obsadzovací tón aleboako skratka od【Redial】+
【Auto-redial. Po aktivácii sa rozsvieti príslušná LED.
položiek).
led bliká, ak sú neprečítané zázamy o zmeškaných
hovoroch.
Wired VoIP Phone
ePhone-2000
Slovensky
664
4
Page 66

S
【Meno】:Funkcie v móde Menu
【MUTE】:Zmazanie znaku
【FUNC】:Návrat do menu úroveň vyššiu
【SPK】:Ukončenie menu
【HOLD】: Potvrdenie, Uloženie
【+】:Nasledujúca položka、Posun kurzora doprava
【-】: Predchádzajúca položka、Posun kurzora doľava
Aktivovanie 『Main Menu』?
1. Stačte 【FUNC】+ 【#】 pre konfiguráciu cez klávesnicu。
2. Po zadaní IP adresy a sieťovej masky vášho terminálu, môžete pre
konfigurovanie použiť prehliadač internetu cez HTTP. Prednastavené
heslo pre prihlásenie pre privilegovaný i používateľský účet je
“0000”.
3. TELNET prístup na TCP porte 23. Prihlasovacie heslo je zhodné s
heslom pre uzamknutie telefónu, prednastavené na “0000”.
Slovensky
4. Prvotná konfigurácia musí byť vykonaná cez klávesnicu, kedže
teledón nemá nastavenú IP adresu. Po nastavení siete môže byť pre
konfiguráciu použitý WEB (HTTP port 80) alebo TELNET klient (TCP
port 23).
Wired VoIP Phone
ePhone-2000
Slovensky
665
5
Page 67

S
Slovensky
Nastavenie siete
Prednastavená sieť pre AirLive ePhone-2000S je DHCP. Teda
AirLive ePhone-1000S sa automaticky pripojí na internet v
akomkoľvek DHCP prostredí.
Ak je v sieti použité PPPoE alebo statické IP adresy, je potrebné
zmeniť nastavenia AirLive ePhone-2000S na príslušné hodnoty.
Choďte na『Main Menu』= stlačte【FUNC】+ # >【6.Network】
+【HOLD】 >【1.General】+【HOLD】pre nastavenie sieťovej
konfigurácie: DHCP, statická IP adresa alebo PPPoE.
1. DHCP
z Stlačte【FUNC】+ # >【6.Network】+【HOLD】 >【1.General】
+【HOLD】 >【1.Mode】+【HOLD】 >【1.DHCP】+【HOLD】
z Deaktivujte【4.Use Static DNS】zvolením 【4.Use Static DNS】
+【HOLD】>【2.DHCP】+【HOLD】
1. Ak chcete nastaviť DNS server odlišne od hodnoty získanej
cez DHCP, zvoľte【1.Static DNS】 a zadajte IP adresu
požadovaného DNS servera do【6.Network】/【1.General】
/【5.Static DNS】, napr. “1.Primary DNS” =168.95.1.1*
2. Statická IP adresa(pevná IP adresa)
z Stlačte【FUNC】+ # >【6.Network】+【HOLD】 >【1.General】
+【HOLD】 >【1.Mode】+【HOLD】 >【2.Static Assign】+【HOLD】
Wired VoIP Phone
ePhone-2000
Slovensky
666
6
Page 68

S
z Choďte na【2.Static Settings】, a zadajte príslušné hodnoty,
napríklad:
z Aktivujte【4.Use Static DNS】vybratím【4.Use Static DNS】+
【HOLD】 >【1.Static DNS】+【HOLD】
z Priraďte【5. DNS Server】vybratím【5. DNS Server】+【HOLD】
>【1.Primary DNS】+【HOLD】, napríklad: “1.Primary DNS =
168.95.1.1*”
1. Host IP = 210.201.210.132*
2. Network mask = 255.255.255.0*
3. Gateway IP = 210.201.210.128*
3. PPPoE
z Stlačte【FUNC】+ # >【6.Network】+【HOLD】 >【1.General】
+【HOLD】 >【1.Mode】+【HOLD】 >【1.DHCP】+【HOLD】
>【3.PPPoE Setting】+【HOLD】
z Zadajte prihlasovacie údaje pre PPPoE napríklad:
1. Login ID = MojPPPoEucet*
2. Password = PPPoEHeslo*
3. Service Name = volitľné, vyžadujú niektorí ISP.
【*】Hodnoty zmenťe podľa vášho skutočného sieťového prostredia.
Poznámka:
Ak vo vašej sieti nie je žiadna brána, zadajte hodnotu pre
Gateway IP ako “0.0.0.0” radšek ako neexistujúcu alebo neplatnú
IP adresu.
Klávesy pre symboly sú v kruhu 2->a->b->c->A->B->C->2
@ : stlačte*a + nechajte kurzor v pohybe kým sa nenájde
Slovensky
Wired VoIP Phone
ePhone-2000
Slovensky
667
7
Page 69

S
WEB konfigurácia
z Stlačte klávesu Function【7】, LCD zobrazí IP adresu telefónu.
z Spustite na PC prehliadač internetu, napr. Microsoft Internet Explorer
(IE), a zadajte do neho IP adresu AirLive ePhone-2000S. Zobraz sa
prihlasovacie okno AirLive ePhone-2000S:
(Skontrolujte, či je adresa vášho PC tej istej podsieti ako je
ePhone-2000S.)
Konfiguračné heslo pre AirLive ePhone-2000S má dve úrovne:
používateľské heslo a administrátorské heslo.
Slovensky
Prednastavené heslo je pre obe úrovne je “0000”
Zadajte heslo a kliknite na tlačidlo “Sign In”.
Registrácia
Blikanie zelenej LED na klávese【Registration】indikuje, že prebieha
registrácia.
Keď zelená LED prestane blikať, výsledok registrácie rozpoznáte z LED:
Wired VoIP Phone
ePhone-2000
Slovensky
668
8
Page 70

S
Zelená LED
svieti
Červená LED
svieti
Zelená LED
bliká
Červená LED
bliká
LED nesvieti
Alebo stlačte【Service Realm】pre zobrazenie stavu registrácie pre každú
aktívnu službu operátora:
0 : s i p . S I P . c o m
0 : f w d . p u l v e r . c o m
X : u n k n o w n . c o m
Úspešná registrácia všetkých aktivovaných slušieb
operátora
Zlyhala registrácia aspoň jednej z aktívnych služien
operátora
Prebieha registrácia. Poznámka: IP SIP telefón
bude v prípade potreby pravidelne obnovovať
adresu registračného záznamu SIP
Žiadnu z aktivovaných služieb operátora sa
nepodarilo úspešne registrovať
Používateľ odhlásil všetky SIP služby a je
odpojený, kým nebude stlačená klávesa
【Registration】 (opätovná registrácia SIP služieb)
0: Registrovaná služba
X: Registrácia služby zlyhala (ďaľší pokus za 90 sekúnd).
Slovensky
Obsluha ePhone-2000S
Stlačte【SPK】pre prepnutie medzi reproduktorom (hands-free) a
slúchadlom. Ak však prepnete na reproduktor pri zdvihnutom slúchadle,
telefón bude prenášať hlas cez slúchadlo, nie cez mikrofón, hovor bude
počuť aj cez reproduktor aj v slúchadle. Vhodné pre posluch hovoru
viacerými osobami v miestnosti bez rušenia hovoriaceho. Mikrofón na
telefóne sa aktivuje, len ak je slúchadlo počas prepnutia položené.
Wired VoIP Phone
ePhone-2000
Slovensky
9
669
Page 71

S
Platí to aj pre použitie hovorovej sady, ak je aktívna, pri zapnutí
reproduktoru bude cez hovorovú sadu počuť hovor avšak nebude sa dať
rozprávať.
1. Adresár
『Main Menu』 =>『1.Address Book』/『1.Search』(Klávesa
【F4】je prednastavená pre aktiváciu adresára).
Vyberte požadované číslo a stlačte【REDIAL】pre jeho voľbu.
2. História hovorov
Stlačte【Call History】pre výber požadovaného zoznamu:
Zmeškané/Prijaté/Volané čísla.
Prechádzajte zoznamom a vyberte požadovanú položku.
Stlačte【REDIAL】pre voľbu čísla.
Poznámka: Ak stlačíte【Call History】keď bliká červená LED
(indikuje prítomnosť nezobrazených zmeškaných hovorov),
zobrazí sa priamo zoznam zmeškaných hovorov.
Slovensky
3. Voľba/hovor cez IP adresu
Použite【*】pre 『@』 a『.』
Použite【**】pre “:” ak cie
porte 5060.
Stlačte【#】pre ukončenie voľby.
Pr. 1: pre volanie sip:192.168.10.200
200”.
Pr. 2: pre volanie sip:192.168.10.200:5070, zvoľte ”192*168*10
*200**5070”.
ľový SIP agent nepočúva na UDP
, zvoľte “192*168*10*
※ Podrobnejšie informácie nájdete v návode k AirLive
ePhone-2000S.
Wired VoIP Phone
ePhone-2000
Slovensky
770
0
Page 72

S
Riešenie niektorých problémov
Problém: Riešenie:
【Registration】 svieti
červená LED
Nastavenie
konfigurácie na
prednastavené
hodnoty.
1. Skontrolujte, či je pripojenie do
internetu cez RJ-45 funkčné.
2. Skontrolujte, či má ePhone-2000S
priradenú IP adresu. Ak nie,
skontrolujte správnosť nastavenia
siete.
3. Skontrolujte platnosť účtu služby.
Informácie o účte poskytne váš
poskytovateľ – operátor VoIP
služby.
1. Stlačte 【FUNC】+ 【#】
2. Zvoľte【8.Advanced】/【3.System
Admin】/【4.Factory value】
3. LCD zobrazí “Reset to Default”
4. Stlačte 1 pre návrat k
prednastaveným hodnotám alebo 2
pre zrušenie operácie
Slovensky
Wired VoIP Phone
ePhone-2000
Slovensky
771
1
Page 73

S
Slovensky
Príloha A: Použitie služby IPtel Free SIP
Pozn.: AirLive nemá žiadne väzby na IPtel. IP telefón bude tiež
pracovať s inými poskytovateľmi SIP proxy
služieb. Nasledujúce inštrukcie sú len informatívne.
1. Vytvorte si IPtel účet na http://sip.iptel.org/user/reg/index.php
2. Podľa zobrazených inštrukcií vyplňte požadované údaje (Meno,
priezvisko …), potom kliknite na “Register”.
Pozn.: Pre obdržanie správy o aktivácii účtu je potrebné zadať počas
registrácie platnú email adresu.
Pozn.: Meno účtu sa môže skladať iba z číslic, nepoužívajte písmená.
3. Po zaregistrovaní cez IPtel sa zobrazí nasledujúca správa s
potvrdením:
Thank you for registering with iptel.org
Your application was forward for approval.
Expect a confirmation message shortly
We are reserving the following SIP address for you:
sip:8635295000@iptel.org.
If you have any further questions feel free to send an email to
info@iptel.org
Skontrolujte vašu email schránku pre správu o aktivácii IPtel účtu. Pre
ukončenie registrácie kliknite na linku, ktorú správa obsahuje.
Wired VoIP Phone
ePhone-2000
Slovensky
772
2
Page 74

S
Thank you for registering with iptel.org.
We are reserving the following SIP address for you: 8635295000@iptel.org
To finalize your registration please check the following URL within 24 hours:
http://sip.iptel.org/user/reg/confirmation.php?nr=e70ab197948118a101516bd
2992c7d7 (If you confirm later you will have to re-register)
4. Prihláste sa na konfiguračnú web stránku AirLive ePhone-2000S.
5. Nastavenie AirLive ePhone-2000S závisi od vášho sieťového
prostredia. Pozrite odsek Nastavenie siete pre informácie
o nastavení siete.
Nasledujúci príklad zobrazuje situáciu s iptel číslom 8635295000 a
heslom 123456. Skontrolujte relevantné hodnoty týmto postupom:
z WEB Main page ->【SIP Settings】->【1st Domain】
Slovensky
Wired VoIP Phone
ePhone-2000
Slovensky
773
3
Page 75

S
Slovensky
Activate zaškrtnuté
Authentication
Login User ID meno vášho IPtel účtu
(napríklad: 8635295000)
Login Password heslo k vášmu IPtel účtu
(napríklad: 123456)
SIP Address-of-Record
Alias/Nickname/Display Názov vášho iptel účtu
(napríklad: 8635295000)
Protocol SIP
Username/Phone-No váš iptel SIP URL
(napríklad: 8635295000@ iptel.org)
Proxy Server Default Outbound Proxy
Proxy FQDN iptel.org
Transport UDP
UDP Port 5060
Registrar Server Same as Proxy
z Kliknite na Modify pre uloženie zmien
z Kliknite na【Advanced】->【System admin】->【Re-REGISTER】
pre opätovnú registráciu Proxy serveru
z Môžete začať voliť čísla vašich priateľov/známych. Dajte vedieť
každému vaše iptel meno! Čím viac ľudí bude v iptel komunite, tým
s viac ľudmi môžete telefonovať zadarmo!
z Viac informácií nájdete na http://www.iptel.org/phpBB/
Wired VoIP Phone
ePhone-2000
Slovensky
774
4
Page 76

S
Slovensky
POZNÁMKY
Wired VoIP Phone
ePhone-2000
Slovensky
775
5
Page 77

S
パッケージコンテンツ
z AirLive eフォーン-2000S VoIP IPフォーン
z 1つパワーアダプター
z 1本のRJ-45イーサネット・ケーブル
z クイックインストール・ガイド
z インスタレーションCD
日本語
ePhone-2000S ファンクション
Auto-Redial
DND
Forward
Speak
A Call
Auto-Redial
1
5
DND
1
4
7
Registration
B Call
Registration
3
2
7
6
Conference
Forward
2
ABCABC
5
JKLGHI
MNO
8
TUVPQ RS
WXYZ
0
Reject
URL
Addr. Book
4
8
Call History
3
DEF
6
9
#
2 x 16 LCD
A B Channel
Service Realm
Reject
Addr. Book
URL
Call History
Conference
MWI
Mute
Func.
Hand Free
Hold
日本語
Microphone
776
6
XFER FLASH
Wired VoIP Phone
ePhone-2000
Speed Dial
REDIALVolume +/-
Page 78

S
ハードウェアインストール
ルーターとの接続
RJ-45 の片端を AirLive ePhone-2000s LAN ポートに差し込んで
ください、そして、あなたのルータの LAN ポートの 1 つの別の
末端を差し込んでください。
Cable. ADSL Modem
Router
LAN
PC
DC IN
AC Adapter
WAN
LAN PC
RJ45
ルータなしの接続
RJ-45 の片端を AirLive ePhone-2000s LAN ポートに差し込んで
ください、そして、あなたの HUB の LAN ポートの1 つの別の
末端を差し込んでください。
ウェブブラウザを使用することで ePhone-2000S をコンフィギ
ュレーションを行い、あなたは、最初にあなたの ePhone-2000S
の IP アドレスを設定するために 6 ページを参照してください。
Cable. ADSL Modem
Hub
LAN
DC IN
LAN PC
RJ45AC Adapter
Wired VoIP Phone
ePhone-2000
日本語
PC
777
7
日本語
Page 79

S
キーパッド・コンフィギュレーション
【Name】:呼び出しモードによる機能
【A/B Channel】:コールライン(たいてい 2 つの同時呼び出し)/会話中にこ
のチャンネルについての呼び出しの情報をレビューし
ます。
【Service Realm】:アイドルの状態でそれぞれアクティブサービス・ドメ
インの登録状態がを表示し、電話をかけている間、目
標サービスドメイン(ISP)を切り換えてください。
【Reject】:入って来る待つ呼び出しを拒絶します。
【MWI】:メッセージ待ち指示、MWI: ボイスメールシステムへのアクセス
【MUTE】:ミュート
【FUNC】:
【SPK】:ハンドフリー
【HOLD】:ホールド
【SPD】:短縮ダイヤル
【REDIAL】:最後にダイヤルされる番号をリダイヤル
【Flash】:呼び出し/エグジット・コンファレンスモードを転送、取り返し
【XFER】:トランスファー
日本語
【+】:ボリューム・アップ(ベル、ヘッドホーン、送受話器、スピーカー)
【-】:ボリュームはダウンしています (ベル、ヘッドホーン、送受話器、
【Registration】:再登録。LED はそれぞれのアクティブサービス・ドメ
メニュー
ます。
スピーカー)
インの登録状態を示します。
Wired VoIP Phone
ePhone-2000
日本語
778
8
Page 80

S
緑色 LED オン
赤 LED オン
緑色 LED 点滅
赤 LED 点滅
LED オフ
【Auto-redial】:自動再ダイヤル、最後のダイヤルされた番号「接続され
【DND】:擾乱しないでください。(赤の LED が示す、オンである、)
【Forward】:前に入って来るように待つことは呼びます。
【URL】:キーパッドを使用して、アルファベットと数を入れてください。
(赤の LED、オンである)
【Address Book】:アドレス帳(エントリーを探索するか、エントリーを
【Call History】:ミスコール/レシーバーコール/ダイヤルされた番号。赤
【Conference】:3 パーティーのローカルの会議
よくすべてのアクティブサービスドメインを成功
に登録します。
少なくとも 1 つのアクティブサービスドメインを
登録することができませんでした。
登録は進行中です。注意、IP SIP 電話は必要に応
じて定期的に記録の SIP アドレス登録をリフレッ
シュします。
それらのアクティブサービスドメインのいずれも
登録することができません。
ユーザは、明らかにすべての SIP サービスをログ
アウトして、オフラインで‘ユーザはオンライン
上に登場するように再び【Registration】キーを押
します。(すべての SIP サービスに再登録します)
た(鳴ること)まで。この特徴は、話中音が聞かれると、ま
たは+ 【Redial】【Auto-リダイヤル】のショート-ハンド
します。いったんアクティブされると、対応する LED は
オンになるでしょう。
すべてリストする)へのアクセス。
い LED が点滅いる場合、ミスコールの読まれていないレ
コードがあることを示します。
日本語
Wired VoIP Phone
ePhone-2000
日本語
779
9
Page 81

S
【Name】:メニュー・モードによる機能
【MUTE】:削除可能文字
【FUNC】:上部のレベルサブメニューに返ります
【SPK】:エグジット・メニュー
【HOLD】:確認,
【+】:次のアイテム、カーソルを右に移動させます
【-】:前のアイテム、カーソルを左に移動させます
保存
どのように『メインメニュー』を動かすか
1. プレス【FUNC】+【#】キーパッドを通して構成します。
2. あなたの端末の IP とネットワークマスクを構成した後に、あなたは
あなたからのどんな現代のウェブブラウザのためにも HTTP でそれ
を構成する PC を指すことができます。特権があり、ユーザレベル
の両方アカウント用のデフォルト・ログイン・パスワードは「0000」
です。
3. TCP ポート 23 の上の電話の中へのTELNET。ログイン・パスワー
ドは、電話ロック・パスワード(そのデフォルトは「0000」であると
日本語
同じです。
4. 最初に、それが有効な IP をまだ運ばないので、あなたの電話は単に
キーパッドによって形成することができます。あなたのネットワー
クを構成し終えた後に、あなたは、あなたの電話を構成するのに、
ウェブブラウザ(HTTP ポート 80)かTELNET クライアント(TCP ポー
ト 23)のどちらかを使用することができます。
Wired VoIP Phone
ePhone-2000
日本語
880
0
Page 82

S
ネットワーク設定
AirLive ePhone-2000S のためにセットするデフォルトは
DHCP です。したがって、AirLive ePhone-1000S はどんな DHCP
環境でもインターネットに接続することができるでしょう。
ネットワーク環境が PPPoE あるいはスタティックな IP のいずれ
かである場合は、その対応するネットワーク環境に AirLive
ePhone-2000S のネットワークのセッティングを変更してくださ
い。
『Main Menu』に行って、=プレス【FUNC】 +#>【6.Network】+
【HOLD】【1.General】+【HOLD】あなたのネットワーク環境に
基づく電話を構成してください: DHCP、スタティックな IP また
は PPPoE。
1. DHCP
z プレス【FUNC】+ # >【6.Network】+【HOLD】 >【1.General】
+【HOLD】 >【1.Mode】+【HOLD】 >【1.DHCP】+【HOLD】
z 選ぶことによって、【4.Use Static DNS】を動作しないようにしま
す。【4.Use Static DNS】+【HOLD】>【2.DHCP】+【HOLD】
1. DHCP によって得られたものを使用する代わりに異なった
ドメイン名サーバを割り当てたいなら、あなたは、
【6.Network】/【1.General】/【5.Static DNS】にあなたの特
定の DNS の IP を選んで【1.Static DNS】、設定するべきで
す、「1.Primary DNS」=168.95.1.1*などのように。
日本語
2. スタティックな IP 環境(Fixed IP)
z プレス【FUNC】+ # >【6.Network】+【HOLD】 >【1.General】
+【HOLD】 >【1.Mode】+【HOLD】 >【2.Static Assign】+【HOLD】
Wired VoIP Phone
ePhone-2000
日本語
881
1
Page 83

S
z 【2.Static 設定】に行ってください、そして、あなたの ISP に基
づくネットワーク・コンフィギュレーションを入れてください。
例えば:
1. Host IP = 210.201.210.132*
2. Network mask = 255.255.255.0*
3. Gateway IP = 210.201.210.128*
z プレス【4.Use Static DNS】+(【HOLD>)【1.Static DNS】+【HOLD】
を選ぶことによって、【4.Use Static DNS】を可能にしてください。
z 割り当て、【5. DNS Server】 プレスを選ぶ、【5 DNS Server】 +
【HOLD】>【1.Primary DNS】 + 以下などの【HOLD】 「1.Primary
DNS=168.95.1.1*」
3. PPPoE
z プレス【FUNC】+ # >【6.Network】+【HOLD】 >【1.General】
+【HOLD】 >【1.Mode】+【HOLD】 >【1.DHCP】+【HOLD】
>【3.PPPoE Setting】+【HOLD】
z あなたの PPPoE 認証情報を入力する、次のように:
1. ログイン ID = MyPPPoE アカウント*
2. パスワード= PPPoEDialup パスワード*
3. サービス名=オプション、いくつかの ISP はそれを要求する
かもしれません。
【*】値はあなたの実際のネットワーク環境に調節されるべきです。
注意:
日本語
LAN にゲートウェイなしなら、あなたは存在しない、あるいは無
効の IP よりむしろ「0.0.0」ゲートウェイ IP を指定するべきです。
シンボル・キーは2-によるサークルであり>a>-b>-c>-1 つの
―B>>-C- >2
@ : プレス*と +カーソルを動かして、それを見つけてくださ
い。
Wired VoIP Phone
ePhone-2000
日本語
882
2
Page 84

S
WEB コンフィギュレーション
z ファンクションキー【7】を押す、LCD は IP アドレスを示します。
z マイクロソフト・インターネット・エクスプローラ(IE)のようなウェブ
・ブラウザを始めて、AirLive な ePhone-2000S のウェブ・ブラウザ上
の IP アドレスを入力してください。 AirLive ePhone-2000S ログイン・
スクリーンが表示されます。
(あなたの PC の IP アドレスおよび ePhone-2000S が同じサブネット上に
あることを確かめてください。)
AirLive ePhone-2000S ウェブ配置パスワードは 2 つのカテゴリーに付属
します:ユーザ・パスワードおよび管理者パスワード。
デフォルト・ユーザ・レベル・アカウントおよび特権のあるアカウントは
「0000」です。パスワードを入力して、次に「Sign In」ボタン、クリック
してください。
登録メッセージ
日本語
【Registration】キーの点滅している緑色の LED は、登録が受けることで
あることを示します。
緑の LED が点滅をやめれば、LED によって登録結果を知ることができま
した:
Wired VoIP Phone
ePhone-2000
日本語
883
3
Page 85

S
緑色 LED
オン
赤 LED オ
ン
緑色 LED
点滅
赤 LED 点
滅
LED オフ
または、それぞれのアクティブサービスドメインの登録状態を示すように
【Service Realm】を押します。:
よくすべてのアクティブサービスドメインを成功に
登録します。
少なくとも 1つのアクティブサービスドメインを登録
することができませんでした。
登録は進行中です。注意、IP SIP 電話は必要に応じて
定期的に記録の SIP アドレス登録をリフレッシュし
ます。
それらのアクティブサービスドメインのいずれも登
録することができません。
ユーザは、明らかにすべての SIP サービスをログアウ
トして、オフラインで‘ユーザはオンライン上に登場
するように再び【Registration】キーを押します。(す
べての SIP サービスに再登録します)
0 : s i p . S I P . c o m
0 : f w d . p u l v e r . c o m
X : un k nown . co m
0: 登録されたドメイン
X: ドメインの登録は失敗しました(90 秒以降、再試行してくだ
さい)。
ePhone-2000S の使用
ハンズフリー、そして、受話器モードを切り換えるように【SPK】に押し
日本語
ます。しかしながら、受話器が持ち上げられている状態で(掛けられるとこ
ろで)あなたがハンズフリーなモードに切り替わると、電話がスピーカモー
ドであるでしょう。それはマイクロホンからではなく送受話器から音声を
送信し続け、スピーカーおよび送受話器レシーバーの両方への音声を同時
にしました。それは、同じ部屋の人をすべて聞かせる間に話し手の音声を
明確にするのを支援するでしょう。
Wired VoIP Phone
ePhone-2000
日本語
884
4
Page 86

S
それがハンズフリーなモードにあるときだけ、電話は音声伝送のためにマ
イクロホンを動かすでしょう、そして、フックの上に受話器があります。
これはまた、イヤホーンモードに適用されます。 イヤホーンが可能にされ
ているやかましいスピーカーモードで、イヤホーンは声にもかかわらず、
話しできなく聞かれることができるでしょう。
1. アドレス帳
『メインメニュー』 =>『1. アドレス帳』/『1.
ルトで、【F4】がアドレス帳にアクセスするようにプログラム
される).
番号を選んでそして【REDIAL】を押します。
2. コールヒストリー
【Call History】を押して、呼び出しリストでダイヤルしだい番
号を選びます: ミス/受信/ダイヤル番号。
リストをトラバースして、そして、目標エントリーを再開して
ください。
【REDIAL】を押し、外にダイヤルします。
3. 注意: 赤い LED が点滅している場合、あなたが【Call History】を
押すと、それは直接「ミスコール」リストを入力するでしょう。(ミ
スコールが見られていないことをインジケータします)
4. IP ダイヤル
『@』 と『.』の代わりには【*】を使用してください。
目標SIP エージェントがUDP ポート 5060 上で聞かない場合、
“:”の代わりに【**】を使用します。
【#】をダイヤルしてダイヤルを終えます。
コールsip:192.168.10.200“192*168*10*200” をダイヤ
E.g. 1:
ルしてください。
E.g. 2: コールsip:192.168.10.200:5070 ”192*168*10*
200**5070” をダイヤルしてください。
※ ※ 詳細な構成について2000AirLive ePhone-2000S
検索』(デフォ
日本語
のマニュアルを参照します。.
Wired VoIP Phone
ePhone-2000
日本語
885
5
Page 87

S
簡単なトラブルシューティング
問題: トラブルシューティング:
【Registration】は赤
信号を示された
日本語
工場のデフォルト設定
に、セットします
1. RJ-45 のインターネット接続は間
違いかどうかをチェックしてくだ
さい。
2. 2000ePhone-2000S が IP アドレス
を取得することができるかどうか
チェックしてください。そうでなけ
れば、ネットワーク・セットをチェ
ックして、配置が正確かどうか確か
めてください。
3. 3. アカウントが有効であることを
確認してください。アカウント情報
のためにこの VoIP サービスプロバ
イダーに連絡してください。
1. 【FUNC】+ 【#】を押します
2. 【8.Advanced】/【3.System Admin】
/【4.Factory value】をピックします
3. 3. LCD は「デフォルトとするリセ
ット」示されるでしょう。取り消す
ためにデフォルトか 2 をリセット
するプレス 1
Wired VoIP Phone
ePhone-2000
日本語
886
6
Page 88

S
付録 A:IPtel の自由な SIP サービスの使用
注意: AirLive、IPtel に加入しません。また、IP 電話は他の SIP
代理サービスの大多数と共に動作します。 次の指示は自
分の情報のみ向けです。
1. IPtel アカウントを適用します。
http://sip.iptel.org/user/reg/index.php
2. 以下に示すように、個人情報(最初に、名/LastName…)に記入して
ください、そして、次に、「レジスタ」をクリックします。
注:あなたの電子メールアドレスがアカウント起動電子メールを受け取
るために正確であることを確かめてください。
注意: 数字でユーザ名を構成しなければなりません。 キャラクタと共
にそれを構成しないでください。
3. 3. IPtel で登録した後、次の確認メッセージを見るでしょう。
iptel.org で登録してくれてありがとう。
あなたのアプリケーションは承認のためにフォワードしまし
た。
まもなく、確認メッセージを予想してください。
私たちはあなたのために次の SIP アドレスを予約しています。
sip:8635295000@iptel.org.
どうぞうお気軽く質問に電子メールを送らせてください。
info@iptel.org
日本語
IPtel アカウント起動電子メールがあるか電子メールをチェックしてく
ださい。登録を終了させるためにその電子メール中のリンクをクリック
してください。
Wired VoIP Phone
ePhone-2000
日本語
887
7
Page 89

S
iptel.org で登録してくれてありがとう。
私たちはあなたのために次の SIP アドレスを予約しています。
8635295000@iptel.org
あなたの登録を成立させるには、24 時間以内に以下のURL をチェックし
てください。
http://sip.iptel.org/user/reg/confirmation.php?nr=e70ab197948118a101516
bd2992c7d7 (あなたが、後で確認するなら、再登録しなければならないで
す。)
4. AirLive ePhone-2000S ウェブ配置ページをログインします。
5. AirLive ePhone-2000S の構成はあなたのネットワーク環境に依
存します。 ネットワーク・コンフィギュレーションについてネ
ットワーク設定を参照してください。
以下の例では iptel 番号 8635295000、としてと iptel サービス・パスワ
ードは 123456 です。以下の関連する構成をチェックしてください。
z WEB メインページ->【SIP 設定】->【1st Domain】
日本語
Wired VoIP Phone
ePhone-2000
日本語
888
8
Page 90

S
アクティブ チェック
認証
ログイン・ユーザ ID iptel ユーザ名
(例: 8635295000)
ログイン・パスワード iptel パスワード
(例: 123456)
SIP レコードのアドレス
別名/愛称/ディスプレイ iptel ユーザ名
例: 8635295000)
プロトコル SIP
ユーザ名/電話番号 iptel SIP URI
(例:8635295000@ iptel.org)
代理サーバー デフォルトのアウトバウンド代理
プロキシ FQDN iptel.org
トランスポート UDP
UDP ポート 5060
登録係サーバー プロキシと同じです
z 変更をクリックして、設定を保存してください。
z 【Advanced】をクリックする->【System admin】―>【ReREGISTER】
はプロキシサーバーを再登録します。
日本語
z 友人と家族にダイヤルし始めてください。必ず iptel ユーザ名を皆に
伝えてください!
り多くの人々に無料で電話することができます。
z 詳しい情報は http://www.iptel.org/phpBB/
より多くの人々が iptel コミュニティーにいればよ
Wired VoIP Phone
ePhone-2000
日本語
889
9
Page 91

S
MEMO
日本語
Wired VoIP Phone
ePhone-2000
日本語
990
0
Page 92

S
Obsah balení
Česky
z 1x AirLive ePhone-2000S VoIP telefon
z 1x napájecí adaptér
z 1x RJ-45 Ethernet kabel
z Instalační příručka
z Instalační CD
Funkce ePhone-2000S
Auto-Redial
DND
Forward
Speak
A Call
Auto-Redial
1
5
DND
1
4
7
Registration
B Call
Registration
3
2
7
6
Conference
Forward
2
ABCABC
5
JKLGHI
MNO
8
TUVPQ RS
WXYZ
0
URL
Addr. Book
4
8
Call History
3
DEF
6
9
#
Reject
2 x 16 LCD
A B Channel
Service Realm
Reject
Addr. Book
URL
Call History
Conference
MWI
Mute
Func.
Hand Free
Hold
Czech
Microphone
991
1
XFER FLASH
Wired VoIP Phone
ePhone-2000
Speed Dial
REDIALVolume +/-
Page 93

S
r
Instalace zařízení
Česky
Připojení přes route
Zapojte jeden konec Ethernetového kabelu do portu RJ-45 na
telefonu a druhý konec kabelu do volného portu LAN na routeru.
Cable. ADSL Modem
Router
LAN
PC
DC IN
AC Adapter
WAN
LAN PC
RJ45
Připojení bez routeru
Zapojte jeden konec Ethernetového kabelu do portu RJ-45 na
telefonu a druhý konec kabelu do volného portu LAN na switch.
Chcete-li konfigurovat ePhone-2000S přes webový prohlížeč,
nastavte na telefonu IP adresu dle návodu na straně 6.
Cable. ADSL Modem
Hub
LAN
DC IN
LAN PC
RJ45AC Adapter
Wired VoIP Phone
ePhone-2000
Czech
PC
2
992
Page 94

S
Konfigurace tlačítky telefonu
Česky
【Name】:Funkce Volání
【A/B Channel】:linky volání (2 nezávislé hovory v jednu chvíli)
【Service Realm】:zobrazí stav každé aktivní služby.
【Reject】:odmítnutí příchozího volání
【MWI】:Indikace zprávy záznamníku, MWI: Hlasový záznamník telefonu,
nezávislý na službě providera.
【MUTE】:mute
【FUNC】:menu
【SPK】:hands-free
【HOLD】:hold
【SPD】: rychlá volba čísla
【REDIAL】:poslední volané číslo.
【Flash】:přepojení/Ukončení konferenčního hovoru
【XFER】:transfer
【+】:zesílení hlasitosti (zvonění, sluchátko, reproduktor)
【-】:zeslabení hlasitosti (zvonění, sluchátko, reproduktor)
【Registration】:pře-registrace. LED indikuje stav registrace každé aktivní
služby
Wired VoIP Phone
ePhone-2000
Czech
993
3
Page 95

S
Česky
Zelená LED
svítí
Červená LED
svítí
Zelená LED
bliká
Červená LED
bliká
LED nesvítí
【Auto-redial】:Opakované vytáčení. Tato služba může být využitelná při
【DND】:Nedostupný – svítí červená LED
【Forward】:přesměrování příchozích hovorů
【URL】:Využití tlačítek k zadání písmen a čísel (červená LED).
【Address Book】:Telefonní seznam (hledání nebo prohlížení seznamu).
Registrace telefonu ke všem službám proběhla v
pořádku.
Registrace některé ze služeb telefonu neproběhla
v pořádku.
Registrace služeb probíhá.
Neproběhla registrace k žádné službě.
Uživatel byl odhlášen od všech služeb (zařízení je
off-line). Zmáčkněte tlačítko 【Registration】k
opakovanému přihlášení ke všem SIP službám.
obsazeném volaném čísle. Službu můžete aktivovat po
zaznění obsazovacího tónu nebo klávesovou zkratkou
【Redial】+ 【Auto-redial】.
【Call History】:Zmeškané hovory/Přijaté hovory/Volaná čísla. Blikající
červená LED indikuje nepřehrané vzkazy nebo nepřijaté
hovory.
【Conference】:3-společné konference
Wired VoIP Phone
ePhone-2000
Czech
994
4
Page 96

S
【Name】:Funkce v menu Mode
Česky
【MUTE】:Smaže znak
【FUNC】:Návrat do nadřazeného menu
【SPK】:Opustit menu
【HOLD】:Potvrzení, Uložení
【+】:Další položka, přemístění kurzoru vpravo
【-】: Předchozí položka, přemístění kurzoru vlevo
Jak aktivovat『Main Menu』?
1. Stiskněte【FUNC】+ 【#】 ke konfiguraci pomocí tlačítek na telefonu。
2. Po konfiguraci vaší IP adresy a podmasky telefonu můžete
konfigurovat telefon přes webové rozhraní vašeho PC. Defaultní
heslo je “0000”.
3. TELNET do telefonu na portu TCP 23. Přihlašovací heslo je
defaultně “0000”.
4. Zpočátku může být telefon konfigurovatelný pouze přes tlačítka
telefonu, dokuď nebude nastavená správná IP adresa. Poté
můžete konfiguraci provádět přes webové rozhraní.
Wired VoIP Phone
ePhone-2000
Czech
995
5
Page 97

S
Síťová nastavení
Česky
Defaultní nastavení pro AirLive ePhone-2000S je DHCP.
V případě, že se máte přidělovanou IP adresu automaticky.
V případě, že se k internetu připojujete přes PPPoE nebo máte
pevnou IP, změňte konfiguraci dle vašeho připojení.
Jděte do 『Main Menu』= stiskněte【FUNC】+ # >【6.Network】
+【HOLD】 >【1.General】+【HOLD】 v základní konfiguraci
síťového připojení: DHCP, pevná IP nebo PPPoE.
1. DHCP
z Stiskněte【FUNC】+ # >【6.Network】+【HOLD】 >【1.General】
+【HOLD】 >【1.Mode】+【HOLD】 >【1.DHCP】+【HOLD】
z Zakázat【4.Use Static DNS】po zvolení【4.Use Static DNS】+
【HOLD】>【2.DHCP】+【HOLD】
1. Jestliže chcete zvolit jiný DNS než je server DHCP, proveďte
následující:【1.Static DNS】 a nastavte DNS 6.Network】
/【1.General】/【5.Static DNS】, např. “1.Primary DNS”
=168.95.1.1*
2. Pevná IP adresa
z Stiskněte 【FUNC】+ # >【6.Network】+【HOLD】 >【1.General】
+【HOLD】 >【1.Mode】+【HOLD】 >【2.Static Assign】+【HOLD】
Wired VoIP Phone
ePhone-2000
Czech
996
6
Page 98

S
z Jděte na【2.Static Settings】, a vyplňte vaši konfiguraci od vašeho
internet providera. Např.:
1. IP = 210.201.210.132*
2. Podmaska sítě = 255.255.255.0*
3. Gateway IP = 210.201.210.128*
z Zvolte【4.Use Static DNS】 zvolíte stiskem【4.Use Static DNS】
+【HOLD】 >【1.Static DNS】+【HOLD】
z Zvolte【5. DNS Server】zvolíte stiskem 【5. DNS Server】+
【HOLD】 >【1.Primary DNS】+【HOLD】, např.: “1.Primary DNS
= 168.95.1.1*”
Česky
3. PPPoE
z Stiskněte【FUNC】+ # >【6.Network】+【HOLD】 >【1.General】
+【HOLD】 >【1.Mode】+【HOLD】 >【1.DHCP】+【HOLD】
>【3.PPPoE Setting】+【HOLD】
z Zadejte vaše přihlašovací informace:
1. Login ID = PřihlašovacíPPPoEjméno
2. Password = PřihlašovacíPPPoEheslo
3. Service Name = Volitelné, záleží na internet providerovi.
【*】Value should be adjusted to your real network environment
Note:
If you reside on a LAN without gateway, you should specify the
gateway IP as “0.0.0.0” rather than assigning a non-existent or an
invalid IP.
symbols key could be circle by 2->a->b->c->A->B->C->2
@ : press*and + let cursor move to find it
Wired VoIP Phone
ePhone-2000
Czech
997
7
Page 99

S
WEB konfigurace
Česky
z Stiskněte Function key【7】, na LCD displayi se ukáže IP adresa.
z Spusťte webový prohlížeč (např. Internet Explorer) a do řádku adresy
zadejte IP adresu telefonu. Zobrazí se následující přihlašovací
obrazovka:
(Ujistěte se, že IP telefon i Váš PC mají stejnou podmasku sítě.)
AirLive ePhone-2000S web konfigurace je chráněna dvěma typy hesel:
Uživatelským heslem a Administrátorským heslem.
Defaultní heslo pro uživatele i administrátora je “0000”
Vložte heslo a stiskněte tlačítko “Sign In”.
Přihlašovací zprávy
Blikající zelená LED ukazuje stav registrace telefonu.
Poté, co se LED přestane blikat zeleně, můžete zjistit stav telefonu dle
následujícího stavu:
Wired VoIP Phone
ePhone-2000
Czech
998
8
Page 100

S
Zelená
LED svítí
Červená
LED svítí
Zelená
LED bliká
Červená
LED bliká
LED
nesvítí
Nebo stiskněte【Service Realm】k zobrazení registrace aktivní služby:
Registrace telefonu ke všem službám proběhla v
pořádku.
Registrace některé ze služeb telefonu neproběhla v
pořádku.
Registrace služeb probíhá.
Registrace k žádné službě neproběhla v pořádku.
Uživatel byl odhlášen od všech služeb (zařízení je
off-line). Zmáčkněte tlačítko 【 Registration 】 k
opakovanému přihlášení ke všem SIP službám.
0 : s i p . S I P . c o m
0 : f w d . p u l v e r . c o m
X : u n k n o w n . c o m
0: registrovaná doména – služba je funkční
X: registrace k doméně – služba není funkční (opakované
přihlašování po 90 vteřinách).
Česky
Použití ePhone-2000S
Stiskněte【SPK】na přepnutí mezi hands-free a handset módy. Pokaždé,
když přepnete ze sluchátka do hands-free módu (při vyvěšeném
sluchátku), volání se přepne do reproduktoru: pokračuje přenost hlasu ze
sluchátka, ne z mikrofonu, a příchozí hovor je slyšet jak v reproduktoru, tak
i ve sluchátku. Mikrofon na telefonu se aktivuje pouze v případě, že je
telefon v hands-free módu a sluchátko je zavěšeno.
Wired VoIP Phone
ePhone-2000
Czech
999
9
 Loading...