

Page 1

ePhone-2000S
Wired IP Phone
User’s Manual
AirLive ePhone-2000S English Version
-i-
Page 2

AirLive ePhone-2000S
<English Version>
CONTENTS
I. Airlive ePhone-2000S Diagram................................................................................................... 1
1. Front View..................................................................................................................................1
2. Rear View ................................................................................................................................... 1
3. Back View ................................................................................................................................... 1
II. Key Definition........................................................................................................................... 2
III. Basic Configuration ................................................................................................................. 4
1. How to activate 『Main Menu』?............................................................................................ 4
2. Network Settings ........................................................................................................................4
(1) DHCP ............................................................................................................................. 4
(2) Static IP Environment(Fixed IP)............................................................................... 4
(3) PPPoE ............................................................................................................................ 4
3. SIP Service ................................................................................................................................. 5
IV. Phone Calls ............................................................................................................................... 7
1. How to dial out?.......................................................................................................................7
2. Dialing Method .......................................................................................................................... 7
(1) Address book..................................................................................................................7
(2) Call History.................................................................................................................... 8
(3) ENUM Dialing...............................................................................................................8
(4) Intra-Domain Dialing.....................................................................................................8
(5) Contact Dialing ..............................................................................................................8
(6) IP Dialing ....................................................................................................................... 8
(7) LAN Dialing ..................................................................................................................8
3. Add, Search, Delete and Modify Address Book.......................................................................... 9
(1) Add new address ............................................................................................................ 9
(2) Search............................................................................................................................. 9
(3) Delete ............................................................................................................................. 9
(4) Modify............................................................................................................................ 9
4. Speed Dial.................................................................................................................................. 9
(1) Add speed dial number ................................................................................................10
AirLive ePhone-2000S English Version
-ii-
Page 3

(2) Remove a specific speed dial entry.............................................................................. 10
(3) Speed Dial.................................................................................................................... 10
5. Call Screen...............................................................................................................................10
(1) How to activate and deactivate call screen?........................................................................10
(2) List and Revoke Screened Numbers ..................................................................................... 10
V. Call Forward ..............................................................................................................................10
1. Set up forwarding number........................................................................................................11
2. Enable Call Forwarding Features ........................................................................................... 11
(1) All Calls Forward (Unconditionally Forward)............................................................. 11
(2) Busy Forward............................................................................................................... 11
(3) No Answer Forward ..................................................................................................... 11
3. Do Not Disturb (DND).............................................................................................................. 12
VI. Phone Settings ........................................................................................................................13
1. Password:.................................................................................................................................13
2. DSS features.............................................................................................................................13
3. Date/Time ................................................................................................................................. 14
4. Ringer....................................................................................................................................... 14
5. Lock..........................................................................................................................................14
VII. NAT and Firewall...................................................................................................................14
1. To determine whether you resides on public internet or local area network........................... 14
2. Public Internet Configuration..................................................................................................15
3. LAN Configuration to Traverse NAT/Firewall.........................................................................15
3. Option-1: Contact your network administrator to configure your NAT/Firewall route. ......... 15
4. Option-2 Activate STUN ..........................................................................................................16
(1) To determine whether you are currently NATed or behind a firewall.......................... 17
(2) Activate STUN Mode ..................................................................................................17
VIII. Specify CODEC..................................................................................................................17
IX. Advanced Call Processing ..................................................................................................... 18
1. Mute .........................................................................................................................................18
2. Hold and Retrieve .................................................................................................................... 18
AirLive ePhone-2000S English Version
-iii-
Page 4

3. Handset, Speaker-phone, Ear-phone and Loud-speaker (Open-listening)..............................18
4. Transfer ....................................................................................................................................19
(1) Consultative transfer ........................................................................................................19
(2) Blind Transfer ..................................................................................................................19
5. Conference ............................................................................................................................... 20
(1) When you have set up two connected calls......................................................................20
(2) When you have only one connected call.......................................................................... 20
6. Auto Answer .............................................................................................................................21
(1) Server-side invoked auto-answer for urgent calls:................................................................. 21
(2) Phone-set locally configured to auto-answer all incoming calls unconditionally. ................. 21
(3) Auto-Answer incoming calls arrive on specific registered SIP address-of-records............... 22
AirLive ePhone-2000S English Version
-iv-
Page 5
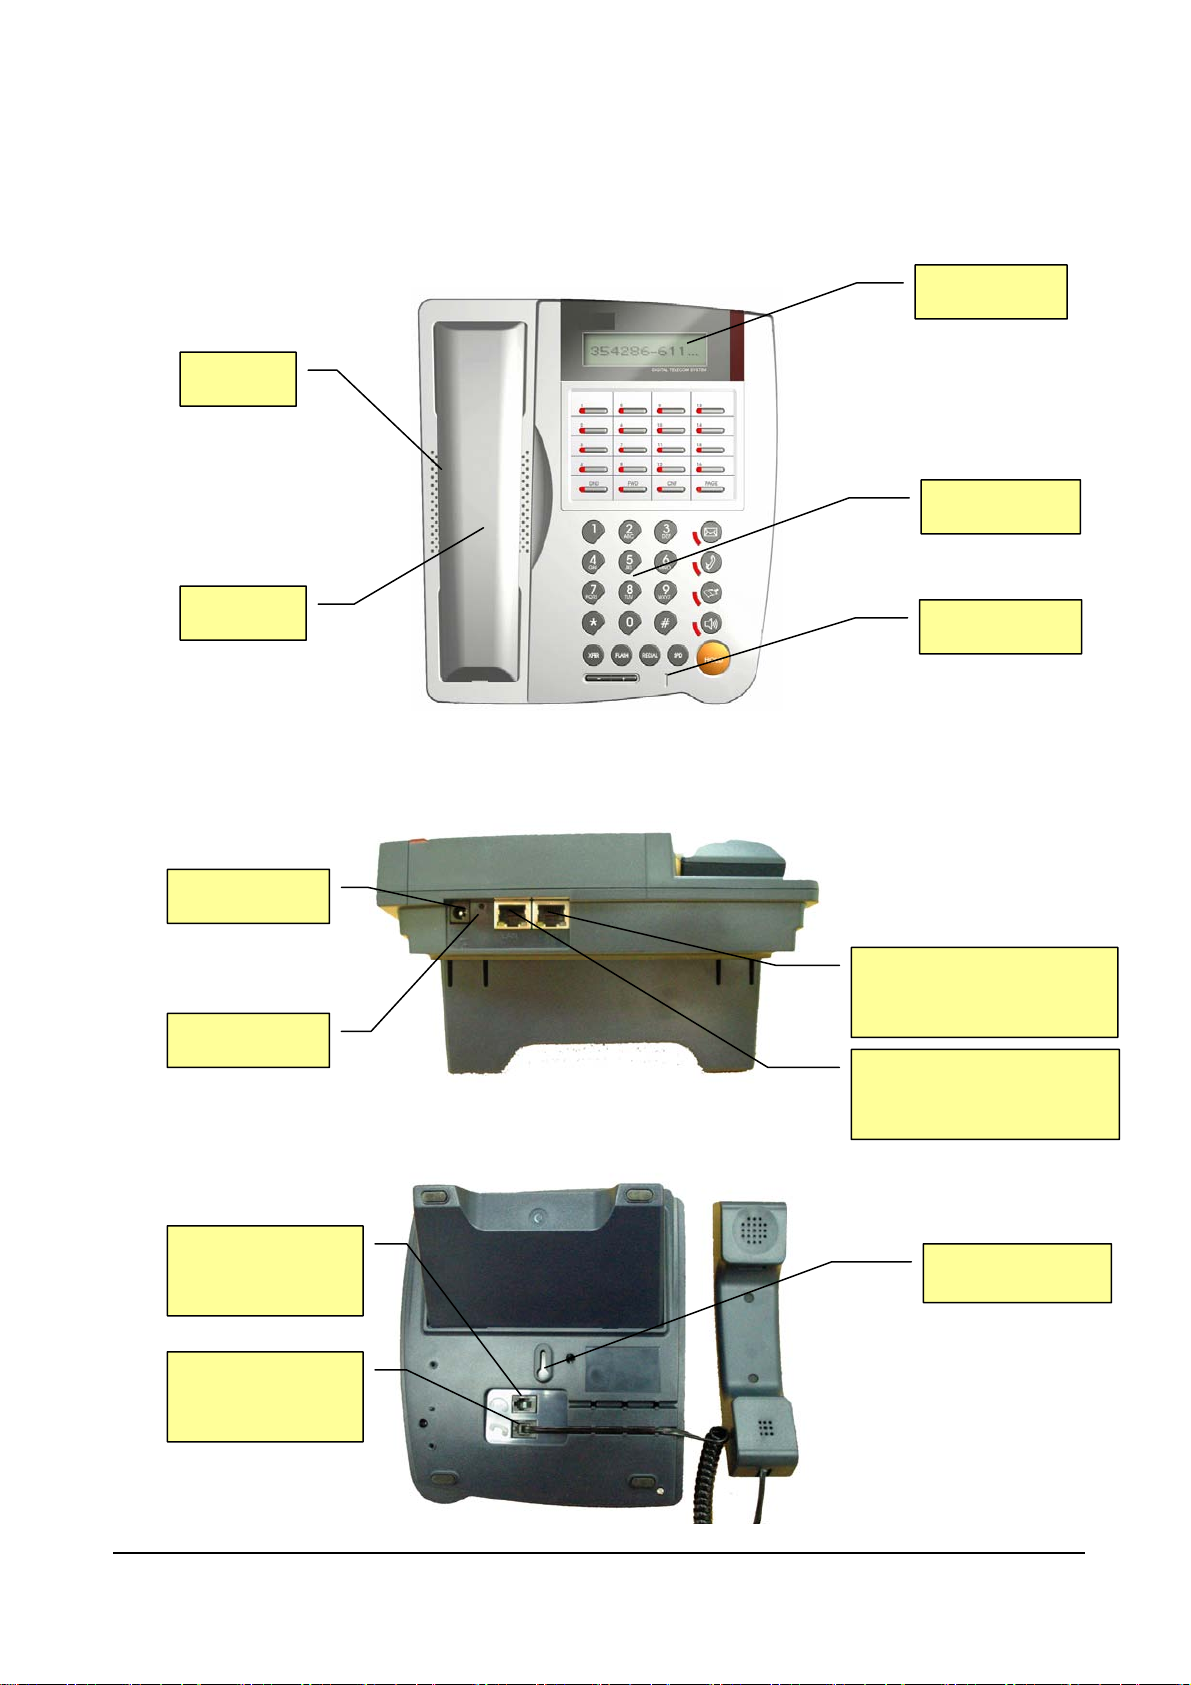
I. Airlive ePhone-2000S Diagram
1. Front View
Speaker
Handset
2. Rear View
2x16 LCD
Keypad
Microphone
Power jack
Reset
3. Back View
Ear-phone Jack
(RJ-11)
Handset Jack
(RJ-11)
10/100 RJ-45 Ethernet
Port (to PC)
10/100 RJ-45 Ethernet
Port (to LAN)
Wall Mount
AirLive ePhone-2000S English Version
-1-
Page 6

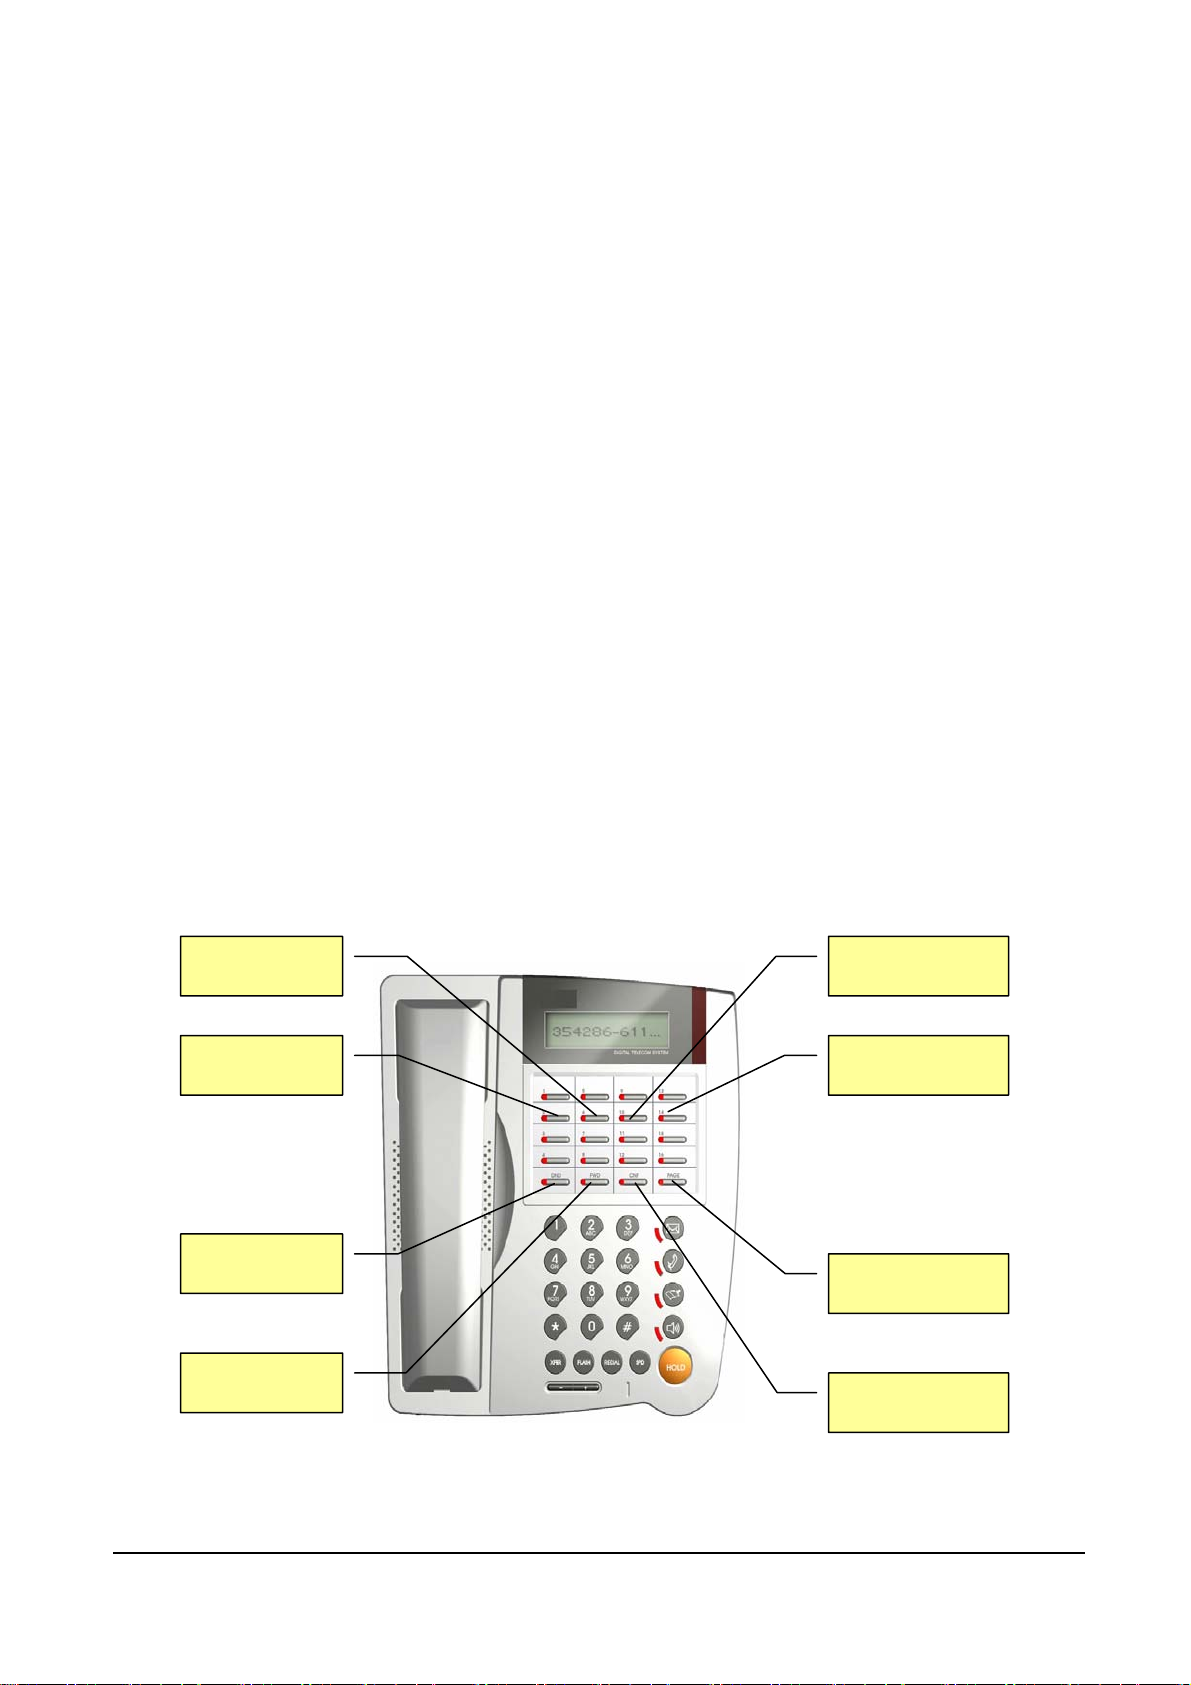
II. Key Definition
A/B Channel
FLASH
XFER
Volume【−,+】
REDIAL
【Name】:Functions in Call Mode | Functions in Menu Mode
Service Realm
Reject
MWI
MUTE
FUNC
SPK/Hands-free
HOLD
SPD
【A/B Channel】:Call lines (2 concurrent calls at most) / Review the calling information on this
channel during conversation.
【Service Realm】:Display the registration status of each active service domain on idle; switch
target service domain (ISP) while making calls.
【Reject】:Reject incoming waiting calls
【MWI】:Message Waiting Indication, MWI: Access to voice mail system.
【MUTE】: Mute | Delete character
【FUNC】:Menu | Return to upper level submenu
【SPK】:Hands-free | Exit menu
【HOLD】:Hold | Confirm, Save
【SPD】:Speed Dial
【REDIAL】:Redial the last dialed number.
【Flash】:Take back transferring calls/Exit Conference mode
【XFER】:Transfer
【+】:Volume UP (Ringer, headset, handset, speaker) | Next item、Move cursor to right
【-】:Volume Down (Ringer, headset, handset, speaker) | Previous item、Move cursor to left
AirLive ePhone-2000S English Version
-2-
Page 7
【Registration】:Re-register. The LED indicates the registration status of each active service
domain:
Green LED On: Successfully register to all activated service domains.
Red LED On: At least one activated service domain could not be registered.
Green LED Flashes: Registration is in progress. Note, IP SIP Phone will regularly refresh
SIP Address-of-Record registration as necessary.
Red LED Flashes: None of those activated service domains can be successfully registered.
LED is off: Users explicitly logs out all SIP service and goes off-line ‘till user presses the
【Registration】key again to go on-line (re-register to all SIP service).
【Auto-redial】:Auto-redial the last dialed number ‘till connected (ringing). This feature can be
activated when busy tone is heard or as a shorthand of 【Redial】+ 【Auto-redial】.
Once activated, the corresponding LED will be on.
【DND】:Do Not Disturb (red LED indicates on)
【Forward】:Forward incoming waiting calls
【URL】:Use keypad to enter alphabets and numbers (red LED on).
【Address Book】:Access to address book (search an entry or list all entries).
【Call History】:Missed calls/Received calls/Dialed Number. If the red LED is flashing, it indicates
there are unread records of missed calls.
【Conference】:3-party local conferencing
Registration URL
Auto-redial Address Book
DND
Call History
Forward
Conference
AirLive ePhone-2000S English Version
-3-
Page 8

III. Basic Configuration
1. How to activate 『Main Menu』?
1. Press 【FUNC】+ 【#】 to configure via keypad。
2. After configuring the IP and network mask of your terminal, you may point any modern web
browser from you PC to configure it by HTTP. The default login password for both
privileged and user-level account is “0000”.
3. TELNETinto the phone on TCP port 23. The login password is same as phone lock
password, which default is “0000”.
4. Initially, your phone can only be configured via keypad since it bears no valid IP yet. After
finishing configuring your network, you can use either a web browser (HTTP port 80) or a
TELNETclient (TCP port 23) to configure your phone.
2. Network Settings
Please go to 『Main Menu』 =>【6.Network】/【1.General】to configure your phone based
on your network environment: DHCP, static IP or PPPoE.
(1) DHCP
z Pick【1.Mode】/【1.DHCP】
z Disable【4.Use Static DNS】by choosing 【2.DHCP】
1. If you want to assign a different domain name server instead of using those
obtained by DHCP, you should choose【1.Static DNS】 and set the IP of your
specific DNS into 【6.Network】/【1.General】/【5.Static DNS】, such as “1.Primary
DNS” = 192.168.3.254*
(2) Static IP Environment(Fixed IP)
z Pick【1.Mode】/【2.Static Assign】
z Go to【2.Static Settings】, and enter your network configurations based on your ISP.
For example:
1. Host IP = 210.201.210.132*
2. Network mask = 255.255.255.0*
3. Gateway IP = 210.201.210.128*
z Enable【4.Use Static DNS】by choosing 【1.Static DNS】
z Assign【5.Static DNS】, such as: “1.Primary DNS = 168.95.1.1*”
(3) PPPoE
z Pick【1.Mode】/【1.DHCP】
z Go to【3.PPPoE Settings】and enter your PPPoE authentication information, such as:
1. Login ID = MyPPPoEAccount*
AirLive ePhone-2000S English Version
-4-
Page 9

2. Password = PPPoEDialupPassword*
3. Service Name = Optional, some ISPs may require it.
【*】Value should be adjusted to your real network environment
Note: if you reside on a LAN without gateway, you should specify the gateway IP as “0.0.0.0”
rather than assigning a non-existent or an invalid IP.
3. SIP Service
(1) Let’s assume that you have obtained the following information from your SIP ISP:
z Account: Michael
z Password: secret
z SIP AoR: 8888@isp.com
z SIP Proxy/Registrar Server: sip.SIP.com, which serves on UDP port 5060
(2) Point web browser to your terminal and enter the following information on 『2.SIP
Settings』/『1st Domain』page.
(3) Alternatively, you may configure it via either keypad or TELNET by going to『Main
AirLive ePhone-2000S English Version
-5-
Page 10

Menu』=>『6.Network』/『2.SIP settings』/『2.Service domain』/『1.1st Realm』
z Activation: Enabled
z Authentication: Note: please remember to check for ending blanks and spaces;
if you erroneously input the ending spaces, the whole string (including
ending spaces) will be treated as your password without trim).
1. Server login: Michael
2. Server passwd: secret
z Address of record:
1. Display Name: Michael Jr. (Could be any combination of alphabets and numbers)
2. Protocol: sip
3. Sip:8888@isp.com
z Proxy server:
1. Configuration: 2.Use default
2. Default proxy:
1. Proxy FQDN: sip.SIP.com
2. Transport: 1.UDP (or 3.TCP and UDP)
3. UDP port: 5060 (SIP proxy listening UDP port of your ISP.)
4. TCP port: 5060 (leave default intact)
z Registrar
1. Configuration: 1.Same as proxy
2. Registrar svr: leave default intact since the registrar and proxy server provided by
your ISP are the same
(4) If you have applied for more than one service domains, please repeat step (1) and (2) until
all active domains are properly configured. IP SIP Phone supports three different active
service domains at most.
(5) Press 【SPK】 to exit the configuration menu and the system will try to register to those
activated SIP domains. The flashing green LED of 【Registration】key indicates that the
registration is undergoing. Once the green LED stops flashing, you could know the
registration result by the LED:
Green LED On: Successfully register to all activated service domains.
Red LED On: At least one activated service domain could not be registered.
Green LED Flashes: Registration is in progress. Note, IP SIP Phone will regularly
refresh its SIP AoR registration as necessary.
Red LED Flashes: None of those activated service domains can be successfully
registered.
LED is off: Users explicitly logs out all SIP service and goes off-line ‘till user presses
the 【Registration】key again to go on-line (re-register to all SIP service).
Or press【Service Realm】to show registration status of each active service domain:
AirLive ePhone-2000S English Version
-6-
Page 11

0 : s i p . S I P . c o m
X
0 : f w d .p u l v e r . c o m
: u n k n o w n . c o m
0: Registered domain
X: Registration failed domain (Retry after 90 seconds).
IV. Phone Calls
Press【SPK】to switch between hands-free and handset mode. However, if you switch to
hands-free mode with handset lifted (off-hooked), the phone will be in loud-speaker mode:
it continues transmitting voice from handset, not from microphone, and played voice to both
speaker and handset receiver simultaneously. It will help clarify the voice of talker while
letting all persons in the same room listen. The phone will activate microphone for voice
transmission only when it is on hands-free mode and the handset is on hook. This applies to
ear-phone mode as well. In loud speaker mode with ear-phone enabled, the ear-phone could
hear voice but not speak-able.
1. How to dial out?
f w d . pu l v e r . c o m
3 2 0 0
By default, you can gain access to active Service-Domain-N by line-N whenever
applicable. That is, the default service domain of [B call] is 2
if available; otherwise, it will use the 1st active service domain as default.
Moreover, you could change the target service domain while making calls by pressing
【Service Realm】to circle those active service domains (no matter whether they have
registered or not), but must before dialing the ‘#’, which finishes the dialing. The active
service domain will appear on the upper-right corner.
2. Dialing Method
Sip.Sip.com
fwd.pulver.com
Auto-locate
nd
active service domain
In dialing phase, you could use【MUTE】to correct typos.
(1) Address book
z 『Main Menu』 =>『1.Address Book』/『1.Search』(By default 【F4】 is programmed
to access address book).
z Pick the target number and press【REDIAL】to dial out.
AirLive ePhone-2000S English Version
-7-
Page 12

(2) Call History
z Press【Call History】to choose desired call lists:Missed/Received/Dailed numbers.
z Traverse the list and pick up the target entry.
z Press 【REDIAL】to dial out.
Note: if you press 【Call History】 while its red LED is flashing (indicating there are
unviewed missed calls), it will enter the “Missed calls” list directly.
(3) ENUM Dialing
z Starting with【#】for ENUM dialing
z Dial the target number (6 digits at least), ending with a【#】to speed up dialing phase.
E.g.: to call “tel:+886-3-5295000”, please dial “#88635295000#”。
(4) Intra-Domain Dialing
z Enter the user part of the target AoR or dial alias number directly.
z The target SIP service domain could be circle by press 【Service Domain】.
z Press 【#】to finishing dialing.
Intra-domain dialing is applicable if both party registered to the same SIP domain
(possibly to the same SIP proxy/registrar server)。 E.g., if sip:Michael@sip.Sip.com
wants to place a call to sip:8888@Sip.com, he could just dial 【3200#】 when
“Sip.com” has selected as target service domain.
(5) Contact Dialing
z Use 【*】for 『@』 and『.』
z Use 【**】 for 『:』if the target SIP agent does not listen on UDP port 5060.
z Press【#】to finishing dialing
E.g. 1: to call sip:3200@192.168.10.200, please dial “3200*192*168*10*200”.
E.g. 2: to call sip:3200@192.168.10.200:5070, please dial
”3200*192*168*10*200**5070”.
(6) IP Dialing
z Use【*】for 『@』 and『
z Use【**】for “
:” if the target SIP agent does not listen on UDP port 5060.
.』
z Dial【#】to finish dialing.
E.g. 1: to call sip:192.168.10.200, please dial “192*168*10*200”.
E.g. 2: to call sip:192.168.10.200:5070, please dial ”192*168*10*200**5070”.
(7) LAN Dialing
(Applicable only while both parties locate on the same LAN and their IP prefix, 24-bits,
are the same).
z Starts with a【*】
z Dial the last suffix of target IP (the number must be between 1 and 255, inclusive).
z Use 【**】for “:” if the target SIP agent does not listen on UDP port 5060.
E.g., if “192.168.10.200” wants to dial “192.168.10.31”, please dial 【*31#】 or
AirLive ePhone-2000S English Version
-8-
Page 13

【*031#】。
※ Note: 【*69】has been reserved for call return feature, please dial 【*069】
if you want to call a IP of “xxx.xxx.xxx.69”.
3. Add, Search, Delete and Modify Address Book
You may point web browser to your terminal’s IP and go to 『Address Book』to configure it.
Below illustrates how to configure address book by keypad or TELNET.
(1) Add new address
z 『Main Menu』=>『1.Address Book』/『2.Add Entry』
z Enter Display Nam, such as Michael
z Pick address type, default is SIP.
z Enter SIP AoR or ENUM number without protocol field, such as:
i. sip: 211.21.189.62
ii. sip: michael@sip.Sip.com
iii. tel: +886-3-5295000
(2) Search
z 『Main Menu』=>『1.Address Book』/『1.Search』
z Enter the prefix to search or press 【Hold】to list all addresses
(3) Delete
Option 1:
z 『Main Menu』=>『1.Address Book』/『1.Search』
z Search for the address to remove and press【HOLD】to view the item.
z Pick『2.Erase』from this address and press【HOLD】to delete it.
Option 2:
z 『Main Menu』=>『1.Address Book』/【3.Erase】
z Choose either 『1.One by One』or『2.Erase All』to clear address book.
(4) Modify
z 『Main Menu』=>『1.Address book』/『1.Search』
z Search for the address you want to modify then press【HOLD】to view
z Choose 『1.Modify』 from the menu of this address and modify it
4. Speed Dial
You may point web browser to your terminal’s IP and go to 『Address Book』/『Speed Dials』
to configure it. Below illustrates how to configure speed dials by keypad or TELNET.
AirLive ePhone-2000S English Version
-9-
Page 14

(1) Add speed dial number
z 『Main Menu』=>『1.Address Book』/『4.Speed Dials』
z Go to the digit you want to set for speed dial and press 【HOLD】
z Pick the target number from address book to associate with this speed dial digit.
Press 【HOLD】to save.
(2) Remove a specific speed dial entry
z 『Main Menu』=>『1.Address Book』\『4.Speed Dials』
z Go to the digit you want to set for speed dial.
z Press 【MUTE】to remove the current speed dial mapping.
(3) Speed Dial
z [0-19] +【SPD】; e.g.: ‘1’+【SPD】or ‘01’ + 【SPD】
z 【SPD】+ [00-19]; e.g.:【SPD】+ ‘01’.
【
Note: if you want to dial single digit only, such as
SPD】+ 【1】, please press an
additional
inter-digit timeout, which default is 4 seconds. For example, 【SPD】+ 【1】+ 【#】.
【#】
to finish dialing; otherwise, it will wait for the second digit until
5. Call Screen
You may point web browser to your terminal’s IP and go to 『Address Book』/『Call Screen』
to configure it. Below illustrates how to configure it by keypad or TELNET.
(1) How to activate and deactivate call screen?
z 『Main Menu』=>『1.Address Book』/『1.Search』
z Locate the target address that you want to screen and press 【HOLD】to choose
z Go to『3.Screen Call』and press【HOLD】 to toggle call screen.
(2) List and Revoke Screened Numbers
z 『Main Menu』=>『1.Address Book』/『5.Call Screening』 to view all screened
addresses.
z Locate the target address that you want to remove from screening list and press
【HOLD】to choose.
z Pick 『3.Revoke』and press 【HOLD】to remove it from the screened list.
V. Call Forward
You may point web browser to your terminal’s IP and go to 『Call Forward』to configure it.
Below illustrates how to configure call forward by keypad or TELNET.
AirLive ePhone-2000S English Version
-10-
Page 15

1. Set up forwarding number
z 『Main Menu』=>『4.Call Forward』/『1. Target Number』
z Press 【HOLD】 to pick an entry from address book. Use 【Õ】and 【Ö】to view
the current forwarding number. Press 【MUTE】to remove the current mapping of
forward number.
Note: on incoming calls arrival, both red LED of 【Reject】and【Forward】function keys will
be on. If you press 【Reject】on which time, the incoming call will be rejected as busy and
recorded as a received call, but it will not be forwarded in anyway. If you would like to
transfer it to your configured forwarding number, you should press【Forward】. If you have
not configured the forwarding number, the incoming call will be rejected as busy and
recorded as a missed call.
2. Enable Call Forwarding Features
(1) All Calls Forward (Unconditionally Forward)
z 『Main Menu』=>『4.Call Forward』 / 『1.All Calls Fwd』
z Pick『Enabled』and press【HOLD】 to save your setting.
z Once this feature is enabled, the red LED of【Forward】function key will flash to
remind you that all incoming calls will be silently forwarded to the forwarding
number you previously configured (no ringing tone would ever be heard!). If you
have not configured the forwarding number, the peer will be replied as ”480
Temporarily unavailable” and recorded as a missed call.
(2) Busy Forward
z 『Main Menu』=>『4.Call Forward』/『3.Busy Forward』
z Pick『Enabled』and press【HOLD】to save your setting.
z Once this feature is enabled, the system will start to forward incoming calls to the
forwarding number you previously configured when the system is busy (on which
time you have already had 2 calls are waiting). If you have not configured such
forwarding number, it will reply the peer as busy and recorded as a missed call.
(3) No Answer Forward
z 『Main Menu』=>『4.Call Forward』 / 『4.No Answer Fwd』/ 『1.Status』 and
AirLive ePhone-2000S English Version
-11-
Page 16

pick 『Enabled』, press【HOLD】to save it.
z 『Main Menu』=>『4.Call Forward』 / 『4.No Answer Fwd』/ 『2.No Answer
Time』, and configure the ringing expiration time before forwarding the incoming
call (system default is ringing for 30 seconds) . Press【HOLD】 to save your
setting.
z Once “forward on no-answer” feature is enabled, if you do not answer the
incoming call before the timer expires, it will be forwarded to the forwarding
number you previously configured. If you have not configured the forwarding
number, the peer will be replied as “no answer” and recorded as a missed call.
3. Do Not Disturb (DND)
z Press【DND】function key to toggle this feature: if the red LED is on, this feature
is enabled; otherwise it is disabled.
z When this feature is on, all incoming calls will be silently (no ringing tone will
ever be heard) forwarded to the forwarding number you previously configured. If
you have not configured the forwarding number, the peer will be replied as ”480
Temporarily unavailable” and recorded as a missed call.
AirLive ePhone-2000S English Version
-12-
Page 17

VI. Phone Settings
You may point web browser to your terminal’s IP and go to 『Phone Settings』to configure it.
Alternatively, you may configure your terminal via keypad or TELNET by going to『Main
Menu』=>『3. Phone Setting』. Below illustrate the keypad/TELNE configuration steps.
1. Password:
(needed on web configuration, telneting into the phone and unlocking the phone)
z Enter your old password then press【HOLD】(Default password is “0000”)
z Enter your new password then press【HOLD】(Accept only digits 0~9)
z Re-type your new password to confirm, then press【HOLD】to finish.
Web Page: 『Phone Settings』/ 『Account』.
2. DSS features
Web Page: 『Phone Settings』/ 『DSS Features』.
User programmable keys for easy access to various phone features.
z Pick the function keys you want to program for short-cut key then press【HOLD】.
For example, you may program some hot-lines for one-touch dial out.
z Browse the available functions, press【HOLD】to confirm.
The default mapping of these programmable function keys are:
DSS Keys
【F1】:Forward menu – shortcut to activate forward menu.
【F2】: Channel info–show information of the last call on each call channel【A / B】.
【F3】: Call Detail - show detail records of the latest three connected and finished calls.
【F4】: Speed dials – activate speed dial list.
【F5】
【F6】: Network Speed - adjust the voice quality based on network link speed.
【F7】: Network Info - show the current active host IP, MAC address and DNS IP(s).
AirLive ePhone-2000S English Version
: Messaging – Access to out-of-dialog instant messaging.
-13-
Page 18

【F8】: Call Return - place a call to the last incoming call, either a missed or received one
3. Date/Time
Web Page: 『Phone Settings』/ 『Date / Time』.
z Choose the item and press【HOLD】to configure:
1. Date: System date
2. Time: System time
3. Date format: date displaying format
4. Time zone (default is GMT+00:00)
Use digits key【0】~【9】to switch between +/-
5. DST settings (day-light saving time, default is 0:00)
Note: if you want to keep the date and time you manually set, you must disable SNTP
synchronization from 7.3.1-SNTP Mode; otherwise, it will synchronize system
time with assigned NTP server.
4. Ringer
1. Ringer volume: (Adjust the ringing volume on incoming calls arrival).
z 【+】and【-】to increase or decrease ringing volume.
2. Ringer type: (Pick your favorite ringing tone)
z 【+】 and【-】to listen your favorite ringing, press 【HOLD】to save your
setting.
5. Lock
z 『Main Menu』=>『3.Phone settings』/『8. Lock』
z 『1.=Y』to lock out the phone such that it could not make outbound calls (but still could
take incoming calls, or『2.=N』to cancel this operation and press【HOLD】to confirm.
After locking out the phone, to unlock it, you need the phone password.
VII. NAT and Firewall
If this phone locates within a local area network and you want to place a call to public internet,
you must configure your phone to traverse the NAT and firewall currently behind. Please refer to
section-13 “NAT Traversal” on “IP SIP Phone v2 User’s Guide” for detail, and below illustrates
how to configure your terminal by keypad or TELNET.
1. To determine whether you resides on public internet or local area network
z 『Main Menu』=>『8.Advanced』/『4.System status』 or press 【F7】(default is
AirLive ePhone-2000S English Version
-14-
Page 19

“Network Info”).
z Go to 『1.Network』 and use【+】and【-】to navigate active network configuration:
host IP, MAC address, active primary DNS IP and optional secondary DNS IP (In that
order).
z If your host IP is within any of the listed ranges, then your IP SIP Phone resides on
LAN, otherwise, it locates on public internet.
i. 10.0.0.0 ~ 10.255.255.255 (10.xxx.xxx.xxx).
ii. 172.16.0.0 ~ 172.31.255.255 (172.16.xxx.xxx ~ 172.31.xxx.xxx).
iii. 192.168.0.0 ~ 192.168.255.255 (192.168.xxx.xxx).
Note: if your host IP is 127.0.0.1, you should reconfigure your network to acquire a valid IP.
2. Public Internet Configuration
z 『Main Menu』=>『6.Network』/『4.NAT & firewall』/『2.UDP traversal』
z Enable “1.Full access” by press 【HOLD】
3. LAN Configuration to Traverse NAT/Firewall
There are basically 2 options for CPE to traverse NAT/Firewall:
(a) Option 1: Set up a static route in the NAT gateway (Recommend)。
(b) Option 2: Use STUN to measure out ports.
Please adopt suitable option based on your network configuration.
Note: some SIP ISPs may provide SIP-aware router (NAT/Firewall) for their customers.
When you use a SIP-aware router, NAT detection should be set to "Off" as if you
were on the public internet and the configuration is the same as “Public Internet
Configuration”: 『6.Network』/『4.NAT & firewall』/『2.UDP traversal』/『1.Full
access』, which is to say that you do not have to worry about the NAT, nor firewall.
3. Option-1: Contact your network administrator to configure your NAT/Firewall route.
z Contact your network administrator and acquire at least 7 consecutive UDP ports
mapped from the NAT to your IP SIP Phone.
For example:
i. NAT IP = 210.95.168.1 (you may detect your NAT IP by STUN from 『Main
Menu』=>『6.Network』/『4.NAT & firewall』/ 『1. STUN』/ 『2. Diagnose
NAT』)
ii. The network administrator has mapped UDP port 10101~10107 from NAT to
your IP SIP Phone 192.168.1.50.
Note 1: Since the network administrator has to configure the NAT/firewall to map
those UDP ports to your IP SIP Phone, thus you should use static IP instead of
DHCP as your network configuration. Otherwise you take the risk that the IP
SIP Phone would get a different IP from the currently set into the mapping
when it reboot and re-get its IP by DHCP.
AirLive ePhone-2000S English Version
-15-
Page 20

Note 2: If there are several phones reside under the same NAT, their NAT port
mappings must not be overlapped since they all share the same NAT resource!
z Configure SIP service signaling port:『Main Menu』=>『6.Network』/『2.SIP settings』
/『1.SIP service』. Take the scenario above as an example:
1. Transport: 1 (or 3, you must include UDP anyway).
2. SIP port: 10101
z Configure RTP ports by going to 『Main Menu』=>『6.Network』/『3 RTP settings』.
Take the mapped ports as an example:
1. Base: 10102 (Must be an even number and between 3000 and 65532)
2. Range: 6 (Must be an even number and larger than or equal to 4).
Note: RTP ports are used for voice media transmission. Those ports must be
consecutive and start with an even number. Besides, at least 4 ports are needed
for a phone equips with a capacity of two concurrent calls, where each channel
needs 2 ports for RTP/RTCP.
z Assign static NAT IP by going to『Main Menu』=>『6.Network』/『4.NAT & firewall』
/『3.Static NAT IP』 and fill in the acquired NAT IP from network administrator, such
as 210.95.168.1 mentioned above (you may also detect your NAT IP by STUN
from 『Main Menu』=>『6.Network』/『4.NAT & firewall』/ 『1. STUN』/ 『2.
Diagnose NAT』).
Note: if your NAT equipped with no fixed IP, such as those NATs dial into WAN by
PPPoE, then you must synchronize the NAT IP currently set into IP SIP Phone
whenever your NAT IP changed (Such as NAT re-dialup). By default, the
system will auto-detect the NAT IP (if the STUN server configured into
menu-6.4.1.1『STUN server』is viable) and notify you by sending an instant
message whenever it determine a mismatch between the NAT you configured
into menu 6.4.3-『Static NAT IP』and the one it auto-discovered by STUN
protocol. Alternatively, you may go to『Main Menu』=>『6.Network』/『4.NAT
& firewall』/『4.Dynamic NAT IP』and enable『2.Update by STUN』to
auto-refresh the newly changed NAT IP into menu-6.4.3『Static NAT IP』
whenever it detects an inconsistency.
z Enable Assigned static NAT IP by going to 『Main Menu』=>『6.Network』/『4.NAT
& firewall』/『2.UDP traversal』, selecting『2.Static NAT map』and press【HOLD】
to confirm activation.
4. Option-2 Activate STUN
Setting up the NAT router is impossible in many cases, and new equipment may be too
expensive. For these environments, "Simple Traversal of UDP Through NATs" (STUN)
has come to rescue. To enable STUN, you must acquire the IP of your served STUN
server and diagnose your NAT to see if STUN is viable.
AirLive ePhone-2000S English Version
-16-
Page 21

(1) To determine whether you are currently NATed or behind a firewall
z Go to 『Main Menu』=>『6.Network』/『4.NAT & firewall』/『1.STUN』 and
configure your STUN server in “1.STUN server”, such as “Sip.com” (IP SIP
Phone will try to locate the STUN server of “Sip.com” domain via DNS SRV
query (_stun._udp.Sip.com) or “STUN.Sip.com” (61.222.26.124) (explicitly
specify the STUN server). Press 【HOLD】to confirm.
z Go to 『Main Menu』=>『6.Network』/『4.NAT & firewall』/『1.STUN』/
『2. Diagnose NAT』to detect your NAT type. If the diagnosis is one of the
following, you could consider enable STUN as a way to traverse NAT;
otherwise you should adopt option-1.
1. Public internet (Neither NAT nor Firewall is involved)。
2. Symmetric UDP Firewall
3. Full cone NAT
4. Restricted cone NAT
5. Port restricted cone NAT
(2) Activate STUN Mode
z 『Main Menu』=>『6.Network』/『4.NAT & firewall』/『2.UDP traversal』
z Choose ”3.Enable STUN” and press 【HOLD】to confirm.
Note: the STUN server configured into 『6.Network』/『4.NAT & firewall』/『1.STUN』
/『1.STUN server』must be functional and reachable for STUN to work.
VIII. Specify CODEC
The CODECs available on the phone includes G.711A (64kbps), G.711μ (64kbps),
G.729A/G.729AB (8 kbps), G.723.1/G.723.1A (both 5.3 and 6.4 kbps). The default
preference is to prioritize them based on their compressed voice quality: the higher quality it
is, the higher priority it will be. That is, the default CODEC preference is G.711A, G.711μ,
G.729A then G.723.1A (in that order).
High quality comes in a price: it consumes more precious bandwidth. Take G.711μ for
example, it takes as much as 64 kbps per call, as opposed to 5.3 kbps if G.723.1A is
employed. Thus, if you have limited bandwidth for VoIP, you should consider prioritize
those CODECs come with lower bit-rates such that it will use the most preferred CODEC on
making/taking calls.
z To set up personal CODEC preference by keypad or TELNET:
『Main Menu』=>『8.Advanced』/『1.CODEC』/『1.Preferences』
Reorder the CODEC precedence:
0: Disable the selected CODEC
1: Highest priority
8: Lowest priority
AirLive ePhone-2000S English Version
-17-
Page 22

z To set up personal CODEC preference by web browser, please go to 『Advanced』/
『CODEC』
Note: if you disable all CODECs, it will auto-arrange the available CODECs and those
come with lower bit-rates take precedence. Besides, you should just lower the
priorities of G.711 in most circumstances rather than overly disabling them such
that the phone could gracefully fall back to G.711A or G.711μ when the peer does
not support those low bit-rate CODECs for voice compression.
IX. Advanced Call Processing
1. Mute
z Set up a connected call.
z Press【MUTE】to toggle your voice transmission. On muting state, the red LED of
【MUTE】will be on, and you can hear still the peer’s voice; however they cannot hear
you.
2. Hold and Retrieve
z Set up a connected call.
z Press 【HOLD】 to put the peer on hold and the corresponding green LED of 【A/B
Channel】 will flash (on which time you can put the handset back to the seat while
keeping the peer connected).
z Press 【HOLD】 again to retrieve the call. Alternatively, you can press 【A/B Channel】
to retrieve the call as well. If the handset is on hook, you can retrieve the holding call by
turn on speaker phone by pressing【SPK】 too.
Note: if you are held by the peer, IP SIP Phone will play music-on-hold.
3. Handset, Speaker-phone, Ear-phone and Loud-speaker (Open-listening)
z Press 【SPK】 to switch between speaker-phone and handset. The red LED of 【SPK】
indicates speaker-phone is on or off..
z However, if you are in ear-phone mode, then press 【SPK】will switch between handset
and ear-phone. The flashing red LED of 【SPK】indicates it is now in ear-phone mode.
z To switch to loud-speaker phone (open-listening), you should turn the speaker on while
keeping handset lifted (off-hooked). Then you can continue talking by handset while all
by-listeners in the same room could hear your conversation from the speaker. This is to
AirLive ePhone-2000S English Version
-18-
Page 23

facilitate the meeting where there are many listeners but there is only one talking at any
time.
4. Transfer
(1) Consultative transfer
(Announce it first before actually transfer the call).
z Set up a connected call to party-A
z Press【XFER】to put A on hold and gain dial-tone.
z Dial the target number of party-B and press 【#】 to finish dial.
z Wait ‘till B picks up, announcing the call from A (consultation).
z If B is unwilling to take this call, you may press【FLASH】to cancel the transfer
operation and take back A.
z Press【XFER】again (or you could just hang up the call to B) to transfer party-A to
party-B. Note, you may do so even when B has not picked up the consultation call yet
(such as it is in ringing back phase) to perform a call-transfer; and this is the so-called
Semi-attended transfer.
z (Optional) Alternatively, you may press 【Conference】to hold a 3-way conference with
A and B instead of transferring A to B.
Alternatively, you may do a consultative transfer as follows:
z Take an incoming call from party-A on【A Channel】.
z Get an empty channel by pressing 【B Channel】to perform a call switch (effectively put
A on hold), then make an outbound call to party-B.
z After talking to party-B, you decide to transfer A to B, press 【XFER】 on 【B Channel】
to perform a call-transfer. Note, you may do so even when B has not picked up the
consultation call yet (such as it is in ringing back phase) to perform a call-transfer; and
this is the so-called Semi-attended transfer.
z However, if you decide to host a conference among party-A and party-B rather than
transfer from call-A to call-B, you should press【Conference】to conference both parties
in.
Note, you cannot transfer two inbound calls to each other!
(2) Blind Transfer
(Transfer the call without asking the transferring target first.)
z Set up a connected call to party-A
z Press【XFER】to put A on hold and gain dial-tone.
z Dial the target number of party-B without an ending 【#】; instead, you SHOULD press
AirLive ePhone-2000S English Version
-19-
Page 24

【XFER】 immediately to transfer party-A to party-B; alternatively, you MAY just hang
up (on B-channel) as soon as finishing dialing B’s number without an ending【#】.
z (Optional) During dialing phase, if you decide not to transfer but to take back party-A,
press 【FLASH】 to abandon blind transfer and take back A (alternative, you may press
【A/B Channel】to cancel blind transfer and take back A as well).
Note, if you press 【#】 to finish dialing, it behaves just the same as consultative transfer.
Alternatively, you may do a blind transfer as follows:
z Take an incoming call from party-A on【A Channel】.
z Get an empty channel by pressing 【B Channel】to perform a call switch (effectively put
A on hold), and gain dial tone.
z Dial the target number of party-B without an ending 【#】; instead, you SHOULD press
【XFER】 immediately to transfer party-A to party-B; alternatively, you MAY just
hang up (on B-channel) as soon as finishing dialing B’s number without an ending【#】.
Note, you cannot transfer two inbound calls to each other!
5. Conference
(1) When you have set up two connected calls
z Set up two connected calls
z Press 【Conference】when either call is activate to create a conference.
z If the 【Conference】could be set up, its green LED will be on.
(2) When you have only one connected call
z Call the first party, and set up a connected calls
z Press 【Conference】to switch to an empty line, on which time the system will play
dial-tone, waiting for user’s dial, and the red LED will be on.
z System will set up a 3-way local conference when the 2
time, the green LED will be on.
Note:
z If a 3-way local conference cannot be hosted, the red LED of
flash for a while. This may due to the fact that both connected parties demand a
compressed voice CODEC, such as G.723.1 or G.729 (A/B), and thus a conference
nd
call connected; on which
【
Conference】 will
cannot be held between them since the compressed voice CODEC is shared between
them.
z Once the conference call initiator disconnects, the calls are terminated between all
parties.
z To disconnect a specific party in a three-way local conference, you may ask the party to
whom you want to disconnect to hang up first. Alternatively, you may press 【FLASH】
AirLive ePhone-2000S English Version
-20-
Page 25

to tear down the conference and separate them into 2 independent calls first, then
disconnect each of them as your wish.
z To place a conference call on hold, press the 【HOLD】 key. The other parties can not
talk among themselves. To avoid disrupting the other callers, consider muting the call
instead. To mute the call, press the 【MUTE】 button.
z Call waiting calls cannot be conferenced in; the conferencing node must establish both
legs of the 3-Way conference.
z You cannot perform transfer on conference calls.
z The phone supports only 3-way local conference. To conference in additional callers, the
last person called with an IP SIP Phone can call an additional person, that new person
can then call someone else, and so on. This is called “daisy-chaining.
6. Auto Answer
If auto-answer feature is enabled when an incoming call arrives, the phone-set will play
distinguished auditable tone shortly, then answer the call by turning on speaker-phone (or headset if
it is enabled) on idle mode; otherwise proceed as a normal incoming call.
By idle, it means the phone-set is neither engaged in a call nor a call on hold.
IP SIP Phone implements various ways to support auto-answer features:
(1) Server-side invoked auto-answer for urgent calls:
Use of a private header “P-Auto-answer” in the initial INVITE message for the server-side
invoked auto-answer extension:
Please refer to section 10.9 “Auto Answer” on “IP SIP Phone User’s Guide” for detail.
(2) Phone-set locally configured to auto-answer all incoming calls unconditionally.
a. Unconditionally auto-answer all incoming calls on idle mode can be achieved by either
configuring the global phone-set setting and/or map the auto-answer feature as a
programmable key.
b. To configure the global phone-set setting for auto-answer:
z Press 【FUNC】 + 【#】 to activate menu.
z Go to submenu 『5. Preferences』 / 『9.Auto-Answer』.
1 . E n a b l e d .
2. D i s a b l e d
System default is Disabled
Note, Web configuration page is 『Preferences』=> “Auto Answer”.
c. If you have mapped one of your DSS keys to “Auto-Answer”, press this DSS to toggle
auto-answer mode. Once enabled, the corresponding red LED of mapped DSS key will be
on, and the phone will auto-answer
AirLive ePhone-2000S English Version
(1)
all incoming calls arrive on idle mode. Besides,
-21-
Page 26

unmap this DSS feature will turn off auto-answer configuration as well.
(3) Auto-Answer incoming calls arrive on specific registered SIP address-of-records.
For each service domain, you can configure to auto-answer all incoming calls to this SIP account
(<FROM> header in the initial INVITE message). This
is particularly useful for IP-PBX to
implement broadcast feature. Alternatively this feature is also useful when the user have 2 SIP
accounts (or more), one for public and one for private use only, and he/she wants to
auto-answer all calls to his/her private account.
To configure the account-specific auto-answer feature:
z Press 【FUNC】 + 【#】 to activate menu.
z Go to submenu 『6. Network』/『2.SIP Settings』/『2.Service Domain』/『N
-th
/『Auto-Answer』.
1 . E n a b l e d .
2. D i s a b l e d
Default is Disabled.
Note, Web configuration page is 『SIP Settings』/ 『N
-th
Domain』=> “Auto Answer”.
a. Once enabled, all calls destined to this specific service account will be auto-answered on
idle mode.
b. This works even when the system-wide auto-answering is off.
z auto-answer
(1)
operation:
Realm』
i. On idle mode, the phone-set will play a distinguished auditable tone shortly, then answer the
call by turning on speaker-phone (or headset if applicable). By idle, it either takes no call or
is putting a call on hold.
ii. Otherwise, proceed as normal incoming calls
z Incoming call processing rules (by precedence):
i. If the phone is engaged in do-not-disturb mode, then DND wins
ii. Otherwise, if the phone has turned on unconditionally forward feature, then all incoming
calls are forwarded.
iii. Check for auto-answer feature:
a. Check for server-side auto-answer feature.
b. Check for the global switch for auto-answer feature.
c. Match this call against all enabled service domains for auto-answering feature, if a
match is located, auto-answer it.
iv. Otherwise, proceed as normal incoming calls.
AirLive ePhone-2000S English Version
-22-
 Loading...