

Page 1

AirLive ePhone – 1000S
VOIP IP Phone
Multi-language Guide
English ● ●
Deutsch ● ●
1
7
Page 2

A
Package Contents
! One AirLive ePhone-1000S VoIP IP phone
! One power adaptor
! One RJ-45 Ethernet cable
! Quick Installation Guide
! Installation CD
English
ePhone-1000S Functions
Ovislink
irLive ePhone-1000S
English
1
1
Page 3
A
English
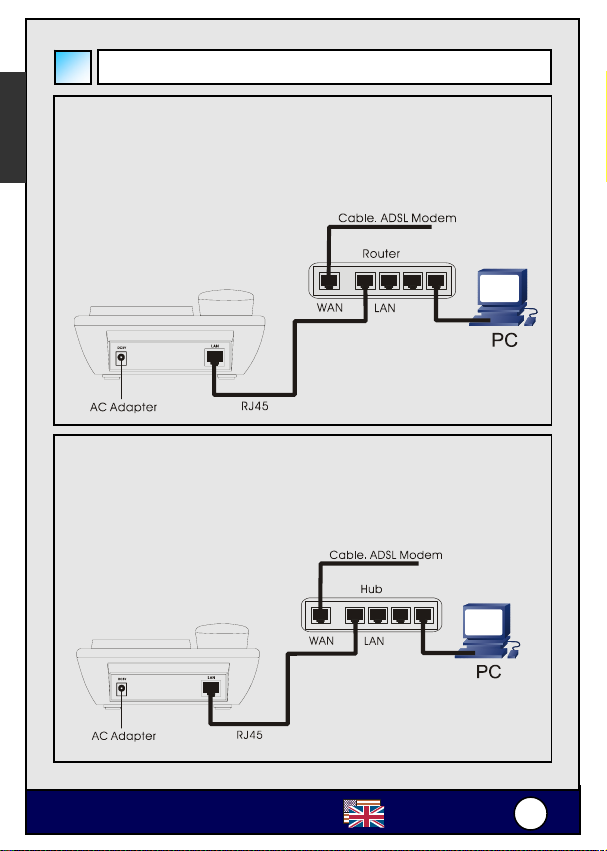
Hardware Installation
Connection with router
Plug one end of the RJ-45 to your AirLive ePhone -1000S LAN
port, and plug another end to one of the LAN port of your router.
Once “Ready for call” is shown on the screen, the hardware
installation is completed.
Connection without routers
Plug one end of the RJ-45 to your AirLive ePhone -1000S LAN
port, and plug another end to one of the LAN port of your HUB.
Once “Ready for call” is shown on the screen, the hardware
installation is completed.
Ovislink
irLive ePhone-1000S
English
2
2
Page 4
A
NAT Environment configuration:
If the AirLive ePhone-1000S is under the NAT environment
(Press the IP button on the front panel, if the LCD shows the IP
address as 192.168.x.x or 10.x.x.x), please contact your VoIP
service provider for the information.
※ Refer to the AirLive ePhone-1000S Manual for detailed
configuration of the AirLive ePhone-1000S.
English
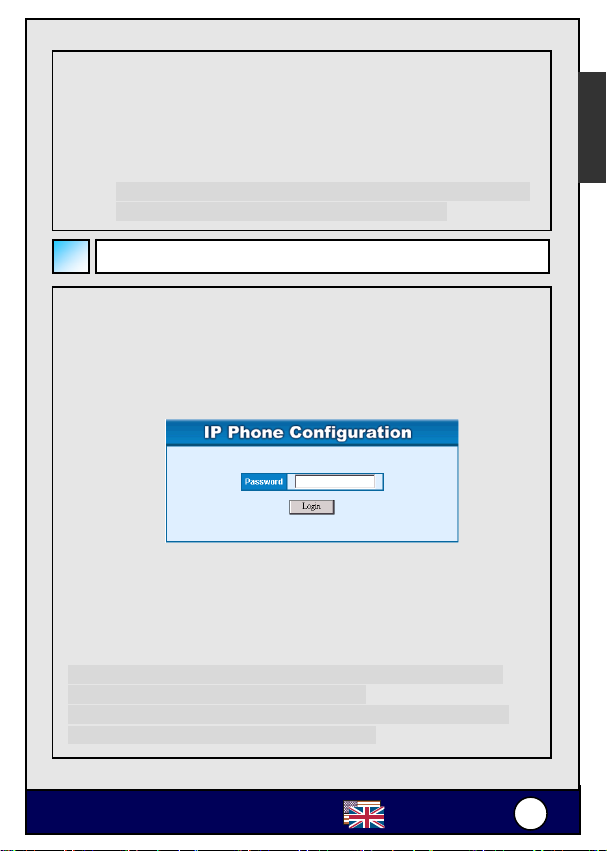
WEB Configuration
! Press the IP button on the front panel , the LCD will shows its
IP address.
! Start a Web browser, such as Microsoft’s Internet Explorer (IE),
and enter the AirLive ePhone-1000S’s IP address on the web
browser. Address. The AirLive ePhone-1000S login screen is
displayed:
The AirLive ePhone -1000S web configuration password comes
with two categories: User password and Administrator password.
1. The default User Password is 1234.
2. The default Administrator Password is 12345678.
Please input the password, then click “Login” button.
Note: If you have a FWD or iptel account, please refer to the
Appendix for detailed configuration guide.
Note: Refer to the AirLive ePhone-1000S Manual for detailed
configuration of the AirLive ePhone-1000S.
Ovislink
irLive ePhone-1000S
English
3
3
Page 5
A
English
Prepare your Internet information, and then follow the steps
below to install your AirLive ePhone -1000S.
※ For the Cable ISP subscriber:
Cable ISPs usually provide DHCP to its subscribers, and each
time they only allow one user logon. Therefore, most ISPs
require their subscribers report the MAC address of their internet
devices to allow them to use the service. If you want to apply
another account for AirLive ePhone -1000S, just simply report
the MAC address of your AirLive ePhone -1000S to your ISP
provider.
If you want to use multiple internet devices in the same time, you
need a router to connect to the ISP, and connect your internet
devices to the router. Then replace the original MAC address to
your router’s MAC address.
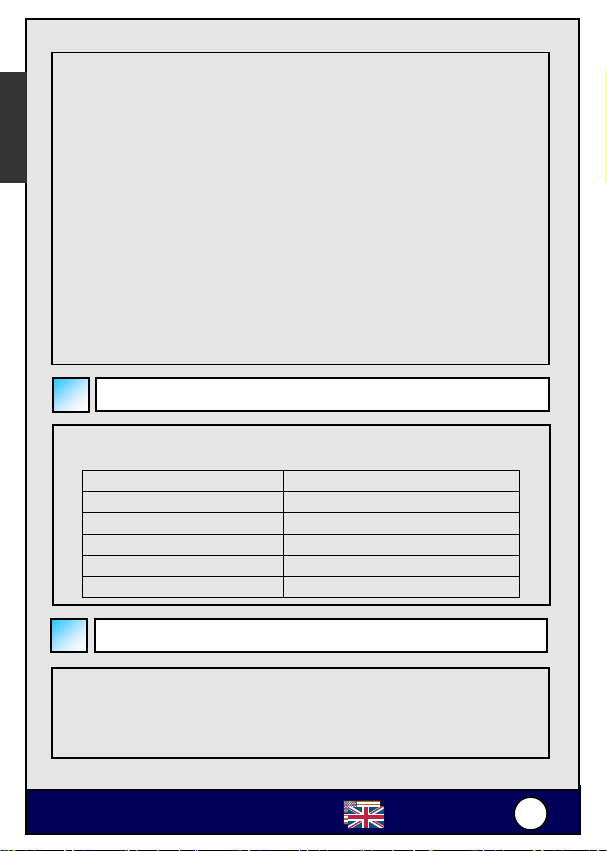
Keypad Configuration
AirLive ePhone -1000S is able to be configured using keypad.
Below table illustrates Function keys for configuration:
Keys Function
SPD / HOLD Change Settings
REDIAL / MUTE Main Menu Options
< VOL -- Next Page
VOL + > Previous Page
ENTER Confirm Setting
Ovislink
Network Settings
" The default setting for AirLive ePhone-1000S is DHCP.
Therefore, AirLive ePhone-1000S will be able to connect
to the internet under any DHCP environment.
irLive ePhone-1000S
English
4
4
Page 6

A
" If the network environment is either PPPoE or Static IP,
please change the networking setting of AirLive
ePhone-1000S to its corresponding network environment.
" Enter keypad configuration mode and select [network
setting]. Select DHCP, Static IP or PPPoE based on your
network environment on the phone.
DHCP Setting
1. Connect the RJ-45 Ethernet Cable to the RJ-45 port on the
AIRLIVE EPHONE-1000S, and then plug in the power.
2. Press 1234# (Hold the # key) # LCD shows [Password] #
Press 1234 and then press ENTER # LCD shows [Network
Settings].
3. Press ENTER # LCD shows [iptype] # Press SPD/HOLD #
Blinking Cursor # Press 1 and then press ENTER (1 sets your
networking settings to the DHCP mode).
4. Press REDIAL/MUTE multiple times # LCD shows [save
settings] # Press ENTER # LCD shows [Are You Sure?] #
Press ENTER to finish this setting. IPF will then reboot.
Static IP Setting
1. Connect the RJ-45 Ethernet Cable to the RJ-45 port on the
AIRLIVE EPHONE-1000S, and then plug in the power.
2. Press 1234# (Hold the “#” key) # LCD shows [Password] #
Press 1234 and then press ENTER # LCD shows [Network
Settings].
3. Press ENTER # LCD shows [iptype] # press SPD/HOLD #
Blinking Cursor# Press 0 and then press ENTER. (0 sets
your networking settings to the Static IP mode)
English
Ovislink
irLive ePhone-1000S
English
5
5
Page 7

A
English
4. Press ENTER # LCD shows [IP] # Press SPD/HOLD #
Blinking Cursor # Input IP address (XXX*XXX*XXX*XXX) and
then press ENTER
5. Press ENTER # LCD shows [Subnet Mask] # Press
SPD/HOLD # Blinking Cursor # Input Subnet Mask
information (XXX*XXX*XXX*XXX) and then press ENTER.
6. Press ENTER # Router # Press SPD/HOLD # Blinking
Cursor # Input Default Gateway Information
(XXX*XXX*XXX*XXX) and then press ENTER.
7. Press REDIAL/MUTE multiple times # LCD shows [save
settings] # Press ENTER # LCD shows [Are You Sure?] #
Press ENTER to finish this setting. IPF will then reboot.
PPPoE Setting
1. Connect the PPPoE network to the RJ-45 port of the AIRLIVE
EPHONE-1000S, and then plug in the power.
2. Press 1234# (Hold the “#” key) # LCD shows [Password] #
Press 1234 and then press ENTER # LCD shows [Network
Settings].
3. Press ENTER # LCD shows [iptype] # press SPD/HOLD #
Blinking Cursor # Press 2 and then press ENTER. (2 sets your
networking settings the PPPoE mode)
4. Press ENTER # LCD shows [pppid] # Press SPD/HOLD #
Input PPPoE account number and then press ENTER.
5. Press ENTER # LCD shows [pppin] # Press SPD/HOLD #
Input PPPoE password and then press ENTER # Press
ENTER again to complete the configuration
6. Press REDIAL/MUTE multiple times # LCD shows [save
settings] # Press ENTER # LCD shows [Are You Sure?] #
Press ENTER to finish this setting. IPF will then reboot.
Ovislink
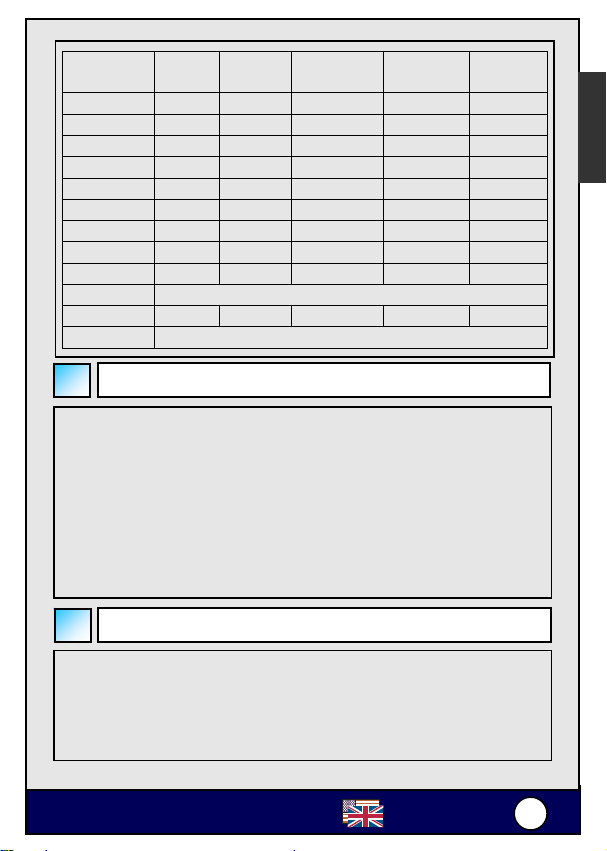
Keypad and Symbols mapping table
irLive ePhone-1000S
English
6
6
Page 8
A
g
)
Number
key
1 1 . , ? Ú/!
2 2 A/a B/b C/c 【
3 3 D/d E/e F/ f 】
4 4 G/g H/h I/i *
5 5 J/j K/k L/l
6 6 M/m N/n O/o #
7 7 P/p Q/q R/r S/s
8 8 T/t U/u V/v
9 9 W/w X/x Y/y Z/z
* .
0 0 Space :Ú@ ;Ú- ’Ú&
# Switch to upper/lower case
Press
once
Press
twice
Press 3
times
Press 4
times
Press 5
times
English
Registration Message
When the registration for AirLive ePhone-1000S is successful,
Ready for Call will appear on the screen, so does the time and
date. If the registration is not successful, Log on Fail or Wait
Logon will appear. The possible reasons of the registration
failure would be:
$ Internet connection is fail. (Fail to acquire the IP address
under the DHCP and PPPoE mode, or some IP
configurations are wrong under the Static IP mode),
$ Re
istration is fail. (Fail to register to the VoIP server
Ovislink
Using AirLive ePhone-1000S
1. Pick up the handset or press ENTER.
2. After hearing the dial tone, press the phone number you
want to dial.
3. Press # right after the numbers, or wait for 4 seconds. The
number you want to dial will then be sent out.
irLive ePhone-1000S
English
7
7
Page 9

A
Some Simple Troubleshooting
English
Problem: Troubleshooting:
LCD display down or
disorder
LCD shows [Please dial],
but the phone is unable to
dial or hang up.
LCD shows [Wait Logon],
[Log On], or [Log On
Failed]
LCD shows [Ready for
call]. However, when
dialing the phone number,
the LCD shows [Please
Hangup]
Hear echo during the
conversation
Noise Please check the connection and
Set to the factory default
setting
Unplug the power # Wait for 5
seconds # Plug the power back.
Unplug the power # Wait for 5
seconds # Plug the power back.
1. Please check the Internet
connection of the RJ-45 is ok.
2. Please check if the AIRLIVE
EPHONE-1000S is able to
acquire an IP address. If not,
please check the Network
Setting and see if the
configuration is correct.
3. Please verify that the account is
valid. Please contact you VoIP
service provider for the account
information.
Please verify that the account is
valid. Please contact you VoIP
service provider for the account
information.
Please press VOL – to the proper
volume.
see if the connection is loose.
1. Press 1234* # LCD shows
[Booting…] # Release the
keypad * # LCD shows [Page0
running] # Press #5*5 # the
AIRLIVE EPHONE-1000S will
reboot.
2. After rebooting, the phone set
to be the factory default.
Ovislink
irLive ePhone-1000S
English
8
8
Page 10

A
Appendix A: Using IPtel Free SIP Serivce
Note: OvisLink is not affiliated with IPtel. The IP Phone also
work with majority of other SIP proxy service. The
following instruction is for your own information only.
1. Apply a IPtel account at http://sip.iptel.org/user/reg/index.php
2. As shown below, fill in your personal information (First
Name/LastName …), then click “Register”.
Note: Please make sure that your email address is correct in
order for you to receive the account activation email.
Note: The user name must be composed with numbers. Please
do not compose it with characters.
3. After you have registered with the IPtel, you will see the
following confirmation message:
Thank you for registering with iptel.org
Your application was forward for approval.
Expect a confirmation message shortly
We are reserving the following SIP address for you:
If you have any further questions feel free to send an email to
Check your email for the IPtel account activation email. Please
click the link in that email to finalize the registration.
Thank you for registering with iptel.org.
We are reserving the following SIP address for you: siptw@iptel.org
To finalize your registration please check the following URL within 24 hours:
http://sip.iptel.org/user/reg/confirmation.php?nr=e70ab197948118a101516b
d2992c7d7 (If you confirm later you will have to re-register)
4. Login the AirLive ePhone-1000S Web Configuration page
5. The AirLive ePhone-1000S configuration depends on your
network environment. Please refer to the Network Settings for
the network configuration.
sip:siptw@iptel.org.
info@iptel.org
English
Ovislink
irLive ePhone-1000S
English
9
9
Page 11

A
English
If you connect the IP Phone to the Internet and have the
public IP, please Choose the “Using a Public IP “.
If your IP phone is connecting to the internet through the
router, please choose the “Using Outbound Proxy under
NAT “ first. It is does not work, then try the “Using STUN
under NAT “.
In the following example we have IPtel Number as 780821 and
FWD Service Password as 123456. Please check the related
configuration as follows:
! Using a Public IP
use service checked
service addr iptel.org
service id iptel.org
nat traversal disable
nat addr blank
phone number your iptel username (For example: 780821)
account your iptel username (For example: 780821)
pin your iptel password (For example: 123456)
register port 5060
rtp port 1722 (Can use any even number between
1024~65535)
local type phonenumber
dtmf inband audio
Ovislink
irLive ePhone-1000S
English
110
0
Page 12

A
! Using Outbound Proxy under NAT
English
use service checked
service addr iptel.org
service id iptel.org
nat traversal disable
nat addr blank
phone number your iptel username (For example: 780821)
account your iptel username (For example: 780821)
pin your iptel password (For example: 123456)
register port 5060
rtp port 1722 (Can use any even number between
1024~65535)
local type phonenumber
dtmf inband audio
! Using STUN under NAT
Ovislink
irLive ePhone-1000S
English
111
1
Page 13

A
English
use service checked
service addr iptel.org
service id iptel.org
nat traversal stun
nat addr larry.gloo.net
phone number your iptel username (For example: 780821)
account your iptel username (For example: 780821)
pin your iptel password (For example: 123456)
register port 5060
rtp port 6800 (Can use any even number between
1024~65535)
local type phonenumber
dtmf inband audio
$ Configure the audio settings
Audio type AUTO
Audio frames 3
$ Click Save/Reboot to save your settings
Ovislink
" Start dialing your friends and family. Be sure to tell
everyone about your IPtel username! The more people in
the IPtel community, the more people you can call for
free!
" For more information, please go to
http://www.iptel.org/phpBB/
irLive ePhone-1000S
English
112
2
Page 14

A
Packungsinhalt
! AirLive ePhone-1000S VoIP IP Phone
! Netzteil
! RJ-45 Ethernet-Kabel
! Kurzanleitung
! Installations-CD
Deutsch
ePhone-1000S Funktionen
Ovislink
irLive ePhone-1000S
Deutsch
113
3
Page 15

A
r
Hardware-Installation
Inbetriebnahme mit einem Route
Stecken Sie ein Ende des RJ-45-Kabels in den LAN-Port Ihres
AirLive ePhone-1000S und verbinden Sie das andere Ende mit
Deutsch
dem LAN-Port Ihres Routers. Sobald das Display “Ready for call”
anzeigt ist die Hardware-Installation abgeschlossen.
Inbetriebnahme ohne Router
Stecken Sie ein Ende des RJ-45-Kabels in den LAN-Port Ihres
AirLive ePhone-1000S und verbinden Sie das andere Ende mit
dem LAN-Port Ihres HUBs. Sobald das Display “Ready for call”
anzeigt ist die Hardware-Installation abgeschlossen.
Ovislink
irLive ePhone-1000S
Deutsch
114
4
Page 16

A
Konfiguration in einer NAT-Umgebung
Wird das AirLive ePhone-1000S in einer NAT-Umgebung
betrieben (Nach Betätigung des IP-Buttons an der Frontplatte
werden IP-Adressen aus den Bereichen 192.168.x.x oder
10.x.x.x angezeigt), so fragen Sie bitte Ihren VoIP
Serviceprovider nach weiteren Informationen.
※ Detaillierte Angaben zur Konfiguration finden Sie in
der Bedienungsanleitung Ihres AirLive
Deutsch
WEB-Konfiguration
! Betätigen Sie den IP-Button an der Frontplatte: Die IP-Adresse
Ihres AirLive ePhone-1000S wird jetzt angezeigt.
! Starten Sie einen Webbrowser (z.B. MS Internet Explorer) und
geben Sie dort diese IP-Adresse ein. Es erscheint das
Anmeldefenster Ihres AirLive ePhone-1000S:
Sie können sich hier sowohl als Benutzer als auch als
Administrator anmelden:
3. Das voreingestellte Benutzer-Passwort ist 1234.
4. Das voreingestellte Administrator-Passwort ist 12345678.
Nach Eingabe des Passworts klicken Sie bitte den “Login”-Button.
Anmerkung: Zur Benutzung eines FWD oder iptel Zugangs finden
Sie detaillierte Konfigurationsanweisungen im Anhang.
Anmerkung: Detailliertere Angaben zur Konfiguration entnehmen
Sie bitte der Bedienungsanleitung Ihres AirLive ePhone-1000S.
Ovislink
irLive ePhone-1000S
Deutsch
115
5
Page 17

A
Legen Sie zunächst die Informationen über Ihren Internetzugang
bereit und folgen Sie zur Installation Ihres AirLive ePhone
-1000S den weiter unten beschriebenen Schritten.
※ Bei Anbindung über einen ISP via Standleitung:
Hier wird meist DHCP benutzt und nur ein gleichzeitiger Login
Deutsch
pro Benutzer zugelassen. Somit benötigen die meisten ISPs
(Internet Service Provider) von ihren Kunden die Angabe der
MAC-Adresse des angebundenen Netzwerkgerätes. Zur
Freischaltung Ihres AirLive ePhone-1000S teilen Sie Ihrem ISP
daher bitte die MAC-Adresse Ihres AirLive ePhone-1000S mit.
Bei gleichzeitiger Benutzung mehrerer Geräte im Netzwerk wird
deren Anbindung an den ISP über einen Router realisiert, und es
muss somit die MAC-Adresse des Routers mitgeteilt werden.
Konfiguration per Tastenfeld
Das AirLive ePhone-1000S kann über das Tastenfeld konfiguriert
werden. Hier die Beschreibung der Funktionstasten:
Taste Funktion
SPD/HOLD Einstellungen ändern
REDIAL/MUTE Optionen des Hauptmenüs
< VOL -- Nächste Seite
VOL + > Vorherige Seite
ENTER Einstellung bestätigen
Ovislink
Netzwerk-Einstellungen
" Die Voreinstellung des AirLive ePhone-1000S ist
DHCP. Die Internetanbindung in einer DHCP-Umgebung
wird somit automatisch konfiguriert.
irLive ePhone-1000S
Deutsch
116
6
Page 18

A
" Erfolgt die Anbindung über PPPoE oder eine statische IP,
so passen Sie die Netzwerkeinstellung ihres AirLive
ePhone-1000S bitte wie im Folgenden beschrieben an.
" Wählen Sie [network setting] im Konfigurationsmodus des
Tastenfelds. Wählen Sie DHCP, Static IP oder PPPoE in
Abhängigkeit von der Art des Netzwerkes, mit dem Ihr
AIRLIVE EPHONE-1000S verbunden ist.
Deutsch
DHCP-Einstellung
1. Verbinden Sie das RJ-45-Kabel mit dem RJ-45 Port des
AirLive ePhone-1000S und stecken Sie den Netzstecker ein.
2. Geben Sie 1234# ein (#-Taste halten) # LCD: [Password] #
geben Sie 1234 und ENTER ein # LCD: [Network Settings].
3. Drücken Sie ENTER # LCD: [iptype] # Drücken Sie
SPD/HOLD # Cursor blinkt# Drücken Sie 1 and dann ENTER
(1 setzt Ihre Netzwerk-Einstellung auf DHCP-Modus)
4. Betätigen Sie mehrmals REDIAL/MUTE # LCD: [save
settings]# Drücken Sie ENTER # LCD: [Are You Sure?] #
Bestätigen Sie die Einstellungen mit ENTER. Es erfolgt ein
Neustart des IPF.
Einstellungen für statische IP
4. Verbinden Sie das RJ-45-Kabel mit dem RJ-45 Port des
AirLive ePhone-1000S und stecken Sie den Netzstecker ein.
5. Geben Sie 1234# ein (#-Taste halten) # LCD: [Password] #
geben Sie 1234 und ENTER ein # LCD: [Network Settings].
6. Drücken Sie ENTER # LCD: [iptype] # Drücken Sie
SPD/HOLD # Cursor blinkt# Drücken Sie 0 and dann
ENTER (0 wählt den Modus für statische IP)
Ovislink
irLive ePhone-1000S
Deutsch
117
7
Page 19

A
4. Drücken Sie ENTER # LCD: [IP] # Betätigen Sie SPD/HOLD
# Cursor blinkt # Geben Sie die IP-Addresse
(XXX*XXX*XXX*XXX) ein und bestätigen Sie mit ENTER.
5. Drücken Sie ENTER # LCD: [Subnet Mask] # Betätigen Sie
SPD/HOLD # Cursor blinkt # geben Sie die Subnetzmaske
Deutsch
(XXX*XXX*XXX*XXX) ein und bestätigen Sie mit ENTER.
6. Drücken Sie ENTER # [Router] # Betätigen Sie SPD/HOLD
# Cursor blinkt # Geben Sie die IP des Default Gateway ein
(XXX*XXX*XXX*XXX) and bestätigen Sie mit ENTER.
7. Drücken Sie mehrmals REDIAL/MUTE # LCD: [save
settings] # Drücken Sie ENTER # LCD: [Are You Sure?] #
Betätigen Sie zum Abschluss ENTER. Es erfolgt ein Neustart
des IPF.
Einstellungen für PPPoE
7. Verbinden Sie das RJ-45-Kabel mit dem RJ-45 Port Ihres
AirLive ePhone-1000S und stecken Sie den Netzstecker ein.
8. Geben Sie 1234# ein (#-Taste halten) # LCD: [Password] #
geben Sie 1234 und ENTER ein # LCD: [Network Settings].
9. Drücken Sie ENTER # LCD: [iptype] # Drücken Sie
SPD/HOLD # Cursor blinkt# Drücken Sie 2 and dann ENTER
(2 wählt den Modus für PPPoE).
10. Drücken Sie ENTER #LCD:[pppid] # Drücken Sie
SPD/HOLD # Geben Sie die Login-Kennung Ihres PPPoE-
-Zugangs ein und bestätigen Sie mit ENTER.
11. Drücken Sie ENTER#LCD:[pppin]# Drücken Sie
SPD/HOLD # Geben Sie Ihr PPPoE-Passwort ein und
bestätigen Sie mit ENTER # Drücken Sie zum Abschluss
nochmals ENTER.
12. Drücken Sie mehrmals REDIAL/MUTE # LCD: [save settings]
# Drücken Sie ENTER # LCD: [Are You Sure?] # Bestätigen
Ovislink
irLive ePhone-1000S
Deutsch
118
8
Page 20

A
g
Zuordnung der Tastensymbole
Ziffern-
Ta st e
1 1 . , ? Ú/!
2 2 A/a B/b C/c 【
3 3 D/d E/e F/ f 】
4 4 G/g H/h I/i *
5 5 J/j K/k L/l
6 6 M/m N/n O/o #
7 7 P/p Q/q R/r S/s
8 8 T/t U/u V/v
9 9 W/w X/x Y/y Z/z
* .
0 0 Leerz. :Ú@ ;Ú- ’Ú&
# Umschaltung Groß-/Kleinschrift
1x
drücken
2x
drücken
3x
drücken
4x
drücken
5x
drücken
Registrierungsmeldung
Nach erfolgreicher Registrierung Ihres AirLive ePhone-1000S
erscheint Ready for Call sowie Uhrzeit und Datum auf dem
Display. Bei misslungener Registrierung wird Log on Fail oder
Wait Logon angezeigt. Mögliche Ursachen für eine
fehlgeschlagene Registrierung sind:
$ Fehlerhafte Internetverbindung (keine zugewiesene
IP-Adresse bei DHCP und PPPoE, falsche
IP-Konfiguration bei statischer IP)
$ Fehler bei der Re
istrierung am VoIP-Server selbst
Benutzung des AirLive ePhone-1000S
4. Nehmen Sie den Hörer ab oder drücken Sie ENTER.
5. Nachdem Sie das Freizeichen vernehmen wählen Sie die
Telefonnummer des gewünschten Gesprächspartners.
6. Drücken Sie # nach Eingabe der Nummer oder warten Sie 4
Sekunden. Die eingegebene Nummer wird dann übermittelt.
Deutsch
Ovislink
irLive ePhone-1000S
Deutsch
119
9
Page 21

A
Tipps zur Fehlerbehebung
Problem: Fehlerbehebung:
LCD-Display aus oder
Anzeige gestört
Deutsch
LCD zeigt [Please dial] an,
aber kein Wählen oder
Auflegen möglich
LCD zeigt [Wait Logon],
[Log On], oder [Log On
Failed]
LCD zeigt [Ready for call],
beim Wählen einer
Nummer jedoch [Please
Hangup]
Echos während einer
Verbindung
Störgeräusche Überprüfen Sie bitte Ihre
Werkseinstellungen
wieder herstellen
Netzstecker ziehen # 5 Sekunden
warten # Netzstecker wieder
einstecken
Netzstecker ziehen # 5 Sekunden
warten # Netzstecker wieder
einstecken
4. Bitte überprüfen Sie Ihren
RJ-45 Netzwerkanschluss.
5. Prüfen Sie bitte, ob Ihr AirLive
ePhone-1000S eine IP-Adresse
zugewiesen bekommt.
Andernfalls bitte die NetzwerkKonfiguration überprüfen
6. Stellen Sie sicher, dass Ihr
VoIP-Account gültig ist und
fragen Sie Ihren
VoIP-Dienstleister nach den
Zugangsdaten.
Stellen Sie sicher, dass Ihr
VoIP-Account gültig ist und fragen
Sie Ihren VoIP-Dienstleister nach
den Zugangsdaten.
Drücken Sie VOL zum Anpassen
der Lautstärke.
Kabelverbindungen.
3. Drücken Sie 1234* # LCD:
[Booting…] # * loslassen #
LCD: [Page0 running] # #5*5
drücken # Der AIRLIVE
EPHONE-1000S bootet neu.
4. Nach dem Neustart sind die
Werkseinstellungen aktiviert.
Ovislink
irLive ePhone-1000S
Deutsch
220
0
Page 22

A
Anhang A: Iptel free SIP Service
Anmerkung: OvisLink hat keine besondere Verbindung zu
IPtel. Das IP-Phone lässt sich ebenso mit den meisten anderen
SIP Proxy-Diensten betreiben.
3. Richten Sie sich unter http://sip.iptel.org/user/reg/index.php
einen Account bei IPtel ein.
4. Geben Sie wie unten gezeigt Ihre persönlichen Informationen
ein (Vorname/Nachname …), dann klicken Sie auf “Register”.
Anmerkung: Überzeugen Sie sich von der korrekten Eingabe
Ihrer Email-Adresse, da Sie hierüber Ihre Zugangsdaten
erhalten.
Der Benutzername muss ausschließlich aus Zahlen bestehen.
4. Nach Ihrer Registrierung bei Iptel sehen Sie die folgende
Deutsch
Ovislink
Thank you for registering with iptel.org
Your application was forward for approval.
Expect a confirmation message shortly
We are reserving the following SIP address for you:
If you have any further questions feel free to send an email to
Sehen Sie in Ihrer Email nach der IPtel-Aktivierungsmail und
klicken Sie zur Bestätigung auf den darin aufgeführten Link.
Thank you for registering with iptel.org.
We are reserving the following SIP address for you: siptw@iptel.org
To finalize your registration please check the following URL within 24 hours:
http://sip.iptel.org/user/reg/confirmation.php?nr=e70ab197948118a101516b
d2992c7d7 (If you confirm later you will have to re-register)
6. Gehen Sie auf die AirLive ePhone-1000S Web-Konfiguration.
7. Die Konfiguration des AirLive ePhone-1000S richtet sich nach
der Art Ihrer Netzwerkverbindung. Gehen Sie bitte gemäß den
weiter oben aufgeführten “Netzwerkeinstellungen” vor.
irLive ePhone-1000S
sip:siptw@iptel.org.
info@iptel.org
Deutsch
221
1
Page 23

A
Wenn Sie Ihr IP-Phone über eine öffentliche IP ans Internet
anbinden, wählen Sie bitte “Using a Public IP“.
Falls Ihr IP-Phone über einen Router mit dem Internet
verbunden ist, so wählen Sie bitte zunächst “Using
Outbound Proxy under NAT“. Falls dies nicht klappt, so
Deutsch
versuchen Sie bitte “Using STUN under NAT“.
Im folgenden Beispiel benutzen wir als IPtel-Number 780821 und
als FWD Service Passwort 123456. Hier die von der Art der
Netzwerkanbindung abhängigen Konfigurationseinstellungen:
! Benutzung einer öffentlichen IP-Adresse
use service ausgewählt
service addr iptel.org
service id iptel.org
nat traversal aus
nat addr leer
phone number Ihr IPtel Benutzername (z.B.: 780821)
account Ihr IPtel Benutzername (z.B.: 780821)
pin Ihr IPtel Passwort (z.B.: 123456)
register port 5060
rtp port 1722 (eine beliebige gerade Zahl zwischen
1024 und 65535)
local type phonenumber
dtmf inband audio
Ovislink
irLive ePhone-1000S
Deutsch
222
2
Page 24

A
! Benutzung von “Outbound Proxy under NAT”
Deutsch
use service ausgewählt
service addr iptel.org
service id iptel.org
nat traversal aus
nat addr lehr
phone number Ihr IPtel Benutzername (z.B.: 780821)
account Ihr IPtel Benutzername (z.B.: 780821)
pin Ihr IPtel Passwort (z.B.: 123456)
register port 5060
rtp port 1722 (eine beliebige gerade Zahl zwischen
1024 und 65535)
local type phonenumber
dtmf inband audio
! Benutzung von “STUN under NAT”
Ovislink
irLive ePhone-1000S
Deutsch
223
3
Page 25

A
Deutsch
use service ausgewählt
service addr iptel.org
service id iptel.org
nat traversal stun
nat addr larry.gloo.net
phone number Ihr IPtel Benutzername (z.B.: 780821)
account Ihr IPtel Benutzername (z.B.: 780821)
pin Ihr IPtel Passwort (z.B.: 123456)
register port 5060
rtp port 6800 (eine beliebige gerade Zahl zwischen
1024 und 65535)
local type phonenumber
dtmf inband audio
$ Konfigurieren Sie die Audio-Einstellungen
Audio type AUTO
Audio frames 3
$ Klicken Sie Save/Reboot zum Speichern der Einstellungen
Ovislink
" Rufen Sie jetzt Ihre Freunde und Ihre Familie an.
Erzählen Sie jedem von Ihrem Benutzernahmen bei IPtel!
Je mehr Mitglieder der IPtel Community beitreten, umso
mehr Leute können Sie kostenlos anrufen!
" Weitere Informationen finden Sie unter
http://www.iptel.org/phpBB/
irLive ePhone-1000S
Deutsch
224
4
 Loading...