

Page 1

BU-720
720P Outdoor
IR Night Vision IPCAM
User’s Manual
Page 2

Copyright and Disclaimer
Copyright & Disclaimer
No part of this publication may be reproduced in any form or by any means, whether
electronic, mechanical, photocopying, or recording without the written consent of OvisLink
Corp.
OvisLink Corp. has made the best effort to ensure the accuracy of the information in this
user’s guide. However, we are not liable for the inaccuracies or errors in this guide.
Please use with caution. All information is subject to change without notice
This product contains some codes from GPL. In compliance with GPL agreement, AirLive
will publish the GPL codes on our website. Please go to
"Support->GPL" menu to download source code.
All Trademarks are properties of their respective holders.
www.airlive.com and go to the
i AirLive BU-720 User’s Manual
Page 3

Copyright and Disclaimer
FCC Statement
Federal Communication Commission Interference Statement
This equipment has been tested and found to comply with the limits for a Class B digital
device, pursuant to Part 15 of the FCC Rules. These limits are designed to provide
reasonable protection against harmful interference in a residential installation. This
equipment generates, uses and can radiate radio frequency energy and, if not installed and
used in accordance with the instructions, may cause harmful interference to radio
communications. However, there is no guarantee that interference will not occur in a
particular installation. If this equipment does cause harmful interference to radio or
television reception, which can be determined by turning the equipment off and on, the A
user is encouraged to try to correct the interference by one of the following measures:
Reorient or relocate the receiving antenna.
Increase the separation between the equipment and receiver.
Connect the equipment into an outlet on a circuit different from that to which the
receiver is connected.
Consult the dealer or an experienced radio/TV technician for help.
FCC Caution
Any changes or modifications not expressly approved by the party responsible for
compliance could void the user's authority to operate this equipment. This device complies
with Part 15 of the FCC Rules. Operation is subject to the following two conditions: (1) This
device may not cause harmful interference, and (2) this device must accept any
interference received, including interference that may cause undesired operation. For
product available in the USA/Canada market, only channel 1~11 can be operated.
Selection of other channels is not possible.
This device and its antenna(s) must not be co-located or operation in conjunction with any
other antenna or transmitter.
FCC Radiation Exposure Statement
This equipment complies with FCC radiation exposure limits set forth for an uncontrolled
environment. This equipment should be installed and operated with minimum distance
20cm between the radiator & your body.
AirLive BU-720 User’s Manual ii
Page 4

Table of Contents
Table of Contents
1. Overview .....................................................................................................1
1.1 Introduction ..........................................................................................1
1.2 Features...............................................................................................1
1.3 Product Specification ...........................................................................2
1.4 System Requirement ...........................................................................5
2. Package Contents and Installation...........................................................6
2.1 Package Content .................................................................................6
2.2 Connections.........................................................................................6
2.3 Mounting the Camera ..........................................................................7
2.4 Connect to IP Camera .........................................................................8
3. Using IP Camera via Web Browser.........................................................11
3.1 Windows Web Browser......................................................................11
3.2 Mac Web Browser..............................................................................12
4. Operating IP Camera via Mobile Phone .................................................14
4.1 Mobile Phone Viewing .......................................................................14
4.2 Using IP Camera via iPhone..............................................................15
5. Configuration of Main Menu....................................................................16
5.1 Live View............................................................................................17
5.2 Configuration .....................................................................................18
5.3 Client Settings....................................................................................19
6. Configuration-Basic Settings..................................................................20
6.1 Account ..............................................................................................20
6.2 Network..............................................................................................22
6.3 Date Time ..........................................................................................25
iii
AirLive BU-720 User’s Manual
Page 5

Table of Contents
7. Camera Settings.......................................................................................27
7.1 Video..................................................................................................27
7.2 Image.................................................................................................30
7.3 E-PTZ Setting ....................................................................................32
8. Playback ...................................................................................................33
8.1 Client PC............................................................................................34
8.2 Network Storage ................................................................................35
8.3 Local Storage.....................................................................................35
9. Event .........................................................................................................36
9.1 Event Server ......................................................................................36
9.2 Event List ...........................................................................................37
9.3 Motion Detection................................................................................38
9.4 Tampering Detection ..........................................................................39
9.5 Schedule............................................................................................39
10. System ....................................................................................................40
10.1 Maintenance ....................................................................................41
10.2 Date Time ........................................................................................41
10.3 Security............................................................................................42
10.4 Network Basic..................................................................................42
10.5 Network Advanced...........................................................................43
10.6 LED..................................................................................................44
10.7 System Log......................................................................................44
11. Appendix.................................................................................................45
A. Frame-rate and Bitrate Table...............................................................45
B. Storage Requirement Table .................................................................50
AirLive BU-720 User’s Manual iv
Page 6

1. Overview
1. Overview
1
This user’s guide explains how to operate this camera from a computer. A user should read
this manual completely and carefully before you operate the device.
1.1 Introduction
The BU-720 IP Camera is an inexpensive and fully scalable surveillance device. Users are
able to view live video streaming over the Internet, and it is only one of benefits for using
BU-720 IP Camera. It is also equipped with PoE port which allows power and data to be
transmitted via a single Ethernet cable. This useful function provides an easier installation,
lower cabling costs and allows placement of AirLive PoE cameras in locations without
access to electrical source.
With the IP-66 waterproof housing, AirLive BU-720 suits for environments such as stairs,
main entrance, street, and basement.
The device is accessible via the LAN or Internet connection. Connect your device directly to
a local area network or xDSL modem, and with Microsoft® Internet Explorer you get instant,
on demand video streams. Within minutes you can set up the device to capture a video
sequence to a PC. The live video can be uploaded to a website for the world to see.
1.2 Features
This manual will illustrate the steps of how to setup and operate this IP camera, so you’ll
also soon be enjoying the benefits of these product features:
30FPS at 1280x800
802.3af PoE Port
15 Meter IR LED with Adjustable Brightness
Multiple H.264, Motion JPEG and MPEG-4 Video Streams
4mm Wide Angle Lens
Low Lux Sensor for Ultra Bright Images
Micro SD Card Slot for Local Storage
WDR Enhanced
IP-66 Weatherproof and Cable through Housing
Free 64-Channel Recording Software
1
AirLive BU-720 User’s Manual
Page 7

1.3 Product Specification
Model BU-720
Camera Type Outdoor Bullet Type
Max Resolution 1280X800
Image Sensor 1/4" Mega Pixel Color CMOS Sensor
Sensor Resolution 1280X800
1. Overview
Camera
Video
Lens Type
Board Lens
4mm, F1.5
Night Vision Yes
Max IR Distance 25M
Minimum
0 Lux with IR LEDs on
Illumination
Mechanical IR-Cut
Built-In Removable IR Cut Filter
Filter
Auto Iris None
48°27' (H)
Viewing Angle
37°17' (V)
E-PTZ
Pan/Tile Control
Preset Points-Up to 32 preset point
Camera Tour-Up to 8 tours
Analog Video Out Yes
Video Compression H.264 , MPEG4 , MJPEG
Video Profile 10
30 fps @ 1280 X 800
30 fps @ 1280 X 720
Resolution and
30 fps @ 640 x 480
Frame Rate
30 fps @ 320 X 240
30fps @ 160 X 120
Multi-profile streaming
Streaming over UDP, TCP, or HTTP
M-JPEG streaming over HTTP
(for non IE browser) Streaming
3GPP mobile view
Configurable frame rate and bandwidth
Support both CBR and VBR
Region of Interest None
Image Processing AE, AWB
AirLive BU-720 User’s Manual 2
Page 8

Noise reduction
Color, brightness, sharpness, contrast, Hue
Mirror/Flip
Privacy Masks
Text, time and date OSD
Digital Zoom 10x
Audio Encoder None
1. Overview
Audio
Network
LED and Button
Audio Streaming None
Audio Input/Output None
One RJ45 Port; IEEE 802.3u Compliant
Ethernet
10/100 Mbps Fast Ethernet with Auto-MDIX
PoE IEEE802.3af
TCP/IP, UDP, ICMP, DHCP, NTP, DNS,
Supported
Protocols
DDNS, SMTP, FTP, HTTP, HTTPs, Samba,
PPPoE, UPnP, Bonjour, RTP, RTSP and
RTCP
Password protection
Security
IP filter
HTTPS
Users Up to 20 simultaneous users
Power LED Blue Color
Link/Act. LED Blue Color
Reboot and Factory Default
Reset Button
(Push and Hold Over 5 Sec)
General
Network Processor DSP Base
System ROM 8 MByte NAND Flash
System RAM 128Mbyte DDR SDRAM
Power Supply DC12V
Power
8 Watts Max.
Consumption
RJ-45 10BaseT/100BaseTX
12V DC power jack
Connector
Composite video out
Reset button
Operation: Temp: -25℃ ~ 50℃
Humidity: 20% ~ 85% non-condensing
Environment
Storage: Temp: -15℃ ~ 60℃
Humidity: 0% ~ 90% non-condensing
3
AirLive BU-720 User’s Manual
Page 9

1. Overview
SD card slot Micro SD
Dimension HxWxD:145x145x100 (φ)mm
CamPro Express 64,
CamPro Professional Software
Search & Installation-IP Wizard II
System
Integration
Event Triggers
Motion detection
External input via DI interface
Motion Detection 3
FTP or NAS file upload
E-mail alter
Event handler
HTTP, and TCP notification
DO (digital output) alarm
UPNP Yes
Application
Programming
Interface
Open API for software integration
ONVIF
SDK
Video Buffer Pre- and post- alarm buffering
Intelligent video motion detection and
Alarm Triggers
external input
File upload via FTP or email
Notification via email, HTTP
Alarm Events
External output activation
Viewing System
Save to SD card
Network storage
Continuous
Yes
recording
OS Windows® XP, Vista, 7
Browser IE 6.0 or later, Firefox 2.0 or later, Safari
Cell Phone With 3GPP player
Video Player VLC, Quick Time, Real Player, Core Player
AirLive BU-720 User’s Manual 4
Page 10

1. Overview
1.4 System Requirement
For normal operation and viewing of the network camera, it’s recommended that your
system meets these minimum requirements for proper operation:
Item Requirements
CPU Minimum Intel® Core 2 Duo or higher
(Core i3 or above is recommended)
Graphic Card 256 MB RAM graphic cards
(or equivalent on-board graphic cards)
RAM Minimum 1 GB of RAM, (2GB or above is recommended)
Operating
Window 2000, 2003, XP, Vista or Windows 7
System
Mac OS Leopard 10.5
Web Browser Internet Explore 6 or later
Note: Please keep updating the latest Windows software and service package.
(Ex: Net Framework, Windows Media Player, Enhance ActiveX Security)
5
AirLive BU-720 User’s Manual
Page 11
2. Package Contents and Installation
2. Package Contents and
2
Installation
2.1 Package Content
A user can find the following items in the package as below:
1. AirLive BU-720 is the main element of the product.
2. Bundle CD include Setup Wizard II, CamPro Express64, Video Tutorial, Quick Start
Guide, User Manual and other tools
3. Power Adapter dedicates 12V DC electric power output to Network Camera.
4. Quick Start Guide provides important information and instructions for installing this
device.
5. Accessory Package
2.2 Connections
AirLive BU-720 User’s Manual 6
Page 12
2. Package Contents and Installation
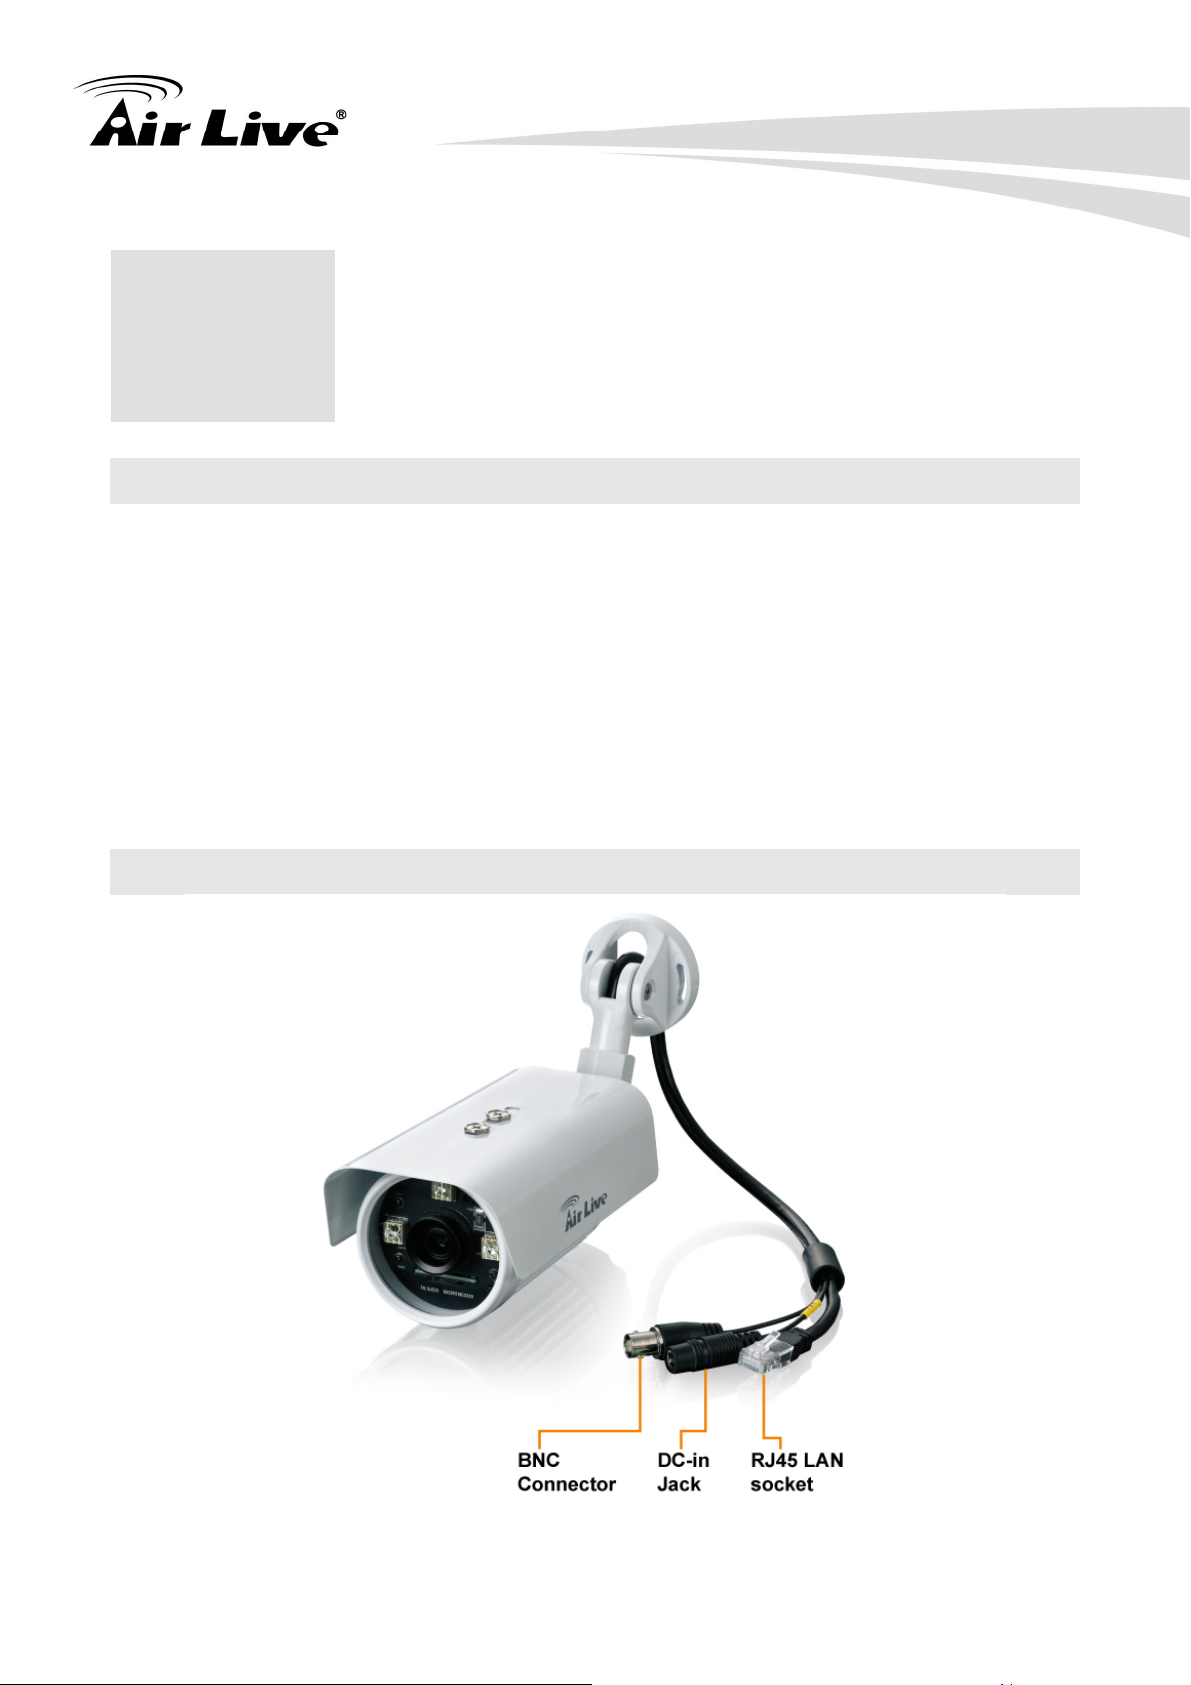
1. RJ45 LAN socket: Connect to PC or Hub/Switch.
For 10Base-T Ethernet or 100Base-TX Fast Ethernet cabling connection, this Ethernet
port built N-Way protocol can detect or negotiate the transmission speed of the network
automatically. Please use Category 5 cable to connect the Network Camera to a
100Mbps Fast Ethernet network switch or hub.
In front of the camera, there is a network LED embedded:
Network LED (Flash yellow)
This LED will be flashing while network accessing via Ethernet.
2. DC-in Jack
The input power is 12VDC.
Note that supply the power to the Network Camera with the power adapter included in
package.
3. BNC Connector
The composite video format will be sent out through this connector. User might connect
the IP Camera to a monitor or DVR via this connector.
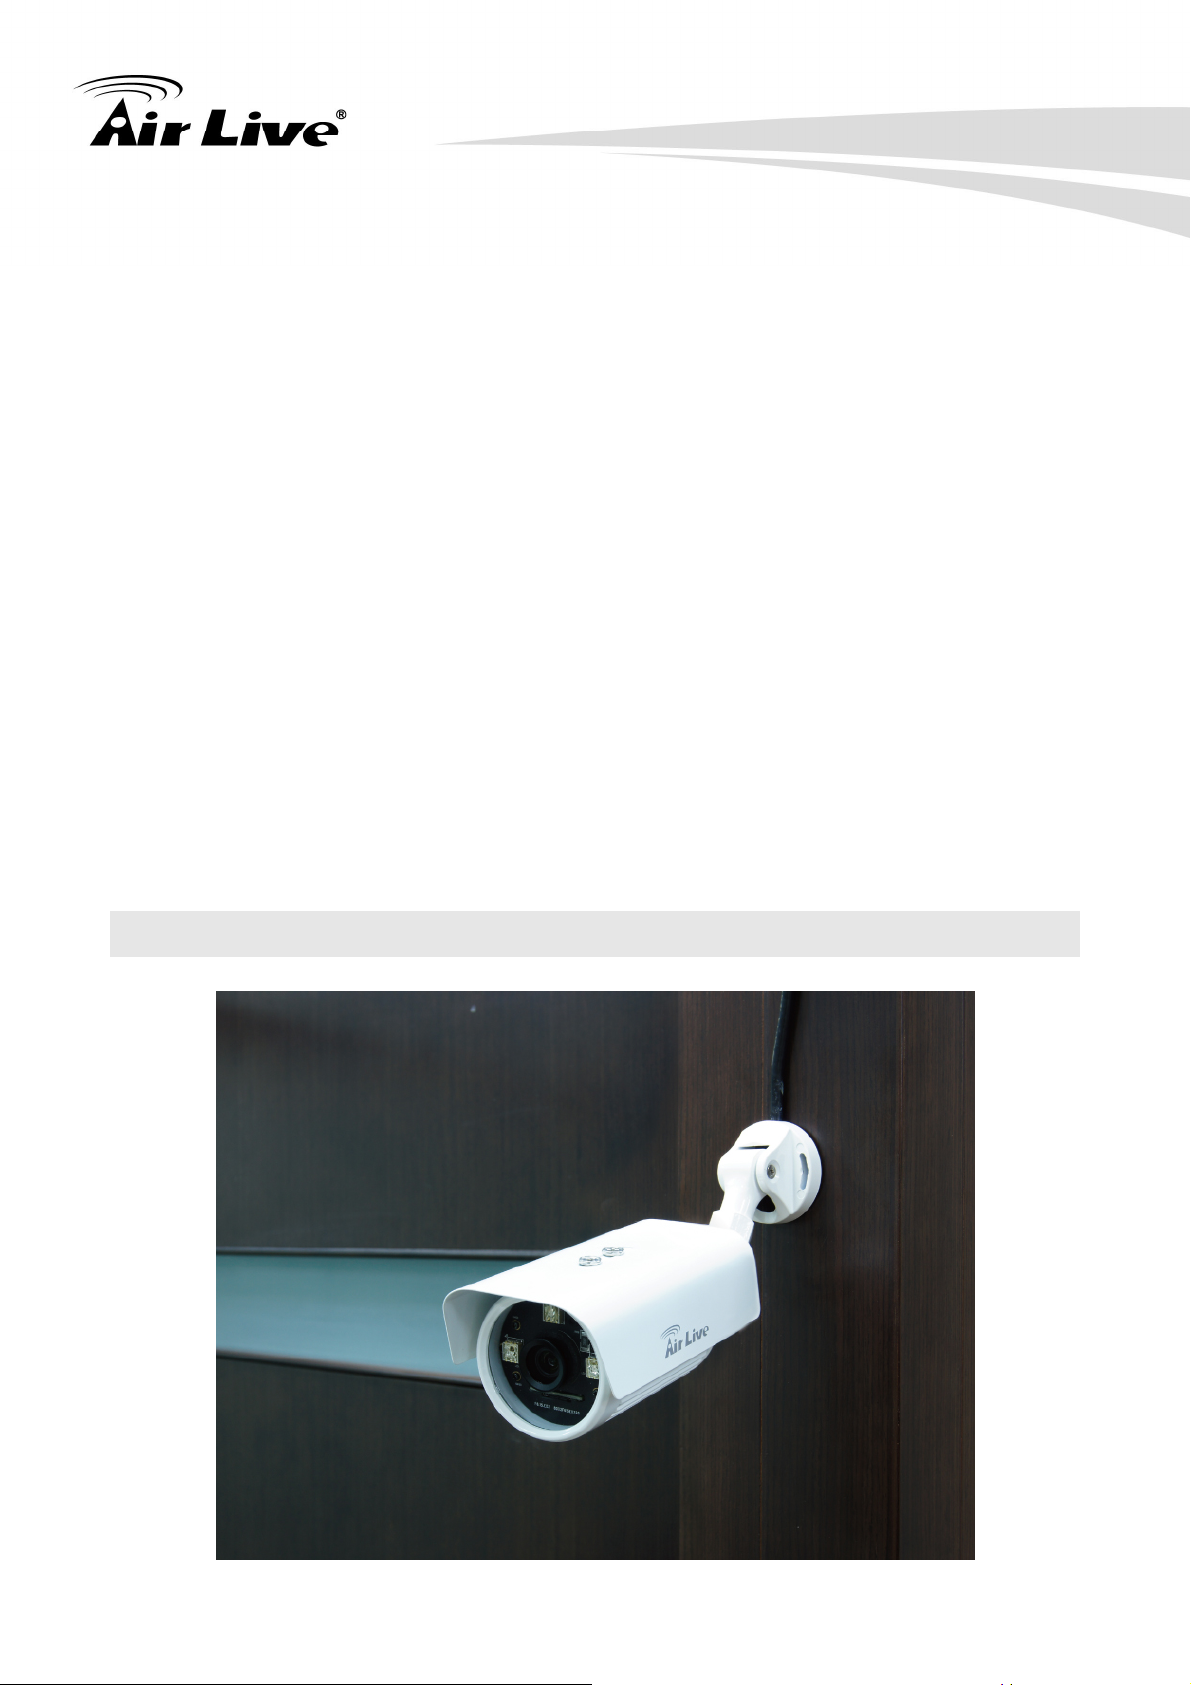
2.3 Mounting the Camera
Fix the camera with bundle wall mount kit as below.
7
AirLive BU-720 User’s Manual
Page 13
2. Package Contents and Installation
Install the Camera in LAN
1. Plug an Ethernet cable into the Camera
Connect an Ethernet cable to the LAN socket and attach it into the network.
2. Connect the external power supply to Camera
Connect the attached power adapter to the DC power jack of the camera.
Note: Use the power adapter, 12VDC, included in the package and connect it to wall
outlet for AC power.
Once you have installed the camera well and powered it on, the power LED (Steady red)
will turn on for booting up process. The power LED (Steady blue) will turn on for booting
up completion. Furthermore, the power LED will be changed to flash purple for FW
upgrading.
2.4 Connect to IP Camera
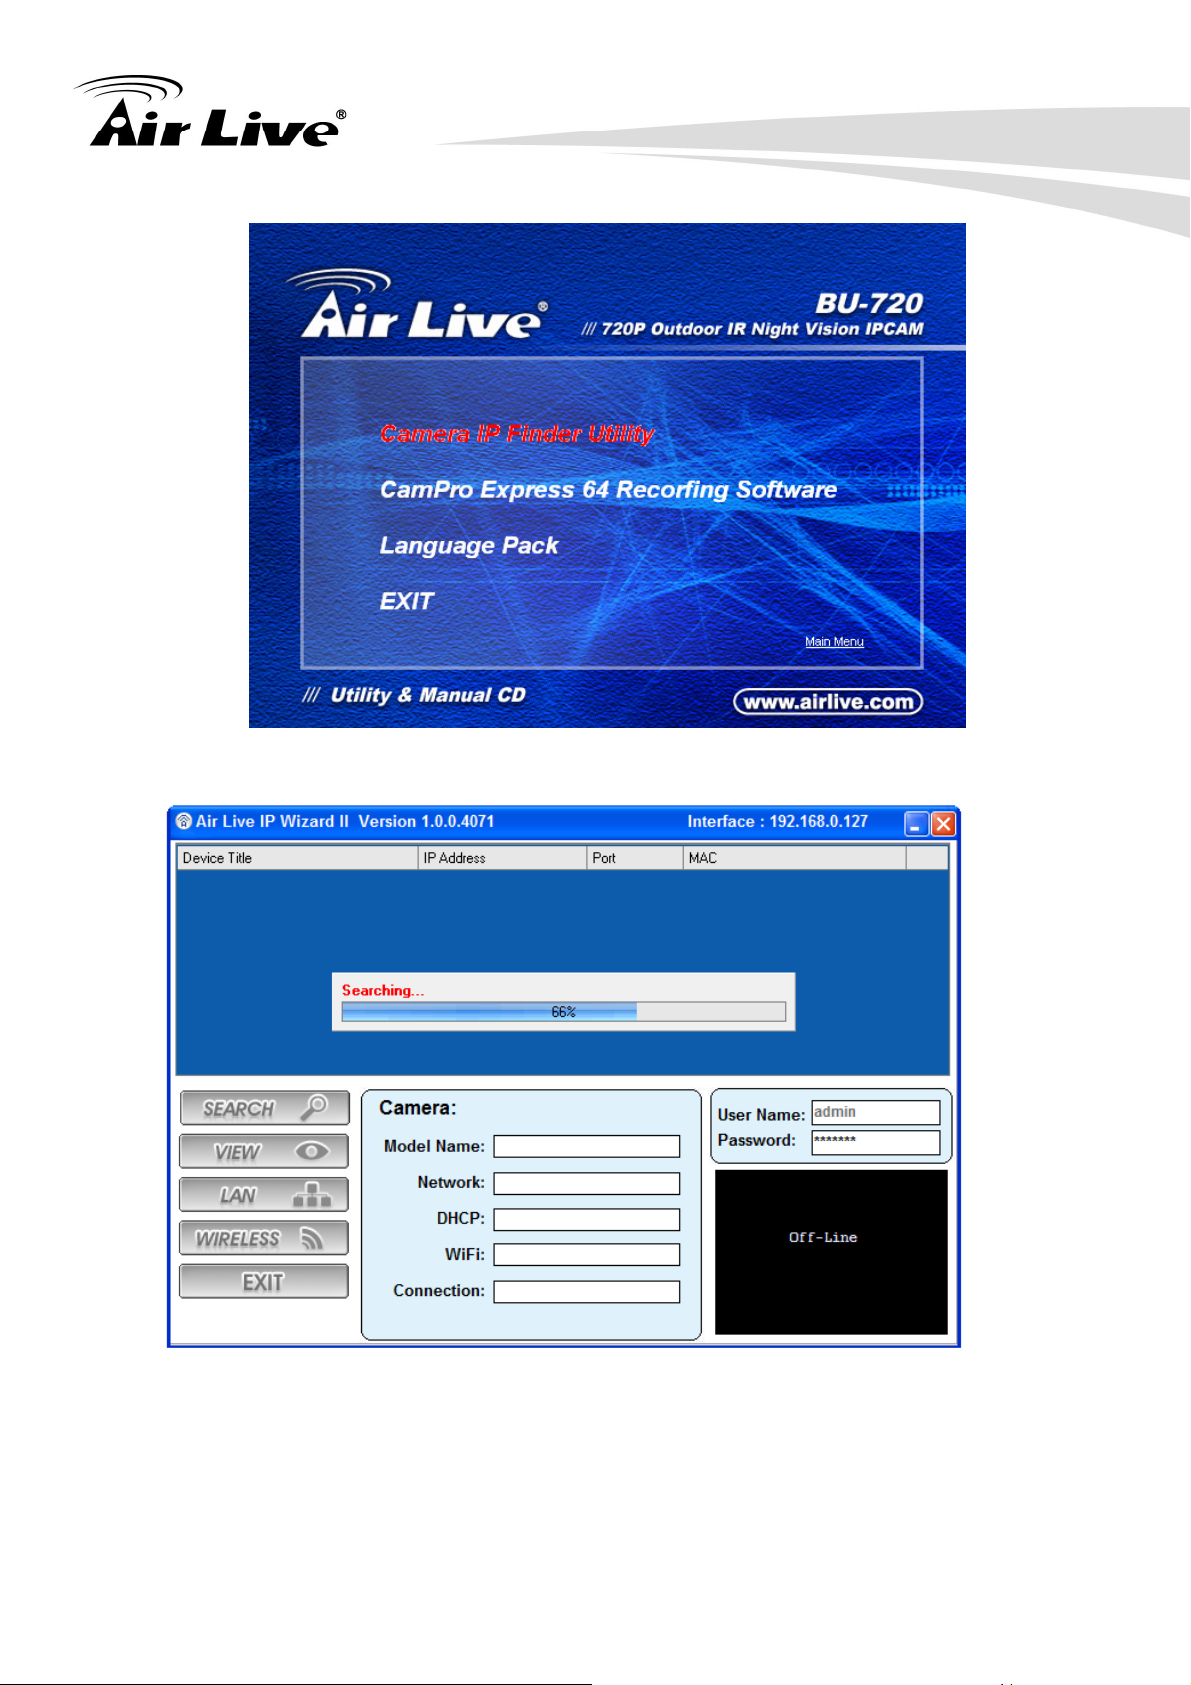
1. Insert the bundle CD into your PC/Laptop.
2. Auto Run Screen then shows up; click “Install Software Æ Camera IP Finder Utility” to
install the configuration tool software.
AirLive BU-720 User’s Manual 8
Page 14
2. Package Contents and Installation
3. After completing installation, run the configuration tool software.
9
AirLive BU-720 User’s Manual
Page 15
2. Package Contents and Installation
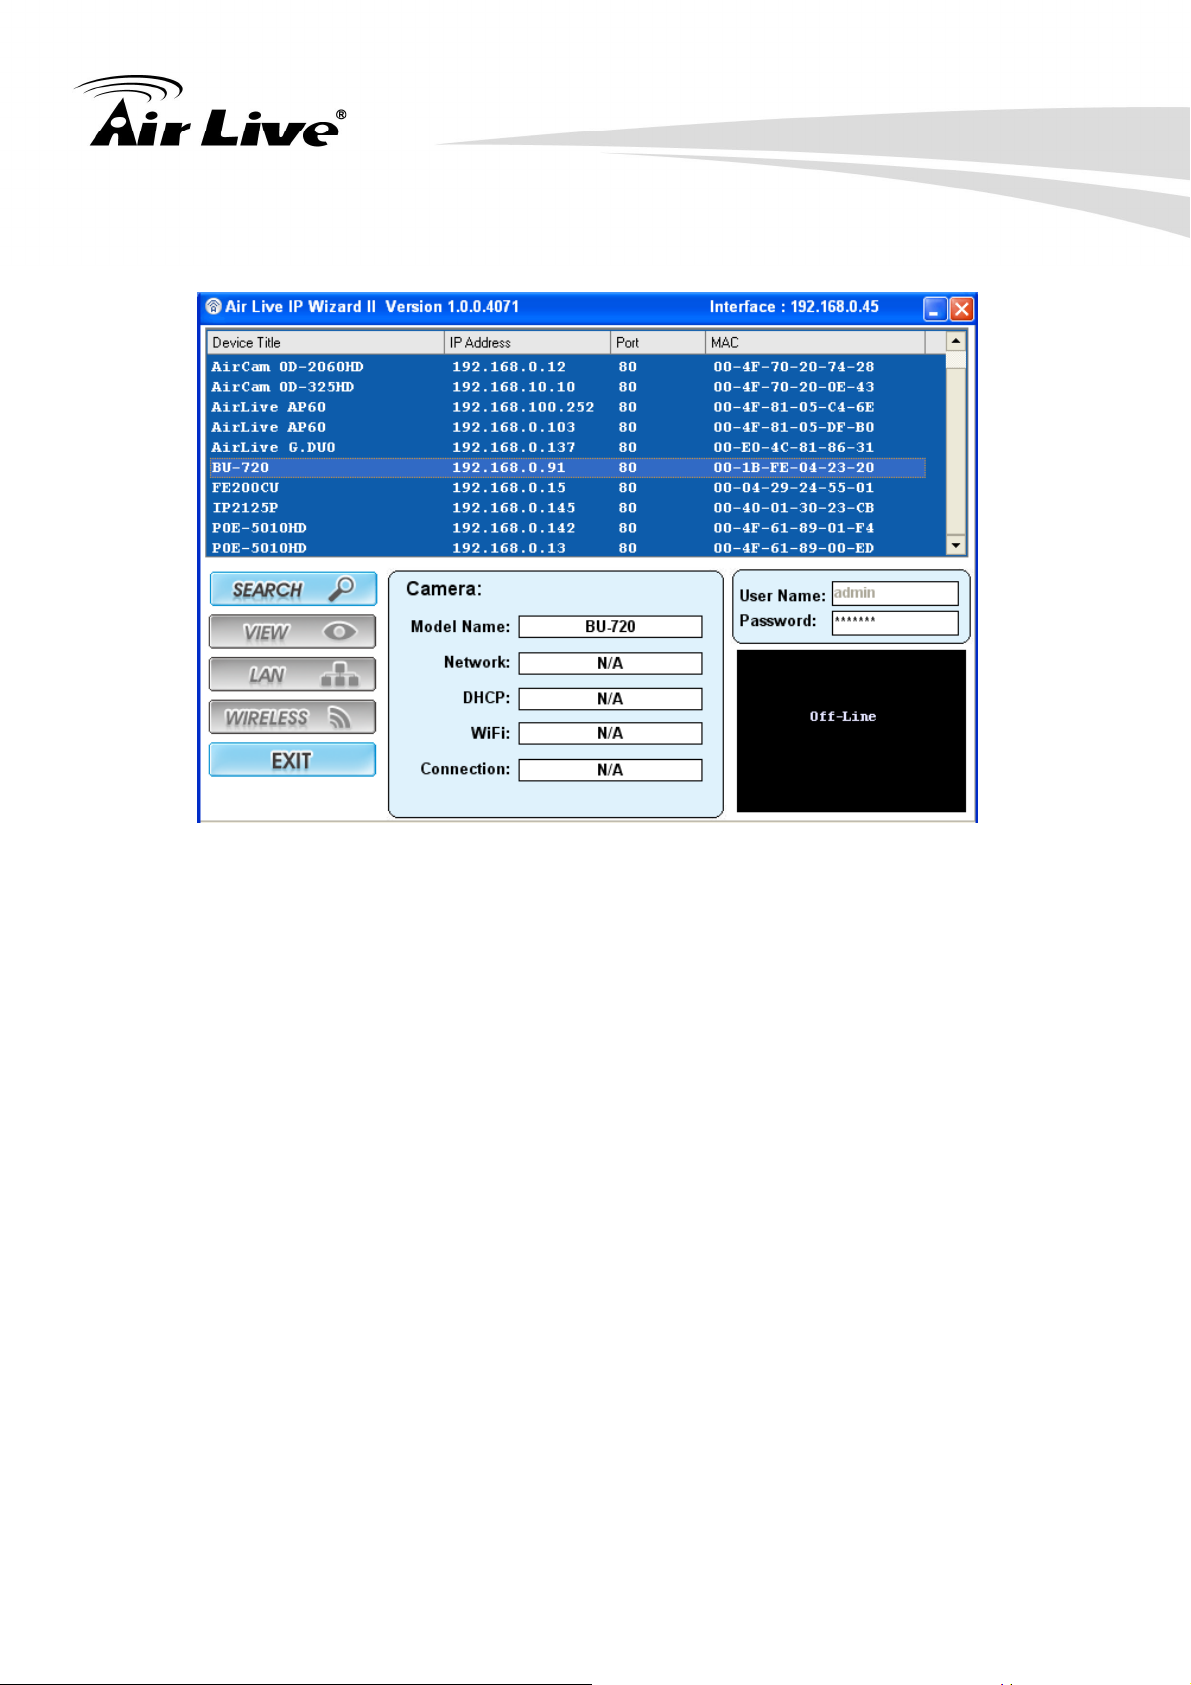
4. The Software scans the network and finds the IP Camera and then lists them in the
dialog box.
5. If the Camera’s IP address is in the same IP segment as your LAN, select the founded IP
Camera and double click on the item. Then, the default browser will show up and connect
to the IP camera’s Web automatically.
AirLive BU-720 User’s Manual 10
Page 16
3. Using IP Camera via Web Browser
3. Using IP Camera via
3
3.1 Windows Web Browser
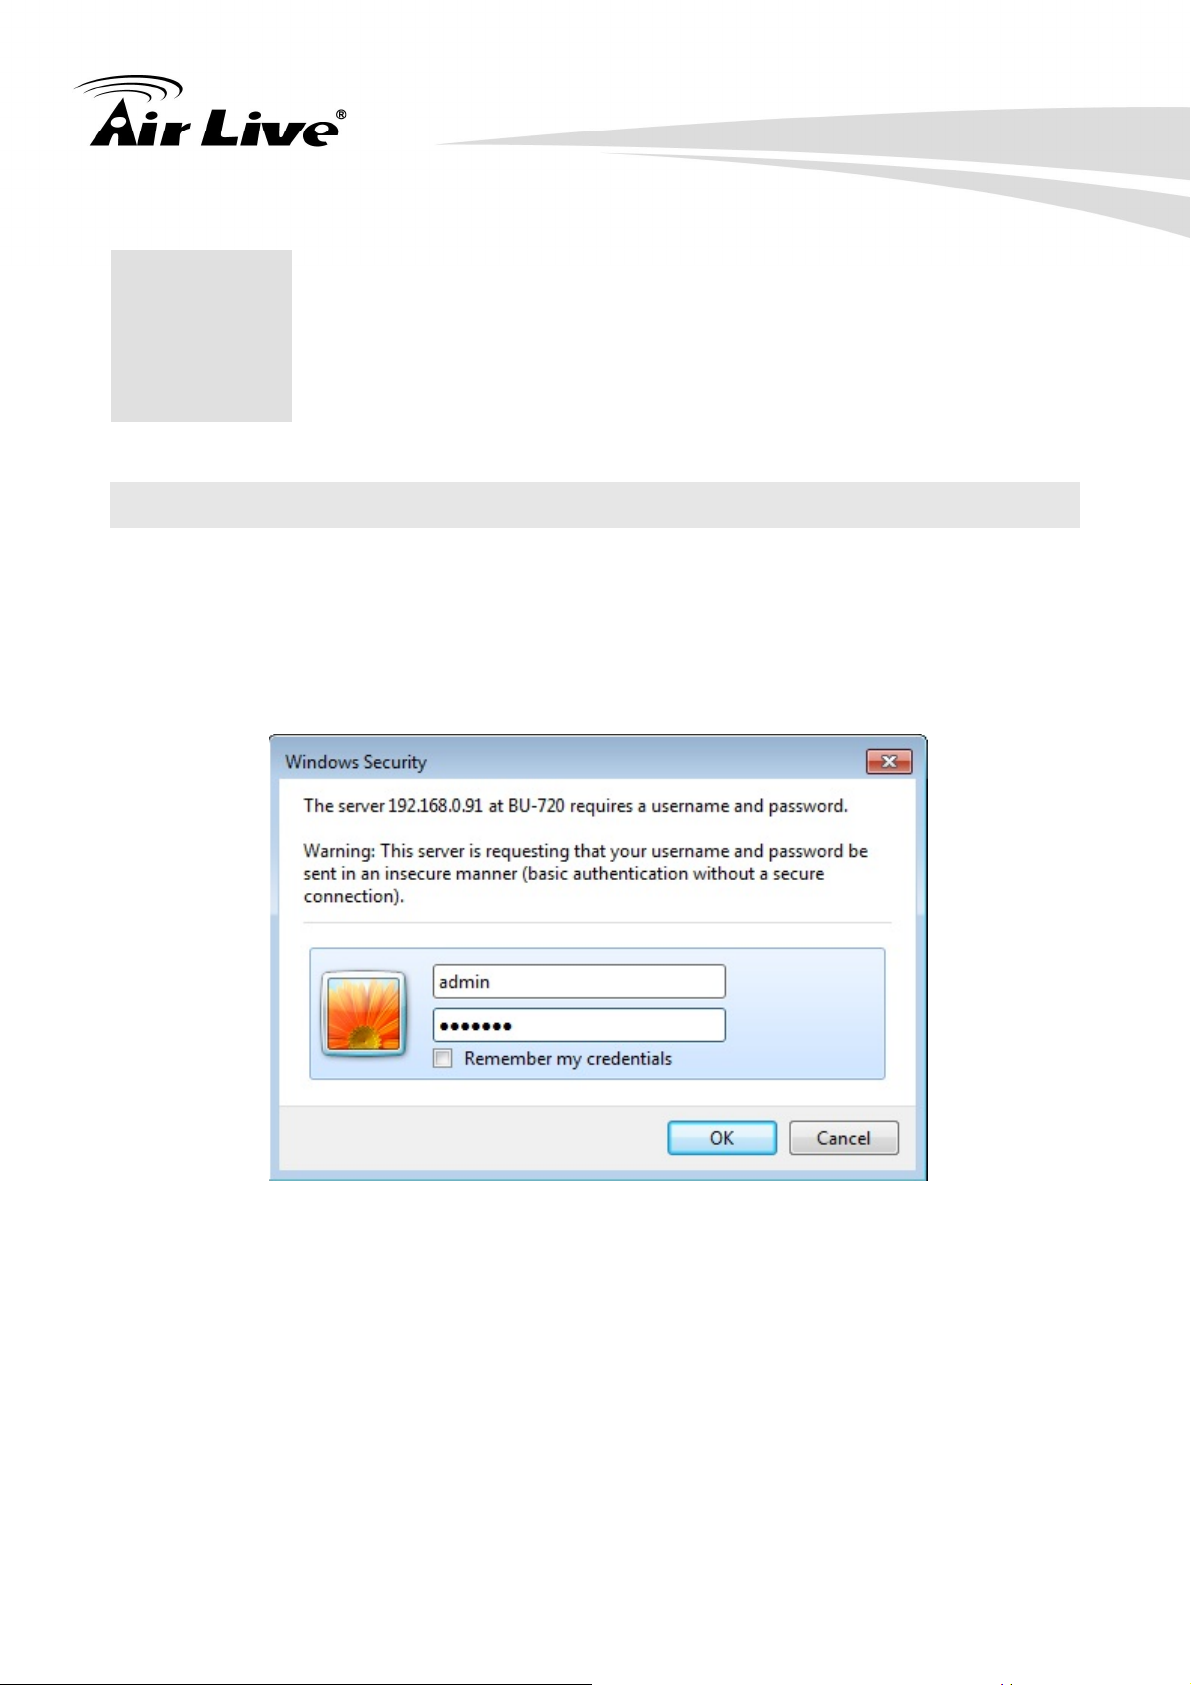
1. Open your web browser, and enter the IP address or host name of the IP camera in the
Location / Address field of your browser.
Note: If you only want to view the video without accessing Setting screen, enter
“http://<IP>/index2.htm” as your web URL.
Web Browser
2. Use the default account “admin” and default password “airlive”.
Note: The default user name “admin” and the password “airlive” are set at the factory for
the administrator. You can change them in the Account Menu. (Please check
“Configuration → Basic Settings → Account”)
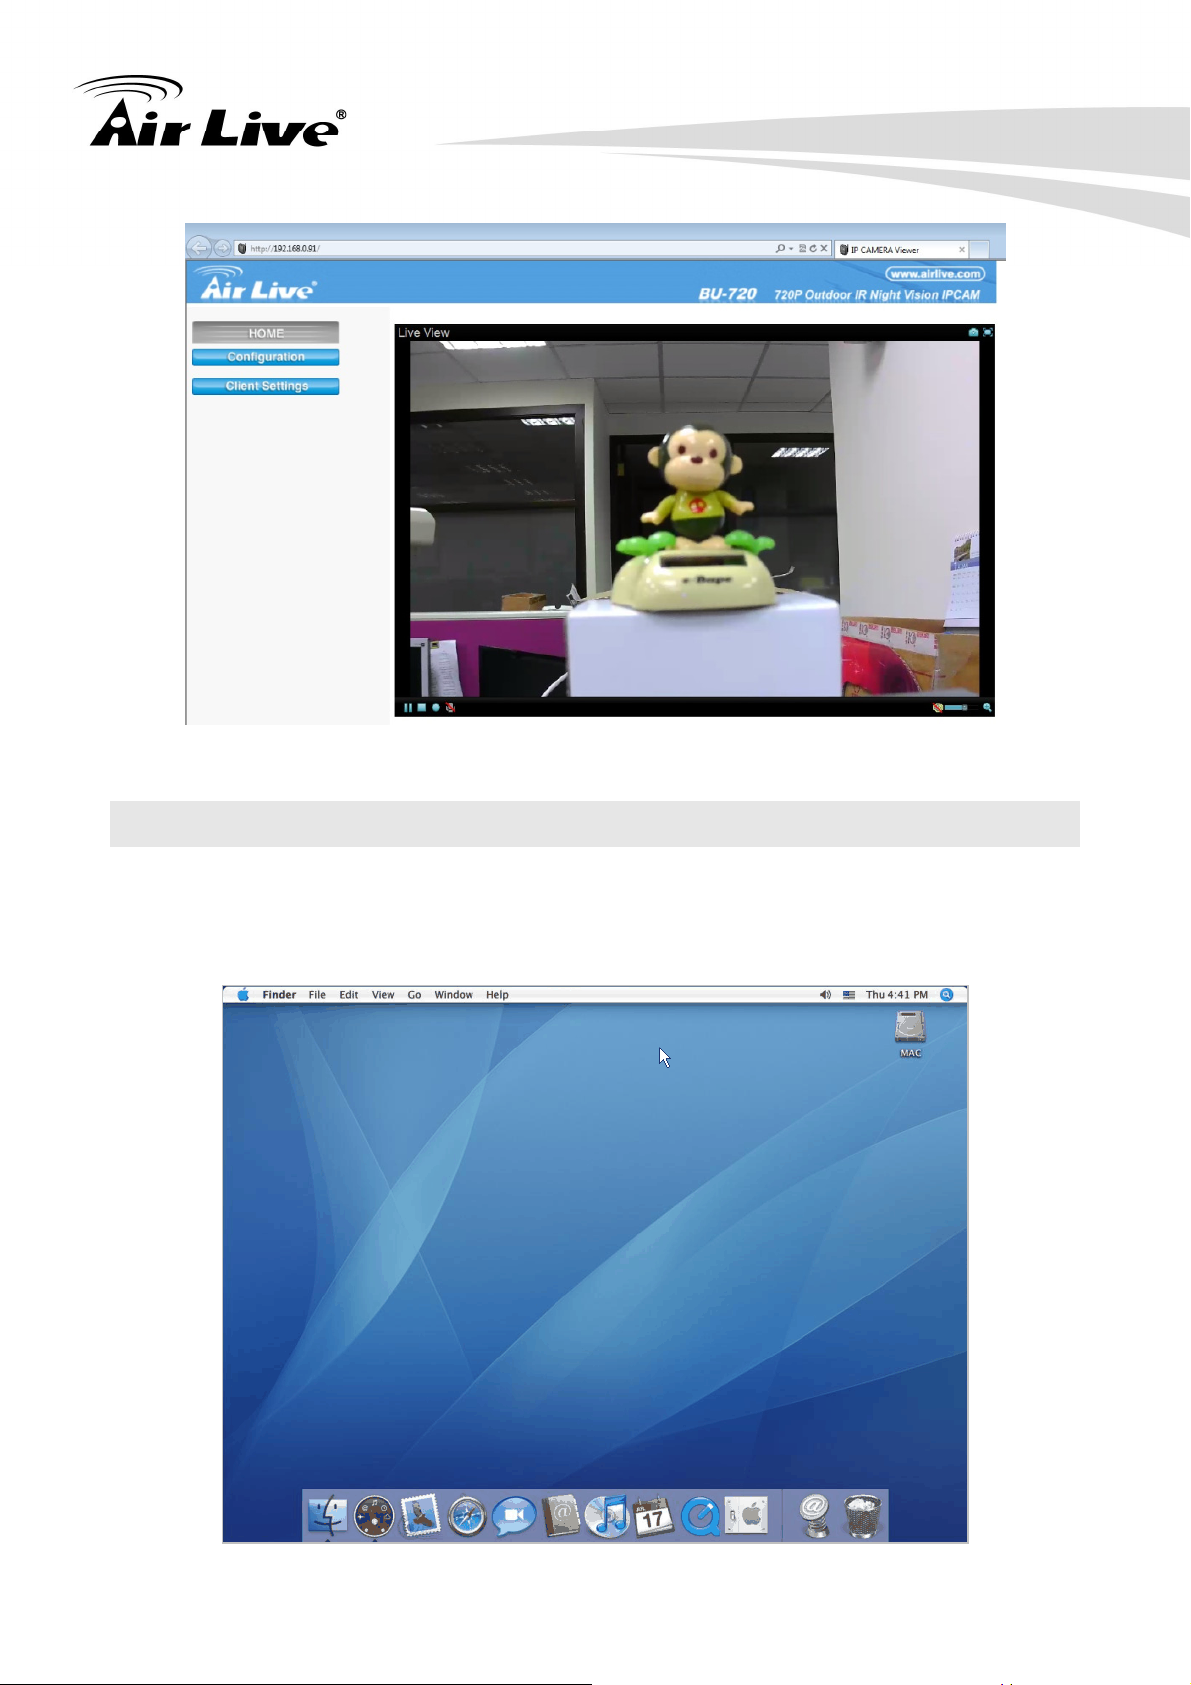
3. The monitor image will be displayed in your browser. In the left side of main configuration
are “Configuration” and “Client Settings”. For more details, you can check the following
chapters.
11
AirLive BU-720 User’s Manual
Page 17
3. Using IP Camera via Web Browser
3.2 Mac Web Browser
1. Click the Safari icon, and enter the IP address of the IP camera in the Location / Address
field of your browser.
Note: If you only want to view the video without Setting screen “http://<IP>/index2.htm”
as your web URL.
AirLive BU-720 User’s Manual 12
Page 18
3. Using IP Camera via Web Browser
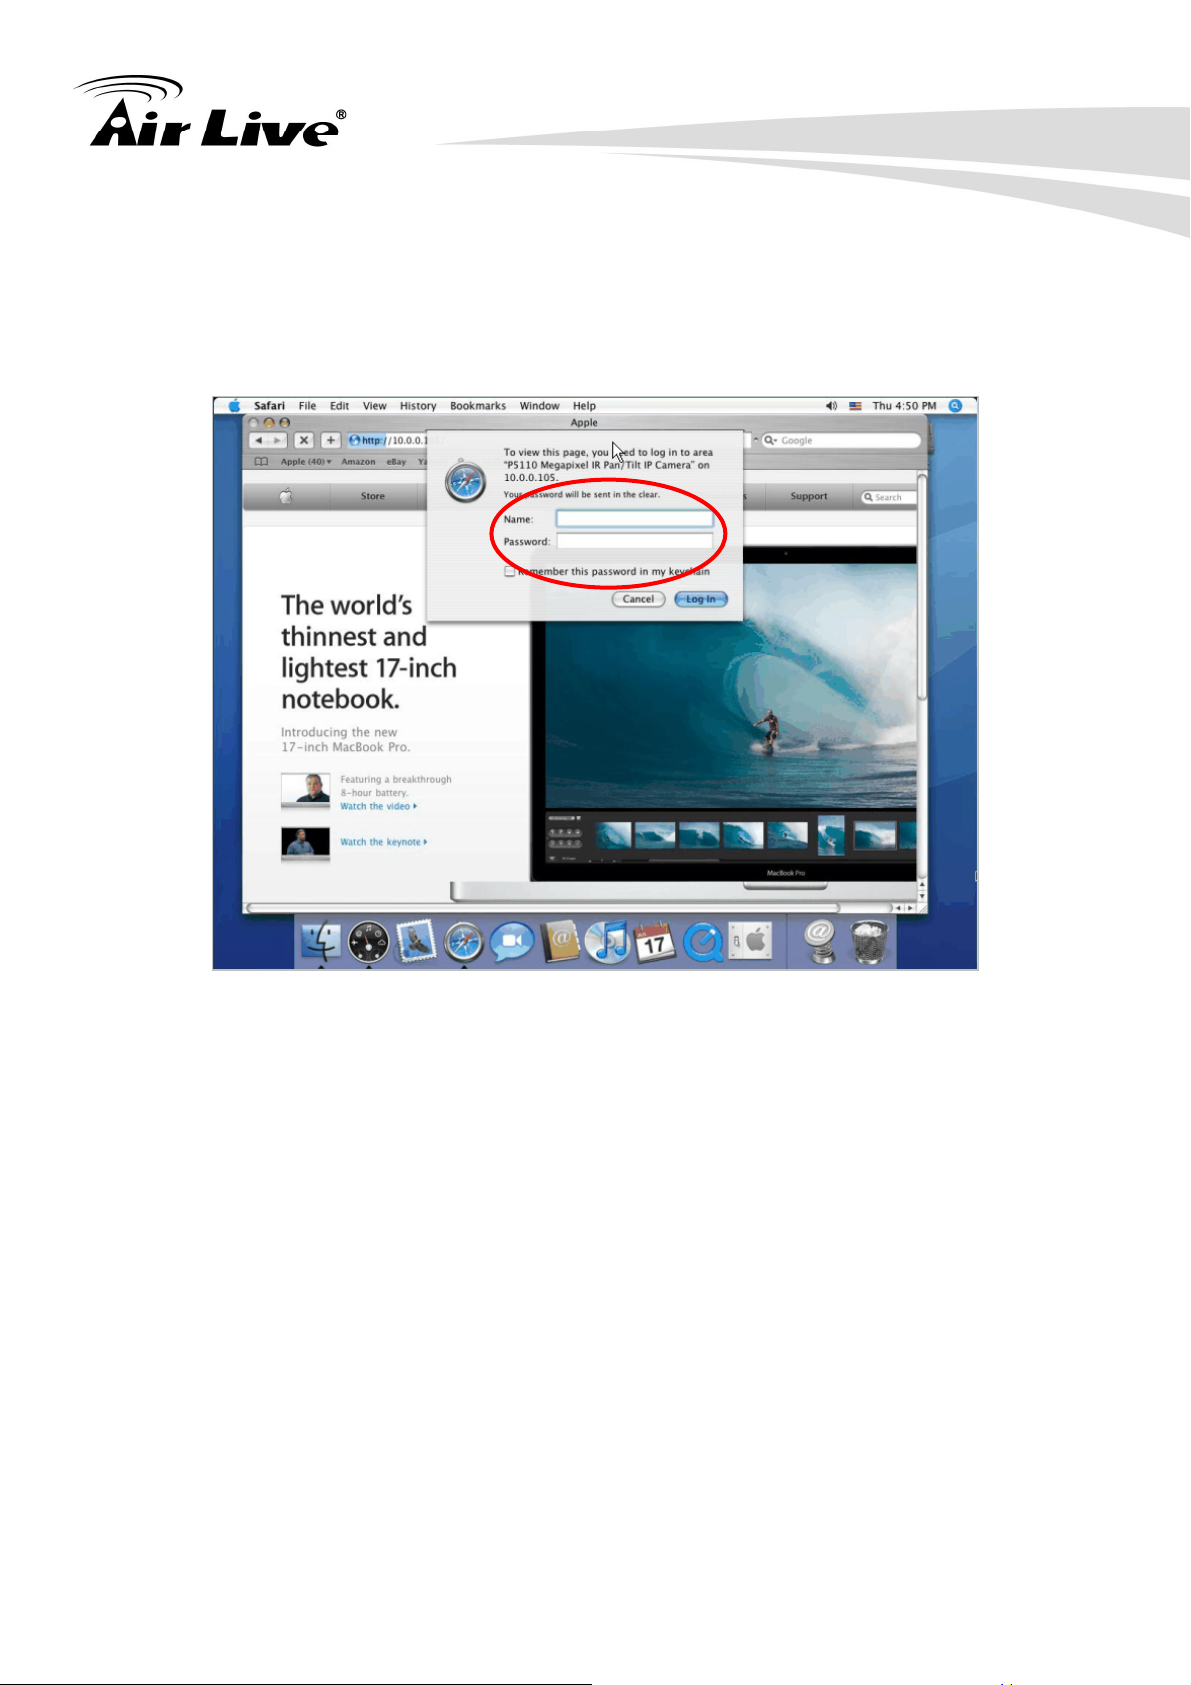
2. Enter the default account “admin” and default password “airlive”.
Note: The default user name is “admin” and the default password is “airlive” . You can
change them in the Account Menu (Please check “Configuration → Basic Settings →
Account”)
13
AirLive BU-720 User’s Manual
Page 19

4. Operating IP Camera via Mobile Phone
4. Operating IP Camera
4
4.1 Mobile Phone Viewing
1. 3G Mobile Phone Streaming Viewing
For 3G mobile phone viewing, type “rtsp://<IP>:<PORT>/video.3gp ” into your 3G
Streaming Link. <IP> is the Public IP address of your IP camera; <PORT> is the RTSP
port of your IP camera (Default value is 554.) Example: rtsp://100.10.10.1:554/video.3gp
via Mobile Phone
Note: You can also use RTSP clients (RealPlayer, VLC, QuickTime Player…etc.) to view
RTSP streaming, just type in “rtsp://<IP>:<PORT>/video.3gp” as the Player URL
2. 2.5G Mobile Phone WAP Viewing
For 2.5G mobile phone viewing, type “http://<IP>/mobile.wml” into your 2.5G WAP
Browser. <IP> is the Public IP address of your IP camera.
3. 2.5G Mobile Phone Browser Viewing
For 2.5G mobile phone viewing, type “http://<IP>/mobile.wml ” into your 2.5G Web
Browser. <IP> is the Public IP address of your IP camera.
AirLive BU-720 User’s Manual 14
Page 20

4. Operating IP Camera via Mobile Phone
4.2 Using IP Camera via iPhone
You can access to your IP camera via your iPhone. Please follow the setting process below.
Then you can use the Web UI via iPhone.
A. Select Safari function
B. Type IP address in your web link.
C. Type name and password.
Default value is admin / airlive.
Then click Login In
D. The Web User Interface and
live image will show up in the
middle of screen.
Note: The image is continuous snapshots, not video. Thus, live image can’t be
recorded here.
15
AirLive BU-720 User’s Manual
Page 21

5. Configuration of Main Menu
5. Configuration of Main
5
In the left side of main configuration are Configuration and Client Settings. For more
details, please check the following Chapters.
In the right side, you can control Live View in your main Browser. The functions include
Snapshot, Open digital zoom, Audio, and Video Play.
Menu
Snapshot
Full screen
AirLive BU-720 User’s Manual 16
Video Play
Audio Play Open digital zoom
Page 22

5. Configuration of Main Menu
5.1 Live View
1. Snapshot
You can capture an image by clicking the camera icon and save it in the operating
computer.
Symbols Meaning
A snapshot window appears after clicking the icon.
Save the picture captured by snapshot into your computer.
Return to the view screen
full screen
2. Digital zoom in / out the image via the monitor window
A. Click to display the digital zoom in window.
B. Pull the to adjust the digital zoom range, and it
will be showed on the above window.
C. Use the left click of your mouse to move to anywhere in the window area.
3. Video play buttons
Symbols Meaning
Note: Concerning the recording storage requirement of your hard disk, please refer to
the APPENDIX / B. Storage Requirement Table.
Pause the current video stream for a moment.
Play the video stream.
Stop the current displayed video.
Record the current video stream.
17
AirLive BU-720 User’s Manual
Page 23

5. Configuration of Main Menu
5.2 Configuration
This function is only for the Administrator. Click “Configuration” on the home page of web
user interface to get into the Basic Settings, Camera Settings, Playback, Event, System
and Status menu.
1. Basic Settings
Click Basic Settings. There are sub-menus including Account, Network, Date and Time.
For more detail information, you can refer to Chapter 6.
2. Camera Settings
Click Camera Settings. There are sub-menus including Video, Image and E-PTZ Setting.
For more detail information, you can refer to Chapter 7.
3. Playback
Click Playback. There are sub-menus including Client PC, Network Storage and Local
Storage. For more detail information, you can refer to Chapter 8.
4. Event
Click Event. There are sub-menus including Event Server, Event List, Motion Detection,
Tampering Detection and Schedule. For more detail information, you can refer to Chapter
9.
5. System
Click System. There are sub-menus including Maintenance, Date Time, Security,
Network Basic, Network Advanced, LED and System Log. For more detail information,
you can refer to Chapter 10.
6. Status
Click Information. It provides the general information of the device such as Product
Information, Security, Video Setting, Event list, Network and Port status.
AirLive BU-720 User’s Manual 18
Page 24

5. Configuration of Main Menu
7. Help
Click Help. There is detail description of all functions.
5.3 Client Settings
This function is only for the client. Click this button to control Profile, View Size, Protocol,
and Video Buffer.
1. Profile
Click the drop-down menu to choose one of the four profiles for the Live View.
2. View Size
Select the desired view size of image resolution between Fit Screen and Full Screen.
3. Protocol
Select the transferring protocol among TCP, UDP, and HTTP.
4. Video Buffer
Turn the Video Buffer function On / Off. The Video Buffer function makes the streaming
more smoothly in unsteady network environment, but might cause a little delay in live
viewing.
19
AirLive BU-720 User’s Manual
Page 25

6. Configuration-Basic Setup
6. Configuration-Basic
6
Settings
Click the Basic Settings to display the sub-menus including Account, Network and Date
Time.
6.1 Account
1. Account List
The device default account and password setting is “admin / airlive”. That means
everyone who knows IP address can access the device including all configuration. It is
necessary to create a new password if the device is intended to be accessed by specific
ones.
AirLive BU-720 User’s Manual 20
Page 26

6. Configuration-Basic Setup
Click “Add” to create the accounts to the specific users. There are 1 default account and
9 accounts that you may assign 3 different viewer modes as you wish. The instruction of
3 viewer modes listed as below:
- Viewer: It only allows the user to access to the Live View page.
- Operator: It allows to view the Live View page, create/modify events, and adjust certain
others settings.
- Administrator: It allows the user to watch the Live View and access all configurations.
2. Anonymous Setting
There is a drop-down menu for “Anonymous viewer” to disable or enable the function.
21
AirLive BU-720 User’s Manual
Page 27

6. Configuration-Basic Setup
6.2 Network
Click the Network to display the sub-menus including TCP/IP and PPPoE.
1. TCP/IP
Internet Protocol Version 4 (TCP/IPv4)
- Obtain an IP address automatically (DHCP): If a DHCP server is installed on the
network, to select this while the IP address is assigned by the DHCP server.
- Use the following IP address: Select this option when the fixed IP address is set.
z IP address: Enter the IP address of the device.
z Subnet mask: Enter the subnet mask.
z Default gateway: Enter the default gateway.
AirLive BU-720 User’s Manual 22
Page 28

6. Configuration-Basic Setup
- Obtain DNS server address automatically: Select this to obtain the address of DNS
server automatically.
- Use the following DNS server address: Select this when you set the fixed address as
the IP address of DNS server.
z Primary DNS server: Enter the IP address of the primary DNS server.
z Secondary DNS server: Enter the IP address of the secondary DNS server,
if necessary.
HTTP
- HTTP port number: Select 80 in general situations. If you want to use a port number
other than 80, select the text box and enter a port number between 1024 and 65535.
z When you have set the HTTP port number to a number other than 80 on the
Network Setting screen in the Setup Program, access the device by typing the
IP address of the device on the web browser as follows:
Example: when HTTP port number is set to 2000 http://192.168.1.100:2000/
Note: Reboot the IP Camera after the network setting has been made.
Note: If you connect the IP Camera with your computer directly, the default
network domain of camera is 192.168.1.xx
2. PPPoE
If your ISP provides Dynamic IP with authentication by username and password, type all
PPPoE information in this part. When using the PPPoE function, you need to turn on the
DDNS or IP Notification function at the same time.
23
AirLive BU-720 User’s Manual
Page 29

6. Configuration-Basic Setup
- IP address: The IP address is obtained at the PPPoE connecting with network.
- User ID: Enter the user ID for authentication necessary of PPPoE connections. Type it
up to 64 characters.
- Password: Enter the password for authentication necessary of PPPoE connections.
Type it up to 32 characters.
- Re-type password: Re-type the password to confirm.
- Obtain DNS server address automatically: Select this to obtain the address of DNS
server automatically.
- Use the following DNS server address: Select this when you set the fixed address as
the IP address of DNS server.
z Primary DNS server: Enter the IP address of the primary DNS server.
z Secondary DNS server: Enter the IP address of the secondary DNS server.
Note:
1. PPPoE (Point-to-Point Protocol over Ethernet): PPPoE is a network protocol for
encapsulating Point-to-Point Protocol frames insider Ethernet frames. PPPoE
connection is used mainly with ADSL service where individual users connect to
the ADSL transceiver (modem) over Ethernet work. It also widely used in XDSL
(digital affiliate line such as ADSL, VDSL or SDSL)
2. Reboot the IP Camera after the network setting has been made.
3. The IP Camera with Intelligent IP Installer can’t be founded after turning on the
PPPoE and reboot.
AirLive BU-720 User’s Manual 24
Page 30

6.3 Date Time
The Date/ Time screen displays all options of time setting.
6. Configuration-Basic Setup
- Current Date / Time
It displays current time and date of IP Camera and PC that you connected, and you may
select the Date/Time format as you wish in the drop-down menu.
Note: If you would like the Date / Time information shows on the Live View screen,
please check “Basic Setup →Video →Overlay → Overlay Type → Time Stamp” and
save the setting.
- Synchronization Method
Keep current setting: Select this mode to keep the current date and time of this IP
Camera.
Synchronize with Client PC: Select this mode to keep the date and time of this IP
Camera same as the monitoring PC.
25
AirLive BU-720 User’s Manual
Page 31

6. Configuration-Basic Setup
Manual setting: Select this mode to adjust manually the date and time of this IP
Camera.
Synchronize with NTP: Specify the NTP server name and click “Update now” to
synchronize the date and time of this IP Camera with those of the time server, known as
the NTP server.
- Time Zone
Time Zone: Select the Time Zone format of Greenwich Mean Time among different
cities. The time display will be the same as the current date / time option.
Daylight Saving Time: There are two modes to choose for setting up daylight saving
time.
z By Date: Set the start and end time by select month, day, hour, and minute.
z By Week Number: Set the start and end time by select month, week, hour, and
minute.
Note: The NTP server (Network Time Protocol) is the time server which is an Internet
standard protocol built on the top of TCP / IP. This assures accurate synchronization
to the millisecond of computer clock times in a network of computers.
AirLive BU-720 User’s Manual 26
Page 32

7. Live View
7. Camera Settings
7
Click the Camera Settings to display the sub-menus including Video, Image, and E-PTZ
Setting.
7.1 Video
1. Video Setting
- Image
Image Rotated: Select the screen display of “flip”, “mirror”, or “flip + mirror.
Video clip format: Select RECORDING compression format of H.264、MPEG-4、
and MJPEG .
z Profile1 (H.264): H.264 provides higher compression rate than MPEG-4. Thus,
H.264 can decrease the bandwidth usage and further apply on 3G. However,
H.264 will occupy more system resources than MPEG-4. As long as the
operating system appears operating difficulties under H.264 format, please
change to select MPEG-4.
27
AirLive BU-720 User’s Manual
Page 33

z Profile2 (MPEG-4): MPEG-4 has the advantage of sending a lower volume of date
per time unit across the network (bit-rate) compared to Motion JPEG and
therefore provides a relatively high image quality at a lower bit-rate (bandwidth
usage).
z Profile3 (MJPEG): Motion JPEG stream uses considerable amounts of bandwidth,
but provides excellent image quality and access to every image contained in the
stream.
- Overlay
Text information can be showed on the display screen, such as Date / Time and the
user-defined title.
- Privacy Mask
Privacy Mask is an area of solid color that bans users from viewing part of monitored
area.
Click “Add” and a setting pop-up window come out. A translucent rectangle is located
at up left of the image, drag it to where you wish to cover and resize it. Enter a
descriptive name, select the color and enable it then save.
7. Live View
AirLive BU-720 User’s Manual 28
Page 34

7. Live View
2. Profile
There are five stream profiles available for quick set-up. These settings can be adjusted
and new customized profiles can be created. Each profile has a descriptive name,
describing its usage and/or purpose. The profiles can be selected from the Live View
page.
z Create a new stream profile: Click “Add” and a setting pop-up window comes out,
z Edit the stream profile: Click the profile you appoint to modify and click “Edit” to do
the further setting.
3. Day / Night
- IR Cut Filter Mode: There are 4 modes, “Auto, Night Mode, Day Mode, Schedule”, for
IR cut filter to switch, which make IR cut filter work based on different conditions.
- IR Cut Filter Switch Delay: This is interval time (by seconds) when the IR cut filter
switch has been implemented till it indeed works.
- IR Cut Filter Threshold:
Dark: This is the threshold for the IR cut filter image environment being bright turning to
dark.
Bright: This is the threshold for the IR cut filter image environment being dark turning to
bright.
- IR / IR cut filter schedule: The IR cut filter can be scheduled manually as you wish to
turn it on. You may configure each time mode in advance in “Schedule”.
Please refer to Chapter 6.4 Video.
29
AirLive BU-720 User’s Manual
Page 35

7.2 Image
1. Image Settings
- Image Enhancement
z Brightness: The image brightness can be adjusted in the range 0-100. A higher
value produces a brighter image.
z Saturation: Adjust the saturation in the range 0-100. The higher value gets more
colorful image.
z Contrast: Adjust the image's contrast by raising or lowering the value in the range
0-100.
z Sharpness: Control the sharpness applied to the image in the range 0-100. A
sharper image might increase image noise especially in low light conditions. A
lower setting reduces image noise, but the image would be less sharp.
7. Live View
- White Balance
z Color Tone: There are 3 optional color tones (cool, real and warm). It depends on
individual preference to select.
z Auto White Balance: This is used to adjust for the different colors present in
different light sources, to make the colors in the image appear the same. The IP
camera can be set to automatically identify the light source and compensate for
its color. Alternatively, the type of light source can be manually selected from the
drop-down menu.
- Exposure Setting
z Exposure Frequency: The default setting of lighting environment is Auto.
However, you may select 50 or 60 Hz upon the lighting environment of your
country. The hold current option fixes the current exposure settings
z Automatic exposure: You can manually set the exposure value, which ranges
from 0-100(dark to bright). The default value is 25.
z Exposure time: Select a proper exposure time according to the light source of the
surroundings. The exposure times are selectable as the following durations:
1/120second, 1/60 second, 1/30 second, 1/12 second, 1/6 second, 1/3 second,
and 1second. Shorter exposure time brings less light.
z Gain: Accord to the surroundings in the low light and make the range among 1-64.
The higher value makes brighter image; however it brings more noise at the
same time.
AirLive BU-720 User’s Manual 30
Page 36

7. Live View
z Low light behavior: This is the operation aiming at low light and night mode.
According to the surroundings you can manually set the preferable settings
different from the regular “Exposure Settings”. Nevertheless, the low light
behavior can be scheduled up by working day, weekend, and night mode as
user’s preference.
z Backlight Compensation: It makes the object display clearly when the image
background is too bright or the object is too dark.
- Wide Dynamic Range
Enable Wide Dynamic Range auto in different level to improve the exposure when
both bright and dark areas simultaneously in the field of view of the camera. The level
goes from 1-8, the larger number brings stronger influence. Note the default is off.
- Noise Reduction
Select the period you wish the noise reduction being executed in the drop-down menu,
there are working day, weekend, and night modes.
2. View Setting
A view area is a cropped part of the overview image. Each view area is treated as a
video source in Live View with its own Video Stream, PTZ and Event settings. There
are 4 areas can be presented and 6 various resolutions for each view area.
Note: Except the View Area1 has been fixed to be full resolution, the rest of the
three are available to be set to resolution you wish in the drop-down menu.
31
AirLive BU-720 User’s Manual
Page 37

7. Live View
7.3 E-PTZ Setting
1. Patrol Setting
- Control Panel
The control panel can be set up the selected view area in every profile. Besides the
viewing window, there is a PTZ control panel to go to the direction you want.
Note: Before operating this function, you must set the resolution beneath 1920x1080,
and move your view area to your desired position.
- Preset Position
Name your every position and click “add”. You can click “go” to make sure if the preset
position has been written in.
- Guard Tour
Click “add”. Name the tour first, and then add in the preset position you desired to form
the tour. You can manually set the PTZ speed and the interval time.
2. PTZ Control
You may set the speed of digital Pan/Tilt/Auto Pan. The range goes 1-100 (slow to fast).
AirLive BU-720 User’s Manual 32
Page 38

8. Playback
8. Playback
8
Click the Playback to display the sub-menus including Client PC, Network Storage and
Local Storage.
33
AirLive BU-720 User’s Manual
Page 39

8. Playback
8.1 Client PC
This is for uploading the recorded file saved in the PC and play back to see the video.
❸❷❶ ❹❺ ❼ ❽ ❾ ❿
❶
Click it to upload the recorded file in the PC.
❷
Click it to stop the current video.
❸
Click it to pause the playing video.
❹
Click it to slow down the playing speed.
❺
Click it to speed up the playing speed.
❻
It displays the current playing video length.
❼
It displays the whole video length.
❽
It displays the current video speed.
❾
Click it to adjust the volume of video and mute.
❿
Click it to make digital zoom.
AirLive BU-720 User’s Manual 34
Page 40

8. Playback
8.2 Network Storage
The network storage provides the storage function for saving image files to the specified
computer and folder connected with the operating computer.
Before using this function you must go to Event Server in Event (Chapter 10) to configure
all settings and make the recording file saved here.
8.3 Local Storage
The memory card provides local storage function for saving image files to the specified SD
card in your camera. This function can be enabled only when you insert SD card to the
camera and the SD/SDHC card works well.
Before using this function you must go to SD card in Event (Chapter 10) to configure all
settings and make the recording file saved here.
35
AirLive BU-720 User’s Manual
Page 41

9. Event
9. Event
9
Click the Event to display the sub-menus including Event Server, Event List, motion
Detection, Tampering Detection and Schedule.
9.1 Event Server
1. Event Server
Click “Add” to create an event server; then the setting page pops up. Name it; select your
network type put on the storage location. This is optional to create the password for
certain group to use it. Then click the “Test” button to see if it works. It will show the
information on the pop-up window to see your setting if it has been made successfully.
There are 3 types of event transmission offered to select. There is a range 0~7 seconds
can be selected individually for pre-event and post-event. There are 3 suffix options for
naming image file by Name, Date Time and Sequential Number.
AirLive BU-720 User’s Manual 36
Page 42

9. Event
2. SD Card
Make sure to insert the SD Card first then click “on”. Create a folder name for event
server in SD Card. There is optional selection for overwrite the previous file or not. If not,
you may set a warning when the capacity is below the following percentage: 5%, 10%,
25% and 50%.
9.2 Event List
1. Event List
- General
Name the event file and make it on or off.
- Trigger
You may activate the following trigger types as you wish depended on various
conditions:
z Motion Detection: Click it on for using Motion Detection function as a sensor. You
must configure motion detection function before taking this as the trigger. Set
minimum time interval between 2 triggers, and choose the desired detection
area. The detection type individually stands for the following meanings:
Start: The trigger would be activated when the target object starts to move.
Stop: The trigger would be activated when the target object stops to move.
Start-Stop: The trigger would be activated during the target object starts to
move till it stops.
z Audio Detection: Click it on for using Audio Detection function as a sensor. You
must configure audio detection function before taking this as the trigger. Set
minimum time interval between 2 triggers. The detection type stands for the
following meanings individually:
Start: The trigger would be activated when the sound is made.
Stop: The trigger would be activated when the sound is cut off.
Start-Stop: The trigger would be activated during the sound is made and cut off.
z Periodical: This condition can be set during the certain period (by minute) to start
the trigger.
z On boot: The event is triggered when the IP Camera has been started over.
z Capacity Warning: This is triggered when SD Card capacity is be below the value
you set.
z Network Link Down: The event is triggered when the network gets disconnected.
z IP Notification: The event is triggered when the network being restarted or the IP
being changed. There are optional network types to select, such as DHCP、
Static IP and PPPoE.
37
AirLive BU-720 User’s Manual
Page 43

- Action
There are multiple choices for action taking which is optional for a user to select all of
them or part of them: Send Image、Send Notification、PTZ Action or Night Mode.
z Send Image: You may set up where the image sent to, options like event server
and SD card. You must configure it first. Please refer to Event Server (Chapter
9.1).
z Send Notification: First go to HTTP server, and than configure the HTTP server
URL, port, User ID, Password, and Proxy server settings.
Note: The setting of URL should be same as CGI.
z PTZ Action: First configure the PTZ to set up the preset positions and tour you
desired. You may select to return to the last position after the event being
triggered.
z Night Mode: You may set up this action being activated continually while the
9. Event
event triggered or continually every period (by second) interval.
Note: Only Motion Detection excludes Night Mode.
- Schedule
You may set up the event schedule as “always” or scheduled by working day, weekend
or night mode. You must configure schedule before using it.
2. Scheduled Recording
- General
Name the recording file and make it on or off.
- Action
z File Size: You can manually write in the file size as the suggested range.
z Cyclic Size: You can manually write in the cyclic size as the suggested range.
- Schedule
You may set up the event schedule as “always” or scheduled by working day, weekend
or night mode. You must configure schedule before using it.
9.3 Motion Detection
Add the motion detection zone and name it. You can adjust the zone of detection with the
mouse. Maximum 10 detection zone can be set. The bar on the top of motion detection
area is red when the alarm is triggered.
AirLive BU-720 User’s Manual 38
Page 44

9. Event
z Threshold: Set the threshold of the alarm in the motion detection zone. The
higher threshold is; the lesser detections can be triggered.
z Sensitivity: Set the sensitivity for motion detection zone. The higher sensitivity is;
the more sensitive it gets.
9.4 Tampering Detection
Select “on”, if you want to activate the tempering detection.
Trigger Duration: This setting is set for the trigger started for the duration of tampering
lasting you configure. The duration range is from 5 seconds to 900 seconds.
9.5 Schedule
The schedule is made for Event List to set the recording period. There are already 3
modes (Working Day、Weekend and Night Mode) has been set for a user. 7 more modes
are available to set manually.
39
AirLive BU-720 User’s Manual
Page 45

10. System
10. System
10
Click the System to display the sub-menus including Maintenance, Date Time, Security,
Network Basic, Network Advanced, LED and System Log.
AirLive BU-720 User’s Manual 40
Page 46

10. System
10.1 Maintenance
- Restart
Restart button is for reboot the IP Camera digitally. You may reboot the camera manually
or automatically.
Click “on” and shown two modes for a user to reboot the camera automatically.
z Sequential Mode offers the selection that how many days you would like to
reboot, 7 days at most.
z Schedule Mode is able to select the certain day and time to reboot.
- Backup / Restore
Default: Click this button to recover this IP Camera to the factory default setting. A
confirmation dialogue will appear and then click “OK” to execute. The network indicator
on this IP Camera will start to blink. This IP Camera will reboot automatically after
completing adjustments to the default setting. Don't turn off this IP Camera until the
device reboots. Furthermore, the IP and Date Time that are already set up can be fixed.
Backup: You can save the setting data of this IP Camera into a file. Click “Save” and
follow the instructions on the browser to save the setting data file to the location you
specified.
Restore: Download the saved setting data of this IP Camera. Click “Browse” and select
saved file. Click “OK” and this IP Camera is adjusted according to the loaded data and
then restarted.
- Firmware Upgrade
Update the device software. Click “Browse” and select the file for updating. A
confirmation dialogue will appear. Click “OK” to start. This IP Camera will reboot upon
completion.
- Upload Language Pack:
Clicking “Browse” and selecting the file for updating. The present language display of
web user Interface can be changed. A confirmation dialogue will appear. Click “OK”; then
the update will be applied immediately. The default language is “English.”
Note: You might find the Language Pack in the bundle CD.
10.2 Date Time
Please refer to Chapter 6.3.
41
AirLive BU-720 User’s Manual
Page 47

10. System
10.3 Security
1. Account
Please refer to Chapter 6.1.
2. IP Address Filter
Once it was enabled, the listed IP address are allowed or denied access to the product.
Add the IP Address that you’d like to allow or deny, and select allow or deny from the list
and save it.
3. HTTPS
HTTPS is a URL scheme used to indicate a secure HTTP connection. It is syntactically
identical to the http:// scheme normally used for accessing resources using HTTP. Use an
https: //URL/ with a different default TCP port (443) and an additional encryption /
authentication layer between the HTTP and TCP. You can use the IP camera through
HTTPS easily by using https:// instead of http://.
z Create & Install: Create a self-signed certificate for HTTPS to recognize.
z Installed Certificate: Display or remove the properties of the installed certificate.
z HTTPS Connection Policy: Set HTTPS connection policy for different level of
users.
To use the HTTPS encryption, please set up “Create self-signed certificate” for the first
time you use the HTTPS function, and then set up the connection policy for different
users.
Note: When HTTPS with RTSP is enabled the “on” mode, the IP Camera only
protect the setting such as username and password, and do not protect video and
audio. When HTTPS with RTSP is enabled the “off” mode, the IP Camera will
protect all setting including video and audio.
10.4 Network Basic
Please refer to Chapter 6.2.
AirLive BU-720 User’s Manual 42
Page 48

10.5 Network Advanced
1. RTSP
- General
z RTP Port Range: The default value of port range is 5000 ~ 7999 and it can be
changed from 1124 to 65534.
z RTSP Port: The default value is 554. If the IP Cameras are connected with router
and installed outside over 2 sets, all of them are need support RTSP. Please fill
the value in the blank space in the range from 1124 to 65534.
z RTSP Configuration: Configure the RTSP by profile, and then enable or disable
the authentication.
- Multicast
z Status: This can enabled or disabled the multicast.
10. System
z Access Name: This will be shown and changed along with the profile you select.
z Multicast Address: Specify the multicast server address.
z Video / Audio Port: Specify the transmission port number of the video data from
1124 to 65534.
z Time to Live: Set the maximum TTL that multicast can pass through. The default
value is 15.
2. UPnP
If you have a router to access to internet and the router supports UPnP IGD function, you
need to turn on the UPnP Port Forwarding function.
z HTTP port: Enter the HTTP port number and default HTTP port is 80.
z SSL port: Enter the SSL port number and default SSL port is 443.
z RTSP port: Enter the RTSP port, default value is 554 for computer view.
Note: UPnP (Universal Plug and Play): UPnP is a set of computer network protocol.
It allows devices to connect seamlessly and simplify the implementation of
networks in the home and corporate environments.
3. Bonjour
Bonjour, also known as zero-configuration networking, enables automatic discovery of
computers, devices, and services on IP networks. Bonjour uses industry standard IP
protocols to allow devices to automatically discover each other without the need to enter
IP addresses or configure DNS servers.
z Device Name: Enter Device Name you wish.
Note: How to use Bonjour in your Windows Browser UI? Please check the link
below: http://www.apple.com/support/downloads/bonjourforwindows.html
43
AirLive BU-720 User’s Manual
Page 49

10. System
4. DDNS
DDNS is a system which allows the domain name data held in a name server to be
updated in real time. The most common use for DDNS is allowing an internet domain
name to be assigned to a computer with a varying / dynamic IP Address. It is possible to
make other sites on the internet establishing connection to the machine without needing
to track the IP Address themselves.
z Server name: Choose the DDNS Server from the list.
z A user ID: Enter the user ID for authentication necessary for DDNS connections.
Type it up to 64 characters.
z Password: Enter the password for authentication necessary for DDNS
connections. Type it up to 32 characters.
z Re-type password: Re-type the password to confirm.
z Host name: Enter the host name that is registered to the DDNS server.
z Periodical Update: Update your DDNS information periodically.
10.6 LED
This is optional for a user to select wheatear the LED indicator is shown or not, as the IP
Camera is turned on. What benefit it gets when LED off is it’s not easily to be aware when
somebody sneak in the space where the camera installed, especially at the darkness.
10.7 System Log
Enable the remote log to let the log being saved in the remote server, in case that the
camera being cut down.
Put on the server name and select the sever port and save it.
AirLive BU-720 User’s Manual 44
Page 50

11. Appendix
11. Appendix
11
A. Frame-rate and Bitrate Table
This section helps you to set the IP Camera with your network environment to access
Internet, basing on your network upload environment to choose the suitable Image-Quality
setting. For example, if the network environment is ADSL 256Kb (upload) / 2Mb (download),
the most fluent Image-Quality needs to set up under 256 Kb situation.
A.1 CMOS
Mega Model
A.1.1 H.264 @ 15fps / kbps
Quality 1280*1024 1280*720 640*480 320*240
Excellent
Detailed
Good
Standard
Medium
2800 1900 300 90
1700 1300 200 75
1300 900 170 60
800 600 150 55
600 450 130 45
A.1.2 H.264 @ 10fps / kbps
Quality 1280*1024 1280*720 640*480 320*240
Excellent
Detailed
Good
Standard
Medium
1900 1400 250 70
1200 900 180 60
900 650 160 55
650 450 130 50
450 350 120 40
A.1.3 H.264 / kbps, fps
Image-Size Bitrate Setting
1280*1024 6144 15
1280*1024 6144 10
1280*1024 2048 15
1280*1024 2048 10
1280*1024 512 15
1280*1024 512 10
1280*720 6144 15
1280*720 6144 10
1280*720 2048 15
Frame-Rate
Setting
Current Bitrate
6300 15
6300 10
2200 15
2200 10
550 15
550 10
6300 15
6300 10
2200 15
Current
Frame-Rate
45
AirLive BU-720 User’s Manual
Page 51

11. Appendix
1280*720 2048 10
1280*720 512 15
1280*720 512 10
640*480 6144 15
640*480 6144 10
640*480 2048 15
640*480 2048 10
640*480 512 15
640*480 512 10
320*240 6144 15
320*240 6144 10
320*240 2048 15
320*240 2048 10
320*240 512 15
320*240 512 10
2200 10
550 15
550 10
6300 15
6300 10
2200 15
2200 10
550 15
550 16
5100 15
3600 10
2200 15
2200 10
550 15
550 10
A.1.4 MPEG 4@ 15fps / kbps
Quality 1280*1024 1280*720 640*480 320*240
Excellent
Detailed
Good
Standard
Medium
3800 3000 600 130
2900 2200 450 110
1800 1400 300 90
1200 900 250 70
900 600 200 60
A.1.5 MPEG4@ 10fps / kbps
Quality 1280*1024 1280*720 640*480 320*240
Excellent
Detailed
Good
Standard
Medium
3000 2300 500 110
2200 1600 400 100
1400 1100 250 80
950 700 200 65
700 550 180 50
A.1.6 MPEG4 / kbps, fps
Image-Size Quality Setting
1280*1024 6144 15
1280*1024 6144 10
1280*1024 2048 15
1280*1024 2048 10
1280*1024 512 15
1280*1024 512 10
1280*720 6144 15
1280*720 6144 10
1280*720 2048 15
Frame-Rate
Setting
Current Bitrate
5200 12
6300 10
2200 15
2200 10
550 15
550 10
6300 15
6300 10
2200 15
Current
Frame-Rate
AirLive BU-720 User’s Manual 46
Page 52

11. Appendix
1280*720 2048 10
1280*720 512 15
1280*720 512 10
640*480 6144 15
640*480 6144 10
640*480 2048 15
640*480 2048 10
640*480 512 15
640*480 512 10
320*240 6144 15
320*240 6144 10
320*240 2048 15
320*240 2048 10
320*240 512 15
320*240 512 10
2200 10
550 15
550 10
6300 15
6300 10
2200 15
2200 10
550 15
550 10
2200 15
1800 10
2200 15
1800 10
550 15
550 10
A.1.7 MJPEG @ 15fps / kbps
Quality 1280*1024 1280*720 640*480 320*240
Excellent
Detailed
Good
Standard
Medium
17500 16000 7800 2600
12000 9500 4000 1500
10000 6800 2900 1100
7000 5100 2200 800
4300 3200 1400 500
A.1.8 MJPEG@ 10fps / kbps
Quality 1280*1024 1280*720 640*480 320*240
Excellent
Detailed
Good
Standard
Medium
16000 14500 5500 1700
9000 6500 2700 1000
6500 4700 2000 800
4700 3500 1500 600
2800 2200 1000 350
A.1.9 MJPEG / kbps, fps
Image-Size Quality Setting
1280*1024 Excellent 15
1280*1024 Excellent 10
1280*1024 Good 15
1280*1024 Good 10
1280*1024 Medium 15
1280*1024 Medium 10
1280*720 Excellent 15
1280*720 Excellent 10
1280*720 Good 15
Frame-Rate
Setting
Current Bitrate
17500 8
16000 8
10000 15
6500 10
4300 15
2800 10
16000 12
14500 10
6800 15
Current
Frame-Rate
47
AirLive BU-720 User’s Manual
Page 53

11. Appendix
1280*720 Good 10
1280*720 Medium 15
1280*720 Medium 10
640*480 Excellent 15
640*480 Excellent 10
640*480 Good 15
640*480 Good 10
640*480 Medium 15
640*480 Medium 10
320*240 Excellent 15
320*240 Excellent 10
320*240 Good 15
320*240 Good 10
320*240 Medium 15
320*240 Medium 10
4700 10
3200 15
2200 10
7800 15
5500 10
2900 15
2000 10
1400 15
1000 10
2600 15
1700 10
1100 15
800 10
500 15
350 10
A.2 VGA Model
A.2.1 H.264 @ 30fps / kbps
Quality 640*480 320*240
Excellent
Detailed
Good
Standard
Medium
A.2.2 H.264@15 fps / kbps
Quality 640*480 320*240
Excellent
Detailed
Good
Standard
Medium
A.2.3 H.264 / kbps, fps
Image-Size Bitrate Setting
640*480 6144 30
640*480 6144 15
640*480 2048 30
640*480 2048 15
640*480
640*480 512 15
320*240 6144 30
512 30
800 120
450 100
300 70
200 60
180 50
500 100
300 80
250 60
180 55
150 50
Frame-Rate
Setting
Current Bitrate
6300 30
6300 15
2200 30
2200 15
550 30
550 15
6300 30
Current
Frame-Rate
AirLive BU-720 User’s Manual 48
Page 54

320*240 6144 15
320*240 2048 30
320*240 2048 15
320*240 512 30
320*240 512 15
A.2.4 MPEG4 @ 30fps / kbps
Quality 640*480 320*240
Excellent
Detailed
Good
Standard
Medium
A.2.5 MPEG4@ 15fps / kbps
Quality 640*480 320*240
Excellent
Detailed
Good
Standard
Medium
11. Appendix
5500 15
2200 30
2200 15
550 30
550 15
1400 250
1000 160
600 120
400 90
300 80
900 180
650 140
450 100
300 80
200 70
A.2.6 MPEG4 / kbps, fps
Image-Size Bitrate Setting
640*480 6144 30
640*480 6144 15
640*480 2048 30
640*480 2048 15
640*480 512 30
640*480 512 15
320*240 6144 30
320*240 6144 15
320*240 2048 30
320*240 2048 15
320*240 512 30
320*240 512 15
A.2.7. MJPEG @ 30fps / kbps
Quality 640*480 320*240
Excellent
Detailed
Good
Frame-Rate
Setting
15000 5000
7500 2800
5500 2000
Current Bitrate
6300 30
6300 15
2200 30
2200 15
550 30
550 15
5100 30
2800 15
2200 30
2200 15
550 30
550 15
Current
Frame-Rate
49
AirLive BU-720 User’s Manual
Page 55

Standard
Medium
A.2.8. MJPEG@ 15fps / kbps
Quality 640*480 320*240
Excellent
Detailed
Good
Standard
Medium
A.2.9. MJPEG / kbps, fps
Image-Size Bitrate Setting
640*480 Excellent 30
640*480 Excellent 15
640*480 Good 30
640*480 Good 15
640*480 Medium 30
640*480 Medium 15
320*240 Excellent 30
320*240 Excellent 15
320*240 Good 30
320*240 Good 15
320*240 Medium 30
320*240 Medium 15
11. Appendix
4200 1600
2600 1000
7500 2600
3800 1500
2800 1200
2100 850
1400 500
Frame-Rate
Setting
Current Bitrate
15000 30
7500 15
5500 30
2800 15
2600 30
1400 15
5000 30
2600 15
2000 30
1200 15
1000 30
500 15
Current
Frame-Rate
B. Storage Requirement Table
This section helps to set Recording Storage System.
Please refer to the following table to find out the capability for recording into your hard disk.
B.1 Mega Model
B.1.1. H.264 Storage Requirement GB / channel / day @ 15fps
Quality 1280*1024 1280*720 640*480 320*240
Excellent
Detailed
Good
Standard
Medium
AirLive BU-720 User’s Manual 50
232.4 157.7 24.9 7.5
141.4 107.9 16.6 6.3
107.9 74.7 14.2 5
66.4 49.8 12.5 4.6
49.8 37.4 10.8 3.8
Page 56

B.1.2. H.264 Storage Requirement GB / channel / day @ 10fps
Quality 1280*1024 1280*720 640*480 320*240
Excellent
Detailed
Good
Standard
Medium
157.7 116.2 20.8 5.9
99.6 74.7 15 5
74.7 54 13.3 4.7
54 37.4 10.8 4.2
37.4 29.1 10 3.4
B.1.3. MPEG4 Storage Requirement GB / channel / day
Image-Size Bitrate Setting Frame-Rate Setting
1280*1024 6144 15
1280*1024 6144 10
1280*1024 2048 15
1280*1024 2048 10
1280*1024 512 15
1280*1024 512 10
1280*720 6144 15
1280*720 6144 10
1280*720 2048 15
1280*720 2048 10
1280*720 512 15
1280*720 512 10
640*480 6144 15
640*480 6144 10
640*480 2048 15
640*480 2048 10
640*480 512 15
640*480 512 10
320*240 6144 15
320*240 6144 10
320*240 2048 15
320*240 2048 10
320*240 512 15
320*240 512 10
11. Appendix
Storage
Requirement
522.9
522.9
182.6
182.6
45.7
45.7
522.9
522.9
182.6
182.6
45.7
45.7
522.9
522.9
182.6
182.6
45.7
45.7
423.3
298.8
182.6
182.6
45.7
45.7
B.1.4. MPEG4 Storage Requirement GB / channel / day @ 15fps
Quality 1280*1024 1280*720 640*480 320*240
Excellent
Detailed
Good
Standard
Medium
315.4 249 49.8 10.8
240.7 182.6 37.4 9.2
149.4 116.2 24.9 7.5
99.6 74.7 20.8 5.9
74.7 49.8 16.6 5
51
AirLive BU-720 User’s Manual
Page 57

B.1.5. MPEG4 Storage Requirement GB / channel / day @ 10fps
Quality 1280*1024 1280*720 640*480 320*240
Excellent
Detailed
Good
Standard
Medium
249 190.9 41.5 9.2
182.6 132.8 33.2 8.3
116.2 91.3 20.8 6.7
78.9 58.1 16.6 5.4
58.1 45.7 14.5 4.2
B.1.6. MPEG4 Storage Requirement GB / channel / day
Image-Size Quality Setting Frame-Rate Setting
1280*1024 6144 15
1280*1024 6144 10
1280*1024 2048 15
1280*1024 2048 10
1280*1024 512 15
1280*1024 512 10
1280*720 6144 15
1280*720 6144 10
1280*720 2048 15
1280*720 2048 10
1280*720 512 15
1280*720 512 10
640*480 6144 15
640*480 6144 10
640*480 2048 15
640*480 2048 10
640*480 512 15
640*480 512 10
320*240 6144 15
320*240 6144 10
320*240 2048 15
320*240 2048 10
320*240 512 15
320*240 512 10
11. Appendix
Storage
Requirement
431.6
522.9
182.6
182.6
45.7
45.7
522.9
522.9
182.6
182.6
45.7
45.7
522.9
522.9
182.6
182.6
45.7
45.7
182.6
149.4
182.6
149.4
45.7
45.7
B.2 VGA Model
B.2.1. H.264 Storage Requirement GB / channel / day @ 30fps
Quality 640*480 320*240
Excellent
Detailed
Good
Standard
AirLive BU-720 User’s Manual 52
66.4 10
37.4 8.3
24.9 5.9
16.6 5
Page 58

Medium
15 4.2
B.2.2. H.264 Storage Requirement GB / channel / day @ 15fps
Quality 640*480 320*240
Excellent
Detailed
Good
Standard
Medium
41.5 8.3
24.9 6.7
20.8 5
15 4.6
12.5 4.2
B.2.3. H.264 Storage Requirement GB / channel / day
Image-Size Bitrate Setting
640*480 6144 30
640*480 6144 15
640*480 2048 30
640*480 2048 15
640*480
640*480 512 15
320*240 6144 30
320*240 6144 15
320*240 2048 30
320*240 2048 15
320*240 512 30
320*240 512 15
512 30
Frame-Rate
Setting
Current Bitrate
6300 522.9
6300 522.9
2200 182.6
2200 182.6
550
550 45.7
6300 522.9
5500 456.5
2200 182.6
2200 182.6
550 45.7
550 45.7
11. Appendix
Storage
Requirement
45.7
B.2.4. MPEG4 Storage Requirement GB / channel / day @ 30fps
Quality 640*480 320*240
Excellent
Detailed
Good
Standard
Medium
116.2 20.8
83 13.3
49.8 10
33.2 7.5
24.9 6.7
B.2.5. MPEG4 Storage Requirement GB / channel / day @ 15fps
Quality 640*480 320*240
Excellent
Detailed
Good
Standard
Medium
74.7 15
54 11.7
37.4 8.3
25 6.7
16.6 5.9
53
AirLive BU-720 User’s Manual
Page 59

B.2.6. MJPEG Storage Requirement GB / channel / day
Image-Size Bitrate Setting
640*480 6144 30
640*480 6144 15
640*480 2048 30
640*480 2048 15
640*480 512 30
640*480 512 15
320*240 6144 30
320*240 6144 15
320*240 2048 30
320*240 2048 15
320*240 512 30
320*240 512 15
Frame-Rate
Setting
Current Bitrate
6300 522.9
6300 522.9
2200 182.6
2200 182.6
550 45.7
550 45.7
5100 423.3
2800 232.4
2200 182.6
2200 182.6
550 45.7
550 45.7
11. Appendix
Storage
Requirement
AirLive BU-720 User’s Manual 54
 Loading...