

Page 1
User's Manual
User's Manual
English
Page 2
1
Welcome
Dear user, thanks for purchasing this product.
Much investment in time and effort has gone into its development,
and it is our hope that it will give you many years of trouble-free service.
Safety Notice
1. Do not drop, puncture or disassemble the
camera; otherwise the warranty will be voided.
2. Avoid all contact with water, and dry hands
before using.
3. Do not expose the camera to high temperature
or leave it in direct sunlight. Doing so may
damage the camera.
4. Use the camera with care. Avoid pressing hard
on the camera body.
5. For your own safety, avoid using the camera
when there is a storm or lightning.
6. Do not use batteries of different specifications.
Doing so may lead to the potential for serious
damage.
7. Remove the battery during long periods
between usage, as a deteriorated battery may
affect the functionality of the camera.
8. Remove the battery if it shows signs of leaking
or distortion.
9. Use only the accessories supplied by the
manufacturer.
10. Keep the camera out of the reach of infants.
Page 3

2
Table of Contents
Welcome .......................................................................... 1
Safety Notice ................................................................... 1
Table of Contents ...........................................................
2
Getting Started ................................................................4
Knowing your camera parts ..................................................................4
Installing the battery ............................................................................. 5
Using the charger .................................................................................6
Inserting a memory card (optional) .......................................................7
Attaching the carrying strap ..................................................................8
Basic Operations ............................................................ 9
Turning on your camera ........................................................................ 9
Turning off your camera ........................................................................
9
Using the LCD monitor .........................................................................10
Reading LCD indicators ........................................................................ 11
Setting time and language ....................................................................12
Recording a video clip ..........................................................................13
Tak
ing a still picture ..............................................................................15
Recording a voice clip .......................................................................... 16
Playing back your recordings ............................................................... 17
Playing MP3 music ............................................................................... 18
Connecting the camera to a TV ............................................................
20
Advanced Operations ....................................................21
Menu operation ..................................................................................... 21
Menu illustration ................................................................................... 21
Menu items in Camera mode ............................................................... 22
Menu items in Playback mode .............................................................. 26
Menu items in MP3 mode .....................................................................27
Menu items in Voice mode ...................................................................
27
Menu items in Setting mode ................................................................. 28
Page 4

3
Table of Contents
Copying Files to Your PC ............................................... 31
Installing the driver to your PC ............................................................. 31
Connecting the camera to your PC ...................................................... 33
Copying files to the PC .........................................................................
34
Viewing/Playing files on your PC ..........................................................
36
File location .......................................................................................... 37
Using PC Camera ...........................................................38
Installing the software ...........................................................................38
Starting the application ......................................................................... 38
Using the PC Camera ........................................................................... 41
Appendix:A .....................................................................44
Troubleshooting ....................................................................................44
Flicker Settings ..................................................................................... 47
System Message .................................................................................. 47
Storage Capacity .................................................................................. 48
Battery Life Indicator ............................................................................. 49
Battery Life ........................................................................................... 49
Appendix:B .....................................................................50
Instruction for ArcSoft MediaConverter™ .............................................50
Appendix:C .....................................................................58
Specifications ....................................................................................... 58
Appendix:D .....................................................................59
System Requirements ..........................................................................59
Page 5
4
Getting Started
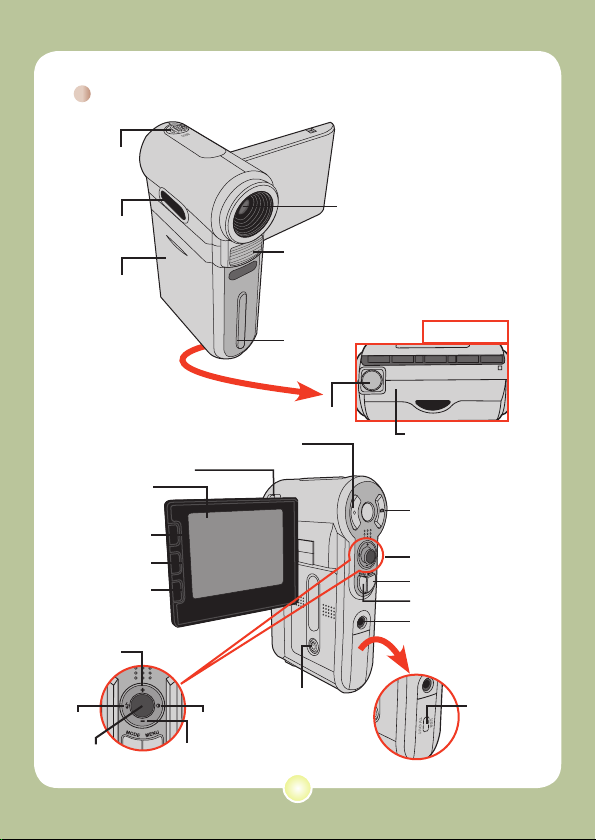
Knowing your camera parts
SD/MMC card slot
(inside the battery cover)
Bottom view
Tripod socket
Battery cover
Flash strobe
Lens
Microphone
Speaker
Strap hook
Power button
Direction buttons
Earphone connector
Next button/
Fast forward button
LCD monitor
Record button
Menu button
Mode button
Shutter button
Focus switch
Previous button/
Fast backward button
Play/Pause button
Zoom in button
Zoom out button
White balance button
Flash button
OK key
USB connector/
TV OUT connector
Page 6

5
Installing the battery
1 Open the battery cover.
Slide the battery cover open as indicated.
2 Install the battery.
Place the accessory Li-Ion battery into the
compartment. Note that the metallic contacts
must be aligned with the contacts in the
compartment.
3 Replace the cover.
After the battery is properly installed, replace
the battery cover.
Treat the Li-Ion battery with care:
• Keep the battery away from fire or high-temperature environment
(over 140ºF or 60ºC).
• Do not drop the battery or try to disassemble it.
• If the battery is not used for long periods, fully discharge and
charge the battery at least once a year to maintain its lifecycle.
Upon using the battery for the first time, you are recommended to
fully discharge and then charge the battery to ensure its lifecycle.
Purchasing additional batteries:
This camera uses one 8210 Li-Ion battery as power source. You
can purchase the 8210 Li-Ion Rechargeable battery (3.7 volt;
850mAh) at your local shop.
Page 7
6
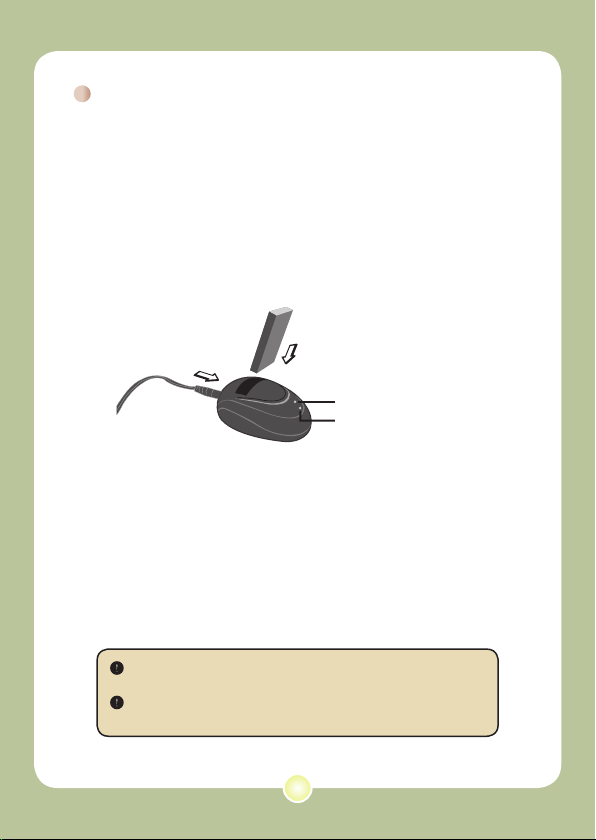
Using the charger
The battery attached is not fully charged. Please charge the
battery at least 4 hours for first time use.
1 Connect one end of the supplied AC adapter to the
charger stand and the other end to a wall outlet.
2 Place the depleted battery pack into the charger.
Note that the metallic contacts must be aligned with the contacts in the
charger.
Charging indicator
Power indicator
To a wall outlet
Battery pack
3 The charging indicator turns red and the charge
starts.
4 When the charging indicator turns green, the battery
pack is fully charged
.
This charger can only be used to charge the accessory battery
pack. Do not use it to charge other unknown batteries.
When in use, do not place the charger near fire or in an enclosed
area that retains heat.
Page 8
7
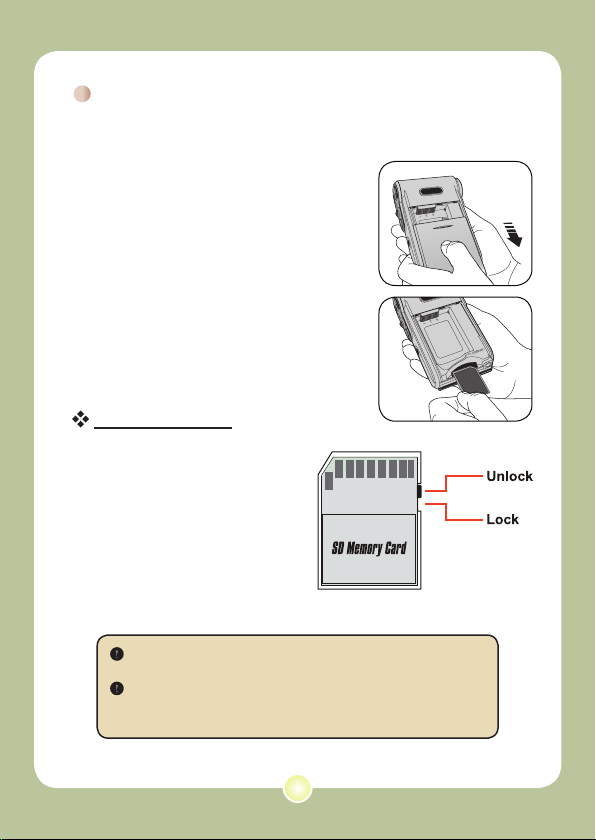
In addition to the built-in flash
memory, your camera can store data
on a Secure Digital (SD) card or a
MultiMedia card (MMC).
To insert a memory card, do the
followings:
(1) Open the battery cover.
(2) Gently push the card as indicated
until the card reaches the bottom
of the slot.
To remove the memory card, gently
push the card and it will pop up. Then
pull the card out of the slot.
Write protection
The SD card comes with a
write-protect switch. When
the write-protect switch is set
to the Lock position, the card
will become non-writable. To
ensure that the camera can
operate normally, you should
set the write-protect switch
to the Unlock position before
inserting the SD card.
Inserting a memory card (optional)
Do not remove the memory card while the camera is processing
data (when the LED is blinking).
When a memory card is inserted, the camera will use the card
as the main storage medium. Files stored in the camera’s built-in
memory will become inaccessible until the card is removed.
Page 9
8
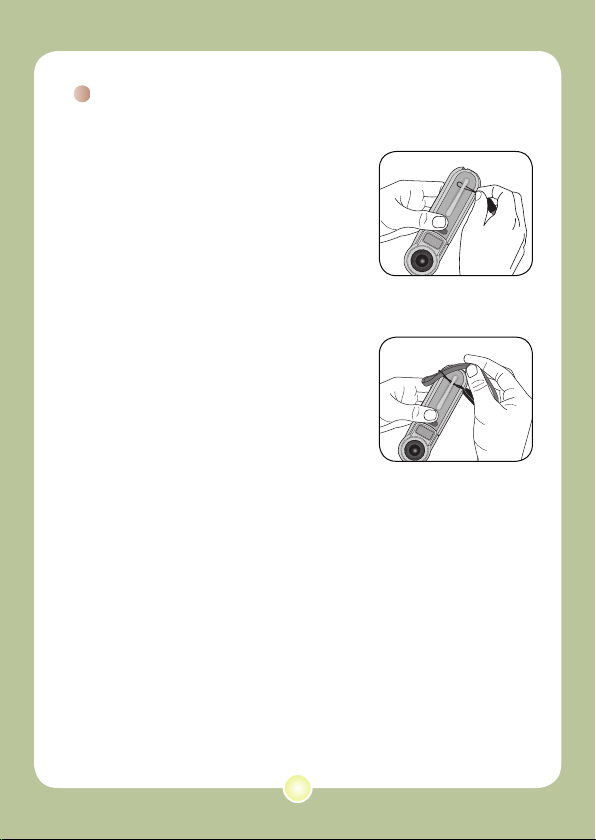
Attaching the carrying strap
1 Thread one end of the strap into
the strap hook.
2 Thread the strap as illustrated
on the right.
Page 10
9
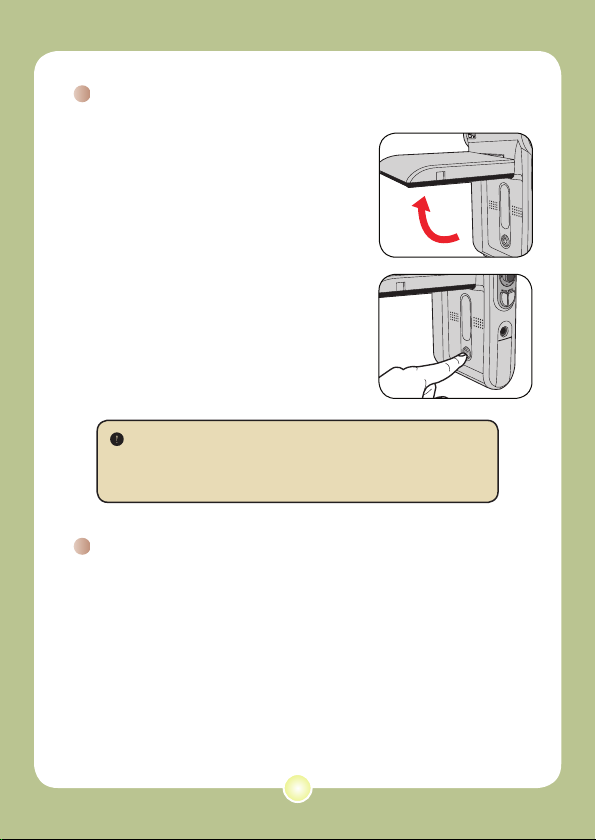
Turning on your camera
Open the LCD monitor and the camera
will be automatically powered on.
OR
When the camera is powered off with
the LCD monitor open, press and hold
down the Power button for 1 second to
turn on the camera.
Turning off your camera
Press and hold down the Power button for 1 ~ 3 seconds to turn
off the camera.
OR
If the camera stays inactive for a long period of time, it may
automatically shut down due to the Auto-Off setting. See page
29 for more information.
If the camera is not turned on after pressing the Power button,
please check:
1. The battery pack is well installed in the camera.
2. The battery pack has enough power left.
Basic Operations
Page 11
10
The LCD monitor can be used to
compose image settings for shooting,
to review recorded files, or to change
menu options.
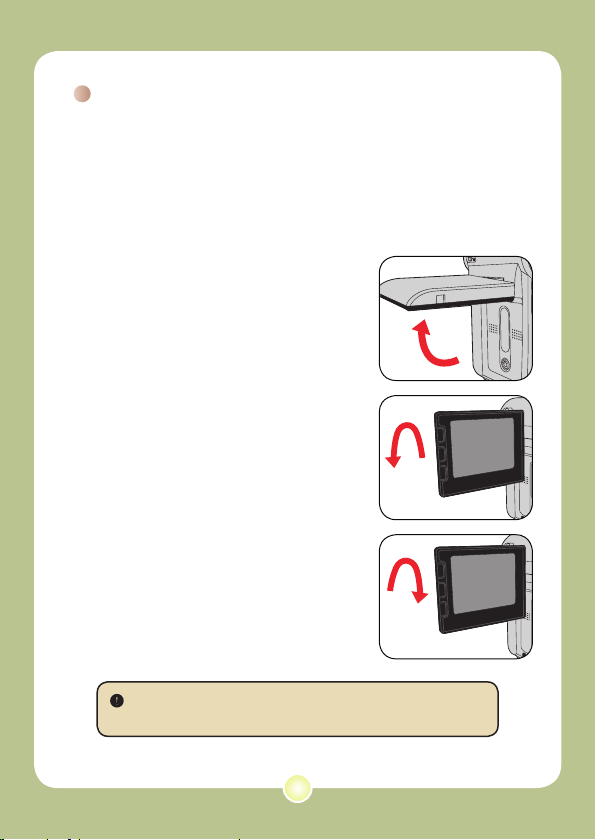
The LCD monitor can be rotated to the
following positions:
1 Open the LCD monitor.
2 Rotate the LCD monitor.
The LCD monitor can be rotated up to 270
degrees as indicated. You can position the
panel at any angle to serve your filming
purpose.
Using the LCD monitor
When the LCD monitor is flipped over, the previewed image on the
LCD will be automatically adjusted.
90°
180°
Page 12
11
2.0 0008
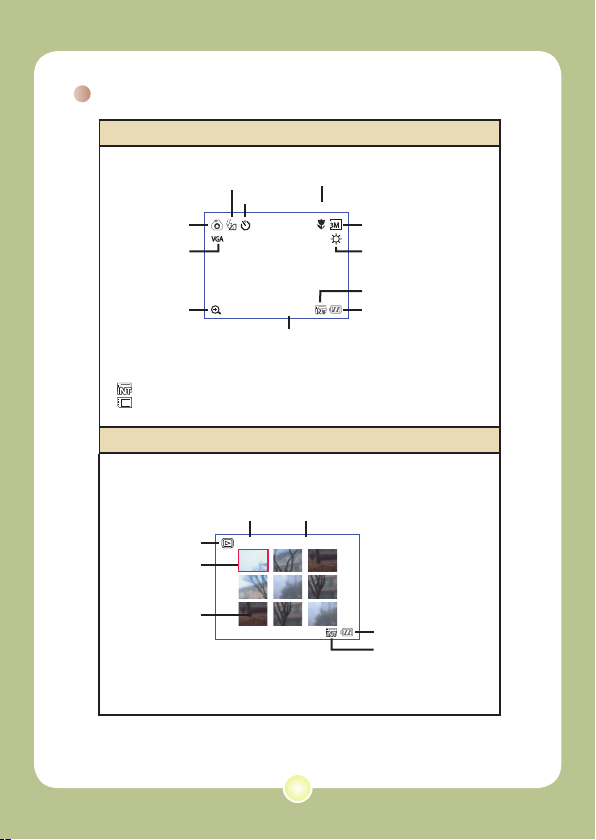
Reading LCD indicators
Digital Camcorder mode:
2.0 0008
Battery Life
White balance
Photo resolution
Number of recordings
Selftimer
Zoom ratio
Storage medium*
1
Video resolution
Mode icon
Flash mode
*1 This icon will change according to the storage medium you are using:
: internal memory.
: memory card.
Playback mode:
0001/0009
MPEG
Battery Life
Storage medium
Current / Total recordings
Image thumbnail
Highlight box
Mode icon
File type
Focus
Page 13

12
Setting time and language
When you power on the camera for the first time, you are
recommended to adjust the time and language settings.
1 Turn on the camera.
2 Press the Mode button and use the Direction buttons
to select the Setting ( ) mode. Then press the OK
key to enter.
3 Use the Direction buttons to select the Date & Time
(
30
) item.
4 Press the OK key or move the Direction buttons
toward right to enter the sub-menu.
5 Move the Direction buttons left or right to shift
between items. Move the Direction buttons up or
down to adjust the value. Press the OK key or right
key of the Direction buttons to confirm the setting.
6 Press the Menu button or Mode button to return to
the menu, and then use the Direction buttons to
select the Language (
ABC
) item.
7 Press the OK key or move the Direction buttons
toward right to enter the sub-menu.
8 Use the Direction buttons to select a suitable
language and press the OK key to confirm.
Page 14

13
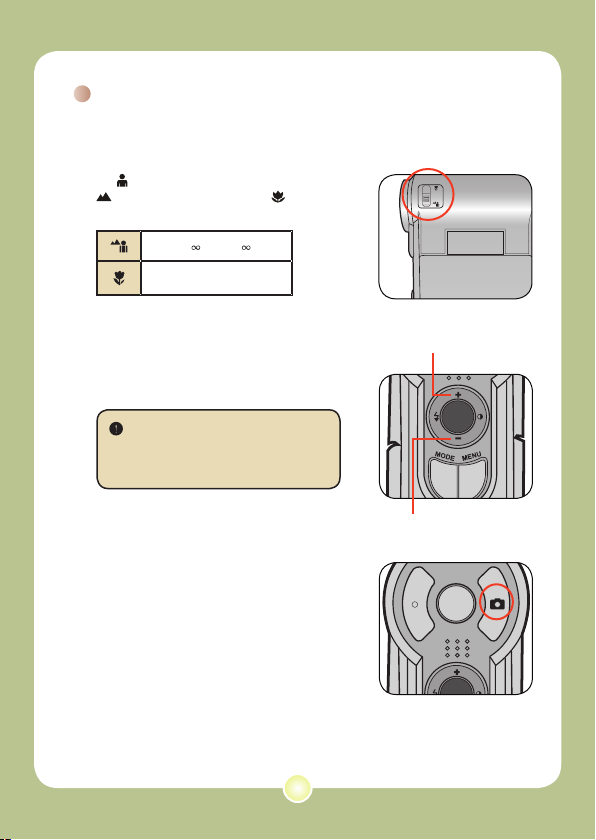
Recording a video clip
1 Adjust the focus.
Set the Focus Switch to an appropriate
setting. Normally, you should set the focus to
( ) for most filming conditions. Select (
) only for close-ups. The focus is adjustable
during recording.
70cm ~ (28” ~ )
50cm ~ 70cm (20” ~ 28”)
2 Zooming
Move the Direction buttons up or down
to zoom in or zoom out the screen. The
maximum magnification is 4
X.
The zoom function is also available during recording.
Adjust other advanced settings if necessary. See the section
“Advanced Operations” on page 21 for more information.
Zoom in
Zoom out
Page 15
14
Recording a video clip (continued)
3 Press the Record button to start recording.
4 Press the Record button again to stop recording.
2.0 0008
00:00:07
Timer
Page 16
15
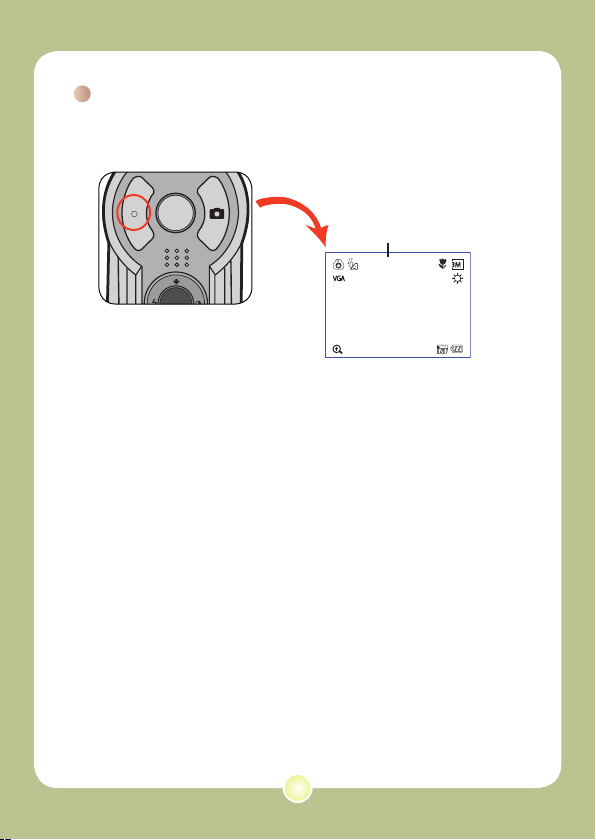
Taking a still picture
1 Adjust the focus.
Set the Focus Switch to an appropriate
setting. Normally, you should set the focus
to ( ) for most filming conditions. Select (
) for scenery photos. Select ( ) only for
close-ups.
70cm ~ (28” ~ )
50cm ~ 70cm (20” ~ 28”)
2 Zooming
Use the Zoom button or Up/Down key to
zoom in or zoom out the screen.
Adjust other advanced settings
if necessary. See the section
“Advanced Operations” on page 21
for more information.
3 Press the Shutter button to take
a still picture.
Zoom in
Zoom out
Page 17
16
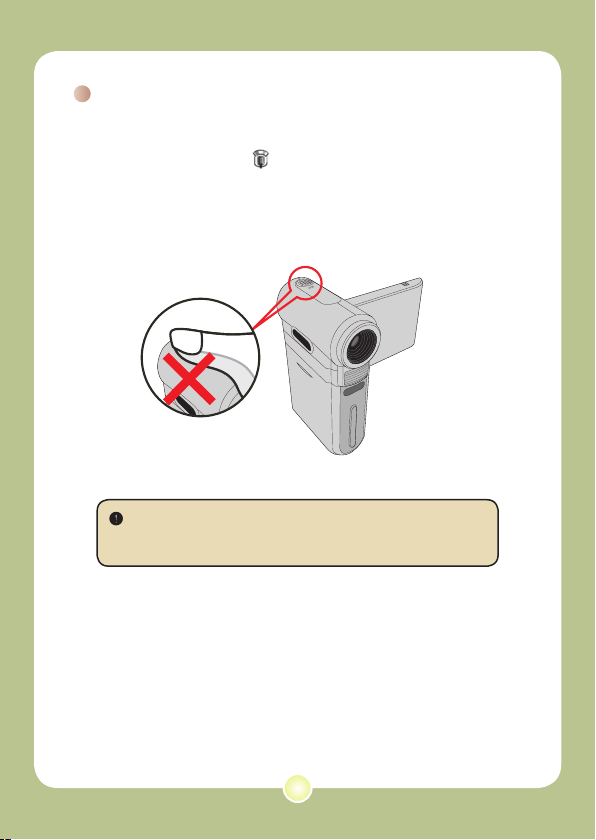
Recording a voice clip
1 Press the Mode button and use the Direction buttons
to select the Voice (
) mode. Then press the OK
key to enter.
2 Press the Record button to start recording.
Before or during recording, you can move the Direction buttons
toward left or right to adjust microphone sensibility, thus setting the
sound volume of the recording.
3 When you are done, press the Record button again
to stop recording.
Avoid blocking the microphone
Page 18
17
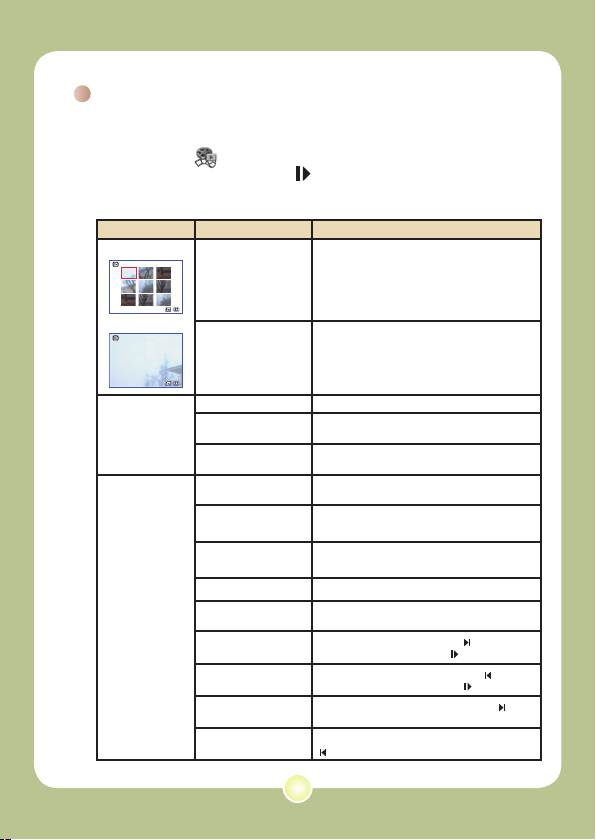
Playing back your recordings
1 Press the Mode button and use the Direction buttons to select
the Playback ( ) mode. Then press the OK key to enter. Or
press the Play/Pause button ( ) below the LCD monitor.
2 Operations in playback mode:
File type How to... Action
Index mode
0001/0009
MPEG
Full-screen mode
0001/0009
MPEG
Shift between index
mode and full-screen
mode
In index mode, press the OK key to switch to
full-screen mode. In full-screen mode, press the
Menu button to switch to index mode. (When
reviewing a picture, if you move the Direction
buttons down when the zoom ratio is 1.0x, the
screen will switch to index mode.)
Shift between files
1. In index mode: Use the Direction buttons to
move the highlight box.
2. In full-screen mode: Use the Direction
buttons to move left or right.
Picture
Zoom in/out Use the Direction buttons to move up or down.
Lock/Release zoom
ratio
When the zoom ratio is greater than 1.0x, press
the OK key.
Browse the enlarged
picture
When the zoom ratio is locked, use the
Direction buttons to browse the picture.
Video
&
Audio
Start playing
When selected (in full-screen mode), the file
automatically starts playing.
Pause/Resume
playing
During playing/While paused, press the OK key.
Adjust the volume
level
During playing, use the Direction buttons to
move up or down.
Stop playing During playing, press the Menu button.
Return to the preview
screen
Press the Shutter button.
Fast forward
During playing, press the Next ( ) button. To
stop, press the Play/Pause ( ) button.
Fast backward
During playing, press the Previous ( ) button.
To stop, press the
Play/Pause ( ) button.
Select the next file
While paused/stopped, press the Next ( )
button.
Select the previous file
While paused/stopped, press the Previous (
) button.
Page 19
18
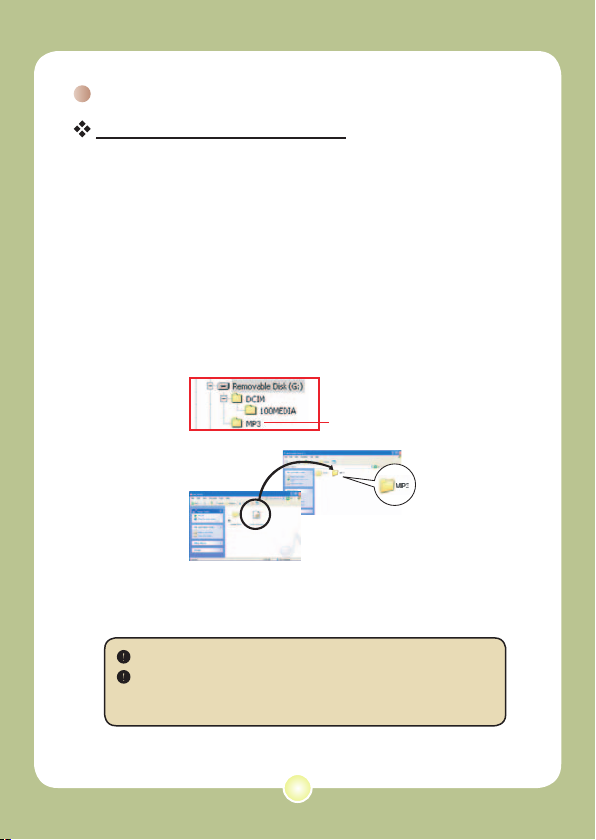
Playing MP3 music
Copy MP3 files to the camera
Before you can play MP3 music, you need to copy MP3 files to
the camera first.
1 Connect the camera to your PC.
Turn on the camera, and connect the camera to a PC using the USB cable.
For details on connecting the camera to your PC, see page 33.
2 Copy files to the camera.
After the camera is connected to the PC, double-click on My Computer
and you will find a removable disk. Create a “MP3” folder in the removable
disk, and then you can copy MP3 files into the folder for playing.
MP3 files must be placed in the “MP3” folder for playing.
To take advantage of the removable disk function, Windows 98SE
users may need to install the accessory driver. See page 31-32 for
details on the installation.
For MP3 files
Page 20
19
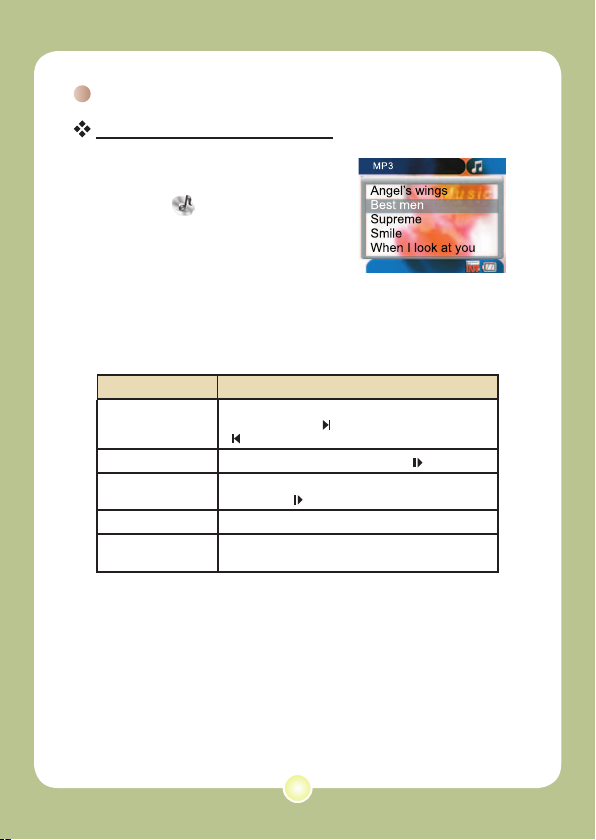
Playing MP3 music (continued)
Playing music in MP3 mode
1 Press the Mode button and use
the Direction buttons to select
the MP3 ( ) mode. Then
press the OK key to enter.
2 Operations in MP3 mode:
How to... Action
Shift between tracks
Use the Direction buttons to move up or down.
Or press the Next ( ) button or Previous
( ) button.
Start playing Press the OK key or the Play/Pause ( ) button.
Pause/Resume
playing
During playing/While paused, press the OK key or the
Play/Pause ( ) button.
Adjust sound volume Use the Direction buttons to move left or right.
Stop playing
During playing, press the Menu button or use the
Direction buttons to move up or down.
MP3 mode
Page 21
20
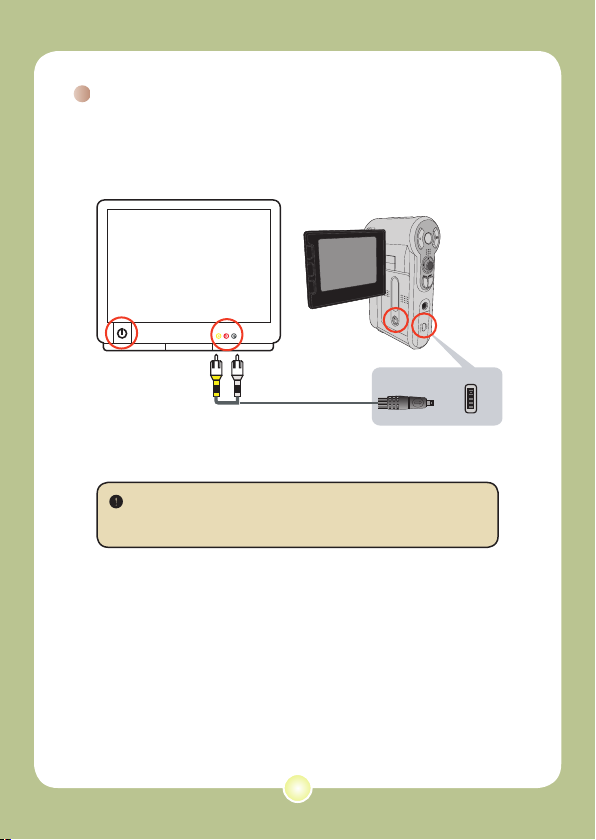
Connecting the camera to a TV
Connect your camera and TV via the accessory AV cable for
real-time display. You can display your video clips, still pictures,
and audio recordings directly on your TV, sharing them with your
friends and family.
Video Audio
AV-Mode
TV
USB
TV
OUT
2
3
4
1
1 Turn on your TV and switch the TV to AV mode.
The TV system is different across countries. To configure the TV-
out setting, please refer to page 28. (ex. Taiwan/America: NTSC;
Europe/China: PAL)
2 Connect the audio and video ends of the AV cable to the TV.
3 Turn on the camera.
4 Connect the other end of the AV cable to your camera.
Page 22
21
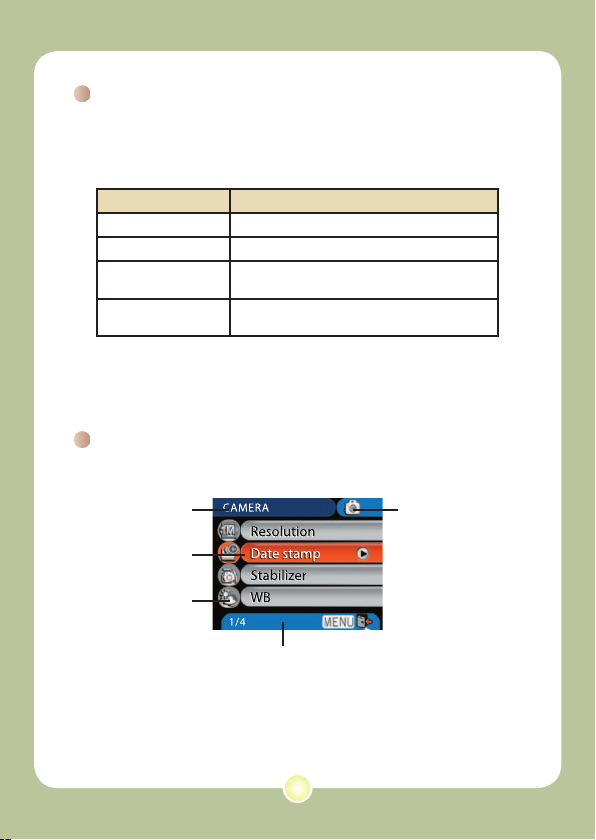
Menu operation
The menu items provide several options for you to fine-tune your
camera functions. The following table gives details on menu
operations.
How to... Action
Bring up the menu
Press the Menu button.
Move the highlight bar Use the Direction buttons to move up or down.
Enter sub-menu/
Confirm an item
Press the OK key.
Exit menu/Go back to
upper menu
Press the Menu button (when in sub-menu).
Advanced Operations
Menu icon
Information bar
Highlight bar
Menu item
Menu illustration
Menu title
Page 23

22
Menu items in Camera mode
Power-on → Press the Menu button.
Item Option Description
Resolution
6 Mega-pixel
Camera
1M
Set picture resolution to 1280x960.
3M
Set picture resolution to 2048x1536.
6M
Set picture resolution to 2816x2112.
8 Mega-pixel
Camera
3M
Set picture resolution to 2048x1536.
5M
Set picture resolution to 2560x1920.
8M
Set picture resolution to 3264x2448.
Date Stamp
On
Print a date mark on each picture.
Off
Disable date mark.
Stabilizer
On
Minimize blur caused by hand
shake.
Off
Disable stabilizer.
Page 24
23
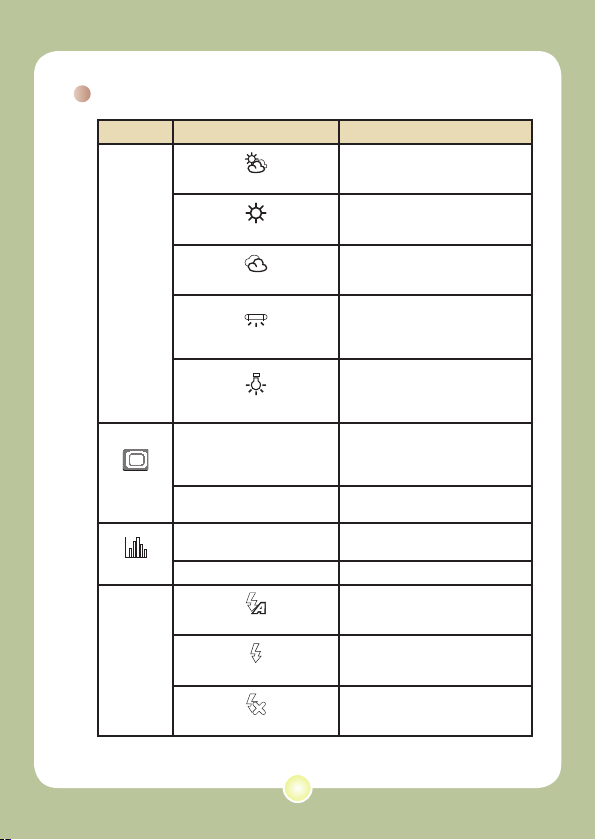
Menu items in Camera mode (continued)
Item Option Description
WB
Auto
The camera automatically adjusts
white balance.
Sunny
This setting is suitable for outdoor
recording in sunny weather.
Cloudy
This setting is suitable for recording
in cloudy weather or shady
environments.
Fluorescent
This setting is suitable for indoor
recording with fluorescent lamp
lighting, or environments with high
color temperature.
Tungsten
This setting is suitable for indoor
recording with incandescent lamp
lighting, or environments with low
color temperature.
PhotoFrame
1 ~ 10
This setting allows you to add
customsized frames to photos. 10
background frames are available on
the LCD monitor.
0
The Photo-Frame function is
disabled.
Histogram
On
Image histogram displays on the
screen.
Off
Disable histogram.
Flash
Auto
The flash automatically fires when
the lighting is insufficient.
On
The flash is forced to fire in every
shot.
Off
The flash is disabled.
Page 25
24
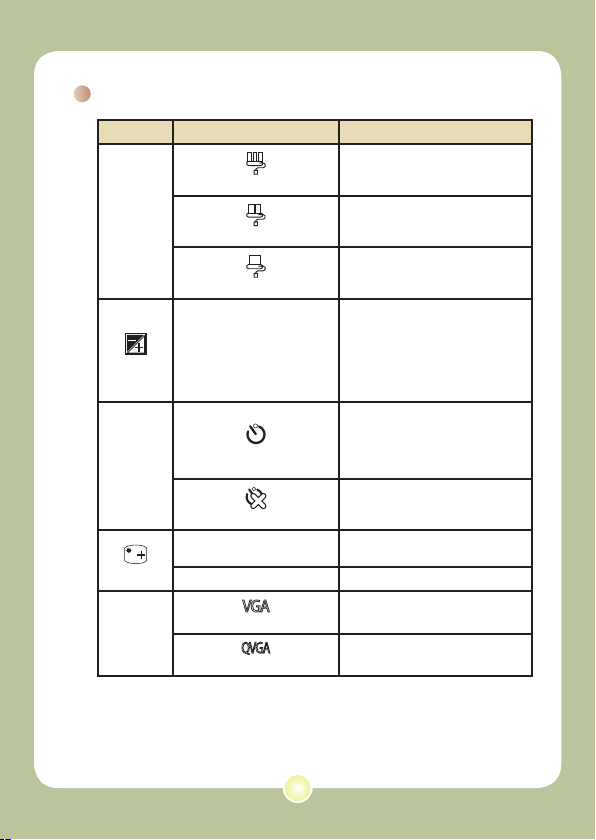
Menu items in Camera mode (continued)
Item Option Description
Effect
Normal
Make recordings in natural color.
B&W
Make recordings in black and white.
Classic
Make recordings in sepia-toned
color.
Exposure
-2~+2
Manually adjust the exposure to
gain better effect when the preview
image appears too bright or too
dark. A positive value indicates the
image will be brighter than usual;
while a negative value makes the
image dimmer.
Selftimer
On
Enable the selftimer. After the
selftimer is turned on, the camera
will have ten seconds delay before
recording when the Shutter button
is pressed.
Off
Disable selftimer.
Icon
On
Enable OSD (on screen display)
icons to display on the screen.
Off
Disable OSD icons.
Video
VGA
Set the video resolution to VGA
(640x480 pixels).
QVGA
Set the video resolution to QVGA
(320x240 pixels).
Page 26
25
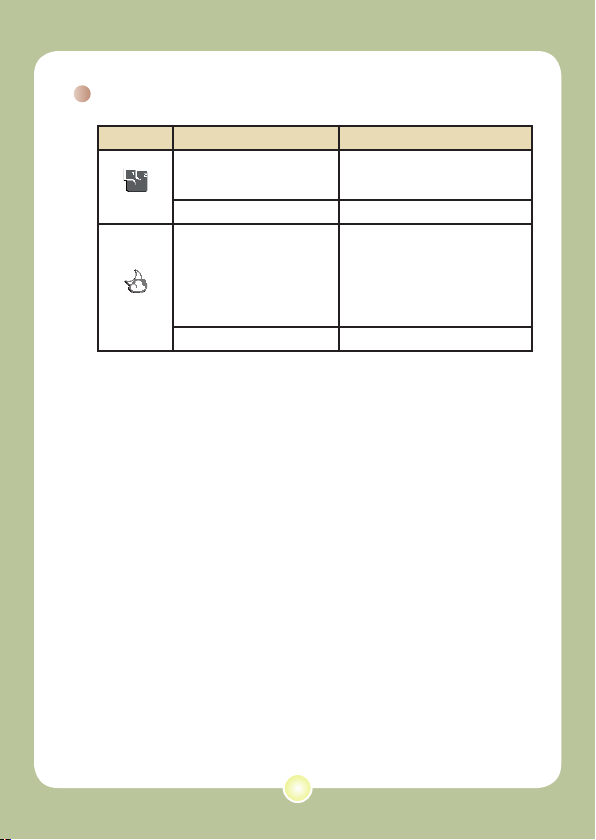
Menu items in Camera mode (continued)
Item Option Description
Two-in-One
On
This setting allows you to combine
two images taken individually into
one photo.
Off Disable the Two-in-One function.
NightShot
On
This setting allows you to take a
photograph with a dark background.
Since the shutter speed will slow
down when taking photographs at
a dark place, we recommend using
a tripod to eliminate blurring from
hand shake.
Off Disable the Night Mode function.
Page 27
26
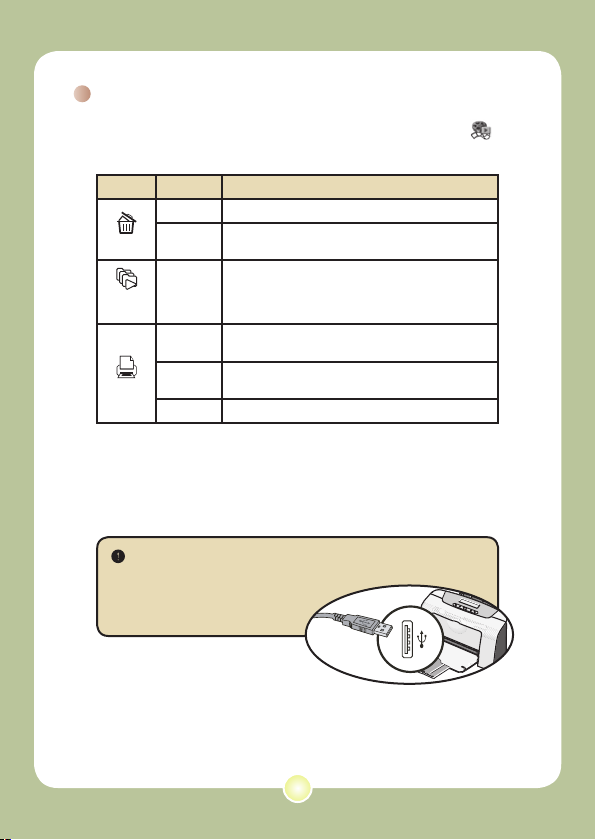
Menu items in Playback mode
Power-on → Press the Mode button → Enter the Playback ( )
mode → Press the Menu button.
Item Option Description
Delete
One Delete current file.
All
Delete all pictures and video/audio files stored in
the memory.
Slide
Show
-
The camera displays images in sequence. Only
JPEG pictures and the first frames of MPEG files will
be displayed. You can press the Menu button to stop
the slide show.
Print
One
Print current image when connected to a PictBridgeready printer.
All
Print all images when connected to a PictBridgeready printer.
Cancel
Cancel action.
* If there is no files in the camera, no items will be seen.
Before using the Print command in the menu, you need to connect
the camera to a PictBridge compatible printer via the accessory
USB cable. See page 30 for
more details on connecting a
printer.
Page 28
27
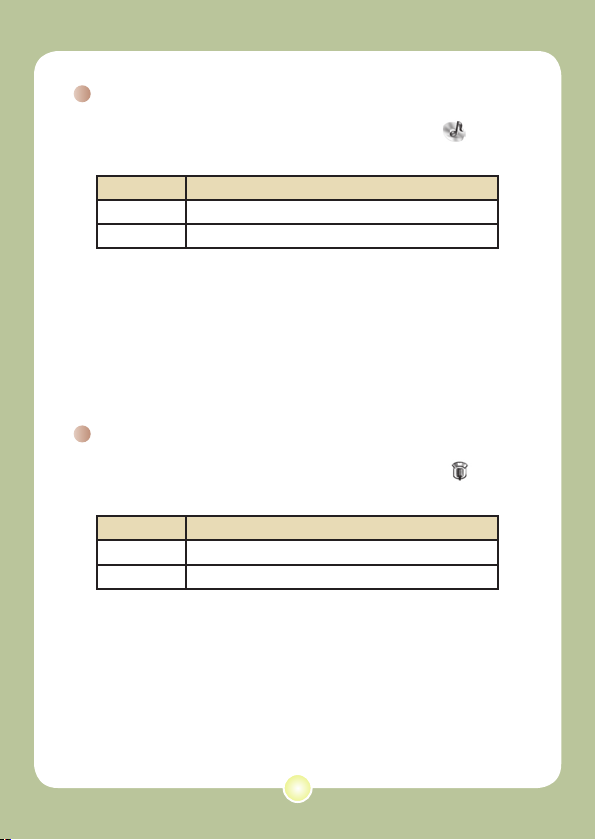
Menu items in MP3 mode
Power-on → Press the Mode button → Enter the MP3 ( )
mode → Press the Menu button.
Item Description
Delete One Delete current track.
Cancel Cancel action.
Menu items in Voice mode
Power-on → Press the Mode button → Enter the Voice ( )
mode → Press the Menu button.
Item Description
Delete One Delete current voice recording.
Delete All
Delete all voice recordings.
Page 29
28
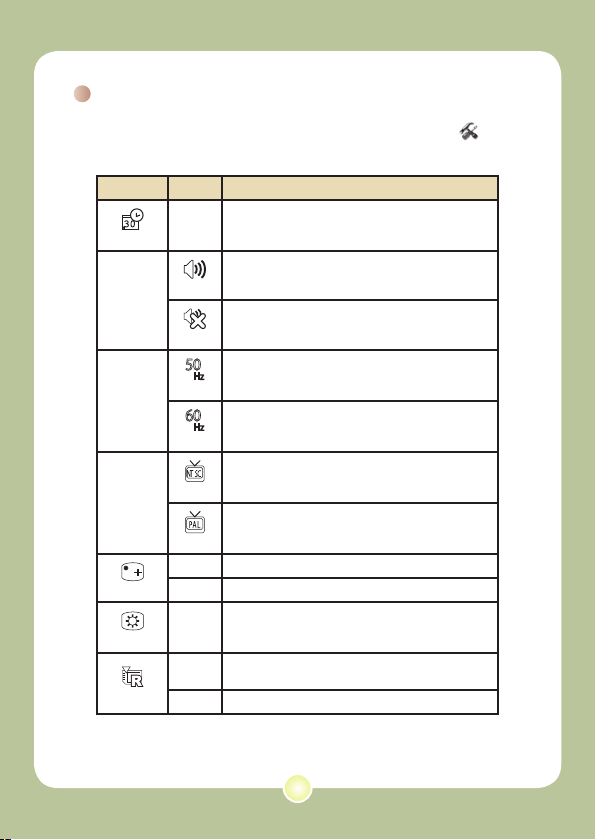
Menu items in Setting mode
Power-on → Press the Mode button → Enter the Setting ( )
mode → Press the Menu button.
Item Option Description
30
Date & Time
-
Set date and time.
Beep
On
Enable beep sound.
Off
Disable beep sound.
Flicker
50Hz
Set flicker frequency to 50Hz. For settings reference,
see page 47.
60Hz
Set flicker frequency to 60Hz. For settings reference,
see page 47.
TV-out
NTSC
Set TV system compatibility to NTSC. This option
is suitable for America, Taiwan, Japan, and Korea
areas.
PAL
Set TV system compatibility to PAL. This option is
suitable for Germany, England, Italy, Netherlands,
China, Japan, and Hong Kong.
Icon
On
Enable OSD icons to display on the screen.
Off
Disable OSD icons.
LCD Bright
-2~+2
Set LCD brightness. A positive value makes the
LCD brighter; while a negative value makes the LCD
dimmer.
Format
Yes
Format the storage medium. Note that all files stored
in the medium will be gone.
No
Cancel action.
Page 30
29
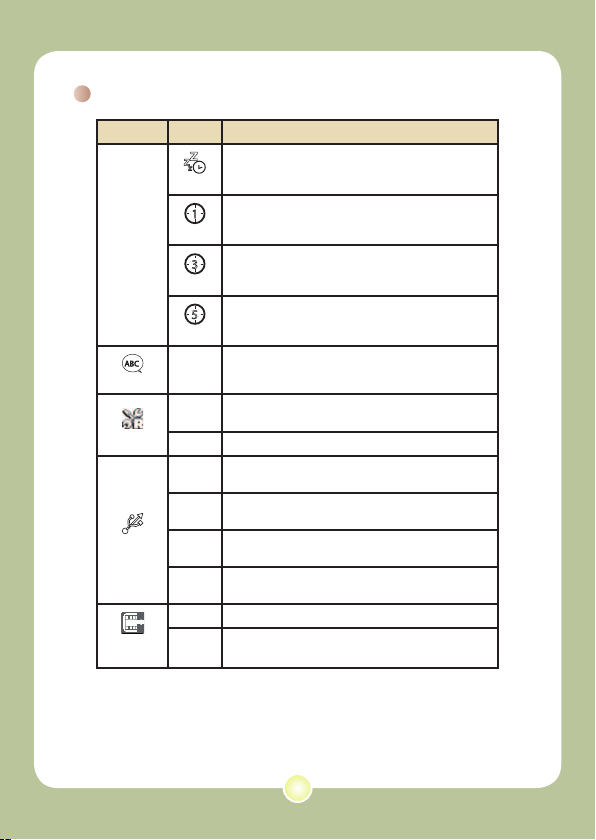
Menu items in Setting mode (continued)
Item Option Description
Auto Off
Z
Z
Z
Off
Disable Auto-off function.
1 min
The camera automatically shuts down when staying
inactive for over 1 minute.
3 min
The camera automatically shuts down when staying
inactive for over 3 minutes.
5 min
The camera automatically shuts down when staying
inactive for over 5 minutes.
Language
-
Lets you select the language used for OSD.
Default
Yes
Restore factory defaults. Note that your current
settings will be overridden.
No
Cancel action.
USB Mode
Menu
When connected to a PC, the camera displays a
menu for you to choose a desired connection mode.
Camera
When connected to a PC, the camera automatically
enters Camera (PC camera) mode.
Disk
When connected to a PC, the camera automatically
enters Disk (removable disk) mode.
Printer
When connected to a PC, the camera automatically
enters Printer mode.
Start
Movie
On
Enable Start Movie function.
Off
Disable Start Movie function.
Page 31

30
Menu items in Setting mode (continued)
To connect the camera to a PictBridge compatible printer, follow
these steps:
1) Power on the camera.
2) Set the camera USB mode to Printer (page 29).
3) Open the connector cover and connect one end of the accessory
USB cable to the camera.
4) Connect the other end of the USB cable to the printer.
5) Power on the printer.
Page 32

31
Copying Files to Your PC
Installing the driver to your PC
You need to install the camera driver to ensure that video clips
can be played back on your PC. To install the software:
1 Insert the driver CD.
Turn on your computer. Then place the
accessory CD into the CD-ROM drive.
Do not connect the camera to your computer at this stage.
Shut down all other applications running on your computer.
If the autorun screen does not appear automatically, double-click
on My Computer and then the CD-ROM drive. Then start the
Setup.exe program manually.
2 Start the installation.
Click on the driver icon to launch the installation of the driver.
Notice for Windows 2000 users:
During the installation process, a warning message regarding
digital signature may appear twice or more. Please click on Yes
to continue the process. The software is fully compatible with
Windows 2000 operation system.
Page 33

32
Installing the driver to your PC (continued)
3 Install the driver.
The Install Shield Wizard will then
appear and automatically install the
program. Click on Next and follow the
on-screen instructions to complete the
installation.
4 Install codecs.
After the driver installation is
completed, the program will
prompt you to install Windows
Media Player Codecs. If
you are not sure whether the
codecs have been installed in
your computer, please click on
Yes
and follow the on-screen
instructions to complete the
installation.
5 Install Direct X 9.0c or above.
After the codecs installation is completed,
you will be prompted to install Direct X 9.0c
or above if the program is not yet installed
in your computer. Please click on Yes
to
continue.
Windows Media Player Codecs and Direct X 9.0c or above are
necessary for viewing the video clips recorded by the camera.
6 Restart the computer.
After the installation is completed, you may
need to restart your computer for the driver
to take effect.
Page 34

33
Connecting the camera to your PC
1 Connect the USB cable
to your computer.
Turn on your computer, and then
connect the accessory USB cable
to the USB port of your computer.
Make sure the cable and the port
are correctly aligned.
2 Turn on the camera.
3 Connect the USB cable to your
camera
Connect the other end of the USB cable to
your camera.
The default is set to “Disk” mode, if you would
like to set other modes as default, please
refer to “USB Mode” section on page 29 for
more information.
Notice for Windows 2000/XP/ME users:
If you want to disconnect the camera from your computer, please
follow these steps:
1. Double-click in the system tray.
2. Click (USB Disk), and then click Stop.
3. Select the camera when the confirmation screen appears and
click
OK.
4. Follow the on-screen instructions to safely disconnect the
camera from your computer.
Page 35

34
Copying files to the PC
1 This step varies depending on your
operation system:
For Windows XP users:
After the camera is connected to your
computer, a dialogue window will appear
automatically. Please select the item
Open
folder to view files using Windows
Explorer and click OK.
For Windows 2000/ME/XP
users:
Double-click on My Computer. Then doubleclick on the icon of the removable disk that
has just appeared.
Page 36

35
Copying files to the PC (continued)
2 Double-click on the DCIM file folder.
3 Double-click on the 100MEDIA file folder.
4 Drag the target file into My Documents or the
destination folder.
Page 37

36
Viewing/Playing files on your PC
1 Double-click on My Documents or any other folder
that stores your files.
2 Double-click on the desired file, and the file will be
opened by the program matching the file type.
Page 38

37
File location
After connecting the camera to your computer, a removable
disk will appear in your computer. The removable disk actually
represents the storage medium of your camera. In the disk you
can find all of your recordings. Refer to the figure below to see
where the files are stored.
For multimedia files.
For MP3 files.
Page 39

38
Using PC Camera
Installing the software
The PC camera software is included in the camera driver, and
therefore you should install the driver before using the PC
camera function. If you have not yet installed the driver, see
page 31 for details on the installation.
Starting the application
1 Turn on the camera and connect
the camera to your computer.
Turn on the camera, and then connect the
camera to your computer using the accessory
USB cable. See page 33 for more details.
2 Switch to Camera mode.
Press the Menu button to bring up the
options menu. Use the Direction buttons
to select the Camera item and press the
OK key to confirm.
The default is set to “Disk” mode, if you
would likt to set other modes, please
refer to “USB Mode” section on page 29
for more information.
If you want to use the Video Conferencing function, please install
programs such as Netmeeting to serve the purpose.
Page 40

39
Notice for Windows ME users:
When the indicated screen appears,
please select Automatic search
for a better driver and click Next
to continue.
Starting the application (continued)
Notice for Windows 98SE users:
1. Click
Next when the following screen appears.
2. When the following screen appears, select Search for the best
driver for your device
and click Next to continue.
3. During installation, some users may need to insert a licensed 98SE
CD into the CD-ROM drive for copying the needed files.
4. Follow the on-screen instructions to complete the installation.
Notice for Windows 2000 users:
When using the PC camera function for the first time, the warning
message regarding digital signature may appear twice or more. Please
click Yes to continue the installation. The camera is fully compatible
with Windows 2000 operation system.
Page 41

40
Starting the application (continued)
3 Launch the PC Camera program.
Double-click the icon ( ) on the Desktop to start the program. After the
program starts, you can begin to use the PC camera function.
If you cannot find the program shortcut on the desktop, you can
start the program from the Programs menu.
Page 42

41
Using the PC Camera
Start recording a video clip
Stop recording
Snapshot
Format *
Source *
Start/Stop preview window
Setting *
Open album
Select video source
* Sub-menu available.
To view pictures taken by the PC Camera, please click on to
open the photo album. Or, as an alternate option, go to the “Work
Temp” folder to find the files.
Page 43

42
Using the PC Camera (continued)
Recording an AVI movie
1. Click on the icon.
2. Press to specify the path
and name of the AVI file.
3. Set the frame rate and
recording time according to
your needs.
4. Press the Start to Record
button to begin recording.
5. To stop recording, click on
the
icon.
Taking a snapshot
Click on the icon to take a snapshot.
Configuring format options
Color Space:
Select one of the following functions according to your needs.
- RGB 24: This item is for retaining better quality.
- MJPG: This item indicates the AVI movie will be more
compressed to gain the advantage of faster processing speed.
Output Size:
Set output size to change the
size of the preview window. The
default size is 320x240. Select
larger pixels when you need a
larger preview window.
Page 44

43
Configuring source options
Device Control:
- Brightness: You can check the
“Auto” item and let the program
adjust image brightness for you, or
uncheck the “Auto” item and slide
the bar to adjust image brightness
manually.
- Quality: If the network bandwidth
is congested when using PC
Camera, slide the bar toward
“Faster Video” to avoid this problem.
Configuring flicker options
If you take your camera abroad, and
find the screen of your computer
flickers when using PC Camera
function, please check the Cancel
Flicker item to prevent noises from
appearing on the screen. Or, you can
refer to the Flicker Settings table on
page 47 for proper flicker value that
suits the country you are staying.
Using the PC Camera (continued)
Page 45

44
Appendix:A
When using the camera:
Problem Cause Solution
The camera can
not be powered on
normally.
The battery is out of
power.
Replace the battery.
The battery is incorrectly
installed.
Re-install the battery.
The camera is still
powered on, but the
LCD monitor does
not display.
If the camera stays
idle over one minute,
the LCD monitor will
automatically shut down
to save power.
Press any button except the
power button to reactivate
the display.
Can not take
pictures or video
clips when pressing
the Shutter or
Record button.
Out of memory.
Free some space from the
SD/MMC card or the internal
memory.
The camera is
recharging the flash
strobe.
Wait until the flash strobe is
fully charged.
Using a “protected” SD
card.
Set the SD card to be
writable.
The LCD monitor
displays “MEMORY
ERROR” or “CARD
ERROR” message.
Or the camera
cannot read the
memory card.
The format of the
memory card is not
compatible with the
camera.
Use the camera “Format”
function to format the card.
The memory card is
corrupted.
Replace the memory card
with a new one.
Troubleshooting
Page 46

45
Appendix:A
When using the camera:
Problem Cause Solution
I did not delete the
pictures and video
clips, but can not
find them in the
memory card.
The lost recordings are
saved in the internal
memory.
It happens when you insert
a memory card after taking
a few pictures or video clips.
You can access those files
after removing the memory
card.
Cannot use the flash
strobe.
If the battery icon
indicates low battery,
the flash strobe may
be disabled due to
insufficient voltage.
Replace the battery.
The camera does
not respond to
any action during
operation.
The camera encounters
software failure.
Remove the battery pack
and replace it into the
compartment. Then power
on the camera.
The recorded
pictures appear too
blurred.
The focus is not
correctly set.
Adjust the focus to an
appropriate position.
The recorded
pictures or video
clips appear too
dark.
The environment of
shooting or recording
does not have adequate
light.
Use flash strobe when taking
pictures. Add extra light
sources when recording
video clips.
Noises occur when
viewing images on
the LCD monitor or
on the computer.
The flicker setting does
not match the standard
of the country you are
staying.
Adjust the flicker setting.
For
more information, please
refer to the “Flicker Settings”
table on page 47.
Page 47

46
Appendix:A
When connecting the camera to the computer or TV:
Problem Cause Solution
I cannot view the
video clips on my
computer.
Driver or software is
not installed on the
computer.
Install Direct X 9.0c or
above and Windows Media
9.0 Codecs to solve this
problem. See page 31 for
details on installing the
software, or go to http://www.
microsoft.com to download
the required files.
Driver installation
failed.
The installation is
terminated abnormally.
Remove the driver and other
related programs. Follow
the installation steps in
the manual to re-install the
driver.
The camera has been
connected to the PC via
the USB cable before
installing the driver.
Install the driver before
plugging in the USB cable.
The TV screen
does not display
after connecting the
camera to the TV.
The camera is not
correctly connected to
the TV.
Reconnect the camera to TV
correctly.
A conflict with other
installed camera
or capture device
occurred.
The device is not
compatible with the
camera.
If you have any other camera
or capture device installed
in your computer, please
completely remove the
camera and its driver from
the computer to avoid the
conflict.
Noises occur on my
computer screen
when using Video
Conferencing.
The flicker setting does
not match the standard
of the country you are
staying.
Adjust the flicker setting.
For
more information, please
refer to the “Flicker Settings”
table on page 47.
Page 48

47
Appendix:A
Country England Germany France Italy Spain Netherlands
Setting 50Hz 50Hz 60Hz 50Hz 50Hz 50Hz
Country Portugal America Taiwan China Japan Korea
Setting 50Hz 60Hz 60Hz 50Hz 50/60Hz 60Hz
Note: The flicker setting is based on the frequency standard of your local power supply.
Flicker Settings
Message Description
Recording The camera is recording a file.
Please Unlock SD Card
If you insert a SD card and the card is set to “Protected”, this message
will show up when the camera tries to write data into the card.
No File
When the camera is set to Playback mode without any existing file to
play, this message will show up.
Please Change Battery
The battery life of the camera is low. You should replace the battery with
a new one immediately.
Memory Full
The storage memory is full and can not store any more files. Please
change the SD/MMC card or delete some files to free some memory
space.
Card Error
The inserted card is not compatible with the camera. Please change the
card or try formatting the card.
Memory Error
The camera can not access data in the internal memory.
Please format the medium to solve this problem.
Strobe Is Charging The flash strobe is charging.
File Format Error The file being played is not compatible with the camera.
Deleting The camera is performing file deletion.
Formatting The camera is formatting the storage medium.
Setting The camera is performing a setting action.
System Message
Page 49

48
Appendix:A
Storage Capacity
Memory
Video (min.)
Audio (min.)
VGA QVGA Maximum
Flash memory (16MB for storage) 2 7 15
SD/MMC card (128MB) 6 22 90
SD/MMC card (256MB) 12 44 190
SD/MMC card (512MB) 24 88 380
SD/MMC card (1GB) 48 176 760
Memory
Still picture
8 Mega-pixel camera 6 Mega-pixel camera
8M 5M 3M 6M 3M 1M
Flash memory (16MB for storage) 20 30 50 25 50 170
SD/MMC card (128MB) 130 210 300 170 300 1000
SD/MMC card (256MB) 260 420 600 340 600 2000
SD/MMC card (512MB) 520 840 1200 680 1200 4000
SD/MMC card (1GB) 1040 1680 2400 1360 2400 8000
Note: The actual value of capacity may vary (up to ± 30%) depending on the color saturation
and complexity of your subject and surroundings.
Page 50

49
Appendix:A
Icon Description
Full battery life
Moderate battery life
(white)
Low battery life
* If the indicator turns red,
flash strobe is disabled.
Empty battery life
Note: To avoid sudden outage of power supply, you are recommended to replace the battery
when the icon indicates low battery life.
Battery Life Indicator
Still picture Video clip
Number of shots Recording time (minute)
290 90
* shoot every 30 seconds
** flash is on
*** resolution is set to 2816x2112 pixels
* resolution is set to VGA (640x480 pixels)
Note: This table is for your reference only. The actual battery life depends on your battery
type and recharge level.
Battery Life
Page 51

50
Appendix:B
Instruction for ArcSoft MediaConverter™
Introduction
ArcSoft MediaConverter is a powerful all-in-one multimedia file
converter. This utility quickly and effortlessly converts photo, video,
and music files into formats optimized for use on your portable device.
Multiple files and file types can be converted at the same time. It’s
easy! Three simple steps are all it takes. (Refer to page 53 for more
information.)
System requirements
To install and run the MediaConverter, your system must meet the
following minimum requirements:
Microsoft Windows 98 SE/ME/2000/XP (Home or Professional)
50 MB free hard drive space
256 MB RAM
DirectX 9 (DirectX 9c recommended)
Microsoft Windows Media Player 9.0 (for converting WMA and WMV
files)
Microsoft Windows 98 SE/ME/2000/XP (Home or Professional)
Apple QuickTime 6.5 (for converting MOV files)
Page 52

51
Appendix:B
Supported file formats
Video
Video files are converted and copied to the selected location as MPEG4 encoded AVI files, WMV files or MPEG-4 encoded ASF files (Default).
Supported file types for conversion
- AVI (Microsoft Video 1 format, Cinepak, Intel Indeo, uncompressed,
etc.)
- MPEG-1 in MPEG, MPG, MPE
- DAT (VCD MPEG1)
- MPEG-4 in AVI format
- MPEG-4 in ASF
- WMV
- QuickTime MOV
QuickTime 6.5 and Windows Media Player 9.0 or above are required for
QuickTime MOV and WMV file conversion, respectively.
Supported file types for export
- AVI (MPEG-4 SP)
- WMV
- ASF(MPEG-4 SP)
Page 53

52
Appendix:B
Converting files
Page 54

53
Appendix:B
Step 1: Select media
Adding files for conversion
1 Click the “Select Media” button.
2 An “Open” window will appear. Navigate to the folder that contains the
files you’d like to convert.
a. Use the “Files of type” pull-down to filter the file types you’d like to
display.
b. Preview highlighted files to be sure that they’re the ones you want.
Check the “AutoPlay” box to start the playback automatically
after you click a file.
3 Repeat steps 1 and 2 above until all the files you want are added. In
addition to using the above method, you can also drag-and-drop files
directly to the file list in the program window.
Removing files
To delete a file from the list, highlight it and click the “X” icon.
Page 55

54
Appendix:B
Step 2: Select destination
Click the “Select Destination” button to select the location where
your converted files will be saved. The default save location is “C:\
Documents and Settings\[current user]\My documents”. However,
you’ll most likely want to save the files to your portable device. In this
case, make sure your device is connected, and then click “Select
Destination” and choose the device.
Settings
Various program settings can be accessed by clicking the “Settings”
button. Each section lets you select one of two settings: “Optimize for
the selected device,” and “Use custom conversion settings.”
Page 56

55
Appendix:B
Optimize for the selected device
This is the default setting. The program will automatically set the
conversion parameters according to your selected device.
Use custom conversion settings
If you decide to use this option, you can set the various conversion
parameters manually.
Video settings
When converting a video file, there are several different parameters:
- Resolution (Options include QVGA (320 x 240) [default] and VGA
(640 x 480))
- File Format (MPEG-4 encoded AVI files, WMV files or MPEG-4
encoded ASF files)
- Video Bitrate (Options include 500KB, 1.0MB, 1.5MB, 2.0 MB
[default], 2.5 MB, and 3.0 MB)
- Audio Bitrate (Options include 96 KB, 128 KB [default], 192 KB)
- Frame Per Second (Options include [in fps] 15.00, 20.00, 24.00,
25.00 [default], and 29.97)
Selecting “Optimize for the selected device” uses the default values
above, where applicable.
After viewing/modifying the various settings, select either “Save” or
“Cancel” to return to the main screen. Click “Save” if you’d made
changes that you’d like to keep. Otherwise, click “Cancel.”
Page 57

56
Appendix:B
Step 3: Convert
When you’re ready, select (highlight) the files you’d like to convert from
the list, and then click the “Convert” button.
A progress bar will display the current status. Various popups may
appear asking for specific confirmation. A popup will appear and inform
you once all the files have been converted and stored to the location
you selected.
Playing the converted ASF files in your camera
To play the video clips or movies (MPEG-4 in ASF format only)
converted by ArcSoft MediaConverter in your MPEG-4 digital
camera, please follow the steps below.
Step 1
Insert a SD/MMC card in the card slot of the camera and connect the
camera to PC via the USB cable. You could follow the instructions of
“Connecting the camera to your PC” on page 33 for more information.
Page 58

57
Appendix:B
Step 2
Save the ASF files converted by MediaConverter on PC to your camera.
1 Copy the converted ASF files.
2 Open Windows Explorer to find a “Removable Disk” appeared in My
Computer.
3 Double-click on the icon of Removable Disk.
4 Double-click on the DCIM file folder.
5 Double-click on the 100MEDIA file folder.
6 Paste the files into 100MEDIA file folder.
7 Change the file names to CLIP****.ASF.
**** could be any 4-digit number from 0001 to 9999.
The file name must follow the naming principle of your camera, so
that the camera could identify the files saved on 100MEDIA.
Step 3
Now you can use the Playback ( ) mode to enjoy the video clips or
movies on the large LCD monitor!
The ArcSoft MediaConverter in this package is a customized version for
your digital camera. You may visit the website http:\\www.arcsoft.com for
more product information.
Page 59

58
Appendix:C
Specifications
Item Description
Model 8 Mega-pixel camera 6 Mega-pixel camera
Image sensor 5 Mega (2560x1920 pixels) 3 Mega (2048x1536 pixels)
Resolution
Still image: 3M/5M/8M
Movie: 640x480 (VGA)
320x240 (QVGA)
Still image: 1M/3M/6M
Movie: 640x480 (VGA)
320x240 (QVGA)
Lens 4X digital zoom lens F2.8~F5.3 4X digital zoom lens F3.0
File format ASF, JPEG WAV, MP3
Video frame rate
640x480, up to 30fps;
320x240, up to 30fps
Internal memory 32MB flash memory (16MB for storage)
External memory SD/MMC (Max. 2GB)
LCD display 2.4” TFT LCD
TV out NTSC/PAL system supported
Interface USB 2.0
Microphone Yes
Speaker Yes
Night shot Yes (both in still image and video modes)
Stabilizer Yes
Direct print Supports PictBridge compatible printer
Battery 8210 Li-ion rechargeable battery (3.7V 850mAh)
Dimensions 107mmx68mmx32mm
Note: Specifications are subject to change without notification.
Page 60

59
Operating System: Windows 98SE/ME/2000/XP
CPU: Pentium III or above
System RAM: 128MB or above
Graphic Card: 64MB, 24 bit true color
CD-ROM speed: 4x or above
Software: Direct X 9.0c or above and Windows Media Player Codecs
Other: USB connector
System Requirements
Appendix:D
Page 61

User's Manual
User's Manual
Deutsch
Page 62

1
Herzlich willkommen!
Lieber Benutzer, vielen Dank für den Kauf dieses Produkts.
In die Entwicklung des Geräts wurde viel Zeit und Mühe investiert, und
wir hoffen, es wird Ihnen viele Jahre störungsfreien Betrieb und Freude
bescheren.
Sicherheitshinweise
1. Lassen Sie die Kamera nicht fallen und
beschädigen und zerlegen Sie die Kamera
nicht, andernfalls erlischt die Gewährleistung.
2. Vermeiden Sie jeglichen Kontakt des Geräts
mit Wasser und trocknen Sie sich die Hände
ab, bevor Sie es verwenden.
3. Setzen Sie die Kamera keinen hohen
Temperaturen aus und lassen Sie das Gerät
nicht in direkter Sonneneinstrahlung liegen.
Andernfalls könnten Schäden an der Kamera
auftreten.
4. Verwenden Sie die Kamera behutsam.
Vermeiden Sie es, starken Druck auf das
Kameragehäuse auszuüben.
5. Verwenden Sie die Kamera zu Ihrer
eigenen Sicherheit nicht bei Gewittern oder
Blitzschlag.
6. Verwenden Sie keine Batterien mit anderen
Spezifikationen. Andernfalls können unter
Umständen schwere Schäden am Gerät
entstehen.
7. Entfernen Sie die Batterie, wenn Sie das
Gerät längere Zeit nicht verwenden, da
mängelbehaftete Batterien die Funktionalität
der Kamera beeinträchtigen können.
8. Entfernen Sie die Batterie, falls diese
Anzeichen von Ausrinnen oder Verformungen
aufweist.
9. Verwenden Sie ausschließlich vom Hersteller
angebotenes Zubehör.
10. Bewahren Sie die Kamera außerhalb der
Reichweite von Kindern auf.
Page 63

2
Inhaltsverzeichnis
Herzlich willkommen! ..................................................... 1
Sicherheitshinweise ....................................................... 1
Inhaltsverzeichnis ..........................................................2
Erste Schritte .................................................................. 4
Kennenlernen der Kamerateile .............................................................4
Einlegen der Batterie ............................................................................ 5
Verwendung des Ladegeräts ................................................................
6
Einlegen einer Speicherkarte (optional) ............................................... 7
Ontgrendelen ........................................................................................7
Vergrendelen ........................................................................................
7
Anbringen des Tragriemens .................................................................
8
Grundfunktionen ............................................................9
Einschalten der Kamera .......................................................................9
Ausschalten der Kamera ......................................................................9
Verwendung des LCD-Bildschirms .......................................................
10
Lesen der LCD-Anzeigen .....................................................................11
Einstellen der Zeit und Sprache ........................................................... 12
Aufzeichnen von Videos .......................................................................
13
Aufnehmen von Fotos .......................................................................... 15
Aufzeichnung von Sprachdateien .........................................................16
Wiedergeben Ihrer Aufzeichnungen .....................................................
17
Wiedergabe von MP3-Musik ................................................................ 18
Anschließen der Kamera an ein TV-Gerät ............................................
20
Erweiterte Funktionen .................................................... 21
Menübedienung ....................................................................................21
Menüabbildung ..................................................................................... 21
Menüpunkte im Kameramodus ............................................................. 22
Menüpunkte im Wiedergabemodus ......................................................26
Menüpunkte im MP3-Modus ................................................................. 27
Page 64

3
Inhaltsverzeichnis
Menüpunkte im Sprachaufzeichnungsmodus ....................................... 27
Menüpunkte im Einstellungsmodus ......................................................28
Kopieren von Dateien auf Ihren PC ..............................31
Installieren des Treibers auf dem PC ...................................................31
Anschließen der Kamera an einen PC .................................................33
Kopieren von Dateien auf den PC ........................................................ 34
Anzeigen/Wiedergeben von Dateien auf Ihrem PC ..............................36
Dateipfad ..............................................................................................37
Verwenden als PC-Kamera ............................................ 38
Installieren der Software .......................................................................38
Starten des Programms ........................................................................ 38
Verwenden als PC-Kamera ..................................................................
41
Anhang: A ........................................................................ 44
Problembehebung ................................................................................44
Frequenzeinstellungen .........................................................................47
Systemmeldungen ................................................................................47
Speicherkapazität ................................................................................. 48
Batterieladestandsanzeige ...................................................................49
Batterieladestand .................................................................................. 49
Anhang: B .......................................................................50
Anleitung für den ArcSoft MediaConverter™ ........................................ 50
Anhang: C .......................................................................58
Technische Daten .................................................................................58
Anhang: D .......................................................................59
Systemvoraussetzungen ......................................................................59
Page 65

4
Erste Schritte
Kennenlernen der Kamerateile
SD-/MMC-Karteneinschub
(im Batteriefach)
Ansicht von unten
Stativanschluss
Batteriefachabdeckung
Blitzlicht
Objektiv
Mikrofon
Lautsprecher
Riemenöse
Ein-/Aus-Taste
Richtungstasten
Kopfhöreranschluss
Vor-Taste
Schnellvorlauf-Taste
LCD-Bildschirm
Aufnahmetaste
Menütaste
Modustaste
Auslösertaste
Fokusregler
Zurück-Taste
Schnellrücklauf-Taste
Wiedergabe-/
Pause-Taste
Vergrößern-Taste
Verkleinern-Taste
Weißabgleich-Taste
Blitz-Taste
OK-Taste
USB-Anschluss /
TV-Ausgang
Page 66

5
Einlegen der Batterie
1 Öffnen Sie die
Batteriefachabdeckung.
Ziehen Sie die Batteriefachabdeckung wie
abgebildet auf.
2 Legen Sie die Batterie ein.
Legen Sie die mitgelieferte, wiederaufladbare
Li-Ionen-Batterie in das Batteriefach ein. Bitte
beachten Sie, dass die Metallkontakte mit
den Kontakten im Batteriefach auszurichten
sind.
3 Bringen Sie die Abdeckung
wieder an.
Bringen Sie die Batteriefachabdeckung nach
dem ordnungsgemäßen Einlegen der Batterie
wieder an.
Beachten Sie beim Umgang mit der Li-Ionen-Batterie die folgenden
Vorsichtsmaßnahmen:
• Halten Sie die Batterie von Feuer oder Umgebungen mit hohen
Temperaturen fern (über 60ºC).
• Lassen Sie die Batterie nicht fallen und versuchen Sie nicht, sie zu
zerlegen.
• Falls Sie die Batterie längere Zeit nicht verwenden, sollten Sie
die Batterie mindestens ein Mal jährlich vollständig entladen und
wieder aufladen, um ihre volle Lebensdauer zu gewährleisten.
Bei erstmaliger Verwendung der Batterie wird empfohlen, die Batterie
vollständig zu entladen und anschließend vollständig zu laden, um
ihre volle Lebensdauer zu gewährleisten.
Kauf zusätzlicher Batterien:
Diese Kamera verwendet eine wiederaufladbare 8210 Li-IonenBatterie für die Stromversorgung. Sie können eine wiederaufladbare
8210 Li-Ionen-Batterie (3,7 Volt, 850 mAh) bei Ihrem Händler vor Ort
erwerben.
Page 67

6
Verwendung des Ladegeräts
Die mitgelieferte Batterie ist nicht vollständig geladen. Bitte laden
Sie die Batterie vor dem ersten Gebrauch mindestens 4 Stunden
lang auf.
1 Schließen Sie ein Ende des mitgelieferten Netzteils
an das Ladegerät und das andere Ende an eine
Wandsteckdose an.
2 Legen Sie die leere Batterie in das Ladegerät ein.
Bitte beachten Sie, dass die Metallkontakte mit den Kontakten im Ladegerät
auszurichten sind.
Ladeanzeige
Netzanzeige
Zur Wandsteckdose
Batterie
3
Die Ladeanzeige leuchtet rot, und der Ladevorgang
beginnt.
4 Sobald die Ladeanzeige grün wird, ist die Batterie
vollständig aufgeladen.
Dieses Ladegerät kann nur zum Laden der mitgelieferten
Batterie verwendet werden. Verwenden Sie es nicht, um andere,
unbekannte Batterien zu laden.
Stellen Sie das Ladegerät nicht in der Nähe von Feuer oder in
einem geschlossenen Bereich auf, in dem sich Wärme stauen
kann, während es in Verwendung ist.
Page 68

7
Zusätzlich zum eingebauten FlashSpeicher kann Ihre Kamera Daten auf
einer Secure Digital (SD) oder einer
MultiMedia (MMC) Karte speichern.
Gehen Sie wie folgt vor, um eine
Speicherkarte einzulegen:
(1) Öffnen Sie die
Batteriefachabdeckung.
(2) Drücken Sie die Karte behutsam
hinein, bis sie das Ende des
Einschubs erreicht.
Um die Speicherkarte zu entnehmen,
drücken Sie die Karte behutsam,
woraufhin sie ein Stück herausspringt.
Ziehen Sie die Karte anschließend aus
dem Einschub.
Schreibschutz
SD-Karten sind mit einem
Schreibschutzschalter versehen.
Wenn der Schreibschutzschalter
in der Stellung Lock ist, kann die
Karte nicht beschrieben werden.
Um zu gewährleisten, dass
die Kamera ordnungsgemäß
funktionieren kann, sollten Sie
den Schreibschutzschalter in die
Stellung Unlock bringen, bevor Sie die
SD-Karte einlegen.
Einlegen einer Speicherkarte (optional)
Entfernen Sie die Speicherkarte nicht, während die Kamera Daten
verarbeitet (wenn die LED rot blinkt).
Ist eine Speicherkarte eingelegt, verwendet die Kamera die Karte
als Hauptspeichermedium. Auf Dateien, die im eingebauten
Speicher der Kamera gespeichert sind, kann nicht zugegriffen
werden, bis die Karte entfernt wird.
Ontgrendelen
Vergrendelen
Page 69

8
Anbringen des Tragriemens
1 Fädeln Sie ein Ende des
Riemens durch die Öse.
2 Fädeln Sie den Riemen wie
rechts abgebildet durch die
Schlaufe.
Page 70

9
Einschalten der Kamera
Öffnen Sie den LCD-Bildschirm. Die
Kamera schaltet sich automatisch ein.
ODER
Ist die Kamera abgeschaltet, der
LCD-Bildschirm aber offen, halten Sie
die Ein-/Aus-Taste an der Kamera
1 Sekunde lang gedrückt, um die
Kamera anzuschalten.
Ausschalten der Kamera
Halten Sie die Ein-/Aus-Taste 1 - 3 Sekunden lang gedrückt, um
die Kamera auszuschalten.
ODER
Falls die Kamera längere Zeit inaktiv ist, schaltet sie sich
unter Umständen, je nach Einstellung der Funktion Auto-Aus,
automatisch aus. Siehe Seite 29 für weitere Informationen.
Falls die Kamera sich durch Drücken der Ein-/Aus-Taste nicht
einschaltet, prüfen Sie bitte, ob:
1. Die Batterie ordnungsgemäß in die Kamera eingelegt ist.
2. Die Batterie ausreichend geladen ist.
Grundfunktionen
Page 71

10
Der LCD-Bildschirm kann verwendet
werden, um das Bild für die Aufnahme
einzurichten, aufgezeichnete Dateien
anzuzeigen oder Menüoptionen zu
ändern.
Der LCD-Bildschirm kann in die
folgenden Positionen gedreht werden:
1 Öffnen Sie den LCD-Bildschirm.
2 Drehen Sie den LCD-Bildschirm.
Der LCD-Bildschirm kann wie abgebildet um
bis zu 270 Grad gedreht werden. Sie können
den Bildschirm also in einen beliebigen Winkel
bringen, der für Ihre Aufnahmezwecke am
besten geeignet ist.
Verwendung des LCD-Bildschirms
Wird der LCD-Bildschirm umgedreht, wird das Vorschaubild auf
dem LCD-Bildschirm automatisch angepasst.
90°
180°
Page 72

11
2.0 0008
Lesen der LCD-Anzeigen
Digitalcamcordermodus:
2.0 0008
Batterieladestand
Weißabgleich
Fotoauflösung
Anzahl der Aufnahmen
Selbstauslöser
Zoom-Verhältnis
Speichermedium*
1
Videoauflösung
Modussymbol
Blitzmodus
*1 Dieses Symbol ändert sich je nach dem verwendeten Speichermedium:
: Interner Speicher.
: Speicherkarte.
Wiedergabemodus:
0001/0009
MPEG
Batterieladestand
Speichermedium
Aktuelle Aufnahme / Aufnahmen gesamt
Miniaturbild
Markierungsrahmen
Modussymbol
Dateityp
Fokus
Page 73

12
Einstellen der Zeit und Sprache
Es wird empfohlen, beim erstmaligen Einschalten der Kamera
die Zeit und die Sprache einzustellen.
1 Schalten Sie die Kamera ein.
2 Drücken Sie die Modustaste und verwenden Sie die
Richtungstasten, um den Einstellungsmodus
( ) auszuwählen. Drücken Sie anschließend die
OK-Taste, um den Modus aufzurufen.
3 Verwenden Sie die Richtungstasten, um den
Menüpunkt Datum&Zeit (
30
) auszuwählen.
4 Drücken Sie die OK-Taste oder die Rechtstaste der
Richtungstasten, um das Untermenü aufzurufen.
5 Drücken Sie die Links- oder Rechtstaste der
Richtungstasten, um zwischen den Feldern
zu wechseln. Drücken Sie die Aufwärts- oder
Abwärtstaste der Richtungstasten, um den Wert
anzupassen. Drücken Sie die OK-Taste oder die
Rechtstaste der Richtungstasten, um die Einstellung
zu bestätigen.
6 Drücken Sie die Menütaste oder Modustaste,
um ins Menü zurückzukehren und verwenden
Sie anschließend die Richtungstasten, um den
Menüpunkt Sprache (
ABC
) auszuwählen.
7 Drücken Sie die OK-Taste oder die Rechtstaste der
Richtungstasten, um das Untermenü aufzurufen.
8 Verwenden Sie die Richtungstasten, um die
gewünschte Sprache auszuwählen und drücken Sie
zur Bestätigung die OK-Taste.
Page 74

13
Aufzeichnen von Videos
1 Stellen Sie den Fokus ein.
Bringen Sie den Fokusregler in eine
geeignete Stellung. Für die meisten
Umgebungsbedingungen beim Filmen
sollten Sie den Fokus auf ( ) einstellen.
Wählen Sie ( ) nur für Nahaufnahmen. Der
Fokus kann auch während der Aufzeichnung
angepasst werden.
70cm ~ (28” ~ )
50cm ~ 70cm (20” ~ 28” )
2 Verwenden der Zoomfunktion.
Verwenden Sie zum Vergrößern oder
Verkleinern die Aufwärts- oder Abwärtstaste
der Richtungstasten. Das Bild kann maximal
4-fach vergrößert werden.
Die Zoomfunktion steht auch während des Aufzeichnens zur
Verfügung.
Passen Sie gegebenenfalls andere, erweiterte Einstellungen an.
Siehe Abschnitt „Erweiterte Funktionen“ auf Seite 21 für weitere
Informationen.
Zoom erhöhen
Zoom verringern
Page 75

14
Aufzeichnen von Videos (Fortsetzung)
3 Drücken Sie die Aufnahmetaste, um mit der
Aufzeichnung zu beginnen.
4 Drücken Sie die Aufnahmetaste erneut, um die
Aufzeichnung zu beenden.
2.0 0008
00:00:07
Aufnahmedauer
Page 76

15
Aufnehmen von Fotos
1 Stellen Sie den Fokus ein.
Bringen Sie den Fokusregler in eine
geeignete Stellung. Für die meisten
Umgebungsbedingungen beim Filmen sollten
Sie den Fokus auf ( ) einstellen. Wählen
Sie ( ) für Landschaftsaufnahmen. Wählen
Sie ( ) nur für Nahaufnahmen.
70cm ~ (28” ~ )
50cm ~ 70cm (20” ~ 28” )
2 Verwenden der Zoomfunktion.
Verwenden Sie zum Vergrößern oder
Verkleinern die Zoomtaste oder die Aufwärts/Abwärtstaste.
Passen Sie gegebenenfalls andere,
erweiterte Einstellungen an. Siehe
Abschnitt “Erweiterte Funktionen” auf
Seite 21 für weitere Informationen.
3 Drücken Sie die Auslösertaste,
um ein Foto aufzunehmen.
Zoom erhöhen
Zoom verringern
Page 77

16
Aufzeichnung von Sprachdateien
1 Drücken Sie die Modustaste und
verwenden Sie die Richtungstasten, um den
Sprachaufzeichnungsmodus ( ) auszuwählen.
Drücken Sie anschließend die OK-Taste, um den
Modus aufzurufen.
2 Drücken Sie die Aufnahmetaste, um mit der
Aufzeichnung zu beginnen.
Sie können vor oder während der Aufzeichnung die Links-
oder Rechtstasten der Richtungstasten drücken, um die
Mikrofonempfindlichkeit und dadurch die Lautstärke der
Aufzeichnung einzustellen.
3 Wenn Sie fertig sind, drücken Sie die Aufnahmetaste
erneut, um die Aufzeichnung zu beenden.
Achten Sie darauf, das
Mikrofon nicht zu blockieren.
Page 78

17
Wiedergeben Ihrer Aufzeichnungen
1 Drücken Sie die Modustaste und verwenden Sie die
Richtungstasten, um den Wiedergabemodus
( ) auszuwählen.
Drücken Sie anschließend die OK-Taste, um den Modus
aufzurufen. Oder drücken Sie die Wiedergabe-/Pause-Taste
( )
unterhalb des LCD-Bildschirms.
2 Funktionen im Wiedergabemodus:
Dateityp Funktion Vorgang
Indexmodus
0001/0009
MPEG
Vollbildmodus
0001/0009
MPEG
Umschalten zwischen
Indexmodus und
Vollbildmodus
Drücken Sie im Indexmodus die OK-Taste,
um zur Vollbildansicht zu wechseln. Drücken
Sie in der Vollbildansicht die Menütaste, um
zum Indexmodus zu wechseln. Wenn Sie beim
Betrachten eines Fotos bei einem Zoomverhältnis
von 1,0 die Abwärtstaste drücken, wechselt die
Anzeige in den Indexmodus.
Wechseln zwischen
Dateien
1. Im Indexmodus: Verwenden Sie die
Richtungstasten, um den Markierungsrahmen zu
verschieben.
2. In der Vollbildansicht: Verwenden Sie die
Richtungstasten , um nach links oder nach rechts
zu gelangen.
Foto
Zoom erhöhen/
verringern
Verwenden Sie die Richtungstasten, um nach
oben oder nach unten zu gelangen.
Zoomverhältnis sperren/
freigeben
Drücken Sie bei einem Zoomverhältnis von mehr
als 1,0 die OK-Taste.
Schwenken über
vergrößerte Fotos
Verwenden Sie bei gesperrtem Zoomverhältnis
die Richtungstasten, um über das Bild zu
schwenken.
Video
&
Audio
Wiedergabe beginnen
Wenn (im Vollbildmodus) eine Datei ausgewählt
wird, beginnt deren Wiedergabe automatisch.
Anhalten/Fortsetzen der
Wiedergabe
Drücken Sie während der Wiedergabe/Pause
die OK-Taste.
Einstellung der
Lautstärke
Verwenden Sie während der Wiedergabe die
Richtungstasten, um nach oben oder nach unten
zu gelangen.
Wiedergabe beenden
Drücken Sie während der Wiedergabe die
Menütaste.
Rückkehr zum
Vorschau-Bildschirm
Drücken Sie die Auslösertaste.
Schnellvorlauf
Drücken Sie während der Wiedergabe die VorTaste ( ) . Um den Schnellvorlauf anzuhalten,
drücken Sie die Wiedergabe-/Pause-Taste ( ).
Schnellrücklauf
Drücken Sie während der Wiedergabe die
Zurück-Taste ( ) . Um den Schnellrücklauf
anzuhalten, drücken Sie die Wiedergabe-/PauseTaste ( ).
Auswahl der nächsten
Datei
Drücken Sie während der Wiedergabe/Pause die
Vor-Taste ( ) .
Auswahl der vorherigen
Datei
Drücken Sie während der Wiedergabe/Pause die
Zurück-Taste ( ) .
Page 79

18
Wiedergabe von MP3-Musik
Kopieren von MP3-Dateien auf die Kamera
Bevor Sie MP3-Musik wiedergeben können, müssen Sie MP3Dateien auf die Kamera kopieren.
1 Schließen Sie die Kamera an den Computer an.
Schalten Sie die Kamera ein und schließen Sie die Kamera mit dem
USB-Kabel an einen PC an. Siehe Seite 33 für Einzelheiten über das
Anschließen der Kamera an Ihren PC.
2 Kopieren Sie die Dateien auf die Kamera.
Doppelklicken Sie nach dem Anschließen der Kamera an den PC auf
Arbeitsplatz. Ein Wechseldatenträger wird angezeigt. Erstellen Sie auf
dem Wechseldatenträger einen Ordner namens “MP3” und kopieren Sie
MP3-Dateien in diesen Ordner, um diese wiedergeben zu können.
MP3-Dateien müssen sich für die Wiedergabe im Ordner „MP3“
befinden.
Um den Vorteil der Wechseldatenträgerfunktion zu nützen, müssen
Benutzer von Windows 98SE den mitgelieferten Treiber installieren.
Siehe Seiten 31-32 für Einzelheiten über die Installation.
For MP3 files
Page 80

19
Wiedergabe von MP3-Musik (Fortsetzung)
Wiedergabe von Musik im MP3-Modus
1 Drücken Sie die Modustaste
und verwenden Sie die
Richtungstasten, um den MP3Modus ( ) auszuwählen.
Drücken Sie anschließend
die OK-Taste, um den Modus
aufzurufen.
2 Funktionen im MP3-Modus:
Funktion Vorgang
Wechseln zwischen
Liedern
Verwenden Sie die Richtungstasten, um nach oben
oder nach unten zu gelangen. Oder drücken Sie
entweder die Vor-Taste ( ) oder die Zurück-Taste
( ) .
Wiedergabe
beginnen
Drücken Sie die OK-Taste oder die Wiedergabe-
/Pause-Taste ( ) .
Anhalten/Fortsetzen
der Wiedergabe
Drücken Sie während der Wiedergabe/Pause die OKTaste oder die Wiedergabe-/Pause-Taste ( ) .
Anpassen der
Lautstärke
Verwenden Sie die Richtungstasten , um nach links
oder nach rechts zu gelangen.
Wiedergabe
beenden
Drücken Sie während der Wiedergabe die Menütaste
oder verwenden Sie die Richtungstasten, um nach
oben oder nach unten zu gelangen.
MP3-Modus
Page 81

20
Anschließen der Kamera an ein TV-Gerät
Schließen Sie die Kamera zur Echtzeitanzeige mit dem
mitgelieferten AV-Kabel an ein TV-Gerät an. Sie können Ihre
Videos, Fotos und Audiodateien direkt über ein TV-Gerät
wiedergeben, um sie so mit Freunden und Familie zu teilen.
Video Audio
AV-Mode
TV
USB
TV
OUT
2
3
4
1
1 Schalten Sie das TV-Gerät ein und schalten Sie das TV-
Gerät in den AV-Modus.
Das TV-System ist je nach Land verschieden. Zur Konfiguration der
TV-Ausgangseinstellung lesen Sie bitte auf Seite 28 nach (Beispiel:
Taiwan/Amerika: NTSC; Europa/China: PAL)
2 Schließen Sie die Audio- und Videostecker des AV-Kabels
an das TV-Gerät an.
3 Schalten Sie die Kamera ein.
4 Schließen Sie das andere Ende des AV-Kabels an Ihre
Kamera an.
Page 82

21
Menübedienung
Die Menüs bieten einige Optionen, mit denen Sie
Feineinstellungen der Funktionen Ihrer Kamera vornehmen
können. Die nachstehende Tabelle enthält Einzelheiten über die
Menübedienung.
Funktion Vorgang
Aufrufen des Menüs Drücken Sie die Menü-Taste.
Verschieben des
Markierungsrahmens
Verwenden Sie die Richtungstasten, um nach oben
oder nach unten zu gelangen.
Aufrufen von
Untermenüs /
Bestätigen einer
Eingabe
Drücken Sie die OK-Taste.
Beenden des
Menüs/Zurück ins
übergeordnete Menü
Drücken Sie die Menü-Taste (im Untermenü).
Erweiterte Funktionen
Menüsymbol
Informationsleiste
Markierungsbalken
Menüpunkt
Menüabbildung
Menütitel
Page 83

22
Menüpunkte im Kameramodus
Einschalten → Drücken Sie die Menü-Taste.
Menüpunkt Optionen Beschreibung
Aufl ösung
6 Megapixel
Kamera
1M
Einstellen der Fotoaufl ösung auf
1280x960.
3M
Einstellen der Fotoaufl ösung auf
2048 x 1536.
6M
Einstellen der Fotoaufl ösung auf
2816x2112.
8 Megapixel
Kamera
3M
Einstellen der Fotoaufl ösung auf
2048 x 1536.
5M
Einstellen der Fotoaufl ösung auf
2560 x 1920.
8M
Einstellen der Fotoaufl ösung auf
3264x2448.
Datumstempel
Ein
Ausdruck des Datums auf jedem
Bild.
Aus
Deaktivieren des Datumdrucks.
Stabilisator
Ein
Minimiert durch Verwackelungen
entstandene Unschärfen.
Aus
Deaktivieren des Stabilisators.
Page 84

23
Menüpunkte im Kameramodus (Fortsetzung)
Menüpunkt Optionen Beschreibung
Weißabgleich
Auto
Die Kamera passt den Weißabgleich
automatisch an.
Sonnig
Diese Einstellung ist geeignet
für Aufnahmen im Freien bei
Sonnenschein.
Wolkig
Diese Einstellung eignet sich für
Außenaufnahmen bei Bewölkung
oder in schattiger Umgebung.
Fluoreszierend
Diese Einstellung ist geeignet
für Aufnahmen in Räumen
mit Leuchtstoffröhren oder
Umgebungen mit hoher
Farbtemperatur.
Wolfram
Diese Einstellung ist geeignet
für Aufnahmen in Räumen mit
Glühlampenlicht oder Umgebungen
mit geringer Farbtemperatur.
Fotorahmen
1 ~ 10
Diese Einstellung ermöglicht
es Ihnen, Fotos mit Rahmen zu
versehen. Auf dem LCD-Bildschirm
stehen zehn Hintergrundrahmen zur
Auswahl zur Verfügung.
0
Die Fotorahmenfunktion wird
deaktiviert.
Histogramm
Ein
Das Bildhistogramm wird auf dem
Bildschirm angezeigt.
Aus Das Histogramm wird deaktiviert.
Flash
Auto
Der Blitz wird automatisch
ausgelöst, wenn die Beleuchtung
nicht ausreichend ist.
Ein
Der Blitz wird bei jeder Aufnahme
ausgelöst.
Aus
Der Blitz ist abgeschaltet.
Page 85

24
Menüpunkte im Kameramodus (Fortsetzung)
Menüpunkt Optionen Beschreibung
Effekt
Normal
Für Aufnahmen mit natürlichen
Farben.
S&W
Für Aufnahmen in Schwarz-Weiß.
Klassisch
Für Aufnahmen in Sepiatönen.
Belichtung
-2~+2
Sie können die Belichtung manuell
einstellen, um eine bessere
Einstellung zu erzielen, wenn das
Vorschaubild zu hell oder zu dunkel
wirkt. Ein positiver Wert bedeutet,
dass das Bild heller als gewöhnlich
wird; ein negativer Wert lässt das
Bild dunkler erscheinen.
Selbstauslöser
Ein
Aktivieren des Selbstauslösers.
Wenn der Selbstauslöser aktiviert
ist, wartet die Kamera nach dem
Drücken der Auslösertaste zehn
Sekunden, bis die Aufnahme erfolgt.
Aus
Deaktivieren des Selbstauslösers.
Symbol
Ein
Die Anzeige der Bildschirmsymbole
wird aktiviert.
Aus
Die Anzeige der Bildschirmsymbole
wird deaktiviert.
Video
VGA
Einstellen der Videoauflösung auf
VGA (640 x 480 Pixel).
QVGA
Einstellen der Videoauflösung auf
QVGA (320 x 240 Pixel).
Page 86

25
Menüpunkte im Kameramodus (Fortsetzung)
Menüpunkt Optionen Beschreibung
Zwei-in-
Eins
Ein
Diese Einstellung ermöglicht es
Ihnen, zwei separat aufgenommene
Bilder zu einem Foto
zusammenzuführen.
Aus
Deaktivieren der Zwei-in-EinsFunktion.
Nachtaufn.
Ein
Diese Einstellung ermöglicht
Ihnen das Aufnehmen von Fotos
in dunkler Umgebung. Da die
Verschlusszeit beim Aufnehmen
von Fotos in dunkler Umgebung
wesentlich verlängert wird,
empfehlen wir die Verwendung
eines Stativs, um Unschärfen
aufgrund von Verwackelungen zu
vermeiden.
Aus
Deaktivieren der
Nachtaufnahmefunktion.
Page 87

26
Menüpunkte im Wiedergabemodus
Einschalten → Drücken Sie die Modus-Taste → Aufrufen des
Wiedergabemodus ( ) → Drücken Sie die Menü-Taste.
Menüpunkt Optionen Beschreibung
Löschen
Einzeln Löschen der aktuellen Datei.
Alles
Löschen aller Fotos und Video-/Audiodateien im
Speicher.
Diavorführung
-
Die Kamera zeigt Fotos nacheinander an. Nur JPEGBilder und das jeweils erste Bild von MPEG-Dateien
werden angezeigt. Sie können die Menütaste
drücken, um die Diavorführung zu beenden.
Drucken
Einzeln
Druck des aktuellen Bilds bei Anschluss an einen
PictBridge-kompatiblen Drucker.
Alles
Druck aller Bilder bei Anschluss an einen PictBridgekompatiblen Drucker.
Abbrechen
Abbrechen des Vorgangs.
* Falls sich keine Dateien auf der Kamera befinden, werden keine
Menüpunkte angezeigt.
Bevor Sie den Druckbefehl im Menü verwenden können, müssen
Sie die Kamera über das mitgelieferte USB-Kabel an einen
PictBridge-kompatiblen Drucker
anschließen. Siehe Seite 30 für
weitere Einzelheiten über das
Anschließen eines Druckers.
Page 88

27
Menüpunkte im MP3-Modus
Einschalten → Drücken Sie die Modus-Taste → Aufrufen des
MP3-Modus ( ) → Drücken Sie die Menü-Taste.
Menüpunkt Beschreibung
Löschen Löschen des aktuellen Lieds.
Abbrechen Abbrechen des Vorgangs.
Menüpunkte im Sprachaufzeichnungsmodus
Einschalten → Drücken Sie die Modus-Taste → Aufrufen des
Sprachaufzeichnungsmodus ( ) → Drücken Sie die Menü-
Taste.
Menüpunkt Beschreibung
Löschen Löschen der aktuellen Sprachaufnahme.
Abbrechen Löschen aller Sprachaufnahmen.
Page 89

28
Menüpunkte im Einstellungsmodus
Einschalten → Drücken Sie die Modus-Taste → Aufrufen des
Einstellungsmodus ( ) → Drücken Sie die Menü-Taste.
Menüpunkt Optionen Beschreibung
30
Datum&Zeit
-
Einstellen von Datum und Uhrzeit.
Pieper
Ein
Aktivieren der Tastentöne.
Aus
Deaktivieren der Tastentöne.
Flimmer
50Hz
Stellt die Frequenz auf 50 Hz ein. Siehe Seite 47 für
eine Einstellungsübersicht.
60Hz
Stellt die Frequenz auf 60 Hz ein. Siehe Seite 47 für
eine Einstellungsübersicht.
TV-Ausgang
NTSC
Einstellen der TV-Systemkompatibilität auf NTSC.
Diese Option eignet sich für Amerika, Taiwan, Japan
und Korea.
PAL
Einstellen der TV-Systemkompatibilität auf PAL.
Diese Option eignet sich für Deutschland, England,
Italien, die Niederlande, China, Japan und
Hongkong.
Symbol
Ein
Die Anzeige der Bildschirmsymbole wird aktiviert.
Aus
Die Anzeige der Bildschirmsymbole wird deaktiviert.
Helligkeit
-2~+2
Einstellen der LCD-Helligkeit. Durch einen positiven
Wert wird der LCD-Bildschirm heller; durch einen
negativen Wert wird der LCD-Bildschirm dunkler.
Formatieren
Ja
Formatieren des Speichermediums. Bitte beachten
Sie, dass sämtliche auf dem Medium gespeicherten
Dateien unwiederbringlich gelöscht werden.
Nein
Abbrechen des Vorgangs.
Page 90

29
Menüpunkte im Einstellungsmodus (Fortsetzung)
Menüpunkt Optionen Beschreibung
Auto-Aus
Z
Z
Z
Aus
Deaktivieren der Auto-Aus-Funktion.
1 Min
Die Kamera schaltet sich automatisch aus, wenn sie
länger als 1 Minute inaktiv ist.
3 Min
Die Kamera schaltet sich automatisch aus, wenn sie
länger als 3 Minuten inaktiv ist.
5 Min
Die Kamera schaltet sich automatisch aus, wenn sie
länger als 5 Minuten inaktiv ist.
Sprache
-
Ermöglicht Ihnen die Auswahl der Menüsprache.
Standard
Ja
Wiederherstellen der Werkseinstellungen. Bitte
beachten Sie, dass dadurch alle von Ihnen
vorgenommenen Einstellungen zurückgesetzt
werden.
Nein
Abbrechen des Vorgangs.
USB-Modus
Menü
Bei Anschluss an einen PC zeigt die Kamera
ein Menü an, aus dem Sie den gewünschten
Verbindungsmodus auswählen können.
Kamera
Bei Anschluss an einen PC wechselt die Kamera
automatisch in den Kameramodus (PC-Kamera).
Disk
Bei Anschluss an einen PC wechselt die
Kamera automatisch in den Diskmodus
(Wechseldatenträger).
Drucker
Bei Anschluss an einen PC wechselt die Kamera
automatisch in den Druckermodus.
Film
beginnen
Ein
Aktivieren der Filmstartfunktion.
Aus
Deaktivieren der Filmstartfunktion.
Page 91

30
Menüpunkte im Einstellungsmodus (Fortsetzung)
Gehen Sie wie folgt vor, um die Kamera an einen PictBridge-
kompatiblen Drucker anzuschließen:
1) Schalten Sie die Kamera ein.
2) Stellen Sie den USB-Modus der Kamera auf Drucker ein (Seite
29).
3) Öffnen Sie die Anschlussabdeckung und schließen Sie ein
Ende des mitgelieferten USB-Kabels an die Kamera an.
4) Schließen Sie danach das andere Ende des USB-Kabels an
den Drucker an.
5) Schalten Sie den Drucker ein.
Page 92

31
Kopieren von Dateien auf Ihren PC
Installieren des Treibers auf dem PC
Damit Videos auf dem PC wiedergegeben werden können,
müssen Sie den Kameratreiber installieren. So installieren Sie
die Software:
1 Legen Sie die Treiber-CD ein.
Schalten Sie den Computer ein. Legen Sie die
mitgelieferte CD in das CD-ROM-Laufwerk ein.
Schließen Sie die Kamera noch nicht an den Computer an.
Schließen Sie alle anderen Programme am Computer.
Falls der Startbildschirm nicht automatisch angezeigt wird,
doppelklicken Sie auf Arbeitsplatz und anschließend auf das CDROM-Laufwerk. Starten Sie anschließend das Programm Setup.
exe manuell.
2 Beginnen Sie mit der Installation.
Klicken Sie auf das Treiber-Symbol, um mit der Installation des Treibers zu
beginnen.
Hinweis für Benutzer von Windows 2000:
Während des Installationsvorgangs kann zwei Mal oder
öfter eine Warnmeldung bezüglich der digitalen Signatur
eingeblendet werden. Bitte klicken Sie jeweils auf Ja, um den
Vorgang fortzusetzen. Die Software ist voll kompatibel mit dem
Betriebssystem Windows 2000.
Page 93

32
Installieren des Treibers auf Ihrem PC (Fortsetzung)
3 Installieren Sie den Treiber.
Der Installationsassistent wird
aufgerufen und führt die Installation
des Programms automatisch durch.
Klicken Sie auf Weiter und befolgen
Sie die Bildschirmanweisungen, um die
Installation abzuschließen.
4 Installieren Sie Codecs.
Nachdem die Treiberinstallation
abgeschlossen ist, fordert das
Programm Sie auf, Windows
Media Player Codecs zu
installieren. Falls Sie nicht
sicher sind, ob die Codecs
bereits auf Ihrem Computer
installiert sind, klicken Sie bitte
auf Ja und befolgen Sie die
Bildschirmanweisungen, um die
Installation abzuschließen.
5 Installieren Sie Direct X 9.0c
oder höher.
Nachdem die Installation der Codecs
abgeschlossen ist, werden Sie aufgefordert,
Direct X 9.0c oder höher zu installieren,
falls dieses Programm noch nicht auf Ihrem
Computer installiert ist. Bitte klicken Sie auf
Ja, um fortzufahren.
Windows Media Player Codecs und Direct X 9.0c oder höher
werden benötigt, um mit der Kamera aufgezeichnete Videos
wiederzugeben.
6 Starten Sie den Computer neu.
Nachdem die Installation abgeschlossen ist,
müssen Sie den Computer unter Umständen
neu starten, damit der Treiber aktiviert wird.
Page 94

33
Anschließen der Kamera an einen PC
1 Schließen Sie das USB-
Kabel an den Computer
an.
Schalten Sie den Computer
ein und schließen Sie das
mitgelieferte USB-Kabel an
den USB-Anschluss Ihres
Computers an. Vergewissern Sie
sich, dass Kabel und Anschluss
ordnungsgemäß ausgerichtet sind.
2 Schalten Sie die Kamera ein.
3 Schließen Sie das USB-Kabel
an die Kamera an
Schließen Sie das andere Ende des USBKabels an die Kamera an.
Als Standard ist der Modus „Disk“ eingestellt.
Falls Sie einen anderen Modus als Standard
einstellen möchten, lesen Sie bitte für weitere
Informationen den Abschnitt „USB-Modus“
auf Seite 29.
Hinweis für Benutzer von Windows 2000/XP/ME:
Gehen Sie beim Abschließen der Kamera vom Computer bitte wie
folgt vor:
1. Doppelklicken Sie auf das Symbol in der Systemablage.
2. Klicken Sie auf das Symbol (USB-Laufwerk) und
anschließend auf Beenden.
3. Wählen Sie die Kamera aus, wenn der Bestätigungsbildschirm
angezeigt wird und klicken Sie auf
OK.
4. Befolgen Sie die Bildschirmanweisungen, um die Kamera sicher
vom Computer abzuschließen.
Page 95

34
Kopieren von Dateien auf den PC
1 Dieser Schritt unterscheidet sich je
nach Betriebssystem:
Für Benutzer von Windows XP:
Nach dem Anschließen der Kamera an den
Computer wird automatisch ein Dialogfenster
angezeigt. Bitte wählen Sie den Menüpunkt
Ordner mit dem Windows Explorer öffnen
und klicken Sie auf OK.
Für Benutzer von Windows
2000/ME/XP:
Doppelklicken Sie auf Arbeitsplatz.
Doppelklicken Sie anschließend auf
das Symbol des neu angezeigten
Wechsellaufwerks.
Page 96

35
Kopieren von Dateien auf den PC (Fortsetzung)
2 Doppelklicken Sie auf den Dateiordner DCIM.
3 Doppelklicken Sie auf den Dateiordner 100MEDIA.
4 Ziehen Sie die Zieldatei nach Eigene Dateien oder in
ein sonstiges Zielverzeichnis.
Kopieren von Bildern
nach „Eigene Dateien“
Page 97

36
Anzeigen/Wiedergeben von Dateien auf Ihrem PC
1 Doppelklicken Sie auf Eigene Dateien oder einen
anderen Ordner, in dem Ihre Dateien gespeichert
sind.
2 Doppelklicken Sie auf die gewünschte Datei.
Die Datei wird mit einem für diesen Dateityp
vorgesehenen Programm geöffnet.
Page 98

37
Dateipfad
Nach dem Anschließen der Kamera an den Computer wird
auf dem Computer ein Wechsellaufwerk angezeigt. Das
Wechsellaufwerk steht für das Speichermedium Ihrer Kamera.
Auf diesem Wechsellaufwerk finden Sie Ihre Aufzeichnungen.
Den Speicherort der Dateien entnehmen Sie bitte der
nachstehenden Abbildung.
Für Multimedia-Dateien.
Für MP3-Dateien.
Page 99

38
Verwenden als PC-Kamera
Installieren der Software
Die PC-Kamerasoftware ist im Kameratreiber enthalten, deshalb
sollten Sie zuerst den Treiber installieren, bevor Sie die PCKamerafunktion verwenden. Falls Sie den Treiber noch nicht
installiert haben, lesen Sie bitte auf Seite 31 Einzelheiten über
die Installation nach.
Starten des Programms
1 Schalten Sie die Kamera ein und
schließen Sie die Kamera an den
Computer an.
Schalten Sie die Kamera ein und schließen Sie
die Kamera mit dem mitgelieferten USB-Kabel
an Ihrem Computer an. Siehe Seite 33 für
weitere Informationen.
2 Wechseln Sie in den
Kameramodus.
Drücken Sie die Menü-Taste, um das
Optionsmenü aufzurufen. Verwenden
Sie die Richtungstasten, um den
Menüpunkt Kamera auszuwählen
und drücken Sie zur Bestätigung die
OK-Taste.
Als Standard ist der Modus „Disk“
eingestellt. Falls Sie einen anderen Modus als
Standard einstellen möchten, lesen Sie bitte für weitere Informationen den
Abschnitt „USB-Modus“ auf Seite 29.
Falls Sie die Videokonferenzfunktion verwenden möchten,
installieren Sie bitte für diesen Zweck geeignete Programme wie
beispielsweise Netmeeting.
Page 100

39
Hinweis für Benutzer von
Windows ME
:
Wenn der abgebildete Bildschirm
angezeigt wird, wählen Sie
bitte Automatisch nach einem
besseren Treiber suchen
und klicken Sie auf Weiter, um
fortzufahren.
Starten des Programms (Fortsetzung)
Hinweis für Benutzer von Windows 98SE:
1. Klicken Sie auf Weiter, wenn der folgende Bildschirm angezeigt wird.
2. Wenn der folgende Bildschirm angezeigt wird, wählen Sie
Nach dem
besten Treiber für das Gerät suchen
und klicken Sie auf Weiter,
um fortzufahren.
3.
Während der Installation kann es vorkommen, dass Sie eine
lizenzierte Windows 98SE CD in das CD-ROM-Laufwerk einlegen
müssen, um die benötigten Dateien zu kopieren.
4. Befolgen Sie die Bildschirmanweisungen, um die Installation
abzuschließen.
Hinweis für Benutzer von Windows 2000:
Wenn Sie die PC-Kamerafunktion zum ersten Mal verwenden, kann
zwei Mal oder öfter die Warnmeldung bezüglich der digitalen Signatur
angezeigt werden. Bitte klicken Sie jeweils auf Ja, um die Installation
fortzusetzen. Die Software ist voll kompatibel mit dem Betriebssystem
Windows 2000.
 Loading...