

Page 1
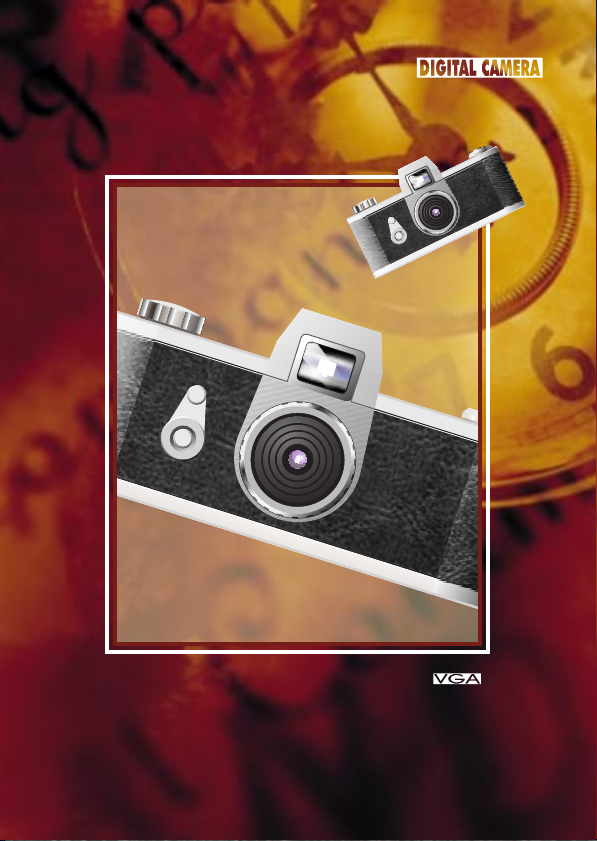
My digital eye!
English
Digital Camera
Installation Guide
Page 2

English
Contents
Contents Checklist
System Requirements
Specifications
Operating Environment
How to Use Your Digital Camera
Switching the camera on
Taking a picture
Additional features
Self Timer
Continuous mode
Clearing the stored images
Changing the picture resolution
How to Upload Photo & Video to PC
Start ManagerDigital Camera
Mode Selecting
PC Camera Mode
DSC Mode
Uploading Photos
Enhanced Resolution Mode
Editing Photos
Uploading Video
AVI Creator
Playing Video
Image processing
Mail Function
Troubleshooting
1
2
3
4
5
6
7
8
9
10
11
12
13
14
Page 3
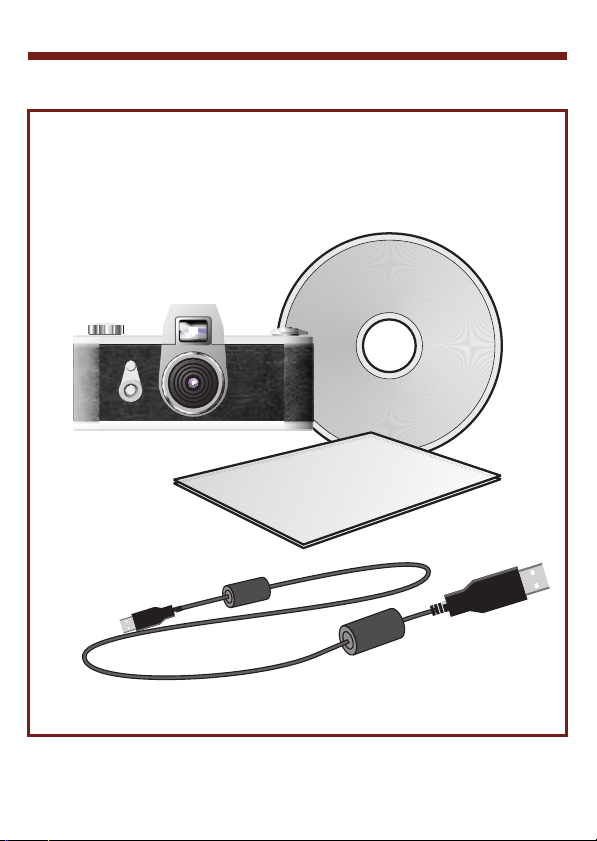
Contents Checklist
1.Digital Camera
2.Application / Driver CD
Driver & Application
3.Install Quick Guide
4.USB Cable
NOTE: If you are missing any of these contents please inform your dealer or
your nearest support office so that the contents can be replaced.
Install Quick Guide
..1..
Page 4

English
System Requirements
Microsoft Windows 98 / ME / 2000
Pentinum 200 MHz (or equivalent) processor or higher
32 MB of RAM (64 MB recommended)
Video card with 2 MB of RAM for minimum 16 bit (High Color) display
4X speed CD-ROM
An available USB port
Specifications
Sensor type
Iamge Performance for Video Stream
9 fps for QVGA(320x240 Pixels)
3 fps for VGA(640x480 Pixels)
Memory & Images
26 Picture for VGA ,
107 Pictures for QVGA
Dimension
Battery
Interface type
Software Support
: Color VGA(640x480)CMOS image sensor
:
(SDRAM 64Mbit):
(640x480 Pixels)
(320x240 Pixels)
:1.6"x3.5"x1.2" (40.6mmx88.9mmx30.5mm)
: AAA1.5V x2 battery
: USB Port
: Microsoft Windows 98/ME/2000
Operating Environment
The camera should be operated only within the following environmental
conditions:
41-104 F ; 5-40 C
20% - 85% relative humidity, non-condensing
Digital Camera Cautions!
Never immerse any part of the or its components into any fluid or
liquid.
Disconnect the from your computer before cleaning it.
Remove dust or stains with a soft cloth dampened with water or neutral detergent.
Do not use any volatile chemicals or liquids such as thinner or benzene to clean the
Digital Camera
Do not place hot items on the surface of the .
Do not attempt to disassemble the .
Digital Camera
.
Digital Camera
Digital Camera
Digital Camera
..2..
Page 5
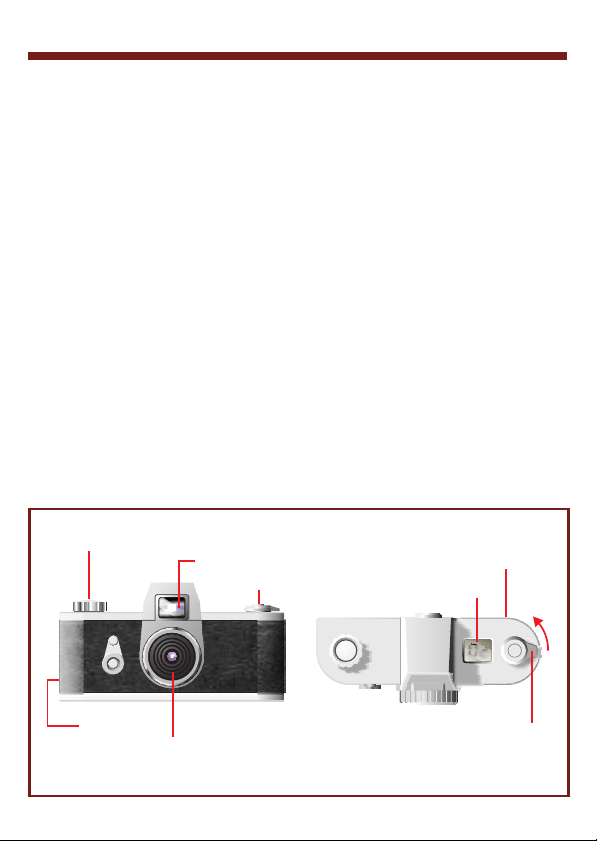
How to Use Your Digital Camera
Introduction
The camera is capable of taking and storing VGA(640x480 Pixels) images or
QVGA Images. These images may be uploaded to a PC via
(320x240 Pixels)
the USB port.
The camera has two switches on it.
SW1 is the shutter switch. SW2 is the mode switch.
The LCD display is combined with SW2 to show the setting information.
Installing Batteries
User Interface
The is powered by 2 AAA batteries, or via the USB connector
Digital Camera
when attached to a PC.
***Notes ***
When the batteries are unloaded, all of your stored pictures will be
lost.(Battery Capacity: continous snapshot for 2 hours, stand by can
workforapproximately2 week)
Shutter Switch( )SW1
View Finder
Mode Switch( )SW2
Battery Cover
LCD Display
20
USB Port
Lens
Battery Cover Switch
..3..
Page 6

English
Switching the camera on
Pressing the SW2 when the LCD is blank will power on the camera. The
camera will automatically power off after 30 seconds of inactivity. The LCD
indicates the camera mode either "Lr" for low resolution (QVGA images) or
"Hr" for high resolution(VGA images). The LCD then displays the number of
pictures you have remaining.
(Picture remaining number)
OFF
ON
Taking a picture
Press the shutter button to take a picture. A high pitched beep indicates that
the picture was taken successfully and the counter will decrease accordingly.
A low beep indicates insufficient light to take a picture. A series of beeps is an
indication that the camera is full.
Additional features
Pressing the mode switch repeatedly cycles through additional features as
displayed on the LCD. When a given feature is displayed it may be selected
by pressing the shutter button. If an option is not selected within 5 seconds
the display will revert back to the number of available pictures.
Press SW2 to change features
Features are displayed
Press SW1 to select mode
..4..
Page 7

Self Timer
Pressing the mode button until "St" appears in the LCD then pressing the
shutter button will start a 10 second self-timer. The camera will issue a short
beep every second and then a longer beep. The next beep indicates that the
picture has been taken.
Note: The self-timer can not be selected when the camera is full.
Change mode to "St"
"St" is displayed
Press SW1 to initiate the self-timer mode
Pictures may be taken continuously as long as the shutter button is pressed
Continuous mode
(and the camera is not full) as follows:
Press the mode button until the Ct appears in the LCD. Pressing the shutter
button within 5 seconds will cause the camera to start taking pictures for as
long as the shutter button is held down. If the shutter button is not pressed
within 5 seconds the camera will revert back to normal picture taking.
Note: During the continuous mode the camera will allow pictures to be taken
with incorrect exposure.
Change mode to "Ct"
"Ct" is displayed
Press SW1 to select Continuous mode
..5..
Page 8

English
Clearing the stored images
Press the mode button until CL appears on the LCD. Pressing the shutter
button once will cause the camera to beep and the CL will start flashing .
Pressing the shutter button again within 5 seconds will clear the camera and
reset the picture counter.
Switch mode to "CL"
"CL" will be displayed
Press SW1 to select clear mode
LCD will start flashing
Click SW1 twice to clear the memory
Changing the picture resolution
Picture resolution may only be changed when the camera memory is empty.
If any pictures have been taken then the memory must first be cleared. To
change resolution press the mode switch until the resolution option is
displayed, either Hr to change to high resolution mode (if you are currently in
the low resolution mode)or Lr to change to low resolution(if you are currently
in the high resolution mode). The camera will beep and the display will reset
to indicate the number of pictures available.
..6..
Switch mode to "Hr" or "Lr"
"Hr" or "Lr" will be displayed
Press SW1 to change resolution
Page 9

How to Upload Photo & Video to PC
Thank you for purchasing the . This guide will walk you
through the steps of how to install the onto your computer
system.
Place the CD into your CD-ROM and click on the Manager
Icon to begin the installation. If the CD does not automatically display,
simply go to "Start" then "Run" and select the path "D:\Setup.exe". You may
need to replace "D" with the letter that corresponds to your CD-ROM drive.
Now your computer is initializing the Wise Installation Wizard. Please wait.
Digital Camera
Digital Camera
Manager InstallationDigital Camera
Digital Camera
Digital Camera Manager
The welcome screen will appear,
then click "Next"?
The dialog box that appears asks if you
would like to restart your computer now or
later. Press "OK" to complete installation.
The CD will begin installing the
driver to the proper location.
..7..
Page 10

English
Start ManagerDigital Camera
Stored pictures may be uploaded to a PC at any time whether or not the
camera is full. Plugging the USB connector into the camera will cause it to
reset. A double beep will sound, but all stored pictures will remain. When the
USB connector is unplugged the camera will switch off. When connected to
the PC the camera may be used as a normal PC camera.
Connect the smaller end of the
USB connector to the side of the
camera.
Plug the other end of
the USB connector
into an available USB
port on your computer.
Note:When plugged into
a USB port the camera
gets its power from the
PC. The camera may be
used like this without
any batteries. However,
all pictures will be lost
when the USB connector
is unplugged.
To start using the Manager, simply click on the "Start"
menu and go up to "Programs" Then go to the folder named "
" and select it. This is the program where you can begin to use
Camera
Digital Camera
Digital
your camera.
..8..
Page 11

Mode Selecting
==Press the "Live View" button to switch the camera to PC Camera mode.
=
Press the "DSC Function" button to switch the camera to DSC & Camcorder
=
mode.
Live View (PC Camera Mode)
DSC Function (DSC Mode)
PC Camera Mode
In this mode, it is easy to attach the camera to your system, to use as a
stand PC camera.
the current view is displayed in the "preview" window.
=
Press "Video Source" button to
adjust advanced setings.
=
Press "Video Format" button to set
=
image size.
=
Press "Snap Shot" button to
=
capture an image to album folder.
=
Press "Record button" to recording
=
a video clip to album folder.
..9..
Page 12

English
DSC Mode
Uploading Photos:
This allows you to upload photos captured by the camera.
Press the "Link" button to link up the camera and upload photo icons.
<
Press the "Folder" button to open the album folder window.
=
Press the "Transfer all" or "Transfer selected" button to transfer photos to
>
the album folder.
=
link up camerafor image upload
=
=
Open or Closealbum folder window
=
=
Transfer selectedphotos to album folder
=
=
Transfer allphotos to album folder
=
Enhanced Resolution Mode
. The Largest Resolution : XGA( 800K pixels )
. Optical Resolution: VGA( 300K pixels )
Your camera has particular enhanced image skills, which make images
sharper by enhancing the original VGAimage to XGAimage.
How to operate:
.. 10..
Click the setting button.
Click " picture ".
Choose " Enhanced resolution ".
You can download your images again.
Page 13

Editing Photos:
It is easy to edit any photo you want in the album folder. Double click the
photo icon to execute your default image application (such as Imaging,
Paint....etc.) to edit your image file.
Uploading Video:
This takes advantage of the continuous mode. It is recommended that this
be displayed in QVGA(low resolution mode). When the camera is full(107
pictures in continuous mode)attach it to the PC via the USB connector and
run the AVI creator. Press the AVI Creator button, and your Images will be
uploaded from the camera then processed into a video clip. This AVI file will
be saved in your album folder.
AVI Creator
(Reverse)
AVI Creator
.. 11 ..
Page 14

English
AVI Creator:
Select Images you want to process into a video clip.
<
Press "Setting" button to adjust fram rate.
=
Press "Fram Rate" button to create a AVI file saved in album folder.
>
Playing Video:
You can play any video clip file (AVI format) you want in album folder by
double clicking the AVI file icon to execute your default media application.
this will then play the selectedAVI file.
.. 12..
Page 15

Image processing:
Click the "Image Process" button to select the image processing function
you want. After pressing "OK" the selected image will be processed using
the checked function.
Image Process
Mail Function:
Click the "Mail" button to attach seleted image files automatically to a new
email document. it is easy to send images to distant family and friends!
Mail
.. 13..
Page 16

English
Troubleshooting
Install step missed
camera have to do with the fact that the end-user accidentally skips a step
during installation. Solution: Uninstall the camera, and reinstall it, making
sure to follow each step of the Quick Install Guide.
- Most of the problems associated with using the
USB ports not enabled in the BIOS
Guide completely, the camera still does not work. Go into the Device
Manager and see if a section called "Imaging Devices" is listed. If this
section does not exist, check the "Sound, Video, and Game Controllers"
section to see if the camera is listed there. If it is, then the problem is that
the USB ports are not enabled in your BIOS. You need to enter BIOS and
enable them. Then you need to uninstall and reinstall the camera in order to
use it.
Conflict with another camera driver capture device
other camera installed on your computer, remove the camera and it's driver
completely from your system to avoid a driver conflict with another camera
or capture device.
Ulead Photo Express SE
to bundle this software with our cameras. Beyond replacing a CD that may
have a bad copy of the software on it, we cannot help you either learn to
use or troubleshoot each of these pieces of software. Below are the links to
each site that makes these products:
Hours: 8 a.m. to 5 p.m. Pacific Time, Monday through Friday
- The company contracts with various companies
Ulead Systems Photo Express SE
http://www.ulead.com/pe/runme.htm
support@ulead.com
Tech Support: 310.523.9399
- Even after following the Quick Install
- If you have any
.. 14..
82-100-90010 V1.0
 Loading...